Irresistible Traditional Holiday Fruit Cake Recipe for Festive Joy

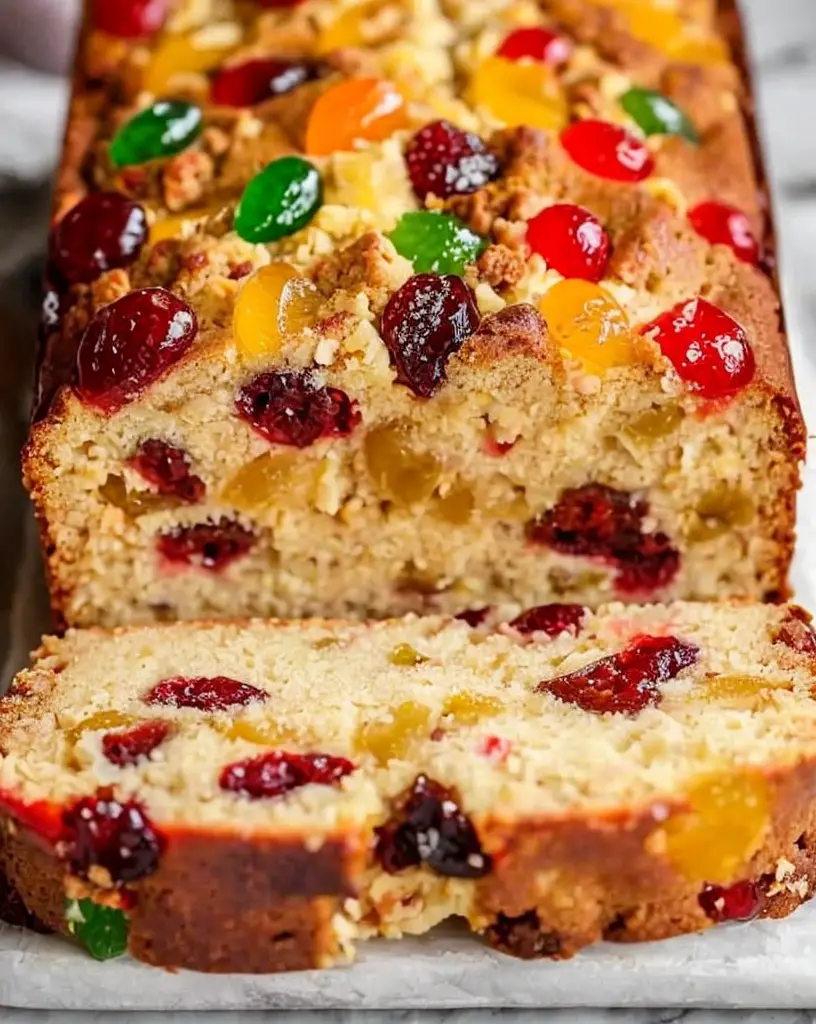
Traditional Holiday Fruit Cake Recipe: A Festive Delight

Get ready to embrace the festive season with a Traditional Holiday Fruit Cake Recipe that steals the show. This fruit-laden, spiced marvel is the perfect centerpiece for your holiday feast, offering dynamic flavors with every bite. Infused with rich spices and assorted dried fruits, this fruit cake is a must-try for any baking enthusiast aiming to impress.

Why You’ll Love This Recipe

One of the greatest joys of the Traditional Holiday Fruit Cake is its ability to bring people together. Its aromatic blend of spices and fruits fills your home with warmth, making it an ideal treat for gatherings. The moist, dense texture and the mix of tangy and sweet fruits promise a slice that satisfies every craving.

This recipe is a timeless classic for holiday celebrations. It’s a versatile dessert, perfect for gifting, enjoying with coffee, or an indulgent treat post-dinner. The flexibility of the ingredients allows for personalization while retaining its traditional charm.

Context/Background

Fruit cake has deep roots dating back to the Roman era and has evolved over centuries. Traditionally reserved for special occasions, its endurance as a holiday staple is a testament to its beloved status. The technique of aging the cake with spirits was believed to enhance the flavors, a practice that continues today, truly embodying the joy of holiday customs.

Recipe Details

Serves: 12
Prep Time: 30 minutes
Cook Time: 2 hours
Total Time: 2 hours 30 minutes

Ingredients

  • 2 cups all-purpose flour
  • 1 teaspoon baking powder
  • 1/2 teaspoon salt
  • 1 teaspoon ground cinnamon
  • 1 teaspoon ground nutmeg
  • 1/2 teaspoon ground cloves
  • 1 cup unsalted butter, softened
  • 1 cup brown sugar
  • 4 large eggs
  • 1/4 cup dark rum
  • 1/4 cup orange juice
  • 2 cups mixed dried fruits (raisins, currants, apricots)
  • 1 cup chopped nuts (walnuts or pecans)
  • Additional rum for soaking

Directions

  1. Preheat your oven to 300°F (150°C). Grease and line a 9-inch round cake pan.
  2. In a bowl, whisk together the flour, baking powder, salt, cinnamon, nutmeg, and cloves.
  3. In a separate bowl, cream the butter and brown sugar until fluffy. Add the eggs one at a time, beating well after each addition.
  4. Mix in the rum and orange juice. Gradually add the dry ingredients, stirring until just combined.
  5. Fold in the mixed dried fruits and nuts. Pour the batter into the prepared pan, smoothing the top.
  6. Bake in the preheated oven for 2 hours, or until a toothpick inserted into the center comes out clean.
  7. Allow the cake to cool in the pan for 10 minutes, then remove and transfer to a wire rack.
  8. After cooling, wrap the cake in cheesecloth soaked in additional rum. Store in an airtight container for flavors to mature before serving.

Tips for Perfect Traditional Holiday Fruit Cake

  • Soak the fruits overnight in rum for a richer flavor.
  • Ensure the butter is at room temperature for better creaming.
  • Bake the cake on a low temperature to prevent burning.
  • Aging the cake wrapped in rum-soaked cloth enhances flavor.

Serving Suggestions

Serve your Traditional Holiday Fruit Cake with a dusting of powdered sugar or a scoop of rich vanilla ice cream. It pairs excellently with a glass of mulled wine or hot cider.

Storage and Leftovers

Store any leftover fruit cake in an airtight container at room temperature, wrapped in plastic wrap to maintain freshness. It can also be frozen for up to three months. When ready to serve, thaw overnight in a refrigerator.

Final Thoughts

Embrace the festive spirit by preparing this Traditional Holiday Fruit Cake. With its blend of fruits, nuts, and spices, it’s as delightful to eat as it is to gift. Encourage your loved ones to enjoy a slice during the holidays, crafting memories that endure beyond the season.

Recipe Notes

  • Substitute dark rum with brandy or apple juice for a non-alcoholic version.
  • Experiment with different dried fruits, such as cranberries or figs, for varied flavors.

Delicious Vanilla Banana Walnut Cake Recipe: A Nutty Fruity Delight

Luscious Vanilla Banana Walnut Cake Recipe: Your New Favorite Dessert

Get ready to indulge in the delightful flavors of this Luscious Vanilla Banana Walnut Cake. This scrumptious cake combines the natural sweetness of bananas with a hint of vanilla and the satisfying crunch of walnuts, creating a dessert that’s both delicious and irresistibly moist.

Why You’ll Love This Recipe

This Vanilla Banana Walnut Cake is perfect for any occasion. The rich banana flavor is complemented by the warm notes of vanilla, making it both comforting and indulgent. Its moist texture and nutty crunch mean this cake is bound to be a hit at any gathering. Especially great for banana lovers, the walnuts add an extra layer of flavor and texture that elevates this cake beyond the ordinary.

Whether you’re looking to impress your guests or treat yourself to a delicious dessert, this cake is an absolute winner. It’s versatile enough to serve at birthdays, family dinners, or even as a sweet weekend indulgence.

Context/Background

Banana cake has been a beloved treat for decades, celebrated for its ability to turn ripe bananas into delicious desserts. Originating in the United States in the early 20th century, banana cakes became popular due to their easy-to-acquire ingredients and satisfying taste. This recipe takes a classic approach by enhancing the banana flavor with vanilla and walnuts, creating a unique twist on a timeless favorite.

Recipe Details

Serves: 8

Prep Time: 20 minutes

Cook Time: 45 minutes

Total Time: 1 hour 5 minutes

Ingredients

  • 1 1/2 cups all-purpose flour
  • 1 teaspoon baking soda
  • 1/2 teaspoon salt
  • 1/2 cup unsalted butter, softened
  • 3/4 cup granulated sugar
  • 2 large eggs
  • 1 teaspoon vanilla extract
  • 3 ripe bananas, mashed
  • 1/2 cup chopped walnuts

Directions

  1. Preheat your oven to 350°F (175°C). Grease and flour a 9-inch round cake pan.
  2. In a medium bowl, whisk together the flour, baking soda, and salt. Set aside.
  3. In a large bowl, beat the butter and sugar until light and fluffy. Add the eggs one at a time, beating well after each addition. Stir in the vanilla extract.
  4. Mix in the mashed bananas until well combined.
  5. Gradually add the dry ingredients to the banana mixture, stirring until just combined. Fold in the chopped walnuts.
  6. Pour the batter into the prepared cake pan and smooth the top with a spatula.
  7. Bake for 45 minutes, or until a toothpick inserted into the center of the cake comes out clean.
  8. Allow the cake to cool in the pan for 10 minutes before transferring it to a wire rack to cool completely.

Tips for Perfect Luscious Vanilla Banana Walnut Cake

  • Use very ripe bananas for maximum flavor and sweetness.
  • Ensure your butter is at room temperature for a smooth batter texture.
  • Fold in the walnuts gently to retain their texture.
  • Cool the cake completely before slicing to maintain its structure.

Serving Suggestions

Serve this cake alone or with a dollop of whipped cream. A dusting of powdered sugar or a scoop of vanilla ice cream can also complement the flavors wonderfully.

Storage and Leftovers

Store any leftovers in an airtight container at room temperature for up to 3 days. You can also refrigerate the cake for up to a week or freeze it for up to 3 months for longer storage.

Final Thoughts

This Luscious Vanilla Banana Walnut Cake is sure to become a household favorite. Its irresistible flavors and simple preparation make it a perfect choice for both novice and seasoned bakers. Enjoy creating this delightful dessert and savoring every bite!

Recipe Notes

  • For a vegan version, replace eggs with flax eggs and butter with plant-based alternative.
  • Add chocolate chips for an extra touch of sweetness.
  • Try using almond extract instead of vanilla for a different aroma.

Delightful Pecan Caramel Baklava Cups: An Easy Dessert Recipe

“`html

Pecan Caramel Baklava Cups: A Delightful Twist on a Classic Dessert

Indulge in the rich and decadent flavors of Pecan Caramel Baklava Cups. This modern twist on a traditional dessert combines the crisp, flaky layers of phyllo pastry with the gooey decadence of caramel and the nutty crunch of pecans. Perfect for any occasion, these bite-sized treats are sure to impress your guests and satisfy your sweet tooth.

Why You’ll Love This Recipe

These Pecan Caramel Baklava Cups are the epitome of a perfect dessert. The combination of buttery phyllo dough, sweet caramel, and crunchy pecans creates a heavenly mix of textures and flavors. Not only are they easy to prepare, but they’re also an elegant addition to any dessert table. Whether for a fancy dinner party or a cozy family gathering, these cups are bound to become your go-to indulgence.

The ease of serving is another reason to love this recipe. Their bite-sized nature makes them ideal finger food, eliminating the need for forks or complicated serving methods. Plus, with their eye-catching presentation, they are a feast for both the eyes and the palate.

Context/Background

Baklava, a dessert with roots in Middle Eastern and Mediterranean cuisine, has been loved for centuries for its sweet, nutty, and buttery layers. Traditionally made with walnuts or pistachios, this version features pecans and the addition of caramel to introduce an extra layer of flavor and texture.

This adaptation maintains the essential elements of classic baklava while bringing a unique twist that draws inspiration from Southern pecan desserts and the universal love for caramel. The use of phyllo cups makes it both practical and novel, perfect for modern entertaining.

Recipe Details

Serves: 12

Prep Time: 15 minutes

Cook Time: 20 minutes

Total Time: 35 minutes

Ingredients

  • 1 package (15 sheets) phyllo dough
  • 1 cup pecans, finely chopped
  • 1 cup caramel sauce
  • 1/2 cup unsalted butter, melted
  • 1/4 cup brown sugar
  • 1 teaspoon ground cinnamon
  • Pinch of salt

Directions

  1. Preheat the oven to 350°F (175°C). Grease a mini muffin tin or use paper liners.
  2. Cut phyllo sheets into squares that fit into muffin cups. Layer 3-4 squares per cup, brushing each layer with melted butter.
  3. In a bowl, mix chopped pecans, brown sugar, cinnamon, and salt.
  4. Fill each phyllo cup with the pecan mixture. Drizzle caramel sauce over the top.
  5. Bake for 18-20 minutes, until the phyllo is golden brown and crisp.
  6. Let cool slightly before removing from the tin. Serve warm or at room temperature.

Tips for Perfect Pecan Caramel Baklava Cups

  • Thaw the phyllo dough in the refrigerator overnight for easier handling.
  • Keep the phyllo covered with a damp towel to prevent it from drying out while assembling.
  • Use a pastry brush to ensure even butter application between layers.
  • Customize the sweetness by adjusting the quantity of caramel sauce to your taste.

Serving Suggestions

Pair these Pecan Caramel Baklava Cups with a scoop of vanilla ice cream or a dollop of whipped cream for an extra indulgent treat. They also complement a steaming cup of coffee or a chilled glass of dessert wine.

Storage and Leftovers

Store any leftover baklava cups in an airtight container at room temperature for up to two days. For longer storage, refrigerate them for up to a week. Reheat in the oven to restore crispness before serving.

Final Thoughts

Give this Pecan Caramel Baklava Cups recipe a try and relish in the delightful blend of caramel, pecans, and crisp phyllo layers. It’s a rewarding dessert that combines heritage with innovation, promising a luscious experience with every bite.

Recipe Notes

  • If you prefer, substitute walnuts or almonds for pecans.
  • Enhance the flavor by adding a splash of vanilla extract to the pecan mixture.
  • For a richer taste, use homemade caramel sauce.

“`

Indulge in Luxurious Mini Crème Brûlée Cheesecakes with Caramel Delight

“`html

Luxurious Mini Crème Brûlée Cheesecakes with Caramel Topping: A Decadent Delight

Indulge in the ultimate dessert experience with our Luxurious Mini Crème Brûlée Cheesecakes with Caramel Topping. Combining the creamy richness of cheesecake with the crisp caramelized sugar that defines a classic crème brûlée, this decadent treat is sure to become a favorite. Whether hosting a dinner party or simply treating yourself, these mini delights promise a gourmet touch that is irresistible.

Why You’ll Love This Recipe

This recipe brings together the perfect harmony of textures and flavors. The creamy cheesecake base beautifully complements the crunchy and sweet caramel topping, creating a dessert that is truly sensational. Perfect for impressing guests, these cheesecakes offer individual servings, making them convenient and elegant. Additionally, the rich and smooth flavors make them ideal for any special occasion, from birthdays to anniversaries.

Not only is this recipe indulgent, but it’s also versatile. You can dress it up further with fresh fruit or a dollop of whipped cream. Plus, with their mini size, they are perfect for portion control while still allowing you to indulge in luxurious flavors.

Context/Background

Crème brûlée, a classic French dessert, is traditionally served in ramekins with a caramelized sugar crust on top. The origins of the dish date back to the 17th century and it has since become a symbol of sophisticated indulgence. By integrating these elements with cheesecake, another beloved dessert with roots in ancient Greece, this recipe combines two historical favorites into one modern masterpiece. This fusion is popular in contemporary dessert trends, bringing together the best of different culinary worlds.

Recipe Details

Serves: 12

Prep Time: 25 minutes

Cook Time: 60 minutes

Total Time: 1 hour 25 minutes

Ingredients

  • 1 cup graham cracker crumbs
  • 3 tablespoons unsalted butter, melted
  • 16 ounces cream cheese, softened
  • 1/2 cup granulated sugar
  • 2 large eggs
  • 1 teaspoon vanilla extract
  • 1 cup heavy cream
  • 1/4 cup caramel sauce
  • 1/2 cup granulated sugar (for topping)

Directions

  1. Preheat the oven to 325°F (163°C) and line a muffin pan with paper liners.
  2. Mix graham cracker crumbs and melted butter in a bowl until combined. Press a tablespoon of the mixture into the bottom of each muffin cup.
  3. In a large bowl, beat the cream cheese and 1/2 cup sugar until smooth. Add eggs, one at a time, beating well after each. Mix in vanilla extract.
  4. Divide the batter evenly among the muffin cups, filling each about 3/4 full.
  5. Bake for 20-25 minutes or until the centers are set. Remove from the oven and allow to cool to room temperature, then refrigerate for at least 4 hours.
  6. Before serving, spread a thin layer of caramel sauce over each cheesecake. Sprinkle about 2 teaspoons of sugar on top of each and use a kitchen torch to gently caramelize the sugar until it turns golden brown. Allow to cool for a few minutes to form a hard crust.

Tips for Perfect Luxurious Mini Crème Brûlée Cheesecakes

  • Ensure cream cheese is fully softened to prevent lumps in your batter.
  • Use a gentle hand when bruleeing the sugar to avoid burning it.
  • Chill the cheesecakes thoroughly before serving for the best texture.
  • Experiment with flavors by adding a hint of citrus zest for a fresh twist.

Serving Suggestions

These mini crème brûlée cheesecakes are perfect served on their own, but you can elevate them with a side of fresh berries or a dollop of homemade whipped cream. Pairing with a light dessert wine or espresso can further enhance their decadent taste.

Storage and Leftovers

Store any leftover cheesecakes in an airtight container in the refrigerator for up to 5 days. For best results, brûlée the sugar topping just before serving to maintain its crisp texture. You can also freeze the cheesecakes, without the topping, for up to 2 months. Thaw in the refrigerator overnight and add the caramel and sugar crust before serving.

Final Thoughts

These Luxurious Mini Crème Brûlée Cheesecakes with Caramel Topping are sure to become a favorite in your dessert repertoire. Their classic elegance combined with a modern twist makes them both timeless and trendy—a true treat for any occasion. Try this recipe today and enjoy the perfect union of cheesecake and crème brûlée. You deserve every indulgent bite!

Recipe Notes

  • Substitute graham cracker crumbs with gluten-free crumbs for a gluten-free option.
  • Add a tablespoon of cocoa powder to the crust for a chocolatey touch.
  • Weight the base slightly more for extra crunch.

“`

Irresistible Churro Cheesecake Donut Cookies: A Sweet Dessert Fusion

“`html

Churro Cheesecake Donut Cookies: A Sweet Twist on a Classic

If you love churros, cheesecake, and donuts, then you’re in for a treat with our Churro Cheesecake Donut Cookies. This recipe combines the best flavors of each dessert into a deliciously sweet and unique cookie experience that will satisfy any sweet tooth.

Why You’ll Love This Recipe

The Churro Cheesecake Donut Cookies are a delightful combination of crunchy, creamy, and chewy textures. These cookies are perfect for special occasions or when you need a comfort dessert. The cinnamon sugar coating gives them a churro-like exterior while the creamy cheesecake filling adds a rich and tangy twist, and the donut-inspired dough provides a satisfyingly chewy base.

Whether you’re hosting a party, bringing treats to a gathering, or just indulging yourself, this recipe is sure to impress. They are not only fun to make but also absolutely delicious to eat, bringing a unique flavor fusion to your dessert repertoire.

Context/Background

Churros have long been a favorite among those who love fried dough, originating from Spanish and Portuguese cuisine. Cheesecake, with its soft and creamy filling, offers a complementary flavor profile, often associated with indulgent desserts. Our recipe combines these beloved sweets with donut cookies—a creative innovation that is sweeping the baking world—offering an exciting twist on familiar classics.

By merging these three iconic recipes, we’ve created a unique dessert that blends various techniques and cultures, providing a culinary experience like no other. The Churro Cheesecake Donut Cookies stand as a testament to the infinite possibilities of dessert fusion.

Recipe Details

Serves: 12
Prep Time: 20 minutes
Cook Time: 15 minutes
Total Time: 35 minutes

Ingredients

  • 1 cup all-purpose flour
  • 1/2 cup unsalted butter, softened
  • 1/4 cup granulated sugar
  • 1/4 cup brown sugar
  • 1 egg
  • 1 tsp vanilla extract
  • 1 tsp ground cinnamon
  • 1/2 cup cream cheese, softened
  • Additional cinnamon sugar for coating

Directions

  1. Preheat your oven to 350°F (175°C). Line a baking sheet with parchment paper.
  2. In a medium bowl, cream together the butter, granulated sugar, and brown sugar until light and fluffy.
  3. Add in the egg and vanilla extract, mixing thoroughly.
  4. In another bowl, whisk the flour and cinnamon, then gradually add to the wet mixture until well combined.
  5. Scoop 1 tablespoon of dough and flatten it slightly. Add a small dollop of cream cheese in the center and fold the dough to encase the cream cheese completely.
  6. Roll the dough balls in cinnamon sugar and place them on the prepared baking sheet.
  7. Bake for 12-15 minutes, or until the edges are golden brown. Allow to cool on a wire rack.

Tips for Perfect Churro Cheesecake Donut Cookies

  • Ensure the cream cheese is softened for easy filling.
  • Chill the dough slightly if it’s too sticky to handle.
  • Use a cookie scoop for consistent sizes.
  • Dust with extra cinnamon sugar immediately after baking for a more intense flavor.

Serving Suggestions

Serve these cookies warm with a cup of coffee or hot chocolate. They also pair beautifully with a scoop of vanilla ice cream or a drizzle of chocolate sauce for extra indulgence.

Storage and Leftovers

Store the Churro Cheesecake Donut Cookies in an airtight container at room temperature for up to 3 days. For longer storage, keep them in the refrigerator, where they can last up to a week. Reheat slightly in the microwave before serving to enjoy them warm.

Final Thoughts

If you’re looking to impress friends, family, or just treat yourself, these Churro Cheesecake Donut Cookies are a must-try. The fusion of flavors and textures makes them unforgettable, and they’re bound to become a favorite in your recipe collection.

Recipe Notes

  • For a vegan option, replace butter and cream cheese with plant-based alternatives.
  • Add a pinch of nutmeg to the cinnamon sugar for a spiced twist.
  • Experiment with fillings, such as Nutella or fruit preserves, for variation.

“`

Irresistible Butterfinger Caramel Crunch Mini Pies Recipe for Sweet Lovers

“`html

Butterfinger Caramel Crunch Mini Pies 🍫🥧 – Easy Recipe 😋

Indulge in the perfect fusion of chocolate, caramel, and crunch with these Butterfinger Caramel Crunch Mini Pies. This easy recipe brings layers of creamy caramel and crispy Butterfinger pieces together in a delightful mini pie. Perfect for sweet lovers and a hit at any gathering, these mini delights are sure to satisfy your dessert cravings.

Why You’ll Love This Recipe

These Butterfinger Caramel Crunch Mini Pies are incredibly easy to prepare, making them suitable for both novice and experienced bakers. Each bite offers a heavenly combination of creamy caramel and the unmistakable, crispy Butterfinger crunch, ensuring every bite is filled with delicious textures and flavors.

Ideal for parties or family gatherings, these mini pies add a touch of fun and indulgence to any occasion. Plus, their mini size means they’re perfect for individual servings, offering a personalized dessert experience for everyone.

Context/Background

This delightful recipe takes inspiration from classic caramel pies but introduces a unique twist with the addition of Butterfinger candy bars. Originating from the sweet and salty flavor trend, these pies combine traditional ingredients with beloved candy bars for a modern dessert experience.

Recipe Details

Serves: 12 mini pies

Prep Time: 20 minutes

Cook Time: 10 minutes

Total Time: 30 minutes

Ingredients

  • 1 cup crushed Butterfinger candy bars
  • 1 cup caramel sauce
  • 12 mini graham cracker pie crusts
  • 1 cup whipped cream
  • 1/2 cup melted chocolate (for drizzling)
  • Extra crushed Butterfinger pieces (for topping)

Directions

  1. Preheat your oven to 350°F (175°C).
  2. In a small bowl, mix the crushed Butterfinger candy bars with the caramel sauce.
  3. Fill each mini graham cracker pie crust with the caramel and Butterfinger mixture, distributing evenly.
  4. Place the mini pies on a baking sheet and bake for 10 minutes.
  5. Remove from the oven and allow the pies to cool completely.
  6. Top each mini pie with a dollop of whipped cream.
  7. Drizzle melted chocolate over the whipped cream and top with extra crushed Butterfinger pieces.
  8. Refrigerate until ready to serve.

Tips for Perfect Butterfinger Caramel Crunch Mini Pies

  • Ensure the candy bars are crushed finely to distribute evenly in the pie mixture.
  • For extra flavor, consider adding a pinch of sea salt to the caramel mixture.
  • Melt the chocolate slowly to avoid burning.
  • Serve chilled for the best taste experience.

Serving Suggestions

Serve these Butterfinger Caramel Crunch Mini Pies chilled with a hot cup of coffee or tea for an irresistible dessert ensemble. They also pair well with a scoop of vanilla ice cream on the side.

Storage and Leftovers

Store any leftover mini pies in an airtight container in the refrigerator for up to 3 days. For optimal freshness, do not add the whipped cream topping until you are ready to serve.

Final Thoughts

If you’re a fan of rich caramel paired with the iconic crunch of Butterfinger candy, these mini pies are a must-try. Easy to make and delightful to eat, they are ideal for savoring on a cozy night in or impressing guests at your next gathering.

Recipe Notes

  • Substitute the mini graham cracker crusts with chocolate crusts for a more intense chocolate flavor.
  • Experiment with different candy variations if Butterfinger isn’t available.
  • Add a sprinkle of crushed nuts on top for additional texture.

“`

Indulge in Cherry Garcia Fudge: A Decadent Christmas Dessert Recipe

“`html

Cherry Garcia Fudge Recipe: A Decadent Christmas Dessert

Indulge in the ultimate festive treat with this Cherry Garcia Fudge Recipe, a decadent Christmas dessert that perfectly captures the spirit of the season. With the rich flavors of creamy chocolate and tart cherries, it’s sure to be a holiday favorite!

Why You’ll Love This Recipe

This Cherry Garcia Fudge is not only delicious but also incredibly easy to make. The combination of dark chocolate, sweet cherries, and a hint of vanilla creates a delightful balance that’s both rich and refreshing. Whether you’re entertaining guests or cozying up by the fireplace, this fudge makes the perfect treat.

Plus, it’s a versatile dessert that can be made ahead of time, saving you hassle during the busy holiday season. Each bite is a perfect blend of texture and taste, offering something special for everyone’s palate.

Context/Background

Inspired by the popular ice cream flavor, this Cherry Garcia Fudge brings the iconic blend of chocolate and cherry into a luxurious, homemade confection. Fudge itself dates back to the late 19th century, often enjoyed during special holidays due to its rich flavor and ease of preparation.

This particular recipe embraces the classic characteristics of fudge while adding a festive twist with the addition of dried cherries. It’s a homage to the Jerry Garcia-inspired ice cream, reimagined as a delightful holiday treat.

Recipe Details

Serves: 16 pieces

Prep Time: 10 minutes

Cook Time: 5 minutes

Total Time: 2 hours (including cooling time)

Ingredients

  • 2 cups dark chocolate chips
  • 1 can (14 oz) sweetened condensed milk
  • 1 tsp vanilla extract
  • 1 cup dried cherries
  • 1/2 cup chopped walnuts (optional)
  • Pinch of salt

Directions

  1. Line an 8×8 inch baking dish with parchment paper.
  2. In a medium saucepan, combine dark chocolate chips and sweetened condensed milk over low heat. Stir constantly until smooth and melted.
  3. Remove from heat and stir in vanilla extract and salt.
  4. Fold in dried cherries and walnuts, if using.
  5. Pour the mixture into the prepared baking dish, spreading evenly.
  6. Refrigerate for at least 2 hours or until set.
  7. Once set, lift fudge out of the pan using the parchment paper and cut into squares.

Tips for Perfect Cherry Garcia Fudge

  • Use high-quality dark chocolate for the best flavor.
  • Ensure to stir continuously while melting the chocolate to prevent burning.
  • Chill the fudge fully before cutting to get neat squares.

Serving Suggestions

Enjoy Cherry Garcia Fudge with a hot cup of cocoa or coffee for a perfect holiday pairing. It also makes a lovely gift when wrapped in festive paper and tied with a ribbon.

Storage and Leftovers

Store leftover fudge in an airtight container in the refrigerator for up to two weeks. For longer storage, freeze the fudge for up to three months, ensuring it is well-wrapped to avoid freezer burn.

Final Thoughts

This Cherry Garcia Fudge is an irresistible treat that will undoubtedly become a staple in your holiday dessert lineup. Its rich chocolate flavor, combined with the tangy cherries, offers a decadent experience hard to resist. Give it a try and bring some joy to your Christmas festivities!

Recipe Notes

  • For a nut-free version, simply omit the walnuts.
  • You can substitute milk chocolate for a sweeter, creamier fudge.
  • Feel free to add other dried fruits like cranberries for a different taste.

“`

Irresistible Baklava Cream Sandwich Cookies: A Delightful Dessert Twist

“`html

Baklava Cream Sandwich Cookies: A Delectable Twist on a Classic Delight

Discover the irresistible indulgence of Baklava Cream Sandwich Cookies, a fusion of the classic baklava flavors you love with a modern twist. These cookies boast layers of flaky goodness, rich nuts, and a creamy filling that will captivate your taste buds and leave you craving more.

Why You’ll Love This Recipe

These Baklava Cream Sandwich Cookies are a unique treat, combining the sophisticated flavors of traditional baklava with the playful nature of sandwich cookies. Perfect for any occasion, they offer a delightful blend of sweetness and texture with every bite.

Whether you’re hosting a party, looking for a special dessert to impress guests, or simply satisfying a sweet tooth, this recipe is sure to become a favorite. The combination of creamy filling with the nutty and honeyed layers creates an unforgettable taste experience.

Context/Background

Baklava has a rich history dating back to the Ottoman Empire, known for its layers of filo pastry filled with nuts and drenched in honey syrup. By reimagining this classic into buttery cookies with a creamy twist, the Baklava Cream Sandwich Cookies pay homage to its roots while delivering a fresh, innovative approach.

Recipe Details

Serves: 10

Prep Time: 30 minutes

Cook Time: 20 minutes

Total Time: 50 minutes

Ingredients

  • 1 cup butter, softened
  • 1/2 cup brown sugar
  • 2 cups all-purpose flour
  • 1 cup ground walnuts
  • 1/2 cup honey
  • 1 tsp cinnamon
  • 1 cup cream cheese, softened
  • 1/4 cup powdered sugar
  • 1 tsp vanilla extract

Directions

  1. Preheat your oven to 350°F (175°C).
  2. In a large bowl, cream together butter and brown sugar until light and fluffy.
  3. Gradually mix in the flour, ground walnuts, honey, and cinnamon until well combined.
  4. Roll dough into small balls and flatten slightly.
  5. Place on a baking sheet lined with parchment paper and bake for 15-20 minutes or until golden brown.
  6. Let the cookies cool completely on a wire rack.
  7. In a separate bowl, beat cream cheese, powdered sugar, and vanilla extract until smooth.
  8. Spread the cream cheese mixture on half of the cooled cookies, then top each with another cookie to form sandwiches.

Tips for Perfect Baklava Cream Sandwich Cookies

  • Ensure all ingredients are at room temperature for smoother mixing.
  • A pinch of salt can enhance the sweetness of the cookies.
  • Chill dough for easier handling and shaping.
  • Use a pastry bag for evenly distributed cream filling.

Serving Suggestions

Serve these Baklava Cream Sandwich Cookies with a cup of strong coffee or tea for a delightful afternoon treat. They also make a perfect addition to dessert platters for special gatherings.

Storage and Leftovers

Store the cookies in an airtight container in the refrigerator for up to one week. If you plan to keep them longer, freeze the cookies without the filling and assemble fresh before serving.

Final Thoughts

Baklava Cream Sandwich Cookies offer an exciting way to enjoy the beloved flavors of baklava in a decadent cookie form. Their delightful combination of textures and tastes ensures a memorable experience. Give this recipe a try and indulge in a slice of culinary innovation.

Recipe Notes

  • You can substitute walnuts with pistachios for a different variation.
  • For a vegan option, use a dairy-free cream cheese substitute.
  • Adjust the sweetness level by reducing honey quantity for a less sweet cookie.

“`

Irresistible Chocolate Maraschino Cherry Coconut Truffles for Sweet Indulgence

Chocolate Maraschino Cherry Coconut Truffles: A Decadent Delight

Indulge in the rich and luxurious flavors of Chocolate Maraschino Cherry Coconut Truffles. This delightful treat combines the lusciousness of chocolate with the sweetness of maraschino cherries and the exotic taste of coconut. Perfect for satisfying your sweet tooth, these truffles are an irresistible treat for any occasion.

Why You’ll Love This Recipe

These Chocolate Maraschino Cherry Coconut Truffles are a must-try for chocolate lovers and anyone with a sweet tooth. The combination of cherry and chocolate creates a decadent flavor profile that’s both rich and satisfying. The added coconut gives these truffles a unique twist, making them a standout dessert option for holidays, parties, or just a special treat for yourself.

Not only do the truffles taste amazing, but they’re also incredibly easy to make. With simple ingredients and straightforward steps, you can whip up a batch in no time, making them perfect for last-minute dessert cravings or a quick entertaining solution.

Context/Background

Truffles have long been a favorite confectionery treat, originating from France in the late 19th century. Traditionally made with a ganache center, these confections have evolved to include various fillings and coatings. The addition of maraschino cherries and coconut to these truffles offers a modern twist on a classic dessert, infusing traditional European elegance with tropical flair.

Recipe Details

Serves: 12

Prep Time: 20 minutes

Cook Time: 10 minutes

Total Time: 30 minutes

Ingredients

  • 1 cup semi-sweet chocolate chips
  • 1/2 cup heavy cream
  • 1/2 cup maraschino cherries, chopped
  • 1 cup shredded coconut
  • 1 tablespoon butter
  • 1 teaspoon vanilla extract
  • Pinch of salt

Directions

  1. In a small saucepan, heat the heavy cream and butter over medium heat until it just begins to simmer. Remove from heat and stir in the chocolate chips until smooth.
  2. Add vanilla extract and salt to the chocolate mixture, stirring until fully combined.
  3. Fold in the chopped maraschino cherries and shredded coconut. Mix until the ingredients are evenly distributed.
  4. Transfer the mixture to the refrigerator and let it chill for at least 2 hours or until firm.
  5. Once firm, use a small scoop or spoon to portion out the truffle mixture and roll into balls.
  6. Optional: Roll truffles in additional shredded coconut for a decorative touch.
  7. Place the finished truffles on a baking sheet lined with parchment paper and refrigerate for an additional 30 minutes before serving.

Tips for Perfect Chocolate Maraschino Cherry Coconut Truffles

  • Ensure the chocolate is completely melted and smooth before adding other ingredients.
  • For best results, use high-quality chocolate chips.
  • Chill the truffle mixture thoroughly before rolling into balls to make shaping easier.
  • Experiment with different coatings, such as crushed nuts or powdered sugar, for added texture.

Serving Suggestions

Serve these truffles at room temperature for the best flavor. They pair beautifully with a cup of coffee or a glass of dessert wine. Arrange them on a platter for parties or present them in decorative boxes for a homemade gift.

Storage and Leftovers

Store these truffles in an airtight container in the refrigerator for up to two weeks. For longer storage, you can freeze them for up to three months. Allow them to thaw in the refrigerator before serving.

Final Thoughts

The perfect fusion of chocolate, cherries, and coconut makes these truffles a truly decadent indulgence that you simply must try. Whether for a special occasion or a simple treat, these truffles are sure to impress your friends and family. So go ahead, give them a try and savor the delightful amalgamation of flavors!

Recipe Notes

  • To customize the flavor, try adding a splash of cherry liqueur for an adult twist.
  • For a nutty variation, substitute half the coconut with finely chopped almonds.
  • If your truffle mixture is too soft to shape, chill it for an additional hour in the refrigerator.

Delicious Reuben Fritters Recipe: Crispy and Cheesy Snack Bites

“`html

Reuben Fritters 🧀🥓 – Crispy, Cheesy, Bite-Sized Snacks!

Introducing Reuben Fritters, the ultimate crispy, cheesy, bite-sized snack that’s guaranteed to be a hit at your next gathering! These savory fritters pack all the flavors of a classic Reuben sandwich into a golden, crunchy shell – perfect for anyone who loves a delicious twist on traditional favorites. With their melty cheese and flavorful fillings, Reuben Fritters will become your new favorite appetizer or snack.

Why You’ll Love This Recipe

These Reuben Fritters are the perfect combination of crispy and creamy, offering a delightful contrast in textures. They’re packed with all the savory goodness of a Reuben sandwich, including corned beef, tangy sauerkraut, and gooey Swiss cheese, making them an irresistible savory treat. Plus, they’re easy to make and just as easy to devour, ideal for entertaining or enjoying as a snack.

Whether you’re hosting a game day party or a casual get-together, Reuben Fritters are sure to impress. Their bite-sized form makes them easy to share, and their rich, indulgent flavors will have everyone reaching for more. Trust us, this tasty creation will be the talk of your next gathering!

Context/Background

The beloved Reuben sandwich is said to have originated in the early 20th century, with disputed origins between New York and Omaha. Regardless of where it began, the combination of corned beef, Swiss cheese, sauerkraut, and Russian dressing has become a classic. By transforming this iconic sandwich into fritters, we’re giving it a fun and novel twist that retains all its classic flavors.

Making fritters involves deep frying, which gives them their characteristic crispy exterior. A skill that’s easy to master with a little practice, this technique ensures that all the delicious fillings are perfectly encased within a crunchy golden shell.

Recipe Details

Serves: 4-6

Prep Time: 15 minutes

Cook Time: 10 minutes

Total Time: 25 minutes

Ingredients

  • 1 cup cooked corned beef, chopped
  • 1 cup Swiss cheese, shredded
  • 1/2 cup sauerkraut, drained
  • 1/4 cup all-purpose flour
  • 1/4 teaspoon salt
  • 1/4 teaspoon black pepper
  • 2 large eggs, beaten
  • 1 cup breadcrumbs
  • Vegetable oil, for frying

Directions

  1. In a large bowl, combine corned beef, Swiss cheese, and sauerkraut.
  2. Add flour, salt, and pepper, mixing until well combined.
  3. Form the mixture into small balls, about 1 tablespoon each.
  4. Dip each ball into the beaten eggs, then roll in breadcrumbs to coat.
  5. Heat vegetable oil in a large skillet over medium heat.
  6. Fry the fritters in batches, turning occasionally, until golden brown and crispy on all sides, about 3-4 minutes per batch.
  7. Remove fritters and drain on paper towels. Serve warm with your favorite dipping sauce.

Tips for Perfect Reuben Fritters

  • Ensure the oil is well-heated before frying for the crispiest results.
  • Do not overcrowd the pan to maintain oil temperature.
  • Use fresh breadcrumbs for a lighter texture.
  • Experiment with different cheese types for unique flavor variations.

Serving Suggestions

Serve your Reuben Fritters with a side of Russian dressing or mustard for dipping. They pair excellently with a cold beer or a crisp white wine, perfect for any casual gathering.

Storage and Leftovers

Store leftover fritters in an airtight container in the refrigerator for up to 2 days. Reheat in the oven at 350°F until hot and crispy, about 5-7 minutes.

Final Thoughts

Reuben Fritters are a fun and tasty way to enjoy the flavors of the classic sandwich in a new form. Try making these delightful snacks today, and watch as they become a favorite in your household. Perfect for any occasion, these fritters will keep everyone coming back for more!

Recipe Notes

  • For a vegetarian version, substitute corned beef with mushrooms or tempeh.
  • Use gluten-free breadcrumbs and flour if desired.
  • Feel free to add in a touch of caraway seeds for an extra flavor boost.

“`