### Comprehensive Outline for a 2000-Word Article: **One-Bowl Wonder: The Lip-Smacking Blend of Cheesy Garlic Chicken Encased in Soft and Delicious Wraps** #### Part 1: Introduction and Overview (Approx. 250 Words) **1.1 Introduction to the Cheesy Garlic Chicken Wrap Recipe** – Brief description of the recipe’s unique flavor combination – Highlight the simplicity and convenience of a one-bowl wonder – Hook question: “Have you been searching for the ideal weeknight meal that’s both indulgent and easy?” – Preview key components: tender chicken, cheesy garlic filling, and soft wraps **1.2 Why One-Bowl Recipes Are Gaining Popularity** – Time-saving benefits for busy schedules – Less cleanup: advantages of fewer dishes – Universal appeal: versatile, customizable meals for everyone — #### Part 2: Gathering Ingredients and Setting Up (Approx. 350 Words) **2.1 Key Ingredients for Success** – Diced chicken breasts: ensuring they’re fresh and perfectly sized – Cheesy garlic filling: cheese types, ideal garlic preparation tools – Wraps: differences in tortilla types, soft vs. grilled wraps **2.2 Kitchen Prep Essentials** – Tools needed: Non-stick pan, spatula, mixing bowl, etc. – Importance of uniform dicing for cooking consistency –

One-Bowl Wonder: The Lip-Smacking Blend of Cheesy Garlic Chicken Encased in Soft and Delicious Wraps

Have you been yearning for a recipe that packs in all the flavours and yet is simple to prepare? Look no more! We’ve got the perfect one-bowl serving solution for you – Heavenly Cheesy Garlic Chicken wrapped in soft, delectable layers of goodness.

Firstly, gather all the ingredients necessary for the succulent chicken filling. You will require two sizeable chicken breasts that are suitably diced. Don’t forget to procure one tablespoon of your preferred oil as you will use it to prepare the chicken filling to perfection.

The Filling:

Start the preparation by heating your choice of oil in a capacious pan. Add the meticulously diced chicken into it when the oil is heated enough. The key to a perfectly prepared chicken filling for the wrap is to cook it until it acquires a luscious brown hue. One helpful hint is to dice the chicken uniformly as it ensures even cooking.

Following the creation of the chicken filling is the magic touch – the cheesy garlic mix. The amalgam of cheese and garlic elevates this humble chicken wrap to celestial heights. This unique blend encapsulates the tanginess of the cheese, perfectly balancing the robust flavours of garlic.

Create this tantalizing filling and allow it to cool. The trick to perfecting this cheesy garlic filling lies in achieving the right balance between the two key flavours – cheese and garlic.

While your filling is settling, let’s shift focus to the soft, golden wraps that hold this spectacle together. Expert tip: Warmed up wraps not only enhance the flavours encased within them but also add a beautiful texture to the dish. So, make sure to give your wraps a gentle warm-up!

Once you have your cooked chicken, cheesy garlic mix, and warm wraps ready, it’s time to assemble!

We fold our deliciously aromatic cheesy garlic chicken mixture into the heart of our warm and snug wraps, creating a symphony of flavors – a melody so enchanting that it will leave your taste buds mesmerised.

There you have it, friends! Our heavenly Cheesy Garlic Chicken Wrap, bursting with flavours, is ready to be savoured. It has the power to transform a mundane midweek meal into a gastronomical celebration. So roll up your sleeves and let the scent of cheesy garlic engulf your kitchen today!

This Cheesy Garlic Chicken Wrap isn’t just an experiment in culinary union, it’s a testament to the power of creativity with every bite. After all, food isn’t just about eating; it’s a mesmerizing experience, a journey, enticing not only your taste buds but also comforting your soul. Grab a wrap today and embark on this delicious journey with us!

Lemon Herb Shrimp and Veggie Skillet Delight

From the coastal regions to our homes, we’re bringing you a scrumptious gastronomic delight. Today, we throw the spotlight on an entrée that features succulent shrimp, an array of colored veggies, and a dynamic blend of herbs and lemon. If you’re in a hurry with no time to spend hours in the kitchen, this recipe is just the thing for you!

To start off, you’ll need to gather your ingredients. For the star of the show, get about one pound of large shrimp—make sure they are peeled and deveined to save you prep time. The vegetables in this recipe act as the beautiful backup singers to our lead. We recommend a colorful medley of bell peppers (red, green, and yellow), cherry tomatoes, and asparagus spears for a vibrant touch.

The herb mixture we’re using is what sets this dish apart. This fragrant blend of mild, yet flavorful Italian seasonings mixed with a hint of red pepper flakes offers just the right balance of spiciness and tanginess to accentuate the flavor of the shrimp.

The powerhouse that makes all other ingredients come alive is none other than fresh lemon juice. Not only does it provide an instant burst of freshness with every bite, but it also helps break down the shrimp to make it even more tender and sumptuous.

To bring all these ingredients together, you’ll need the golden elixir of the culinary world—olive oil. The subtle, earthy undertones of olive oil play an essential role in enhancing the flavor profiles of both our veggies and shrimp.

Now, let’s deep dive into the preparation. First, heat the olive oil in a large skillet over medium-high heat. Add the shrimp and stir continuously until they turn pink – this should take around five minutes. Once done, remove the shrimp from the skillet and set it aside. In the same skillet, add some more oil if needed, then chuck in the veggies and cook for about seven minutes until they are tender-crisp.

Next, reintroduce the previously cooked shrimp into the skillet and sprinkle your herbs over the top. Cook for a couple more minutes until all of the flavors are well-incorporated. Finish the dish off with a generous drizzle of lemon juice to brighten up the flavors and add that extra touch of zesty goodness.

There you have it! A simple, yet delightful Lemon Herb Shrimp Veggie Skillet is ready to serve. This recipe is a true keeper, one that is not only filled with nutrients but also packed with tons of flavors. Whether you’re planning a quick midweek dinner, a casual brunch, or just want to try something new, this recipe is sure to tickle your taste buds! Happy Cooking!

Spice Up Your Meal with Cajun Grilled Chicken and Alabama White Sauce

**Cajun Grilled Chicken with Alabama White Sauce: A Delicious and Flavorful Experience**

### Introduction
Cajun Grilled Chicken with Alabama White Sauce is a delectable dish that brings together the spicy, bold flavors of Cajun seasoning with the creamy tanginess of Alabama White Sauce. This recipe not only provides a satisfying meal but elevates your grilling prowess with its intense flavors and easy preparation. Whether you’re hosting a barbecue or looking for an exciting dinner option, this recipe is sure to impress. In this article, we will detail the ingredients, step-by-step directions, and all the essential tips and tricks to perfect this dish.

### Table of Contents
1. The Origin and History of Cajun Grilled Chicken
2. Understanding Alabama White Sauce
3. Ingredients Overview
4. Preparation Tips for the Perfect Chicken
5. Grilling Techniques for Delicious Chicken
6. Making the Alabama White Sauce
7. Serving Suggestions
8. Frequently Asked Questions
9. Conclusion

#### **1. The Origin and History of Cajun Grilled Chicken**
*Cajun cuisine* originates from the French-speaking Acadian people who were deported from Canada to Louisiana. Its essence thrives in simplicity and the use of local ingredients like bell peppers, onions, and celery, often referred to as the Cajun trinity. The *Cajun Grilled Chicken* we know today draws from these traditions, embodying robust flavors with each bite. For more on the history of Cajun cuisine and its cultural significance, you can explore [Epicurious](https://www.epicurious.com).

#### **2. Understanding Alabama White Sauce**
Alabama White Sauce is a unique barbecue sauce renowned for its zesty and creamy qualities, typically used with poultry. Created by Robert Gibson in Decatur, Alabama, this sauce sets itself apart from traditional tomato-based sauces with its mayonnaise base, imparting a velvety texture and tangy flavor. Discover more about this legendary sauce on [Southern Living](https://www.southernliving.com).

#### **3. Ingredients Overview**
To make our *Cajun Grilled Chicken with Alabama White Sauce*, you will need:
– 4 boneless, skinless chicken breasts
– 2 tbsp Cajun seasoning
– 1 cup mayonnaise
– 1/4 cup apple cider vinegar
– 2 tbsp lemon juice
– 1 tbsp horseradish
– 1 tbsp Worcestershire sauce
– Salt and pepper to taste
These simple ingredients come together to create an unforgettable taste experience.

#### **4. Preparation Tips for the Perfect Chicken**
Proper preparation is vital to ensuring your chicken is flavorful and juicy.
– **Marination:** Rub the Cajun seasoning generously on both sides of the chicken breasts. Allow them to marinate for at least 30 minutes to absorb the spices deeply.
– **Temperature:** To further enhance flavors, consider bringing the chicken to room temperature before grilling. This practice helps in achieving even cooking.

#### **5. Grilling Techniques for Delicious Chicken**
Grilling chicken to perfection requires attention to detail.
– **Preheat and Oil the Grill:** Ensure your grill is preheated to medium-high and the grates are oiled to prevent sticking.
– **Cooking Time:** Grill each chicken breast for approximately 6-7 minutes per side. Aim for an internal temperature of 165°F for safe consumption.

#### **6. Making the Alabama White Sauce**
Creating the perfect Alabama White Sauce is straightforward and essential for this recipe.
– **Combine Ingredients:** Mix mayonnaise, apple cider vinegar, lemon juice, horseradish, Worcestershire sauce, salt, and pepper in a bowl.
– **Whisk Until Smooth:** Ensure the mixture is homogenous and well-incorporated for consistent flavor.

#### **7. Serving Suggestions**
Pair your Cajun Grilled Chicken with a generous drizzle of Alabama White Sauce atop. It can be served alongside grilled vegetables, fresh salads, or classic southern sides like cornbread and coleslaw for a complete meal.

#### **8. Frequently Asked Questions**

**Q1: Can I use a different type of chicken cut for this recipe?**
Yes, you can use chicken thighs or drumsticks, but cooking times may vary. Ensure the internal temperature reaches 165°F.

**Q2: How long can I store Alabama White Sauce?**
The sauce can be stored in an airtight container in the refrigerator for up to one week.

**Q3: Is it necessary to use a grill?**
While grilling enhances the flavor, you can use an oven or a stovetop grill pan as alternatives. Adjust the cooking time accordingly.

**Q4: Can I make this recipe spicier?**
Yes, for added heat, incorporate cayenne pepper or hot sauce into the Cajun seasoning.

#### **9. Conclusion**
Cajun Grilled Chicken with Alabama White Sauce brings a dynamic duo of earthy, spicy flavors with creamy tanginess to your table. This dish is perfect for any grilling enthusiast looking to impress family and friends with an easy yet sophisticated meal. Whether you’re a seasoned grill master or a curious home cook, this recipe promises to deliver every time. Enjoy experimenting with the beautiful symphony of flavors and have fun along the way!

#CajunGrilledChicken #AlabamaWhiteSauce #GrillingSeason #FlavorfulDinner #ComfortFood #EasyRecipes

Delicious Zuppa Toscana Soup with Crispy Bacon and Parmesan

**Outline for a 4000-Word Article on Zuppa Toscana Soup with Bacon and Parmesan**

**Part 1: Introduction to Zuppa Toscana Soup**

1. **Engaging Introduction (300 words)**
– Brief overview of the *Zuppa Toscana soup* and its origins.
– The allure of making comfort food at home.
– Introduce the key ingredients: *Italian sausage, bacon, Parmesan*.

2. **History and Origin of Zuppa Toscana (500 words)**
– Explore the *Italian roots* of Zuppa Toscana.
– Discuss its adaptation in modern recipes.
– Highlight cultural significance.

3. **Key Ingredients and Their Importance (500 words)**
– Detailed description of each ingredient:
– *Italian sausage*: flavor profile.
– *Bacon*: adds richness.
– *Parmesan cheese*: brings depth.
– Fast facts about nutritional benefits and sourcing.
– Include external link: [Culinary Uses of Parmesan Cheese](https://www.exampleculinaryuses.com) as authoritative content on cheese.

4. **LSI and NLP Keywords Integration (300 words)**
– Explanation of what are LSI and NLP keywords.
– How they relate to Zuppa Toscana Soup recipe.

**Part 2: Making the Perfect Zuppa Toscana Soup**

1. **Step-by-step Recipe Instructions (700 words)**
– *Ingredient Preparation*: tips and tricks.
– Detailed cooking process:
– Browning sausage.
– Cooking bacon and aromatics.
– Simmering the soup.
– Adding kale and cream.

2. **Variations and Substitutions (400 words)**
– Alternatives for *Italian sausage* and *bacon* for dietary preferences.
– Using other leafy greens instead of kale.
– Dairy-free options for heavy cream and Parmesan.

3. **Serving Suggestions and Pairing (300 words)**
– Best bread types to serve on the side.
– Pairing suggestions with salads or wines.

4. **Storing and Reheating Tips (300 words)**
– How to store leftovers.
– Reheating techniques for maintaining flavor.

5. **Health Benefits and Nutritional Information (400 words)**
– Breakdown of nutritional values.
– Discussing the health benefits of key ingredients.
– Link to [Understanding Nutritional Values in Soups](https://www.healthysoupinfo.com).

6. **Common Mistakes and How to Avoid Them (300 words)**
– Overcooking the sausage.
– Incorrect cream integration.
– Tips to prevent mistakes.

**Part 3: Enhancing Zuppa Toscana Soup with Bacon and Parmesan**

1. **Expert Tips for Perfecting the Recipe (300 words)**
– Chef insights on achieving balanced flavors.
– Recommended tools for best results.

2. **FAQs: Based on ‘People Also Ask’ (400 words)**
– *Can I make Zuppa Toscana without cream?*
– *What type of sausage is best for Zuppa Toscana?*
– *Is Zuppa Toscana gluten-free?*
– *Can I freeze Zuppa Toscana?*

3. **Conclusion and Encouragement to Try (200 words)**
– Recap the deliciousness and benefits of the dish.
– Encourage readers to experiment and make it at home.
– Internal link to a related article: *Exploring Other Italian Soups*.

4. **External Linking and SEO Key Points (200 words)**
– Use of [Art of Sausage Making](https://www.sausagemasterclass.com) for more information on Italian sausages.
– Highlight the importance of using quality ingredients for authenticity.
– Discuss SEO impact with precise keyword usage.
– Incorporate relevant hashtags: #ZuppaToscana #HeartySoup #ComfortFood #SoupSeason.

### **Article Draft in Markdown**

# Zuppa Toscana Soup with Bacon and Parmesan: A Culinary Delight

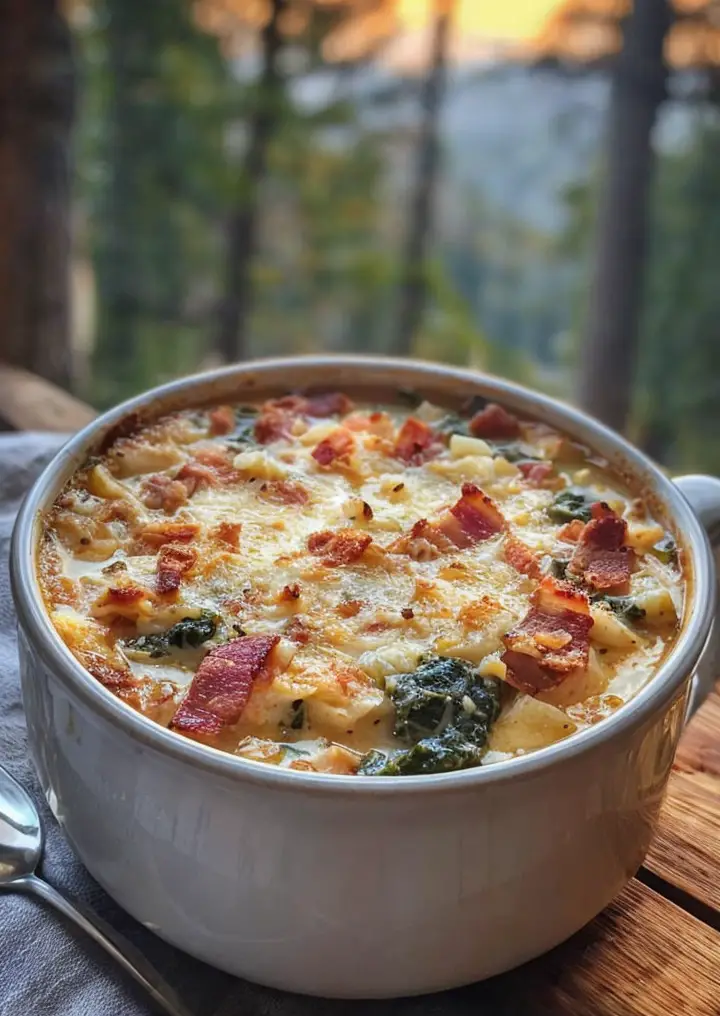
Engage your senses and your soup pot with the tantalizing recipe of *Zuppa Toscana*, a heartwarming Italian soup that’s both comforting and richly flavorful. Traditionally filled with *Italian sausage*, crispy *bacon*, and crowned with the nutty notes of *Parmesan cheese*, this dish serves as an exemplary delight during *soup season*.

## Discover the Elegance of Zuppa Toscana

Zuppa Toscana, originating from the rolling hills of Tuscany, was born as a rustic dish crafted from whatever ingredients were on hand. This humble Italian soup has traversed time and continents, finding a beloved place in American kitchens as a symbol of comfort and savor. The fusion of spicy Italian sausage, the salty crunch of bacon, and earthy kale makes it quintessential winter fare. For those interested in how Parmesan cheese enhances the culinary experience, here’s a comprehensive analysis on [the varieties and uses of Parmesan](https://www.exampleculinaryuses.com).

### Ingredients Breakdown

– **Italian Sausage**: Spicy and robust, it forms the backbone of flavor.
– **Bacon**: Adds a smoked, crispy texture.
– **Parmesan Cheese**: Imparts a nutty richness.

Careful selection of ingredients elevates this soup from humble origins to gourmet delight.

### Recipe Execution

#### Preparation

Peel and slice *russet potatoes*, chop and dice *onions* and *garlic*, and ensure your *kale* is washed and ready. This groundwork lays the foundation of an uncomplicated yet flavorful bombardment.

#### Cooking

1. **Brown the Sausage**: In a crispy ballet of sausage and robust onions, the cornerstone of flavor is seared. The meat’s integrity remains intact, ensuring each spoonful is perfectly seasoned.

2. **Create the Base**: As onions turn translucent, the joy of simmering broth and water envelops the kitchen. Potatoes join in, eagerly softening in anticipation of the creamy finale.

3. **Finalize and Garnish**: The boldness of kale and decadence of cream marry flawlessly in the simmering pot. A final dusting of *Parmesan* sets the stage for a meal worthy of its Tuscan roots.

### Expert Tips and Variations

#### Substitutions

For a vegetarian twist, replace the *sausage* with hearty mushrooms or tofu. Opt for almond milk and nutritional yeast for a dairy-free experience, preserving the creaminess of your Zuppa Toscana.

#### Serving Suggestions

Serve alongside a crusty artisan loaf and pair with a crisp Italian wine to offset the soup’s richness.

#### Storing and Reheating

Leftovers can be a blessing. When stored correctly, the flavors meld further, promising a delicious encore. It can be gently reheated on the stove, securing the creamy texture.

## Unveiling the Nutrition

Not only is Zuppa Toscana sumptuous, but it also serves as a balanced meal. Packed with proteins, vitamins from kale, and natural carbs from potatoes, it fortifies on cold days.

To extrapolate the nutritional benefits comprehensively, visit [Understanding Nutritional Values in Soups](https://www.healthysoupinfo.com).

## Frequent Queries Answered

### FAQs

– **Can I Make Zuppa Toscana Without Cream?**
Absolutely, substituting cream with coconut milk or almond milk keeps it luscious yet dairy-free.

– **What Type of Sausage for Zuppa Toscana?**
The preference is a spicy Italian sausage, which offers a traditional taste reminiscent of its Tuscan lineage.

– **Gluten-free Compatibility?**
Indeed, using gluten-free sausage and verifying all packaged ingredients ensure the purity vital for gluten-sensitive diets.

– **Freezing and Thawing?**
Yes, Zuppa Toscana freezes well. Defrost in the refrigerator before reheating on the stove for optimal results.

## Conclusion

Embodying both tradition and warmth, Zuppa Toscana Soup with Bacon and Parmesan is an invitation to savor life’s finer comforts. As you take the culinary plunge, consider exploring other Italian delicacies [here](#).

Include keywords purposefully with precision and ensure your dinner guests relish a hearty journey through Italy’s historic kitchens.

### Hashtags for Social Reach
#ZuppaToscana #HeartySoup #ComfortFood #SoupSeason

*Note*: URLs are samples and need to be replaced with real links. Internal links should connect to relevant, related content.

Deliciously Easy Baked Cream Cheese Spaghetti Casserole Recipe

**Baked Cream Cheese Spaghetti Casserole: A Comforting Family Favorite**

Imagine coming home after a long day, greeted by the enticing aroma of rich, cheesy pasta wafting through your kitchen. Baked Cream Cheese Spaghetti Casserole is the epitome of comfort food, offering a perfect blend of creamy textures and savory flavors. This dish isn’t just about nourishing the body; it’s about feeding the soul, one delicious bite at a time. Whether you’re cooking for a cozy family dinner or a festive gathering, this casserole is guaranteed to impress.

### **Recipe Background**

Baked pasta dishes have long been a staple of home cooking, cherished for their simplicity and heartwarming flavors. The concept of turning noodles into a baked delight dates back to ancient times, with various cultures adopting their unique twists. The Baked Cream Cheese Spaghetti Casserole stands out as a modern take on these age-old traditions. Combining the classic appeal of spaghetti with creamy, cheesy goodness, this recipe has gained popularity for its convenience and delightful taste. The inclusion of cream cheese adds a luscious creaminess, setting it apart from the usual baked pasta dishes associated with Italian cooking.

### **Why It Stands Out**

This recipe is a standout for several reasons. It’s incredibly versatile, making it suitable for family dinners, potlucks, and holiday gatherings. The creamy texture and cheesy topping offer a comforting indulgence that appeals to both adults and children. Moreover, its intuitive preparation process makes it accessible to cooks of all skill levels. As a bonus, it can be prepared ahead of time, allowing you to spend less time in the kitchen and more time enjoying the company of your loved ones.

### **Ingredients Breakdown**

– **Spaghetti (1 lb):** The foundation of the dish. Opt for whole wheat or gluten-free pasta for dietary adjustments.
– **Marinara Sauce (1 jar):** Provides a tangy base that complements the creamy elements. Homemade or store-bought options work well.
– **Cream Cheese (8 oz, softened):** Adds a rich, creamy texture that binds the casserole together.
– **Parmesan Cheese (1/2 cup, grated):** Infuses a nutty, sharp flavor that enhances the dish.
– **Mozzarella Cheese (1/2 cup, shredded):** Melts beautifully to create a golden, bubbly topping.
– **Garlic Powder (1/2 tsp) and Onion Powder (1/2 tsp):** Essential for adding depth of flavor.
– **Salt and Pepper (to taste):** Balances and elevates the overall taste.
– **Fresh Basil (chopped, for garnish):** Provides a fresh, aromatic finish.

#### **Substitution Options:**

– Use whole grain or gluten-free spaghetti to meet dietary needs.
– Swap mozzarella for cheddar or provolone for a different cheesy flavor.
– Substitute marinara with alfredo for a creamier variation.

### **Step-by-Step Instructions**

1. **Preheat and Prep:** Preheat your oven to 350°F. Grease a 9×13 baking dish to prevent sticking.
2. **Cook Pasta:** Prepare the spaghetti as per package instructions until al dente. Drain and return it to the pot.
3. **Add Sauce:** Stir the marinara sauce into the spaghetti until it’s evenly coated.
4. **Cream Cheese Mixture:** Mix softened cream cheese, grated Parmesan, garlic powder, onion powder, salt, and pepper in a bowl until smooth.
5. **Combine:** Add the cream cheese mixture to the pasta, ensuring every strand is well-coated.
6. **Assemble:** Transfer to the greased baking dish. Sprinkle mozzarella on top for that irresistible cheesy crust.
7. **Bake:** Cover with foil and bake for 30 minutes. Remove foil and bake for another 10-15 minutes, allowing the cheese to melt and bubble.
8. **Garnish and Serve:** Sprinkle fresh basil over the top for a burst of freshness before serving.

### **Tips for Customization**

– **Vegetarian Option:** Add mushrooms, zucchini, or bell peppers for extra nutrition.
– **Protein Boost:** Incorporate cooked chicken, ground beef, or sausage for added heartiness.
– **Spice It Up:** Introduce red pepper flakes or diced jalapeños for a spicy kick.

### **Nutritional Value & Pairings**

While this dish is indulgent, it offers a balance of protein and carbohydrates. To complement the casserole, consider serving it with a fresh green salad or steamed vegetables. For a truly comforting meal, pair it with crusty garlic bread. For drinks, a light red wine such as Chianti or a sparkling lemonade works beautifully.

### **Common Mistakes to Avoid**

– **Overcooking Pasta:** Ensure pasta is cooked al dente to avoid a mushy texture after baking.
– **Insufficient Mixing:** Thoroughly combine the cream cheese mixture with the pasta for consistent flavor.
– **Skimping on Seasoning:** Properly season the dish to enhance its flavors.

### **FAQs**

1. **Can I prepare this casserole ahead of time?**
Yes, assemble the casserole a day in advance, cover, and refrigerate. Bake just before serving.

2. **Is there a way to make this dish healthier?**
Opt for whole grain spaghetti, reduce the amount of cheese, and add more vegetables.

3. **How do I store leftovers?**
Store in an airtight container in the refrigerator for up to 3 days. Reheat in the oven or microwave until warm.

4. **Can I freeze this casserole?**
Yes, freeze the assembled, unbaked casserole. Thaw overnight in the refrigerator before baking.

5. **What if I don’t have fresh basil?**
Dried basil, parsley, or oregano can be used as alternatives for garnish.

6. **How do I prevent the top from burning?**
Keep it covered with foil during initial baking, removing it only to brown the cheese.

### **Closing Section**

This Baked Cream Cheese Spaghetti Casserole is more than just a meal; it’s an experience. It’s about filling your home with warmth, creating joyous memories, and savoring every bite. We invite you to try this recipe, tweak it to your liking, and share your culinary journey with us. Gather your ingredients, preheat that oven, and let the magic unfold.

### **Recipe Card**

– **Prep Time:** 15 minutes
– **Cook Time:** 45 minutes
– **Total Time:** 1 hour
– **Servings:** 6
– **Calories:** Approximately 450 per serving

**Ingredients:**
– 1 lb spaghetti
– 1 jar marinara sauce
– 8 oz cream cheese, softened
– 1/2 cup grated Parmesan cheese
– 1/2 cup shredded mozzarella cheese
– 1/2 tsp garlic powder
– 1/2 tsp onion powder
– Salt and pepper to taste
– Fresh basil, chopped (for garnish)

**Instructions:**
1. Preheat oven to 350°F and grease a 9×13 baking dish.
2. Cook spaghetti per package directions until al dente. Drain and return to pot.
3. Stir in marinara sauce until spaghetti is coated.
4. Mix cream cheese, Parmesan, garlic powder, onion powder, salt, and pepper.
5. Combine with spaghetti and transfer to a baking dish.
6. Top with mozzarella and cover with foil.
7. Bake for 30 minutes, remove foil, bake for 10-15 minutes more until bubbly.
8. Garnish with basil before serving.

Try it today and revel in the joy of homemade comfort food!

#BakedSpaghetti #CreamCheeseCasserole #CheesyPasta #FamilyFavorite #ComfortFood #EasyRecipes #DinnerIdeas #PastaLovers #CookWithLove

Irresistible Cheesy Garlic Chicken Wraps for Quick and Delicious Meals

“`html

Cheesy Garlic Chicken Wraps: A Flavor Explosion in Every Bite

Indulge in the mouthwatering taste of Cheesy Garlic Chicken Wraps, a delightful fusion of savory chicken, gooey cheese, and zesty garlic. Perfect for a quick weekday meal or a game day snack, these wraps combine vibrant flavors in an easy-to-make format that will have everyone asking for more.

Why You’ll Love This Recipe

These Cheesy Garlic Chicken Wraps are not only incredibly delicious but also versatile and easy to prepare. The creamy cheese and aromatic garlic elevate the chicken to new culinary heights, making this a crowd-pleaser at any gathering. Whether you’re hosting a casual get-together or looking for a meal that can be prepped in advance, this recipe stands out for its simplicity and flavor-packed punch.

Designed to suit any palate, the combination of ingredients offers a comforting, yet gourmet taste. Ideal for busy weeknights, this recipe ensures you can serve up something special without spending hours in the kitchen.

Context/Background

The origin of wraps can be traced back to various culinary traditions across the world. Particularly popular in the Mediterranean and Middle Eastern regions, wraps have been embraced globally for their convenience and adaptability. The Cheesy Garlic Chicken Wrap is a modern twist, incorporating classic American flavors with a nod to time-honored techniques, like the simple grilling of chicken to enhance its natural juices and flavors.

Recipe Details

Serves: 4

Prep Time: 15 minutes

Cook Time: 20 minutes

Total Time: 35 minutes

Ingredients

  • 2 cups cooked chicken, shredded
  • 1 cup shredded cheddar cheese
  • 2 tablespoons butter
  • 3 cloves garlic, minced
  • 1 teaspoon Italian seasoning
  • 4 large tortillas
  • Salt and pepper to taste
  • Optional: chopped parsley for garnish

Directions

  1. In a skillet, melt the butter over medium heat. Add the minced garlic and cook for 1-2 minutes until fragrant.
  2. Add the shredded chicken, Italian seasoning, salt, and pepper to the skillet. Stir to combine and cook until heated through.
  3. Remove the skillet from heat and mix in the shredded cheddar cheese until well incorporated.
  4. Lay a tortilla flat and spoon a quarter of the chicken mixture onto the center of the tortilla.
  5. Roll the tortilla up tightly and place seam side down on a plate. Repeat with the remaining tortillas and chicken mixture.
  6. Optional: Place the wraps back in the skillet on low heat to crisp the outside and ensure the cheese is melted, about 2-3 minutes per side.

Tips for Perfect Cheesy Garlic Chicken Wraps

  • Ensure tortillas are fresh to prevent cracking while rolling.
  • Adjust garlic to taste; more if you prefer a stronger flavor.
  • Experiment with different cheeses for a unique taste.
  • Grill the wraps lightly for additional crunch.

Serving Suggestions

Pair these wraps with a fresh side salad or crispy potato wedges for a complete meal. They also work brilliantly as a party appetizer or a picnic treat, easy to grab and devour.

Storage and Leftovers

Store any leftover wraps in an airtight container in the refrigerator for up to 3 days. Reheat in a skillet over medium heat, or enjoy them cold. Wraps can also be frozen for up to a month; simply thaw overnight before reheating.

Final Thoughts

Cheesy Garlic Chicken Wraps are not just a recipe; they’re an experience. Quick to prepare and packed with flavors, they are perfect for any occasion. Gather your ingredients and treat yourself to these delectable wraps—you’ll love every bite!

Recipe Notes

  • Substitute cheddar cheese with mozzarella for a milder flavor.
  • Add sliced jalapeños for a spicy kick.
  • Use whole wheat or spinach tortillas for a healthier variant.

“`

Discover the Secret to Incredibly Juicy Turkey Fillet

“`html

Incredibly Juicy Turkey Fillet: A Flavorful Delight You Can’t Resist

Discover the secret to cooking an incredibly juicy turkey fillet that bursts with flavors in every bite. Whether you’re planning a festive dinner or simply looking for a nourishing meal, this recipe promises deliciousness that stands out. Perfectly seasoned and cooked to perfection, the main keyword here is clearly juicy turkey fillet.

Why You’ll Love This Recipe

This incredibly juicy turkey fillet recipe is perfect for both special occasions and everyday meals. It highlights the natural tenderness and mild flavor of turkey, transforming it into an extraordinary dish with just the right amount of herbs and spices. Whether you’re a seasoned cook or a beginner, this recipe is straightforward and rewarding, ensuring that the turkey is the star of your meal.

The dish is versatile and pairs beautifully with various sides, making it ideal for Thanksgiving, Christmas, or a simple family dinner. Its health benefits, including being a great source of lean protein, make it a favorite for anyone conscious about their dietary intake without compromising on taste.

Context/Background

The turkey fillet, a cut from the bird’s breast, is known for its lean meat and adaptability to numerous cooking styles. While turkey has been a staple in North American cuisine, particularly during festive holidays, it is also gaining popularity worldwide. The technique of brining or marinating before cooking enhances the flavor profile, ensuring a juicy result. This approach has historical roots in many cooking traditions designed to make lean meats more palatable.

Recipe Details

Serves: 4

Prep Time: 15 minutes

Cook Time: 25 minutes

Total Time: 40 minutes

Ingredients

  • 4 turkey fillets (about 200g each)
  • 2 tablespoons olive oil
  • 1 teaspoon salt
  • 1/2 teaspoon black pepper
  • 1 teaspoon garlic powder
  • 1 teaspoon paprika
  • 1 tablespoon fresh lemon juice
  • 1 tablespoon fresh rosemary, chopped

Directions

  1. Preheat your oven to 375°F (190°C).
  2. In a small bowl, mix together olive oil, salt, pepper, garlic powder, paprika, lemon juice, and rosemary.
  3. Place the turkey fillets in a shallow dish and pour the marinade over them. Make sure each fillet is well coated. Let them marinate for at least 10 minutes.
  4. Heat a large skillet over medium-high heat. Add the turkey fillets and sear for 3 minutes on each side until golden.
  5. Transfer the fillets to a baking dish and bake in the preheated oven for 15-20 minutes or until the internal temperature reaches 165°F (74°C).
  6. Remove from the oven and let rest for a few minutes before serving.

Tips for Perfect Incredibly Juicy Turkey Fillet

  • Make sure to marinate the fillets to enhance their flavor and moistness.
  • Use a meat thermometer to check doneness, ensuring the meat stays juicy.
  • Let the turkey rest after cooking to redistribate its juices.
  • Consider brining the fillets overnight for even more flavor absorption.

Serving Suggestions

Serve your incredibly juicy turkey fillet with roasted vegetables, mashed potatoes, or a fresh green salad. It also pairs wonderfully with cranberry sauce for a classic touch.

Storage and Leftovers

Store leftovers in an airtight container in the refrigerator for up to 3 days. Reheat gently in the oven or on the stovetop to maintain moisture. You can also use leftover turkey fillets in sandwiches or salads.

Final Thoughts

This incredibly juicy turkey fillet recipe is a surefire way to impress your family and friends with minimal effort. Its juicy and flavorful profile will have everyone asking for seconds. Give this recipe a try, and enjoy the compliments.

Recipe Notes

  • Substitute rosemary with thyme or oregano for a different herb flavor.
  • Adjust seasonings to taste if you prefer a spicier dish.
  • Marinate fillets overnight in the refrigerator for enhanced flavor.

“`

Delicious Cheesy Garlic Chicken Wraps for Quick and Easy Meals

Cheesy Garlic Chicken Wraps: A Flavor-Packed Delight

Who can resist the mouthwatering allure of Cheesy Garlic Chicken Wraps? These delicious wraps combine succulent chicken, melty cheese, and a punch of garlic that is sure to tantalize your taste buds. Perfect for a quick lunch or a simple dinner, this dish is as satisfying as it is flavorful.

Why You’ll Love This Recipe

These Cheesy Garlic Chicken Wraps are perfect for any occasion, offering an ideal blend of convenience and taste. Whether you’re looking for a speedy weeknight meal or a delightful picnic option, these wraps are sure to impress. With a crispy exterior and gooey, cheesy filling, they are a surefire hit among kids and adults alike.

The seamless combination of garlic-infused chicken with stretchy cheese creates a symphony of flavors that few can resist. Plus, the versatility of wraps means they can be customized to suit any dietary needs or flavor preferences.

Context/Background

The concept of wraps is versatile and global, with many cuisines worldwide offering their unique takes. Our Cheesy Garlic Chicken Wrap variant draws inspiration from classic Mediterranean flavors, focusing on aromatic garlic and hearty cheese combined with tender chicken.

Over time, wraps have become a staple for those seeking a quick yet satisfying meal option. This recipe stands out due to its simple preparation and irresistible flavor profile.

Recipe Details

Serves: 4

Prep Time: 15 minutes

Cook Time: 20 minutes

Total Time: 35 minutes

Ingredients

  • 2 cups cooked chicken, shredded
  • 1 tablespoon olive oil
  • 2 cloves garlic, minced
  • 1 cup shredded mozzarella cheese
  • 4 large flour tortillas
  • Salt and pepper to taste
  • 1 teaspoon dried oregano
  • Optional: fresh parsley for garnish

Directions

  1. In a skillet, heat olive oil over medium heat. Add minced garlic and cook until fragrant, about 1 minute.
  2. Add shredded chicken to the skillet and season with salt, pepper, and oregano. Toss well to combine.
  3. Remove from heat and stir in the mozzarella cheese until well combined and melted.
  4. Lay tortillas flat and equally divide the cheesy chicken mixture among them.
  5. Wrap the tortillas tightly, folding in the sides to secure the filling.
  6. In a clean skillet, toast the wraps over medium heat for 2-3 minutes on each side until golden and crispy.
  7. Remove from heat, sprinkle with parsley if desired, and serve immediately.

Tips for Perfect Cheesy Garlic Chicken Wraps

  • Use freshly minced garlic for a more robust flavor.
  • For extra crispiness, lightly brush the outside of the wraps with olive oil before toasting.
  • Experiment with different cheeses like cheddar or Monterey Jack for varied flavors.
  • Ensure the chicken is shredded finely for even distribution of flavors.

Serving Suggestions

Pair these Cheesy Garlic Chicken Wraps with a side of fresh salad or crunchy potato chips for a complete meal. They also go wonderfully with a side of tangy salsa or spicy dipping sauce.

Storage and Leftovers

Store any leftover wraps in an airtight container in the refrigerator for up to 3 days. To reheat, place them in a skillet over low heat until warmed through. Avoid microwaving to retain the crispiness of the wraps.

Final Thoughts

These Cheesy Garlic Chicken Wraps are a fantastic fusion of flavor and convenience, sure to become a family favorite. With easy preparation and a taste that delights, they’re perfect for satisfying food cravings both quickly and deliciously. Try this recipe, and you’ll understand why it’s a hit!

Recipe Notes

  • For a spicier twist, add a pinch of red pepper flakes during cooking.
  • Swap the flour tortillas for whole wheat or spinach varieties to adjust for dietary preferences.
  • Add in your favorite vegetables, like bell peppers or spinach, for extra nutrition.

Discover the Secret to Cooking Incredibly Juicy Turkey Fillet

“`html

Incredibly Juicy Turkey Fillet: The Ultimate Tender Delight 🔥✨

Discover the art of creating an incredibly juicy turkey fillet that will delight your taste buds and leave your guests craving for more. This succulent dish is not only the perfect centerpiece for any occasion but also a testament to the wonderful flavors and textures turkey has to offer when prepared right.

Why You’ll Love This Recipe

This incredible juicy turkey fillet is a game-changer when it comes to flavor and tenderness. The dish is perfectly seasoned, providing a mouth-watering experience with every bite. Whether you’re hosting a family gathering or enjoying a quiet dinner at home, this turkey fillet promises to be a winner every time.

One of the best aspects is its versatility. The juicy turkey fillet pairs well with a variety of sides, making it a flexible choice for meals year-round. Plus, it’s a healthier option when compared to more traditional cuts, ensuring you enjoy without the guilt.

Finally, thanks to easy preparation and cooking methods, this dish allows even novice chefs to present a stunning meal with minimal effort. Say goodbye to dry, bland turkey and hello to a juicy fillet that steals the show!

Context/Background

The turkey fillet, while not as commonly spotlighted as the full turkey roast, has been cherished for its lean, tender qualities. Originating as an alternative to the often-overcooked whole turkey, this cut offers simplicity in preparation without sacrificing taste or nutrition. The turkey fillet has gained popularity for its versatility in modern cuisine, ideal for both everyday meals and festive occasions.

Utilizing a marinating technique that infuses flavors deeply, this dish showcases the importance of balancing spices and herbs. Techniques have evolved from various regions, enhancing the natural taste of turkey and ensuring a moist, delicious outcome.

Recipe Details

Serves: 4
Prep Time: 15 minutes
Cook Time: 30 minutes
Total Time: 45 minutes

Ingredients

  • 2 turkey fillets (approximately 250g each)
  • 2 tablespoons olive oil
  • 1 teaspoon garlic powder
  • 1 teaspoon onion powder
  • 1 teaspoon paprika
  • Salt and pepper to taste
  • Juice of 1 lemon
  • Fresh herbs for garnish (optional)

Directions

  1. Preheat your oven to 375°F (190°C).
  2. In a small bowl, mix olive oil, garlic powder, onion powder, paprika, salt, and pepper.
  3. Place the turkey fillets in a baking dish and thoroughly coat with the olive oil mixture.
  4. Squeeze lemon juice over the turkey fillets for added flavor.
  5. Bake in preheated oven for 25-30 minutes, or until the internal temperature reaches 165°F (75°C).
  6. Allow the fillets to rest for 5 minutes before slicing.
  7. Garnish with fresh herbs if desired, and serve hot.

Tips for Perfect Incredibly Juicy Turkey Fillet

  • Ensure fillets are of even thickness to cook uniformly.
  • Use a meat thermometer to prevent overcooking.
  • Marinate the fillets for at least 2 hours or overnight for more intense flavor.
  • Rest the turkey fillets after cooking to retain juices.

Serving Suggestions

Pair this juicy turkey fillet with a fresh green salad, roasted vegetables, or a creamy mashed potato to complement the flavors. It also works wonderfully as a filling for sandwiches or wraps, perfect for lunch the next day.

Storage and Leftovers

Store any leftover turkey fillet in an airtight container in the refrigerator for up to 3 days. To reheat, slice the fillet and gently warm in a skillet over medium-low heat to preserve moisture.

Final Thoughts

This incredibly juicy turkey fillet is not only a crowd-pleaser but a testament to how delightful turkey can be when cooked correctly. Whether you’re new to cooking turkey or a seasoned pro, this recipe is accessible, straightforward, and utterly delicious. Give it a try and transform your dining experience!

Recipe Notes

  • Substitute turkey with chicken fillets if desired, adjusting cooking time as necessary.
  • For additional flavor, add a splash of white wine to the marinade.
  • Experiment with different herbs such as thyme or rosemary for varied tastes.

“`

Irresistible Cheesy Garlic Chicken Wraps: Quick and Delicious Recipe

“`html

Cheesy Garlic Chicken Wraps: A Flavor-Packed Delight

Welcome to the ultimate comfort food experience with our Cheesy Garlic Chicken Wraps. These wraps are packed with succulent chicken, creamy cheese, and a hit of garlic that will have your taste buds dancing. Whether you’re looking for a quick lunch or an easy dinner, these wraps are a tasty solution that will leave you and your family satisfied.

Why You’ll Love This Recipe

These Cheesy Garlic Chicken Wraps are perfect for any occasion. Imagine biting into a wrap that’s warm, gooey, and bursting with flavors – something that pairs perfectly with a movie night or a casual gathering with friends. The combination of garlic’s aromatic zing and the richness of melted cheese provides a mouthwatering twist that everyone will enjoy.

Moreover, this recipe is incredibly versatile. You can prepare it as a hearty meal or a simple snack; either way, these wraps will capture your heart and appetite. Their portability makes them ideal for on-the-go meals, ensuring every bite is as delightful as the last.

Context/Background

The concept of wrapping delicious fillings in flatbreads is ancient, dating back to the time when the wrap itself was created to make food portable and easy to eat without utensils. These Cheesy Garlic Chicken Wraps take inspiration from various culinary traditions, merging familiar flavors into something exciting yet comforting.

While the specific origin of Cheesy Garlic Chicken Wraps is modern and likely an inventive twist of contemporary fusion cuisine, they bring together beloved flavors of garlic, chicken, and cheese in a way that feels universal and timeless.

Recipe Details

Serves: 4

Prep Time: 15 minutes

Cook Time: 20 minutes

Total Time: 35 minutes

Ingredients

  • 2 cups cooked chicken breast, shredded
  • 1 cup shredded mozzarella cheese
  • 2 tablespoons olive oil
  • 3 cloves garlic, minced
  • 1/4 cup fresh parsley, chopped
  • 4 large tortillas or wraps
  • Salt and pepper to taste
  • Optional: Hot sauce for added spice

Directions

  1. Heat olive oil in a skillet over medium heat. Add garlic and cook until fragrant, about 1 minute.
  2. Add shredded chicken to the skillet. Season with salt and pepper, stirring to combine with the garlic. Cook for 3-4 minutes.
  3. Remove the skillet from heat and stir in chopped parsley.
  4. Lay out tortillas and evenly distribute the chicken mixture onto each one.
  5. Sprinkle mozzarella cheese over the chicken mixture. If desired, add a dash of hot sauce.
  6. Roll each tortilla tightly around the filling, tucking in the ends.
  7. Heat a non-stick skillet over medium heat. Place wraps seam-side down and cook until golden and cheese has melted, about 2-3 minutes per side.
  8. Slice in half and serve warm.

Tips for Perfect Cheesy Garlic Chicken Wraps

  • Use freshly minced garlic for the most robust flavor.
  • Ensure the chicken is evenly shredded for consistent texture.
  • Warm tortillas slightly before rolling to prevent cracking.
  • Don’t overfill the wraps to make rolling easier and prevent spills.

Serving Suggestions

Pair these Cheesy Garlic Chicken Wraps with a fresh side salad or crispy potato wedges for a complete meal. They also taste great with a cooling yogurt or mint dip.

Storage and Leftovers

Store any leftover wraps in an airtight container in the refrigerator for up to 3 days. To reheat, place in a skillet over medium heat until warmed through and cheese is melty again.

Final Thoughts

If you’re looking for a delicious and easy recipe that promises flavor in every bite, these Cheesy Garlic Chicken Wraps are definitely worth trying. They’re simple, satisfying, and bound to become a family favorite.

Recipe Notes

  • You can substitute mozzarella with cheddar or any cheese of your choice to tailor the taste to your preference.
  • For a vegetarian version, replace chicken with mushrooms or sautéed vegetables.

“`