
Table of Contents
Homemade Crunch Bars: The Only Recipe You’ll Ever Need
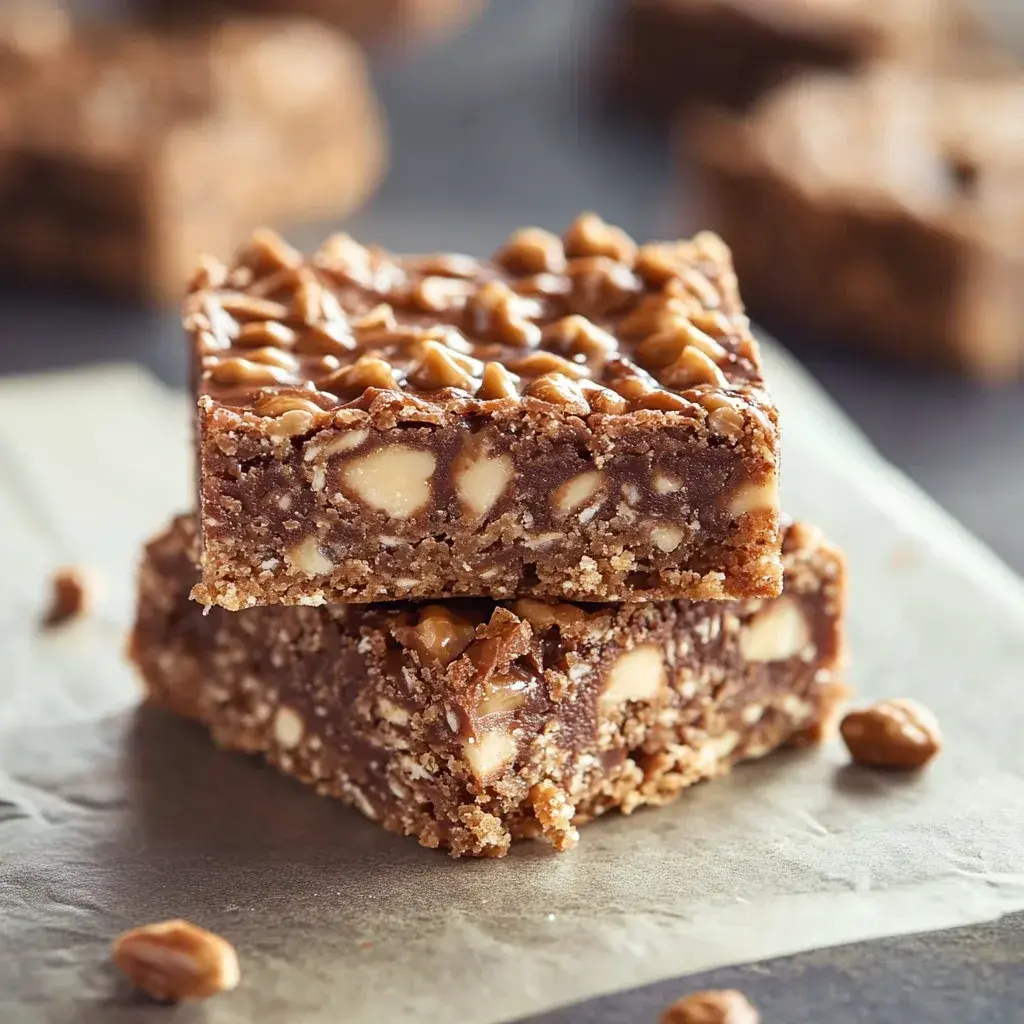
If you’re craving a quick, irresistible treat that requires no oven and minimal effort, look no further than these Homemade Crunch Bars. Imagine satisfying your sweet tooth with a perfect blend of crispy rice cereal and velvety chocolate, all coming together in under 40 minutes. This no-bake wonder is ideal for busy parents, novice bakers, or anyone seeking a foolproof dessert that delivers maximum flavor with zero hassle. Whether it’s for a family snack, party favor, or midnight indulgence, Homemade Crunch Bars are the ultimate easy recipe to master, promising a delightful crunch in every bite.
The allure of Homemade Crunch Bars lies in their sensational textures and flavors that dance on your palate. Each bar boasts a satisfying crunch from the rice cereal, contrasted beautifully with the smooth, rich melt of chocolate and marshmallows. As you bite in, you’ll experience the buttery richness that coats every piece, releasing hints of sweetness with a subtle depth from the chocolate chips. The aroma of melting chocolate fills the air, evoking cozy evenings and simple joys, making these bars not just a treat but a sensory escape that builds excitement with every preparation step.
What sets this Homemade Crunch Bars recipe apart on cookingwithemy.com is our commitment to making it the most reliable and beginner-friendly version you’ll find anywhere. Drawing from years of testing and perfecting no-bake recipes, we’ve incorporated a Chef’s Secret that elevates the texture and taste beyond the ordinary. Readers will discover pro tips, ingredient spotlights, and common pitfalls to avoid, ensuring your bars turn out perfectly every time. Plus, we’ve included make-ahead strategies and FAQs to build your confidence in the kitchen—let’s dive into this no-bake magic and make your baking dreams come true.
Why This Homemade Crunch Bars Recipe is a Game-Changer
The Chef’s Secret: The unique angle of this recipe is its “No-Bake Magic,” which relies on gently melting the ingredients over low heat to preserve the crispiness of the rice cereal while achieving a perfectly cohesive bar. This technique prevents the mixture from becoming overly sticky or losing its texture, something many recipes overlook. By melting the butter, chocolate chips, and marshmallows slowly, we ensure a silky base that coats the cereal evenly, resulting in bars that are chewy yet crunchy—elevating them from basic treats to gourmet-level delights.
Unbeatable Texture: The science behind the texture comes from the careful balance of fats and sugars in the unsalted butter and marshmallows. The butter creates a stable emulsion that binds everything together without making it greasy, while the marshmallows add a stretchy quality that sets into a firm yet tender structure upon refrigeration. This combination ensures the bars maintain their crunch for days, thanks to the low moisture content of the rice cereal, which absorbs just enough mixture to stay crisp.
Foolproof for a Reason: This recipe has been tested multiple times in real home kitchens to guarantee success, even for beginners. We’ve fine-tuned measurements and steps to account for common variables like ingredient temperatures, making it incredibly reliable. Expect consistent results with minimal cleanup, as the no-bake method keeps things simple and stress-free—turning what could be a messy endeavor into a joyful, repeatable process.
Ingredient Spotlight: Quality Makes the Difference
For rice cereal, this staple provides the signature crunch that makes Homemade Crunch Bars so addictive. Using 3 cups of high-quality rice cereal, like a brand that’s freshly crisp and free from additives, ensures your bars have that light, airy texture without sogginess. Quality matters because stale cereal can lead to a mushy final product, diminishing the overall appeal. If you’re substituting, opt for puffed rice or cornflakes for a similar effect, but avoid sweetened versions to keep the chocolate from overpowering the mix.
When it comes to chocolate chips, 1 cup of semi-sweet or dark varieties adds a rich, indulgent depth that balances the sweetness of the other ingredients. Choose chips from reputable sources with high cacao content for a more pronounced flavor and smoother melt. Quality chocolate elevates the bars by preventing a waxy texture, ensuring a luxurious mouthfeel. For substitutions, try chopped chocolate bars if chips aren’t available, or use milk chocolate for a milder taste, but be mindful that it might increase sweetness.
Unsalted butter, at 4 tablespoons, is crucial for binding the mixture without adding extra salt, allowing the chocolate and marshmallows to shine. Fresh, high-fat butter from quality sources melts evenly and contributes to a creamy consistency. Why quality matters: It prevents the bars from tasting greasy or off-flavor. A great substitution is coconut oil for a dairy-free option, which maintains the richness while adding a subtle tropical note, though it may slightly alter the firmness.
Mini marshmallows, requiring 2 cups, provide the gooey factor that holds everything together. Opt for fresh, name-brand marshmallows for optimal meltability and flavor, as they dissolve smoothly without lumps. Their role is to create a sticky base that sets perfectly in the fridge. For substitutions, vegan marshmallows work wonderfully for dietary needs, or you could use marshmallow fluff, but adjust quantities to avoid an overly sweet result—ensuring the bars remain balanced and delicious.
Optional toppings like nuts or sprinkles add a customizable flair, enhancing both texture and visual appeal. While not essential, using fresh, roasted nuts ensures they complement the crunch without overpowering the chocolate base. Quality matters for crunch and taste; substitute with seeds for a nut-free version, or dried fruit for added nutrition, allowing you to tailor the recipe to your preferences while keeping it versatile.
Step-by-Step Instructions
Step 1: Preparing the Baking Dish
Start by greasing an 8×8-inch baking dish with butter or a light cooking spray to prevent the mixture from sticking. Use a paper towel or your fingers to spread it evenly across the bottom and sides for a non-stick surface. This step ensures easy removal of the bars once set. Pro Tip: For the best results, chill the greased dish in the fridge for a minute—this helps the mixture set faster and maintain its shape.
Step 2: Melting the Butter and Chocolate Chips
In a medium saucepan over low heat, add 4 tablespoons of unsalted butter and 1 cup of chocolate chips. Stir constantly until they melt into a smooth, glossy mixture, which should take about 2-3 minutes. Avoid rushing this by keeping the heat low to prevent scorching. Common Mistake to Avoid: Don’t use high heat, as it can cause the chocolate to seize or burn, resulting in a grainy texture—always stir gently and remove from heat if it starts bubbling.
Step 3: Incorporating the Mini Marshmallows
Once the butter and chocolate are melted, stir in 2 cups of mini marshmallows until they are fully melted and combined, creating a thick, uniform mixture. This should happen quickly, about 1-2 minutes, as the residual heat does the work. Pro Tip: Use fresh marshmallows for the smoothest melt; if they’re old, they might clump, so cover the pan to trap heat without direct flame.
Step 4: Folding in the Rice Cereal
Gently fold in 3 cups of rice cereal using a spatula, ensuring every piece is evenly coated with the chocolate-marshmallow mixture. Work quickly but carefully to maintain the cereal’s crunch. Common Mistake to Avoid: Over-mixing can crush the cereal, leading to a dense bar—fold just until combined, like you’re tossing a salad, to preserve the texture.
Step 5: Pouring and Pressing the Mixture
Pour the coated mixture into your prepared 8×8-inch baking dish and use the back of a spoon or your hands (with parchment paper for protection) to press it down firmly into an even layer. Aim for about 1/2-inch thickness for uniform bars. Pro Tip: Lightly grease your pressing tool to avoid sticking, which helps achieve clean edges and professional-looking squares.
Step 6: Adding Optional Toppings
If desired, sprinkle on optional toppings like nuts or sprinkles while the mixture is still warm, gently pressing them in to adhere. This step adds extra flavor and visual appeal without altering the core recipe. Common Mistake to Avoid: Wait too long to add toppings, and they won’t stick properly—do this immediately after pouring for the best results.
Step 7: Refrigerating and Slicing
Refrigerate the dish for about 30 minutes until the bars are fully set and firm to the touch. Once chilled, remove from the fridge and slice into squares using a sharp knife for clean cuts. Pro Tip: Dip your knife in hot water and dry it before slicing to get neat, professional edges without crumbling the bars.
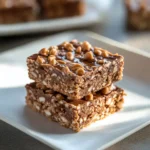
Serving & Presentation
Elevate your Homemade Crunch Bars by presenting them on a simple wooden board or festive platter, arranged in a grid for a visually appealing display. Add a sprinkle of sea salt or drizzle of melted chocolate as an impressive garnish to enhance the flavors and make them pop. For complementary pairings, serve these bars alongside fresh fruit like strawberries for a refreshing contrast, or pair with a scoop of vanilla ice cream to create a decadent dessert. They also shine as an afternoon snack with coffee or tea, making them versatile for casual gatherings or kids’ lunchboxes—experiment with themed presentations, like holiday sprinkles, to make every occasion special.
Make-Ahead & Storage Solutions
Make-Ahead Strategy: Prepare the mixture up to 3 days in advance by following the steps up to pouring into the dish, then cover and refrigerate the assembled bars. For components, you can melt and mix the butter, chocolate, and marshmallows ahead, storing in an airtight container in the fridge for up to 24 hours—reheat gently on the stove before adding cereal.
Storing Leftovers: To maintain maximum freshness, store cooled bars in an airtight container at room temperature for up to 3 days, or refrigerate for up to a week to preserve crunch. For longer storage, freeze the bars in a single layer on a baking sheet until solid, then transfer to a freezer-safe bag for up to 2 months—use parchment paper between layers to prevent sticking.
The Best Way to Reheat: To restore the original texture and flavor, let frozen bars thaw at room temperature for 10-15 minutes, or microwave individual pieces for 10 seconds at a time. Avoid overheating to keep the crunch intact—reheating in a low oven (250°F for 5 minutes) works for a warm, fresh-from-the-pan feel without melting.
Frequently Asked Questions (FAQ)
How do you make chocolate chip cookies from scratch?
While this recipe is for Homemade Crunch Bars, if you’re interested in chocolate chip cookies, start by creaming butter and sugar, then add eggs, vanilla, and dry ingredients like flour and baking soda. Mix in chocolate chips and bake at 375°F for 8-10 minutes. However, for crunch bars, focus on our no-bake method for a quicker alternative that delivers similar chocolatey goodness.
What can I substitute for butter in chocolate chip cookies?
For chocolate chip cookies, common butter substitutes include applesauce for a lower-fat option, coconut oil for a tropical twist, or vegan butter for dairy-free baking. In the context of Homemade Crunch Bars, you can swap butter for coconut oil to maintain the creamy texture, ensuring it melts smoothly over low heat without altering the no-bake magic.
How long should chocolate chip cookies bake in the oven?
Typically, chocolate chip cookies bake for 8-12 minutes at 350-375°F, depending on size and desired doneness. For our Homemade Crunch Bars, there’s no baking involved, so enjoy the convenience of a recipe that sets in the fridge, making it perfect for those avoiding the oven altogether.
What are some creative ways to serve chocolate chip cookies?
Chocolate chip cookies can be served warm with ice cream for sundaes, crumbled over yogurt for a breakfast treat, or used in cookie sandwiches with frosting. Similarly, for Homemade Crunch Bars, get creative by layering them in parfaits, topping with whipped cream, or even incorporating them into no-bake desserts for a fun twist on traditional servings.
Can these Homemade Crunch Bars be made gluten-free?
Absolutely! Use certified gluten-free rice cereal to make this recipe gluten-free. The rest of the ingredients, like chocolate chips and marshmallows, are typically gluten-free, but always check labels. This simple swap maintains the no-bake magic while accommodating dietary needs.
Are Homemade Crunch Bars suitable for kids?
Yes, these bars are kid-friendly and easy to customize with fun toppings like sprinkles. They’re a great way to involve children in the kitchen, teaching them basic mixing skills without any heat risks from baking.
How can I make this recipe healthier?
To healthify Homemade Crunch Bars, use dark chocolate chips for added antioxidants, reduce sugar by opting for less marshmallows, or incorporate nuts for protein. You could also swap in whole-grain cereal for extra fiber, keeping the recipe’s appeal while boosting nutrition.
Tried This Recipe? Leave a Comment!
Did you make this recipe? I’d love to hear how it turned out! Please leave a comment and a rating below. Your feedback helps other home cooks and supports cookingwithemy!
For more delicious inspiration, follow me on Pinterest!
Homemade Crunch Bars
Description
Homemade Crunch Bars are a deliciously easy no-bake treat, combining the crunch of rice cereal with rich chocolate. Perfect for any occasion, these bars will satisfy your sweet cravings effortlessly.
Ingredients
- 3 cupsrice cereal
- 1 cupchocolate chips (semi-sweet or dark)
- 4 tablespoonsunsalted butter
- 2 cupsmini marshmallows
- Optional toppings: nuts or sprinkles
Instructions
- Grease an 8×8-inch baking dish with butter or cooking spray.
- In a medium saucepan over low heat, melt the butter and chocolate chips until smooth.
- Stir in mini marshmallows until melted and fully combined with the chocolate mixture.
- Gently fold in rice cereal until evenly coated.
- Pour the mixture into the prepared baking dish and press down firmly to create an even layer.
- Add optional toppings before it cools completely, if desired.
- Refrigerate for about 30 minutes until set, then slice into squares.
Nutrition
- Calories: 170
- Sugar: 10g
- Fat: 8g
- Carbohydrates: 23g
- Protein: 2g
Conclusion
This delicious one-pot spaghetti offers a comforting blend of savory flavors from fresh tomatoes, herbs, and pasta, making it an ideal choice for quick family dinners or busy weeknights. Its simple preparation method ensures a hearty, satisfying meal without the hassle of multiple pots and pans. For a fun variation, try swapping in ground turkey for a lighter twist, and serve it with a sprinkle of Parmesan cheese for added indulgence. If you’re in the mood for more easy meals, you might also like our Crispy Homemade Chicken Nuggets or Panda Express Orange Chicken for equally effortless and tasty options.
