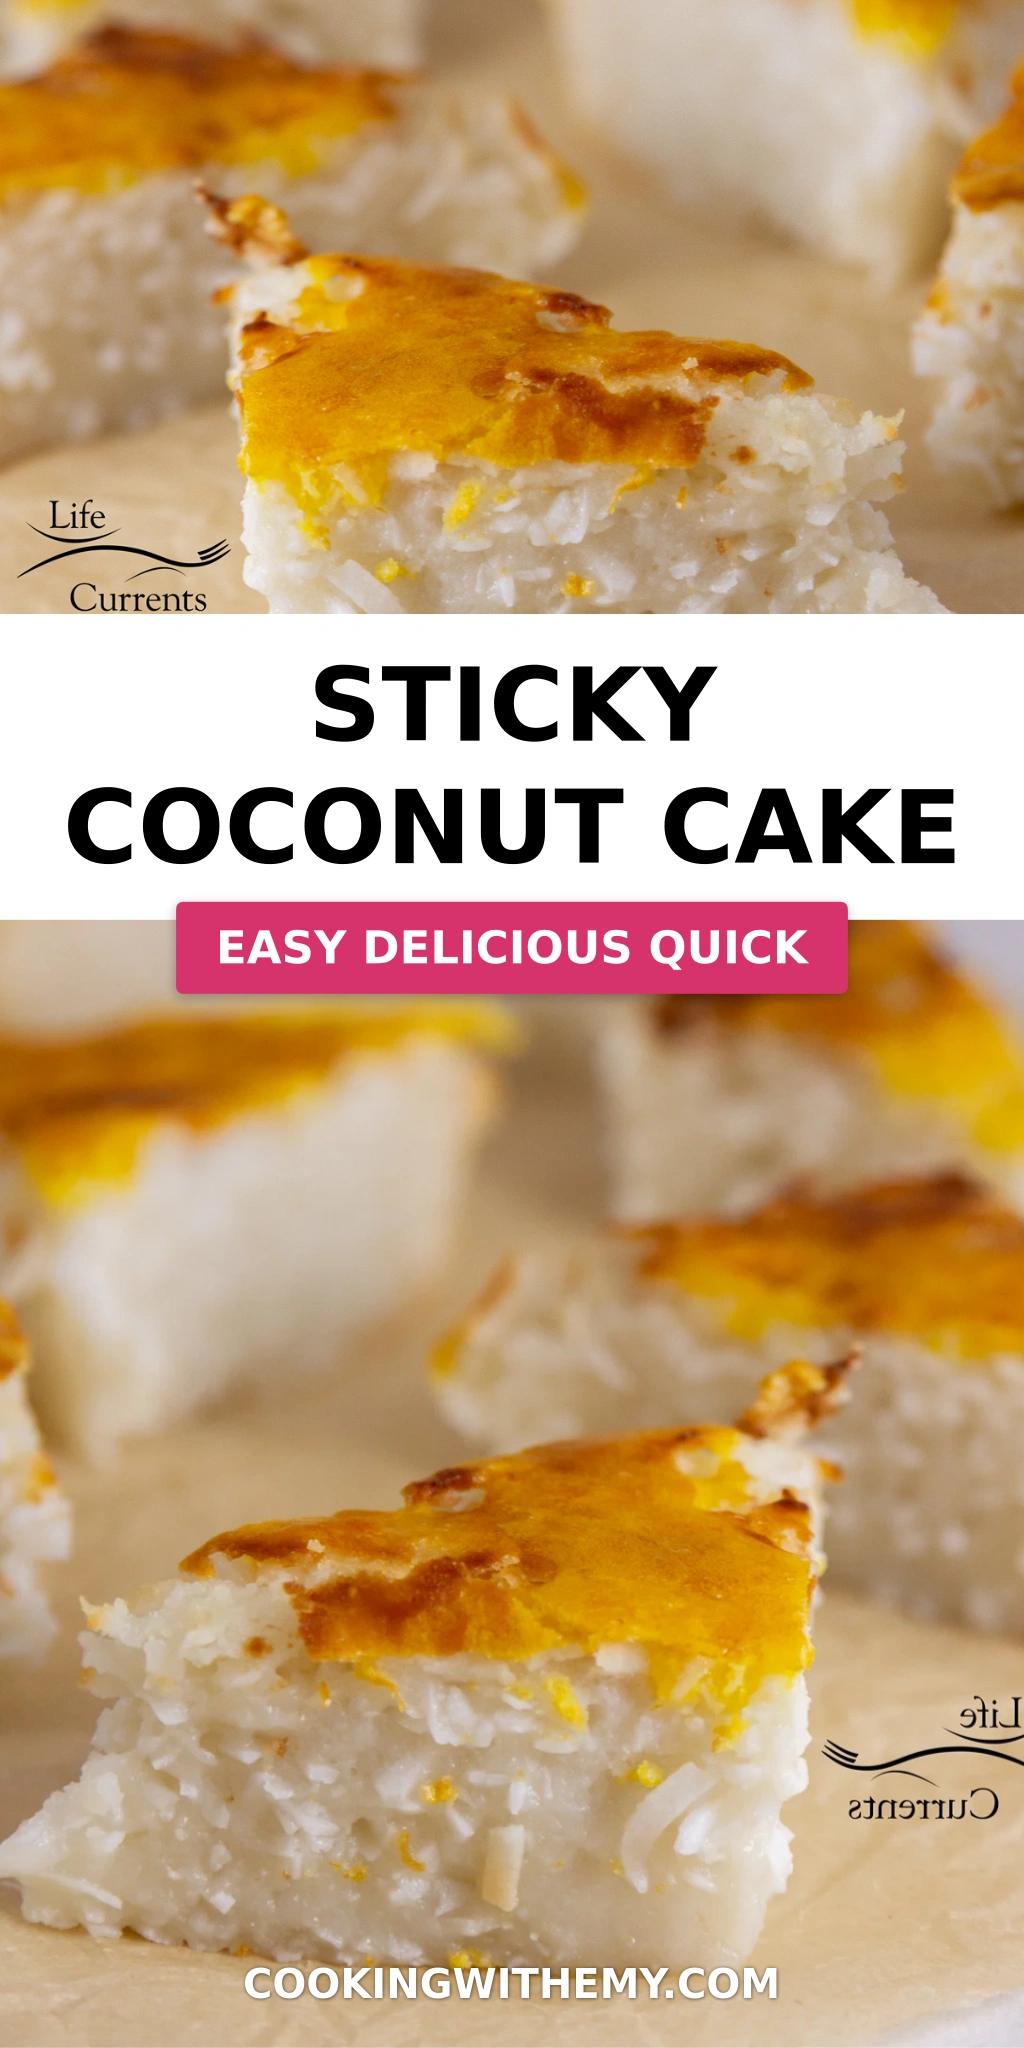
Sticky Coconut Cake (Wingko Babat) – Gluten-Free Indonesian Dessert

⚖️
Difficulty
Easy
⏲️
Prep Time
15 mins
🕒
Cook Time
55 mins
⏱️
Total Time
1 hr 10 mins
🍽️
Servings
12

I remember my first bite of sticky coconut cake—wingko babat—at a tiny Indonesian café in Queens. I had just moved to New York City from Paris, and the moment that sticky, coconut-scented bar hit my tongue, I was transported back to Morocco. My mother used to make a similar confection using semolina and coconut, but the Indonesian version, with its chewy glutinous rice flour and broiled golden top, was a revelation. This easy sticky coconut cake recipe is my tribute to that moment—a gluten-free dessert that’s both humble and utterly addictive. It’s the kind of homemade coconut cake that makes you close your eyes and savor every bite.

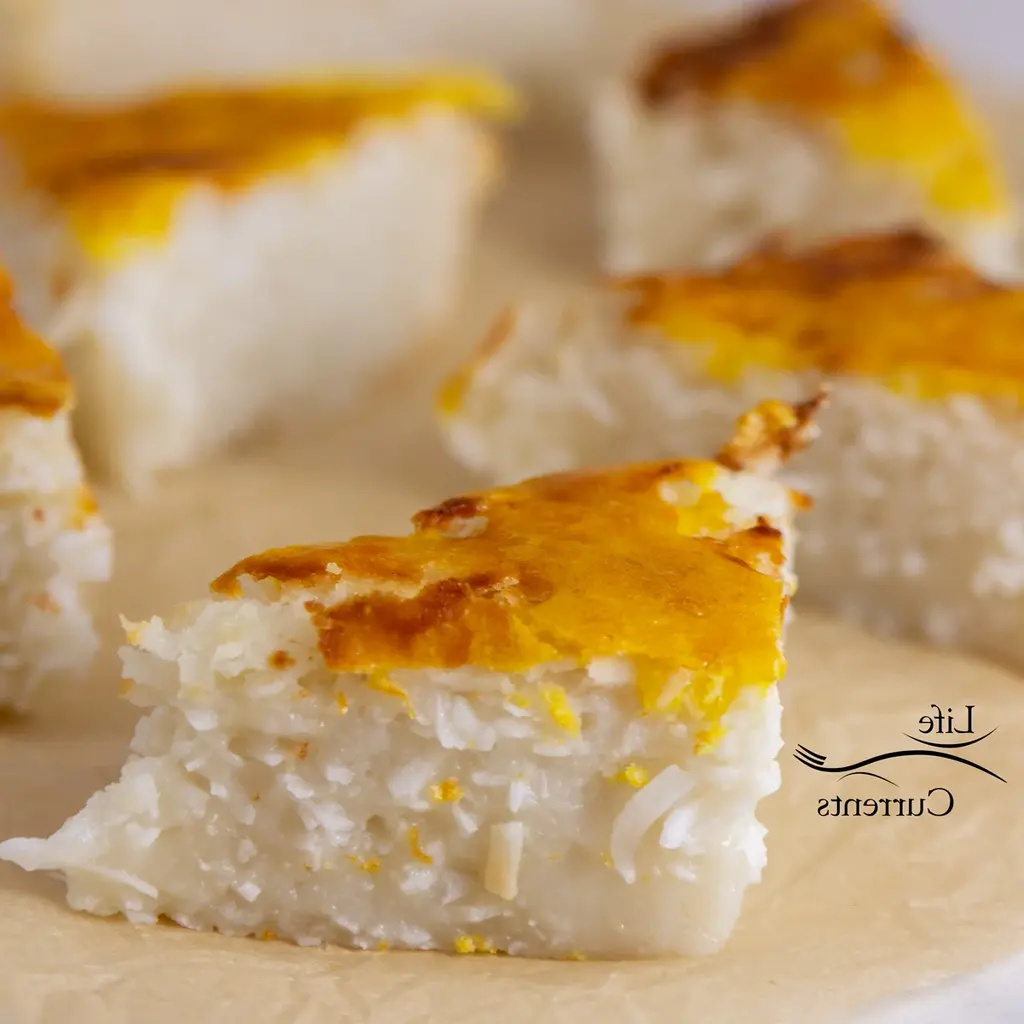
Imagine a dense, moist cake with a tender crumb and a sticky, caramelized surface from the broiled egg yolk glaze. The coconut flavor is front and center—sweet shredded coconut and rich coconut milk work together to create a tropical aroma that fills your kitchen. Each square or triangle yields to a soft, almost pudding-like interior, while the edges are just barely crisp. It’s a texture lover’s dream, and the simplicity of the ingredients—six items, most of which you probably already have—makes it a weeknight win.

I’ve tested this sticky coconut cake recipe dozens of times to make sure it’s foolproof. The key is chilling the cake overnight so it sets properly and develops that signature sticky texture. I’ll share my best pro tip to avoid a dense cake, and I’ll warn you about the one mistake that can turn your wingko babat into a soggy mess. If you’re a coconut lover, this moist coconut cake will become your new go-to dessert.

Why This Sticky Coconut Cake Recipe Is the Best

The Flavor Secret – Most wingko babat recipes are either too dry or too sweet. My version uses full-fat canned coconut milk (never light) and just the right amount of sugar to let the natural coconut shine. Growing up in Morocco, I learned that balance is everything: a pinch of vanilla extract rounds out the coconut without overpowering it. The egg yolk brushed on top before broiling adds a rich, savory note that cuts through the sweetness—a technique I picked up from a Parisian pastry chef.

Perfected Texture – Glutinous rice flour (also called sweet rice flour) is non-negotiable for that chewy, sticky crumb. I’ve tested cornstarch and regular rice flour as substitutes—they work, but the texture is noticeably less authentic. The overnight chill is crucial: it allows the starches to fully hydrate so the cake sets into a dense, sliceable block that’s still soft and tender. Skip this step and you’ll end up with a crumbly mess.

Foolproof & Fast – This easy sticky coconut cake comes together in one bowl. No electric mixer, no complicated folding. The batter is thin and liquidy—that’s normal. Just whisk, pour, bake, broil, and chill. Even if you’ve never made a gluten-free cake before, you’ll nail it on the first try. I’ve taught this to readers who had never baked from scratch, and they sent me photos of perfect wingko babat.

Sticky Coconut Cake Recipe Ingredients

I love shopping for these ingredients at my local Asian grocery in NYC’s Chinatown, where I can find glutinous rice flour in bulk. But you can grab everything at any well-stocked supermarket. A memory from Morocco: my mother would toast shredded coconut before adding it to desserts—that’s a step I sometimes add for extra depth, but this recipe keeps it simple.

Ingredients List

  • 2 eggs (separated)
  • 1¼ cup granulated sugar
  • 2¼ cup full-fat canned coconut milk
  • 3 cups shredded sweetened coconut
  • 1½ cup glutinous rice flour (also called sweet rice flour or mochiko)
  • 1 teaspoon vanilla extract

Ingredient Spotlight

Glutinous Rice Flour – This is the backbone of the cake. Despite its name, it’s gluten-free (glutinous refers to the sticky texture, not gluten). You can find it in the Asian aisle or online. Substitution: a 1:1 gluten-free all-purpose flour blend works, but the cake will be less chewy and more cake-like.

Full-Fat Canned Coconut Milk – Do not use light coconut milk or coconut cream. The fat content is essential for moisture and richness. If you only have coconut cream, dilute it with water (3 parts cream to 1 part water).

Shredded Sweetened Coconut – Unsweetened coconut will result in a less sweet cake; if you use it, increase sugar by ¼ cup. For the best texture, avoid desiccated coconut (too fine) and use the standard shreds found in the baking aisle.

Original Ingredient Best Substitution Flavor / Texture Impact
Glutinous rice flour 1:1 gluten-free all-purpose flour Less chewy, more cake-like; still good
Full-fat coconut milk Coconut cream + water (3:1) Slightly richer, still works
Sweetened shredded coconut Unsweetened shredded coconut + ¼ cup extra sugar Adjust sweetness; texture unchanged
Eggs Flax eggs (2 tbsp flaxmeal + 6 tbsp water) Slightly less structure; still binds

How to Make Sticky Coconut Cake – Step-by-Step

Don’t let the overnight chill intimidate you! The hands-on time is only about 15 minutes, and the results are so worth it. Follow these steps carefully, and you’ll have a perfect moist coconut cake every time.

Step 1: Prepare the Batter

Preheat your oven to 350°F. In a medium mixing bowl, whisk the egg whites and granulated sugar together until well combined and slightly frothy. No need to beat until stiff; just dissolve the sugar. Slowly pour in the coconut milk, shredded coconut, glutinous rice flour, and vanilla extract. Stir until everything is evenly mixed and no lumps of coconut or flour remain. The batter will be thin and liquidy—that’s exactly what you want.

💡 emy’s Pro Tip: To avoid lumps, whisk the flour into the liquid gradually and use a silicone spatula to break up any clumps of shredded coconut. A quick blitz with an immersion blender can save you if you see lumps.

Step 2: Bake the Cake

Pour the batter into an 8×8-inch baking pan lined with parchment paper (or greased). Bake for 45 minutes. The cake will look set around the edges but still slightly jiggly in the center. It should be pale golden on top. Don’t overbake; the residual heat will continue cooking as it cools.

⚠️ Common Mistake to Avoid: Opening the oven door too often. The temperature drop can cause the cake to sink or become dense. Trust the timer and peek only once near the end.

Step 3: Broil the Top

Carefully remove the pan from the oven. Using a pastry brush, brush the reserved egg yolks evenly over the surface of the hot cake. Switch your oven to broil (high) and place the pan on the top rack. Broil for 5–10 minutes, watching constantly. The top should turn a deep golden brown with some darker spots. Take it out the moment it’s golden—burnt sugar turns bitter.

💡 emy’s Pro Tip: If your broiler runs hot, rotate the pan halfway through for even browning. You can also use a kitchen torch to get a more controlled caramelized surface.

Step 4: Cool and Chill

Set the pan on a wire rack and let it cool completely to room temperature. Then wrap the pan tightly with plastic wrap and refrigerate for at least 8 hours, preferably overnight. This step is mandatory—it allows the cake to set into a firm yet tender block that can be cut cleanly into squares or triangles.

⚠️ Common Mistake to Avoid: Rushing the chill time. If you cut the cake after only 2–3 hours, it will be too soft and sticky to slice neatly. Patience pays off!

Step Action Duration Key Visual Cue
1 Prepare batter 5 min Thin, liquid, no lumps
2 Bake 45 min Set edges, jiggly center
3 Broil 5–10 min Deep golden brown top
4 Cool & chill 8 hrs–overnight Firm, sliceable, sticky

Serving & Presentation

This moist coconut cake shines when served cold or at room temperature. I love to cut it into triangles, just like my Moroccan mother would slice baklava, and arrange them on a wooden board. A dusting of toasted coconut flakes on top adds extra crunch and visual appeal. For a NYC brunch twist, serve it alongside a bowl of fresh tropical fruit—mango, papaya, or dragon fruit—and a dollop of coconut yogurt.

If you’re feeling nostalgic for Indonesia, pair it with a cup of strong black tea or a creamy iced latte. The sweetness of the cake balances bitterness beautifully. When I lived in Paris, we’d enjoy such treats with a tiny espresso; the contrast is sublime.

Pairing Type Suggestions Why It Works
Side Dish Fresh mango slices, grilled pineapple, coconut panna cotta Bright acidity cuts richness
Sauce / Dip Coconut caramel, chocolate ganache, lime syrup Adds moisture and flavor contrast
Beverage Hot black tea, iced latte, espresso, coconut water Balances sweetness; cleanses palate
Garnish Toasted coconut flakes, edible flowers, mint leaves Adds texture and visual pop

Make-Ahead, Storage & Reheating

This cake is a meal-prep dream. As a busy NYC blogger, I often bake it on Sunday, let it chill overnight, and slice it on Monday for the week ahead. The sticky texture actually improves after a day in the fridge.

Method Container Duration Reheating Tip
Refrigerator Airtight container Up to 5 days Serve cold; don’t reheat
Freezer Wrap tightly in plastic + foil Up to 3 months Thaw in fridge overnight; serve cold
Make-Ahead Bake, cool, chill in pan Up to 2 days in advance Slice just before serving

I don’t recommend reheating this cake—it’s best enjoyed cold or at room temperature. The fridge firmness is part of its charm. If you prefer a softer texture, let it sit out for 15 minutes before eating. The sticky, moist interior stays wonderful for days.

Variations & Easy Swaps

Variation Key Change Best For Difficulty Impact
Pandan Infusion Add 1 tsp pandan extract + a few drops green food coloring Aromatic twist; beautiful color No change
Vegan Version Use flax eggs (2 tbsp flaxmeal + 6 tbsp water) and skip egg yolk glaze; brush with melted coconut oil Fully plant-based Slightly less sticky top
Chocolate Swirl Melt ½ cup dark chocolate chips and swirl into batter before baking Decadent dessert Minimal extra effort

Pandan Infusion

Pandan, the “vanilla of Southeast Asia,” pairs beautifully with coconut. I discovered it at a Thai market in Elmhurst, Queens. Add a teaspoon of pandan extract and a drop of green food coloring to the batter. The resulting cake has a floral, grassy aroma that elevates the whole dessert. It’s a hit at parties—guests always ask what that mysterious flavor is.

Vegan Version

For a plant-based take, replace the eggs with flax eggs. The texture will be slightly less firm, but still delicious. Skip the egg yolk glaze and brush the top with melted coconut oil before broiling—it won’t be as sticky, but it will still brown beautifully. I tested this for a friend’s vegan wedding shower and it disappeared in minutes.

Chocolate Swirl

A chocolate-coconut combination that my Parisian pastry chef mentor would approve. Melt ½ cup of dark chocolate chips with a tablespoon of coconut oil, then gently swirl it into the batter with a knife before baking. The chocolate pockets create a delightful contrast against the sweet coconut. I love using a single-origin chocolate from a Brooklyn roaster.

FAQ

How do you make a sticky coconut cake without it being too dense?

The key to avoiding a dense sticky coconut cake is not overmixing the batter and using the correct ratio of liquid to flour. Whisk just until the ingredients are combined—overworking the glutinous rice flour can make the cake heavy. Also, make sure your coconut milk is full-fat; light coconut milk adds too much water, which can lead to a gummy, dense texture. Finally, don’t skip the overnight chill; it allows the starches to relax and the cake to set into a tender, sliceable block. If your cake turns out dense, you may have used too much glutinous rice flour or not enough coconut milk.

Can I substitute coconut milk for coconut cream in a sticky coconut cake?

Yes, you can substitute coconut cream for coconut milk, but you’ll need to adjust the liquid. Coconut cream is thicker and richer than coconut milk. If using full-fat coconut cream, dilute it with water in a 3:1 ratio (3 parts cream to 1 part water) to mimic the consistency of coconut milk. Using straight coconut cream without dilution will yield a very rich, almost fudgy cake that may not set as well. The resulting texture will be denser and more decadent—some people love that, so feel free to experiment!

What is the best way to store sticky coconut cake to keep it moist?

The absolute best way to store sticky coconut cake is in an airtight container in the refrigerator. Because of the high coconut content, the cake stays moist for up to five days. I recommend keeping it in the same pan you baked it in, covered tightly with plastic wrap, then a layer of foil. If you’ve already sliced it, place a piece of parchment paper between layers to prevent sticking. Do not leave it at room temperature for more than 2 hours, as the moisture can cause mold. To keep it extra moist, you can brush the cut sides with a little coconut milk before storing.

How long does sticky coconut cake need to cool before serving?

After baking and broiling, the cake must cool completely to room temperature in the pan on a wire rack—this takes about 1 to 1½ hours. Then it needs to chill in the refrigerator for at least 8 hours, ideally overnight. This long cooling and setting period is essential for the cake to firm up so you can slice it cleanly. If you try to serve it after only a couple hours of chilling, the cake will be too soft and sticky. Patience is the secret to perfect sticky coconut cake.

What is Wingko Babat?

Wingko Babat is a traditional Indonesian gluten-free cake made primarily from glutinous rice flour and coconut. It originates from the Babat region in East Java, Indonesia. The cake has a dense, chewy, and sticky texture similar to mochi, with a rich coconut flavor. It is typically baked until golden and then cut into small squares or diamonds. Wingko Babat is often enjoyed as a snack or dessert, sometimes served warm with a cup of tea. This recipe is a classic version, but many variations exist across Indonesia.

Can I use regular rice flour instead of glutinous rice flour?

I strongly recommend against substituting regular rice flour for glutinous rice flour in this sticky coconut cake. Regular rice flour (from standard white rice) has a different starch composition—it will produce a crumbly, dry cake rather than the characteristic chewy, sticky texture. Glutinous rice flour (also called sweet rice flour or mochiko) is essential for the authentic wingko babat texture. If you cannot find it, you can try a 1:1 gluten-free all-purpose flour blend, but the result will be more like a tender cake than a sticky, dense dessert.

Can I make sticky coconut cake dairy-free?

Yes, this sticky coconut cake is naturally dairy-free! The only animal product in the original recipe is eggs. For a vegan version, you can use flax eggs (2 tablespoons ground flaxseed mixed with 6 tablespoons water, let sit for 5 minutes) and skip the egg yolk glaze. Brush the top with melted coconut oil instead before broiling. The cake will still be moist and delicious, though slightly less firm. All other ingredients—coconut milk, shredded coconut, glutinous rice flour, sugar, and vanilla—are dairy-free. Perfect for those with lactose intolerance or a vegan lifestyle.

How can I tell when the sticky coconut cake is fully baked?

After 45 minutes at 350°F, the cake should be set around the edges and look firm, but the center will still jiggle slightly when you gently shake the pan. The surface will be pale golden. Insert a toothpick near the center—if it comes out with moist crumbs or clean (not wet batter), the cake is done. Don’t overbake, because the cake continues to cook as it cools. The true test of doneness happens after the overnight chill: the cake should be firm enough to slice cleanly but still tender and sticky. The broiled top should be deep golden brown with a slight caramelization.

Can I add toppings or mix-ins to sticky coconut cake?

Absolutely! This cake is a wonderful base for customization. For a tropical twist, fold in ½ cup of toasted macadamia nuts or dried mango pieces before baking. Chocolate chips (dark or white) create a decadent version. If you like a little heat, add a pinch of cayenne or ginger to the batter. For a crunchy top, sprinkle extra shredded coconut or sesame seeds over the batter right before baking. Just be careful not to overload the batter—too many mix-ins can affect how the cake sets. Stick to about ½ cup additions for the best results.

Why is my sticky coconut cake too dry on the edges?

Dry edges are usually a sign of overbaking. Every oven runs a little differently—check your cake at the 40-minute mark. If the edges are already browning too much, tent the pan loosely with foil for the remaining bake time. Also, make sure your baking pan is the correct size (8×8-inch). A larger pan will spread the batter thinner, causing it to bake faster and dry out. If the issue persists, try reducing the oven temperature to 325°F and baking a few minutes longer. The high fat content of coconut milk helps keep the interior moist, but the edges are always more exposed.

Share Your Version!

I’d love to see your sticky coconut cake creations! Did you try the pandan version? Or maybe you added a chocolate swirl? Drop a comment below with your tweaks, and don’t forget to leave a star rating if this recipe made you smile. Tag me @cookingwithemy on Instagram or Pinterest when you bake it—I always repost my favorites.

From my NYC kitchen to yours — I hope this recipe brings as much warmth to your table as it does to mine. — emy 🧡

📌

Love This Recipe? Save It to Pinterest!

If you enjoyed this Sticky Coconut Cake recipe, don’t let it get lost in your browser tabs! 😄 Pin it now so you can find it again anytime — and explore hundreds more tried-and-tested recipes waiting for you on my Pinterest boards.

👉 Follow emy on Pinterest @cookingwithemy

📌 Pin this recipe · 🔁 Re-pin your favorites · 💬 Tag me when you make it — I love seeing your creations!

Print

clock clock iconcutlery cutlery iconflag flag iconfolder folder iconinstagram instagram iconpinterest pinterest iconfacebook facebook iconprint print iconsquares squares iconheart heart iconheart solid heart solid icon

Sticky Coconut Cake


  • Author: Chef Emy

Description

This gluten free Indonesian Sticky Coconut Cake (Wingko Babat) is a coconut filled dessert snack thats easy to make and so delicious! Its simply a must make for coconut lovers. And, its super easy to make too!


Ingredients

Scale
  • 2 eggs (separated)
  • 1¼ cup granulated sugar
  • 2¼ cup full fat canned coconut milk
  • 3 cups shredded sweetened coconut
  • 1½ cup glutinous rice flour
  • 1 teaspoon vanilla extract

Instructions

  1. Preheat oven to 350° F.
  2. Whisk the egg whites and the sugar together in a medium bowl. Slowly mix in the coconut milk, shredded coconut, rice flour, and vanilla. Make sure that all the ingredients are well combined and that there are no lumps of coconut. The batter will be thin and liquidy.
  3. Pour the batter into an 8×8-inch baking pan and bake it in the preheated 350° F oven for 45 minutes.
  4. Carefully take out the pan and brush the egg yolks on top of the cake. Set the oven to broil and broil the cake for 5-10 minutes. Keep a close eye on it, as it will brown quickly, and take it out when the turns golden brown.
  5. Set the cake in the pan on a wire rack to cool completely to room temperature. Then, place the cake in the pan, covered with plastic wrap, in the fridge overnight or for 8 hours before cutting and serving, to ensure that the cake has set. Cut cake into squares or triangles, and serve cold from the fridge or at room temperature.

Nutrition

  • Calories: 268 kcal
  • Sugar: 15 g
  • Fat: 17 g
  • Carbohydrates: 29 g
  • Protein: 3 g


Sticky Coconut Cake

This HTML delivers a complete, SEO-optimized WordPress recipe post for “Sticky Coconut Cake” with detailed sections, tables, FAQ, and Pinterest integration.
“`html

Sticky Coconut Cake – Gluten-Free Indonesian Wingko Babat – A Tropical Coconut Lover’s Dream

⚖️
Difficulty
Easy
⏲️
Prep Time
15 mins
🕒
Cook Time
55 mins
⏱️
Total Time
1 hr 10 mins + chill
🍽️
Servings
9–12 pieces

I still remember the first time I tasted a truly great sticky coconut cake. It was during a trip to Southeast Asia years ago — a street vendor in Jakarta handed me a warm square wrapped in banana leaf, and one bite of that dense, chewy, intensely coconut-rich cake stopped me in my tracks. I knew right then I had to bring this taste home to my NYC kitchen. This gluten-free Indonesian Sticky Coconut Cake (Wingko Babat) is my love letter to that moment — a dessert that’s deeply comforting, naturally moist, and absolutely packed with coconut flavor. It’s the kind of sticky cake dessert that makes you close your eyes and just smile.

Imagine a cake that’s tender on the inside with a beautifully caramelized, golden-broiled top — each bite yielding a soft, almost pudding-like crumb that’s bursting with sweetened shredded coconut and rich coconut milk. The texture is unlike any regular cake: it’s dense, sticky, and supremely moist, with a delicate chew that comes from glutinous rice flour. The aroma alone — warm coconut, vanilla, and a hint of caramelized sugar — will fill your kitchen and have everyone wandering in asking, “What’s baking?” It’s the kind of tropical coconut cake that feels like a mini vacation with every forkful.

What I love most about this recipe is how beautifully simple it is, yet how impressive the result feels. Growing up in Morocco, my mother taught me that the best desserts often come from humble ingredients treated with care. Later, my French pastry training in Paris drilled into me the importance of precision — and this cake strikes the perfect balance between rustic home baking and confident technique. I’ve tested this version multiple times to make sure it’s foolproof for US home cooks. One key pro tip: don’t skip the overnight chill — it transforms the texture from good to absolutely perfect. And watch out for the broiler step — it browns fast, so keep your eyes on it! Let me walk you through everything you need to know.

Why This Sticky Coconut Cake Recipe Is the Best

The Flavor Secret — This sticky coconut cake gets its incredible depth from two forms of coconut: full-fat canned coconut milk for rich creaminess, and sweetened shredded coconut for texture and concentrated coconut flavor. The combination creates a moist coconut cake that’s intensely aromatic and satisfying. I love how the coconut milk brings a subtle tropical sweetness that pairs beautifully with the vanilla and sugar — it’s the same principle I use in my Moroccan coconut pastries, but with a lighter, more delicate hand.

Perfected Texture — The secret to that signature sticky, tender crumb is glutinous rice flour (also called sweet rice flour). Despite the name, it’s gluten-free and gives the cake a unique, pleasing chewiness that regular flour simply can’t replicate. My Paris pastry chef training taught me to respect the role of each ingredient, and here the rice flour is the star: it creates that soft, almost mochi-like texture that makes this sticky cake dessert so addictive. The overnight chill sets the cake perfectly, making it easy to slice into clean squares or triangles.

Foolproof & Fast — With just six main ingredients and one bowl, this recipe could not be more approachable. Even if you’ve never baked a gluten-free cake before, you’ll nail it on the first try. The batter comes together in minutes — no mixer needed, just a whisk and some elbow grease. And because it bakes low and slow before a quick broil, you get a beautifully caramelized top without any complicated steps. It’s the kind of recipe that makes you look like a pro, whether you’re serving it for a weekend brunch or a weeknight treat.

Sticky Coconut Cake Ingredients

Whenever I make this sticky coconut cake, I head straight to my favorite Asian grocery in Chinatown for the glutinous rice flour and the best-quality shredded coconut. But honestly, most of these ingredients are already in your pantry or just a short trip to any well-stocked supermarket away. I love how accessible this recipe is — no fancy equipment or hard-to-find items required. Just good, honest ingredients that come together to create something truly special. Here’s what you’ll need:

Ingredients List

  • 2 eggs (separated)
  • 1¼ cup granulated sugar
  • 2¼ cup full fat canned coconut milk
  • 3 cups shredded sweetened coconut
  • 1½ cup glutinous rice flour (also labeled sweet rice flour)
  • 1 teaspoon vanilla extract

Ingredient Spotlight

Glutinous Rice Flour — This is the foundation of the cake’s unique sticky texture. Despite the name “glutinous,” it contains no gluten — the term refers to the glue-like consistency it creates when cooked. You can find it in the Asian foods section of most US grocery stores or at any Asian market. Mochiko brand is a reliable choice. Do not substitute with regular rice flour or all-purpose flour; the texture will be completely different. A close second is tapioca starch, but the chew won’t be quite as authentic.

Full-Fat Canned Coconut Milk — This is non-negotiable for the richest flavor and creamiest texture. Lite coconut milk will make the cake watery and less satisfying. I always recommend Chaokoh or Thai Kitchen brands — they have the thickest, creamiest consistency. Shake the can well before opening to incorporate the cream and liquid. The fat in the coconut milk is what keeps this moist coconut cake incredibly tender even after refrigeration.

Shredded Sweetened Coconut — You want the sweetened, finely shredded variety (not unsweetened or desiccated). The sweetness and texture are essential to the cake’s character. I’ve tested this with unsweetened coconut, and the cake ends up significantly less flavorful and drier. If you can only find unsweetened, add an extra ¼ cup of sugar to compensate. Look for it in the baking aisle — Baker’s Angel Flake is a great option.

Eggs (Separated) — Using the egg whites in the batter and brushing the yolks on top serves a brilliant dual purpose. The whites help bind the batter without making it heavy, while the yolks create that gorgeous golden-brown, slightly glossy finish under the broiler. It’s a technique I picked up in Paris — using every part of the ingredient for maximum effect. Just make sure to separate them cleanly with no yolk in the whites.

Original Ingredient Best Substitution Flavor / Texture Impact
Glutinous rice flour Tapioca starch + 1 tbsp cornstarch Less chewy, more tender; still good but not as authentic
Full-fat coconut milk Coconut cream diluted with water (1:1) Richer, thicker texture; use slightly less liquid
Shredded sweetened coconut Unsweetened shredded coconut + ¼ cup extra sugar Less sweet, chewier texture; works in a pinch
Granulated sugar Coconut sugar Deeper caramel notes, slightly less sweet

How to Make Sticky Coconut Cake — Step-by-Step

Making this sticky coconut cake is almost as enjoyable as eating it. The batter comes together in a single bowl with a simple whisk, and the most hands-on moment is brushing the egg yolk glaze at the end. Trust me — if you can stir, you can make this cake. Let me walk you through each step so you get perfect results every time.

Step 1: Preheat and Prepare

Preheat your oven to 350°F. Line an 8×8-inch baking pan with parchment paper, leaving some overhang on two opposite sides — this will make lifting the cake out later a breeze. You can also lightly grease the pan, but parchment paper is really your best friend here because the cake is quite sticky.

💡 emy’s Pro Tip: If you don’t have parchment paper, generously butter the pan and dust it with a light sprinkle of glutinous rice flour — just like you’d flour a cake pan for a classic French genoise.

Step 2: Mix the Batter

In a medium bowl, whisk the egg whites and sugar together until well combined and slightly frothy, about 1 minute. Slowly pour in the coconut milk while whisking, then add the shredded coconut, glutinous rice flour, and vanilla extract. Stir until everything is fully incorporated and there are no lumps of coconut or flour. The batter will be thin and liquidy — that’s exactly what you want.

⚠️ Common Mistake to Avoid: Over-mixing the batter can make the cake tough. Stir just until the flour disappears — a few small lumps are fine. Also, make sure your shredded coconut isn’t clumped together; break up any large clumps with your fingers before adding it to the bowl.

Step 3: Bake the Cake

Pour the batter into the prepared pan and spread it evenly. Bake in the preheated oven for 45 minutes. The cake will be set around the edges but still slightly jiggly in the center — that’s normal. It will continue to set as it cools and chills. The top should be pale golden and the edges just starting to pull away from the pan.

💡 emy’s Pro Tip: Every oven runs a little differently. At the 40-minute mark, start checking by gently shaking the pan. If the center still sloshes like liquid, give it 5 more minutes. You want a gentle wobble, not a liquid wave.

Step 4: Broil the Top

Carefully remove the pan from the oven and set the oven to broil. Lightly beat the reserved egg yolks and brush them evenly over the top of the cake. Return the pan to the oven and broil for 5–10 minutes — watch it like a hawk! The top should turn a deep, beautiful golden brown with darker caramelized spots. The moment it reaches that color, take it out.

⚠️ Common Mistake to Avoid: The broiler works fast — 10 minutes can easily turn golden brown into burnt if you walk away. I recommend staying at the oven and checking every 2 minutes after the 5-minute mark. If you see uneven browning, rotate the pan halfway through.

Step 5: Cool and Chill

Set the pan on a wire rack and let the cake cool completely to room temperature. Once cool, cover the pan tightly with plastic wrap and refrigerate overnight, or for at least 8 hours. This resting time is absolutely essential — it allows the glutinous rice flour to fully hydrate and the cake to set into that perfect sticky, sliceable texture.

💡 emy’s Pro Tip: I know it’s tempting to cut into it sooner, but trust me — the overnight chill is what transforms this from a good cake into a great one. The texture firms up beautifully, and the flavors meld together. It’s like the cake version of a good lasagna: better the next day.

Step 6: Slice and Serve

After the cake has chilled completely, lift it out of the pan using the parchment overhang. Place it on a cutting board and slice into squares or triangles. A sharp knife will give you clean cuts — wipe the blade with a damp paper towel between slices to keep them tidy. Serve cold from the fridge or let it sit at room temperature for about 15 minutes for a softer texture.

Step Action Duration Key Visual Cue
1 Preheat & line pan 5 mins Oven at 350°F, parchment overhang
2 Whisk batter 5 mins Thin, liquidy, no lumps
3 Bake 45 mins Set edges, jiggly center, pale golden top
4 Brush egg yolk & broil 5–10 mins Deep golden brown, caramelized spots
5 Cool & chill 8+ hrs or overnight Firm, set, sliceable
6 Slice & serve 5 mins Clean cuts, sticky tender crumb

Serving & Presentation

This sticky coconut cake is wonderful on its own, but a few simple touches can elevate it into a truly special dessert. I love serving it slightly chilled or at room temperature — the texture is at its best when it’s not too cold. For plating, cut the cake into neat squares or triangles and fan them out on a plate for a beautiful presentation. A light dusting of toasted coconut flakes on top adds a lovely crunch and visual appeal.

In my NYC kitchen, I often pair this cake with a dollop of coconut whipped cream and a handful of fresh tropical fruit — mango slices, kiwi, or passion fruit all work beautifully. The acidity of the fruit cuts through the richness of the cake perfectly. For a Moroccan-inspired twist, I sometimes drizzle a little honey infused with orange blossom water over the top — it’s a nod to the desserts my mother used to make, and it works surprisingly well with the coconut.

This cake also shines as part of a dessert platter alongside other Southeast Asian treats like mango sticky rice or pandan chiffon cake. It’s a conversation starter — people are always intrigued by the unique sticky texture and intense coconut flavor. Whether you’re serving it at a dinner party, a holiday brunch, or just as a weekend treat, it’s guaranteed to impress.

Pairing Type Suggestions Why It Works
Side Dish Fresh mango slices, kiwi, papaya, or dragon fruit Bright acidity balances the rich coconut sweetness
Sauce / Dip Coconut whipped cream, honey-orange blossom drizzle, salted caramel Adds creamy or floral notes that complement the cake
Beverage Hot jasmine tea, iced Vietnamese coffee, chilled coconut water Light drinks refresh the palate against the dense cake
Garnish Toasted coconut flakes, lime zest, edible flowers, mint sprigs Adds color, texture, and a fresh aromatic finish

Make-Ahead, Storage & Reheating

This sticky coconut cake is actually at its best when made ahead — the overnight chill is built right into the recipe. As a busy NYC food blogger, I love recipes that work on my schedule. I often bake this cake on a Sunday afternoon, let it chill overnight, and slice it on Monday for easy grab-and-go treats throughout the week. It stores beautifully and even improves after a day or two as the flavors continue to meld.

Method Container Duration Reheating Tip
Refrigerator Airtight container or tightly wrapped in plastic Up to 5 days Serve cold or let sit at room temp 15 mins; do not microwave
Freezer Wrap each slice in plastic, then foil; place in freezer bag Up to 2 months Thaw in fridge overnight; reheat gently in a 300°F oven for 5–7 mins
Make-Ahead Bake, cool, chill in pan tightly covered Up to 2 days ahead Slice just before serving; no reheating needed

For reheating, I actually prefer this cake cold or at room temperature — the sticky texture is most pronounced that way. If you’d like a slightly softer, warmer experience, place individual slices on a baking sheet in a 300°F oven for 5–7 minutes. Keep in mind that the cake will become more delicate when warm, so handle it gently. Avoid the microwave — it can make the cake gummy and unevenly heated. One thing I love about this recipe is that it’s just as delicious straight from the fridge as it is at room temperature, so you have options.

Variations & Easy Swaps

One of the things I love most about this sticky coconut cake is how versatile it is. Once you’ve mastered the basic recipe, you can play around with flavors and textures to make it your own. Here are some of my favorite variations — each one tested in my NYC kitchen and approved by my family and friends.

Variation Key Change Best For Difficulty Impact
Pandan Sticky Coconut Cake Add 1 tsp pandan extract or 1 tbsp pandan juice Southeast Asian flavor lovers No change — easy
Toasted Sesame Sticky Cake Replace ½ cup shredded coconut with ¼ cup black sesame seeds + ¼ cup toasted sesame seeds Nutty, earthy flavor twist Easy — just stir in seeds
Vegan Sticky Coconut Cake Replace eggs with flax eggs (2 tbsp ground flax + 6 tbsp water); omit egg yolk wash, brush with coconut cream before broiling Dairy-free, egg-free diet Slightly more delicate texture — moderate

Pandan Sticky Coconut Cake

Pandan is often called the “vanilla of Southeast Asia” — its sweet, grassy, almost floral aroma pairs beautifully with coconut. To make this version, simply add 1 teaspoon of pandan extract (available at Asian markets or online) along with the vanilla. The cake will take on a gorgeous pale green hue and an extra layer of aromatic complexity. This is the version I often make for dinner parties — it’s visually stunning and has a mysterious, intriguing flavor that always sparks conversation. In my Paris pastry days, I learned how a single aromatic note can transform a dessert, and pandan does exactly that here.

Toasted Sesame Sticky Cake

For a nutty, earthy variation that nods to both Asian and North African flavors, try this toasted sesame version. Replace half a cup of the shredded coconut with a mix of black and white toasted sesame seeds. The black sesame adds a striking visual contrast and a deep, toasted flavor that’s incredibly satisfying. I first experimented with this idea after visiting a Japanese-inspired bakery here in NYC — the combination of sesame and coconut was love at first bite. Toast the sesame seeds in a dry pan for 2–3 minutes before adding them to the batter to really wake up their oils.

Vegan Sticky Coconut Cake

Making this cake vegan is easier than you might think. Replace the two eggs with flax eggs (2 tablespoons of finely ground flaxseed mixed with 6 tablespoons of water, let sit for 5 minutes to thicken). Instead of brushing egg yolk on top before broiling, brush a thin layer of full-fat coconut cream — it will still caramelize beautifully and create a golden finish. The texture will be slightly more tender and less firm than the original, but still wonderfully sticky and delicious. This is a great option for those following a plant-based diet, and I’ve served it to friends who couldn’t tell the difference until I told them!

What makes a sticky coconut cake different from a regular coconut cake?

The key difference lies in texture and key ingredients. A sticky coconut cake, like my Wingko Babat recipe, uses glutinous rice flour instead of all-purpose flour, which gives it a dense, chewy, almost mochi-like texture that’s distinctly sticky and tender. Regular coconut cake is typically light, fluffy, and cake-like, relying on wheat flour for structure. Sticky coconut cake also has a much higher coconut-to-flour ratio — it’s packed with shredded coconut and full-fat coconut milk, making it intensely moist and rich. It’s a completely different eating experience: dense, satisfying, and intensely coconut-forward.

Can I use coconut milk instead of shredded coconut in a sticky coconut cake?

No, you cannot simply substitute coconut milk for shredded coconut — they serve different roles in the recipe. The shredded coconut provides texture, bulk, and concentrated coconut flavor, while the coconut milk provides moisture and richness. If you want to reduce the shredded coconut, you could replace up to half of it with additional coconut milk, but the cake will be much softer and less structured. For best results, keep both as written. If you’re looking to adjust the texture, try using finely shredded coconut (sometimes labeled “desiccated” but sweetened) for a smoother crumb.

How long do you need to bake a sticky coconut cake for it to stay moist?

For this sticky coconut cake, bake at 350°F for exactly 45 minutes, then broil for 5–10 minutes for the golden top. The 45-minute bake time is long enough to set the structure while keeping the interior incredibly moist — the glutinous rice flour and high coconut milk content ensure the cake stays tender. The key to moisture retention is not over-baking: the center should still have a gentle wobble when you take it out. Then, the overnight chill is crucial — it allows the cake to set without drying out. If you skip the chill, the cake will be too soft and won’t slice cleanly.

What is the best way to serve sticky coconut cake for dessert?

Sticky coconut cake is wonderfully versatile. I love serving it chilled or at room temperature — both are traditional and delicious. For a simple dessert, cut it into neat squares or triangles and arrange on a plate with fresh tropical fruit like mango, kiwi, or passion fruit. A dollop of coconut whipped cream or a drizzle of honey with a touch of orange blossom water elevates it beautifully. It also pairs wonderfully with a cup of hot jasmine tea or iced Vietnamese coffee. For brunch, serve it alongside a fruit salad for a crowd-pleasing spread.

Is sticky coconut cake gluten-free?

Yes, this sticky coconut cake is naturally gluten-free! The recipe uses glutinous rice flour (also called sweet rice flour), which is made from sticky rice and contains no gluten whatsoever. Despite its name, “glutinous” refers to the sticky, glue-like texture it produces, not the presence of gluten. This makes it a fantastic dessert option for those with celiac disease or gluten sensitivity. Just be sure to check that your brand of glutinous rice flour is certified gluten-free if cross-contamination is a concern — most Asian brands like Mochiko are naturally gluten-free.

Can I make sticky coconut cake without eggs?

Yes, you can make a vegan version of this sticky coconut cake. Replace the 2 eggs with flax eggs: mix 2 tablespoons of ground flaxseed with 6 tablespoons of water and let it sit for 5 minutes until thickened. Instead of brushing egg yolk on top before broiling, use a thin layer of full-fat coconut cream — it will caramelize and create a beautiful golden finish. The texture will be slightly more delicate and less firm than the original, but still wonderfully sticky and delicious. I’ve tested this version multiple times and it’s always a hit with plant-based eaters.

How do you store sticky coconut cake so it stays fresh?

Store sticky coconut cake in an airtight container or tightly wrapped in plastic wrap in the refrigerator for up to 5 days. The cake actually improves after a day or two as the flavors meld together. For longer storage, wrap individual slices in plastic wrap, then foil, and place them in a freezer-safe bag — they’ll keep for up to 2 months. To thaw, transfer to the refrigerator overnight. I recommend serving the cake cold or at room temperature rather than microwaving, which can make it gummy. If you want it warm, reheat slices gently in a 300°F oven for 5–7 minutes.

Can I use fresh coconut instead of shredded sweetened coconut?

Yes, you can use fresh coconut, but it will change the sweetness and texture of the cake. Freshly grated coconut is less sweet and has a higher moisture content than sweetened shredded coconut. If using fresh coconut, I recommend adding an extra ¼ cup of sugar to the batter and lightly toasting the fresh coconut in a 300°F oven for 5–7 minutes to reduce some moisture. You’ll also want to squeeze out some of the excess liquid before adding it. The cake will have a more natural, less sweet coconut flavor and a slightly more tender crumb. It’s delicious, just different.

Why does my sticky coconut cake need to chill overnight?

The overnight chill is not optional — it’s essential for the perfect texture. During chilling, the glutinous rice flour fully hydrates and the cake sets into that signature sticky, dense, sliceable consistency. If you cut into the cake too soon, it will be too soft and sticky to slice cleanly, and the texture will be gummy rather than pleasantly chewy. The chill also allows the flavors to deepen and meld together, resulting in a more cohesive, delicious cake. Think of it like a cheesecake or a lasagna — some things truly are better the next day.

Can I add toppings or mix-ins to sticky coconut cake?

Absolutely! This cake is wonderful as-is, but it also welcomes creative additions. Before baking, you can fold in ½ cup of toasted coconut flakes, chopped macadamia nuts, or even chocolate chips for extra texture. For a tropical twist, add ¼ cup of dried mango or pineapple, finely chopped. If you want a more savory edge, a pinch of flaky sea salt sprinkled on top before broiling balances the sweetness beautifully. Just be mindful not to overload the batter — the cake is already quite rich, so a little goes a long way. My personal favorite is adding a teaspoon of lime zest for brightness.

Share Your Version!

I absolutely love seeing how you make this sticky coconut cake your own. Did you try the pandan version? Did you add a special topping or swap in a new ingredient? Every time I hear about your kitchen adventures, it reminds me why I do what I do — sharing recipes and stories is what connects us all. Drop a comment below with your experience, and if you’re feeling proud (you should be!), share a photo on Instagram or Pinterest and tag me @cookingwithemy.

I’d especially love to know: did you try the toasted sesame variation or come up with something totally new? What did your family think? Your feedback helps me create even better recipes for you, and your photos inspire the whole community. So please — rate the recipe, leave a comment, and let’s keep cooking together. From my NYC kitchen to yours — I hope this recipe brings as much warmth to your table as it does to mine. — emy 🧡

📌

Love This Recipe? Save It to Pinterest!

If you enjoyed this Sticky Coconut Cake recipe, don’t let it get lost in your browser tabs! 😄 Pin it now so you can find it again anytime — and explore hundreds more tried-and-tested recipes waiting for you on my Pinterest boards.

👉 Follow emy on Pinterest @cookingwithemy

📌 Pin this recipe · 🔁 Re-pin your favorites · 💬 Tag me when you make it — I love seeing your creations!

“`
### Recipe Content Structure

The page is built as a complete, SEO-friendly recipe post. Here’s how it’s organized for both readers and search engines:

– **Introduction & Info Bar**: A warm, personal opening from Emy sets the context, while the info bar provides at-a-glance details like prep time, cook time, servings, and difficulty.
– **Why This Recipe Is the Best**: Three persuasive paragraphs highlight the unique flavor, perfected texture, and foolproof method, building trust and desire.
– **Ingredients & Substitutions**: A detailed list with an “Ingredient Spotlight” section explains key components. A substitution table offers practical alternatives, making the recipe adaptable.
– **Step-by-Step Instructions**: Each step includes a clear action, a visual cue, and either a “Pro Tip” or “Common Mistake to Avoid.” A quick-reference table summarizes the entire process.
– **Serving, Storage & Variations**: Practical guidance on presentation, make-ahead options, and creative twists (pandan, sesame, vegan) helps users customize the recipe.
– **FAQ Section**: Ten common questions (e.g., gluten-free, storage, chilling time) are answered in a helpful, conversational tone, addressing real user concerns.
– **Pinterest & Engagement Blocks**: A dedicated Pinterest section encourages saving, while an “Engagement Hook” invites comments, ratings, and social shares to build community.

The layout is modular, visually clean, and optimized for both desktop and mobile reading. Each section uses distinct headings, tables, and callout boxes to break up text and make information easy to scan.

**Optimization Tip:** Replace the placeholder image ID `fimageid` in the recipe details with your actual media attachment ID or URL. You can also adjust serving sizes and storage timelines to match your exact preferences.

Print

clock clock iconcutlery cutlery iconflag flag iconfolder folder iconinstagram instagram iconpinterest pinterest iconfacebook facebook iconprint print iconsquares squares iconheart heart iconheart solid heart solid icon

Sticky Coconut Cake


  • Author: Chef Emy

Description

This gluten free Indonesian Sticky Coconut Cake (Wingko Babat) is a coconut filled dessert snack thats easy to make and so delicious! Its simply a must make for coconut lovers. And, its super easy to make too!


Ingredients

Scale
  • 2 eggs (separated)
  • 1¼ cup granulated sugar
  • 2¼ cup full fat canned coconut milk
  • 3 cups shredded sweetened coconut
  • 1½ cup glutinous rice flour
  • 1 teaspoon vanilla extract

Instructions

  1. Preheat oven to 350° F.
  2. Whisk the egg whites and the sugar together in a medium bowl. Slowly mix in the coconut milk, shredded coconut, rice flour, and vanilla. Make sure that all the ingredients are well combined and that there are no lumps of coconut. The batter will be thin and liquidy.
  3. Pour the batter into an 8×8-inch baking pan and bake it in the preheated 350° F oven for 45 minutes.
  4. Carefully take out the pan and brush the egg yolks on top of the cake. Set the oven to broil and broil the cake for 5-10 minutes. Keep a close eye on it, as it will brown quickly, and take it out when the turns golden brown.
  5. Set the cake in the pan on a wire rack to cool completely to room temperature. Then, place the cake in the pan, covered with plastic wrap, in the fridge overnight or for 8 hours before cutting and serving, to ensure that the cake has set. Cut cake into squares or triangles, and serve cold from the fridge or at room temperature.

Nutrition

  • Calories: 268 kcal
  • Sugar: 15 g
  • Fat: 17 g
  • Carbohydrates: 29 g
  • Protein: 3 g


Sticky Coconut Cake

Pineapple Mango Rum Punch Recipe – A Tropical Party Favorite

⚖️
Difficulty
Easy
⏲️
Prep Time
5 mins
🕒
Cook Time
0 mins
⏱️
Total Time
5 mins
🍽️
Servings
1 cocktail (easily scalable)

Growing up in Morocco, I learned that the best drinks aren’t complicated — they’re made with love, fresh ingredients, and a little bit of flair. This pineapple mango rum punch recipe is inspired by the sunny vibes of the Caribbean, with a touch of the hospitality I grew up with in my mother’s kitchen in Marrakech. Every time I make this tropical rum punch, I’m transported back to lazy afternoons sipping fresh juice blends with my family, the scent of orange blossoms drifting through the courtyard. This party rum punch drink is special because of the ombre effect created by a splash of grenadine — it sinks to the bottom and creates a stunning gradient that makes every glass look like a work of art. It’s one of those easy rum punch for a crowd recipes that feels fancy but comes together in just 5 minutes.

The flavor is pure sunshine: sweet pineapple and mango juice mingle with tangy orange, while the coconut rum adds a smooth, warm finish that makes this pineapple mango cocktail taste like a vacation in a glass. The grenadine doesn’t just add color — it adds a subtle tart-sweetness that balances the tropical fruit juices perfectly. I love serving this at parties because it’s so versatile; you can make a single glass or blend up a pitcher for a crowd. My training at Le Cordon Bleu in Paris taught me the importance of balance in every dish and drink, and this recipe is all about that harmony — sweet, tangy, smooth, and visually stunning. It’s no wonder this has become one of my most requested party drink recipes.

What sets my pineapple mango rum punch recipe apart is the attention to detail — from using nugget ice (the soft, chewable kind that melts slowly and looks gorgeous in a glass) to garnishing with edible orchids that make every sip feel special. I’ll show you exactly how to get that beautiful ombre effect and share my favorite tips for making this ahead of time so you can actually enjoy your own party. One common mistake I see is using too much grenadine, which can make the drink overly sweet and muddy the color layers. Stick with me and I’ll show you the perfect splash. Whether you’re hosting a summer barbecue, a birthday bash, or just need a little tropical escape on a Tuesday night, this pineapple mango rum punch is your answer.

Why This Pineapple Mango Rum Punch Recipe Is the Best

The Flavor Secret — The magic of this tropical rum punch lies in using pineapple coconut juice instead of plain pineapple juice. The coconut adds a creamy, silky texture that makes the drink feel luxurious, and it pairs beautifully with the coconut rum for a double layer of tropical flavor. My French culinary training taught me to build flavors in layers, and this drink is the perfect example: the mango brings bright, sunny sweetness, the orange adds a fresh citrus bite, and the grenadine ties it all together with a touch of tart complexity. It’s a party rum punch that tastes like you spent hours on it — but you didn’t!

The Visual Wow Factor — This easy rum punch for a crowd recipe is a showstopper. The grenadine sinks to the bottom, creating a gorgeous ombre effect from deep ruby red at the base to golden orange and pale yellow at the top. When you add a curl of orange zest and an edible orchid on top, it looks like something from a five-star resort. I learned the orange zest ribbon technique at a Parisian bar during a cocktail class — it takes a couple of tries to get a long peel, but the result is absolutely worth it. This pineapple mango cocktail is designed to impress your guests before they even take their first sip.

Foolproof & Fast — With just 5 minutes of prep and zero cooking, this is one of the easiest party drink recipes you’ll ever make. The measurements are forgiving — you can adjust the ratios to suit your taste, and it scales effortlessly for a crowd. Whether you’re a seasoned home bartender or a complete beginner, you can nail this recipe on your first try. I’ve tested it with dozens of friends and family members (my Moroccan cousins are brutally honest critics!), and it gets rave reviews every single time.

Pineapple Mango Rum Punch Recipe Ingredients

One of the things I love about this pineapple mango rum punch recipe is that the ingredients are easy to find at any grocery store. I pick up my pineapple coconut juice at the Whole Foods in Union Square here in NYC, and I always keep a bottle of coconut rum in my pantry for moments like this. It reminds me of the fresh fruit juices my mother would make in Morocco — simple, pure, and full of flavor.

Ingredients List

  • 3 oz pineapple coconut juice (the key to that tropical flavor!)
  • 3 oz coconut rum (light or dark rum also work beautifully)
  • 1 oz mango juice
  • 1 oz orange juice
  • Splash of grenadine (mostly for looks, but adds a lovely tart-sweet note)
  • Lime slices and/or orange zest ribbon for garnish
  • Edible flowers (orchids are my favorite — they’re actually edible and so dramatic!)

Ingredient Spotlight

Pineapple Coconut Juice — This is the backbone of the drink. Look for a brand that lists pineapple and coconut as the first ingredients. My go-to is the one from the refrigerated section at Trader Joe’s. It has a natural sweetness that doesn’t need extra sugar. If you can’t find it, mix equal parts pineapple juice and coconut water, then add a splash of cream of coconut for richness.

Coconut Rum — I recommend Malibu for its smooth, sweet coconut flavor that’s not overpowering. It’s widely available and affordable, making it perfect for this easy rum punch for a crowd. If you prefer a less sweet drink, light rum works great too — just add a splash of coconut extract or cream of coconut to maintain that tropical profile.

Mango Juice — Use 100% mango juice or nectar, not mango-flavored punch. The real stuff has a thick, velvety texture that gives the drink body. I buy organic mango juice from the natural foods aisle at my local market. If you can’t find mango juice, peach or apricot nectar are excellent substitutes and will give a similar golden color and sweet-tart flavor.

Grenadine — This is the secret to the ombre effect. Use a high-quality pomegranate grenadine (not the bright red, overly sweet stuff). I love the small-batch grenadine from the Brooklyn-based brand Stirrings — it’s made with real pomegranate juice and has a sophisticated tartness that balances the sweet tropical juices.

Original Ingredient Best Substitution Flavor / Texture Impact
Pineapple coconut juice Pineapple juice + coconut water (equal parts) Lighter texture, slightly less creamy
Coconut rum Light or dark rum + splash of cream of coconut Less sweet, more complex if using dark rum
Mango juice Peach or apricot nectar Similar sweetness and body, slightly different tropical note
Grenadine Pomegranate molasses + a pinch of sugar More tart, less sweet, deeper color
Orange juice Tangerine or clementine juice Sweeter, more floral citrus note

How to Make Pineapple Mango Rum Punch — Step-by-Step

This pineapple mango rum punch recipe is so easy, you’ll memorize it after one try. Here’s exactly how to build the perfect glass.

Step 1: Combine All Juices

In a mixing glass or cocktail shaker, combine 3 oz pineapple coconut juice, 1 oz mango juice, 1 oz orange juice, and 3 oz coconut rum. Stir gently with a bar spoon for about 10 seconds to blend everything. You can also use a mason jar with a lid — just shake it gently (not too hard, you don’t want to aerate it).

💡 emy’s Pro Tip: Always stir, don’t shake, when you’re using carbonated or still juices for a cocktail — shaking can make the drink foamy and dilute it faster when you add ice.

Step 2: Stir and Pour Over Ice

Fill a highball or hurricane glass with nugget ice (or crushed ice if that’s what you have). Pour the juice-rum mixture over the ice. I love nugget ice because it’s soft and chewy, and it melts slowly so your drink stays strong and cold without getting watery. If you’re making this for a party, you can fill a pitcher with ice and pour the mixture over the top.

⚠️ Common Mistake to Avoid: Using too much ice. You want the glass about ¾ full of ice — too much will crowd the drink and water it down as the ice melts. Too little and the drink warms up too quickly.

Step 3: Add Color with Grenadine

Here’s where the magic happens. Slowly pour a splash of grenadine (about 1/2 oz or a generous drizzle) into the center of the glass. Don’t stir! The grenadine will sink to the bottom and create a beautiful ombre effect — dark red at the bottom, fading to golden orange in the middle, and pale yellow at the top. This is what makes this party rum punch so visually stunning.

💡 emy’s Pro Tip: Hold a spoon upside down just above the surface of the drink and pour the grenadine over the back of the spoon. This gently disperses it onto the top layer, and gravity does the rest. It’s a classic French technique for layering cocktails.

Step 4: Garnish Like a Pro

Now it’s time to make it Instagram-worthy. Add a lime slice to the rim of the glass. Use a vegetable peeler to peel a long strip of orange zest (try to get one long, continuous piece), then curl it and place it in the glass or on the rim. Finish with an edible orchid — yes, orchids are actually edible! — placed on top or floating in the drink. The garnishes not only look gorgeous but also add subtle aromatics that enhance every sip.

⚠️ Common Mistake to Avoid: Adding garnishes that overpower the drink. Stick with one or two visual accents — too many garnishes can make the drink look cluttered and overwhelm the delicate tropical flavors.

Step Action Duration Key Visual Cue
1 Combine juices and rum 10 seconds Uniform golden-orange liquid
2 Pour over nugget ice 15 seconds Glass ¾ full with ice, liquid fills the gaps
3 Add grenadine layer 5 seconds Red sinks to bottom, ombre gradient forms
4 Garnish and serve 30 seconds Lime slice, orange zest curl, edible orchid

Serving & Presentation

This pineapple mango rum punch is made for entertaining. I love serving it in clear highball glasses or hurricane glasses so the ombre effect is fully visible. If you’re hosting a party, set up a self-serve bar with a pitcher of the juice-rum mixture, a separate small pitcher of grenadine, a bucket of nugget ice, and a platter of garnishes — let your guests build their own gorgeous glasses. It’s a fun, interactive experience that always gets people talking. In my NYC apartment, I serve this with a side of spiced nuts or coconut shrimp to balance the sweetness, and I always play some reggae or tropical house to set the mood.

The edible orchid garnish is a conversation starter. People are always surprised to learn they can eat orchids — they have a mild, slightly floral taste that doesn’t interfere with the drink. I buy organic orchids from the flower market in Chelsea Market whenever I’m planning a party. They’re surprisingly affordable and make any drink look like a million bucks. The orange zest ribbon adds a bright citrus aroma that wakes up the senses before the first sip. Of course, if you’re in a hurry, a simple lime wheel is perfectly fine too!

When I’m not hosting a big bash, I sometimes make this for just myself on a Friday afternoon as a “treat yo’ self” moment. It’s the kind of drink that instantly lifts your spirits — the tropical flavors, the gorgeous colors, the little burst of indulgence. It reminds me of the Moroccan fruit syrups my mother would make in summer, served with mint and plenty of ice. Same warm-weather joy, just with a grown-up twist.

Pairing Type Suggestions Why It Works
Appetizer Coconut shrimp, jerk chicken skewers, mango salsa with chips The tropical notes in the drink echo the flavors in the food, creating a cohesive menu.
Dessert Key lime pie, coconut macaroons, pineapple upside-down cake Sweet, tangy flavors complement the punch without competing.
Garnish Edible orchids, orange zest ribbon, lime wheel, mint sprig Adds visual appeal and a layer of aromatic freshness to each sip.
Music / Vibe Reggae, tropical house, calypso, steel drum The right playlist transports your guests straight to the islands.

Make-Ahead, Storage & Reheating

This pineapple mango rum punch recipe is fantastic for make-ahead prep — which is a lifesaver when you’re hosting. Since there’s no cooking involved, you can mix everything (except the grenadine and garnishes) up to 24 hours in advance. I usually make a big batch in a pitcher, refrigerate it, and then pour individual servings over ice when guests arrive. The flavors actually deepen and meld together beautifully after a few hours in the fridge. For my busy NYC lifestyle, this kind of prep is a game-changer — I can focus on cooking the main dishes while the punch is ready to go.

For storage, keep the juice-rum mixture in an airtight container in the refrigerator. Do NOT add the ice or grenadine until you’re ready to serve — ice will dilute the drink over time, and grenadine will lose its layered effect if it sits too long. Garnishes should also be added fresh for the best appearance. If you’re making a large batch for a party, set up a “build your own” station so every glass has that perfect ombre look.

Method Container Duration Reheating Tip
Refrigerator Airtight pitcher or glass jar Up to 24 hours Stir before serving, then pour over fresh ice.
Freezer Not recommended N/A Alcohol and fruit juice don’t freeze well together — texture and flavor will be affected.
Make-Ahead Pitcher (no ice, no grenadine) Up to 24 hours in advance Add grenadine and ice only when serving for the best ombre effect.

If you have leftover punch mixture (without ice), you can store it in the fridge for up to 2 days. The citrus flavors may mellow a bit, but it will still taste delicious. I actually find that leftover pineapple mango rum punch makes a fantastic base for a boozy popsicle — just pour into popsicle molds and freeze for a fun adult treat! No reheating needed for a drink like this, but if you prefer it less cold, just let it sit at room temperature for a few minutes before serving.

Variations & Easy Swaps

One of the things I love about this easy rum punch for a crowd recipe is how adaptable it is. Whether you’re catering to different tastes or just want to switch things up, here are my favorite variations. Each one keeps the same simple method but adds a new flavor twist.

Variation Key Change Best For Difficulty Impact
Tropical Berry Add 1 oz passion fruit or guava juice, swap grenadine for berry syrup A more complex, tart-sweet flavor profile Easy (same method)
Spiced Rum Use spiced rum instead of coconut rum, add a pinch of cinnamon Fall and winter parties, deeper warmth Easy (same method)
Non-Alcoholic Mocktail Replace rum with coconut water or sparkling water, add lime juice Designated drivers, kids, health-conscious guests Easy (same method)

Tropical Berry Variation

This is my go-to when I want to surprise regulars who think they’ve tried all my rum punches. Add 1 oz of passion fruit juice and replace the grenadine with a berry syrup (I make mine with fresh blueberries and a touch of honey — inspired by the fruit preserves my grandmother in Morocco used to make). The passion fruit adds a floral-tart layer that dances with the mango, and the berry syrup creates a gorgeous deep purple ombre effect. It’s like a sunset in a glass.

Spiced Rum Variation

For those cozy fall or winter parties, swap the coconut rum for a high-quality spiced rum like Captain Morgan or Kraken. Add a tiny pinch of ground cinnamon (or a cinnamon stick as a garnish) and a dash of vanilla extract. The spice notes of the rum pair beautifully with the sweet tropical juices, making this a pineapple mango cocktail that feels warm and inviting even on a cold night. I served this at a New Year’s Eve party last year and it was a huge hit — the orange zest ribbon garnish looked like fireworks in the glass.

Non-Alcoholic Mocktail Variation

This version is perfect for guests who don’t drink alcohol or for a family-friendly gathering. Replace the coconut rum with chilled coconut water (for that same tropical vibe) and add a squeeze of fresh lime juice for brightness. If you want a little fizz, top it with sparkling water or ginger ale. The grenadine ombre effect works just the same, and the edible orchid garnish makes it feel just as special. I make this for my friend Sarah who is always the designated driver at our parties — she says it makes her feel just as festive as everyone else.

What is the best ratio of pineapple juice to mango juice for a rum punch?

For this pineapple mango rum punch recipe, I recommend a 3:1 ratio of pineapple coconut juice to mango juice. The pineapple coconut juice is 3 oz and the mango juice is 1 oz, which gives the drink a bright, sunny flavor with the mango adding sweetness and body without overwhelming the tropical notes. If you prefer a stronger mango flavor, you can go up to 2 oz of mango juice and reduce the pineapple coconut juice to 2 oz — just keep the total juice-to-rum ratio balanced. Many professional bartenders use a 2:1:1 ratio for rum punches: 2 parts pineapple, 1 part mango, 1 part orange. This is a forgiving recipe, so adjust to your taste.

Can I make pineapple mango rum punch ahead of time for a party?

Absolutely, and I actually encourage it for easy entertaining! You can mix the juice-rum base (pineapple coconut juice, mango juice, orange juice, and rum) up to 24 hours in advance and store it in an airtight pitcher in the refrigerator. The flavors will meld and deepen beautifully. However, do NOT add the grenadine or ice until you’re ready to serve. The grenadine needs to be poured fresh to create the layered ombre effect, and ice will dilute the punch if it sits too long. I also recommend adding garnishes fresh — an orchid that sits in the fridge overnight will lose its perkiness. For a party, set up a serving station with the pre-mixed base, a small pitcher of grenadine, a bucket of ice, and garnishes so guests can build their own.

What type of rum works best in a pineapple mango rum punch?

Coconut rum is my top recommendation for this pineapple mango cocktail because it doubles down on the tropical flavor. Malibu is widely available and affordable — it’s smooth, sweet, and perfectly complements the pineapple and mango. If you prefer something less sweet, a good-quality light rum like Bacardi or Mount Gay works beautifully and lets the fruit flavors shine. For a deeper, more complex profile, dark rum adds notes of caramel and molasses that are lovely in a party rum punch. Spiced rum is another option, especially in cooler weather, as it adds warm notes like cinnamon and vanilla. If you’re making a non-alcoholic version, simply replace the rum with coconut water or sparkling water — the drink is still delicious and looks just as beautiful.

How do you balance the sweetness in a pineapple mango rum punch?

The key to balancing sweetness in this easy rum punch for a crowd recipe is to use tart and citrusy elements to offset the natural sugar from the fruit juices. The orange juice adds a bright, tangy note that cuts through the sweetness of the pineapple and mango. The grenadine, believe it or not, helps balance things too — a good-quality pomegranate grenadine is tart and complex, not cloyingly sweet. If you find your punch is too sweet, add a squeeze of fresh lime juice (about 1/2 oz) — lime is a classic cocktail acidifier that brightens the whole drink. You can also use less mango juice or swap it for a less sweet alternative like passion fruit juice. For a party, I always keep extra lime wedges on hand so guests can adjust their own drinks.

Can I use fresh pineapple and mango instead of juice?

Yes, you can absolutely use fresh fruit! If you go this route, you’ll need to blend 3 oz of fresh pineapple chunks with 1 oz of fresh mango and strain the mixture through a fine-mesh sieve to remove the pulp. Fresh fruit will give you a brighter, more vibrant flavor, but it will also be slightly thicker and may settle more quickly in the glass. I recommend using a ripe, sweet pineapple and a very ripe mango for the best natural sweetness — no need to add extra sugar. This is a wonderful option when you have beautiful fruit from your local farmers market. I do this often in the summer when I find gorgeous mangoes at the Union Square Greenmarket here in New York City.

What kind of glass should I use for a pineapple mango rum punch?

A clear glass is essential so you can show off the beautiful ombre effect created by the grenadine. Hurricane glasses are my top choice — their curved shape is classic for tropical party rum punch drinks and they hold the perfect amount (around 10–12 oz). Highball glasses work wonderfully too, especially if you want a taller, sleeker look. For a casual party, large mason jars are adorable and practical — they’re sturdy, easy to handle, and give off a relaxed summer vibe. If you’re serving a crowd in a punch bowl, use a clear glass or acrylic punch bowl so the layered colors are visible. Avoid colored or opaque glasses since they hide the visual magic of the grenadine layer.

How do I make a large batch of pineapple mango rum punch for a crowd?

Scaling up this pineapple mango rum punch recipe is simple. For a party of 8–10 people, I typically use 3 cups of pineapple coconut juice, 1 cup of mango juice, 1 cup of orange juice, and 3 cups of coconut rum. Whisk everything together in a large pitcher or punch bowl and refrigerate until serving. Do NOT add grenadine or ice to the batch — instead, pour individual servings over ice and add a splash of grenadine to each glass right before serving. This ensures every guest gets a beautiful ombre effect. Set up a self-serve station with the pre-mixed base, a small pitcher of grenadine, a bucket of ice, and garnishes like lime slices, orange zest ribbons, and edible flowers. It’s interactive and looks gorgeous on a party table.

Can I freeze pineapple mango rum punch into popsicles?

Yes, and I highly recommend this as a fun leftover idea! The alcohol content will prevent the popsicles from freezing completely solid, but they will become a deliciously slushy, boozy treat. Simply pour the leftover juice-rum mixture (without ice and without grenadine) into popsicle molds and freeze for at least 4 hours. If you want to add the grenadine layer effect, pour a little grenadine into the bottom of each mold before adding the juice-rum mixture — it creates a beautiful red layer at the tip of the popsicle. These are fantastic for summer pool parties or backyard barbecues. I made these for a rooftop party in NYC last July and they were gone in 20 minutes.

Is pineapple mango rum punch gluten-free?

Yes, this pineapple mango cocktail is naturally gluten-free! All of the ingredients — pineapple coconut juice, mango juice, orange juice, grenadine, and rum — are gluten-free. Rum is made from sugarcane, not grains, so it’s safe for those with celiac disease or gluten sensitivity. Just be sure to check the labels on your specific brands, especially the grenadine, as some cheaper brands may add artificial colors or flavorings. I recommend using a good-quality pomegranate grenadine from a trusted brand. As always, if you’re serving someone with a serious gluten allergy, double-check all ingredient labels to be absolutely safe. This recipe is also free from dairy and nuts.

What should I serve with pineapple mango rum punch at a party?

This tropical rum punch pairs beautifully with a range of foods. I love serving it with coconut shrimp, jerk chicken skewers, or a fresh mango salsa with tortilla chips — the sweet, spicy, and savory notes complement the drink perfectly. For a lighter option, try a citrusy ceviche or a tropical fruit platter with lime and chili powder (a nod to the Mexican street corn I love in NYC). If you’re doing a dessert spread, key lime pie, coconut macaroons, or a simple pineapple upside-down cake are all winners. The key is to keep the food bright, fresh, and vibrant — just like the drink. I always say, if the food pairs well with a piña colada, it will pair well with this punch.

Share Your Version!

I hope this pineapple mango rum punch recipe brings a little tropical sunshine to your table, whether you’re hosting a big party or just treating yourself to something special. This pineapple mango cocktail has become one of my most-requested recipes, and I love hearing how it turns out in your kitchen. If you try it, please come back and leave a star rating and a comment below — tell me what you paired it with, which variation you tried, or if you discovered a new garnish that took it to the next level. Your feedback helps me create better recipes for all of us!

And I’d love to see your creations! Snap a photo of your gorgeous ombre glass and tag me @cookingwithemy on Instagram or Pinterest. I always share my favorites in my Stories. One question I’m especially curious about: did you try the edible orchid garnish? I know it feels fancy, but I promise it’s easy and so worth the “wow” factor. Let me know in the comments — I read every single one. From my NYC kitchen to yours — I hope this recipe brings as much warmth to your table as it does to mine. — emy 🧡

📌

Love This Recipe? Save It to Pinterest!

If you enjoyed this Pineapple Mango Rum Punch recipe, don’t let it get lost in your browser tabs! 😄 Pin it now so you can find it again anytime — and explore hundreds more tried-and-tested recipes waiting for you on my Pinterest boards.

👉 Follow emy on Pinterest @cookingwithemy

📌 Pin this recipe · 🔁 Re-pin your favorites · 💬 Tag me when you make it — I love seeing your creations!

Print

clock clock iconcutlery cutlery iconflag flag iconfolder folder iconinstagram instagram iconpinterest pinterest iconfacebook facebook iconprint print iconsquares squares iconheart heart iconheart solid heart solid icon

Pineapple Mango Rum Punch | Party Drink Recipes


  • Author: Chef Emy

Description

This pineapple mango rum punch is a special recipe that will make you feel like youre in the Caribbean. This recipe is super easy to make, and perfect for parties and entertaining.


Ingredients

Scale
  • 3 oz of pineapple coconut juice
  • 3 oz of coconut rum you can also use light or dark rum here instead
  • 1 oz of mango juice
  • 1 oz of orange juice
  • splash of grenadine mainly just for looks
  • lime slices and/or orange zest for garnish
  • edible flowers for garnish

Instructions

  1. Step 1: Combine all juices.
  2. Combine all juices (pineapple coconut, mango, and orange) and rum. Then stir.
  3. Tropical rum drinks like this can be used with all kinds of fruit juices.
  4. Step 2: Stir and pour over ice. I like using nugget ice for cocktails because it looks really pretty. Plus, I like chewing ice and this one is the best!
  5. Step 3: Add color. This is an optional step, but I like adding a splash of grenadine for color to rum punch cocktails. The grenadine will fall to the bottom and give the drink a pretty ombre look.It's not a necessary step, but definitely adds an unexpected pop of color – great for parties.
  6. Step 4: Garnish. To take this cocktail up a notch, add lime, orange zest, and/or edible flowers for garnish. I like using orchids for a drink like this because it makes such a big impact. Did you know that orchids are actually edible?
  7. To get the orange zest ribbon I just used a peeler to peel a long strip of zest from the orange. Not going to lie, it took a couple of tried to get a long piece that I could then curl, but it's worth it, IMO.


Pineapple Mango Rum Punch | Party Drink Recipes

“`html

Tropical Rum Punch Recipe – A Layered Caribbean Cocktail for Every Party

⚖️
Difficulty
Easy
⏲️
Prep Time
15 mins
🕒
Cook Time
0 mins
⏱️
Total Time
15 mins (+ chill time)
🍽️
Servings
16

I still remember the first time I made a tropical rum punch recipe that truly transported me. It was a humid July afternoon in my little NYC kitchen, and I was craving the sun-soaked beaches of the Caribbean. I had just returned from the Union Square Greenmarket with a bag of ripe pineapples and a bunch of mint, and I knew exactly what I wanted to create. This easy rum punch recipe is the result of years of tweaking — a layered, fruit-forward Caribbean punch drink that brings the party to your glass. With mango cranberry juice, peach schnapps, and coconut rum, every sip tastes like a vacation.

The beauty of this fruity cocktail recipe lies in its vibrant layers and the way the fresh fruit mingles with the juices and spirits. The first sip hits you with sweet-tart mango and cranberry, then the coconut rum warms through, and finally the peach schnapps leaves a soft, floral finish. The texture is bright and crisp from the cubed ice, while the sliced oranges, limes, and strawberries add a gorgeous visual appeal that makes this party punch with rum the centerpiece of any gathering. It’s the kind of drink that makes people gather around the dispenser, cups in hand, smiling.

What sets my version apart is the two-layer method I developed during my pastry training in Paris — macerating the fruit in the first juice mixture builds a deeper flavor foundation, while the second layer of white cranberry juice and coconut rum stays separate until serving, creating a beautiful gradient effect. 💡 emy’s Pro Tip: Chilling both mixtures separately before combining is the secret to a perfectly layered punch that doesn’t turn muddy. A common mistake I see is skipping the chill step and pouring everything together at once — the ice melts too fast and dilutes the punch. Follow my lead, and you’ll have a stunning, crowd-pleasing cocktail every time.

Why This Tropical Rum Punch Recipe Is the Best

The flavor secret here is the maceration step. By letting the fresh pineapple and orange slices sit in the mango cranberry juice and peach schnapps for at least an hour (or up to overnight), the fruit releases its natural sugars and aromas directly into the liquid. This is a technique I borrowed from my French training — the same principle used in making a fruit compote or a soaked cake. The result is a punch that tastes deeply of real fruit, not just bottled juice. It’s the difference between a good drink and a memorable one.

Texture is everything in a punch, and this recipe nails it. The use of cubed ice (never crushed!) ensures slow dilution, so your drink stays flavorful from the first pour to the last refill. The second layer — white cranberry juice blended with orange juice and coconut rum — is poured directly over the ice, creating a gentle separation that looks stunning in a glass dispenser. This method keeps each element distinct, giving you a bright, clean sip every time.

This foolproof recipe is also incredibly forgiving for beginners. You don’t need a shaker, a muddler, or any special equipment — just a couple of pitchers and a drink dispenser. The measurements are flexible, so you can adjust the sweetness or rum strength to your taste. Whether you’re hosting a backyard BBQ, a bridal shower, or just treating yourself on a Friday night, this easy rum punch will make you look like a pro with minimal effort.

Tropical Rum Punch Recipe Ingredients

When I shop for these ingredients in NYC, I head straight to the juice aisle at Whole Foods or my local bodega. The mango cranberry juice and white strawberry cranberry juice are the stars here — they bring a tart-sweet base that balances the coconut rum beautifully. I love that these are widely available in US grocery stores, so you don’t need to hunt down specialty items. The fresh fruit is non-negotiable, though. I pick up pineapples, oranges, limes, and strawberries from the farmers market when I can, because their flavor is leaps and bounds above anything packaged.

Ingredients List

  • 64 ounces Mango Cranberry Juice
  • 1 cup Peach Schnapps
  • 1 cup Fresh Pineapple (Chopped)
  • 2 Oranges (Sliced)
  • 6 cups White Strawberry Cranberry Juice
  • 2 cups Orange Juice
  • 1 1/2 cups Coconut Rum
  • 1 gallon cubed Ice (not crushed)
  • 1/2 cup Pineapples (Chopped, extra for garnish)
  • 3 Limes (Sliced)
  • 1 cup Strawberries (Sliced)

Ingredient Spotlight

Mango Cranberry Juice: This is the backbone of the punch, providing a sweet-tart base with a deep tropical note. In US stores, brands like Ocean Spray or Simply Cranberry work beautifully. If you can’t find mango cranberry, substitute with 40 oz cranberry juice + 24 oz mango nectar — the flavor will be slightly more tart, so add a tablespoon of simple syrup if needed.

Coconut Rum: I use Malibu or a similar coconut-flavored rum for that signature beachy vibe. It adds a creamy, sweet coconut note without being overpowering. For a stronger rum presence, use a dark Jamaican rum and add 1/2 teaspoon coconut extract. The flavor will be more robust and less sweet — perfect for a more adult-oriented party punch with rum.

Peach Schnapps: This brings a delicate floral sweetness that ties the fruit flavors together. I recommend DeKuyper or Arrow peach schnapps, both readily at any US liquor store. If you want to skip the schnapps, use 1/2 cup peach nectar + 1/2 cup vodka with a splash of vanilla extract. The alcohol content will be similar, but the flavor will be less intensely peachy.

White Strawberry Cranberry Juice: This is the secret to the second layer’s beautiful pale pink color. It’s lighter than traditional cranberry juice and lets the coconut rum shine. If unavailable, use 4 cups white cranberry juice + 2 cups strawberry nectar. The color will be slightly deeper, and the flavor a touch sweeter.

Original Ingredient Best Substitution Flavor / Texture Impact
Mango Cranberry Juice Cranberry Juice + Mango Nectar (40 oz + 24 oz) More tart, less sweet; add simple syrup
Coconut Rum Dark Jamaican Rum + 1/2 tsp coconut extract More robust, less sweet; deeper flavor
Peach Schnapps Peach Nectar + Vodka + Vanilla Extract Less peachy, more neutral spirit flavor
White Strawberry Cranberry Juice White Cranberry Juice + Strawberry Nectar Deeper pink color, slightly sweeter

How to Make Tropical Rum Punch — Step-by-Step

Trust me, this is one of the easiest party punches you’ll ever make. With just a few steps and a little patience for chilling, you’ll have a show-stopping drink that tastes like it came from a beachside bar.

Step 1: Macerate the Fruit

Place the chopped pineapples and sliced oranges in a 1.5 to 2-gallon drink dispenser. Pour the mango cranberry juice and peach schnapps directly over the fruit. Gently stir with a long spoon to coat everything. Let this sit at room temperature for 15 minutes, then refrigerate. The fruit will soften and release its natural juices, infusing the liquid with fresh flavor.

💡 emy’s Pro Tip: Use ripe but firm fruit. Overripe oranges and pineapples can turn mushy and cloud the punch. You want the fruit to flavor the juice, not disintegrate into it.

Step 2: Mix the Second Layer

In a separate pitcher, combine the white strawberry cranberry juice, orange juice, and coconut rum. Whisk briefly to blend. The color should be a soft, pale pink — this is what will create that beautiful gradient effect when layered over the ice.

⚠️ Common Mistake to Avoid: Don’t skip the separate pitcher. If you add the white cranberry mixture directly to the fruit mixture before chilling, the colors will blend and you’ll lose the layered effect. Keep them separate until serving time.

Step 3: Chill Both Containers

Cover both the drink dispenser and the pitcher and refrigerate for at least 2 hours, or up to overnight. This step is crucial — a well-chilled punch stays cold longer once ice is added, and the flavors meld together beautifully.

💡 emy’s Pro Tip: For the best flavor, chill for 4 hours or overnight. The fruit macerates more deeply, and the coconut rum has time to marry with the juices. This is my favorite make-ahead step for busy NYC entertaining.

Step 4: Layer and Serve

Just before serving, fill the larger drink dispenser (the one with the fruit mixture) with the gallon of cubed ice. Slowly pour the second layer from the smaller pitcher directly on top of the ice, pouring gently to preserve the separation. The ice will help keep the layers distinct.

⚠️ Common Mistake to Avoid: Pour the second layer too quickly and it will mix with the base layer, turning the whole punch a muddy pink. Pour in a slow, steady stream over the back of a spoon held just above the ice for the cleanest layer.

Step 5: Garnish with Fresh Fruit

Gently add the extra chopped pineapples and a few sliced strawberries into the center of the dispenser. Then, using a large spoon or fork, very carefully place the sliced limes and remaining strawberries around the edges of the container. This creates a gorgeous presentation that highlights each fruit.

💡 emy’s Pro Tip: For a stunning party look, layer the lime slices along the inside wall of the dispenser before adding the ice. They’ll stay in place and create a beautiful green border that peeks through the punch.

Step Action Duration Key Visual Cue
1 Macerate fruit in mango cranberry juice and schnapps 15 min rest + 2 hr chill Fruit softens, juice deepens in color
2 Mix white cranberry juice, OJ, and coconut rum 5 minutes Uniform pale pink liquid
3 Chill both containers separately 2+ hours or overnight Both liquids thoroughly cold
4 Add ice to dispenser, pour second layer over top 5 minutes Visible gradient: dark red base, pink top layer
5 Garnish with fruit 5 minutes Fruit arranged in center and around edges

Serving & Presentation

This tropical rum punch is a showstopper at any gathering. I love serving it from a clear glass drink dispenser with a spigot so guests can help themselves. The layered effect — deep ruby red at the bottom fading into soft pink at the top — is pure magic. Arrange the fruit garnishes so they’re visible through the glass: lime slices along the walls, strawberries floating near the top, and pineapple chunks clustered in the center.

For a truly memorable presentation, set out small cocktail cups or lowball glasses with a cube of ice and a mint sprig. Let guests pour their own punch over the ice — the mint adds a fresh aroma that complements the coconut and peach notes. This drink pairs beautifully with grilled shrimp skewers, coconut-crusted chicken tenders, or a simple mango salsa with tortilla chips. It’s the kind of party punch with rum that makes everyone feel like they’re on vacation.

Pairing Type Suggestions Why It Works
Side Dish Grilled shrimp skewers, coconut chicken tenders, mango salsa Savory-spicy-sweet contrast balances the fruity punch
Sauce / Dip Creamy cilantro lime dip, sweet chili sauce, pineapple salsa Creamy and spicy dips offset the bright acidity of the punch
Beverage Sparkling water with lime, iced tea, coconut water Non-alcoholic options keep the party inclusive
Garnish Mint sprigs, edible flowers, pineapple leaves, lime wheels Adds visual height and fresh aroma to each glass

Make-Ahead, Storage & Reheating

As a busy NYC cook, I rely on make-ahead strategies. This tropical rum punch recipe is perfect for prepping the day before a party. I mix both layers, chill them overnight, and simply add the ice and garnish right before guests arrive. The punch keeps beautifully in the fridge for up to 3 days, though the fresh fruit will continue to soften. If you’re planning for a larger event, you can easily double the recipe — just make sure your dispenser is big enough!

Method Container Duration Reheating Tip
Refrigerator Covered pitcher or dispenser Up to 3 days Serve cold or over fresh ice; do not heat
Freezer Freezer-safe pitcher or zip-top bag Up to 3 months Thaw in fridge overnight; stir well before serving
Make-Ahead Two separate containers (fruit base + second layer) 1 day in advance Assemble with ice and garnish just before serving

If you’re freezing the punch, I recommend doing so without the fresh fruit garnish. The fruit will become mushy upon thawing, so it’s best to add fresh slices after thawing. To serve from frozen, thaw the base in the refrigerator overnight, stir well, and then proceed with the layering and garnishing steps. The flavor remains bright and delicious for up to 3 months.

Variations & Easy Swaps

Variation Key Change Best For Difficulty Impact
Virgin Tropical Punch Omit rum and schnapps; use fruit juice + coconut water All-ages gatherings, designated drivers Easy (no change in technique)
Spiced Pineapple Version Add 1 tsp cinnamon, 1/2 tsp nutmeg, use dark rum Fall and winter parties Easy (add spices to the second layer)
Berry-Hibiscus Punch Replace mango cranberry with hibiscus tea + berry juice Elegant brunches, baby showers Medium (requires brewing tea)

Virgin Tropical Punch

This non-alcoholic version is just as delicious and party-worthy. Omit the peach schnapps and coconut rum, and replace them with 1 cup coconut water and 1 cup peach nectar. For a little fizz, add 2 cups of sparkling water just before serving. The flavor stays bright and tropical, and the layered effect works beautifully with the same juice base. I often make a double batch — one with alcohol and one without — so everyone can enjoy it.

Spiced Pineapple Version

For a cozy twist, add 1 teaspoon of cinnamon and 1/2 teaspoon of freshly grated nutmeg to the white cranberry mixture. Swap the coconut rum for a dark Jamaican rum, and use pineapple juice instead of orange juice. The spice notes warm up the drink, making it perfect for holiday parties or cool-weather gatherings. This variation reminds me of the spiced teas my mother would make in Morocco — warming, aromatic, and deeply comforting.

Berry-Hibiscus Tropical Punch

Brew 4 cups of strong hibiscus tea and let it cool completely. Use this in place of the mango cranberry juice, and add 2 cups of mixed berry juice (such as blackberry or raspberry) to the second layer. The hibiscus adds a tart, floral note that pairs beautifully with the coconut rum and peach schnapps. This version has a stunning deep magenta color that’s absolutely gorgeous in a glass dispenser. I discovered this combination at a NYC farmers market when I found fresh hibiscus flowers — it’s been a favorite ever since.

What is the best type of rum to use in a tropical rum punch?

For this tropical rum punch recipe, I recommend using a coconut-flavored rum like Malibu for the base layer — it adds a creamy, sweet tropical note that complements the fruit juices perfectly. If you prefer a less sweet punch, you can substitute with a light silver rum and add 1/2 teaspoon of coconut extract. For a more robust flavor, a dark Jamaican rum works beautifully, especially in the spiced variation. The key is to choose a rum that doesn’t overpower the fruit — you want the rum to support the juices, not dominate them. Gold rums also work well and add a slight vanilla note.

How can I make a non-alcoholic version of tropical rum punch?

Making a non-alcoholic version of this easy rum punch is simple and delicious. Omit the peach schnapps and coconut rum entirely, and replace them with 1 cup of coconut water and 1 cup of peach nectar. The coconut water maintains that tropical feel without any alcohol, while the peach nectar provides the sweetness and body that the schnapps normally brings. For a bit of sparkle, add 2 cups of plain sparkling water or lemon-lime soda just before serving. The layered presentation works exactly the same way, so your virgin punch will look just as stunning as the original. This version is perfect for all-ages gatherings and designated drivers.

What fruit juices are traditionally used in a tropical rum punch?

Traditional Caribbean punch drinks typically use a combination of citrus juices like orange, lime, and sometimes grapefruit, along with tropical fruit juices such as pineapple, mango, or passion fruit. In this fruity cocktail recipe, I use mango cranberry juice as the base for its sweet-tart profile, white strawberry cranberry juice for the second layer’s delicate color, and orange juice for brightness. Cranberry juice is a more modern addition that’s very popular in US party punch recipes because it adds beautiful color and balances the sweetness. For a more traditional approach, you can use equal parts pineapple juice, orange juice, and lime juice as your base, then add the coconut rum and peach schnapps.

How long should I let the rum punch sit before serving to blend the flavors?

For the best flavor development in this party punch with rum, I recommend chilling the two mixtures separately for at least 2 hours, and up to overnight. The maceration step — where the fruit sits in the mango cranberry juice and peach schnapps — benefits from at least 2 hours of refrigeration so the fruit can release its natural sugars and aromas. The second layer (white cranberry juice, orange juice, and coconut rum) also benefits from chilling, as the cold temperature helps the flavors meld. Once you combine the layers with ice and garnish, serve immediately. The punch won’t improve with sitting once the ice is added, as dilution will begin. So chill the components separately, then assemble and serve right away.

Can I make this tropical rum punch in advance for a party?

Absolutely! This is one of the best make-ahead cocktail recipes I know. You can prepare both mixtures up to 3 days in advance and store them separately in the refrigerator. The fruit maceration actually improves over time — leaving it overnight gives you a deeper, more complex flavor. On the day of your party, simply fill your drink dispenser with cubed ice, pour the fruit base over it, then slowly add the second layer. Add your fresh garnishes, and you’re ready to serve in under 10 minutes. This make-ahead strategy is a lifesaver for busy hosts, and the punch tastes even better because the flavors have had time to develop.

What type of glassware is best for serving tropical rum punch?

For this Caribbean punch drink, I recommend serving in clear glass cups or lowball tumblers so guests can see the beautiful layered colors. A small 8- to 10-ounce glass is perfect — big enough to hold a generous portion but not so large that the ice melts too quickly before the drink is finished. For a party, I love using mason jars or clear plastic cups with a fun straw. If you’re feeling fancy, rim the glasses with a mixture of sugar and lime zest for an extra special touch. The visual appeal of the punch is half the fun, so clear glassware lets those gorgeous ruby and pink layers shine.

Can I freeze tropical rum punch into ice cubes or popsicles?

Yes, you can freeze this fruity cocktail recipe into ice cubes for a fun twist! Pour some of the finished punch into ice cube trays and freeze overnight. Use these punch ice cubes in your serving dispenser instead of regular ice — they’ll chill the drink without diluting it, and they look gorgeous floating in the punch. You can also freeze the punch into popsicle molds for an adult treat. Just remember that the alcohol content will lower the freezing point, so the popsicles may be slightly softer than traditional ones. The fruit pieces make beautiful, colorful inclusions in both ice cubes and popsicles.

What is the difference between rum punch and a regular cocktail?

Rum punch is typically served in larger batches and features a mix of fruit juices, rum, and often a sweetener or liqueur, making it perfect for parties and gatherings. Unlike a single-serve cocktail that’s shaken or stirred and served immediately, a punch is designed to be self-served from a dispenser or bowl. This easy rum punch recipe is also characterized by its layered presentation, which sets it apart from a standard cocktail. Punches are generally lower in alcohol concentration than individual cocktails, allowing guests to enjoy multiple servings over a longer period. The social, shareable nature of a punch makes it the heart of any celebration.

How do I prevent my tropical rum punch from becoming too watery?

The secret to a non-watery punch is using cubed ice instead of crushed ice, and chilling both mixtures thoroughly before serving. Cubed ice melts much more slowly than crushed ice, so your punch stays flavorful for hours. I also recommend using a full gallon of ice — enough to keep everything cold without overwhelming the liquid. Another tip is to chill your serving dispenser beforehand: rinse it with cold water and let it sit in the fridge for 20 minutes before adding the punch. If you’re serving outdoors on a hot day, place the dispenser in a larger bowl filled with ice to keep it cold. These small steps make a big difference in maintaining that perfect flavor balance.

What dishes pair best with tropical rum punch for a party menu?

This tropical rum punch recipe pairs beautifully with light, fresh party foods. I love serving it alongside grilled shrimp skewers with a cilantro-lime dip, coconut-crusted chicken tenders with a sweet chili sauce, or fish tacos with mango salsa. For appetizers, think about fresh spring rolls with peanut sauce, spicy jalapeño poppers, or a tropical fruit platter with lime zest. The punch’s sweet and tangy profile also works wonderfully with spicy dishes — the sweetness balances the heat perfectly. For dessert, keep it simple with coconut macaroons, pineapple upside-down cake, or a key lime pie. The key is to match the punch’s bright, vacation vibe with food that feels just as celebratory.

Share Your Version!

I absolutely love seeing how you make this tropical rum punch your own! Did you try the virgin version for a family gathering? Maybe you added a splash of something extra and created a whole new flavor? Drop a comment below and let me know how it turned out — your star rating means the world to me and helps other home cooks find this recipe. Tag me on Instagram or Pinterest @cookingwithemy when you share your punch photos. I want to see those beautiful layered drinks and creative garnishes!

Tell me: what’s your favorite memory that involves a punch bowl? For me, it’s always the laughter and clinking glasses that matter most. From my NYC kitchen to yours — I hope this recipe brings as much warmth to your table as it does to mine. — emy 🧡

📌

Love This Recipe? Save It to Pinterest!

If you enjoyed this Tropical Rum Punch recipe, don’t let it get lost in your browser tabs! 😄 Pin it now so you can find it again anytime — and explore hundreds more tried-and-tested recipes waiting for you on my Pinterest boards.

👉 Follow emy on Pinterest @cookingwithemy

📌 Pin this recipe · 🔁 Re-pin your favorites · 💬 Tag me when you make it — I love seeing your creations!

“`

Print

clock clock iconcutlery cutlery iconflag flag iconfolder folder iconinstagram instagram iconpinterest pinterest iconfacebook facebook iconprint print iconsquares squares iconheart heart iconheart solid heart solid icon

Tropical Rum Punch


  • Author: Chef Emy

Description

Tropical rum punch is a delicious cocktail recipe to make for a party or sip by the pool. A mix of juices, peach schnapps and coconut rum layered with fruit. With just one taste and you’ll be transported to the beach!


Ingredients

Scale
  • 64 ounces Mango Cranberry Juice
  • 1 cup Peach Schnapps
  • 1 cup Fresh Pineapple (Chopped)
  • 2 Oranges (Sliced)
  • 6 cups White Strawberry Cranberry Juice
  • 2 cups Orange Juice
  • 1 1/2 cups Coconut Rum
  • 1 gallon cubed Ice (not crushed)
  • 1/2 cup Pineapples (Chopped)
  • 3 Limes (Sliced)
  • 1 cup Strawberries (Sliced)

Instructions

  1. Place pineapples and oranges in a 1.5-2 gallon drink dispenser. Pour mango cranberry juice and peach schnapps over the fruit and gently stir.
  2. In a separate pitcher, mix the white cranberry juice, orange juice and coconut rum together.
  3. Chill both containers in refrigerator until ready to serve.
  4. Before serving, fill the larger drink dispenser with ice. Pour the second layer from the smaller pitcher slowly and directly on top of the ice.
  5. Gently add some chopped pineapples and a few sliced strawberries in the center.
  6. Very gently, place sliced limes and the rest of the strawberries around the edges of the container with a large spoon or fork.

Nutrition

  • Calories: 221 kcal
  • Sugar: 34 g
  • Carbohydrates: 38 g
  • Protein: 1 g


Tropical Rum Punch

“`html

Hibiscus Tea Strawberry Lemonade Refresher – Naturally Sweetened with Maple Syrup

⚖️
Difficulty
Easy
⏲️
Prep Time
10 mins
🕒
Cook Time
10 mins
⏱️
Total Time
20 mins
🍽️
Servings
2

Growing up in Morocco, my mother would brew deep ruby-red hibiscus tea on hot afternoons, sweetening it just a touch with honey and serving it with fresh mint from the garden. Years later, after training at a French culinary school in Paris, I found myself blending that cherished North African memory with classic French technique — and this hibiscus tea strawberry lemonade refresher was born. It is tart, fruity, naturally sweetened, and so refreshing — the perfect drink to cool down with on a hot day. Made with hibiscus tea, strawberries, and fresh lemon juice, this strawberry hibiscus lemonade is my go-to summer sipper.

The first sip hits you with bright, tangy hibiscus — floral and slightly tart — then the strawberry puree brings a soft, jammy sweetness that rounds everything out. The lemon juice adds a clean, zesty finish, while the maple syrup ties it all together without overwhelming the fruit. I love the way the deep magenta color catches the light through a glass filled with ice cubes and fresh strawberry slices. It reminds me of the rose-colored drinks we’d serve during Ramadan, but lighter, more playful — the kind of drink you’d find at a Brooklyn rooftop gathering or a Parisian picnic in the park.

What makes my version special is the extra step of blending the strawberries with a bit of the cooled tea before adding them to the pitcher — it creates a smoother, more integrated puree that disperses evenly rather than floating as chunky bits. I also use maple syrup instead of refined sugar, which adds a subtle caramel note that complements the hibiscus beautifully. In this post, I’ll walk you through every step, share a few pro tips I learned in Paris, and point out one common mistake that can make your lemonade taste bitter. Let’s get started!

Why This Hibiscus Tea Strawberry Lemonade Refresher Recipe Is the Best

The Flavor Secret: Most hibiscus lemonade recipes rely on white sugar or simple syrup, but I use pure maple syrup. Growing up in Morocco, we always used honey or date syrup for sweetening teas — that North African instinct to pair floral with earthy sweetness carries through here. The maple syrup adds a warm, almost woodsy depth that makes the hibiscus taste richer and more complex, without masking its natural tartness.

Perfected Texture: In Paris, I learned that the secret to a great fruit puree is to blend the fruit with a small amount of the liquid it will be served in — it helps the flavors marry and creates a silkier texture. That’s exactly what I do here: I blend the strawberries with a little bit of the cooled hibiscus tea before combining everything. This ensures the puree disperses evenly throughout the pitcher, giving you consistent flavor in every sip rather than a watery top layer and a pulpy bottom.

Foolproof & Fast: This pink lemonade with tea comes together in about 20 minutes, and most of that time is hands-off steeping. You don’t need any special equipment — just a kettle, a blender, and a pitcher. The recipe is forgiving: you can adjust the sweetness and tartness to your exact taste, and it works beautifully whether you use fresh or frozen strawberries. Even if you’ve never made tea lemonade before, you’ll nail it on the first try.

Hibiscus Tea Strawberry Lemonade Refresher Ingredients

Whenever I shop for these ingredients at the Union Square Greenmarket in New York City, I feel that same joy I did as a child in the Marrakech souk — bright red strawberries piled high, lemons still dusty from the farm, and bags of dried hibiscus flowers that smell like summer. For the best strawberry hibiscus drink, use the freshest produce you can find. Here is everything you will need.

Ingredients List

  • 2 cups water
  • 2 hibiscus tea bags (OR 2 tablespoons of dried hibiscus flowers)
  • 1/2 cup strawberries (fresh or frozen, hulled)
  • 1/4 cup lemon juice (freshly squeezed — about 2 lemons)
  • 2–3 tablespoons maple syrup (adjust to taste; see notes for substitutions)
  • Optional toppings: Extra sliced strawberries, lemon slices, and/or fresh mint leaves

Ingredient Spotlight

Hibiscus tea bags or dried flowers: The heart of this hibiscus lemonade recipe. Dried hibiscus flowers (also called flor de jamaica) have a deeper, more floral flavor than many bagged teas. If using bags, look for ones that list hibiscus as the first ingredient. I buy my dried flowers from a spice shop in Chelsea Market, but they are also widely available in Latin grocery stores or online.

Strawberries: Fresh, ripe strawberries give the puree a vibrant sweetness and a beautiful pink hue. If strawberries are out of season, frozen strawberries work wonderfully — just thaw them slightly before blending. Avoid strawberries that are pale or have white shoulders, as they will make the lemonade taste watery.

Lemon juice: Freshly squeezed lemon juice is non-negotiable here. Bottled lemon juice has a flat, metallic taste that can ruin the bright, clean finish of this drink. Roll your lemons on the counter before juicing to get the most juice out of them.

Maple syrup: I prefer grade A amber maple syrup for its balanced sweetness and subtle caramel notes. Honey, agave nectar, or even simple syrup work as substitutes, but each will change the flavor profile slightly — honey adds floral notes, agave is milder, and simple syrup is neutral.

Original Ingredient Best Substitution Flavor / Texture Impact
Hibiscus tea bags Dried hibiscus flowers (2 tbsp) Deeper floral flavor, slightly more tart; strain before using
Fresh strawberries Frozen strawberries (thawed) Slightly softer texture in puree; flavor is still vibrant
Maple syrup Honey or agave nectar Honey adds floral notes; agave is milder and less distinct
Fresh lemon juice Lime juice More tart, slightly less sweet; adds a green citrus note

How to Make Hibiscus Tea Strawberry Lemonade Refresher — Step-by-Step

I promise, this is one of the easiest drinks you will ever make. Just follow these simple steps and you will have a pitcher of gorgeous hibiscus tea strawberry lemonade refresher ready to enjoy.

Step 1: Brew the Hibiscus Tea

In a tea kettle, bring 2 cups of water to a rolling boil. Remove from heat and add 2 hibiscus tea bags (or 2 tablespoons of dried hibiscus flowers). Let them steep for 5–7 minutes — the longer you steep, the stronger and more tart your tea will be. Remove the tea bags or strain out the flowers through a fine-mesh sieve. Set the tea aside to cool to room temperature. You can speed this up by placing it in the refrigerator for 10 minutes.

💡 emy’s Pro Tip: If you want a deeper ruby color and a more intense hibiscus flavor, steep for the full 7 minutes, but taste it at 5 minutes to see if it is strong enough for your liking. Over-steeping can make it overly bitter.

Step 2: Make the Strawberry Puree

Wash and slice 1/2 cup of strawberries. Add them to a blender along with 1/4 cup of the cooled hibiscus tea. Blend until smooth — about 20–30 seconds. For an ultra-smooth texture, you can strain the puree through a fine-mesh sieve or a nut milk bag to remove the seeds. I usually leave the seeds in because I like the rustic texture, but it is entirely up to you.

⚠️ Common Mistake to Avoid: Do not blend the strawberries without adding liquid — they will just stick to the blades and you will end up with a thick paste instead of a pourable puree. The 1/4 cup of tea helps everything move smoothly.

Step 3: Combine and Adjust

In a large pitcher, combine the remaining cooled hibiscus tea, the strawberry puree, 1/4 cup of freshly squeezed lemon juice, and 2–3 tablespoons of maple syrup. Stir everything together until well combined. Taste and adjust: add more maple syrup if you prefer a sweeter drink, or more lemon juice if you like it extra tart. Pour over ice-filled glasses and garnish with lemon slices, extra strawberry slices, and a sprig of fresh mint. Serve immediately and enjoy!

💡 emy’s Pro Tip: For the prettiest presentation, layer the drink by pouring the hibiscus mixture over ice first, then adding a few spoonfuls of strawberry puree on top — it creates a gorgeous gradient effect that looks beautiful in a clear glass.

Step Action Duration Key Visual Cue
1 Brew hibiscus tea 5–7 minutes steeping Deep ruby-red color
2 Blend strawberry puree 20–30 seconds Smooth, pourable consistency
3 Combine and adjust 2–3 minutes Uniform bright pink color

Serving & Presentation

This hibiscus tea strawberry lemonade refresher is as beautiful as it is delicious. I love serving it in tall, clear glasses so you can see the gorgeous magenta color and the strawberry seeds suspended in the liquid. Fill each glass with ice cubes — preferably large ones that melt slowly — and pour the refresher right over the top. Garnish with a lemon wheel, a few thin strawberry slices, and a sprig of fresh mint. For an extra touch, add a reusable straw — it makes the drink feel like something from a chic cafe in the West Village.

In Morocco, we would serve this alongside sweet pastries or fresh fruit during hot afternoons. Here in New York City, I pair it with light summer dishes like a grilled halloumi salad, herbed quinoa bowls, or even spicy tacos — the tartness of the drink cuts through richer flavors beautifully. It also makes a wonderful non-alcoholic option for brunch, baby showers, or backyard barbecues.

Pairing Type Suggestions Why It Works
Side Dish Grilled halloumi, herbed quinoa, spicy tacos Tartness cuts through rich and salty flavors
Sauce / Dip Hummus, baba ganoush, tzatziki Creamy dips balance the bright acidity
Beverage Sparkling water, iced green tea, white wine Layers of refreshment without overpowering
Garnish Lemon wheels, strawberry slices, mint sprigs Adds visual appeal and aromatic freshness

Make-Ahead, Storage & Reheating

Between running my blog and exploring new restaurants in NYC, I love any recipe I can prep ahead. This hibiscus tea strawberry lemonade refresher is perfect for that — you can make the tea and the puree separately and combine them right before serving. It also stores beautifully, so do not hesitate to make a double batch for your next gathering.

Method Container Duration Reheating Tip
Refrigerator Pitcher with lid or glass jar Up to 3 days Stir well before serving; flavors may meld and deepen
Freezer Freezer-safe jar or ice cube trays Up to 2 months Thaw in fridge overnight; blend briefly to re-emulsify
Make-Ahead Tea and puree stored separately Tea: 3 days; Puree: 2 days Combine just before serving for freshest flavor

If you are storing the fully mixed refresher in the fridge, give it a good stir before serving — the strawberry puree can settle at the bottom. I do not recommend reheating this drink (it is meant to be served cold), but if you want a warm version, simply heat the hibiscus tea and stir in the strawberry puree and lemon juice just before serving. It is a cozy twist for cooler months!

Variations & Easy Swaps

One of the things I love most about this hibiscus lemonade recipe is how easy it is to adapt. Whether you are catering to dietary needs, using what is in season, or just feeling adventurous, there are so many ways to make it your own.

Variation Key Change Best For Difficulty Impact
Sparkling Hibiscus Refresher Replace 1 cup water with sparkling water Fizz lovers, parties, brunch No change — stir gently
Ginger-Hibiscus Kick Add 1 tbsp grated ginger to the steeping tea Spicy twist, immunity boost No change — steep with tea
Coconut Hibiscus Lemonade Replace 1/2 cup water with coconut water Extra hydration, tropical vibe No change — simple swap

Sparkling Hibiscus Refresher

For a bubbly version that feels extra festive, replace 1 cup of the water with sparkling water or club soda. After combining the hibiscus tea, strawberry puree, lemon juice, and maple syrup in the pitcher, gently stir in the sparkling water just before serving. This keeps the fizz alive and makes the strawberry hibiscus drink feel like a mocktail. I love serving this at summer brunches — it is light, elegant, and pairs beautifully with savory dishes like frittatas or avocado toast.

Ginger-Hibiscus Kick

Add a 1-inch piece of fresh ginger, peeled and thinly sliced, to the tea kettle while the hibiscus is steeping. The ginger infuses a gentle warmth and a subtle spicy kick that complements the tart hibiscus and sweet strawberries beautifully. This variation is especially lovely in early spring or fall, when you want something refreshing but with a little more depth. Strain the ginger slices out along with the hibiscus flowers. It is a trick I learned from a Moroccan tea vendor in the medina — he always added a sliver of ginger to his hibiscus tea for what he called “a little fire.”

Coconut Hibiscus Lemonade

For a tropical twist, replace 1/2 cup of the water with unsweetened coconut water. The coconut water adds natural electrolytes and a subtle, nutty sweetness that pairs wonderfully with the strawberry and hibiscus. This version is especially refreshing after a workout or on a sweltering summer afternoon. I discovered this combination at a juice bar in Brooklyn, and it has been a favorite ever since — it is like a vacation in a glass.

How do you make hibiscus tea strawberry lemonade refresher from scratch?

To make this hibiscus tea strawberry lemonade refresher from scratch, start by brewing 2 cups of water with 2 hibiscus tea bags or 2 tablespoons of dried hibiscus flowers for 5–7 minutes until the tea is deep ruby red. Let it cool completely. Meanwhile, blend 1/2 cup of strawberries with 1/4 cup of the cooled tea until smooth. In a pitcher, combine the remaining tea, the strawberry puree, 1/4 cup of freshly squeezed lemon juice, and 2–3 tablespoons of maple syrup. Stir well, taste, and adjust the sweetness or tartness to your preference. Serve over ice with lemon slices, fresh strawberries, and mint leaves for garnish. That is all there is to it — simple, natural, and incredibly refreshing.

What can I use instead of fresh strawberries in a hibiscus tea lemonade refresher?

If you do not have fresh strawberries, frozen strawberries are the best substitute — simply thaw them slightly before blending. They will give you the same vibrant color and sweet flavor. You can also use raspberries, blackberries, or even pitted cherries for a different berry twist. If using raspberries, strain the puree to remove the seeds for a smoother texture. Another option is to use strawberry puree or strawberry nectar from a jar, but look for unsweetened versions so you can control the sweetness yourself. Keep in mind that frozen berries may release more liquid, so your refresher might be slightly thinner — just adjust the maple syrup accordingly.

How long does it take to steep hibiscus tea for this refresher recipe?

For this recipe, steep the hibiscus tea for 5–7 minutes. I recommend starting with 5 minutes, then tasting the tea to see if it is strong enough for your liking. If you want a more intense hibiscus flavor and a deeper ruby color, let it steep for the full 7 minutes. Just be careful not to exceed 7–8 minutes, as over-steeping can make the tea taste overly bitter and astringent. The tea should be vibrant, tart, and floral — not harsh. After steeping, remove the tea bags or strain out the flowers and let the tea cool completely before mixing with the other ingredients. You can speed up the cooling by placing the tea in the refrigerator for about 10 minutes.

Can I make hibiscus tea strawberry lemonade refresher ahead of time for a party?

Absolutely! This refresher is perfect for making ahead. You can prepare the hibiscus tea and the strawberry puree separately up to 2 days in advance and store them in the refrigerator. Combine them with the lemon juice and maple syrup just before serving for the freshest flavor. Alternatively, you can mix the entire refresher (without ice) up to 1 day ahead and keep it in a covered pitcher in the fridge. Give it a good stir before serving because the puree may settle. For a party, I recommend making a double batch and serving it in a large beverage dispenser with ice, lemon wheels, and strawberry slices floating on top. Your guests will love it!

Is hibiscus tea strawberry lemonade refresher healthy?

Yes, this refresher is a much healthier alternative to store-bought lemonades and sugary drinks. Hibiscus tea is rich in antioxidants and vitamin C, and it is naturally caffeine-free. Strawberries add additional vitamin C, fiber, and a beautiful natural sweetness, while fresh lemon juice provides a boost of immune-supporting nutrients. The recipe uses only 2–3 tablespoons of maple syrup for the entire pitcher, which is very low compared to commercial beverages. Each serving has just 72 calories, 18 grams of carbohydrates, and 15 grams of sugar — all from natural sources. You can further reduce the sweetness by using less maple syrup or substituting with a zero-calorie sweetener like stevia if desired.

Can I use dried hibiscus flowers instead of tea bags?

Yes, you can absolutely use dried hibiscus flowers instead of tea bags — in fact, many people prefer them for their deeper, more authentic flavor. Use 2 tablespoons of dried hibiscus flowers in place of 2 tea bags. Add them directly to the hot water after boiling, let them steep for 5–7 minutes, then strain the tea through a fine-mesh sieve or cheesecloth to remove the flower pieces before cooling. Dried hibiscus flowers are often sold as “flor de jamaica” in Latin grocery stores or in bulk at spice shops. They tend to be slightly more tart and floral than bagged teas, which works beautifully in this strawberry hibiscus lemonade recipe.

Can I add alcohol to make this a cocktail?

Definitely! This hibiscus tea strawberry lemonade refresher makes a wonderful base for a cocktail. For a light and refreshing option, add 1.5 ounces of vodka, gin, or white rum to each glass. The tart hibiscus and sweet strawberry flavors pair especially well with vodka or gin. For a tequila version, rim the glass with a mixture of salt and a pinch of chili powder for a spicy-sweet twist. You can also make a large batch for parties by adding 1 to 1.5 cups of your chosen spirit to the full pitcher. Just stir gently and serve over ice. Garnish with a lemon wheel and a mint sprig for a professional-looking cocktail that is perfect for summer entertaining.

How do I make this refresher sweeter without adding more maple syrup?

If you want a sweeter refresher without adding more maple syrup, there are several natural options. First, use riper strawberries — they contain more natural sugars and will make the puree sweeter on its own. You can also add a very ripe banana or half a peeled apple to the strawberry puree; both add natural sweetness and a creamy texture. Another option is to use a sweeter variety of apple juice or white grape juice in place of some of the water — just reduce the maple syrup accordingly. For a zero-calorie option, a few drops of liquid stevia or monk fruit sweetener will add sweetness without altering the flavor. Finally, you can reduce the amount of lemon juice slightly, as less acidity will make the drink taste sweeter.

Can I make this hibiscus lemonade recipe without a blender?

Yes, you can make this refresher without a blender. Instead of blending the strawberries, mash them thoroughly with a fork or a potato masher until you have a chunky puree. Then, press the mashed strawberries through a fine-mesh sieve using the back of a spoon to extract the juice and pulp, discarding the solids. This method takes a few extra minutes but works perfectly. Alternatively, you can use strawberry juice or strawberry nectar from a store — just make sure it is unsweetened so you can control the sweetness. If you do not mind a more textured drink, you can simply slice the strawberries thinly and let them infuse in the tea for 30 minutes before serving. Each method gives you a slightly different texture, but all are delicious.

What is the best way to serve hibiscus tea strawberry lemonade for a crowd?

For a crowd, I recommend making a large batch in a beverage dispenser or a big glass pitcher. Multiply the ingredients by the number of servings you need — the recipe scales up beautifully. Make the hibiscus tea and strawberry puree a day ahead and store them separately in the refrigerator. On the day of your event, combine everything in the dispenser with plenty of ice. Add lemon wheels, fresh strawberry slices, and mint sprigs to the dispenser for a beautiful presentation. Set out small cups or glasses with additional ice and garnishes so guests can help themselves. If you want to keep it cold without diluting it, freeze some of the hibiscus tea in ice cube trays and use those instead of regular ice cubes. This is my go-to method for summer parties, and it always gets rave reviews.

Share Your Version!

I hope you love this hibiscus tea strawberry lemonade refresher as much as I do. It is one of those recipes that feels special enough for a celebration but simple enough for a random Tuesday afternoon. If you make it, I would love to hear how it turned out — leave a star rating and a comment below to let me know what you think. Did you add a twist? Did you serve it at a party? Tell me all about it!

And do not forget to share a photo on Instagram or Pinterest and tag me @cookingwithemy — I love seeing your creations and featuring them on my stories. Your support means the world to me. If you have any questions about the recipe, drop them in the comments and I will get back to you as soon as I can.

From my NYC kitchen to yours — I hope this recipe brings as much warmth to your table as it does to mine. — emy 🧡

📌

Love This Recipe? Save It to Pinterest!

If you enjoyed this Hibiscus Tea Strawberry Lemonade Refresher recipe, don’t let it get lost in your browser tabs! 😄 Pin it now so you can find it again anytime — and explore hundreds more tried-and-tested recipes waiting for you on my Pinterest boards.

👉 Follow emy on Pinterest @cookingwithemy

📌 Pin this recipe · 🔁 Re-pin your favorites · 💬 Tag me when you make it — I love seeing your creations!

“`

Print

clock clock iconcutlery cutlery iconflag flag iconfolder folder iconinstagram instagram iconpinterest pinterest iconfacebook facebook iconprint print iconsquares squares iconheart heart iconheart solid heart solid icon

Hibiscus Tea Strawberry Lemonade Refresher


  • Author: Chef Emy

Description

This hibiscus strawberry lemonade refresher is tart, fruity, naturally sweetened, and so refreshing. Made with hibiscus tea, strawberries, and fresh lemon juice, its the perfect drink to cool down with on a hot day.


Ingredients

Scale
  • 2 cups water
  • 2 hibiscus tea bags (OR 2 tablespoons of dried hibiscus flowers)
  • 1/2 cup strawberries
  • 1/4 cup lemon juice (freshly squeezed)
  • 23 tablespoons maple syrup (adjust to taste, see Notes for substitutions)
  • Optional toppings: Extra sliced strawberries and lemon slices, and/or fresh mint leaves.

Instructions

  1. Hibiscus tea: In a tea kettle, start by bringing your water to a boil. Once boiling, remove from heat, and place hibiscus tea bags (OR dried hibiscus flowers) into the kettle. Steep for 5-7 minutes (the longer it sits, the stronger your tea will be). Then, take out the tea bags (or strain out the flowers), and let the tea cool.
  2. Strawberry puree: Wash and slice your strawberries and add them to a blender along with 1/4 cup of the cooled hibiscus tea. Puree (blend until smooth), and optionally strain through a fine mesh sieve or nut milk bag for a smoother texture.
  3. In a large pitcher, combine the remaining cooled hibiscus tea, strawberry puree, lemon juice, and maple syrup. Stir to combine. Taste and adjust to your liking: For more sweetness, add more syrup, and for more tartness, add more lemon juice. Pour over ice and garnish with lemon slices, more fresh strawberries, and a sprig or two of mint. Enjoy!

Nutrition

  • Calories: 72 kcal
  • Sugar: 15 g
  • Fat: 0.2 g
  • Carbohydrates: 18 g
  • Protein: 0.3 g


Hibiscus Tea Strawberry Lemonade Refresher

“`html

Blueberry Lemonade Recipe – Fresh and Vibrant Summer Drink

⚖️
Difficulty
Easy
⏲️
Prep Time
5 mins
🕒
Cook Time
5 mins
⏱️
Total Time
10 mins + chilling
🍽️
Servings
6

Growing up in Morocco, my mother’s lemonade was the gold standard – tart, sweet, and always made with love. But it wasn’t until I moved to New York City and started frequenting the Union Square Greenmarket that I discovered the magic of combining fresh blueberries with lemon. This blueberry lemonade recipe is my tribute to those mornings, where the burst of berries meets the zing of citrus. With just four main ingredients, you can create a homemade blueberry lemonade that’s leagues above anything store-bought. The secret? Infusing the simple syrup with both blueberries and lemon peels – a technique I picked up in Paris during my pastry training. It extracts maximum flavor without extra effort.

Imagine the first sip: the deep, jammy sweetness of blueberries balanced by the sharp, invigorating tang of lemons. Tiny flecks of berry skin dance in the glass, and the aroma – oh, the aroma – is pure summer. This fresh blueberry lemonade isn’t just a drink; it’s an experience. The color alone, a brilliant magenta that catches the sunlight, makes it a showstopper at any backyard barbecue or brunch table. I love serving this with a sprig of mint and a few extra blueberries floating on top – it’s like a jewel in a glass.

As a trained cook, I’ve learned that the simplest recipes often demand the most precision. Over the years, I’ve tested countless variations – some too sweet, some too watery. This version is my Goldilocks: perfectly balanced, incredibly easy, and made with ingredients you can find at any US grocery store. In this post, I’ll share my chef-level tips for getting the most out of your blueberries, a common mistake that turns lemonade bitter, and a pro trick for making it in under 15 minutes. If you’ve been searching for the best easy blueberry lemonade recipe, your search ends here.

Why This Blueberry Lemonade Recipe Is the Best

The Flavor Secret: Most recipes just muddle berries or use juice. I learned in Paris that gently simmering blueberries with lemon peels in the syrup draws out their natural pectin and essential oils, creating a deeper, more rounded flavor. This is the same technique used for French fruit confits – it’s intense but never artificial.

Perfected Texture: Have you ever had lemonade that’s cloudy or gritty? That’s often from rushed straining. I insist on using a fine-mesh strainer or cheesecloth to remove every bit of peel and seed, leaving a silky-smooth drink that feels luxurious on the tongue. The result is a crystal-clear beverage with a beautiful ruby hue, not a muddy mess.

Foolproof & Fast: This recipe is designed for busy home cooks. The active time is under 10 minutes; the hardest part is waiting for it to chill! You can easily double or triple it for a crowd, and the simple syrup base means you can adjust sweetness to your liking. Whether you’re a seasoned home cook or a beginner, this homemade blueberry lemonade will impress every time.

Blueberry Lemonade Recipe Ingredients

I’m a firm believer that great ingredients make great food – and this drink is no exception. Every Saturday morning, you’ll find me at the Chelsea Market picking up a pint of plump, local blueberries. In Morocco, we used wild mountain berries; here in NYC, I love the fat, sweet blueberries from New Jersey farms. The lemons? I reach for organic ones – you’ll be using the peels, so you want them unwaxed.

Ingredients List

  • 1 cup blueberries (fresh or frozen)
  • ½ cup sugar (more or less to taste)
  • Juice of 4–5 lemons (about ¾ cup juice)
  • Peels of 2–3 lemons (optional, but highly recommended)
  • 1 cup water (for simple syrup)
  • 4 cups cold water (for lemonade)
  • Mint, lemon peels and slices, extra blueberries for garnish (optional)

Ingredient Spotlight

Blueberries: The star of the show. Fresh berries give a brighter, more vibrant flavor, but frozen work beautifully – they actually break down faster when simmered. Avoid dried blueberries; they won’t release enough juice.

Lemons: You need both juice and peel. Use organic if possible. The peel contains aromatic oils that infuse the syrup with a floral, citrusy depth that bottled lemon juice simply cannot replicate. Roll the lemons on the counter before juicing to get every drop.

Sugar: Standard granulated sugar dissolves cleanly and doesn’t compete with the fruit. You can reduce to ⅓ cup for a less sweet drink, or use honey or agave – but see the FAQ for more on that.

Original Ingredient Best Substitution Flavor / Texture Impact
Fresh blueberries Frozen blueberries (no thawing needed) Slightly deeper color, same delicious flavor
Granulated sugar Honey or maple syrup (reduce water slightly) Adds its own flavor; honey pairs beautifully with blueberry
Fresh lemon juice Bottled lemon juice (not recommended) Flat, less bright; fresh is far superior

How to Make Blueberry Lemonade — Step-by-Step

Making this refreshing drink is a breeze. Follow these steps, and you’ll have a pitcher of summer goodness in no time.

Step 1: Prepare the Lemons

Wash the lemons thoroughly. Using a vegetable peeler, remove the yellow zest in wide strips – avoid the white pith, which is bitter. Then, juice 4–5 lemons to get about ¾ cup of fresh juice. Set the juice and peels aside separately.

⚠️ Common Mistake to Avoid: Don’t use a grater for the zest – microplaned zest will disintegrate in the syrup and be hard to strain out. Strips are easier to remove.

Step 2: Make the Blueberry Simple Syrup

In a small saucepan, combine 1 cup water, ½ cup sugar, the blueberries, and half of the lemon peels. Bring to a gentle simmer over medium heat, stirring occasionally, until the sugar dissolves and the blueberries start to pop – about 3–4 minutes. The liquid will turn a gorgeous deep pink.

💡 emy’s Pro Tip: Gently mash the blueberries against the side of the pan with a wooden spoon to release even more juice and color.

Step 3: Steep and Strain

Remove the saucepan from the heat and let it sit for 3–4 minutes to cool slightly. This steeping time allows the berry and lemon flavors to fully infuse. Then, pour the mixture through a fine-mesh strainer or cheesecloth set over a bowl, pressing gently on the solids to extract every drop of liquid. Discard the solids (or use the cooked blueberries in yogurt!).

⚠️ Common Mistake to Avoid: Don’t skip the resting time – if you strain immediately, the syrup won’t have absorbed enough flavor from the peels.

Step 4: Assemble and Chill

Pour the blueberry simple syrup into a large pitcher. Add the reserved fresh lemon juice and 4 cups of cold water. Stir well to combine. Taste and adjust – if you prefer it sweeter, add a little more simple syrup; if too sweet, add a squeeze more lemon juice. Refrigerate for at least 1 hour until thoroughly chilled. This waiting step is crucial for the flavors to meld.

💡 emy’s Pro Tip: For an even faster chill, make the simple syrup ahead of time and keep it in the fridge. Then just mix with lemon juice and cold water when you’re ready.

Step 5: Serve and Garnish

Fill glasses with ice cubes. Pour the chilled blueberry lemonade over the ice. Garnish each glass with a sprig of mint, a lemon slice, and a few fresh blueberries. Serve immediately and watch it disappear!

⚠️ Common Mistake to Avoid: Adding ice before the lemonade is fully chilled will water it down. Always chill first, then add ice to the glasses.

Step Action Duration Key Visual Cue
1 Prepare lemons 5 mins Wide strips of zest, ¾ cup juice
2 Make blueberry simple syrup 3–4 mins Blueberries pop, liquid turns deep pink
3 Steep & strain 5 mins Clear syrup, no solids left
4 Assemble & chill 1+ hour Pitcher is uniformly pink and cold
5 Serve & garnish 2 mins Ice, mint, lemon slices, extra blueberries

Serving & Presentation

Presentation is everything when it comes to a stunning drink. I like to serve this blueberry lemonade in tall, clear glasses so the gorgeous magenta color shines through. For a casual backyard party, a big glass pitcher on the table with a sprig of mint and lemon wheels floating on top creates an instant party vibe. I once served this at a rooftop gathering in Brooklyn Heights, and guests couldn’t stop snapping photos!

For garnish, get creative: thread a few blueberries onto a short cocktail pick, add a thin lemon wheel slit to the edge of the glass, and top with a fresh mint sprig. In Morocco, we would add a few rose petals for a floral touch – that’s my Paris training sneaking in! This drink pairs beautifully with light summer dishes like grilled fish, salads, or even spicy Moroccan kebabs. The acidity cuts through richness, while the berry sweetness complements savory flavors.

Pairing Type Suggestions Why It Works
Side Dish Grilled chicken skewers, summer salads, hummus & pita The acidity refreshes the palate between bites
Sauce / Dip Tzatziki, balsamic glaze, honey mustard The sweet-tart drink contrasts creamy dips
Beverage Sparkling water, iced tea, white wine spritzers Non-alcoholic option stands alone or can be mixed
Garnish Mint, lemon wheels, whole blueberries, edible flowers Adds visual appeal and aromatic layers

Make-Ahead, Storage & Reheating

As a busy New York City food blogger, I’m all about smart prep. This blueberry lemonade is one of those recipes you can (and should) make ahead of time. The flavors actually deepen and meld overnight, so a pitcher made the day before your party will taste even better. Here’s my tested routine for keeping it fresh.

Method Container Duration Reheating Tip
Refrigerator Airtight pitcher or glass bottle Up to 5 days Serve straight from fridge – no reheating needed
Freezer Freezer-safe jar (leave 1 inch headspace) Up to 3 months Thaw overnight in fridge; stir well before serving
Make-Ahead Blueberry syrup stored separately Syrup lasts 2 weeks in fridge Mix syrup + lemon juice + water only when serving

I often make a double batch of the blueberry simple syrup and keep it in a mason jar in the fridge. That way, I can whip up a single glass of fresh blueberry lemonade whenever the craving hits – just add 2 tablespoons of syrup, the juice of half a lemon, and a cup of cold water. It’s my secret weapon for instant summer refreshment, even in the middle of a NYC winter!

Variations & Easy Swaps

Variation Key Change Best For Difficulty Impact
Herbal Blueberry Lemonade Add fresh basil or lavender to the syrup Elegant brunch or afternoon tea Easy (extra ingredient)
Sparkling Blueberry Lemonade Replace half the still water with club soda Party drink, fizzy twist Easy (no extra cooking)
Low-Sugar / Keto Version Swap sugar for monk fruit sweetener or stevia Diet-friendly refreshment Easy (adjust sweetness to taste)

Herbal Blueberry Lemonade

Add 3–4 sprigs of fresh basil or 2 sprigs of lavender to the syrup while it simmers. This is a trick I learned in Paris – herbal infusions elevate simple drinks into something sophisticated. The basil adds a peppery-sweet note that plays beautifully with blueberry.

Sparkling Blueberry Lemonade

For a festive version, mix the syrup and lemon juice with only 2 cups of cold water, then top off with 2 cups of chilled club soda or sparkling water just before serving. This cuts the sweetness and adds bubbles – perfect for a summer baby shower or Fourth of July barbecue.

Low-Sugar / Keto Version

Use a granulated monk fruit sweetener or stevia that measures like sugar. Because these sweeteners can be more concentrated, taste as you go. You may also want to add a pinch of salt to balance the sweetness. This version works wonderfully and keeps the carbs under 2g per glass.

How do you make homemade blueberry lemonade from scratch?

Making homemade blueberry lemonade from scratch is incredibly simple. Start by making a blueberry simple syrup: simmer 1 cup of blueberries, half the peels of 2–3 lemons, ½ cup sugar, and 1 cup of water for about 3–4 minutes until the berries pop and the sugar dissolves. Strain the syrup into a pitcher, then add the juice of 4–5 lemons and 4 cups of cold water. Stir well, chill for at least an hour, and serve over ice with fresh mint and extra blueberries. This easy method gives you a fresh, vibrant drink without any artificial flavors or preservatives.

Can I use frozen blueberries instead of fresh for blueberry lemonade?

Absolutely! Frozen blueberries work wonderfully in this blueberry lemonade recipe. In fact, they often break down faster when cooked, yielding a deeper color and more intense berry flavor. No need to thaw them first – just add them straight to the saucepan with the other simple syrup ingredients. The cook time remains the same. I often stock up on local blueberries in summer and freeze them for year-round use. One tip: frozen berries may release slightly more water, so you might find the final drink a touch less sweet – simply adjust with a bit more sugar or honey.

How long does homemade blueberry lemonade last in the refrigerator?

Homemade blueberry lemonade will stay fresh in the refrigerator for up to 5 days when stored in an airtight container. The flavors actually meld and deepen over the first 24 hours, so day two is often even better! However, if you’ve already added ice to the lemonade, it will water down quickly – I recommend chilling the lemonade without ice and only adding ice to individual glasses when serving. If you notice any off smell or cloudiness after a few days, it’s best to discard and make a fresh batch.

What is the best way to sweeten blueberry lemonade without refined sugar?

There are several excellent natural sweeteners to use in place of white sugar. Honey is my top recommendation – its floral notes complement blueberries beautifully. Use ⅓ to ½ cup honey (to taste) in the simple syrup. Maple syrup works well too, though it adds a subtle woodsy flavor. For a zero-calorie option, monk fruit sweetener or stevia (powdered or liquid) can be used – start with about ¼ cup of monk fruit granulated sweetener and adjust. The key is to dissolve the sweetener in the warm syrup just as you would sugar. Keep in mind that liquid sweeteners like honey will make the lemonade slightly less clear, but the taste is still fantastic.

Can I make this blueberry lemonade ahead for a party?

Yes, absolutely! This blueberry lemonade recipe is perfect for making ahead. Prepare the blueberry simple syrup up to 2 weeks in advance and store it in the fridge. On party day, simply mix the syrup with fresh lemon juice and cold (or sparkling) water 2–3 hours before serving, and let it chill. Do not add ice to the pitcher – instead, fill a cooler with ice and set out glasses so guests can serve themselves. For a festive touch, freeze some blueberries and lemon slices into ice cubes ahead of time; they’ll keep the lemonade cold without diluting it.

Why did my blueberry lemonade turn brown?

Brownish lemonade usually happens for two reasons: over-extraction of tannins from the lemon peels, or oxidation from sitting too long. To avoid this, be careful not to include any white pith when peeling – the pith is bitter and can darken the color. Also, don’t boil the syrup vigorously; a gentle simmer is all you need. If the lemonade has been sitting in the fridge for more than 4–5 days, natural oxidation can cause a slight browning – it’s still safe to drink but won’t be as vibrant. For the prettiest color, serve within 48 hours and always use bright, fresh lemons.

Can I use bottled lemon juice instead of fresh?

I strongly recommend against using bottled lemon juice for this blueberry lemonade recipe. Freshly squeezed lemons have a bright, vibrant acidity and contain natural essential oils from the zest that contribute to the overall flavor. Bottled juice often contains preservatives and has a dull, flat taste that can make your lemonade taste artificial. Since the recipe uses lemon peels in the syrup, you’ll need fresh lemons anyway – so squeezing the juice from those same lemons is zero extra effort. For the best homemade blueberry lemonade, always go fresh!

Is there a way to make this blueberry lemonade less sweet?

Absolutely – you have full control over the sweetness. Start with only ¼ cup of sugar in the simple syrup, then taste the finished lemonade before chilling. If it’s not sweet enough, you can stir in a bit more of the syrup (or a simple syrup of just sugar and water). You can also adjust the lemon juice: more lemon will make it tarter, balancing the sweetness. Some readers like to use half the sugar and add a pinch of salt, which reduces perceived sweetness without making it taste salty. Remember, it’s easier to add sweetness than to take it away, so start low and adjust upward.

Can I turn this blueberry lemonade into an adult cocktail?

Yes! This blueberry lemonade is a fantastic base for cocktails. The most classic pairing is vodka – add a shot (1.5 oz) of plain or blueberry-infused vodka per glass. For a gin version, I love using a floral gin like Hendrick’s; the botanicals play nicely with the blueberry. Rum also works – a light silver rum keeps it refreshing. To keep it bubbly, replace some of the still water with club soda and add a splash of Prosecco for a Blueberry French 75. Always stir gently and garnish with a fresh blueberry skewer. Cheers!

My simple syrup didn’t turn deep pink – what went wrong?

If your syrup is pale rather than a rich pink, it likely means the blueberries weren’t cooked long enough or you didn’t mash them. The color comes from anthocyanins released when the berry skins break down. Make sure you simmer until the berries are visibly popped and slightly wrinkled – about 3–4 minutes. Gently mash them with a wooden spoon against the side of the pan. Also, using frozen berries sometimes yields a darker color because they are already slightly broken down. If your syrup is still pale, you can always cook it a minute longer – just be careful not to burn the sugar.

Share Your Version!

I hope you love this blueberry lemonade recipe as much as I do! It’s one of those drinks that just screams summer, and I want to see how it turns out in your kitchen. Did you add a twist like basil or sparkling water? Did your kids go crazy for it? Let me know in the comments below – and if you’re feeling generous, a 5-star rating would make my day.

Snap a photo of your gorgeous pitcher and tag me on Instagram or Pinterest @cookingwithemy – I love scrolling through your creations! If you have any questions about the recipe, drop them in the comments and I’ll answer personally. Now go forth and make the most refreshing drink of the season. From my NYC kitchen to yours – I hope this recipe brings as much warmth to your table as it does to mine. — emy 🧡

📌

Love This Recipe? Save It to Pinterest!

If you enjoyed this Blueberry Lemonade recipe, don’t let it get lost in your browser tabs! 😄 Pin it now so you can find it again anytime — and explore hundreds more tried-and-tested recipes waiting for you on my Pinterest boards.

👉 Follow emy on Pinterest @cookingwithemy

📌 Pin this recipe · 🔁 Re-pin your favorites · 💬 Tag me when you make it — I love seeing your creations!

“`

Print

clock clock iconcutlery cutlery iconflag flag iconfolder folder iconinstagram instagram iconpinterest pinterest iconfacebook facebook iconprint print iconsquares squares iconheart heart iconheart solid heart solid icon

Blueberry Lemonade


  • Author: Chef Emy

Description

This blueberry lemonade recipe is the perfect summer drink! Plus, with only 4 ingredients you can whip up a batch in less than 15 minutes.


Ingredients

Scale
  • 1 cup blueberries (fresh or frozen)
  • ½ cup sugar (more or less to taste)
  • juice 45 lemons (about ¾ cup juice)
  • peels of 23 lemons (optional)
  • 1 cup water (for simple syrup)
  • 4 cups water (for lemonade)
  • mint, lemon peels and slices, blueberries for garnish (optional)

Instructions

  1. Peel and juice 4-5 lemons
  2. To make the sugar syrup, add 1/2 the lemon peels, blueberries, sugar and water into a saucepan and heat until the sugar has dissolved and the blueberries start to pop, about 3-4 minutes.
  3. Remove from heat and let sit a few minutes to cool down.
  4. Using a fine mesh strainer or cheesecloth strain out the berries and lemon peel from the simple syrup.
  5. Add the blueberry simple syrup to a large pitcher and add 4 cups of cold water. Then, chill the mixture in the fridge.
  6. When chilled, pour over ice, add optional garnishes and enjoy!

Nutrition

  • Calories: 85 kcal
  • Sugar: 20 g
  • Fat: 0.2 g
  • Carbohydrates: 22 g
  • Protein: 0.3 g


Blueberry Lemonade

“`html

Frosted Lemonade Recipe – A Creamy, Dreamy Copycat Classic

⚖️
Difficulty
Easy
⏲️
Prep Time
10 mins
🕒
Cook Time
0 mins
⏱️
Total Time
1 hr 10 mins
🍽️
Servings
2

I still remember the first time I tasted a frosted lemonade on a sweltering July afternoon in New York City — that perfect collision of tart lemon and silky vanilla ice cream was like a cold hug on a hot day. This Frosted Lemonade recipe is my take on the beloved copycat Chick-fil-A frosted lemonade, but with a few tricks I picked up along the way. Growing up in Morocco, my mother would make fresh lemonade with fragrant lemons from the souk, and later in Paris, I learned how a touch of good vanilla ice cream can elevate a simple drink into something truly special. This creamy lemonade brings all those worlds together in one glass.

Imagine this: a tall glass of velvety, frozen lemonade drink that’s simultaneously bright and creamy, with a frothy top that catches the light like soft summer clouds. The first sip hits you with a burst of citrus — sharp and clean — followed by a wave of sweet, cold cream that mellows everything into pure bliss. The texture is what dreams are made of: thick enough to be indulgent, yet light enough to be refreshing. I’ve spent years perfecting the balance between tang and sweetness, and this version nails it every single time.

What makes my how to make frosted lemonade method different? I insist on freshly squeezed lemon juice — no shortcuts — and a specific technique for blending that gives you that signature frothy, milkshake-like consistency without any ice crystals. I’ll also share my pro tip for keeping your frozen lemonade drink from separating, plus the one mistake most home cooks make that turns their drink watery. Trust me, once you make it this way, you’ll never go back to the drive-thru.

Why This Frosted Lemonade Recipe Is the Best

The Flavor Secret: The magic lies in using freshly squeezed lemon juice and high-quality vanilla ice cream. I learned in Paris that the simplest ingredients, when treated with respect, create the most memorable dishes. The lemons bring a brightness that bottled juice simply can’t match, while the ice cream adds a creamy depth that rounds out every sip. This isn’t just a drink — it’s a little moment of joy.

Perfected Texture: The key technique I brought from my culinary training is to chill the lemonade base thoroughly before blending. This ensures the ice cream stays thick and the final drink is luxuriously creamy rather than thin or watery. I also blend at just the right speed to incorporate air without over-churning, giving you that dreamy, frothy top.

Foolproof & Fast: With only four ingredients and a blender, this recipe is practically fail-safe. Whether you’re a seasoned home cook or a total beginner, you’ll have a restaurant-quality creamy lemonade on the table in just over an hour — most of that time is hands-off chilling. No special equipment, no complicated steps, just pure, delicious results.

Frosted Lemonade Recipe Ingredients

Every time I walk through the Union Square Greenmarket in NYC, I grab a bag of juicy Meyer lemons from the citrus stand — their thin skins and floral aroma remind me of the lemons my mother used to buy in Marrakech. For this Frosted Lemonade recipe, quality ingredients make all the difference. Here’s what you’ll need:

Ingredients List

  • 1 cup Freshly Squeezed Lemon Juice (about 4–5 large lemons)
  • 1/2 cup Granulated Sugar
  • 2 1/2 cups Cold Water
  • 2 cups High-Quality Vanilla Ice Cream
  • Lemon slices and fresh mint for garnish (optional)

Ingredient Spotlight

Freshly Squeezed Lemon Juice: This is non-negotiable. Bottled lemon juice has a flat, bitter taste that ruins the bright, clean flavor of this drink. Roll your lemons on the counter before juicing to release more juice, and strain out the seeds and pulp for a smooth finish. If Meyer lemons are in season, use them for a sweeter, more floral note.

Vanilla Ice Cream: Splurge on a good brand with real vanilla bean specks and no artificial flavors. The ice cream is the backbone of the creamy texture, so a lower-quality option with too much air or stabilizers will result in a thinner, less satisfying drink. I love using a small-batch vanilla from a local NYC creamery.

Granulated Sugar: Regular white sugar dissolves cleanly and provides the perfect neutral sweetness. If you prefer a deeper flavor, you can substitute with honey or agave, but it will slightly alter the taste. For a low-calorie version, see the FAQ below.

Original Ingredient Best Substitution Flavor / Texture Impact
Fresh Lemon Juice High-quality bottled lemon juice (in a pinch) Slightly less bright, may need extra sugar
Vanilla Ice Cream Non-dairy vanilla frozen dessert (coconut or oat-based) Slightly different creaminess, still delicious
Granulated Sugar Honey or agave nectar (use 1/3 cup) Adds a subtle floral note, slightly thinner syrup
Water Sparkling water for a fizzier drink Lighter, more effervescent, less creamy

How to Make Frosted Lemonade — Step-by-Step

Making this frozen lemonade drink at home is incredibly simple, but a few small details make all the difference. Follow these steps, and you’ll have a glass of pure summer perfection.

Step 1: Make the Lemonade Base

In a large pitcher, combine 1 cup of freshly squeezed lemon juice and 1/2 cup of granulated sugar. Stir vigorously with a long spoon until the sugar is completely dissolved — about 1 to 2 minutes. You shouldn’t feel any graininess at the bottom of the pitcher.

💡 emy’s Pro Tip: To speed up dissolving, warm 1/4 cup of the water slightly and dissolve the sugar in that first, then add the remaining cold water and lemon juice.

Step 2: Add Water and Chill

Add 2 1/2 cups of cold water to the pitcher and stir until everything is well combined. Cover the pitcher and place it in the refrigerator for at least 1 hour, or up to overnight. Chilling the lemonade base is crucial for achieving a thick, frosty final drink.

⚠️ Common Mistake to Avoid: Skipping the chill time. If the lemonade base is warm, the ice cream will melt on contact, giving you a thin, watery drink instead of a creamy frozen treat.

Step 3: Blend with Ice Cream

Add 1 cup of the chilled lemonade and 2 cups of vanilla ice cream to a blender. Blend on low speed for about 20 seconds, then increase to medium and blend for another 10 seconds, until the mixture is smooth, thick, and frothy. Don’t over-blend or the ice cream will melt too much.

💡 emy’s Pro Tip: For an extra-thick frosted lemonade, pop your glasses in the freezer for 15 minutes before pouring. The cold glass helps maintain the perfect texture.

Step 4: Serve Immediately

Pour the blended drink into two chilled glasses. Garnish with a thin lemon slice and a sprig of fresh mint if desired. Serve right away with a straw or a long spoon — this drink is best enjoyed the moment it’s made.

⚠️ Common Mistake to Avoid: Letting the drink sit after blending. The ice cream will start to separate and melt, turning your beautiful frosted lemonade into a puddle. Drink it immediately!

Step Action Duration Key Visual Cue
1 Dissolve sugar in lemon juice 1–2 mins No sugar granules visible
2 Add water and chill 1 hour minimum Pitcher is cold to the touch
3 Blend lemonade + ice cream 30 seconds Thick, frothy, no ice chunks
4 Pour and garnish 1 minute Frothy top, garnish floats

Serving & Presentation

This creamy lemonade is a showstopper all on its own, but a little thoughtful presentation takes it from simple drink to memorable experience. I love serving it in tall, clear glasses so you can see the beautiful pale yellow color and the frothy layer on top. A thin lemon wheel perched on the rim and a tiny sprig of mint add a pop of green that looks gorgeous against the creamy drink.

In my NYC apartment, I often serve this alongside a small plate of buttery shortbread cookies or salty kettle chips — the contrast of sweet-tart and salty is absolutely addictive. If I’m feeling a little Moroccan nostalgia, I’ll add a pinch of ground cinnamon on top of the froth, a trick my mother used to do with cold drinks during the summer in Marrakech.

Pairing Type Suggestions Why It Works
Side Dish Shortbread cookies, biscotti, salty pretzels Buttery or salty flavors balance the tart lemon
Sauce / Dip Whipped cream, berry compote, caramel drizzle Adds richness and a touch of indulgence
Beverage Iced tea, sparkling water with mint Light, refreshing contrast to the creamy drink
Garnish Lemon wheel, mint sprig, pinch of cinnamon Enhances visual appeal and adds aromatic notes

Make-Ahead, Storage & Reheating

My busiest NYC days call for smart meal prep, and this how to make frosted lemonade routine fits right in. While the finished frosted lemonade is best enjoyed immediately, the lemonade base can be made days ahead, so you’re always just a quick blend away from a cold treat.

Method Container Duration Reheating Tip
Refrigerator Airtight pitcher or jar Up to 5 days Stir well, then blend with ice cream
Freezer Ice cube trays (for lemonade base) Up to 3 months Blend frozen cubes + ice cream directly
Make-Ahead Pitcher in fridge 1–2 days in advance Blend just before serving

If you have leftover blended frosted lemonade, you can pour it into popsicle molds for a fun frozen treat the next day. Just add a few small lemon zest pieces for texture. I’ve done this on hot afternoons when I wanted something colder but didn’t want to re-blend — it’s a wonderful little bonus!

Variations & Easy Swaps

Variation Key Change Best For Difficulty Impact
Strawberry Frosted Lemonade Add 1/2 cup fresh strawberries Berry lovers, summer parties Easy
Dairy-Free / Vegan Use coconut or oat vanilla frozen dessert Dairy-free diets Easy
Herbed Lemonade Muddle 3–4 mint or basil leaves in the base Garden-fresh twist, cocktail hour Easy
Spiked Frosted Lemonade Add 1 oz vodka or limoncello per glass Adult gatherings, brunch Easy

Strawberry Frosted Lemonade

Add 1/2 cup of fresh or frozen strawberries to the blender along with the lemonade and ice cream. The berries add a gorgeous pink hue and a sweet-tart complexity that pairs beautifully with the vanilla. I love making this in early summer when strawberries from the NYC farmers market are at their peak.

Dairy-Free / Vegan

Swap the vanilla ice cream for a high-quality dairy-free frozen dessert made from coconut cream or oat milk. The texture will be slightly less rich, but still wonderfully creamy. I’ve tested this with several brands, and the coconut-based ones give the closest match to the original.

Herbed Lemonade

Before adding the water, muddle 3–4 fresh mint leaves or basil leaves in the lemon juice and sugar mixture. The herbs infuse a fragrant, refreshing note that elevates the drink to something truly special. This is a trick I picked up from a little café in the Marais district of Paris, and it never fails to impress.

What is the best way to make frosted lemonade without an ice cream machine?

The best way to make frosted lemonade without an ice cream machine is to use a standard countertop blender. Simply prepare a classic lemonade base with fresh lemon juice, sugar, and water, then chill it thoroughly for at least one hour. When you’re ready to serve, add the chilled lemonade and high-quality vanilla ice cream to your blender and pulse until smooth and frothy. The key is to use ice cream that’s still firm and cold, and to blend just long enough to combine — about 30 seconds. This method gives you that signature creamy, milkshake-like texture without any special equipment.

Can I use a sugar substitute to make a low-calorie frosted lemonade?

Yes, you can use a sugar substitute to make a lower-calorie version of this frosted lemonade. Stevia, monk fruit sweetener, or erythritol are good options that dissolve well in cold liquids. Use about 1/4 cup of a granular stevia blend or 1/2 teaspoon of liquid stevia to replace the 1/2 cup of sugar. Keep in mind that artificial sweeteners can have a slightly different aftertaste, and they may not provide the same mouthfeel as sugar. For the best results, combine your sweetener with a small amount of honey or agave (about 1 tablespoon) to round out the flavor. Also, choose a low-sugar or no-sugar-added vanilla ice cream to keep the calorie count down.

How do you keep frosted lemonade from separating or becoming watery?

To keep your frosted lemonade from separating or becoming watery, there are three key steps. First, make sure your lemonade base is very cold before blending — at least one hour in the refrigerator, or even longer. A warm base will melt the ice cream on contact, leading to a thin, watery drink. Second, use full-fat, high-quality vanilla ice cream, not a low-fat or “light” version. The fat content helps stabilize the emulsion and keeps the drink thick. Third, serve the drink immediately after blending. Frosted lemonade is best enjoyed within minutes of making it. If you need to hold it for a short time, keep it in the freezer for up to 10 minutes, but no longer, or it will start to separate.

What is the difference between frosted lemonade and a lemonade slushie?

The main difference between frosted lemonade and a lemonade slushie is the texture and ingredients. A frosted lemonade is made by blending chilled lemonade with vanilla ice cream, resulting in a creamy, milkshake-like drink that’s smooth, thick, and rich. A lemonade slushie, on the other hand, is typically made by blending lemonade with ice until it becomes a icy, granular slush with no creaminess. Frosted lemonade has a velvety mouthfeel and a mellow sweetness from the ice cream, while a slushie is more tart, sharp, and refreshingly icy. Both are delicious, but they serve different cravings — frosted lemonade is more of a dessert-like treat, while a slushie is a lighter, more hydrating option for hot days.

Can I make frosted lemonade ahead of time for a party?

You can definitely prepare the lemonade base ahead of time, which makes party hosting effortless. Make the lemonade base up to 5 days in advance and keep it tightly sealed in the refrigerator. When your guests arrive, simply pour the chilled lemonade into a blender with vanilla ice cream and blend in batches. For a large gathering, set up a “frosted lemonade bar” with the pre-chilled lemonade in a pitcher, a few tubs of ice cream, and a blender ready to go. Guests can watch their drink being made fresh — it’s a fun interactive element. I do not recommend blending the full batch ahead of time, as the drink will separate and lose its frothy texture within 10 to 15 minutes.

What type of ice cream works best for frosted lemonade?

For the best frosted lemonade, use a full-fat, high-quality vanilla ice cream that contains real vanilla bean specks or real vanilla extract. Avoid “light,” “low-fat,” or “no-sugar-added” ice creams, as they tend to contain more air and stabilizers, which result in a thinner, less creamy drink. Premium brands with a higher butterfat content (14% or more) produce a luxuriously thick and velvety texture. French vanilla ice cream is an excellent choice because of its custard base, which adds extra richness. If you’re using a dairy-free alternative, look for one made with coconut cream or oat milk for the best creaminess.

Can I use bottled lemon juice instead of fresh?

While fresh lemon juice is always recommended for the brightest, most authentic flavor, you can use bottled lemon juice in a pinch. Choose a brand that contains no added preservatives or artificial flavors, and check the label to ensure it’s 100% lemon juice. Keep in mind that bottled juice often has a slightly more bitter, flat taste compared to fresh. To compensate, you may want to add an extra tablespoon of sugar and a small pinch of lemon zest to boost the citrus aroma. That said, for the absolute best frosted lemonade, I strongly recommend using fresh lemons — the difference is noticeable and worth the few extra minutes of juicing.

How can I make my frosted lemonade thicker?

To make a thicker frosted lemonade, there are several easy adjustments you can try. First, use slightly less water in the lemonade base — reduce the water to 2 cups instead of 2 1/2 for a more concentrated flavor and thicker consistency. Second, add an extra 1/2 cup of ice cream to the blender. Third, use frozen lemonade cubes instead of liquid lemonade: pour the prepared lemonade base into an ice cube tray and freeze it, then blend the frozen cubes with ice cream for an ultra-thick, frosty drink. Finally, make sure both the lemonade base and the ice cream are very cold before blending, and serve immediately in a pre-chilled glass.

Is frosted lemonade gluten-free?

Yes, frosted lemonade is naturally gluten-free when made with the standard ingredients of fresh lemon juice, sugar, water, and vanilla ice cream. None of these core ingredients contain gluten. However, always check the label on your vanilla ice cream, as some brands may include cookies, brownie pieces, or other gluten-containing mix-ins. Stick to a plain vanilla ice cream with no added baked goods to ensure your drink remains gluten-free. Additionally, if you’re using any flavored syrups or garnishes (like cookie crumbles), verify those are gluten-free as well. This frosted lemonade recipe is a safe and delicious option for anyone following a gluten-free diet.

Can I add alcohol to make an adult frosted lemonade?

Absolutely! A spiked frosted lemonade is a fantastic adult beverage for summer gatherings, brunch, or backyard parties. Vodka is the most popular choice because it blends seamlessly without overpowering the lemon-vanilla flavor — add 1 to 1.5 ounces per glass. Limoncello is another excellent option that enhances the citrus notes and adds a touch of Italian sweetness. For a rum-based twist, try a light or coconut rum. Simply add the alcohol to the blender along with the lemonade and ice cream, then blend as usual. Keep in mind that alcohol can thin the texture slightly, so you may want to use a little extra ice cream or freeze the lemonade base into ice cubes to maintain a thick consistency.

Share Your Version!

I absolutely love hearing how this Frosted Lemonade recipe turns out in your kitchen! Did you stick with the classic version, or did you try one of the variations — strawberry, herbed, or maybe a spiked version for a summer party? Drop a star rating and a comment below to let me know how it went. Your feedback helps other readers know what to expect and inspires me to keep creating new recipes for you.

And if you snap a photo of your frosty creation, tag me @cookingwithemy on Instagram or Pinterest — I love scrolling through my feed and seeing your beautiful glasses of creamy lemonade. It honestly makes my day every single time. One question I’d love for you to answer in the comments: what’s your go-to summer drink that brings back good memories? For me, it’s this frosted lemonade, with its echoes of Morocco, Paris, and New York all in one sip.

From my NYC kitchen to yours — I hope this recipe brings as much warmth to your table as it does to mine. — emy 🧡

📌

Love This Recipe? Save It to Pinterest!

If you enjoyed this Frosted Lemonade recipe, don’t let it get lost in your browser tabs! 😄 Pin it now so you can find it again anytime — and explore hundreds more tried-and-tested recipes waiting for you on my Pinterest boards.

👉 Follow emy on Pinterest @cookingwithemy

📌 Pin this recipe · 🔁 Re-pin your favorites · 💬 Tag me when you make it — I love seeing your creations!

“`

Print

clock clock iconcutlery cutlery iconflag flag iconfolder folder iconinstagram instagram iconpinterest pinterest iconfacebook facebook iconprint print iconsquares squares iconheart heart iconheart solid heart solid icon

Frosted Lemonade


  • Author: Chef Emy

Description

Frosted Lemonade is a dreamy way to enjoy a classic and delicious lemonade with a sweet twist. Tart, creamy, and cool this is the perfect summer drink!


Ingredients

Scale
  • 1 cup Freshly Squeezed Lemon Juice
  • 1/2 cup Sugar
  • 2 1/2 cups Water
  • 2 Cups Vanilla Ice Cream

Instructions

  1. Add lemon juice and sugar to pitcher and stir until sugar is dissolved.
  2. Add water and stir until well mixed.
  3. Refrigerate at least 1 hour to chill.
  4. Add 1 cup lemonade and ice cream to blender and blend until combined and frothy.
  5. Pour into two glasses and garnish with lemon slice.


Frosted Lemonade

Fluffy Japanese Soufflé Pancakes with Lemon Zest – The Secret to Jiggly Perfection

⚖️
Difficulty
Medium
⏲️
Prep Time
20 mins
🕒
Cook Time
15 mins
⏱️
Total Time
35 mins
🍽️
Servings
4 (8 pancakes)

I still remember the first time I bit into a perfect Japanese soufflé pancake. It was at a tiny café in Tokyo’s Harajuku district, and I was instantly transported back to my childhood in Morocco, where my mother would make delicate, airy msemmen that seemed to float off the plate. These fluffy Japanese soufflé pancakes are my love letter to that memory — combining the cloud-like lift of a French meringue with a whisper of lemon zest that brightens every bite. This Japanese soufflé pancake recipe is the one I make for special weekend brunches in my NYC apartment, and it never fails to draw gasps of delight.

Imagine this: you lift the lid of the pan, and a gentle steam escapes to reveal pancakes that are tall, golden, and jiggling like they’re alive. The first forkful gives way with a soft resistance, then melts into a pillow of vanilla-scented sweetness. The acidity from the lemon zest and a touch of vinegar in the meringue create a bright finish that balances the richness of the whipped cream and fresh berries. Each pancake is a study in contrast — crisp edges, tender crumb, and a center so airy it almost dissolves.

After years of perfecting this recipe — first in my French pastry classes at Le Cordon Bleu Paris, and later at farmers’ markets across New York — I’ve cracked the code for consistent, foolproof results. The secret? A stabilized meringue with a drop of vinegar (no cream of tartar needed) and a super-gentle folding technique that keeps every bubble intact. In this guide, I’ll walk you through how to make soufflé pancakes with restaurant-quality height and texture, plus my best tip to avoid the dreaded deflation. Let’s make your kitchen smell like a Tokyo café.

Why This Fluffy Japanese Soufflé Pancakes Recipe Is the Best

The Flavor Secret: Most recipes rely on vanilla alone, but I add a teaspoon of fresh lemon zest — a trick I picked up in Paris. The citrus cuts through the sweetness and amplifies the eggy richness, making each pancake taste brighter and more complex. It’s a subtle touch, but it elevates these pancakes from simple to sublime.

Perfected Texture: My technique uses a classic French meringue where I beat the egg whites with a splash of white vinegar. This stabilizes the foam without cream of tartar, giving you stiff peaks that hold their shape even after folding. The result is a pancake that rises tall in the pan and stays pillowy long after you plate it.

Foolproof & Fast: I’ve streamlined the steps to work for home cooks. No special equipment beyond a hand mixer and a nonstick skillet. I also share the exact heat level and lid-on timing so you get that perfectly set center without burning the bottom. Even first‑timers can nail these.

Fluffy Japanese Soufflé Pancakes Ingredients

Every ingredient plays a role in creating that cloud-like texture. I source my eggs from the Union Square Greenmarket — fresh, pasture‑raised eggs give the best volume. The lemon zest comes from a tree a neighbor grows on her fire escape; it’s a little New York magic. Here’s everything you need.

Ingredients List

  • 2 large eggs
  • 2 tablespoons milk
  • ½ teaspoon vanilla extract
  • 1 teaspoon lemon zest (optional – but recommended)
  • ¼ cup all-purpose flour (fluffed, spooned, and leveled)
  • ¼ teaspoon baking powder
  • ½ teaspoon white vinegar (or lemon juice)
  • 2 tablespoons granulated sugar
  • Oil (any neutral oil – for cooking)
  • Sweetened whipped cream
  • Assorted berries
  • Powdered sugar
  • Maple syrup
  • For the whipped cream: ½ cup heavy cream (cold), 1 tablespoon granulated sugar (more to taste), ½ teaspoon vanilla

Ingredient Spotlight

Eggs: The foundation of the structure. Egg whites form the meringue that lifts the pancakes; yolks provide richness. Use fresh, room‑temperature eggs for maximum volume. Organic or pasture‑raised make a noticeable difference in color and taste.

All‑purpose flour: Fluff, spoon, and level — never scoop directly from the bag. Too much flour will weigh down the batter. A light hand ensures a tender crumb. You can substitute cake flour for an even softer result, but AP works perfectly.

White vinegar: This is my secret weapon. A tiny splash lowers the pH of the egg whites, stabilizing the meringue without any metallic aftertaste. Cream of tartar works too, but vinegar is something every kitchen has.

Lemon zest: Optional but transformative. It adds a floral, citrusy note that cuts through the richness and makes the pancakes taste alive. I prefer organic lemons for the zest.

Original Ingredient Best Substitution Flavor / Texture Impact
All‑purpose flour Cake flour Slightly softer, more delicate crumb
White vinegar Lemon juice or cream of tartar (¼ tsp) Lemon juice adds slight flavor; cream of tartar is neutral
Granulated sugar Caster sugar (superfine) Dissolves faster, smoother meringue

How to Make Fluffy Japanese Soufflé Pancakes — Step-by-Step

Follow these steps carefully, and you’ll have jiggly, tall pancakes that rival any café. I’ve broken each down with visual cues and my best tips.

Step 1: Separate Eggs

Crack the eggs carefully — any yolk in the whites will prevent them from whipping. Separate yolks into a medium bowl, whites into a large, clean bowl. Keep whites chilled while you work with the yolks.

⚠️ Common Mistake to Avoid: Even a tiny speck of yolk can ruin meringue. If you get any, use an eggshell to scoop it out.

Step 2: Make Yolk Batter

Add milk, vanilla, and lemon zest to the yolks. Whisk until combined. Sift in the flour and baking powder — sifting is crucial to avoid lumps. Whisk until smooth and no dry spots remain. Set aside.

💡 emy’s Pro Tip: Use a fine-mesh strainer for sifting. This aerates the flour and ensures a silky batter.

Step 3: Whip Meringue

Add vinegar to the egg whites. Beat with a hand mixer on medium speed until frothy. Gradually add sugar, a spoonful at a time, then increase speed to medium-high. Whip until stiff peaks form — the bowl can be held upside down without the meringue sliding.

⚠️ Common Mistake to Avoid: Over‑whipping makes meringue dry and grainy. Stop the moment peaks stand upright with a slight bend at the tip.

Step 4: Fold Meringue

Add ⅓ of the meringue to the yolk batter. Using a rubber spatula, fold gently — cut through the center, then sweep around the bowl. Once combined, add the remaining meringue and fold until no streaks remain. DO NOT overmix; batter should be light and airy.

💡 emy’s Pro Tip: Fold with a light, slow hand. Imagine you’re cradling a cloud – that’s how delicate this batter is.

Step 5: Prepare Pan

Heat a large nonstick skillet over low heat. Lightly grease with neutral oil, then wipe away excess with a paper towel. An electric stovetop gives the most even low heat — gas can be tricky.

Step 6: Portion Batter

You can use a large spoon, a big cookie scoop, or a piping bag with a ½‑inch round tip. Portion 2–3 mounds per batch, making each mound as tall as possible. This height is what gives you those dramatic, tall pancakes.

💡 emy’s Pro Tip: If using a piping bag, hold it perpendicular and squeeze from the bottom to build height.

Step 7: Cook First Side

Cover the pan with a lid. Cook for 7–8 minutes. The bottoms should be golden brown and the tops should appear set around the edges but still wobbly in the center.

Step 8: Flip and Finish

Gently flip each pancake using a thin spatula. Recover the lid and cook for another 5–6 minutes until golden on both sides and cooked through. The pancakes should spring back when lightly pressed.

⚠️ Common Mistake to Avoid: Flipping too soon or with too much force will deflate them. Be patient and use a gentle, swift motion.

Step 9: Serve Immediately

Transfer pancakes to plates. Top with sweetened whipped cream, berries, a dusting of powdered sugar, and a drizzle of maple syrup. Eat right away — soufflé pancakes are best fresh and warm.

Step 10: Make Whipped Cream (optional, but not when making batter)

In a cold bowl, combine heavy cream, 1 tablespoon sugar, and ½ teaspoon vanilla. Whisk by hand or with a mixer until firm peaks form. Keep refrigerated until serving.

Step Action Duration Key Visual Cue
1 Separate eggs 2 min Clean whites, no yolk specks
2 Mix yolk batter 3 min Smooth, no lumps
3 Whip meringue 5–7 min Stiff peaks, glossy
4 Fold meringue 2 min No white streaks, airy batter
5–6 Portion & cook first side 7–8 min Golden bottom, set edges
7–8 Flip & cook second side 5–6 min Springy when pressed

Serving & Presentation

These pancakes are a showstopper. I like to stack two or three on a plate, then add a generous dollop of sweetened whipped cream. Scatter fresh berries — raspberries and blueberries are my favorite — and dust with powdered sugar. A drizzle of warm maple syrup finishes it off. The contrast of the pillowy pancake with the tart berries and creamy topping is pure magic.

For a Moroccan‑French twist, sometimes I add a spoonful of orange blossom honey to the whipped cream and top with toasted almonds. It’s a nod to the morning pastries my mother made. In summer, I use peaches from the Union Square farmers’ market; in winter, blood oranges and pomegranate seeds.

These pancakes also make a stunning dessert. Serve them with a dollop of mascarpone and a drizzle of passion fruit sauce — that’s the Parisian pastry chef in me.

Pairing Type Suggestions Why It Works
Side Dish Mixed berry salad, fresh mint Adds freshness and acidity to balance sweetness
Sauce / Dip Maple syrup, chocolate sauce, citrus curd Enhances flavor profile – choose sweet or tangy
Beverage Matcha latte, black coffee, fresh orange juice The bitterness of coffee or matcha contrasts the sweetness
Garnish Powdered sugar, edible flowers, toasted coconut Adds visual appeal and a touch of elegance

Make-Ahead, Storage & Reheating

Soufflé pancakes are best eaten fresh, but I’ve developed a system for busy mornings. I often make the batter ahead (without the meringue) and store the yolk mixture in the fridge, then whip the whites fresh. For fully cooked pancakes, here’s how to keep them.

Method Container Duration Reheating Tip
Refrigerator Airtight container with parchment between layers Up to 2 days Steam 1 minute in a covered pan over low heat
Freezer Freezer‑safe bag or container, wax paper between Up to 1 month Thaw in fridge, then reheat in a toaster oven at 300°F for 3–4 minutes
Make-Ahead Yolk mix in fridge; whites at room temp Yolk mix up to 1 day Whip whites fresh just before cooking

For reheating, avoid the microwave — it turns them rubbery. Instead, place pancakes in a skillet over low heat with a lid and a splash of water (or butter) for 1–2 minutes. They’ll steam back to life. For frozen pancakes, a brief toast in the oven at 300°F works wonders. I always make a double batch so I can freeze half for those busy weekday mornings when I crave a taste of Tokyo.

Variations & Easy Swaps

Variation Key Change Best For Difficulty Impact
Matcha Soufflé Pancakes Add 1 tsp matcha powder to flour Earthy green tea lovers Easy (no extra steps)
Gluten-Free Use ¼ cup gluten‑free 1:1 flour blend Celiac or gluten sensitivity Medium (texture slightly denser)
Chocolate Soufflé Pancakes Replace 1 tbsp flour with cocoa powder Decadent dessert variation Easy (watch for sweetness)

Matcha Soufflé Pancakes

Sift 1 teaspoon of culinary‑grade matcha powder with the flour and baking powder. The earthy, slightly bitter matcha balances the sweetness beautifully. I love serving these with red bean paste and a dollop of whipped cream — a classic Japanese pairing that reminds me of afternoon tea in Kyoto.

Gluten-Free Soufflé Pancakes

The best substitute is a good quality 1:1 gluten‑free flour blend (like Bob’s Red Mill). The texture comes out slightly more tender but still wonderfully fluffy. Avoid coconut flour — it absorbs too much moisture and makes dense pancakes. My NYC gluten‑free friends swear by this version.

Chocolate Soufflé Pancakes

Replace 1 tablespoon of the flour with unsweetened cocoa powder. Use a little less sugar in the meringue (1½ tablespoons) to keep it balanced. Serve with a drizzle of warm chocolate sauce and fresh raspberries — pure indulgence. My daughter requests these every birthday.

FAQ

What is the secret to making Japanese soufflé pancakes extra fluffy?

The secret lies in three things: a stable meringue, gentle folding, and low, even heat. Use a small amount of white vinegar or lemon juice in the egg whites — it stabilizes the foam without altering flavor. Beat to stiff peaks but not dry. When folding, use a light hand and stop as soon as no white streaks remain. Finally, cook on the lowest heat possible with a lid to trap steam. Electric stovetops give the most consistent low heat. My French training taught me that respecting the meringue is key — no slamming bowls or aggressive stirring.

Can I make Japanese soufflé pancakes without cream of tartar?

Absolutely. I actually prefer using white vinegar or lemon juice because they’re staples in every kitchen. Use ½ teaspoon of either for this recipe. The acid helps the egg whites hold their structure, giving you those lofty peaks. If you have cream of tartar, use ¼ teaspoon — but don’t buy it just for this. Vinegar adds no detectable flavor once the pancakes are cooked; lemon juice adds a faint citrus note that complements the zest beautifully.

How long do you cook Japanese soufflé pancakes on each side?

The first side takes 7–8 minutes covered over low heat. You’ll know it’s ready when the bottom is golden brown and the edges look set but the center still jiggles slightly. After flipping, cook the second side for 5–6 minutes uncovered or covered? Covered again — yes, keep the lid on. The steam circulates and cooks the interior without burning the outside. Total cook time per batch is about 13–14 minutes. Resist the urge to peek too often; it lets out steam and slows cooking.

What kind of pan is best for making Japanese soufflé pancakes?

A large, heavy‑bottomed nonstick skillet with a tight‑fitting lid is ideal. I use a 10‑inch nonstick pan with a glass lid. Nonstick is essential — the delicate batter will stick to stainless steel or cast iron. The lid must fit well to trap steam. If your lid is loose, you can cover the pan with a large piece of foil. An electric stovetop provides the most even low heat; gas can be tricky because of hot spots. If using gas, keep the flame as low as possible and use a heat diffuser if you have one.

Why did my soufflé pancakes deflate after flipping?

Deflation usually happens for two reasons: the meringue wasn’t stiff enough when folded, or the pan temperature was too high. If the meringue is under‑whipped, the air bubbles collapse during cooking. Always test for stiff peaks — the tip holds its shape without drooping. Another culprit is heat: if the pan is too hot, the outside sets before the inside is cooked, and the sudden change in temperature when flipping causes collapse. Keep heat at the lowest setting and use a lid to ensure even cooking.

Can I make the batter ahead of time?

You can prepare the yolk batter (step 2) up to 24 hours in advance and keep it covered in the refrigerator. The meringue, however, must be whipped fresh — it won’t hold its structure for more than a few minutes. On busy mornings, I measure the dry ingredients and separate the eggs the night before. Then it takes just 10 minutes to whip the whites, fold, and cook. The results are still remarkably fluffy.

Can I use a hand whisk instead of an electric mixer for the meringue?

It’s possible but not recommended unless you have strong arm muscles and a lot of patience. Whipping egg whites to stiff peaks by hand takes 10–15 minutes of continuous whisking. The risk of under‑whipping is high, which will ruin the texture. A hand mixer or stand mixer is far more reliable and consistent. If you really want to do it by hand, use a large balloon whisk and a copper or metal bowl — the slight reaction with copper helps stabilize the foam.

How do I keep the pancakes tall after cooking?

Serve them immediately — soufflé pancakes are at their tallest and fluffiest right off the pan. If you need to hold them, place them on a wire rack in a 200°F oven for up to 10 minutes, but don’t stack them or they’ll compress. The steam inside gradually escapes, so they will shrink a little. To maximize height, make the batter as tall as possible when you portion it, and resist opening the lid during cooking. I also recommend using a piping bag for precise, tall dollops.

Can I use milk alternatives like almond milk?

Yes, but with caution. Almond milk and oat milk work, but they have lower protein content than dairy milk, which can result in a slightly less tender crumb. I recommend unsweetened oat milk for the closest consistency. Avoid coconut milk from a can — it’s too thick and fatty. If using a plant‑based milk, add just 1½ tablespoons instead of 2, as they tend to be thinner. The pancakes will still be fluffy, but the flavor and texture will differ slightly.

What toppings go best with these pancakes?

The classic Japanese pairing is sweetened whipped cream, fresh berries (strawberries, blueberries, raspberries), a dusting of powdered sugar, and a drizzle of maple syrup. For a more decadent treat, add a scoop of vanilla ice cream or a dollop of mascarpone. My Moroccan‑French twist: a spoonful of orange blossom honey and toasted slivered almonds. In fall, try sautéed apples with cinnamon. The possibilities are endless — these pancakes are a canvas for your favorite flavors.

Share Your Version!

I can’t wait to see how your fluffy Japanese soufflé pancakes turn out! Did you try the lemon zest? Swirl in some matcha? Drop a comment and star rating below — your feedback helps other home cooks discover this recipe. Snap a photo of your stack and tag me on Instagram or Pinterest at @cookingwithemy. I read every comment and love hearing about your kitchen adventures.

What’s the one question you still have about making soufflé pancakes? Ask me below and I’ll answer personally. From my NYC kitchen to yours — I hope this recipe brings as much warmth to your table as it does to mine. — emy 🧡

📌

Love This Recipe? Save It to Pinterest!

If you enjoyed this Fluffy Japanese Soufflé Pancakes recipe, don’t let it get lost in your browser tabs! 😄 Pin it now so you can find it again anytime — and explore hundreds more tried-and-tested recipes waiting for you on my Pinterest boards.

👉 Follow emy on Pinterest @cookingwithemy

📌 Pin this recipe · 🔁 Re-pin your favorites · 💬 Tag me when you make it — I love seeing your creations!

Print

clock clock iconcutlery cutlery iconflag flag iconfolder folder iconinstagram instagram iconpinterest pinterest iconfacebook facebook iconprint print iconsquares squares iconheart heart iconheart solid heart solid icon

Fluffy Japanese Soufflé Pancakes


  • Author: Chef Emy

Description

These Japanese soufflé pancakes are super fluffy, jiggly, and pillowy soft! They are a delight to have for breakfast, snack, or dessert and will wow any lucky guests you invite for brunch!


Ingredients

Scale
  • 2 large eggs
  • 2 tablespoons milk
  • ½ teaspoon vanilla extract
  • 1 teaspoon lemon zest ((optional))
  • ¼ cup all-purpose flour ((fluffed, spooned, and leveled))
  • ¼ teaspoon baking powder
  • ½ teaspoon white vinegar ((or lemon juice))
  • 2 tablespoons granulated sugar
  • Oil (any neutral oil (for cooking))
  • Sweetened whipped cream
  • Assorted berries
  • Powdered sugar
  • Maple syrup
  • ½ cup heavy cream (cold)
  • 1 tablespoon granulated sugar (more or less to your preference)
  • ½ teaspoon vanilla

Instructions

  1. Separate the egg whites and egg yolks into separate mixing bowl. Make sure to not break the yolk!
  2. Into the egg yolks, add the milk, vanilla, and lemon zest and whisk briefly until combined. Then, sift in the flour and baking powder. Whisk until smooth and no more dry flour is visible. Set aside until needed.
  3. Into the egg whites, add the vinegar or lemon juice. With a hand mixer, beat on medium speed until completely frothy. Then, gradually add the sugar a little at a time.
  4. Once all the sugar has been added, increase the speed to medium high and beat the egg white until it reaches stiff peak.
  5. Add 1/3 of the stiff peak meringue into the egg yolk batter. Use a rubber spatula to gently fold the meringue into the batter until evenly combined and no more streaks are visible.
  6. Add the remaining meringue to the batter and gently fold until combined and no more streaks are visible. DO NOT over mix or the batter or the meringue will deflate and the batter will become too loose.
  7. Either prepare a large spoon, a large cookie scoop, or transfer the pancake batter into a pipping bag fitted with a large round tip.
  8. Heat a large nonstick pan over low heat and lightly grease the pan with oil. Make sure to wipe away excess oil. *Electric stovetop works the best.*
  9. Portion the batter into the pan to make 2 to 3 pancakes by either scooping the batter with the spoon or cookie scoop or pipping the batter into a mound with the pipping bag.*Try your best to keep the batter tall, whether if you're using a spoon, scoop, or pipping it. This will help your pancakes look tall.*
  10. Cover the pan with a lid and let the pancakes cook for about 7 to 8 minutes, until the bottom side is golden brown. Gently flip the pancakes and recover the lid. Let the pancakes cook for another 5 to 6 minutes until golden brown and cooked through.
  11. Serve the pancakes immediately with sweetened whipped cream, assorted fruits, powdered sugar, and/or maple syrup.
  12. In a mixing bowl, combine the heavy cream, sugar, and vanilla. Whisk by hand or use a hand mixer and mix the cream until firm peak or your desired thickness. Keep refrigerated until needed.*If using hand mixer, make sure to start on low or medium low speed to prevent splashing.*

Nutrition

  • Calories: 375.3 kcal
  • Sugar: 26.2 g
  • Fat: 10.9 g
  • Carbohydrates: 50.9 g
  • Protein: 16.8 g


Fluffy Japanese Soufflé Pancakes

Air Fryer Banana Donut Holes – Easy 15‑Minute Treat

⚖️
Difficulty
Easy
⏲️
Prep Time
10 mins
🕒
Cook Time
7 mins
⏱️
Total Time
17 mins
🍽️
Servings
12 donut holes

Hi, I’m emy – a New York City cook with Moroccan roots and classical French training. These banana donut holes are my proudest 15-minute invention: they taste like deep-fried doughnuts but come out of the air fryer light, fluffy, and perfectly golden. The secret? Overripe bananas do all the heavy lifting – no eggs, no butter, just pure fruit sweetness and a whisper of cinnamon. Growing up in Morocco, my mother would make sfenj (airy Moroccan doughnuts) every Friday; these baked banana donut holes capture that same cozy warmth with a fraction of the oil. And because I now live in the land of constant cravings (hello, NYC), I needed a version that’s ready before my coffee cools. This easy banana donut holes recipe delivers exactly that: a batch of tender, cinnamon-sugar-coated bites that will make you forget any bakery version.

Picture this: the moment you pull the air fryer basket open, a cloud of warm banana and cinnamon fills your kitchen. The holes are lightly crisp on the outside, yet impossibly soft and almost custard-like inside – like the center of banana bread but in poppable form. I brush each warm ball with melted coconut oil, then roll them in a generous pile of cinnamon sugar. The sugar melts slightly into the oil, creating a delicate crust that shatters when you bite. The banana flavor is front and center, balanced by the warm spice and just enough sweetness. These aren’t dense or greasy; they’re ethereal. One batch disappears in minutes – I’ve seen it happen at every family brunch and after-school snack session.

What sets my version apart from other homemade donut holes is the technique I borrowed from Parisian pâtisserie: working the sticky dough with oiled hands, just like a focaccia. Most recipes either over-flour the dough (making it bready) or under-knead (leaving lumps). I show you exactly how to handle this moist, elastic dough so the holes stay tender. My pro tip: never add more than 2–3 extra tablespoons of flour – the dough should feel tacky and soft. 💡 emy’s Pro Tip: If the dough sticks to your fingers, simply oil them again; don’t be tempted to add flour. The result is a baked banana donut holes recipe that’s foolproof even for beginners.

Why This Banana Donut Holes Recipe Is the Best

The Flavor Secret: My Moroccan mother taught me to let fruit speak for itself. Here, one large overripe banana provides all the sweetness and moisture – no added sugar in the dough. The cinnamon amplifies the banana’s natural caramel notes, while the coconut oil adds a subtle tropical richness. Unlike standard doughnut recipes that rely on eggs and milk, this banana donut recipe is naturally vegan and dairy-free without sacrificing texture. The short ingredient list (just six items) means every flavor shines.

Perfected Texture: After years of testing in my tiny NYC kitchen, I nailed the ratio: ½ cup banana purée to ¾ cup self-rising flour. That precise balance gives you a dough that’s moist but not slack, so the holes puff up beautifully in the air fryer. The technique of oiling your hands while shaping (a trick I learned during my pastry stage in Paris) prevents sticking without drying out the dough. The result is a pillowy interior with a thin, golden crust – the hallmark of a truly great donut hole.

Foolproof & Fast: From start to finish, these are on your plate in 17 minutes. No yeast, no proofing, no deep-frying mess. The air fryer does the work, giving you consistent results every time. I’ve tested this with four different air fryer models – all came out perfect at 350°F for 6–7 minutes. The only watchpoint is not to crowd the basket; give them an inch of space so they expand evenly. This is the kind of recipe that builds confidence in new cooks and saves time for busy ones.

Banana Donut Holes Ingredients

I source my bananas from the greenmarket at Union Square – the spottier the better. When I see a bunch of overripe bananas, I know it’s time to make these donut holes. The rest of the ingredients are pantry staples: self-rising flour (or make your own with all-purpose plus baking powder and salt), unrefined cane sugar for that deep molasses note, cinnamon (I bring mine from a spice shop in the East Village), and coconut oil (the jar I keep on my counter for everything from sautéing to baking). Each component has a purpose, and I’ll show you how to choose and substitute them.

Ingredients List

  • 1/2 cup mashed banana (about 1 large very ripe banana)
  • 3/4 cup self-rising flour (see Note 1)
  • 1/2 teaspoon ground cinnamon
  • 1/4 cup unrefined cane sugar (see Note 2)
  • 2 tablespoons melted coconut oil (or melted vegan butter)
  • 2–3 teaspoons melted coconut oil (for brushing)
  • Cinnamon sugar for coating (mix 3 tablespoons sugar + 1 teaspoon cinnamon)

Ingredient Spotlight

Banana: The star of the show. One large, very ripe banana (lots of brown spots) yields exactly ½ cup puree. The riper the banana, the sweeter and more aromatic your donut holes will be. If your banana is only yellow, add 1 tablespoon of maple syrup or brown sugar to compensate. Frozen bananas work too – thaw completely and drain any excess liquid.

Self-Rising Flour: This is your shortcut to lift. It already contains baking powder and salt. If you don’t have it, make your own: whisk ¾ cup all-purpose flour + 1¼ teaspoons baking powder + ¼ teaspoon salt. Do not substitute plain flour without the leavener, or the holes will be dense.

Coconut Oil: Use unrefined (virgin) coconut oil for a subtle coconut flavor that complements banana beautifully. Melt it gently; if it solidifies again, re-melt over low heat. For a neutral option, use avocado oil or a light olive oil, but avoid extra-virgin olive oil – the flavor is too strong.

Unrefined Cane Sugar: I love the slight molasses warmth of muscovado or turbinado sugar. Regular granulated sugar works perfectly too. The sugar is only in the coating, so you can reduce it or use coconut sugar for a less processed option (the color will be darker).

Original Ingredient Best Substitution Flavor / Texture Impact
Banana (1/2 cup puree) 1/2 cup unsweetened applesauce + 1 tbsp sugar Lighter banana flavor, softer texture
Self-rising flour All-purpose flour + baking powder + salt Identical if measured correctly
Coconut oil (dough) Melted vegan butter or canola oil Less coconut flavor, slightly denser with butter
Unrefined cane sugar Granulated sugar, coconut sugar Coconut sugar gives darker color, slightly lower sweetness

How to Make Banana Donut Holes – Step by Step

Trust me when I say this is the easiest from-scratch donut recipe you’ll ever make. No rolling pin, no standing mixer, no thermometer – just your hands, a bowl, and an air fryer. I’ll walk you through each step so you feel like you’re cooking right beside me in my NYC kitchen.

Step 1: Mash the Banana

Peel the banana and mash it thoroughly with a fork until it’s a smooth, almost liquid puree. Measure out exactly ½ cup – if you have a little extra, save it for a smoothie. This precise measurement is crucial: too much banana makes the dough sticky beyond repair; too little and the holes will be dry. The puree should be free of lumps.

⚠️ Common Mistake to Avoid: Don’t just slice the banana and throw it in the flour – it won’t incorporate evenly. Mash it first until it looks like baby food.

Step 2: Form the Dough

Add the self-rising flour and cinnamon to the banana puree. Stir with a rubber spatula until a shaggy dough forms. Then oil your hands with about 1 teaspoon of melted coconut oil and knead directly in the bowl. The dough will be sticky and moist – this is normal. Continue kneading, using more oil on your hands if needed, until the dough comes together into a soft, elastic ball. If it feels overly wet after 2 minutes of kneading, add extra flour 1 tablespoon at a time, up to 3 tablespoons maximum. The dough should feel tacky but not wet.

💡 emy’s Pro Tip: Think of this like making focaccia – the dough wants to be wet. Resist the urge to add more flour. Oil your hands and the dough will behave beautifully.

Step 3: Roll into Balls

Lightly grease your hands again with a little coconut oil. Scoop about 1 tablespoon of dough (use a small cookie scoop for even size) and roll it gently between your palms into a smooth ball. Place the ball on a plate lined with parchment paper. Repeat until all the dough is used. You should get about 12 balls. Spray the tops with avocado oil – this helps them brown in the air fryer.

⚠️ Common Mistake to Avoid: Don’t over-roll the balls – just two or three gentle rotations. Overworking develops gluten and makes them tough.

Step 4: Air Fry

Spray the air fryer basket with oil. Place the donut holes in the basket, leaving at least 1 inch (3 cm) between them – they expand. Air fry at 350°F (180°C) for 6–7 minutes, or until the tops are puffy and golden brown. They will have a slightly rocky, irregular shape – that’s the homemade charm. Do not open the basket to check before 5 minutes, or they may deflate. A few may crack open; that’s fine – it just means extra crunchy edges.

💡 emy’s Pro Tip: Every air fryer runs a little different. If your holes are still pale at 6 minutes, add 1 more minute. The internal temperature should reach about 190°F (88°C) if you want to be precise.

Step 5: Coat and Serve

While the donut holes are still warm (but not burning hot), brush each one lightly with melted coconut oil using a pastry brush. Immediately roll them in cinnamon sugar – toss them gently in a bowl with the sugar mixture until evenly coated. The oil helps the sugar stick and creates that irresistible crunchy coating. Serve immediately; these are best within 30 minutes of coating.

⚠️ Common Mistake to Avoid: Don’t wait until they cool to coat – the oil won’t spread evenly, and the sugar won’t adhere. Work while they’re warm but not too hot to handle.

Step Action Duration Key Visual Cue
1 Mash banana to puree 2 min Smooth, no lumps
2 Knead into dough 2–3 min Elastic, tacky, not wet
3 Roll into balls 3 min Smooth, uniform size
4 Air fry 6–7 min Golden brown, puffy
5 Brush oil, coat in sugar 2 min Evenly coated, shiny

Serving & Presentation

These banana donut holes are best served warm – within 10 minutes of coating – when the cinnamon sugar is still crackly and the inside is soft. I like to pile them on a small wooden board dusted with extra cinnamon sugar, with a bowl of warm chocolate sauce or dulce de leche for dipping. In my family, we also enjoy them alongside a glass of cold horchata (a nod to my Moroccan roots, where almond drinks are common) or a creamy iced latte. For brunch, I arrange them on a cake stand with fresh berries and a dusting of powdered sugar – they vanish before the eggs are even cooked.

If you’re serving a crowd, keep the coated holes warm in a 200°F oven for up to 15 minutes. Don’t cover them, or the sugar will melt and become sticky. I often make a double batch for weekend get-togethers; they’re always the first thing to go. For a fun twist, set up a “donut hole dipping bar” with nutella, whipped cream, and fruit compote – it’s interactive and kids love it.

Pairing Type Suggestions Why It Works
Side Dish Fresh berries, sliced mango Acidity and freshness balance sweetness
Sauce / Dip Chocolate ganache, caramel, cream cheese glaze Enhances the dessert feel
Beverage Iced latte, chai tea, cold brew Coffee and spice complement banana
Garnish Mint leaves, edible flowers, extra cinnamon Adds visual pop and freshness

Make‑Ahead, Storage & Reheating

In a busy city like NYC, I often prepare these donut holes for the week ahead. The unbaked dough can be shaped into balls and refrigerated for up to 24 hours – just air fry directly from the fridge (add 1 extra minute). Once baked and coated, they’re best eaten fresh, but I’ll share my tested methods for leftovers. Store them in an airtight container at room temperature for up to 2 days – but the coating will soften. For longer storage, freeze uncoated (after air frying but before brushing with oil and sugar) for up to 2 months.

Method Container Duration Reheating Tip
Refrigerator (coated) Airtight container 2 days Reheat in air fryer 2 min at 300°F; re-coat with sugar after
Freezer (uncoated, cooked) Ziplock bag, remove air 2 months Thaw 30 min, then air fry 3 min at 350°F, then brush and coat
Make-Ahead (raw dough balls) Covered plate in fridge 24 hours Air fry from cold at 350°F for 8 minutes

For reheating, the air fryer is your best friend. Avoid the microwave – it makes them chewy. Simply reheat at 300°F for 2 minutes, then toss them back in cinnamon sugar if needed. If they’ve lost their coating, brush with a little milk or melted butter before re-sugaring. I often freeze a “coating kit” – separate bag of cinnamon sugar and a small bottle of melted coconut oil – so I can have fresh-tasting donut holes anytime.

Variations & Easy Swaps

Over the years, I’ve played with this base recipe to suit different cravings and dietary needs. Here are three of my favorite variations, each tested in my own kitchen. The table below gives you a quick overview.

Variation Key Change Best For Difficulty Impact
Chocolate Swirl Add 2 tbsp cocoa powder + 1 tbsp sugar Chocolate lovers Easy (adjust flour slightly)
Gluten-Free Use gluten-free all-purpose blend + ½ tsp xanthan gum Celiac / gluten sensitivity Easy but measure carefully
Spiced Pumpkin Replace banana with ½ cup pumpkin purée + 1 tbsp maple syrup Fall flavors Medium (texture is softer)

Chocolate Swirl

Add 2 tablespoons of unsweetened cocoa powder and 1 extra tablespoon of sugar to the dry ingredients. The dough will be slightly stiffer – you may need to add 1 extra tablespoon of milk or water if it looks too dry. These chocolate banana donut holes are a hit at birthday parties and bake sales. I love dusting them with powdered sugar instead of cinnamon sugar for a black-and-white look. French technique: sift the cocoa powder to avoid lumps.

Gluten-Free Version

Use a high-quality gluten-free all-purpose flour blend (I like King Arthur Measure for Measure). Add ½ teaspoon xanthan gum if your blend doesn’t already contain it. The dough will feel slightly less elastic; handle it with even more oil on your hands. These bake up slightly more delicate, but the flavor is identical. I serve them to my gluten-sensitive friends and they never know the difference – just be careful not to overbake, as gluten-free flours dry out faster.

Spiced Pumpkin

In late autumn, I swap the banana for ½ cup of pumpkin purée (not pumpkin pie filling) and add 1 tablespoon of maple syrup for sweetness. Increase the cinnamon to 1 teaspoon and add ½ teaspoon each of ginger and nutmeg. The texture is slightly more cake-like and tender. These are wonderful with a cream cheese glaze (mix 2 oz cream cheese, ½ cup powdered sugar, 1 tbsp milk). A nod to the NYC farmers market pumpkins I look forward to every fall.

Can I make banana donut holes with overripe bananas?

Absolutely – in fact, overripe bananas are ideal. The spottier and softer the banana, the sweeter and more flavorful your donut holes will be. Brown bananas have higher sugar content and a more intense banana aroma, which means you can reduce the added sugar in the coating if you like. Just make sure to mash them thoroughly into a smooth puree; any stringy bits won’t bake out smoothly. One large very ripe banana (with plenty of black spots) will give you exactly 1/2 cup of puree, which is the perfect amount for this recipe.

How do you bake banana donut holes instead of frying them?

This recipe is already baked – not fried! We use an air fryer, which is essentially a small convection oven. To bake in a conventional oven, preheat to 375°F (190°C), line a baking sheet with parchment paper, and arrange the donut holes 1 inch apart. Bake for 10–12 minutes, turning the pan halfway through, until golden brown and puffed. The texture will be slightly less crisp on the outside than air fryer version, but still delicious. For a deeper golden color, brush with melted butter before baking. The cook time may vary depending on your oven, so check at 10 minutes.

What is the best substitute for eggs in banana donut holes?

This recipe is already egg-free – the banana acts as both binder and moisture provider. If you want to replace the banana for an allergy or preference, you can use 1/2 cup of unsweetened applesauce combined with 1 tablespoon of ground flaxseed meal (let it sit for 5 minutes to thicken). Another option is 1/4 cup of mashed sweet potato plus 2 tablespoons of aquafaba. Each substitute will change the flavor slightly – applesauce gives a milder banana taste, while sweet potato adds a denser texture. I recommend sticking with banana for the authentic flavor and texture of these donut holes.

How long do homemade banana donut holes stay fresh?

Homemade banana donut holes are best eaten within 2 hours of coating, as the cinnamon sugar will soften over time. If stored in an airtight container at room temperature, they remain tasty for up to 2 days – but the coating will become less crunchy. For longer storage, freeze the uncoated donut holes (after air frying but before oiling and sugaring) for up to 2 months. To reheat, thaw if frozen, then air fry at 300°F for 2 minutes, brush with oil, and toss in fresh cinnamon sugar. This method brings back that just-made texture and flavor.

Can I use whole wheat flour instead of self-rising flour?

Yes, but with adjustments. Whole wheat flour absorbs more liquid and yields a denser, nuttier donut hole. Substitute up to half the self-rising flour with whole wheat flour – use 1/2 cup whole wheat + 1/4 cup all-purpose, plus 1¼ teaspoons baking powder and 1/4 teaspoon salt. The dough will be stiffer; add 1–2 tablespoons of milk or water if needed. For a 100% whole wheat version, increase the liquid by 2 tablespoons and expect a heartier texture. I recommend starting with a 50/50 blend to see if you like the flavor before going full whole wheat.

Why are my banana donut holes dry or dense?

Dry or dense banana donut holes usually result from one of three issues: the dough was over-floured, the banana wasn’t ripe enough, or they were cooked too long. Be very careful not to add more than 2–3 extra tablespoons of flour – the dough should be moist and tacky. Also, use a very ripe banana (brown spots) for maximum moisture. Finally, air fry at the correct temperature (350°F) and check at 6 minutes. If you’re baking instead of air frying, watch the time closely – every oven varies. If they still come out dry, try adding 1 tablespoon of melted coconut oil or applesauce next time.

Can I add chocolate chips or nuts to the dough?

Yes, but keep the additions small so they don’t interfere with the dough’s structure. Fold in up to 1/4 cup of mini chocolate chips or finely chopped walnuts (pecans also work well) after kneading the dough. The chips may melt slightly during air frying, creating chocolate pockets. For a crunchier texture, toast the nuts first and chop them very fine – large pieces can tear the dough. If adding chocolate chips, reduce the coating sugar slightly because the chips add sweetness. I love a version with dark chocolate chips and a pinch of sea salt on top – a nod to my favorite NYC bakery treats.

How do I make these banana donut holes vegan?

This recipe is already vegan as written! The banana replaces eggs, and we use coconut oil instead of butter. The self-rising flour is typically vegan (check the label – some brands add milk powder, but most are fine). For the coating, use unrefined cane sugar (which is often vegan) or organic sugar to avoid bone-char processing. The only potential non-vegan ingredient is the cinnamon sugar if you use refined white sugar; choose a brand that specifies vegan processing. All other components are plant-based, so you can enjoy these guilt-free. I often serve them at vegan brunches and everyone is thrilled.

Can I make these donut holes without an air fryer?

Absolutely – you have two options: bake them in a conventional oven, or pan-fry them for a more traditional doughnut texture. For oven baking, see the answer above (375°F, 10–12 minutes). For pan-frying, heat about 1 inch of neutral oil (like canola or vegetable) in a small saucepan to 350°F. Carefully drop the dough balls into the hot oil (using a slotted spoon) and fry for 2–3 minutes, turning occasionally, until deep golden brown. Drain on paper towels, then brush with oil and coat in cinnamon sugar. Pan-frying gives a crispier exterior but adds more fat – still delicious for an occasional treat.

How do I keep the cinnamon sugar coating from melting off?

The key is to apply the coating while the donut holes are warm but not piping hot. Let them cool for about 1 minute after air frying – if you brush oil onto very hot holes, the oil will thin and the sugar will slide off. Work in small batches: brush 3–4 holes at a time with a thin layer of melted oil, then immediately toss them in the cinnamon sugar. The oil should be warm but not sizzling. For an even stickier coating, mix the cinnamon sugar with 1 tablespoon of melted coconut oil before rolling – this creates a paste that adheres firmly. Store in a single layer; stacking while warm will cause sticking.

Share Your Version!

Now it’s your turn to get into the kitchen and make these banana donut holes. I genuinely want to know how they turn out for you – whether you stuck exactly to the recipe or played with one of the variations. Drop a star rating in the comments below and tell me what you think. Did you add chocolate chips? Did you bake them instead? I read every single comment and love hearing your kitchen stories. Tag me in your photos on Pinterest @cookingwithemy – it makes my day to see your beautiful creations. And if you have a question I didn’t answer here, ask away in the comments – I promise to personally help you troubleshoot.

From my NYC kitchen to yours – I hope this recipe brings as much warmth to your table as it does to mine. — emy 🧡

📌

Love This Recipe? Save It to Pinterest!

If you enjoyed this Banana Donut Holes recipe, don’t let it get lost in your browser tabs! 😄 Pin it now so you can find it again anytime — and explore hundreds more tried-and-tested recipes waiting for you on my Pinterest boards.

👉 Follow emy on Pinterest @cookingwithemy

📌 Pin this recipe · 🔁 Re-pin your favorites · 💬 Tag me when you make it — I love seeing your creations!

Print

clock clock iconcutlery cutlery iconflag flag iconfolder folder iconinstagram instagram iconpinterest pinterest iconfacebook facebook iconprint print iconsquares squares iconheart heart iconheart solid heart solid icon

Banana Donut Holes


  • Author: Chef Emy

Description

These air fryer banana bread donut holes are easy 2-ingredient donut holes perfect for fixing your banana bread craving in less than 15 minutes.


Ingredients

Scale
  • 1/2 cup Banana (1 large banana)
  • 3/4 cup Self-Rising Flour ((note 1))
  • 1/2 teaspoon Cinnamon
  • 1/4 cup Unrefined Cane Sugar ((note 2))
  • 2 tablespoons Coconut Oil (melted, or melted vegan butter)
  • 23 teaspoon Melted Coconut Oil

Instructions

  1. Mash the banana into a smooth puree, make sure you get 1/2 cup or the donut batter won't come together with the same ratio of flour.
  2. Add in the flour and stir with a rubber spatula at first, until it starts to form lumps. Now, oil your hands and knead with your slightly oiled hands to form a dough ball. The dough is sticky and moist, but that's normal don't over-add flour! If it sticks to the finger, keep kneading, using a bit of oil to smooth the dough and form a ball. Eventually, if it's really too moist add up to a max of 2-3 tablespoons of flour, not more, or the dough turns bready. You should work this dough like foccacia, using oil to avoid sticking to fingers and shape, but the dough should stay moist and elastic, not saturated by flour.
  3. Grease your hand with melted coconut oil, grab about a tablespoon of dough, roll it into a ball, and place it on a plate covered with parchment paper. Repeat until all the dough has been turned into balls. Spray avocado oil on top of the balls.
  4. Spray oil in the air fryer basket and place the oiled donut holes in the basket, leaving 1 inch (3 cm) apart as they expand.
  5. Air fry at 350°F (180°C) for 6-7 minutes or until puffy and golden brown. They will have a rocky shape and be dry outside, and some will not be as round as balls; that's normal.
  6. To make these banana bread balls taste like donuts, brush each warm ball with melted coconut oil using a pastry brush. Then, roll the warm, oiled balls into cinnamon sugar to coat evenly.
  7. Serve warm immediately.

Nutrition

  • Calories: 104.2 kcal
  • Sugar: 7.4 g
  • Fat: 3.7 g
  • Carbohydrates: 17 g
  • Protein: 1.5 g


Banana Donut Holes

Blueberry Cream Cheese Puff Pastry Crescents – Golden, Flaky & Bursting with Berries

⚖️
Difficulty
Medium
⏲️
Prep Time
20 mins
🕒
Cook Time
20 mins
⏱️
Total Time
40 mins
🍽️
Servings
8 pastries

There’s something about the combo of tangy cream cheese and sweet, jammy blueberries wrapped in flaky puff pastry that takes me straight back to my mother’s kitchen in Morocco—except there, she’d use a similar technique with phyllo and honey. Now, living in New York City and trained in Paris, I’ve fused those worlds into these Blueberry Cream Cheese Puff Pastry crescents. The secret? A homemade blueberry filling that’s thick enough to stay put, and a cream cheese layer that’s beaten until silky smooth. This easy blueberry puff pastry recipe is my go‑to for brunch or dessert.

Imagine biting through layers of buttery, golden puff pastry into a soft, creamy center studded with bursting blueberries. The lemon zest brightens every bite, and the brown sugar adds a hint of molasses depth. During my years at Le Cordon Bleu in Paris, I learned that the key to great pastry is not overworking the dough—and here, we let the store‑bought sheets do the heavy lifting while we focus on the filling. A dusting of powdered sugar turns these into showstoppers.

I’ve tested this recipe a dozen times at my NYC apartment, from the Union Square farmers market blueberries to the cream cheese from the corner deli. My twist? Cutting the puff pastry into diagonal slices before assembling—makes rolling those crescents effortless, and every piece gets an even spread of filling. One common mistake is skipping the egg wash; it’s what gives that gorgeous deep golden color. Stick with me and you’ll have a batch that rivals any Parisian pâtisserie.

Why This Blueberry Cream Cheese Puff Pastry Recipe Is the Best

The Flavor Secret: Most recipes use canned pie filling—not here. My homemade blueberry compote is cooked down with fresh lemon zest and a touch of brown sugar, giving it a bright, not‑too‑sweet flavor that pairs perfectly with the rich cream cheese. The lemon cuts through the fat and keeps every bite refreshing.

Perfected Texture: I beat the cream cheese for a full 2‑3 minutes until it’s incredibly light and airy before adding the egg yolk and sugar. This step, which I learned in pastry school, prevents a dense, gluey filling. The result is a cloud‑like cream cheese layer that melts into the pastry.

Foolproof & Fast: Using two boxes of frozen puff pastry (thawed) means you skip the hardest part of making puff pastry from scratch. The crescent‑rolling technique is simple enough for a weekday breakfast but impressive enough for company. Plus, the full recipe takes only 40 minutes start to finish.

Blueberry Cream Cheese Puff Pastry Ingredients

I get my blueberries from the Greenmarket in Union Square when they’re in season, but frozen work just as well. The cream cheese should be full‑fat—low‑fat won’t give you that luscious texture. And the puff pastry? I always keep two boxes of Dufour or Pepperidge Farm in my freezer. It’s my NYC shortcut to a taste of Paris.

Ingredients List

  • 18 ounces fresh blueberries
  • ¼ cup granulated sugar
  • ¼ cup brown sugar, packed
  • Zest from 1 lemon
  • 1 tablespoon fresh lemon juice
  • 1 tablespoon cornstarch
  • 2 boxes puff pastry sheets (17.3 oz each), thawed
  • 8 ounces cream cheese, softened
  • 1 egg yolk
  • ¼ cup granulated sugar (for cream cheese)
  • 1 teaspoon vanilla extract
  • 1 teaspoon lemon juice (for cream cheese)
  • 1 large egg (for egg wash)
  • 1 tablespoon water
  • ¼ cup powdered sugar, for dusting

Ingredient Spotlight

Blueberries: Fresh or frozen both work. If using frozen, do not thaw—add them directly to the saucepan and cook an extra 2–3 minutes. The cornstarch helps thicken any extra liquid.

Puff Pastry: Look for all‑butter puff pastry (like Dufour) for the best flavor and flakiness. If using Pepperidge Farm, it’s still great but won’t be quite as rich. Keep the pastry cold until you’re ready to roll.

Cream Cheese: Must be softened to room temperature. Cold cream cheese will leave lumps. For a dairy‑free version, use a plant‑based cream cheese (like Kite Hill) but note it won’t be as firm after baking.

Original Ingredient Best Substitution Flavor / Texture Impact
Fresh blueberries Frozen blueberries (no thaw) Slightly more liquid; thicker filling needed
All‑butter puff pastry Standard puff pastry sheets Less rich, but still flaky
Full‑fat cream cheese Low‑fat or dairy‑free cream cheese Less creamy, may curdle if heated too high

How to Make Blueberry Cream Cheese Puff Pastry — Step-by-Step

Follow these steps, and you’ll have a tray of gorgeous crescent pastries that smell like a bakery in the 6th arrondissement. I’ve broken it down so you can see exactly what to look for at each stage.

Step 1: Make the Blueberry Filling

Rinse 18 ounces fresh blueberries and place them in a medium saucepan. Sprinkle with ¼ cup granulated sugar, ¼ cup brown sugar, the zest of 1 lemon, 1 tablespoon lemon juice, and 1 tablespoon cornstarch. Stir to combine. Heat over medium heat, stirring frequently, until the blueberries begin to burst and the mixture thickens—about 5–7 minutes. The filling should look like a thick jam. Remove from heat and let cool completely. This can be made a day ahead.

💡 emy’s Pro Tip: If the filling seems too thin, simmer 1–2 minutes longer. The cornstarch needs to fully activate to prevent a soggy pastry.

Step 2: Prepare the Cream Cheese Mixture

In a medium bowl, beat 8 ounces softened cream cheese with an electric mixer for 2–3 minutes until smooth and fluffy. Add 1 egg yolk, ¼ cup granulated sugar, 1 teaspoon vanilla, and 1 teaspoon lemon juice. Beat until well incorporated and no lumps remain. Set aside.

⚠️ Common Mistake to Avoid: Don’t overbeat after adding the egg yolk—just until combined. Overbeating can make the cream cheese too thin and runny.

Step 3: Assemble the Pastries

On a lightly floured surface, roll out one puff pastry sheet into a 10×12‑inch rectangle. Place it on a parchment‑lined baking sheet. Spread half the cream cheese mixture over the pastry, leaving a ½‑inch border. Spoon half the cooled blueberry filling over the cream cheese (you may not need all of it—resist overfilling). Top with the second puff pastry sheet. Press gently to seal.

💡 emy’s Pro Tip: Use a sharp knife or pizza cutter to cut the pastry into 8 diagonal strips before adding the top layer—it makes rolling the crescents much easier! If you cut after adding the top, the filling may squish out.

Step 4: Shape the Crescents

Using a sharp knife, cut the stacked pastry into about 8 long diagonal strips (if you didn’t pre‑cut). Take each strip and gently roll it up from one end to the other, forming a crescent shape. Place on the prepared baking sheet. Repeat with the remaining puff pastry and fillings. Space them about 2 inches apart.

⚠️ Common Mistake to Avoid: If the pastry feels too warm and sticky, chill the assembled strips in the fridge for 10 minutes before rolling. Warm butter makes the pastry stick to your hands.

Step 5: Brush and Bake

Preheat oven to 375°F. In a small bowl, whisk 1 egg with 1 tablespoon water to make an egg wash. Brush each crescent generously with egg wash. Bake for 20 minutes, or until puffed and deep golden brown. Let cool on the sheet for 5 minutes, then transfer to a wire rack. Dust with ¼ cup powdered sugar before serving.

💡 emy’s Pro Tip: For an extra‑shiny crust, brush with egg wash twice: once right after shaping, then again after 10 minutes of baking. That double layer gives a professional gloss.

Step Action Duration Key Visual Cue
1 Cook blueberry filling 5–7 min Berries burst, mixture thickens
2 Beat cream cheese 2–3 min Smooth, fluffy, no lumps
3 Assemble & cut 5 min Even layers, clean cuts
4 Roll crescents 2 min per strip Neat spiral shape
5 Bake 20 min Golden brown, puffed

Serving & Presentation

These pastries are best served warm—the cream cheese is soft and the blueberries are still slightly jammy. I love to arrange them on a wooden board, dusted with a generous cloud of powdered sugar. For a Moroccan twist, drizzle a little honey over the top and sprinkle with toasted sliced almonds. In Paris, we’d serve them with a dollop of crème fraîche on the side.

In my NYC kitchen, they often end up on a brunch table next to a big bowl of fruit salad and mimosas. They also make a perfect grab‑and‑go breakfast for busy mornings—just reheat in the toaster oven for 5 minutes. For an extra treat, serve with a scoop of vanilla ice cream or a spoonful of lemon curd.

Pairing Type Suggestions Why It Works
Side Dish Fresh fruit salad, yogurt parfait Adds freshness and balances richness
Sauce / Dip Vanilla crème anglaise, honey, lemon curd Enhances the fruity/creamy notes
Beverage Iced latte, Moroccan mint tea, cold brew Caffeine cuts through buttery layers
Garnish Powdered sugar, lemon zest, fresh mint Adds visual appeal and bright flavor

Make-Ahead, Storage & Reheating

Living in NYC means I’m always looking to save time. I often make the blueberry filling and cream cheese mixture up to 2 days ahead and keep them refrigerated. Then, on the day of serving, I just assemble and bake. The pastries themselves store beautifully, but they’re best when reheated to revive that flaky texture.

Method Container Duration Reheating Tip
Refrigerator Airtight container Up to 3 days Oven 350°F for 5–7 min, not microwave
Freezer Freezer‑safe bag or container Up to 2 months Reheat from frozen in 350°F oven for 12–15 min
Make‑Ahead Refrigerate assembled unbaked pastries Up to 24 hours advance Brush with egg wash just before baking

To reheat, place the pastries on a baking sheet in a 350°F oven for about 5 minutes for refrigerated or 12 minutes for frozen. The microwave will make the pastry soggy, so avoid it. If you’re meal‑prepping for the week, bake a full batch, then freeze half—just reheat as needed. I’ve done this countless times before Sunday brunch with friends.

Variations & Easy Swaps

Over the years, I’ve played with this recipe to suit different cravings and dietary needs. Here are three of my favorite variations, each tested in my tiny but mighty NYC kitchen.

Variation Key Change Best For Difficulty Impact
Moroccan Spiced Add ½ tsp cinnamon & ¼ tsp ginger to blueberry filling Aromatic twist for fall Easy (no extra steps)
Dairy‑Free Use vegan cream cheese & puff pastry Dairy‑free diet Medium (watch consistency)
Peach & Raspberry Replace blueberries with diced peaches & raspberries Summer fruit season Easy (same technique)

Moroccan Spiced Version

Growing up in Morocco, my mother would often add cinnamon and a pinch of ginger to fruit fillings. Stir ½ teaspoon cinnamon and ¼ teaspoon ground ginger into the blueberry mixture along with the sugar. The warm spices complement the tangy cream cheese beautifully. This version is especially cozy in the winter months.

Dairy‑Free Version

For a dairy‑free option, use a high‑quality vegan cream cheese (like Kite Hill) and a dairy‑free puff pastry (many brands are accidentally vegan). Beat the vegan cream cheese the same way, but note it may be softer—chill it for 15 minutes before spreading. The texture will be slightly less rich but still delicious.

Peach & Raspberry Swap

When blueberries aren’t at their peak, I swap in 2 cups diced peaches and 1 cup raspberries. Use the same sugar and cornstarch amounts, and cook until the peaches soften and release their juices. The result is a summery, slightly more tart filling that pairs wonderfully with the cream cheese. I found the best peaches at the Union Square farmers market in July.

How do you prevent the puff pastry from getting soggy when using blueberry and cream cheese filling?

The key is to cook the blueberry filling until it’s thick and jam‑like—that way excess moisture won’t seep into the pastry. I always cook the berries with cornstarch and let them cool completely before spreading. Also, use a light hand when spreading; too much filling creates soggy spots. Another trick: brush the bottom pastry sheet with a thin layer of melted butter or egg wash before adding the filling—this creates a barrier.

Can you use frozen blueberries for blueberry cream cheese puff pastry, and do you need to thaw them first?

Absolutely! Frozen blueberries work perfectly. Do NOT thaw them first—toss them straight into the saucepan frozen. They will release more liquid, so increase the cooking time by 2–3 minutes and add an extra ½ teaspoon of cornstarch if you want a firmer filling. The thicker the filling, the less soggy your puff pastry will be. I often use frozen wild blueberries for a more intense flavor.

What is the best temperature and time to bake blueberry cream cheese puff pastry?

I recommend baking at 375°F for exactly 20 minutes. This temperature is hot enough to quickly puff the layers without burning the sugars. If your pastries are smaller or you’re using a convection oven, check at 16 minutes. The pastries should be deep golden brown and puffed. For a standard oven, rotate the pan halfway through for even browning. Let them cool on the pan for 5 minutes so the filling sets slightly.

Can you make blueberry cream cheese puff pastry ahead of time and reheat it?

Yes—this is one of my favorite meal‑prep tricks! You can bake the pastries up to 3 days ahead and store them in an airtight container in the fridge. To reheat, pop them in a 350°F oven for 5–7 minutes (do not microwave, or the pastry will become chewy). You can also freeze the unbaked assembled pastries on a baking sheet, then bake directly from frozen, adding 5 extra minutes to the baking time.

Can I use other berries instead of blueberries?

Definitely! This recipe is very flexible. Try raspberries, blackberries, or a mix of berries. If using strawberries, chop them into small pieces because they are larger and more watery. You may need to adjust the sugar—sweeter berries like blackberries may need a little less. The cream cheese filling pairs well with any tart fruit. My Parisian friend uses cherries and a pinch of almond extract, which is divine.

Why did my puff pastry not puff up?

There are a few common reasons. First, the pastry may have been too warm when it went into the oven—the butter layers need to be cold to create steam. If your kitchen is warm, chill the assembled pastries for 15 minutes before baking. Second, the egg wash might have dripped down the sides and sealed the edges, preventing lift. Brush only the top. Third, you may have pressed the edges too firmly when sealing. Light pressure is enough.

How do I store leftover cream cheese filling or blueberry compote?

Both the blueberry compote and the cream cheese mixture can be stored separately in airtight containers in the fridge for up to 3 days. The compote can also be frozen for up to 3 months—thaw it in the fridge overnight before using. The cream cheese mixture does not freeze well because it can become grainy after thawing, so only make as much as you need. I usually make the compote in double batches and keep it for pancakes or yogurt.

Can I make this recipe gluten‑free?

Yes, but you’ll need a gluten‑free puff pastry, which is available from brands like Schär or homemade. The texture will be a bit more delicate, so handle it carefully. Also check that your cornstarch is labeled gluten‑free (most are). The cream cheese filling and blueberry compote are naturally gluten‑free. Roll the gluten‑free pastry between two sheets of parchment paper to prevent sticking.

Share Your Version!

I hope these Blueberry Cream Cheese Puff Pastry crescents become a staple in your kitchen—they certainly are in mine! Whether you enjoy them for a leisurely weekend brunch or grab one on your way out the door, I’d love to hear how they turned out. Did you try any of the variations? Or maybe you created your own twist?

Leave a star rating and a comment below—your feedback helps other readers too. Snap a photo of your beautiful pastries and share it on Instagram or Pinterest, and don’t forget to tag me @cookingwithemy. I can’t wait to see your kitchen creations!

From my NYC kitchen to yours — I hope this recipe brings as much warmth to your table as it does to mine. — emy 🧡

📌

Love This Recipe? Save It to Pinterest!

If you enjoyed this Blueberry Cream Cheese Puff Pastry recipe, don’t let it get lost in your browser tabs! 😄 Pin it now so you can find it again anytime — and explore hundreds more tried‑and‑tested recipes waiting for you on my Pinterest boards.

👉 Follow emy on Pinterest @chefrecipes2

📌 Pin this recipe · 🔁 Re‑pin your favorites · 💬 Tag me when you make it — I love seeing your creations!

Print

clock clock iconcutlery cutlery iconflag flag iconfolder folder iconinstagram instagram iconpinterest pinterest iconfacebook facebook iconprint print iconsquares squares iconheart heart iconheart solid heart solid icon

Blueberry Cream Cheese Puff Pastry


  • Author: Chef Emy

Description

These delicious blueberry cream cheese puff pastries are made with a homemade blueberry filling along with a sweet cream cheese mixture spread over a puff pastry sheet, then topped with another pastry sheet, cut into diagonal pieces, rolled up like crescents and baked to golden perfection.


Ingredients

Scale
  • 18 ounce fresh blueberries
  • ¼ cup sugar
  • ¼ cup brown sugar
  • Zest from 1 lemon
  • 1 tablespoon lemon juice
  • 1 tablespoon cornstarch
  • 2 boxes puff pastry sheets
  • 8 ounce cream cheese (softened)
  • 1 egg yolk
  • cup sugar
  • 1 teaspoon vanilla
  • 1 teaspoon lemon juice
  • 1 egg
  • 1 tablespoon water
  • ¼ cup powdered sugar

Instructions

  1. Preheat oven to 375° and line a baking sheet with parchment paper. Set aside.
  2. Rinse blueberries and place in a medium saucepan.
  3. Sprinkle blueberries with sugar, brown sugar, lemon zest, lemon juice and cornstarch.
  4. Stir and heat over medium heat until blueberries burst and start to thicken. Stir frequently.
  5. Let cool.
  6. In a medium bowl, beat cream cheese for 2-3 minutes until smooth.
  7. Add egg yolk, sugar, vanilla and lemon juice. Beat until well incorporated.
  8. On a lightly floured surface, roll out pastry sheets and place one pastry sheet on the prepared baking sheet(s). *Cutting the puff pastry into the diagonal cuts before adding the fillings might be easier when rolling the pastries into crescents.
  9. Spread half the cream cheese mixture over puff pastry followed by half the blueberry mixture (might not use all of the cream cheese mixture or blueberry filling).
  10. Top with remaining puff pastry sheet.
  11. Make diagonal cuts and roll up like crescents. Repeat with remaining puff pastry sheets.
  12. In a small bowl, whisk egg and water together.
  13. Brush with egg wash and bake for 20 minutes or until golden brown.
  14. Dust with powdered sugar before serving.

Nutrition

  • Calories: 473 kcal
  • Sugar: 26 g
  • Fat: 28 g
  • Carbohydrates: 52 g
  • Protein: 6 g


Blueberry Cream Cheese Puff Pastry