
Table of Contents
- Raspberry-Filled Almond Snow Cookies: The Only Recipe You’ll Ever Need
- Why This Raspberry-Filled Almond Snow Cookies Recipe is a Game-Changer
- Ingredient Spotlight: Quality Makes the Difference
- Step-by-Step Instructions
- Serving & Presentation
- Make-Ahead & Storage Solutions
-
Frequently Asked Questions (FAQ)
- How do I prevent the raspberry filling from leaking out of snow cookies?
- Can I use a different type of berry jam for almond snow cookies?
- What is the best consistency for the cookie dough for almond snow cookies?
- How long should almond snow cookies be baked to achieve the perfect texture?
- Can I make this recipe vegan/gluten-free?
Raspberry-Filled Almond Snow Cookies: The Only Recipe You’ll Ever Need
The holiday season is a time for warmth, joy, and of course, delicious treats! If you’re searching for that perfect festive cookie that combines delicate flavors with an elegant presentation, look no further. These Raspberry-Filled Almond Snow Cookies are a revelation, bringing together the nutty depth of almond with the bright sweetness of raspberry, all dusted in a whimsical snowy coating of powdered sugar. This recipe is designed to be your go-to for Raspberry-Filled Almond Snow Cookies, ensuring a tender, flavorful cookie every single time. We dive deep into the nuances of creating these showstoppers, so you can impress your guests and family with confections that look as good as they taste.
Imagine biting into a cookie that’s both melt-in-your-mouth tender and delightfully fragrant with almond. The subtle crunch from the finely ground almonds and the sweet, slightly tart burst of raspberry jam at its center create a symphony of textures and tastes. As these cookies cool, they’re rolled in a generous dusting of powdered sugar, giving them their signature “snowy” appearance and an ethereal, sweet finish. These aren’t just any snowdrop cookies; they are an experience – a moment of pure indulgence that captures the magic of the season and makes every bite feel like a special occasion.
We understand that baking exceptional cookies requires more than just a list of ingredients. At cookingwithemy.com, we’re dedicated to providing you with the knowledge and confidence to achieve bakery-quality results in your own kitchen. This recipe for almond cookies showcases a carefully balanced method developed by Chef Sally, focusing on achieving the perfect cookie-to-filling ratio and a melt-in-your-mouth texture that’s truly unforgettable. We’ll guide you through each step, uncovering the secrets to perfectly formed, never-leaking raspberry fillings and the ideal “snowy” finish, making this the definitive guide to Raspberry-Filled Almond Snow Cookies online.
Why This Raspberry-Filled Almond Snow Cookies Recipe is a Game-Changer
The Chef’s Secret
The magic behind these Raspberry-Filled Almond Snow Cookies lies in the tender almond dough, which is crucial for achieving that melt-in-your-mouth texture. By incorporating almond flour and using a precise ratio of butter to sugar, we create a dough that’s rich, slightly crumbly, and incredibly fragrant. This careful balance ensures the cookies hold their shape during baking while remaining delightfully delicate, a perfect canvas for the sweet raspberry filling.
Unbeatable Texture
The synergy between almond flour and all-purpose flour is key to the superior texture of these almond cookies. Almond flour contributes a moistness and a subtle, nutty chewiness that regular flour alone cannot provide. When combined with softened butter and just the right amount of granulated sugar, it creates a luxurious crumb that’s both tender and structurally sound, preventing these delicate holiday cookies from crumbling prematurely.
Foolproof for a Reason
We’ve meticulously tested this recipe to ensure consistent, beautiful results every time. From the chilling of the dough, which prevents spreading and makes handling easier, to the exact baking time for a perfect golden edge, every detail is considered. You’ll find the instructions clear and actionable, designed to empower even novice bakers to create stunning and delicious raspberry cookies.
Ingredient Spotlight: Quality Makes the Difference
Almond Flour: The star of our unique approach, almond flour lends a distinct nutty flavor and a wonderfully tender, slightly chewy texture that makes these Raspberry-Filled Almond Snow Cookies stand out. For the best results, use finely ground blanched almond flour, which ensures a smoother dough and a more delicate crumb. If you can’t find it, you could technically use almond meal, but it will result in a coarser texture.
Unsalted Butter, Softened: High-quality unsalted butter is foundational for flavor and texture. Ensuring it’s softened, not melted, allows it to cream effectively with sugar, incorporating air to create a lighter cookie. European-style butter, with its higher fat content, can offer an even richer flavor, though standard unsalted butter works perfectly well.
Granulated Sugar: This standard baking staple not only sweetens but also aids in the creaming process, contributing to the cookie’s tender texture and delicate crispness. The measured amount here is calibrated to balance the sweetness of the jam and the final powdered sugar coating, ensuring a harmonious flavor profile in every bite of these snowdrop cookies.
Vanilla Extract & Almond Extract: Pure vanilla extract adds a warm, comforting aroma and flavor base, while almond extract intensifies the nutty notes from the almond flour, creating a more pronounced and delightful almond experience. Using pure extracts, rather than imitations, significantly enhances the overall quality and depth of flavor in these almond cookies.
All-Purpose Flour: This provides the necessary structure to hold the cookie together, balancing the richness of the almond flour and butter. The measured amount is carefully chosen to create a dough that’s pliable enough to fill but firm enough to hold its shape during baking and cooling.
Salt: A pinch of salt is essential in any sweet baked good. It doesn’t just add a subtle savory contrast; it actually enhances all the other flavors in the cookie, bringing out the natural sweetness of the jam and the richness of the almond.
Raspberry Jam: The jewel in the crown of these raspberry cookies! Opt for a good quality, thick raspberry jam or preserves. A thicker jam will hold its shape better during baking and is less likely to leak out. If your jam is particularly runny, you can drain off any excess liquid or even gently simmer it for a few minutes to thicken it before using.
Powdered Sugar: For that signature snowy finish! This coats the warm cookies, creating a beautiful, frosty appearance and adding a final touch of sweetness that perfectly complements the almond and raspberry. Make sure it’s unsifted for the best coating.
Step-by-Step Instructions
Step 1: Preparing the Dough Base
In a spacious mixing bowl, begin by creaming together the softened unsalted butter and granulated sugar. Use an electric mixer on medium speed until the mixture is light, fluffy, and pale yellow. This step is crucial for incorporating air, which will contribute to the cookie’s tender texture.
Pro Tip: Ensure your butter is truly softened – it should give slightly when pressed with your finger, but not be greasy or melted. This will allow it to cream properly without becoming oily.
Step 2: Infusing with Flavor and Almond Goodness
Next, add the pure vanilla extract and the potent almond extract to the creamed butter and sugar mixture. Mix until thoroughly combined. Gradually introduce the almond flour, all-purpose flour, and salt. Continue mixing on low speed until just combined and a cohesive dough forms. Be careful not to overmix once the flour is added, as this can develop gluten and lead to tougher cookies.
Common Mistake to Avoid: Overmixing the dough after adding the flour. This can make your cookies tough and dense. Mix only until no dry streaks of flour remain.
Step 3: Chilling the Dough for Perfect Handling
Once your dough is formed, flatten it into a disk, wrap it tightly in plastic wrap, and refrigerate for at least 1 hour. This chilling period is essential. It allows the fats to firm up, which prevents the cookies from spreading excessively during baking, and also makes the dough much easier to handle and shape into perfect balls for filling.
Pro Tip: You can flatten the dough into a disk before wrapping; this helps it chill more evenly and quickly.
Step 4: Preheating and Baking Preparations
Preheat your oven to 350°F (175°C). While the oven heats, line your baking sheets with parchment paper. This prevents the cookies from sticking and ensures even baking and easy cleanup. Having your baking sheets ready means you can get the shaped cookies into the oven promptly.
Common Mistake to Avoid: Not using parchment paper or a silicone baking mat. This can lead to cookies sticking and burning on the bottom.
Step 5: Shaping and Filling the Cookies
Once the dough is chilled and firm, roll it into uniform 1-inch balls. Using your thumb or the end of a small spoon, gently press an indentation into the center of each dough ball. Carefully spoon about 1/2 teaspoon of raspberry jam into each indentation. Ensure you don’t overfill, as this can lead to leakage.
Pro Tip: If the dough becomes too soft to handle while shaping, return it to the refrigerator for 10-15 minutes.
Step 6: Baking to Golden Perfection
Place the filled cookie balls onto the prepared baking sheets, leaving about 2 inches between them. Bake for 10-12 minutes, or until the edges of the cookies are just beginning to turn lightly golden. The centers may still look slightly soft; they will continue to set as they cool. Overbaking will result in dry, hard cookies.
Common Mistake to Avoid: Overbaking the cookies. Watch for the edges to be lightly golden; the centers will firm up as they cool to achieve the perfect tender texture.
Step 7: The Snowy Finish
Allow the cookies to cool on the baking sheets for about 5 minutes before transferring them to a wire rack. While they are still warm but not hot, gently roll each cookie in the powdered sugar until fully coated, creating that signature snowy appearance. The warmth helps the sugar adhere beautifully.
Pro Tip: Use a shallow bowl or plate for rolling cookies in powdered sugar; it makes it easier to get an even coating.
Serving & Presentation
These Raspberry-Filled Almond Snow Cookies are a feast for the eyes and the palate, making them perfect for any festive gathering. For an elegant presentation, arrange them on a tiered serving stand, allowing their snowy white coating and vibrant red centers to pop. You can also place a few on individual dessert plates as part of a larger sweet spread. Consider garnishing a platter with a few fresh raspberries, a dusting of edible glitter, or small sprigs of rosemary for a touch of green and aromatic contrast. These cookies pair wonderfully with a warm cup of tea, coffee, or a glass of milk, and they make a delightful addition to a holiday cookie box or as a charming finale to a rich meal.
Make-Ahead & Storage Solutions
These holiday cookies are wonderfully suited for make-ahead preparation, easing your holiday baking stress. You can prepare the cookie dough up to 2 days in advance and keep it tightly wrapped in the refrigerator. When ready to bake, let it sit at room temperature for about 15-20 minutes until it’s pliable enough to roll. Shape and fill them as directed, and bake. The fully baked cookies, once cooled and dusted with powdered sugar, can be stored airtight at room temperature for up to 5 days. For longer storage, freezing is an excellent option; flash freeze the powdered cookies on a baking sheet until firm, then transfer them to a freezer-safe container or bag for up to 3 months. When you’re ready to enjoy, thaw them at room temperature. They retain their delicious flavor and delightful snowy texture remarkably well.
Frequently Asked Questions (FAQ)
How do I prevent the raspberry filling from leaking out of snow cookies?
The key to preventing raspberry filling leakage is to use a thick jam or preserves and to avoid overfilling. Jam that has been simmered slightly to a jammy consistency and then cooled works best. Only fill the indentation with about 1/2 teaspoon. Ensure the edges of the cookie dough are sealed around the filling, and avoid overbaking, which can cause the jam to bubble and escape.
Can I use a different type of berry jam for almond snow cookies?
Absolutely! While raspberry is classic, you can certainly use other berry jams. Strawberry, blueberry, or even a mixed berry jam will work beautifully. Just ensure the jam is thick, as a runnier consistency increases the risk of leakage. You might also consider a tart cherry preserves for a different flavor profile.
What is the best consistency for the cookie dough for almond snow cookies?
The ideal consistency for the cookie dough is firm and pliable, not sticky. After chilling for at least an hour, it should be firm enough to easily roll into balls and press an indentation without sticking excessively to your hands. If it feels too sticky when you start shaping, pop it back in the fridge for another 10-15 minutes.
How long should almond snow cookies be baked to achieve the perfect texture?
Bake these Raspberry-Filled Almond Snow Cookies for 10-12 minutes at 350°F (175°C). They are done when the edges are lightly golden brown, and the centers are still slightly soft. They will continue to firm up as they cool on the baking sheet. Overbaking will lead to dry, hard cookies, so keep a close eye on them after the 10-minute mark.
Can I make this recipe vegan/gluten-free?
Yes, with a few adjustments! For a gluten-free version, use a certified gluten-free all-purpose flour blend and ensure your almond flour is pure almond. For a vegan version, substitute the butter with a high-quality vegan butter stick and ensure your jam is vegan. Egg replacers are not typically needed as this recipe relies on the fat and structure from butter/flour.
Tried This Recipe? Leave a Comment!
Did you make these delightful Raspberry-Filled Almond Snow Cookies? I’d love to hear how they turned out for you! Please leave a comment and a rating below. Your feedback helps other home cooks and supports cookingwithemy by sharing your experience!
For more delicious inspiration, follow me on Pinterest!
.
Print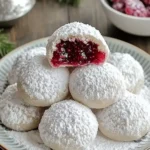
Raspberry-Filled Almond Snow Cookies
- Total Time: 1 hour 27 minutes
- Yield: 24 cookies 1x
Description
These delightful cookies feature a tender almond dough filled with sweet raspberry jam and rolled in powdered sugar for a snowy finish.
Ingredients
- 1 cup almond flour
- 1/2 cup unsalted butter, softened
- 1/4 cup granulated sugar
- 1 teaspoon vanilla extract
- 1/4 teaspoon almond extract
- 1 1/2 cups all-purpose flour
- 1/4 teaspoon salt
- 1/2 cup raspberry jam
- 1 cup powdered sugar for rolling
Instructions
- In a large bowl, cream together the softened butter and granulated sugar until light and fluffy.
- Add the vanilla extract and almond extract, mixing well.
- Gradually stir in the almond flour, all-purpose flour, and salt until a dough forms.
- Wrap the dough in plastic wrap and chill in the refrigerator for at least 1 hour.
- Preheat the oven to 350°F (175°C) and line baking sheets with parchment paper.
- Roll the dough into 1-inch balls. Make an indentation in each ball and fill with about 1/2 teaspoon of raspberry jam.
- Bake for 10-12 minutes or until the edges are lightly golden.
- Allow cookies to cool slightly, then roll in powdered sugar while still warm.
Notes
For a gluten-free version, ensure all ingredients are certified gluten-free. Store in an airtight container for up to 5 days.
- Prep Time: 15 minutes
- Cook Time: 12 minutes
- Method: Dessert
- Cuisine: American
Nutrition
- Calories: 120
- Sugar: 8g
- Fat: 6g
- Carbohydrates: 15g
- Protein: 2g
