“`html
Table of Contents
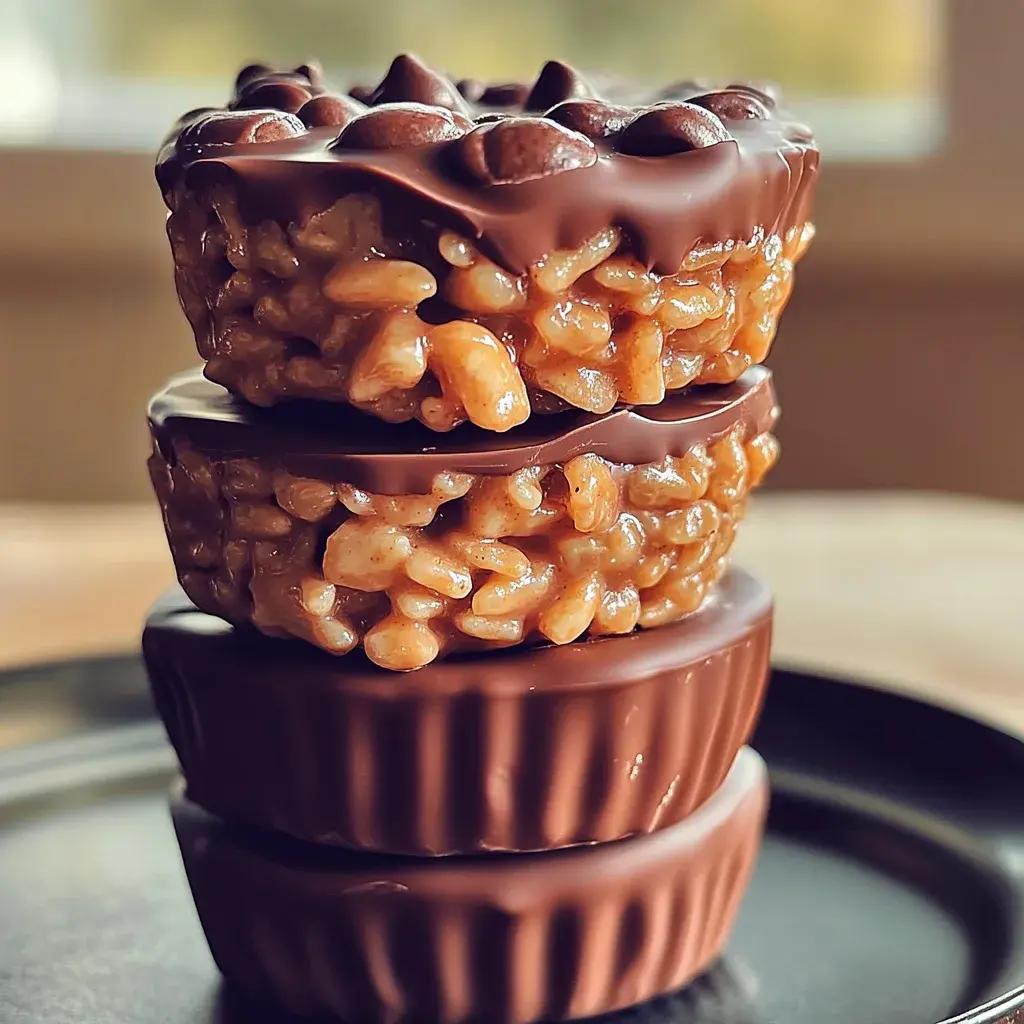
Chocolate Peanut Butter Rice Krispie Cups
Introduction: Craving a Nostalgic Treat?
Did you know that the average person consumes over 60 pounds of sweets annually? If you’re among those who find themselves reaching for a delightful, textural treat that’s both a crowd-pleaser and a nostalgic throwback, then you’re in the right place. Today, we’re diving into the wonderfully simple yet utterly irresistible world of Chocolate Peanut Butter Rice Krispie Cups! These aren’t your average pantry staples; they’re a harmonious blend of crunchy, chewy, chocolatey, and nutty goodness, all rolled into perfectly portioned cups. Get ready to transform humble ingredients into a no-bake marvel that will have everyone asking for the recipe. Let’s get baking (or rather, no-baking)!
Ingredients That Sing Together
The magic of these Chocolate Peanut Butter Rice Krispie Cups lies in their simplicity and the way familiar ingredients come together to create something extraordinary. Each element plays a crucial role in achieving that perfect balance of textures and flavors.
For the Base:
- 6 tablespoons (85g) unsalted butter: The creamy foundation that binds everything together.
- 10 ounces (283g) mini marshmallows (about 4 cups): These provide the gooey, sticky texture. You can also use regular marshmallows, just chop them up. For a less sweet base, try using a touch less.
- 1 teaspoon vanilla extract: A whisper of warmth to enhance the sweet flavors.
- 6 cups (170g) crispy rice cereal: The star of the show, providing that signature crunch. Ensure it’s fresh for maximum crispiness!
For the Chocolate Peanut Butter Swirl:
- 1 cup (250g) creamy peanut butter: Choose your favorite! Smooth peanut butter creates a seamless swirl. If you prefer crunchy, go for it, but it might affect the texture slightly. Natural peanut butter can sometimes lend a slightly oilier texture, so aim for a processed, creamy brand for best results.
- 1/2 cup (85g) semi-sweet chocolate chips: These melt into a rich, decadent layer. Milk chocolate or dark chocolate chips work too, depending on your preference.
- 1 tablespoon (14g) butter: To help our chocolate ganache spread smoothly.
Timing is Everything
15 minutes
5 minutes
20 minutes (+ chilling time)
12-16 cups
Compared to many baked desserts, these Rice Krispie Cups are lightning-fast! The prep and melt time is minimal, making them an ideal last-minute dessert option. The actual “active” cooking time is under 10 minutes, with the rest being chilling time to set.

Step-by-Step Instructions
Step 1: Prep Your Pan
First things first, let’s get our molds ready. Line a 12-cup muffin tin with paper or silicone liners. This not only makes cleanup a breeze but also ensures each cup releases perfectly. If you don’t have liners, you can lightly grease the muffin tin cups, but liners are definitely recommended for that clean, professional look!
Step 2: Melt the Butter and Marshmallows
In a large saucepan, melt the 6 tablespoons of butter over low heat. Once melted, add the mini marshmallows (or chopped regular marshmallows) and stir continuously until they are completely melted and smooth. It’s crucial to keep the heat low to prevent the marshmallows from scorching. We’re aiming for a glossy, gooey mixture, not a burnt, sticky mess!
Step 3: Stir in the Peanut Butter
Remove the saucepan from the heat. Now, stir in the creamy peanut butter and the vanilla extract. Mix until the peanut butter is fully incorporated into the melted marshmallow mixture, creating a smooth, luscious blend. The aroma at this stage is already heavenly!
Step 4: Add the Cereal
Gently fold in the crispy rice cereal, ensuring each piece is coated with the peanut butter-marshmallow mixture. Work quickly but carefully. You want to ensure even distribution without crushing the cereal, which would compromise that delightful crunch.
Step 5: Press into Pan
Divide the cereal mixture evenly among the prepared muffin cups. Using a spatula or lightly greased hands, press the mixture down firmly into each cup. This is key to ensuring your cups hold their shape and have a good density. Don’t be shy with the pressing – a firmer pack equals a sturdier cup.
Step 6: Chill and Cut
Now for the chocolatey topping! In a microwave-safe bowl, combine the semi-sweet chocolate chips and the 1 tablespoon of butter. Microwave in 30-second intervals, stirring between each, until the chocolate is melted and smooth. You can also melt this over a double boiler. Spoon a small amount of the melted chocolate over each pressed Rice Krispie cup, spreading it slightly to cover the top. Pop the entire muffin tin into the refrigerator for at least 30-60 minutes, or until the chocolate is set and the cups are firm. Once chilled, you can gently lift them out using the liners. Let them sit at room temperature for a few minutes before serving for the best texture – perfectly crisp outside, wonderfully chewy inside, with that luscious chocolate peanut butter finish.
Nutritional Information
While these are a treat, understanding the approximate nutritional content can be helpful:
- Calories: Approximately 250-300 per cup, depending on exact measurements and ingredients used.
- Fat: Around 12-15g (mostly from butter and peanut butter).
- Carbohydrates: Roughly 30-35g (primarily from marshmallows and cereal).
- Sugar: Approximately 15-20g (from marshmallows and chocolate).
- Protein: About 3-5g (from peanut butter).
Please note that these are estimates and can vary.
Healthier Alternatives
Looking to lighten up this classic? You can make mindful swaps without sacrificing too much flavor:
- Reduced-Sugar Marshmallows: Some brands offer marshmallows with less sugar.
- Healthier Peanut Butter: Opt for natural peanut butter with no added sugar, though be mindful of its oil separation.
- Dark Chocolate: Use dark chocolate chips (70% cacao or higher) for a less sweet topping with more antioxidants.
- Whole Grain Cereal: Consider using a puffed whole grain cereal if available, though it might alter the classic crispiness.
- Portion Control: Making them in mini muffin tins naturally helps with portion sizes.
Serving Suggestions
These Chocolate Peanut Butter Rice Krispie Cups are fantastic on their own, but here are a few ideas to elevate them:
- With a Glass of Milk: The ultimate classic pairing.
- Kid’s Lunchboxes: A delightful surprise that’s easy to pack.
- Potlucks & Parties: Their individual serving size and crowd-pleasing flavors make them perfect for gatherings.
- Dessert Bar Addition: Arrange them alongside cookies, brownies, or cupcakes for a varied treat table.
- Drizzle with Extra Chocolate: For an extra decadent touch, drizzle a little more melted chocolate over the set topping.
Common Mistakes to Avoid
To ensure your Chocolate Peanut Butter Rice Krispie Cups turn out perfectly every time, steer clear of these common pitfalls:
- Overheating Marshmallows: This can lead to a tough, chewy texture rather than a gooey one. Keep the heat low and stir constantly.
- Crushing the Cereal: Stirring too vigorously can break down the cereal, resulting in a dense, less crispy texture.
- Not Pressing Firmly: If you don’t press the mixture into the cups, they might crumble easily.
- Waiting Too Long to Mold: The marshmallow mixture can harden quickly, making it difficult to press evenly if you delay.
- Using Stale Cereal: Old cereal will result in a flat, unappealing texture. Always check the freshness!
Storing Tips
These cups are best enjoyed fresh, but they can be stored for a few days:
- At Room Temperature: Store in an airtight container at room temperature for up to 2 days. They tend to soften slightly over time.
- In the Refrigerator: For longer storage (up to a week), keep them in an airtight container in the refrigerator. They will be firmer but still delicious.
- Freezing: You can freeze them! Layer them between parchment paper in a freezer-safe container. They will keep for up to a month. Thaw at room temperature before serving.
Frequently Asked Questions
***Can I use crunchy peanut butter?***
Yes, you can! Crunchy peanut butter will add an extra layer of texture to your cups. However, for the smoothest swirl and to ensure the best binding, creamy peanut butter is often preferred.
***What kind of crispy rice cereal is best?***
The classic Kellogg’s Crispy Rice cereal is recommended for its flavor and texture. Ensure it’s fresh, as stale cereal will not yield the best results.
***Can I make these dairy-free?***
You can adapt these to be dairy-free by using dairy-free butter, dairy-free marshmallows (check ingredients as some contain gelatin), and dairy-free chocolate chips. Peanut butter is naturally dairy-free.
***My mixture feels too dry/wet. What did I do wrong?***
If it’s too dry, you may have overworked the cereal. If it’s too wet, ensure your marshmallows were fully melted and you used the correct butter amount. Sometimes a little extra cereal or marshmallow can help adjust the consistency if it’s slightly off.
***How do I get a clean chocolate swirl on top?***
Ensure your chocolate is melted smoothly. A small spoon or offset spatula is best for spreading. For a more artful look, you can use a toothpick to create swirls before the chocolate sets.
These Chocolate Peanut Butter Rice Krispie Cups are a delightful journey back to childhood, with a decadent twist. They’re simple, satisfying, and always a hit. Give them a try and let us know what you think in the comments below! Happy no-baking!

Chocolate Peanut Butter Rice Krispie Cups
Description
Indulge in the ultimate no-bake dessert with these Chocolate Peanut Butter Rice Krispie Cups, perfectly balancing crunchy and creamy textures to satisfy your sweet tooth.
Ingredients
- 4 cupsRice Krispies cereal
- 1 cupcreamy peanut butter
- 1 cupsemi-sweet chocolate chips
- ½ cupunsalted butter
- 1 tspvanilla extract
- Optional toppings: sprinkles or chopped nuts
Instructions
- Gather your ingredients and line a muffin tin with cupcake liners.
- In a saucepan over low heat, melt the butter and chocolate chips together until smooth, stirring frequently.
- Remove from heat and mix in the peanut butter and vanilla until well combined.
- Fold in the Rice Krispies until they are evenly coated with the chocolate-peanut butter mixture.
- Spoon the mixture into the muffin liners, pressing down gently for shape.
- Chill in the refrigerator for about 30 minutes or until firm.
Nutrition
- Calories: 190
- Sugar: 10g
- Fat: 12g
- Carbohydrates: 18g
- Protein: 3g
“`
