“`html
Table of Contents
- What is a Salmon Sushi Bake?
- Ingredients for Your Easy Salmon Sushi Bake
- Timing is Everything: Prep, Cook, and Enjoy
- Step-by-Step Guide to Your Salmon Sushi Bake
- Nutritional Information: A Peek at the Goodness
- Healthier Alternatives for a Lighter Bite
- Serving Suggestions: Elevate Your Meal
- Common Mistakes to Avoid
- Storing Tips: Enjoying Leftovers
- Frequently Asked Questions about Salmon Sushi Bake
Easy Salmon Sushi Bake Recipe: A Delicious Twist on Classic Sushi
What is a Salmon Sushi Bake?
Are you searching for a weeknight dinner that’s both incredibly satisfying and delightfully different? If the thought of recreating your favorite sushi restaurant experience at home excites you, but you’re intimidated by the rolling and delicate preparation, then you’re in for a treat with this Easy Salmon Sushi Bake! This dish captures all the beloved flavors of a salmon sushi roll – the tender, savory salmon, the perfectly seasoned sushi rice, and that irresistible creamy element – but in a warm, comforting, and incredibly easy-to-make baked casserole. It’s the ultimate comfort food for sushi lovers, offering a deconstructed, approachable way to enjoy those classic tastes. With layers of seasoned rice, flaky salmon, and a luscious creamy sauce, all baked to golden perfection, this recipe delivers a bold flavor explosion that’s perfect for solo dinners, family meals, or even potlucks. Get ready to impress yourself and your loved ones with this innovative twist on a classic!
Ingredients for Your Easy Salmon Sushi Bake
The beauty of this salmon sushi bake lies in its straightforward ingredients, many of which you might already have in your pantry. We’re aiming for that perfect balance of textures and tastes that makes sushi so addictive. Here’s what you’ll need:
For the Rice:
- 2 cups sushi rice, rinsed until the water runs clear. This ensures fluffy, separate grains.
- 2 ¼ cups water for cooking rice. The perfect ratio for tender, sticky sushi rice.
- 1/3 cup rice vinegar. Adds that signature tangy sweetness.
- 2 tablespoons granulated sugar. Balances the vinegar’s tartness.
- 1 teaspoon salt. Enhances all the flavors.
For the Salmon Topping:
- 1.5 lbs salmon, cooked and flaked. About 2-3 salmon fillets, baked or pan-seared until just cooked through and tender.
- 1/4 cup mayonnaise. The creamy base that binds everything. Use full-fat for the best richness.
- 2 tablespoons Sriracha. For that delightful spicy kick. Adjust to your heat preference!
- 1 tablespoon soy sauce (or tamari for gluten-free). Adds a savory, umami depth.
- 1 teaspoon sesame oil. For a nutty, aromatic finish.
- 2 green onions, thinly sliced (whites and greens separated). Adds a fresh, mild oniony bite.
- Optional: 1 tablespoon Kewpie mayonnaise. If you want to lean into that authentic Japanese mayo flavor, Kewpie is king!
For the Sauce:
- 1/2 cup mayonnaise. Again, full-fat is recommended for a luxurious sauce.
- 1/4 cup sour cream or Greek yogurt. For tanginess and a lighter, creamier texture.
- 2 tablespoons Sriracha. More heat for that layered spicy flavor.
- 1 tablespoon soy sauce or tamari. Savory depth.
- 1 teaspoon lemon juice. Brightens up the flavors.
- 1/2 teaspoon garlic powder. A subtle savory note.
Optional Garnishes:
- Toasted sesame seeds. For crunch and nutty aroma.
- Nori strips or flakes. For that classic sushi seaweed flavor and visual appeal.
- Extra sliced green onions (green parts). For freshness and color.
- Roe (fish roe). For a pop of color and briny flavor.
Timing is Everything: Prep, Cook, and Enjoy
Compared to traditional sushi rolling, which can easily take an hour or more for beginners, this salmon sushi bake is a speed demon! The prep time is mostly occupied by cooking the rice and flaking the salmon. Baking is relatively quick, making this a fantastic option when you’re craving sushi flavors but short on time. On average, similar baked rice dishes might take around 40-60 minutes total, so our 45-50 minute timeframe is perfectly competitive for a delicious, home-cooked meal.
Step-by-Step Guide to Your Salmon Sushi Bake
Let’s get this delicious bake assembled. Don’t worry, it’s incredibly forgiving and fun to make!
Step 1: Cook the Sushi Rice
First things first, let’s get that perfect sushi rice going. In a medium saucepan, combine the rinsed sushi rice and water. Bring to a boil, then reduce heat to low, cover, and simmer for 15-20 minutes, or until all the water is absorbed. While the rice is cooking, whisk together the rice vinegar, sugar, and salt in a small bowl until the sugar and salt are dissolved. Once the rice is cooked, let it sit, covered, for 10 minutes off the heat. Then, transfer the hot rice to a large bowl. Gently fold in the vinegar mixture using a cutting motion with a rice paddle or spatula until evenly distributed. Fan the rice as you mix to cool it down and give it a glossy sheen. Let it cool slightly.
Step 2: Prepare the Salmon
While the rice is cooking and cooling, prepare your salmon. If you haven’t already, cook your salmon fillets using your preferred method – baking, pan-searing, or poaching. Let them cool slightly, then remove any skin and bones. Flake the salmon into bite-sized pieces using a fork. In a bowl, combine the flaked salmon with 1/4 cup mayonnaise, 2 tablespoons Sriracha, 1 tablespoon soy sauce, 1 teaspoon sesame oil, and the white parts of the green onions. Mix gently until everything is well combined. Taste and adjust seasonings if needed – maybe a little more Sriracha for heat or soy sauce for saltiness.
Step 3: Mix the Creamy Sauce
In a separate small bowl, whisk together the 1/2 cup mayonnaise, sour cream (or Greek yogurt), 2 tablespoons Sriracha, 1 tablespoon soy sauce, lemon juice, and garlic powder until smooth and creamy. This sauce will be drizzled over the top before baking and is key to that decadent, rich flavor we all love.
Step 4: Assemble the Bake
Preheat your oven to 375°F (190°C). Lightly grease an 8×8 inch baking dish or a similar-sized oven-safe dish. Spread the cooled, seasoned sushi rice evenly across the bottom of the prepared dish, pressing it down gently to form a compact layer. Next, spoon the salmon mixture evenly over the rice layer, spreading it out to cover the rice completely.
Step 5: Bake to Perfection
Drizzle the prepared creamy sauce generously over the salmon layer. Make sure to cover most of the surface, as this sauce will become beautifully golden and slightly caramelized during baking. Place the baking dish in the preheated oven and bake for 20-25 minutes, or until the top is golden brown and bubbly around the edges. The aroma that fills your kitchen will be incredible!
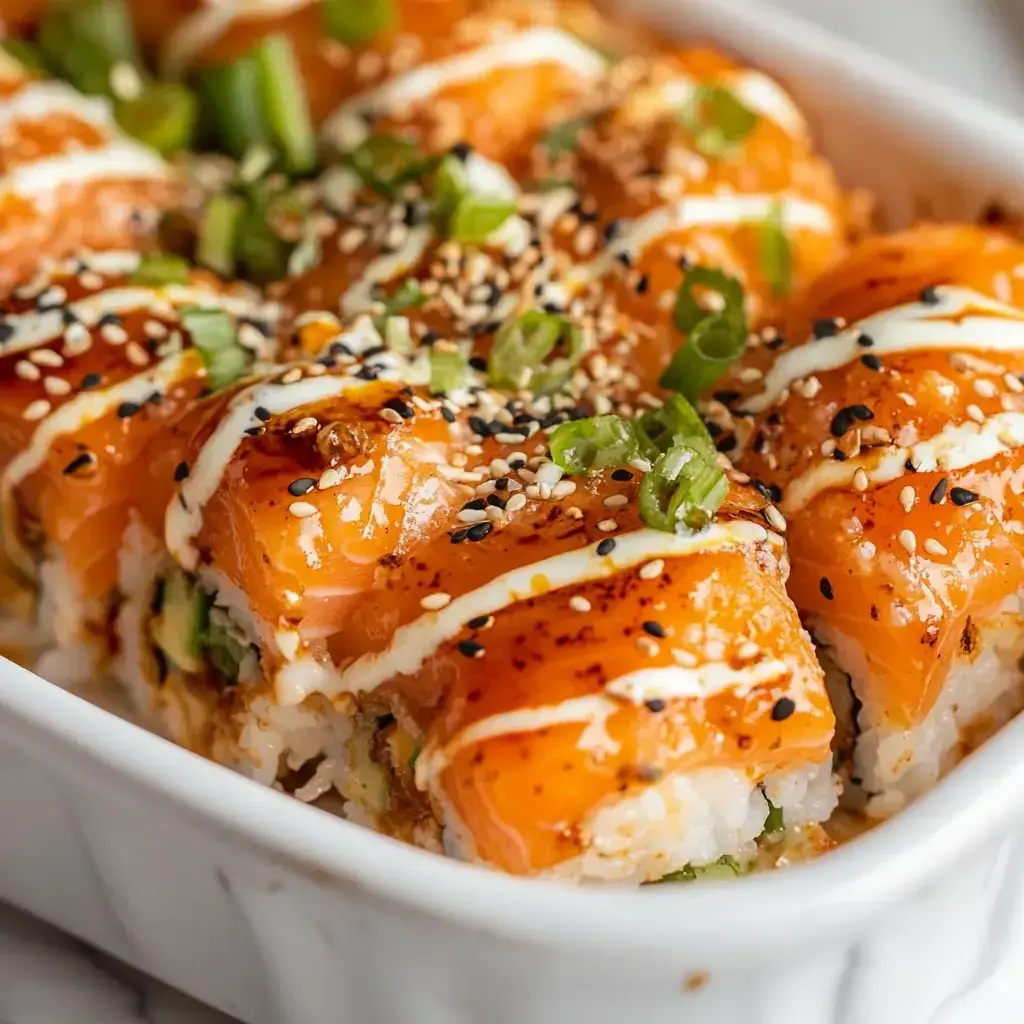
Step 6: Garnish and Serve
Once out of the oven, let the salmon sushi bake cool for about 5-10 minutes. This allows it to set slightly, making it easier to serve. Garnish generously with toasted sesame seeds, nori strips, the green parts of the sliced green onions, and any other desired toppings like roe. Slice into squares and serve warm. Enjoy the delightful textures and flavors!
Nutritional Information: A Peek at the Goodness
While exact nutritional values can vary based on specific ingredients and portion sizes, a typical serving of this Easy Salmon Sushi Bake generally offers:
- Calories: Approximately 450-600 per serving (depending on richness of mayo/sauce).
- Protein: Excellent source from salmon.
- Healthy Fats: From salmon and mayonnaise.
- Carbohydrates: Primarily from sushi rice.
- Sodium: Can be moderate due to soy sauce; consider low-sodium options.
Remember, this is an estimate. For precise tracking, it’s best to use a nutrition calculator with your specific ingredients.
Healthier Alternatives for a Lighter Bite
Looking to lighten up this delicious dish without sacrificing flavor? Try these swaps:
- Rice: Use brown sushi rice or a blend of brown and white rice for added fiber. Cauliflower rice can also be a lower-carb alternative, though it will change the texture significantly.
- Mayonnaise: Opt for light mayonnaise or a mix of light mayo and Greek yogurt. For the salmon mixture, you can also use mashed avocado for creaminess.
- Salmon: Use a leaner fish like cod or tilapia if preferred, or simply reduce the portion size of salmon. Baked or steamed salmon is healthier than pan-fried in oil.
- Soy Sauce: Use low-sodium soy sauce or tamari to reduce sodium intake.
Serving Suggestions: Elevate Your Meal
This Salmon Sushi Bake is a complete meal on its own, but it pairs wonderfully with a few additions:
- Side Salad: A simple green salad with a light vinaigrette or a Japanese-style cucumber salad offers a refreshing contrast.
- Edamame: Steamed and lightly salted edamame pods are a classic and healthy accompaniment.
- Miso Soup: A warm bowl of miso soup is a perfect start or complement to the meal.
- Pickled Ginger: Serve with pickled ginger on the side to cleanse the palate between bites.
Common Mistakes to Avoid
- Not Rinsing Rice: Failing to rinse sushi rice can lead to gummy, overcooked grains.
- Overmixing Rice: Be gentle when seasoning sushi rice to avoid breaking the grains and creating a mushy texture.
- Overcooking Salmon: Ensure your salmon is just cooked through before flaking. Overcooked salmon will be dry.
- Skipping the Cooling Time: Letting the rice cool slightly prevents it from making the bake too wet. Letting the bake rest before serving helps it set.
- Not Tasting and Adjusting: Every ingredient, especially Sriracha and soy sauce, can vary. Taste your mixtures and adjust seasonings before assembling and baking.
Storing Tips: Enjoying Leftovers
Leftover salmon sushi bake can be stored in an airtight container in the refrigerator for up to 3-4 days. Reheat gently in the oven or microwave until warmed through. While it’s delicious as leftovers, the rice texture might change slightly. It’s best enjoyed fresh for optimal flavor and texture.

Frequently Asked Questions about Salmon Sushi Bake
***Can I use a different type of fish?***
Absolutely! While salmon is classic for its rich flavor, other flaky white fish like cod or tilapia, or even canned tuna (drained well), can be used. Just ensure they are cooked and flaked appropriately. You can also use imitation crab meat for a different twist.
***Does it taste like raw sushi?***
No, it tastes like a warm, baked version of sushi flavors. The key ingredients are there – seasoned rice, salmon, and the creamy, tangy sauce – but the baking process transforms it into a comforting casserole. It’s more about the flavor profile than replicating the texture of raw sushi.
***Can I make this ahead of time?***
You can prepare the components ahead of time. Cook and season the rice, cook and flake the salmon, and mix the sauce. You can even assemble the bake a few hours in advance and keep it covered in the refrigerator. You might need to add a few extra minutes to the baking time if baking from cold.
***How spicy is this recipe?***
The spice level comes primarily from the Sriracha. The recipe calls for a moderate amount, but you can easily adjust it. Add more for extra heat, or use less if you prefer a milder dish. You can also use a milder chili sauce if Sriracha is too spicy for you.
***What kind of rice is best?***
Sushi rice (also known as short-grain Japanese rice) is highly recommended because it becomes sticky when cooked, which is ideal for forming layers in a bake. Regular long-grain rice will not give you the same texture.
Conclusion
This Easy Salmon Sushi Bake is a game-changer for anyone who loves sushi but seeks a simpler, warm, and comforting preparation. It’s packed with flavor, surprisingly easy to assemble, and is guaranteed to be a hit at any meal. Say goodbye to sushi-rolling stress and hello to delicious, baked goodness!
Did you try this Easy Salmon Sushi Bake? Let us know in the comments below! We’d love to see your creations and hear your feedback. Don’t forget to save this pin for your next craving!

Salmon Sushi BakeSalmon Sushi Bake
Description
Use fresh or canned salmon– Drain well for the best texture.2Furikake is key– it Adds umami and crunch.Serve with nori– Scoop into seaweed sheets for sushi vibes! Use fresh or canned salmon– Drain well for the best texture.2Furikake is key– it Adds umami and crunch.Serve with nori– Scoop into seaweed sheets for sushi vibes!
Ingredients
- 2 cups cooked sushi rice
- 2 tbsp rice vinegar, 1 tbsp sugar, ½ tsp salt
- 8 oz cooked salmon (flaked)
- 4 oz cream cheese, ¼ cup mayo, 1 tbsp sriracha, 1 tbsp soy sauce
- ½ cup shredded imitation crab (optional)
- ½ tsp sesame oil, 1 sheet nori (chopped)
- Toppings: ¼ cup furikake, 2 tbsp green onions, 1 tbsp sesame seeds, extra sriracha & mayo
Instructions
- Mix rice vinegar, sugar, and salt into warm rice.
- Combine salmon, cream cheese, mayo, sriracha, soy sauce, sesame oil, and imitation crab.
- Layer sushi rice in a greased 8×8” dish, sprinkle with furikake, and spread the salmon mixture on top
- Bake at 375°F (190°C) for 15-20 min.
- Garnish with green onions, sesame seeds, and drizzle mayo & sriracha. Serve with nori sheets.
Notes
Use fresh or canned salmon– Drain well for the best texture.2Furikake is key– it Adds umami and crunch.Serve with nori– Scoop into seaweed sheets for sushi vibes!
Use fresh or canned salmon– Drain well for the best texture.2Furikake is key– it Adds umami and crunch.Serve with nori– Scoop into seaweed sheets for sushi vibes!
“`
