“`html
Table of Contents
🐻 Whimsical Polar Bear Cookies: A Holiday Delight 🎄
Introduction
Are you looking to bake a holiday treat that’s as adorable as it is delicious? With millions searching for “Christmas cookie recipes” annually, what if you could create something truly unique and heartwarming for your festive table? These Whimsical Polar Bear Cookies are the answer! More than just a sweet treat, they are a project of love, designed to bring smiles and a touch of enchantment to your holiday celebrations. Imagine the delight on your loved ones’ faces as they discover these charming, edible bears, crafted with a sprinkle of holiday magic and a whole lot of homemade goodness. Easy to make and absolutely delightful, they’re a must-have for Christmas baking. Bring joy to your family and friends with this fun and festive recipe! 🎅 🍪
Ingredients List
Crafting these delightful polar bears is simpler than you might think. Here’s what you’ll need:
- Butter: 1 cup (2 sticks) unsalted butter, softened to room temperature. This provides a rich, creamy base and helps the cookies hold their shape. For a slightly nuttier flavor, you could consider brown butter, but ensure it’s cooled before creaming.
- Granulated Sugar: 1 cup. This sweetens the cookies and contributes to their crispness.
- Large Egg: 1. Acts as a binder, giving the cookies structure and richness. Ensure it’s at room temperature for smoother incorporation.
- Vanilla Extract: 1 teaspoon. The classic aroma and flavor enhancer that complements the buttery notes perfectly.
- All-Purpose Flour: 2 ½ cups. The foundation of our cookie dough. Sifting it beforehand can ensure a lighter texture.
- Baking Powder: ½ teaspoon. This leavening agent helps the cookies spread just a bit, preventing them from being too dense.
- Salt: ¼ teaspoon. Balances the sweetness and enhances the overall flavor profile.
- Powdered Sugar (for dusting): 1 cup, or more as needed. For that signature snowy polar bear look.
- For Decoration: Black edible food marker or small dots of black icing for eyes and nose.
Timing
Let’s break down the time commitment for this heartwarming baking project. On average, most cookie recipes require around 20-30 minutes of prep and 10-15 minutes of bake time per batch. Our Polar Bear Cookies are slightly more involved due to shaping and decoration, but the results are well worth it!
Step-by-Step Instructions
Step 1: Whipped Wonder Cookie Dough
Begin by creaming the softened butter and granulated sugar together in a large bowl using an electric mixer. Beat on medium speed until light and fluffy, about 3-4 minutes. This incorporates air, which will give your cookies a tender crumb. Next, beat in the egg and vanilla extract until well combined. Scrape down the sides of the bowl as needed.
Step 2: Shaping the Charming Polar Bears
In a separate medium bowl, whisk together the all-purpose flour, baking powder, and salt. Gradually add the dry ingredients to the wet ingredients, mixing on low speed until just combined. The dough will be slightly soft. Now, for the fun part! Take about 1 tablespoon of dough and roll it into a ball for the body. Take a smaller piece, about ½ teaspoon, roll it into a ball, and flatten it slightly to create the head. Attach the head to the body by gently pressing them together. For the ears, pinch off two tiny pieces of dough, roll them into small balls, flatten them slightly, and attach them to the top of the head.
Step 3: Chilling for Perfect Bears
Place the shaped polar bear cookies onto a baking sheet lined with parchment paper. Ensure they have a little space between them. Cover the baking sheet loosely with plastic wrap and refrigerate for at least 30 minutes. Chilling the dough is crucial for a few reasons: it prevents excessive spreading during baking, making your polar bears retain their delightful shape, and it firms up the dough, making it easier to handle.
Step 4: Baking to Golden Perfection
Preheat your oven to 350°F (175°C). Once the cookies have chilled, bake them for 10-12 minutes, or until the edges are lightly golden brown. Keep a close eye on them, as oven temperatures can vary. The centers should still look soft. Remove from the oven and let the cookies cool on the baking sheet for a few minutes before transferring them to a wire rack to cool completely. This helps them set up properly.
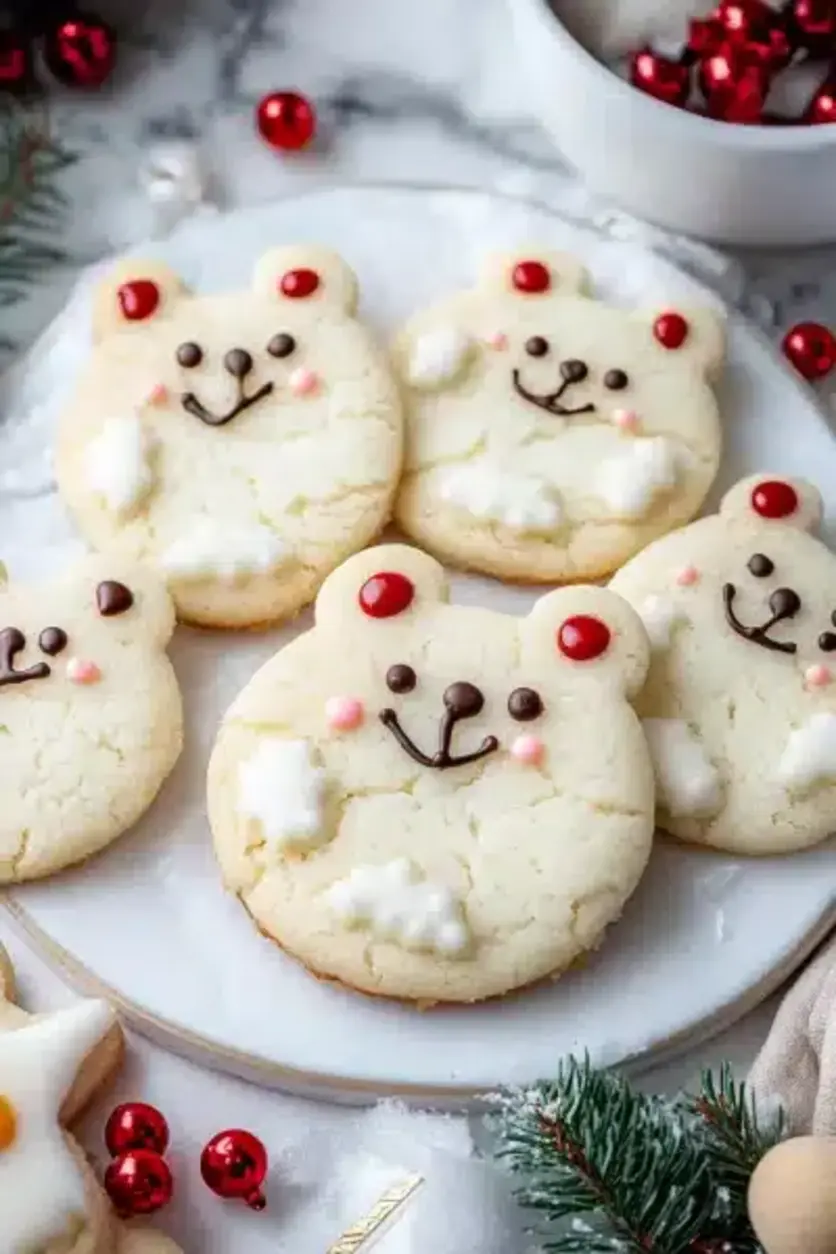
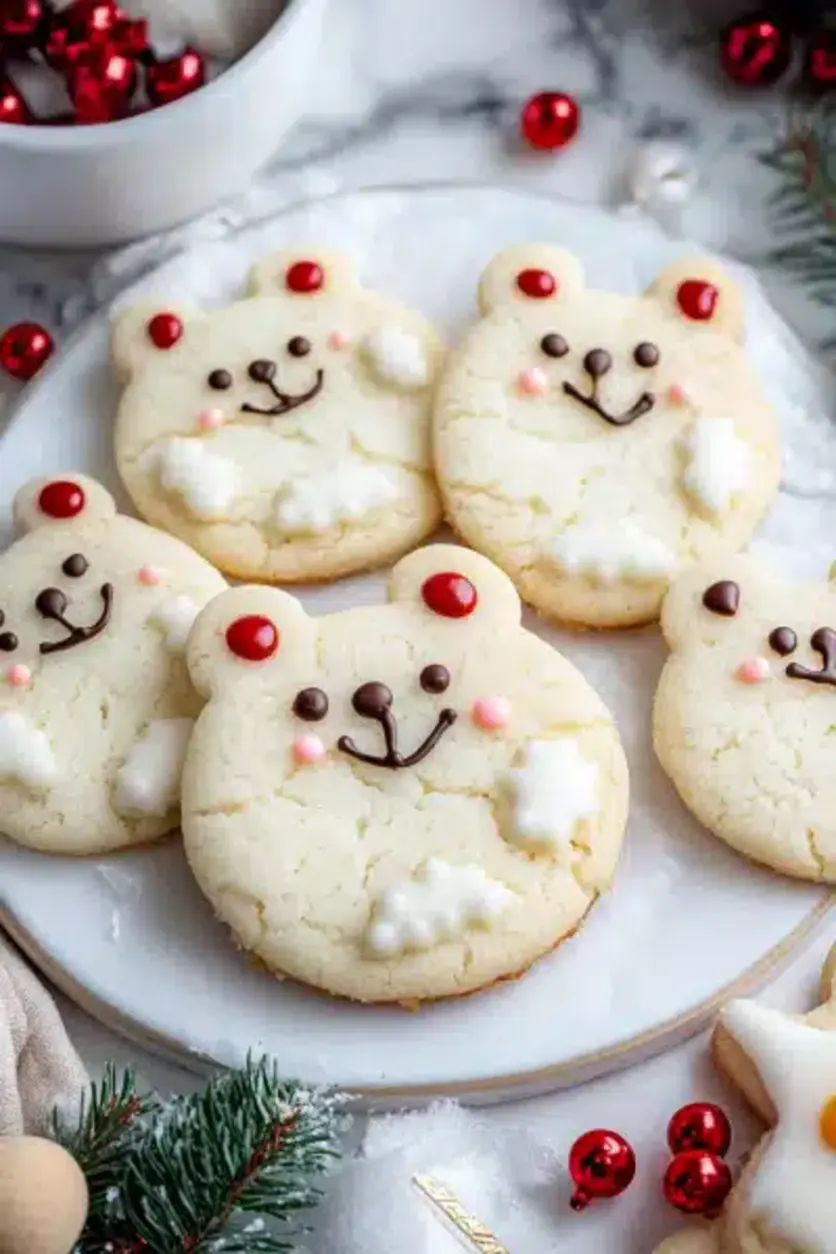
Step 5: Decorating Polar Bear Magic
Once the cookies are completely cool, it’s time for the final touch! Lightly dust each polar bear cookie with powdered sugar using a fine-mesh sieve for a snowy effect. Use a black edible food marker or a tiny dot of black icing to create two eyes and a small nose on each bear’s head. This simple detail truly brings your polar bears to life!
Nutritional Information
While the exact nutritional information can vary based on ingredient brands and portion sizes, here’s an approximate breakdown per cookie (assuming 24 cookies per batch):
- Calories: Approx. 150-180 kcal
- Carbohydrates: Approx. 20-25g
- Fat: Approx. 7-10g
- Protein: Approx. 2g
- Sugar: Approx. 12-15g
Healthier Alternatives
Want to make these delightful treats a bit lighter without sacrificing flavor? Try these swaps:
- Reduced Sugar: Decrease the granulated sugar by ¼ cup. You can also use a sugar substitute like erythritol, though this may affect texture slightly.
- Whole Wheat Flour: Substitute ¼ to ½ of the all-purpose flour with whole wheat flour for added fiber. Ensure you don’t substitute more than half, as it can make cookies too dense.
- Unsweetened Applesauce: Replace some of the butter with unsweetened applesauce (e.g., reduce butter by 2 tablespoons and add 2 tablespoons applesauce). This can add moisture, but may also lead to softer cookies.
- Less Butter: Use low-fat butter sticks or slightly reduce the butter quantity, understanding this might impact crispness.
Serving Suggestions
These polar bear cookies are perfect for a variety of occasions:
- Holiday Cookie Platters: Arrange them alongside gingerbread men, sugar cookies, and other festive treats.
- Hot Chocolate Companion: They are the perfect dunkable companion for a warm mug of hot chocolate.
- Kids’ Party Favors: Package them in small treat bags for a charming take-home gift.
- Creative Decor: Use them to decorate the rim of a festive cake or cupcake.
Common Mistakes
To ensure your polar bears are as perfect as can be, watch out for these common pitfalls:
- Overmixing the Dough: Overworking the flour can develop gluten, leading to tough cookies. Mix only until just combined.
- Not Chilling the Dough: Skipping the chilling step almost guarantees your cookies will spread too much and lose their adorable shape.
- Incorrect Baking Time: Overbaking will result in hard, dry cookies. Underbaking means they won’t set up properly.
- Decorating While Warm: Applying powdered sugar or icing to warm cookies will cause them to melt and become messy. Ensure they are completely cool.
Storing Tips
To keep your polar bear cookies fresh and delightful:
- Airtight Container: Store cooled, decorated cookies in an airtight container at room temperature.
- Layering: If stacking, place parchment paper between layers to prevent sticking.
- Freshness: They are best enjoyed within 3-5 days of baking.
- Freezing: Un-decorated, baked cookies can be frozen in an airtight container for up to 3 months. Thaw completely before decorating.
FAQs
***Can I make these cookies ahead of time for a holiday party?***
Absolutely! You can bake the cookies a day or two in advance and store them in an airtight container. Decorations can be added just before serving for maximum freshness and visual appeal, or up to a day ahead.
***Why are my cookies spreading too much?***
This is often due to the dough being too warm, not enough flour, or too much fat/sugar. Ensure your butter is softened but not melted, measure your flour accurately (spoon and level method is best), and always chill the dough as the recipe instructs.
***What kind of icing should I use for the decoration?***
For the eyes and nose, a tiny dot of black royal icing dries hard and is perfect. Alternatively, a black edible food marker is the easiest and neatest option.
***Can I make the dough a day in advance?***
Yes! You can prepare the cookie dough and refrigerate it for up to 2-3 days. You may need to let it sit at room temperature for a few minutes to make it pliable enough to shape.
These Whimsical Polar Bear Cookies are more than just a recipe; they are a symbol of holiday joy and a delightful way to spend time with loved ones in the kitchen. Gather your ingredients, put on some festive music, and let the holiday baking magic begin!
Polar Bear Cookies Recipe: Adorable, Soft, and Delicious!
Description
These adorable Polar Bear Cookies are made with a soft cream cheese cookie base, topped with creamy buttercream frosting, and decorated to resemble playful polar bears. Perfect for holiday parties, baking with kids, or adding a sweet, festive touch to your dessert table!
Ingredients
- 3/4 cupunsalted butter, room temperature (170g)
- 1/2 cupfull-fat cream cheese, room temperature (113g)
- 1 1/2 cupsgranulated sugar (300g)
- 1large egg, room temperature (56g)
- 2 tspvanilla extract (8g)
- 3 cupsall-purpose flour (375g)
- 1 Tbspcornstarch (8g)
- 1/2 tspbaking powder (2g)
- 1/2 tspfine salt (3g)
- 1 cupunsalted butter, room temperature (226g)
- 1 Tbspvanilla extract (12g)
- 1/2 tspfine salt (3g)
- 3 1/2 cupspowdered sugar (454gor 1 lb. box)
- 1/4 cupheavy cream (60g)
- 1 cupwhite sanding sugar
- 30large chocolate chips
- Round black sprinkles (for eyes)
- Round red or pink sprinkles (for cheeks)
Instructions
- In a large bowl, beat butter and cream cheese until smooth. Add sugar and cream until light and fluffy. Mix in egg and vanilla.
- In a separate bowl,whisktogether flour, cornstarch, baking powder, and salt. Gradually add dry ingredients to the wet mixture.
- Divide dough into two portions, wrap in plastic, and chill for at least 2 hours.
- Roll dough to 1/3-inch thickness and cut out 2 1/2-inch circles for faces and 3/4-inch circles for ears. Assemble polar bears by attaching ears to faces. Chill for 15 minutes.
- Bake cookies at 350°F (175°C) for 12–14 minutes or until edges are set. Cool completely.
- Beat butter until creamy for frosting. Add vanilla and salt, then mix in powdered sugar and cream until smooth. Pipe frosting onto cookies and dip in sanding sugar.
- Add a frosted oval for the muzzle, chocolate chips for noses, and sprinkles for eyes and cheeks. Enjoy your creations!
Notes
Chilling the dough is essential for preventing spread.
Store frosted cookies in an airtight container at room temperature for 2 days, in the fridge for up to 5 days, or freeze for up to 1 month.
For best results, don’t overbake the cookies.
Nutrition
- Calories: 205
- Sugar: 21g
- Fat: 10g
- Carbohydrates: 28g
- Protein: 2g
“`
