“`html
Table of Contents
Cherry Chocolate Ice Cream Cake Recipe
Indulge in the Ultimate Cherry Chocolate Ice Cream Cake
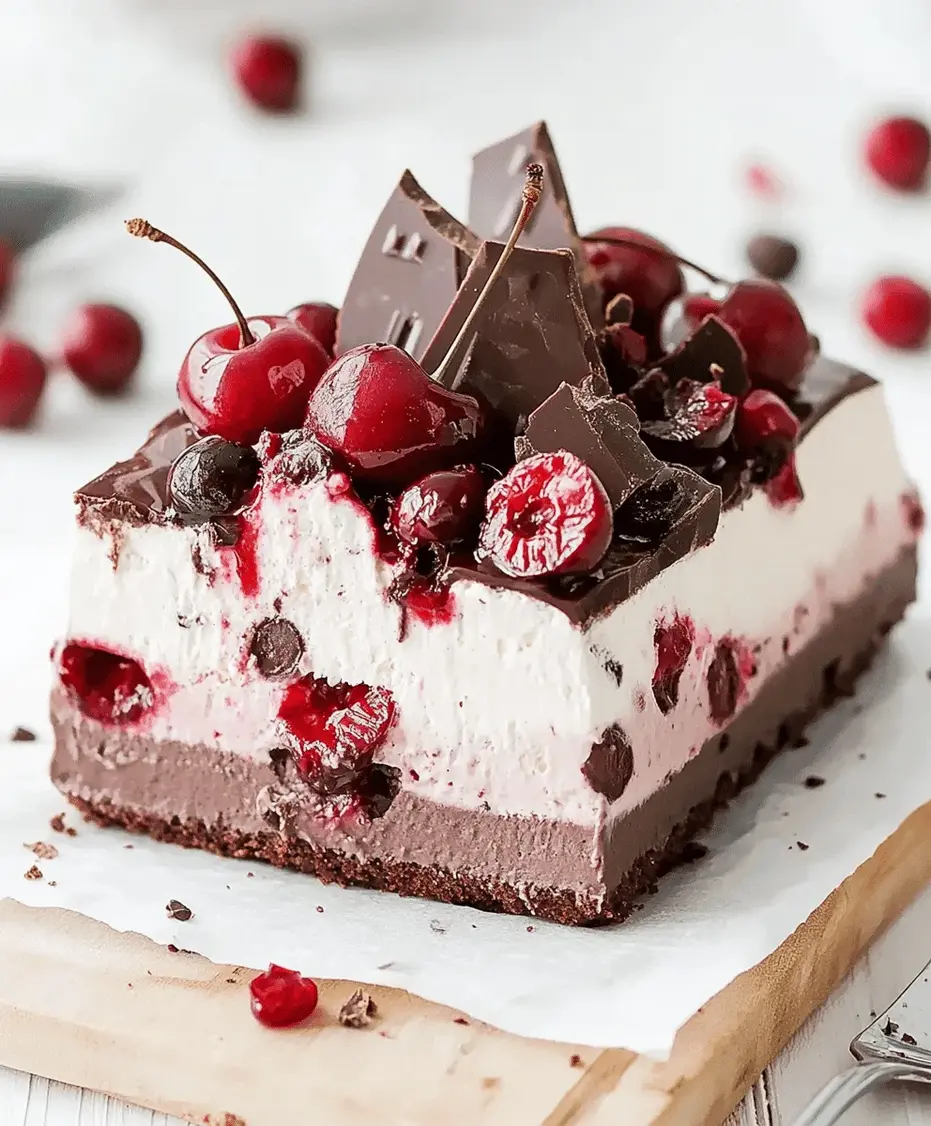
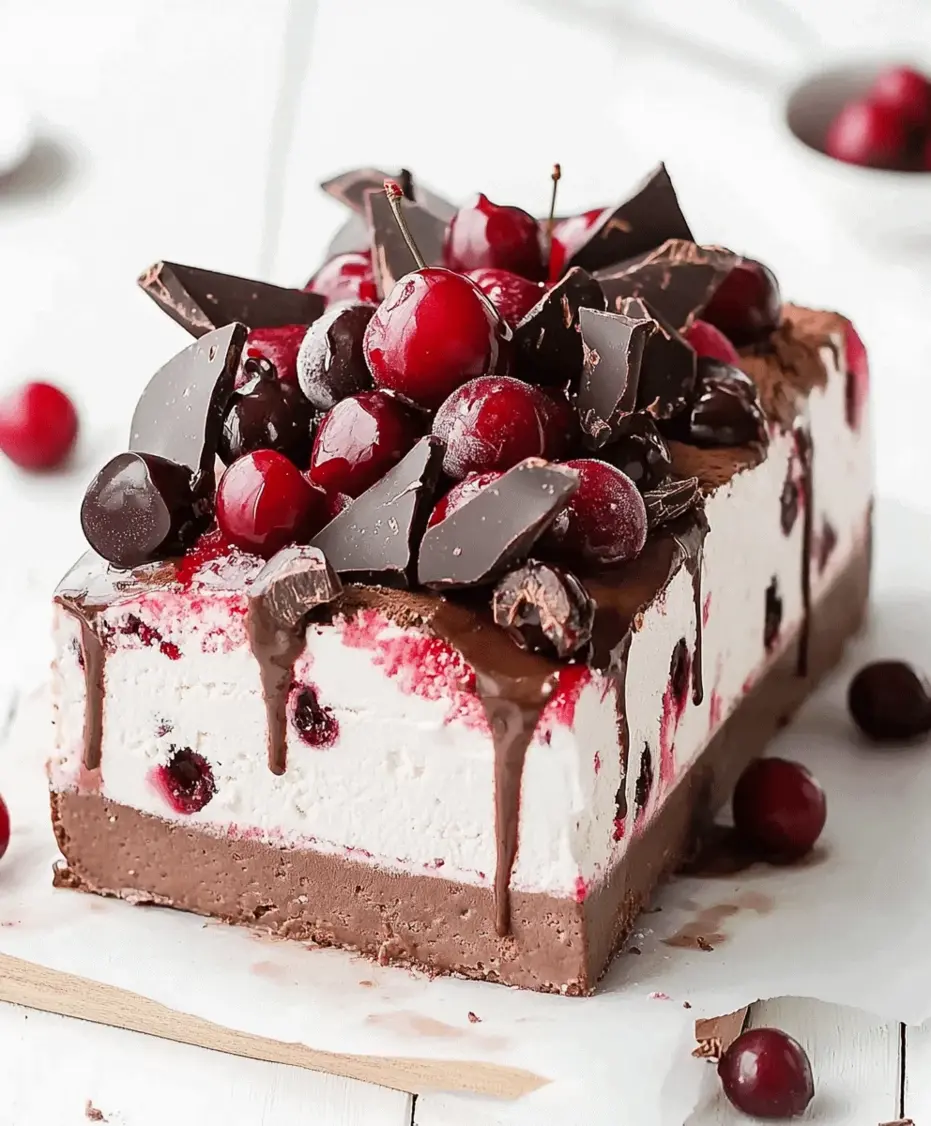
Are you searching for a dessert that screams celebration and pure decadence? If you’re anything like us, the combination of rich chocolate and sweet cherries is a match made in heaven. But what if we told you that this flavor pairing could be elevated into a show-stopping ice cream cake? This Cherry Chocolate Ice Cream Cake is not just a dessert; it’s an experience. Imagine layers of impossibly creamy chocolate ice cream, a vibrant, slightly tart cherry filling, all nestled within a perfectly crisp chocolate cookie crust. Topped with fluffy whipped cream and a generous scattering of chocolate shavings, this cake is guaranteed to be the star of any occasion. Forget store-bought; this homemade marvel is surprisingly achievable and will undoubtedly impress your guests.
Ingredients: A Symphony of Flavors and Textures
Crafting this delightful cake requires a few carefully chosen ingredients that work in harmony. Think of each component as a note in a delicious symphony.
For the Crunchy Chocolate Crust:
- 2 cups chocolate cookie crumbs: These form the foundation, providing a delightful crunch and deep chocolate flavor. (Think Oreos or chocolate graham crackers, finely crushed.)
- 1/2 cup unsalted butter, melted: This binds the crumbs together, creating a firm yet tender base.
- 2 tablespoons granulated sugar: A touch of sweetness to enhance the cookie flavor.
For the Chocolate Ice Cream Layers:
- 2 quarts high-quality chocolate ice cream: The star of the show! Opt for a rich, creamy, full-fat version for the best texture and flavor. Allow it to soften slightly for easier spreading.
For the Luscious Cherry Filling:
- 2 cups pitted cherries, fresh or frozen: Bursting with bright, tart, and sweet flavor. If using frozen, no need to thaw completely.
- 1/2 cup granulated sugar: To balance the tartness of the cherries and create a syrupy consistency. Adjust to your sweetness preference.
- 2 tablespoons cornstarch: This acts as a thickener, ensuring a jam-like consistency that won’t make the cake watery.
- 1 tablespoon fresh lemon juice: A little acidity brightens the cherry flavor and cuts through the richness of the ice cream.
- 1 teaspoon vanilla extract: Enhances the overall sweetness and depth of the cherry filling.
For the Topping:
- 1 cup heavy whipping cream: For a cloud-like whipped cream topping. Ensure it’s cold for best results.
- 2 tablespoons powdered sugar: For a subtly sweet and smooth whipped cream.
- Chocolate shavings or curls: For that elegant, professional finish.
Substitutions and Notes:
- Crust: If you don’t have chocolate cookies, regular graham crackers or even vanilla wafers can work, though the chocolate flavor will be less intense. Adjust sugar slightly if using less sweet cookies.
- Ice Cream: While chocolate is key, you could experiment with a dark chocolate or even a chocolate mint ice cream. Ensure it’s a premium quality for the best result.
- Cherries: Any variety of cherries will work. If you prefer a sweeter filling, reduce the sugar slightly. For a more intense cherry flavor, a splash of cherry liqueur can be added (ensure it cooks off appropriately).
Timing is Everything
30 minutes
8+ hours
8 hours 30 minutes (active time is much less!)
Compared to most elaborate dessert recipes, the active preparation for this ice cream cake is quite minimal. The majority of the time is hands-off freezing. This means you can prepare it the day before a party, making your event day much more relaxed!
Step-by-Step Instructions: Crafting Your Masterpiece
Let’s dive into creating this delightful dessert. Patience is key, especially with freezing times!
Step 1: Prepare the Chocolate Crust
In a medium bowl, combine the chocolate cookie crumbs, melted butter, and granulated sugar. Stir until the crumbs are evenly moistened, resembling wet sand. Press this mixture firmly and evenly into the bottom of a 9-inch springform pan. Use the bottom of a glass or measuring cup to ensure a compact and even layer. Place the pan in the freezer while you prepare the other components.
Step 2: Soften the Chocolate Ice Cream
This is crucial for easy spreading. Take your chocolate ice cream out of the freezer about 15-20 minutes before you plan to assemble. You want it soft enough to spread easily but not melted. If you’re using two separate containers, soften them simultaneously.
Step 3: Assemble the First Ice Cream Layer
Remove the springform pan with the crust from the freezer. Scoop about half of the softened chocolate ice cream onto the crust. Gently spread it into an even layer using an offset spatula or the back of a spoon. Work quickly to prevent it from melting too much.
Step 4: Add the Cherry Filling
In a small saucepan, combine the pitted cherries, granulated sugar, cornstarch, and lemon juice. Cook over medium heat, stirring constantly, until the mixture thickens and becomes bubbly. This should take about 5-7 minutes. Remove from heat and stir in the vanilla extract. Let the cherry filling cool completely. Once cooled, spoon it evenly over the first layer of chocolate ice cream, leaving about a 1/2-inch border around the edge to prevent overflow when the second ice cream layer is added.
Step 5: Add the Second Ice Cream Layer
Once the cherry filling has cooled, scoop the remaining chocolate ice cream over it. Spread this layer evenly to cover the cherries completely. Smooth the top as much as possible. You can use an offset spatula for a cleaner finish.
Step 6: Freeze the Cake
Cover the springform pan tightly with plastic wrap, then with aluminum foil. Place the cake in the freezer and freeze for at least 6-8 hours, or preferably overnight, until completely firm.
Step 7: Decorate the Cake
When you’re ready to serve (or about an hour before), prepare the whipped cream. In a chilled bowl, beat the heavy whipping cream and powdered sugar until stiff peaks form. Carefully remove the sides of the springform pan. Frost the top and sides of the ice cream cake with the whipped cream. Sprinkle generously with chocolate shavings or curls.
Step 8: Final Freeze and Serve
Return the decorated cake to the freezer for at least another 30-60 minutes to allow the whipped cream to firm up. Slice with a sharp knife dipped in hot water for cleaner cuts. Serve immediately and enjoy!
Nutritional Snapshot
While this is a decadent treat, here’s an approximate nutritional breakdown per serving (assuming 10 servings). Please note that these are estimates and can vary based on specific brands and ingredients used.
- Calories: ~450-550 kcal
- Fat: ~25-35g
- Saturated Fat: ~15-20g
- Carbohydrates: ~40-50g
- Sugar: ~30-40g
- Protein: ~5-8g
- Sodium: ~100-150mg
Healthier Alternatives & Flavor Tweaks
Looking to lighten things up or cater to specific dietary needs? Here are some swaps that minimize flavor compromise:
- Lighter Crust: Use crushed whole-wheat graham crackers or a blend of almond flour and cocoa powder mixed with a touch of butter or coconut oil for a lower-carb option.
- Lower-Sugar Filling: Use a sugar substitute like erythritol or stevia blend in the cherry filling, adjusting to taste.
- Dairy-Free: Opt for dairy-free chocolate ice cream and whip coconut cream (the thick part from a chilled can) with a sugar substitute for the topping. Ensure your cookie crumbs are also dairy-free.
- Reduced Fat Whipped Cream: Use a reduced-fat whipping cream, though the texture may be slightly less stable.
Serving Suggestions
This ice cream cake is magnificent on its own, but here are a few ideas to elevate the experience:
- Berry Coulis: Drizzle with a raspberry or strawberry coulis for an extra burst of fruitiness.
- Chocolate Sauce: A warm chocolate ganache drizzled over the top is always a winner.
- Fresh Berries: Garnish with a few fresh cherries or mixed berries for a pop of color and freshness.
- Mint Garnish: A fresh mint sprig adds a touch of elegance.
Common Mistakes to Avoid
Preventing these common pitfalls will ensure your ice cream cake turns out perfectly:
- Not Softening Ice Cream Enough: Trying to spread rock-hard ice cream will lead to an uneven, broken layer.
- Over-Softening Ice Cream: If it becomes too liquid, your cake layers might mix or become icy.
- Not Cooling Cherry Filling: Adding hot filling to ice cream will cause it to melt rapidly.
- Impatience with Freezing: Not allowing adequate freezing time will result in a cake that doesn’t hold its shape.
- Not Prepping the Pan: Properly greasing and lining the springform pan makes removal much easier.
Storing Your Ice Cream Cake
Proper storage is key to maintaining the integrity and deliciousness of your ice cream cake. Once frozen solid, keep the cake tightly wrapped in plastic wrap and foil. It can be stored in the freezer for up to 2 weeks. For best results, bring it to room temperature for about 10-15 minutes before slicing and serving.
The Sweetest Ending
This Cherry Chocolate Ice Cream Cake is more than just a dessert; it’s a celebration of flavor, texture, and pure joy. The interplay between the rich chocolate crust, the creamy ice cream, and the vibrant cherry filling creates a truly unforgettable experience. It’s perfect for birthdays, anniversaries, holidays, or simply when you need a spectacular treat. So gather your ingredients, embrace the chill, and get ready to impress yourself and your loved ones with this magnificent creation. Don’t wait – start planning your ice cream cake adventure today!
Did you make this recipe? We’d love to hear about it! Share your thoughts in the comments below or tag us on social media with #CherryChocolateDreamCake!
Frequently Asked Questions
Here are answers to some common questions you might have:
What kind of chocolate ice cream is best for this cake?
A high-quality, rich, and creamy chocolate ice cream will yield the best results. Think premium brands or even homemade if you’re feeling ambitious. Dark chocolate ice cream also works wonderfully for a more intense chocolate flavor.
Can I make the crust ahead of time?
Yes! The chocolate crust can be made a day or two in advance and stored in an airtight container in the freezer until you’re ready to assemble the cake.
How do I get clean slices of ice cream cake?
The trick is to use a large, sharp knife that has been dipped in hot water and then quickly wiped dry before each slice. This helps the knife glide through the frozen ice cream smoothly.
Can I use different fruit fillings?
Absolutely! Raspberry, strawberry, or even a mixed berry filling would be delicious alternatives. Adjust sugar and thickener as needed depending on the fruit’s moisture content.
How do I store leftovers?
Store any leftover cake tightly wrapped in plastic wrap and foil in the freezer. It will maintain its quality for up to two weeks.
Cherry Chocolate Ice Cream Cake Recipe
Description
This Cherry Chocolate Ice Cream Cake is a decadent treat featuring layers of creamy chocolate ice cream, cherry filling, and a crunchy chocolate crust. Topped with whipped cream and chocolate shavings, this dessert is perfect for celebrations or a sweet indulgence.
Ingredients
- 2 cupschocolate cookie crumbs
- 4 tbspmelted butter
- 1 quartchocolate ice cream, softened
- 1 ½ cupscherry pie filling
- 1 quartvanilla ice cream, softened
- 1 cupheavy whipping cream
- 2 tbsppowdered sugar
- Chocolate shavings for garnish
Instructions
Notes
Allow ice cream to soften slightly before spreading for easier layering.
For a firmer texture, freeze overnight before slicing.
Use fresh cherries instead of pie filling for a less sweet version.
Nutrition
- Calories: 420
- Sugar: 38g
“`
