“`html
Table of Contents
Homemade Cherry Jam Recipe
Introduction
Did you know that a single cup of cherries contains over 260mg of potassium and is packed with antioxidants like anthocyanins, which give them their vibrant red color? This brings us to a delicious question: how can you capture this incredible nutritional profile and the peak flavor of summer in a jar to enjoy all year round? The answer lies in mastering the art of homemade cherry jam. Forget the overly sweet, gelatinous store-bought versions. This guide will walk you through creating a truly exceptional preserve that highlights the cherry’s natural tart-sweet balance, enhanced with just a hint of lemon. Whether you’re a seasoned canner or a first-time jam maker, this recipe for the best homemade cherry jam is designed for success, yielding a rich, glossy spread that’s perfect for toast, pastries, cheese boards, or simply eaten by the spoonful.
Ingredients List
The magic of this jam comes from the synergy of just a few simple ingredients. Using high-quality, ripe fruit is non-negotiable for the best flavor.
- 2 pounds (about 900g) fresh, ripe cherries – Look for Bing, Rainier, or Montmorency varieties. They should be plump, firm, and deeply colored. You’ll notice a fragrant, sweet aroma when they’re perfect. Substitution: Frozen pitted cherries work wonderfully if fresh are out of season. Thaw completely and drain any excess liquid.
- 2 cups (400g) granulated sugar – Sugar acts as both a sweetener and a preservative, drawing out the cherries’ natural pectin and juices. Substitution: For a deeper flavor, substitute up to 1/2 cup with light brown sugar.
- Juice of 1 large lemon (about 3 tablespoons) – The acid is crucial. It brightens the flavor, helps with setting, and balances the sweetness. You should taste a bright, clean tartness. Substitution: 1 tablespoon of bottled lemon juice can be used, but fresh is preferred for flavor.
- 1 teaspoon pure vanilla extract (optional but recommended) – Adds a warm, floral depth that complements the cherry flavor beautifully.
- 1/2 teaspoon unsalted butter (optional) – A tiny pat helps reduce foaming during the boil, resulting in a clearer jam.
Timing
Compared to many fruit jam recipes that require overnight macerating or lengthy processing, this homemade cherry jam recipe is remarkably efficient. The active prep and cook time clocks in at just about an hour from start to finish. This is significantly faster than recipes for fruits like fig or citrus marmalade, which often require multiple days. The quick turnaround means you can go from market-fresh fruit to jarred perfection in a single morning or afternoon.
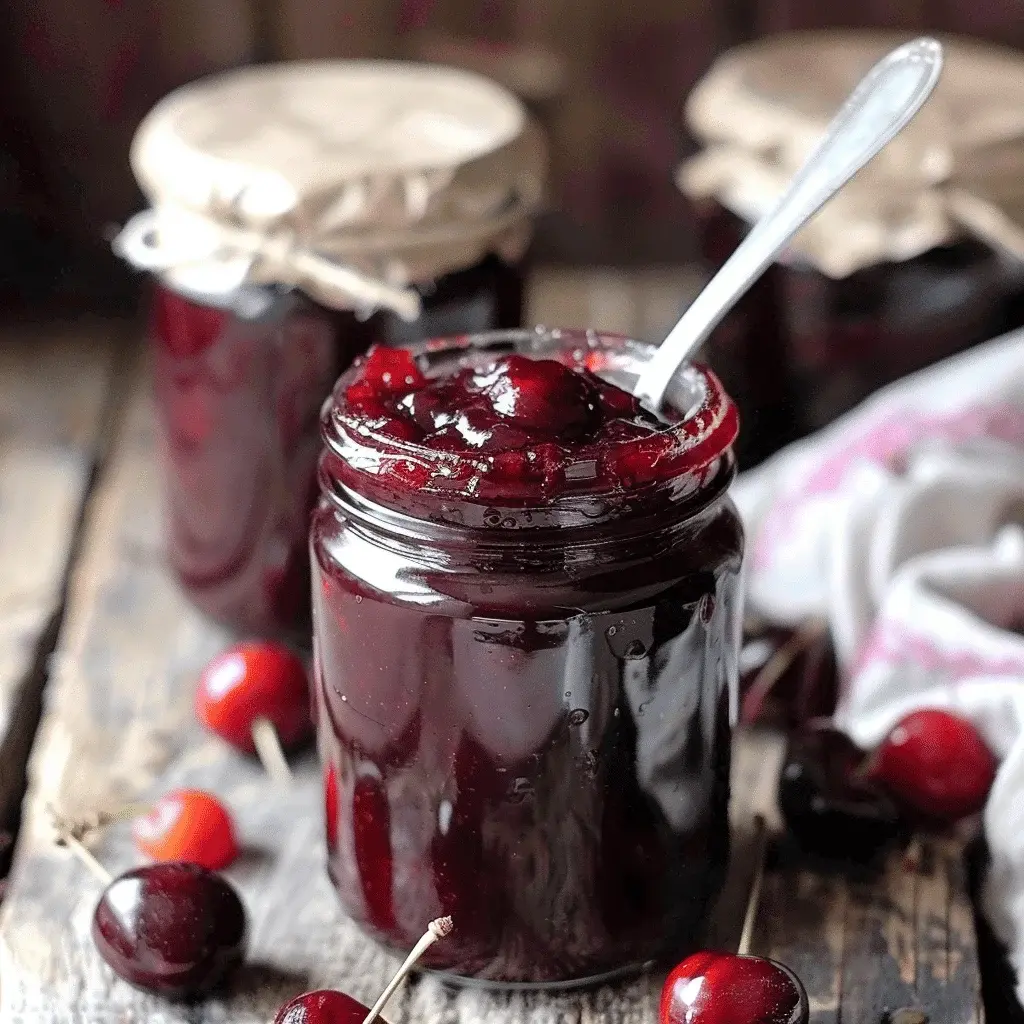
Fresh cherries transform into a glossy, jewel-toned jam perfect for gifting or enjoying at home.
Step-by-Step Instructions
Step 1: Prepare Your Cherries
Start by washing your cherries thoroughly in cool water. The most important task here is pitting. I highly recommend using a cherry pitter—it’s a game-changer for speed and keeps your fingers (and kitchen) clean. If you don’t have one, you can use a chopstick or a small piping tip to push the pit out through the stem end. As you pit, give each cherry a rough chop into halves or quarters. This increases the surface area, helping the fruit break down and release its juices more efficiently. Don’t discard any juices that accumulate during chopping; add every precious drop to your cooking pot.
Step 2: Combine and Macerate
Place all the chopped cherries and any accumulated juice into a large, heavy-bottomed pot or Dutch oven. A wide pot is better than a tall one, as it allows for faster evaporation. Add the sugar and lemon juice. Gently stir everything together until the sugar begins to coat the fruit. At this stage, you can let the mixture sit for 20-30 minutes. This maceration time allows the sugar to pull the liquid out of the cherries, creating a syrup before you even turn on the heat. You’ll see the fruit become glossy and sitting in a pool of ruby-red liquid.
Step 3: Cook to Perfection
Place the pot over medium-high heat. Stir occasionally until the sugar completely dissolves and the mixture comes to a full, rolling boil. This is a vigorous boil that can’t be stirred down. Add the optional butter here to minimize foam. Now, the key to perfect jam texture is maintaining this rolling boil. Stir frequently to prevent scorching on the bottom. You’ll watch the mixture transform from a watery syrup with chunks of fruit to a thicker, more cohesive bubbling mass. The bubbles will become larger and glassier. This process usually takes 20-30 minutes. The aroma will fill your kitchen with the most incredible sweet-tart fragrance.
Step 4: Test and Jar
To test for the set, remove the pot from the heat. Place a small plate in your freezer for 5 minutes. Drop a teaspoon of jam onto the cold plate, wait 30 seconds, then push it with your finger. If it wrinkles and holds its shape, it’s ready. If it’s still runny, return to a boil for another 3-5 minutes and test again. Once set, skim off any foam from the surface and stir in the vanilla extract if using. While the jam is hot, carefully ladle it into clean, sterilized jars, leaving 1/4-inch headspace. Wipe the rims, apply lids and bands, and process in a boiling water bath for 10 minutes to seal (adjust for altitude if necessary). Let the jars cool undisturbed for 12-24 hours; you should hear the satisfying “pop” of the lids sealing.
Nutritional Information
(Per tablespoon serving, approximate)
- Calories: 45
- Total Carbohydrates: 11g
- Sugars: 10g (primarily natural fruit sugars and added sugar)
- Fiber: 0.2g
- Vitamin C: 1% of Daily Value
- Potassium: 20mg
While jam is a sweet condiment, cherries contribute beneficial plant compounds like anthocyanins and quercetin, which have antioxidant and anti-inflammatory properties.
Healthier Alternatives
You can make thoughtful swaps to adjust the nutritional profile without sacrificing the classic jam texture and flavor.
- Reduce Sugar: You can safely reduce the sugar to 1.5 cups (300g). The jam will be tarter and slightly less firm, but the lemon juice will help with setting. Do not reduce below a 3:4 fruit-to-sugar ratio (e.g., 2 lbs fruit to 1.5 cups sugar) for safe water bath canning.
- Use a Pectin Alternative: For a lower-sugar jam, use no-sugar-needed pectin (like Pomona’s). Follow the package instructions, which allow you to sweeten with a small amount of honey, maple syrup, or a sugar substitute like erythritol.
- Boost Fiber: Add 1-2 tablespoons of chia seeds at the end of cooking (after removing from heat). Let sit for 10 minutes to thicken. This creates a chia “jam” style spread that’s packed with fiber and omega-3s. Note: This version is for refrigeration, not long-term canning.
Serving Suggestions
This versatile jam shines far beyond the breakfast table.
- Classic Breakfast: Swirl into yogurt, oatmeal, or spread thickly on toast, croissants, or buttermilk biscuits.
- Cheese Board Star: Pair with creamy brie, sharp aged cheddar, or tangy goat cheese on a cracker.
- Savory Glazes: Thin with a little vinegar or wine to make a glaze for roasted pork tenderloin, duck breast, or baked ham.
- Dessert Enhancement: Use as a filling for thumbprint cookies, layer in a parfait, or warm and drizzle over vanilla ice cream or cheesecake.
Common Mistakes
- Using Underripe Fruit: Underripe cherries lack natural pectin and sweetness, leading to a jam that may not set properly and tastes bland. Always use ripe, fragrant fruit.
- Stirring Insufficiently: Once the jam reaches a rolling boil, it can scorch easily on the bottom of the pot. Stir frequently with a wooden spoon or heatproof spatula.
- Overcooking: Boiling too long after the set point results in a dark, overly thick, and caramelized jam that can taste burnt. Use the cold plate test religiously.
- Ignoring Headspace: Filling jars too full prevents a proper vacuum seal during processing. Always leave 1/4-inch of space between the jam and the lid.
Storing Tips
- Sealed Jars: Properly processed and sealed jars can be stored in a cool, dark pantry for up to 1 year. The flavor is best within the first 6-8 months.
- Opened Jars/Refrigerator Jam: Once opened, store in the refrigerator and use within 3-4 weeks. If you skip the water bath canning step and just make a batch for the fridge, it will keep for 2-3 weeks.
- Freezing: For long-term storage without canning, cool the jam completely and ladle it into freezer-safe containers, leaving 1/2-inch headspace for expansion. Freeze for up to 1 year. Thaw in the refrigerator.

Homemade jam makes a thoughtful and delicious gift from your kitchen.
Conclusion
Creating your own homemade cherry jam is more than just a kitchen project; it’s a way to preserve the fleeting sweetness of summer. This recipe, with its straightforward steps and focus on quality ingredients, guarantees a rich, flavorful spread that surpasses anything you can buy. The process is meditative and the reward—rows of gleaming jars filled with ruby-red jam—is immensely satisfying. So, the next time you see baskets of ripe cherries at the market, grab a few extra pounds and give this recipe a try. We’d love to see your results! Share a photo of your beautiful jam creation on Instagram and tag @spicemingle to join our community of home preservers.
Made this recipe? Don’t forget to rate it and leave a comment below
