
Table of Contents
The Ultimate Japanese Katsu Bowls with Tonkatsu Sauce: Crispy, Savory & Simple
Introduction: The Ultimate Comfort Food
Welcome to CookingWithEmy.com, where we bring global flavors straight to your kitchen. Today, we’re diving into a dish that perfectly encapsulates the harmony of Japanese cuisine: Japanese Katsu Bowls with Tonkatsu Sauce. Imagine a bowl of steaming, perfectly cooked rice topped with a golden-brown, impossibly crispy cutlet of chicken or pork, all brought together by a rich, savory-sweet tonkatsu sauce. This isn’t just a meal; it’s an experience. The magic of katsu lies in its beautiful contrast—the shattering crispness of the panko crust giving way to tender, juicy meat, all balanced by the umami depth of the signature sauce. While it may look and taste like something from your favorite restaurant, we promise it’s a completely achievable weeknight triumph. This recipe is designed for home cooks of all levels, breaking down the process into simple, foolproof steps. Get ready to create a bowl of comfort that’s deeply satisfying, incredibly flavorful, and sure to become a regular in your dinner rotation.
Why This Is The Best Katsu Bowl Recipe
You might be wondering what sets this Japanese Katsu Bowl recipe apart from the rest. The answer lies in the details. First, we focus on technique. Properly pounding the meat isn’t just about thickness; it ensures even cooking and maximum tenderness, preventing the dreaded dry cutlet. We emphasize the “double-dredge” method for a crust that stays adhered and crisps up perfectly. Second, we empower you with choice. While store-bought tonkatsu sauce is convenient, we provide a simple, 4-ingredient homemade version that allows you to control the sweetness and saltiness, creating a sauce that’s uniquely yours. Third, this recipe is built for adaptability. Whether you use chicken breast, pork loin, or even venture into vegetarian options, the core method remains the same. We also include pro tips for achieving that professional-level crispness without a deep fryer and guide you on selecting the right rice for the perfect base. This isn’t just a recipe; it’s a masterclass in creating a iconic dish with confidence and ease.
💡 The Kitchen Team’s Pro Tip: For the crispiest, most professional-looking katsu, let the breaded cutlets rest on a wire rack for 10 minutes before frying. This allows the coating to set and adhere, preventing the breadcrumbs from falling off in the oil.Ingredients & Substitutions
Gathering your ingredients is the first step to katsu success. Here’s everything you’ll need, along with smart swaps to accommodate dietary needs or pantry shortages. Using high-quality, fresh ingredients makes a noticeable difference, especially in a dish with so few components.
| Ingredient | Quantity | Notes & Substitutions |
|---|---|---|
| Boneless Chicken Breasts or Pork Loin Cutlets | 2 (about 6 oz each) | Pounded to ½-inch thickness. Pork tenderloin slices also work. For a lighter option, try turkey cutlets. |
| Panko Breadcrumbs | 1 cup | Do not substitute with regular breadcrumbs. Panko’s large, flaky texture is essential for maximum crispiness. |
| All-Purpose Flour | ½ cup | Can use gluten-free 1:1 flour blend for a gluten-free version. |
| Large Eggs | 2 | Beaten. For an egg-free wash, use ½ cup milk or buttermilk. |
| Cooked White Rice | 3 cups | Short-grain sushi rice is preferred for its sticky texture. Jasmine or brown rice are good alternatives. |
| Oil for Frying | About 1-1.5 cups | Use a neutral oil with a high smoke point: vegetable, canola, or peanut oil. |
| For Homemade Tonkatsu Sauce (or use ½ cup store-bought): | ||
| Ketchup | 3 tbsp | Provides sweetness and body. |
| Worcestershire Sauce | 2 tbsp | The umami backbone. Use a vegetarian Worcestershire if needed. |
| Soy Sauce | 1 tbsp | Use tamari for a gluten-free sauce. |
| Sugar | 1 tsp | Adjust to taste. Honey or maple syrup can be used. |
| Garnish (Optional) | – | Fresh parsley, sliced green onions, toasted sesame seeds, or shredded cabbage. |
Step-by-Step Instructions
Follow these detailed steps to create perfect Japanese Katsu Bowls. We recommend reading through all instructions once before you begin and preparing your mise en place (having all ingredients measured and ready) for a smooth cooking process.
Step 1: Prepare the Meat
Place each chicken breast or pork cutlet between two sheets of plastic wrap or inside a large zip-top bag. Using a meat mallet, rolling pin, or even the bottom of a heavy skillet, pound the meat evenly to a ½-inch thickness. This tenderizes the meat and ensures it cooks quickly and evenly. Season both sides generously with salt and black pepper.
Step 2: Set Up Your Breading Station
Organization is key! Set up three shallow bowls or plates in this order: 1) The flour, seasoned with a pinch of salt and pepper. 2) The beaten eggs. 3) The panko breadcrumbs. Having a clean workspace with this assembly line will make the breading process fast and tidy.
Step 3: Bread the Cutlets
Take one seasoned cutlet and dredge it thoroughly in the flour, shaking off any excess. Next, dip it into the beaten egg, allowing the excess to drip off. Finally, place it into the panko breadcrumbs. Use your dry hand to scoop crumbs over the top and press firmly to ensure a complete, even coating that adheres well. Transfer the breaded cutlet to a clean plate or wire rack. Repeat with the remaining cutlet.
💡 The Kitchen Team’s Pro Tip: For an extra-thick, extra-crispy crust, use the “double-dredge” method: after the first egg dip and panko coating, quickly dip the cutlet back into the egg and then into the panko a second time. This creates a legendary crunch!Step 4: Fry to Golden Perfection
In a large skillet (cast iron is ideal), heat about ½ inch of oil over medium-high heat until it reaches 350°F (175°C). If you don’t have a thermometer, test by dropping a few panko crumbs into the oil; they should sizzle vigorously and float immediately. Carefully lay the breaded cutlets into the hot oil. Do not overcrowd the pan; fry in batches if necessary. Fry chicken for 3-4 minutes per side, or pork for 2-3 minutes per side, until deeply golden brown and cooked through. The internal temperature should reach 165°F (74°C) for chicken and 145°F (63°C) for pork. Transfer to a wire rack set over a baking sheet (this keeps them crispy) or a paper towel-lined plate.
Step 5: Make the Tonkatsu Sauce (If Homemade)
While the cutlets rest, whisk together the ketchup, Worcestershire sauce, soy sauce, and sugar in a small bowl until the sugar is fully dissolved. Taste and adjust sweetness or saltiness to your preference. Let it sit for a few minutes to allow the flavors to meld.
Step 6: Assemble the Bowls
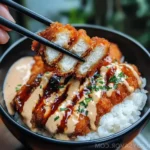
Slice the fried katsu cutlets against the grain into 1-inch strips. Divide the warm, cooked rice between two bowls. Arrange the sliced katsu over the rice. Drizzle generously with the tonkatsu sauce. Garnish with chopped parsley, green onions, or a sprinkle of sesame seeds. Serve immediately while the katsu is still hot and crispy.
Serving & Presentation
Presentation elevates the home-cooked meal to a restaurant-quality experience. For authentic Japanese Katsu Bowls, consider serving the tonkatsu sauce on the side for dipping, allowing everyone to control their sauciness. Traditional sides include a simple, finely shredded cabbage salad (which provides a refreshing, crisp contrast) and a small bowl of miso soup. For a more substantial bowl, add quick-pickled vegetables (like carrots and cucumbers), a soft-boiled egg, or a handful of steamed broccoli. The beauty of the bowl is its versatility—arrange the components neatly for visual appeal. Remember, we eat with our eyes first!
Storage & Reheating
Storage: Store components separately for best results. Place cooled, uncut katsu cutlets in an airtight container in the refrigerator for up to 3 days. Store rice and sauce in separate containers. The katsu will lose its crispness in the fridge but can be revived.
Reheating for Best Results: Do not microwave the katsu, as it will become soggy. To restore crispness, reheat in a conventional oven or toaster oven. Preheat to 375°F (190°C) and place the katsu on a wire rack over a baking sheet. Heat for 10-15 minutes, or until hot and re-crisped. You can also use an air fryer at 375°F for 5-8 minutes. Reheat rice separately with a sprinkle of water, covered, in the microwave.
Delicious Recipe Variations
The katsu bowl is a fantastic template for creativity. Here are some popular variations to try:
- Chicken Katsu (Torikatsu): The classic version as written, using chicken breasts.
- Pork Katsu (Tonkatsu): The original and most traditional, using pork loin or tenderloin cutlets.
- Vegetarian Katsu: Use thick slices of firm tofu (pressed well), portobello mushroom caps, or even cauliflower steaks. Follow the same breading and frying process.
- Curry Katsu Bowl (Katsu Curry): Instead of tonkatsu sauce, serve the crispy cutlet over rice smothered in a rich, thick Japanese curry sauce.
- Cheese Katsu: Place a slice of mild cheese (like mozzarella or gouda) in the center of the pounded cutlet, fold to enclose, then bread and fry as usual for a delicious, melty surprise.
- Fish Katsu: Use white fish fillets like cod or haddock. Adjust frying time to 2-3 minutes per side, depending on thickness.
Frequently Asked Questions (FAQ)
1. Can I bake the katsu instead of frying it?
Yes! For a healthier baked version, place the breaded cutlets on a wire rack set over a baking sheet. Spray or brush both sides generously with oil. Bake in a preheated 425°F (220°C) oven for 15-20 minutes, flipping halfway, until golden and cooked through. The crust will be slightly less shatteringly crisp than fried but still delicious.
2. What’s the difference between tonkatsu sauce and Worcestershire sauce?
Tonkatsu sauce is a thicker, sweeter, and fruit-based condiment that uses Worcestershire sauce as one of its key ingredients. Worcestershire sauce on its own is thinner, more pungent, and less sweet. They are not direct substitutes.
3. Can I make this recipe gluten-free?
Absolutely. Use gluten-free panko breadcrumbs (available at many stores), a gluten-free 1:1 flour blend, and ensure your soy sauce is tamari. Check that your Worcestershire sauce is also gluten-free.
4. Why did my breading fall off during frying?
This usually happens if the oil isn’t hot enough, if you didn’t shake off excess flour/egg, or if you didn’t press the panko on firmly. Letting the breaded cutlets rest for 10 minutes before frying also helps the coating set and adhere.
5. Can I use an air fryer?
Yes, air fryer katsu works well! Spray the breaded cutlets generously with oil on both sides. Air fry at 400°F (200°C) for 10-12 minutes, flipping halfway, until golden and cooked through.
6. What can I use if I don’t have panko?
Panko is highly recommended for its unique texture. In a pinch, you can pulse regular breadcrumbs in a food processor to make them coarser, but the result will be denser and less crispy.
7. How do I know when the oil is ready for frying?
The ideal temperature is 350°F (175°C). Without a thermometer, use the “wooden chopstick test”: dip the end of a wooden chopstick into the oil. If steady, vigorous bubbles form around it immediately, the oil is ready.
8. Can I prepare katsu ahead of time?
You can bread the cutlets and refrigerate them on a wire rack for up to 4 hours before frying. For best results, fry just before serving. You can also freeze unbreaded, pounded cutlets or fully cooked, cooled katsu for up to 2 months. Reheat frozen cooked katsu in the oven at 375°F until hot.
Loved This Recipe? Save It For Later!
Pin the image below to your Dinner Ideas or Japanese Food board on Pinterest to save this ultimate Japanese Katsu Bowls recipe. Follow @cookingwithemy on Pinterest for more delicious inspiration!
📌 Recommended Pinterest Pin Description:
“The ULTIMATE Japanese Katsu Bowls with Tonkatsu Sauce! Crispy chicken or pork, fluffy rice, and savory-sweet sauce. Easy 35-minute recipe with step-by-step tips. #katsubowl #tonkatsu #japaneserecipe #comfortfood #easydinner”
Japanese Katsu Bowls with Tonkatsu Sauce
Description
Japanese Katsu Bowls with Tonkatsu Sauce are the ultimate comfort food, combining crispy, golden cutlets with fluffy rice and a savory-sweet sauce. This simple yet flavorful recipe is perfect for a quick weeknight dinner or an indulgent treat that feels like dining out.
Ingredients
- 2 boneless chicken breasts or pork loin cutlets (pounded to ½-inch thickness)
- 1 cup panko breadcrumbs
- ½ cup all-purpose flour
- 2 large eggs (beaten)
- 3 cups cooked white rice (sushi rice preferred)
- ½ cup tonkatsu sauce (store-bought or homemade*)
- Oil for frying (vegetable or canola)
- Fresh parsley or green onion for garnish (optional)
- 3 tbsp ketchup
- 2 tbsp Worcestershire sauce
- 1 tbsp soy sauce
- 1 tsp sugar
Instructions
- Pound chicken to ½-inch thickness and season with salt and pepper.
- Set up a breading station with three bowls: one for flour, one for beaten eggs, and one for panko breadcrumbs.
- Coat each cutlet in flour, then dip in egg, and finally coat with panko breadcrumbs, pressing gently to adhere.
- Heat oil in a large frying pan over medium-high heat to about 350°F (175°C).
- Fry the cutlets for 3-4 minutes per side (for chicken) or 2-3 minutes per side (for pork) until golden and cooked through. Transfer to a paper towel-lined plate.
- If making homemade tonkatsu sauce, mix ketchup, Worcestershire sauce, soy sauce, and sugar in a small bowl. Adjust sweetness to taste.
- Assemble bowls by adding cooked rice, sliced cutlets, and a generous drizzle of tonkatsu sauce. Garnish with parsley or green onions, if desired. Serve immediately.
