Table of Contents
The Ultimate No-Bake Lemon Cheesecake: Your Secret to Effortless Elegance
Welcome to CookingWithEmy.com! I’m The Kitchen Team, and today we’re unlocking the secret to the most refreshing, creamy, and utterly simple dessert you’ll ever make. This No-Bake Lemon Cheesecake is more than just a recipe; it’s your ticket to a stunning, crowd-pleasing treat without ever turning on the oven. Perfect for warm days, busy schedules, or when you just crave that perfect balance of tangy and sweet.

Why This No-Bake Lemon Cheesecake is a Game-Changer
In the world of desserts, few things are as universally loved as a good cheesecake. Yet, the traditional baked version can be intimidating—water baths, cracked tops, and lengthy cooling times. That’s where this No-Bake Lemon Cheesecake swoops in to save the day. It embodies the essence of summer: bright, zesty, and incredibly light. The filling is a cloud of creamy, lemony perfection, resting on a buttery, crumbly shortbread crust. It’s a dessert that looks like it came from a professional patisserie but requires minimal effort and zero baking expertise. Whether you’re hosting a garden party, need a last-minute dessert for a potluck, or simply want to treat your family, this recipe is your new best friend.
Why This is the Best No-Bake Lemon Cheesecake Recipe
You might find many no-bake cheesecake recipes online, but this one stands out for several key reasons. First, we use a high ratio of full-fat cream cheese to double cream, which guarantees a rich, stable, and sliceable filling that won’t weep or collapse. The lemon juice is carefully measured to provide a vibrant tang without overpowering the creaminess or affecting the setting power. The shortbread crust is a step above the usual graham cracker—it adds a sweet, rich, and sandy texture that complements the lemon perfectly. Furthermore, our method emphasizes technique, like whipping the cream cheese and sugar until perfectly smooth before adding the cream, ensuring no lumps and a flawlessly silky texture. This recipe has been tested to deliver consistent, spectacular results every single time.
Ingredients & Substitutions
Using quality ingredients is the first step to an exceptional no-bake lemon cheesecake. Here’s what you’ll need, along with smart swaps if necessary.
| Ingredient | Quantity | Notes & Possible Substitutes |
|---|---|---|
| Shortbread Biscuits (Cookies) | 10.5 oz (about 300 g) | This creates a rich, buttery base. Graham crackers, digestive biscuits, or vanilla wafers work well too. |
| Unsalted Butter | 3.5 oz (100 g / about 7 tbsp) | Melted. Unsalted is preferred to control saltiness. Salted butter can be used—just omit any added salt. |
| Full-Fat Cream Cheese | 21 oz (600 g), room temp | CRUCIAL: Use brick-style, full-fat cream cheese. Low-fat or tub varieties contain more water and will result in a soft, unstable filling. |
| Powdered (Icing) Sugar | 3.5 oz (100 g / about 1 cup) | Sifted. Dissolves easily and sweetens without graininess. Granulated sugar is not recommended. |
| Double Cream / Heavy Whipping Cream | 10 fl oz (300 ml / 1 ¼ cups) | For the filling. Must be cold for whipping. Minimum 36% milk fat. |
| Fresh Lemon Juice | 2.5 fl oz (75 ml / ⅓ cup) | Freshly squeezed is best. About 3 medium lemons. Bottled juice lacks brightness. |
| Double Cream / Heavy Whipping Cream | 5 fl oz (150 ml / ⅔ cup) | For the topping. Keep cold. |
| Powdered (Icing) Sugar | 2 tbsp | For sweetening the whipped cream topping. |
| Garnish | Lemon slices & zest | For a beautiful, fresh finish. Thinly sliced lemons and microplaned zest are perfect. |
Step-by-Step Instructions
Follow these detailed steps for a flawless no-bake lemon cheesecake. Read through all instructions before beginning.
Step 1: Prepare the Springform Pan
Lightly grease the bottom and sides of an 8-inch (20 cm) springform pan. For easier removal, you can line the bottom with a round of parchment paper. Set aside.
Step 2: Make the Shortbread Crust
Place the shortbread biscuits in a food processor. Pulse until you have fine, even crumbs. You can also place them in a sturdy zip-top bag and crush with a rolling pin. In a microwave-safe bowl or small saucepan, melt the butter until just liquid. Pour the melted butter over the biscuit crumbs and pulse (or mix with a fork) until all the crumbs are evenly moistened and resemble wet sand.
Transfer the mixture to your prepared pan. Using the bottom of a glass or a flat measuring cup, press the crumbs firmly and evenly into the bottom of the pan. Press them up the sides about ½ inch to create a slight lip. This creates a sturdy base for the filling. Place the crust in the refrigerator to set while you make the filling.
Step 3: Create the Lemon Cheesecake Filling
In the bowl of a stand mixer fitted with the paddle attachment (or a large bowl with a hand mixer), add the room-temperature cream cheese. Beat on medium speed for about 1 minute until smooth and pliable. Scrape down the bowl. Add the sifted powdered sugar and beat on low until incorporated, then increase to medium and beat for another 1-2 minutes until completely smooth and no lumps remain. Scrape the bowl again.
Switch to the whisk attachment (or use whisk beaters on your hand mixer). With the mixer on low, slowly pour in the 10 oz (300 ml) of cold double cream. Once combined, increase the speed to medium-high and whisk until the mixture thickens noticeably and holds soft peaks, about 2-3 minutes. It will look like a very thick, luscious whipped cream.
With the mixer on low, gradually pour in the fresh lemon juice. The mixture will loosen slightly. Increase the speed to medium and continue to whisk until the filling is very thick and holds stiff peaks. This is crucial for a sliceable cheesecake. It should be thick enough that a spoon dragged through it leaves a clear path. Use a spatula to give it one final fold, ensuring everything is homogenous.
Step 4: Assemble and Chill
Retrieve the chilled crust from the fridge. Spoon the thick lemon filling onto the crust. Using an offset spatula or the back of a spoon, spread it into an even layer, smoothing the top. Gently tap the pan on the counter a few times to release any air bubbles.
Cover the top of the pan directly with plastic wrap to prevent any fridge odors from absorbing. Refrigerate for a minimum of 5-6 hours, but overnight is ideal. This extended chilling time is non-negotiable for the perfect, clean slice.
Step 5: Prepare the Topping and Garnish
About 1-2 hours before serving, make the whipped cream topping. In a clean, chilled bowl, combine the remaining 5 oz (150 ml) of cold double cream and 2 tbsp of powdered sugar. Whisk by hand or with a mixer until it forms firm, pipeable peaks.
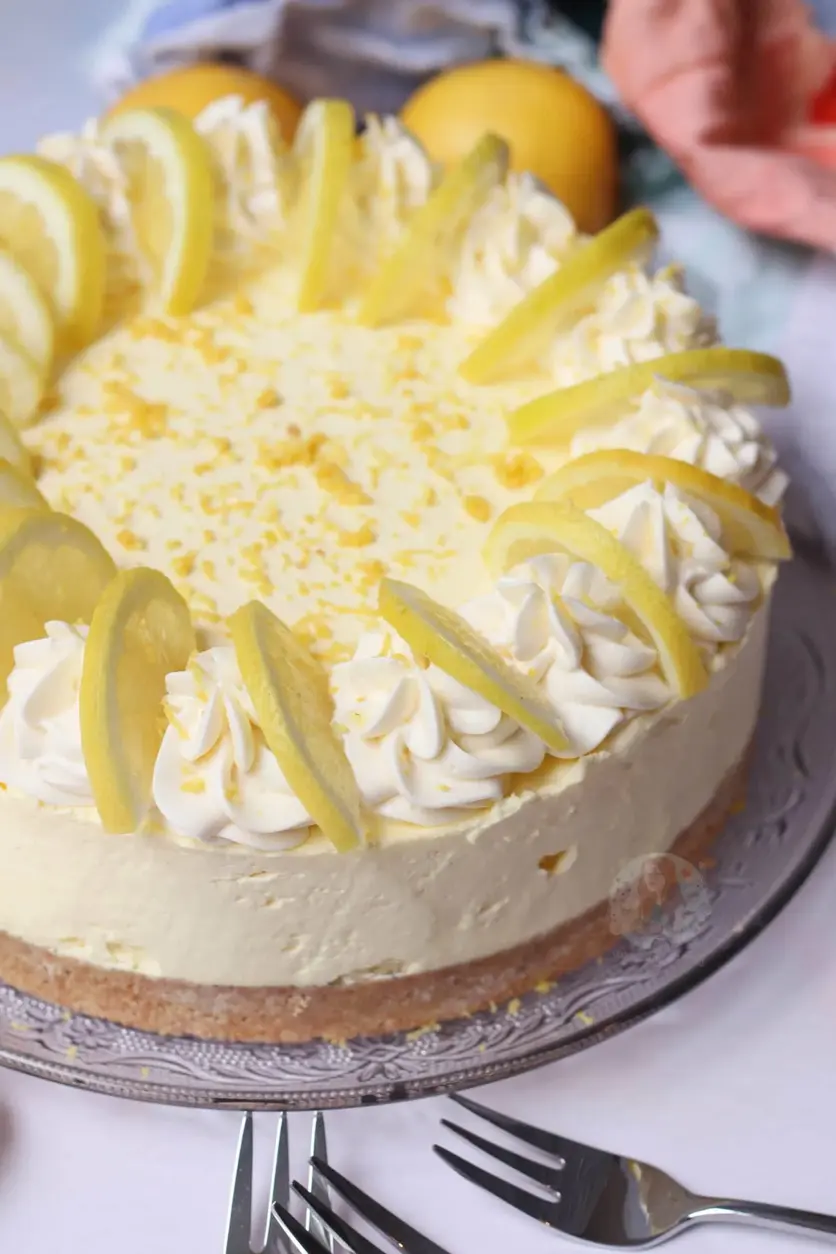
Carefully run a thin knife around the inside edge of the springform pan, then release the clamp. Transfer the cheesecake to a serving plate. Pipe the whipped cream around the border using your favorite piping tip (a star tip is classic). Alternatively, you can simply dollop it on with a spoon. Garnish with thin lemon slices and a generous sprinkling of fresh lemon zest.
Serving Suggestions
This no-bake lemon cheesecake is a star on its own, but a few accompaniments can elevate it to a restaurant-worthy dessert. Serve each slice with a drizzle of vibrant raspberry or blueberry coulis for a beautiful color contrast and a berry-lemon flavor pairing. A small side of macerated berries (berries tossed with a little sugar and lemon zest) adds freshness. For a touch of texture, sprinkle some toasted almond slices or crumbled shortbread on the plate. A dollop of lemon curd on the side intensifies the citrus experience. For beverage pairings, consider a glass of Moscato d’Asti, a crisp Sauvignon Blanc, or a simple glass of iced tea with mint.
Storage & Make-Ahead Tips
Storage: The assembled cheesecake (without the fresh whipped cream topping) will keep beautifully in the refrigerator, covered tightly with plastic wrap or in an airtight container, for up to 4-5 days. Add the whipped cream and garnish on the day you plan to serve it for the best texture and appearance.
Freezing: This cheesecake freezes exceptionally well! Freeze the fully set, undecorated cheesecake (on its springform pan base) for 2-3 hours until solid. Then, wrap it tightly in several layers of plastic wrap and a final layer of aluminum foil. Label and freeze for up to 2 months. To serve, thaw it overnight in the refrigerator. Add fresh topping and garnish after thawing.
Make-Ahead: This is the ultimate make-ahead dessert. Prepare the crust and filling up to 2 days in advance. Assemble and let it set in the fridge. The flavors actually improve and meld together over 24-48 hours.
Delicious Variations to Try
Once you’ve mastered the classic, the fun begins! Here are some fantastic twists on this no-bake lemon cheesecake recipe:
- Lemon Blueberry: Fold 1 cup of fresh or frozen (and thawed/drained) blueberries into the filling before pouring it into the crust. Swirl in ¼ cup of blueberry jam for a marbled effect.
- Lemon Meringue: Skip the whipped cream topping. Instead, top the chilled cheesecake with a layer of homemade or store-bought lemon curd. Use a kitchen torch to toast mini meringues placed on top for decoration.
- Ginger-Lemon: Replace the shortbread biscuits with gingersnap cookies for the crust. Add 1 tablespoon of finely minced crystallized ginger to the filling.
- Tropical Lemon: Add ½ cup of well-drained crushed pineapple to the filling and use a coconut biscuit (like Nice or Hobnobs) for the crust. Top with toasted coconut flakes.
- Individual Jars: Layer the crust and filling in small mason jars or dessert glasses for adorable, portable single servings. Chill for just 2-3 hours.
Frequently Asked Questions (FAQ)
We strongly advise against it for this recipe. Full-fat cream cheese and heavy cream/double cream are essential for the proper structure, richness, and stability of a no-bake cheesecake. Low-fat alternatives have more water and stabilizers, which can lead to a soft, runny, or grainy filling that may not set properly.
The most common causes are: 1) The cream or cream cheese wasn’t cold enough when whipping. 2) The mixture wasn’t whipped to stiff, thick peaks before chilling. 3) Low-fat dairy was used. 4) Not enough chilling time. If it’s still runny before chilling, whip it longer. If it’s runny after chilling, you can try freezing it for an hour to firm up, but prevention is key.
Yes, though a springform is easiest for clean removal. You can use a 9-inch pie dish or a regular 8-inch cake pan lined with parchment paper with overhanging edges (a “sling”) to help lift the cheesecake out. A deep tart pan with a removable bottom also works well.
Use a long, thin, sharp knife. Dip the knife in very hot water, wipe it dry with a clean towel, and make a cut. Repeat this process—heat, dry, cut—for each slice. This melts through the cream cheese cleanly for professional-looking pieces.
For the best, brightest flavor, fresh lemon juice is highly recommended. Bottled juice often has a flat, preservative taste. However, in a pinch, you can use it. Consider adding an extra teaspoon of fresh lemon zest to boost the citrus aroma.
The filling is naturally gluten-free. To make the entire dessert gluten-free, simply use certified gluten-free shortbread cookies or biscuits for the crust.
You can, though this recipe is designed to set firmly with chilling alone. If you need to speed things up, you can soften 1 teaspoon of unflavored powdered gelatin in 2 tablespoons of cold water, then dissolve it over low heat or in the microwave for 5-10 seconds. Let it cool slightly, then whisk it into the filling after adding the lemon juice.
A hard crust usually means too much butter. A crumbly crust means not enough. The mixture should hold together when pinched. Adjust by adding more melted butter (a teaspoon at a time) if it’s crumbly, or adding more crumbs if it’s greasy. Press it firmly into the pan.
We hope you love this refreshing and simple No-Bake Lemon Cheesecake as much as we do! It’s a testament to how a few quality ingredients and a little patience can create something truly spectacular. Don’t forget to share your creations with us on Pinterest @cookingwithemy. Happy no-baking from The Kitchen Team at CookingWithEmy.com!
No-Bake Lemon Cheesecake!
Description
A delicious, sweet and easy no-bake lemon cheesecake! Part of my back-to-basics series!
Ingredients
- 300 g shortbread biscuits
- 100 g unsalted butter
- 600 g full-fat cream cheese
- 100 g icing sugar
- 300 ml double cream
- 75 ml lemon juice ((about 3 lemons))
- 150 ml double cream
- 2 tbsp icing sugar
- Lemon slices
- Lemon zest
Instructions
- Blitz your shortbread biscuits to a fine crumb. Melt your unsalted butter carefully, and then add into your biscuits.
- Blitz the biscuits again to combine, and add to the bottom of your 8″/20cm deep springform tin.
- Add your cream cheese to a stand mixer bowl, or a large bowl. Add in your icing sugar, and whisk until smooth using the whisk attachment on the stand mixer, or using the whisks on your electric hand whisk.
- Pour in your double cream, and whisk. As the mixture is starting to thicken, add in your lemon juice (and yellow food colouring if using), and whisk again.
- Continue to whisk until very thick. Be careful to check the mixture frequently to see how thick it is, and fold through with a spatula to make it all even.
- Once whisked, spread over the biscuit base, and then leave to set in the fridge fully for at least 5-6 hours, or preferably over night for longer.
- Whisk together your double cream and icing sugar until pipeable. Pipe onto your cheesecake with your favourite tip.
- Add a bit of lemon per slice, and sprinkle over some lemon zest.
