Table of Contents
Chile Rellenos Casserole Layered Smoky Cheese – A Breakfast‑Brunch‑Dinner Delight
When I walk into my little Manhattan kitchen, memories of my grandmother’s open‑air spice market in Rabat flood back—her smoky green chiles the stars of every dish. That aroma inspired me to marry a classic Mexican staple with Southern comfort, creating a breakfast‑brunch‑dinner casserole that feels like a hug you can cook.
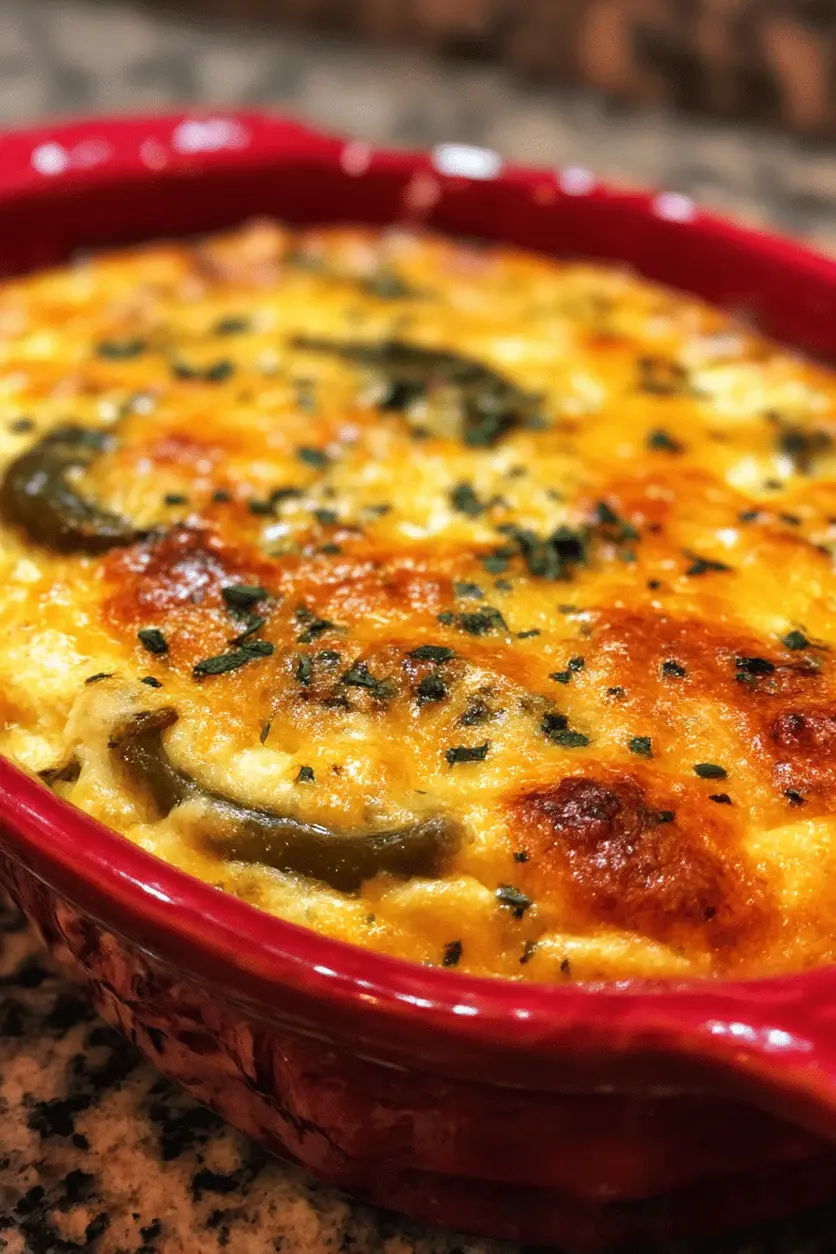
Picture a golden, bubbling top speckled with bright green chile hearts. Inside, layers of Monterey Jack melt into a silky, smoky base, while Sharp Cheddar adds a sharp bite that dances with every bite. The creamy custard rises just enough that it feels like a souffle, yet retains the casserole’s familiar heartiness. A swirl of cilantro, a drizzle of sour cream, and even a slice of avocado add fresh brightness against the rich, melty depths.
I perfected this recipe at a friend’s New York loft, using a high‑heat stove that lets the cheese crisp just so. The secret you’ll need: whisk the egg mixture slowly to keep it light, and remember to let it rest after baking—this step sets the perfect crumb. A common mistake is over‑mixing the eggs, which collapses the structure; keep it silky and gentle to preserve the soufflé‑like lift.
Why This Chile Rellenos Casserole Recipe Is the Best
The flavor secret lies in layering the smoky green chiles beneath a double cheese coat. This sandwich‑style approach creates a crunchy skin while keeping the inside luscious, a contrast that my NYC friends rave about as a brunch hit.
The texture won’t quit. A gentle whisking technique from my Paris pastry lessons, combined with a touch of flour, traps steam and lifts the custard like a souffle. The result: airy, yet firm enough to slice cleanly. Even a beginner can master the rise with this formula.
It’s quick, accessible, and forgiving. The ingredients are pantry staples or easy finds at any farmers market. Whether you’re cooking for a crowd or single‑serve, it scales up or down without losing its charm. The layered cheesy brilliance means you can rehearse it ahead, and it still feels freshly baked.
Chile Rellenos Casserole Ingredients
I source my chiles from the farmers market in Brooklyn’s Sunset Park, where vendors bring the freshest heirloom green chilies I can find. The Monterey Jack comes from a local dairy in Jersey City, while the sharp cheddar is my go‑to from a New York cheese shop with a history older than the city itself.
Ingredients List
- Roasted Green Chiles: 6 large, peeled and seeded
- Shredded Monterey Jack Cheese: 2 cups
- Shredded Sharp Cheddar Cheese: 1 cup
- Large Eggs: 5
- Whole Milk: 1/2 cup
- All‑Purpose Flour: 2 tablespoons
- Baking Powder: 1 teaspoon
- Salt: 1/2 teaspoon
- Black Pepper: 1/4 teaspoon
- Cooking Spray or Butter: For greasing the dish
Ingredient Spotlight
Roasted Green Chiles: These serve as the smoky foundation. Choose chiles that feel slightly fibrous and have a bright green tint. In the U.S., you can find them at most supermarkets or fresh markets; for a boost, use chipotle or smoked adobo sauce. A quick swap is roasted poblano with a splash of lime for a tangy edge.
Monterey Jack Cheese: A mild, creamy cheese that melds beautifully with the cheddar. Look for cheeses that are semi‑soft and have a low moisture content. If you’re on a diet or miss the melt, cheddar aged six months does a comparable job with an even sharper bite.
Large Eggs: They are the backbone of the casserole’s custard. White eggs keep the color bright; if you prefer organic, look for “farm‑fresh” labels. As a quick substitute, you can replace one egg with ¼ cup of Greek yogurt—this gives moisture and richness without the density.
| Original Ingredient | Best Substitution | Flavor / Texture Impact |
|---|---|---|
| Monterey Jack Cheese | Sharp Cheddar | Tighter melt, more bite, less creaminess |
| All-Purpose Flour | Cornstarch | Gives silkier custard, lower gluten |
| Whole Milk | Half-and-half | Richer, denser, more buttery flavor |
How to Make Chile Rellenos Casserole — Step‑by‑Step
This step‑by‑step guide will keep the sauce silky, the cheese evenly melted, and the casserole looking Instagram‑ready.
Step 1: Preheat the Oven
Preheat your oven to 375°F (190°C) while you prepare the base. A steady heat is essential for a uniform rise.
💡 emy’s Pro Tip: Use a baking stone or sheet to keep heat consistent and help the bottom crisp.
Step 2: Whisk the Egg Mixture
In a medium bowl, whisk eggs, milk, flour, baking powder, salt, and pepper until smooth. A smooth mix keeps the casserole from becoming lumpy.
⚠️ Common Mistake to Avoid: Over‑whisking, which creates too much air and can cause the casserole to crack.
Step 3: Line the Bottom with Chiles
Lightly grease a 9‑x‑13 inch baking dish. Arrange half of the green chiles into an even layer, seeds removed.
💡 emy’s Pro Tip: Press the chiles down gently to create a snug bed for the cheese.
Step 4: Layer Chiles and Cheese
Sprinkle half the Monterey Jack then layer the remaining chiles. Add the remaining cheese. Pour the egg mixture evenly over the layered stack.
⚠️ Common Mistake to Avoid: Skipping the intermediate cheese layer, resulting in a single cheese flavor profile.
Step 5: Bake
Place the dish in the oven and bake 30–35 minutes, or until the top is golden and the centre is set.
💡 emy’s Pro Tip: Check a toothpick; it should come out clean if the centre is cooked.
Step 6: Rest
Let it rest for at least 10 minutes before slicing. Resting allows the custard to firm, resulting in easier, cleaner cuts.
⚠️ Common Mistake to Avoid: Cutting immediately after baking, causing the cheese to ooze everywhere.
Step 7: Finish with Fresh Toppings
Top with chopped cilantro, sliced avocado, or a drizzle of sour cream. The fresh accents cut through the richness.
💡 emy’s Pro Tip: Add a pinch of smoked paprika for an extra smoky nuance.
| Step | Action | Duration | Key Visual Cue |
|---|---|---|---|
| 1 | Preheat oven | 5 min | Oven light turns steady |
| 2 | Whisk eggs | 3 min | Smooth, lump‑free batter |
| 3 | Arrange chiles | 2 min | Even green layer |
| 4 | Layer cheeses | 1 min | Golden coat visible |
| 5 | Bake | 30–35 min | Golden crust, bubbling edge |
| 6 | Rest | 10 min | Cheese set, holds shape |
| 7 | Add toppings | 2 min | Fresh green garnish visible |
Serving & Presentation
Serve slices straight from the casserole, plating them on a warm plate to keep the cheese at its very best. I love adding a spoonful of fresh salsa, a dollop of Greek yogurt, or a few sprigs of fresh parsley to brighten the profile.
Pair it with a crisp green salad featuring olives, a side of roasted sweet potatoes for a sweet‑savory balance, or a simple corn on the cob for that classic Southern feel. For the adventurous, a splash of red wine or a cold glass of sparkling rosé makes an unexpected but delightful complement.
A quick garnish of smoked paprika and a drizzle of high‑quality olive oil turns the dish into an instant feast worthy of a brunch spread for friends or a comforting dinner for the family.
| Pairing Type | Suggestions | Why It Works |
|---|---|---|
| Side Dish | Roasted sweet potatoes, corn on the cob, sautéed spinach | Sweetness and earthiness balance the rich casserole |
| Sauce / Dip | Salsa, guacamole, Greek yogurt, crema | Adds brightness and cuts through the cheese. |
| Beverage | Sparkling rosé, chilled pilsner, apple cider | Cleans palate, pairs with smoky flavors. |
| Garnish | Fresh cilantro, pumpkin seeds, chives | Adds crunch and color contrast. |
Make-Ahead, Storage & Reheating
My NYC life is a mad dash, so I prep this casserole a day ahead. I build it up, cover tightly, and refrigerate. It stays fresh and delicious for up to three days, and I can reheat it whole or in slices.
| Method | Container | Duration | Reheating Tip |
|---|---|---|---|
| Refrigerator | Foil‑wrapped casserole dish | Up to 3 days | Reheat at 350°F for 15 min, then broil 3–5 min. |
| Freezer | Plastic container with lid | Up to 2 months | Thaw in fridge overnight; reheat 350°F 12–15 min. |
| Make‑Ahead | Assembled but not baked | Can be baked up to 24 h before serving | Bake when needed, add toppings last 5 min. |
When reheating, I keep the casserole in a lightly greased pan to preserve moisture. I also splash a teaspoon of milk on top before baking to keep the cheese moist. After cooling, I let it settle for 5 minutes before slicing; this keeps the slice clean and the texture intact.
Variations & Easy Swaps
| Variation | Key Change | Best For | Difficulty Impact |
|---|---|---|---|
| Roasted Red Pepper Variation | Swap green chiles with roasted red for sweeter, milder flavor. | Family‑friendly, lower heat. | None. |
| Gluten‑Free & Dairy‑Free Switch | Use a gluten‑free flour blend and blend cashew‑based cheese. | Health‑conscious diners. | Easy replacement. |
| Seasonal Winter Twist | Add diced butternut squash & cinnamon. | Festive holiday meal. | Minor extra prep. |
Roasted Red Pepper Variation
Replacing the smoky green chiles with oven‑roasted red peppers gives a softer, sweet undertone that pairs beautifully with a dash of smoked paprika. The flavor profile remains familiar while adding a comforting pop of color.
Gluten‑Free & Dairy‑Free Switch
Swap the all‑purpose flour for a blend of chickpea and rice flours; use a cashew‑based cheese that melts like real cheddar. The texture stays rich and the casserole is safe for those with food sensitivities, still delivering the same comforting bite.
Seasonal Winter Twist
Add diced butternut squash, a pinch of cinnamon, and a splash of maple syrup. The sweetness balances the smoky cheese, creating a dish that feels like a holiday centerpiece while staying true to its Mexican roots.
How long does Chile Rellenos Casserole keep in the fridge?
It stays fresh for up to three days in an airtight container or tightly wrapped in foil. The custard base remains tender, and the cheese layers keep their melt. For best taste, consume within 48 hours, or freeze for up to two months to extend shelf life.
Can I use fresh green chilies instead of roasted?
Yes, you can substitute fresh chilies, but you’ll need to boil them in water with a splash of vinegar for 30 minutes to mellow the heat and remove skins. Pat them dry before layering to keep excess moisture from making the casserole soggy.
Is this casserole good for a large brunch?
Absolutely. The recipe scales up easily; just double the ingredients and use a 10‑x‑13 inch dish or bake in two 9‑x‑13. The layered cheese creates an impressive presentation that’s both hearty and visually appealing for a crowd.
What dairy alternatives work in this recipe?
Non‑dairy cheeses like almond‑based or cashew cheddar, along with oat or soy milk, can replace their dairy counterparts. Use a blend of 1 cup almond milk and a teaspoon of nutritional yeast for that cheesy flavor, and a mix of equal parts almond and soy cashew cheese to keep the melt.
What should I use for a gluten‑free version?
A gluten‑free flour blend such as King Kong or Bob’s Red Mill in place of all‑purpose flour, and a gluten‑free baking powder. Ensure the rest of the ingredients (like cheese and milk) are labeled gluten‑free. The cake’s texture remains fluffy and slightly firmer.
Do I need to pre‑bake the chiles?
You can roast the chiles first for deeper smoky flavor that carries through the bake, but it’s optional. If you skip roasting, simply slice the chilies and layer them raw; the casserole’s oven heat will soften them, though the smokiness will be milder.
What’s a good side for this casserole?
A crisp green salad with lime vinaigrette or roasted sweet potatoes complements the richness. For brunch, a fried polenta slice or breakfast potatoes add hearty texture. The side dishes lift the meal and help balance the cheesy depth.
Can I make the casserole from scratch and freeze?
Yes, you can assemble the casserole, bake it, then let it cool thoroughly before freezing in a freezer‑safe container. It reheats well; thaw overnight in the fridge, then bake at 350°F for 15‑20 minutes or microwave until warmed through.
How can I add a bit of spice to the casserole?
Sprinkle a pinch of cayenne pepper or add a diced pepper pepper to the egg mixture before pouring. Alternatively, serve with a jalapeño‑horchata or a smoky salsa on the side for an extra heat kick.
Is it safe to store leftovers with cheese on top?
Yes, but keep the dish sealed tightly to avoid the cheese drying out or absorbing fridge odors. When reheating, add a splash of milk or a few spoonfuls of yogurt to keep the cheese moist and flavorful.
Share Your Version!
I’d love to hear how you twist this comfort dish. Leave a star rating and comment below—did you add an extra kick of spice, swap in a different cheese, or serve it for a holiday brunch? Your insights help me keep my NYC kitchen buzzing with new ideas.
Snap a photo of your finished casserole and share it on Instagram or Pinterest. Tag me so I can see your magic and maybe feature your creation on my socials. And if you’re experimenting, ask me one specific question about the recipe so we can brainstorm together.
From my NYC kitchen to yours — I hope this recipe brings as much warmth to your table as it does to mine. — emy 🧡
Love This Recipe? Save It to Pinterest!
If you enjoyed this Chile Rellenos Casserole recipe, don’t let it get lost in your browser tabs! 😄 Pin it now so you can find it again anytime — and explore hundreds more tried‑and‑tested recipes waiting for you on my Pinterest boards.
👉 Follow emy on Pinterest @exorecipe
📌 Pin this recipe · 🔁 Re-pin your favorites · 💬 Tag me when you make it — I love seeing your creations!
Got a favorite twist? Drop your thoughts and keep this conversation sizzling in the comments below!

Chile Rellenos Casserole
Description
A cozy, flavorful take on traditional Chile Rellenos baked into a creamy, cheesy, and smoky casserole thats perfect for breakfast, brunch, or dinner.
Ingredients
- Roasted Green Chiles: 6 large, peeled and seeded Bring the signature smoky heat.
- Shredded Monterey Jack Cheese: 2 cups Melts beautifully into a gooey, creamy layer.
- Shredded Sharp Cheddar Cheese: 1 cup Adds a bold, tangy contrast to the Jack.
- Large Eggs: 5 Create the soft, souffle-like structure of the casserole.
- Whole Milk: 1/2 cup Lightens the eggs and gives them a custardy texture.
- All-Purpose Flour: 2 tablespoons Helps bind the egg mixture.
- Baking Powder: 1 teaspoon Gives a slight lift for a fluffier bite.
- Salt: 1/2 teaspoon Enhances every flavor.
- Black Pepper: 1/4 teaspoon Adds a subtle kick.
- Cooking Spray or Butter: For greasing the dish Prevents sticking and gives a golden edge.
Instructions
- Preheat your oven to 375°F (190°C). Lightly grease your baking dish with butter or cooking spray.
- In a bowl, whisk together eggs, milk, flour, baking powder, salt, and pepper until smooth.
- Line the bottom of your baking dish with half the green chiles, spreading them evenly.
- Sprinkle half the cheeses over the chiles, then layer with remaining chiles and the rest of the cheese. Pour the egg mixture evenly over everything.
- Bake uncovered for 3035 minutes, or until the top is golden and the center is set.
- Let it rest for at least 10 minutes before slicing to help it firm up and make serving easier.
- Top with fresh cilantro, avocado slices, or a drizzle of sour cream if desired.
