Table of Contents
Peach Galette Recipe – French Pastry Techniques for a Crispy, Buttery Crust – A Fresh Take
It’s been a while since I first carried a French baguette into a Moroccan souk, but that memory still fuels every pie crust I touch. When I stood in a Manhattan farmer’s market, the scent of ripe peaches stirred a little nostalgia, and I thought: why not bring the effortless elegance of a French galette to this fresh, summery fruit?
Imagine a buttery, flaky dough that curls around the sweet, caramel‑led peaches, speckled with cinnamon and a hint of vanilla, while the crust bubbles like an open‑mouth pastry. The buttery crumb, kissed by the slight bite of salt, plays off the soft, juicy peaches, creating a symphony of textures that almost sing in your mouth.
I took this classic Southern comfort and turned it into a Paris‑inspired pastry using a simple chilled dough technique. No flipping the dough; no blind‑baking. I’ll reveal the key pro tip for a buttery crackle and warn you about one common mistake that can ruin the crispness.
Why This Peach Galette Recipe Is the Best
The secret sauce? A chilled, pinch‑crusted dough that melts in the oven but stays puffed, thanks to the combination of butter and cold shortening. This method, honed in my Paris kitchens, cuts prep time and guarantees that golden, flaky edges that hold the peach swirls perfectly.
The texture feels like a mosaic—every bite delivers the soft, tender dough, the buttery pinches, and the luscious peach filling that bursts with tangy-sweet flavor. The result is both a visual treat and a mouth‑watering experience that rides that sweet, tart spectrum the way a Moroccan tagine balances spice.
Even if you’re new to baking, the steps are straightforward and the dough curls naturally during baking. No plus‑up crust or blind‑bake. I’ve packed techniques I learned in flagship Paris pâtisserie into this recipe, and you’ll find that the galette will rise beautifully without accidental holes.
Peach Galette Ingredients
I fetched each ingredient from the market stalls crowned with early‑summer peach ribbons—packed in Canadian fields—plus a few pantry staples that survive every kitchen in NYC. The sweetness is pure, the butter crisp, the flour light; a trio that sings like a French café at dawn.
Ingredients List
- 1½ cups all‑purpose flour
- ½ cup cold butter (cut into ½‑inch pieces)
- 3 Tbsp cold shortening
- 2 Tbsp granulated sugar
- ½ tsp salt
- ¼ cup milk
- ½ cup granulated sugar (for filling)
- 3 Tbsp flour (for filling)
- ½ tsp ground cinnamon
- 4–5 ripe peaches, peeled, pitted, sliced
Ingredient Spotlight
All-Purpose Flour – Brought structure and a fine crumb. I recommend a medium‑protein flour for a lighter crust. If you prefer whole‑grain, swap for ½ cup whole wheat flour but expect a denser base. The texture remains tender, but the flavor deepens with toasted nutty notes.
Cold Butter – This is what gives the galette its buttery pull and flaky layers. Choose European butter for a richer taste. If you’re vegan, replace with ¼ cup canola oil to keep the tenderness; the crust will still puff but will be less crumbly.
Peaches – The stars of the show. I favor Rosalina peaches from the Midwest; they hold their shape. For a deeper, tart punch, use a small gram of Sante peach. If peaches are out of season, ripe nectarines add a bright zing.
| Original Ingredient | Best Substitution | Flavor / Texture Impact |
|---|---|---|
| All-purpose flour | Whole wheat flour | Denser crust, nutty flavor |
| Butter | Coconut oil | Slight coconut hint, less crumbly |
| Peaches | Nectarines | Tart brightness, slower melting |
How to Make Peach Galette — Step-by-Step
Below is a simplified roadmap that keeps the batter from getting soggy while letting the peaches build their own caramel flavor in the oven.
Step 1: Mix Dry Ingredients
In a large bowl, combine 1½ cups flour, 2 Tbsp sugar, ½ tsp salt, and 3 Tbsp flour for the filling. Using a silicone mixer or your hands, whisk until the mixture is lightly crumbly.
💡 emy’s Pro Tip: Start with a blender to get a fine crumb that sticks better to the butter.
Step 2: Add Butter and Shortening
Tip the cold butter and 3 Tbsp shortening into the dry mix. Pulse until the dough looks like coarse crumbs and small flecks of butter are visible.
⚠️ Common Mistake to Avoid: Adding too much butter or letting the dough warm can make it sticky and collapse.
Step 3: Chill Dough
Wrap the dough in parchment and refrigerate for at least 45 minutes—1 hour for a perfect, crisp edge.
💡 emy’s Pro Tip: Let it sit 2 hours if you’re preparing ahead; the cold keeps the butter from melting.
Step 4: Preheat Oven
Set your oven to 375 °F (190 °C) and allow it to heat fully before you bake.
Step 5: Prepare Peach Filling
In a bowl, toss sliced peaches with ½ cup sugar, 3 Tbsp flour, and ½ tsp cinnamon until coated. Set aside.
⚠️ Common Mistake to Avoid: Overmixing can cause the peaches to break apart.
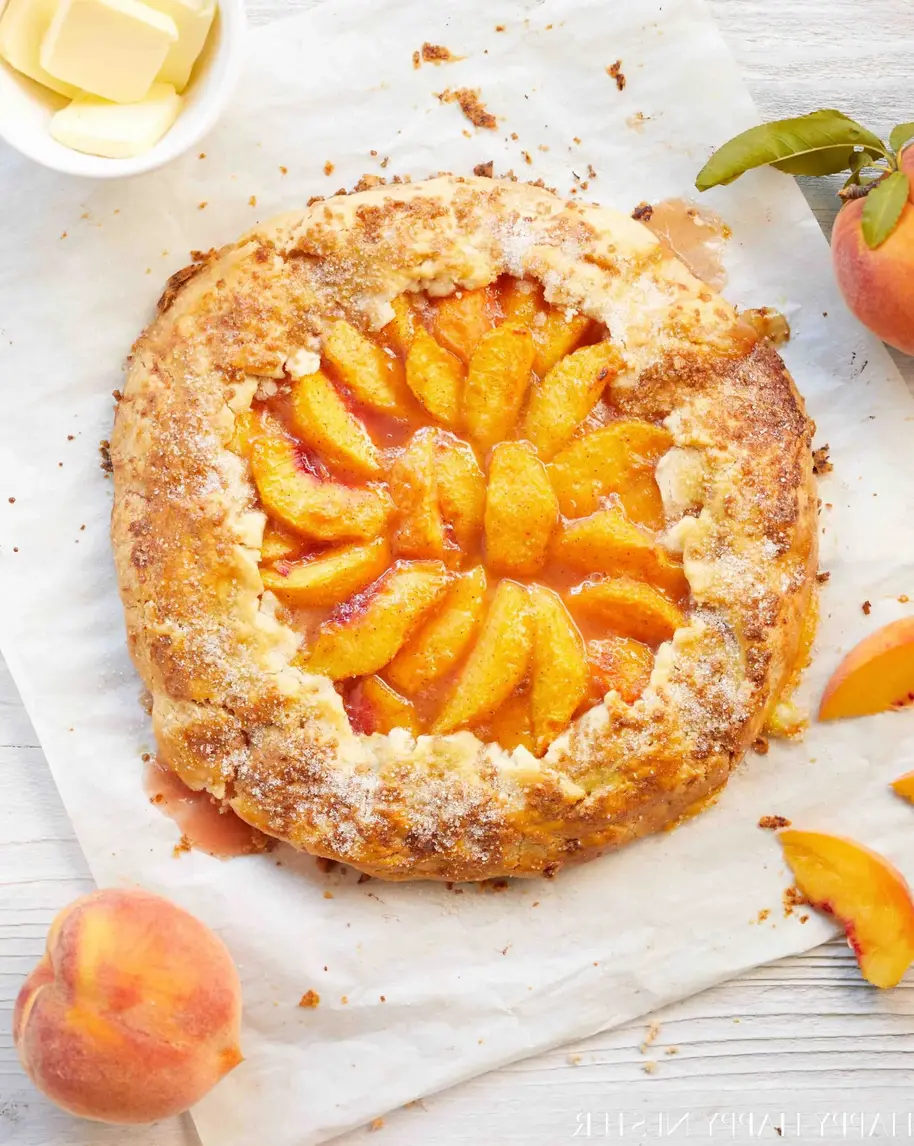
Step 6: Assemble Galette
Roll the chilled dough to an 11‑inch circle on parchment. Place it on a rimless baking sheet. Arrange peach chunks in a close concentric pattern, leaving the center for a smaller circle of crust.
Step 7: Fold Edges
Fold the dough over the peaches, creating overlapping folds. Aim for no cracks so the juices don’t leak.
💡 emy’s Pro Tip: Brush the exposed crust with a beaten egg for a dazzling golden finish.
Step 8: Bake
Bake for 50–60 minutes. The top should be golden and the crust crisp. If the edges brown too fast, tent loosely with foil.
⚠️ Common Mistake to Avoid: Leaving the pie uncovered too early can scorch the crust.
Step 9: Cool & Serve
Let the galette rest on a wire rack 10 minutes before slicing. Serve warm with a dollop of vanilla ice cream if you like.
| Step | Action | Duration | Key Visual Cue |
|---|---|---|---|
| 1 | Mix dry | 5 min | Crumbly mixture |
| 2 | Add butter | 3 min | Flecks of butter visible |
| 3 | Chill dough | 45–60 min | Firm, cold dough |
| 4 | Preheat oven | 10 min | Temperature steady |
| 5 | Toss peaches | 5 min | Peach coating glistens |
| 6 | Assemble & fold | ≈10 min | Edges sealed |
| 7 | Bake | 50–60 min | Golden crust |
| 8 | Cool & serve | 10 min cool | Sliced golden wedges |
Serving & Presentation
Serve each wedge on a warm crumbly croissant or a small bowl of Greek yogurt for a textural contrast. Sprinkle with your favorite pistachios or toasted almond slivers, and drizzle a little honey – the way I did on a Sunday at the Mercado de Levittown. It reads like a meal from a Paris café with a North African soul.
For a brunch twist, add a dollop of mascarpone cream and a dusting of powdered sugar. If you’re watching calories, finish with a light drizzle of pure maple syrup and a sprig of fresh mint. The result makes a show‑stopping yet comforting platter.
| Pairing Type | Suggestions | Why It Works |
|---|---|---|
| Side Dish | Roasted Beet Salad, Fresh Herb Crostini | Earthy contrast and flavor balance |
| Sauce / Dip | Honey‑yogurt vinaigrette, Lemon‑caper butter | Adds tart zing and richness |
| Beverage | Sparkling rosé, Peach hibiscus tea, Vanilla liqueur | Refreshes palate and echoes peach |
| Garnish | Fresh mint, toasted pistachios, edible flowers | Picturesque and aromatic |
Make-Ahead, Storage & Reheating
I love prepping ahead for my weekly brunch menu. I bake the galette a day in advance, lock it in an airtight aluminum lid for fridge storage, and reheat in a hot 375 °F oven for 10 minutes for that fresh‑baked crunch.
| Method | Container | Duration | Reheating Tip |
|---|---|---|---|
| Refrigerator | Airtight sealable bag | 3 days | Reheat 10 min at 375 °F |
| Freezer | Fridge‑safe container | 2 months | Thaw 4 hrs, bake 8 min at 400 °F |
| Make‑Ahead | Ready‑to‑bake parchment on tray | 1 day | Finish baking straight from fridge 8 min |
When you reheat, keep an eye on the crust; a bit of parchment paper beneath helps preserve crispness. For the next day, I often finish with a sprinkling of sea salt to bring out the peach’s natural sweetness.
Variations & Easy Swaps
| Variation | Key Change | Best For | Difficulty Impact |
|---|---|---|---|
| Lemon‑Blueberry Galette | Add ½ cup blueberries, zest of one lemon, 1 tbsp lemon juice | Summer fruit lovers | More prep but same bake time |
| Gluten‑Free Peach Galette | Use 1 cup gluten‑free blend plus ¼ cup xanthan gum | Allergy friendly | Minor adjustments in dough handling |
| Spiced Ginger Peach Galette | Add 1 tsp ginger, ¼ tsp cloves to filling | Holiday menu | Same process, aromatic boost |
Lemon‑Blueberry Galette
I keep this variant in my Rio de Janeiro kitchen during summer — the blueberries give a rainbow pop, and the lemon zest brightens the sweetness. A refreshing palate cleanser, it’s almost like a fruit salad wrapped in pastry.
Gluten‑Free Peach Galette — Dairy‑Free
By swapping whole‑grain flour with a certified gluten‑free blend and replacing butter with oat butter, I made a version that still manages to rise but tastes surprisingly delicate — a win for gluten‑sensitive diners.
Spiced Ginger Peach Galette — Seasonal Twist
Adding ginger and a pinch of cloves gives the pastry an almost Moroccan spice aroma while the peach remains a star. Think of it as a sweet‑spicy croissant for the fall season.
Can I make the peach galette ahead of time?
I love the idea of prepping for a busy week. Absolutely, you can bake the galette a day ahead and refrigerate it in an airtight container. When you’re ready to serve, reheat it in a 375 °F oven for about 10 minutes until the crust is golden again. The filling will be warm and the crust will retain its crispness. For a fresh‑look, trim stray edges before reheating. This prep leaves you with ready‑made dessert that’s still delicious.
What is the best type of peach for this galette?
Selection is crucial because the peach’s texture determines how juicy the filling turns out. Look for peaches that have a slight give under pressure but are firm enough to hold their shape when sliced. The more blush or ruby rosy color, the sweeter and milder the fruit will be. For a bit of tartness, choose peaches that have a deeper hue or a slight purple tint. They’ll give the galette a lovely contrast, especially in summer heat, and tend to stay rosettes longer in the oven.
Do I need an oven thermometer for baking a galette?
You’re welcome to use one for extra precision, but the recipe works well with a standard oven set to 375 °F (190 °C). If you’re prone to oven temperature variations, an internal thermometer can help you confirm the crust reaches 190 °C by checking the bottom of the baking sheet after 10 minutes. This ensures the galette is cooked through without over‑browning. Many of my NYC friends rely on digital timers and visual cues rather than thermometers.
Can I freeze the galette for later use?
Yes—freezing is an excellent option for long‑term storage. Freeze the fully baked galette in a bag or foil, wrapped tightly to avoid freezer burn. When you’re ready to eat, let the pastry thaw overnight and bake it at 375 °F for about 8–10 minutes. The crust will regain its crispness, and the peach filling remains moist and flavorful. This approach is great for holiday parties or for meal‑prep mindful of freezer hustle in this city.
What’s a quick alternative if I’m short on time?
You can skip the chill time by press‑compressing the dough quickly into parchment and letting it sit at room temperature for 15 minutes. Then, follow the assembly and bake as usual. The final crust may be slightly less flaky, but it will still deliver a buttery, caramelized peach filling. Another trick is to use pre‑made pie crust or a store‑bought puff pastry—just adapt the sauce ratios for a swifter turnover.
Is it okay to use frozen peaches in the galette?
Frozen peaches can work if they’re thawed and drained well; otherwise they’ll release too much liquid, making the crust soggy. I recommend thawing them in a colander, patting them dry, and tossing them in a light flour mix before adding the sugar. That helps absorb moisture and keeps the filling from becoming watery. Don’t forget to reduce the liquid sugar amount slightly if the peaches are particularly juicy.
Can I swap peaches with another fruit?
Absolutely. Pears, nectarines, or ripe plums make excellent replacements for peaches. Each brings a distinct flavor—maybe a subtle perfumed note from pears or a tart sweetness from plums. Adjust the sugar level slightly to match the fruit’s natural sweetness. The baking time stays the same, but you may need to tweak the flour amount in the filling if the alternative fruit is softer.
Do I need to blind bake the crust?
You don’t have to blind bake a galette because it’s a free‑form pie only partially covered by dough. The over‑folded edges will seal the filling in, so you just bake until the crust is golden. Blind baking is more common for fully covered pies where you need to let the crust set before adding filling. In our case, the crust’s puffing from the butter gentle gives you a flaky interior without it sinking into the peach.
How can I prevent the galette crust from becoming soggy?
You’ll want to keep the peaches dry before baking. Pat the peeled slices with paper towels, toss them in a very light flour mix, and then re‑mix with the sugar. Also, the upper crust of the galette should be brushed with beaten egg or milk to help it brown. Finally, lay a layer of grated parmesan on the dough edges before folding, which will absorb excess moisture and keep that golden snap alive.
Can I add a middle crust to the galette?
Yes, if you prefer a fully covered pastry. Roll the dough into a circular shape, wrap loosely around the peaches, and pinch the edges. The crust will rise more, giving you a pie‑like texture. A middle crust will add a bit of additional bake time, so check the center with a knife for doneness. Many chefs design the galette for an open‑handed look, but a full crust can make the display more humble and rustic.
Share Your Version!
I’d love to hear how you’ve adapted this Peach Galette recipe. Drop a comment below, rate it, and let me know which ingredient you swapped or where you added that extra pinch of love. Feel free to post a lively photo on Instagram or Pinterest and tag @cookingwithemi. In what way did you sprinkle a little French flair into your galette? I’m all ears.
From my NYC kitchen to yours — I hope this recipe brings as much warmth to your table as it does to mine. — emy 🧡
Love This Recipe? Save It to Pinterest!
If you enjoyed this Peach Galette recipe, don’t let it get lost in your browser tabs! 😄 Pin it now so you can find it again anytime — and explore hundreds more tried‑and‑tested recipes waiting for you on my Pinterest boards.
👉 Follow emy on Pinterest @chefrecipes2
📌 Pin this recipe · 🔁 Re-pin your favorites · 💬 Tag me when you make it — I love seeing your creations!

Peach Galette Recipe
Description
This Peach Galette Recipe is so simple to make and it tastes delicious. If you want the flavor of a peach pie, this is a nice alternative.
Ingredients
- 1½ cup flour
- ½ cup butter (chilled and cut into ½-inch pieces)
- 3 tbsp shortening (chill)
- 2 tbsp sugar
- 1 pinch salt
- milk
- raw sugar (You can use granulated sugar for sprinkling on crust.)
- ½ cup sugar
- 3 tbsp flour
- ½ tsp cinnamon
- 4 or 5 peaches (skinned and sliced)
Instructions
- Place flour, butter, shortening, sugar, and salt in a Cuisinart blender.
- Pulse the blender at first, and the dough will resemble a very coarse meal.
- Continue to mix the pastry dough until it forms a round soft ball.
- Sprinkle a piece of parchment or wax paper with flour and place the dough on the paper. Flatten into a small disk shape.
- Wrap up the dough in the parchment paper and refrigerate for at least two hours.
- Preheat the oven to 375° F.
- Peel and slice peaches into ¼ – ½" thick wedges.
- In a medium-size bowl, stir the granulated sugar, flour, and cinnamon.
- Gently toss prepared peaches into the sugar mixture. You can add a tiny bit more sugar if your peaches are tart,
- Remove dough from the refrigerator. Place on a floured piece of parchment measuring 12" long and wide. I transfer the dough and paper to a rimless baking sheet.
- Beat your ball of chilled dough with a rolling pin and knead the dough briefly around the edges to soften slightly. Moving from below center, roll the dough out to the edge. Lift the dough, turn it slightly, and give another roll. Sprinkle dough on the top and bottom with flour and keep rolling.
- Create an 11" circle with the dough. I needed the edges a bit thicker to lift it over the top of the galette.
- Starting 1 to 1½ inches from the edge of the round, arrange the peach wedges in a single layer in concentric circles until you reach the center of the circle. When placing the peaches on the dough, leave the extra juice in the bowl and not on your galette.
- Fold the outer edges of the pastry over the peaches, creating overlapping folds as you work around the perimeter. Once you form the galette, ensure no cracks in the dough where the peach filling can seep.
- Brush the top of the pastry with the milk and sprinkle with sugar.
- If your galette is juicy, place another baking sheet underneath to catch any juices overflowing.
- Bake for 50 to 60 minutes, until the crust is golden and the filling is cooked. I covered my galette loosely with tin foil and the last 10 minutes of baking uncovered it.
- Let the galette cool on the baking sheet on a wire rack. Cut into wedges and serve warm.
