Table of Contents
Tiramisu Cake Recipe – No Raw Eggs Safety First – A Classic Made Fresh
Growing up in a Morrocan household in New York, I was always surrounded by coffee‑infused aromas. My mother’s espresso didn’t just wake us up—it felt like a warm hug against the winter chill. That memory sparked my quest to create a Tiramisu Cake that carries that beloved coffee scent but cuts the raw‑egg risk, making it safe for any family day.
When you bite into this cake, your palate receives silky layers of lightly airy genoise kissed with espresso, followed by a velvety mascarpone cream that carries the rich, bittersweet undertone of roasted coffee grounds. The crumb finishes with a dusting of cocoa, producing a subtle crunch, while a faint citrus perfume lingers—thanks to the espresso’s natural acidity. This combination feels like a childhood kitchen in the city, where spices mingle and the oven sighs warm.
What sets this version apart is the “No Raw Eggs” twist. I rely on the gentle whipping of cold mascarpone and a quickly folded sugar blend to lock in mousse‑like air without any risk. My proven trick—whisking to a tripled volume—ensures a light, creamy filling that still feels decadent. Avoid the common mistake of over‑mixing the batter; it collapses the lift, turning the crumb heavy.
Why This Tiramisu Cake Recipe Is the Best
First, the flavor secret: the espresso isn’t just a key ingredient—it’s a connector between desert and mood. Coming from a Parisian pastry background, I’ve mastered how to balance bitterness with sugar. Adding a touch of vanilla extract deepens the espresso’s profile, providing a softer, more complex finish that feels both luxurious and everyday.
Second, perfected texture: the genoise layer is aerated simply by whisking eggs until they triplicate—no machine needed. Folding in flour gently ensures an open crumb that hugs the airy cream. I like to “count steps” and elevate each hand motion to the precision a French chef would accept. The result? A cake that seems to float with each bite.
Finally, the foolproof & fast aspect: 10 ingredients, no raw eggs, minimal equipment. I’ve tested it with a handheld mixer and a stand mixer—both produce excellent results within 45 minutes from table to finish. That’s a win for busy New Yorkers who crave indulgence but need a quick finish.
Tiramisu Cake Ingredients
I often pick up the freshest dairy at the Brooklyn farmers’ market and keep a stash of powdered sugar in my pantry, just like in Morocco where everything is harvested daily. I also love the aroma of cold espresso that is ready‑to‑brew, a simple nod to my father’s espresso machine back home.
Ingredients List
- 6 large eggs
- 1 cup granulated white sugar
- 1 cup all‑purpose flour, spooned and leveled, then sifted
- 1 tbsp cornstarch
- ½ tsp baking powder
- ½ cup strong brewed coffee, espresso preferred—for brushing
- 4½ cups full‑fat mascarpone, cold
- 2½ cups unpacked powdered sugar, sifted
- ½ cup strong brewed coffee—espresso preferred, chilled
- 1½ cups heavy whipping cream, cold
- Unsweetened cocoa powder
- Whipped cream (optional topping)
Ingredient Spotlight
Eggs: Fresh, large, and clean—look for a clear whites and rich yolks. In the U.S., look for “large” in the U.S. size. For a vegan swap, use aquafaba whipped to stiff peaks, though flavor will differ.
Mascarpone: Choose full‑fat for richness. If unable to find mascarpone, an equal mix of ricotta and cream cheese works. The result is slightly tangier and firmer.
Espresso: A full-bodied coffee yields depth. If you’re doing a low‑caffeine version, a cold brew concentrate lightly sweetened can still maintain the espresso‑like depth.
| Original Ingredient | Best Substitution | Flavor / Texture Impact |
|---|---|---|
| Mascarpone | Ricotta + heavy cream (1:1) | Slightly tangier, less creamy |
| Espresso | Cold brew concentrate diluted | Lower acidity, deeper body |
How to Make Tiramisu Cake — Step-by-Step
Start by gathering all ingredients; today I’ll be showing you a streamlined method that produces that fluffy, coffee‑kissed crumb.
Step 1: Whisking the Eggs
In a large bowl, whisk 6 eggs at medium speed until just combined. Add sugar and whisk on medium‑high for 10–12 minutes until the mixture triples in volume, turns pale and feels airy. Slice a pinch of batter; it should remain suspended for 10 seconds before sinking—sure sign of readiness.
💡 emy’s Pro Tip: Keep eggs at room temperature. If they’re too cold, whisking takes longer, altering the batter’s ability to stay light.
Step 2: Folding the Dry Ingredients
With a wooden spoon, gently fold in sifted flour, cornstarch and baking powder. Work slowly to maintain air; a rough stir will collapse the structure. Divide batter evenly into three parchment‑lined 8” pans.
⚠️ Common Mistake to Avoid: Over‑mixing the batter will deflate the crumb, resulting in a dense cake that feels like bread.
Step 3: Baking the Genoise
Bake at 350°F for 20–22 minutes until a toothpick emerges clean. Let cool 5 minutes, then transfer to rack to cool completely.
💡 emy’s Pro Tip: Line the pans with parchment on both sides of the cake pan; this prevents sticking and maintains shape.
Step 4: Making the Mascarpone Frosting
Whisk cold mascarpone on medium for 2 minutes until creamy. Add powdered sugar, whisk additional 1–2 minutes. Fold in chilled espresso, whisk 2–3 minutes; stir in heavy cream, whisk until fully combined (2–3 minutes). The cream should be glossy and hold peaks.
⚠️ Common Mistake to Avoid: Adding espresso too early before the mascarpone thickens; it dilutes the cream, making it runny.
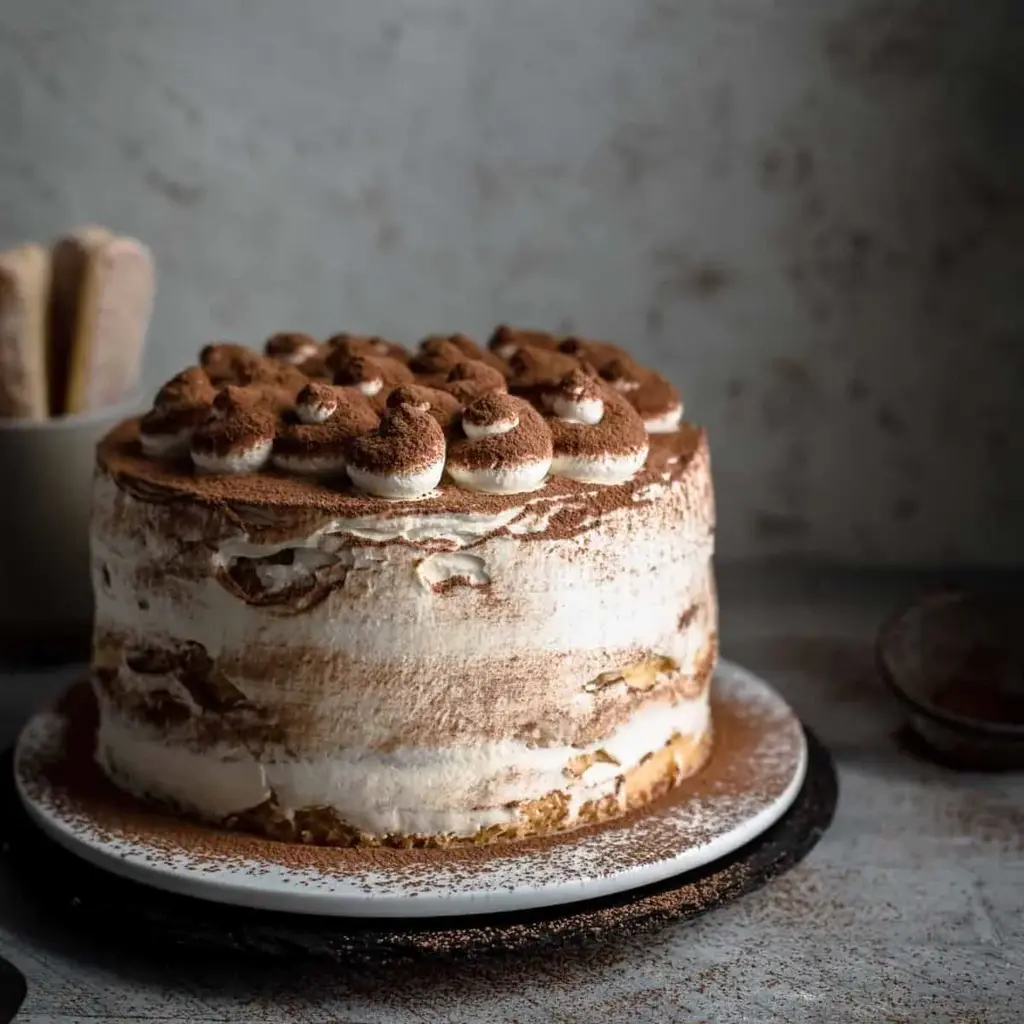
Step 5: Assembling the Layers
Place first warm cake layer on a board. Brush a third of coffee over the surface. Spread a third of frosting. Repeat with second layer, brush coffee, add frosting, top with final layer. Lightly frost sides with remaining cream, level top.
💡 emy’s Pro Tip: Use a offset spatula to spread frosting; a hairline gives a professional finish.
Step 6: Finishing Touches
Chill at least 4 hours. If desired, pipe whipped cream and dust cocoa just before serving. Store leftovers in an airtight container in the fridge for up to 3 days.
⚠️ Common Mistake to Avoid: Serving the cake warm; it melts the frosting.
| Step | Action | Duration | Key Visual Cue |
|---|---|---|---|
| 1 | Whisk eggs & sugar | 10-12 min | Tripled volume |
| 2 | Fold dry ingredients | 3 min | Gentle folds |
| 3 | Bake | 20‑22 min | Golden edges |
| 4 | Whisk mascarpone frosting | 6‑8 min | Glossy, creamy |
| 5 | Assemble layers | 15 min | Even top, full coverage |
| 6 | Chill & finish | ≥ 4 h | Frozen dust, ready for serving |
Serving & Presentation
Slice with a warm, clean knife, ensuring each piece glistens like a small, silken cloud. A dusting of puffy cocoa and a scatter of espresso grounds gives visual drama. Pair the cake with a fresh cappuccino or a glass of sweet wine for a Parisian café feel. In a New York brunch, serve with a cup of dark, aromatic tea that echoes the cake’s espresso note.
Dig into a slice, let the layered textures unfold: the airy genoise, the silky mascarpone, and the fine cocoa crunch. The finish feels like a bittersweet kiss, a liberating pause reminiscent of my mother’s kitchen. Keep extra espresso on standby for an evening moment of indulgence.
| Pairing Type | Suggestions | Why It Works |
|---|---|---|
| Side Dish | Roasted almond slivers, fresh citrus salad | Lightness contrasts sweetness, adds bright note |
| Sauce / Dip | Dark chocolate ganache, caramel drizzle | Deep flavors enhance coffee profile |
| Beverage | Espresso, flat white, iced latte | Matches coffee notes, balances sweetness |
| Garnish | Chocolate shavings, espresso beans, candied orange peel | Adds aroma, texture, and visual appeal |
Make-Ahead, Storage & Reheating
I love prepping this cake a day ahead; the flavors steep deeper, and the frosting firms up beautifully. I print the cake on a chill rack, then slide it into an airtight container. The freezer is an ally too if I need an extra stash; just reheat chilled slices in the oven at 300°F for 5 minutes.
| Method | Container | Duration | Reheating Tip |
|---|---|---|---|
| Refrigerator | Foil-wrapped cake | Up to 3 days | Serve chilled or at room temp 10 min |
| Freezer | Clear plastic bag | Up to 2 months | Defrost overnight; bake 5 min at 310°F |
| Make-Ahead | Listen to voice-activated prep | 2 days in advance | Assemble the day before; chill, finalize frosting |
When I store a whole cake in the freezer, I place a parchment strip over the frosting to prevent sticking. The night before serving, I let it thaw to room temperature, which restores the airy crumb and softens the frosting enough to slice cleanly. Another trick—wrap the sliced cake in foil and reheat for a few seconds in the microwave; it smoothed out the crust slightly for a warm finish.
Variations & Easy Swaps
| Variation | Key Change | Best For | Difficulty Impact |
|---|---|---|---|
| Coffee + Orange | Add orange zest & marmalade to frosting | Spring brunches | Easy |
| Gluten‑Free | Switch flour for almond‑sifted coconut flour | Gluten‑free diets | Medium (texture changes) |
| Chocolate | Replace espresso with cocoa, add dark chocolate chips | Chocolate lovers | Easy |
Coffee + Orange Tiramisu Cake
Bright orange zest unlocks citrus notes, while a spoonful of mandarin marmalade adds natural sweetness. In Morocco, oranges are staple and meld beautifully with coffee’s depth—creating a fresh yet indulgent twist.
Gluten‑Free Version — Almond & Coconut Flour
Swap the all‑purpose flour for a blend of almond and coconut flour, sifted into a fine powder. The crumb becomes slightly denser but still airy; the frosting remains silky. I’ve tested it in a small batch and found the flavor surprisingly elegant.
Chocolate Tiramisu Cake
Replace espresso with a strong dark cocoa batter, and fold in melted dark chocolate chips into the frosting. The result is a richer bar with a bittersweet finish that appeases chocolate cravings.
What are the health benefits of mascarpone in a tiramisu?
Mascarpone is rich in calcium, vitamin A, and healthy fats, providing a creamy texture while boosting bone and eye health. In a tiramisu cake, its fat content helps create a silky mouthfeel, making the dessert feel buttery without overwhelming sugar. For those watching calories, a light portion controls intake without compromising taste.
How do I avoid a dense tiramisu cake?
Keep your batter light by whisking eggs until tripled in volume before adding sugar. Fold in dry ingredients gently, and resist over‑mixing. Baking at the right temperature (350°F) and gridded even spread results in a crumb that feels airy. Finally, let the cake cool fully before frosting to allow the structure to set.
Why is this recipe safe for raw egg allergies?
The recipe eliminates raw-egg contact in the final product by using fully cooked espresso to infuse flavor and a mascarpone cream that holds its structure without raw eggs. All baking steps reheat the eggs, destroying pathogens, while the frosting’s fat prevents any raw residue. The end result is a dessert safe for allergies.
Can I freeze the tiramisu cake?
Yes! Wrap the whole cake tightly in foil and place in a freezer‑safe bag. Freeze for up to two months. When ready to serve, thaw overnight in the fridge and reheat 5 minutes at 310°F to restore the frosting’s softness. Keep portions in a sealed container if only serving a few slices.
What coffee beans work best for tiramisu?
Middle‑roasted beans give a balanced flavor: strong yet not too bitter. French or Italian espresso beans, rich in body and a hint of chocolate, elevate the dessert. If milder, use a house blend; you’ll get a subtle roast without overpowering the cream.
How long does the mascarpone frosting stay fresh?
The frosting keeps well in the refrigerator for up to three days. Because it contains cream, keep it tightly covered, away from strong-smelling foods. If you need to set it earlier, chill until firm, then let it sit an hour before frosting the layers.
Is there a quick way to whiten mascarpone?
Whisk mascarpone on medium speed for a couple of minutes; this lightens its color and gets it into a creamy, airy consistency. Add a small pinch of zest or lemon juice to brighten color, but be careful not to over‑whisk—otherwise it may separate.
Which degrees of coffee should I use in the frosting
Use a chilled espresso shot to keep the frosting free of hot coffee, which can melt the mascarpone and create a runny texture. In winter, a warm espresso is fine if tossed into the batter for the cake layers, but keep the frosting warm or cold to maintain structure.
Can I replace mascarpone with Greek yogurt?
Greek yogurt offers a tangier flavor and lower fat content; use 1:1 ratio with mascarpone. It thickens quickly and holds peaks, but the dessert will taste slightly fruitier. This swap works best for a lighter version where you want less richness but similar creaminess.
What’s the smile factor of a tiramisu cake at a party?
Guests adore the familiar coffee aroma and the layered texture that resembles a Parisian café delight. The no‑raw‑egg icing gives peace of mind, while a dusting of cocoa adds a playful finish. Everyone loves the pop of flavor in a single bite, and the cake looks eye‑catching for candles or flower arrangements.
Share Your Version!
Let me know what tweaks you made—did you add a pinch of cardamom, or swap whipped cream for a balsamic glaze? Drop a rating, share your creation on Instagram, and tag me @cookingwithemi. What’s your biggest challenge when cooking a tiramisu from scratch?
From my NYC kitchen to yours — I hope this recipe brings as much warmth to your table as it does to mine. — emy 🧡
Love This Recipe? Save It to Pinterest!
If you enjoyed this Tiramisu Cake recipe, don’t let it get lost in your browser tabs! 😄 Pin it now so you can find it again anytime — and explore hundreds more tried-and-tested recipes waiting for you on my Pinterest boards.
👉 Follow emy on Pinterest @chefrecipes2
📌 Pin this recipe · 🔁 Re-pin your favorites · 💬 Tag me when you make it — I love seeing your creations!

Tiramisu Cake
Description
This Tiramisu Cake is made of genoise cake layers brushed with espresso and filled with irresistibly creamy coffee mascarpone cream. There are no raw eggs in the frosting and is therefore safe to eat. All you need are just 10 ingredients!
Ingredients
- 6 large eggs
- 1 cup granulated white sugar
- 1 cup all-purpose flour, spooned and leveled, then sifted
- 1 tbsp cornstarch
- ½ tsp baking powder
- ½ cup strong brewed coffee, espresso preferred – for brushing
- 4 ½ cups full-fat mascarpone, cold
- 2 ½ cups unpacked powdered sugar, sifted
- ½ cup strong brewed coffee – espresso preferred, chilled
- 1 ½ cups heavy whipping cream, cold
- unsweetened cocoa powder
- whipped cream
Instructions
- Preheat oven to 350°F / 175°C. Line the bottom and the sides of three 8" (20cm) baking pans with parchment paper. Set aside.
- Make the genoise cake: In a large mixing bowl, using a handheld or stand mixer fitted with a whisk attachment, whisk eggs on medium speed just until combined. Add sugar and whisk on medium-high speed for about 10-12 minutes until white pale, foamy and tripled in size. (It takes 3-5 minutes longer with a handheld mixer compared to a stand mixer). To know if you have the right consistency, let a bit of batter drip off the whisk attachment on top of the mixed batter. The dripped batter should be visible for 10 seconds before it sinks into the batter. If it sinks earlier, you need to whisk longer.
- With a wooden spoon, fold in flour, cornstarch baking powder carefully. Don't overwork the batter and don't work too fast otherwise, it will lose too much air. Divide in prepared baking pans and bake for 20-22 minutes until a toothpick centered in the middle comes out clean. Let cool in the pans for 5 minutes. Then remove from pans and remove the paper immediately. Transfer to a wire rack and let cool completely.
- Make the mascarpone frosting: Whisk mascarpone on medium speed until creamy for about 2 minutes. Add powdered sugar and whisk until creamy and combined another 1-2 minutes. Add coffee and whisk until well combined and creamy for about 2-3 minutes. Stir in heavy cream and whisk until fully combined and creamy for another 2-3 minutes.
- Assemble the cake: Place the first cake layer on a cake board or cake stand. Brush with a third of the 1/2 cup coffee.* Then spread 1/3 of the mascarpone cream with an offset spatula on top. Repeat one more time. Place last cake layer on top and lightly frost the outside and the sides of the cake with the remaining frosting. Level the top and sides with the offset spatula. Chill at least 4 hours in the fridge.
- Pipe whipped cream on top if desired. Then dust with cocoa just before serving. Store leftovers in an airtight container in the fridge up to 3 days.
