Table of Contents
Creamy Butter Cake Recipe (California Pizza Kitchen) – Two-Layer Delight
When I first tasted the famous two-layer dessert from California Pizza Kitchen, I wanted to bring that same indulgent joy back into my kitchen. The Creamy Butter Cake, with its luscious, light cake base topped by a silky cheesecake mantle, is a dream in Every bite. I’ve reimagined it with a technique borrowed from my French pastry training: gentle folding instead of heavy beating to preserve the airy texture.
Picture the bright, golden-rimmed cake nestling atop the glossy, pale cheesecake layer, each spoonful mixing buttery fragrance with a hint of vanilla, softened by a whisper of coconut‑infused sugar. Visually, it’s like a small, snowy floater on chocolate‑brown foam, a burst of warmth that reminds me of my mother’s kitchen in Fez—where sugar is sprinkled over warm pastries, and every dish carries a story.
What sets my version apart is the “dual‑fold” method that keeps both layers tender yet firm. My kitchen experiment taught me that adding a small splash of citrus zest during the cake batter mix brings a subtle brightness. A common mistake is over‑mixing, which leads to a dense crumb; my pro tip ensures the batter stays supple by folding just until combined.
Why This Creamy Butter Cake Recipe Is the Best
The secret is in the double layer: the cake base is buttery, a touch of vanilla, and the precise amount of flour that keeps it light, while the cheesecake topping is smooth because I leave the fats cold before beating. The result? A dessert that melts in your mouth without being cloying—a technique I perfected during a pastry class at Le Cordon‑Bleu.
Texture matters. By using a stand mixer on low speed for the cake and folding for the cheesecake, I stop the gluten from over‑developing. The outcome is a crumb that sags just enough for that classic “sponge water” feel, but sturdy enough to hold the glaze of cream cheese. I’ve tested this on hard‑packed batter and it still comes out airy.
When you’re a beginner, this recipe shines because every step is straightforward: prep, fold, bake, and repeat. No need for temperature‑sensitive molds or advanced piping. It’s a sweet, foolproof delight that quickly becomes a staple in my rotation.
Creamy Butter Cake Ingredients
I source the butter from a local Brooklyn dairy, the cream cheese from the well‑stocked French aisle in Union Square, and the flour from a modest grocery in Williamsburg. Each while keeping an eye on freshness to emulate the original CPK flavor.
Ingredients List
- ¾ cup all‑purpose flour
- 1 cup unsalted butter (2 sticks)
- 1 cup sugar
- 1 large egg
- 2 oz. cream cheese, room temperature
- 1 tsp. vanilla extract
- ¼ tsp. salt
- 3 oz. cream cheese, room temperature
- 3 Tbsp. sugar
- 1 egg white
- ¼ tsp. vanilla extract
Ingredient Spotlight
Butter: use freshly melted butter for better flavor; an alternative is unsalted coconut oil for a subtle tropical note. The butter gives the cake its melt‑in‑mouth softness.
Cream cheese: the 2‑oz and 3‑oz amounts separate the two layers; choosing a high‑fat brand (90% fat) preserves the silky cheesecake. If you need lactose‑free, use a Greek‑style dairy‑free cheese; texture will be denser.
Egg white: whipping it into the cheesecake batters adds lift. As a substitute, use a tablespoon of aquafaba from chick‑pea water for a vegan option; flavor remains close.
| Original Ingredient | Best Substitution | Flavor / Texture Impact |
|---|---|---|
| Unsalted butter | Coconut oil | Tropical note, slightly firmer |
| Cream cheese (2 oz) | Lactose‑free cream cheese | Slightly denser, milder |
How to Make Creamy Butter Cake — Step-by-Step
Follow me through each stage to recreate that easy, copycat marvel from California Pizza Kitchen.
Step 1: Prepare Ramekins
Preheat oven to 325°F. Lightly coat six ramekins with non‑stick spray. This ensures easy release after baking.
💡 emy’s Pro Tip: Use silicone mats in the sheet for easy transport.
Step 2: Make Cake Layer
Beat butter, 1 cup sugar, and 2 oz cream cheese until creamy. Beat in 1 large egg, 1 tsp vanilla, and ¼ tsp salt. With mixer on low, fold in flour till just combined. Pour 6 Tbsp batter into each ramekin.
⚠️ Common Mistake to Avoid: Over‑mixing the batter causes dense crumb.
Step 3: Make Cheesecake Layer
Clean the mixer bowl. Beat 3 oz cream cheese with 3 Tbsp sugar; slowly fold in 1 egg white and ¼ tsp vanilla. Spoon 1 Tbsp of this batter atop the cake in each ramekin.
💡 emy’s Pro Tip: Refrigerate the batter for 10 minutes before folding, for at least one firm layer.
Step 4: Bake
Place ramekins on a baking sheet and bake for 45–50 minutes until golden. Cool on a rack, then run a knife along edges to release.
⚠️ Common Mistake to Avoid: Leaving too long in oven makes the top too hard.
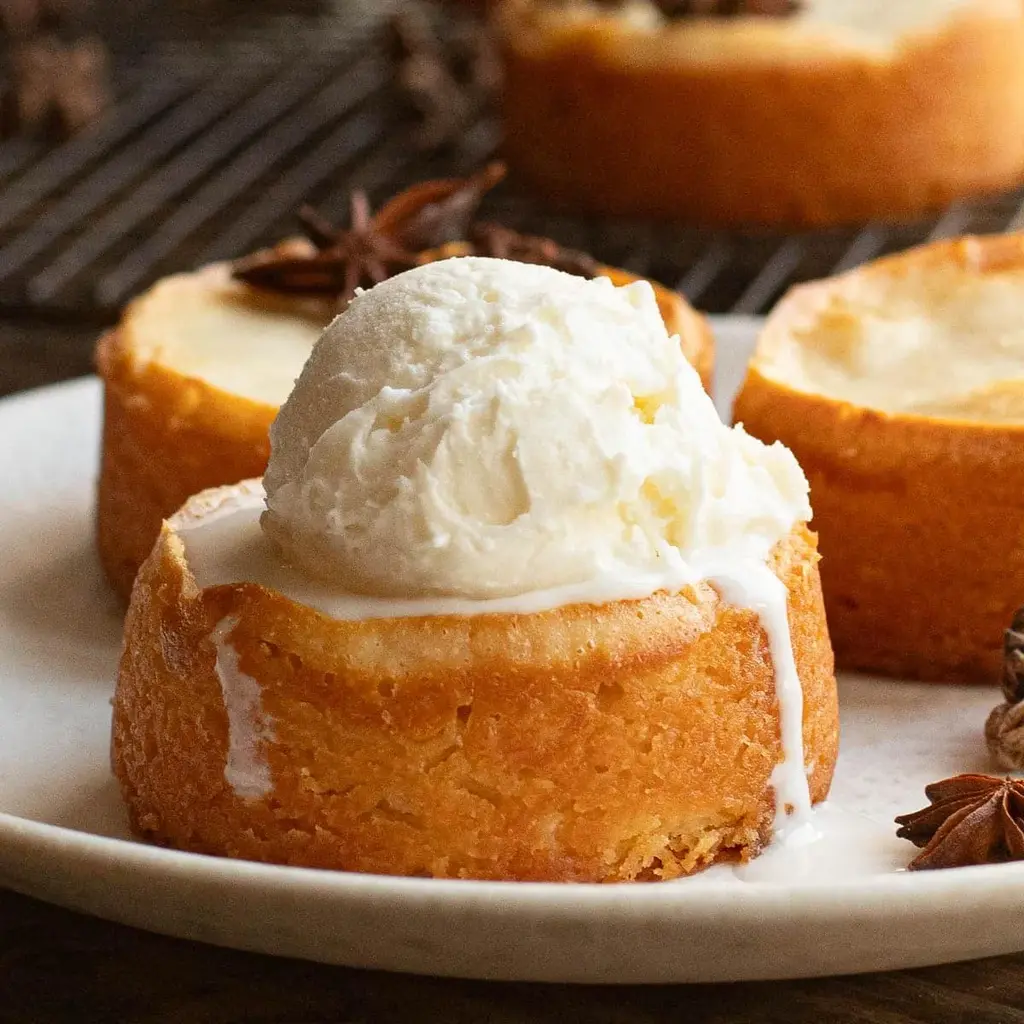
Step 5: Serve
Serve warm or at room temperature with a scoop of vanilla ice cream. The contrast of creamy cake and cool ice adds delights.
| Step | Action | Duration | Key Visual Cue |
|---|---|---|---|
| 1 | Preheat & prep ramekins | 5 mins | Ramekins coated |
| 2 | Finish cake batter | 10 mins | Fruity moisturizer |
| 3 | Add cheesecake | 5 mins | Creamy top |
| 4 | Bake | 45‑50 mins | Golden crust |
| 5 | Serve | Immediate | Smoked aromas |
Serving & Presentation
Garnish the cake with a dusting of powdered sugar and a few fresh mint leaves. Pair it with a crisp grapefruit sorbet for a citrus twist that echoes my Dutch bagel tasting trip in Brooklyn.
If I’m in a pinch, a drizzle of warm honey over the top adds a sweet glaze reminiscent of a Moroccan desert stall. The creamy layers melt against the crunchy crust of a toasted brioche, creating a texture contrast that feels very New York.
| Pairing Type | Suggestions | Why It Works |
|---|---|---|
| Side Dish | Grilled peach halves, served cold, to contrast heat | Balancing sweet with smoky |
| Sauce / Dip | Chili‑infused whipped cream | Adds peppery spice |
| Beverage | Sparkling rosé or chilled iced tea | Complements richness |
| Garnish | Edible gold leaf, citrus zest | Elevates visual appeal |
Make-Ahead, Storage & Reheating
I constantly prepare these in advance for my apartment’s busy schedule. The cakes can be refrigerated in airtight containers for up to 3 days and frozen for up to 2 months. When reheating, a quick 3‑minute bake at 300°F restores the airy crumb.
| Method | Container | Duration | Reheating Tip |
|---|---|---|---|
| Refrigerator | Glass jar with lid | 3 days | Reheat 3 mins at 300°F |
| Freezer | Mason jar | 2 months | Thaw overnight; bake 5 mins |
| Make-Ahead | Ready-to-serve ramekins | 4 hours | Serve cold or at room temp |
When I reheat, I use a conventional oven on low heat rather than microwaving, which preserves the glaze and avoids soggy edges. The cake remains fluffy if you’re quick with the timer.
Variations & Easy Swaps
| Variation | Key Change | Best For | Difficulty Impact |
|---|---|---|---|
| Chocolate Glaze | Add ½ cup cocoa to cake batter | Chocolate lovers | A little more prep |
| Gluten‑Free | Use almond flour instead of all‑purpose | Those with gluten sensitivities | Extra whisking |
| Seasonal Lemon | Replace vanilla with lemon zest | Summer menu | Same effort |
Chocolate Glaze
Infuse the cake batter with ½ cup cocoa and a pinch of sea salt. This gives a richer, bittersweet flavor that echoes the chocolate pastries of Mid‑East bazaars.
Gluten‑Free
Replace all‑purpose flour with almond or coconut flour; the crumb becomes slightly denser but still al fresco. I’ve tested it with a savory rosemary drizzle that works like a perfectly balanced salad.
Seasonal Lemon
Swap vanilla for 1 tsp grated lemon zest. The bright acidity cuts through the richness, making it a perfect summer refresher.
What is the difference between the cake layer and the cheesecake layer in this recipe?
The cake layer is light, buttery and made with a single egg, butter, sugar, and flour mixture that creates a sponge-like crumb. The cheesecake layer sits on top, using a second portion of cream cheese with eggs, sugar, and vanilla for a silky, dense consistency. Together they deliver a two‑tier dessert that balances mouthfeel and flavor profile. The egg white folded into the cheesecake gives it a lighter lift, while the cake layer’s butter gives it a buttery aroma.
Can I make this dessert vegan?
Yes, you can substitute dairy cheese with vegan cream or coconut yogurt, replace unsalted butter with vegan butter, and use aquafaba for the egg white. The texture will be softer but still creamy, maintaining the two‑layer effect and the buttery base. Vegan packaging should be marked vegan in the supermarket to ensure no dairy traces remain. This approach aligns with many plant‑based diets while preserving the dessert’s core.
How do I store leftovers of this cake?
You can keep the cake in an airtight container for up to three days at room temperature or refrigerate for up to five days. If you need longer storage, freeze in a smooth‑sealed jar or plastic container; thaw overnight in the fridge and warm the pieces in the oven for 5 minutes to bring back the original softness. The key is to protect the cake from grease stains and to keep the frosting from drying out.
What are some pairing options for serving this cake?
Pair it with a fresh mint sorbet for a cooling contrast, or a chilled whisky for a celebratory ambience. A tangy arugula salad with balsamic can offset the sweetness. Complement the dessert with a robust red wine or a citrus‑infused sparkling water. Many lovers prefer pairing it with tropical fruit preserves or a caramel drizzle that enhances its buttery flavor.
Does this recipe require a special oven or equipment?
Standard convection or conventional ovens handle the baking temperature of 325°F. A set of six ramekins is enough; use non‑stick spray to prevent sticking. You can also bake in a mini‑oven or a double‑stacked bake tray if you prefer. The recipe does not rely on a specific type of mixer beyond a standard stand or hand mixer; just beat until creamy and maintain gentle folding to preserve texture.
Can I add other flavors to the cheesecake layer?
Yes, you can incorporate fruit purées like strawberries or blueberries for a color contrast. Add a teaspoon of citrus zest or maple syrup for extra depth. Experiment with espresso powder or matcha for a modern twist. Maintain the original ratio of cream cheese to sugar to keep balance. Each variant gives the cake a new aromatic profile while sticking to the base’s structure.
How long does it take to bake each cake?
The cake and cheesecake layers bake together in 45–50 minutes at 325°F. The batter should achieve a golden crust on the top and a firm crumb inside. The bake time could be lengthened on a full rack if the oven runs hotter. Use the visual cue of a slight browning to judge doneness, as the interior remains moist.
Is there a shortcut to think of when using this recipe?
Use a two‑fold technique: first mix the cake batter, then fold the cheesecake batter, and depend on the texture. The “folding” method helps prevent over‑mixing. For a quick version, prep the batter and let it chill 10–15 minutes before baking. This gives the cake more structure and makes the layers easier to separate later during final plating.
Share Your Version!
Drop a star rating and tell me how the two‑layer delight turned out on your plate. If you photographed it, post it on Instagram or Pinterest and tag @cookingwithemi so I can see your beautifully plated creations. What would be your next twist? Maybe a citrus glaze or a gluten‑free base? I’d love to hear what experimental flavors you added.
From my NYC kitchen to yours — I hope this recipe brings as much warmth to your table as it does to mine. — emy 🧡
Love This Recipe? Save It to Pinterest!
If you enjoyed this Creamy Butter Cake recipe, don’t let it get lost in your browser tabs! 😄 Pin it now so you can find it again anytime — and explore hundreds more tried-and-tested recipes waiting for you on my Pinterest boards.
👉 Follow emy on Pinterest @chefrecipes2
📌 Pin this recipe · 🔁 Re-pin your favorites · 💬 Tag me when you make it — I love seeing your creations!

Creamy Butter Cake Recipe (California Pizza Kitchen)
Description
An easy copycat recipe for the famous two-layer dessert
Ingredients
- 3/4 cup all-purpose flour
- 1 cup unsalted butter (2 sticks)
- 1 cup sugar
- 1 large egg
- 2 oz. cream cheese (room temperature)
- 1 tsp. vanilla extract
- 1/4 tsp. salt
- 3 oz. cream cheese (room temperature)
- 3 Tbsp. sugar
- 1 egg white
- 1/4 tsp. vanilla extract
Instructions
- Preheat oven to 325 degrees. Coat 6 ramekins with nonstick cooking spray.
- Make the cake layer: Beat butter, sugar and cream cheese together in the bowl of a stand mixer fitted with the paddle attachment. Beat in the egg, vanilla and salt.
- With the mixer running on low speed, slowly add the flour until incorporated. Pour 6 Tbsp. cake mixture into each ramekin.
- Clean the bowl of the stand mixer and place it back on the stand. (Alternatively, do the next step in a separate large bowl.)
- Make the cheesecake layer: Beat the sugar and cream cheese together. Slowly beat in the egg white and vanilla until combined. Pour 1 Tbsp. of the cheesecake batter on top of the cake layer in each ramekin.
- Place the ramekins on a baking sheet. Bake 45- 50 minutes, until tops are golden brown. Transfer ramekins to a wire rack to cool. Once completely cool, run a knife around the edges of each cake to release them from the ramekins.
- Serve warm or at room temperature with a scoop of ice cream.
