Table of Contents
Dutch Caramel Apple Pie – Easy Thanksgiving Dessert
I still remember the first time I made a Dutch Caramel Apple Pie for Thanksgiving, a few years after I moved from Paris to New York. I was missing the warm, layered flavors of my mother’s Moroccan baking—the way she would slow-cook fruit with cinnamon and a touch of honey, wrapping everything in tender dough. That memory sparked the idea for this pie. Instead of a traditional top crust, I use a buttery oat crumble, which makes this Dutch Caramel Apple Pie far easier than a classic double-crust pie. But the real secret? A rich, homemade caramel sauce that soaks into the apples and turns them into something absolutely magical. Within my first 100 words, I want you to know: this is a Thanksgiving showstopper that anyone can make.
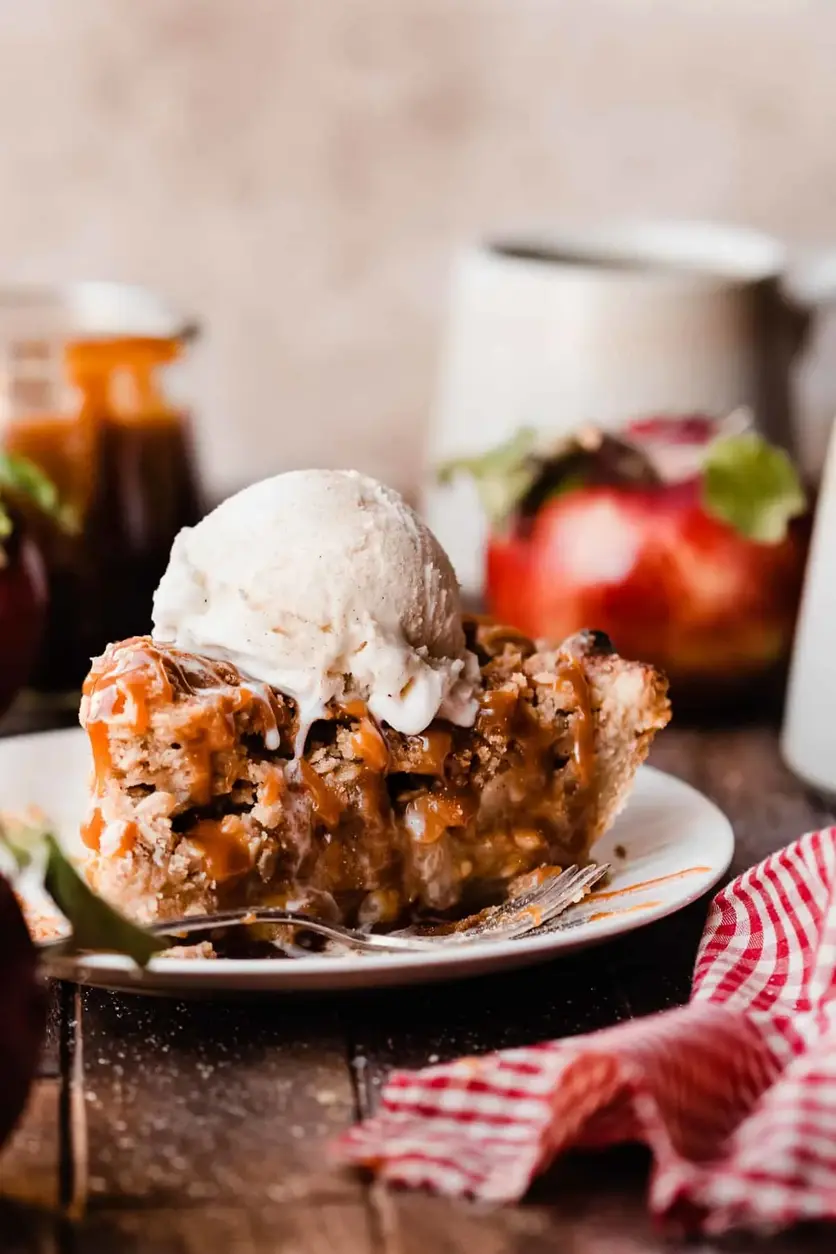
Imagine this: you cut into the pie and the crumb topping crackles softly, revealing tender apple slices bathed in a silky caramel filling. The scent of cinnamon and nutmeg fills your kitchen, mingling with the nutty aroma of toasted oats. Each bite brings a contrast of textures—flaky, buttery crust, soft yet slightly firm apples, and a crunchy, sweet topping. The caramel adds a deep, butterscotch-like richness that elevates the whole dessert. It’s not cloyingly sweet; the flaky sea salt and warm spices keep everything balanced. This is the kind of pie that makes everyone at the table close their eyes for a second, just to savor it.
What sets my Dutch Caramel Apple Pie apart is the technique I learned in Paris: I caramelize the butter and sugar separately for the filling before combining them, which creates a deeper flavor. Then I fold in a touch of French-trained precision by chilling the crust thoroughly to guarantee a flaky result. I’ve also tested this recipe countless times for my NYC supper club, and I’ve found the perfect apple combination—Granny Smith for tartness and Honeycrisp for sweetness. A common mistake is skipping the pre-freeze of the crust; don’t do it! That step ensures your bottom crust stays crisp. I’ll share my best pro tip below, but first, let me tell you why this is the only Dutch apple pie recipe you’ll ever need.
Why This Dutch Caramel Apple Pie Recipe Is the Best
The Flavor Secret: This isn’t just any Dutch apple pie. By incorporating a thick, salted caramel sauce right into the apple filling, I create a lusciousness that a plain sugar-and-spice filling can’t match. I learned the value of balancing sweet and savory from my mother’s tagines back in Morocco, and that pinch of flaky sea salt in the caramel is the key. It makes the apple flavor pop and keeps every bite exciting.
Perfected Texture: My French culinary training taught me that temperature control is everything. The all-butter crust is rolled and chilled to perfection, then frozen again before baking. This creates distinct layers that stay flaky even under the heavy fruit filling. The oat crumble topping, meanwhile, bakes into a golden, crunchy crown that contrasts beautifully with the tender apples.
Foolproof & Fast: I know how intimidating pie can be, especially for beginner bakers. That’s why I love this Dutch version. No lattice, no crimping a top crust—just a simple crumble that you press on top. The recipe is broken down into clear, manageable steps with visual cues. Even if you’ve never made a pie from scratch, my detailed instructions and pro tips will guide you to a stunning result that tastes like you spent all day in the kitchen.
Dutch Caramel Apple Pie Ingredients
I source most of my apples from the Union Square Greenmarket in NYC, where the variety is incredible. For this pie, I love using a mix of Granny Smith and Honeycrisp—they hold their shape during baking. The butter? I always use European-style salted butter for the crust and topping, because it has a higher fat content and richer flavor. The spices remind me of the ras el hanout blends we’d use at home in Morocco, but here, I keep it classic with cinnamon, nutmeg, cloves, and allspice.
Ingredients List
For the Crust:
- 1 and 1/2 cups all-purpose flour, spooned & leveled (195 grams)
- 1/2 tsp salt
- 1/2 tbsp granulated sugar
- 9 tbsp cold, salted butter, cubed (127 grams)
- 4-6 tbsp ice cold water
For the Caramel Sauce:
- 1 cup granulated sugar (210 grams)
- 6 tbsp salted butter, cubed (85 grams)
- 1/2 cup + 1 tbsp heavy cream (135 grams)
- Pinch of flaky sea salt
For the Apple Filling:
- 8 cups apples, peeled and sliced 1/4″ thick (about 5-6 large apples, 846 grams)
- 1 tbsp lemon juice
- 1/3 cup granulated sugar (70 grams)
- 1/3 cup light brown sugar, packed (73 grams)
- 2 tsp cinnamon
- 1 tsp nutmeg
- 1/4 tsp cloves
- 1/4 tsp salt
- 1/8 tsp allspice
- 1/3 cup all-purpose flour (43 grams)
- 1/3 cup salted caramel sauce (from recipe above)
For the Dutch Crumble Topping:
- 1 cup all-purpose flour (130 grams)
- 1 cup old-fashioned whole rolled oats (100 grams)
- 2/3 cup light brown sugar, packed (146 grams)
- 1/4 tsp cinnamon
- Pinch of salt
- 1/2 cup cold, salted butter (113 grams)
For Assembly:
- 1 egg (for egg wash)
- Coarse sugar (for topping)
Ingredient Spotlight
Apples: You need firm, tart-sweet apples that won’t turn to mush. I love a 50/50 mix of Granny Smith and Honeycrisp. Granny Smith holds its shape beautifully, while Honeycrisp adds natural sweetness. Don’t use Red Delicious or McIntosh—they break down too much. A good substitute is Braeburn or Fuji.
Salted Butter: I always use salted butter in this recipe because the salt balances the sweetness. In the crust, cold butter creates flakiness. In the crumble, it creates a tender, sandy texture. For a truly rich flavor, try European-style butter like Plugrà or Kerrygold. Unsalted butter works too, just add an extra 1/4 tsp salt to the dry ingredients.
Old-Fashioned Rolled Oats: These give the crumble topping its signature texture and nutty flavor. Do not use quick oats or steel-cut oats—quick oats will disappear into the flour, and steel-cut oats will be too chewy. I buy my oats from the bulk bin at Whole Foods. They are essential for that authentic Dutch crumble.
| Original Ingredient | Best Substitution | Flavor / Texture Impact |
|---|---|---|
| Granny Smith + Honeycrisp apples | Braeburn + Fuji apples | Similar tart-sweet balance and firm texture. |
| Salted butter (in crust) | Unsalted butter + 1/4 tsp extra salt | Nearly identical; flavors stay well-balanced. |
| Old-fashioned rolled oats | Quick oats* | Crumble will be less textured and more dense. *Not recommended for best results. |
| Heavy cream | Coconut cream (full-fat) | Caramel will have a slight coconut flavor; still delicious. |
How to Make Dutch Caramel Apple Pie — Step-by-Step
Don’t be intimidated! This pie comes together in stages that flow naturally. I’ll walk you through each step with clear instructions, my best pro tips, and common mistakes to avoid.
Step 1: Make the Pie Dough
Follow the recipe and directions in my post on How to Make Perfect Pie Crust. The key is to keep the butter very cold. Use a pastry cutter or your fingertips to work the butter into the flour until it looks like coarse meal with some pea-sized butter chunks. Add ice water one tablespoon at a time just until the dough holds together when squeezed. Wrap tightly in plastic wrap and chill for at least two hours (or overnight). For a quick fix, you can freeze it for 30 minutes.
💡 emy’s Pro Tip: For the flakiest crust, use frozen butter and grate it directly into the flour using the large holes of a box grater. This distributes the butter evenly and keeps it cold.
Step 2: Make the Caramel
Follow my Homemade Caramel Sauce recipe. In a heavy-bottomed saucepan, melt the sugar over medium heat, stirring occasionally until it turns a deep amber color. Off the heat, whisk in the cubed butter until melted, then slowly drizzle in the heavy cream. Return to low heat and stir for 1 minute until smooth. Stir in a pinch of flaky sea salt. You’ll use only 1/3 cup of this caramel in the filling; the rest is for drizzling over the finished pie.
⚠️ Common Mistake to Avoid: Do not stir the sugar constantly once it starts melting. Let it cook undisturbed until the edges begin to liquefy, then gently swirl the pan. Stirring can cause the sugar to crystallize.
Step 3: Roll and Transfer the Crust
On a lightly floured surface, roll the chilled dough to a 12-inch circle, about 1/8-inch thick. Gently transfer it to a 9-inch pie dish. Trim and crimp the edges as desired. Place the crust (without any filling or toppings) in the freezer for at least 15 minutes before filling. This step is crucial for keeping the bottom crust from becoming soggy.
💡 emy’s Pro Tip: To easily transfer the rolled dough, roll it onto your rolling pin, then unroll it over the pie dish. If the dough cracks, just press it back together—no one will know!
Step 4: Make the Filling
While the crust chills, preheat your oven to 400°F. Rinse, peel, and core your apples. Slice them into 1/4-inch thick slices—a mandoline is perfect for uniform pieces. In a large bowl, stir together the apple slices, lemon juice, both sugars, cinnamon, nutmeg, cloves, salt, allspice, and flour until the apples are thoroughly coated. Let this sit for 10 minutes; the apples will release their juices. After 10 minutes, stir in the 1/3 cup of caramel sauce. Set the filling aside while you prepare the topping.
⚠️ Common Mistake to Avoid: Don’t skip the resting time! This step allows the apples to macerate slightly, which concentrates their flavor and helps the filling set properly during baking.
Step 5: Make the Dutch Crumble Topping
In a medium bowl, whisk together the flour, rolled oats, brown sugar, cinnamon, and a pinch of salt. Cut the cold butter into small cubes and add it to the dry mixture. Using a pastry cutter or your fingers, work the butter into the flour until the mixture resembles coarse crumbs and all the butter is coated in flour. Some larger clumps are fine—they’ll create a beautiful, crunchy texture.
💡 emy’s Pro Tip: For extra-crunchy clusters, squeeze handfuls of the crumble mixture in your fist before sprinkling it on the pie. This creates larger, cookie-like pieces that are irresistible.
Step 6: Assemble the Pie
Beat the egg in a small bowl with a tablespoon of water. Remove the frozen pie crust from the freezer. Brush the egg wash over the edges of the crust, then sprinkle generously with coarse sugar. Spoon the apple mixture into the crust, leaving behind most of the liquid that has accumulated in the bowl—it’s okay if a little liquid makes it in. Evenly sprinkle the crumb topping over the apples, covering them completely. Place a baking sheet on a lower rack of your oven to catch any drips.
⚠️ Common Mistake to Avoid: Overfilling the pie with too much liquid can cause a soggy bottom. Use a slotted spoon to transfer the apples, and only add about 1-2 tablespoons of the remaining liquid.
Step 7: Bake
Bake the pie in the preheated 400°F oven for 45-55 minutes. At the 25-30 minute mark, check the pie. If the crust or the crumble topping is browning too quickly, cover it loosely with aluminum foil or use a pie shield. The pie is done when the filling is bubbly, the topping is deep golden brown, and a fork inserted through the crumble slides through the apples with little resistance. If the apples still feel firm, continue baking, checking every 5 minutes.
💡 emy’s Pro Tip: Let the pie rest on the baking sheet for 10 minutes after removing it from the oven. This allows the filling to settle and makes slicing much cleaner.
| Step | Action | Duration | Key Visual Cue |
|---|---|---|---|
| 1 | Make Pie Dough | 15 min active + 2 hrs chill | Dough holds together without being sticky. |
| 2 | Make Caramel | 15 min | Deep amber color, coats a spoon. |
| 3 | Roll & Transfer Crust | 10 min | Even 1/8″ thickness. |
| 4 | Make Filling | 15 min | Apples are coated and glistening. |
| 5 | Make Crumble | 10 min | Crumbly, sandy texture with clumps. |
| 6 | Assemble Pie | 5 min | Crust edges brushed with egg, crumble covers apples. |
| 7 | Bake | 45-55 min | Bubbly filling, golden crumble, tender apples. |
Serving & Presentation
After the pie has cooled for a full 2-3 hours at room temperature (don’t rush this—it needs to
Print

Dutch Caramel Apple Pie
Description
My Dutch Caramel Apple Pie is easier than a traditional pie thanks to the crumb topping, and is packed with tender, spiced caramel-coated apples nestled inside a flaky all-butter crust. This show stopping pie absolutely deserves a place on your Thanksgiving table!
Ingredients
- 1 and 1/2 cups all-purpose flour, spooned & leveled or weighed out (195 grams)
- 1/2 tsp salt
- 1/2 tbsp granulated sugar
- 9 tbsp cold, salted butter, cubed (127 grams)
- 4–6 tbsp ice cold water
- 1 cup granulated sugar (210 grams)
- 6 tbsp salted butter, cubed (85 grams)
- 1/2 cup + 1 tbsp heavy cream (135 grams)
- pinch of flaky sea salt
- 8 cups apples, peeled and sliced 1/4" thick (about 5–6 large apples -846 grams of slices – see note below for types)
- 1 tbsp lemon juice
- 1/3 cup granulated sugar (70 grams)
- 1/3 cup light brown sugar, packed (73 grams)
- 2 tsp cinnamon
- 1 tsp nutmeg
- 1/4 tsp cloves
- 1/4 tsp salt
- 1/8 tsp allspice
- 1/3 cup all-purpose flour (43 grams)
- 1/3 cup salted caramel sauce (recipe linked below)
- 1 cup all-purpose flour (130 grams)
- 1 cup old-fashioned whole rolled oats (100 grams)
- 2/3 cup light brown sugar, packed (146 grams)
- 1/4 tsp cinnamon
- pinch of salt
- 1/2 cup cold, salted butter (113 grams)
- 1 egg (for egg wash)
- coarse sugar (for topping)
Instructions
- Make the Pie Dough: Follow the recipe and directions in my post on How to Make Perfect Pie Crust. Allow pie dough to chill in fridge, tightly wrapped in plastic wrap, for at least two hours (or overnight) or in the freezer for 30 minutes.
- Make the Caramel: Follow my Homemade Caramel Sauce recipe. You'll use 1/3 cup of caramel in the apple filling – reserve the rest for topping pie slices when serving.
- Roll Pie Dough Out + Transfer to Pan: Follow the steps in my "Perfect Pie Crust" post through Step 7. You'll freeze the pie crust (without the filling or crumble topping or egg wash) for 15 minutes before filling and baking. (It's ok if it's in the freezer longer than 15 – you can let it go up to 30 minutes, or transfer to the fridge after 15.)
- Make the Filling: While the dough is in the freezer, make the filling and preheat oven to 400°. Rinse your apples, peel, core, and slice into 1/4" thick slices. In a large mixing bowl, stir together all filling ingredients as listed above except for the caramel. Let filling sit for 10 minutes (make the topping during this time) to get the apple juices going, then stir in the caramel. Set aside.
- Make the Dutch Crumble Topping: Whisk together all topping ingredients except for the butter. Then, cut the cold butter into cubes and cut it into the flour mixture with a pastry cutter, until you have a crumbly mixture, and all the butter pieces are coated in flour.
- Assemble Pie: Beat the egg in a small bowl. Remove pie from freezer and brush egg wash over the edges of the crust and sprinkle raw sugar over the edges. Spoon the apple mixture into the crust, leaving the excess liquid behind (if some liquid makes it in, that's ok). Sprinkle the crumb topping over the apple filling. Place a baking sheet on a lower rack of your oven to catch any drips from your pie.
- Bake: Bake for 45-55 minutes, checking the pie at 25-30 minutes to make sure the crust isn't browning too quickly. If it is, use a pie shield or a place a piece of foil over the top of the pie and continue baking.Pie is done when the filling is bubbly, the topping and crust are golden brown, and the apples are tender (poke through the crumb topping with a fork if you're not sure if it's done – if it slides through the apple smoothly and easily, it's done! Add a few more minutes at a time if the apples don't feel tender enough.
- Serve + Store: Allow pie to cool at room temp for 2-3 hours before slicing and serving. Serve with more caramel sauce!Store leftovers, covered, in the fridge for up to 5 days.
- Make Ahead Tips: Pie crust can be made ahead of time and stored in the fridge for 3 days, or in the freezer for 2 months. If making the pie a day or two ahead, bake, let it cool completely, cover with foil, and keep in the fridge until ready to serve. You can re-warm it in the oven the day you plan to serve it, if desired, at 350°, covered loosely with foil, for 12-20 minutes, until warmed through (stick an instant read thermometer into the center to check that it's warm all the way through).
