Table of Contents
Oreo Ice Cream Sandwich Cake: The No-Bake Layered Dessert You’ve Been Dreaming Of
This Oreo Ice Cream Sandwich Cake is the dessert that makes everyone’s eyes light up — mine included — and it all started on a hot summer afternoon in my mother’s tiny kitchen in Morocco. We didn’t have air conditioning, so we lived for cold treats made from whatever we could find. Now, living in New York City, I still crave that same feeling: a no-bake, outrageously easy dessert that delivers pure joy. This Oreo Ice Cream Sandwich Cake has 6 delicious layers made from ice cream sandwiches, fluffy whipped topping, rich hot fudge, and crushed Oreos. It’s the kind of sweet treat that looks like you spent hours on it, when really, it comes together in about 15 minutes.
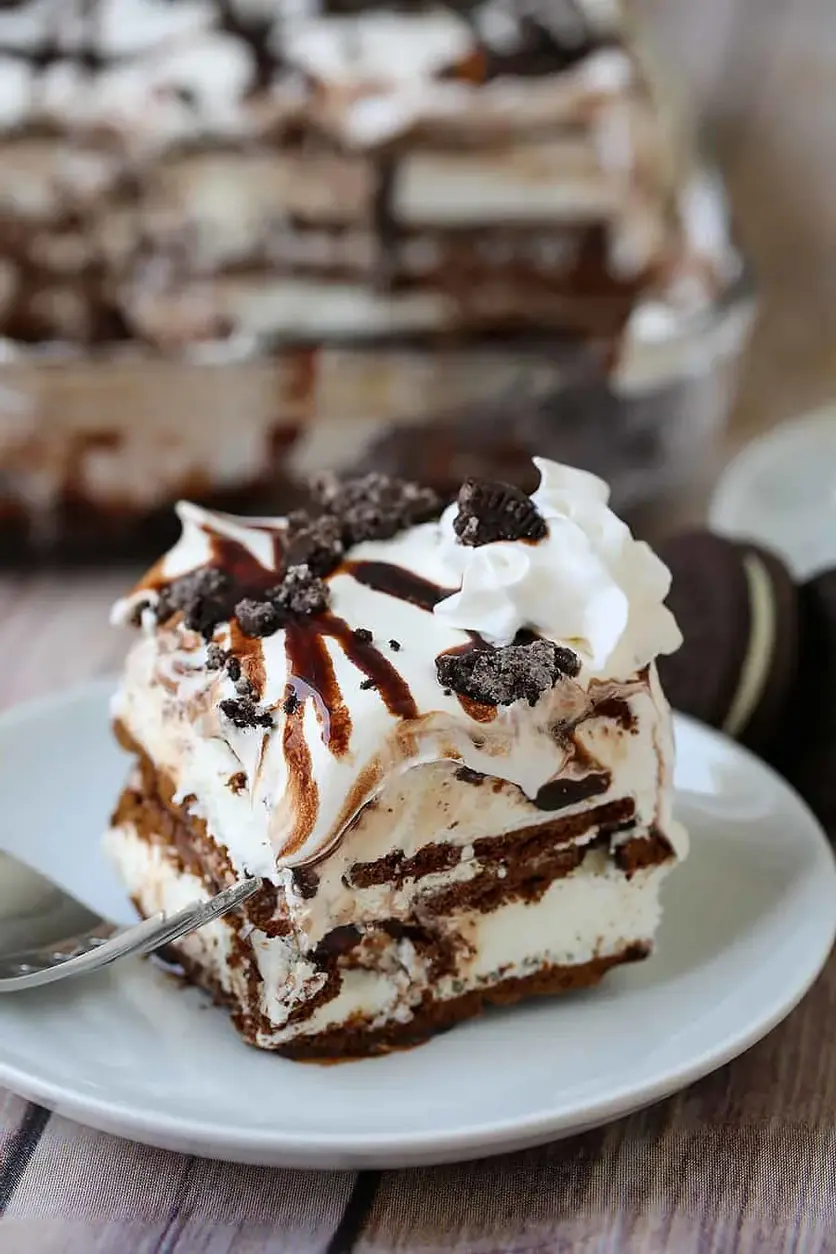
Imagine cutting into this cake: the first thing you see are those perfect layers of vanilla ice cream sandwich, then a cloud of whipped topping, followed by a ribbon of glossy fudge and a generous sprinkle of dark, crunchy Oreo crumbs. The texture is incredible — the ice cream sandwiches soften just enough to become cake-like, while the fudge stays rich and the Oreos add that satisfying crunch. It’s a symphony of cold, creamy, and crunchy, all in one slice. I always think back to my Paris training when I’m layering desserts like this; it’s all about building distinct layers that sing together. And the best part? No oven needed, so your kitchen stays cool.
As a professional cook, I’ve tested this Oreo Ice Cream Sandwich Cake more times than I can count, making sure every component works in perfect harmony. My secret? A quick trick with the whipped topping that keeps it light and stable, and a method for layering that prevents the whole thing from turning into a soggy mess. I’ve also seen a common mistake — using frozen whipped topping straight from the freezer, which makes it impossible to spread. Trust me, a little patience goes a long way. From my NYC kitchen to yours, this recipe is foolproof and undeniably delicious.
Why This Oreo Ice Cream Sandwich Cake Recipe Is the Best
The Flavor Secret: This isn’t just any ice cream cake — it’s a masterclass in balance. The vanilla ice cream sandwiches provide a neutral, creamy base that lets the chocolate fudge and crushed Oreos shine. I’ve learned from my French pastry training that even simple desserts need harmony, so I make sure the fudge is drizzled generously but not overwhelmingly, and the Oreos are crushed to the perfect texture — fine enough to disperse throughout, but with a few larger pieces for that satisfying crunch. It’s the same principle I use when making a classic mille-feuille: every layer must be distinct yet complementary.
Perfected Texture: The key is in how the ice cream sandwiches soften. When you layer them with the whipped topping and fudge, they absorb just enough moisture to become tender and cake-like, without turning into a puddle. I’ve perfected the ratio of whipped topping to fudge to ensure the sandwiches stay intact but still yield to that perfect, soft bite. This is a technique I picked up in Paris when making bavarois — it’s all about controlling moisture. You want each slice to hold its shape but melt in your mouth.
Foolproof & Fast: This Oreo Ice Cream Sandwich Cake is the ultimate beginner-friendly dessert. There’s no baking, no complicated techniques, and no special equipment. You just layer, freeze, and serve. It’s the kind of recipe that my neighbors in NYC ask for again and again because it’s so reliable. Whether you’re making it for a birthday party, a summer barbecue, or just a weeknight treat, it always turns out perfectly. The ingredients are simple and easy to find at any grocery store, and the assembly takes less time than watching a single episode of your favorite show.
Oreo Ice Cream Sandwich Cake Ingredients
I love sourcing my ingredients for this cake from the local grocery store near me in Chelsea, but honestly, everything you need is probably already in your kitchen. I remember my mother would make a similar layered dessert with whatever cookies and cream she could find in the market in Marrakech. Here in the US, it’s so easy — Oreos and ice cream sandwiches are staples.
Ingredients List
- 24 Ice cream Sandwiches (the classic vanilla kind)
- 12 Oreos (crushed)
- Hot Fudge Topping (about 1 cup, or as needed)
- 8 oz Whipped Topping (thawed and divided, like Cool Whip)
Ingredient Spotlight
Ice Cream Sandwiches: These are the backbone of the cake. Look for the classic rectangular vanilla ice cream sandwiches — they fit perfectly in a 9×13 pan. The quality matters; cheaper brands may have a more icy texture, while premium ones are creamier. I usually grab the store brand at my local supermarket and they work great. If you can only find square ones, you may need to trim them to fit.
Oreos: The classic Oreo is non-negotiable for that iconic cookies-and-cream flavor. I always use the regular ones, not the Double Stuf, because the ratio of cookie to cream is perfect for crushing. You can crush them in a bag with a rolling pin or pulse them in a food processor — just aim for a mix of fine crumbs and small chunks for texture.
Hot Fudge Topping: Use a good-quality hot fudge, not chocolate syrup. The fudge needs to be thick and rich so it doesn’t just soak into the cake. I love the kind that comes in a jar and has that fudgy, almost pudding-like consistency. You can even warm it slightly to make it easier to drizzle.
Whipped Topping: I always use thawed Cool Whip or a similar non-dairy whipped topping. It’s stable, sweet, and easy to spread. Make sure it’s fully thawed in the refrigerator, not at room temperature, to avoid it becoming too liquid. I divide it in half for the two layers — this ensures each layer is perfectly coated.
| Original Ingredient | Best Substitution | Flavor / Texture Impact |
|---|---|---|
| Ice Cream Sandwiches | Gluten-Free Ice Cream Sandwiches | Slightly different texture; may be less cake-like |
| Oreos | Gluten-Free Chocolate Sandwich Cookies | Similar crunch; slightly different cocoa flavor |
| Hot Fudge Topping | Homemade Chocolate Ganache | Richer, more sophisticated chocolate flavor |
| Whipped Topping | Homemade Stabilized Whipped Cream | Lighter, less sweet; may deflate faster |
How to Make Oreo Ice Cream Sandwich Cake — Step-by-Step
Trust me, this is the easiest dessert you’ll ever make. Just follow these simple steps, and you’ll have a stunning, crowd-pleasing cake in no time.
Step 1: Layer the Ice Cream Sandwiches
Arrange 12 ice cream sandwiches in a single layer in the bottom of a 9×13-inch pan. You may need to cut one or two to fit the edges snugly. This forms the base of your cake.
💡 emy’s Pro Tip: Work quickly while the sandwiches are still frozen. If they start to soften too much, pop them back in the freezer for a few minutes.
Step 2: Spread the Whipped Topping
Spread half of the thawed whipped topping evenly over the first layer of ice cream sandwiches. Use an offset spatula or the back of a spoon to create an even, smooth layer. This is the creamy, cloud-like layer.
⚠️ Common Mistake to Avoid: Don’t press too hard or the whipped topping will mix into the sandwiches. Gently spread it to keep the layers distinct.
Step 3: Drizzle the Fudge
Drizzle half of the hot fudge topping over the whipped topping. You can warm the fudge slightly in the microwave for 10-15 seconds if it’s too thick to drizzle. Aim for an even distribution, but don’t worry about perfection — the swirls look beautiful.
💡 emy’s Pro Tip: If the fudge is too thick, add a teaspoon of milk and stir before drizzling. This makes it easier to spread without disturbing the whipped topping.
Step 4: Sprinkle the Crushed Oreos
Sprinkle half of the crushed Oreos evenly over the fudge layer. The crumbs add that essential crunch and chocolate flavor between the layers.
⚠️ Common Mistake to Avoid: Don’t crush the Oreos into dust. You want a mix of fine crumbs and small chunks for the best texture contrast.
Step 5: Repeat the Layers
Repeat steps 1-4 once again: add another layer of 12 ice cream sandwiches, then the remaining whipped topping, then the remaining fudge, and finally the remaining crushed Oreos on top.
💡 emy’s Pro Tip: Gently press down on the second layer of sandwiches to make sure everything is level before adding the toppings.
Step 6: Freeze the Cake
Freeze the cake for at least 30 minutes before serving. If you’re making it ahead, cover the pan tightly with plastic wrap or foil and freeze for up to a month. The longer it freezes, the more the flavors meld together.
⚠️ Common Mistake to Avoid: Don’t skip the freezing time. If you try to cut it too soon, the layers will slide apart. Give it at least 30 minutes to set.
Step 7: Thaw and Serve
Allow the cake to thaw for about 10 minutes at room temperature before slicing and serving. This softens it just enough to make cutting easy and the texture perfect. Use a sharp knife to get clean, beautiful slices.
💡 emy’s Pro Tip: Run your knife under hot water and wipe it dry between cuts for the cleanest slices. It makes a huge difference.
| Step | Action | Duration | Key Visual Cue |
|---|---|---|---|
| 1 | Layer ice cream sandwiches | 2 minutes | Pan bottom fully covered |
| 2 | Spread whipped topping | 2 minutes | Even white layer |
| 3 | Drizzle hot fudge | 1 minute | Swirls of chocolate over white |
| 4 | Sprinkle crushed Oreos | 1 minute | Dark crumbs evenly scattered |
| 5 | Repeat layers | 5 minutes | Second full stack formed |
| 6 | Freeze | 30+ minutes | Firm to the touch |
| 7 | Thaw and serve | 10 minutes | Edges soften slightly |
Serving & Presentation
Serving this Oreo Ice Cream Sandwich Cake is where the fun begins. I like to cut it into neat squares and place each slice on a chilled plate — it keeps the cake from melting too quickly. For an extra touch, I drizzle a little extra hot fudge on top and add a dollop of whipped cream. It’s a simple presentation that feels like something from a fancy NYC diner.
This cake is the star of any gathering. At summer barbecues in Brooklyn, it’s always the first thing to disappear. I love pairing it with a cold glass of milk, a scoop of vanilla ice cream on the side, or even a drizzle of caramel sauce for extra indulgence. When I think back to France, I remember how they’d serve a simple gâteau glacé with a tiny espresso — it’s a beautiful contrast. Here, a strong cup of coffee or a cold brew works wonders.
| Pairing Type | Suggestions | Why It Works |
|---|---|---|
| Side Dish | Fresh berries, sliced bananas | Adds freshness and cuts richness |
| Sauce / Dip | Extra hot fudge, caramel sauce | Enhances chocolate and caramel notes |
| Beverage | Cold milk, hot coffee, espresso | Cleanses the palate between bites |
| Garnish | Whipped cream, mint leaves, chocolate shavings | Adds elegance and visual appeal |
Make-Ahead, Storage & Reheating
