Table of Contents
Cheesy Garlic Chicken Wraps — Quick Melt-in-Your-Mouth Buttery Garlic Sauce
Growing up in Marrakesh, I always craved the comforting blend of spices that could turn a simple sandwich into a feast. After honing my technique in Parisian kitchens, I moved to New York to fuse those flavors with the fast-paced vibe of the city. When I stumbled on an idea to merge creamy mozzarella with garlicky buttery sauce, I knew I had a winning recipe that would echo the warmth of my mother’s kitchen and the hustle of Broadway. That’s why “Cheesy Garlic Chicken Wraps” became my ultimate go-to for a quick, comforting bite.
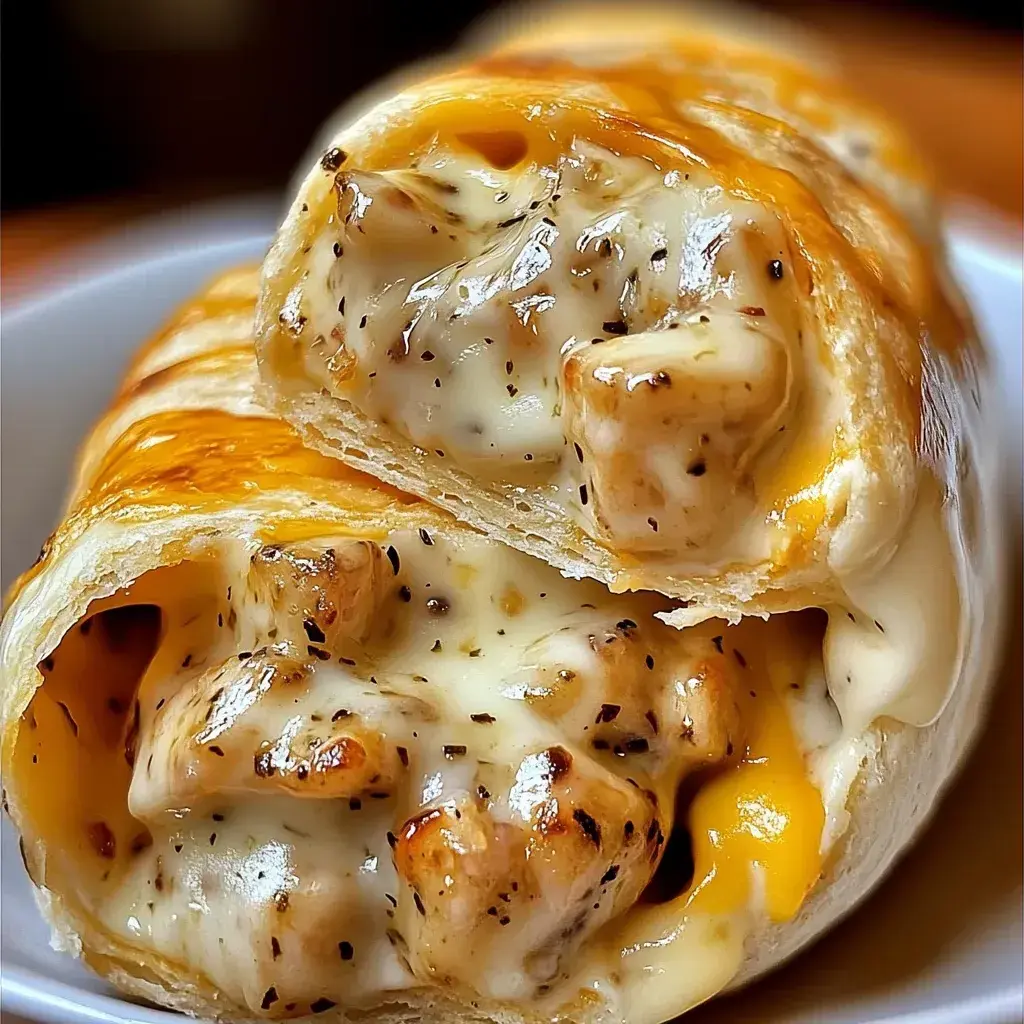
Picture the tender chunks of chicken coated in a rich blend of melted butter, minced garlic, and a whisper of Italian seasoning. The cheese transforms into a glossy, golden blanket, bubbling as it warms. The aroma—garlic, blissful butter, and warm oregano—fills the air, while the tortilla’s slight crisp at the edges provides a satisfying crunch. Slap one in place of a traditional sandwich; it’s a mouthful of comfort wrapped in one bite.
What sets this wrap apart is the “melt‑in‑your‑mouth” garlic butter layer, a simple yet luxurious twist that even the most busy New Yorker can make in under 25 minutes. I’ll show you my pro tip: keep the butter at medium heat so it doesn’t burn, and use leftover rotisserie chicken for authentic flavor. I’ll also warn you against leaving the garlic too long—burny garlic simply wrecks the taste. Let’s dive in!
Why This Cheesy Garlic Chicken Wraps Recipe Is the Best
My culinary training taught me that flavor is layered, not layered. This recipe layers creamy mozzarella, tangy sour cream, and a garlic‑butter splash to create an indulgent heart while five minutes on the skillet whispers a Parisian technique of constant stirring. The result? A wrap that feels like home but looks street‑food chic.
Texture is everything. I criss‑cross the chicken through the cheese mix, ensuring that every bite carries a buttery melt and a squeaky crunch from the tortilla. The split‑skin technique keeps steam inside, guaranteeing a soft, juicy interior that doesn’t squeeze out when you bite.
Even a novice can achieve restaurant‑grade results. All the steps are single‑pan, the seasoning is minimal, and the assembly is so intuitive you’ll finish before the coffee pot empties. It’s a versatile, fast, and foolproof wrap that satisfies cravings while staying healthy.
Cheesy Garlic Chicken Wraps Ingredients
I grab the freshest chicken from the small farmers market off 5th, grab mozzarella off the brick‑oven cheese corner in the grocery store, and combine everything in a skillet that feels like an old Parisian stove. The ingredients are simple, yet every component plays a pivotal role.
Ingredients List
- 2 cups cooked chicken (shredded or diced)
- 1 ½ cups shredded mozzarella or cheddar cheese
- ¼ cup cream cheese (softened)
- 2 tbsp butter (melted)
- 3 cloves garlic (minced)
- ¼ cup sour cream
- 1 tsp garlic powder
- 1 tsp Italian seasoning
- 4 large tortillas
- Salt and pepper (to taste)
- Fresh parsley (for garnish, optional)
Ingredient Spotlight
Garlic: The aromatic heart of the sauce—use fresh cloves for depth. In the city, I’ll cut them super thin so they release a whisper of citrusy aroma. Substitute with 1 tsp of garlic paste for a more stable, long‑lasting flavor.
Cheese: Mozzarella gives melt, cheddar offers sharpness. I always keep them at room temp before melting to avoid a rubbery texture. Swap with vegan mozzarella if you need dairy‑free, and you’ll still get that creaminess.
Tortillas: Look for whole‑wheat for a fiber boost or plain flour for a neutral base. If you want a gluten‑free version, unlabeled flour tortillas (certified GF) will hold the filling just fine.
Rotisserie Chicken: Residual spices and a smoky base bring authenticity. Buy fresh from local butchers or a pre‑cooked deli chicken; the leftover will be a lifesaver.
| Original Ingredient | Best Substitution | Flavor / Texture Impact |
|---|---|---|
| Mozzarella | Vegan mozzarella | Creamy, less dairy bite |
| Sour Cream | Greek yogurt | Tangier, thicker |
| Butter | Olive oil | Healthier, hazier |
How to Make Cheesy Garlic Chicken Wraps — Step-by-Step
All you need is a skillet, a heat‑proof pan, and a pinch of love.
Step 1: Sauté Garlic
Heat a teaspoon of butter over medium heat, toss minced garlic, sauté 1‑2 minutes until fragrant but not browned. Watch carefully—burnt garlic turns bitter and spoils the wrap’s vibe.
💡 emy’s Pro Tip: Remove the skillet from heat once the garlic turns translucent to avoid burning.
Step 2: Heat Chicken
Add the chicken, drizzle with garlic powder, Italian seasoning, salt, pepper. Stir until the chicken is heated through and evenly coated. The gentle seasoning will deepen flavor.
⚠️ Common Mistake to Avoid: Over‑crowding the pan—shots cause uneven heat and a soggy wrap.
Step 3: Mix Cheeses
In a bowl, combine softened cream cheese, sour cream, and half the shredded cheese. Mix until smooth—this will become the buttery glue for the filling.
💡 emy’s Pro Tip: Let the cream cheese sit at room temp before blending to avoid a lumpy mix.
Step 4: Combine Chicken & Cheese
Stir the chicken into the cheese mixture until everything is fully blended. The mixture should be thick yet pourable, like a rich dip.
⚠️ Common Mistake to Avoid: Mixing too vigorously—can separate the cheese, resulting in a gritty texture.
Step 5: Assemble Wraps
Lay tortillas flat, spoon equal portions in the center, sprinkle remaining cheese. Fold sides and roll tight, shaping into a cylinder.
💡 emy’s Pro Tip: Press lightly to unpack the quarter of a hand while rolling for better seal.
Step 6: Cook Wraps
Sear on a clean skillet or grill pan over medium heat. Cook 2‑3 minutes per side until golden and cheese melts. Press gently with a spatula for even browning.
⚠️ Common Mistake to Avoid: Not preheating the pan—wrappers steam, not crisp.
| Step | Action | Duration | Key Visual Cue |
|---|---|---|---|
| 1 | Sauté Garlic | 1‑2 mins | Translucent garlic |
| 2 | Heat Chicken | 2‑3 mins | Seasoned aroma |
| 3 | Mix Cheeses | 1‑2 mins | Smooth consistency |
| 4 | Combine Chicken & Cheese | 1‑2 mins | Thick yet pourable |
| 5 | Assemble Wraps | 2 mins | Even filling |
| 6 | Cook Wraps | 2‑3 mins per side | Golden crust |
Serving & Presentation
Let the wraps rest for a minute to keep the cheese from oozing. Slice each into halves for a charming bite‑size appetizer or serve whole for a quick lunch. Sprinkle chopped parsley for a fresh pop against the golden crust.
Pair with a crisp green salad dressed in Dijon vinaigrette, or a chilled cucumber raita that mirrors Moroccan mint tea. For a touch of NYC flair, serve alongside a handful of pickled jalapeños or a drizzle of honey‑mustard glaze.
| Pairing Type | Suggestions | Why It Works |
|---|---|---|
| Side Dish | Caesar salad, coleslaw, roasted veggies | Fresh crunch balances creamy filling |
| Sauce / Dip | Tzatziki, chipotle mayo, cilantro lime sauce | Adds tang or heat to cut richness |
| Beverage | Ice‑cold soda, cucumber lemonade, sparkling water | Refreshes palate between bites |
| Garnish | Micro‑greens, toasted pumpkin seeds, feta crumbles | Adds texture and visual pop |
Make-Ahead, Storage & Reheating
I prep this overnight whenever I have a full Monday. I assemble the wraps, let them chill, then finish cooking the next day. The flavors meld wonderfully.
| Method | Container | Duration | Reheating Tip |
|---|---|---|---|
| Refrigerator | Zip‑lock pack | 2‑3 days | Microwave 30‑45 sec then finish in skillet. |
| Freezer | Plastic film | 4‑6 months | Thaw overnight, then reheat as above. |
| Make-Ahead | Wraps assembled | 1 week | Fold individual wraps in foil; reheat each in skillet. |
I recommend pressing the wraps on a griddle after storing to restore that crisp top—eschewing a soggy texture that can happen if you reheat too long.
Variations & Easy Swaps
| Variation | Key Change | Best For | Difficulty Impact |
|---|---|---|---|
| Spicy Chipotle Wrap | Add chipotle powder in step 2 | Heat‑seekers | Easy |
| Gluten‑Free Wrap | Use GF tortillas | Sensitive stomachs | Very easy |
| Mediterranean Twist | Replace cheddar with feta, add chopped olives | Taste lovers | Easy |
Spicy Chipotle Wrap
A fiery twist that brings smoky heat. Incorporate chipotle powder into the chicken seasoning and add crushed red pepper for an extra kick. Great for mornings when you need a jolt of flavor.
Gluten‑Free Wrap
Swap the standard tortilla for a certified gluten‑free one. The texture remains tender, and the melt‑in‑your‑mouth sauce still adheres, ensuring a hassle‑free version for those with celiac disease.
Mediterranean Twist
Replace cheddar with crumbled feta and add pitted black olives. The briny olives and tangy feta echo my mother’s Tagine, offering a vibrant, hearty flavor that’s perfect for summer dinners.
How do I keep the cheese from melting off the wrap?
Use a moderate heat and a tight roll; the heat will create steam that locks the cheese in place. Also ensure the tortilla is pliable, not cracked—often a quick pre‑heat in a dry skillet edges will help seal the wrap. If the cheese starts to slide off, form a slight pinch around the wrap before adding the filling.
Can I use this recipe with leftover chicken?
Absolutely! Leftover rotisserie or grilled chicken works great. Just reheat it in the skillet with the garlic butter before adding the cheese mixture so it absorbs the flavor and gets nice, even heat. This makes the wrap lighter and boosts the aroma.
What can I use instead of mozzarella?
Cheddar, provolone, or a mix of pepper jack and mozzarella are all good substitutes. A blend of mild cheddar and Gouda gives a silky melt. If you want a dairy‑free option, plant‑based mozzarella or a non‑dairy cheddar will hold well. The key is a cheese that melts smoothly at moderate temperature.
Is there a way to make these wraps vegan?
Sure! Use a plant‑based chicken alternative, swap the cheese for a vegan blend of cashew‑based mozzarella and nutritional yeast, and replace butter with coconut or olive oil. Keep the garlic and seasonings; the result still feels creamy and buttery with a zesty kick.
Can I freeze the cooked wraps?
Flaked wraps can be frozen, but the texture slightly changes. Wrap them tightly in foil, freeze, and reheat directly in a dry skillet or oven at 350°F for 10 minutes. They’ll regain crispness, though the cheese might lose a little gooeyness.
Do I need a grill pan for best results?
A steel or cast‑iron skillet works well because it distributes heat evenly. A grill pan gives that sear streak, but you’ll still get a perfectly golden crust. The important thing is a hot pan and not to cover the wraps while cooking.
What about adding herbs for extra flavor?
Fresh parsley or cilantro is delicious, sprinkle on top before serving. A garnish of chopped mint or dill can link the Moroccan roots to the modern wrap. You can also tuck in a pinch of dried oregano for extra depth.
How should I store the ingredients if I’m not using them immediately?
Keep cooked chicken in an airtight container in the fridge for up to 3 days. Cheese should stay sealed; shredded mozzarella or cheddar can be frozen if needed. Butter sits at room temperature for a few hours but keep it in the fridge if you don’t need it right away.
Can I use frozen chicken for this recipe?
Yes, thaw the chicken in the fridge overnight or use the defrost setting on your microwave. Once thawed, sauté as usual. Frozen chicken might hold moisture, but the butter‑garlic sauce cooks that out quickly.
Is it better to let the wrap cool before cutting?
Allowing the assembled wrap to sit for a minute lets the cheese firm slightly, making it easier to cut. If you cut immediately, it can feel overly soft, and the cheese may slide out. Letting it rest also lets steam settle, preventing overly soggy interiors.
Share Your Version!
If you try this, drop a star rating and leave a review below. I love hearing how it turned into your family’s favorite! Tag your creations on Instagram or Pinterest with @cookingwithemi so I can see how you’re putting a New York twist on a Moroccan classic. If you’ve tweaked the recipe, let me know—what absorbed garlic you added or how you made it dairy‑free?
From my NYC kitchen to yours — I hope this recipe brings as much warmth to your table as it does to mine. — emy 🧡
Love This Recipe? Save It to Pinterest!
If you enjoyed this Cheesy Garlic Chicken Wraps recipe, don’t let it get lost in your browser tabs! 😄 Pin it now so you can find it again anytime — and explore hundreds more tried‑and‑tested recipes waiting for you on my Pinterest boards.
👉 Follow emy on Pinterest @chefrecipes2
📌 Pin this recipe · 🔁 Re-pin your favorites · 💬 Tag me when you make it — I love seeing your creations!
Got a favorite wrap recipe? Share it with me!
Drop a comment or DM me your twist. I thrive on the creative swap of flavors that my city offers.
Cheesy Garlic Chicken Wraps
Ingredients
- 2 cups cooked chicken (shredded or diced)
- 1 ½ cups shredded mozzarella or cheddar cheese
- ¼ cup cream cheese (softened)
- 2 tbsp butter (melted)
- 3 cloves garlic (minced)
- ¼ cup sour cream
- 1 tsp garlic powder
- 1 tsp Italian seasoning
- 4 large tortillas
- Salt and pepper (to taste)
- Fresh parsley (for garnish, optional)
Instructions
- Sauté Garlic:
- In a skillet, melt the butter over medium heat. Add the minced garlic and sauté for 1-2 minutes until it becomes fragrant.
- Tip: Be careful not to burn the garlic as it will turn bitter.
- Heat Chicken:
- Add the cooked chicken to the skillet. Season with garlic powder, Italian seasoning, salt, and pepper. Stir well to coat the chicken evenly and heat through.
- Tip: Use leftover rotisserie chicken for added flavor and convenience.
- Mix Cheeses:
- In a bowl, combine the softened cream cheese, sour cream, and half of the shredded cheese. Mix until smooth.
- Tip: Ensure the cream cheese is softened for easy mixing.
- Combine Chicken and Cheese Mixtures:
- Remove the skillet from heat. Add the chicken to the cream cheese mixture and stir until fully combined.
- Assemble Wraps:
- Lay out the tortillas and divide the chicken mixture evenly in the center of each. Sprinkle the remaining shredded cheese on top. Fold the sides of each tortilla over the filling and roll tightly into wraps.
- Cook Wraps:
- Heat a clean skillet or grill pan over medium heat. Place the wraps seam-side down and cook for 2-3 minutes per side, until golden brown and the cheese is melted.
- Tip: Press down gently with a spatula for even browning and to help seal the wraps.
