“`html
Table of Contents
S’mores Cookies – 30-Minute Quick & Easy Recipe
I still remember the first time I had a s’more — it was during a family trip to upstate New York not long after I moved to the US from Morocco. I was already a trained pastry chef from Paris, but that humble campfire treat stopped me in my tracks. The combination of toasted marshmallow, melted chocolate, and crunchy graham cracker felt like a revelation. These S’mores Cookies capture all of that magic in under 30 minutes — no campfire required. Every bite delivers that same nostalgic campfire experience, but in a soft, chewy cookie that comes together fast enough for a weeknight craving. This is the kind of recipe I turn to when I want big flavor with minimal fuss, and it’s become a favorite in my NYC kitchen for good reason.
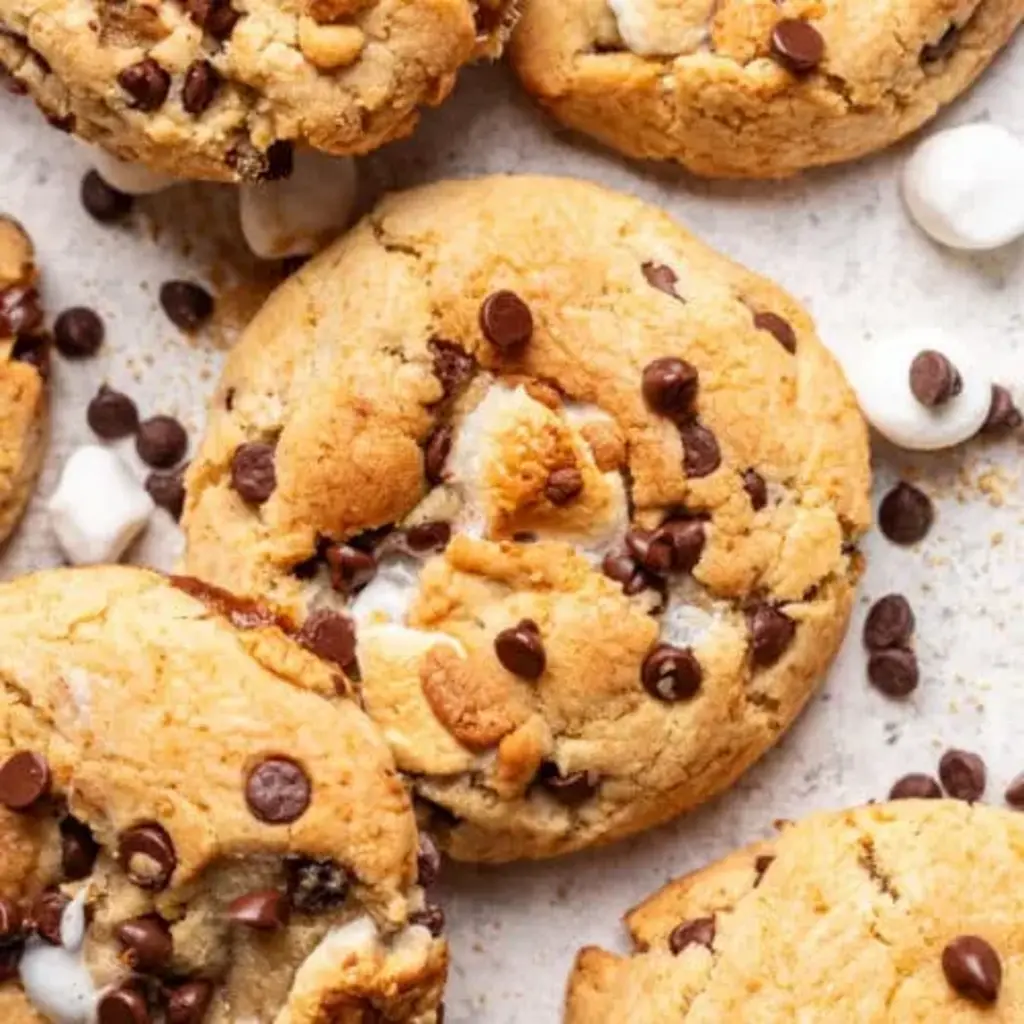
Imagine pulling a tray of these cookies from the oven: the edges are golden and slightly crisp, the centers are soft and pillowy, and every cookie is studded with gooey pockets of melted marshmallow and rich semi-sweet chocolate chips. Tiny bits of graham cracker add the slightest crunch and that unmistakable honey-wheat flavor that makes s’mores so iconic. The aroma that fills your kitchen — buttery cookie dough mingling with toasted marshmallow and warm chocolate — is pure comfort. I love how the marshmallows caramelize just slightly at the edges during baking, creating little pockets of chewy, golden sweetness that remind me of a perfect campfire toast.
What sets these S’mores Cookies apart from other versions is the technique I developed during my pastry training in Paris. Most recipes call for creaming butter and sugar together, but I use a quick melted butter method that gives you a denser, chewier cookie with that signature “s’mores” texture. The key is using mini marshmallows halved and folding them in gently so they don’t disappear into the dough. One common mistake home bakers make is overmixing after adding the flour, which activates gluten and makes the cookies tough. I’ll show you exactly how to avoid that — plus my pro tip for getting those perfect melty marshmallow pockets in every single cookie.
Why This S’mores Cookies Recipe Is the Best
The Flavor Secret: Growing up in Morocco, I learned early that balance is everything in cooking. These S’mores Cookies deliver exactly the right balance of sweetness — the semi-sweet chocolate chips keep things from becoming cloying, while the light brown sugar adds a molasses warmth that complements the graham cracker crumbs beautifully. A pinch of salt in the dough sharpens all the flavors. This is the same principle I use in my French pastry work: every element has a purpose, and the result is a cookie that tastes complex, not just sweet.
Perfected Texture: During my time at culinary school in Paris, I learned that texture is what separates a good cookie from an unforgettable one. These cookies are engineered to be soft and tender with slightly crisp edges — the melted butter method ensures a dense, fudgy interior, while the mini marshmallows create those irresistible gooey pockets. The graham cracker crumbs add just enough texture to keep every bite interesting. I’ve tested this recipe more times than I can count to get the bake time just right: 10 to 15 minutes at 350°F gives you that perfect set with a soft center.
Foolproof & Fast: One of the things I love most about living in New York City is the fast pace, and this recipe was designed with that energy in mind. No stand mixer needed, no chilling required, and no complicated techniques. Everything comes together in one bowl with a whisk and a spatula. Even if you’ve never baked cookies from scratch before, you’ll end up with a batch that looks and tastes like you spent hours on them. That’s the kind of kitchen win I want every home cook to experience.
S’mores Cookies Ingredients
I buy my butter from a small dairy farm at the Union Square Greenmarket in NYC — it has a higher butterfat content that makes these cookies extra rich. The mini marshmallows I grab from any corner bodega, but I always look for the freshest bag because stale marshmallows don’t melt as beautifully. And the graham cracker crumbs? I crush them myself from a box of classic honey graham crackers — it takes two minutes and the texture is so much better than pre-crushed versions.
Ingredients List
- ½ cup butter
- ½ cup granulated sugar
- ¼ cup light brown sugar (packed)
- 1 teaspoon vanilla extract
- 1 large egg
- 1 cup all-purpose flour
- ½ teaspoon baking soda
- ¼ teaspoon salt
- ½ cup mini semisweet chocolate chips
- ½ cup mini marshmallows (halved)
- ¼ cup graham cracker crumbs
Ingredient Spotlight
Butter: The foundation of any great cookie. I use unsalted butter so I can control the salt level. Melting the butter (rather than creaming it at room temperature) changes the cookie texture — it yields a denser, chewier result that holds up beautifully to the marshmallow and chocolate. If you only have salted butter, reduce the added salt to ⅛ teaspoon.
Mini Marshmallows: These are the star of the show for capturing that campfire s’mores feel. I always halve the mini marshmallows so they melt into gooey pockets rather than disappearing entirely into the dough. Fresh marshmallows are key — check that they’re soft and springy before using. Stale marshmallows become hard and won’t melt as smoothly.
Graham Cracker Crumbs: This is what gives the cookies that authentic s’mores flavor and a subtle crunch. I recommend crushing whole graham crackers in a zip-top bag with a rolling pin — you get irregular pieces that distribute beautifully. Fine crumbs from a box work in a pinch, but the texture won’t be as satisfying. Honey graham crackers are classic, but cinnamon or chocolate work too.
Semi-Sweet Chocolate Chips: Mini chips are ideal because they scatter evenly through the dough and give you chocolate in every bite. Semi-sweet strikes the perfect balance against the sweetness of the marshmallow and brown sugar. If you prefer milk chocolate, go ahead — the cookies will be sweeter but still delicious. Dark chocolate chips (60-70% cacao) are my personal favorite for a more sophisticated flavor.
| Original Ingredient | Best Substitution | Flavor / Texture Impact |
|---|---|---|
| Butter | Vegan butter (e.g., Miyoko’s) | Slightly less rich, still tender; use 1:1 |
| All-purpose flour | Gluten-free 1:1 blend (with xanthan gum) | Slightly more crumbly; use same volume |
| Mini marshmallows | Large marshmallow, cut into 8 pieces each | Bigger gooey pockets; reduce mixing to avoid tearing |
| Graham cracker crumbs | Crushed digestive biscuits or speculoos | Different flavor profile; digestives are milder, speculoos adds spice |
How to Make S’mores Cookies — Step-by-Step
Trust me when I say this is one of the easiest cookie recipes you’ll ever make. No stand mixer, no chilling the dough, no fuss. Just one bowl, a whisk, a spatula, and about 20 minutes to cookie bliss. Let me walk you through each step with the tips I’ve picked up from years of testing.
Step 1: Melt the Butter
Place ½ cup butter in a microwave-safe bowl and microwave for about 40 seconds. Whisk until the butter is completely melted. It should be liquid and warm but not hot. If it’s too hot, let it sit for a minute — you don’t want to cook the egg when you add it later.
💡 emy’s Pro Tip: If you don’t have a microwave, melt the butter in a small saucepan over low heat. Watch it carefully — you want it fully melted but not bubbling. Let it cool for 2 minutes before moving on.
Step 2: Mix in the Sugars
Add ½ cup granulated sugar and ¼ cup packed light brown sugar to the melted butter. Whisk vigorously for about 30 seconds until the mixture looks smooth and combined. The brown sugar should be fully incorporated with no lumps.
⚠️ Common Mistake to Avoid: Don’t skip whisking the sugar and butter together for the full 30 seconds. This step helps dissolve the sugar granules, which gives you a smoother cookie with a better crumb. Under-whisking can leave you with grainy spots.
Step 3: Add Vanilla and Egg
Stir in 1 teaspoon vanilla extract and 1 large egg until fully incorporated. The mixture should look glossy and cohesive. Make sure the egg is at room temperature for the best emulsion — if it’s cold, the butter can seize up slightly.
💡 emy’s Pro Tip: To bring an egg to room temperature quickly, place it in a bowl of warm water for 5 minutes. This small step makes a big difference in how smoothly the dough comes together.
Step 4: Add the Dry Ingredients
Add 1 cup all-purpose flour, ½ teaspoon baking soda, and ¼ teaspoon salt. Please read this note about properly measuring flour: spoon the flour into your measuring cup and level it off with a knife — don’t scoop directly from the bag, which packs the flour and gives you too much. Mix the dough until just combined. You should see no more streaks of flour, but don’t keep mixing beyond that. Dough should be soft and a little sticky but not overly sticky.
⚠️ Common Mistake to Avoid: Overmixing the dough after adding the flour is the #1 reason cookies turn out tough. Gluten develops as you mix, and too much gluten makes cookies dense and bread-like. Stop as soon as the flour disappears. A few streaks are fine — they’ll incorporate when you fold in the mix-ins.
Step 5: Fold in the Mix-Ins
Stir in ½ cup mini semisweet chocolate chips, ½ cup mini marshmallows (halved), and ¼ cup graham cracker crumbs. Use a rubber spatula or a wooden spoon. Fold gently until evenly distributed. The dough will be a bit lumpy from the marshmallows and graham pieces — that’s exactly what you want.
💡 emy’s Pro Tip: Reserve about 1 tablespoon each of chocolate chips and marshmallow halves. After portioning the dough, press a few pieces onto the tops of the cookie dough balls. This gives you those beautiful, bakery-style tops with visible chocolate and marshmallow.
Step 6: Scoop and Bake
Preheat the oven to 350°F. Scoop out 3 tablespoons of dough (a medium cookie scoop works perfectly) and place dough balls 2 inches apart on a parchment-lined baking sheet. Bake for 10-15 minutes, or until the cookies are set. They will be puffy and still look a little underbaked in the middle — that’s the sweet spot. The edges should be lightly golden and the tops should look set but soft.
⚠️ Common Mistake to Avoid: Overbaking is the biggest risk here. Cookies continue to bake on the hot sheet pan after you pull them from the oven. If they look fully done in the oven, they’ll be overbaked by the time they cool. Take them out when the centers are still soft and slightly puffy — they’ll set into perfectly chewy cookies as they cool.
| Step | Action | Duration | Key Visual Cue |
|---|---|---|---|
| 1 | Melt butter | 40 seconds | Fully liquid, no solid pieces |
| 2 | Mix sugars into butter | 30 seconds | Smooth, no sugar lumps |
| 3 | Add vanilla and egg | 30 seconds | Glossy, cohesive mixture |
| 4 | Add flour, baking soda, salt | Until just combined | No flour streaks, soft & sticky dough |
| 5 | Fold in mix-ins | 30-45 seconds | Evenly distributed, lumpy dough |
| 6 | Scoop and bake | 10-15 minutes | Puffy, golden edges, soft center |
Serving & Presentation
These S’mores Cookies are at their absolute best when served warm, about 5 minutes after they come out of the oven. The marshmallows are still soft and stretchy, the chocolate is melted, and the texture is pure heaven. I love arranging them on a simple wooden board or a vintage ceramic plate that reminds me of the serving dishes my mother used in Morocco. A light dusting of graham cracker crumbs over the top adds a beautiful finishing touch.
In my NYC apartment, I often serve these cookies with a tall glass of cold milk — it’s the classic pairing for a reason. But for a more grown-up twist, I love them alongside a strong cup of espresso or a latte. The bitterness of the coffee cuts through the sweetness beautifully. If I’m hosting friends, I’ll set up a small cookie platter with these S’mores Cookies alongside something fruity, like fresh berries, to balance the richness.
For an extra-special presentation, try warming the cookies in a 300°F oven for 3 minutes before serving, then add a small scoop of vanilla ice cream on top. The warm-cold contrast is incredible, and it takes the s’mores experience to a whole new level. This is how I serve them when I want to impress dinner guests — it never fails to get oohs and ahhs.
| Pairing Type | Suggestions | Why It Works |
|---|---|---|
| Side Dish | Fresh berries, apple slices, fruit salad | Bright acidity cuts the sweetness and richness |
| Sauce / Dip | Warm caramel sauce, chocolate ganache, peanut butter drizzle | Adds another layer of indulgence and flavor contrast |
| Beverage | Cold milk, espresso, latte, hot chocolate | Coffee’s bitterness balances sugar; milk cleanses the palate |
| Garnish | Extra graham cracker crumbs, flaky sea salt, mint leaves | Adds texture, visual appeal, and a flavor pop |
Make-Ahead, Storage & Reheating
Living in New York City means my schedule can get chaotic, so I’m all about make-ahead strategies that don’t sacrifice quality. These S’mores Cookies are wonderfully forgiving when it comes to storage, and with a few simple tricks, you can enjoy them fresh-tasting for days. Here’s how I handle it in my own kitchen.
| Method | Container | Duration | Reheating Tip |
|---|---|---|---|
| Refrigerator | Airtight container with parchment between layers | Up to 5 days | Microwave 10-12 seconds for gooey center |
| Freezer | Freezer-safe zip-top bag or airtight container | Up to 3 months | Thaw at room temp 30 mins, then warm 5 mins at 300°F |
| Make-Ahead | Scoop dough balls onto tray, freeze until solid, then bag | Up to 3 months in advance | Bake from frozen at 350°F — add 2-3 minutes to bake time |
For the very best texture when reheating, I use a two-step method: microwave for 10 seconds to soften the marshmallow and chocolate, then pop the cookie in a 300°F oven for 3 minutes to re-crisp the edges. It sounds fussy, but it takes less than 5 minutes and makes the cookie taste almost fresh-baked. If you’re in a hurry, just the microwave works — but the oven step really restores that perfect edge-to-center contrast.
One thing to keep in mind: marshmallows can become chewy and tough when refrigerated for more than a day. That’s why I recommend freezing any cookies you won’t eat within 24 hours. Frozen cookies that are properly reheated taste miles better than refrigerated ones that have been sitting for days. Trust me on this — I learned it the hard way during a batch testing marathon!
Variations & Easy Swaps
| Variation | Key Change | Best For | Difficulty Impact |
|---|---|---|---|
| Dark Chocolate & Sea Salt | Use 60-70% dark chocolate chips, add flaky sea salt on top | Adults who prefer less sweet, more sophisticated cookies | Easy (same method) |
| Gluten-Free S’mores Cookies | Replace all-purpose flour with gluten-free 1:1 blend | Gluten-sensitive bakers and guests | Easy (same method) |
| Peanut Butter S’mores | Reduce butter to ¼ cup, add ¼ cup creamy peanut butter | Peanut butter lovers, lunchbox treats | Easy (same method) |
Dark Chocolate & Sea Salt Variation
This is my personal favorite variation, inspired by the French pastry principle of balancing sweetness with salt. Use ½ cup dark chocolate chips (60-70% cacao) and reduce the granulated sugar to ⅓ cup. After baking, sprinkle a few flakes of Maldon sea salt over each cookie. The salt crystals add a tiny crunch and a burst of savory flavor that makes the chocolate taste deeper and more complex. It’s a sophisticated twist that still feels like a s’mores cookie at heart.
Gluten-Free S’mores Cookies
I tested this variation for a friend who has celiac, and I was thrilled with how well it worked. Swap the all-purpose flour with a high-quality gluten-free 1:1 baking blend that contains xanthan gum (I like Bob’s Red Mill). The dough will feel slightly more tender and a bit stickier, so I recommend chilling it for 15 minutes before scooping. The cookies spread a little more, so space them 2½ inches apart. The texture is slightly more delicate but still chewy and delicious — no one at the table will know they’re gluten-free.
Peanut Butter S’mores Variation
This one came to me during a late-night baking session in my NYC kitchen — I was out of butter and had peanut butter sitting on the counter. Reduce the butter to ¼ cup and add ¼ cup creamy peanut butter (natural, no-stir works best). Melt it together with the butter and proceed with the recipe. The peanut butter adds a savory richness that pairs beautifully with the chocolate and marshmallow. Use milk chocolate chips here instead of semi-sweet for a classic peanut butter cup vibe. These are always the first to disappear at parties.
Can I make S’mores Cookies without a stand mixer?
Absolutely — this recipe is designed to be made without any electric mixer. Everything comes together with a whisk and a rubber spatula in one bowl. The melted butter method means you don’t need to cream butter and sugar together, which is the step that typically requires a stand mixer or hand mixer. Just whisk the melted butter with the sugars, stir in the vanilla and egg, then fold in the dry ingredients and mix-ins. It’s actually faster and results in a chewier cookie than the traditional creaming method.
Why did my S’mores Cookies spread too much?
Excessive spreading usually comes down to one of three things: the butter was too hot when you mixed it, the dough was too warm when it went into the oven, or the flour was under-measured. If your butter was hot (not just melted), it can cause the dough to spread before the structure sets. Let the melted butter cool for 2-3 minutes before adding the sugars. Also, make sure you’re measuring flour correctly — spoon it into the cup and level it off. Scooping from the bag packs the flour and gives you too much, which can actually cause spreading in the opposite way, but under-measuring definitely leads to flat cookies.
Can I use regular-sized marshmallows instead of mini?
Yes, you can use regular marshmallows, but I recommend cutting each one into 8 small pieces with kitchen shears or a sharp knife dipped in cold water (to prevent sticking). Full-sized marshmallows are too large and will create big empty pockets in the cookie as they melt and then collapse. Halved mini marshmallows are ideal because they distribute evenly and create those perfect gooey pockets throughout the cookie. If using regular marshmallows cut smaller, expect slightly larger pockets and a more rustic look — still delicious, just different.
How do I keep the marshmallows from burning in the oven?
Marshmallows can burn quickly because they’re mostly sugar. The key is to press the marshmallow pieces gently into the dough so they’re partially surrounded by cookie dough, which protects them from direct heat. Also, avoid placing dough balls with exposed marshmallow pieces too close to the oven’s top heating element — bake on the middle rack. If you notice the marshmallows browning too fast during baking, tent the baking sheet loosely with aluminum foil for the last 2-3 minutes. Mini marshmallows halved will caramelize beautifully before they burn, giving you that golden-toasted campfire flavor.
Can I freeze S’mores Cookies dough for later?
Yes, this dough freezes beautifully! Scoop the dough into 3-tablespoon balls and arrange them on a parchment-lined baking sheet. Freeze until solid (about 1-2 hours), then transfer the frozen dough balls to a freezer-safe zip-top bag or airtight container. They’ll keep for up to 3 months. When you’re ready to bake, place the frozen dough balls on a lined baking sheet and bake at 350°F, adding 2-3 minutes to the bake time. No need to thaw first. This is one of my favorite meal-prep tricks — fresh cookies whenever the craving strikes.
What makes these S’mores Cookies different from regular chocolate chip cookies?
These cookies have three distinct elements that set them apart: mini marshmallows that melt into gooey, caramelized pockets; graham cracker crumbs folded into the dough for that classic honey-wheat flavor and subtle crunch; and a higher ratio of brown sugar to granulated sugar, which gives them a deeper, molasses-like sweetness and a softer, chewier texture. The combination of these three ingredients recreates the campfire s’mores experience in cookie form. Plus, the melted butter method gives them a denser, fudgier texture than a standard chocolate chip cookie.
Can I make these S’mores Cookies dairy-free?
Yes, with a simple swap. Replace the butter with a high-quality vegan butter stick (I recommend Miyoko’s or Country Crock Plant Butter — not the spreadable tub version, which has too much water). Use dairy-free chocolate chips (most semi-sweet chips are naturally dairy-free, but check the label). The graham crackers in the US are typically dairy-free, but double-check your brand. The cookies will be slightly less rich and the texture may be a touch more tender, but they’re still absolutely delicious and will satisfy any s’mores craving.
How do I know when S’mores Cookies are done baking?
Look for these visual cues: the edges should be lightly golden and firm to the touch, the tops should look set but still soft and slightly puffy in the center, and the marshmallows should be golden and caramelized at the edges. The centers will look a tiny bit underbaked — that’s exactly what you want. A toothpick inserted near the center should come out with a few moist crumbs, not wet batter. Remember that cookies continue to bake on the hot sheet pan for 2-3 minutes after you pull them from the oven, so it’s better to err on the side of slightly underdone.
Can I add extra mix-ins to these cookies?
Definitely — these cookies are a great base for customization. Chopped pecans or walnuts add a lovely crunch that complements the soft marshmallow and chocolate. White chocolate chips or butterscotch chips can replace some or all of the semi-sweet chocolate for a different flavor profile. Dried cherries or cranberries bring a tart contrast that cuts through the sweetness. Just keep the total volume of mix-ins to about 1 cup total (including the marshmallows and chocolate chips) to avoid overwhelming the dough. Too many add-ins can prevent the cookies from holding together properly.
How should I store S’mores Cookies to keep them soft?
Store them in an airtight container at room temperature with a slice of plain bread — the bread releases moisture that keeps the cookies soft. Replace the bread slice every day. They’ll stay fresh for up to 3 days this way. If you need to store them longer, I recommend freezing them instead of refrigerating, because the refrigerator can make marshmallows tough and chewy. For frozen cookies, thaw at room temperature for 30 minutes, then warm them in a 300°F oven for 3-5 minutes to restore that fresh-baked texture with gooey centers and slightly crisp edges.
Share Your Version!
Now it’s your turn to bring these S’mores Cookies to life in your own kitchen! I’d love to hear how they turned out for you — did you try one of the variations, or did you come up with your own twist? Drop a star rating and a comment below to tell me about your experience. Your feedback helps other home cooks know what to expect, and I personally read every single comment.
If you share a photo on Instagram or Pinterest, be sure to tag me @cookingwithemi — I absolutely love seeing your creations! And here’s a question for you: which campfire memory would these cookies bring back for you? For me, it’s those crisp mountain nights in upstate New York, but I’d love to hear your story. Happy baking, friends!
From my NYC kitchen to yours — I hope this recipe brings as much warmth to your table as it does to mine. — emy 🧡
Love This Recipe? Save It to Pinterest!
If you enjoyed this S’mores Cookies recipe, don’t let it get lost in your browser tabs! 😄 Pin it now so you can find it again anytime — and explore hundreds more tried-and-tested recipes waiting for you on my Pinterest boards.
👉 Follow emy on Pinterest @exorecipe
📌 Pin this recipe · 🔁 Re-pin your favorites · 💬 Tag me when you make it — I love seeing your creations!
⭐ Made this recipe? Leave a star rating below!
Your feedback helps other readers — and I love hearing about your kitchen wins. Did you try a variation? Drop a comment and tell me all about it! 💬
“`
Print

S’mores Cookies
Description
S’mores cookies are soft cookies with melty marshmallows, chocolate chips, and graham cracker crumbs that take less than 30 minutes to make.
Ingredients
- ½ cup butter
- ½ cup granulated sugar
- ¼ cup light brown sugar (packed)
- 1 teaspoon vanilla extract
- 1 large egg
- 1 cups all-purpose flour
- ½ teaspoon baking soda
- ¼ teaspoon salt
- ½ cup mini semisweet chocolate chips
- ½ cup mini marshmallows (halved)
- ¼ cup graham cracker crumbs
Instructions
- Preheat the oven to 350 F.
- Microwave the butter for about 40 seconds. Whisk until the butter is completely melted.
- Add the sugars, and mix until well-combined.
- Stir in vanilla and egg until incorporated.
- Add the flour, baking soda, and salt. Please read the recipe note about properly measuring flour.
- Mix dough until just combined. Dough should be soft and a little sticky but not overly sticky.
- Stir in chocolate chips, mini marshmallows, and graham cracker crumbs.
- Scoop out 3 tablespoons of dough (medium cookie scoop) and place 2 inches apart on baking sheet.
- Bake for 10-15 minutes, or until cookies are set. They will be puffy and still look a little underbaked in the middle.
