Table of Contents
6-Ingredient Peanut Butter Pie with Easy Oreo Crust – A No-Bake Dessert You’ll Make on Repeat
Let me tell you a little story. Growing up in Morocco, my mother’s kitchen was a place of warm spices, slow-cooked tagines, and sweet pastries drizzled with honey and rose water. Desserts there were elegant but often intricate — layers of phyllo, ground almonds, and fragrant syrups. When I moved to Paris for culinary school, I fell hard for French pastry: the precision of a pâte brisée, the silkiness of a proper crème pâtissière. But here’s the thing — some of the most beloved desserts in the world are the simplest. And this 6-Ingredient Peanut Butter Pie with Easy Oreo Crust is proof. No fussy techniques, no long ingredient lists — just pure, decadent flavor that comes together in under half an hour. That’s the kind of dessert I want in my life, and I think you do too.
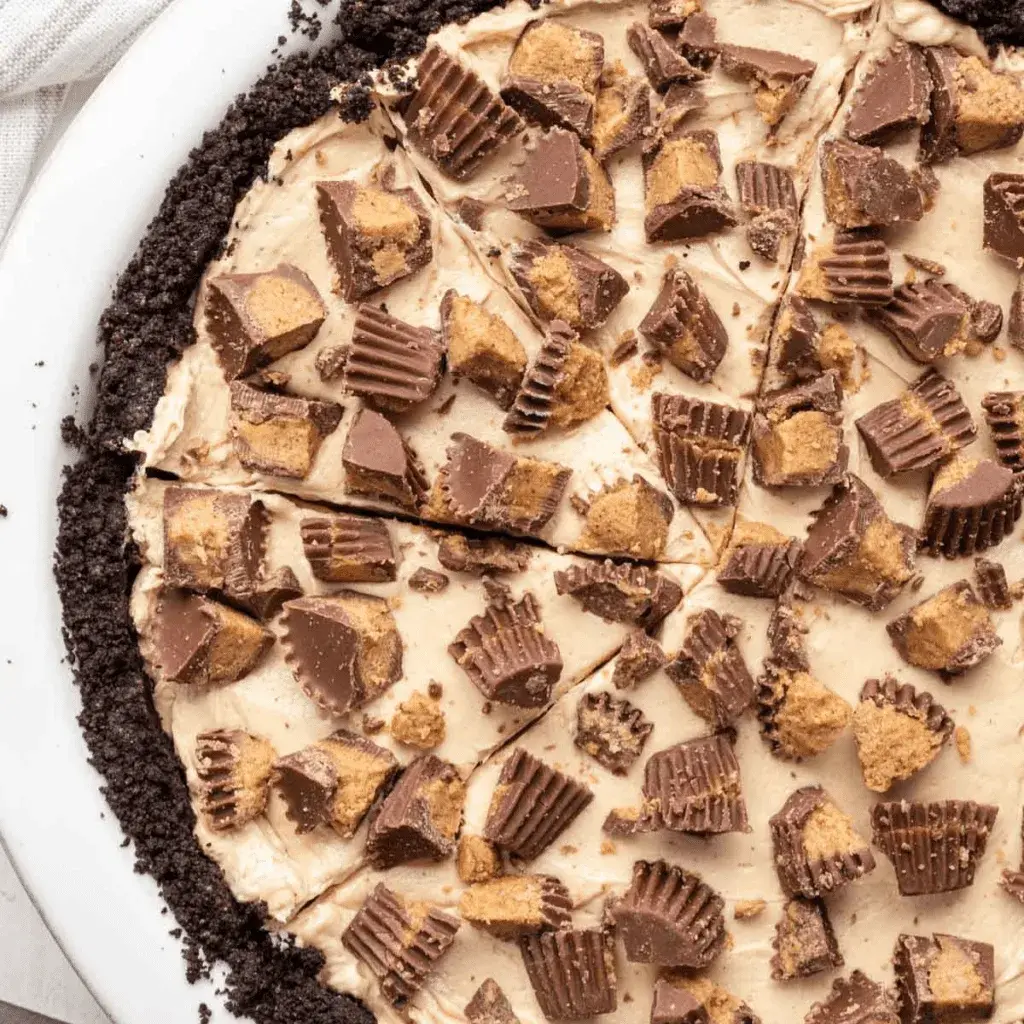
Imagine this: a thick, buttery Oreo crust that shatters ever so slightly under your fork, giving way to a filling that’s impossibly creamy, rich with peanut butter, and just sweet enough. The first bite hits you with that familiar peanut butter comfort — the kind you remember from childhood — but then the cream cheese and whipped topping lift it, making it feel elegant and grown-up. I like to finish mine with chopped peanut butter cups, a drizzle of warm chocolate sauce, and maybe a sprinkle of flaky sea salt if I’m feeling fancy. The contrast of textures — crunchy crust, silky filling, melty chocolate — is absolutely irresistible. It’s the kind of pie that disappears in minutes at a dinner party, with guests asking for the recipe before they’ve even finished their slice.
I’ve tested this peanut butter pie with Oreo crust about a dozen times in my tiny NYC kitchen, tweaking the ratios until the filling was fluffy but not too firm, sweet but not cloying, and stable enough to slice cleanly after a proper chill. What I love most is how forgiving it is. You don’t need a candy thermometer, a piping bag, or any special equipment. Whether you’re a seasoned baker or someone who’s never made a pie from scratch, this recipe is going to make you look like a rockstar. And with over 40 five-star votes from my readers, I’m not the only one who thinks so. Let me share a few tricks I’ve learned along the way — including a pro tip for getting that crust perfectly even — and one common mistake that can leave your filling grainy (hint: it’s all about the cream cheese temperature).
Why This 6-Ingredient Peanut Butter Pie Recipe Is the Best
The Flavor Secret: My twist on classic 6-Ingredient Peanut Butter Pie comes down to one thing — letting the peanut butter shine without drowning it in sugar. So many peanut butter pies taste more like sweetened cream than actual peanut butter. I use a full cup of creamy peanut butter and just ¾ cup powdered sugar, which lets the nutty, savory notes come through. It’s the same principle I learned in Paris: a great dessert doesn’t mask its main ingredient — it celebrates it. The cream cheese adds a subtle tang that cuts through the richness, just like a dollop of crème fraîche would in a French tart.
Perfected Texture: The texture of this pie is what makes it truly special. The filling is light and moussy thanks to the Cool Whip folded in at the end, but it still has enough body to hold a clean slice. I tested this both with homemade whipped cream and with Cool Whip, and I have to say — Cool Whip wins here. It stabilizes the filling without weighing it down, and it keeps the pie light even after days in the fridge. The Oreo crust is baked just long enough to set, giving it a firm, sandy texture that contrasts beautifully with the creamy center. It’s a textural harmony I learned to appreciate during my pastry training in France: every great dessert needs contrast.
Foolproof & Fast: With just six core ingredients and about 25 minutes of active work, this easy peanut butter pie is practically foolproof. There’s no rolling, no tempering, no complicated steps. The hardest part is waiting for it to chill! Whether you’re making it for a weeknight treat or a holiday gathering, this recipe delivers consistent, crowd-pleasing results every single time. I’ve had readers tell me they made it for Thanksgiving, for birthday parties, and even for Super Bowl Sunday — and it was a hit every time.
Peanut Butter Pie Ingredients
When I make this pie in my New York City kitchen, I pick up my ingredients from the Union Square Greenmarket (for the cream cheese, always the good stuff) and my local bodega for everything else. The list is so short, you might already have most of it in your pantry. Let me walk you through each one and share a few substitutions I’ve tested over the years.
Ingredients List
- 30 Oreos (crushed) — about 3 cups of crumbs
- 5 tbsp butter (melted)
- 8 oz cream cheese (softened to room temperature)
- 1 cup creamy peanut butter (Jif or Skippy recommended, not natural)
- ¾ cup powdered sugar
- 8 oz Cool Whip (thawed)
- Reese’s cups (chopped, for topping — optional but highly recommended)
- Reese’s pieces (for garnish — optional)
- Crushed Oreos (for garnish — optional)
- Chocolate, caramel, or peanut butter drizzle (optional)
Ingredient Spotlight
Cream Cheese is the backbone of this filling. It needs to be at genuine room temperature — not cold, not microwaved-to-death — so it blends smoothly with the peanut butter. I always use full-fat Philadelphia cream cheese for the best texture and flavor. If you use low-fat, the filling may turn out looser and less stable. For a dairy-free version, I’ve had great results with Kite Hill’s plant-based cream cheese, though the texture is slightly softer.
Peanut Butter is, of course, the star. I strongly recommend using a standard creamy peanut butter like Jif or Skippy — the kind with a bit of sugar and stabilizers. Natural peanut butter (the kind that separates) can make the filling oily and grainy. I learned this the hard way during my first test! If you only have natural, stir it very well and expect a slightly less cohesive texture. The flavor will still be wonderful.
Cool Whip might seem like a shortcut, but it’s actually the secret to the filling’s perfect texture. It adds airiness and stability without the risk of deflating that homemade whipped cream sometimes does. You can substitute with an equal amount of stabilized whipped cream (heavy cream whipped with a bit of powdered sugar and gelatin), but Cool Whip is easier and more reliable for this recipe.
| Original Ingredient | Best Substitution | Flavor / Texture Impact |
|---|---|---|
| Oreos | Chocolate graham crackers or chocolate wafer cookies | Slightly less sweet, less Oreo cream flavor, still a great chocolate crust |
| Cream cheese | Kite Hill plant-based cream cheese (dairy-free) | Slightly softer set, still creamy, tangy flavor is milder |
| Peanut butter (creamy) | Sunflower seed butter (for nut-free) | Different flavor profile, slightly less rich, good for allergies |
| Cool Whip | 1½ cups heavy cream, whipped with 2 tbsp powdered sugar | Lighter texture, less stable, must serve within 24 hours |
How to Make Peanut Butter Pie with Oreo Crust — Step-by-Step
Making this peanut butter pie with Oreo crust is almost embarrassingly easy. But I’m going to walk you through every step with the precision I learned in Paris, plus a few pro tips from my own kitchen. Trust me — follow these steps, and your pie will turn out perfectly every time.
Step 1: Prep the Crust
Preheat your oven to 350°F. Coat a 9-inch pie pan with non-stick spray and set aside. This step is simple but important — a well-greased pan ensures the crust releases cleanly when you slice. I like using a ceramic or glass pie dish for even baking, but metal works too.
💡 emy’s Pro Tip: For the most even crust, spray the pan first, then wipe it lightly with a paper towel to remove any excess. Too much spray can make the crust greasy.
Step 2: Crush and Butter the Oreos
Pulse the cookies in a food processor until you have fine, uniform crumbs. (No food processor? No problem. Place the Oreos in a zip-top bag and crush them with a rolling pin — it’s a great way to release any stress!) Pour the melted butter over the crumbs and stir until every crumb is moistened. You want the mixture to look like wet sand — if it seems dry, add another tablespoon of melted butter.
⚠️ Common Mistake to Avoid: Don’t over-process the cookies — you want crumbs, not paste. And don’t skip the butter coating, or the crust will be crumbly and fall apart when you slice the pie.
Step 3: Press and Bake
Press the crumb mixture firmly into the bottom and up the sides of the prepared pie plate. Use the bottom of a measuring cup to pack it tightly — this is my favorite trick for a perfectly even crust. Bake for 8–10 minutes, until it smells deeply chocolatey and looks set. Place it on a wire rack to cool completely before adding the filling.
💡 emy’s Pro Tip: If the crust slides down the sides while baking, use a small piece of foil to gently press it back into place while it’s still warm. I learned this trick during my pastry days in Paris — it saves so many crusts!
Step 4: Make the Filling
In a large bowl, beat the softened cream cheese and peanut butter together with an electric mixer until smooth and fluffy. The mixture will be thick — that’s normal. Add the powdered sugar and mix until fully incorporated. Finally, fold in the Cool Whip by hand with a rubber spatula until no white streaks remain. The filling should be light, airy, and a pale tan color.
⚠️ Common Mistake to Avoid: If your cream cheese is too cold, it will form small lumps in the filling. Let it sit on the counter for at least 30 minutes before starting. Microwaving cream cheese can melt it unevenly, so I don’t recommend it.
Step 5: Fill and Top
Once your crust is completely cool, spoon the peanut butter filling into it and spread it into an even layer. Smooth the top with an offset spatula or the back of a spoon. Now comes the fun part: pile on the toppings! I use chopped Reese’s cups, Reese’s pieces, crushed Oreos, and a drizzle of warm chocolate sauce. Go wild — there are no rules here.
💡 emy’s Pro Tip: Add your toppings while the filling is still slightly soft, so they stick. If you wait until after chilling, they’ll just slide off. Press them in gently for a picture-perfect finish.
Step 6: Chill and Serve
Place the pie in the freezer for at least 3 hours, or in the refrigerator for at least 5 hours, until the filling is firm and set. The pie is best served cold — straight from the fridge or freezer. To slice, run a sharp knife under hot water, wipe it dry, and cut clean slices. Wipe the knife between cuts for perfect slices every time.
⚠️ Common Mistake to Avoid: Don’t rush the chilling time! If the pie isn’t fully set, it will be a delicious mess when you try to slice it. Patience is key — and believe me, I know it’s hard to wait.
| Step | Action | Duration | Key Visual Cue |
|---|---|---|---|
| 1 | Prep pan & preheat | 5 mins | Oven at 350°F, pan greased |
| 2 | Crush Oreos + mix with butter | 5 mins | Mixture looks like wet sand |
| 3 | Press into pan + bake | 10 mins | Crust is fragrant and set |
| 4 | Make filling: beat cream cheese + pb, add sugar, fold in cool whip | 8 mins | Filling is light, fluffy, no lumps |
| 5 | Fill crust + top with garnishes | 5 mins | Even filling, toppings pressed in |
| 6 | Chill (freezer or fridge) | 3 hrs (freezer) or 5 hrs (fridge) | Filling is firm to the touch |
Serving & Presentation
This 6-Ingredient Peanut Butter Pie is a showstopper no matter how you serve it, but a little attention to presentation goes a long way. I like to run a hot knife under water, wipe it dry, and then cut clean, crisp slices. Serve each slice with a dollop of whipped cream, an extra drizzle of chocolate or caramel sauce, and a sprinkle of flaky sea salt if you have it. The salt balances the sweetness and makes the peanut butter flavor pop — it’s a trick I picked up from a pastry chef in Paris who salted every caramel and chocolate dessert.
For gatherings, I sometimes set up a small topping bar with extra chopped Reese’s cups, crushed Oreos, chocolate shavings, and even some chopped banana (a classic combo with peanut butter). Let your guests customize their slices — it’s always a hit. And if you’re serving this at a summer barbecue or potluck, keep the pie chilled until serving time. It holds up well for about 30 minutes at room temperature, but it’s truly at its best straight from the fridge.
| Pairing Type | Suggestions | Why It Works |
|---|---|---|
| Side Dish | Fresh fruit salad, vanilla ice cream, or a simple chocolate chip cookie | The fruit adds brightness; the ice cream adds creaminess; the cookie adds crunch |
| Sauce / Dip | Warm chocolate ganache, salted caramel, or a peanut butter drizzle | Adds richness and visual appeal; the warm sauce contrasts with the cold pie |
| Beverage | Cold glass of milk, hot coffee, espresso, or a chocolate stout | Milk and coffee cut the sweetness; stout complements the chocolate and peanut butter |
| Garnish | Flaky sea salt, crushed Reese’s cups, chocolate shavings, fresh banana slices | Salt enhances flavor; chocolate adds visual contrast; banana is a classic pairing |
Make-Ahead, Storage & Reheating
This pie is the ultimate make-ahead dessert — perfect for busy NYC schedules like mine. I often prepare the crust and filling the night before, chill it overnight, and add the toppings just before serving. It actually tastes better the next day, as the flavors have time to meld together. Here’s everything you need to know about storing and reheating.
| Method | Container | Duration | Reheating Tip |
|---|---|---|---|
| Refrigerator | Covered with plastic wrap or in an airtight pie carrier | Up to 5 days | Serve straight from fridge — no reheating needed |
| Freezer | Wrap tightly in plastic wrap, then foil, or use a freezer-safe dish | Up to 3 months | Thaw overnight in the fridge; do not microwave |
| Make-Ahead | Assemble in the pie pan, cover tightly | Up to 2 days before serving | Add toppings just before serving for best presentation |
If you’re freezing the pie, I recommend adding the toppings after thawing. The chocolate and candy pieces can get a bit soggy if frozen on top. Simply assemble, freeze without toppings, then thaw in the fridge overnight and add your garnishes before serving. The crust stays remarkably crisp even after freezing — that butter and Oreo combination is powerful stuff.
One more thing: this pie is served cold, so there’s no real “reheating” involved. But if you want the chocolate drizzle to be warm and gooey, heat a few tablespoons of chocolate chips with a splash of cream in the microwave for 15-second intervals, stirring in between, and pour it over the chilled slices just before serving. That warm-cold contrast is absolutely divine.
Variations & Easy Swaps
| Variation | Key Change | Best For | Difficulty Impact |
|---|---|---|---|
| Chocolate Peanut Butter Dream | Add ½ cup melted semi-sweet chocolate to the filling | Chocolate lovers, birthday parties | Easy |
| Gluten-Free Peanut Butter Pie | Use gluten-free chocolate sandwich cookies (like Glutino) for the crust | Gluten-free guests, Celiac-friendly | Easy |
| Banana Peanut Butter Pie | Layer sliced bananas over the crust before adding the filling | Summer parties, banana lovers | Easy |
Chocolate Peanut Butter Dream
For the serious chocolate lovers out there, melt ½ cup of semi-sweet chocolate chips (I like Ghirardelli) with a tablespoon of coconut oil, let it cool slightly, and fold it into the filling along with the Cool Whip. The result is a marbled, mousse-like filling that’s even richer and more decadent. I sometimes add a teaspoon of instant espresso powder to deepen the chocolate flavor — a classic French pastry trick that doesn’t make the pie taste like coffee but amplifies the chocolate notes beautifully.
Gluten-Free Peanut Butter Pie
Making this pie gluten-free is as simple as swapping the Oreos for gluten-free chocolate sandwich cookies. I’ve tested this with Glutino and Kinnitoons brands — both work perfectly. The crust will be slightly more delicate, so press it firmly and allow it to cool completely before filling. All the other ingredients (cream cheese, peanut butter, powdered sugar, Cool Whip) are naturally gluten-free, but always check the labels on your peanut butter and Cool Whip to be sure.
Banana Peanut Butter Pie
Peanut butter and banana is a match made in heaven. For this variation, slice 2 ripe (but not mushy) bananas into ¼-inch rounds and arrange them in a single layer over the cooled crust before adding the filling. The bananas add a natural sweetness and a soft, creamy texture that pairs beautifully with the peanut butter. I like to add a layer of chocolate ganache on top and a sprinkle of crushed peanuts for crunch. This version is especially popular at my summer dinner parties — it feels fresh and indulgent at the same time.
Can I use natural peanut butter for this peanut butter pie?
You can, but I don’t recommend it for the best results. Natural peanut butter (the kind that separates into oil and solids) can make the filling slightly grainy and less stable. The oil can also separate during chilling, leaving you with a greasy texture. If natural peanut butter is all you have, stir it very thoroughly before measuring, and expect a slightly softer set. For the creamiest, most reliable pie, stick with standard creamy peanut butter like Jif or Skippy — they contain stabilizers that help the filling hold its shape beautifully.
How long does this 6-Ingredient Peanut Butter Pie need to chill?
For the best texture, chill the pie in the freezer for at least 3 hours, or in the refrigerator for at least 5 hours. The filling needs time to firm up so it slices cleanly. If you’re in a hurry, the freezer method is faster, but be careful not to freeze it solid — 3 hours is the sweet spot. For the most stable and delicious results, I actually prefer chilling it in the fridge overnight. The flavors meld together beautifully, and the texture becomes perfectly creamy and sliceable.
Can I make this peanut butter pie ahead of time for a party?
Absolutely — in fact, I encourage it! This pie is an ideal make-ahead dessert. You can assemble the entire pie (crust, filling, and toppings) up to 2 days in advance and keep it covered in the refrigerator. The crust stays crisp, and the filling actually improves as the flavors meld. If you want to make it even further ahead, freeze the pie (without toppings) for up to 3 months, then thaw it in the fridge overnight and add the toppings just before serving. It’s my go-to strategy for busy holiday hosting.
Can I use homemade whipped cream instead of Cool Whip?
Yes, you can substitute homemade whipped cream, but there are a few things to know. For a stable substitute, whip 1½ cups of heavy cream with 2 tablespoons of powdered sugar until stiff peaks form. The texture will be lighter and more airy than with Cool Whip, and the pie may not hold its shape as well after a day or two. Cool Whip contains stabilizers that keep the pie firm and sliceable for days. If you use homemade whipped cream, I recommend serving the pie within 24 hours for the best texture.
How do I get clean slices of peanut butter pie?
Getting clean, beautiful slices is easier than you think. First, make sure the pie is fully chilled — at least 3 hours in the freezer or 5 hours in the fridge. Then, run a sharp chef’s knife under hot water, wipe it dry with a clean towel, and make your cut in one smooth motion. Wipe the knife clean and reheat it under hot water between each slice. This technique works like magic. I also recommend using a pie pan with a removable bottom (like a springform pan) for the easiest release and prettiest presentation.
Can I use a different cookie for the crust?
Definitely! While Oreos give this pie its signature chocolatey crust, you can easily switch things up. Chocolate graham crackers, chocolate wafer cookies (like Nabisco Famous Wafers), or even regular graham crackers all work well. If you use regular graham crackers, you might want to add a tablespoon of cocoa powder to keep the chocolate flavor. The amount of butter stays the same — about 5 tablespoons for 30 cookies worth of crumbs. Each cookie type will give a slightly different texture and sweetness level, so feel free to experiment!
Is this peanut butter pie gluten-free?
This recipe as written is not gluten-free because traditional Oreos contain wheat flour. However, making it gluten-free is very simple: just swap the Oreos for a gluten-free chocolate sandwich cookie brand like Glutino or Kinnitoons. All the other ingredients — cream cheese, peanut butter, powdered sugar, and Cool Whip — are naturally gluten-free. As always, check the labels on your specific products to be absolutely sure, as formulations can vary. The gluten-free crust may be slightly more delicate, so press it firmly and let it cool completely before filling.
Can I freeze peanut butter pie with the toppings on?
I recommend freezing the pie without the toppings for the best results. Chopped peanut butter cups and other candy toppings can become soft and lose their crunch when frozen and thawed. Instead, freeze the fully assembled pie (crust and filling) without toppings, tightly wrapped in plastic wrap and then foil. When you’re ready to serve, thaw the pie overnight in the refrigerator, then add your fresh toppings just before slicing. This way, the peanut butter cups stay crunchy and the chocolate drizzle stays glossy — your pie will look and taste freshly made.
What is the best way to crush Oreos for the crust?
There are three great methods, and the best one depends on what you have available. A food processor gives the most consistent, fine crumbs — just pulse the whole Oreos (cream filling included) until you have uniform crumbs. If you don’t have a food processor, place the cookies in a large zip-top bag and crush them with a rolling pin or even a heavy skillet. This method is oddly satisfying and works perfectly. A third option is to crush them in a blender in small batches. Whichever method you choose, aim for fine, even crumbs — not big chunks — for a crust that holds together beautifully.
How many calories are in a slice of peanut butter pie?
Based on my recipe testing and nutrition calculations, one slice of this 6-Ingredient Peanut Butter Pie (based on 8 servings) contains approximately 694 calories, 47g of fat, 59g of carbohydrates, 39g of sugar, and 15g of protein. It’s definitely an indulgent treat, but the good news is that a small slice is very satisfying thanks to the rich peanut butter and creamy filling. I always recommend cutting 8 generous slices or 10 slightly smaller ones if you’re serving it after a big meal. The nutrition values will vary slightly based on the specific brands you use and any additional toppings.
Share Your Version!
I absolutely love hearing from you — it’s the best part of running my little corner of the internet. If you make this 6-Ingredient Peanut Butter Pie with Easy Oreo Crust, please leave a star rating and a comment below telling me how it turned out. Did you add any fun toppings? Did you try one of the variations? Your feedback helps me create better recipes and helps other readers know what to expect.
And if you share a photo on Instagram or Pinterest, tag me @cookingwithemi — I love seeing your creations! I always share my favorites in my stories. Here’s a question for you: what’s your favorite way to top this pie — are you a chocolate drizzle person, a candy-bar-on-top person, or do you like it plain and simple? I’d genuinely love to know. Drop your answer in the comments, and thank you from the bottom of my heart for being here.
From my NYC kitchen to yours — I hope this recipe brings as much warmth to your table as it does to mine. — emy 🧡
Love This Recipe? Save It to Pinterest!
If you enjoyed this 6-Ingredient Peanut Butter Pie with Easy Oreo Crust recipe, don’t let it get lost in your browser tabs! 😄 Pin it now so you can find it again anytime — and explore hundreds more tried-and-tested recipes waiting for you on my Pinterest boards.
👉 Follow emy on Pinterest @exorecipe
📌 Pin this recipe · 🔁 Re-pin your favorites · 💬 Tag me when you make it — I love seeing your creations!
📣 Did you make this recipe?
I’d love to hear how it turned out! Leave a star rating ⭐⭐⭐⭐⭐ in the comments below and share your photos with me on Instagram @cookingwithemi. Your feedback makes my day and helps other readers too!
💬 Question of the day: Chocolate drizzle or extra peanut butter cups on top — which team are you on?
6-Ingredient Peanut Butter Pie with Easy Oreo Crust
Description
With over 40 5-star votes, this homemade peanut butter pie will be the star of your next gathering! It’s made with a thick, buttery oreo crust, a rich and decadent peanut butter filling, and topped with chopped peanut butter cups. This pie only takes about 30 minutes to prep and you need 6 simple ingredients to make it!
Ingredients
- 30 oreos (crushed )
- 5 tbsp butter (melted )
- 8 oz cream cheese (softened to room temperature)
- 1 cup creamy peanut butter
- ¾ cup powdered sugar
- 8 oz cool whip
- Reese's cups
- Reese's pieces
- crushed oreos
- chocolate, caramel, or peanut butter drizzle
Instructions
- Preheat oven to 350°. Coat a pie pan with non-stick spray and set aside.
- Pulse cookies in a food processor (other options include using a blender or crushing cookies by hand in a plastic bag). Pour melted butter into the cookie crumbs and stir until coated.
- Press crumbs evenly into the bottom and up the sides of the pie plate, making sure to pack it tightly. Bake for 8-10 minutes. Set on a wire rack to cool completely.
- With an electric mixer, beat the peanut butter and cream cheese until smooth (this mixture will be thick). Add in the powdered sugar and mix, followed by the cool whip.
- When your crust is completely cooled, fill it with the peanut butter mixture and spread into an even layer. Then finish it with peanut butter cups on top (or other toppings).
- Chill in the freezer for at least 3 hours or fridge for 5 hours before serving. This pie is best served cold.
