Table of Contents
Black Forest Cookie Dough Brownie Bombs: The Ultimate Indulgence
Prepare to embark on a culinary adventure that will redefine your dessert expectations. We’re diving deep into the creation of Black Forest cookie dough brownies, a treat so magnificent it’s practically a dessert revolution. Forget ordinary brownies; these are “bombs” of flavor, bursting with layers of rich chocolate, decadent cookie dough, and tart cherries. If you’ve ever yearned for the perfect harmonious blend of textures and tastes, your search ends here. This recipe isn’t just a guide; it’s your ticket to dessert nirvana, meticulously crafted to bring you the most sensational brownie bombs recipe you’ve ever encountered.
Imagine sinking your teeth into a fudgy brownie base, followed by swirls of luscious, safe-to-eat cookie dough, all punctuated by the bright, juicy burst of cherries. This isn’t just a dessert; it’s an experience. The aroma alone, a symphony of warm chocolate and sweet vanilla, will fill your kitchen and draw everyone in. The textures are a masterpiece: the dense, moist brownie, the slightly chewy cookie dough, and the soft bite of the cherries. These chocolate cherry brownies are designed to tantalize every sense, promising pure bliss with every single bite.
At cookingwithemy.com, we believe in making extraordinary desserts accessible. This particular recipe for cookie dough brownie bites has been perfected to ensure unparalleled flavor and texture, even for novice bakers. We’ve unlocked the “Chef’s Secret” to achieving that perfect balance, ensuring your no-bake brownie balls (well, these are baked, but that delightful chewiness is akin to no-bake!) are a guaranteed hit. Get ready to impress, indulge, and possibly develop a delightful new obsession!
Why This Black Forest Cookie Dough Brownie Recipe is a Game-Changer
The Chef’s Secret: Achieving That Irresistible Chewiness
The secret to these spectacularly chewy yet fudgy Black Forest cookie dough brownies lies in a carefully balanced ingredient ratio and a specific temperature. We’re not just mixing ingredients; we’re creating a perfect alchemy. The key is to avoid overmixing the batter once the flour is added; this develops gluten, which leads to tough brownies. Instead, we gently fold ingredients together at each stage, ensuring a tender crumb. Furthermore, the precise ratio of butter to sugar, coupled with the type of cocoa powder used (a good quality Dutch-process cocoa works wonders here for a deeper flavor), contributes significantly to the signature moistness and chew that makes these more than just brownies.
Unbeatable Texture: The Fudgy-to-Chewy Sweet Spot
Achieving that perfect balance between fudgy and chewy is an art form, and this recipe masterfully combines both. The richness comes from a higher fat content relative to flour, creating that dense, melt-in-your-mouth fudginess. The chewiness, on the other hand, is encouraged by the sugar content and the baking time. Baking at the specified temperature of 350°F (175°C) for the recommended duration ensures the edges set while the center remains slightly underbaked, which is crucial for that desirable gooey texture. This careful choreography of ingredients and baking science results in brownie bombs that are consistently perfect.
Foolproof for a Reason
We understand that not everyone is a seasoned baker, which is why this recipe has been rigorously tested to be as foolproof as possible. Each step is broken down into clear, actionable instructions, and common pitfalls are addressed. From ensuring your butter is perfectly softened (but not melted!) to knowing exactly when to pull these chocolate cherry brownies from the oven, we’ve covered all the bases. You can trust that following these steps will lead you to a stunning batch of cookie dough brownie bites every single time.
Ingredient Spotlight: Quality Makes the Difference
All-Purpose Flour: The backbone of our brownie! Use a good quality all-purpose flour for consistent results. Avoid overmeasuring by spooning it into your cup and leveling it off. If you need a gluten-free option, a 1:1 gluten-free baking blend that contains xanthan gum should work well, though texture may vary slightly.
Cocoa Powder: This is where the deep chocolate flavor truly comes alive. We recommend using Dutch-process cocoa powder for a smoother, richer, and less acidic chocolate taste. Natural cocoa powder can be used, but the flavor might be slightly brighter and the color less intense. Ensure it’s fresh; old cocoa powder can lead to a dull flavor.
Granulated Sugar: Sweetness and moisture are key roles of sugar here. It also contributes to the chewy texture. White granulated sugar is standard. If you want a deeper molasses note, you could experiment with a small percentage of brown sugar, but this will alter the texture slightly.
Unsalted Butter, Softened: Butter is the soul of a good brownie, providing richness and flavor. Ensure it’s genuinely softened to room temperature – it should give slightly when pressed but not be greasy or melted. Using unsalted allows you to control the salt content precisely. European-style butter, with its higher fat percentage, can add an extra layer of richness.
Large Eggs: Eggs bind the ingredients, add richness, and contribute to the structure and lift of the brownies. Make sure they are at room temperature for better emulsification. For safety if using store-bought cookie dough, ensure your eggs are pasteurized if you have concerns about raw egg consumption in the cookie dough portion.
Vanilla Extract: Pure vanilla extract adds a wonderful depth of flavor that complements chocolate beautifully without overpowering it. Imitation vanilla extract can be used in a pinch but will not provide the same aromatic complexity.
Chocolate Chips: For those extra pockets of melted chocolate goodness, high-quality semi-sweet or dark chocolate chips are ideal. You can also chop a good quality chocolate bar for more uneven, melty pockets. If you love cherries, consider using dark chocolate chips, which offer a more robust flavor to stand up to the fruit.
Cookie Dough, Prepared: This is where the magic happens! Use your favorite homemade or store-bought edible cookie dough. Ensuring it’s egg-free is crucial for safety if you plan to eat it uncooked. The dough adds a delightful chewy surprise within the brownie.
Cherries, Pitted and Chopped: Fresh or frozen (thawed and drained) cherries add a burst of fruity tartness that cuts through the richness of the chocolate and brownie. Maraschino cherries can be used, but they are much sweeter and will significantly alter the flavor profile; fresh or frozen dark sweet cherries are best for a true Black Forest experience.
Step-by-Step Instructions
Step 1: Preheat Oven and Prepare Pan
Preheat your oven to 350°F (175°C). Grease and flour a 9×13 inch baking pan, or line it with parchment paper, leaving an overhang on the sides for easy removal. This preparation ensures your Black Forest cookie dough brownies won’t stick and release effortlessly.
Pro Tip: Using parchment paper creates “handles” for lifting the entire baked brownie slab out of the pan. This makes cutting and cooling so much easier and cleaner!
Step 2: Mix the Dry Ingredients
In a large mixing bowl, whisk together the all-purpose flour, cocoa powder, and granulated sugar. Whisking them together first ensures that the cocoa powder is evenly distributed and there are no clumps, leading to a uniform chocolate flavor in your brownie bombs recipe.
Common Mistake to Avoid: Don’t just dump the dry ingredients in. Thoroughly whisking them ensures consistent flavor and texture throughout the brownies, preventing pockets of unsweetened flour or cocoa.
Step 3: Incorporate Wet Ingredients
Add the softened unsalted butter, large eggs, and vanilla extract to the dry ingredients. Stir with a spatula or wooden spoon until just combined. Be careful not to overmix at this stage; the batter should be thick and fudgy.
Pro Tip: Ensure your butter is truly softened (room temperature), not melted. Softened butter creams better with sugar, contributing to a tender crumb and better flavor in your chocolate cherry brownies.
Step 4: Fold in the Goodies
Gently fold in the chocolate chips and the prepared cookie dough. You want to distribute them evenly throughout the batter, but avoid overmixing to maintain that delicious fudgy texture. Some streaks of cookie dough are perfectly fine and add to the visual appeal of these cookie dough brownie bites.
Common Mistake to Avoid: Overmixing after adding the flour and wet ingredients can develop gluten, resulting in tough, cakey brownies instead of fudgy ones. Mix only until just combined.
Step 5: Assemble the Bombs in the Pan
Spread the brownie batter evenly into the prepared baking pan. Use your spatula to push it into every corner. This creates the base for your Black Forest cookie dough brownie bombs.
Pro Tip: Lightly dampen your spatula with water to make spreading the thick batter easier and prevent sticking.
Step 6: Top with Cherries
Distribute the pitted and chopped cherries evenly over the top of the brownie batter. Gently press them down slightly so they are nestled into the batter, ready to bake and release their sweet-tart juices.
Common Mistake to Avoid: Don’t bury the cherries too deeply. They should be visible on the surface so they can caramelize slightly during baking without getting lost.
Step 7: Bake to Perfection
Bake in the preheated oven for 25-30 minutes. The edges should look set, and a toothpick inserted into the center should come out with moist crumbs attached, not wet batter. This is crucial for achieving the perfect balance of fudgy and chewy.
Pro Tip: All ovens vary! Start checking for doneness around the 25-minute mark. Overbaking is the quickest way to dry out your delicious no-bake brownie balls (even though they’re baked!).
Step 8: Cool and Cut into Bombs
Allow the brownies to cool completely in the pan on a wire rack before cutting them into desired “bomb” shapes or squares. Cooling is essential for clean cuts and to allow the fudgy center to set properly.
Common Mistake to Avoid: Cutting the brownies while they are still warm will result in a messy, gooey situation. Patience is key to those perfect, clean sections of deliciousness!
Serving & Presentation
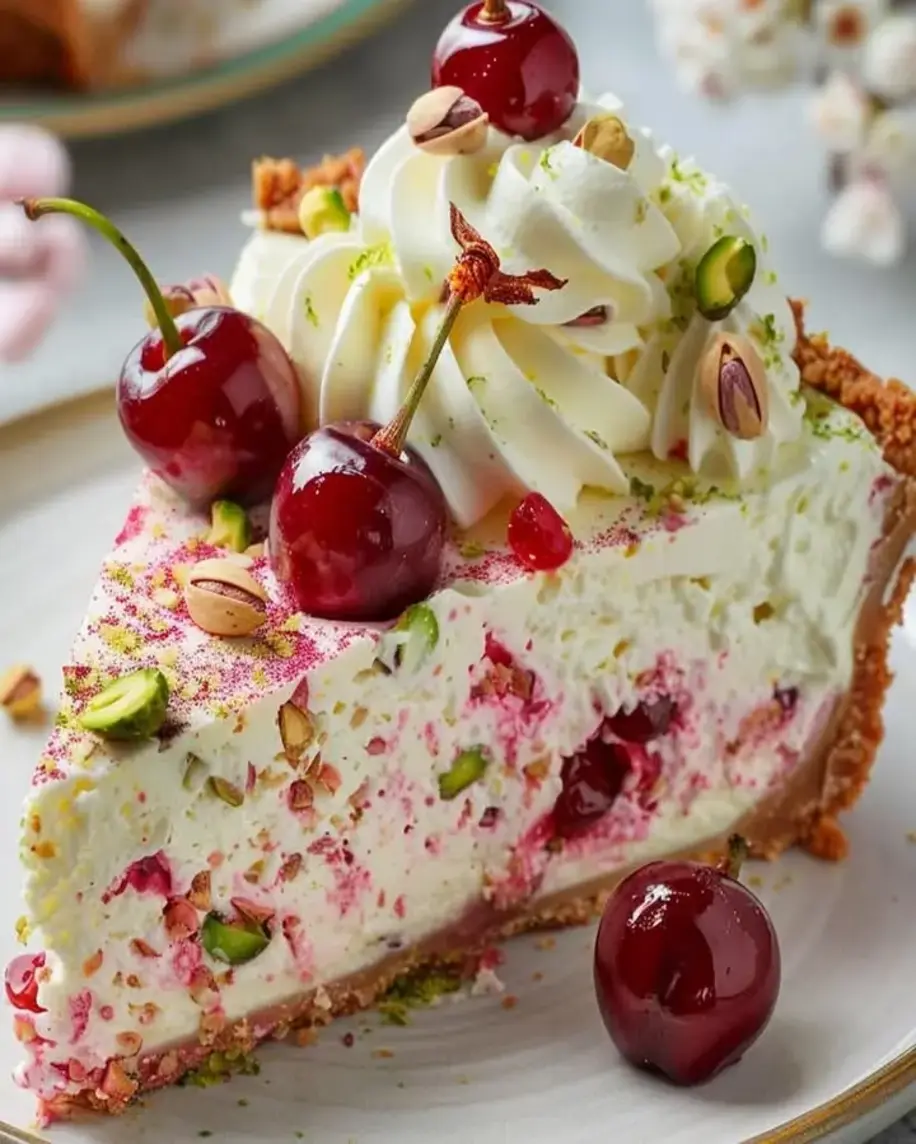
Elevate your Black Forest cookie dough brownie bombs from simply delicious to a show-stopping dessert! For a truly authentic Black Forest presentation, dust the tops with a generous amount of cocoa powder or powdered sugar using a fine-mesh sieve. A dollop of freshly whipped cream or a scoop of good quality vanilla or cherry ice cream on the side makes for an irresistible pairing. Garnish with a few extra chocolate chips, a sprinkle of chopped cherries, or even a chocolate curl for an added touch of elegance. These chocolate cherry brownies are also fantastic served slightly warm, allowing the cookie dough and chocolate chips to become delightfully gooey.
If you’re serving these as part of a dessert buffet, consider cutting them into small, bite-sized squares for easy sampling. They pair beautifully with a strong cup of coffee or a glass of rich red wine, which complements the deep chocolate and cherry notes. For a more festive occasion, add a sprig of mint or a single maraschino cherry (if you didn’t use them in the recipe) as a pop of color. The visual contrast of the dark brownie, swirls of cookie dough, and vibrant cherries makes them naturally appealing.
Make-Ahead & Storage Solutions
These Black Forest cookie dough brownie bombs are incredibly versatile, making them perfect for make-ahead magic.
Make-Ahead Strategy: You can bake the brownies up to 2 days in advance. Once completely cooled, store them in an airtight container at room temperature. For longer storage, or if your kitchen is particularly warm, refrigerating them is a great option. The flavors often meld and deepen overnight, making them even more delicious!
Storing Leftovers: If you happen to have any leftovers (which is unlikely!), store them in an airtight container. They will keep well at room temperature for up to 2 days. For optimal freshness and to prevent them from drying out or becoming stale, storing them in the refrigerator is recommended. They can be stored in the refrigerator for up to 3-4 days. For longer preservation, you can freeze them: wrap individual brownie bombs or slices tightly in plastic wrap, then place them in a freezer-safe bag or container for up to 2 months.
The Best Way to Reheat: If you’ve refrigerated or frozen your cookie dough brownie bites, you’ll want to bring them back to their prime. For refrigerated brownies, simply let them sit at room temperature for about 15-20 minutes before serving. For frozen brownies, you can reheat them gently in a low oven (around 250°F or 120°C) for about 5-10 minutes, or until warmed through. You can also microwave them for very short intervals (10-15 seconds), checking frequently, until they reach your desired warmth. Be cautious not to overheat, as this can dry them out.
Frequently Asked Questions (FAQ)
How do you prevent Black Forest cookie dough brownie bombs from getting dry?
The key to preventing dry brownies is careful baking and proper cooling. Ensure you do not overbake them; a toothpick inserted into the center should come out with moist crumbs, not completely clean. Overbaking dries out the moisture. Also, allow them to cool completely in the pan before cutting. Once cooled, store them in an airtight container; refrigeration actually helps maintain moisture for these types of brownies. Using good quality butter and not overmixing the batter also contributes to a moist crumb.
What’s the best way to store leftover Black Forest cookie dough brownie bombs?
The best way to store leftover Black Forest cookie dough brownie bombs is in an airtight container. For short-term storage (up to 3-4 days), an airtight container at room temperature is usually sufficient if your kitchen is cool. For longer storage or if your kitchen is warm, refrigerate them in an airtight container. This helps maintain their freshness and prevents them from drying out. You can also freeze them for up to 2 months by wrapping them tightly and storing them in a freezer-safe bag.
Can I substitute regular chocolate chips for the dark chocolate in these brownie bombs?
Absolutely! You can definitely substitute regular semi-sweet chocolate chips for dark chocolate chips. The flavor profile will be slightly sweeter and less intensely chocolatey, which many people prefer. You could even use milk chocolate chips, though the flavor will be much milder. The key is to use chocolate chips you enjoy eating, as they will significantly impact the overall taste of your Black Forest cookie dough brownie bombs.
How long do Black Forest cookie dough brownie bombs typically bake for?
Black Forest cookie dough brownie bombs typically bake for about 25 to 30 minutes. However, this can vary depending on your oven and the depth of your baking pan. It’s crucial to check for doneness around the 25-minute mark. A toothpick inserted into the center should come out with moist crumbs clinging to it, indicating they are perfectly fudgy and not overbaked. Avoid baking until the toothpick comes out completely clean, as this means they are likely overdone and will be dry.
Can I use fresh cherries instead of frozen?
Yes, you can absolutely use fresh cherries! If using fresh cherries, make sure to pit them thoroughly and chop them into similar-sized pieces as you would frozen cherries. You may want to gently pat them dry with a paper towel before adding them to the batter to reduce excess moisture, although this is less critical than with thawed frozen cherries.
Can I make this recipe vegan/gluten-free?
Making this recipe both vegan and gluten-free requires specific substitutions. For a gluten-free version, use a high-quality 1:1 gluten-free baking flour blend. For a vegan version, you’ll need to substitute the butter with vegan butter, the eggs with flax eggs (2 tbsp flaxseed meal + 6 tbsp water, let sit for 5-10 mins), and ensure your chocolate chips and cookie dough are also vegan. You would also need to use an egg-free preparation for the cookie dough if making it yourself or buy a specifically labeled vegan egg-free edible cookie dough. Some of these substitutions may slightly alter the texture.
Tried This Recipe? Leave a Comment!
Did you make this recipe? I’d love to hear how it turned out! Please leave a comment and a rating below. Your feedback helps other home cooks and supports cookingwithemy!
For more delicious inspiration, follow me on Pinterest!
.
Print
Black Forest Cookie Dough Brownie Bombs
- Total Time: 50 minutes
- Yield: 12 servings 1x
Description
A decadent dessert combining brownie, cookie dough, and black forest flavors like chocolate and cherries.
Ingredients
- 1 cup all-purpose flour
- 1/2 cup cocoa powder
- 1 cup granulated sugar
- 1/2 cup unsalted butter, softened
- 2 large eggs
- 1 teaspoon vanilla extract
- 1 cup chocolate chips
- 1 cup cookie dough, prepared
- 1 cup cherries, pitted and chopped
Instructions
- Preheat oven to 350°F (175°C).
- In a bowl, mix flour, cocoa powder, and sugar.
- Add softened butter, eggs, and vanilla extract; stir until combined.
- Fold in chocolate chips and cookie dough.
- Press mixture into a greased baking pan.
- Top with chopped cherries.
- Bake for 25-30 minutes or until set.
- Allow to cool before cutting into bombs.
Notes
Ensure cookie dough is egg-free for safety. Store in an airtight container in the refrigerator for up to 3 days.
- Prep Time: 20 minutes
- Cook Time: 30 minutes
- Method: Dessert
- Cuisine: American
Nutrition
- Calories: 350
- Sugar: 25g
- Fat: 18g
- Carbohydrates: 45g
- Protein: 5g
