Easy Apple Pie Egg Rolls Recipe

easy-apple-pie-egg-rolls

Introduction

Is there anything more comforting than the scent of warm apple pie filling your kitchen? Now imagine that iconic flavor wrapped in a delightfully crispy, handheld package. These Apple Pie Egg Rolls deliver that exact magic, and they will absolutely become your new favorite treat. Furthermore, they combine the nostalgic joy of a classic dessert with a fun, modern twist that everyone adores. Ultimately, this recipe promises to create moments of pure, shared happiness around your table.

So what exactly are Apple Pie Egg Rolls? Essentially, we take a sweet, spiced apple pie filling and envelop it in a thin egg roll wrapper. Then, we bake or fry them until the exterior becomes golden brown and perfectly crisp. This brilliant fusion matters because it takes a potentially complicated baking project and simplifies it into an approachable, foolproof dessert. Moreover, the recipe honors the timeless flavors we cherish while encouraging creativity in the kitchen. This treat fits our blog’s tone perfectly because we always strive to share innovative yet accessible recipes that bring people together. For instance, if you enjoy creative dessert mashups, you might also love our recipe for Churro Cupcakes, which offers another fun twist on a classic. Additionally, this recipe utilizes simple ingredients you likely already have, making it an ideal solution for unexpected guests or a spontaneous sweet craving. The process is straightforward and incredibly rewarding, therefore guaranteeing a impressive result every single time. Ultimately, these egg rolls bridge the gap between homemade comfort and effortless entertaining, making them a perfect fit for any occasion.

Why I Love This Recipe

I personally love this recipe because it reminds me of hectic but happy holiday gatherings. My family always demanded pie, but I never had enough time to make a full lattice-topped masterpiece from scratch. Consequently, I developed these Apple Pie Egg Rolls as a clever shortcut that everyone, especially the kids, could help assemble. Now, we make them together every fall, and the ritual of wrapping and rolling creates as many memories as the eating itself. They capture the essence of my favorite Apple Crisp but in a portable, party-friendly form that never fails to delight.

Health and Nutrition

Why it’s good for your body

These Apple Pie Egg Rolls deliver a surprisingly nutritious twist on a classic dessert. For instance, apples provide a powerful dose of soluble fiber, which actively supports healthy digestion and keeps you feeling full. Furthermore, this fiber, specifically pectin, helps manage blood sugar levels by slowing sugar absorption into your bloodstream.

Additionally, cinnamon, a key spice in these rolls, boasts impressive anti-inflammatory properties. Consequently, it can help your body fight oxidative stress. Moreover, by baking instead of deep-frying, you significantly reduce the overall fat content without sacrificing that satisfying crispy texture.

Ultimately, enjoying these Apple Pie Egg Rolls means you treat yourself to essential vitamins from the fruit filling. Therefore, you receive a wholesome dessert option that truly cares for your well-being. Finally, each bite combines comfort with conscious ingredients for a smarter indulgence.

How it fits in a healthy lifestyle

You can absolutely enjoy these Apple Pie Egg Rolls as part of a balanced diet. Think of them as a smarter dessert choice for satisfying your sweet tooth without derailing your goals. Their baked nature makes them a lighter alternative to traditional fried pastries, aligning perfectly with a heart-healthy eating pattern.

Pair one with a source of protein, like a scoop of Greek yogurt, for a more complete and satisfying snack. This approach helps manage cravings and keeps your energy levels stable. For more ideas on building nutritious meals, explore our guide on easy meal prep ideas that save time.

Remember, a healthy lifestyle embraces all foods in moderation. These egg rolls fit right into that philosophy, allowing you to enjoy flavor and tradition without guilt. If you are exploring other dietary needs, you might also find value in our tips for gluten-free baking to adapt recipes to your preferences.

How to Prepare This Dish

Steps and time-saving tips

First, grab a large mixing bowl and combine your finely diced apples with sugar, cinnamon, and a pinch of nutmeg. Toss everything together until the apples get a beautiful, even coating. Meanwhile, lay out your egg roll wrappers on a clean surface, and keep a small bowl of water nearby. Next, place a generous spoonful of the apple mixture onto the center of each wrapper. Then, fold the bottom corner tightly over the filling, fold in the sides, and roll it up securely. Use your finger to dab a little water on the final corner; this acts as a natural seal to prevent any leaks. For a major time-saver, use a pre-made apple pie filling. However, you can also chop your apples ahead of time and store them in lemon water to avoid browning. Finally, heat your oil to 350°F and fry these bundles until they turn a perfect, crispy golden brown. Drain them on a wire rack instead of paper towels for an extra-crispy finish every single time.

Mistakes I’ve made and learned from

I have absolutely overfilled these egg rolls more times than I care to admit. Consequently, the filling burst right through the wrapper during frying, creating a huge mess and soggy egg rolls. I learned that a modest two tablespoons of filling is the sweet spot for a perfect seal. Another common error I made was not properly sealing the final edge with enough water, which caused them to unravel in the hot oil. Now, I take that extra second to make sure it’s completely sealed. Also, getting the oil temperature correct is crucial; if it’s too cool, the egg rolls absorb oil and become greasy. I finally invested in a simple kitchen thermometer to take the guesswork out of frying. For more tips on avoiding common pitfalls, my guide on perfect frying techniques covers everything you need to know for success.

Cultural Connection and Variations

Where this recipe comes from

Every culture, it seems, has its own brilliant way of wrapping delicious fillings in a dough and frying it to golden perfection. Consequently, the Apple Pie Egg Roll feels like a beautiful culinary handshake. It marries the all-American comfort of a classic apple pie with the ancient, widespread technique of the egg roll. My grandmother, for instance, always made traditional apple pie for Thanksgiving. However, one year we had a huge crowd and she needed a faster, more portable option. She brilliantly scooped her famous spiced apple filling into egg roll wrappers, creating our family’s first batch of Apple Pie Egg Rolls. They were an instant hit. Meanwhile, other cultures might use spring roll pastry or even a flaky phyllo dough for a similar treat. Some bakers add a splash of rum or Calvados to the apples, while others might include raisins or a sharp cheddar cheese for a savory twist. Ultimately, this recipe showcases how a simple idea can travel and adapt, creating something new and wonderful that still tastes like home.

How it fits in today’s cooking

Today, the Apple Pie Egg Roll fits perfectly into our fast-paced, fusion-loving food culture. Firstly, it delivers that iconic nostalgic flavor in a fun, handheld format that everyone adores. They are a superstar at parties and holiday gatherings, often becoming the talking point of the dessert table. Moreover, modern home cooks love adapting the recipe to suit different dietary needs. For example, many easily make it vegan by using plant-based butter and serving it with a scoop of dairy-free vanilla ice cream. Others might opt for an air fryer to achieve a lighter, less oily version without sacrificing that essential crispy crunch. Furthermore, this dessert seamlessly bridges the gap between a complicated baking project and a simple weeknight treat. You can even prepare a large batch and freeze them, ready to bake whenever a craving strikes. They pair wonderfully with so many other desserts, making them a fantastic addition to any easy dessert charcuterie board. Ultimately, the Apple Pie Egg Roll remains a beloved and relevant treat because it effortlessly combines tradition with modern convenience.

Taste and Texture

What makes it delicious

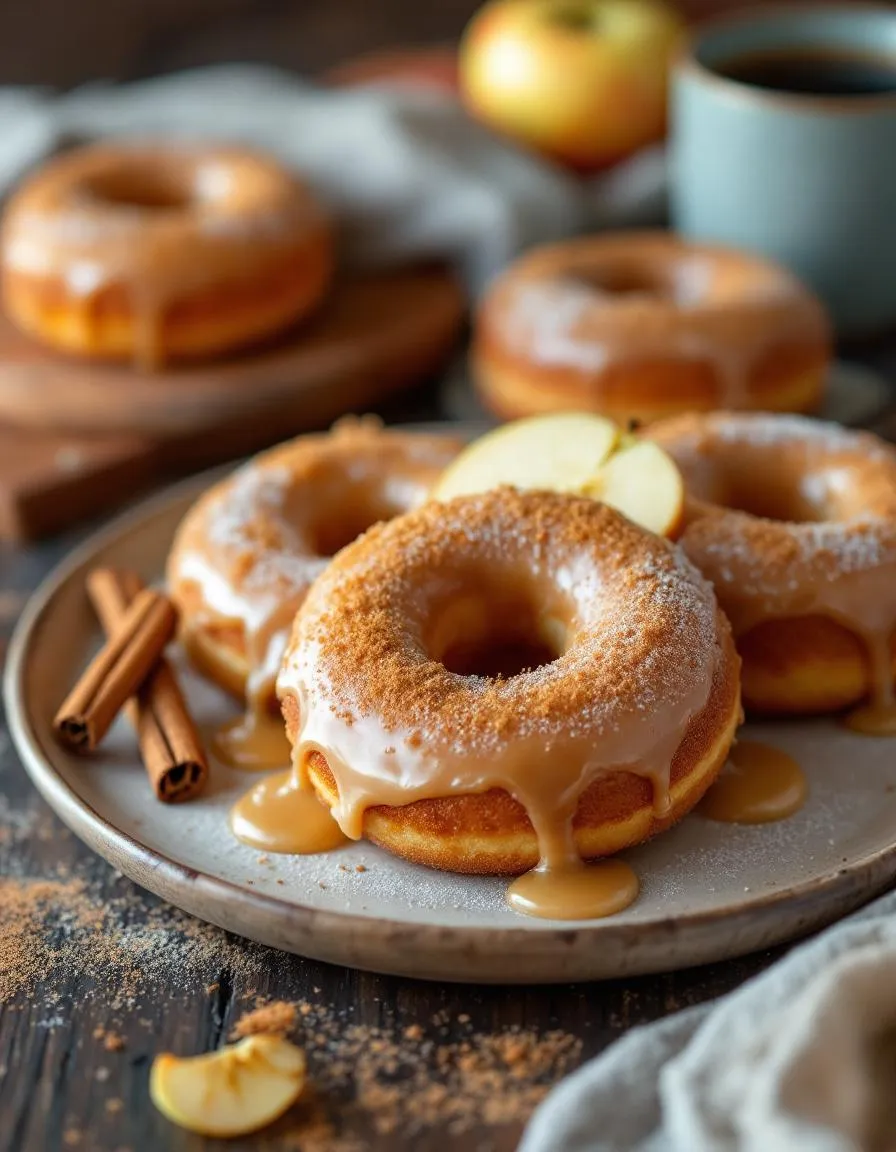
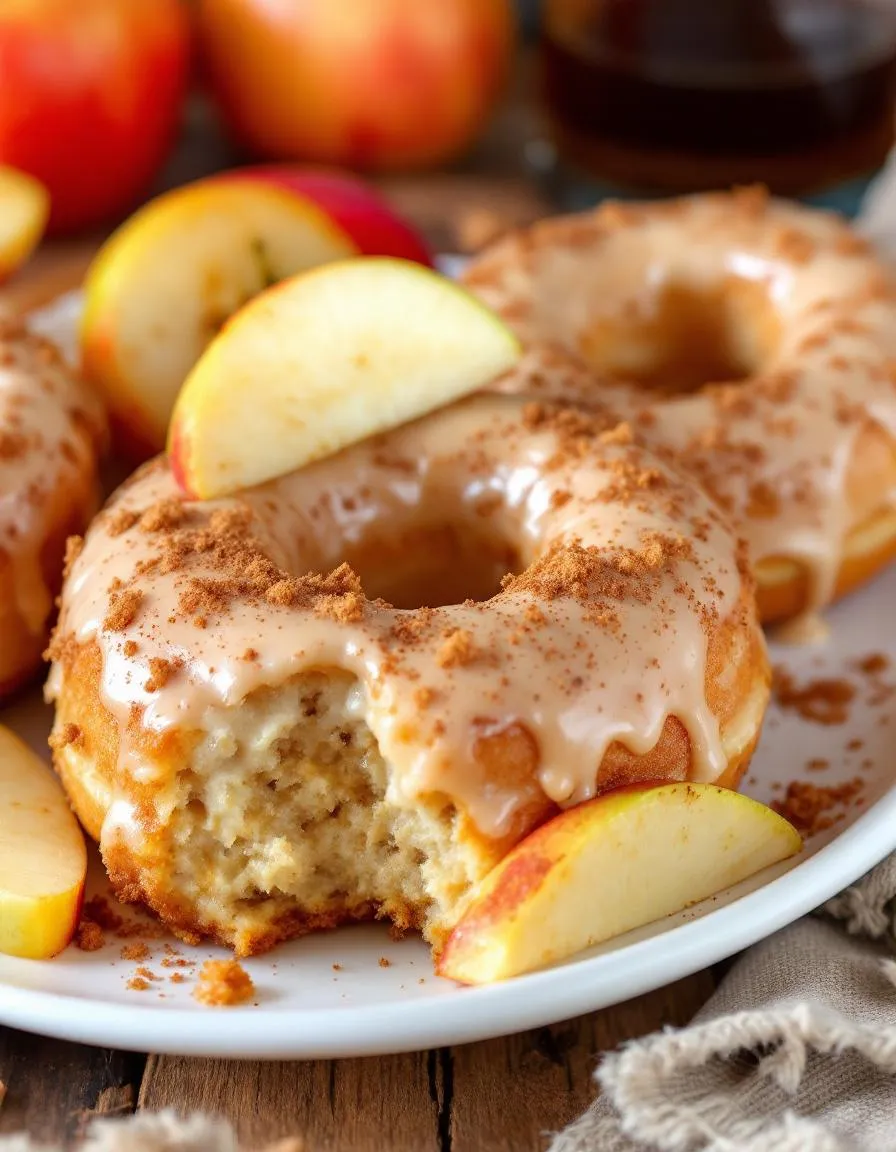
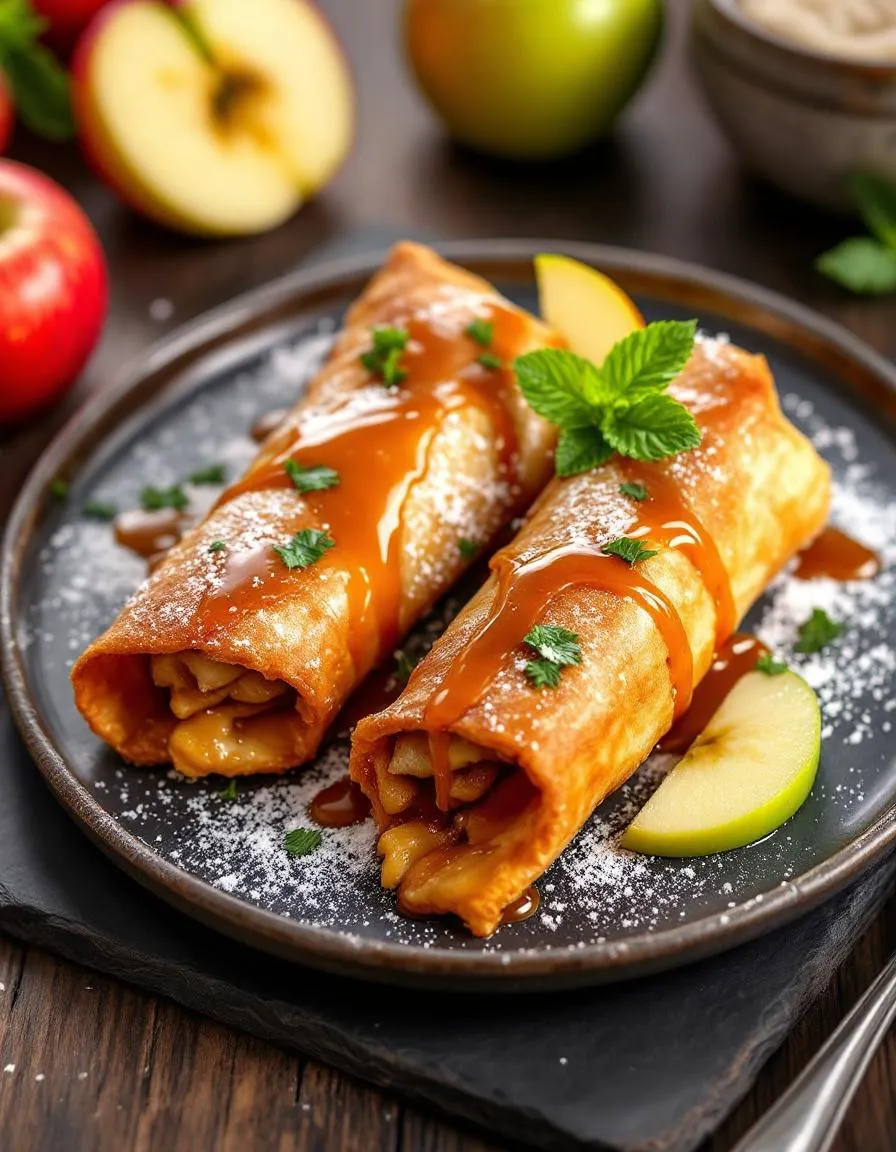
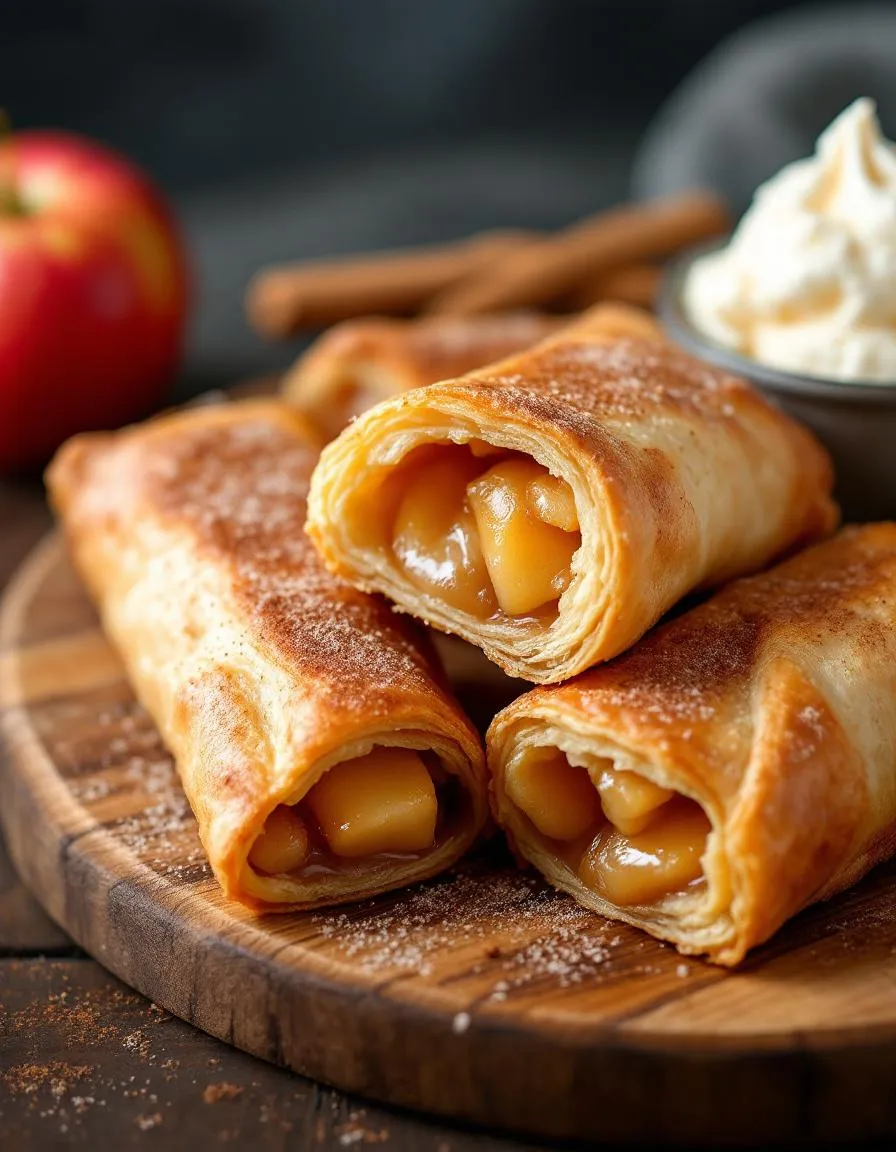
These Apple Pie Egg Rolls deliver a spectacular crunch with every single bite. Consequently, the delicate, flaky wrapper shatters to reveal a warmly spiced, tender apple filling. That soft interior, fragrant with cinnamon and brown sugar, creates a beautiful contrast against the crisp shell. Ultimately, the experience is like enjoying a handheld slice of classic apple pie but with an excitingly fun and crispy texture. The aroma alone, with its sweet and spicy notes, will make your kitchen smell incredible.

Boosting the flavor

For an even more decadent treat, simply drizzle your warm Apple Pie Egg Rolls with a rich caramel sauce. Alternatively, a scoop of vanilla bean ice cream melts perfectly over the top for a classic a la mode experience. Furthermore, you can amplify the warm spices by adding a pinch of nutmeg or cardamom to the apple mixture. If you love experimenting with flavors, consider trying a dollop of our cinnamon cream cheese frosting for a tangy twist. For another fantastic pairing, a cup of our slow cooker spiced apple cider makes the perfect cozy companion to this dessert.

Tips for Success

Best practices for results

Always ensure your apple pie filling is completely cool before assembling your Apple Pie Egg Rolls; otherwise, the heat will make the wrappers soggy and difficult to seal. Furthermore, keep your unused egg roll wrappers under a damp towel to prevent them from drying out and cracking while you work. For a perfectly golden and crispy shell, maintain your oil temperature at a steady 350 degrees Fahrenheit. Finally, let your finished Apple Pie Egg Rolls rest on a wire rack for a few minutes so the filling can set beautifully.

Mistakes to avoid

A common mistake is overfilling the wrappers, which can cause them to burst open during frying. To prevent this, use just two tablespoons of filling and follow our guide on how to fold egg rolls for a secure seal. Additionally, do not overcrowd your pot or fryer, as this will drastically drop the oil temperature and lead to greasy results. For more guidance on achieving the perfect fry, check out our tips for troubleshooting deep frying at home.

Serving and Pairing Suggestions

How to serve this dish

Present your Apple Pie Egg Rolls in a way that wows your guests. For instance, arrange them standing up in a tall glass for a fun and modern look. Alternatively, drizzle the caramel or cinnamon sugar glaze in an artistic pattern on the plate before placing them down. Always serve these warm pastries immediately so the filling is blissfully hot and the wrapper stays beautifully crisp. Furthermore, a light dusting of powdered sugar or a scoop of vanilla ice cream melting on the side makes for a perfect holiday or brunch centerpiece. These Apple Pie Egg Rolls truly turn any gathering into a special occasion.

What goes well with it

A scoop of vanilla bean ice cream is the ultimate partner for warm Apple Pie Egg Rolls. The cold, creamy texture creates a wonderful contrast with the hot, spiced filling. Similarly, a hot mug of our spiced Pumpkin Spice Latte complements the cinnamon notes perfectly. For a brunch spread, consider serving these egg rolls alongside a light and refreshing beverage. Our vibrant Mixed Berry Smoothie offers a tart counterpoint that cuts through the sweetness beautifully.

What are apple pie egg rolls made of?

Apple pie egg rolls are made with a simple filling of diced apples, sugar, cinnamon, and a touch of lemon juice, all wrapped in egg roll or spring roll wrappers. The filling is very similar to a traditional apple pie, but the format allows for a crispy, handheld treat. These delicious Apple Pie Egg Rolls are then fried or baked until golden brown.

Can you bake apple pie egg rolls instead of frying?

Absolutely! For a lighter option, you can bake apple pie egg rolls. Simply brush them lightly with melted butter or oil and bake in a preheated oven at 400°F (200°C) for 15-20 minutes, flipping halfway through, until they are crispy and golden brown. Baking is a fantastic way to enjoy these treats with less oil.

What do you serve with apple pie egg rolls?

The classic pairing for apple pie egg rolls is a scoop of vanilla ice cream, which creates a wonderful hot-and-cold contrast. You can also serve them with a drizzle of caramel sauce, a dusting of powdered sugar, or a dollop of whipped cream. These toppings enhance the warm, spiced apple flavor perfectly.

How do you keep egg rolls from getting soggy?

The key to preventing soggy Apple Pie Egg Rolls is to ensure your apple filling is not too watery. Tossing the diced apples with a little cornstarch helps thicken the juices. Also, make sure your oil is hot enough for frying, or if baking, do not overcrowd the pan, as this creates steam.

Print
clock clock iconcutlery cutlery iconflag flag iconfolder folder iconinstagram instagram iconpinterest pinterest iconfacebook facebook iconprint print iconsquares squares iconheart heart iconheart solid heart solid icon

Apple Pie Egg Rolls


  • Author: Chef Mia

Description

A fun fusion dessert that combines the flavors of classic apple pie with the crispy texture of egg rolls.


Ingredients

Scale

For the Crust:

  • 4 large apples, peeled and diced
  • 1/4 cup brown sugar
  • 1 tsp ground cinnamon
  • 1/4 tsp nutmeg
  • 1 tbsp lemon juice
  • 1 tbsp cornstarch
  • 8 egg roll wrappers
  • 2 tbsp melted butter
  • 1/4 cup granulated sugar for coating
  • Oil for frying

Instructions

1. Prepare the Crust:

  1. Combine apples, brown sugar, cinnamon, nutmeg, lemon juice, and cornstarch in a bowl. Mix well and let sit for 10 minutes.
  2. Place an egg roll wrapper diagonally. Spoon 2-3 tbsp of apple mixture in the center. Fold bottom corner over filling, then fold sides toward center. Roll tightly and seal edge with water.
  3. Heat oil to 350°F (175°C). Fry egg rolls for 2-3 minutes per side until golden brown. Drain on paper towels.
  4. Brush with melted butter and roll in granulated sugar while still warm. Serve with vanilla ice cream if desired.

Notes

You can customize the seasonings to taste.

Easy Baked Apple Cider Donuts Recipe

easy-baked-apple-cider-donuts

Introduction

Is there anything that truly captures the cozy, comforting essence of autumn more perfectly than a warm, spiced donut? That first bite, brimming with nostalgia and the unmistakable flavor of the season, instantly transports you to a crisp fall day. Fortunately, you can now recreate that magical feeling right in your own kitchen with these incredibly easy and healthier Baked Apple Cider Donuts. This recipe delivers all the classic flavor you crave without the mess of a deep fryer, making your home smell absolutely incredible.

So, what exactly are Baked Apple Cider Donuts? Essentially, they are a tender, cake-style donut that we infuse with the rich, concentrated flavor of reduced apple cider. We then bake them in a special pan, which creates their iconic ring shape and gives them a delightful, slightly crisp exterior. This method matters because it offers a fantastic guilt-free alternative to the traditional fried version, allowing you to enjoy this seasonal treat more often. Moreover, this recipe fits our blog’s tone perfectly as we always strive to share approachable, family-friendly recipes that turn out wonderfully every single time. For instance, if you enjoy the warm spices in these donuts, you will absolutely adore our classic Cinnamon Swirl Bread. This recipe simplifies the process, ensuring that anyone, from a baking novice to a seasoned pro, can achieve bakery-quality results. Ultimately, we focus on creating memorable food experiences that bring people together, much like our beloved Old Fashioned Apple Crisp does for so many families.

Why I Love This Recipe

My love for these Baked Apple Cider Donuts runs deep, rooted in annual family trips to the local orchard. Every fall, we would go apple picking and the reward was always a fresh, warm donut. I wanted to capture that same joy for my own children without the long lines. This recipe does exactly that. The moment the cinnamon and nutmeg hit the air, it signals the start of our favorite season. Furthermore, I love that I can feel good about letting my kids have a second one, knowing they are baked and packed with real apple flavor. It is a simple pleasure that creates the happiest of memories.

Health and Nutrition

Why it’s good for your body

These Baked Apple Cider Donuts offer a surprisingly wholesome treat. First, because you bake them instead of frying, they contain significantly less fat than traditional donuts. Consequently, you enjoy a delicious dessert without the heavy grease. Moreover, apple cider provides the star flavor, and it brings a host of benefits. For instance, apple cider contains polyphenols, which are powerful antioxidants that help combat oxidative stress in your body.

Additionally, this recipe incorporates warm spices like cinnamon and nutmeg. These spices do more than just add flavor; in fact, they possess anti-inflammatory properties and can aid in digestion. Therefore, every bite supports your wellbeing in a small way. Furthermore, using whole ingredients like real apples and eggs contributes valuable nutrients. Ultimately, these Baked Apple Cider Donuts deliver a cozy, satisfying experience that also nourishes you.

How it fits in a healthy lifestyle

You can absolutely enjoy these Baked Apple Cider Donuts as part of a balanced diet. Think of them as a mindful treat rather than a forbidden indulgence. Baking them at home gives you complete control over the ingredients, allowing you to make smart swaps. For example, you can easily use a gluten-free flour blend to accommodate dietary needs, turning them into a perfect gluten-free breakfast option. Their satisfying nature, thanks to the fiber from apples, also helps curb cravings, preventing overindulgence later.

Pair one with a source of protein, like a Greek yogurt or a handful of nuts, for a more complete and sustaining snack. This approach to eating—enjoying what you love while nourishing your body—is key to a positive relationship with food. For more inspiration on creating balanced meals that include delicious treats, explore our guide on healthy meal prep strategies that work for real life.

How to Prepare This Dish

Steps and time-saving tips

First, reduce your apple cider to intensify its flavor; this simple step makes a huge difference. Meanwhile, preheat your oven and generously grease your donut pan. Next, whisk your dry ingredients together in a large bowl. In a separate bowl, vigorously whisk the wet ingredients, including the reduced cider, until they are perfectly smooth and emulsified. Then, gently fold the wet mixture into the dry ingredients; however, be careful not to overmix the batter. Subsequently, spoon the batter into a piping bag or a sturdy zip-top bag for effortless, mess-free filling. Snip the corner and pipe the batter evenly into each donut cavity, filling them about two-thirds full. Immediately place the pan in the preheated oven and bake until the tops spring back when lightly pressed. Finally, let the Baked Apple Cider Donuts cool in the pan for just a few minutes before transferring them to a wire rack. Meanwhile, whisk together the simple cinnamon sugar coating or a sweet glaze. For the best results, brush the warm donuts with melted butter and then dredge them in the cinnamon sugar. Alternatively, drizzle a simple powdered sugar glaze over the top for a sweeter finish. Enjoy your homemade Baked Apple Cider Donuts right away with a hot cup of coffee.

Mistakes I’ve made and learned from

I have absolutely overmixed this batter in a rush, which resulted in surprisingly tough Baked Apple Cider Donuts. Now, I simply stir until the last streak of flour disappears, and the texture is infinitely better. Another common error? Not reducing the cider first. The flavor was always too faint until I started simmering it down to a syrup, which concentrates the apple essence beautifully. I also learned the hard way that letting the donuts steam in the pan makes them soggy; a quick five-minute rest is all they need before you move them to a cooling rack. For more on avoiding common pitfalls, my guide on common baking mistakes covers these issues in greater detail. Furthermore, choosing the right pan is crucial for even baking, a lesson I learned after a few uneven batches. If you’re in the market for a new one, my review of the best donut pans can help you find a reliable option. Trust me, learning from these errors will save you so much time and guarantee a perfect batch every single time.

Cultural Connection and Variations

Where this recipe comes from

Every autumn, orchards across New England transform into bustling hubs, and the scent of these spiced cakes absolutely fills the air. This tradition, however, runs much deeper than a simple seasonal treat. Farmers originally fried cake batter in lard to create a hearty, calorie-dense snack for long harvest days. Consequently, the baked version we love today evolved for home kitchens, offering a lighter but equally delicious alternative.

Meanwhile, families often pass down their own unique twists. For instance, my grandmother always added a pinch of cardamom to her batter, a subtle nod to our Scandinavian heritage. In other parts of the world, similar treats take different forms. Germany offers its sugar-dusted Berliner, while Latin America has its fluffy, syrup-soaked sopapillas. Ultimately, the best Baked Apple Cider Donuts always carry the warmth of the orchard and the spirit of the cook.

How it fits in today’s cooking

This classic treat perfectly fits our modern desire for nostalgic, from-scratch baking. Furthermore, its baked nature aligns with today’s preference for slightly healthier indulgences. Home cooks now creatively adapt the recipe, often using alternative flours or plant-based milks for dietary needs.

These donuts seamlessly transition from a weekend breakfast project to the star of a holiday brunch spread. They pair wonderfully with a warm cup of coffee or even a scoop of ice cream for a decadent dessert. In fact, for another fantastic seasonal dessert that captures this cozy feeling, you must try our ultimate Pumpkin Spice Cupcakes. Moreover, if you are looking for the perfect breakfast pairing to go with your fresh-baked donuts, our Cinnamon Roll Pancakes are a guaranteed crowd-pleaser. This enduring relevance proves that some traditions only get better with time.

Taste and Texture

What makes it delicious

These Baked Apple Cider Donuts greet you with a wonderfully fragrant aroma of warm cinnamon and sweet, spiced apple. Each bite delivers a supremely moist and tender crumb that simply melts in your mouth. Furthermore, the cozy, caramel-like notes from the reduced apple cider perfectly complement the deep, earthy warmth of the spices. Ultimately, the classic cinnamon-sugar coating provides a delightful, slightly crisp contrast to the soft, cakey interior, making every mouthful a perfect balance.

Boosting the flavor

For an extra flavor kick, consider adding a simple cream cheese glaze; its tangy sweetness beautifully highlights the apple notes. Alternatively, a handful of chopped pecans folded into the batter introduces a wonderful crunch. You can also amplify the warm spice profile with a pinch of cardamom or a dash of freshly grated nutmeg. For another delicious autumn-inspired treat that uses similar warm spices, explore our popular pumpkin bread recipe. Finally, serving these Baked Apple Cider Donuts warm alongside a cold, creamy glass of vanilla iced coffee creates a truly unforgettable pairing.

Tips for Success

Best practices for results

First, always chill your batter for at least thirty minutes before baking. Consequently, this crucial step helps your Baked Apple Cider Donuts hold their iconic shape and rise properly. Meanwhile, generously grease your donut pan with butter or non-stick spray to guarantee a perfect release every single time. For the best texture, furthermore, avoid overmixing your batter and instead stir the ingredients just until they combine.

Mistakes to avoid

A common error involves overfilling the donut cavities, which unfortunately leads to misshapen donuts that bake together. Instead, fill each well only two-thirds full for a perfect ring shape. Additionally, do not over-reduce your apple cider, as this can create an overly sweet and sticky final product. For more guidance on achieving the ideal consistency for your reductions, explore our guide on how to reduce apple cider. Finally, always allow your Baked Apple Cider Donuts to cool in the pan for a few minutes before transferring them to a wire rack; otherwise, they might break. For more essential baking tips that prevent breakage, check out our baking tips for beginners.

Serving and Pairing Suggestions

How to serve this dish

Present your warm Baked Apple Cider Donuts on a beautiful rustic wooden board for a cozy, autumnal feel. Alternatively, stack them high on a vintage cake stand to create a stunning centerpiece for your holiday brunch. For a special touch, lightly dust them with extra cinnamon sugar right before serving. Meanwhile, a drizzle of simple vanilla glaze or a side of whipped cream instantly elevates these treats. Consequently, your guests will adore this welcoming presentation.

Serve these donuts fresh from the oven at a family gathering or package them in cute boxes as edible favors. Ultimately, the inviting aroma and homestyle look of Baked Apple Cider Donuts make any occasion feel more festive.

What goes well with it

A hot mug of spiced chai tea makes a perfect companion, as its warm spices beautifully echo the flavors in your Baked Apple Cider Donuts. Similarly, a glass of cold, crisp apple cider enhances the cozy autumn experience. For a truly decadent breakfast, pair your donut with a creamy pumpkin spice latte. Furthermore, a scoop of vanilla bean ice cream turns this treat into an unforgettable dessert.

Consider serving these donuts alongside our popular Quick Pumpkin Muffins for a delightful fall-themed breakfast spread. Finally, a dollop of our homemade Cinnamon Honey Butter creates a wonderfully rich and spreadable topping that complements the donuts’ soft texture.

What is the best way to store baked apple cider donuts?

For maximum freshness, store your baked apple cider donuts in an airtight container at room temperature for up to 2 days. For longer storage, you can freeze them for up to 3 months; just be sure to wrap them tightly in plastic wrap and then place them in a freezer bag to prevent freezer burn.

Can I make baked apple cider donuts without a donut pan?

Yes, you can make them without a specialized pan. Simply spoon the batter into a greased muffin tin to create baked apple cider donut “holes” or “muffins.” The baking time may need to be adjusted slightly, but the delicious spiced flavor will be exactly the same.

How do you reduce apple cider for donuts?

To reduce apple cider, simply pour 1 to 2 cups of cider into a small saucepan and simmer it over medium-low heat for 20-40 minutes, stirring occasionally, until it has reduced down to about 1/4 to 1/2 cup. This concentrated syrup is the key to packing intense apple flavor into your baked apple cider donuts.

Why are my baked donuts dry?

Dry baked donuts are often the result of overmixing the batter or overbaking. To ensure moist baked apple cider donuts, mix the batter just until the ingredients are combined and avoid opening the oven door frequently. Using ingredients like yogurt, buttermilk, or your reduced apple cider also helps maintain moisture.

Print
clock clock iconcutlery cutlery iconflag flag iconfolder folder iconinstagram instagram iconpinterest pinterest iconfacebook facebook iconprint print iconsquares squares iconheart heart iconheart solid heart solid icon

Baked Apple Cider Donuts


  • Author: Chef Mia

Description

Warm, spiced donuts baked to perfection with reduced apple cider for a cozy fall treat.


Ingredients

Scale

For the Crust:

  • 2 cups all-purpose flour
  • 1 1/2 teaspoons baking powder
  • 1 1/2 teaspoons cinnamon
  • 1/2 teaspoon nutmeg
  • 1/4 teaspoon salt
  • 1/2 cup apple cider, reduced to 1/4 cup
  • 1/2 cup milk
  • 2 tablespoons unsalted butter, melted
  • 1/2 cup granulated sugar
  • 1/4 cup brown sugar
  • 1 large egg
  • 1 teaspoon vanilla extract

Instructions

1. Prepare the Crust:

  1. Preheat oven to 350°F (175°C). Grease a donut pan.
  2. Whisk together flour, baking powder, cinnamon, nutmeg, and salt in a bowl.
  3. In another bowl, mix reduced apple cider, milk, melted butter, sugars, egg, and vanilla.
  4. Combine wet and dry ingredients, stirring until just mixed. Spoon batter into donut pan.
  5. Bake for 10-12 minutes until a toothpick comes out clean. Cool slightly before glazing.

Notes

You can customize the seasonings to taste.

Best Pumpkin Cheesecake – Creamy & Smooth Recipe

best-pumpkin-cheesecake-creamy-smooth

Introduction

Is there anything more comforting than the warm, spiced aroma of pumpkin and cinnamon filling your kitchen? Honestly, that scent alone signals the start of the coziest season. Moreover, it promises something incredibly delicious is on the way. This recipe for the ultimate Pumpkin Cheesecake captures that feeling perfectly. It transforms those classic autumn flavors into a rich, creamy, and stunning dessert that will absolutely become the star of your holiday table.

So what exactly is this celebrated dessert? Fundamentally, a Pumpkin Cheesecake is a beautiful fusion of two beloved classics. It masterfully combines the velvety, tangy richness of a New York-style cheesecake with the warm, spiced essence of pumpkin pie. The result is a decadent slice that feels both familiar and entirely new. This dessert matters because it is more than just a sweet treat. It is a centerpiece that evokes nostalgia and creates new memories around gatherings with family and friends. Furthermore, it fits our blog’s tone perfectly. We celebrate approachable recipes that deliver restaurant-quality results right in your own home. For instance, if you enjoy making classic desserts, you might also love our guide to creating the perfect Classic New York Cheesecake. This Pumpkin Cheesecake follows that same ethos. It provides clear, step-by-step instructions for a show-stopping dessert that seems complex but is completely achievable. Ultimately, we believe that baking should be a joyful and rewarding experience. This recipe delivers that, along with a spectacular dessert that will have everyone asking for seconds. For more seasonal baking inspiration, explore our collection of Fall Baking Favorites.

Why I Love This Recipe

This particular Pumpkin Cheesecake recipe holds a special place in my heart. I originally developed it for a Friendsgiving dinner years ago, and it instantly became a non-negotiable request for every subsequent gathering. What truly won me over was its flawless texture. The filling is impossibly smooth and creamy, without a single crack, and the ginger snap crust adds a wonderfully spicy crunch that complements the pumpkin perfectly. Most importantly, it consistently earns those wonderful, wide-eyed looks of pure delight from my guests, which is the best reward any baker can receive.

Health and Nutrition

Why it’s good for your body

Pumpkin cheesecake offers more than just incredible flavor. For instance, pumpkin puree provides a powerful dose of vitamin A, which actively supports healthy vision and a strong immune system. Furthermore, this delicious dessert delivers a good amount of antioxidants like beta-carotene. These compounds help your body combat oxidative stress, thereby promoting overall cellular health.

Additionally, many recipes incorporate warm spices like cinnamon and nutmeg. Consequently, these spices not only enhance the taste but also offer their own anti-inflammatory properties. Moreover, the eggs and dairy in a classic Pumpkin Cheesecake contribute high-quality protein and calcium. This combination actively supports muscle repair and bone strength after you enjoy a slice.

Ultimately, enjoying a serving of Pumpkin Cheesecake means you are treating yourself to a dessert with genuine nutritional merits. So, you can feel good about indulging in a dessert that truly loves you back.

How it fits in a healthy lifestyle

You can absolutely enjoy pumpkin cheesecake as part of a balanced diet. Think of it as a celebratory food rather than an everyday indulgence. Savoring a reasonable portion mindfully allows you to appreciate the rich flavors without overdoing it. This approach helps you maintain a healthy relationship with food while still enjoying the treats you love.

Many modern recipes easily adapt to specific dietary needs. For example, you can create a fantastic gluten-free version by using a nut-based crust. You can also explore using reduced-fat cream cheese or natural sweeteners to tailor the recipe to your heart-healthy goals. The key is finding a balance that works for your lifestyle and nutritional plans.

Pairing a slice with a cup of coffee or tea makes for a perfect afternoon treat that satisfies your sweet tooth. Remember, a healthy lifestyle includes room for joy and delicious food. For more ideas on creating balanced meals that leave room for dessert, check out our guide on easy healthy meal prep.

How to Prepare This Dish

Steps and time-saving tips

First, gather all your ingredients to make the process smooth. Meanwhile, preheat your oven to 325°F. Start by crushing the graham crackers for the crust. For a major time-saver, use a food processor to pulverize them in seconds. Then, simply mix the crumbs with melted butter and a touch of sugar. Firmly press this mixture into the bottom and slightly up the sides of your springform pan. Consequently, you create the perfect base for your Pumpkin Cheesecake. Next, beat the room-temperature cream cheese until it’s completely smooth and lump-free. This crucial step prevents a grainy texture. Gradually add the sugar and beat again until everything is well combined. Afterwards, whisk in the pumpkin puree, eggs, sour cream, and all those warm spices. Importantly, mix on low speed to avoid incorporating too much air, which can cause cracks. Pour your luxurious filling over the prepared crust and gently smooth the top. Finally, bake until the edges are set but the center still has a slight jiggle. Let it cool completely on a wire rack before you even think about transferring it to the refrigerator. Chill your Pumpkin Cheesecake for at least four hours, or ideally overnight. This patience allows the flavors to meld and the texture to become perfectly firm and sliceable.

Mistakes I’ve made and learned from

I once pulled my Pumpkin Cheesecake from the oven looking perfect, only to hear a loud crack form as it cooled on the counter. I learned the hard way that drastic temperature changes are the enemy. Now, I always let it cool gradually in the turned-off oven with the door slightly ajar. This method prevents those stressful surface cracks every single time. Another rookie mistake? Using cold cream cheese straight from the fridge. It never blends smoothly, leaving you with a lumpy batter no matter how long you mix. I make sure my dairy ingredients are truly at room temperature now, which is a simple trick I picked up from my guide on achieving the perfect cheesecake batter consistency. And for the love of all that is good, do not overbake it. The center should wobble a bit when you jiggle the pan. It continues to set as it chills. Trust the process, and you will be rewarded with the creamiest dessert. For more detailed troubleshooting, my post on avoiding common cheesecake cracks covers all the bases.

Cultural Connection and Variations

Where this recipe comes from

Every family seems to have its own cherished version of Pumpkin Cheesecake, a dessert that beautifully marries the old world with the new. My own grandmother always insisted on using fresh, roasted sugar pumpkins instead of canned puree, a method that filled her entire house with the most incredible autumnal aroma for hours. This practice, however, is just one thread in a rich global tapestry. For instance, many bakers in the American South might add a generous pinch of bourbon or a crunchy pecan crust, creating a distinctly regional twist. Meanwhile, some European variations might lean into spices like cardamom or anise, offering a more complex flavor profile than the classic pumpkin pie spice blend we often use. Ultimately, this dessert tells a story of harvest celebration and cozy gatherings. No matter where it comes from, a great Pumpkin Cheesecake always feels like a warm hug on a cool day.

How it fits in today’s cooking

Today, this classic dessert effortlessly holds its place at the center of our holiday tables and our everyday baking routines. Modern cooks constantly find new ways to enjoy it, proving its incredible versatility. For example, many now create stunning no bake cheesecakes for a quicker, yet equally delicious, seasonal treat that requires no oven time. Furthermore, its flavor profile makes it a perfect candidate for other creative desserts. Consequently, you can often find its essence inspiring other creations, like a decadent batch of pumpkin cheesecake cookies that capture all the cozy flavor in a portable, bite-sized form. This adaptability ensures that the Pumpkin Cheesecake remains a beloved favorite, seamlessly fitting into both elaborate festive meals and simple weeknight indulgences.

Taste and Texture

What makes it delicious

This Pumpkin Cheesecake delivers a symphony of autumnal flavors. Initially, your palate registers the rich, creamy filling, which is perfectly spiced with warm cinnamon, ginger, and nutmeg. Furthermore, the velvety smooth texture melts luxuriously in your mouth, contrasting beautifully with the crisp, buttery graham cracker crust. Each bite of this Pumpkin Cheesecake releases a fragrant, comforting aroma that tastes like the essence of fall. Ultimately, the experience is both decadently rich and surprisingly light, leaving a sweetly spiced finish that invites another slice.

Boosting the flavor

Fortunately, you can easily elevate this dessert with a few creative tweaks. For instance, a generous dollop of homemade whipped cream adds a cool, airy contrast to the dense filling. Alternatively, a drizzle of salted caramel sauce introduces a wonderful sweet-and-salty complexity that complements the warm spices. Moreover, consider swapping the traditional graham cracker base for a gingersnap crust to amplify the spicy notes. Finally, a sprinkle of toasted pecans on top provides a delightful crunch that makes every bite more exciting.

Tips for Success

Best practices for results

First, always use room temperature ingredients for a perfectly smooth and lump-free filling. Furthermore, thoroughly scrape down the sides of your bowl to ensure everything combines evenly. For the best texture, avoid overmixing the batter once you add the flour. Consequently, you will prevent too much air from developing, which can cause cracking. Finally, allow your Pumpkin Cheesecake to cool gradually in the turned-off oven to prevent it from falling.

Mistakes to avoid

A common error is using a watery pumpkin puree, which can make your filling runny. Instead, always blot your puree with a paper towel to remove excess moisture. Additionally, many bakers skip the water bath, but this step is essential for gentle, even cooking. For more guidance on this technique, see our tutorial on how to use a water bath. Moreover, do not overbake your Pumpkin Cheesecake; the center should still have a slight jiggle. Remember, the residual heat will continue to cook it as it cools. If you are unsure about doneness, our article on troubleshooting cheesecake offers great visual cues.

Serving and Pairing Suggestions

How to serve this dish

Present your Pumpkin Cheesecake as the stunning centerpiece it deserves to be. For a beautiful finish, top each slice with a generous dollop of freshly whipped cream. Alternatively, a simple dusting of cinnamon or a drizzle of caramel sauce adds instant elegance. This dessert truly shines during holiday gatherings, especially Thanksgiving and Christmas. Moreover, you can make individual servings by using a mason jar for a fun and portable treat.

Consider the setting for maximum impact. A chilled Pumpkin Cheesecake slices beautifully for a formal dinner party. Conversely, a room temperature version offers a softer, creamier texture for a casual family dessert. Finally, garnish with toasted pecans or a twist of orange zest for a pop of color and crunch that delights the senses.

What goes well with it

A hot cup of coffee makes a classic partner for this spiced dessert. The robust bitterness of the brew perfectly cuts through the rich, sweet creaminess of the Pumpkin Cheesecake. For a truly decadent experience, serve it alongside a glass of our Salted Caramel Hot Chocolate. The warm, buttery notes of caramel create a heavenly flavor combination.

If you prefer a boozy companion, a small glass of bourbon or spiced rum works wonderfully. The oak and vanilla notes in the spirit mirror the warm spices in the cheesecake. Furthermore, a lighter, fruit-forward dessert like our Classic Strawberry Shortcake offers a refreshing contrast if you are serving a dessert buffet. Ultimately, these pairings elevate your slice of Pumpkin Cheesecake into a memorable culinary event.

Why did my pumpkin cheesecake crack?

Cracking usually happens from overmixing the batter, which incorporates too much air, or from a rapid temperature change after baking. To prevent a cracked pumpkin cheesecake, avoid overbeating after adding the eggs and let it cool gradually in the oven with the door slightly ajar.

Does pumpkin cheesecake need to be refrigerated?

Yes, absolutely. Due to the dairy content in the cream cheese and the eggs, pumpkin cheesecake must be refrigerated. Store it in an airtight container to keep it fresh and to prevent it from absorbing other flavors from your fridge.

Can you freeze pumpkin cheesecake?

Yes, you can freeze pumpkin cheesecake for up to 2-3 months. Wrap the entire cheesecake or individual slices tightly in plastic wrap and then aluminum foil to prevent freezer burn. Thaw it overnight in the refrigerator before serving.

How do you know when a pumpkin cheesecake is done?

The edges of the pumpkin cheesecake should look set, but the center should still have a slight jiggle, similar to Jell-O, when you gently shake the pan. It will continue to set as it cools. Overbaking is a common cause of a dry texture.

Print
clock clock iconcutlery cutlery iconflag flag iconfolder folder iconinstagram instagram iconpinterest pinterest iconfacebook facebook iconprint print iconsquares squares iconheart heart iconheart solid heart solid icon

Pumpkin Cheesecake


  • Author: Chef Mia

Description

A creamy, spiced pumpkin cheesecake with a graham cracker crust, perfect for autumn gatherings.


Ingredients

Scale

For the Crust:

  • 1 1/2 cups graham cracker crumbs
  • 1/4 cup granulated sugar
  • 1/2 cup unsalted butter, melted
  • 24 oz cream cheese, softened
  • 3/4 cup granulated sugar
  • 1/4 cup brown sugar
  • 1 cup canned pumpkin puree
  • 3 large eggs
  • 1 tsp vanilla extract
  • 1 tsp ground cinnamon
  • 1/2 tsp ground ginger
  • 1/4 tsp ground nutmeg
  • 1/4 tsp ground cloves

Instructions

1. Prepare the Crust:

  1. Preheat oven to 325°F (165°C). Combine graham cracker crumbs, 1/4 cup sugar, and melted butter. Press into a 9-inch springform pan.
  2. In a large bowl, beat cream cheese, granulated sugar, and brown sugar until smooth. Mix in pumpkin puree.
  3. Add eggs one at a time, then mix in vanilla, cinnamon, ginger, nutmeg, and cloves until well combined.
  4. Pour filling over crust. Bake for 55-60 minutes until center is set. Cool completely, then refrigerate for at least 4 hours before serving.

Notes

You can customize the seasonings to taste.

Best Pumpkin Recipes – Sugar Apron

best-pumpkin-recipes-sugar-apron

Introduction

There is something truly magical about the scent of pumpkin and warm spices wafting from your kitchen. It instantly wraps you in a cozy blanket of nostalgia, promising a taste of pure autumn comfort. If you yearn to capture that feeling in every single bite, then you absolutely must explore the magic of Pumpkin Archives – Sugar Apron. This recipe collection goes far beyond the ordinary, offering a gateway to creating unforgettable seasonal moments and delicious memories right at your own table.

So, what exactly is Pumpkin Archives – Sugar Apron? Essentially, it is a cherished compilation of meticulously tested recipes that celebrate pumpkin in all its glorious forms. This particular archive focuses on delivering fail-proof, crowd-pleasing dishes that balance homestyle comfort with a touch of elegance. Each recipe matters because it empowers you to create not just food, but centerpieces for gathering and connection. Furthermore, these dishes perfectly fit the warm, approachable, and celebratory tone we cultivate here. They are designed for real home cooks who want impressive results without unnecessary complexity. For instance, if you adore classic flavors, our traditional pumpkin pie recipe is a timeless choice. Alternatively, if you seek a morning treat, our archive offers fantastic options for pumpkin bread that will make your entire house smell incredible. The entire philosophy behind Pumpkin Archives – Sugar Apron revolves around trust, quality, and the simple joy of baking something wonderful from scratch.

Why I Love This Recipe

I have a deeply personal connection to the Pumpkin Archives – Sugar Apron because it embodies the spirit of my grandmother’s kitchen. She taught me that baking is an act of love, and these recipes consistently deliver that same heartfelt feeling. Every time I bake from this collection, I not only create something delicious but also feel a profound link to those cherished family traditions and the warm, welcoming aromas of my childhood.

Health and Nutrition

Why it’s good for your body

Pumpkin Archives – Sugar Apron truly nourishes your body from the inside out. For instance, pumpkin provides a powerhouse of vitamin A, which actively supports sharp vision and a strong immune system. Moreover, this essential vitamin promotes healthy, glowing skin. Additionally, the dish delivers a significant dose of dietary fiber. Consequently, this fiber aids digestion and helps you feel full and satisfied for longer, which can prevent unnecessary snacking.

Furthermore, Pumpkin Archives – Sugar Apron incorporates warming spices like cinnamon. Importantly, these spices offer their own anti-inflammatory properties. Therefore, enjoying this meal does more than just satisfy your taste buds; it actively contributes to your overall wellness. Finally, the natural sweetness of the ingredients means you can enjoy a decadent-feeling dessert without the typical sugar crash. Ultimately, making Pumpkin Archives – Sugar Apron a fantastic choice for a health-conscious treat.

How it fits in a healthy lifestyle

This recipe seamlessly fits into a balanced eating plan. You can confidently enjoy Pumpkin Archives – Sugar Apron as a nutritious dessert that doesn’t derail your goals. It naturally aligns with a whole-foods approach to eating, focusing on the goodness of real ingredients. For anyone exploring gluten-free options, this dessert is a perfect and safe choice that doesn’t compromise on flavor or texture.

If you are looking for more inspiration for healthy and delicious treats, explore our guide on gluten-free baking tips. Furthermore, incorporating wholesome desserts like this one is a key part of sustainable healthy habits. For more ideas on creating a well-rounded menu, check out our collection of easy weeknight dinners that pair perfectly with a lighter sweet ending.

How to Prepare This Dish

Steps and time-saving tips

First, gather all your ingredients for the Pumpkin Archives – Sugar Apron. This simple prep step saves you from frantic mid-recipe searches. Preheat your oven now to ensure it reaches the perfect temperature. Next, whisk your wet ingredients together vigorously until they are completely smooth and emulsified. In a separate bowl, combine the dry ingredients. Gradually fold the dry mixture into the wet ingredients, but be careful not to overmix the batter. A few lumps are perfectly fine and will prevent a tough texture. Meanwhile, generously grease your baking pan. Pour the beautiful batter into the prepared pan and use a spatula to spread it evenly into the corners. Finally, place the pan in the center of your preheated oven. Set a timer because visual cues are your best friend here. The heavenly aroma will tell you it’s almost done, but a toothpick test confirms it. Let the Pumpkin Archives – Sugar Apron cool completely on a wire rack. This patience is crucial for the ideal texture and makes frosting much easier.

Mistakes I’ve made and learned from

I have absolutely learned the hard way that overmixing is the arch-nemesis of a tender Pumpkin Archives – Sugar Apron. I once whisked that batter into a smooth, glue-like paste, resulting in a final product that was sadly dense and tough. Now, I fold the ingredients until they are just combined, and the difference is incredible. Another classic error of mine was impatience with cooling. I’ve tried to frost a warm cake, creating a melted, sloppy mess that looked nothing like the beautiful dessert I envisioned. Letting your creation cool completely is non-negotiable for a perfect finish. For more on getting textures just right, my experiments with achieving a perfectly moist crumb were a game-changer. And if you’re worried about presentation, my guide on achieving smooth buttercream will save you from my early frosting disasters.

Cultural Connection and Variations

Where this recipe comes from

My grandmother’s kitchen always smelled of cinnamon and nutmeg in the fall. Consequently, she would pull out her weathered notebook, the one she called her Pumpkin Archives – Sugar Apron, and begin her baking ritual. This specific recipe for pumpkin bread feels like a warm hug because it connects generations. However, families around the world put their own spin on pumpkin treats. For instance, in Australia, they might add macadamia nuts for a local crunch. Meanwhile, in the UK, bakers often incorporate mixed spice for a more complex warmth. My aunt, on the other hand, always stirs in a handful of dark chocolate chips, a twist we all adore. Ultimately, this dish celebrates harvests and togetherness across cultures. Therefore, every family seems to have its own version tucked away. The beauty of the Pumpkin Archives – Sugar Apron lies in its ability to adapt while still feeling like home.

How it fits in today’s cooking

This pumpkin bread recipe absolutely thrives in modern kitchens. Busy home cooks, for example, love that they can easily make it ahead for a quick breakfast or a satisfying snack. Furthermore, it fits perfectly into today’s love for seasonal, whole-food cooking. Many bakers now adapt it by using whole wheat flour or a flax egg, creating a healthier version without losing any comfort. You can find similar adaptable, make-ahead brilliance in our popular collection of healthy muffin recipes. This loaf also remains a superstar for holiday gatherings and casual weeknight desserts alike. Its inviting aroma simply says “fall” no matter the occasion. Interestingly, its role has expanded from a classic dessert to a versatile treat for any time of day. For another fantastic way to enjoy seasonal flavors, consider our ultimate pumpkin spice latte cupcakes. Ultimately, this recipe continues to create new memories in today’s cooking routines.

Taste and Texture

What makes it delicious

This Pumpkin Archives – Sugar Apron recipe delivers a wonderfully moist and tender crumb that simply melts in your mouth. Moreover, the warm, fragrant spices like cinnamon and nutmeg create an aromatic hug, perfectly complementing the sweet, earthy pumpkin flavor. Each bite of Pumpkin Archives – Sugar Apron offers a satisfyingly dense yet soft texture, while a subtle vanilla undertone rounds out the entire experience beautifully.

Boosting the flavor

For an extra flavor boost, consider folding a handful of dark chocolate chips or toasted pecans into the batter before baking. Alternatively, a simple cream cheese glaze drizzled on top adds a tangy sweetness that contrasts the spices perfectly. Furthermore, a dollop of our Homemade Whipped Cream provides a light, cloud-like texture. Finally, serving it warm with a scoop of Vanilla Bean Ice Cream transforms it into an decadent dessert.

Tips for Success

Best practices for results

Always use room temperature ingredients for your Pumpkin Archives – Sugar Apron, as this ensures a smooth, even batter that bakes perfectly. Furthermore, make sure you properly measure your flour by spooning it into the measuring cup and leveling it off for the correct density. Additionally, do not overmix the batter once you add the dry ingredients; simply stir until the last streaks of flour disappear. Finally, trust the toothpick test for doneness rather than relying solely on the timer for the best Pumpkin Archives – Sugar Apron.

Mistakes to avoid

A common error is using canned pumpkin pie mix instead of pure pumpkin puree, which will drastically alter the sweetness and spice profile. To fix this, always double-check the label to ensure you have the correct product. Moreover, avoid overbaking your creation, as this can lead to a dry texture. For more guidance on perfect baking times, explore our guide on common baking mistakes. Another frequent issue is not properly creaming the butter and sugar, which provides essential structure. For best results, use a stand mixer for several minutes until the mixture becomes light and fluffy. You can learn more about this crucial technique in our baking science article.

Serving and Pairing Suggestions

How to serve this dish

Present your Pumpkin Archives – Sugar Apron warm for the ultimate cozy experience. For a beautiful brunch spread, arrange the slices on a rustic wooden board. Alternatively, plate individual servings with a dusting of powdered sugar for a simple yet elegant finish. This dish truly shines during holiday gatherings, so consider it for your Thanksgiving or Christmas morning table. Finally, garnish each piece with a dollop of freshly whipped cream or a sprinkle of cinnamon to make it visually irresistible.

What goes well with it

A hot cup of coffee perfectly complements the warm spices in Pumpkin Archives – Sugar Apron. The robust flavor creates a wonderful balance with the sweet and earthy notes of the bake. For a savory contrast that makes a complete meal, try serving it alongside our popular Easy Breakfast Casserole. Moreover, a cool, creamy glass of cold brew or a chai latte also makes an excellent pairing. If you want to continue the autumnal theme, a slice pairs wonderfully with our spiced Pumpkin Spice Latte Cupcakes for an indulgent dessert course.

What is the best pumpkin for baking?

The best pumpkins for baking are sugar pumpkins, also known as pie pumpkins. These smaller, sweeter varieties have a denser, less watery flesh than larger carving pumpkins, which makes them ideal for creating the rich, smooth textures found in the Pumpkin Archives – Sugar Apron recipes. Using the right pumpkin ensures your pies, breads, and other treats will have the best flavor and consistency.

How do you make pumpkin puree from scratch?

To make homemade pumpkin puree, cut a sugar pumpkin in half, remove the seeds and stringy pulp, and roast it cut-side down on a baking sheet until the flesh is very tender. Scoop the soft flesh into a food processor or blender and blend until completely smooth. This fresh puree will elevate any recipe from the Pumpkin Archives – Sugar Apron, offering a superior flavor to most canned versions.

Can you freeze pumpkin bread?

Yes, you can absolutely freeze pumpkin bread to enjoy later. Allow the bread to cool completely after baking, then wrap it tightly in plastic wrap followed by aluminum foil or place it in a heavy-duty freezer bag. When you’re ready for a slice, simply thaw it at room temperature; this method helps preserve the moist, tender crumb that is a hallmark of Sugar Apron’s recipes.

What are some unique pumpkin recipes?

Beyond classic pie, unique pumpkin recipes include savory options like pumpkin mac and cheese, pumpkin risotto, or spicy pumpkin soup. For sweet twists, try pumpkin cinnamon rolls, pumpkin cheesecake bars, or pumpkin spice granola. The Pumpkin Archives – Sugar Apron is a fantastic resource for discovering these creative and delicious ways to use pumpkin throughout the fall season and beyond.

Print
clock clock iconcutlery cutlery iconflag flag iconfolder folder iconinstagram instagram iconpinterest pinterest iconfacebook facebook iconprint print iconsquares squares iconheart heart iconheart solid heart solid icon

Pumpkin Spice Muffins


  • Author: Chef Mia

Description

Moist and flavorful pumpkin muffins with warm spices, perfect for autumn mornings or holiday gatherings.


Ingredients

Scale

For the Crust:

  • 1 cup canned pumpkin puree
  • 2 large eggs
  • 1/2 cup vegetable oil
  • 1/3 cup milk
  • 1 1/2 cups all-purpose flour
  • 1 cup granulated sugar
  • 1 tsp baking powder
  • 1/2 tsp baking soda
  • 1 tsp ground cinnamon
  • 1/2 tsp ground nutmeg
  • 1/4 tsp ground cloves
  • 1/4 tsp salt

Instructions

1. Prepare the Crust:

  1. Preheat oven to 375°F (190°C) and line a muffin tin with paper liners.
  2. In a large bowl, whisk together pumpkin puree, eggs, oil, and milk until smooth.
  3. In another bowl, combine flour, sugar, baking powder, baking soda, spices, and salt.
  4. Gradually fold dry ingredients into wet ingredients until just combined; do not overmix.
  5. Divide batter evenly among muffin cups, filling each about 3/4 full.
  6. Bake for 20-25 minutes or until a toothpick inserted comes out clean. Cool before serving.

Notes

You can customize the seasonings to taste.

Easy Caramel Apple Cheesecake Dip Recipe

easy-caramel-apple-cheesecake-dip

Introduction

Imagine the coziest fall gathering, where laughter fills the air and the scent of cinnamon and sugar wraps around you like a warm blanket. Now, picture a dessert that captures that entire feeling in one irresistible, creamy bite. This magical experience is exactly what you get with this incredibly Easy caramel apple cheesecake dip. It transforms simple ingredients into a show-stopping treat that will have everyone begging for the recipe. Furthermore, it requires zero baking and comes together in mere minutes, making it the perfect solution for your spontaneous cravings and planned parties alike.

This Easy caramel apple cheesecake dip is a no-bake dessert that masterfully combines the rich, tangy flavor of cheesecake with the sweet, buttery notes of caramel and the fresh, crisp crunch of apples. Essentially, it is a deconstructed cheesecake meant for dipping, offering all the satisfaction of the classic dessert without any of the fuss. This recipe matters because it delivers immense flavor and a sophisticated appearance with minimal effort, effectively breaking down the barrier between complicated baking and easy entertaining. It fits our blog’s philosophy perfectly, as we champion recipes that are both approachable and impressive. Whether you are a seasoned host or a kitchen novice, this dip empowers you to create something extraordinary. For another fantastic no-bake dessert that follows this same principle, you must try our no bake eclair cake. Ultimately, this dip is more than just a recipe; it is a tool for creating joy and connection over delicious food. Moreover, its versatility means you can serve it with apple slices for a lighter option or with graham crackers and pretzels for a decadent treat. If you enjoy the combination of fruit and creamy desserts, our strawberry pretzel salad offers a similarly delightful sweet and salty contrast.

Why I Love This Recipe

This Easy caramel apple cheesecake dip holds a special place in my heart because it became an instant tradition for our family’s football Sundays. The first time I made it, my kids abandoned their chips to crowd around the bowl, enthusiastically dipping apple slices and laughing. I love how it brings everyone together without keeping me tied to the kitchen. The simplicity allows me to be part of the fun, and the unanimous praise it receives every single time never gets old. It is my ultimate go-to for creating a little bit of magic with very little effort.

Health and Nutrition

Why it’s good for your body

This Easy caramel apple cheesecake dip offers more than just incredible flavor. For instance, the apples provide a solid foundation of dietary fiber, which actively supports your digestive health. Furthermore, this fiber helps you feel fuller for a longer period, potentially aiding in mindful eating habits.

Additionally, the dairy components deliver a valuable dose of calcium and protein. Consequently, these nutrients are essential for maintaining strong bones and supporting muscle repair. Moreover, when you choose a wholesome base like Greek yogurt, you significantly boost the protein content of your Easy caramel apple cheesecake dip.

Ultimately, this dip cleverly combines the natural sweetness of fruit with rich, satisfying ingredients. Therefore, it can help curb intense sugar cravings with a more balanced option. Finally, enjoying a treat like Easy caramel apple cheesecake dip also contributes positively to your mental well-being by making healthy eating feel enjoyable and sustainable.

How it fits in a healthy lifestyle

You can absolutely enjoy this Easy caramel apple cheesecake dip as part of a balanced diet. Think of it as a smarter indulgence that fits right into your wellness goals. For a nutrient-packed snack, simply pair a modest portion with fresh apple slices or other fruit. This approach adds more vitamins and fiber to your treat, making it even more satisfying.

If you follow specific dietary needs, you can easily adapt this recipe. For those exploring gluten-free living, this dip is a fantastic option when served with appropriate dippers. It also complements a heart-healthy eating pattern when you focus on portion control. Remember, balance is key, and finding ways to enjoy your favorite flavors is crucial for long-term success. For more inspiration on making balanced choices, explore our guide on building healthy eating habits. You can also discover how to satisfy your sweet tooth with other delicious and mindful recipes.

How to Prepare This Dish

Steps and time-saving tips

First, grab a large mixing bowl and your hand mixer. Beat the softened cream cheese until it becomes perfectly smooth and creamy. This crucial step ensures your dip has a luxuriously silky base without any unpleasant lumps. Next, gradually add the brown sugar and vanilla extract, then continue mixing for another two minutes until everything is well-combined and fluffy. Meanwhile, fold in the whipped topping gently with a spatula until you achieve a light, airy consistency. Furthermore, spread this creamy mixture evenly into your serving dish. Now, generously drizzle the caramel sauce over the entire surface. For a fantastic finishing touch, sprinkle the chopped pecans and mini chocolate chips on top. Finally, cover the dish and chill your Easy caramel apple cheesecake dip in the refrigerator for at least one hour. This resting time allows the flavors to meld together beautifully. Serve this incredible dip with sliced apple wedges, graham crackers, or even soft pretzels for dipping.

Mistakes I’ve made and learned from

I once made the classic mistake of using cream cheese straight from the fridge. Consequently, I ended up with a lumpy, graasy base that no amount of mixing could fix. Now, I always set my cream cheese on the counter for a solid hour before I start. Another lesson learned the hard way was skipping the chill time. I was impatient and served my Easy caramel apple cheesecake dip immediately. Unfortunately, it was far too soft and the flavors hadn’t yet developed their full potential. This experience taught me that patience is the most important ingredient. For more tips on getting the perfect consistency, my guide on avoiding common cheesecake mistakes was a lifesaver. Also, if you’re worried about your apples browning before serving, my post on keeping apple slices fresh has all the easy solutions you need.

Cultural Connection and Variations

Where this recipe comes from

This dip tells a delicious story of American ingenuity. It essentially mashes up two beloved classics: the state fair caramel apple and the rich, creamy New York style cheesecake. Families often serve it during autumn gatherings, especially around Halloween and Thanksgiving. The crisp apples offer a refreshing crunch that perfectly cuts through the sweet, decadent layers.

People prepare this treat differently across the country. In the South, for instance, many cooks might add a handful of toasted pecans for a praline-like twist. Meanwhile, Midwestern versions often feature a heavier sprinkle of cinnamon or even a dash of pumpkin pie spice to enhance the cozy, fall feeling. Some families even pass down their own secret ingredient, like a splash of bourbon or a layer of crushed graham crackers at the bottom of the bowl.

Ultimately, this Easy caramel apple cheesecake dip captures the essence of fall in a shareable format. It turns a simple fruit into a celebratory centerpiece. Every bite delivers that familiar, comforting flavor combination we all love.

How it fits in today’s cooking

This dip remains incredibly relevant because it fits our modern need for easy, crowd-pleasing recipes. It’s a superstar at holiday potlucks and football Sunday gatherings alike. Furthermore, contemporary home cooks constantly find new ways to adapt it for dietary needs, effortlessly creating vegan or gluten-free versions without losing any flavor.

Many people now incorporate it into their seasonal meal prep. They pair it with apple slices for a healthy-ish snack or use it as a stunning dessert board centerpiece. In fact, it complements other fall favorites perfectly. For example, you could serve it alongside a slice of pumpkin pie cheesecake for the ultimate autumnal feast.

Its simplicity is its greatest strength. Consequently, even a beginner can achieve a dessert that feels gourmet and special. This makes the Easy caramel apple cheesecake dip a timeless recipe that continues to bring people together. For another quick and impressive dessert idea, explore our popular chocolate chip cookie dough cheesecake.

Taste and Texture

What makes it delicious

This Easy caramel apple cheesecake dip delivers a spectacular creamy texture that feels incredibly rich and smooth on your tongue. Each bite bursts with the sweet, buttery flavor of caramel, which perfectly complements the tangy, luxurious cream cheese base. Furthermore, the warm, fragrant notes of cinnamon and vanilla weave through the dip, creating a comforting aroma. Finally, the experience is wonderfully balanced, making this Easy caramel apple cheesecake dip an irresistible treat.

Boosting the flavor

For an even more decadent experience, consider folding in chunks of your favorite candy bar. Alternatively, a sprinkle of flaky sea salt on top just before serving creates a fantastic sweet-and-salty contrast that elevates every element. You can also explore other dessert dips for inspiration, like this chocolate hummus, to discover new flavor combinations. Moreover, serving it alongside homemade cinnamon sugar tortilla chips instead of apples adds a warm, crispy texture that is absolutely divine.

Tips for Success

Best practices for results

First, always use full-fat, room temperature cream cheese for the smoothest, most luxurious texture in your Easy caramel apple cheesecake dip. Additionally, thoroughly drain the can of apple pie filling to prevent any excess liquid from making your dip runny. For the best flavor, however, let your finished dip chill in the refrigerator for at least one hour before serving.

Mistakes to avoid

A common mistake is over-mixing the cream cheese, which can incorporate too much air and make your dip fluffy instead of dense and creamy. Consequently, mix the base just until everything is fully combined and smooth. Furthermore, do not substitute homemade caramel sauce unless you have a truly thick and reliable recipe; otherwise, a runny sauce will ruin the dip’s consistency. For more guidance on getting your caramel just right, check out our guide on how to make caramel sauce. Finally, serve your dip with the right dippers; soft cookies might break. Instead, opt for sturdy options like our recommended cinnamon sugar tortilla chips for the perfect bite every time.

Serving and Pairing Suggestions

How to serve this dish

First, present your Easy caramel apple cheesecake dip in a beautiful, wide-rimmed bowl. This simple step creates a stunning centerpiece for your dessert table. For a truly festive touch, generously drizzle extra caramel sauce over the top and sprinkle it with finely chopped pecans. Consequently, you will love how these garnishes add wonderful texture and visual appeal.

Serve this delightful dip at your next holiday gathering or autumn potluck. Meanwhile, keep it chilled until your guests arrive for the best consistency. Ultimately, this Easy caramel apple cheesecake dip turns any casual get-together into a special celebration.

What goes well with it

Pair your Easy caramel apple cheesecake dip with an array of crunchy dippers for a perfect textural contrast. For instance, crisp apple slices, graham crackers, and shortbread cookies all work wonderfully. Additionally, a warm mug of our spiced chai latte makes a fantastic beverage partner that highlights the warm autumn spices.

For an over-the-top dessert experience, consider serving a small scoop alongside this creamy dip. Furthermore, its rich, chocolatey notes create an unforgettable flavor combination that your guests will adore. Finally, a cold glass of milk or a crisp hard cider also cuts through the sweetness beautifully, completing your dessert spread.

Can I make caramel apple cheesecake dip ahead of time?

Yes, you can prepare this easy caramel apple cheesecake dip up to 2 days in advance. For the best texture, store it in an airtight container in the refrigerator and give it a good stir before serving. The flavors actually meld together nicely when made ahead.

What are the best apples to serve with cheesecake dip?

Crisp, slightly tart apples like Granny Smith or Honeycrisp are perfect for dipping as they provide a nice contrast to the sweet dip. You can also use sweeter varieties like Fuji or Gala. To prevent browning, toss your sliced apples with a little lemon juice before serving.

What can I use instead of Cool Whip in this dip?

If you prefer not to use Cool Whip, you can substitute an equal amount of freshly whipped heavy cream. For the best consistency, whip one cup of heavy cream with a tablespoon of powdered sugar until stiff peaks form, then fold it into the cream cheese mixture. This substitution works wonderfully in an easy caramel apple cheesecake dip.

How long does caramel apple dip last in the fridge?

This easy caramel apple cheesecake dip will stay fresh in the refrigerator for 3 to 5 days when stored in a sealed container. Always check for any signs of spoilage before consuming leftovers. For the best taste and texture, we recommend enjoying it within the first few days.

Print
clock clock iconcutlery cutlery iconflag flag iconfolder folder iconinstagram instagram iconpinterest pinterest iconfacebook facebook iconprint print iconsquares squares iconheart heart iconheart solid heart solid icon

Easy Caramel Apple Cheesecake Dip


  • Author: Chef Mia

Description

A creamy, no-bake cheesecake dip swirled with caramel and topped with apple pieces—perfect for dipping with graham crackers or apple slices.


Ingredients

Scale

For the Crust:

  • 8 oz cream cheese, softened
  • 1/2 cup powdered sugar
  • 1 tsp vanilla extract
  • 1/2 cup caramel sauce, plus extra for drizzling
  • 1 large apple, diced
  • 1 tbsp lemon juice
  • Graham crackers or apple slices for serving

Instructions

1. Prepare the Crust:

  1. In a medium bowl, beat cream cheese, powdered sugar, and vanilla until smooth and creamy.
  2. Fold in 1/4 cup caramel sauce gently to create swirls—do not overmix.
  3. Toss diced apple with lemon juice to prevent browning, then stir into the dip.
  4. Transfer to a serving bowl, drizzle with remaining caramel, and chill for 30 minutes before serving with graham crackers or apple slices.

Notes

You can customize the seasonings to taste.

Easy Maple Pumpkin Cookies – Savory Splash

easy-maple-pumpkin-cookies

Introduction

Is there anything cozier than the warm, inviting aroma of pumpkin and maple wafting through your kitchen? Honestly, it feels like a hug in a house. This season, we are moving beyond the classic pie to embrace a truly unique treat: Maple Pumpkin Cookies – Savory Splash. These cookies capture the essence of fall but with a sophisticated, unexpected twist that will absolutely become your new favorite autumn tradition. They are the perfect blend of sweet and savory that somehow feels both nostalgic and entirely new.

So, what exactly are Maple Pumpkin Cookies – Savory Splash? Fundamentally, they are a soft, cake-like pumpkin cookie, sweetened with rich maple syrup and warm baking spices. However, the “Savory Splash” comes from a brilliant addition: a generous amount of sharp, salty cheese and a hint of fresh rosemary folded right into the dough. This combination creates a complex flavor profile that is simply irresistible. These cookies matter because they break the mold. They are not a dessert cookie but rather the perfect accompaniment to a warm bowl of soup, a sharp charcuterie board, or simply enjoyed with a cup of coffee in the afternoon. They fit our blog’s mission perfectly, as we always strive to share unique recipes that elevate everyday ingredients into something extraordinary. For instance, if you love using seasonal produce in creative ways, you must explore our ultimate guide to roasting winter vegetables. Furthermore, these Maple Pumpkin Cookies – Savory Splash are incredibly easy to make, requiring just one bowl and no fancy equipment, which makes them an ideal project for bakers of any skill level. They prove that you do not need complex techniques to create something truly special and memorable for your friends and family.

Why I Love This Recipe

I have a deep personal connection to this recipe for Maple Pumpkin Cookies – Savory Splash. My grandmother always made a sweet version of pumpkin cookies, and while I adored them, I often craved something a little less sugary. One chilly afternoon, I decided to experiment by adding some aged cheddar from her fridge and a sprig of rosemary from her windowsill garden. The result was pure magic and immediately reminded me of her beloved herb-infused focaccia, which balances similar savory and herbal notes. Now, every time I bake a batch, the smell instantly transports me back to her kitchen, but I also feel like I am adding my own chapter to our family’s culinary story. These cookies represent the best of both worlds: tradition and innovation, all in one delicious bite.

Health and Nutrition

Why it’s good for your body

These Maple Pumpkin Cookies – Savory Splash pack a powerful nutritional punch. First, pumpkin puree delivers a hefty dose of vitamin A, which actively supports your vision and immune system. Moreover, this essential vitamin promotes healthy skin. Additionally, pumpkin provides a good amount of fiber, which naturally aids digestion and helps you feel fuller for longer.

Furthermore, maple syrup acts as a more natural sweetener compared to refined sugars. It offers beneficial antioxidants and minerals like manganese and zinc. Consequently, your body can enjoy a sweet treat without the typical blood sugar spike. The warming spices, such as cinnamon and ginger, also contribute anti-inflammatory properties. Therefore, each bite of Maple Pumpkin Cookies – Savory Splash supports your overall wellness.

Finally, the healthy fats from ingredients like coconut oil or nuts actively support heart and brain health. Ultimately, you can feel great about indulging in a cookie that nourishes your body from the inside out. Enjoying Maple Pumpkin Cookies – Savory Splash means you are making a delicious and smart choice.

How it fits in a healthy lifestyle

Maple Pumpkin Cookies – Savory Splash fit beautifully into a balanced eating plan. You can easily enjoy one as a satisfying afternoon snack that curbs cravings without processed ingredients. They also make a fantastic pre-workout bite, offering a natural energy boost from complex carbohydrates.

For anyone exploring specific dietary needs, these cookies are a wonderful option. If you are focusing on gluten-free eating, you can easily adapt the recipe with your favorite 1:1 flour blend. The wholesome ingredients also align perfectly with a heart-healthy focus. For more inspiration on building nourishing meals, explore our guide on easy weekly meal prep that saves time and supports your goals. Ultimately, this recipe proves that mindful eating can still be incredibly delicious.

How to Prepare This Dish

Steps and time-saving tips

First, preheat your oven to 350°F and line your baking sheets with parchment paper. Meanwhile, whisk your dry ingredients—flour, baking soda, salt, and warm spices—in a medium bowl. In a separate, larger bowl, cream the softened butter with both granulated and brown sugars until the mixture becomes light and fluffy. Next, beat in the pumpkin puree, pure maple syrup, a whole egg, and a generous splash of vanilla extract. Gradually fold your dry mixture into these wet ingredients, but take care not to overmix the dough. For a major time-saving tip, use a cookie scoop to drop rounded tablespoons of dough onto your prepared sheets; this ensures every Maple Pumpkin Cookies – Savory Splash bakes evenly and saves you from messy hands. Bake them for 10 to 12 minutes, just until the edges feel firm to the touch. Finally, let the cookies cool completely on the pan before you add any frosting. This patience prevents a melty mess and guarantees the perfect texture for every single batch of Maple Pumpkin Cookies – Savory Splash.

Mistakes I’ve made and learned from

I have absolutely learned the hard way that accurate measurements are everything with these cookies. Initially, I would just scoop my flour directly from the bag, which inevitably led to a dense, cakey texture instead of the soft, chewy perfection I craved. Now, I always spoon and level my flour for the lightest, most consistent Maple Pumpkin Cookies – Savory Splash. Another classic blunder of mine was using cold, hard butter straight from the fridge. This prevented proper creaming with the sugars and resulted in a oddly greasy cookie. Letting your butter properly soften on the counter is non-negotiable, a lesson I also had to learn the hard way with my Perfect Chewy Chocolate Chip Cookies. Furthermore, if your spices have been sitting in the cabinet for a year, they lose their potency. For the most vibrant flavor, make sure your spices are fresh; this is a universal rule I apply to all my baking, especially for something like my Spiced Apple Cider Bundt Cake.

Cultural Connection and Variations

Where this recipe comes from

My family always argues that pumpkin belongs in pie, but I believe it shines in cookies. This recipe for Maple Pumpkin Cookies – Savory Splash actually pulls from two distinct traditions. Firstly, it honors the classic New England practice of using maple syrup as a primary sweetener, a technique that generations of home cooks have perfected. Secondly, it embraces the savory-sweet flavor profile that many global cuisines celebrate, especially around the holidays.

Interestingly, different regions put their own spin on similar concepts. For instance, some Italian bakers might add a pinch of rosemary and pine nuts for a more earthy, aromatic cookie. Conversely, bakers in the American South may fold in pecans or a brown sugar glaze, creating a richer, sweeter treat. My version, however, stays true to its cozy roots with warm spices and that unmistakable maple backbone. Ultimately, this process creates a beautiful fusion that feels both familiar and entirely new.

Every autumn, the scent of these cookies baking immediately transports me to crisp afternoons and family gatherings. The Maple Pumpkin Cookies – Savory Splash have become our edible signal that the holiday season is truly beginning. They carry the warmth of tradition while inviting a little culinary adventure into our kitchen.

How it fits in today’s cooking

Thankfully, the Maple Pumpkin Cookies – Savory Splash fits perfectly into modern cooking routines. Its relevance comes from a growing desire for seasonal, whole-food ingredients that deliver both nostalgia and nutrition. Furthermore, today’s home cooks often adapt the base recipe to suit dietary needs, easily swapping in gluten-free flour or a flax egg without losing any of its signature charm.

You can easily incorporate these cookies into various occasions. They make a fantastic make-ahead dessert for a busy week, and they also star as the perfect sweet ending to a festive holiday meal. Moreover, their portable nature makes them ideal for lunchboxes, picnics, or a simple afternoon pick-me-up alongside your favorite coffee.

This versatility ensures the recipe remains a beloved staple. Ultimately, it bridges the gap between time-honored tradition and contemporary convenience. For anyone looking to expand their baking repertoire with other seasonal favorites, exploring a collection of inspiring fall treats is a wonderful next step.

Taste and Texture

What makes it delicious

These Maple Pumpkin Cookies – Savory Splash offer a wonderfully complex sensory experience. First, they greet you with a warm, fragrant aroma of cinnamon and nutmeg that promises pure comfort. Upon the first bite, you discover a uniquely soft and cake-like texture that melts tenderly in your mouth. The rich, earthy sweetness of pumpkin puree mingles perfectly with the deep, robust notes of pure maple syrup. Consequently, each morsel delivers a cozy, spiced flavor that is both nostalgic and utterly satisfying. Ultimately, the delightful Maple Pumpkin Cookies – Savory Splash create a perfect harmony of autumnal flavors and comforting textures.

Boosting the flavor

You can easily elevate these cookies with a few creative twists. For instance, a simple drizzle of cinnamon glaze adds a sweet and spicy finish that complements the maple notes. Alternatively, fold in a handful of toasted pecans or walnuts to introduce a satisfying crunch. Furthermore, a pinch of extra ginger or a dash of cardamom can amplify the warm spice profile beautifully. If you enjoy pairing your treats, consider serving them alongside a scoop of our vanilla bean ice cream for a fantastic contrast of temperatures and textures. Finally, a small sprinkle of flaky sea salt right before baking enhances every single flavor.

Tips for Success

Best practices for results

First, always chill your dough for at least one hour because this step prevents the cookies from spreading too much. For the best texture, use parchment paper on your baking sheets. Additionally, measure your flour correctly by spooning it into the measuring cup and leveling it off to avoid dense cookies. Furthermore, use room temperature ingredients to ensure your Maple Pumpkin Cookies – Savory Splash batter comes together smoothly and evenly every single time.

Mistakes to avoid

A common error is overmixing the dough, which can develop too much gluten and lead to tough cookies; instead, mix just until the ingredients combine. Also, avoid using stale baking soda or powder, as they will fail to leaven your cookies properly. For more guidance on this, our guide on baking powder vs baking soda explains their roles and shelf life. Finally, do not overbake them if you want a soft and chewy center; pull your Maple Pumpkin Cookies – Savory Splash from the oven when the edges look set. For perfect results every time, consider checking your oven’s accuracy with our tips on how to calibrate your oven.

Serving and Pairing Suggestions

How to serve this dish

Present your freshly baked Maple Pumpkin Cookies – Savory Splash on a rustic wooden board for a charming, homespun feel. Alternatively, arrange them on a elegant cake stand to instantly elevate your dessert spread. For a special touch, dust them lightly with a pinch of flaky sea salt just before serving. These cookies truly shine during autumn gatherings and holiday feasts. Moreover, they make a delightful addition to any brunch menu alongside savory items. Always serve your Maple Pumpkin Cookies – Savory Splash warm to maximize their cozy, aromatic spices.

What goes well with it

A hot cup of spiced chai tea makes a perfect partner for these cookies. The warm spices in the chai beautifully echo the cinnamon and nutmeg in your Maple Pumpkin Cookies – Savory Splash. For a creamy contrast, consider a scoop of vanilla bean ice cream on the side. Furthermore, a sharp, tangy cheese can create a wonderful savory balance. For your next brunch, try pairing them with our savory Herb Breakfast Casserole. Finally, a chilled glass of our refreshing Cucumber Mint Lemonade offers a bright, palate-cleansing finish to this rich treat.

What makes Maple Pumpkin Cookies – Savory Splash different from sweet pumpkin cookies?

Unlike traditional sweet pumpkin cookies, Maple Pumpkin Cookies – Savory Splash incorporates savory elements like a hint of black pepper, thyme, or a pinch of sea salt. This creates a unique flavor profile that balances the natural sweetness of the maple and pumpkin, making them a sophisticated snack perfect for cheese boards or as an appetizer.

Can I use fresh pumpkin puree for this Maple Pumpkin Cookies – Savory Splash recipe?

Absolutely, using homemade pumpkin puree will give your Maple Pumpkin Cookies – Savory Splash a fantastic fresh flavor. Just ensure your puree is thick and has been strained of excess moisture to prevent the cookie dough from becoming too wet and affecting the final texture.

What are the best cheeses to pair with savory pumpkin cookies?

The savory notes in Maple Pumpkin Cookies – Savory Splash pair wonderfully with a variety of cheeses. A sharp aged cheddar, creamy goat cheese, or a bold blue cheese all complement the maple and pumpkin flavors beautifully, creating an elegant flavor combination.

How should I store Maple Pumpkin Cookies – Savory Splash to keep them fresh?

To maintain their texture, store your Maple Pumpkin Cookies – Savory Splash in an airtight container at room temperature for up to 3 days. For longer storage, you can freeze the baked cookies for up to 2 months; simply thaw them at room temperature when you’re ready to serve.

Print
clock clock iconcutlery cutlery iconflag flag iconfolder folder iconinstagram instagram iconpinterest pinterest iconfacebook facebook iconprint print iconsquares squares iconheart heart iconheart solid heart solid icon

Mapo Pumpkin Cookies – Savory Splash


  • Author: Chef Mia

Description

A unique fusion of spicy Sichuan mapo flavors and sweet pumpkin in a soft, savory cookie with a hint of maple sweetness.


Ingredients

Scale

For the Crust:

  • 1 cup pumpkin puree
  • 2 tbsp maple syrup
  • 1/4 cup doubanjiang (fermented chili bean paste)
  • 1 tsp Sichuan peppercorns, ground
  • 2 cups all-purpose flour
  • 1/2 tsp baking soda
  • 1/4 cup vegetable oil
  • 1/4 cup finely chopped scallions
  • 2 cloves garlic, minced
  • 1 tsp ginger, grated
  • 1/2 cup firm tofu, crumbled
  • 1/4 cup water

Instructions

1. Prepare the Crust:

  1. Preheat oven to 350°F (175°C) and line a baking sheet with parchment paper.
  2. In a bowl, mix pumpkin puree, maple syrup, vegetable oil, doubanjiang, ground Sichuan peppercorns, garlic, and ginger until well combined.
  3. Gradually add flour and baking soda to the wet ingredients, stirring until a soft dough forms. Fold in crumbled tofu and scallions.
  4. Drop tablespoon-sized portions of dough onto the prepared baking sheet, spacing them about 2 inches apart.
  5. Bake for 12-15 minutes or until edges are lightly golden. Let cool on the sheet for 5 minutes before transferring to a wire rack.

Notes

You can customize the seasonings to taste.

Easy Mini Pumpkin Swirled Cheesecakes Recipe

easy-mini-pumpkin-swirled-cheesecakes

Introduction

There is something truly magical about the first crisp breeze of autumn that sends us all searching for warmth and comfort. We crave those iconic flavors that define the season, and nothing captures that cozy feeling quite like a rich, spiced dessert. If you long for the taste of classic fall baking but need a simpler, more elegant option, these Mini Pumpkin Swirled Cheesecakes are your perfect answer. They deliver all the nostalgia of a holiday gathering in a perfectly personal, adorable package.

So what exactly are Mini Pumpkin Swirled Cheesecakes? Essentially, they are a brilliant fusion of two beloved desserts: a creamy, tangy New York-style cheesecake and a warmly spiced pumpkin pie filling. We expertly swirl these two batters together and bake them in a standard muffin tin, which creates stunning individual treats. This approach matters because it solves the common problems of a full-sized cheesecake; there is no fussy springform pan, no daunting water bath, and no agonizing wait for a giant cake to chill. Instead, you get portion-controlled perfection that is ideal for everything from a weeknight treat to a stunning contribution to a festive potluck. Furthermore, this recipe fits our blog’s mission perfectly by transforming a seemingly complex baking project into an accessible and utterly rewarding experience for home cooks of any skill level. You can achieve a gorgeous, impressive dessert without any professional pastry training. For more inspiration on using seasonal ingredients, explore our favorite apple recipes for fall. The best part is how these mini cheesecakes make any occasion feel special. They offer a built-in portion size that eliminates messy slicing and ensures every guest gets a beautiful dessert with both the rich cheesecake and spiced pumpkin elements in every single bite. Ultimately, this recipe empowers you to create a professional-quality dessert that celebrates the very best flavors of the season.

Why I Love This Recipe

This recipe holds a special place in my heart because it became a happy accident during a hectic Thanksgiving years ago. I desperately wanted to make a pumpkin cheesecake but realized too late that I lacked a springform pan. Rather than panic, I decided to experiment with a muffin tin, swirling the batters on a whim. The result was these incredibly charming Mini Pumpkin Swirled Cheesecakes that were an instant hit with my family. They now symbolize flexibility and joy in my kitchen, reminding me that some of the best creations come from thinking on your feet and embracing simplicity without sacrificing an ounce of flavor.

Health and Nutrition

Why it’s good for your body

These Mini Pumpkin Swirled Cheesecakes offer more than just incredible flavor; they also provide some surprising nutritional perks. First, pumpkin puree serves as the star ingredient, and it delivers a powerful dose of vitamin A. Consequently, this essential nutrient actively supports healthy vision and a strong immune system. Additionally, pumpkin contributes beneficial fiber, which naturally aids digestion and helps you feel satisfied.

Moreover, the spices in these Mini Pumpkin Swirled Cheesecakes, like cinnamon and nutmeg, do more than just taste amazing. In fact, they possess natural anti-inflammatory properties. Furthermore, using wholesome ingredients like real cream cheese and eggs provides a source of high-quality protein and calcium for bone health. Therefore, each bite supports your body in multiple ways. Ultimately, this dessert allows you to indulge your sweet tooth while also giving your body valuable nutrients.

How it fits in a healthy lifestyle

Enjoying these Mini Pumpkin Swirled Cheesecakes fits perfectly into a balanced approach to eating. Their individual portion size is a major advantage, as it helps with natural portion control so you can savor a treat without overindulging. You can easily incorporate them into your meal plan as a satisfying end to a healthy dinner.

We designed this recipe with flexibility in mind. For instance, you can easily adapt it to be gluten-free by using your favorite gluten-free cookie crust. If you are exploring more ways to enjoy mindful desserts, our guide on healthy dessert swaps offers fantastic tips. Remember, a sustainable healthy lifestyle includes room for the foods you love. Balancing nutritious meals with occasional treats like these cheesecakes is key. For more inspiration on creating a well-rounded eating pattern, check out our ultimate meal prep guide to make healthy choices effortless throughout your week.

How to Prepare This Dish

Steps and time-saving tips

First, grab your food processor to make the crust. Pulse the graham crackers into fine crumbs, then add the melted butter and sugar. Meanwhile, line your muffin tin with papers. Press a heaping tablespoon of the crumb mixture firmly into the bottom of each liner. Next, beat the cream cheese until it is completely smooth and creamy. Gradually add the sugar and beat again. Then, incorporate the eggs one at a time, followed by the vanilla and sour cream. However, do not overmix the batter after adding the eggs. Divide this plain batter in half. Stir the pumpkin puree and warm spices into one portion. Now, layer the batters into the crusts. Start with a spoonful of plain batter, then add a spoonful of pumpkin batter. Use a toothpick or a knife to gently swirl the two together for a marbled effect. Bake until the centers are just set. Finally, let them cool completely before chilling for at least four hours. For a huge time-saver, make these Mini Pumpkin Swirled Cheesecakes a day ahead.

Mistakes I’ve made and learned from

I learned the importance of temperature the hard way. Initially, I used cold cream cheese straight from the fridge, which resulted in a lumpy batter that no amount of mixing could fix. Now, I always ensure my ingredients are at room temperature for the smoothest filling. Another common pitfall is overbaking, which makes the texture dry and crumbly instead of luxuriously creamy. I pull my Mini Pumpkin Swirled Cheesecakes from the oven when the edges are set but the center still has a slight jiggle. For more detailed guidance on avoiding cracks, my post on perfect cheesecake tips covers everything you need to know. Also, if you love the pumpkin flavor here, you must try my pumpkin spice latte cake next; it uses a similar technique for a stunning swirl.

Cultural Connection and Variations

Where this recipe comes from

We can trace the roots of this dessert back to two classic American traditions. Firstly, the rich, creamy cheesecake arrived with European immigrants, finding a beloved home in New York. Secondly, we have the pumpkin pie, a staple of autumnal harvests and Thanksgiving feasts. Someone, somewhere brilliantly decided to swirl these two icons into one perfect bite. Consequently, the Mini Pumpkin Swirled Cheesecakes were born, offering all the flavor without the commitment of a whole slice.

Families often put their own spin on this treat. For instance, some bakers might add a dash of bourbon or a sprinkle of candied ginger to the pumpkin mixture for a warm kick. Alternatively, others might use a gingersnap crust instead of graham crackers to amplify the spice notes. My grandmother always insisted on roasting a sugar pumpkin herself, claiming canned puree could never compare. Meanwhile, a friend from the South adds a pecan streusel topping for extra crunch. Ultimately, these personal touches make every batch of Mini Pumpkin Swirled Cheesecakes a unique celebration.

How it fits in today’s cooking

This dessert absolutely thrives in modern kitchens. Primarily, it fits perfectly into our love for individual portions and make-ahead convenience. Furthermore, it remains a superstar of the holiday season, effortlessly bridging the gap between Thanksgiving and Christmas parties. Busy hosts appreciate that they can prepare these mini cheesecakes days in advance, freeing up precious oven time.

Today’s cooks also adapt the recipe to suit various dietary needs. For example, many easily create a gluten-free cheesecake version by using almond flour in the crust. Others swap in plant-based cream cheese and serve them as a stunning vegan option. Moreover, this recipe encourages creativity with other flavors. If you adore the creamy texture, you might love exploring a chocolate caramel cheesecake for a different seasonal twist. Ultimately, these mini delights continue to capture our hearts by blending tradition with contemporary flexibility.

Taste and Texture

What makes it delicious

These Mini Pumpkin Swirled Cheesecakes deliver a perfect harmony of flavors and textures. First, you experience the rich, creamy cheesecake filling, which is luxuriously smooth and tangy. Simultaneously, the spiced pumpkin swirl introduces a warm, earthy sweetness that fills your kitchen with an autumnal fragrance. Each bite offers a delightful contrast against the crisp, buttery graham cracker crust that crumbles just right. Ultimately, the dessert feels incredibly indulgent yet beautifully balanced, making every Mini Pumpkin Swirled Cheesecake a truly memorable treat.

Boosting the flavor

Fortunately, you can easily elevate these mini cheesecakes with a few creative twists. For instance, a dollop of homemade whipped cream adds a light, cloud-like sweetness that complements the spices beautifully. Alternatively, a drizzle of salted caramel sauce introduces a wonderful salty contrast that enhances the pumpkin flavor. Furthermore, consider swapping the traditional graham cracker base for a ginger snap crust to add a spicy, molasses-kissed crunch. If you love experimenting with crusts, our guide on creative cheesecake crust options offers fantastic inspiration. For another festive dessert that pairs wonderfully with these flavors, try serving them alongside our popular pumpkin cinnamon rolls for a full fall-themed spread.

Tips for Success

Best practices for results

First, always ensure your cream cheese is at room temperature for a perfectly smooth and lump-free filling. Furthermore, use a gentle swirling motion with a knife or toothpick to create beautiful patterns without overmixing the batters. For the best texture and flavor, chill your Mini Pumpkin Swirled Cheesecakes for the full recommended time before serving.

Mistakes to avoid

A common mistake is overfilling the liners, which causes the batter to spill over and bake unevenly. Instead, fill them only two-thirds full to allow room for the cheesecakes to rise slightly. Additionally, avoid overbaking, as this leads to a dry and cracked texture. For more guidance, check out our guide on how to tell when cheesecake is done. Moreover, do not skip the water bath if the recipe calls for it, as it creates essential steam for even cooking. If you are using a different pan, our tips for using different size baking pans can help you adjust the recipe correctly.

Serving and Pairing Suggestions

How to serve this dish

Present your Mini Pumpkin Swirled Cheesecakes on a beautiful platter for a stunning effect. For a festive touch, lightly dust the tops with cinnamon or nutmeg right before serving. Alternatively, add a small dollop of freshly whipped cream and a delicate mint leaf for a pop of color. These individual desserts are perfect for holiday gatherings, as they offer a personal, elegant treat for each guest. Furthermore, you can easily set up a toppings bar with caramel sauce, chopped pecans, and chocolate shavings for a fun, interactive dessert experience.

Serve these Mini Pumpkin Swirled Cheesecakes chilled for the best texture and flavor. They make an incredible finale to a Thanksgiving feast or a special highlight at a fall brunch. Their petite size also makes them ideal for potlucks and parties, allowing guests to mingle and enjoy without needing a plate and fork.

What goes well with it

A hot cup of spiced chai tea makes a wonderful companion to these creamy desserts. The warm spices in the chai beautifully echo the cinnamon and nutmeg in the Mini Pumpkin Swirled Cheesecakes, creating a perfectly cozy pairing.

For a truly decadent dessert spread, consider serving these mini cheesecakes alongside a slice of our rich Chocolate Espresso Cake. The deep coffee and chocolate notes provide a delightful contrast to the sweet, spiced pumpkin flavor.

Finally, balance the richness with a light, refreshing beverage. A glass of cold apple cider or our homemade Vanilla Bean Iced Latte cleanses the palate beautifully after each delicious bite.

Can you freeze Mini Pumpkin Swirled Cheesecakes?

Yes, you can freeze these cheesecakes for up to 2 months. Place them in a single layer on a baking sheet to freeze solid, then transfer them to an airtight container or freezer bag with parchment paper between layers. Thaw them overnight in the refrigerator before serving for the best texture.

How do you get a clean swirl in cheesecake?

For a clean swirl, use a knife or toothpick to gently drag through the dollops of pumpkin and plain cheesecake batter. Make sure not to over-swirl, as this will muddy the pattern. The key to beautiful Mini Pumpkin Swirled Cheesecakes is creating bold, distinct marbling.

Why did my mini cheesecakes sink in the middle?

Sinking usually occurs from overmixing the batter, which incorporates too much air, or from opening the oven door during baking, causing a sudden temperature drop. To prevent this, mix just until ingredients are combined and avoid disturbing the cheesecakes while they bake and cool.

What is the best pan to use for mini cheesecakes?

A standard muffin tin lined with paper or foil liners works perfectly for Mini Pumpkin Swirled Cheesecakes. For easier removal and cleaner edges, consider using a non-stick pan or silicone baking liners. This ensures your individual desserts hold their shape beautifully.

Print
clock clock iconcutlery cutlery iconflag flag iconfolder folder iconinstagram instagram iconpinterest pinterest iconfacebook facebook iconprint print iconsquares squares iconheart heart iconheart solid heart solid icon

Mini Pumpkin Swirled Cheesecakes


  • Author: Chef Mia

Description

Creamy individual cheesecakes with a spiced pumpkin swirl, perfect for fall gatherings.


Ingredients

Scale

For the Crust:

  • 1 cup graham cracker crumbs
  • 3 tbsp melted butter
  • 16 oz cream cheese, softened
  • 1/2 cup granulated sugar
  • 2 large eggs
  • 1 tsp vanilla extract
  • 1/2 cup pumpkin puree
  • 1/2 tsp cinnamon
  • 1/4 tsp nutmeg
  • 1/4 tsp ginger

Instructions

1. Prepare the Crust:

  1. Preheat oven to 325°F. Line a muffin tin with 12 liners.
  2. Mix graham cracker crumbs and melted butter. Press 1 tbsp into each liner.
  3. Beat cream cheese and sugar until smooth. Add eggs one at a time, then vanilla.
  4. Remove 1 cup batter. To remaining, add pumpkin puree and spices.
  5. Alternate spoonfuls of plain and pumpkin batter in liners. Swirl with a toothpick.
  6. Bake 20-25 minutes until set. Cool completely before refrigerating 2 hours.

Notes

You can customize the seasonings to taste.

Best Pecan Pie Baked Oatmeal (Gluten-Free)

best-pecan-pie-baked-oatmeal

Introduction

Do you ever crave the cozy, decadent flavors of a classic pecan pie but need a wholesome breakfast that actually fuels your day? Imagine filling your kitchen with that warm, buttery aroma first thing in the morning without any guilt. This dream becomes your delicious reality with our incredible Pecan Pie Baked Oatmeal (Gluten-Free + Vegan-Friendly!). It perfectly captures the essence of the beloved dessert while transforming it into a nourishing, feel-good meal that everyone can enjoy.

Pecan Pie Baked Oatmeal (Gluten-Free + Vegan-Friendly!) is a hearty, make-ahead breakfast casserole that delivers all the comforting flavor of its namesake. Essentially, we combine wholesome rolled oats with a rich, caramel-like sauce and plenty of toasted pecans. We then bake everything until the top is golden and crisp while the center remains wonderfully soft. This dish matters because it proves that you do not have to sacrifice flavor for dietary needs. It is entirely free from gluten, dairy, and eggs, making it a fantastic inclusive option for gatherings. Furthermore, it aligns perfectly with our blog’s mission to create approachable, delicious recipes that cater to various lifestyles. You can easily prepare it ahead of time, which simplifies busy mornings. For another fantastic make-ahead breakfast, our popular Vegan Breakfast Burritos are always a crowd-pleaser. This Pecan Pie Baked Oatmeal (Gluten-Free + Vegan-Friendly!) recipe is a celebration of how creative, simple ingredients can create something truly magical and satisfying for everyone at the table.

Why I Love This Recipe

I genuinely adore this Pecan Pie Baked Oatmeal (Gluten-Free + Vegan-Friendly!) because it reminds me of family holiday mornings without the sugar crash. It feels like a special treat, yet it powers me through my day. The process of toasting the pecans fills my home with such a comforting scent that it instantly boosts my mood. I also love how versatile it is; sometimes I add a handful of frozen blueberries for a tart contrast, much like I do with my Classic Vegan Pancakes. Most importantly, sharing this dish with friends who have different dietary needs and seeing their faces light up is the best feeling. It is my ultimate go-to for a breakfast that feels both indulgent and incredibly wholesome.

Health and Nutrition

Why it’s good for your body

This Pecan Pie Baked Oatmeal (Gluten-Free + Vegan-Friendly!) delivers a powerful nutritional punch to start your day. First, the hearty oats provide a fantastic source of soluble fiber, which actively helps to regulate your digestion and keep you feeling full and satisfied for hours. Consequently, you can avoid those mid-morning energy slumps and unhealthy snacking habits.

Furthermore, the star ingredients in this Pecan Pie Baked Oatmeal (Gluten-Free + Vegan-Friendly!) offer their own unique benefits. For example, pecans are packed with healthy monounsaturated fats and antioxidants that support brain health and reduce inflammation. Additionally, by using natural sweeteners like maple syrup, this dish provides a more stable energy release compared to refined sugars.

Ultimately, you get a delicious breakfast that truly nourishes your body from the inside out. Moreover, each serving of this Pecan Pie Baked Oatmeal (Gluten-Free + Vegan-Friendly!) contributes essential vitamins and minerals like manganese and magnesium, which are crucial for energy production and bone health.

How it fits in a healthy lifestyle

This baked oatmeal seamlessly fits into a balanced and mindful eating plan. It makes meal prep a breeze, giving you a ready-to-go breakfast that supports your wellness goals without any morning stress. Whether you follow a gluten-free diet or a plant-based lifestyle, this recipe has you covered with its thoughtful ingredient choices.

You can easily enjoy it as part of a heart-healthy diet, thanks to the wholesome fats from nuts and the cholesterol-free nature of its plant-based ingredients. For those looking to maintain energy levels or manage weight, its high fiber and protein content promote lasting satiety. Pair a square with a scoop of Greek yogurt or a side of fruit for an even more balanced breakfast that keeps you fueled and focused all morning long.

How to Prepare This Dish

Steps and time-saving tips

First, preheat your oven to 375°F and generously grease your baking dish. This simple step prevents sticking and makes cleanup a breeze. Next, whisk together your wet ingredients like maple syrup, plant-based milk, and a flax egg in a large bowl until they are perfectly smooth. Then, gently stir in the rolled oats, cinnamon, and a pinch of salt until everything is just combined. Be careful not to overmix the batter, as this keeps the final texture delightfully tender. Now, fold in most of your chopped pecans, saving a handful for that beautiful, crunchy topping. Pour this cozy mixture into your prepared dish and spread it into an even layer. Finally, artfully scatter the remaining pecans across the top and drizzle everything with a little extra maple syrup for that iconic caramelized finish. Bake for 30-35 minutes until the edges are golden and the center is set. Let it cool for a few minutes; this allows it to firm up beautifully for serving.

Mistakes I’ve made and learned from

I have absolutely learned this recipe the hard way, so you don’t have to. My biggest blunder was using quick oats instead of old-fashioned rolled oats, which resulted in a disappointingly mushy texture that lacked any satisfying bite. Now, I always double-check my pantry to ensure I have the right base for a perfect bake. Another common hiccup I encountered was impatience; I would pull the dish out too early because the top looked done, only to find a soupy center. I learned that the true test is a firm middle that doesn’t jiggle wildly. For more guidance on nailing vegan baking textures, my post on essential vegan baking tips was a game-changer. And if you’re new to egg substitutes, understanding how a flax egg works will save you from my early gummy disasters. Trust me, a little patience and the right ingredients make all the difference for a flawless Pecan Pie Baked Oatmeal.

Cultural Connection and Variations

Where this recipe comes from

This Pecan Pie Baked Oatmeal (Gluten-Free + Vegan-Friendly!) takes its soul from classic Southern American dessert. Generations of families gather around pecan pie during the holidays, especially Thanksgiving. Its rich, sweet, and nutty flavor tells a story of tradition and comfort. My own grandmother always made the pie, filling her kitchen with the most incredible aroma. However, we wanted to capture that same warm feeling in a breakfast-friendly form. Consequently, we transformed the beloved dessert into a nourishing morning bake.

Around the world, people prepare oats in wonderfully diverse ways. In many European countries, for instance, cooks often simmer oats into a creamy porridge. They might top it with fresh berries or a dollop of jam. Our version, however, celebrates the bold, caramelized sweetness of the American South. Some families might add a splash of bourbon for depth, while others might use maple syrup instead of corn syrup. Ultimately, this Pecan Pie Baked Oatmeal (Gluten-Free + Vegan-Friendly!) offers a wholesome twist on a timeless classic, making it accessible for everyone at the table.

How it fits in today’s cooking

This dish fits perfectly into modern meal prep routines. Busy home cooks adore it because they can make a batch on Sunday and enjoy warm breakfasts all week. Furthermore, it aligns beautifully with today’s dietary preferences, being both gluten-free and vegan. It brings the nostalgia of a holiday dessert into everyday life, turning an ordinary morning into something special. For a similar make-ahead breakfast option, many readers also love our popular Vegan Breakfast Burritos.

It also remains a star for holiday brunches and seasonal gatherings. Imagine serving it on a crisp autumn morning alongside a warm cup of coffee. The recipe adapts easily too; you can stir in diced apples for a fall variation or a handful of dark chocolate chips for a decadent twist. Moreover, it pairs wonderfully with other brunch classics. For example, it makes a fantastic sweet companion to a savory dish like our Spinach and Feta Quiche. Ultimately, this bake proves that comfort food can be both indulgent and mindful.

Taste and Texture

What makes it delicious

This Pecan Pie Baked Oatmeal (Gluten-Free + Vegan-Friendly!) delivers a wonderfully cozy and decadent experience. First, you will notice the rich, buttery aroma of toasted pecans and warm cinnamon wafting from your oven. Each spoonful offers a satisfying contrast between the creamy, soft baked oats and the delightfully crisp pecan topping. Moreover, the deep caramel-like sweetness from maple syrup and molasses perfectly balances the earthy, nutty oat base. Ultimately, this dish creates a comforting, dessert-for-breakfast feel that is both wholesome and indulgent.

Boosting the flavor

Fortunately, you can easily elevate your Pecan Pie Baked Oatmeal (Gluten-Free + Vegan-Friendly!) with a few creative twists. For instance, serve a warm slice with a generous drizzle of our luscious vegan salted caramel sauce to amplify the buttery notes. Alternatively, stir a spoonful of chunky almond butter into the batter before baking for an extra layer of richness and protein. Consequently, you create a more complex and satisfying breakfast. Furthermore, a scoop of creamy coconut yogurt or a handful of fresh berries on top provides a lovely, tangy contrast to the sweet, spiced oatmeal. For another delicious pairing, try a scoop of our vanilla bean coconut whipped cream to make it truly special.

Tips for Success

Best practices for results

First, always use certified gluten-free rolled oats to ensure the entire dish is safe. Moreover, press the topping down gently into the wet mixture before baking to create a perfectly crisp crust. For the best texture and flavor, let your Pecan Pie Baked Oatmeal (Gluten-Free + Vegan-Friendly!) rest for about ten minutes after baking. Consequently, it will set beautifully and become easier to serve. Finally, always check your maple syrup for freshness, as it provides the signature sweetness.

Mistakes to avoid

Avoid overmixing the batter, as this can lead to a dense and gummy texture; instead, stir the ingredients just until they combine. Furthermore, do not skip toasting the pecans, because this crucial step unlocks their rich, nutty flavor and adds a wonderful crunch. If you find your nuts are browning too quickly, you can learn more about managing this in our guide on how to toast pecans. Additionally, ensure your baking powder is fresh for proper rising; otherwise, your oatmeal bake might turn out flat. For more insights on achieving the perfect bake every time, explore our tips for gluten-free baking.

Serving and Pairing Suggestions

How to serve this dish

Immediately serve this Pecan Pie Baked Oatmeal (Gluten-Free + Vegan-Friendly!) warm from the oven for the ultimate comforting experience. Furthermore, consider scooping individual portions into bowls for a cozy family breakfast. For a beautiful brunch or holiday table presentation, bake it in a decorative ceramic dish. Always garnish each serving with a few extra toasted pecans and a light drizzle of maple syrup. This final touch not only adds flavor but also makes the dish look incredibly inviting.

Alternatively, let this wholesome Pecan Pie Baked Oatmeal (Gluten-Free + Vegan-Friendly!) cool completely for a fantastic make-ahead option. You can then slice it into neat bars for an on-the-go breakfast or a healthy dessert. Consequently, it becomes a versatile star for any occasion, from a quiet morning to a festive gathering.

What goes well with it

Pair a warm slice with a dollop of creamy, cool coconut whipped cream. This combination creates a delightful contrast in temperatures and textures that wonderfully complements the rich, spiced flavors of the oatmeal. Moreover, the creamy topping mellows the sweetness perfectly.

For a complete and satisfying brunch, serve it alongside a protein-packed side. Specifically, our popular Vegan Scrambled Eggs balance the meal with a savory element. Additionally, a fresh, crisp side salad can also provide a lovely counterpoint to the dish’s decadent nature.

Finally, a hot beverage makes an excellent partner. A cup of strong black coffee or a spiced chai latte cuts through the sweetness beautifully. For a truly special treat, however, we recommend pairing it with our refreshing Cinnamon Vanilla Cold Brew for a delicious caffeine kick.

Can I make pecan pie baked oatmeal ahead of time?

Absolutely! This Pecan Pie Baked Oatmeal is an excellent make-ahead breakfast. You can prepare it the night before, store it covered in the refrigerator, and simply bake it in the morning for a warm, hassle-free meal.

What can I use instead of maple syrup in vegan baked oatmeal?

For a similar liquid sweetener, you can substitute agave nectar or date syrup in equal measure. If you’re not strictly vegan, you could also use honey, though that would change the classification of this Pecan Pie Baked Oatmeal (Gluten-Free + Vegan-Friendly!) recipe.

How do I store and reheat leftover baked oatmeal?

Store any leftover Pecan Pie Baked Oatmeal in an airtight container in the refrigerator for up to 4 days. For the best texture, reheat individual portions in the microwave for 60-90 seconds or in a 350°F oven until warmed through.

Is this baked oatmeal recipe gluten-free?

Yes, this recipe is naturally gluten-free as it uses certified gluten-free rolled oats. Always ensure your oat brand is labeled gluten-free to avoid cross-contamination, making this a safe and delicious Pecan Pie Baked Oatmeal (Gluten-Free + Vegan-Friendly!) option for those with celiac disease or gluten sensitivity.

Print
clock clock iconcutlery cutlery iconflag flag iconfolder folder iconinstagram instagram iconpinterest pinterest iconfacebook facebook iconprint print iconsquares squares iconheart heart iconheart solid heart solid icon

Pecan Pie Baked Oatmeal


  • Author: Chef Mia

Description

A cozy, comforting breakfast that tastes just like pecan pie! Made with gluten-free oats and naturally sweetened, this vegan-friendly baked oatmeal is perfect for meal prep.


Ingredients

Scale

For the Crust:

  • 2 cups gluten-free rolled oats
  • 1/2 cup chopped pecans
  • 1/4 cup maple syrup
  • 1/4 cup coconut sugar
  • 1 tsp cinnamon
  • 1/2 tsp nutmeg
  • 1/4 tsp salt
  • 1 3/4 cups unsweetened almond milk
  • 1/4 cup coconut oil, melted
  • 1 tsp vanilla extract
  • 1 flax egg (1 tbsp ground flax + 3 tbsp water)

Instructions

1. Prepare the Crust:

  1. Preheat oven to 375°F (190°C) and grease an 8×8 baking dish.
  2. In a large bowl, combine oats, pecans, coconut sugar, cinnamon, nutmeg, and salt.
  3. In another bowl, whisk together almond milk, maple syrup, melted coconut oil, vanilla, and flax egg.
  4. Pour wet ingredients into dry and stir until well combined. Transfer to baking dish.
  5. Bake for 30-35 minutes until set and golden. Let cool slightly before serving.

Notes

You can customize the seasonings to taste.

Best Pecan Pie Baked Oatmeal Recipe

best-pecan-pie-baked-oatmeal

Introduction

Do you ever crave the cozy, comforting flavors of a classic dessert but need a wholesome start to your day? Imagine sitting down to a warm, satisfying breakfast that tastes exactly like a slice of homemade pecan pie. This Pecan Pie Baked Oatmeal transforms that nostalgic dessert experience into a nourishing morning meal you can feel genuinely good about. Furthermore, it fills your kitchen with an incredible aroma that promises a truly special breakfast ahead.

Pecan Pie Baked Oatmeal is a hearty, make-ahead breakfast casserole that masterfully combines rolled oats, pecans, and warm spices with a caramel-like sweetness. Essentially, it captures the soul of the beloved Southern dessert in a format perfect for breakfast. This recipe matters because it solves the eternal dilemma of choosing between a healthy option and a decadent treat. Consequently, you no longer have to decide; you get the best of both worlds in every single bite. Moreover, it aligns perfectly with our blog’s mission to deliver recipes that are both approachable and exceptionally delicious. This dish is ideal for meal prep, as you can bake it on a Sunday and enjoy effortless breakfasts all week long. Additionally, it is a fantastic crowd-pleaser for holiday mornings or when you have house guests. For another fantastic make-ahead breakfast option, consider our popular Overnight Oats Four Ways. Ultimately, this Pecan Pie Baked Oatmeal is more than just food; it is a warm hug in a bowl that turns an ordinary morning into a celebration.

Why I Love This Recipe

This recipe holds a special place in my heart because it reminds me of slow weekend mornings at my grandma’s house. She always believed that breakfast should feel like a celebration, and this Pecan Pie Baked Oatmeal absolutely delivers on that sentiment. I love how the simple act of pulling it from the oven brings everyone to the table, eager to share a meal and start the day together. It is my go-to recipe for creating new memories with my own family, especially during the holidays. The combination of the toasty pecans and the sweet, creamy oatmeal never fails to comfort and delight everyone who tries it. For a different but equally comforting baked good, you must try our Classic Banana Bread. This dish truly embodies the joy of a homemade breakfast.

Health and Nutrition

Why it’s good for your body

This Pecan Pie Baked Oatmeal transforms a classic dessert into a wholesome breakfast powerhouse. First, it delivers a fantastic dose of soluble fiber from the oats. Consequently, this fiber helps you feel full and satisfied for hours, which supports healthy digestion and stable blood sugar levels. Moreover, the dish incorporates heart-healthy fats from pecans. These unsaturated fats actively work to support good cholesterol levels and overall cardiovascular health.

Additionally, this recipe smartly uses natural sweetness. For example, maple syrup and ripe bananas provide a rich flavor without relying on refined sugars. Therefore, you can enjoy a truly decadent-tasting meal that still nourishes your body. Furthermore, each serving of Pecan Pie Baked Oatmeal offers a good source of essential minerals like magnesium and zinc from the pecans. Ultimately, this meal gives you sustained energy to power through your morning while also delivering important nutrients.

How it fits in a healthy lifestyle

This Pecan Pie Baked Oatmeal fits beautifully into a balanced eating plan. It makes meal prep a breeze, giving you a ready-to-go breakfast that prevents less healthy morning choices. You can easily enjoy it as part of a heart-smart diet thanks to the beneficial fats from the pecans. For anyone following a gluten-free lifestyle, simply ensure you use certified gluten-free oats.

Pair a square with a side of Greek yogurt or a hard-boiled egg to add a protein boost that keeps you energized even longer. This approach aligns perfectly with building a satisfying and nutritious breakfast routine. If you love the cozy flavors here but need a quicker option, explore our guide to speedy oatmeal upgrades for more inspiration. This baked oatmeal proves that you truly can have a delicious treat that also supports your wellness goals.

How to Prepare This Dish

Steps and time-saving tips

First, preheat your oven to 375°F and generously grease your baking dish. This initial step ensures your Pecan Pie Baked Oatmeal releases beautifully later. Meanwhile, whisk the eggs, milk, maple syrup, and vanilla in a large bowl until they are perfectly smooth. Next, gently stir in the old-fashioned oats, cinnamon, and a pinch of salt. Let this mixture sit for about five minutes; this allows the oats to start absorbing the liquid for a better texture. In a separate small bowl, quickly toss the pecans with a little extra maple syrup. Now, pour the oat base into your prepared dish and evenly scatter the sweetened pecans on top. Finally, bake for 35 to 40 minutes until the edges are golden and the center is set. For a true pecan pie experience, drizzle a little more syrup over each warm serving.

Mistakes I’ve made and learned from

I have absolutely overbaked this Pecan Pie Baked Oatmeal, turning my dream breakfast into a dry brick. The key is to remember it continues to set as it cools, so pull it out when the center still has a very slight jiggle. Another common error I made was using quick oats instead of old-fashioned, which resulted in a mushy, less satisfying texture. For the perfect firm-yet-tender bite, stick with old-fashioned rolled oats every time. If you’re new to baking with oats, my guide on avoiding common oatmeal mistakes can save you a lot of trial and error. And if you love the flavors here, you must try my classic stovetop pecan pie for another delicious twist on this classic combination.

Cultural Connection and Variations

Where this recipe comes from

This Pecan Pie Baked Oatmeal recipe feels like a warm hug from the American South. It pulls its soul from the classic pecan pie, a staple on holiday tables from Georgia to Texas. Families often pass down their prized pie recipes through generations, each one boasting a secret twist. Some use a dash of bourbon, while others swear by a specific syrup blend. Consequently, we took that beloved, nutty filling and gave it a wholesome, breakfast-ready twist. We essentially baked all that gooey, caramelized goodness right into a hearty oat base.

Around the world, people enjoy oats in countless ways. For instance, in Scotland, they might prepare a savory porridge. Meanwhile, in Germany, they often bake oats into dense, fruit-laden cakes. Our version, however, leans into a very specific American tradition. My own family always served pecan pie at Thanksgiving. Eventually, I started craving those flavors on a regular autumn morning, not just once a year. This dish bridges that gap perfectly. You can easily find regional variations, too. A Vermont cook might use pure maple syrup, while a Southern baker may add chopped peaches for a peachy-pecan delight. Ultimately, this Pecan Pie Baked Oatmeal celebrates tradition while inviting personal creativity.

How it fits in today’s cooking

This dish fits beautifully into modern cooking routines because it masters the art of the make-ahead meal. Busy home cooks adore preparing a large batch on Sunday. They then have a quick, satisfying breakfast ready for the entire week. Furthermore, it aligns perfectly with today’s desire for comforting, yet nutritious, food. It feels indulgent but fuels your body with whole grains and healthy fats.

Many people now incorporate it into their holiday brunch spreads. It offers a fantastic, crowd-feeding alternative to sugary pastries. For another amazing make-ahead breakfast option, consider our popular overnight oats four ways. This Pecan Pie Baked Oatmeal also adapts seamlessly to various dietary needs. You can easily make it gluten-free or vegan without losing any of its decadent charm. It truly proves that classic flavors can thrive in a contemporary kitchen. If you love this cozy bake, you will absolutely adore our pumpkin baked oatmeal for another seasonal twist. It’s a timeless recipe that continues to find new fans and new occasions.

Taste and Texture

What makes it delicious

This Pecan Pie Baked Oatmeal delivers a wonderfully cozy and comforting experience. First, you smell the warm, fragrant notes of cinnamon and toasted pecans as it bakes. Each spoonful offers a delightful contrast between the creamy, soft oatmeal base and the satisfyingly crisp, buttery pecan topping. Moreover, the rich caramel-like sweetness from the maple syrup and brown sugar perfectly complements the earthy, nutty flavor. Ultimately, the texture is both hearty and indulgent, making every bite of this Pecan Pie Baked Oatmeal feel like a special treat.

Boosting the flavor

You can easily elevate your breakfast with a few creative twists. For instance, try swirling in a spoonful of our salted caramel sauce before baking for a deeper, gooey sweetness. Additionally, a dollop of vanilla yogurt or a splash of cold cream on top creates a fantastic hot-and-cold contrast. Furthermore, a pinch of nutmeg or a dash of vanilla extract will amplify the warm spice profile beautifully. For another delicious pairing, consider serving it alongside our classic fluffy pancakes for a full brunch spread. Finally, a sprinkle of flaky sea salt right before serving always heightens all the other flavors.

Tips for Success

Best practices for results

First, always use old-fashioned rolled oats for the best texture in your Pecan Pie Baked Oatmeal. Furthermore, make sure you thoroughly mix the wet ingredients before combining them with the dry ones. Consequently, you will achieve a perfectly uniform bake without any dry pockets. For an extra rich flavor, always toast your pecans beforehand to deepen their nutty essence. Finally, let your finished Pecan Pie Baked Oatmeal rest for a few minutes before serving so it sets up beautifully.

Mistakes to avoid

Avoid overmixing the batter after you add the oats, as this can lead to a gummy texture. Instead, gently fold everything together until it is just combined. Additionally, do not forget to grease your baking dish properly to prevent frustrating sticking issues. For more guidance on this, our tutorial on how to grease a pan covers all the best methods. Moreover, ensure you do not underbake the dish, as the center should be set and not jiggly for the perfect consistency. If you are ever unsure about doneness, you can always reference our guide on telling when baked goods are done for helpful clues.

Serving and Pairing Suggestions

How to serve this dish

Serve your Pecan Pie Baked Oatmeal warm for the ultimate cozy experience. Furthermore, scoop it into individual bowls for a comforting family breakfast. For a special brunch or holiday gathering, plate each portion with flair. Next, garnish with a few extra toasted pecans and a light drizzle of maple syrup. This Pecan Pie Baked Oatmeal also makes a stunning centerpiece when served straight from its baking dish. Consequently, it turns an ordinary morning into a festive occasion.

What goes well with it

Balance the rich sweetness with a cool, creamy side. A dollop of vanilla Greek yogurt or a splash of cold milk provides a perfect contrast. For a truly decadent brunch, pair it with a crispy, savory option like our classic Air Fryer Bacon. Additionally, a hot cup of coffee or a glass of cold brew cuts through the sweetness beautifully. Finally, complete your morning spread with a refreshing, tangy beverage such as our favorite Homemade Orange Juice.

Can I make pecan pie baked oatmeal ahead of time?

Absolutely! This Pecan Pie Baked Oatmeal is an excellent make-ahead breakfast. You can prepare it the night before, store it covered in the refrigerator, and simply bake it in the morning for a warm, ready-to-eat meal.

How do you keep baked oatmeal from getting soggy?

The key is using the right ratio of liquid to oats and ensuring a proper bake time. For this Pecan Pie Baked Oatmeal, using old-fashioned rolled oats helps maintain texture, and baking until the top is golden and the center is set prevents sogginess.

Is baked oatmeal good for meal prep?

Yes, baked oatmeal is a fantastic meal prep option. This Pecan Pie Baked Oatmeal reheats beautifully throughout the week. Simply store individual portions in airtight containers and warm them up in the microwave for a quick and satisfying breakfast.

Can I use quick oats instead of rolled oats for baked oatmeal?

It’s not recommended, as quick oats absorb more liquid and have a softer texture, which can make your Pecan Pie Baked Oatmeal turn out mushy. For the best consistency and classic chewy texture, stick with old-fashioned rolled oats.

Print
clock clock iconcutlery cutlery iconflag flag iconfolder folder iconinstagram instagram iconpinterest pinterest iconfacebook facebook iconprint print iconsquares squares iconheart heart iconheart solid heart solid icon

Pecan Pie Baked Oatmeal


  • Author: Chef Mia

Description

A warm and comforting baked oatmeal that captures the flavors of classic pecan pie, perfect for breakfast or brunch.


Ingredients

Scale

For the Crust:

  • 2 cups old-fashioned rolled oats
  • 1/2 cup chopped pecans
  • 1/3 cup maple syrup
  • 2 large eggs
  • 1 3/4 cups milk
  • 1 tsp vanilla extract
  • 1 tsp cinnamon
  • 1/4 tsp salt
  • 1/4 cup brown sugar
  • 2 tbsp melted butter

Instructions

1. Prepare the Crust:

  1. Preheat oven to 375°F and grease an 8×8 baking dish.
  2. In a large bowl, combine oats, pecans, cinnamon, and salt.
  3. In another bowl, whisk together eggs, milk, maple syrup, vanilla, and melted butter.
  4. Pour wet ingredients into dry ingredients and stir until combined.
  5. Transfer mixture to prepared baking dish and sprinkle with brown sugar.
  6. Bake for 30-35 minutes until set and golden brown on top.
  7. Let cool for 5 minutes before serving.

Notes

You can customize the seasonings to taste.

Best Pumpkin Cream Cheese Bread Recipe

best-pumpkin-cream-cheese-bread

Introduction

Is there anything more comforting than the warm, spiced aroma of pumpkin baking? It instantly wraps you in a cozy hug and promises something delicious. This feeling is exactly why I created this ultimate recipe for Pumpkin Cream Cheese Bread. It perfectly captures the essence of fall in every single slice. Furthermore, it combines two beloved flavors into one irresistible treat that will become your new seasonal obsession.

Pumpkin Cream Cheese Bread is a moist, warmly spiced pumpkin loaf swirled with a rich, tangy cream cheese filling. This dessert bread matters because it elevates the classic pumpkin bread into something truly extraordinary. The contrast between the soft, spiced pumpkin cake and the creamy, slightly sweet cheese layer creates a perfect balance in every bite. It fits our blog’s tone because we specialize in approachable recipes that feel both special and doable for home bakers of any skill level. You can easily whip up this stunning loaf for a weekend breakfast, a holiday brunch, or a simple afternoon snack with a cup of coffee. Moreover, it fills your kitchen with an incredible aroma that everyone will love. For another fantastic way to use seasonal produce, consider our popular recipe for Apple Crisp. This Pumpkin Cream Cheese Bread recipe uses simple ingredients you likely already have, and it delivers a impressive result that seems like it came from a professional bakery. Ultimately, it is the definitive treat for pumpkin season. If you enjoy this, you might also love our classic Banana Bread for a year-round baking staple.

Why I Love This Recipe

I love this Pumpkin Cream Cheese Bread because it reminds me of baking with my grandmother every autumn. She always believed the best way to welcome the cooler weather was with something warm from the oven. Consequently, the process of making this bread feels like a cherished ritual. I especially enjoy the moment I swirl the cream cheese into the batter, creating those beautiful marbled patterns. Most importantly, sharing a slice with my family and seeing their smiles is my absolute favorite part of the entire experience.

Health and Nutrition

Why it’s good for your body

Pumpkin Cream Cheese Bread offers a surprisingly wholesome treat. First, pumpkin puree provides a powerful dose of vitamin A, which actively supports your vision and immune system. Furthermore, this essential vitamin acts as a robust antioxidant. Consequently, it helps protect your cells from daily damage.

Moreover, pumpkin contributes valuable fiber to this delicious loaf. Fiber actively promotes healthy digestion and helps you feel satisfied longer. Additionally, the warming spices like cinnamon and nutmeg do more than just add flavor; they also possess natural anti-inflammatory properties. Therefore, each slice of Pumpkin Cream Cheese Bread delivers more than just incredible taste.

Finally, the cream cheese filling adds a welcome source of calcium and protein. This combination actively helps build strong bones and supports muscle repair. Ultimately, enjoying a piece of Pumpkin Cream Cheese Bread means you are treating yourself to a dessert that genuinely nourishes your body from the inside out.

How it fits in a healthy lifestyle

This Pumpkin Cream Cheese Bread fits beautifully into a balanced eating plan. You can easily enjoy a slice as a satisfying breakfast paired with Greek yogurt or as a mindful afternoon snack with a cup of tea. The key is thoughtful portion control, allowing you to indulge your sweet tooth without overdoing it.

For those with specific dietary needs, you can easily adapt this recipe. Simply use a reliable gluten-free flour blend to make it celiac-friendly. If you are exploring more ways to incorporate vegetables into your desserts, our guide to veggie-packed desserts offers fantastic inspiration. Remember, a healthy lifestyle embraces flexibility and joy in eating. This bread proves that you can have a decadent treat that also contributes to your overall well-being. Pair it with other wholesome choices throughout your day, like those found in our healthy baking swaps article, for a truly nourishing approach.

How to Prepare This Dish

Steps and time-saving tips

First, preheat your oven and generously grease a standard loaf pan. Meanwhile, whisk your dry ingredients together in a large bowl. In a separate bowl, vigorously cream the softened butter and sugars until the mixture becomes light and fluffy. Next, beat in the eggs one at a time, followed by the vanilla and pumpkin puree. Gradually fold the dry ingredients into this wet mixture, but be careful not to overmix the batter. For the cream cheese filling, simply beat the cream cheese with sugar and a touch of flour until it is perfectly smooth. Now, pour half of your pumpkin batter into the prepared pan. Then, gently spoon the cream cheese layer on top before covering it with the remaining batter. Swirl a knife through the layers to create a beautiful marbled effect. Finally, bake until a toothpick inserted into the pumpkin bread part comes out clean. Let the loaf cool completely in the pan for easier slicing. For a real time-saver, measure your dry ingredients the night before.

Mistakes I’ve made and learned from

I have definitely learned a few lessons the hard way with this Pumpkin Cream Cheese Bread. Initially, I would use cold cream cheese straight from the fridge, which resulted in a lumpy, unspreadable filling that created huge pockets in my baked good. Now, I always ensure every dairy ingredient is truly at room temperature for a perfectly smooth swirl every single time. Another classic error was impatience; slicing into the warm loaf seemed like a great idea until it completely fell apart on the cutting board. Trust me, the agonizing wait for it to cool is absolutely worth it for those perfect, photogenic slices. For more tips on getting your ingredients just right, check out my guide on how to properly measure flour. And if you love this combination of flavors, you must try my popular pumpkin cream cheese muffins next; they bake faster and are great for on-the-go mornings.

Cultural Connection and Variations

Where this recipe comes from

This Pumpkin Cream Cheese Bread recipe feels like a warm hug from autumn itself. My grandmother, for instance, always baked it the moment the first crisp leaf hit the ground. Her version, however, featured a thick, sweet ribbon of cinnamon swirled right through the center. Many families across the American South, similarly, have their own cherished take on this classic. They might fold in toasted pecans or a dash of bourbon for a deeper flavor profile.

Globally, bakers interpret the concept quite differently. In Australia, for example, they often create a savory version with herbs and feta cheese. Conversely, some European bakers might prepare a denser, stollen-like loaf with marzipan instead of cream cheese. Ultimately, every culture embraces the comforting union of squash and spice in their own way. This particular Pumpkin Cream Cheese Bread recipe, therefore, represents a beautiful fusion of tradition and personal touch. It connects us to harvest festivals and generations of home bakers who celebrated the season’s bounty.

How it fits in today’s cooking

Pumpkin Cream Cheese Bread absolutely thrives in modern kitchens. It seamlessly fits into today’s cooking as a beloved staple of fall brunches and holiday morning spreads. Furthermore, contemporary bakers constantly adapt it to suit various dietary needs. They might use gluten-free flour blends or a flax egg for a vegan version, ensuring everyone can enjoy a slice.

This loaf also bridges the gap between dessert and breakfast, making it a versatile star. Many people now enjoy it as a special treat alongside their afternoon coffee. For another fantastic seasonal bake that pairs perfectly with this bread, explore our popular Apple Cider Donuts. Ultimately, its enduring appeal lies in its simple, comforting nature. It evokes nostalgia while fitting right into our current routines. If you need a show-stopping dessert for your next gathering, this bread also complements our stunning Chocolate Hazelnut Tart beautifully on any dessert table.

Taste and Texture

What makes it delicious

This Pumpkin Cream Cheese Bread masterfully balances warm, earthy spices with a rich, tangy creaminess. Each slice delivers a moist, incredibly tender crumb that simply melts in your mouth. Meanwhile, the sweet pumpkin base, fragrant with cinnamon and nutmeg, perfectly complements the decadent swirl of smooth, slightly tart cream cheese. Ultimately, the experience of this Pumpkin Cream Cheese Bread is a harmonious blend of autumnal comfort and indulgent dessert.

Boosting the flavor

For an even more decadent experience, consider a simple ingredient swap. For instance, using brown sugar instead of white sugar in the batter will deepen the molasses notes and add a wonderful moisture. Furthermore, a drizzle of vanilla glaze or a sprinkle of toasted pecans right before serving introduces a delightful crunch and extra layer of sweetness. If you adore the cream cheese element, our perfect cream cheese frosting makes an exceptional spread for a warm slice. Finally, a scoop of vanilla bean ice cream turns this bread into a spectacular dessert, much like our favorite pumpkin cake.

Tips for Success

Best practices for results

Always use room temperature cream cheese and eggs for a perfectly smooth, lump-free filling. Furthermore, thoroughly grease your loaf pan to guarantee your Pumpkin Cream Cheese Bread releases easily after baking. For the best flavor, use pure pumpkin puree instead of pumpkin pie filling. Finally, allow the loaf to cool completely in the pan before slicing it for clean, beautiful pieces.

Mistakes to avoid

Avoid overmixing the batter after you add the dry ingredients; otherwise, you will develop too much gluten and create a tough, dense crumb. Similarly, do not skip the step of swirling the cream cheese layer with a knife, as this ensures even distribution. For more guidance on achieving the perfect texture, read our article on common baking mistakes to avoid. Moreover, ensure your baking soda is fresh for proper rise; if you are unsure, you can always test your baking soda for freshness with a simple vinegar test.

Serving and Pairing Suggestions

How to serve this dish

Present your Pumpkin Cream Cheese Bread as the star of any brunch or holiday table. For a beautiful presentation, arrange thick, elegant slices on a rustic wooden board. Furthermore, a light dusting of powdered sugar or a simple drizzle of vanilla glaze adds a touch of bakery-worthy charm. This bread also makes a wonderful gift; simply wrap a cooled loaf in pretty parchment paper and tie it with twine. Ultimately, whether you serve it warm from the oven or at room temperature, its inviting aroma and moist texture will captivate everyone.

What goes well with it

A hot cup of coffee perfectly cuts through the rich sweetness of Pumpkin Cream Cheese Bread. Alternatively, a cold glass of milk provides a classic, comforting pairing that everyone loves. For a more decadent brunch spread, consider serving it alongside a light and fluffy omelet. This savory option creates a delightful balance against the spiced, sweet notes of the bread. Moreover, you can complete your autumn feast with a bowl of our savory roasted butternut squash soup.

How do you keep cream cheese from sinking in pumpkin bread?

To prevent the cream cheese swirl from sinking, ensure your cream cheese filling is thick and not overly liquid. Chilling the cream cheese mixture for 15-20 minutes before swirling it into the batter also helps it hold its place. A properly thickened filling will create a beautiful marbled effect throughout your Pumpkin Cream Cheese Bread.

Can I use canned pumpkin for pumpkin cream cheese bread?

Yes, canned pure pumpkin puree is perfect for this recipe and is what most bakers use. Be sure to use 100% pure pumpkin puree, not pumpkin pie filling, which has added sugars and spices. The canned variety provides consistent moisture and flavor for your Pumpkin Cream Cheese Bread.

How should I store pumpkin bread with cream cheese swirl?

Due to the dairy in the cream cheese swirl, this bread must be stored in the refrigerator. Keep it in an airtight container or tightly wrapped in plastic wrap to maintain freshness and prevent it from drying out. Proper storage will keep your Pumpkin Cream Cheese Bread moist and delicious for up to 5 days.

Can you freeze pumpkin cream cheese bread?

You can freeze this bread, but the texture of the cream cheese swirl may change slightly upon thawing. For best results, wrap the cooled loaf tightly in plastic wrap and then aluminum foil before placing it in a freezer-safe bag. Thaw it overnight in the refrigerator for the best texture.

Print
clock clock iconcutlery cutlery iconflag flag iconfolder folder iconinstagram instagram iconpinterest pinterest iconfacebook facebook iconprint print iconsquares squares iconheart heart iconheart solid heart solid icon

Pumpkin Cream Cheese Bread


  • Author: Chef Mia

Description

A moist and flavorful pumpkin bread swirled with a rich cream cheese filling, perfect for autumn baking.


Ingredients

Scale

For the Crust:

  • 2 cups all-purpose flour
  • 1 tsp baking soda
  • 1/2 tsp salt
  • 1 tsp ground cinnamon
  • 1/2 tsp ground nutmeg
  • 1/4 tsp ground cloves
  • 1 cup pumpkin puree
  • 1/2 cup vegetable oil
  • 1 cup granulated sugar
  • 2 large eggs
  • 1/4 cup water
  • 8 oz cream cheese, softened
  • 1/4 cup granulated sugar
  • 1 large egg yolk
  • 1/2 tsp vanilla extract

Instructions

1. Prepare the Crust:

  1. Preheat oven to 350°F (175°C). Grease a 9×5 inch loaf pan.
  2. In a medium bowl, whisk together flour, baking soda, salt, cinnamon, nutmeg, and cloves. Set aside.
  3. In a large bowl, mix pumpkin puree, oil, sugar, eggs, and water until well combined. Gradually add dry ingredients and mix until just incorporated.
  4. In a separate bowl, beat cream cheese, sugar, egg yolk, and vanilla until smooth and creamy.
  5. Pour half of the pumpkin batter into the prepared pan. Spoon half of the cream cheese mixture over the batter. Repeat layers and swirl gently with a knife.
  6. Bake for 55-65 minutes or until a toothpick inserted comes out clean. Cool in pan for 15 minutes before transferring to a wire rack.

Notes

You can customize the seasonings to taste.