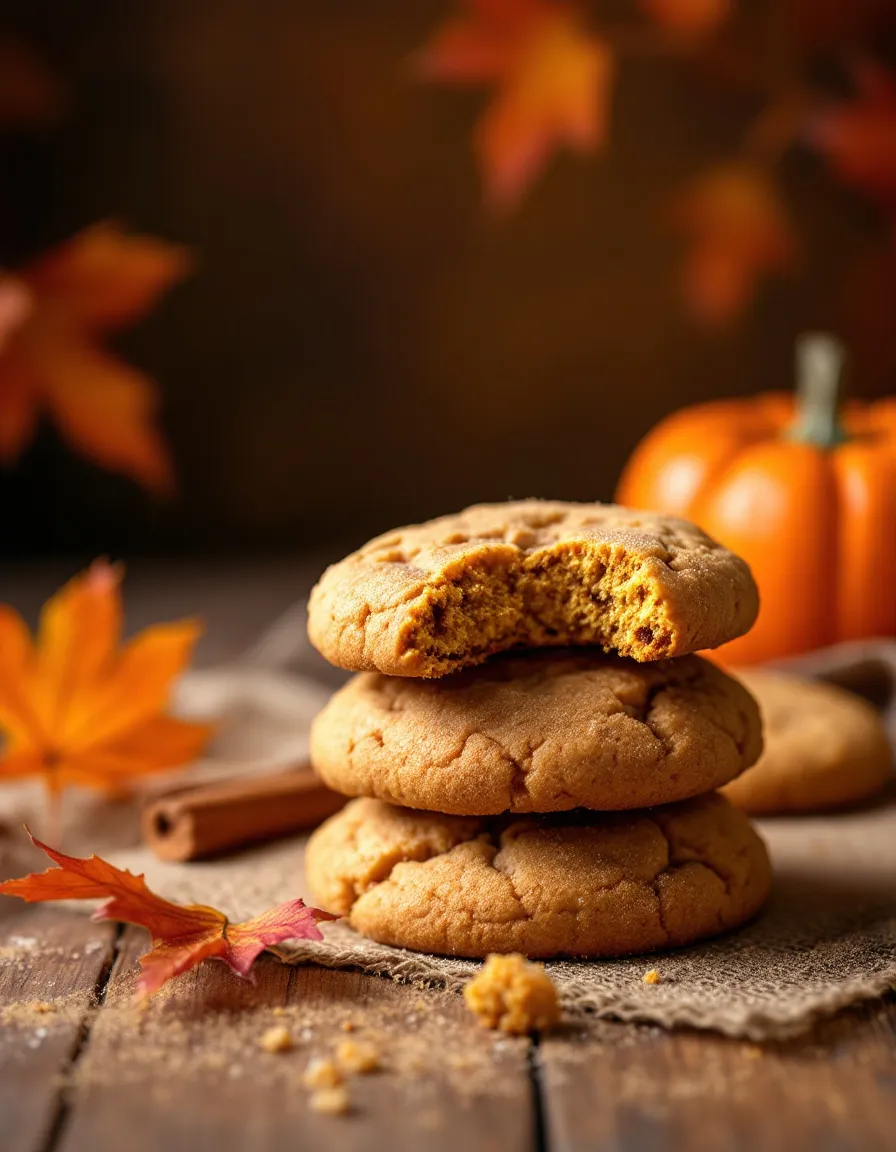
Pumpkin Pecan Cobbler: A Comforting Fall Delight
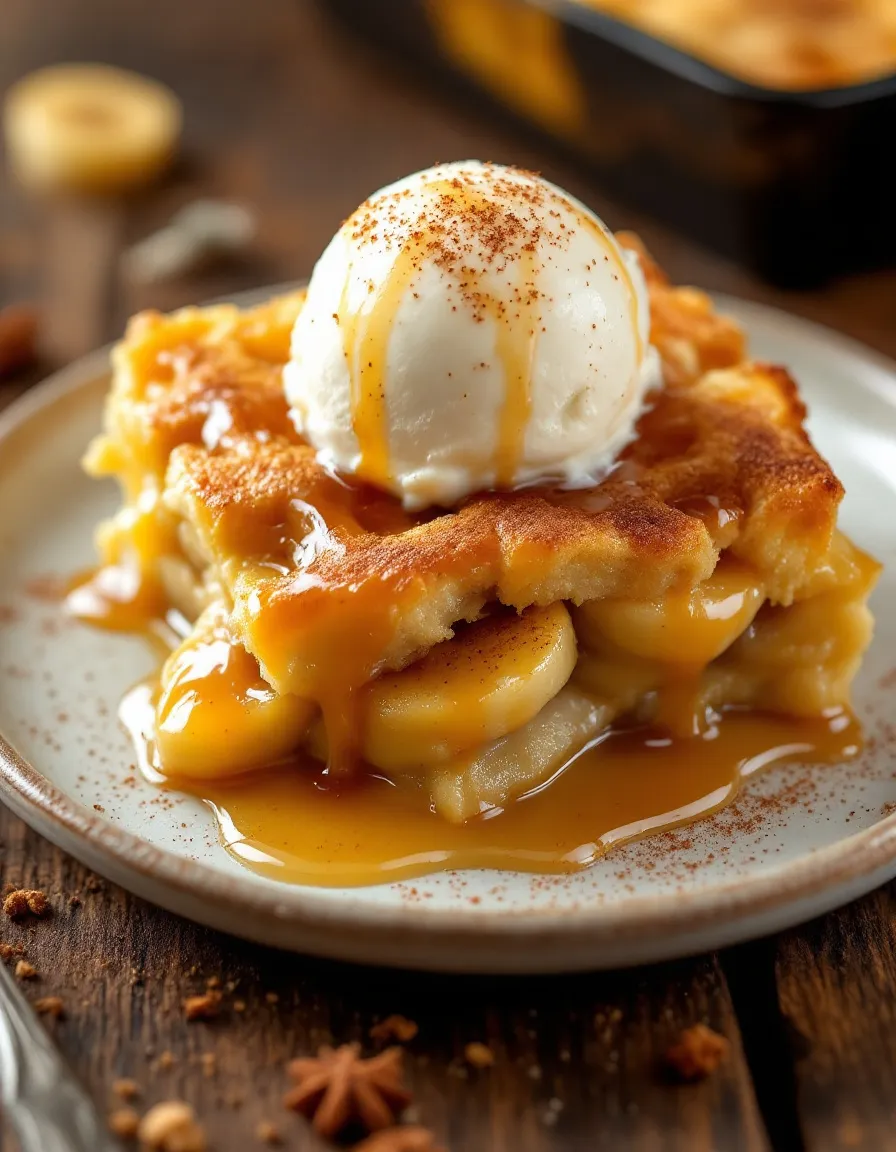
Pumpkin Pecan Cobbler is a delightful dessert that captures the essence of fall. This dessert is a harmonious blend of warm pumpkin and crunchy pecans, creating a soul-soothing indulgence that is perfect for cozy gatherings and festive occasions. The rich flavors of cinnamon and nutmeg evoke a sense of nostalgia, reminding you of family gatherings and autumn celebrations. As you sink your spoon into this cobbler, the golden pumpkin filling combined with the crumbly topping will bring warmth to your heart and joy to your taste buds.
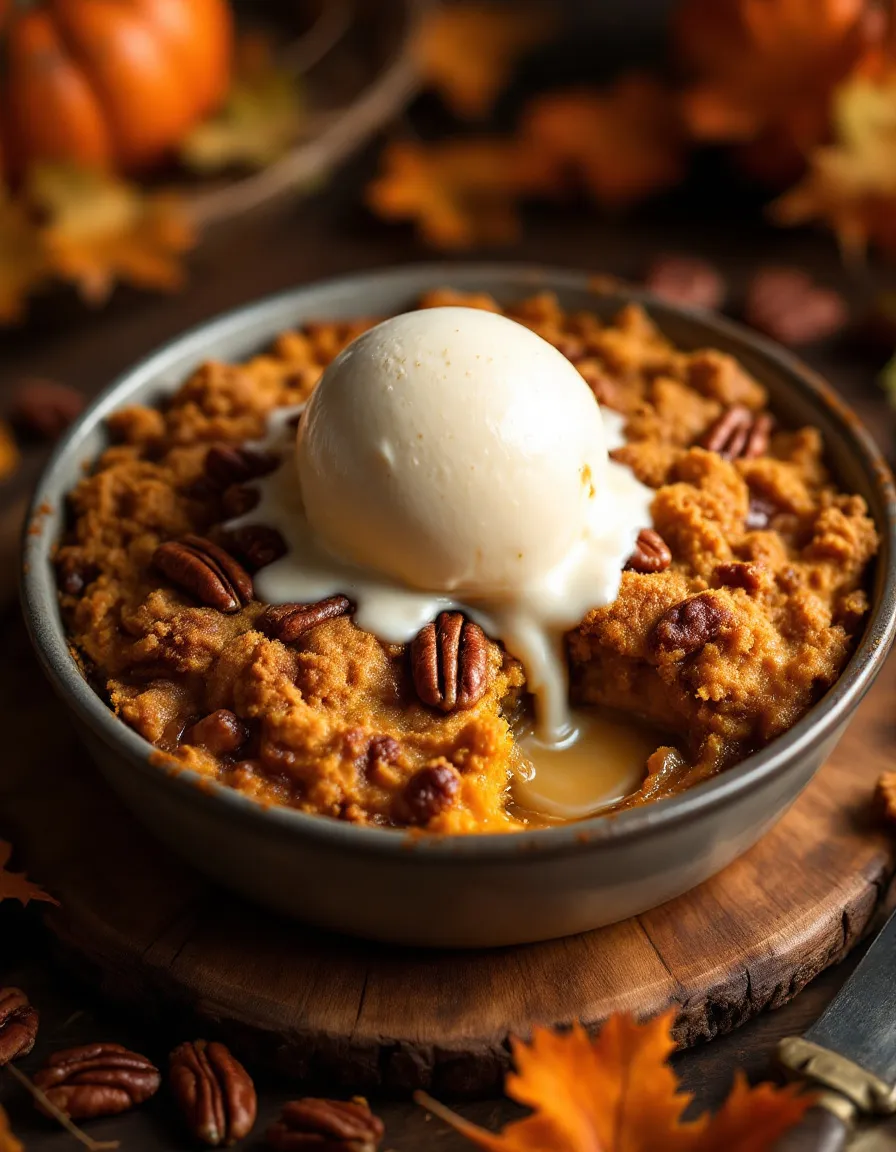
The texture of this cobbler is an irresistible combination of soft and crunchy. The bottom layer features a velvety pumpkin filling that is spiced to perfection, while the pecan topping adds a delightful crunch with every bite. Together, they create a wonderful contrast that keeps you returning for more. Serve it warm with a scoop of vanilla ice cream or a dollop of whipped cream for an unforgettable dessert experience that is sure to impress your friends and family.
Quick Recipe Highlights
- Flavor Profile: The sweet and spiced pumpkin mingles beautifully with the nutty flavor of pecans, creating a balanced dessert that appeals to all taste buds.
- Texture: Enjoy the creamy, soft pumpkin filling topped with a crunchy, golden-brown pecan layer, providing a satisfying contrast in every mouthful.
- Aroma: The warm scent of cinnamon and nutmeg wafts through your kitchen, inviting everyone to gather around the table.
- Visual Appeal: The dish’s warm oranges and browns create a visually stunning presentation, perfect for autumn-themed celebrations.
- Skill Level Needed: This recipe is designed for all skill levels, making it a great choice for beginner cooks and seasoned bakers alike.
- Special Equipment: A medium baking dish and mixing bowls are all you need to create this comforting dessert.
Recipe Overview
- Difficulty Level: This Pumpkin Pecan Cobbler is classified as easy, requiring minimal skills and time, making it accessible for home bakers of all experience levels.
- Category: This dish falls under the dessert category, specifically as a sweet bread or cobbler that perfectly complements a fall meal.
- Cuisine: Its roots are deeply embedded in American cuisine, showcasing the use of seasonal ingredients such as pumpkin and nuts that are traditional in Southern cooking.
- Cost: The approximate cost of preparing this cobbler is budget-friendly, thanks to readily available ingredients such as pumpkin puree and pecans.
- Season: Fall is the ideal season for this dessert, aligning with pumpkin harvesting and festive autumn celebrations.
- Occasion: Perfect for Thanksgiving dinners, family gatherings, or cozy dessert nights at home, enhancing any occasion with its warmth and flavor.
Why You’ll Love This Recipe
This Pumpkin Pecan Cobbler combines warm spices with the creamy texture of pumpkin, making it an irresistible dish to enjoy with family and friends. The amalgamation of flavors brings comfort and joy that is quintessential for autumn celebrations. As it bakes, your kitchen fills with a delightful aroma that heralds the arrival of the fall season, making each bite a heartwarming experience.
Preparing this cobbler is incredibly convenient, requiring only a handful of ingredients and minimal effort. It’s as simple as mixing the pumpkin filling and topping it with pecans. This ease of preparation allows you to whip it up ahead of time, freeing you to focus on other dishes or enjoy time with loved ones while it bakes to perfection in the oven. Plus, it’s an excellent way to use leftover pumpkin puree!
Nutritionally, this recipe stands out as it utilizes pumpkin, which is a nutrient-dense food rich in vitamins A and C along with antioxidants. Coupled with pecans that provide healthy fats and protein, this cobbler, when enjoyed in moderation, can be a delightful way to add some nutrition to your dessert table while satisfying sweet cravings.
When it comes to social gatherings, sharing this Pumpkin Pecan Cobbler with loved ones creates memorable moments around the table. Warm desserts are fantastic for fostering conversation, laughter, and togetherness—key elements of any enjoyable gathering. Whether you’re serving it at a formal dinner or a casual family meal, it will surely be a standout at the table.
Lastly, this recipe is highly accessible, using common ingredients that anyone can find at their local grocery store. Its cost-effectiveness makes it an excellent choice for those looking to treat themselves during the cooler months without breaking the bank. Plus, the impressive presentation will make you appear like a professional baker even if it’s your first time making a cobbler!
Historical Background and Cultural Significance
The Pumpkin Pecan Cobbler’s origins trace back to early American settlers who embraced the harvest produce of their environment. Pumpkin, a native plant to North America, became a staple ingredient in many traditional dishes, especially among Indigenous communities. Throughout history, cobblers emerged as an easy way to utilize various fruits and vegetables, baking them under a simple pastry crust—evolving into the beloved desserts we enjoy today.
Culturally, cobblers have played a significant role in American culinary traditions, often associated with holidays and family gatherings. The combination of pumpkin and pecans reflects the agricultural bounty of the fall season and showcases the regional flavors that characterize Southern cuisine. Over the years, variations of cobblers have spawned across the United States, adapting influenced by local ingredients and tastes.
This specific recipe showcases the blend of flavors and textures that have grown to symbolize comfort food in American culture. As families gather to celebrate harvest time or Thanksgiving, dishes like the Pumpkin Pecan Cobbler hold a special place at the table, evoking feelings of nostalgia and warmth that bring people together.
Interestingly, regional variations of this dessert exist, with some incorporating spices indigenous to certain cultures or adding different types of nuts. The cobbler’s evolution reflects the fusion of culinary traditions, allowing it to adapt and thrive during different seasons and in diverse households across the country.
Ingredient Deep Dive
Pumpkin: Pumpkin is not only a flavorful ingredient but also packed with nutrients such as beta-carotene, which is converted to vitamin A in the body. It is vital for eye health and has antioxidant properties. When selecting a pumpkin for your cobbler, opt for pure pumpkin puree rather than pumpkin pie filling, ensuring a more natural taste. Store unused pumpkin puree in the fridge for up to a week or freeze it for later use.
Pecans: Pecans are native to the Southern United States and are known for their rich, buttery flavor. They are a great source of healthy fats, protein, and essential vitamins, making them a nutritious addition to your diet. When choosing pecans, look for fresh, unsalted varieties. Store in an airtight container in a cool, dark place to prolong their freshness, and consider substituting walnuts if you need an alternative nut option.
Common Mistakes to Avoid
- Using pumpkin pie filling instead of plain pumpkin puree: Pumpkin pie filling includes sugar and spices, which can alter the recipe’s taste considerably.
- Not preheating the oven: Failing to preheat your oven can result in uneven cooking and improper baking times, affecting the cobbler’s texture.
- Overmixing the batter: Mix just until combined; overmixing can lead to a dense cobbler instead of the light and fluffy texture desired.
- Ignoring storage recommendations: Proper storage is crucial for maintaining freshness. Leaving the cobbler out too long can make it spoil faster.
- Using stale nuts: Ensure your pecans are fresh; using old or rancid nuts can ruin the flavor of the entire dessert.
- Not adjusting the sweetness: Taste your pumpkin mixture before baking and adjust the sweetness to your preference to ensure a balanced flavor.
- Baking in the wrong size dish: Using a baking dish that’s too large can cause the filling to dry out, while a dish that’s too small can overflow.
- Skipping the cooling time: Let the cobbler cool before serving; this helps the filling set and improves the overall flavor.
Essential Techniques
Mixing Ingredients: Properly incorporating your ingredients is vital for a consistent texture in your cobbler. Use a spatula to gently fold in the pumpkin and sugars without overmixing. This technique helps maintain air pockets for a lighter cobbler.
Baking: Monitor your cobbler closely towards the end of baking. When the top is golden brown and the edges are bubbling, you know it’s time to take it out. A toothpick inserted in the center should come out clean, signaling it’s perfectly baked.
Pro Tips for Perfect Pumpkin Pecan Cobbler
1. For a deeper flavor, toast your pecans lightly before adding them to the topping. This enhances their nuttiness and complements the warm spices.
2. Experiment with different spices. A pinch of ginger or cloves can add an exciting twist to the classic flavor.
3. Serve with homemade whipped cream to elevate the dessert further—whipping your cream with a touch of maple syrup can add a unique sweetness.
4. Make sure to let the cobbler sit for at least 10 minutes after baking; this resting period allows the flavors to settle and the filling to firm up.
5. Customize the sweetness by using brown sugar instead of granulated sugar for a richer, molasses-like flavor.
6. Consider adding a splash of vanilla extract to enhance the overall taste experience of your cobbler.
7. Serve it warm for the best experience, complemented by ice cream or cream for a decadent dessert feeling.
8. If you enjoy a bit of spice, consider a dash of cayenne pepper in the topping for a surprising kick!
Variations and Adaptations
For a regional twist, try adding local spices or even experimenting with seasonal ingredients like butternut squash in place of pumpkin to switch things up. Incorporate different nuts such as walnuts or almonds to yield varied flavors and textures. For a healthier take, consider using oats in the topping for added fiber and a delightful chewiness.
Adaptations can also cater to dietary needs—gluten-free oat flour could be a suitable alternative to regular flour, ensuring everyone can enjoy this delicious dish. For those looking for a low-sugar option, use natural sweeteners like honey or maple syrup instead of refined sugars.
Seasonal modifications like swapping in cranberries for added tartness in the fall can also bring a fresh dimension to the cobbler. Changing the topping to include chocolate chips or even caramel can create a decadent variation that excites the palate.
Presentation is key, so consider layering the cobbler in individual jars for a fun and trendy dessert presentation. Garnish with fresh mint or a sprinkle of cinnamon to impress your guests!
Serving and Presentation Guide
For an elegant yet simple presentation, serve the Pumpkin Pecan Cobbler in individual dessert bowls. Top with a generous scoop of vanilla ice cream or a dollop of whipped cream for a classic pairing. To elevate the visual appeal, sprinkle some extra toasted pecans and cinnamon on top for a rustic charming touch.
For a more modern spin, consider plating it in a mason jar, which allows layers of cobbler to be visible. This not only makes for a delightful visual display but also makes serving easier for guests. Always serve the cobbler warm for optimal flavor and satisfaction.
Consider pairing this dessert with a warm spiced beverage such as mulled cider or coffee to create a comforting and cozy dining experience. Temperature plays a significant role, as serving the cobbler too cold detracts from the flavor, and too hot may burn the palate.
Portion control is essential if you’re serving this at a gathering. Aim for modest servings, as this dessert can be quite rich and filling. Offering smaller plates encourages guests to enjoy more bites without overwhelming their appetite.
Wine and Beverage Pairing
Pair your Pumpkin Pecan Cobbler with a light dessert wine, such as a late harvest Riesling or a fresh Moscato, both of which will complement the sweetness of the cobbler beautifully. Alternatively, a spiced red wine could enhance the fall flavors and add a touch of warmth to your dessert experience.
For a non-alcoholic option, consider pairing with spiced apple cider or a chai tea. Both beverages bring a warm, comforting element that harmonizes with the cobbler’s spices.
If you enjoy coffee, a rich espresso or a creamy cappuccino serves as a delightful contrast to the sweet dessert, creating a well-rounded dessert experience. Always serve beverages at the appropriate temperature to enhance overall enjoyment.
Storage and Shelf Life
To store your Pumpkin Pecan Cobbler, allow it to cool completely before covering it with plastic wrap or aluminum foil to retain moisture. It can stay fresh in the fridge for up to 3 days. For longer storage, consider freezing it; ensure it’s well-wrapped to avoid freezer burn and can be stored for up to 3 months.
Signs of spoilage include an off smell or visible mold. If reheating, ensure even heating throughout to prevent any cold spots—reheating in the oven at 350°F for about 15-20 minutes is effective. Always err on the side of caution when in doubt about spoilage.
Freezing individual portions can allow you to enjoy this delightful dessert any time without needing a full bake. And remember to let it thaw in the fridge overnight before reheating to ensure the best recovery of flavors and textures.
Make Ahead Strategies
Consider preparing the pumpkin filling ahead of time and storing it in the refrigerator for up to 2 days before baking. This strategy saves time on busy days and prompts fresher flavors as the spices can blend and deepen.
You can also prepare the topping separately, storing it in an airtight container until you’re ready to assemble and bake. This step reduces prep time considerably on the day of serving and ensures a delightful, freshly baked dessert.
Assess how various elements of the recipe hold up over time to avoid soggy textures. For example, baking the cobbler directly before serving yields the best results in terms of taste and presentation.
When you reheat, be careful not to overdo it—monitoring closely will help preserve the cobbler’s delicate balance and quality. You may also choose to add fresh elements like whipped cream just before serving to enhance freshness.
Scaling Instructions
To halve the recipe, simply divide all ingredients by two, ensuring the baking time remains similar as smaller sizes often bake quicker. For doubling or tripling, check that your baking dish is adequately sized, as you want to avoid overcrowding, which can lead to uneven baking.
Consider ingredient adjustments that may need slight modifications; for instance, spices may need to be proportionally increased less than doubled to maintain balance. It might be necessary to adjust baking times when scaling up, as larger quantities can require additional time in the oven.
Always keep in mind the quantity of servings you plan to accommodate when preparing the dish. Storing extra portions can help maintain freshness and keep your dessert options versatile.
Nutritional Deep Dive
Your Pumpkin Pecan Cobbler packs nutritional value alongside satisfying flavor. With a generous serving of pumpkin, each piece delivers a dose of vitamins A and C, crucial for immune function and skin health. In addition, the fiber content from both pumpkin and pecans supports digestion and contributes to overall health.
Macro-wise, the dessert balances carbohydrates from the filling with healthy fats found in pecans. This balance not only keeps the meal enjoyable but offers healthy energy sources that can sustain you longer than typical sugary desserts.
Micronutrient analysis reveals that this cobbler also has calcium and potassium benefits from the nuts, playing a minor yet crucial role in supporting bone health and muscle function. Portion control will help manage caloric intake while still allowing you to indulge in this comforting fall treat.
Consider discussing dietary restrictions or alternatives for guests, ensuring everyone can enjoy a slice of this warm, spiced delight while staying mindful of their health needs and preferences.
Dietary Adaptations
To make this Pumpkin Pecan Cobbler gluten-free, you can substitute regular flour with almond flour or a gluten-free baking blend, ensuring that the texture remains intact. For a dairy-free option, choose plant-based butter or coconut oil as a replacement.
If you’re seeking a lower-carb twist, consider using a keto-friendly sweetener and almond flour. This adaptation will still give you that rich flavor profile while accommodating low-carb dietary needs.
Vegan adaptations can easily be made by substituting eggs with flaxseed meal or applesauce, adding moisture without dairy or meat. Moreover, using coconut cream in place of whipped cream can offer a delicious vegan dessert experience.
Low-FODMAP dietary users can adjust by selecting pecans in moderation and ensuring no excess high-FODMAP ingredients are included, making this delicious dish suitable for restricted diets.
Troubleshooting Guide
If you encounter texture issues, consider adjusting the liquid ratios; too much liquid can lead to a soggy cobbler while too little can result in dry textures. If flavor balance feels off, taste and adjust sweetness or spices before baking to achieve the desired flavor profile.
Temperature problems often arise with oven settings, ensuring your oven is calibrated correctly can prevent undercooking or burning. Use an oven thermometer to check your settings, confirming consistent temperatures throughout the process.
Equipment challenges might arise with baking dishes; ensure your dish is appropriate in size and material for even cooking. Glass or ceramic dishes work best to achieve that desired golden-brown finish and even heat distribution.
Recipe Success Stories
Community feedback about the Pumpkin Pecan Cobbler has been overwhelmingly positive, with many home bakers praising its ease of preparation and delicious flavor. Readers have shared their adaptations, showcasing creative toppings such as caramel drizzles or adding a layer of chocolate for unique twists.
Success stories highlight the enjoyment families have had making this cobbler together, turning a simple recipe into cherished memories around the kitchen. It’s a joyful tradition that brings loved ones closer, echoing the essence of fall and gratitude.
Photography tips include using natural light to capture the vibrant colors of the cobbler, showcasing the layering of pumpkin and pecans in beautiful detail. Social media posts have celebrated various adaptations that spark inspiration among home bakers, leading to a vibrant sharing community.
Frequently Asked Questions
Can I use fresh pumpkin instead of canned? Yes! You can roast and puree fresh pumpkin, but it may require more time than using canned pumpkin puree, which is more convenient for this recipe.
How should I store leftovers? Cool the cobbler completely, cover tightly or store in an airtight container in the refrigerator for up to 3 days.
Can I freeze the cobbler? Absolutely! Wrap it tightly and freeze for up to 3 months. Thaw in the fridge overnight before reheating.
How do I make it sweeter or less sweet? Adjust sweetness by increasing or decreasing the sugar added to the pumpkin mixture. Always taste before baking to find the right balance.
What can I substitute if I’m out of pecans? You can use walnuts, almonds, or even sunflower seeds as substitutes to maintain texture and flavor.
Can I make this cobbler ahead of time? Yes! You can prepare the pumpkin filling up to 2 days in advance and assemble it right before baking.
Is this recipe suitable for vegans? Yes, you can substitute eggs with flaxseed meal or applesauce and use plant-based butter.
What can I serve with this cobbler? Best served warm with whipped cream or vanilla ice cream, and consider a dash of caramel sauce for extra richness.
Do I need to cover it while baking? No, covering is unnecessary; letting it bake uncovered allows the top to get nicely browned and crisp.
What’s the best way to tell when it’s done? When the top is golden brown and the edges are bubbling, plus a toothpick inserted into the center should come out clean.
Additional Resources
For those who enjoyed this recipe, consider exploring related recipes that highlight the flavors of fall, such as Apple Crisp or Sweet Potato Pie. Technique guides on making the perfect pie crust or creating homemade whipped cream can enhance your baking skills and dessert offerings.
Ingredient information on the nutritional benefits of pumpkin and nuts can further inspire and inform your cooking journey. Additionally, researching seasonal variations can help you discover new and exciting ways to present familiar flavors throughout the year.
Join the Conversation
We invite you to share your experiences with this Pumpkin Pecan Cobbler! Join us on social media, capturing and sharing your baking journey with photos and stories. Sharing variations you’ve adopted or how you’ve hosted gatherings around this dessert can inspire others and build a community passionate about cooking.
Engagement through recipe reviews is encouraged, as it allows everyone to connect over their culinary successes and challenges. We’re excited to hear how you make this recipe uniquely yours and the memories you create along the way!
The Recipe
Pumpkin Pecan Cobbler
Serves: 8
Prep Time: 15 mins
Cook Time: 45 mins
Total Time: 60 mins
Kitchen Equipment Needed
- Medium baking dish
- Mixing bowls
- Whisk
- Spatula
Ingredients
- 1 cup of pumpkin puree
- 1 cup of granulated sugar
- 1 teaspoon of cinnamon
- ½ teaspoon of nutmeg
- 2 eggs
- 1 cup of chopped pecans
- ¾ cup of all-purpose flour
- ½ teaspoon of vanilla extract
- ¼ teaspoon of salt
Directions
- Preheat the oven to 350°F (175°C).
- In a large mixing bowl, whisk together the pumpkin puree, sugar, cinnamon, nutmeg, eggs, and vanilla until well combined.
- Fold in the chopped pecans, flour, and salt until the mixture is smooth.
- Pour the pumpkin mixture into a greased medium baking dish.
- Bake for 45 minutes, or until the top is golden brown and a toothpick inserted into the center comes out clean.
- Allow to cool slightly before serving warm.
Recipe Notes
- Feel free to substitute with different nuts or add dried cranberries for a fruity twist.
- Store leftovers covered in the fridge for up to 3 days.
- This recipe can easily be doubled for larger gatherings.