Decadent Chocolate Espresso Ricotta Torte: A Rich Dessert Delight
Indulge in the rich flavors of this Chocolate Espresso Ricotta Torte, a luxurious dessert that marries the deep, bold taste of espresso with the silky smoothness of ricotta cheese. As you slice through the chocolatey exterior, you’ll uncover a heavenly layer that combines the sweetness of dark chocolate with the creaminess of ricotta, creating an experience that’s both rich and satisfying. This torte is perfect for coffee lovers and dessert aficionados alike, providing a delightful way to end any meal.
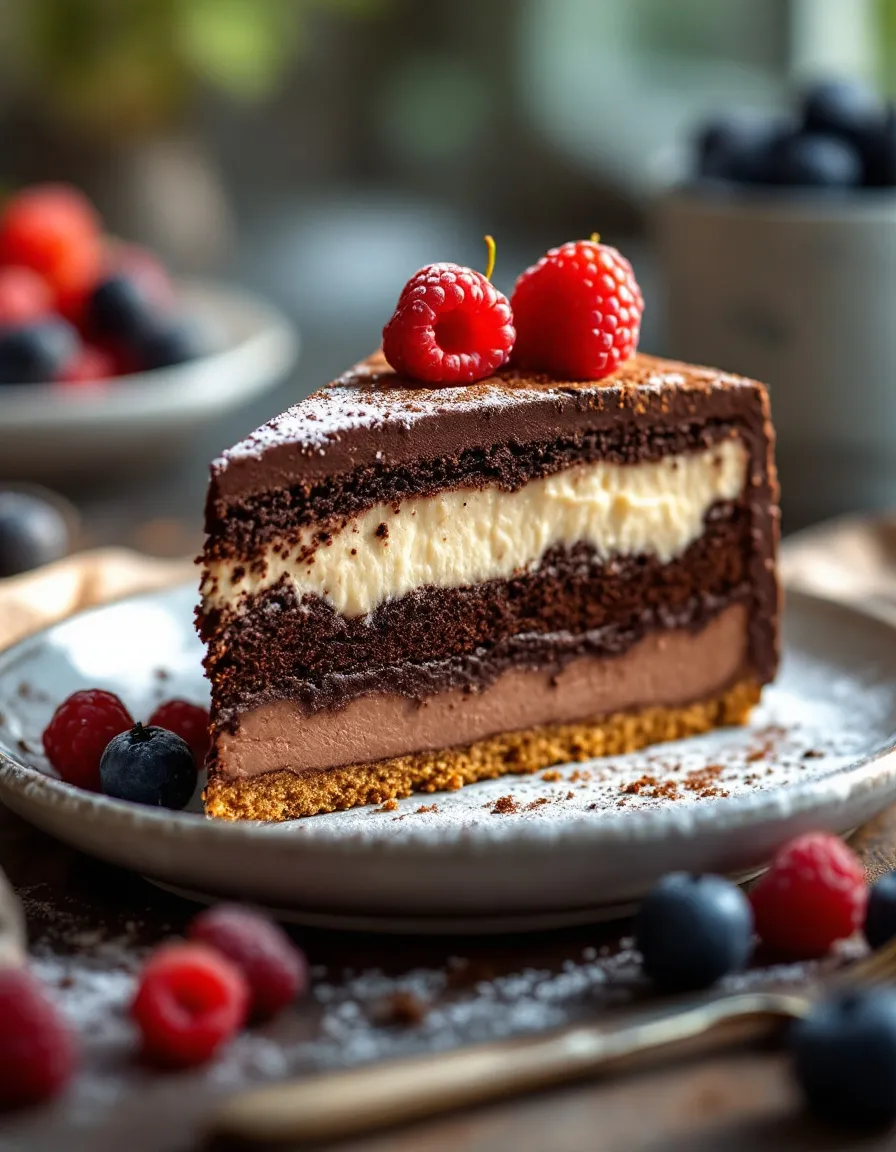
The unique composition of this Chocolate Espresso Ricotta Torte not only captivates the palate but also provides a visually stunning presentation. The glossy surface and perfect slice reveal contrasting textures that offer a delightful mouthfeel, and the aroma of chocolate and espresso permeates your kitchen as it bakes. Whether you’re hosting a dinner party or simply treating yourself, this dessert promises to impress with its combination of flavors and sophisticated appearance.
Quick Recipe Highlights
- Flavor Profile: A harmonious blend of rich chocolate and bold espresso, balanced with the subtle creaminess of ricotta.
- Texture: Silky smooth inside with a firm crust, providing a satisfying contrast in every bite.
- Aroma: The intoxicating scent of freshly brewed espresso mingles with the sweetness of chocolate, creating an irresistible allure.
- Visual Appeal: A glossy chocolate finish with a dusting of cocoa, glimmering enticingly on your dessert table.
- Skill Level Needed: Intermediate skills required; perfect for anyone ready to enhance their baking techniques.
- Special Equipment: A 9-inch springform pan and a food processor will make preparing this torte a breeze.
Recipe Overview
- Difficulty Level: This recipe is classified as intermediate, as it requires some precision in measuring and timing to achieve the perfect consistency.
- Category: A dessert that can also double as a luxurious finish to a coffee afternoon or special event.
- Cuisine: Italian, with influences from traditional tortes and contemporary dessert innovations.
- Cost: Overall costs are moderate, primarily depending on quality chocolate and fresh ricotta, making it an accessible indulgence.
- Season: Enjoy this torte year-round, but it makes an exquisite centerpiece for fall and winter celebrations.
- Occasion: Perfect for birthdays, holidays, or any gathering where you want to showcase your baking prowess.
Why You’ll Love This Recipe
The incredible balance of flavors in this Chocolate Espresso Ricotta Torte makes it a standout dessert. The bitterness from the espresso gives depth to the sweetness of the chocolate, while the ricotta introduces a creaminess that complements the rich cocoa. Each bite is an explosion of taste that keeps you reaching for more.
Not only is the taste delightful, but the preparation is both simple and rewarding. The use of a food processor speeds up the process significantly, allowing you to spend less time in the kitchen and more time enjoying your guests. This torte comes together quickly and requires minimal hands-on time, making it a convenient choice for any occasion.
From a nutritional standpoint, the ricotta adds protein and calcium while still allowing you to indulge in a decadent dessert. This balance means you can feel good about enjoying a slice after a balanced meal, and the rich chocolate offers an antioxidant boost that’s hard to resist.
When entertaining, nothing draws people in quite like the aroma of baking chocolate mingled with coffee. It’s a dessert that invites conversation and brings people together, creating memories. The rich look and taste make it a conversation starter, instantly impressing guests and sparking dialogue about flavors, techniques, and favorites.
Lastly, this recipe is financially accessible. You can achieve a gourmet dessert experience without the high cost found in restaurants. With a few high-quality ingredients and a little effort, you can present a dish that looks like a million bucks but costs a fraction of that.
Historical Background and Cultural Significance
The origins of torte can be traced back to European culinary traditions, specifically in Italy where various forms of torte have been enjoyed for centuries. Traditionally made with layers of cake and filling, this Chocolate Espresso Ricotta Torte embodies both classic and modern interpretations of this beloved dessert. The use of ricotta cheese, a staple dairy product in Italian cooking, adds a twist that enhances taste and texture.
Culturally, Italian desserts signify celebration and togetherness. Recipes are often passed down through generations, bringing families together during special occasions. This torte not only highlights the Italian affinity for rich flavors but also exemplifies the importance of community and shared experiences that revolve around feasting.
Over the years, the torte has evolved, adapting to different ingredients and baking styles. The introduction of espresso not only provides an exciting flavor addition but also showcases the Italian love for coffee, transforming the dessert into a beloved treat for coffee and chocolate lovers alike.
Despite its Italian roots, variations of the chocolate torte can be found worldwide, each incorporating unique local flavors, ingredients, and baking methods. Whether it’s adding spices, different nuts, or flavors, each region adds its own signature to this classic dessert while preserving its heart.
Ingredient Deep Dive
Chocolate: Chocolate holds a special place in culinary history, often seen as a luxurious treat. Its origins date back to the ancient Mesoamerican cultures, where it was highly valued. In terms of nutritional benefits, high-quality dark chocolate is an excellent source of antioxidants, which can reduce stress and improve heart health. When selecting chocolate for this torte, opt for at least 70% cocoa content for a richer taste. Store your chocolate in a cool, dark place to maintain its quality, and consider substituting with vegan chocolate if you prefer.
Espresso: Espresso, a concentrated form of coffee originating from Italy, adds an intense flavor that pairs beautifully with chocolate. Historically, it reflects the Italian culture’s deep-rooted connection to coffee. Nutritionally, espresso contains caffeine and antioxidants but in a moderate dose. When choosing your espresso, look for fresh, whole beans and grind them just before use for the best flavor. Store your beans in an airtight container and avoid direct sunlight. If espresso isn’t available, strong brewed coffee can serve as a substitute, though the taste will differ slightly.
Ricotta: This soft cheese has a rich history in Italian cooking, known for its creamy texture and subtle flavor. Nutritionally, ricotta is high in protein and calcium. To select quality ricotta, aim for fresh, creamy varieties with a smooth texture. It should be kept refrigerated and ideally consumed within five days of opening. If you’re out of ricotta, cottage cheese can work as a stand-in, provided it’s blended until smooth for the right consistency.
Common Mistakes to Avoid
- Using low-quality chocolate: Opting for a cheaper chocolate can drastically affect the flavor; always choose high-quality chocolate for baking.
- Not allowing the torte to cool: Cutting into a warm torte may lead to a mess; allow it to cool completely to set properly.
- Over-mixing the batter: Mixing too much can incorporate too much air and lead to a dense texture; mix until just combined.
- Skipping the parchment: Not using parchment paper can lead to sticking; ensure the pan is lined for easy removal.
- Incorrect measurements: Be precise with your ingredient measurements; baking is a science that requires accuracy.
- Baking at the wrong temperature: Not preheating your oven can affect cooking times; always ensure your oven is at the correct temperature before baking.
- Using room temperature ingredients: For optimal mixing and emulsification, ensure your eggs and ricotta are at room temperature.
- Decorating too soon: Wait until the torte is fully cooled to avoid melting any delicate garnishes.
Essential Techniques
Mixing: Understanding the mixing process is vital for achieving the right texture in your torte. Proper mixing ensures that all ingredients combine evenly without incorporating excessive air. To master this technique, mix on low speed just until the ingredients are combined. Avoid overmixing to prevent a dense torte. Visual cues for success include a smooth batter without visible lumps.
Baking: Perfect baking is crucial for ensuring that your torte sets properly. The goal is to achieve a slight jiggle in the center when the torte is fresh out of the oven, indicating it will firm up upon cooling. Use an oven thermometer to ensure accurate readings, and check on your torte a few minutes before the suggested baking time for optimal results. Look for the edges to pull away slightly from the sides of the pan as a sign of readiness.
Pro Tips for Perfect Chocolate Espresso Ricotta Torte
– Always use fresh ingredients, especially for the espresso and ricotta, as they significantly impact flavor and texture.
– Let the torte cool completely before slicing to allow the flavors to meld and the texture to set perfectly.
– Consider adding a little espresso powder into the crust for an extra kick of flavor.
– Serve with a dollop of whipped cream or mascarpone cheese for an elevated touch.
– Dusting the torte with cocoa powder just before serving enhances its visual appeal and adds a rich cocoa flavor.
– Use high-quality chocolate for melting; the flavor will be richer and more complex.
– Experiment with adding a layer of fruit, such as raspberries or strawberries, between the layers for added freshness.
– If you prefer a gluten-free option, ensure your ingredients, particularly your baking powder and chocolate, are free from gluten.
Variations and Adaptations
Diving into regional variations, some Italian regions incorporate citrus zest, like orange or lemon, to the batter for a bright, aromatic twist. Seasonal adaptations can include toppings like caramelized apples or roasted pears in the fall or fresh berries in the spring. Dietary modifications could mean substituting the sugar for honey or agave syrup for a more natural sweetener.
Flavor variations might incorporate nuts, like crushed hazelnuts or almonds, either in the batter or as a topping to add crunch. For texture modifications, consider swirling in a chocolate ganache layer for added creaminess. Presentation alternatives might involve serving the torte as individual mini tortes, perfect for parties and gatherings.
Serving and Presentation Guide
For plating, use a sharp, clean knife to slice the torte, ensuring smooth edges. A beautiful presentation is as important as the dish itself; consider serving each slice on a white plate with a sprig of mint or a dusting of powdered sugar. Garnishing with berries brings a pop of color and balances the richness of the dessert.
Traditional accompaniments include a scoop of vanilla or coffee ice cream, while modern serving suggestions could involve pairing it with a rich espresso or a herbal tea for contrast. Temperature considerations are essential; serve the torte warm or at room temperature, allowing the flavors to fully develop and the textures to shine. For portion control, servings should be modest, as this dessert is quite rich.
Wine and Beverage Pairing
For wine pairings, consider a rich dessert wine like a Port or a sweet Marsala that complements the chocolate’s sweetness. Non-alcoholic alternatives could include a sparkling water with a twist of lemon to cleanse the palate. If you want to stick to coffee, a light roast brewed coffee can enhance the torte’s flavors, while a darker roast espresso can pull out the flavors beautifully. Serve all beverages at optimal temperatures: wines slightly chilled and coffees hot.
Storage and Shelf Life
Storing your Chocolate Espresso Ricotta Torte correctly will prolong its freshness. Layers of plastic wrap can keep your torte moist while refrigerated. Ideally, it should be consumed within five days for the best flavor, although it could last up to a week if stored properly. Signs of spoilage include an off smell or discoloration. For reheating, warm your individual slices in the microwave for about 10-15 seconds, ensuring it doesn’t dry out. The torte can be frozen; wrap it tightly in plastic wrap followed by aluminum foil and store for up to three months.
Make Ahead Strategies
To give your Chocolate Espresso Ricotta Torte a head start, consider preparing the batter a day in advance. You can also bake the torte ahead of time, allowing it to cool completely before storing it. For even better flavor, refrigerate overnight. To enhance the quality when you’re ready to serve, allow it to come to room temperature before slicing. Assembly tips include waiting to add any garnishes until just before serving to maintain their fresh appeal and avoid sogginess.
Scaling Instructions
If you wish to halve the recipe, simply adjust the ingredient quantities accordingly, using an 8-inch springform pan instead. Doubling or tripling the recipe is possible; however, ensure your oven can accommodate the larger quantity or bake in batches. Adjust cooking times as necessary, particularly with larger quantities, checking for doneness visually. Be cautious with your storage considerations; larger quantities might require different containers or more space in your refrigerator or freezer.
Nutritional Deep Dive
On analyzing the macros, this torte primarily contains carbohydrates from the chocolate and sugar, proteins from the ricotta, and fats from both the chocolate and cheese. The sugar intake can be moderated by inspecting the quantities used and opting for natural sweeteners. Micronutrient analysis shows that dark chocolate provides iron and antioxidants, while ricotta contributes calcium and vitamin A.
For anyone monitoring their dietary habits, paying attention to portion sizes is key as this dessert is rich and indulgent. Enjoying a small slice can satisfy cravings while allowing you to indulge responsibly. This dessert lends itself to balance, especially when paired with a protein-rich or fiber-focused meal beforehand, assisting with weight management and appetite control.
Dietary Adaptations
For gluten-free adaptations, ensure that all ingredients, especially baking powders and chocolates, are certified gluten-free. A dairy-free version can be achieved by substituting coconut cream for ricotta and using dairy-free chocolate. Those following a vegan diet can replace eggs with flaxseeds or silken tofu, ensuring the torte remains rich and satisfying.
For a low-carb or keto approach, consider using keto-friendly sweeteners and almond flour as a crust variation. Paleo-friendly options could involve using raw cacao and nut-based crusts while completely avoiding refined sugars. Other specific diets, such as low-FODMAP, may require consultation on ingredient suitability, particularly regarding sweeteners and dairy substitutes.
Troubleshooting Guide
If you find your torte is too dry, it may have been overbaked; ensure to check it a few minutes before the timer goes off. For texture issues, a dense torte may result from overmixing, while under-mixing could lead to lumps; always strive for just combined without visible flour. If the flavor balance seems off, consider adjusting your sweetener levels or adding a pinch of salt to enhance the chocolate’s depth.
Temperature problems may arise if your oven temperature is inaccurate; using an oven thermometer can help mitigate this. Equipment challenges like a springform pan leaking can be rectified by adding a layer of aluminum foil under the base before pouring in your batter. Lastly, if you run out of a key ingredient, check for substitutions in both texture and flavor compatibility.
Recipe Success Stories
Community members rave about their Chocolate Espresso Ricotta Torte experiences, with many sharing photos of their stunning presentations and recipe adaptations. Numerous bakers found successes using alternative ingredients, such as sugar substitutes or plant-based options, while others focused on achieving perfect texture through varying methods. Reader suggestions highlight ways to tweak baking times and ingredient combinations to match personal preferences, demonstrating the versatility of this recipe.
Photography tips from the community encourage styling slices with a contrasting plate color and adding seasonal fruits for vibrant visuals, making each serving look as delicious as it tastes. Many praised the recipe’s ease and effectiveness, stating it became a staple for gatherings and special occasions alike.
Frequently Asked Questions
Can I use milk instead of ricotta?
Using milk alone will not provide the desired texture in this torte; ricotta is essential for creaminess and structure. For a dairy-free option, consider using almond or cashew cream as alternatives.
How do I know when the torte is done baking?
The torte is done when the center has a slight jiggle but is set around the edges. A toothpick inserted into the center should come out with a few moist crumbs.
Can I freeze the torte?
Yes, the torte can be frozen for up to three months. Wrap it tightly to prevent freezer burn and allow it to come to room temperature before serving.
What can I substitute for espresso?
If espresso isn’t available, using strong brewed coffee works as a good substitute; however, the flavor will differ slightly from the rich espresso taste.
Is there a vegan version of this torte?
Yes! You can create a vegan version by using flaxseed meal instead of eggs and plant-based cream for the ricotta. Look for vegan chocolate as well to maintain the richness.
How long will the torte last once baked?
The torte will last up to five days when stored in the refrigerator. However, for the best flavor, it’s recommended to consume it within the first three days.
Can I use a different type of cheese?
While ricotta is preferred, mascarpone can also be used for a richer texture. Adjust the sugar slightly depending on the sweetness of the cheese.
Does the torte need to be refrigerated?
Yes, the torte should be refrigerated to keep it fresh, especially since it contains ricotta. Allow it to come to room temperature before serving for optimal taste.
Can the torte be made ahead of time?
Absolutely! The torte can be baked a day before serving. It often tastes even better the next day, as the flavors meld together; just wait to add any toppings until serving.
What is the best way to serve this torte?
Serve slices at room temperature, optionally garnished with whipped cream, fresh berries, or a dusting of cocoa powder for an extra special touch.
Additional Resources
If you’re interested in experimenting more with chocolate and coffee, check out our related recipes featuring decadent desserts that use both ingredients in innovative ways. For technique guides, consider exploring how to properly temper chocolate or whip cream to perfection.
Ingredient information can enhance your cooking, guiding you in selecting the freshest and highest quality components for dessert making. Finally, consider upgrading your equipment with high-quality baking tools, which can significantly impact your overall success and enjoyment in the kitchen.
Join the Conversation
We love hearing your thoughts on this Chocolate Espresso Ricotta Torte! Share your photos and creative adaptations on social media, using our hashtag. Connect with fellow food lovers in our community discussions about their variations and successes with the recipe.
Leave a review and let us know your favorite serving suggestions, along with any tips you discovered along the way. Your input helps us continually improve and enrich our recipes for everyone in our culinary family!
The Recipe
Chocolate Espresso Ricotta Torte
Serves: 10 servings
Prep Time: 25 mins
Cook Time: 45 mins
Total Time: 1 hour 10 mins
Kitchen Equipment Needed
- 9-inch springform pan
- Food processor
- Mixing bowls
- Measuring cups and spoons
- Spoon or spatula for mixing
- Toothpick for testing doneness
Ingredients
- 8 oz. dark chocolate (at least 70% cocoa), chopped
- 1/2 cup unsalted butter
- 4 large eggs
- 1 cup granulated sugar
- 1 cup ricotta cheese
- 1 tablespoon espresso, brewed strong
- 1 teaspoon vanilla extract
- 1/2 cup all-purpose flour
- 1/4 teaspoon baking powder
- Pinch of salt
- Cocoa powder for dusting
Directions
- Preheat the oven to 350°F (175°C) and prepare your springform pan by lining it with parchment paper.
- Melt the chocolate and butter together in a double boiler or microwave, stirring until smooth. Let it cool slightly.
- In a large bowl, whisk together the eggs and sugar until frothy. Stir in the ricotta, espresso, and vanilla into the chocolate mixture until fully combined.
- Sift in the flour, baking powder, and salt, gently folding until just mixed.
- Pour the batter into the prepared springform pan and smooth the top.
- Bake for 40-45 minutes, or until a toothpick inserted in the center comes out clean with a few moist crumbs.
- Allow the torte to cool in the pan for 15 minutes before releasing the springform. Let it cool completely on a wire rack.
- Before serving, dust with cocoa powder, and slice into wedges to enjoy!
Recipe Notes
- Feel free to substitute the sugar with a natural sweetener such as honey or maple syrup.
- For a richer flavor, add a tablespoon of espresso powder directly into the batter.
- This torte pairs beautifully with whipped cream or a scoop of vanilla ice cream.