Brown Sugar Layer Cake with Peach Filling: A Heavenly Delight
Brown Sugar Layer Cake with Peach Filling is a delightful dessert that perfectly balances the richness of brown sugar with the juicy sweetness of fresh peaches. This layered cake offers a moist, tender crumb that is reminiscent of a warm summer day, making it a perfect centerpiece for gatherings. Each slice reveals beautiful layers of fluffy cake enhanced by the natural sweetness and vibrant color of the peach filling that practically sings of sunny afternoons.
The combination of flavors in this cake brings together the depth of brown sugar, with caramel notes that are beautifully complemented by the fruity and fragrant peach filling. Whether paired with a dollop of whipped cream or served plain, each bite will transport you to a blissful culinary experience. This recipe is great for those who love baking, and it provides a wonderful opportunity to impress family and friends with your skills in the kitchen.
Quick Recipe Highlights
- Flavor Profile: The rich, caramel notes of brown sugar meld exquisitely with the sweet, tangy peaches for a delightful taste explosion.
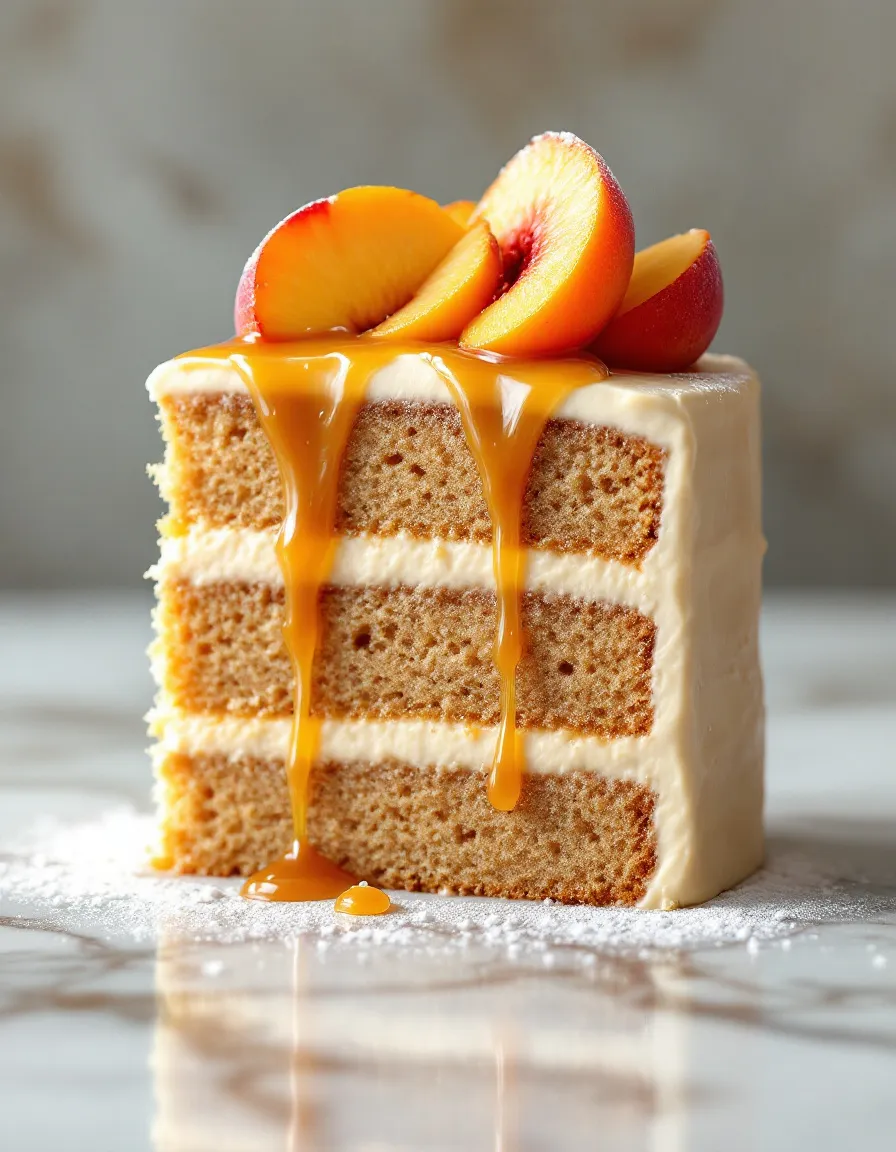
- Texture: This cake features a soft and luscious crumb that pairs beautifully with the smooth, rich peach filling.
- Aroma: The inviting scent of baked brown sugar and fresh peaches fills the air, creating a warm and welcoming atmosphere.
- Visual Appeal: With its golden layers accentuated by rich peach filling, this cake is as stunning as it is delicious.
- Skill Level Needed: Intermediate baking skills are recommended, especially for mastering the layer assembly.
- Special Equipment: A round cake pan set and an electric mixer are essential for achieving the best results.
Recipe Overview
- Difficulty Level: This recipe is rated as medium difficulty due to the need for precise baking techniques and layering.
- Category: Ideal for desserts and celebratory events, this cake can be served at birthdays, weddings, or any festive occasion.
- Cuisine: This cake is inspired by traditional American baking, embracing both homey simplicity and festive celebration.
- Cost: This cake is budget-friendly, with most ingredients being pantry staples; expect a total cost of around $15.
- Season: Summer is the best season for this recipe, as peaches are in peak season, ensuring your cake is bursting with flavor.
- Occasion: Perfect for summer picnics, family reunions, or potlucks, this cake brings everyone together.
Why You’ll Love This Recipe
This Brown Sugar Layer Cake with Peach Filling delights the senses with its incredible taste and unique texture. The rich sweetness of the brown sugar gives the cake a deep flavor profile, while the fresh peaches provide a juicy contrast that keeps your taste buds dancing. The balance between sweetness and acidity in the filling enhances the overall experience, making every slice irresistible.
Convenience is a key benefit of this recipe, as it can be prepared in stages. Bake the layers in advance, and whip up the filling while they cool. This strategy not only ensures that the cake comes together smoothly, but it also allows you to prepare ahead of time, reducing stress for your special event.
From a nutritional standpoint, this cake offers benefits of fresh fruit combined with the wholesome qualities of whole grains if you choose to incorporate them. Using natural ingredients translates to a treat you can enjoy guilt-free. The peaches are rich in vitamins A and C, while brown sugar offers trace minerals that are often absent in white sugar.
Socially, serving this cake at gatherings brings an element of warmth and relish as it evokes nostalgia and comfort. Its delightful flavor encourages sharing and conversation, making it an ideal centerpiece for gatherings.
Lastly, this recipe’s cost-effectiveness is a huge plus. With simple ingredients and straightforward steps, it’s accessible for most home bakers. It’s the perfect way to create an impressive dessert without breaking the bank.
Historical Background and Cultural Significance
The origin of layer cakes in American cuisine can be traced back to the late 19th century, when intricate cakes began to symbolize sophistication in dessert making. The introduction of baking powder allowed for lighter cakes and opened the door for various flavor combinations, including the standout flavors found in this brown sugar layer cake.
Layer cakes, particularly those filled with fruit, hold cultural importance in many American households. They bring to mind gatherings and celebrations where families come together to share in their fond culinary traditions. The use of seasonal fruits like peaches illustrates regional agricultural traditions, especially in Southern cuisine.
Over time, layer cakes have evolved from simple home baking to gourmet dessert presentations. Chefs have taken classic recipes and infused them with modern twists, such as unique flavor pairings and artistic decorations. This Brown Sugar Layer Cake with Peach Filling is a nod to those traditions while also embracing contemporary tastes.
In different regions, variations of fruit-filled layer cakes abound, showcasing local fruits and ingredients. From peach cobbler cakes to apple spice layers, the essence of celebrating bounty is ever-present in these delightful desserts.
Ingredient Deep Dive
Brown Sugar: Brown sugar, with its molasses content, offers a deep flavor that white sugar cannot replicate. Historically, brown sugar has been essential in American baking, providing moisture and subtle caramel notes. When selecting brown sugar, opt for tightly packed varieties for optimal moisture. Store it in an airtight container to prevent hardening. You can substitute white sugar combined with molasses in a pinch for similar results.
Peaches: Peaches are a quintessential summer fruit, celebrated for their delicious sweetness and juicy texture. They are a staple in Southern cuisine and are often used in desserts ranging from pies to cakes. When choosing peaches, select those that give slightly to the touch for optimal ripeness. Store them at room temperature until ripe, then refrigerate. Fresh peaches can be substituted with canned or frozen, though fresh offers the best flavor.
Common Mistakes to Avoid
- Not measuring ingredients accurately can lead to inconsistent texture and taste.
- Overmixing the batter- this can yield a tough cake. Mix just until combined.
- Not allowing cakes to cool completely before frosting can melt the filling and lead to a mess.
- Using unripe peaches may result in a filling that lacks sweetness and flavor.
- Ignoring oven temperature preheating can impact the rise and bake of your cake.
- Forgetting to sift dry ingredients can lead to clumping and uneven mixing.
- Using too much filling may cause the layers to slide apart; moderation is key.
- Failing to level the cake layers can make stacking difficult and unstable.
- Not following the recipe precisely in ingredient ratios can disrupt the balance of flavor and texture.
- Skipping cooling and resting times can negatively affect the final product.
Essential Techniques
Layering Cakes: Proper layering involves leveling your cake layers to ensure stable construction. Use a serrated knife for an even cut. Also, placing the thickest layer at the bottom provides a sturdy base for the top.
Making Fruit Fillings: To achieve a well-rounded peach filling, cook the fruit gently with sugar until it thickens. Stir constantly to prevent burning, and look for a glossy finish as a visual cue for doneness.
Pro Tips for Perfect Brown Sugar Layer Cake with Peach Filling
– Use room temperature ingredients for better continuity in baking.
– Bake on a parchment-lined pan for easy removal.
– Cool layers upside down on a wire rack to maintain a flat surface.
– Brush the cake layers with a simple syrup for added moisture.
– Allow the filling to cool before using it to prevent melting.
– Add a pinch of salt to enhance the sweetness of the peach filling.
– Experiment with different flavor additions to the cake, such as almond or vanilla extracts.
– Decorate with fresh peaches or cream for an appealing presentation.
Variations and Adaptations
You can explore regional variations of this cake by using seasonal fruits. For instance, substitute peaches with plums or berries for a new taste. Consider adding spices like cinnamon or nutmeg for a cozy autumn adaptation.
Adopting dietary modifications is simple with this recipe. Easily create a gluten-free version by using almond flour or a gluten-free blend. To make it vegan, substitute eggs with flaxseed meal or applesauce and replace dairy with plant-based milk.
For texture modifications, add a layer of nuts or chocolate chips between the cake layers for extra crunch. Presentation can be altered through different icing techniques or garnishing with edible flowers for a stunning visual display.
Serving and Presentation Guide
To create an appealing presentation for your Brown Sugar Layer Cake with Peach Filling, consider using a cake stand to elevate its stature. Opt for a simple yet sophisticated frosting technique such as the naked cake style, allowing the filling to peek through.
Garnishing the top with fresh peach slices adds a touch of freshness. Consider adding herbs like mint or lemon balm for color contrast. For a modern touch, serve individual slices on elegant plates alongside a small scoop of vanilla ice cream or whipped cream.
Serving temperature plays a vital role; allow the cake to come to room temperature for the best flavor experience. Portion control tips suggest cutting slices into equal pieces, allowing guests to enjoy without feeling overwhelmed.
Wine and Beverage Pairing
Pairing your dessert with wine can elevate the experience. A late harvest Riesling complements the sweetness of the peach filling beautifully. If you prefer red, a light Pinot Noir works wonders, balancing the richness of brown sugar without overwhelming the palate.
For those seeking non-alcoholic alternatives, consider serving the cake with light iced teas or lemonades. If you’re a coffee enthusiast, a light roast coffee can enhance the flavors of the cake, particularly those of brown sugar.
Serve beverages slightly chilled to balance the warmth of the cake. This allows for a refreshing palate cleanser in between bites.
Storage and Shelf Life
For optimal storage of your Brown Sugar Layer Cake with Peach Filling, wrap it securely with plastic wrap or store it in an airtight container to retain moisture. It can last at room temperature for about 2-3 days, but for longer freshness, refrigerate it.
Ensure the cake is completely cooled before refrigeration to prevent condensation. Signs of spoilage include an off smell and changes in texture. For those wishing to extend shelf life, this cake can be frozen for up to three months. Slice it and wrap individual pieces for convenient serving later.
When reheating, a short burst in the microwave can warm the cake without drying it out. If who prefer a freshly baked taste, warming in an oven at low temperature can restore its fluffiness.
Make Ahead Strategies
To effectively make ahead this Brown Sugar Layer Cake, you can prepare the layers a day in advance. Keep the cooled layers tightly wrapped to prevent drying. Make the peach filling and store it in the refrigerator to enhance flavor.
During the assembly, allow all components to rest at room temperature. This helps in achieving a smooth frosting layer. For added charm, consider assembling the cake shortly before serving, so it remains fresh and visually appealing.
If you want to add elements like whipped cream or fresh fruit just before serving to maintain freshness, it avoids any sogginess.
Scaling Instructions
This recipe can be scaled easily for larger gatherings or smaller portions. To halve the recipe, reduce each ingredient accordingly, and keep an eye on baking times, as smaller cakes may bake quicker.
For larger gatherings, doubling or tripling ingredients can work, but consider adjusting baking time and checking with a toothpick for doneness. Ensure you have a larger mixing bowl, and it may help to bake in batches if you lack sufficient equipment.
When storing scaled cakes, keep the proportions in mind and separate layers, ensuring they are cooled properly for the best results.
Nutritional Deep Dive
In terms of macros, this cake offers a harmonious blend of carbohydrates from sugar and flour, along with healthy fiber derived from the peaches. This makes it a satisfying option to indulge in without completely straying from nutritional balance.
Micronutrient analysis reveals the presence of vitamin A and C from peaches, contributing to overall health benefits. It is essential to enjoy this dessert in moderation, especially for those monitoring sugar intake.
Dietary considerations should include mindful portion sizes to align with weight management goals, yet the balanced flavors of fruits and sugars encourage enjoyment without guilt.
Dietary Adaptations
For a gluten-free version of this cake, consider using almond flour or a certified gluten-free flour blend. When craving a dairy-free option, you can substitute milk with almond or coconut milk, and use vegan butter for frosting.
Followers of a low-carb lifestyle can explore using erythritol or stevia in place of sugar while also opting for almond flour for the base. The cake can also be tailored to fit a keto diet by ensuring sugar content is kept to a minimum.
Adapting to a vegan diet involves replacing eggs with flaxseed meal or chia seeds mixed with water, maintaining similar texture while endorsing ethical eating practices.
Troubleshooting Guide
Texture issues can often arise from overmixing; if your cake turns out dense, remember to mix just until combined. If it crumbles, it may have been overbaked, so check for doneness earlier next time.
Flavor balance problems often stem from incorrect measurements. If a cake turns too sweet, you can enhance it with a little salt in your frosting or a tart fruit on the side. Always taste as you combine flavors to create an enjoyable experience.
Common equipment challenges involve your oven’s heat emission. If baked goods unevenly brown, consider investing in an oven thermometer for accurate temperature readings. Timing concerns, like items burning, require adjusting the time to fit your specific oven’s quirks.
Recipe Success Stories
Community feedback is a vital part of any recipe’s evolution. Many home bakers have reported receiving rave reviews when they serve this Brown Sugar Layer Cake at gatherings, with family and friends returning for seconds.
Readers have shared their personal adaptations, such as using seasonal berries instead of peaches, proving that the recipe stands up to experimentation while retaining its charm.
Photography tips suggest showcasing the cake’s layers and vibrant filling, encouraging engagement on social platforms while inspiring others to try their hand at this delightful cake.
This sharing of experiences fosters a community of bakers eager to explore and create new versions of this beloved dessert.
Frequently Asked Questions
Yes, frozen peaches can be used, but ensure they are thawed and drained before cooking them down for the filling for the best texture.
Reduce the amount of brown sugar slightly or add a layer of tart fruit to balance the flavors.
Absolutely! Simply substitute the all-purpose flour with a gluten-free blend, and remember to check your baking powder for gluten content.
Wrap the cake tightly in plastic wrap and store it in an airtight container. For longer shelf life, refrigerate it.
Yes, you can freeze the layers individually for up to three months. Make sure they are well-wrapped to prevent freezer burn.
The cake can last up to 2-3 days at room temperature, but for more extended freshness, refrigerate it.
You can use white sugar with a bit of molasses mixed in to emulate the depth of flavor that brown sugar provides.
Cream cheese frosting or whipped cream are classics that pair wonderfully with the sweet and fruity layers of this cake.
Yes, chopped nuts like pecans or walnuts can be a delightful addition to the cake layers for added texture and flavor.
Frost between the layers with peach filling, then cover the outside with whipped cream or a simple buttercream to keep it light and delicious.
Additional Resources
Explore related recipes on our blog for seasonal fruits, like peach cobbler or berry tart recipes, that elevate your baking repertoire. We also provide comprehensive guides for mastering essential techniques like making fillings and frostings.
For ingredient information, check out our detailed posts on sourcing fresh peaches and tips for baking with brown sugar to enhance your culinary skills. Equipment recommendations focus on the best cake pans and mixers suited for baking larger cakes, ensuring you have the right tools for success.
For seasonal variations, discover how to incorporate fruits from each season into your baking, expanding your dessert options year-round.
Join the Conversation
We invite you to share your experiences with our Brown Sugar Layer Cake with Peach Filling on social media! Use our hashtag, and don’t forget to tag us in your photos to inspire others in the community.
Leave your recipe reviews and suggestions in the comments, and let us know how you’ve made this recipe your own with personal twists and adaptations. Sharing your story contributes to a vibrant community passionate about baking and sharing delicious treats.
The Recipe
Brown Sugar Layer Cake with Peach Filling
Serves: 8-10
Prep Time: 30 mins
Cook Time: 45 mins
Total Time: 1 hr 15 mins
Kitchen Equipment Needed
- Round cake pans
- Mixing bowls
- Electric mixer
- Spatula
- Cooling rack
Ingredients
- 2 ½ cups all-purpose flour
- 2 cups brown sugar, packed
- ½ cup unsalted butter, softened
- 1 cup milk
- 4 eggs
- 1 tablespoon baking powder
- 1 teaspoon vanilla extract
- 3 cups fresh peaches, diced
- 1 cup sugar (for peach filling)
- 2 tablespoons lemon juice
Directions
- Preheat your oven to 350°F (175°C) and prepare your cake pans with cooking spray or parchment paper.
- In a mixing bowl, cream the butter and brown sugar until light and fluffy.
- Add eggs, one at a time, mixing well after each addition. Stir in vanilla.
- In another bowl, sift together flour and baking powder.
- Alternate adding flour mixture and milk to the sugar mixture, ending with flour. Mix until just combined.
- Pour the batter evenly into the prepared cake pans and bake for 25-30 minutes or until a toothpick inserted comes out clean.
- While the cake cools, prepare the peach filling by combining peaches, sugar, and lemon juice in a saucepan over medium heat. Cook until soft, about 10-15 minutes. Let cool.
- Once cakes have cooled, level the tops if necessary.
- Spread a layer of peach filling between the cakes and frost the outside as desired. Serve and enjoy!
Recipe Notes
- Feel free to enhance the frosting with cream cheese for added richness.
- Make ahead of time, and assemble shortly before serving to maintain cake freshness.
- Substitute with seasonal fruits for a personalized twist.