You Can Get A Butterbeer Latte From Starbucks: Accio It To Me!
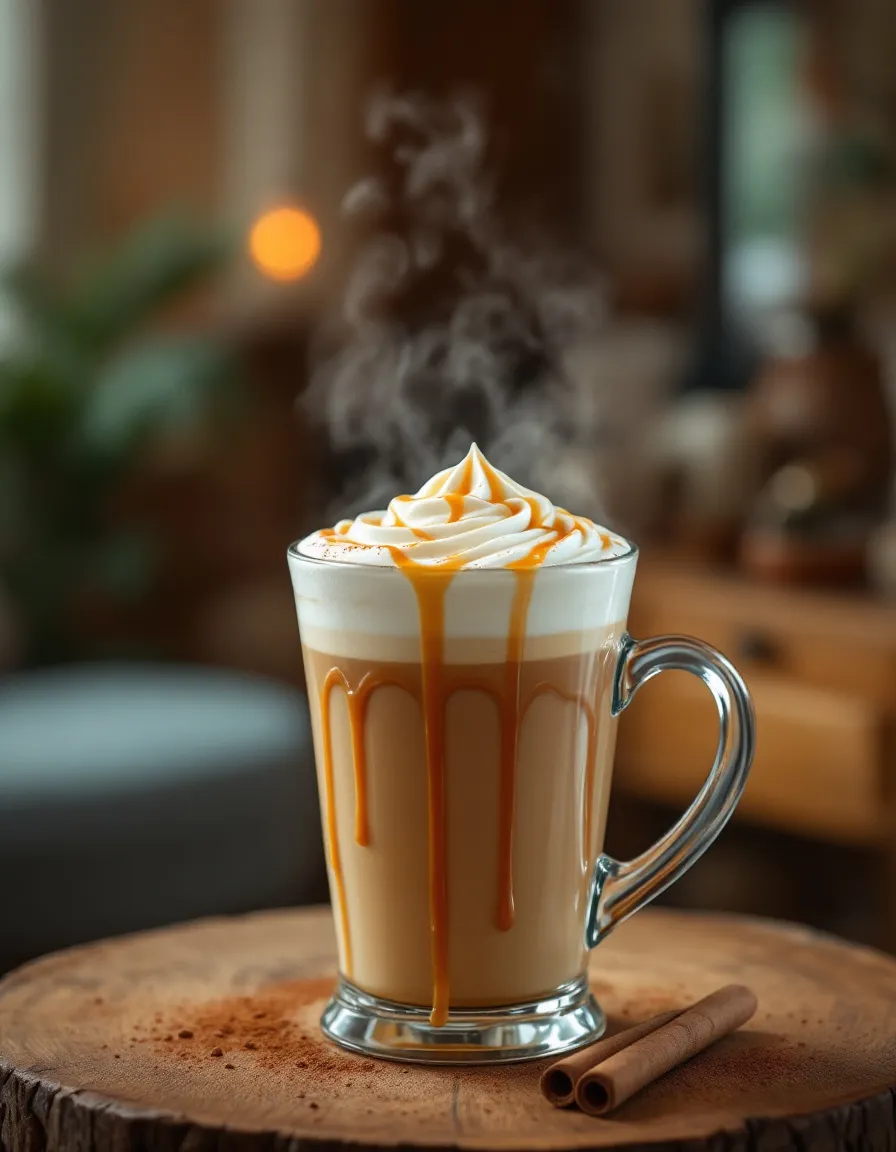
This Butterbeer Latte is a magical blend of flavors that transports you straight to the wizarding world. Imagine warm, creamy buttery goodness combined with hints of rich caramel and vanilla, topped off with frothy whipped cream. This delightful drink is reminiscent of the classic butterbeer served in the Harry Potter series, making it a nostalgic treat for fans and coffee lovers alike. Whether you’re enjoying a cozy afternoon or hosting a themed gathering, this easy recipe will enchant your taste buds and your guests.
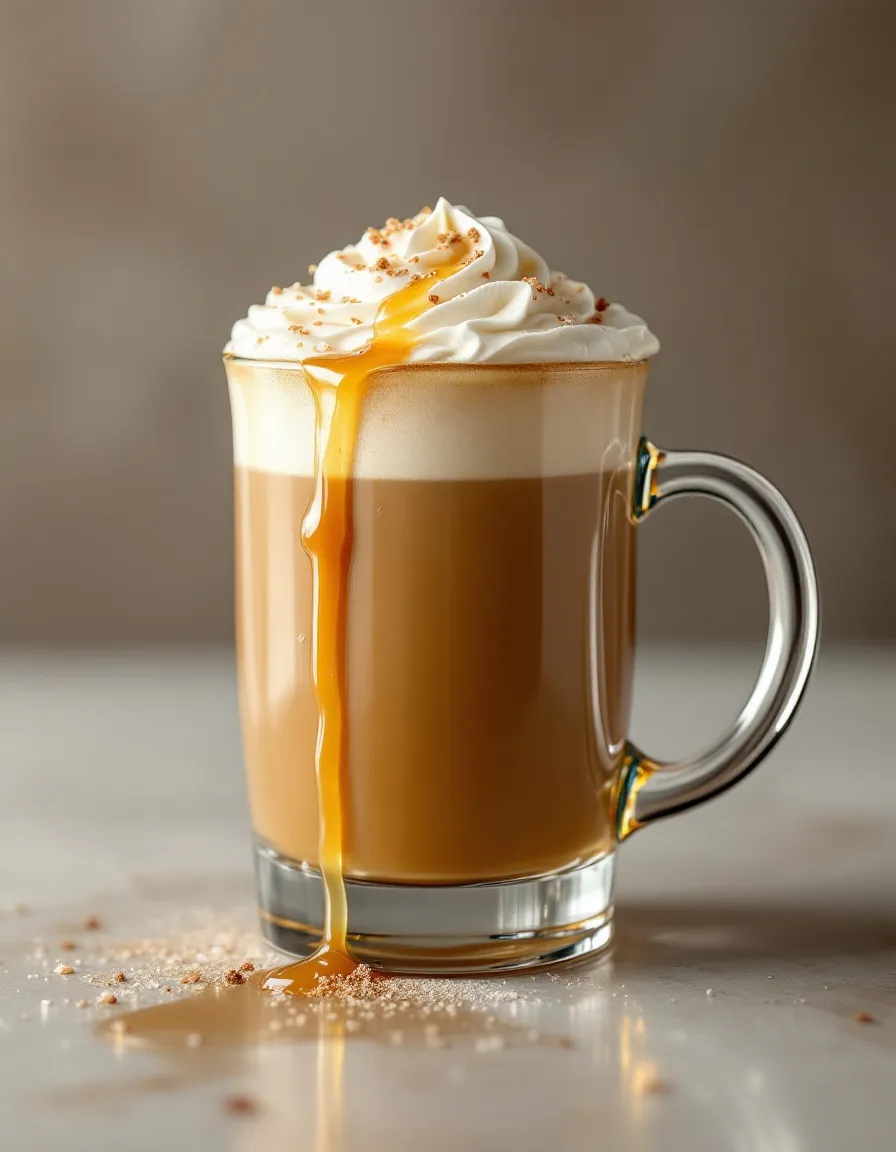
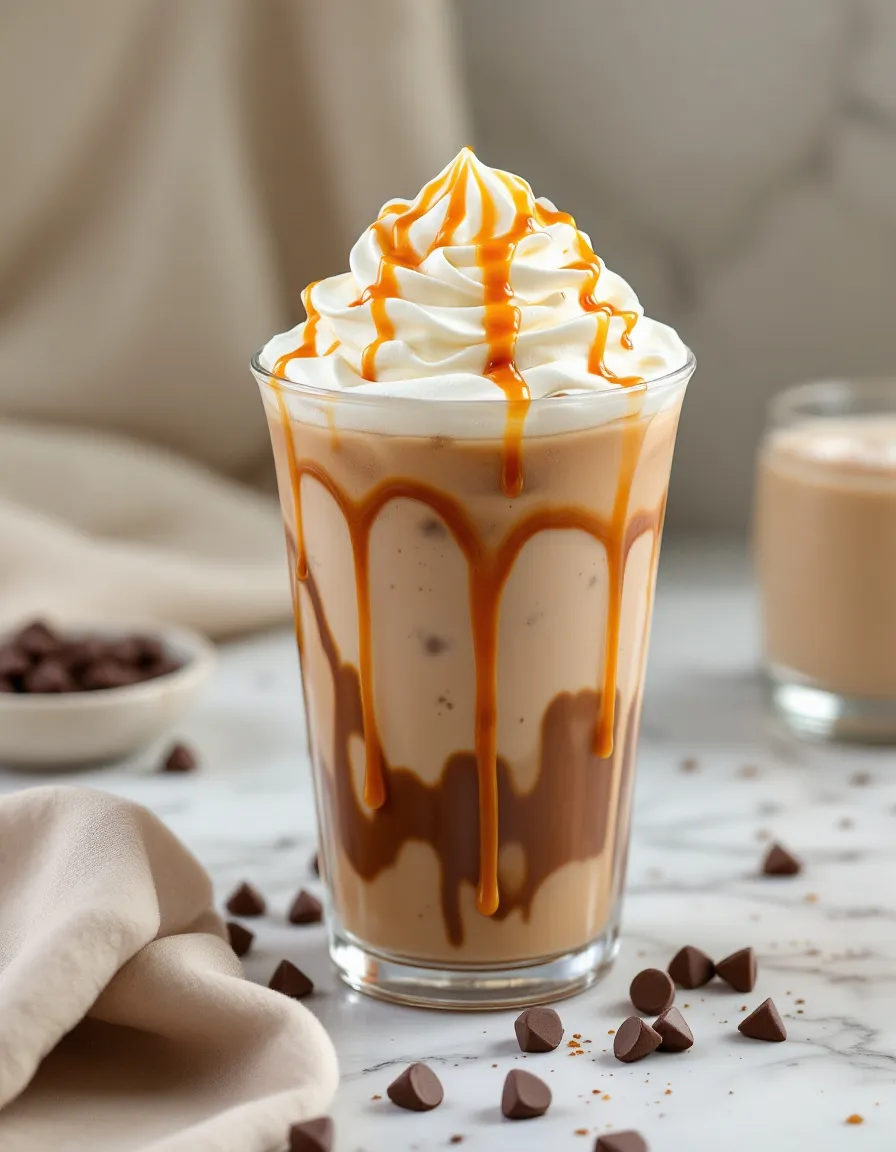
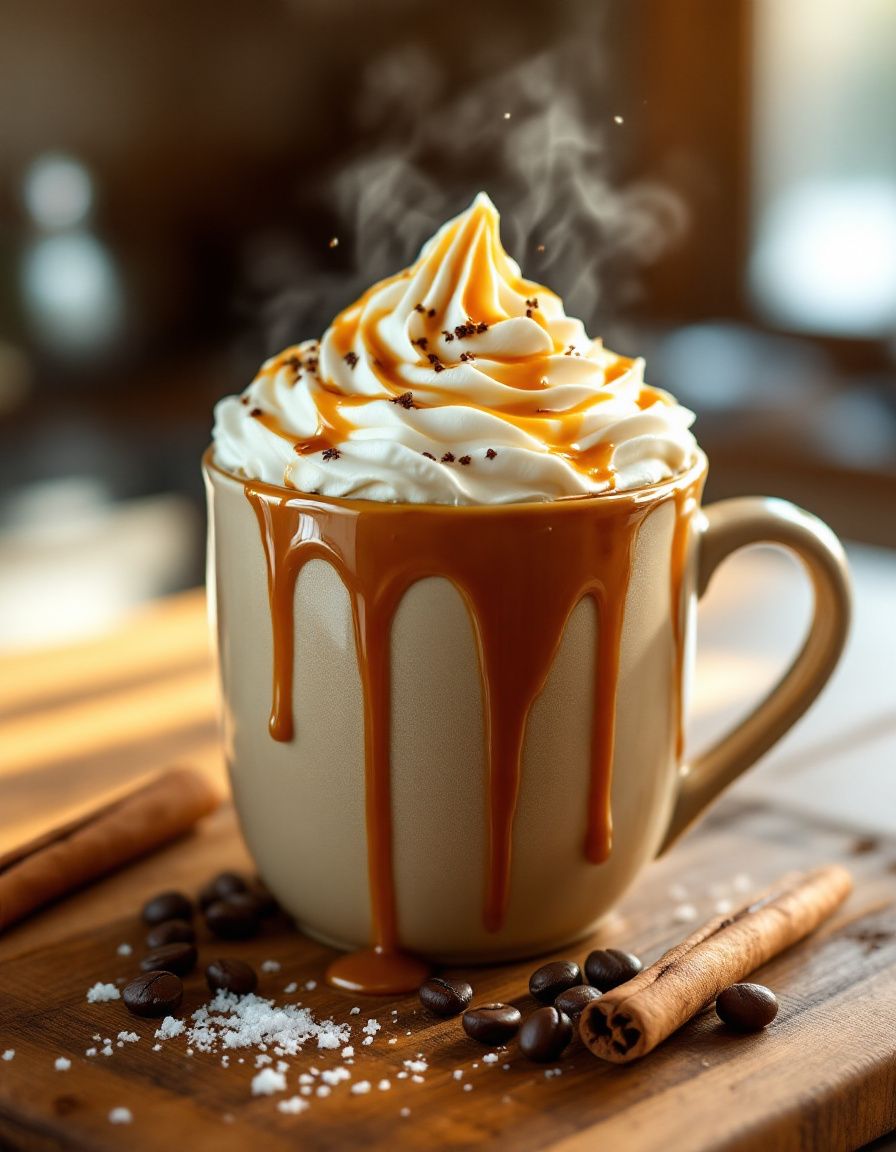
The sheer aroma of this Butterbeer Latte is enough to entice anyone—inviting notes of caramel blended with light spices elevate the sensory experience. As you sip the warm latte, the smooth texture caresses your palate, while its rich golden hue warms your heart. This drink is perfect for cooling autumn days or via a summertime cooling treat served iced, making it a versatile addition to your coffee repertoire.
Quick Recipe Highlights
- Flavor Profile: This latte combines buttery sweet flavors with a hint of vanilla and caramel.
- Texture: The latte is creamy and smooth, with a delightful thickness from the whipped cream on top.
- Aroma: The enticing scent of caramel and butter fills the air, creating an inviting atmosphere.
- Visual Appeal: Creamy, golden latte topped with fluffy whipped cream, it’s a feast for the eyes!
- Skill Level Needed: This recipe is simple and perfect for beginners, requiring minimal cooking techniques.
- Special Equipment: All you need is a blender and a coffee maker to whip up this delightful drink.
Recipe Overview
- Difficulty Level: This Butterbeer Latte is categorized as easy, making it accessible for anyone to create.
- Category: This drink fits perfectly into the beverage category, ideal for cafes and home coffee stations.
- Cuisine: With roots in American café culture, this drink brings together flavors inspired by English butterscotch.
- Cost: The ingredients are affordable, with a total cost of around $5-7 for multiple servings.
- Season: Perfect for fall and winter months, this latte brings warmth and comfort on chilly days.
- Occasion: A fantastic choice for themed parties, cozy gatherings, or simply enjoying on a quiet evening.
Why You’ll Love This Recipe
This Butterbeer Latte is not just about great taste; it also offers a creamy texture that elevates the experience. Each sip is like a warm hug, perfect for chilly evenings or when you need a mood boost. The blend of flavors is crafted to please both caramel lovers and those who enjoy the comforting notes of butter and vanilla, creating a delightful experience in every cup.
Convenience is a cornerstone of this recipe, as it can be made in under 15 minutes, allowing you to satisfy your cravings quickly. With just a few ingredients that you probably already have in your pantry, it’s a straightforward and stress-free recipe. No complicated techniques here, making it achievable for anyone—perfect for both everyday enjoyment and special occasions.
Nutritionally, while this latte is a treat, it offers some benefits. The addition of milk provides calcium, and you can easily adjust the sweetness to your preference, making it more suitable for a balanced diet. Swapping out sugary syrups for natural sweeteners can decrease calorie count without sacrificing flavor.
The Butterbeer Latte also brings social value; it’s a delightful drink to share with friends and family. Hosting a Harry Potter-themed gathering? This beverage could steal the show, igniting conversation and making memories. Each cup encourages connection, reminding us of the shared experiences that come with good food and drink.
Moreover, this recipe is cost-effective. With only a few ingredients and minimal effort, you can delight your taste buds without breaking the bank. Enjoying café-style drinks at home saves money while providing the same comforting experience of your favorite coffee shop.
Historical Background and Cultural Significance
The Butterbeer Latte’s origin can be traced back to the beloved Harry Potter series, where butterbeer is served at the iconic Three Broomsticks Inn. While originally a fictional drink described as warm and frothy, it has gained popularity in real-life cafés, forever cementing its place in the hearts of fans around the world. The transformation of this drink into a café staple represents the fusion of literature and culinary creativity.
Culturally, butterbeer symbolizes a connection to friendship and adventure in the Harry Potter universe. It’s often associated with cozy gatherings among friends, evoking feelings of warmth and nostalgia. Its rise to prominence in popular culture has inspired myriad variations, including our own delightful latte version that brings this whimsical flavor to life.
Over time, recipes for butterbeer have evolved from their original ideas to include variations such as frozen or iced. Each adaptation brings unique elements that cater to different tastes while maintaining the spirit of the original. The popularity has paved the way for innovative interpretations, from rich fudge flavors to lighter, dairy-free options.
Regional variations further add to the allure of the Butterbeer Latte. In some areas, local cafés may offer their unique twists, but the comforting profile of buttery sweetness and caramel remains the common thread. This diversity encourages experimentation and creativity, allowing everyone to put their unique stamp on this classic drink.
Ingredient Deep Dive
Milk: Milk is the base of our butterbeer latte, providing a creamy texture and rich flavor. It has been a staple in many cultures for centuries, known for its nutritional benefits, including calcium and protein. When selecting milk, whole milk offers a richer taste, while dairy-free alternatives like almond or oat milk provide different textures and flavors. It’s best stored in the refrigerator and consumed before its expiration date.
Butter Extract: Butter extract is the key ingredient that gives our latte its signature buttery flavor. While it may seem simple, butter extract carries with it a history linked to baking and dessert innovations. This ingredient enhances flavors and can replace traditional butter, making it a convenient option. When purchasing, look for high-quality extracts to ensure optimal taste and aroma. Store in a cool, dark place for longevity.
Vanilla Syrup: Vanilla syrup adds sweetness and aromatic notes that elevate this drink beyond the ordinary. Its origin dates back to early French patisserie, where it was used to flavor confections. Along with enhancing flavor, this syrup also has the versatility to be used in various desserts and drinks. When selecting syrup, opt for natural variations without artificial additives for the best flavor. Once opened, store in the refrigerator to maintain freshness.
Caramel Sauce: Caramel sauce integrates sweetness with a touch of decadence, binding the flavors together beautifully in the latte. Caramel’s legacy has roots in candy-making, stretching back to ancient times. This ingredient not only adds flavor but also visual appeal to the drink. Choose sauce with quality ingredients for an authentic taste. Keep in a sealed jar in the pantry until opened.
Common Mistakes to Avoid
- Using Low-Quality Ingredients: Always opt for high-quality extracts and sauces to enhance your drink’s flavor.
- Not Frothing the Milk Properly: Frothed milk creates the creamy texture essential to this beverage, so take time with this step.
- Over or Under-Sweetening: Adjust sweetness according to your taste but avoid overpowering the drink with sugar.
- Forgetting to Stir: Properly mix the syrup and sauce into the milk to ensure an even distribution of flavors.
- Ignoring Temperature: Ensure that your milk is heated to the right temperature; too hot can scald it, while too cool won’t provide the comforting warmth desired.
- Skipping the Whipped Cream: A dollop of whipped cream enhances the presentation and adds an extra creamy layer that complements the drink.
- Using Cold Milk: Cold milk will not achieve the desired creaminess and warmth required for this latte.
- Not Measuring Ingredients: Use precise measurements for balanced flavors; free pouring might disrupt the flavor profile.
- Rushing the Process: Take your time to properly prepare each component for the best result.
- Not Exploring Variations: Feel free to experiment with flavors like butterscotch or spice to find your perfect blend.
Essential Techniques
Frothing Milk: Frothing milk is crucial for creating that creamy texture for your latte. Use a milk frother or whisk to aerate the milk until it’s light and bubbly. Achieving the right foam can transform a standard drink into a café-quality latte. Watch for visual cues; the milk should appear velvety and smooth, not bubbly or separated.
Mixing Flavors Evenly: Properly mixing ingredients ensures that each sip delivers a delightful burst of flavor. Begin by mixing syrup and butter extract into your warm milk before adding caramel sauce. This will result in a well-balanced taste. Avoid clumping or layering by stirring gently but thoroughly until everything is seamless.
Piping Whipped Cream: When it comes to garnishing, make sure your whipped cream is piped beautifully on top of your latte for stunning presentation. Use a piping bag with a star tip for a professional look. Practice makes perfect; ensure your whipped cream is cold and firm for the best hold and presentation.
Pro Tips for Perfect Butterbeer Latte
– Use whole milk for a richer flavor and creamier texture, but explore dairy-free options for variety.
– Opt for real vanilla extract or syrup, as artificial ones can have an overwhelming flavor.
– Experiment with different types of caramel sauce to find your favorite variety, be it sea salt or traditional.
– A sprinkle of cinnamon on top adds a warm, inviting aroma and enhances flavor.
– Consider making your own vanilla or caramel syrup at home for a personalized touch.
– Chill your glass before serving for an even more refreshing latte when served iced.
– Add a touch of butterscotch syrup for an extra layer of sweetness and depth.
– If you want to try an iced version, simply cool down the components and serve over ice.
Variations and Adaptations
– **Seasonal Variations**: In the fall, add pumpkin spice for a seasonal twist, reminiscent of autumn flavors.
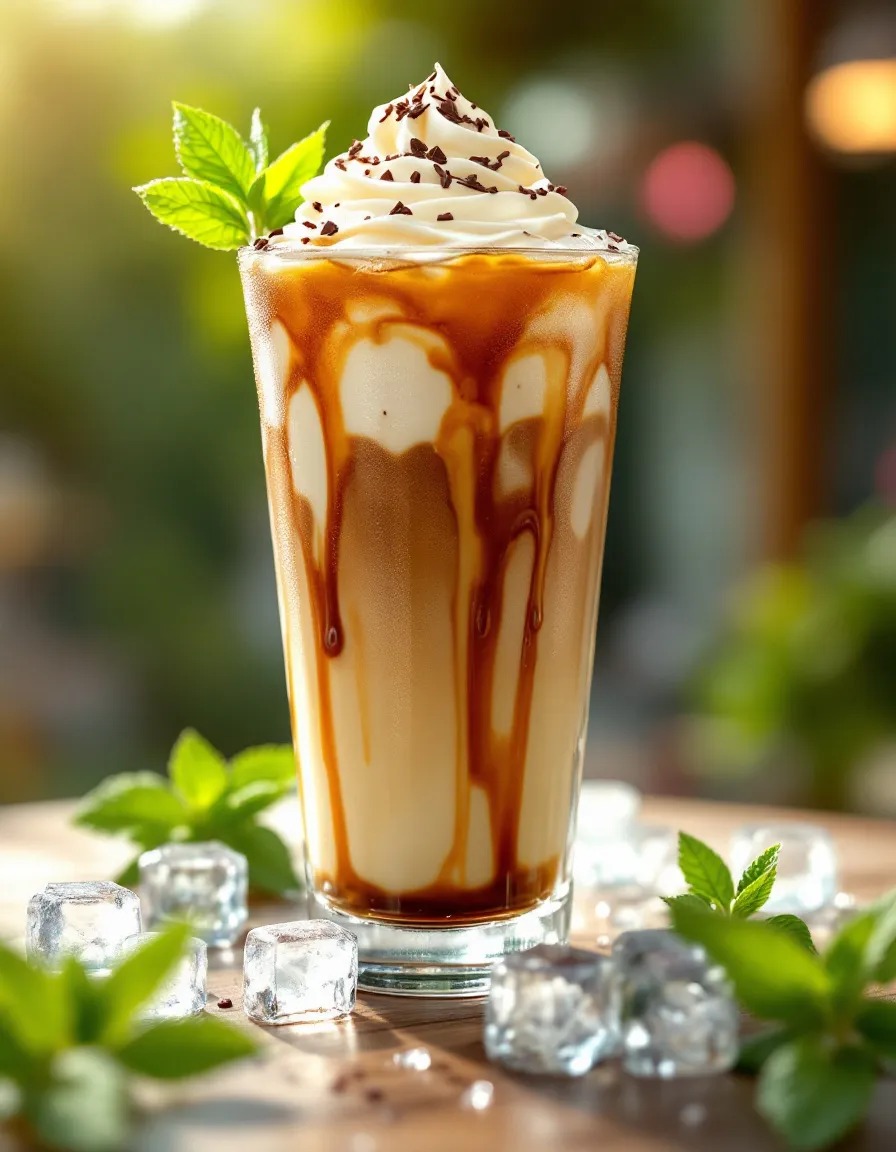
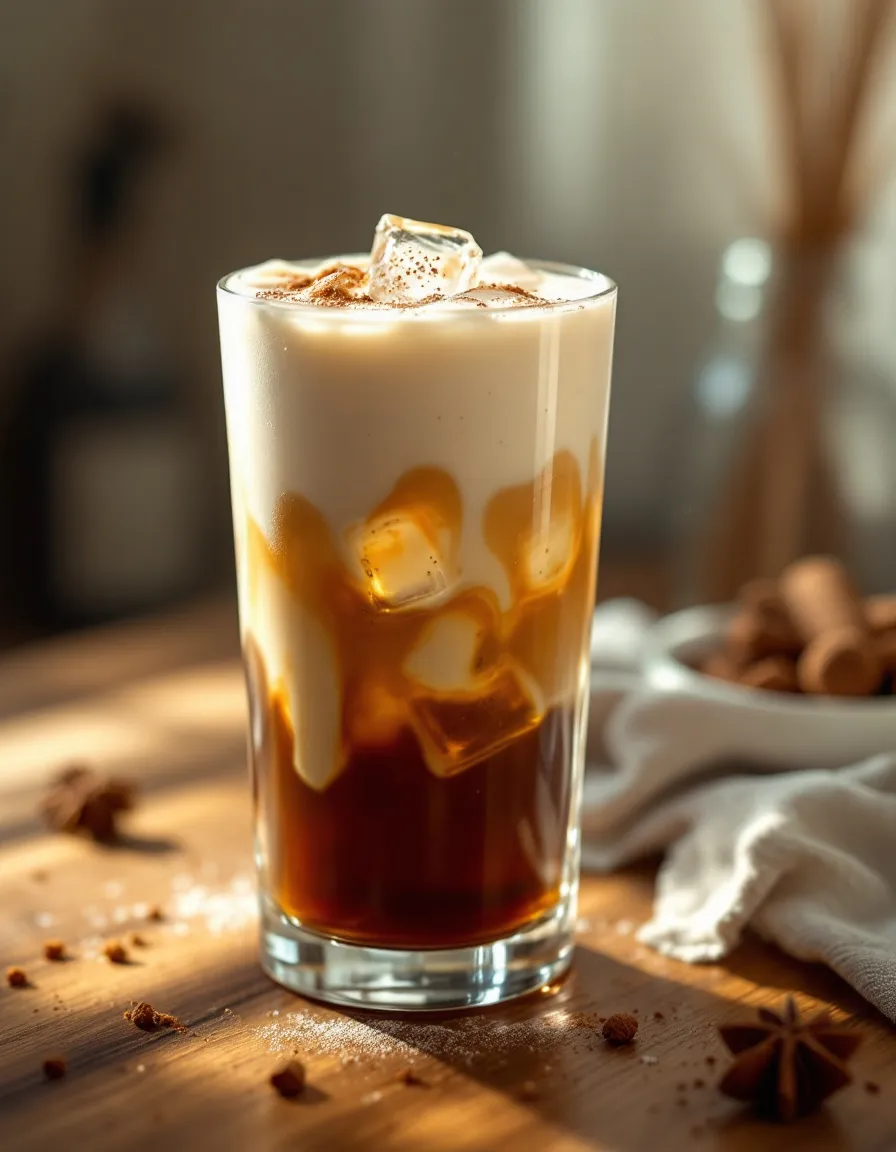
– **Iced Butterbeer Latte**: Simply blend cooled milk with syrup and ice for a refreshing summertime treat.
– **Dairy-Free Option**: Replace milk with oat or almond milk for a vegan-friendly adaptation without losing flavor.
– **Sugar-Free Version**: Use sugar-free syrups for those avoiding sugar while still enjoying the drink.
– **Flavor Variations**: Incorporate a few drops of hazelnut or toffee syrup to customize the flavor profile.
– **Presentation Alternatives**: Instead of whipped cream, top with whipped coconut cream for a non-dairy alternative that packs a flavorful punch.
Serving and Presentation Guide
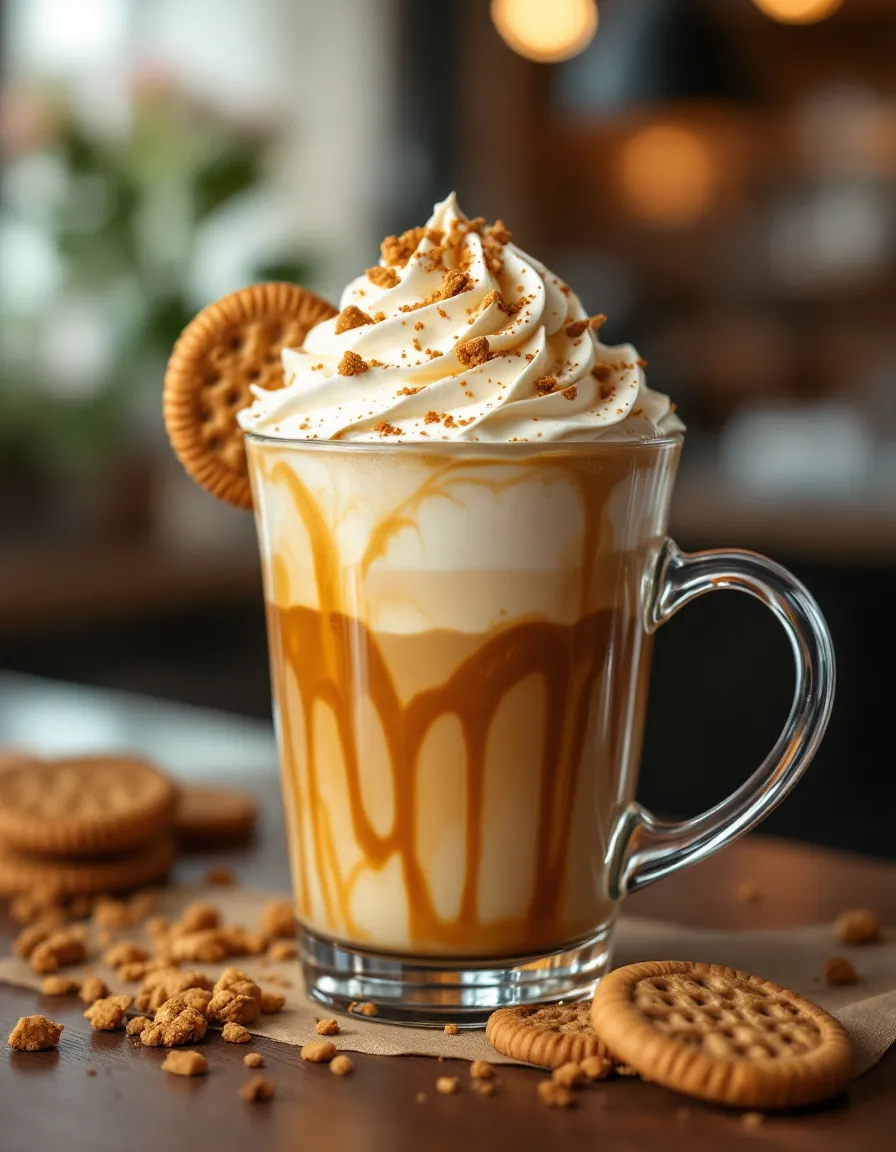
For an aesthetic presentation, use a tall glass to showcase the creamy layers of your Butterbeer Latte. Consider drizzling some caramel sauce along the inside of the glass before pouring, enhancing both looks and taste. Garnish generously with whipped cream, and finish with a sprinkle of cinnamon or a drizzle of extra caramel on top.
Serve the latte warm, and if desired, pair it with shortbread cookies or buttery scones for a lovely afternoon treat. Guests will appreciate the elegant touch, making it perfect for presentations at social gatherings. Temperature is vital, ensure the latte is hot, especially in cooler months, to provide comfort and warmth in each sip.
Wine and Beverage Pairing
Pair this delightful Butterbeer Latte with a glass of chilled Prosecco for a bubbly counterbalance that enhances the creamy sweetness of the latte. If you prefer non-alcoholic options, a simple sparkling water or ginger ale can refresh the palate between sips.
For those who enjoy coffee with a twist, complement the latte with a rich espresso shot for an extra caffeine kick, known as a Butterbeer macchiato. Avoid pairing it with overly bitter drinks to maintain the mellow experience this blend aims to deliver.
Storage and Shelf Life
Butterbeer Latte is ideal for enjoying fresh, but if prepared in advance, store it in an airtight container in the refrigerator. Keep it away from strong odors to maintain its flavor integrity. When reheating, avoid boiling to prevent the milk from curdling. For optimal flavor, consume within 2-3 days.
Freezing is not recommended, as this can separate the milk and extract flavors. Instead, prepare individual servings as desired to ensure freshness every time. If you wish to keep syrup or caramel on hand, these can typically last for a few weeks if stored correctly.
Make Ahead Strategies
To save time during busy days, prepare your elements in advance. Mix the butter extract and vanilla into milk and store it in the refrigerator without frothing until ready to serve. When you’re ready, heat and froth your prepared milk, adding the warm caramel last for a comforting beverage.
You can also pre-make some caramel sauce at home and keep it in a sealed container for quick assembly. Ensure all your elements are fresh to enhance the charming appeal of this latte. For an even simpler experience, consider portioning and combining dry ingredients together for a ready-to-use latte mix.
Scaling Instructions
When halving or doubling your Butterbeer Latte recipe, keep the ratios consistent to maintain the flavor balance. If serving a larger party, consider adjusting your cooking equipment accordingly; a larger pot or a separate frother may be necessary.
For a quicker service when scaling, prepare the latte in batches, blending the liquids before serving. Keeping an eye on timing is essential; you may need to adjust milk heating times as more servings will require longer to reach the desired temperature.
Nutritional Deep Dive
A standard serving of Butterbeer Latte provides a mix of carbohydrates, fat, and a dose of protein, making it a satisfying drink. The milk provides calcium and important vitamins, while the sweeteners supply a quick energy boost. It’s important to enjoy this drink in moderation, considering its sugar content.
To make healthier choices, you could opt for low-fat milk or plant-based alternatives, which can affect the calorie count significantly. This drink can fit into various diets, provided that adjustments are made to suit individual needs, like using sugar substitutes or lower-calorie toppings.
Dietary Adaptations
– **Gluten-Free**: This recipe is naturally gluten-free; no modifications are necessary.
– **Dairy-Free**: Replace milk with almond, soy, or coconut milk to make it dairy-free without sacrificing flavor.
– **Vegan**: Use plant-based whipped cream and ensure all syrups are free from animal products.
– **Low-Carb/Keto**: Swap traditional syrup for sugar-free syrup options, and consider reducing added sugars.
– **Paleo**: Use natural sweeteners like honey or maple syrup instead of processed sugars for a proper paleo approach.
– **Low-FODMAP**: Stick with lactose-free milk and monitor syrup quantities to maintain low-FODMAP status.
Troubleshooting Guide
If the texture of your latte is too watery, ensure that you’re heating the milk properly and not diluting it with too much syrup. For flavor balance, taste before serving; sometimes a small pinch of salt can enhance sweetness.
If your latte is too sweet, add a small splash of unsweetened milk to tone it down. If you experience separation of ingredients, ensure that you mix thoroughly after adding each element. Always heat milk gently to avoid curdling and maintain creaminess.
Recipe Success Stories
Readers have embraced this Butterbeer Latte recipe, recounting their delightful experiences when hosting Harry Potter-themed events. Many have shared their unique twists, from adding extra spices to infuse creativity into the classic drink.
Photographers and bloggers love to showcase their creations, celebrating the ease at which this latte adapts to their style. Community engagement highlights emerging favorite adaptations, enriching the conversation around this beloved recipe.
Frequently Asked Questions
Can I make this drink dairy-free?
Yes! Simply substitute the milk with any plant-based milk option such as almond, soy, or oat milk, and enjoy a creamy and delicious Butterbeer Latte!
What flavor variations can I explore?
You can experiment with flavors like hazelnut or butterscotch syrup for exciting twists on the original beverage. These enhancements add individual character to your latte.
Can I make this latte iced?
Certainly! Prepare the latte as usual and allow it to cool before serving over ice for a refreshing iced Butterbeer Latte treat.
What’s the best way to store leftovers?
Store any leftover latte in an airtight container in the refrigerator for up to 2-3 days. Reheat gently on the stove or in the microwave before serving again.
Is there a way to reduce the sugar content?
Yes! You can use sugar-free syrups or adjust the amount of syrup you’re using. You can also explore natural sweeteners like stevia or monk fruit.
Does this drink suit gluten-free diets?
This Butterbeer Latte is gluten-free, as it does not contain any gluten ingredients. Just be sure your syrups and extracts are also gluten-free.
Can I use different types of milk?
Of course! Feel free to experiment with various milks such as almond, soy, or coconut for a different flavor and texture.”
Does this recipe require a frother?
A frother is recommended for the best texture, but you can also whip the milk by hand or in a blender for similar results.
Can I serve this drink at parties?
Absolutely! The Butterbeer Latte makes a great conversation starter at parties and will undoubtedly enchant the guests with its incredible flavors.
What are the nutritional values of the Butterbeer Latte?
Nutritional values depend on the specific ingredients used. Generally, it provides essential nutrients from the milk and can be made lower in calories by adjusting sweeteners.
How can I make this recipe more indulgent?
Add extra whipped cream on top along with drizzling caramel sauce for a richer, more decadent experience that perfectly compliments the latte.
Additional Resources
Explore our collection of related recipes to discover more delightful beverages, including seasonal lattes and inspired dessert drinks. Enhance your culinary skills with our technique guides, covering everything from perfect milk frothing to flavor balancing.
Additionally, learn about the best equipment recommendations for home-brewed café drinks and seasonal variations that will keep your lattes fresh all year round. Take the next step in your culinary journey and try out these exciting resources!
Join the Conversation
We love hearing from our readers! Share your culinary experiences on social media, and tag us in your Butterbeer Latte creations. Photography enthusiasts will find joy in capturing these magical drinks, so don’t hesitate to show off your skills.
Engage in our thriving community by leaving recipe reviews and sharing your personal adaptations. Let’s conjure up delicious memories together and keep the creativity flowing in the world of flavored lattes!
The Recipe
Butterbeer Latte
Serves: 2
Prep Time: 5 mins
Cook Time: 10 mins
Total Time: 15 mins
Kitchen Equipment Needed
- Milk frother (or whisk/blender)
- Measuring cups and spoons
- Small saucepan
- Tall serving glasses
Ingredients
- 2 cups of milk (or dairy alternative)
- 1 tsp butter extract
- 2 tbsp vanilla syrup
- 2 tbsp caramel sauce
- Whipped cream for topping
- Pinch of salt (optional)
Directions
- In a small saucepan, heat the milk over medium heat without boiling.
- Once warmed, remove from heat and stir in the butter extract, vanilla syrup, and caramel sauce until well combined.
- Froth the milk using the frother or whisk, until it becomes light and creamy.
- Pour the frothy mixture into glasses, ensuring even distribution.
- Top off with whipped cream and a drizzle of caramel sauce.
- Serve immediately and enjoy your magical Butterbeer Latte!
Recipe Notes
- Feel free to add spices like cinnamon or nutmeg for an extra touch of warmth.
- Adjust sweetness to your liking by adding more or less syrup.
- This recipe can easily be doubled or halved as needed.