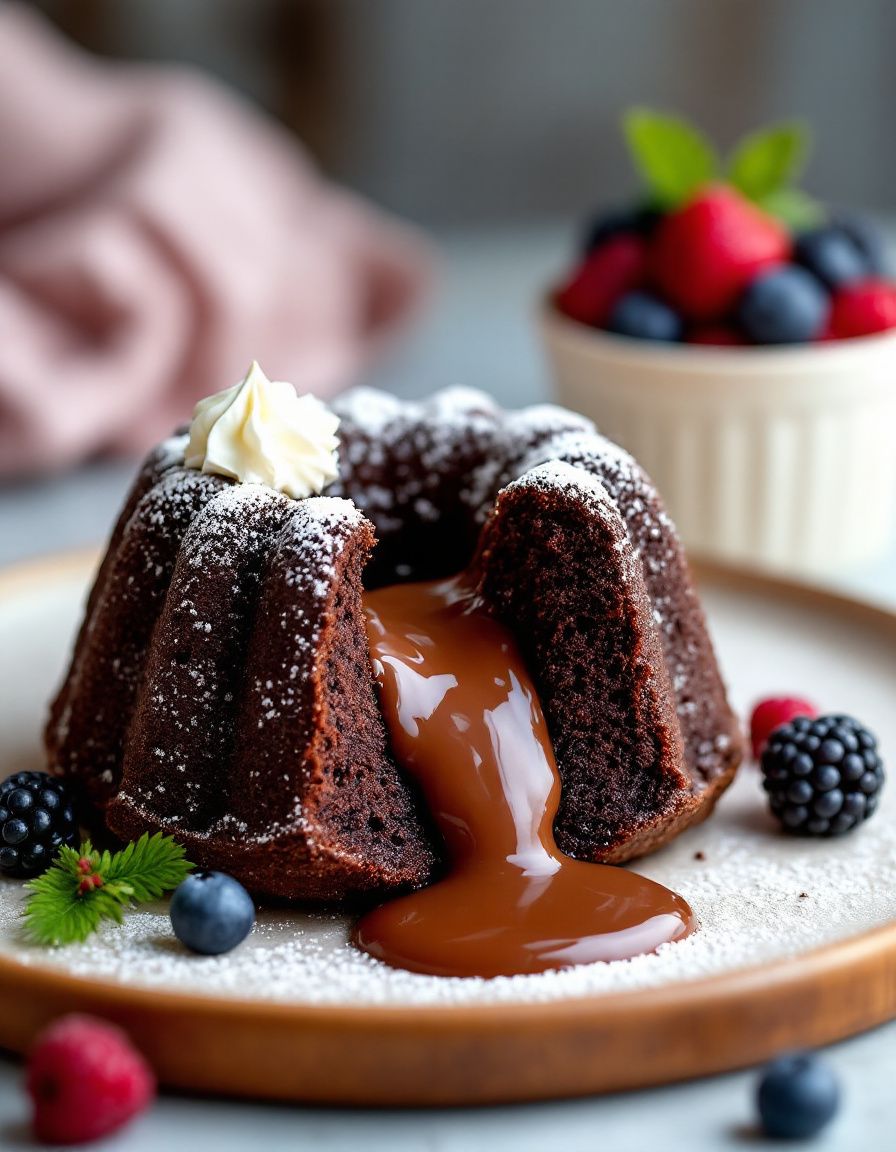
Easy Valentine’s Day Oreo Pops – No-Bake in 30 Minutes

Valentine’s Day Oreo Pops: Sweet Treats to Melt Hearts

⚖️
Difficulty
Easy

⏲️
Prep Time
15 mins

🕒
Cook Time
10 mins

⏱️
Total Time
25 mins

🍽️
Servings
12 pops

Valentine’s Day is the perfect occasion to indulge in sweet treats that symbolize love and affection. This Valentine’s Day Oreo Pops recipe combines the classic flavors of creamy Oreos and rich chocolate, creating delightful treats that are as fun to make as they are to eat. With their vibrant and colorful decorations, these pops are sure to impress your loved ones and add a festive flair to any celebration. Plus, they are simple enough for anyone to create, making them a great project for both kids and adults alike.

The joy of biting into these Oreo pops lies not only in their taste but also in their visual appeal. Coated in luscious chocolate and adorned with sprinkles or heart-shaped toppings, each bite offers a satisfying crunch followed by the soft, creamy filling of the Oreo. These pops are a standalone treat, perfect for gift-giving or serving at parties. Whether you’re making them for a romantic evening or a fun family gathering, these Oreo Pops are a delightful way to celebrate love on Valentine’s Day.

Quick Recipe Highlights

  • Flavor Profile: The combination of rich chocolate and the sweet, creamy Oreo filling creates a mouthwatering contrast that everyone will love.
  • Texture: Enjoy the crunch of the Oreo contrasted with the smooth, melted chocolate coating.
  • Aroma: The sweet scent of chocolate and vanilla wafts through the air, enticing everyone as they cool.
  • Visual Appeal: Brightly colored sprinkles or themed decor make these pops a joy to behold.
  • Skill Level Needed: This recipe is beginner-friendly and requires minimal cooking skills, perfect for novice bakers.
  • Special Equipment: You’ll need lollipop sticks and a microwave-safe bowl, making it accessible for everyone.

Recipe Overview

  • Difficulty Level: The Oreo Pops recipe is easy to make, ideal for cooking with children or for those new to baking.
  • Category: These pops fall under the dessert category but are versatile enough to be served at various occasions.
  • Cuisine: Drawing from American snack traditions, Oreo Pops offer a fun twist on classic desserts.
  • Cost: Inexpensive to make, the ingredients can generally be found in any local grocery store.
  • Season: While perfect for Valentine’s Day, these treats can be enjoyed year-round for any celebration.
  • Occasion: Ideal for Valentine’s Day, birthday parties, or casual gatherings with friends and family.

Why You’ll Love This Recipe

Making Valentine’s Day Oreo Pops is not just about indulging in a delicious treat; it’s an experience that ticks all the boxes for taste and texture. The delightful contrast of crunchy cookies and smooth chocolate provides an irresistible mouthfeel that leaves taste buds wanting more. The moment you dip the Oreos in melted chocolate, you can almost taste the sweetness and decadence that awaits, making them a treat you’ll crave long after the holiday has ended.

Convenience is another hallmark of this recipe. With a preparation time of merely 15 minutes, you can whip these up quickly, making them perfect for a last-minute treat or a fun project with the kids. The simplicity of the steps allows even inexperienced bakers to join in on the fun without the need for extensive cooking knowledge. Moreover, they can be made ahead of time and stored, reducing the pressure of last-minute preparations.

Nutritionally, while these treats are an indulgent dessert, using high-quality chocolate and filling allows for a more enjoyable treat without compromising too much on quality. Although they’re rich, these Oreo Pops can be enjoyed in moderation as part of a balanced diet. Each pop offers a burst of flavor that can be a little reward for a job well done at work or school.

Socially, these pops make for a delightful addition to any gathering. Their whimsical appearance is sure to elicit smiles and compliments, serving as a conversation starter. Whether you’re sharing them at a party or giving them as a gift, these sweet creations highlight the joy and love of the season.

Lastly, their cost-effectiveness makes them an accessible enjoyment for everyone. Most ingredients are affordable and easy to find, allowing anyone to step into the kitchen and create these charming treats without breaking the bank. Plus, they can be easily customized with different decorations or dipping options, ensuring that each batch can cater to varied tastes and preferences.

Historical Background and Cultural Significance

The Oreo cookie, which has enjoyed immense popularity since its introduction in 1912, is the star of this specific recipe. Known for its unique twist of two chocolate wafers filled with sweet cream, the Oreo quickly became a classic in American households. The idea of turning these beloved cookies into pops is a modern take on an old favorite, infusing a fun and playful twist into celebratory treats.

Culturally, desserts like these Oreo Pops become markers of celebration and affection, particularly on occasions like Valentine’s Day. The act of sharing sweets is deeply rooted in many cultures as a demonstration of love and friendship, transforming the mundane into something special. Making Oreo Pops also aligns with a growing trend of personalized and homemade gifts that express thoughtfulness, making them an excellent choice for personal gifts.

Over the decades, the Oreo cookie has undergone numerous evolutions, leading to the creation of various flavors and types, from golden Oreos to seasonal varieties. This evolution provides endless opportunities for creativity, allowing bakers to customize their pops based on personal preference or the season. By incorporating the Oreo into pop form, a nostalgic boost is given to a classic while encouraging innovation.

In many regions, the practice of making desserts for loved ones reflects community values of sharing and togetherness. Oreo Pops encapsulate this spirit beautifully, as they can be shared among family, friends, and loved ones, forging connections through the joy of sweetness, especially during Valentine’s Day.

Ingredient Deep Dive

– **Oreo Cookies**: As a cultural icon, Oreos represent nostalgia for many. Their unique flavor and texture have made them a staple in desserts. They are a great source of fun, with many creative ways to use them in baking. When selecting Oreos, look for fresh packages, and store them in a cool place to maintain their crispness. If you need a substitute, consider chocolate wafers for a similar taste and texture.

– **Chocolate**: A universal favorite, chocolate represents indulgence and celebration. Its rich flavor and smooth texture are comforting and satisfying. For this recipe, use high-quality melting chocolate for the best results. Store chocolate in a cool, dry place. If you don’t have melting chocolate on hand, chocolate chips can be used, although their consistency may vary slightly.

– **Sprinkles or Chocolate Decor**: These colorful additions provide visual appeal and creativity. They are a staple in dessert decoration and play an essential role in aesthetics. When selecting toppings, consider seasonal themes to match the occasion. Store sprinkles in airtight containers to keep them fresh. You can substitute with nuts or shredded coconut for additional texture and flavor.

Common Mistakes to Avoid

  • Not letting the chocolate cool before dipping: If the chocolate is too warm, it can cause the Oreo to become soggy and lose its signature crunch. Always allow cooling for a perfect dip.
  • Dipping the whole Oreo in chocolate: Dipping the Oreo cream side first helps retain shape and ensures even coverage.
  • Overheating the chocolate: Microwaving chocolate without intervals can lead to burning. Always check and stir every 30 seconds for successful melting.
  • Forgetting to put in the sticks: Skipping adding lollipop sticks will make it impossible to enjoy the pops. Be sure to insert them while the chocolate is still soft.
  • Using stale Oreos: Fresh Oreos are essential for maintaining the crunchiness of your pops. Always check for freshness before using.
  • Not allowing enough cooling time: Letting the chocolate set for a sufficient time helps prevent melting and retains their shape.
  • Not decorating immediately: Sprinkles or toppings should be added to chocolate while it is still wet for adherence.
  • Choosing the wrong chocolate: Ensure that the chocolate used is ideal for melting. Chocolate chips are not recommended unless specially formulated for melting.
  • Cutting corners on quality: Using lower-quality chocolate can lead to disappointing results. High-quality options yield better taste and visuals.
  • Using oversized toppings: Ensure decorations aren’t too large, which can overwhelm the pops and affect the eating experience.

Essential Techniques

– **Melting Chocolate**: Melting chocolate properly is crucial for achieving a smooth, glossy finish on your Oreos. Use a microwave-safe bowl and melt in short bursts, stirring frequently to avoid scorching. The best visual cue is when the chocolate is just melted but still thick; if it looks overly runny, it may not set properly.

– **Dipping Technique**: When dipping, use a fork to ensure full coverage while allowing excess chocolate to drip off. This technique prevents clumping and maintains a neat appearance. Master the art by practicing a smooth, single-layer dip for a consistent finish.

– **Setting the Chocolate**: Properly setting the chocolate is essential to ensure a firm pop. Place the dipped pops on parchment paper, allowing for airflow. If the chocolate is shiny and hard to the touch after cooling, you’ve mastered this technique!

Pro Tips for Perfect Valentine’s Day Oreo Pops

1. Use high-quality chocolate chips or melting chocolate for the best results, as low-quality options may thin out and won’t set properly.
2. Ensure your Oreo cookies stay intact during the dipping process; support them gently while dipping to avoid breakage.
3. Consider pairing flavored chocolate with flavored Oreos for a unique taste experience, such as mint or peanut butter-flavored Oreos.
4. If pressed for time, opt for pre-made chocolate melts specifically designed for quick melting and easy customization.
5. Allow your creations to chill in the refrigerator for a few minutes after dipping to help set the chocolate faster.
6. Be adventurous with toppings; try using edible glitter or themed sprinkles to enhance the visual appeal for holidays or events.
7. Customize the pops with different types of Oreos, from limited editions like pumpkin spice to seasonal variations.
8. Create a festive display for serving by arranging the pops in a decorative basket or vase, elevating their presentation.

Variations and Adaptations

The versatility of Oreo Pops is one of their many fabulous attributes. For a fun twist, consider creating regional variations by incorporating local flavors—like adding crushed peppermint for a festive touch during the winter season. You can also adapt these pops to align with seasonal themes, such as using pastel colors and flavors for spring celebrations.

If you want to cater to specific dietary needs, there are plenty of options to consider. For instance, you can use gluten-free Oreos to ensure those with gluten sensitivities can enjoy them. Substituting vegan chocolate and incorporating dairy-free Oreo varieties allows for an inclusive dessert that caters to various dietary preferences.

For an adventure with flavor, think outside the box with toppings and fillings. Drizzle caramel or use chopped fruits for surprising flavor bursts to elevate the classic Oreo taste further. Experimenting with various presentation styles, such as serving the pops on skewers or individually wrapped, can enhance their appeal at parties.

Serving and Presentation Guide

When serving your Valentine’s Day Oreo Pops, presentation is key. A beautiful array of pops can be achieved by placing them upright in a decorative vase filled with foam or rice. This adds a festive touch and makes it easy for guests to grab and enjoy.

Garnishing with fresh fruit alongside the pops can provide a lovely contrast in colors and flavors, like strawberries or raspberries. Additionally, you might consider adding a sprinkle of cocoa powder or chocolate shavings around the base of the vase to give a professional look.

Temperature is important: serving them cold allows for a firmer texture, while room temperature might make them softer and easier for everyone to enjoy. Lastly, be mindful of portion control; one pop per person is typically sufficient to satisfy a sweet tooth without going overboard.

Wine and Beverage Pairing

Pairing a beverage with Valentine’s Day Oreo Pops can enhance the overall experience. A light sparkling wine or Prosecco makes a lovely match, creating a delightful contrast to the desserts’ sweetness. The bubbles cleanse the palate between bites, allowing the rich flavors to shine.

For those preferring non-alcoholic options, consider pairing the pops with fresh milk or hot chocolate, reminiscent of childhood favorites and providing a comforting backdrop to the rich chocolate. A flavored herbal tea, such as hibiscus or vanilla, can also complement the sweetness of the pops without overpowering them.

If you desire an energizing option, serve chilled coffee or espresso with cream. The combined flavors with the chocolatey goodness of the pops create a delightful harmony, enhancing overall enjoyment.

Storage and Shelf Life

To maintain your Valentine’s Day Oreo Pops, proper storage is essential. These treats should be stored in an airtight container at room temperature for optimal freshness. Keeping them away from direct sunlight prevents the chocolate from melting or discoloring.

If you plan to make them in advance, refrigerate them to extend their shelf life. However, be cautious with moisture; condensation can affect the chocolate coating. It’s best not to freeze these pops, as the texture may change upon thawing, resulting in a less enjoyable experience.

Inspect for any signs of spoilage, such as off smells or changes in texture. In general, homemade Oreo Pops can last up to a week when stored correctly. Follow specific storing instructions if you select different ingredients, as some may have varying shelf lives.

Make Ahead Strategies

Making Valentine’s Day Oreo Pops ahead of time is a fantastic way to reduce stress. You can dip the Oreos and decorate them up to two days before serving. Store them in an airtight container to keep them fresh and ready to impress your guests.

If you’re limited on time, prepare the chocolate mixture in advance, allowing you to dip the pops quickly when you’re ready to assemble. You can also pre-dip the Oreos and store them unadorned, adding the toppings just before serving for a fresh, vibrant look.

Quality impact should be considered as well; ensure you aren’t compromising on taste to save time. Time your assembly appropriately, balancing between speed and maintaining the visual appeal that adds to the overall enjoyment.

Scaling Instructions

When scaling this recipe, it’s essential to consider that doubling or halving the amount is straightforward. Simply adjust the number of Oreos and chocolate accordingly. For larger gatherings, tripling can enhance the festive atmosphere.

Ensure your equipment is adequate for any variations in batch size. A larger microwave-safe bowl or pot may be necessary for melting larger quantities of chocolate. Take care to adjust the melting time as well to avoid overheating.

Timing is also critical; while the recipe’s essentials remain constant, keep an eye on cooling and setting time, as larger batches might require slightly longer. Finally, remember to store any pops not consumed immediately in appropriate containers, maintaining freshness.

Nutritional Deep Dive

Each Oreo Pop offers a delightful treat that balances enjoyment with indulgence. From a macronutrient perspective, these pops primarily consist of carbohydrates from the Oreos and sugar from the chocolate. Careful moderation of portion sizes is key to enjoying these treats without concern for excessive sugar intake.

Micronutrient analysis indicates that while these pops are a fun dessert option, they are not rich in vitamins or minerals. However, using high-quality chocolate can introduce antioxidants, providing some health benefits. Reading ingredient labels enables informed choices that can enhance nutritional content when possible.

Consider dietary guidelines when enjoying these pops—pairing them with fruits can add fiber and essential vitamins, helping to create a more balanced treat. Understanding portion analysis helps manage sweet cravings without overwhelming dietary restrictions, allowing for enjoyment with moderation.

Dietary Adaptations

For those with specific dietary needs, Oreo Pops can be adapted easily. Gluten-free Oreos are widely available for those avoiding gluten, ensuring everyone can partake in the fun.
Dairy-free chocolate options open the door for vegan diets; brands specifically designed for melting without animal products are perfect for this recipe.

People following a low-carb or keto lifestyle may also create their version with sugar-free Oreos and dark chocolate options. Exploring variations provides flexibility for all dietary constraints without sacrificing fun or taste.

Low-FODMAP versions can focus on using lactose-free chocolate, ensuring that individuals with IBS can enjoy these delightful pops. Lastly, many modifications can enrich taste and ensure inclusivity for different preferences and needs.

Troubleshooting Guide

If your Oreo Pops do not set properly, the chocolate may have been too warm when dipped. Allow enough cooling time for the chocolate to firm up after dipping; placing them in the refrigerator can speed up this process.

For flavor imbalances, consider adjusting your chocolate choice or toppings for a more cohesive taste. Strongly flavored sprinkles can overwhelm the subtle taste of the Oreo. Experiment with different combinations to find the right balance.

If you encounter texture issues while making the pops, ensure that the Oreos are fresh and emerge from the coating properly. If they are crumbly, the dip might be too warm or not thick enough; adjust the chocolate melting process as needed.

Selecting quality chocolate is essential; low-quality options may lead to unwanted texture variations. Ensure you have the right ingredients for a smooth and delicious finish.

Recipe Success Stories

Many readers have embraced the fun and ease of making Valentine’s Day Oreo Pops, sharing their personal stories and creative twists. One family reported success by incorporating seasonal flavors, creating unique mashups that delighted both children and adults at holiday gatherings.

Children have enjoyed hosting friendly competitions to create the most visually appealing pops, enriching family cooking experiences. The bonding time spent in the kitchen has generated memories that extend beyond just enjoying the treats.

Others have shared their successes in adapting flavors, incorporating fruits or nuts to enhance the overall eating experience. The encouraging feedback highlights the versatility and accessibility inherent in the recipe.

Readers have contributed stunning photos and variations, transforming a classic treat into a canvas of creativity, and helping to inspire new bakers to enjoy the process of cooking at home.

Frequently Asked Questions

What chocolate should I use for dipping my Oreo Pops?

It is best to use high-quality melting chocolate or chocolate wafers, which melt smoothly and set well once cooled. Avoid using regular chocolate chips, as they may not melt properly.

Can I use flavors other than chocolate?

Absolutely! While chocolate is traditional, you can experiment with candy melts in various colors or flavors to create unique pops that suit your taste preferences or themed events.

How do I store leftover Oreo Pops?

Store leftover pops in an airtight container at room temperature for up to a week. If stored in the fridge, allow them to come to room temperature before serving for the best taste.

Can I use gluten-free Oreos?

Yes! Gluten-free Oreos make an excellent substitute if you or someone you’re serving has gluten sensitivities. They maintain the same great flavor and texture.

How do I keep the pops from sticking to each other?

To prevent sticking, allow the chocolate to fully set before placing the pops in storage. Using parchment paper between layers also helps keep them separated.

How can I make these Oreo Pops more visually appealing?

Get creative with your decorations! Use colored chocolate for drizzling, edible glitter, heart-shaped sprinkles, or themed toppers that reflect the occasion for a vibrant look.

How long can I make the Oreo Pops in advance?

You can prepare the Oreo Pops up to two days in advance. Store them in an airtight container to maintain freshness until you are ready to serve.

What is the best way to dip the Oreos without breaking them?

Using a fork or skewer can help you dip the Oreos without manually handling them too much, reducing the risk of breakage. Gently support the Oreo while dipping for best results.

Can I freeze Oreo Pops?

Freezing is not recommended, as it may lead to undesirable texture changes. Instead, store them in a cool location or refrigerator, avoiding unwanted moisture.

What are some great serving ideas for Oreo Pops?

Serve the pops upright in a decorative vase, alongside themed plates, or in individual boxes for gifting. Enhance the display with colored tissue or candy scattering for a festive touch.

Additional Resources

For those excited about diving into the world of dessert making, explore related recipes that celebrate sweet indulgence. From classic chocolate-covered strawberries to whimsical cake pops, the possibilities are endless.

Consult technique guides on skills like melting chocolate properly or decorating desserts beautifully to enhance your baking repertoire. Understanding ingredient selections can also lead to more delicious and accessible treats for every occasion.

For those wanting to keep making desserts as seasons change, discover seasonal variations that coincide perfectly with each holiday or celebration, offering fun and creativity throughout the year.

Join the Conversation

Engage with fellow baking enthusiasts by sharing your Oreo Pop creations on social media. Use eye-catching photography to showcase your unique variations and inspire others in the community.

Recipe reviews and feedback help improve techniques while building connections with other home bakers who share your passion. Consider hosting virtual baking sessions where you can all create and enjoy these Valentine’s Day treats together, creating a sense of community around a shared love for cooking!

The Recipe

Valentine’s Day Oreo Pops

Serves: 12 pops

Prep Time: 15 mins

Cook Time: 10 mins

Total Time: 25 mins

Kitchen Equipment Needed

  • Microwave-safe bowl
  • Fork or skewer for dipping
  • Parchment paper for cooling
  • Airtight container for storage

Ingredients

  • 12 Oreo cookies
  • 1 cup melting chocolate (dark or white)
  • 1/2 cup sprinkles for decoration
  • 12 lollipop sticks

Directions

  1. Prepare your workspace by laying out all ingredients and tools.
  2. In a microwave-safe bowl, melt the chocolate in 30-second intervals until smooth, stirring frequently.
  3. Insert lollipop sticks into the creamy filling of each Oreo, ensuring they are secure.
  4. Dip each Oreo into the melted chocolate, allowing excess to drip off.
  5. Before the chocolate sets, sprinkle with your chosen decorations.
  6. Place the dipped Oreos on parchment paper and allow them to cool until the chocolate is set.
  7. Once set, your Oreo Pops are ready to be enjoyed or packaged as gifts!

Recipe Notes

  • Feel free to experiment with various chocolate and sprinkle colors for different occasions.
  • For a richer flavor, try using flavored chocolate melts.
  • Store popped in an airtight container at room temperature for best results.

Best Valentine’s Day Oreo m&m’s Cookies – Ready in 30 Minutes

Valentine’s Day Oreo M&M’s Cookies: Sweet Treats for Your Loved Ones

⚖️
Difficulty
Easy

⏲️
Prep Time
15 mins

🕒
Cook Time
10 mins

⏱️
Total Time
25 mins

🍽️
Servings
24 cookies

Celebrate love this Valentine’s Day with the delightful twist of Oreo M&M’s Cookies. These cookies are not only visually appealing with vibrant colors but also pack the delicious flavors of chocolate and cream. Picture yourself baking these scrumptious treats to share with your partner, family, or friends, filling your kitchen with the warm aroma of melting chocolate and buttery dough. Each bite brings a delightful crunch from the M&M’s and a rich, creamy burst from the Oreos, making them a perfect sweet indulgence for any occasion.

Whether you are planning a romantic dinner, a sweet surprise for your kids, or simply want to indulge in a unique cookie, these Oreo M&M’s Cookies are a fantastic choice. Easy to make and packed with fun flavors, you can whip up a batch in no time. This enticing recipe combines the iconic flavors of Oreos with colorful chocolate candies, creating a cookie that is both festive and delicious, making it a sure hit for this Valentine’s Day.

Quick Recipe Highlights

  • Flavor Profile: A delightful combination of rich chocolate from the Oreos and sweet, colorful bursts of chocolate from the M&M’s, creating a harmonious balance of flavors.
  • Texture: The cookies have a soft, chewy center with crispy edges, while the M&M’s add a satisfying crunch to each bite.
  • Aroma: The unmistakable scent of baked cookies mingles with the sweet aroma of chocolate, making it hard to resist indulging while they bake.
  • Visual Appeal: Bright, colorful M&M’s peek through the golden-brown cookie dough, making these cookies as pleasing to the eyes as they are to the taste buds.
  • Skill Level Needed: This recipe is beginner-friendly and perfect for anyone looking to bring joy to their kitchen without needing advanced baking skills.
  • Special Equipment: All you need is a mixing bowl, baking sheet, and an oven, making this a straightforward and accessible recipe.

Recipe Overview

  • Difficulty Level: This cookie recipe is easy, making it suitable for bakers of all ages. Even if you are new to baking, you can confidently create delicious cookies that will impress your loved ones.
  • Category: Perfect as a dessert or snack, these cookies make a fantastic addition to any Valentine’s Day celebration, classroom treat, or family gathering.
  • Cuisine: This recipe is inspired by American baking traditions, where cookies are a staple in dessert offerings, especially during festive seasons.
  • Cost: The ingredients are budget-friendly, making this recipe both economical and accessible to everyone, regardless of culinary experience.
  • Season: While ideal for Valentine’s Day, these cookies can be enjoyed year-round, bringing joy in every season.
  • Occasion: Whether for a romantic date night, a fun baking session with kids, or a sweet surprise for friends, this recipe fits every occasion perfectly.

Why You’ll Love This Recipe

– Taste and texture appeal: The sweet, creamy chocolate from the Oreos meets the playful crunch of M&M’s, making for a cookie that is both satisfying and delightful. Each bite provides a burst of flavor and varied texture, drawing you back for more.

– Convenience and preparation benefits: This simple recipe can be prepared quickly with minimal effort and clean-up. The straightforward mixing and baking process is perfect for those who want to enjoy homemade cookies without spending hours in the kitchen.

– Nutritional advantages: While cookies are a treat, this recipe incorporates comforting ingredients that can be enjoyed in moderation. Chocolate can boost mood and energy levels, adding a sprinkle of happiness to your day.

– Social and entertaining value: Cookies are a universal favorite, and bringing a batch of these colorful, attractive Oreos M&M’s Cookies to gatherings makes you the star of the party. They can spark conversations and create joyful memories.

– Cost-effectiveness and accessibility: The ingredients are inexpensive and easy to find in any grocery store, making it a budget-friendly option for creating homemade goodies for loved ones.

Historical Background and Cultural Significance

The origins of classic cookies can be traced back to the early 7th century when the Arabs brought sugar and spice to Europe. Cookies have evolved over the centuries from simple baked goods to the plethora of options available today, including the delicious varieties using popular candies like Oreos and M&M’s.

In America, cookies have become an integral part of the baking culture, especially during festive occasions. The introduction of Oreos in 1912 by Nabisco revolutionized the snacking experience, and the fun, vibrant M&M’s were created shortly after during World War II, making a sweet treat that could withstand heat.

Over the years, as these beloved candies became staples in American households, their integration into cookie recipes sparked the creation of countless variants, with people adopting these combinations to suit their tastes, turning baking into a fun and creative act.

Today, cookies are not only enjoyed at home but have become significant culinary representatives of celebration and community, strengthening bonds as families and friends come together to share homemade treats.

Ingredient Deep Dive

Oreos: Oreos, with their signature cream filling, offer a nostalgic flavor and texture. They provide a unique twist to traditional cookies, combining creamy and crispy elements. High in sugar but also a source of fun, Oreos can be selected based on individual preference, whether classic or seasonal varieties.

M&M’s: M&M’s are colorful candy-coated chocolates known for adding brightness to any dessert. Their origins date back to the 1940s, and they are beloved for their crunch and sweetness. Packed with sugary calories, M&M’s can also be enjoyed in moderation, and they can be customized with various flavors or colors to suit specific occasions.

Common Mistakes to Avoid

  • Not chilling the dough: Chilling helps the cookies maintain their shape and texture. Without it, the cookies may spread too much during baking.
  • Overmixing the dough: Overmixing can lead to tough cookies, so mix just until combined to keep them soft and chewy.
  • Using expired ingredients: Always check the expiration dates on baking soda and baking powder for optimal rise and flavor.
  • Rushing the baking time: Each oven is different, so keep an eye on the cookies and bake them until lightly golden.
  • Ignoring the baking sheet: Line the baking sheet with parchment paper or a silicone mat for easy removal and cleanup.
  • Using the wrong flour: Use all-purpose flour for the best texture and flavor in your cookies; avoid substituting with specialty flours without adjustments.
  • Not measuring ingredients correctly: Precision in measuring pouring ingredients such as flour is key to achieving the perfect cookie dough consistency.
  • Skipping the taste test: Always taste your dough before baking; if it isn’t good raw, it’ll likely not be good baked.

Essential Techniques

Chilling the Dough: Chilling the cookie dough is essential for creating the right texture and flavor. This can prevent excessive spreading during baking and enhance the final cookie’s taste. Mastering this technique will help ensure that every batch comes out perfectly rich and delicious.

Proper Mixing: Mixing the dough properly ensures even distribution of the ingredients. Using a spatula or mixer until just combined prevents toughness. Visual cues for success include seeing no dry flour left and the dough appearing cohesive but not overly sticky.

Pro Tips for Perfect Valentine’s Day Oreo M&M’s Cookies

1. Use room temperature butter for easy creaming and a softer dough, leading to perfectly chewy cookies.
2. Experiment with different types of M&M’s — try peanut or almond varieties for a unique flavor twist.
3. For extra chocolate flavor, add mini chocolate chips into the cookie dough.
4. If desired, drizzle melted chocolate over the baked cookies for an indulgent finish.
5. Use high-quality ingredients, especially chocolate, for richer flavor in every bite.
6. Ensure your oven is correctly preheated for the perfect baking experience and achieve optimal rise.
7. Allow cookies to cool on the baking sheet for easy removal while retaining their shape.
8. Store baked cookies in an airtight container to keep them soft and delicious for days.

Variations and Adaptations

For a fun twist, consider adding seasonal sprinkles during holidays or themed parties. For healthier variations, substitute regular Oreos with gluten-free options, or use dark chocolate M&M’s. You can also explore different flavor combinations, such as incorporating peanut butter or vanilla extract, to enhance the classic sweet and chocolatey flavor profile.

If you are looking for a softer cookie, adjust the baking time slightly or experiment with different ratios of butter and sugar. For those who prefer a chewy texture, ensure not to overbake the cookies and try adding oats.

Serving and Presentation Guide

Plate your cookies on a decorative platter, stacking them for an inviting display. Consider garnishing with fresh fruit or a sprinkling of icing sugar for an elegant touch. Traditional accompaniments could also include a side of milk, enhancing the classic cookie and milk experience.

For modern serving suggestions, place cookies individually in small boxes or bags tied with ribbon for personal gifts. When serving, ensure cookies are at room temperature for optimal flavor and texture.

Wine and Beverage Pairing

Pair these delicious cookies with a glass of sweet dessert wine, such as a Ruby Port or a fruity Moscato, which will enhance the sweetness of the Oreos and M&M’s. For non-alcoholic alternatives, serve with a rich hot chocolate or a classic, cold glass of milk.

If you’re a coffee lover, a smooth latte or a lightly roasted coffee would complement the chocolate flavors beautifully. Be sure to serve beverages at moderate temperatures to enhance the overall tasting experience.

Storage and Shelf Life

Store your Oreo M&M’s Cookies in an airtight container at room temperature to maintain freshness. Properly stored, they can last up to a week, but be sure to consume them within 2-3 days for the best texture and flavor.

You can also freeze unbaked cookie dough for later use; shape the dough into balls, freeze on a baking sheet, then transfer to a container or freezer bag. When ready to bake, simply add a couple of minutes to the baking time for freshly baked cookies at any time.

Make Ahead Strategies

To save time, prepare the cookie dough in advance and store it in the refrigerator for up to 3 days before baking. You can also roll out the dough into logs and freeze them for up to 2 months, allowing you to bake fresh cookies whenever the craving strikes.

For best quality, let the dough come to room temperature before baking. This will ensure easy slicing and a more uniform cooking time, giving you the best texture and flavor from your cookies.

Scaling Instructions

To adjust the recipe for smaller or larger batches, simply halve or double the ingredient quantities. For larger servings, keep the baking sheets spaced adequately and use multiple sheets in the oven, rotating them halfway through for even baking.

If doubling the recipe, consider using an electric mixer to save time and achieve a well-blended dough. Adjust baking times as needed, as larger batches may require extra time or multiple batches to bake thoroughly.

Nutritional Deep Dive

While these cookies are a treat, understanding their nutritional content can enhance your baking experience. Each cookie offers a balance of macronutrients, primarily carbohydrates from sugars and flour, along with fats from butter and chocolate.

For those seeking health benefits, consider serving these cookies in moderation. They provide energy and can boost mood due to the chocolate and sugar, making them a delightful addition to balanced snack options.

Dietary Adaptations

For gluten-free associates, substitute all-purpose flour with an easily accessible gluten-free blend or almond flour. To create dairy-free cookies, use coconut oil in place of butter and almond milk for added moisture.

To cater to vegan diets, replace the eggs with ground flaxseed mixed with water and use a dairy-free chocolate version of M&M’s. Creating a low-carb option may involve using almond flour and sugar replacements for a guilt-free indulgence that still satisfies.

Troubleshooting Guide

If you find your cookies spreading too much, review your chilling and butter temperature practices. Ensure the butter is soft but not melted, and rest the dough for adequate time.

For cookies that are too dry, adjust baking times and consider adding a tablespoon of milk or water to improve moisture levels. If flavor seems off, reviewing ingredient freshness and correct measurements will help align taste expectations.

Recipe Success Stories

Readers have shared their love for these cookies, noting how they made their Valentine’s Day gatherings memorable and fun. Variations suggested by families have included integrating peanut butter and using other favorite candies with delicious results.

Photography tips have emerged around capturing the vibrant colors of M&M’s, with many community members expressing joy in how visually appealing the cookies looked on their dessert tables.

Frequently Asked Questions

Can I use different types of M&M’s?

Absolutely! Feel free to substitute regular M&M’s with peanut, almond, or even seasonal variations for a unique twist on this cookie recipe.

Can I make these cookies ahead of time?

Yes! You can prepare the dough in advance and refrigerate it for up to 3 days or freeze it for future baking. Just remember to allow the dough to come to room temperature before baking.

What should I do if my cookies spread too much while baking?

If your cookies spread, ensure you chill the dough as suggested. If they still spread, your butter may have been too warm; try refrigerating the dough before baking.

How should I store leftover cookies?

Store the cookies in an airtight container at room temperature for up to one week, or freeze them for longer storage options.

Can I substitute the butter with something else?

Yes, you can use coconut oil or a vegan butter alternative to replace regular butter in this recipe for those with dietary restrictions.

What’s the best way to make the cookies chewy?

To achieve a chewy texture, do not overbake the cookies and refrigerate the dough before shaping them. This helps maintain their shape and moisture.

Is it necessary to use Oreos?

While Oreos provide the classic flavor and texture, you can substitute them with other chocolate sandwich cookies to customize the taste, though the results may vary slightly.

Can I freeze baked cookies?

Yes, baked cookies can be frozen. Ensure they are cooled completely before wrapping them tightly in plastic wrap or placing them in an airtight container for freezing.

How do I get the perfect cookie texture?

To ensure a perfect texture, measure ingredients correctly, mix until just combined, and pay attention to baking time for a delicate balance of chewy and crisp.

Can I use alternative flour?

It is possible to use almond flour or other gluten-free flours, but you will likely need to adjust the ratios for the correct texture in the cookies.

Additional Resources

Explore more delightful recipes to bring joy to your baking experiences. Consider trying out other variations of cookie recipes that incorporate ingredients like nuts or fruit.

Look into technique guides that showcase tips on mixing dough effectively or enhancing flavors. Gathering ingredient information can also provide insights into the best selections for maximum freshness when planning your next baking spree.

Finally, take advantage of seasonal variations by tailoring your treats to the holidays, ensuring that each celebration is filled with creativity and deliciousness.

Join the Conversation

Engage with fellow bakers by sharing your Oreo M&M’s Cookies photos and experiences on social media. Don’t hesitate to give feedback on your cooking journey; every suggestion can inspire others to create new variations and adapt the recipe to their liking.

Consider inviting friends to join in from time to time for a baking session. Exploring different flavors and cooking together can enhance the fun and foster community engagement while indulging in the lovely treats you create.

The Recipe

Valentine’s Day Oreo M&M’s Cookies

Serves: 24 cookies

Prep Time: 15 mins

Cook Time: 10 mins

Total Time: 25 mins

Kitchen Equipment Needed

  • Mixing bowl
  • Baking sheet
  • Parchment paper
  • Electric mixer
  • Cookie scoop

Ingredients

  • 1 cup unsalted butter, softened
  • 1 cup brown sugar
  • 1/2 cup granulated sugar
  • 2 large eggs
  • 2 teaspoons vanilla extract
  • 2 1/4 cups all-purpose flour
  • 1 teaspoon baking soda
  • 1/2 teaspoon salt
  • 20 Oreos, chopped
  • 1 cup M&M’s

Directions

  1. Preheat your oven to 350°F (175°C) and line a baking sheet with parchment paper.
  2. In a large mixing bowl, cream together the softened butter, brown sugar, and granulated sugar until light and fluffy.
  3. Add the eggs one at a time, mixing well after each addition, followed by the vanilla extract.
  4. In a separate bowl, combine the flour, baking soda, and salt; gradually incorporate this dry mixture into the wet ingredients.
  5. Fold in the chopped Oreos and M&M’s until evenly distributed throughout the dough.
  6. Using a cookie scoop, drop rounded tablespoons of dough onto the prepared baking sheet, leaving space between each cookie.
  7. Bake in the preheated oven for 10-12 minutes or until the edges are lightly golden but centers remain soft.
  8. Allow cookies to cool on the baking sheet for 5 minutes before transferring them to a wire rack to cool completely.

Recipe Notes

  • For softer cookies, reduce baking time slightly, taking them out when they are still slightly puffy.
  • Store cookies in an airtight container at room temperature for up to 1 week.
  • Feel free to substitute regular Oreos with any flavor of your choice for a unique twist.

Best Oreo Cheesecake Cookies – Ready in 30 Minutes

Delicious Oreo Cheesecake Cookies: A Creamy Delight

⚖️
Difficulty
Moderate

⏲️
Prep Time
20 mins

🕒
Cook Time
10 mins

⏱️
Total Time
30 mins

🍽️
Servings
24 cookies

Indulge in the delightful world of Oreo Cheesecake Cookies, where rich and creamy cheesecake meets the beloved crunch of Oreo cookies. These cookies combine the best of both worlds: the iconic chocolate wafer cookie and a silky cheesecake filling. Perfectly sweet and just a tad tangy, each bite is an explosion of flavor that will have everyone reaching for seconds. Ideal for any occasion, whether it’s a casual family gathering or a festive celebration, these cookies are sure to impress.

The texture of these cookies is a culinary masterpiece; crisp on the outside and soft on the inside, they boast a creamy center that melts in your mouth. Each cookie is studded with crumbled Oreo pieces, providing that signature cookie crunch that balances beautifully with the smoothness of the cheesecake filling. Their pleasing aroma of baked chocolate and cream cheese fills your kitchen, making it impossible to resist the temptation as they cool on the counter.

Quick Recipe Highlights

  • Flavor Profile: Rich chocolate and creamy cheesecake create a harmonious blend that is irresistible.
  • Texture: The cookies offer a crispy bite with a soft, gooey center packed with Oreo chunks.
  • Aroma: A mouthwatering fragrance of vanilla and chocolate beckons as they bake.
  • Visual Appeal: The contrast of dark chocolate and creamy white filling makes these cookies visually stunning.
  • Skill Level Needed: Moderate skill is required, making these cookies ideal for home bakers looking to elevate their dessert game.
  • Special Equipment: A mixing bowl, baking sheet, and an electric mixer are essential for perfect results.

Recipe Overview

  • Difficulty Level: These Oreo Cheesecake Cookies require basic baking skills and a careful approach to mixing and baking.
  • Category: Ideal for desserts or sweet snacks, they can also serve as a fun party treat.
  • Cuisine: While the cheesecake flavor is derived from classic American desserts, the inclusion of Oreos gives a uniquely nostalgic twist.
  • Cost: The ingredients are fairly affordable, making these cookies a budget-friendly choice.
  • Season: Enjoy these cookies year-round, although they are particularly delightful during holidays and family gatherings.
  • Occasion: Perfect for birthdays, bake sales, or simply as a sweet indulgence after dinner.

Why You’ll Love This Recipe

These Oreo Cheesecake Cookies deliver an incredible taste and texture duo that is hard to resist. The rich cheese filling perfectly complements the chocolate cookie base, providing a balance of flavors that tantalize the taste buds. With a delightfully soft center and a slight crunch from the Oreo bits, every bite is a treat that envelops your palate in creamy goodness.

Convenience plays a big role as these cookies come together quickly. The dough doesn’t require extensive chilling, and they bake in a mere 10 minutes. This makes them perfect for those spontaneous cravings or last-minute dessert requests. They also hold well when stored, keeping their flavor intact for several days.

From a nutritional perspective, the ingredients used can offer some benefits, such as calcium from the cream cheese and antioxidants from dark cocoa. While indulgent, they can be enjoyed in moderation as part of a balanced diet. You’re not just treating yourself, but also creating a memorable experience with each batch you bake.

These cookies are also fantastic for entertaining. They are visually appealing and serve as a conversation starter at any gathering. Picture your guests indulging in these delightful treats, savoring flavors and textures that bring joy and satisfaction, fostering a social atmosphere filled with laughter and warmth.

Affordability is another highlight. With just a handful of ingredients, you can whip up a large batch, making them an economical choice for gatherings. Plus, you can often find ingredients on sale, allowing you to stock up without breaking the bank.

Historical Background and Cultural Significance

The origin of Oreo Cookies can be traced back to 1912, and since their introduction, they have become an iconic American treat. The combination of Oreo cookies with cheesecake is a modern culinary invention that reflects current dessert trends where classic flavors are reinvented for contemporary tastes. The Oreo Cheesecake cookie continues to gain popularity, showcasing a fusion of beloved flavors that resonates across age groups.

Culturally, Oreos have been embraced in various forms, from dunking them in milk to incorporating them into elaborate dessert recipes. The iconic dessert’s influence is far-reaching, and combining it with cheesecake is a natural progression, creating a new favorite in the line of American desserts. This dessert is more than just a culinary creation; it’s a part of celebrations, gatherings, and personal moments shared among family and friends.

The recipe for Oreo Cheesecake Cookies has evolved with variations including adding different flavors or textures to cater to diverse palates. Some may add peanut butter or even mint extract, enhancing the versatility of this delightful treat and ensuring there is a variation to satisfy everyone’s preferences.

Additionally, regional variations exist, influenced by local tastes and available ingredients. Some bakers might add spices or nuts to elevate the recipe, while others may focus on the minimalist approach to highlight the Oreo and cheesecake flavors prominently. This versatility illustrates the cookie’s adaptability, allowing it to remain relevant in the ever-evolving culinary landscape.

Ingredient Deep Dive

Oreos: The chocolate wafer cookies bring a delightful crunch and rich flavor, stemming from the combination of cocoa and vanilla. High in sugars and fats, they provide a flavor profile that balances the creamy cheesecake. When selecting Oreos, look for freshness, ensuring they’re not stale. Store them in an airtight container to maintain their crispness.

Cream Cheese: A staple in cheesecake recipes, cream cheese offers a creamy texture and tangy taste. It’s rich in calcium and provides a smooth base that enhances the overall flavor profile. Always choose full-fat cream cheese for the best taste. It should be stored in the refrigerator and can be substituted with mascarpone for a richer flavor.

Common Mistakes to Avoid

  • Using cold ingredients: Ensure that your cream cheese is at room temperature to avoid lumps and to achieve a smooth texture.
  • Overmixing the cookie dough: Overmixing can lead to tough cookies rather than soft and chewy ones, so mix just until combined.
  • Baking at the wrong temperature: Always preheat your oven; baking at a lower temperature can lead to cookies that spread too much.
  • Not measuring ingredients accurately: Baking is a science, so measuring ingredients precisely ensures the best results.
  • Baking on a cold pan: Always use a greased or lined baking sheet for even baking and to prevent sticking.
  • Ignoring cooling time: Allow cookies to cool on the baking sheet before transferring them to a wire rack, as they continue to cook slightly when removed from the oven.
  • Skipping the chilling step: Chilling the dough can enhance flavor and texture, making the cookies extra chewy.
  • Not checking for doneness: Keep an eye on bake time; cookies should be slightly golden at the edges and soft in the center when done.

Essential Techniques

Creting the Cookie Dough: Properly combining wet and dry ingredients is crucial. Start with softened cream cheese and sugar, mixing until smooth before incorporating dry ingredients. This step is vital to avoid lumps in your cookie dough, contributing to a consistent texture throughout.

Chilling the Dough: Allowing your dough to chill enhances the flavor and prevents excessive spreading during baking. 30 minutes is usually sufficient. Monitoring the chilling time can dramatically improve the overall appearance and texture of your cookies, leading to a thicker, chewier result.

Pro Tips for Perfect Oreo Cheesecake Cookies

1. Opt for double-stuffed Oreos for an extra creamy filling that enhances the richness of your cookies.
2. Experiment with other Oreo flavors, such as mint or peanut butter, for a unique twist on the classic recipe.
3. Incorporate chocolate chips for added complexity in flavor and texture.
4. Drizzle melted chocolate on top for an appealing presentation and intensified flavor.
5. Try adding spices like cinnamon or nutmeg to the cookie dough for an unexpected flavor layer.
6. Keep the cookies in an airtight container to maintain their freshness for up to a week.
7. Allow the cookies to cool completely before storing them to prevent them from becoming soggy.
8. Don’t forget to crush some Oreos to sprinkle on top before baking, adding a nice crunchy component.

Variations and Adaptations

For those interested in regional variations, consider adding flavors that celebrate local ingredients. For instance, adding crushed pistachios can offer a Middle-Eastern influence, while using coconut flakes can give an Island flair. Seasonal adaptations may include integrating pumpkin puree in fall or refreshing mint flavor in spring.

Dietary modifications can also be made to fit various lifestyles. To create a gluten-free version, substitute regular Oreos with gluten-free cookies. Alternatively, for a dairy-free option, use vegan cream cheese and enjoy the same delightful flavors.

Texture modifications can lead to fun new experiences; consider chilling the filled cookies before a final bake for a different mouthfeel and appearance. Lastly, traditional presentation can involve simply dusting the cookies with powdered sugar, while more modern ideas might include using edible flowers or flavored whipped cream to elevate the dessert.

Serving and Presentation Guide

When it comes to plating your Oreo Cheesecake Cookies, simplicity is key. Place them on a white platter to highlight their striking contrast of colors. For garnishing, consider adding a sprinkle of crushed Oreos or a drizzle of chocolate sauce over the top.

Serving these cookies slightly warm enhances the creamy center, known to impress guests. For flavor balance, pair them with a scoop of vanilla ice cream or serve alongside a glass of cold milk, allowing for a classic experience reminiscent of childhood.

Consider the cookie’s presentation on festive occasions, stacking them in a tall, clear cupcake tower for a stunning effect at parties. Always consider serving size, which can encourage moderation while allowing everyone a chance to enjoy a delicious treat.

Wine and Beverage Pairing

Pair your Oreo Cheesecake Cookies with a beautifully chilled glass of dessert wine, such as a Rich Merlot or a sweet Riesling, as they complement chocolate-based desserts remarkably well. The luscious notes of these wines accentuate the chocolate flavor of the Oreo while balancing the creamy richness of the cheesecake.

For a non-alcoholic alternative, consider serving these cookies with a rich cappuccino or a creamy milkshake. Alternatively, hot chocolate can amplify the indulgence and warmth of soft cookies, creating a cozy treat perfect for any chilly evening.

Being mindful of serving temperatures is crucial; ensure your beverages are prepared ahead of time for optimal pairing. This attention to detail can amplify your dessert experience, making it memorable for you and your guests.

Storage and Shelf Life

To store your Oreo Cheesecake Cookies, place them in an airtight container at room temperature if you’ll consume them within a few days. For longer storage, refrigerate them, where they can keep fresh for up to a week. When choosing your container, opt for one that allows a bit of space between cookies to avoid sticking together.

Monitor signs of spoilage by keeping an eye out for changes in scent or texture. If cookies start to feel dry or overly hard, they are best discarded. For reheating, a quick microwave zap of 5-10 seconds can restore their original softness without compromising flavor.

For those looking to prepare in advance, consider freezing the cookie dough. Form the dough into balls, freeze on a baking sheet, then transfer to a freezer-safe bag. When ready to bake, simply add a few extra minutes to your baking time for freshly baked cookies any time.

Make Ahead Strategies

Planning ahead can elevate your cookie-presentation game significantly. To prepare, mix the dough, and shape it into individual cookie balls, then freeze them. This way, you can bake fresh cookies whenever needed, without the upscale prep time.

You can also prepare the cream cheese filling in advance. Store it in the fridge; blending it again before use ensures it remains fluffy and easy to incorporate. Assembling the cookies can happen in stages, allowing you to manage your time effectively while ensuring freshness.

Take note of quality when making in advance; keep acidulated ingredients separate until you’re ready to serve. This keeps the flavors bright and vibrant, delivering an impressive taste experience every time.

Scaling Instructions

If you wish to halve or double the recipe, keep in mind that measurements must be precise to maintain the balance of flavors and textures. When increasing the ingredient quantities, consider the size of your baking sheets as crowding can lead to uneven baking.

For a large party, tripling the recipe may require multiple baking sheets and rotating them halfway through, especially if you have a conventional oven. Keep a close eye on your cookies to prevent overbaking as batch sizes can affect temperature regulation.

Always sum up the total baking time accordingly; testing cookies for doneness is essential, particularly when scaling. This attentiveness ensures each batch is perfectly baked no matter the size of the undertaking.

Nutritional Deep Dive

An analysis of the nutritional makeup of these Oreo Cheesecake Cookies reveals a balance of indulgence and energy. Each cookie packs calories primarily from sugars and fats, with dough calories averaging 150-200 per cookie. However, it’s important to consume these as a treat rather than a daily diet staple.

Focusing on micronutrients, cream cheese is a good source of calcium, supporting bone health, while Oreos provide iron, which helps create red blood cells. Understanding serving sizes is crucial for maintaining a balanced intake, and moderation remains a central theme when enjoying such treats.

For weight management, consider enjoying these cookies alongside healthier snacks to create a fulfilling yet balanced dessert experience. Combining richer desserts with lighter options can enhance enjoyment without the guilt while allowing for variety.

Dietary Adaptations

For gluten-free individuals, substituting Oreos with gluten-free cookies remains simple, ensuring the flavor experience isn’t lost. Make sure to use gluten-free flour for the cheesecake base if making it from scratch.

Those adhering to a dairy-free diet can substitute regular cream cheese with vegan varieties or cashew cream. This maintains the rich texture while accommodating dietary needs, allowing everyone to enjoy a taste of this delicious dessert.

Additionally, those on a keto diet can opt for lower-carb ingredients and sugar substitutes, allowing them to indulge without deviating from their dietary lifestyle. Keep portions small to satisfy sweet cravings while staying within nutritional guidelines, thus savoring the experience without worry.

Troubleshooting Guide

If your cookies are too tough, checking the mixing process is essential; overmixing can lead to a densified texture. Make sure creamy fillings are of optimal temperature before use as it influences the final consistency.

Should your cookies spread too much, consider chilling your dough longer before baking while ensuring the oven temperature is accurate. A thermometer can assist in verifying that your oven heats correctly.

Unbalanced flavors can ruin a delightful dessert experience; ensure you measure ingredients accurately, particularly the sugar and cream cheese ratios. Finally, if stuck, don’t hesitate to experiment with different ingredient cutbacks to find your perfect chocolate-cheesecake balance.

Recipe Success Stories

Readers have raved about how these Oreo Cheesecake Cookies bring joy to gatherings. Many share that they have successfully adapted the recipe for various celebrations, earning them rave reviews from family and friends. Suggestions on ingredient variations have inspired others, leading them to create their unique spins on the classic recipe, adding flavors like mint or even peanut butter.

Photography tips have also been shared within the community, showcasing the cookie’s visual appeal that draws people in. By featuring these stunning treats on social media, bakers have spread the word about the joy of making and sharing Oreo Cheesecake Cookies.

Additionally, user feedback highlights how these cookies have transformed ordinary occasions into exceptional ones, fostering friendships and ties over a shared love for delicious homemade desserts.

Frequently Asked Questions

Can I freeze Oreo Cheesecake Cookies?

Yes, you can freeze these cookies! Store them in an airtight container or freezer bag, and they will last up to three months. Just let them thaw at room temperature before serving for the best texture.

What adjustments should I make for high altitude baking?

For high altitude baking, you may need to increase the oven temperature by 15-25°F and reduce the baking time slightly. Adding a tablespoon of flour can also help stabilize the dough.

Can I use reduced-fat cream cheese?

Yes, you can use reduced-fat cream cheese; however, it may slightly alter the texture and taste. Full-fat cream cheese typically yields a richer, creamier filling.

What is the best way to store these cookies?

Store the cookies in an airtight container at room temperature for up to five days, or refrigerate them for up to a week. If you freeze them, they can last for up to three months.

Are there any nut-free substitutions for this recipe?

This recipe is already nut-free, but if using alternative creams or ingredients, ensure that they are labeled nut-free to avoid any allergy issues when serving.

How can I make these cookies dairy-free?

To make these cookies dairy-free, substitute cream cheese with a dairy-free alternative such as cashew cream or vegan cream cheese. Use dairy-free Oreos for a complete dairy-free treat.

Why are my cookies too soft?

Your cookies may be too soft if they are underbaked. Check them around the baking time and let them cool slightly on the baking sheet, as they will firm up as they cool.

How can I enhance the chocolate flavor?

For an enhanced chocolate flavor, use dark chocolate Oreos, add cocoa powder to the dough, or sprinkle chocolate chips throughout the batter before baking.

Can I make this dough ahead of time?

Absolutely! You can prepare the dough in advance and refrigerate it for up to two days before baking. You can also freeze the dough, shaping it into balls and cooking when necessary.

How do I know when the cookies are done baking?

Cookies are typically done when they are golden around the edges but still soft in the center. They will continue to cook a bit after being removed from the oven, so it’s best not to overbake.

Additional Resources

If you enjoyed making Oreo Cheesecake Cookies, explore related recipes like classic cheesecake, other cookie variations, or even decadent cake recipes that feature similar flavors. There are countless technique guides available to enhance your baking skills, alongside ingredient information to help you understand the best choices for your baking endeavors.

Consider investing in quality equipment that suits your baking style; a good mixer or silicone baking mats can provide an advantage. Exploring seasonal variations can introduce new excitement to your baking routine, ensuring you always have something fresh and delightful to share.

Join the Conversation

We’d love to hear about your experiences with these Oreo Cheesecake Cookies! Share your photos and adaptations with us on social media. Your feedback and variations contribute to a vibrant community of bakers eager to share and inspire. Enjoy experimenting and learning from each other, as every bake tells a story worth sharing.

The Recipe

Oreo Cheesecake Cookies

Serves: 24 cookies

Prep Time: 20 mins

Cook Time: 10 mins

Total Time: 30 mins

Kitchen Equipment Needed

  • Mixing bowl
  • Electric mixer
  • Baking sheet
  • Measuring cups and spoons

Ingredients

  • 1 cup cream cheese, softened
  • 1/2 cup granulated sugar
  • 1/2 cup brown sugar
  • 1 large egg
  • 1 teaspoon vanilla extract
  • 1 cup all-purpose flour
  • 1/2 cup cocoa powder
  • 1 teaspoon baking soda
  • 1/4 teaspoon salt
  • 15 Oreo cookies, crushed

Directions

  1. Preheat the oven to 350°F (175°C) and line a baking sheet with parchment paper.
  2. In a mixing bowl, beat the softened cream cheese, granulated sugar, and brown sugar until creamy.
  3. Add the egg and vanilla extract, mixing until fully incorporated.
  4. In another bowl, whisk together the flour, cocoa powder, baking soda, and salt.
  5. Gradually add the dry ingredients to the cream cheese mixture, mixing until combined.
  6. Fold in the crushed Oreos gently to ensure even distribution.
  7. Drop tablespoon-sized mounds of dough onto the prepared baking sheet, spacing them apart.
  8. Bake for 10-12 minutes, until edges are set but centers are still soft.
  9. Allow cookies to cool on the baking sheet for 5 minutes before transferring to a wire rack to cool completely.

Recipe Notes

  • For a thicker texture, refrigerate the dough before baking.
  • Feel free to experiment with different Oreo flavors for unique variations.

Easy Strawberry Brownies with Just 5 Ingredients

Delicious Strawberry Brownies: The Perfect Summer Treat

⚖️
Difficulty
Medium

⏲️
Prep Time
15 mins

🕒
Cook Time
25 mins

⏱️
Total Time
40 mins

🍽️
Servings
12 brownies

Brownies are a beloved go-to dessert, but adding fresh strawberries creates a sensational twist that elevates the traditional treat into a summer delight. These Strawberry Brownies boast a rich chocolate base that is both fudgy and chewy, perfectly complementing the burst of juicy strawberry flavor that emerges from every bite. The combination results in a dessert that’s not just tasty but visually stunning—vibrant flecks of red against dark chocolate are sure to impress family and guests alike.

Imagine sinking your teeth into a freshly baked brownie, the chocolate melting in your mouth, followed by the sweet and slightly tart explosion of strawberries. This recipe is perfect for summer picnics, backyard barbecues, or simply as a delightful way to treat yourself on a warm evening. Not only are these brownies a feast for your taste buds, but they also carry a nostalgic charm, reminding us of carefree days spent enjoying a sweet treat in the sunshine.

Quick Recipe Highlights

  • Flavor Profile: These brownies offer a delightful mix of rich chocolate and sweet, tart strawberries.
  • Texture: They have a fudgy, moist interior that contrasts beautifully with the soft freshness of the strawberries.
  • Aroma: When baking, the sweet aroma of melting chocolate mingles with a lovely fragrance from the strawberries.
  • Visual Appeal: The deep chocolate hue, flecked with bright strawberry pieces, makes for an irresistible presentation.
  • Skill Level Needed: This recipe is approachable for beginner bakers, requiring basic mixing and baking skills.
  • Special Equipment: A mixing bowl, a baking pan, and an oven are all you need to whip up this delectable dessert.

Recipe Overview

  • Difficulty Level: With straightforward steps and minimal ingredients, this recipe is easy enough for both novice and experienced bakers.
  • Category: These brownies fall under the dessert category, perfect for satisfying your sweet tooth.
  • Cuisine: While brownies are a classic American confection, adding strawberries provides a fresh twist common in many summer desserts.
  • Cost: The ingredients are affordable, making this a budget-friendly treat that doesn’t compromise on flavor.
  • Season: Strawberry Brownies are particularly wonderful in the summer when strawberries are at their peak freshness.
  • Occasion: These brownies are versatile enough for various occasions, from casual gatherings to special celebrations.

Why You’ll Love This Recipe

The allure of Strawberry Brownies lies in their delicious blend of flavors and textures that resonate with both kids and adults alike. The sweetness of strawberries harmonizes with the rich bitterness of the chocolate, creating a balanced dessert that is decadent yet refreshing. Each brownie is bursting with strawberries, ensuring that every piece is an experience of both chocolate and fruit.

Not only is this recipe a treat for your taste buds, but it also boasts convenience, making it perfect for quick summer gatherings. You can prepare the batter in under 15 minutes, and the whole baking process takes just around 25 minutes. This quick turnaround allows you to enjoy freshly baked brownies without spending hours in the kitchen. Plus, they can be made ahead of time and served warm or at room temperature, giving you flexibility as you entertain.

From a nutritional standpoint, adding strawberries to brownies brings a boost of vitamins, fiber, and antioxidants, making this dessert a tad healthier than its traditional counterpart. Fresh berries are a great source of vitamin C, manganese, and several antioxidants, which contribute to overall health. This means you can indulge in a sweet treat while still feeling good about the ingredients.

Socially, Strawberry Brownies are a crowd-pleaser at any gathering. Whether it’s a birthday party, summer BBQ, or picnic, these brownies are sure to spark conversations and compliments. Their vibrant look is bound to invite guests to take a bite, and you’ll undoubtedly receive rave reviews.

Cost-effectiveness is another attractive characteristic of this recipe. The basic pantry staples combine with fresh strawberries, which don’t break the bank. Seasonal fruits tend to be cheaper, especially in summer, allowing you to make a batch without stretching your budget. You can also easily double the recipe to serve larger groups, making it a smart choice for gatherings with family and friends.

Historical Background and Cultural Significance

Brownies have been a beloved treat in American cuisine since their inception in the late 19th century. The traditional brownie is thought to have originated in the United States with the first recipe debuting in cookbooks around the turn of the century. The exact origins are somewhat murky, with various claims on who truly created the decadent chocolate treat, but it quickly became a staple in American baking due to its ease of preparation and rich flavor.

As recipes for brownies evolved, bakers began to experiment with different flavors and ingredients, leading to countless variations. Adding fruits like strawberries not only enhances the flavor but also celebrates seasonal produce, reflecting a culinary trend that seeks to utilize fresh, local ingredients. The introduction of strawberries into brownie recipes is a testament to how the culinary world adapts and thrives based on seasonal availability and consumer preferences.

In various cultures, desserts made from similar ingredients, such as chocolate and fruits, have long held significant meaning. They are often tied to celebrations or familial gatherings, signifying a sense of comfort and togetherness. Incorporating strawberries into this classic American dessert not only adds freshness but also invites a touch of nostalgia for warm summer gatherings filled with laughter and joy.

Over time, Strawberry Brownies have become a versatile dessert enjoyed at various occasions, from birthday parties to summer picnics. Their dual appeal as both a sweet indulgence and a fresh summer treat makes them a popular choice around the world, transcending cultural boundaries while creating new family traditions.

Ingredient Deep Dive

Strawberries

Strawberries have been cherished for centuries, with cultural significance dating back to ancient times as symbols of purity and passion. These berries are not only delicious, but they also boast numerous health benefits, being low in calories and high in vitamins C and K, as well as antioxidants. When selecting strawberries, look for bright red, plump fruits with a natural sheen—these indicate freshness. To store, keep them in the refrigerator and avoid washing until just before use; this prolongs their shelf life. If strawberries are out of season, consider substituting with other berries like raspberries or blueberries.

Cocoa Powder

The use of cocoa powder originated from the cacao plant and has a rich history in culinary traditions dating back to ancient Mesoamerican cultures. It’s a powerful ingredient in creating the deep chocolate flavor in brownies, enriched with antioxidants that promote heart health. When buying cocoa powder, choose unsweetened varieties that are high in cacao content for the best flavor. Store cocoa in a cool, dry place to maintain freshness. Alternatives include using high-quality dark chocolate, which can enhance the texture and flavor profile of your brownies.

Butter

Butter plays a crucial role in creating the rich, fudgy texture of these brownies. With origins in ancient dairying practices, butter has woven itself into many cultures as a staple fat for cooking and baking. It adds flavor and moisture, essential for achieving a beautifully chewy brownie. When selecting butter, opt for unsalted to control the salt content in your baking. Store it in the refrigerator and use it within the specified date for maximum freshness. If a lactose-free option is preferable, consider using margarine or coconut oil as a substitute.

Flour

Flour is the backbone of many baked goods, including brownies, where it contributes to structure. The evolution of flour usage dates back thousands of years, where ancient civilizations ground grains into a fine powder for their breads and pastries. Choose all-purpose flour for a balanced result, but if you want gluten-free options, almond flour or coconut flour are excellent substitutes. Store flour in a cool, dry place to prevent spoilage. When using gluten-free flour, note that adjustments may be needed in the recipe’s liquid ratios.

Common Mistakes to Avoid

  • Overmixing the batter: This can lead to tough brownies; mix just until ingredients are combined.
  • Not measuring ingredients accurately: Baking is a science; always use a kitchen scale for precision.
  • Using cold ingredients: Ensure your butter and eggs are at room temperature for better incorporation.
  • Not greasing the pan: Failing to grease or line the pan properly can make removal difficult.
  • Overbaking: Check brownies a few minutes before the recommended time for that fudgy texture.
  • Underestimating cooling time: Allow brownies to cool before cutting to prevent them from falling apart.
  • Using stale or old ingredients: Freshness matters for both flavor and texture.
  • Skipping the resting period: Allow time for flavors to meld and the texture to set after baking.

Essential Techniques

Folding Ingredients

Folding is a delicate technique used to combine ingredients without deflating mixtures. It’s important when incorporating whipped egg whites or whipped cream into batters to maintain airiness. Use a spatula and a gentle motion to fold in, working to bring the mixture from the bottom up over itself. A common pitfall is over-mixing, leading to dense baked goods; visual cues include a uniform color without streaks.

Melting Chocolate and Butter

Melting chocolate and butter together creates a smooth base for brownies. This technique requires gentle heat to avoid seizing the chocolate; a bain-marie or microwave can be used. Stir regularly until melted. It’s crucial to allow it to cool slightly before mixing with other ingredients to prevent cooking them. Perfectly melted butter and chocolate should be glossy and will provide a luscious texture in your brownies.

Baking Timing and Temperature

Understanding your oven’s temperature is crucial for perfect brownies. An oven thermometer can help ensure accuracy. The right baking time can make or break your dessert; underbaked brownies may fall apart and overbaked ones can become dry. The brownies should look set around the edges but still slightly moist in the center. A toothpick test will help; it should come out with a few moist crumbs, not wet.

Testing for Doneness

Properly testing for doneness is essential to achieve that perfect brownie texture. Using a toothpick inserted into the center, check for moist crumbs; this indicates fudginess. If it comes out wet, they need more time. A common pitfall is relying solely on time; every oven is different, so visual and tactile checks are key for success.

Pro Tips for Perfect Strawberry Brownies

Using fresh, in-season strawberries will yield the best flavor and juiciness, enhancing the brownies immensely. Consider macerating the strawberries in a bit of sugar before folding them into the batter to intensify their sweetness. For an extra chocolatey experience, swap out some of the flour for cocoa powder. Be mindful of cooling time; letting them rest for at least an hour will allow the flavors to deepen and the texture to set. When serving, dust with powdered sugar or drizzle with chocolate sauce for visual appeal and additional flavor.

Experimenting with toppings can enhance enjoyment too—try pairing them with vanilla ice cream or whipped cream to elevate your dessert experience. For an added dimension, consider incorporating nuts like walnuts or pecans for a satisfying crunch within your brownies. Lastly, making a double batch and freezing extras can be a convenient way to enjoy these treats any time.

Variations and Adaptations

For those looking to switch things up, consider regional variations such as using local berries or infusing spices like cinnamon for a warm flavor profile. Seasonal changes allow for adaptations, like swapping strawberries for raspberries or using apples in the fall. Dietary modifications can create gluten-free brownies by substituting traditional flour with almond or coconut flour. If you prefer a richer texture, adding cream cheese can create a delightful cheesecake brownie hybrid. For those who enjoy creative presentations, consider layering with whipped cream and serving in a dessert glass for an elegant dessert experience.

Serving and Presentation Guide

To serve Strawberry Brownies beautifully, consider plating them on a vibrant colored plate to contrast with the rich brown of the brownies. A simple dusting of powdered sugar offers a charming finish. Garnish with fresh mint leaves or a light drizzle of chocolate sauce to not only enhance the appearance but also add a flavor contrast. When plating, serve warm with a scoop of vanilla ice cream beside it for a visually stunning and appetizing dessert. Keep brownies neatly cut to maintain their shape, and if desired, cut them into fun shapes with cookie cutters for children’s parties or events.

Wine and Beverage Pairing

The rich flavors of Strawberry Brownies pair beautifully with a light red wine, such as a Pinot Noir, known for its fruity notes that complement the sweetness of the dessert. If you prefer non-alcoholic options, opting for a sparkling water with a hint of fruit essence can enhance the overall experience without the added sugar. For coffee aficionados, a robust espresso or a creamy latte works splendidly, trailing the rich chocolate flavor. When serving, remember to chill white wines and serve reds slightly below room temperature for optimal taste.

Storage and Shelf Life

To maximize freshness, store Strawberry Brownies in an airtight container at room temperature for up to three days. If you prefer to extend their shelf life, they can be frozen for up to three months if wrapped properly—try using plastic wrap followed by aluminum foil or a freezer-safe bag. Pay attention to signs of spoilage, like a change in smell or visible mold, and discard if in doubt. For reheating, a microwave can refresh their fudgy texture, but be careful to not overheat, as this can lead to dryness.

Make Ahead Strategies

Brownies benefit from a make-ahead approach, allowing flavors to deepen over time. You can prepare the batter a day in advance and refrigerate it to expedite baking time later. Additionally, consider baking the brownies one day before an event, as they taste even better the next day. If opting for a multi-step process, bake brownies but skip adding strawberries until just before serving to maintain their fresh flavor. This strategy allows you to have everything ready while saving the final touch for when guests arrive.

Scaling Instructions

You can easily adjust the quantity of Strawberry Brownies to accommodate your gathering’s needs. Halve the recipe for intimate get-togethers to avoid waste. Alternatively, doubling or tripling the recipe is convenient for larger crowds; simply ensure your baking equipment can accommodate the increased batter volume. Remember to adjust baking times slightly; larger batches may require extra baking time to ensure they set correctly. When scaling, keep note of ingredient freshness for optimal flavor.

Nutritional Deep Dive

Each Strawberry Brownie offers a satisfying treat that fits into various dietary patterns, thanks to the fruit infusions. The macros typically comprise a balanced ratio of fats, carbohydrates, and proteins, with the strawberries increasing fiber content and adding natural sweetness. Taking the time to analyze each ingredient can unveil the health benefits associated with them, allowing for delicious indulgence without compromising on nutritional value. Thoughtfully portioning these brownies can aid in mindful eating practices and promote weight management.

Dietary Adaptations

Making Strawberry Brownies more inclusive for dietary preferences is easily achievable. For gluten-free options, simply use almond flour or gluten-free flour blends to maintain texture while accommodating gluten-sensitive guests. Vegan options can be deployed by substituting eggs with flaxseed meal and utilizing vegan butter or oil, maintaining flavor while respecting dietary choices. Low-carb enthusiasts may also play around with sugar alternatives like erythritol while carefully adjusting for sweetness. These adaptations open up possibilities for everyone to enjoy this mouthwatering treat.

Troubleshooting Guide

Texture issues often arise with brownies and can typically be traced back to ingredient ratios or baking time. If your brownies are too cakey, it may indicate overmixing or excess flour; in contrast, overly dense brownies could result from underbaking or improper measurement. If flavor balance becomes a problem, a dash of salt can often enhance the chocolate flavor, bringing sweetness into balance. Pay attention to temperature concerns; if your brownies are not rising as expected, make sure your baking powder is fresh and correctly measured.

Recipe Success Stories

Community feedback around Strawberry Brownies often highlights their punchy flavor and ease, making them a family favorite. Readers frequently share delightful variations, whether adding walnuts for crunch or experimenting with different berries. Adaptation stories also emerge—a common suggestion is to layer brownies with cream cheese frosting, leading to scrumptious cheesecake brownie hybrids. Many enthusiastic bakers showcase their versions, capturing pictures for social media and inspiring others to recreate this delicious dessert.

Frequently Asked Questions

Can I use frozen strawberries instead of fresh?

Absolutely! Frozen strawberries can work in this recipe, though they may be slightly mushier when baked. Thaw them first and drain excess moisture for best results.

How do I know when my brownies are done baking?

The perfect indicator is to use a toothpick; it should come out with a few moist crumbs, not wet batter, ensuring a fudgy center and baked edges.

What’s the best way to cut brownies?

For neat squares, allow your brownies to cool completely. Use a sharp knife, wiping it clean between cuts for a tidy presentation.

Can I substitute the sugar in the recipe?

Yes, alternatives like coconut sugar or brown sugar can replace granulated sugar, adjusting the flavor and texture slightly.

Can these brownies be made ahead of time?

Certainly! These brownies taste even better the next day; you can prepare the batter ahead and refrigerate or bake ahead and store.

How should I store leftover brownies?

Keep them in an airtight container at room temperature for up to three days or freeze for up to three months for longer preservation.

What can I top these brownies with?

Consider serving with whipped cream, vanilla ice cream, or a drizzle of chocolate sauce for an elevated dessert experience.

Are there any dairy-free options for this recipe?

Yes! You can replace butter with coconut oil or dairy-free margarine, while still achieving great results in your brownies.

Is it possible to make these brownies gluten-free?

Absolutely! Simply substitute all-purpose flour with almond flour or a gluten-free blend for delicious results.

Can I add nuts to Strawberry Brownies?

Definitely! Chopped nuts like walnuts or pecans can enhance flavor and texture; just fold them into the batter before baking.

Additional Resources

Explore more delightful recipes on our blog to expand your baking repertoire. Check out our technique guides for mastering brownie perfection or discover more about seasonal ingredients to enhance your dishes. We also recommend checking out our equipment suggestions to ensure you have the right tools for your baking adventures. Whether you’re looking to include seasonal fruits or experiment with new flavors, our additional resources will help you elevate your culinary experiences.

Join the Conversation

We love hearing from our readers! Share your experiences on social media and join our growing community of enthusiastic bakers. Post your pictures of these Strawberry Brownies using our hashtag, and connect with others who love baking and experimenting in the kitchen. Your feedback and suggestions for variations not only inspire us but also enrich our recipe community. We can’t wait to see how you make this delightful dessert your own!

The Recipe

Delicious Strawberry Brownies

Serves: 12 brownies

Prep Time: 15 mins

Cook Time: 25 mins

Total Time: 40 mins

Kitchen Equipment Needed

  • Mixing bowl
  • Baking pan (9×13 inch)
  • Whisk or spatula
  • Measuring cups and spoons
  • Oven

Ingredients

  • 1 cup unsalted butter
  • 2 cups granulated sugar
  • 4 large eggs
  • 1 teaspoon vanilla extract
  • 1 cup all-purpose flour
  • 1 cup cocoa powder
  • 1 cup chopped fresh strawberries
  • 1/2 teaspoon salt
  • 1/2 teaspoon baking powder

Directions

  1. Preheat your oven to 350°F (175°C) and grease the baking pan.
  2. Melt the butter in a mixing bowl, then whisk in the sugar until smooth.
  3. Add the eggs one at a time, mixing well after each addition, then add the vanilla extract.
  4. In a separate bowl, whisk together the flour, cocoa powder, salt, and baking powder.
  5. Gradually combine the dry ingredients with the wet mixture until just mixed.
  6. Gently fold in the chopped strawberries.
  7. Pour the batter into the prepared baking pan and smooth the top.
  8. Bake for 25-30 minutes or until a toothpick inserted in the center comes out with moist crumbs.
  9. Let cool in the pan before transferring to a wire rack and cutting into squares.

Recipe Notes

  • For a more intense chocolate flavor, you can substitute half of the flour with additional cocoa powder.
  • Store leftovers in an airtight container at room temperature for up to three days.
  • Feel free to sprinkle nuts or chocolate chips on top before baking for added crunch or richness.

Best Tres Leches Cupcakes – Moist and Ready in 30 Minutes

Tres Leches Cupcakes: A Rich and Creamy Delight

⚖️
Difficulty
Medium

⏲️
Prep Time
30 mins

🕒
Cook Time
20 mins

⏱️
Total Time
50 mins

🍽️
Servings
12 cupcakes

Tres Leches Cupcakes are a delightful twist on the classic tres leches cake, offering a bite-sized version of this beloved Latin American dessert. These cupcakes are soaked in a rich blend of three kinds of milk, making each bite incredibly moist and bursting with flavor. The creamy topping, often whipped cream, adds a lightness that perfectly balances the sweetness of the cake, transforming a traditional dessert into an exciting new treat.

The process of creating these cupcakes is an adventure in flavor and texture. From the moment you whip the egg whites to create a fluffy batter, to the moment you drizzle the milk mixture over the cupcakes, each step is an invitation to indulge in a creamy, dreamy experience. With their visually appealing look and inviting aroma, these cupcakes are perfect for any gathering or celebration, making them an instant favorite at parties or intimate family dinners.

Quick Recipe Highlights

  • Flavor Profile: The cupcakes boast a perfect balance of sweetness, creaminess, and a hint of vanilla, enhanced by the rich, milky soak.
  • Texture: Expect a moist, tender crumb that melts in your mouth, contrasted with the light, airy whipped cream topping.
  • Aroma: The delightful aroma of vanilla and sweet milk wafts through the air, inviting everyone to come and enjoy.
  • Visual Appeal: Topped with freshly whipped cream and a sprinkle of cinnamon or fruit, these cupcakes are as beautiful as they are delicious.
  • Skill Level Needed: This recipe requires basic baking skills, including mixing, folding, and whipping techniques.
  • Special Equipment: Use standard cupcake pans, mixing bowls, and an electric mixer for the best results.

Recipe Overview

  • Difficulty Level: These cupcakes are classified as medium in difficulty. While they require several steps, the process is straightforward, and the rewards are well worth the effort.
  • Category: Perfect for desserts, snacks, or special occasions, these cupcakes fit seamlessly into any celebratory menu.
  • Cuisine: Tres leches is a traditional Mexican dessert that has spread throughout Latin America, celebrated for its richness and unique texture.
  • Cost: Ingredients are generally affordable, making this a budget-friendly dessert option that impresses guests without breaking the bank.
  • Season: While these cupcakes are suitable year-round, they shine particularly in summer and spring, adding a refreshing treat to warm weather gatherings.
  • Occasion: Ideal for birthdays, anniversaries, or even casual get-togethers, these cupcakes are versatile and loved by many.

Why You’ll Love This Recipe

Tres Leches Cupcakes are a delicious treat, perfect for those who appreciate rich and creamy desserts. Each cupcake absorbs the milk soak, creating a heavenly texture that is both moist and tender. The fluffy whipped cream on top adds a light finish, making the entire experience incredibly satisfying and indulgent.

One of the best aspects of this recipe is its convenience. With straightforward instructions, even novice bakers can achieve delicious results. The ability to prepare these cupcakes in advance is another huge plus—simply soak them and refrigerate until serving, freeing you to enjoy your event without stress.

Nutritionally, while Tres Leches Cupcakes are a treat to be enjoyed occasionally, they provide an opportunity to use high-quality ingredients. By choosing organic dairy, you can enhance the taste while enjoying the benefits of better nutrition.

Socially, these cupcakes are perfect for sharing. Their charming appearance and delightful flavor invite conversation and compliments, making them a highlight on any dessert table.

Moreover, this recipe is economically accessible, as it does not require expensive ingredients. With just a few staples, you can create an impressive dessert that is sure to impress your friends and family.

Historical Background and Cultural Significance

The origins of Tres Leches Cake can be traced back to Latin America, with various countries claiming its creation. The cake is believed to have been inspired by the traditional dessert of soaking cakes in milk, likely dating back to the colonial period.

Culturally, tres leches represents celebration and hospitality in many Latin American countries, frequently served on birthdays and significant holidays. Its creamy essence and rich flavors make it a classic that evokes nostalgia among those who grew up enjoying it.

Over time, recipes for tres leches have evolved, adapting to regional tastes. Variations like adding fruit, nuts, or different flavored creams have emerged, contributing to its popularity.

Regional differences have also led to variations in preparation methods; for instance, some areas prefer a denser cake texture, while others favor a lighter sponge. Each region takes pride in its unique approach to this beloved dessert.

Ingredient Deep Dive

  • Flour: The base for cupcakes, flour provides structure. Opt for all-purpose flour for a balanced texture, and consider wheat flour for a nuttier flavor.
  • Flour is crucial in creating the right balance between tenderness and structure in cupcakes. It’s important to sift before measuring; this aerates the flour and leads to lighter cupcakes. Store flour in a cool, dry place to prolong its shelf life, and consider using it within six months for optimal freshness.

  • Milk: The heart of the tres leches, this is where the richness comes from. Whole milk adds the needed creaminess, while evaporated and condensed milk elevate flavors and sweetness.
  • Each type of milk contributes to a unique profile. Whole milk provides moisture, while sweetened condensed milk and evaporated milk add sweetness and depth. Look for products with no added preservatives, and once opened, store milk in the fridge. Substitute with coconut or almond milk for a non-dairy version.

  • Sugar: Essential for sweetness and moisture, sugar also helps with the cupcake’s browning and texture.
  • Sugar can be adjusted according to preference. Granulated sugar is standard, but brown sugar offers a richer taste. Keep sugar in a cool, airtight container to prevent clumping.

Common Mistakes to Avoid

  • Overmixing the batter: This can lead to dense cupcakes instead of light, fluffy ones. Mix until just combined.
  • Not beating egg whites properly: Undermixed whites will prevent the cake from rising. Look for stiff peaks during whipping.
  • Skimping on soaking time: Allowing the cupcakes to soak adequately ensures each bite is rich and creamy.
  • Not refrigerating: Tres leches cupcakes taste best chilled. Don’t skip this essential step.
  • Skipping the whipped cream topping: This lightens the dessert and enhances the flavor; it’s an essential element.
  • Using low-fat dairy: Stick with whole milk and creams for the richest flavor.
  • Inaccurate measuring of ingredients: Use kitchen scales for precision, especially for flour and sugar.
  • Forgetting to check for doneness: Use a toothpick; if it comes out clean, the cupcakes are ready!

Essential Techniques

Whipping Egg Whites: Properly whipped egg whites are essential for creating a fluffy cupcake. Use a clean bowl and beaters, and ensure that there are no yolks mixed in. Whip until stiff peaks form, allowing the cupcakes to rise beautifully.

Creaming Butter and Sugar: This technique incorporates air into the mixture, resulting in a lighter texture. Beat the butter until smooth before gradually adding sugar, mixing until fluffy. Avoid over-mixing once the eggs are added, to maintain aeration.

Pro Tips for Perfect Tres Leches Cupcakes

1. Use room temperature ingredients for a more even batter.
2. Don’t rush the soaking process; patience results in ultimate flavor absorption.
3. Chill the cupcakes for a couple of hours after soaking for the best taste.
4. Experiment with infused creams, such as vanilla bean or coconut, for added flavor.
5. Add a splash of rum or flavored extract for a unique twist.
6. For added presentation, garnish with fresh fruit or chocolate shavings before serving.
7. Use a serrated knife to slice off the tops if you plan to stack the whipped cream higher.
8. Store leftovers covered in the fridge to ensure they stay moist.

Variations and Adaptations

This recipe lends itself beautifully to adaptations. Consider adding a tropical twist by incorporating coconut milk as part of the soaking mixture. Alternatively, chocolate lovers can add cocoa powder to the batter for a rich chocolate version. For a fruity variation, try adding a layer of strawberries or mangoes atop the whipped cream.

For seasonal adaptations, pumpkin purée can be added to the batter during the fall months, giving a festive flavor to the cupcakes. Dietary modifications are also possible; gluten-free flour blends work well for those avoiding gluten, while a dairy-free milk option can replace traditional dairy.

Presentation is flexible too; consider using mini cupcake liners for bite-sized treats perfect for parties, or layer cupcakes with fruit and cream in trifle dishes for a stunning dessert display.

Serving and Presentation Guide

When serving Tres Leches Cupcakes, consider using simple yet elegant plating techniques. Arrange cupcakes on a beautiful platter, and sprinkle with cinnamon or shredded coconut for added visual appeal. A dollop of whipped cream and fresh berries enhances presentation while adding flavor.

Garnish ideas include mint leaves or citrus zest for a pop of color. Traditional accompaniments of fresh fruit, such as strawberries, serve to complement the flavors. For modern serving suggestions, use clear cups or jars to create individual servings with layers of cupcakes and cream.

An important tip: serve these cupcakes chilled, as they taste best refreshing and cool, allowing the full flavor profiles to shine.

Wine and Beverage Pairing

When it comes to pairing beverages with Tres Leches Cupcakes, consider a light dessert wine, such as a Moscato or a sweet Riesling. The delicate sweetness of the wine enhances the flavor of the cupcakes without overpowering them.

For a non-alcoholic alternative, try serving chilled hibiscus tea, which brings a refreshing tartness that pairs well with the rich creaminess of the cupcakes. For coffee lovers, a lightly brewed espresso or cappuccino serves as an excellent accompaniment, highlighting the dessert’s flavors.

Consider the serving temperature of beverages; chilled options will maintain a refreshing balance against the rich cupcakes.

Storage and Shelf Life

Tres Leches Cupcakes are best stored in the refrigerator due to the whipped cream topping and milk soak. Store them in an airtight container to maintain moisture and prevent drying out. They will remain fresh for about three days in the fridge, making them perfect for make-ahead dessert options.

If you notice any signs of spoilage, such as a sour smell or discoloration in the cream, it’s best to discard them. Freezing is not recommended due to the texture of the whipped cream but if necessary, cupcakes can be frozen before soaking for up to a month, ensuring freshness when you’re ready to prepare the dessert.

Make Ahead Strategies

Planning ahead is an excellent strategy when making Tres Leches Cupcakes. You can bake and cool the cupcakes a day in advance and leave them covered at room temperature. The soaking process can be done the day of serving, enhancing flavor without sacrificing texture as it absorbs the creamy mixture.

Ensure to store the whipped cream separately before serving, as it helps maintain its texture. Once ready to serve, quickly top the cupcakes and chill them to ensure they are nice and cold.

Scaling Instructions

If you’re looking to accommodate more guests, scaling up this recipe is straightforward. Doubling the ingredients will yield 24 cupcakes, but ensure to bake in batches if your oven can’t handle full pans. The cooking time may vary slightly with more cupcakes in the oven, so check for doneness accordingly.

For a smaller gathering, halving the recipe is an easy option. Simply divide all ingredients by two and adjust your pan size if necessary.

Nutritional Deep Dive

Each cupcake provides a delightful dessert experience, although they’re rich in calories and sugar. A macro breakdown shows a good source of carbohydrates and fats, thanks to the creamy toppings.

Micronutrient analysis may vary, but including whole dairy adds essential vitamins like calcium and vitamin D.

Enjoying each cupcake in moderation can fit well within a balanced diet, especially when shared among family and friends. For those monitoring portions, consider using mini cupcake liners to create smaller servings.

Dietary Adaptations

For a gluten-free version, substitute all-purpose flour with a gluten-free blend and ensure all other ingredients are also gluten-free certified.

Those with dairy concerns can adapt the recipe using almond or coconut milk, and whipped coconut cream instead of traditional whipped topping.

A vegan version can be achieved by swapping eggs for flaxseed meal or aquafaba, along with using non-dairy milk and cream.

Low-carb or keto modifications can be made by utilizing almond flour and a sugar substitute, turning this tasty dessert into a low-carb treat without sacrificing flavor.

Troubleshooting Guide

A common issue with these cupcakes might be overly dense texture, often caused by overmixing the batter. Aim for minimal mixing after adding flour to keep the texture light.

If the flavor lacks balance, consider adjusting sugar levels in the milk soak—taste it before pouring over the cupcakes.

If your whipped cream doesn’t hold its shape, ensure to chill your bowl and beaters before whipping and avoid overwhipping.

Timing can also be crucial; if they seem undercooked after the suggested time, do the toothpick test for doneness and adjust cooking times accordingly.

Recipe Success Stories

After sharing this delightful recipe, many bakers have raved about their results. From perfect texture to adjusted flavors, readers frequently comment on how this dessert has become a staple at family gatherings.

Several have shared tips on personal adaptations, such as the inclusion of unique flavor profiles, showcasing how versatile the cupcakes can be.

Readers have also expressed joy in capturing images of their creations, emphasizing how visually stunning the cupcakes are when garnished.

Photographic tips have pinpointed the best angles and lighting to highlight the inviting layers of whipped cream and milky goodness, making it a feast for the eyes as well as the palate.

Frequently Asked Questions

Can I use any type of milk?

A mix of whole milk, evaporated milk, and sweetened condensed milk is traditional, but you can substitute with alternatives like almond or coconut milk for a dairy-free variation.

How do I know when my cupcakes are done baking?

Insert a toothpick in the center of the cupcake; if it comes out clean or with a few crumbs, they are done. Be careful not to overbake.

Can I make this recipe vegan?

Yes, you can replace eggs with a flaxseed mixture and use vegan alternatives for the milk and whipped cream.

How long will these cupcakes last?

Stored in the fridge, they can last for about three days, but they are best enjoyed fresh.

What can I use instead of whipped cream?

You can use whipped coconut cream or a non-dairy whipped topping to suit dietary preferences.

Can I freeze these cupcakes?

It’s not recommended to freeze after soaking, but you can freeze the unsoaked cupcakes for later use.

What is the best way to serve them?

Serve chilled, topped with whipped cream and garnished with fresh fruit or toasted coconut for a beautiful presentation.

How can I make the cupcakes more flavorful?

Consider adding flavor extracts, such as almond or coconut, to the batter and soak for richer layers of flavor.

Can I make mini versions of these cupcakes?

Absolutely! Just reduce the baking time and adjust the soaking time as needed for smaller cupcakes.

Are these cupcakes suitable for children?

Yes, they are generally safe for children, but moderation is key due to their sweetness.

Additional Resources

For those looking to expand their dessert repertoire, consider exploring other Latin American flavors and dessert recipes. Recipes like flan or empanadas offer interesting variations that complement Tres Leches Cupcakes beautifully.

Technique guides on whipping cream or baking cupcakes can provide deeper insights into perfecting your baking skills. Understanding ingredient selection and equipment recommendations can further enhance your baking endeavors.

Consider exploring seasonal variations as well, aligning your baking with fresh ingredients to keep your offerings new and exciting.

Join the Conversation

We invite you to share your adventures in baking Tres Leches Cupcakes! Post pictures of your creations on social media, tag your friends, and inspire them to try this delightful recipe.

Feedback, variations, and learning alongside fellow baking enthusiasts enrich our community. Whether it’s through comments, recipe reviews, or personal adaptations, your experiences help others in their culinary journeys.

Let’s create a thriving community of dessert lovers who appreciate the rich history and delicious flavor of Tres Leches Cupcakes!

The Recipe

Tres Leches Cupcakes

Serves: 12 cupcakes

Prep Time: 30 mins

Cook Time: 20 mins

Total Time: 50 mins

Kitchen Equipment Needed

  • Cupcake pan
  • Parchment paper liners
  • Mixing bowls
  • Electric mixer
  • Toothpick for testing

Ingredients

  • 1 ½ cups all-purpose flour
  • 1 ½ tsp baking powder
  • ½ tsp salt
  • 1/3 cup unsalted butter, softened
  • 1 cup granulated sugar
  • 3 large eggs
  • 1 tsp vanilla extract
  • 1 cup whole milk
  • 1 cup sweetened condensed milk
  • 1 cup evaporated milk
  • 1 ½ cups heavy whipping cream

Directions

  1. Preheat your oven to 350°F (175°C) and line a cupcake pan with liners.
  2. In a mixing bowl, sift together flour, baking powder, and salt.
  3. In another bowl, cream the softened butter and sugar until light and fluffy; add the eggs, one at a time, mixing well after each addition. Add vanilla extract.
  4. Gradually mix the dry ingredients into the wet ingredients, alternating with the whole milk until well combined.
  5. Fill cupcake liners about 2/3 full with batter and bake for 18-20 minutes or until a toothpick inserted comes out clean.
  6. Once cooled, mix the sweetened condensed milk, evaporated milk, and remaining whole milk in a bowl.
  7. Using a toothpick, poke holes in the cooled cupcakes and slowly drizzle the milk mixture over each cupcake, allowing it to soak.
  8. For the frosting, whip the heavy cream until stiff peaks form and frost the soaked cupcakes generously.
  9. Garnish with cinnamon or fresh fruit if desired.

Recipe Notes

  • Adjust sweetness as needed based on personal preference.
  • Feel free to experiment with flavored extracts in the frosting.
  • These cupcakes are best served chilled and can be made a day in advance.

Best Sugar Cookie Cake – Soft, Sweet, and Family Favorite

Sugar Cookie Cake: The Ultimate Sweet Treat

⚖️
Difficulty
Easy

⏲️
Prep Time
15 mins

🕒
Cook Time
25 mins

⏱️
Total Time
40 mins

🍽️
Servings
12

Making a Sugar Cookie Cake is not just about satisfying your sweet tooth; it’s an experience that brings confort and joy to any gathering. When you take that first bite, you are greeted with a soft, buttery sweetness that twirls on your palate, leading to the rich vanilla undertones that are simply irresistible. This cake combines the classic flavor of sugar cookies with the warmth and charm of cake, making it the perfect dessert for birthdays, family gatherings, or a cozy evening at home. Just imagine a warm slice of Sugar Cookie Cake, adorned with colorful sprinkles or a drizzle of icing, tempting you to enjoy every crumb!

Not only is this cake delicious, but its texture is divine. The outer layer bakes to a gentle golden hue while the inside remains soft and moist. Each slice is visually stunning, making it a showstopper on your dessert table. The contrast of colors from sprinkles and icing brings an inviting vibe that tells a story of homemade love and care. You’ll find that the aroma of freshly baked sugar cookie cake fills your home with nostalgia, reminding you of baking days in your grandmother’s kitchen filled with laughter and joy. Enjoying a slice of this cake is like taking a warm hug, a perfect balance of taste and tenderness.

Quick Recipe Highlights

  • Flavor Profile: The cake features a rich, buttery sweetness complemented by vanilla and almond extracts that enhance the classic sugar cookie flavor.
  • Texture: Expect a soft, moist interior with a slight crispness on the edges, making it a delightful experience with each bite.
  • Aroma: The aromatic notes of baked sugar cookies mingle with hints of vanilla, creating an inviting experience as it bakes.
  • Visual Appeal: The cake has a nice golden crust and can be topped with colorful sprinkles or icing for a festive touch.
  • Skill Level Needed: This is an easy recipe, perfect for both novice and experienced bakers looking to create something delightful.
  • Special Equipment: Only basic baking equipment is required, such as mixing bowls, a whisk, and a round cake pan.

Recipe Overview

  • Difficulty Level: This Sugar Cookie Cake is designed for bakers of all skill levels, making it an ideal choice for those new to baking or experienced cooks wanting a simple yet rewarding treat.
  • Category: This delectable dessert falls under the category of cakes and cookies, perfect for celebrations and everyday treats alike.
  • Cuisine: While it takes inspiration from traditional American cookie recipes, this cake offers a versatile approach that can adapt to various culinary influences.
  • Cost: The cost of making this cake is quite budget-friendly, typically amounting to approximately $10, depending on ingredient availability.
  • Season: Sugar Cookie Cake is a favorite year-round; however, it shines during holidays and special occasions such as birthdays and festive gatherings.
  • Occasion: Ideal for birthdays, holidays, or simply as a sweet treat to brighten your day, this cake fits seamlessly into any celebration.

Why You’ll Love This Recipe

Sugar Cookie Cake is a delightful treat that not only satisfies your sweet cravings but also invites many flavor profiles that tantalize the taste buds. The harmonious blend of butter, sugar, and vanilla makes for an exquisite dessert that doesn’t overwhelm the palate. Enjoying this cake with friends and family creates cherished moments, as the familiarity of the flavors rekindles memories of joyful celebrations.

The convenience of preparing this cake is a massive plus. With minimal prep time and easy steps, you can whip it up in no time. It requires no complicated techniques, making it accessible for baking enthusiasts at any level. Furthermore, the straightforward ingredients simplify grocery shopping, allowing you to focus more on the joy of baking rather than searching for exotic items.

Nutritionally speaking, while Sugar Cookie Cake is a treat, it can also be paired with fruits or light creams to balance indulgence with nutrition. It’s a versatile dessert that can also be made healthier with simple substitutions like using whole wheat flour or natural sweeteners, making it suitable for various dietary preferences.

Hosting an event? This cake serves as an attractive centerpiece that sparks joy among your guests. With its bright colors and inviting aroma, it opens conversations and creates a delightful atmosphere. Whether served at a birthday party or a cozy get-together, it’s sure to end your culinary experience on a high note.

Cost-effective and accessible, Sugar Cookie Cake allows you to create an impressive dessert without breaking the bank. It’s a recipe you can easily scale up for larger gatherings, making it a staple in any baking repertoire. Whether it’s a casual family dinner or a festive celebration, you’ll find this delightful cake to be an approachable and enjoyable option.

Historical Background and Cultural Significance

The origins of sugar cookies date back to the early 18th century, where German settlers in America are credited with developing the recipe. Initially created to celebrate special occasions, sugar cookies quickly became a staple in American households. Over the decades, they transformed into various shapes and flavors, leading to the delightful Sugar Cookie Cake we enjoy today.

Sugar cookie variations are widespread, with each culture infusing unique twists. In the United States, the festive traditions around sugar cookies have become synonymous with holidays, especially Christmas, where decorating them is a beloved family activity. The evolution of sugar cookies to cake form brings forth a new dimension of flavor while maintaining the beloved essence of traditional cookies.

The cultural importance of sugar cookies extends beyond their deliciousness. They symbolize celebratory gatherings, communal baking sessions, and home-cooked love. This Sugar Cookie Cake version celebrates those moments, allowing people of all ages to indulge and connect over a shared favorite treat.

In contemporary baking, the Sugar Cookie Cake showcases regional variations. From adding chocolate chips to using flavored extracts, the cake continues to evolve in homes across the globe. Each version tells a story and reflects the tastes and preferences of those who bake it, illustrating the cake’s flexibility and enduring appeal.

Ingredient Deep Dive

Flour: Flour not only provides structure to the Sugar Cookie Cake but also contributes to its texture. It’s essential to choose the right type; all-purpose flour works best for achieving that perfect balance. When selecting flour, look for a finely milled product, and store it in an airtight container to maintain freshness. If you need a gluten-free option, almond flour or a gluten-free blend can be excellent substitutes.

Sugar: The sweetening agent in your sugar cookie cake provides the signature sweetness that everyone loves. White granulated sugar is typically used, but consider using brown sugar for a deeper flavor. Sugar has various health effects; while moderation is key, it also fuels our bodies. Aim for fresh sugar stored in a cool, dry place to prevent clumping and ensure its longevity.

Butter: Unsalted butter is crucial in building your cake’s flavor, moisture, and richness. It’s important to allow your butter to soften at room temperature before mixing for optimal texture. This fat source provides essential nutrients, including Vitamin A, and should be stored properly to avoid spoilage. For a healthier substitute, coconut oil can be used, lending a unique flavor to your cake.

Eggs: Eggs bind your ingredients together and provide moisture, contributing to a light and fluffy texture. Using fresh eggs ensures the integrity of your cake. If you’re vegan, consider flaxseed meal soaked in water as an alternative to eggs, maintaining the cake’s moisture and binding properties while adhering to dietary preferences.

Common Mistakes to Avoid

  • Not measuring ingredients accurately can lead to a cake that is too dense or too dry. Always use a kitchen scale or measuring cups for precision.
  • Overmixing the batter is a critical error; it can result in a tough texture. Mix just until the ingredients are combined, and no flour pockets remain.
  • Using cold butter instead of softened can yield a dense cake. Make sure your butter is at room temperature before starting the mixing process.
  • Failing to preheat the oven can affect baking time and cake texture. Always preheat your oven before placing the cake inside.
  • Not allowing the cake to cool properly before serving can lead to crumbling. Patience is key for the best results!
  • Ignoring the ingredient substitution ratios may cause flavor changes. Always research how to substitute ingredients correctly.
  • Baking with expired ingredients can impact flavor and texture. Always check expiration dates for freshness.
  • Skimping on mixing time can lead to uneven batter and inconsistent baking. Pay attention to mixing to ensure all ingredients are evenly integrated.
  • Not using parchment paper can lead to sticking. Line your baking pan to achieve easy removal and perfect slices.
  • Overbaking can dry out the cake, while underbaking may lead to a gooey texture. Always keep an eye on your cake in the oven.

Essential Techniques

Measuring Ingredients: Measuring accurately is crucial to the success of your Sugar Cookie Cake. Use the right tools, such as dry and liquid measuring cups, to ensure precise portions. Common pitfalls include packing flour too tightly or misreading liquid measurements. Aim for consistency in measurements to avoid fluctuations in your cake’s texture.

Mixing Batter: Blend your ingredients by starting at low speed to avoid flour clouds, then increase to a medium speed as the batter comes together. Look for a creamy consistency, ensuring everything is fully incorporated without mixing too much. The key is to stop when no dry ingredients are visible and avoid overworking the batter, which can affect the final texture.

Pro Tips for Perfect Sugar Cookie Cake

1. For added flavor, consider incorporating a dash of almond extract along with vanilla for a lovely twist on the traditional taste.
2. Experiment with toppings! Spread a layer of cream cheese frosting or whipped cream for a decadent visual presentation.
3. If you like texture, consider folding in some mini chocolate chips or nuts for added crunch.
4. Allow the cake to chill for a short time before slicing; this helps maintain its shape and improves flavor development.
5. Using a room-temperature egg creates a more homogenous batter, promoting a better rise and fluffy texture.
6. For enhanced flavor, use browned butter instead of regular unsalted butter; this adds a rich, nutty taste that complements the cake beautifully.
7. A light dusting of powdered sugar over the finished cake elevates its presentation and adds a touch of sweetness.
8. Consider scaling the recipe to make mini cakes in muffin tins for delightful individual servings, perfect for parties!

Variations and Adaptations

Indulging in variations of the Sugar Cookie Cake can elevate its flavor and style. For a regional twist, add spices like cinnamon or nutmeg for a warm, aromatic experience. Seasonal adaptations also abound; for winter, consider adding peppermint extract or candy cane pieces for a festive flair, while in the summer, fresh berries can provide a refreshing bite.

Dietary modifications allow everyone to enjoy this cake. For gluten-free enthusiasts, opt for a gluten-free flour mix that performs well in baking. Those on a dairy-free diet can utilize coconut or almond milk in place of regular milk and a plant-based butter substitute. Vegan eaters can replace eggs with flax or chia seeds, preserving texture while adhering to dietary preferences.

Flavor variations can include lemon zest for a tangy touch or orange zest for brightness. You might also incorporate chocolate chips or dried fruits for an attractive texture. Explore adding different icings or glazes, such as vanilla bean or lemon glaze, to customize the cake to your taste preferences.

For those looking to modify the presentation, consider going for a layered cake style with frosting in between each layer or creating a beautiful tiered design for parties. The possibilities are endless with this adaptable recipe format to suit personal tastes and celebrations!

Serving and Presentation Guide

To present your Sugar Cookie Cake beautifully, consider using a decorative cake stand. A simple yet elegant presentation can be achieved by lightly dusting powdered sugar over the top before serving or slicing fresh fruits to garnish the sides. For added flair, drizzle a sweet glaze or icing over the top, allowing it to pool slightly for a rustic look.

When serving, consider portion sizes—slice into even pieces to ensure everyone receives a generous serving. Utilize fun, colorful plates that coordinate with the theme of your gathering for an inviting atmosphere. If serving at an event, providing forks and small takeaway boxes can allow guests to enjoy a slice later.

Temperature is key! This cake can be enjoyed warm, so consider lightly warming slices in the microwave for about ten seconds before serving. Offering whipped cream or ice cream alongside creates a delightful contrast to the textural elements of the cake.

Wine and Beverage Pairing

Pairing nicely with Sugar Cookie Cake, consider a sweet white wine like Moscato or a light Pinot Grigio, which complement the cake’s sweetness without overwhelming it. For non-alcoholic options, a homemade vanilla cream soda or iced tea with lemon can refresh and enhance the overall experience.

Coffee and tea enthusiasts can elevate their enjoyment of this cake with a cup of strong coffee or a smooth Earl Grey tea. The warm notes of coffee contrast perfectly with the sweet flavors of the cake. When pairing beverages, consider the serving temperature, ideally offering drinks slightly chilled or piping hot depending on your guest preferences.

Storage and Shelf Life

To store your Sugar Cookie Cake, wrap it in plastic wrap or aluminum foil to maintain its freshness. Keep it in an airtight container on the counter for up to three days; for longer shelf life, refrigeration is an option but may slightly change the texture.

If you notice any moisture or signs of spoilage like unusual smells or a change in color, it’s best to discard it immediately. The cake can also be frozen for up to three months—just ensure it is well wrapped to prevent freezer burn. Before serving frozen slices, allow them to thaw at room temperature for a couple of hours, or warm them in the oven for the best texture.

Reheating the cake is simple; place a slice in the microwave for about ten seconds or warm it in a preheated oven at 350°F for five minutes. These methods help maintain the delightful flavors of the cake.

Make Ahead Strategies

Planning to make your Sugar Cookie Cake ahead of time? You can prepare the batter and store it in the refrigerator for up to 24 hours before baking. Just ensure it’s covered tightly to prevent any drying or tainting from other odors.

If you’ve baked the cake, letting it cool completely before wrapping it for storage will preserve texture and prevent sogginess. You can also bake the cake, let it cool, then freeze it for later, ensuring you enjoy the cake fresh when you need it.

When assembling the cake, consider making frosting a day in advance as well, keeping it stored in the fridge. This strategy saves time and allows flavors to meld beautifully. Prior to serving, remember to re-whip the frosting for the best consistency and flavor.

Scaling Instructions

If you want to adjust the size of your Sugar Cookie Cake, halving the recipe is straightforward—just divide each ingredient accordingly, ensuring you monitor baking times as smaller cakes may cook faster.

For those needing a larger cake for gatherings, doubling or tripling the recipe is easy. Use larger pans and be mindful that the baking time may increase slightly. It’s essential to test for doneness by inserting a toothpick into the center of the cake.

Be prepared to adjust your mixing and baking equipment when scaling; utilize larger bowls and pans, and consider using two oven racks if baking multiple cakes simultaneously. Maintain consistency in baking times by rotating the pans halfway through the process if using multiple trays.

Nutritional Deep Dive

The Sugar Cookie Cake is a delightful indulgence that can be part of a balanced diet when eaten in moderation. With approximately 250-300 calories per serving, it can fit into a treat category while providing essential energy.

Analyzing the macros, the cake typically includes fats from butter, which can be about 15 grams per slice, offering value when choosing quality ingredients. The cake contains around 35 grams of carbohydrates, primarily from sugars and flour, providing quick energy.

Understanding the ingredients can also influence the nutritional benefits of the Sugar Cookie Cake. Using whole grain flour and reducing added sugars can enhance fiber content and nutritional value, contributing to better health outcomes when aiming for balanced indulgences.

When enjoying, being conscious of portion sizes aids weight management. You can savor a small slice, allowing the rich flavors to satisfy your cravings without overindulgence, demonstrating that moderation can enhance your overall enjoyment without sacrificing taste.

Dietary Adaptations

For those with dietary restrictions, adapting the Sugar Cookie Cake can create an enjoyable treat for everyone. Gluten-free options abound; using almond flour or a gluten-free all-purpose blend can yield delicious results while ensuring those with sensitivities can partake.

Dairy-free adaptations can include coconut cream for a whipped topping and non-dairy butter substitutes, allowing for both texture and flavor without compromising dietary needs. Vegan bakers can simply replace eggs with chia or flaxseed to maintain the desired structure without using animal products.

Low-carb and keto enthusiasts may appreciate sugar alternatives like erythritol or monk fruit sweetener, coupled with almond flour, creating a dessert that fits into their eating plan while delivering delightful sweetness.

For those aiming for low-FODMAP options, consider substituting certain sweeteners and monitoring specific ingredient ratios for compatibility while maintaining the cake’s delightful taste and texture.

Troubleshooting Guide

If you encounter texture issues, such as the cake being too dry, ensure that you are not overbaking. Always keep an eye on the clock and check for doneness a few minutes before the suggested baking time.

Flavors that seem off can sometimes be improved with a pinch of salt, balancing sweetness and enhancing the overall flavor profile. Conversely, if the cake turns out too salty, consider pairing it with a sweeter frosting or glaze.

Temperature problems, such as undercooked centers, can arise from incorrect oven settings. Always check your oven’s calibration and adjust the recommended temperature as needed.

Equipment challenges can often stem from incorrect usage; for example, pan choices affect how evenly a cake cooks. Choosing the right material, such as a light-colored metal or glass, can impact baking outcomes.

Additionally, when substituting ingredients, remember that results can significantly vary based on ratios; research how to alter liquid quantities if replacing any critical components. Timing concerns can be mitigated by using a timer and keeping a consistent eye while baking, making adjustments more manageable.

Recipe Success Stories

Reader feedback on the Sugar Cookie Cake highlights success in its flavor and adaptability, connecting with various baking enthusiasts. Many home bakers have shared their experiences of transforming this cake into delightful variations that suit individual palates, including adding chocolate chunks or nuts for a crunchy experience.

Communities engage with this recipe not only by following instructions but also by showcasing their unique adaptations, reinforcing the idea that every baker can make this cake their own. Sharing photographs of their creations inspires others to try the recipe, fostering community encouragement in the kitchen.

A multitude of bakers have reported cheering victories, from perfect rises to rave reviews at gatherings, showcasing the versatility of the Sugar Cookie Cake. Whether it’s a small family dinner or a big celebration, the success stories trickle in, emphasizing the cake’s universal appeal.

Readers often share their photography tips for beautifully presenting the cake, recommending natural lighting for capturing vibrant colors. Additionally, feedback encourages explorers to document their variations, allowing others to witness their creativity and successes with the recipe.

Frequently Asked Questions

Can I make this cake ahead of time? Yes! You can bake the Sugar Cookie Cake a day in advance. Allow it to cool completely before wrapping it tightly in plastic wrap and storing it in an airtight container at room temperature.

What can I use instead of butter? If you’re looking for a dairy-free option, you can substitute butter with coconut oil or vegan butter, which will still yield a soft texture and great flavor.

How do I know when the cake is done baking? The best way to check is to insert a toothpick into the center of the cake. If it comes out clean or with a few crumbs, the cake is done.

Can I freeze this cake? Absolutely! Wrap the cooled cake tightly in plastic wrap, then aluminum foil, and it can be frozen for up to three months. Just make sure to thaw it in the refrigerator before serving.

What toppings do you recommend? For a delicious topping, try cream cheese frosting, whipped cream, or a simple glaze. Sprinkles or fresh fruit can also make for a visually appealing addition.

Can I make this cake without eggs? Yes, you can substitute eggs with flaxseed or chia seeds mixed with water. This will help bind the ingredients as needed for the recipe.

Is it possible to make mini versions of this cake? Yes! You can use a muffin tin to create mini cakes. Baking time will be shorter, so keep an eye on them while they are in the oven.

How can I enhance the flavor of the cake? You can add extracts like almond or lemon for a different flavor profile, or mix in chocolate chips or nuts for additional texture and taste.

What is the best way to mix the batter? Use a hand mixer or a stand mixer to combine all the ingredients thoroughly. Avoid overmixing to keep the cake light and airy.

Is there a gluten-free option for this recipe? Yes! You can substitute regular flour with a gluten-free blend, ensuring that all other ingredients are also gluten-free for safety.

Additional Resources

If you enjoyed this Sugar Cookie Cake recipe, consider exploring similar recipes for delightful treats like Snickerdoodle Cake or Vanilla Butter Cake. Each of these options offers a unique twist on classic flavors that you may enjoy.

Looking to expand your baking skills? Browse our technique guides related to mixing, measuring, and cake decoration to enhance your baking experience. Understanding the nuances of baking techniques can greatly improve your results.

For ingredient information, delve into our comprehensive sections that break down the benefits and uses of different types of flour, sugars, and flavorings, helping you make informed choices in your baking endeavors.

Additionally, consider equipment recommendations to help you in your baking journey. Investing in quality kitchen tools can lead to more consistent and enjoyable baking experiences.

If seasonal baking is your passion, keep an eye out for variants of this cake that celebrate different flavors, such as pumpkin spice for fall or fresh berries in summer to create adaptable recipes suited for any occasion.

Join the Conversation

Join our community for fun discussions around your Sugar Cookie Cake experiences! Share your photographs, variations, and tips for others to see. Engaging with fellow baking enthusiasts brings a sense of joy and camaraderie, where you can celebrate successes or troubleshoot challenges together.

Encourage others to leave reviews and feedback on this recipe. The more contributions we have, the better we can connect and improve our culinary skills as a community. Your insight could spark inspiration for someone else’s baking journey.

Stay connected through our social media channels where you can share your creations and tag us in your delicious moments! Together, we can celebrate the joy of cooking and baking, one sweet treat at a time.

The Recipe

Sugar Cookie Cake

Serves: 12

Prep Time: 15 mins

Cook Time: 25 mins

Total Time: 40 mins

Kitchen Equipment Needed

  • Mixing bowls
  • Electric mixer or whisk
  • Measuring cups and spoons
  • 8-inch round cake pan
  • Parchment paper (optional)

Ingredients

  • 2 ¾ cups all-purpose flour
  • 1 ¼ cups granulated sugar
  • 1 cup unsalted butter, softened
  • 2 large eggs
  • 2 tsp vanilla extract
  • 1 tsp almond extract
  • 1 tsp baking powder
  • ½ tsp salt
  • Sprinkles or frosting for topping (optional)

Directions

  1. Preheat your oven to 350°F (175°C) and grease the cake pan.
  2. In a medium bowl, cream together the softened butter and sugar until light and fluffy.
  3. Beat in the eggs one at a time, and then stir in the vanilla and almond extracts.
  4. In another bowl, whisk together the flour, baking powder, and salt.
  5. Gradually blend the dry ingredients into the wet mixture until just combined.
  6. Pour the batter into the prepared cake pan and smooth the top.
  7. Bake for 25-30 minutes, or until a toothpick inserted into the center comes out clean.
  8. Let it cool in the pan for 10 minutes before transferring it to a wire rack to cool completely.
  9. Once cool, top with sprinkles or frosting if desired.

Recipe Notes

  • For a richer flavor, try browning the butter before mixing it into the batter.
  • You can use gluten-free flour for a gluten-free option!
  • Store leftover cake in an airtight container at room temperature for up to three days.
  • This cake can be frozen for up to three months; wrap well to avoid freezer burn.

Easy Valentine’s Day Caramel Pretzel Bites (Ready in 30 Minutes)

Valentine’s Day Caramel Pretzel Bites: Sweet Meets Salty for a Perfect Treat

⚖️
Difficulty
Easy

⏲️
Prep Time
15 mins

🕒
Cook Time
10 mins

⏱️
Total Time
25 mins

🍽️
Servings
24 bites

This Valentine’s Day, elevate your sweet treats with these delightful Caramel Pretzel Bites. With a perfect blend of salty pretzels, smooth caramel, and a drizzle of chocolate, these bites are sure to impress your loved ones. Perfect for sharing, these simple yet delicious snacks encapsulate the essence of the holiday: sweetness, love, and a touch of whimsy. Whether you’re hosting a romantic dinner or a festive gathering, these Caramel Pretzel Bites are the ideal confection to celebrate the occasion.

Not only do they deliver an irresistible flavor combination, but they also cater to a variety of tastes, making them a hit with both kids and adults. Imagine the crunch of the pretzel wrapping around the gooey caramel, paired with the rich, dark chocolate drizzle. Each bite offers different textures and flavors, creating a memorable eating experience that captures the spirit of Valentine’s Day.

Quick Recipe Highlights

  • Flavor Profile: These Caramel Pretzel Bites are a delightful mix of sweet and salty, combining the rich taste of caramel with the crunch of pretzels.
  • Texture: Enjoy the crunch from the pretzels, the gooeyness of the warm caramel, and a smooth chocolate coating that binds it all together.
  • Aroma: The sweet aroma of melting caramel combined with a hint of saltiness from the pretzels creates an irresistible scent.
  • Visual Appeal: The contrast of golden caramel, dark chocolate drizzle, and the light brown pretzel makes these bites a festive addition to any Valentine’s celebration.
  • Skill Level Needed: This recipe is beginner-friendly and requires basic kitchen skills, making it perfect for novice cooks.
  • Special Equipment: You’ll need a baking sheet, parchment paper, and a microwave-safe bowl for melting the ingredients.

Recipe Overview

  • Difficulty Level: The Caramel Pretzel Bites are categorized as easy to make, making them accessible to cooks of all skill levels. The steps are straightforward and quick.
  • Category: This delicious treat falls under the dessert category, suitable for parties, gatherings, or festive occasions.
  • Cuisine: While they may not belong to a specific traditional cuisine, these bites blend Western dessert influences with a fun, homemade approach.
  • Cost: With common pantry ingredients, the recipe remains budget-friendly, approximately costing around $10 for all needed ingredients.
  • Season: Valentine’s Day is the perfect time for these bites, but they can also be enjoyed year-round for any celebration.
  • Occasion: Perfect for Valentine’s Day, but also great for birthdays, tailgating, or just as a sweet treat for yourself.

Why You’ll Love This Recipe

The combination of sweet and salty in these Caramel Pretzel Bites brings a unique taste that will tantalize your taste buds. Each bite begins with the satisfying crunch of a pretzel, followed by the creamy melted caramel. This combination isn’t just about flavor; it also offers a delightful texture experience. The contrast between the crunchy exterior and the gooey interior makes every bite irresistible.

In addition to being delicious, these treats are incredibly convenient to prepare. With minimal prep time and basic ingredients, you can whip up a batch in under half an hour. This makes them perfect for last-minute gatherings or parties where you want to impress without spending hours in the kitchen. Plus, they require no baking! Just melt, assemble, and enjoy!

From a nutritional standpoint, while indulgent, these bites can be a treat that brightens your day. Pretzels provide a small amount of fiber and are low in fat, while the caramel adds a hint of sweetness. If portioned appropriately, it satisfies your sweet tooth without being overwhelming. It’s all about enjoying it in moderation.

These Caramel Pretzel Bites are not just great for personal enjoyment; they are also excellent for social occasions. The sharing appeal of bite-sized treats encourages guests to mingle and enjoy a variety of flavors, making them a fun addition to any party spread. Your friends and family will appreciate your effort, providing a homemade touch that store-bought items can’t always match.

Finally, the affordability of the ingredients makes this recipe even more appealing. Despite being gourmet in taste, the overall cost is quite low, making it easy to create a delicious treat that won’t break the bank. It’s the perfect sweet for those looking to celebrate love and friendship without overspending.

Historical Background and Cultural Significance

The origins of caramel confections date back to the Middle East, where sugar was first crystallized. Over time, with the availability of new ingredients and techniques, caramel became a popular candy worldwide, leading to various adaptations, including caramel-filled treats like these pretzel bites. This combination of sweet caramel and salty pretzels uniquely speaks to modern culinary innovation.

In America, pretzels have a long-standing history, especially among German communities who brought their traditions over, paving the way for creative recipes like this one. The fusion of pretzels and caramel reflects the ongoing evolution of traditional ingredients into beloved modern snacks.

Although Caramel Pretzel Bites may not be traditional, their adaptability makes them significant in today’s culinary landscape. They represent the merging of different textures and tastes that cater to evolving palates and preferences.

Regional variations also exist; in some areas, these treats are draped in various chocolate flavors or topped with nuts, showcasing local preferences and ingredient availability. This evolution allows for a wide range of flavors and presentations to suit all occasions and celebrations.

Ingredient Deep Dive

Pretzels: Pretzels have been a staple in various cultures, particularly in Germany, where they symbolize good luck. Nutritionally, pretzels are low in fat and can provide some fiber if you choose whole grain options. When selecting pretzels, look for those that have a good crunch and flavor without being too salty. Store them in an airtight container to maintain their crispiness.

Caramel: Caramel has rich roots in candy-making traditions, and its handiwork involves cooking sugar until it melts and takes on a deep amber hue. The nutritional draw here is primarily from sugar; hence, moderation is key. Use fresh or homemade caramel to elevate your bites. Store leftover caramel in the fridge, and you can reheat it for future desserts.

Chocolate: Chocolate’s history spans thousands of years, originating from ancient Mesoamerican cultures. Dark chocolate, in particular, can offer health benefits due to its antioxidant properties. When selecting chocolate for drizzling, opt for high-quality chocolate that melts smoothly. Store chocolate in a cool, dry place to prevent it from blooming.

Common Mistakes to Avoid

  • Using stale pretzels: Ensure your pretzels are fresh and crunchy for the best texture.
  • Overheating the caramel: If you heat caramel too long, it can burn and become unusable; keep a close eye while melting.
  • Using low-quality chocolate: Cheap chocolate can affect the overall flavor; opt for higher quality for better results.
  • Skipping the parchment paper: This will make it difficult to remove your bites after they have set.
  • Not allowing enough cooling time: If you rush the cooling process, the bites may fall apart when you try to serve them.
  • Poorly measuring ingredients: Precision ensures a consistent outcome; always measure your ingredients carefully.
  • Not using a microwave-safe bowl: Glass bowls work best for melting to avoid any plastic melting into your ingredients.
  • Not letting the bites set properly: Allow bites plenty of time to chill in the fridge for best texture.
  • Forgetting to mix flavors: Feel free to add sea salt or crushed nuts for more depth in flavor.
  • Using too much caramel: A little goes a long way; too much can cause them to be overly sweet and messy.

Essential Techniques

Melting the Caramel: Melting caramel requires gentle heating. It’s vital to use a microwave-safe bowl and stir frequently to ensure even melting. Common pitfalls include overheating, leading to burnt caramel, identifiable by a dark color and bitter taste. The perfect melted caramel is smooth and pourable.

Drizzling Chocolate: To achieve an appealing chocolate drizzle, use a piping bag or a fork to create delicate patterns. Overheating chocolate can cause it to seize; watch for a glossy finish as the visual cue for success. If it becomes too thick, add a small amount of vegetable oil to thin it out.

Pro Tips for Perfect Valentine’s Day Caramel Pretzel Bites

1. Use mini pretzels for a bite-sized treat that’s easier to eat and more visually appealing.

2. Add a sprinkle of sea salt on top for a sweet and salty contrast that enhances flavor.

3. Experiment with different types of chocolate like milk, dark, or even white chocolate for varied tastes.

4. Refrigerate the assembled bites for a firmer texture, making them easier to enjoy.

5. For added fun, mix in toppings like crushed nuts or sprinkles before chocolate sets.

6. Create holiday-themed versions by using colored chocolate for special occasions.

7. Consider using homemade caramel for a richer flavor and better texture.

8. Store leftovers in an airtight container at room temperature for quick access later.

Variations and Adaptations

For a unique twist, consider making these bites with flavored pretzels, like cheddar or sesame. Additionally, seasonal adaptations can include using pumpkin spice flavors for autumn or peppermint for holiday gatherings. If you have dietary needs, explore using gluten-free pretzels or sugar-free caramel options for a healthier take on this sweet treat.

Incorporating various nuts can also enhance the texture and provide a crunch that pairs beautifully with caramel. If you’re looking to play with flavors, adding spices like cinnamon or cayenne can create an exciting flavor profile that surprises your guests.

For presentation, consider serving in cupcake liners for individual portions or stacking them on a decorative plate for a beautiful display. The options are endless, and each variation can showcase your creativity.

Serving and Presentation Guide

When it comes to serving your Caramel Pretzel Bites, consider using an elegant tray to enhance visual appeal. Plating on parchment paper can add a casual vibe while making cleanup easy. For garnishing, colorful toppings like sprinkles can add a festive touch.

Pairing with fresh fruits can create a refreshing contrast, particularly good for color contrast and flavor balance. Try serving them at room temperature for optimal enjoyment, but a brief chilling can help if they get too gooey.

For portion control tips, consider cutting each pretzel bite in half for smaller servings or providing bite-sized pieces on platters. This encourages sharing and allows more guests to indulge.

Wine and Beverage Pairing

For a delightful pairing, a sweet dessert wine like Port can complement the richness of the caramel and chocolate flavors. Alternatively, pairing with a fruity sparkling wine can add a refreshing contrast, enhancing the sweetness of the treats.

For non-alcoholic options, consider serving with hot chocolate or a flavored soda to balance the sweetness of the dessert. If coffee lovers are in attendance, a rich espresso could serve as a wonderful companion. Keep all beverages cool or warm, based on good beverage presentation.

Storage and Shelf Life

To keep your Caramel Pretzel Bites fresh, store them in an airtight container at room temperature for up to a week. You can refrigerate them for longer freshness but expect some texture change in the caramel. Always check for any signs of spoilage, like an off smell or abnormal texture, before consuming.

For longer storage, consider freezing them. Place the bites in a single layer on a baking sheet to freeze, then transfer them to a freezer-safe container. Reheating can be done by letting them sit at room temperature for a few minutes or using the microwave briefly.

Make Ahead Strategies

If you’re planning to make these bites ahead of time, prepare the caramel and pretzels separately. Melt the caramel and store it in an airtight container in the fridge. The pretzels can be stored at room temperature. Assemble the treats closer to when you plan to serve for the best texture and flavor.

Additionally, consider prepping ingredients like the chocolate in advance to streamline assembly. When reheating, ensure the bites are brought to room temperature before serving to enhance flavor.

Scaling Instructions

To halve this recipe, simply adjust the ingredients accordingly, ensuring enough space on your baking sheet remains for even spacing. Doubling or tripling can be done easily, just be mindful of your melting equipment capacity when working with larger quantities of caramel and chocolate.

Timing adjustments should not significantly change, but consider longer chilling times if making a larger batch. These adjustments will help maintain the treat’s quality and ensure a delicious outcome regardless of the portion size.

Nutritional Deep Dive

The macro breakdown of these treats highlights the blend of carbohydrates from the pretzels and sugars from the caramel and chocolate. Although a treat, moderation is key in maintaining a balanced diet. The bite delivers a chance to enjoy deconstructed flavors without compromising your dietary needs too heavily.

Micronutrient analysis shows minimal vitamins in these treats, indicating they are primarily a source of enjoyment rather than nutrition. However, incorporating dark chocolate does add some health benefits, including antioxidants. For those focused on weight management, enjoying a small portion can satisfy cravings without excessive calorie intake.

Dietary Adaptations

For gluten-free adaptations, use certified gluten-free pretzels. Dairy-free diets can substitute standard caramel with coconut or almond-based caramel alternatives. Additionally, there are various sugar-free options available that can cater to those on low-carb diets.

For vegan modifications, exploring plant-based chocolate and caramel will ensure that these bites remain 100% dairy-free. Keto dieters can substitute traditional sugary ingredients with low-carb options to maintain the treat’s identity without the added carbs.

Troubleshooting Guide

If your caramel turns out too hard, it may have been cooked too long; next time aim for a lighter color and remove from heat sooner. If too sticky, consider adding a bit of cream when reheating to soften it.

Texture issues can arise if the caramel and chocolate don’t set properly; make sure to follow cooling times accurately. If your pretzels are going soft, ensure they are stored in an airtight container away from moisture.

Recipe Success Stories

Community feedback has consistently praised the satisfaction these treats bring. Many readers have shared their success stories of hosting Valentine’s Day parties featuring these irresistible bites. Variations, such as adding nuts or different chocolate toppings, have garnered excitement among home bakers.

Several adaptations have emerged, encouraging users to mix in their favorite flavors, from spicy to fruity options. This flexibility shows how readers are making this recipe uniquely their own, ensuring it stands the test of time and trend.

Frequently Asked Questions

Can I make these bites ahead of time? Yes, prepare the caramel and pretzels separately to assemble ahead of serving for the best texture and freshness.

How do I store leftovers? Store in an airtight container at room temperature for up to a week, or refrigerate for longer freshness.

What’s the best type of pretzel to use? Use bite-sized mini pretzels for optimal flavor and ease of eating.

Can I use white chocolate instead of dark chocolate? Absolutely, feel free to experiment with different types of chocolate for various flavor profiles.

Are these bites suitable for kids? Yes! With the balance of flavors and fun textures, kids will love these treats.

What’s a good vegan alternative for caramel? Coconut or almond-based caramels make for excellent dairy-free substitutes.

Can I make these gluten-free? Yes, simply use certified gluten-free pretzels for this recipe.

What can I use instead of chocolate for drizzling? You can use melted peanut butter or even different flavored melting chocolates.

How can I prevent my chocolate from seizing? Avoid water exposure when melting; ensure all utensils are completely dry.

What’s the best way to reheat caramel? Place it in the microwave in short intervals to prevent burning.

Additional Resources

If you enjoy these Caramel Pretzel Bites, check out our other delightful dessert recipes that blend sweet and savory in creative ways. Explore technique guides for mastering caramel and chocolate melting, ensuring you’re equipped for successful baking. Ingredient information like sourcing high-quality chocolates and pretzels can further enhance your candy-making endeavors. Don’t miss our kitchen equipment recommendations to make your cooking experience enjoyable and efficient!

Join the Conversation

We love to hear from you! Share your Caramel Pretzel Bites photos on social media and engage with other readers. Your feedback and adaptations of the recipe can inspire future updates or new recipes. Join our community by leaving reviews and suggestions for variations you’ve tried, making our cooking space richer and more diverse!

The Recipe

Valentine’s Day Caramel Pretzel Bites

Serves: 24 bites

Prep Time: 15 mins

Cook Time: 10 mins

Total Time: 25 mins

Kitchen Equipment Needed

  • Baking sheet
  • Parchment paper
  • Microwave-safe bowl
  • Piping bag (optional)

Ingredients

  • 2 cups small pretzels
  • 1 cup caramel candies
  • 2 tbsp heavy cream (optional)
  • 1 cup chocolate (dark or milk)

Directions

  1. Preheat your oven to 350°F (175°C) and line a baking sheet with parchment paper.
  2. Spread the pretzels evenly on the prepared sheet.
  3. Melt the caramel candies in a microwave-safe bowl, stirring every 30 seconds until smooth.
  4. Drizzle the melted caramel over the pretzels and place in the oven for 5 minutes to warm.
  5. Remove from the oven and allow to cool for a few minutes.
  6. Melt the chocolate in the microwave, then drizzle over the cooled caramel pretzels.
  7. Allow the chocolate to set at room temperature or refrigerate for quicker results.
  8. Once set, break them into individual bites and serve!

Recipe Notes

  • Feel free to experiment with toppings such as crushed nuts or sea salt.
  • Store in an airtight container at room temperature for up to a week.
  • Substitute with gluten-free pretzels for dietary needs.

Easy Valentine’s Day Caramel Pretzel Bites (Ready in 30 Minutes)

Valentine’s Day Caramel Pretzel Bites: Sweet & Salty Delight for Your Loved Ones

⚖️
Difficulty
Easy

⏲️
Prep Time
15 mins

🕒
Cook Time
10 mins

⏱️
Total Time
25 mins

🍽️
Servings
24 bites

Valentine’s Day is the perfect occasion to indulge in sweet treats that express love and affection, and nothing says romance quite like these delightful Caramel Pretzel Bites. Combining the flavors of rich caramel, salty pretzels, and luscious chocolate, these bites are perfect for sharing with your beloved. They are not only easy to make but also provide an exciting flavor contrast that will tantalize your taste buds.

Imagine taking a bite of these Caramel Pretzel Bites to find a crunchy pretzel enveloped in gooey caramel and coated in smooth chocolate. They are perfect as a homemade gift for Valentine’s Day or simply as a delicious treat to celebrate the day of love. With every munch, the delightful combination of salty-sweet flavors will leave you wanting more. Whether you’re planning a romantic date night or a fun get-together with friends, these treats will surely be a hit.

Quick Recipe Highlights

  • Flavor Profile: Enjoy the harmonious blend of salty and sweet with depth from the caramel and richness from the chocolate.
  • Texture: Experience the crispness of the pretzels, the chewy consistency of caramel, and the smooth coating of chocolate.
  • Aroma: Relish the mouthwatering aroma of warm caramel mingled with the scent of melted chocolate.
  • Visual Appeal: These bites feature a beautiful golden hue from the caramel, contrasted with the dark chocolate coating.
  • Skill Level Needed: If you can melt chocolate and assemble snacks, you can master this simple yet impressive treat.
  • Special Equipment: A microwave-safe bowl, parchment paper, and baking tray are essential for this easy recipe.

Recipe Overview

  • Difficulty Level: This recipe is classified as easy, making it accessible for all skill levels. You don’t need prior baking experience, just some patience to let the bites set.
  • Category: This recipe falls into the dessert category, acting as a delightful treat suitable for any sweet tooth.
  • Cuisine: While this is a modern twist on chocolate-covered snacks, the use of caramel links it to classic confections popular across cultures.
  • Cost: This affordable treat can be made for under $10, making it budget-friendly for everyone.
  • Season: Perfect for Valentine’s Day, but also delightful for any festive occasion or simply as a weekend treat.
  • Occasion: These bites are great for romantic evenings, movie nights, or as a fun activity with kids.

Why You’ll Love This Recipe

The Caramel Pretzel Bites charm with their thrilling taste and texture, offering a satisfying crunch that perfectly complements the gooey caramel. The sweetness from the chocolate enhances the flavor profile, making each bite irresistible. This combination not only delights your taste buds but also evokes a sense of pure indulgence that feels like a warm embrace.

Convenience is a major benefit of this recipe. With minimal prep time and simple steps, you can whip up these bites in just 25 minutes. They can be made in advance, allowing you to enjoy your time with loved ones without spending hours in the kitchen. Plus, kids can join in on the fun of creating these treats, making it an enjoyable experience for the whole family.

From a nutritional perspective, the use of pretzels provides a bit of fiber and can offer a lighter alternative to traditional snacks. Pairing this with the sweet indulgence of caramel and chocolate creates a balanced treat that satisfies cravings without too much guilt.

Socially, these Caramel Pretzel Bites serve as an excellent conversation starter. They are perfect for sharing, making them great for gatherings and parties. Imagine everyone reaching for these delectable bites while sharing stories and laughter – it creates moments that you’ll cherish.

Lastly, these treats are cost-effective and accessible. With common pantry ingredients, anyone can easily create these delightful snacks without breaking the bank. This makes them a fantastic choice for last-minute gifts or treats during Valentine’s Day or any festive occasion.

Historical Background and Cultural Significance

The origin of caramel can be traced back to the 17th century, with sugar being melted to create a delectable candy. Initially, caramel was enjoyed as a simple sweet treat, but over time, it has evolved into various confections that include additional flavors and textures, including the modern take with pretzels.

Culturally, caramel has held a significant place in festivities, especially in culinary traditions that celebrate sweets. In many cultures, sharing candy represents affection, making Caramel Pretzel Bites an ideal gift for sweethearts on Valentine’s Day.

The evolution of the Caramel Pretzel Bites reflects our growing appreciation for the sweet-salty flavor combination. Recipes like these show how traditional candies can be adapted and modernized to suit contemporary tastes, marrying cultural significance with culinary innovation.

Regional variations of caramel treats vary across countries, from American turtle candies to French nougats. Each culture’s distinct take on caramel highlights its global appeal, making these bites a fascinating treat to explore while enjoying the diverse flavors.

Ingredient Deep Dive

Caramel: Caramel’s rich history includes its use in various desserts for centuries. This delightful ingredient is made through the process of cooking sugar until it melts and turns a beautiful golden color. Nutritionally, caramel is high in sugar, which provides quick energy, but should be consumed in moderation. When selecting caramel for your bites, consider using quality brands or making it homemade for enhanced flavor. Store caramel in a cool, dry place, and if you’re looking for substitutes, butterscotch or chocolate fudge can work too.

Pretzels: Pretzels have their origins in ancient Rome, symbolizing a bond or tie, which ties nicely into their sweet and salty nature. They provide a satisfying crunch in this recipe. Nutritionally, pretzels offer carbohydrates and fiber, but can be high in sodium. When buying pretzels, opt for unsalted versions if you want to control the saltiness of your bites. Store pretzels in an airtight container to maintain their crunchiness. Alternative options include tortilla chips or popcorn for a fun twist.

Common Mistakes to Avoid

  • Overheating chocolate: This can cause it to seize. Always melt in short intervals and at low heat.
  • Using stale pretzels: Ensure your pretzels are fresh for the best crunch and flavor.
  • Not cooling caramel: Allowing caramel to cool slightly before pouring can help it set better.
  • Skipping parchment paper: This can lead to messy cleanup. Always line your tray for easy removal.
  • Uneven coating: Make sure each pretzel bite is fully coated for consistent flavor.
  • Too much caramel: Avoid using excessive caramel that can make the bites soggy.
  • Ignoring chocolate tempering: For shiny results, ensure your chocolate is tempered correctly.
  • Forgetting presentation: Take time to plate these bites nicely for added visual appeal.

Essential Techniques

Melting chocolate is crucial for a smooth coating on the pretzels. Use a microwave or double boiler, and be careful not to overheat it. The ideal temperature is around 90°F to 92°F. Master this by stirring the chocolate frequently and stopping once it’s mostly melted; residual heat will finish the job.

Setting the caramel is essential to prevent it from being too runny. Let it cool slightly before pouring it over the pretzels, which will help it adhere better. A good visual cue is when the caramel is thick enough to coat the back of a spoon gently but still pourable.

Pro Tips for Perfect Valentine’s Day Caramel Pretzel Bites

1. Use high-quality chocolate for a richer flavor and smoother consistency.
2. Experiment with flavored pretzels like cheese or honey mustard for a unique twist.
3. Add a pinch of sea salt on top for a flavor contrast that enhances sweetness.
4. Mix in nuts or sprinkles for an added texture and visual appeal.
5. Allow the bites to cool completely before serving for the best texture.
6. Store any leftovers in an airtight container to maintain freshness.
7. Offer these bites in decorative packaging for a lovely gift option.
8. Create custom bite sizes by adjusting the amount of caramel used on each pretzel.

Variations and Adaptations

Explore regional variations by using local pretzel styles, such as sourdough pretzels for a tangy flavor twist. Seasonal adaptations can include adding spices like cinnamon during fall or crushed peppermint during winter holidays. For dietary modifications, consider using gluten-free pretzels or vegan chocolate to cater to specific dietary needs.

Flavor variations like using white chocolate instead of dark for a sweeter finish or incorporating Nutella as a drizzle can add excitement. For texture modifications, try drizzling the bites with caramel instead of dipping them. Presentation alternatives such as serving on a decorative plate or in small treat bags can enhance their appeal.

Serving and Presentation Guide

To elevate your Caramel Pretzel Bites, consider plating them on a beautiful serving tray or using muffin wrappers for an elegant touch. Garnish with a sprinkle of sea salt or crushed nuts on the bites for added texture and flavor.

Traditional accompaniments could include a warm cup of coffee or a glass of milk, enhancing the sweet experience. For modern serving suggestions, consider pairing with fresh berries or a small scoop of ice cream for a delightful dessert platter. Remember, serving temperature matters; these bites are best enjoyed at room temperature to appreciate the flavors fully. Portion control is also key, aiming for two to three bites per person for a balanced treat.

Wine and Beverage Pairing

For a delightful pairing, opt for a sweet dessert wine like Moscato to complement the caramel’s richness. If you prefer non-alcoholic options, hot chocolate or herbal tea can create a comforting flavor experience alongside these bites.

For coffee lovers, a rich espresso would pair beautifully, offering a nice contrast to the sweetness. When serving, ensure drinks are temperature appropriate; warm beverages are perfect during colder months, while chilled options are recommended for summer events.

Storage and Shelf Life

Store your Caramel Pretzel Bites in an airtight container at room temperature for optimal freshness. They can last for up to a week if kept properly. To maintain the best texture, avoid refrigerating, as this can cause the chocolate to become dull and the caramel to harden.

If you notice any changes in smell or texture, it’s best to discard them. Reheating is not usually recommended, but if desired, use only low heat to soften them slightly. For long-term storage, these bites can be frozen; just ensure they are tightly wrapped to prevent freezer burn.

Make Ahead Strategies

For those short on time, consider prepping the pretzels and caramel a day ahead. Store them separately in airtight containers until you’re ready to assemble. This saves time during busy schedules and maintains the quality of the ingredients.

When preparing bites in advance, ensure that they are fully set before storing, as this keeps them from becoming sticky. If you prefer taking them fresh, prepare the caramel and let it cool before drizzling on pretzels an hour before serving.

Scaling Instructions

Should you wish to scale your recipe for a larger gathering, simply double or triple the ingredient amounts. Make sure to adjust your baking sheets or trays accordingly to accommodate the increased batch.

When scaling down, halve the measurements while keeping an eye on the cooking time, which may vary slightly with smaller batches. If baking equipment adjustments are needed, consider using smaller trays or containers to ensure even coating. For proper storage, adjust quantities if you plan to save leftovers for future enjoyment.

Nutritional Deep Dive

The macro breakdown of each Caramel Pretzel Bite primarily consists of carbohydrates from pretzels and sugars from caramel and chocolate. While the bites provide quick energy, mindful eating is essential, especially considering portion sizes for those watching their sugar intake.

Micronutrient analysis can reveal small amounts of calcium from chocolate and fiber from pretzels, making them a slightly more layered snack. For those maintaining dietary considerations, being aware of serving sizes will help in weight management while indulging in these delightful treats.

Dietary Adaptations

For gluten-free adaptations, simply replace regular pretzels with gluten-free alternatives available in most grocery stores. If you are looking for a dairy-free option, select vegan chocolate and caramel brands ensuring all ingredients adhere to dietary needs.

Vegan adaptations can easily be made by using plant-based dairy alternatives in the chocolate. For those on a low-carb or keto diet, consider using sugar-free chocolate and pretzel alternatives for a guilt-free treat that fits within their lifestyle.

Troubleshooting Guide

If you encounter texture issues with your bites, it could be due to humidity affecting the caramel. Ensure your kitchen is dry while preparing. If the flavor balance is off, consider adding a sprinkle of sea salt or a dash of vanilla to enhance the taste.

Temperature problems during the coating process can arise from chocolate that cools too quickly. Keep the environment warm, and check the consistency before applying. If equipment challenges arise, ensure that all tools are dry and suited for melting processes to avoid complications.

Recipe Success Stories

Our community has shared numerous success stories, highlighting how these Caramel Pretzel Bites have brought joy during celebrations. Many readers have praised the delightful flavor combinations, often experimenting with their own twists that have resulted in unique variations that remain crowd favorites.

In particular, one reader successfully paired these bites with a homemade caramel sauce, enhancing the overall treat. Photography tips shared by fellow bakers have highlighted the importance of natural light for presenting these delectable treats, resulting in stunning visuals that illustrate their beauty.

Frequently Asked Questions

1. Can I use different types of chocolate for this recipe?
Yes! Feel free to experiment with dark, milk, or white chocolate based on your preference.

2. How should I store leftovers?
Leftovers can be stored at room temperature in an airtight container for up to a week.

3. Can I make these bites in advance?
Absolutely! You can prepare and store the components separately to save time when serving.

4. What can I use as a substitute for pretzels?
Alternative options include tortilla chips or even popcorn for a fun twist.

5. How do I prevent the caramel from sticking?
Ensure you use parchment paper when cooling the caramel-covered bites to prevent sticking.

6. Is there a vegan option for caramel?
Yes! Look for plant-based caramel products or make your own using coconut milk.

7. Can I freeze these bites for later?
Yes! Store them in an airtight container, individually wrapped, to enjoy later.

8. How can I enhance the flavor?
Adding a sprinkle of sea salt or using flavored pretzels can enhance the sweet-salty contrast.

9. How long does it take for the bites to set?
Allow the bites to cool for at least 30 minutes before serving to ensure they set properly.

10. Are there any gluten-free pretzel options?
Yes! Many brands offer gluten-free pretzel options that work just as well in this recipe.

Additional Resources

For those interested in further exploring sweet treats, our cooking blog features various related recipes such as chocolate-covered strawberries and homemade caramel popcorn.

Technique guides will help you master the skill of melting and tempering chocolate, offering tips on achieving the perfect consistency each time.

We also provide ingredient information, focusing on the health benefits and culinary uses of chocolate, pretzels, and other baking staples. For those wanting seasonal variations, check out our collection of festive recipes tailored for every holiday mood.

Join the Conversation

We encourage you to share your experiences making these delectable Valentine’s Day Caramel Pretzel Bites on social media. Use our hashtags to connect with fellow baking enthusiasts and showcase your beautiful creations!

If you have any questions or photography tips, feel free to engage with our community in the comments section. We love hearing about your variations and any adaptations you’ve made.

The Recipe

Valentine’s Day Caramel Pretzel Bites

Serves: 24 bites

Prep Time: 15 mins

Cook Time: 10 mins

Total Time: 25 mins

Kitchen Equipment Needed

  • Microwave-safe bowl
  • Parchment paper
  • Baking tray
  • Mixing spoon
  • Spatula

Ingredients

  • 1 bag of pretzels (about 10 oz)
  • 1 cup of soft caramel
  • 1 cup of chocolate chips (dark or milk)
  • Sea salt (optional, for garnishing)

Directions

  1. Preheat your oven to 300°F (150°C).
  2. Spread pretzels in a single layer on a parchment-lined baking tray.
  3. In a microwave-safe bowl, melt the caramel according to package instructions.
  4. Drizzle melted caramel over the pretzels, using a spatula to spread it if needed.
  5. Bake the pretzels with caramel for 5 minutes, allowing them to set slightly.
  6. While they are in the oven, melt the chocolate chips in the microwave.
  7. Remove pretzels from the oven and let them cool slightly.
  8. Dunk each pretzel bite into melted chocolate, fully coating each one.
  9. Remove excess chocolate and place the bites back on the parchment.
  10. If desired, sprinkle a little sea salt on each bite before it sets.
  11. Allow the bites to cool at room temperature until the chocolate and caramel firm up.

Recipe Notes

  • Store leftovers in an airtight container at room temperature.
  • Feel free to experiment with flavored chocolates for added excitement.
  • Adjust the amount of caramel based on your preference for a richer bite or a more subtle flavor.

Easy Valentine’s Day Mini Cakes – Ready in 30 Minutes

Easy Valentine’s Day Mini Cakes: A Sweet Delight for Your Loved Ones

⚖️
Difficulty
Easy

⏲️
Prep Time
30 mins

🕒
Cook Time
15 mins

⏱️
Total Time
45 mins

🍽️
Servings
12 mini cakes

There’s something undeniably special about creating a homemade dessert, especially for occasions like Valentine’s Day. These Easy Valentine’s Day Mini Cakes are not just visually stunning but also irresistibly delicious. Infused with flavors that charm the senses, they are an expression of love and creativity. Each bite is a delightful experience, combining moist cake layers with luscious frosting, perfect for sharing with that special someone or friends on this romantic day.

Imagine these mini cakes adorned with vibrant colors and playful designs, making them a perfect centerpiece for your Valentine’s Day celebration. They’re not just cakes, but tiny expressions of affection! Whether you’re surprising your significant other or indulging in a sweet treat for yourself, these mini cakes promise to deliver joy and sweetness in every bite.

Quick Recipe Highlights

  • Flavor Profile: Delightful layers of vanilla and chocolate flavors balance sweetness with a hint of richness.
  • Texture: The cakes are soft and fluffy, complemented by creamy frosting that melts in your mouth.
  • Aroma: The subtle scent of vanilla mingles with chocolate, creating a warm and inviting atmosphere.
  • Visual Appeal: Colorful decorations make these cakes visually striking, perfect for Valentine’s Day festivities.
  • Skill Level Needed: This recipe is simple enough for beginner bakers, making it a great project for anyone.
  • Special Equipment: A mini cake pan will help create the perfect shape, along with basic baking tools.

Recipe Overview

  • Difficulty Level: The Easy Valentine’s Day Mini Cakes are designed to be accessible for all skill levels, making them a fun baking adventure without the stress.
  • Category: These mini cakes fit perfectly into dessert categories, representing a heartwarming finish to any meal.
  • Cuisine: While these cakes draw inspiration from traditional baking methods, they have been modernized to suit contemporary tastes and styles.
  • Cost: The ingredients for these delightful mini cakes are quite affordable, making it possible to whip up a batch without breaking the bank.
  • Season: Best enjoyed during the romantic season of Valentine’s Day, these cakes add sweetness to any celebration throughout the year.
  • Occasion: Ideal for Valentine’s Day parties, anniversaries, or just as a sweet gesture to someone special.

Why You’ll Love This Recipe

The Easy Valentine’s Day Mini Cakes are not only tasty but also incredibly pleasing to the eye. Imagine each delicate layer filled with delectable frosting; every slice tells a story of sweet love. The soft texture coupled with a luscious topping makes these cakes uneasily resistible. Perfectly portioned, they fit beautifully in your hand or on a pretty plate. Each bite unleashes a fantastic burst of flavors that will keep you coming back for more.

In terms of convenience, this recipe is straightforward and quick. With minimal preparation and cook times, you won’t spend all day in the kitchen. These mini cakes are perfect for busy individuals who still want to create a memorable dessert without spending the entire day baking. Plus, the entire assembly can be a delightful group activity, making it a great way to bond while making delicious treats.

From a nutritional standpoint, you can control the ingredients and incorporate healthier swaps if you choose. By using organic ingredients or reducing sugar, these cakes can be made to suit dietary preferences without sacrificing taste. Plus, they offer a delightful way to share a special treat without overly indulging.

The festive nature of these mini cakes elevates social gatherings. They can effortlessly become the star of the dessert table at Valentine’s parties or date night dinners. Their eye-catching aesthetics can spark conversation and inspire compliments, creating a shared experience of joy and indulgence.

Finally, the cost-effectiveness of this recipe is worth noting. With ingredients that are readily available and usually inexpensive, you can create something special and delightful without the expense of gourmet desserts. Homemade always brings a personal touch, showcasing thoughtfulness without a hefty price tag.

Historical Background and Cultural Significance

Sweet treats have long been a symbol of love and affection, with origins dating back centuries. Mini cakes, particularly, began to rise in popularity with the emergence of baking as a household practice in Europe. These small delights often served as personal gifts, especially around romantic occasions, making them beloved choices for Valentine’s Day.

Culturally, mini cakes capture the essence of celebration and joy. In many households, baking is a cherished tradition, passed down through generations, connecting loved ones over the shared experience of creating something wonderful. These small creations often evoke memories of family gatherings, special occasions, and heartfelt gestures of love.

As the recipe evolved, bakers began to experiment with flavors, presentation, and decoration techniques, leading to the charming variations we see today. The evolution from larger cakes to these smaller, individual servings reflects modern lifestyles, where convenience and variety are valued. Today, mini cakes are often a charming centerpiece at celebrations like birthdays, weddings, and romantic evenings.

Regionally, different cultures have introduced their unique spins on mini cakes, celebrating local flavors and traditions. The diversity in ingredients and techniques reflects regional tastes and influences, allowing for endless adaptations and creativity in baking, making each celebration feel special.

Ingredient Deep Dive

Flour is a fundamental ingredient in baking, providing the structure needed for baked goods. It has a rich history, dating back to ancient civilizations where grains were ground to create flour. Nutritionally, flour serves as an energy source and, when whole grain varieties are used, offers fiber and nutrients. Choose high-quality all-purpose or cake flour for your cakes, and store in a cool, dark place to maintain freshness.

Sugar is more than just a sweetener; it plays a crucial role in the texture and flavor balance of baked goods. Historically, sugar has been a highly sought-after commodity, symbolizing richness and indulgence. In these mini cakes, sugar enhances sweetness and contributes to a tender crumb. For a healthier alternative, consider using natural sweeteners. Always ensure your sugar is sealed tightly to prevent clumping and maintain quality.

Common Mistakes to Avoid

  • Not measuring ingredients accurately can lead to inconsistencies in texture and flavor. Always use measuring cups and spoons for precision.
  • Overmixing the batter can result in dense cakes. Mix just until combined to ensure a light and fluffy texture.
  • Underbaking the mini cakes can cause them to sink. Use a toothpick test to check for doneness; it should come out clean.
  • Using cold ingredients can affect the batter’s consistency. Always bring eggs and dairy to room temperature before mixing.
  • Not preheating the oven can lead to improper baking times. Always preheat to ensure even cooking.
  • Skipping the cooling process can make the frosting slide off the cakes. Allow them to cool completely before decorating.
  • Using outdated baking powder or baking soda will affect rising. Check expiration dates before use.
  • Rushing through decoration leads to less aesthetically pleasing results. Take your time for a polished finish.

Essential Techniques

Understanding the creaming method is vital in achieving light and fluffy cakes. This technique involves beating butter and sugar until airy, which helps incorporate air into the batter. To master this, allow the butter to soften to room temperature for easier mixing, and look for a pale, fluffy consistency as a visual cue for success. Overcreaming can lead to overly airy cakes, while under-creaming may prevent proper rise.

Baking times and temperatures are crucial for perfect results. Familiarize yourself with your oven’s quirks; using an oven thermometer can help ensure accuracy. Visual cues for success include a golden top and springy texture. Adjust timing based on your oven or bake in smaller batches to promote even cooking.

Pro Tips for Perfect Easy Valentine’s Day Mini Cakes

For exceptionally fluffy cakes, sift your dry ingredients together. This ensures an even mix and eliminates clumps. Additionally, consider using room temperature ingredients for a smoother batter. This helps emulsification and leads to a better texture.

Experiment with flavors! Add zest from citrus fruits or a touch of vanilla extract to the batter for heightened taste. When applying frosting, put the cakes in the refrigerator for a short time before decorating to create a firmer surface, making piping easier and neater.

Use gel food coloring for vibrant colors that don’t alter the consistency of your frosting. Always keep your tools clean and dry, as moisture can cause clumping in frosting and impede smooth application.

Think ahead! Prepare your mini cakes in advance and freeze them for later use. Just be sure to wrap them tightly to preserve freshness. This allows you more time to focus on decorating or enjoying the occasion without the last-minute rush.

Add layers of different flavors or fillings; consider fruit preserves or creamy ganache to offer variety. Each cake can become a unique creation that represents the diverse flavors loved by those you’re sharing with.

Lastly, embrace creativity in your presentation! Use edible glitter, sprinkles, or fresh fruit to elevate the look. These minor details can make a big impact on the overall vibe of your dessert table.

Variations and Adaptations

Regional variations of mini cakes can offer delightful surprises. For example, introducing spices like cinnamon or nutmeg can evoke a warming sensation that speaks to seasonal flavors. Adapt your mini cakes by introducing seasonal fruits like strawberries or raspberries to reflect whatever is fresh and available.

Consider dietary modifications by experimenting with gluten-free flours or vegan substitute options like almond or coconut milk. These adaptations allow everyone at the celebration to indulge, regardless of dietary restrictions.

Flavor variations can include using different extracts such as almond or coconut to create unique twists. You may also consider incorporating chocolate chips for an added chocolatey punch that will excite any chocolate lover.

Texture modifications can easily be adjusted by varying the fats used. olive oil or applesauce can introduce moisture and dense texture, creating a unique experience compared to traditional butter-based mini cakes.

For presentation alternatives, use a variety of toppings from toasted coconut to crushed nuts for extra crunch and visual interest. Arrange the cakes on a whimsical platter for an inviting display that encourages sharing.

Serving and Presentation Guide

To plate your Easy Valentine’s Day Mini Cakes, consider a minimalist approach. Use a white or pastel-colored plate that allows the vibrant colors of the cakes to shine through. For garnishing, fresh flowers or edible rose petals can add elegance and a romantic touch.

For traditional accompaniments, serve with whipped cream, berries, or a drizzle of chocolate sauce to complement the flavors of the cakes. Modern serving suggestions can include a playful arrangement on a tiered stand to create height and visual intrigue.

Temperature considerations are key when enjoying these cakes; serve them at room temperature to fully experience the moist texture and flavor. Portion control tips can also enhance the experience, ensuring all guests can enjoy the sweet treat without feeling overwhelmed.

Wine and Beverage Pairing

Pair sparkling wines or prosecco with your Easy Valentine’s Day Mini Cakes for a celebratory feel. The effervescence of the wines will complement the sweetness of the cakes beautifully. For those looking for non-alcoholic alternatives, consider pairing with a cucumber-lime sparkling water, which offers a refreshing contrast.

Coffee lovers can enjoy a dark roast coffee or a cappuccino with the cakes, where the bitterness of the coffee contrasts nicely with the sweetness. Temperature considerations are also essential, serve the coffee hot, allowing its aromas to elevate the decadent experience.

Storage and Shelf Life

Store your Easy Valentine’s Day Mini Cakes in an airtight container at room temperature for 1-2 days. For longer storage, consider refrigerating them, which can keep them fresh for up to a week. Depending on the ingredients, freezing the mini cakes is also an option; wrap securely to avoid freezer burn and consume within 2-3 months.

Signs of spoilage to look out for include off smells or changes in texture. Always ensure cakes are thawed at room temperature before serving to regain moisture. Reheating is not typically required; however, if desired, a quick zap in the microwave for a few seconds can offer a lovely warm treat.

Make Ahead Strategies

Prep timelines for the Easy Valentine’s Day Mini Cakes can be cut down by preparing the batter in advance and refrigerating it overnight. This not only saves time but can actually enhance flavors as ingredients meld together. Once baked, mini cakes can be frozen, allowing you to bake in bulk to prepare for larger gatherings.

When planning for storage between steps, allow cakes to cool completely before wrapping them for freezing. Quality impact assessments suggest that freezing has little effect on taste; however, take caution not to overfreeze, as this can dry them.

For assembly tips, frost just before serving if possible; this keeps decorations fresh and vibrant. If preparing in advance, allow any fresh fruits or toppings to be added just before serving to maintain their quality and appearance.

Scaling Instructions

When halving the Easy Valentine’s Day Mini Cakes recipe, simply adjust the ingredient quantities, maintaining the same ratios. This is perfect if you’re celebrating with a smaller group or trying to streamline your dessert offerings.

Doubling or tripling the recipe can be effectively managed by working in batches. This works well especially if you have multiple mini cake pans. Remember to adjust baking times slightly, as increased volume can lead to longer cooking times.

Equipment adjustments may also be necessary; using different sized pans could affect the cooking time as well. Always start checking for readiness a few minutes earlier than stated in the recipe.

Nutritional Deep Dive

The Easy Valentine’s Day Mini Cakes offer a delicious indulgence; however, it’s important to consider their nutritional aspects. A typical serving size offers a delightful balance of carbohydrates, sugars, and fats. Be mindful of portion control; limiting to one piece can fit well within a balanced diet.

From a macro breakdown perspective, a well-balanced serving can include essential nutrients, but remember that it is still a treat. Consider the inclusion of more nutritious ingredients as you experiment with your cakes, such as substituting white flour for whole grain options to add fiber.

Micronutrient analysis can vary based on specific ingredients used. For example, using eggs provides a good source of protein and necessary vitamins, reinforcing the cakes’ nutritional profile.

Health benefits can be incorporated by adding in fruits, nuts, or seeds, providing antioxidants and beneficial fats. Dietary considerations should allow flexibility for personal preferences, enhancing the cake without sacrificing enjoyment.

Dietary Adaptations

For those following a gluten-free diet, this recipe can be modified using certified gluten-free flour. This simple swap allows everyone to join in the sweetness without distress.

Dairy-free individuals can use plant-based alternatives for butter and milk, achieving similar results without sacrificing flavor. Vegan options are also attainable by replacing eggs with flaxseed or applesauce, providing moisture and binding.

For low-carb or keto followers, pursue almond meal or coconut flour for a different texture profile while significantly lowering carb content. Always test the taste; flavor adaptations may be necessary.

Another approach is to explore paleo-friendly ingredients – substituting traditional sugar for honey or maple syrup can not only provide natural sweetness but also enhance flavors.

Troubleshooting Guide

If your mini cakes come out too dry, check your measurements; often, too little fat or overbaking are culprits. Keeping proper oven temperature and baking time in check can also impact quality.

For flavor balance issues, consider incorporating a pinch of salt to enhance sweetness and counteract excessive sugar. Taste and adjust your ingredients as you mix can improve results dramatically.

Temperature problems, like cakes sinking in the center, can indicate too high of an oven temperature or not enough time in the oven. Always verify your oven’s accuracy through checking with an external thermometer.

If ingredient substitutions are made, be cautious of changes in moisture; adjust the liquid content in your batter accordingly to maintain texture.

Recipe Success Stories

Community feedback highlights how the Easy Valentine’s Day Mini Cakes have created lasting memories during celebrations. Many bakers have shared their adaptation stories, mentioning how they use family traditions to inspire creativity. Positive reviews often center around ease of this recipe, making it a go-to for gatherings and surprising loved ones.

Open conversation within the community often leads to innovative variations, with readers suggesting unique flavors or decorating ideas that add flair. Many document their successes through beautiful photography, showcasing stunning results that invite others to try their hands at baking.

Frequently Asked Questions

What makes these mini cakes special for Valentine’s Day?

The Easy Valentine’s Day Mini Cakes are visually appealing and individually portioned, making them perfect for sharing. Their festive nature and the ability to be customized with decorations or flavors make them ideal for romantic occasions.

Can I make these cakes ahead of time?

Absolutely! The cakes can be made in advance and stored in an airtight container. They can even be frozen for later use, making them a convenient choice for those with busy schedules.

How can I customize the flavors?

You can experiment with different extracts, fillings, or toppings to make each mini cake unique. Consider using almond, lemon, or coconut extracts to enhance the flavor profile.

Are there gluten-free options available?

Yes, you can substitute traditional flour with gluten-free flour blends. Ensure you use certified gluten-free ingredients to avoid cross-contamination.

How do I store the mini cakes?

Store them covered at room temperature for 1-2 days. You can refrigerate them for up to a week or freeze them for longer storage. Don’t forget to wrap them well to preserve freshness!

Can I frost the mini cakes the day before serving?

Frosting them the day before is a great idea! Just be sure to store them in a cool place to maintain the frosting’s integrity.

What if my cakes sink in the middle?

Sinkage often results from insufficient baking time. Ensure you are checking doneness with a toothpick and adhere to the baking times outlined in the recipe.

Can I use alternatives for the frosting?

Certainly! You can opt for whipped cream, cream cheese frosting, or even a fruit glaze, depending on your preference and dietary needs.

Do I need special equipment to make these cakes?

A mini cake pan is recommended for perfectly shaped cakes, but you can also use muffin tins or other baking pans if needed.

How can I make the cakes more visually appealing?

Consider decorating with fresh fruit, edible flowers, or colorful sprinkles. Using different colored icings can also add a fun touch!

What’s the best way to serve these cakes?

They can be served on decorative plates or tiered stands for a festive presentation. Pairing them with drinks like sparkling wine or coffee can enhance the experience.

Additional Resources

For those interested in more sweet inspiration, our related recipes section offers a variety of dessert options that can complement the Easy Valentine’s Day Mini Cakes perfectly. Explore technique guides for specific baking skills that can enhance your overall confidence and ability in the kitchen.

Gaining a deeper understanding of ingredients can also be beneficial. Consider diving into equipment recommendations for different baking tools that could make your kitchen endeavors smoother!

Seasonal variations can transform the spirit of your baking, so keep an eye out for recipes that match different holidays or special events to keep the tradition alive.

Join the Conversation

We invite you to share your experiences on social media! Use hashtags to connect with fellow bakers who enjoy the Easy Valentine’s Day Mini Cakes. Post photos of your creation and share tips for customizing your cakes.

Engage with the community by providing feedback or suggestions based on your baking experience. Recipe reviews and adaptations help inspire others and contribute to a thriving community of passionate bakers.

Whether you’ve made variations or come up with unique tweaks to the recipe, we want to hear about it! Join the conversation today.

The Recipe

Easy Valentine’s Day Mini Cakes

Serves: 12 mini cakes

Prep Time: 30 mins

Cook Time: 15 mins

Total Time: 45 mins

Kitchen Equipment Needed

  • Mini cake pan
  • Mixer (hand or stand)
  • Measuring cups and spoons
  • Spatula
  • Cooling rack
  • Piping bags for frosting

Ingredients

  • 1 cup all-purpose flour
  • ½ cup granulated sugar
  • 1 teaspoon baking powder
  • ¼ teaspoon baking soda
  • ¼ teaspoon salt
  • 1/2 cup unsalted butter, softened
  • 2 large eggs
  • 1 teaspoon vanilla extract
  • ½ cup milk
  • Frosting of choice
  • Sprinkles or decorative toppings (optional)

Directions

  1. Preheat the oven to 350°F (175°C) and grease the mini cake pan.
  2. In a bowl, combine flour, sugar, baking powder, baking soda, and salt. Set aside.
  3. In another bowl, cream together the softened butter and sugar until light and fluffy.
  4. Add eggs, one at a time, mixing well after each addition; then stir in vanilla extract.
  5. Gradually incorporate the dry ingredients, alternating with milk until just combined.
  6. Pour the batter evenly into each cavity of the mini cake pan, filling them about 2/3 full.
  7. Bake for 10-15 minutes or until a toothpick inserted in the center comes out clean.
  8. Allow to cool in the pan for about 5 minutes before transferring to a cooling rack.
  9. Once cooled, frost the mini cakes with your choice of frosting and add optional decorations.

Recipe Notes

  • Feel free to experiment with different flavors by adding zest, extracts, or fruit purees to the batter.
  • This recipe can be doubled for larger gatherings. Just ensure even baking time for all quantities.
  • Store any leftovers in an airtight container to maintain freshness.

Best Valentine Cookies Recipe – Ready in 30 Minutes

Valentine Cookies: Sweet Treats for Your Loved Ones

⚖️
Difficulty
Easy

⏲️
Prep Time
15 mins

🕒
Cook Time
10 mins

⏱️
Total Time
25 mins

🍽️
Servings
24 cookies

Valentine’s Day is the perfect occasion to show your love and affection with homemade treats, and there’s nothing sweeter than festive Valentine cookies! These delightful cookies are buttery soft, perfectly sweet, and can be decorated to express your love. Ideal for gifting or enjoying with family and friends, they encapsulate the essence of Valentine’s Day festivities with their vibrant colors and charming shapes.

As the aroma of freshly baked cookies wafts through your home, hearts will be warmed, and smiles will abound. The process of baking these Valentine cookies serves not only to create a delectable treat but also to foster a sense of togetherness. Whether you’re making them as a surprise for a loved one or having a baking day with friends, these cookies are sure to bring joy and deliciousness to your celebrations.

Quick Recipe Highlights

  • Flavor Profile: These cookies are a delightful blend of sweet vanilla and buttery goodness, perfect for satisfying any sweet tooth.
  • Texture: Soft and chewy with a subtle crunch around the edges, each bite offers a satisfying mouthfeel.
  • Aroma: The sweet, buttery aroma with hints of vanilla creates a warm atmosphere that is truly inviting.
  • Visual Appeal: Vibrant pink and red icing lend a festive appearance that captures the essence of Valentine’s Day.
  • Skill Level Needed: With straightforward steps, this recipe is easy for both novice and experienced bakers.
  • Special Equipment: A rolling pin, cookie cutters, and a baking sheet are all you need for this fun and festive baking project.

Recipe Overview

  • Difficulty Level: This recipe is designed to be easy, making it perfect for bakers of all skill levels, including children supervised by adults.
  • Category: Enjoy these cookies as a delightful dessert or an inviting snack for gatherings on Valentine’s Day.
  • Cuisine: Influenced by classic American baking traditions, these cookies feature a textured base that everyone loves.
  • Cost: Inexpensive to prepare, this recipe primarily uses pantry staples that won’t break the bank.
  • Season: Best enjoyed during the winter and early spring, especially around Valentine’s Day.
  • Occasion: Perfect for romantic celebrations, classroom parties, or simply to enjoy at home with loved ones.

Why You’ll Love This Recipe

Baking Valentine cookies is not just about creating a delicious treat; it’s an experience filled with warmth and love. The advanced blending of flavors creates a delightful taste that will have everyone asking for seconds. The soft and chewy texture is irresistible, making each cookie a pleasure to eat. Plus, the charming decorations allow for creativity, which can be tailored to suit the preferences of the one you’re gifting!

Convenience is another key aspect of this recipe. With a total time of just 25 minutes, you can whip up a batch of these darling cookies without spending all day in the kitchen. Their straightforward preparation allows for quick assembly and minimal mess, making baking enjoyable rather than stressful.

Nutritionally, these cookies provide a small treat to brighten anyone’s day while still being relatively balanced when enjoyed in moderation. They can be an excellent way to provide a sweet energy boost during busy days.

Socially, these cookies can play a central role in gatherings and celebrations. Sharing a plate of fresh Valentine cookies transforms any occasion, fostering connections and creating joyful memories among family and friends.

Lastly, their cost-effectiveness cannot be overlooked. Using simple ingredients that are readily available means you can make these cookies without the hassle of finding specialty items, making them a staple in any festive home kitchen.

Historical Background and Cultural Significance

The tradition of baking cookies can be traced back hundreds of years, with variations across cultures that have evolved over time. Originating in Europe, cookies were once treasured treats that symbolized love and celebration, particularly on special occasions. Today, Valentine cookies are a modern representation of this historical passion for baking and sharing sweet delights with loved ones.

In cultures worldwide, cookies have often played a significant role in holiday celebrations and festivities. Valentine’s Day, in particular, has embraced this tradition, where nurturing relationships is central. Cookies marked with hearts or decorated with romantic themes symbolize affection and care, making them a staple of this holiday.

The evolution of Valentine cookies reflects society’s growing emphasis on homemade gifts as acts of love. As more people engage in baking, these cookies have transformed from mere treats to artistic expressions of creativity and sentiment, highlighting the effort put into making something special for someone dear.

Regional variations of Valentine cookies add a rich tapestry to their historical significance. In Italy, for example, Amaretti cookies are traditionally enjoyed on Valentine’s Day, while in France, heart-shaped macarons often take center stage, showcasing the unique cultural influences on cookie recipes around the world.

Ingredient Deep Dive

Flour: As the backbone of the cookie structure, flour is essential for creating the right texture. Whole wheat or all-purpose flour can be utilized, providing different flavors and nutritional profiles. When selecting flour, it’s crucial to choose a well-bleached kind for optimal results. Store flour in a cool, dry place to maintain its freshness. If gluten-free options are preferred, almond flour or coconut flour can be good substitutes.

Sugar: Sugar not only sweetens these cookies but also plays a fundamental role in achieving the desired texture. Brown sugar adds depth due to its molasses content, resulting in a richer flavor. When selecting sugar, granulated and brown sugars are standard, but other variations, like coconut sugar, can enhance nutritional content. Store in an airtight container to prevent clumping, and for healthier options, consider honey or agave syrup as sweeteners.

Butter: Butter is key in creating the delightful, rich flavor of these cookies. The quality of butter matters; unsalted butter provides the best control over salt content. It’s advisable to use room temperature butter for easy creaming with sugars. For a healthier alternative, coconut oil can be a suitable replacement. Store properly in the fridge or freezer to extend shelf life, and always bring to room temperature before measuring.

Eggs: Eggs also contribute to the structure and moisture of the cookies. They provide additional richness and aid in binding ingredients. When choosing eggs, organic or free-range options can elevate the nutritional aspect of the cookies. If dietary restrictions require alternatives, replacing eggs with flaxseed or applesauce can be beneficial. Store eggs in the refrigerator to maintain freshness and quality.

Common Mistakes to Avoid

  • Not measuring ingredients accurately: Using the incorrect measurements can affect texture and flavor. Always use measuring cups and spoons for precision.
  • Overmixing the dough: Overmixing can lead to tough cookies. Mix just until combined to ensure a tender result.
  • Using cold butter: Cold butter can hinder the creaming process. Make sure to use softened butter for optimal mixing.
  • Ignoring resting time: Allowing cookie dough to chill enhances flavor and texture. Avoid skipping this step!
  • Baking on ungreased sheets: Failing to grease or line baking sheets can lead to stuck cookies. Always use parchment paper for easy removal.
  • Not preheating the oven: Skipping this step can result in uneven baking. Always preheat for consistent results.
  • Baking for too long: Cookies continue to cook after being removed from the oven. Keep a close eye and pull them out at the right time!
  • Storing improperly: Incorrect storage can lead to hard cookies. Store in an airtight container to keep them fresh.

Essential Techniques

Creaming Butter and Sugar: This fundamental technique involves beating butter and sugar together to create a light, airy mixture. It’s essential for the desired texture in cookies. To master this, ensure butter is at room temperature and beat until the mixture is pale and fluffy. Watch for visual cues like a light color and volume increase, which indicates the process is complete.

Chilling the Dough: Chilling the cookie dough before baking solidifies fats, leading to thicker cookies. This step is vital to avoid spreading during baking. To ensure success, wrap the dough tightly and chill for at least 30 minutes. Look for a firm dough that holds shape when handled; this indicates readiness for baking.

Pro Tips for Perfect Valentine Cookies

Use quality ingredients for the best flavor; organic and fresh ingredients make a noticeable difference.
Experiment with different extracts; almond or peppermint extract can add unique flavors to your cookies.
Decorate with edible glitter or sprinkles for a festive touch; visual appeal enhances the enjoyment.
Keep your baking pans cool between batches; this prevents cookies from spreading too much.
For a chewier texture, slightly underbake the cookies, allowing them to set as they cool.
Store cookies in a single layer to maintain their shape and appearance; stacking can cause them to become misshapen.

Variations and Adaptations

Consider creating a gluten-free version using almond flour or a combination of gluten-free blends suitable for cookies. Enhance seasonal appeal by incorporating festive spices like cinnamon or nutmeg during the colder months. For audience-specific needs, adapt the recipe to be dairy-free by using dairy-free butter alternatives.

Flavor variations can include adding citrus zest for a fresh note or incorporating chocolate chips for added richness. When adapting the presentation, consider stacking decorated cookies in clear bags for gifting or arranging them on decorative plates for parties.

Serving and Presentation Guide

For a beautiful presentation, arrange cookies on a tiered cake stand for a stunning display at gatherings. Garnish with fresh berries or mint leaves for added color and vibrancy. Traditional accompaniments may include milk or coffee, enhancing the enjoyable experience.

When serving, consider the temperature of the cookies; they are best enjoyed warm or at room temperature. Portion control is key during gatherings; offer a variety to allow guests to try different flavors without overindulging.

Wine and Beverage Pairing

A light sparkling wine, like Prosecco, pairs wonderfully with sweet cookies, complementing their flavors. For those avoiding alcohol, consider a sweet soda or fruit punch, which offers a refreshing contrast. If coffee is preferred, choose a medium roast for a balanced tasting experience that enhances the sweetness of the cookies.

Ensure beverages are served chilled for the best experience; temperature can significantly impact flavor perception.

Storage and Shelf Life

Store cookies in an airtight container at room temperature for optimal freshness. They typically last 5 to 7 days when stored correctly. For longer storage, consider freezing them; wrap each cookie tightly in plastic wrap before placing them in a freezer-safe bag.

Look for signs of spoilage, including hardening or off smells, which indicate it’s time to discard. When reheating frozen cookies, allow them to thaw at room temperature or warm them in the microwave for a few seconds.

Make Ahead Strategies

Prepping the dough a day in advance can streamline baking on the day of your event. Store cookie dough wrapped in cling film in the fridge, allowing for easier handling. Additionally, baked cookies can be frozen as well; freeze them flat and then store in a container once solid.

Reheating cookies can bring back that fresh-baked taste, so plan on allowing a few minutes in the oven just before serving. Adding fresh ingredients like whipped cream or fruit toppings right before serving can enhance taste perfectly.

Scaling Instructions

If you want to halve the recipe, accurately divide all ingredients, adjusting the baking time as necessary. For doubling or tripling quantities, prepare in batches to ensure consistent mixing and baking. Modify equipment like using larger mixing bowls or more baking sheets to accommodate the increase.

Watch for timing adjustments during baking; larger batches might require slight changes to ensure proper cooking without overburning.

Nutritional Deep Dive

The macro breakdown reveals that each cookie typically contains carbohydrates, paired with some protein and fat from the butter and eggs. When analyzing micronutrients, these cookies provide vitamins like B12 and minerals such as calcium.

Health benefits may include energy boosts from the sugars and essential fats from butter. For those concerned with dietary considerations, these cookies can fit into most diets when enjoyed in moderation, always ensuring thoughtful portion analysis for weight management.

Dietary Adaptations

For gluten-free cookies, substitute regular flour with their gluten-free equivalents, ensuring compatibility in texture. Dairy-free adaptations can be made easily with non-dairy butter and milk options prevalent in stores today.

Those following a vegan diet can opt for egg replacements, such as flaxseed or applesauce while maintaining delicious taste and adherence to dietary preferences. Other modifications to consider include low-carb options using almond flour and sweeteners alongside keto-friendly ingredients.

Troubleshooting Guide

If the texture of your cookies turns out too dry, consider incorporating a tablespoon of milk or adding one more egg on the next batch. For flavor balance issues, a pinch of salt can help bring out sweetness without overpowering the cookies.

Temperature problems during baking may arise from an inaccurate oven thermostat; consider investing in an oven thermometer for precise results. When it comes to ingredient substitutions, remember that not all ingredients behave the same way, so target necessary adjustments when substituting items to ensure a successful bake.

Recipe Success Stories

Community feedback is essential to this Valentine cookie recipe, with many pointing out the delightful soft texture and fantastic flavor. Variation successes often include readers adding their favorite ingredients, like berries or different extract flavors, which many feel enhances the base recipe.

Adaptation stories showcase creativity, with some bakers customizing icing designs that reflect personal messages, making these cookies even more special. Readers often suggest practical tips for getting the perfect glossy icing, ensuring the cookies are not only delicious but visually impressive as well.

Frequently Asked Questions

1. Can I use margarine instead of butter? Yes, margarine can be used, but it may alter the flavor and texture slightly. Ensure it’s a stick variety to mimic butter’s consistency.
2. How can I achieve a softer cookie? Reducing the baking time slightly will yield a softer cookie. Additionally, avoid overmixing the dough and incorporate brown sugar.
3. What can I use instead of eggs? Flaxseed meal or applesauce makes excellent substitutes for eggs in cookies, providing moisture and binding.
4. Can I freeze these cookies? Yes, baked cookies can be frozen. Store them in airtight containers, separating layers with parchment for best results.
5. How should I decorate my cookies? Use royal icing, buttercream, or colored sugar sprinkles for creative decorating. Let your imagination guide you!
6. What are recommended serving sizes? Serving sizes can vary based on preference, but one to two cookies per serving is a good guideline.
7. Can I use whole wheat flour? Yes, you can substitute at least half of the flour with whole wheat flour for extra nutrition but expect a denser cookie.
8. How long can I store my cookies? Stored in an airtight container, cookies can last about a week; freezing extends their life up to three months.
9. What flavors can I add to the dough? Consider adding almond extract or citrus zest for a refreshing twist in flavor. Get creative!
10. Are these cookies suitable for shipping? Yes, you can ship these cookies if packed properly. Ensure they are stored in a sturdy container to prevent breakage.

Additional Resources

Explore related recipes like chocolate chip cookies or holiday sugar cookies for a diverse baking repertoire. Technique guides covering the art of icing and decorating can help elevate your cookie presentation skills.

Ingredient information on flour varieties and sugars can assist in making informed choices for healthier baking. Invest in good-quality baking sheets and mixing bowls to enhance your baking experience and achieve consistent results.

Join the Conversation

We invite everyone to share their baking experiences! Engage with us on social media by posting your homemade cookies and any adaptations you’ve tried. Your recipe reviews and creative variations not only enrich our community but inspire fellow bakers to experiment in their kitchens.

Photography tips can help showcase your delicious creations beautifully as well, letting others enjoy both your work and vision through their screens.

The Recipe

Valentine Cookies

Serves: 24 cookies

Prep Time: 15 mins

Cook Time: 10 mins

Total Time: 25 mins

Kitchen Equipment Needed

  • Baking sheet
  • Parchment paper
  • Mixing bowls
  • Rolling pin
  • Cookie cutters
  • Whisk
  • Spoon or spatula

Ingredients

  • 2 ¾ cups all-purpose flour
  • 1 teaspoon baking powder
  • ½ teaspoon salt
  • 1 cup butter, softened
  • 1 ½ cups granulated sugar
  • 1 egg
  • 1 teaspoon vanilla extract
  • Red and pink icing for decoration

Directions

  1. Preheat your oven to 350°F (175°C) and line baking sheets with parchment paper.
  2. In a bowl, whisk together the flour, baking powder, and salt.
  3. In another bowl, cream together the softened butter and sugar until fluffy.
  4. Add the egg and vanilla extract to the butter mixture, mixing well.
  5. Gradually add the dry ingredients to the wet ingredients until combined.
  6. Chill the dough for at least 30 minutes for better handling.
  7. Roll out the dough on a floured surface, and use cookie cutters to shape your cookies.
  8. Bake for 8-10 minutes or until just golden around the edges. Allow cooling completely.
  9. Decorate cookies with colored icing in festive patterns.

Recipe Notes

  • If you prefer more vibrant colors, consider using gel food coloring in the icing.
  • Store cooled cookies in an airtight container to keep them fresh.
  • Feel free to experiment with different shapes and sizes for added fun!