Start your day off right with our collection of delicious and satisfying breakfast recipes! Whether you’re craving something quick and easy, hearty and filling, or sweet and indulgent, we’ve got you covered.
From fluffy pancakes and crispy waffles to savory egg dishes and protein-packed bowls, our recipes are perfect for busy mornings or leisurely weekend brunches. Looking for something healthy? Try our smoothies, overnight oats, or wholesome breakfast bakes.
No matter your preference, these recipes are designed to bring warmth and energy to your mornings. Get ready to make breakfast your favorite meal of the day! 🍳🥞☕
Perfect Classic Chocolate Chip Cookies – Soft and Chewy
Classic Chocolate Chip Cookies: The Timeless Treat Everyone Craves
⚖️
Difficulty
Easy
⏲️
Prep Time
15 mins
🕒
Cook Time
10 mins
⏱️
Total Time
25 mins
🍽️
Servings
24 cookies
Indulging in a warm, freshly baked Classic Chocolate Chip Cookie is one of life’s simplest pleasures. The first bite reveals a delightful combination of buttery goodness and rich chocolate that ignites the taste buds, leaving you craving more. This recipe not only embodies the essence of comfort food but also evokes warm memories of baking with loved ones during chilly afternoons or festive gatherings. Whether you enjoy them straight from the oven or with a glass of milk, these cookies promise a moment of bliss.
Chocolate chip cookies have a universal appeal, attracting bakers of all skill levels. The beauty of this recipe lies in its simplicity, ensuring that even novice bakers can produce a bakery-quality treat at home. With a handful of pantry staples, you can create a batch that fills your home with an irresistible aroma. Each cookie offers a perfect balance of crisp edges and a soft, chewy center – a texture that speaks to the heart and soul of cookie lovers everywhere.
Quick Recipe Highlights
Flavor Profile: Rich, buttery cookies filled with semi-sweet chocolate chunks that provide a delightful contrast to the cookie’s sweetness.
Texture: The cookies feature a crispy exterior and a soft, chewy interior that melts in your mouth.
Aroma: An irresistible sweet buttery aroma wafts through your kitchen, inviting everyone to take a bite.
Visual Appeal: Golden-brown cookies studded with glossy chocolate chips are a sight to behold.
Skill Level Needed: This recipe requires basic cooking skills, making it accessible for bakers of all levels.
Special Equipment: A baking sheet, mixing bowls, and measuring cups are all you need to master this classic recipe.
Recipe Overview
Difficulty Level: Easy enough for beginner bakers yet satisfying for seasoned cooks, this Classic Chocolate Chip Cookie recipe is approachable for all.
Category: Perfect for snacks, desserts, or treats for gatherings, these cookies fit neatly into any meal category.
Cuisine: An American classic that has become a staple in homes around the world, often associated with family traditions.
Cost: Inexpensive to make with common ingredients such as flour, sugar, butter, and chocolate chips.
Season: Enjoy these cookies year-round, but they often make their grand appearance during holidays and cozy winter evenings.
Occasion: They are perfect for family gatherings, birthday parties, or cozy nights in front of the fireplace.
Why You’ll Love This Recipe
The flavor of classic chocolate chip cookies is unparalleled, combining sweet and savory notes in perfect harmony. Each bite is a delightful explosion of flavors, where the buttery cookie base complements the semi-sweet chocolate chunks. The cookies are sweet enough to satisfy any sweet tooth while maintaining a balance that allows the chocolate to shine without being overly rich.
Convenience is a significant advantage of this recipe. With just a handful of ingredients and a simple method, you can whip up a batch in no time. The dough can be prepared ahead of time and refrigerated for later, allowing you to satisfy sudden cravings. The quick cook time means you can have fresh, warm cookies ready to serve in just twenty-five minutes, making them an excellent choice for impromptu gatherings or family snacks.
Nutritionally, while chocolate chip cookies are a treat, they also offer small benefits—even chocolate has antioxidants! The butter provides a dose of healthy fats, and
Best Gingerbread Star Cookies – Perfect for Holiday Baking
Delicious Gingerbread Star Cookies: A Festive Treat for All Seasons
⚖️
Difficulty
Easy
⏲️
Prep Time
20 mins
🕒
Cook Time
10 mins
⏱️
Total Time
30 mins
🍽️
Servings
24 cookies
Gingerbread Star Cookies are a delightful holiday treat that is perfect for festive gatherings and cozy evenings at home. The combination of warm spices, including ginger, cinnamon, and nutmeg, creates an irresistible aroma that fills your kitchen and wraps you in the spirit of the season. Soft yet slightly crisp, these cookies are both visually appealing and deliciously satisfying, making them an ideal companion for tea, coffee, or milk.
These cookies are not just for the holidays; they can be enjoyed year-round! Whether you want to brighten up a normal day or bring a tasty gift to a friend, these cookies deliver on flavor and charm. Decorating with icing or sprinkles can also allow you to express your creative side. So roll up your sleeves, channel your inner baker, and let’s dive into making these delightful Gingerbread Star Cookies!
Quick Recipe Highlights
Flavor Profile: The warm and spicy notes from the ginger and cinnamon provide a comforting taste, complemented by a hint of sweetness from molasses.
Texture: These cookies feature a crunchy exterior with a soft and chewy center, offering a delightful contrast with each bite.
Aroma: The fragrant blend of ginger, clove, and cinnamon wafts through the air, invoking nostalgia and festive cheer.
Visual Appeal: Shaped like stars and often adorned with colorful icing or sprinkles, these cookies are eye-catching and perfect for holiday displays.
Skill Level Needed: This recipe is easy enough for beginners, requiring basic baking techniques.
Special Equipment: A rolling pin and star-shaped cookie cutters are essential for achieving the perfect cookie shape.
Recipe Overview
Difficulty Level: This Gingerbread Star Cookies recipe is straightforward and requires minimal baking experience, making it suitable for kids and adults alike.
Category: These cookies fit within the dessert category and are perfect for holiday celebrations, gatherings, or simple indulgence.
Cuisine: Originating from Germany, gingerbread has cultural significance in many Western countries, especially during the Christmas season.
Cost: The total cost of ingredients is generally low, making these cookies a budget-friendly baking project.
Season: While they are most popular during the winter holidays, their delightful flavors can be enjoyed year-round.
Occasion: Gingerbread Star Cookies are perfect for holiday parties, cookie exchanges, or as gifts for friends and family.
Why You’ll Love This Recipe
The taste and texture of Gingerbread Star Cookies create an emotional connection with those who enjoy them. The blend of spices provides a balanced and delightful flavor that can evoke memories of family traditions. These cookies’ soft and chewy centers contrast perfectly with their outer brittleness, making every bite an experience to savor.
Preparation is remarkably simple, which means anyone can create these delicious cookies in a short amount of time. The process of rolling out the dough and cutting it into fun shapes adds an element of fun, especially when involving children or friends in the baking process.
From a nutritional perspective, ginger offers several health benefits, such as anti-inflammatory properties, while molasses contains essential minerals like iron, calcium, and magnesium. These Gingerbread Star Cookies can satisfy your sweet tooth without compromising on quality.
Socially, baking and sharing these cookies foster a sense of community, bringing people together during the holidays or any gathering. Decorated cookies can also serve as a great conversation starter or fun activity during festive parties.
Finally, the cost-effectiveness of these cookies cannot be overlooked. The ingredient list is straightforward and economical, making Gingerbread Star Cookies a great way to create delicious treats without breaking the bank.
Historical Background and Cultural Significance
The origins of gingerbread date back to ancient civilizations, where it was often used for medicinal purposes before evolving into a popular holiday treat. The use of spices like ginger and cinnamon was introduced through trade routes, making these ingredients accessible in sweet treats worldwide.
In many cultures, gingerbread symbolizes warmth and home, often linked to celebrations and festive gatherings. Over time, this cookie has become a beloved staple in various holiday traditions, especially in Western cultures where decorating gingerbread houses or cookies has become a cherished family activity.
The evolution of the gingerbread cookie to the star shape showcases the adaptation of recipes through different regions. In Germany, for instance, many recipes were passed down through generations, while other variations highlight local flavors and culinary twists to suit different palates.
Regional variations abound, with each culture adding its own spin to gingerbread cookies, from adding nuts to incorporating various spices. These adaptations enrich the traditional recipe and continue to evolve, keeping the festive spirit alive.
Ingredient Deep Dive
Ginger: Known for its bold flavor and numerous health benefits, ginger has been used as a spice and medicinal root for centuries. It aids digestion, reduces nausea, and has anti-inflammatory properties. When selecting fresh ginger, look for firm, smooth roots without wrinkles. Store in a cool, dry place, and consider freezing for long-term use. Ground ginger can substitute fresh ginger in a pinch, but the flavor will vary slightly.
Cinnamon: This warm spice is synonymous with the holiday season and has a long history as a flavoring and preserving agent. Cinnamon is rich in antioxidants and has anti-inflammatory properties. For optimal flavor, purchase whole cinnamon sticks and grind them fresh before use. Store ground cinnamon in a cool, dark place. While Saigon cinnamon offers a robust flavor, Ceylon cinnamon has a milder taste that could also work in recipes.
Molasses: A key ingredient in gingerbread, molasses adds depth and sweetness. It contains vitamins and minerals, making it a more nutritious sweetener. When choosing molasses, opt for unsulfured varieties for a milder flavor. Store in a cool, dark place and it can last for months. If you find it lacks a richer flavor, Grade B molasses can provide a stronger taste.
Flour: All-purpose flour is the backbone of any cookie recipe, giving structure and texture. For gluten-free adaptations, look for gluten-free flour blends that contain xanthan gum for best results. Store flour in a sealed container to maintain freshness, and sift it before use to prevent clumping.
Common Mistakes to Avoid
Overmixing the dough can lead to tough cookies. Mix until just combined to achieve a tender texture.
Measuring flour incorrectly can result in dry or overly wet dough. Always spoon and level the flour into the measuring cup.
Not chilling the dough can lead to cookies spreading too much during baking. Chill for at least 30 minutes for best results.
Skipping the parchment paper can result in cookies sticking to the baking sheet. Always line the baking sheet for easy removal.
Baking cookies at incorrect temperatures can lead to uneven baking. Always preheat the oven and use an oven thermometer if necessary.
Packing brown sugar too tightly can alter the sweetness of your cookies. Lightly pack it for accurate measurements.
Forgetting to check for doneness can result in overbaked cookies. Look for edges that are firm and a soft center.
Using stale spices can diminish flavor. Ensure your spices are fresh for the best taste.
Not allowing cookies to cool on the baking sheet can cause them to break. Let them cool for a few minutes first.
Skipping the decoration can lead to plain-looking cookies. A little icing can enhance presentation and taste.
Essential Techniques
Mixing Dough: Proper mixing is crucial for developing the right texture. Use a stand mixer or hand mix just until combined, avoiding overmixing. Visual cues include a single cohesive dough, free of dry flour spots.
Rolling and Cutting: Achieve uniform cookie shapes by rolling the dough evenly to about 1/4 inch thickness. Use floured surfaces to prevent sticking, and cut with a sharp cookie cutter for clean edges.
Baking: Ensure your oven is preheated to the correct temperature for even baking. Rotate the baking sheet halfway through for consistent results. Look for a slight sheen on the cookies and firm edges when they’re done.
Cooling: Allow cookies to cool on the sheet for several minutes before transferring them to a wire rack. This prevents them from breaking as they cool and helps maintain their shape.
Pro Tips for Perfect Gingerbread Star Cookies
1. Use fresh spices for the best flavor impact—check expiration dates for optimal taste.
2. Experiment with different shapes and sizes for a variety of cookie presentations.
3. Decorate cookies while they are slightly warm to ensure icing adheres properly.
4. Allow dough to chill overnight for deeper flavors and better texture.
5. Use a baking scale for precise measurements, especially for baking enthusiasts.
6. Incorporate creative designs with icing and edible glitter for festive flair.
7. Experiment with adding chocolate chips or nuts for an extra flavor boost.
8. Taste the dough before baking and adjust spices to your personal preferences.
Variations and Adaptations
For a regional twist, consider adding regional spices or flavorings, such as cardamom or anise, to the dough. Seasonal adaptations can include using pumpkin puree for a fall-inspired cookie. For dietary modifications, use gluten-free flour for those with gluten sensitivities or opt for coconut sugar to lower the glycemic index.
Flavor variations might include adding citrus zest for zing or swapping molasses with maple syrup for a unique sweet balance. Texture modifications such as adding oats could create a heartier cookie, while alternative presentation techniques, such as stacking cookies with cream cheese frosting, can elevate visuals.
Serving and Presentation Guide
To present your Gingerbread Star Cookies, consider sleek, modern platters or rustic wooden boards to enhance their festive appeal. Garnishing with fresh mint leaves or edible flowers can elevate the visual presentation. Traditional accompaniments include hot apple cider, coffee, or spiced tea, while modern serving suggestions can include topping with whipped cream cheese for an indulgent treat.
Temperature matters—serve these cookies at room temperature to appreciate their texture and taste. For portion control, consider using a small lidded jar or cellophane bags for gifting, ensuring each friend gets their fair share of the deliciousness.
Wine and Beverage Pairing
When it comes to pairing beverages with Gingerbread Star Cookies, consider a lightly spiced mulled wine that complements the warm spices of the cookies. Alternatively, a sweet dessert wine like Riesling can enhance the cookie’s sweetness without overpowering the flavors. For those preferring non-alcoholic options, rich hot chocolate with a dash of cinnamon is a great match, providing a creamy contrast to the cookies.
For coffee lovers, serve these cookies with a medium roast, ensuring the cookie flavor doesn’t get overshadowed by overly bold brews. Temperature-wise, all beverages can be served warm to enjoy the full sensory experience.
Storage and Shelf Life
To keep your Gingerbread Star Cookies fresh, store them in an airtight container at room temperature, where they can last up to a week. For longer storage, consider freezing the cookies; wrap them individually in plastic wrap and place them in a freezer-safe bag. This method preserves their taste and texture for several months.
Watch for signs of spoilage, such as changes in texture or unpleasant odors, which indicate it may be time to discard them. If you need to reheat frozen cookies, let them thaw at room temperature and warm them briefly in a 350°F oven.
Make Ahead Strategies
To streamline your holiday baking, consider making the cookie dough a few days in advance and refrigerating it. This not only enhances flavor but also allows for effortless baking when needed. You can also cut and shape the cookies ahead of time, freezing them on a baking sheet before transferring them to a bag for long-term storage.
When assembling layered desserts or additional toppings, add fresh garnishes like whipped cream or fruits right before serving to maintain their quality. Ensure that any additional components are prepped ahead, so assembly is quick and easy on the day of serving.
Scaling Instructions
If you wish to half the recipe, simply divide all ingredient amounts by two; this is ideal for smaller gatherings. For doubling or tripling, ensure you have sufficient space to accommodate the increased dough. Adjust baking times slightly based on the thickness and size of cookies, so keep an eye on them for doneness.
When scaling, it’s useful to have larger mixing bowls or trays to manage the increased quantity. Additionally, store excess dough in the fridge or freezer between batches to maintain freshness.
Nutritional Deep Dive
A macros breakdown reveals these cookies provide carbohydrates primarily from flour and sugar, while fats will come from any added butter. Understand the calorie count per cookie when considering dietary restrictions, as they can pack a punch in sugar content.
The micronutrient profile includes minerals from molasses, such as iron and calcium, contributing to a balanced treat. Ginger also brings anti-inflammatory benefits, making each bite slightly healthier.
Portion control plays a crucial role, as enjoying a couple of cookies with a warm drink can be satisfying without excessive indulgence. Balancing these cookies with other fruits or nuts can enhance your snacking while managing overall weight goals.
Dietary Adaptations
For those needing gluten-free options, substituting regular flour with a 1:1 gluten-free blend ensures all can enjoy Gingerbread Star Cookies. To cater to dairy-free diets, replace butter with coconut oil or vegan margarine, while also considering flax or chia seeds as egg replacements.
Vegans can adapt this recipe by using plant-based ingredients and sweeteners like agave or maple syrup, allowing for a delightful treat that meets dietary needs. Low-carb and keto adaptations might involve utilizing almond flour and low-carb sweeteners to achieve a similar texture while staying within dietary limits.
For those following a Paleo diet, consider using honey or maple syrup alongside almond or coconut flour for a wholesome alternative, enabling these delightful cookies to be enjoyed by everyone.
Troubleshooting Guide
If your cookies come out too tough, it might be due to overmixing the dough or baking them for too long. Use the correct mixing techniques to avoid this issue. If your cookies spread too much, ensure your dough is adequately chilled before baking, as warm dough can result in flatter cookies.
For flavor balance, consider adjusting spices to suit preferences, and don’t hesitate to modify based on personal choices. If you’re facing challenges maintaining texture, shelf time can impact the quality—storing them in an airtight container helps preserve freshness. Lastly, timing your baking appropriately ensures the cookies don’t remain in the oven past the ideal baking window.
Recipe Success Stories
Community feedback reveals that many bakers appreciate how forgiving this recipe is, allowing for personal variations without compromising taste. Stories of baking these cookies as family traditions fill the inbox, showcasing the joy they bring to gatherings.
Variation successes include unique flavor adaptations—some readers enjoy adding chocolate, while others swear by extra spices for heightened flavor. Additionally, engagement through photography tips and presentation ideas enhances the excitement of sharing these cookies online, capturing the festive spirit they embody.
Frequently Asked Questions
Q: Can I use a different shape for the cookies? A: Yes! While star shapes are traditional, feel free to use any cookie cutter shapes you like to personalize your cookies.
Q: How long do the cookies stay fresh? A: Stored in an airtight container, these cookies can last up to a week. They can also be frozen for several months.
Q: Can I use fresh ginger instead of ground ginger? A: Yes, fresh ginger can be used, but the measurement may vary; about 1 tablespoon of grated fresh ginger can replace 1 teaspoon of ground ginger.
Q: Is this recipe suitable for a gluten-free diet? A: Absolutely! Simply substitute the all-purpose flour with a gluten-free flour blend.
Q: Can I make the dough in advance? A: Yes, the dough can be prepared ahead of time and stored in the refrigerator for several days or frozen for longer shelf life.
Q: How can I decorate these cookies? A: Icing, sprinkles, or edible glitter can be used for decoration. Get creative to match your theme or occasion!
Q: What should I do if my cookies spread too much? A: Make sure your dough is chilled prior to baking, as this helps prevent excessive spreading.
Q: How can I adjust the spices in the recipe? A: Feel free to increase or decrease spice amounts to suit your preference; tasting the dough before baking will help guide you.
Q: Can I make this recipe vegan? A: Yes! Substitute butter with coconut oil or vegan margarine and use a flax or chia gel in place of eggs.
Q: What can I serve with these cookies? A: These cookies pair wonderfully with a warm drink such as spiced tea or even a glass of milk for a nostalgic touch.
Additional Resources
If you enjoyed these Gingerbread Star Cookies, you might also like trying other holiday recipes such as Peppermint Bark or Sugar Cookies. Explore technique guides for cookie decorating tips or ingredient information on the benefits of various spices. Perhaps consider equipment recommendations for baking essentials—having the right tools makes the process smoother. Seasonal variations can also lead to delightful experiments with different flavors throughout the year.
Join the Conversation
We’d love to hear about your experiences baking these Gingerbread Star Cookies! Share photos and reviews on social media and let the community know what variations you tried. Would you like to suggest alternative ingredients or interesting flavors? Engage with us or suggest a blog update for more festive treats. Your thoughts and creativity can inspire others in their baking adventures!
The Recipe
Gingerbread Star Cookies
Serves: 24 cookies
Prep Time: 20 mins
Cook Time: 10 mins
Total Time: 30 mins
Kitchen Equipment Needed
Mixing bowl
Rolling pin
Cookie cutters (star shape)
Baking sheet
Parchment paper
Cooling rack
Ingredients
3 cups all-purpose flour
1 1/2 teaspoons ground ginger
1 teaspoon ground cinnamon
1 teaspoon ground nutmeg
1/2 teaspoon ground cloves
1 teaspoon baking soda
1/2 teaspoon salt
3/4 cup unsalted butter, softened
3/4 cup packed brown sugar
1/2 cup unsulfured molasses
1 large egg
Directions
In a mixing bowl, combine flour, ginger, cinnamon, nutmeg, cloves, baking soda, and salt; set aside.
In another bowl, cream together the butter and brown sugar until light and fluffy.
Add molasses and egg to the creamed mixture, mixing well.
Gradually add the dry ingredients to the wet ingredients, mixing until combined.
Cover the dough and refrigerate for at least 2 hours (or overnight).
Preheat your oven to 350°F (175°C) and line baking sheets with parchment paper.
Roll out the chilled dough on a floured surface to about 1/4 inch thick.
Use star-shaped cookie cutters to cut out cookies and place them on the prepared baking sheets.
Bake for 8-10 minutes or until edges are firm. Remove and let cool on the baking sheets for a few minutes before transferring to a wire rack.
Recipe Notes
Decorate with icing and sprinkles after cooling, if desired.
Store cookies in an airtight container for up to one week or freeze for longer storage.
Feel free to experiment with different spices or cookie shapes based on personal preference.
Best Strawberry Sheet Cake Recipe for Any Occasion
Delicious Strawberry Sheet Cake: A Sweet Treat for Every Occasion
⚖️
Difficulty
Easy
⏲️
Prep Time
20 mins
🕒
Cook Time
25 mins
⏱️
Total Time
45 mins
🍽️
Servings
12 servings
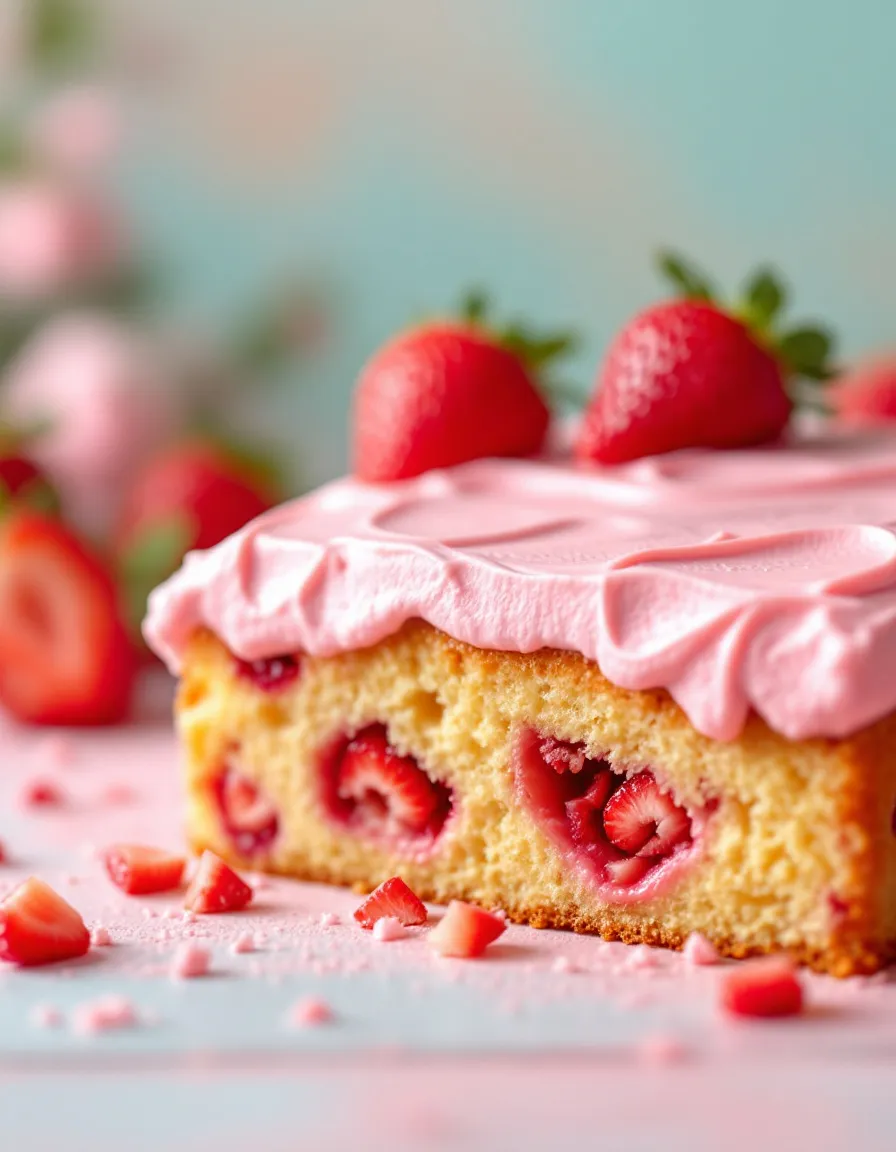
The Strawberry Sheet Cake is a delightful dessert that brings forth the sweet essence of summer with every bite. This cake, infused with fresh strawberries, makes it an unforgettable treat for family gatherings, picnics, or a special celebration. The combination of tender cake and luscious frosting creates a dessert that is both visually stunning and mouthwateringly delicious. Imagine cutting into a vibrant cake with a burst of strawberry flavor, topped with a cloud of cream cheese frosting, making it perfect for any occasion.
As you dive into this indulgent dessert, the aroma of fresh strawberries fills the air, promising to take you on a sensory journey. The cake’s soft crumb, combined with the creaminess of the frosting, offers a satisfying texture that’s hard to resist. Whether you’re a seasoned baker or just starting, this Strawberry Sheet Cake is simple to create and delivers a flavor that rivals any bakery.
Quick Recipe Highlights
Flavor Profile: Sweet, fruity flavors of ripe strawberries with a creamy tang from the frosting.
Texture: Soft and moist cake with a luscious, smooth frosting.
Aroma: Fresh, inviting scent of strawberries combined with vanilla notes.
Visual Appeal: Gorgeous pink hue topped with bright strawberry pieces, making it eye-catching.
Skill Level Needed: Perfect for bakers of all skill levels, requiring basic baking techniques.
Special Equipment: A large baking sheet and a hand mixer or stand mixer for the easiest preparation.
Recipe Overview
Difficulty Level: This Strawberry Sheet Cake is an easy recipe that is perfect for beginner bakers. The steps are straightforward, making it quick to prepare.
Category: A delightful dessert cake, ideal for birthdays, picnics, or any celebration with friends and family.
Cuisine: Inspired by classic American baking traditions, this cake showcases fresh, seasonal ingredients.
Cost: Affordable, using common ingredients such as flour, sugar, and fresh strawberries, making it a budget-friendly dessert option.
Season: Best enjoyed in late spring and summer when strawberries are at their peak freshness.
Occasion: Ideal for backyard barbecues, summer parties, and festive gatherings.
Why You’ll Love This Recipe
This Strawberry Sheet Cake is bursting with flavors that delight the taste buds. The sweetness of the strawberries pairs beautifully with the cream cheese frosting, creating a balance that is both refreshing and satisfying. Each slice reveals a tender crumb that feels moist and airy in your mouth, allowing you to savor each bite. The bright color and fresh taste elevate your dessert experience, making it a showstopper at any gathering.
The convenience of this recipe makes it a go-to for busy bakers. Mixing the batter is quick and easy, and baking it in a single sheet pan saves time and effort compared to traditional layer cakes. It requires minimal equipment, allowing you to create a stunning dessert without the fuss. Once baked, you can easily transport this cake to any event, making it a hassle-free option for gatherings.
Nutrition-wise, strawberries are a rich source of vitamins and antioxidants, offering a healthier dessert alternative. This cake serves as a canvas to indulge, allowing for a guilt-free treat that brings everyone together. With the right balance of sweetness and flavor, it’s a dessert everyone can enjoy, making it a staple in your recipe box.
Preparing this Strawberry Sheet Cake is also an opportunity for connection with family and friends. Whether you are baking alone to unwind or inviting loved ones to help decorate, it creates an atmosphere of joy and collaboration. This cake brings people together, making it a delightful addition to any celebration.
Additionally, this recipe is cost-effective and accessible, relying on basic pantry staples. Whether you’re crafting it for a large gathering or a cozy family dinner, the ingredients are easy to find and budget-friendly. This simplicity paired with its delicious outcome guarantees that your Strawberry Sheet Cake will be a hit wherever you take it.
Historical Background and Cultural Significance
The origins of sheet cakes can be traced back to traditional baking methods that favored practical, easy-to-make desserts for large gatherings. Sheet cakes became popular in the United States during the mid-20th century, serving as a staple for celebrations due to their simplicity and adaptability. This Strawberry Sheet Cake pays homage to those classic roots while highlighting the delightful flavor of fresh strawberries, which have a rich history in American agriculture.
Culturally, strawberries symbolize summer and abundance, often celebrated in festivals that honor their harvest. They are widely regarded as a quintessential fruit in American baking, representing nostalgia and cherished family recipes. The use of strawberries in desserts like this one not only reflects cultural traditions but also the joy of sharing with loved ones.
Over time, the recipe has evolved to accommodate modern tastes, shifting from basic vanilla or chocolate cakes to fruit-infused ideas. Today, strawberry cakes are celebrated across various occasions from picnics to birthdays. The incorporation of fresh strawberries into baked goods has led to endless variations that showcase the versatility of this beloved fruit.
Regional variations also thrive in this dessert category. In some Southern states, for example, strawberry shortcake is a common warm-weather favorite, often built on layers of biscuits instead of cake. This Strawberry Sheet Cake embraces those influences while introducing a light and tender cake that captures the essence of summer.
Ingredient Deep Dive
– **Strawberries**: Fresh strawberries are not just delicious; they are packed with antioxidants and vitamin C. When selecting strawberries, look for bright red, plump berries with a fresh aroma. Store them in the refrigerator but avoid washing until you’re ready to use them to prevent spoilage. They can be substituted with other berries if desired, such as raspberries or blueberries.
– **All-Purpose Flour**: A staple in most baking recipes, all-purpose flour provides structure and stability to cakes. It’s essential to measure flour correctly, using the spoon-and-level method to avoid dense cakes. Store flour in an airtight container in a cool, dry place, and avoid contamination by using clean utensils. For gluten-free options, almond or coconut flour can work, but adjustments in liquid may be necessary.
– **Sugar**: Granulated sugar not only adds sweetness but also helps with the cake’s texture. It’s important to cream sugar thoroughly with butter or oil to incorporate air into the batter, which contributes to fluffiness. Store sugar in a sealed container to prevent clumping. Additionally, brown sugar can be used for a deeper flavor, offering more moisture.
– **Eggs**: Eggs contribute moisture, richness, and act as a binding agent in the cake. Always use room temperature eggs for better integration into the batter. Store eggs in the refrigerator to maintain freshness. If allergic, applesauce or flaxseed can serve as egg substitutes in this recipe.
Common Mistakes to Avoid
Not using room temperature ingredients: Allow butter, eggs, and milk to come to room temperature for optimal mixing and texture.
Overmixing the batter: Mixing too vigorously can lead to a tough cake; stop mixing as soon as everything is combined.
Not measuring ingredients accurately: Improper measurements can yield a dry or gummy cake; always use a kitchen scale or proper measuring cups.
Using stale or old strawberries: Freshness matters; make sure to use ripe strawberries for maximum flavor and sweetness.
Skipping the cooling phase: Allowing the cake to cool before frosting is essential to prevent melting of the frosting.
Not adjusting baking time for different ovens: Each oven is different; start checking the cake a few minutes before the suggested baking time.
Ignoring the baking powder’s expiration date: Expired baking powder won’t properly leaven your cake, resulting in a dense texture.
Not testing the cake’s doneness: Use a toothpick or cake tester in the center of the cake; it should come out clean to indicate it’s done.
Essential Techniques
– **Creaming Butter and Sugar**: This technique is crucial for incorporating air into the cake batter, resulting in a light and fluffy texture. To master it, ensure your butter is at room temperature, then beat until light and pale. Avoid overmixing, which can lead to a dense cake.
– **Folding in Ingredients**: When adding flour or whipped cream, use a gentle folding motion to maintain the airiness of the batter. A rubber spatula works best; scrape down the sides and bottom of the bowl to ensure even incorporation without deflating the mixture.
– **Testing for Doneness**: To check if your cake is ready, insert a toothpick into the middle. It should come out clean or with a few crumbs but not wet batter. This is a critical step to avoid under-baking and ensure your cake has the right texture.
– **Properly Mixing Dry Ingredients**: Sift together flour, baking powder, and salt before combining with wet ingredients. This ensures even distribution and prevents clumps, leading to a uniform texture in the final product.
Pro Tips for Perfect Strawberry Sheet Cake
– Always use fresh, high-quality strawberries for an intense flavor that truly defines this cake.
– Experiment with adding lemon zest to the batter for a refreshing citrusy touch that complements the strawberries beautifully.
– Allow the cake to cool completely before frosting to prevent melting; chilling the cake for a bit can help.
– For added flavor depth, consider infusing your frosting with a hint of vanilla extract or almond extract.
– Slice strawberries thinly for an elegant presentation on top of the frosted cake; it adds both beauty and fresh flavor.
– Use a large, flat offset spatula to evenly spread frosting for a sleek and professional look.
– Consider using a cake leveler to ensure an even surface before frosting, making it easier to decorate.
– If you want to make it in advance, freeze un-frosted cake layers to maintain freshness until ready to serve.
Variations and Adaptations
– **Regional Variations**: In some regions, different berry combinations can be used. Try mixing strawberries with raspberries and blueberries for a true berry medley.
– **Seasonal Adaptations**: Switch out strawberries for peaches or cherries during their peak seasons for a delightful twist on the original flavor.
– **Dietary Modifications**: To make this cake gluten-free, swap all-purpose flour for a gluten-free blend that contains xanthan gum for structure.
– **Flavor Variations**: Infusing the cake with almond extract or citrus zest can elevate the flavor profile and offer a new taste sensation.
– **Texture Modifications**: For a more decadent cake, incorporate a layer of whipped cream in the middle before frosting, adding creaminess and texture contrast.
– **Presentation Alternatives**: Instead of frosting the entire cake, consider serving it as individual slices topped with whipped cream and strawberries for a more casual presentation.
Serving and Presentation Guide
– Consider using a large rectangular serving platter to display the Strawberry Sheet Cake elegantly at gatherings.
– Garnish with fresh mint leaves for a pop of color that complements the strawberries and adds freshness.
– Serve each slice with a dollop of whipped cream and a sprinkle of powdered sugar for an elegant touch.
– For summer events, refrigerate the cake before serving; it can be wonderfully refreshing when served cold.
– Maintain portion control by cutting smaller squares, perfect for sharing at potlucks or picnics, without overwhelming guests.
– Utilize vibrant plates or napkins that echo the bright colors of the strawberries to enhance the visual appeal.
Wine and Beverage Pairing
– Pair this Strawberry Sheet Cake with a light, fruity rosé to complement the flavors of fresh strawberries, enhancing enjoyment.
– A chilled Prosecco can also work beautifully, offering a bubbly contrast that refreshes the palate between bites.
– For non-alcoholic options, serving a sparkling lemonade or iced herbal tea can create a refreshing beverage choice that pairs nicely.
– Coffee lovers may enjoy a rich espresso, which balances the sweetness of the cake while highlighting the strawberry flavors.
– Serve drinks in chilled glasses to keep things refreshing, especially on a warm day, adding to the festive atmosphere.
Storage and Shelf Life
– Store any leftover Strawberry Sheet Cake in an airtight container at room temperature for up to three days. If the temperature is high or if there’s a lot of frosting, consider refrigeration.
– For longer storage, wrap individual slices or the entire cake in plastic wrap and then foil before freezing. It can last up to three months in the freezer.
– When reheating, allow the cake to thaw in the refrigerator overnight before bringing it to room temperature for the best texture.
– Signs of spoilage include an off smell or a change in texture; if you see mold, discard any remaining cake.
– To re-frost a defrosted cake, let it come to room temperature before adding a fresh layer of frosting for a revived look.
Make Ahead Strategies
– Prepare the cake layers a day in advance, leaving them un-frosted and wrapped in plastic wrap to maintain moisture.
– Mix the frosting ahead of time, storing it in the refrigerator for up to a week; just be sure to rewhip it slightly before frosting.
– For enhanced flavor, slice fresh strawberries and macerate them with a little sugar a few hours before serving to draw out the juices.
– Consider assembling the cake just before serving to ensure freshness in taste and presentation.
– Keep any garnishes, like whipped cream or mint, separate until serving for the best texture and visual appeal.
Scaling Instructions
– To halve the recipe, simply reduce all ingredients by half, ensuring you adjust cooking time appropriately, checking for doneness earlier.
– Doubling or tripling the recipe is feasible by using larger baking sheets; be aware that baking time may need to be increased.
– Ensure that oven capacity allows for larger batches; multiple cakes can be baked at once in separate pans if you have room.
– When scaling recipes, consider ingredient availability in bulk and adjust prep area space accordingly to avoid crowding.
– If making additional cakes, prepare the frosting and toppings separately to ensure freshness and avoid sogginess.
Nutritional Deep Dive
– The macro breakdown of this Strawberry Sheet Cake includes carbohydrates primarily from flour and sugar, moderate proteins from eggs, and fats from butter.
– Strawberries contribute a wealth of micronutrients, predominantly vitamin C and fiber, enhancing the nutritional profile of this dessert.
– The yogurt in the frosting can also offer probiotics, promoting gut health when included in moderation.
– Each slice can be enjoyed as an occasional treat, fitting into a balanced diet when paired with physical activity.
– Portion analysis is key; consider enjoying smaller servings to enjoy the flavors without overindulging, promoting well-being.
Dietary Adaptations
– To make this cake gluten-free, substitute all-purpose flour with a gluten-free blend, ensuring the proper texture and taste.
– A dairy-free version can be created using almond or coconut milk in place of regular milk and vegan butter for the frosting.
– Vegan adaptations are possible by using flax eggs as a binder, ensuring that all ingredients adhere to plant-based standards.
– Low-carb and keto diets can explore using almond flour and a sugar substitute while considering adjustments to liquid ratios.
– For those following Paleo or low-FODMAP diets, a commitment to whole, unprocessed ingredients is essential for enjoyment without detriment.
Troubleshooting Guide
– If your cake is too dry, ensure accurate measurements and prevent overmixing; incorporating less flour can help too.
– For flavor imbalance, consider adjusting the amount of sugar or adding a touch of salt to enhance the overall taste.
– Cakes that sink in the middle might be underbaked or have too much leavening agent; double-check your ingredients.
– Equipment challenges can arise with old ovens; using an oven thermometer can aid in achieving the right baking temperature.
– If heavy frosting causes the cake to collapse, allow it to cool down fully before frosting, ensuring structural integrity.
Recipe Success Stories
– Community feedback often highlights the ease of making this Strawberry Sheet Cake, making it a favorite for beginner bakers.
– Variations shared by readers often inspire new twists, turning this classic recipe into an evolving favorite.
– Reader suggestions abound in the comment sections, encouraging creativity in flavors, decorations, and ingredient swaps.
– Many have captured beautiful photos of their creations, showcasing the vibrant colors and delectable appearance.
– The cake’s ability to impress at gatherings has led to numerous requests for recipe shares, solidifying its beloved status.
Frequently Asked Questions
Q1: Can I make this cake ahead of time?
A1: Yes, you can bake the cake layers a day in advance and frost them just before serving for optimal freshness.
Q2: How do I store leftovers?
A2: Store leftover cake in an airtight container at room temperature or refrigerate for up to 3 days; you can freeze it for longer storage.
Q3: Can I use frozen strawberries?
A3: Yes, but fresh strawberries are preferable for flavor and visual appeal. If using frozen, thaw and drain excess moisture before adding.
Q4: What if my cake turns out dense?
A4: A dense cake could be due to overmixing or too much flour. Make sure to measure accurately and avoid vigorous mixing after adding flour.
Q5: Can I use a store-bought frosting?
A5: Absolutely! If you’re short on time, store-bought frosting can work perfectly for this Strawberry Sheet Cake.
Q6: How can I enhance the flavor?
A6: Adding a splash of vanilla extract or a pinch of salt can enhance the flavors significantly without overwhelming the strawberry essence.
Q7: Is this cake suitable for kids?
A7: Yes! This Strawberry Sheet Cake is a hit among kids due to its sweet, fruity flavor; enjoy serving it at birthday parties!
Q8: Can I make a healthier version?
A8: Yes, consider using coconut sugar, whole wheat flour, or reducing the sugar in the frosting to create a lighter dessert.
Q9: What can I use instead of eggs?
A9: Flaxseed meal mixed with water or unsweetened applesauce can serve as a great egg substitute in this recipe.
Q10: How do I know when it’s done baking?
A10: Insert a toothpick into the center of the cake; it should come out clean or with a few crumbs but not wet batter.
Additional Resources
– For those looking for more baking inspiration, check out related recipes like Vanilla Cupcakes or Chocolate Sheet Cake.
– Technique guides on baking basics, such as how to correctly measure ingredients or achieve the perfect frosting, are beneficial.
– Explore in-depth ingredient information available online to learn about the nutritional benefits of fresh strawberries and alternative dairy products.
– Recommendations for kitchen equipment including baking sheets and mixers can provide troubleshooting tips for aspiring bakers.
– Seasonal recipes that highlight fresh produce can complement this Strawberry Sheet Cake and create a themed dessert table for gatherings.
Join the Conversation
– Share your Strawberry Sheet Cake creations on social media and connect with other enthusiastic bakers!
– Consider including photography tips when posting your cake; lighting and plating can make a world of difference in presentation.
– Engage with the community by sharing your thoughts on flavor variations or offering feedback on your baking experience.
– Recipe reviews help a growing community find new favorites while encouraging creativity and experimentation with variations.
The Recipe
Strawberry Sheet Cake
Serves: 12 servings
Prep Time: 20 mins
Cook Time: 25 mins
Total Time: 45 mins
Kitchen Equipment Needed
Large mixing bowl
Measuring cups and spoons
Whisk or hand mixer
Spatula
9×13 inch baking pan
Cooling rack
Ingredients
2 cups all-purpose flour
1 ½ cups granulated sugar
1 cup unsalted butter, softened
4 large eggs
1 cup milk
2 teaspoons baking powder
1 teaspoon vanilla extract
2 cups fresh strawberries, hulled and sliced
8 oz cream cheese, softened
4 cups powdered sugar
1 teaspoon vanilla extract for frosting
Directions
Preheat your oven to 350°F (175°C) and grease the baking pan.
In a large mixing bowl, cream together softened butter and sugar until light and fluffy.
Add in eggs, beating well after each addition, and mix in vanilla extract.
In another bowl, combine flour and baking powder; gradually mix dry ingredients into the wet mixture.
Fold in the milk until the batter is smooth, then add sliced strawberries, mixing gently.
Pour the batter into the greased baking pan and smooth the top with a spatula.
Bake in the preheated oven for about 25 minutes or until a toothpick inserted into the center comes out clean.
Allow the cake to cool fully on a wire rack before frosting.
For the frosting, beat together softened cream cheese and powdered sugar; add vanilla extract and mix until smooth.
Spread the cream cheese frosting evenly over the cooled cake and top with additional strawberry slices for decoration.
Recipe Notes
For richer flavor, consider using brown sugar instead of granulated sugar.
Freeze any leftover cake for future enjoyment; wrap slices individually for easy access!
Substitute with other berries if strawberries are not available.
Best Chocolate Chip Cookies Recipe – Soft and Chewy
Chocolate Chip Cookies: The Ultimate Comfort Dessert
⚖️
Difficulty
Easy
⏲️
Prep Time
15 mins
🕒
Cook Time
10 mins
⏱️
Total Time
25 mins
🍽️
Servings
24 cookies
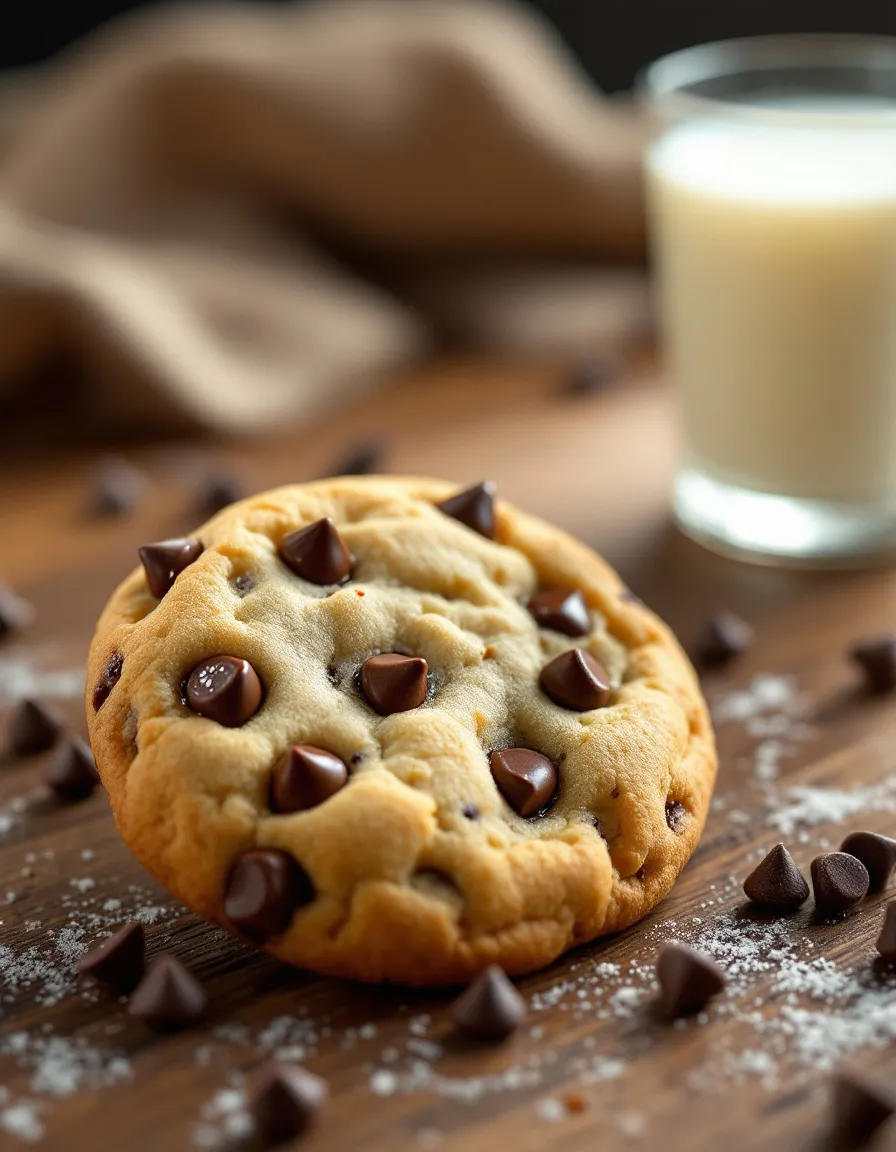
Chocolate chip cookies are the quintessential treat that bridges the gap between childhood nostalgia and adult indulgence. The warm, gooey chocolate melts in your mouth, perfectly complemented by the classic buttery richness of the cookie dough. This recipe will guide you through crafting the perfect cookie, building on a simple foundation of quality ingredients and straightforward techniques.
In just 25 minutes, you can bring this comforting delicacy into your home. Picture yourself pulling a batch from the oven, the rich aroma wafting through your kitchen and inviting everyone to gather. Each cookie is a delightful balance of crispy edges and a soft, chewy center, capturing the essence of what makes chocolate chip cookies an all-time favorite. Whether served warm out of the oven or enjoyed days later, these cookies promise satisfaction with every bite.
Quick Recipe Highlights
Flavor Profile: Rich buttery cookies with semi-sweet chocolate chips create a harmonious sweetness.
Texture: Crispy edges with a soft, gooey center, delivering that ultimate comforting bite.
Aroma: The scents of melted chocolate and baked butter combine for a heavenly experience.
Visual Appeal: Golden-brown cookies dotted with melting chocolate chips—irresistible!
Skill Level Needed: Perfect for beginners with simple steps that lead to delicious results.
Special Equipment: Only basic baking tools are needed, making this recipe accessible.
Recipe Overview
Difficulty Level: This chocolate chip cookie recipe is incredibly easy, ideal for bakers of all levels. With minimal techniques involved, anyone can achieve cookie perfection.
Category: Cookies are a beloved dessert and perfect for snack time, after dinner, or sharing at gatherings.
Cuisine: This recipe is rooted in American baking traditions, particularly popular in homes across the United States.
Cost: The cost of ingredients is fairly low, making chocolate chip cookies an economical choice for dessert.
Season: Perfectly enjoyed year-round, but especially comforting in cooler months when warmth is craved.
Occasion: Ideal for any occasion, from family gatherings to holiday parties or casual evenings at home.
Why You’ll Love This Recipe
Chocolate chip cookies are a timeless treat that never fails to bring joy. Their combination of buttery dough and rich chocolate delivers a taste experience unlike any other. The classic flavor profile appeals to all ages, making them perfect for family events or gatherings with friends.
The convenience of this recipe cannot be overstated. With quick prep and cook times, you can whip up a batch of cookies in less than 30 minutes. This means spontaneous dessert cravings can be satisfied with ease! The uncomplicated instructions make it accessible even for novice bakers.
Not only are these cookies delicious, but they can also be made to accommodate nutritional preferences. By adjusting ingredients slightly, you can create a cookie that fits dietary needs without sacrificing taste.
Socially, cookies are an excellent choice for gatherings. Whether sharing warm cookies at a picnic or giving a box as a gift, they create moments of connection and happiness.
Lastly, the cost-effectiveness of homemade cookies is significant. With just a few affordable ingredients, you can produce a large batch of delicious treats, making them an ideal choice for budget-conscious bakers.
Historical Background and Cultural Significance
The origin of chocolate chip cookies dates back to the 1930s when Ruth Wakefield, who owned the Toll House Inn, created the first chocolate chip cookie recipe. The story goes that she was experimenting with a new chocolate bar for her cookie dough, leading to the iconic dessert we know today.
Culturally, chocolate chip cookies have become a symbol of comfort and home, featured in countless family recipes. They have encouraged baking traditions passed down through generations, making them an important part of American culinary history.
Over the years, recipes have evolved, adapting to new tastes and dietary needs. Today, there are countless variations, from double chocolate to oatmeal chocolate chip that celebrate the beloved cookie’s versatility.
Regionally, you can find adaptations that reflect local flavors. Some homes add nuts, while others may use different types of chocolate, showcasing personal touches in a classic recipe.
Ingredient Deep Dive
Flour is the backbone of any cookie dough. Considered a staple in baking, its ability to structure the cookie is unmatched. When selecting flour, choose all-purpose flour for versatility, ensuring smooth mixing. Stored in a cool, dry place, flour can last months, but for a fresher taste, consider buying whole grain or specialty flour later.
Sugar, particularly brown sugar, offers a depth of flavor that transforms cookies from simple treats to delightfully rich desserts. Brown sugar contains molasses, which not only sweetens but also adds moisture, giving the cookies their chewy texture. For freshness, store in an airtight container; substituting it with coconut sugar can bring a different taste while appealing to health-conscious bakers.
Butter is essential for both flavor and texture in chocolate chip cookies. The high-fat content ensures a rich, melt-in-your-mouth experience. For best results, use unsalted butter to control the salt levels in your cookie dough accurately. However, if you are in need of a dairy-free option, coconut oil or vegan butter can serve as great substitutes.
Chocolate chips are the stars of this recipe. Semi-sweet chocolate chips are traditional but don’t hesitate to explore milk chocolate, dark chocolate, or even white chocolate for a unique twist. Properly stored in a cool, dry place, chocolate can last long; however, consider using high-quality brands for the best taste.
Eggs work as a binding agent, holding all the ingredients together and contributing to moisture. Fresh, organic eggs offer the best flavor, but aquafaba can be an excellent vegan substitute, providing similar binding properties. Store eggs in their original carton in the fridge for maximum freshness.
Common Mistakes to Avoid
Overmixing the dough can lead to tough cookies due to gluten development. Mix until just combined for the best texture.
Underbaking can result in mushy cookies; ensure they have a light golden color before removing them from the oven.
Using cold butter can affect the dough’s consistency and spread. Room temperature butter is ideal for even mixing.
Forgeting to preheat the oven can throw off baking times. Always preheat to ensure even cooking.
Skipping chilling the dough can lead to excessive spreading in the oven. A chill gives cookies a better structure.
Not measuring ingredients accurately can disrupt the balance of flavors; use measuring cups and spoons for precision.
Neglecting to line the baking sheet can cause cookies to stick; parchment paper or silicone mats are a baker’s best friend.
Be cautious of baking soda versus baking powder, as their roles differ; using the wrong one can impact your cookies’ rise and texture.
Overcrowding the baking sheet can result in uneven baking; leave space between cookies so they have room to spread.
Failing to cool the cookies on a wire rack can lead to soggy bottoms. It’s crucial for maintaining their texture.
Essential Techniques
Properly creaming butter and sugar is fundamental. This technique aerates the mixture, creating a light texture. Aim for an airy consistency, and avoid overmixing to maintain tenderness.
Chilling the dough is equally important. Allowing dough to rest in the refrigerator not only enhances flavor but also controls spread during baking. Aim for at least 30 minutes of chill time for optimal results.
Measuring your ingredients accurately helps eliminate inconsistencies in taste and texture. Always use labeled measuring cups for precise amounts and avoid packing flour too tightly.
Lastly, using a cookie scoop ensures equal-sized cookies, leading to uniform baking. A quality scoop can eliminate the hassle and result in evenly baked batches.
Pro Tips for Perfect Chocolate Chip Cookies
When baking chocolate chip cookies, always use room temperature ingredients. This allows for better emulsification and a smoother dough, leading to a better final product.
Experiment with different types of chocolate for added depth. A mix of dark and milk chocolate can provide a more complex flavor that appeals to different palates.
Consider adding a sprinkle of sea salt on top before baking. This enhances the chocolate flavor and adds a delightful crunch.
For a unique twist, try incorporating nuts or dried fruit into the dough. It adds texture and can elevate traditional recipes.
Adjust the baking time based on your oven performance. Set a timer but keep an eye on the cookies to avoid over-baking.
Don’t forget to let cookies cool for at least 5 minutes on the baking sheet before transferring them to a cooling rack. This ongoing cooking helps ensure the right texture.
Try using brown butter for deeper flavor. Simply melt the butter, letting it cook until it turns golden brown, then proceed with the recipe.
Finally, store cookies in an airtight container with a piece of bread to keep them soft as they age.
Variations and Adaptations
For regional variations, consider incorporating local flavors or ingredients. For instance, adding a pinch of cinnamon can draw on choco-bread traditions common in certain areas.
Incorporating seasonal flavors, like pumpkin or ginger spice during fall, can provide a festive twist. Likewise, try adding festive-themed chocolate or colors during holidays.
For dietary modifications, consider making gluten-free versions using almond or oat flour. These flours provide unique textures while remaining delicious.
To enhance flavors, use flavored chocolate chips, such as espresso or mint, to cater to specific tastes.
Texture modifications could involve adding oats for a heartier bite or using a mix of flours to create a chewier cookie.
When it comes to presentation alternatives, drizzle melted chocolate over the top or sprinkle colorful sprinkles for a fun look.
Serving and Presentation Guide
For plating, stack cookies on a rustic wooden board or a decorative platter. This creates an inviting display that’s perfect for sharing.
Garnish with fresh mint sprigs or seasonal fruits for an added touch of color and freshness against the golden-brown cookies.
Traditional accompaniments could feature a glass of cold milk or a scoop of vanilla ice cream on the side for ultimate indulgence.
For modern serving suggestions, consider cookie ice cream sandwiches. Place a scoop of your favorite ice cream between two cookies for a delightful treat.
Consider serving cookies warm from the oven for an incredible melting chocolate experience.
Portion control is essential — aim for a standard size that allows everyone to enjoy their treat without going overboard.
Wine and Beverage Pairing
When it comes to wine pairings, a sweet dessert wine like Port or a fruity red like Zinfandel can complement the sweetness of the chocolate.
For non-alcoholic alternatives, consider serving with cold milk or a vanilla bean soda. These beverages provide a refreshing contrast to the richness of the cookies.
If coffee is more your style, a dark roast coffee pairs beautifully with chocolate, enhancing the richness while contrasting with the sweetness.
Temperature considerations are key. Serve beverages chilled but allow coffee to cool slightly to avoid overpowering the cookies’ delicate flavors.
For serving suggestions, consider creating a dessert plate with cookies and your beverage of choice, enhancing the presentation.
Storage and Shelf Life
To store freshly made cookies, place them in an airtight container at room temperature. This method preserves their softness and flavor.
For longer shelf life, cookies can be frozen. Simply layer between sheets of parchment paper, store in a freezer-safe bag, and freeze for up to three months.
Signs of spoilage include an off smell or changes in texture; if they feel excessively hard or dry, it’s time to discard.
Reheating cookies can be done in a preheated oven or microwave for a few seconds to bring back their warmth and gooey texture.
If freezing, ensure they cool completely before packing to prevent condensation, which can affect texture.
Make Ahead Strategies
When planning to make cookies ahead, prepare the dough and refrigerate it for up to 2 days before baking. This enhances flavors and saves time on busy baking days.
You can also pre-scoop the dough, placing individual balls on a baking sheet to freeze. Once frozen, transfer them to a storage bag, allowing for easy baking later.
Quality can be affected by how long the dough sits; consider baking within 2-5 days for optimal freshness.
For assembly, pre-baking the dough means you simply need to pop cookies in the oven when guests arrive, guaranteeing warm treats.
Finally, when reheating, add a few extra seconds in the microwave or allow a brief oven time to refresh the cookies’ warmth and chocolatey goodness.
Scaling Instructions
If you want to halve the recipe, simply divide all ingredients by two while keeping ratios consistent for best results.
For doubling or tripling, ensure your mixing bowl is large enough to accommodate all the ingredients, and check baking times as larger batches may take longer.
Equipment adjustments are essential; use larger baking sheets or bake in batches if necessary to avoid overcrowding.
Timing modifications may also be necessary; monitor closely as amount of dough affects bake time.
Finally, store any excess dough appropriately while waiting for cookies to be baked again.
Nutritional Deep Dive
Analyzing the macro breakdown, chocolate chip cookies typically contain key nutrients including carbohydrates from flour and sugar, fats from butter, and a touch of protein from eggs.
Micronutrient analysis shows that while the cookies are rich in sugars and fats, they can be enhanced with whole grain or nut flours for more fiber and nutrients.
Moderation is key with these sweet treats as indulging responsibly allows for a balanced diet.
For portion analysis, consider that a single cookie can provide a fair amount of calories and sugars, making it suitable for a satisfying dessert.
Weight management can be supported by enjoying these cookies in smaller portions, emphasizing balance while engaging in active lifestyles.
Dietary Adaptations
For gluten-free versions, substitutes like almond flour or coconut flour can create a delicious alternative while maintaining an enjoyable texture.
Dairy-free chocolate chips allow for a vegan version, while coconut oil can replace butter for further dietary adjustments.
For a low-carb option, try almond and coconut flour again while opting for sugar substitutes like erythritol.
Keto adaptations follow similar principles, with a focus on low-carb ingredients that ensure delicious flavor profiles remain.
Paleo options customize recipes with natural sweeteners such as honey and grains that fit within paleo guidelines, while enhancing the baked goods’ nutritional value.
Low-FODMAP ingredients can also be included, focusing on the types of sugars and potential intolerances individuals may have.
Troubleshooting Guide
If your cookies are too tough, consider reducing mixing time, ensuring no overdevelopment of the gluten occurs.
Flat cookies often stem from using warm dough or not enough flour; chill the dough for optimal texture.
Flavor balance issues could arise from missing or miscommunicating ingredient amounts; taste your dough before baking to adjust accordingly.
If temperatures are problematic, check your oven calibration; an accurate oven is crucial for achieving the perfect bake.
Ensure adequate equipment is in place for proper baking; using baking sheets with different materials can alter results.
Timing concerns can affect cookies’ textures; investing in a good timer or visual cues can help create consistent outcomes.
Recipe Success Stories
Community feedback often focuses on the nostalgia of classic chocolate chip cookies, with personal stories of shared family experiences while baking together.
Many variations have brought about new successes—such as adding espresso powder or nuts—leading to delicious adaptations of the classic recipe.
Reader suggestions on social media underscore how people seek comfort foods, creating invaluable conversation around these cookies’ warm-hearted essence.
Photography tips are shared, emphasizing natural light and rustic, home-style settings that bring cookie moments to life visually as well as gastronomically.
Examples of cookie swaps spark creativity, allowing for diversification and shared innovation—the community thrives on adaptations and inclusivity.
Frequently Asked Questions
1. Can I freeze chocolate chip cookie dough? Yes, you can freeze the dough. Scoop into individual balls and freeze them. Store them in a bag for easy baking later, baking time may require adjusting.
2. How do I make my cookies softer? To achieve softer cookies, slightly underbake them and allow them to cool on the baking sheet. Additionally, using more brown sugar can provide a chewier texture.
3. What’s the difference between light and dark brown sugar? Light brown sugar contains less molasses than dark brown sugar, which impacts flavor and moisture. Use dark brown sugar for a richer taste.
4. Can I use margarine instead of butter? While you can use margarine, note that it may change the flavor and texture of the cookies. Use variations that suit your needs, but stick to what’s recommended for best results.
5. What kind of chocolate is best for cookies? Semi-sweet chocolate chips are traditional, but any combination of chocolate can work. Experiment with dark chocolate or milk chocolate for varied experiences!
6. Is it necessary to chill the dough? Chilling the dough helps with texture and prevents spreading. It’s not strictly necessary, but it can significantly improve your cookies.
7. How long do cookies last? Properly stored cookies can last up to a week at room temperature. You can also freeze them for several months for long-term storage.
8. Can I substitute eggs in this recipe? Yes, substitutes like flax eggs or applesauce can work as replacements, but results may vary—the texture could change based on the sub used!
9. What’s the best way to store cookies? Store cookies in an airtight container at room temperature for maximum freshness. You can use a slice of bread to maintain softness.
10. Can I add nuts to the cookie dough? Absolutely! Walnuts or pecans can add great texture and flavor. Just fold them in gently after mixing your dough.
Additional Resources
If you enjoyed this chocolate chip cookie recipe, explore related recipes such as oatmeal raisin or double chocolate chip cookies for more variety.
Consider technique guides that delve into cake baking or advanced pastry skills to enhance your overall baking knowledge.
Ingredient information can inform your choices about flavors; insights into alternative sweeteners or flour types expand your palette.
Equipment recommendations point to essential tools every baker should have, ensuring each baking session is smooth and efficient.
Lastly, seasonal variations in recipes can inspire themes for festivities, including pumpkin-spiced cookies or gingerbread during the holidays—celebrate with baking year-round!
Join the Conversation
We love seeing how our cookie recipes resonate with your baking adventures! Share your cookie photos on social media and join the discussions around variations and adaptations you’ve made.
Photography tips worth sharing include setting up in natural light and striving for cozy backgrounds that evoke warmth and heartiness, just like these cookies.
Recipe reviews help us grow; your feedback can positively inspire future recipes as we engage with our beloved baking community.
Engage with us—share how you’ve personalized your cookies to suit your tastes. Your creativity can lead to exciting new avenues for others to explore, enhancing our shared passion for baking!
The Recipe
Chocolate Chip Cookies
Serves: 24 cookies
Prep Time: 15 mins
Cook Time: 10 mins
Total Time: 25 mins
Kitchen Equipment Needed
Mixing bowl
Measuring cups and spoons
Cookie sheet
Silicone spatula
Oven mitts
Ingredients
2 1/4 cups all-purpose flour
1/2 tsp baking soda
1 cup unsalted butter, softened
3/4 cup granulated sugar
3/4 cup brown sugar, packed
1 tsp salt
2 tsp vanilla extract
2 large eggs
2 cups semi-sweet chocolate chips
Directions
Preheat your oven to 375°F (190°C).
In a bowl, whisk together flour and baking soda; set aside.
In a large bowl, cream butter, granulated sugar, brown sugar, and salt until light and fluffy.
Add vanilla extract and eggs, mixing until combined.
Gradually add the flour mixture, mixing until just combined.
Fold in chocolate chips.
Drop rounded tablespoons of dough onto ungreased cookie sheets, spacing them 2 inches apart.
Bake for 9-11 minutes or until cookies are golden brown.
Allow cookies to cool on the baking sheet for 2 minutes before transferring them to wire racks to cool completely.
Recipe Notes
For chewier cookies, consider refrigerating the dough for at least 30 minutes before baking.
Experiment with different types of chocolate chips for added flavors.
Ensure to store cookies in an airtight container to maintain freshness.
Best Chocolate Chip Cookies Recipe – Soft and Chewy
Classic Chocolate Chip Cookies: The Ultimate Comfort Treat
⚖️
Difficulty
Easy
⏲️
Prep Time
15 mins
🕒
Cook Time
10 mins
⏱️
Total Time
25 mins
🍽️
Servings
24 cookies
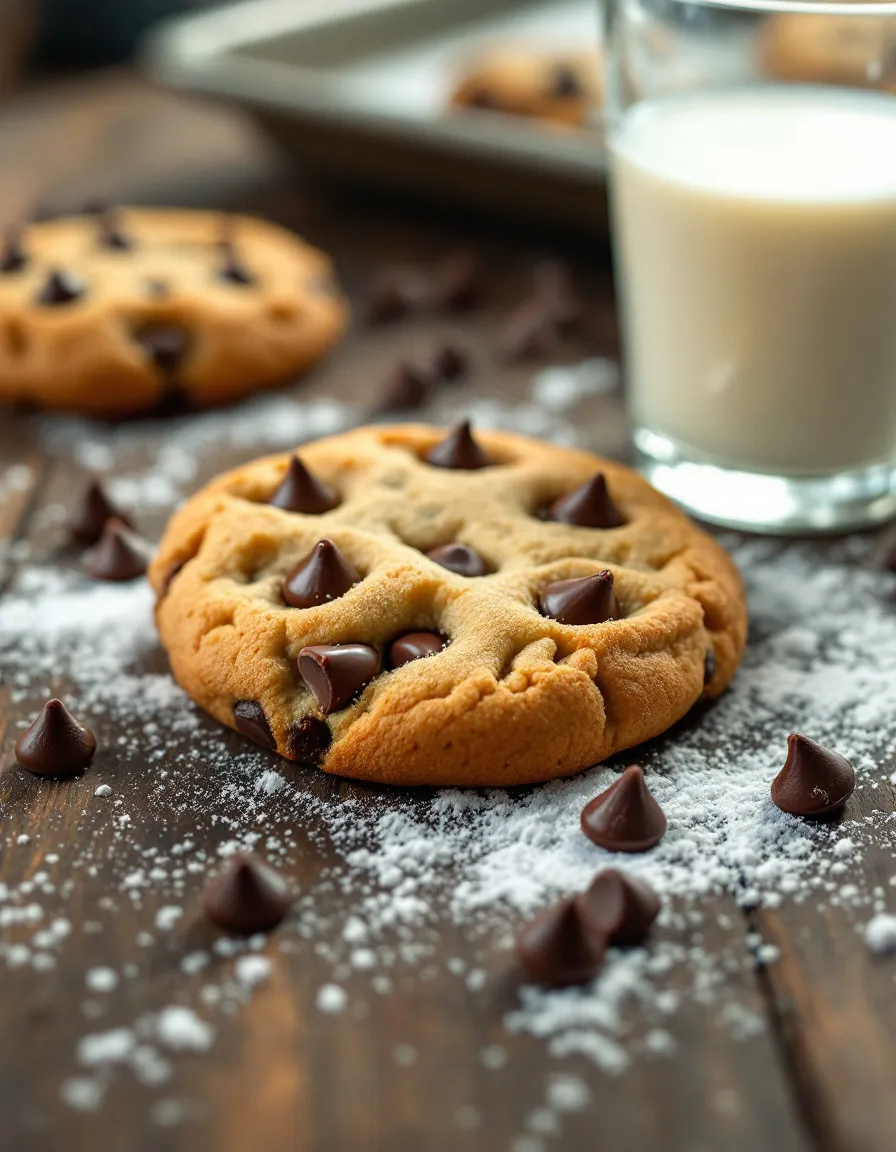
Chocolate chip cookies are the quintessential comfort treat, loved by people of all ages. The combination of sweet, melt-in-your-mouth chocolate and the buttery flavor of freshly baked cookies is simply irresistible. As the dough bakes, your kitchen fills with a warm, inviting aroma that evokes memories of childhood baking sessions. Each bite is a perfect blend of chewy and slightly crisp textures, offering satisfaction and indulgence.
Whether you’re enjoying them with a cold glass of milk or serving them at a gathering, these classic cookies are always a hit. They are perfect as a sweet snack, a thoughtful homemade gift, or a simple dessert to delight friends and family. The beauty of this chocolate chip cookie recipe is in its simplicity, making these cookies both approachable and rewarding to make.
Quick Recipe Highlights
Flavor Profile: Rich chocolate flavors beautifully balanced with a hint of vanilla and a buttery sweetness, creating the ultimate indulgence.
Texture: These cookies offer a delightful contrast between a crisp outer edge and a soft, chewy center that melts in your mouth.
Aroma: The warm scent of baking cookies is complemented by a fragrant hint of vanilla and chocolate, making it hard to resist sneaking a taste.
Visual Appeal: Golden-brown edges with gooey chocolate chips peeking through make these cookies visually tempting on any dessert table.
Skill Level Needed: No prior baking experience is needed, making this cookie recipe an excellent choice for beginners and seasoned bakers alike.
Special Equipment: All you need is a mixing bowl, baking sheet, and oven to create these delicious chocolate chip cookies.
Recipe Overview
Difficulty Level: With just a few simple steps and no special skills required, this chocolate chip cookie recipe is easy and straightforward, perfect for novice bakers.
Category: These cookies fit well into dessert and snack categories, delighting guests at casual gatherings or festive celebrations.
Cuisine: Originating from American kitchens, chocolate chip cookies have become an iconic dessert in many cultures, cherished for their classic taste.
Cost: The ingredients are mostly pantry staples, making these cookies a budget-friendly treat for everyday indulgence.
Season: Ideal for any season, chocolate chip cookies are especially popular during holidays when baking traditions bloom.
Occasion: Perfect for parties, holiday gatherings, or simply as an afternoon snack, these cookies bring joy and comfort wherever they are served.
Why You’ll Love This Recipe
Chocolate chip cookies are a beloved treat, offering an array of flavors and textures that appeal to all ages. The sweet, buttery dough combined with rich, melty chocolate creates a harmonious balance that is simply irresistible. Each cookie provides that perfect crispiness on the outside, while the center remains soft and chewy, allowing for a delightful mouthfeel with every bite. The flavor is not only satisfying but also brings a wave of nostalgia for many, making this recipe a family favorite.
In addition to the wonderful taste, convenience is key with this chocolate chip cookie recipe. It requires minimal time and effort; you can whip up a batch in just 25 minutes. With simple ingredients that are typically found in your pantry, you won’t need to make a special shopping trip. This ease of preparation allows for spontaneous baking sessions and sweet treats whenever the craving strikes.
Nutritionally speaking, while cookies are a dessert, they can also be made with some thoughtful choices. For instance, using high-quality dark chocolate can introduce antioxidants, and incorporating whole wheat flour might provide added fiber. Balance is essential, and enjoying these cookies within a varied diet makes them a delightful part of your culinary repertoire.
Socially, these cookies shine during gatherings. They serve as conversation starters, create connections over shared memories, and are a go-to dessert for diverse occasions. Their familiar appeal makes them ideal for events like birthdays, potlucks, and bake sales, giving everyone a taste of classic comfort.
Lastly, chocolate chip cookies are cost-effective. Many ingredients are affordable, and the recipe produces a generous yield, ensuring you get the most for your money. Plus, if you have unexpected guests, showing you’ve baked a fresh batch of cookies is sure to impress without breaking the bank.
Historical Background and Cultural Significance
The history of chocolate chip cookies dates back to the late 1930s in New England, where Ruth Wakefield invented this iconic treat. A necessity for her business at the Toll House Inn, Ruth decided to add chopped chocolate bars to cookie dough. This delightful creation quickly gained popularity, leading to a package of Toll House chocolate chips being produced for home bakers everywhere.
In the years following Ruth’s invention, chocolate chip cookies evolved from the kitchen staple to a symbol of American comfort food. The ubiquity of these cookies in homes, bakeries, and cafes speaks volumes about their cultural importance. They have become a quintessential dessert associated with childhood, family gatherings, and festive celebrations.
The recipe’s evolution has also included various adaptations worldwide, where different ingredients and techniques reflect regional tastes. While American recipes favor a thick and chewy style, other variations can be found with a thinner, crisper texture, showcasing the playful versatility of this beloved cookie.
Moreover, chocolate chip cookies hold a special place in popular culture. They often make appearances in films, books, and social gatherings, further solidifying their status as a beloved treat. From simple family baking sessions to gourmet innovations in upscale bakeries, their story continues to resonate with generations, making them a timeless classic.
Ingredient Deep Dive
Chocolate Chips
Chocolate chips are at the heart of any chocolate chip cookie recipe, bringing rich, sweet flavors and a delightful melt that enhances the overall cookie experience. Deriving from cacao beans, chocolate has a deep history that stretches back to ancient Mesoamerican cultures. Beyond indulgence, chocolate contains antioxidants and may also provide heart health benefits when consumed in moderation.
When selecting chocolate chips, the quality matters. Look for options that list cocoa solids and cocoa butter as main ingredients. Chocolate chips come in various forms, including semisweet, milk, and dark chocolate, allowing for personal preference in sweetness and richness. Store chocolate chips in a cool, dry place to maintain freshness, and consider baking with high-quality chocolate for a gourmet twist.
Butter
Butter is essential for creating the rich, creamy texture in chocolate chip cookies. It contributes fat to the dough, helping achieve a tender crumb. Traditionally made by churning cream, butter has been a kitchen staple for centuries, forming the base for countless baked goods. Not only does it enhance flavor, but butter also plays a significant nutritional role, providing vitamin A and healthy fats.
For optimal baking results, it is best to use unsalted butter to control the saltiness of the finished cookie. When selecting butter, consider varieties from grass-fed cows, which tend to have higher levels of nutrients. To store, keep butter wrapped, away from strong odors, and be mindful of checking the use-by date to prevent spoilage.
Granulated Sugar
Granulated sugar serves as one of the main sweeteners and helps create the ideal texture in chocolate chip cookies. It provides the necessary sweetness while promoting browning and softening the cookies’ structure. Sugar has a long history in culinary traditions, originating from sugarcane and sugar beets, and is a critical ingredient in baking.
When measuring sugar, use a level cup to achieve accurate results. Experiment with different sugars, such as brown sugar, which adds a deeper flavor and moisture due to its molasses content. Store granulated sugar in a cool, dry place in an airtight container to prevent clumping and maintain freshness.
Common Mistakes to Avoid
Overmixing the dough: This can lead to tough cookies. Mix just until the ingredients are combined to keep them tender and chewy.
Using cold butter: Cold ingredients can lead to cookies that don’t spread properly during baking. Make sure to use softened butter for even texture.
Not measuring flour accurately: Too much flour can result in dry cookies. Use a spoon to fluff the flour before spooning it into the measuring cup for accuracy.
Skipping the chilling step: Chilling the dough prevents spreading and enhances flavor, so don’t skip this important step!
Underbaking cookies: Cookies continue to firm up after they are removed from the oven. Aim for a light golden color for perfectly chewy cookies.
Not greasing the baking sheet properly: Ensure your baking sheets are adequately greased or lined with parchment paper to prevent sticking.
Using stale ingredients: Always check expiration dates on baking soda, flour, and chocolate chips to ensure the best results.
Ignoring cooling time: Let cookies cool on the baking sheet for a few minutes before transferring them to a wire rack to maintain structure.
Essential Techniques
Creaming Butter and Sugar
Creaming butter and sugar is a crucial step in cookie making, as it helps incorporate air into the dough, allowing your cookies to rise and achieve a light texture. To master this technique, use room temperature ingredients and beat them until light and fluffy, usually about 2-3 minutes. A common pitfall is not creaming long enough, resulting in dense cookies. Success can be identified by a pale color and a fluffy consistency.
Chilling the Dough
Chilling the dough is essential for achieving a better texture and preventing the cookies from spreading too much during baking. After mixing the ingredients, wrap your dough in plastic wrap and refrigerate for at least 30 minutes. A common mistake is trying to bake without chilling, which leads to thin, crispy cookies. Look for the dough to firm up and develop a more intense flavor once chilled.
Pro Tips for Perfect Chocolate Chip Cookies
1. Use high-quality chocolate for a richer taste that elevates your cookies to a gourmet level. Dark chocolate chips or a mix of chocolate types can provide a deeper flavor profile.
2. Experiment with half brown sugar and half granulated sugar for a chewier cookie with a wonderful caramel flavor.
3. Adjust baking times according to your oven, and keep an eye on cookies as they bake to achieve your desired texture.
4. Try adding a pinch of sea salt on top of each cookie before baking to enhance the chocolate flavor.
5. Use parchment paper on your baking sheets to ensure even baking and easier clean-up.
6. For an extra special twist, mix in nuts or toffee bits for added crunch and flavor variations.
7. Store baked cookies in an airtight container with a slice of bread to maintain moisture and softness.
8. To make ahead, you can freeze cookie dough balls and bake them directly from the freezer when a fresh batch is needed.
Variations and Adaptations
Chocolate chip cookies can be easily modified to cater to a variety of tastes and dietary preferences. Consider adding oats for a chewy texture or experimenting with nut flours to create gluten-free versions. Additionally, you can infuse different flavors, such as almond extract, or incorporate spices like cinnamon for a unique twist.
For seasonal adaptations, think about adding pumpkin spice during the fall or holiday-themed variations, incorporating cranberries and nuts as festive alternatives. Different chocolate types can also provide delightful variations—try using white chocolate, or even mixing in seasonal goodies like peppermint candies for the winter holidays.
For those with dietary restrictions, making cookies vegan is simple with substitutes like applesauce for eggs and using plant-based butter alternatives. For a lower-carb version, sugar alternatives like erythritol can be utilized, catering to those on keto diets.
Serving and Presentation Guide
When presenting chocolate chip cookies, consider using a decorative platter or tiered cake stand to create an appealing display. Garnishing them with a light dusting of powdered sugar or drizzling melted chocolate on top can add an elegant touch. For a modern twist, serve them in jars, layered with cookie crumbs and ice cream for a delightful dessert.
Temperature plays an important role in serving. Cookies are best enjoyed warm, so providing warm cookies directly from the oven alongside a scoop of ice cream is a fantastic treat. When portioning, consider small to medium-sized cookies for easy handling and to encourage sharing among guests, enhancing the communal enjoyment of treats.
Wine and Beverage Pairing
Pairing beverages with chocolate chip cookies can elevate your dessert experience. A glass of dessert wine, such as a late harvest Riesling, complements the sweetness of the cookies beautifully. Alternatively, a rich Cabernet Sauvignon can enhance the chocolate flavor, making it a sophisticated pairing.
For non-alcoholic options, try pairing with a creamy vanilla milkshake or iced coffee for a delightful treat. Both enhance the cookie’s flavor profile without overpowering it. If you prefer tea, a chai latte can provide a spicy contrast that excels with the sweetness of the cookies. Serve these beverages slightly chilled or warm for a delightful counterbalance to fresh cookies.
Storage and Shelf Life
Proper storage of chocolate chip cookies is essential to maintain freshness. Store them in an airtight container at room temperature for up to one week; add a piece of bread to help retain moisture. If you want to keep your cookies longer, consider freezing them. Wrap individual cookies in plastic wrap and place them in a freezer bag; they can last up to 3 months in the freezer.
Make sure to check cookies for signs of spoilage, such as an off smell or changes in texture. To enjoy frozen cookies, simply let them thaw at room temperature or reheat them in the oven for a few minutes to achieve that freshly baked warmth again.
Make Ahead Strategies
Preparing chocolate chip cookies ahead of time makes entertaining or spontaneous treat-sharing easy. The dough can be made 1-2 days in advance and stored in the refrigerator, making it convenient to bake fresh cookies on short notice. Portion the dough into balls before chilling to simplify baking right from the fridge.
Another option is to freeze the portioned cookie dough. When ready to bake, allow the dough to thaw in the fridge overnight, then proceed with baking. This method maintains dough quality and makes sure your cookies are fresh whenever you need them.
You can also prepare cookie mixes ahead by combining dry ingredients and storing them in jars, only needing to add wet ingredients and chocolate chips later. This allows you to save time while still enjoying the homemade experience.
Scaling Instructions
If you need more or fewer cookies, scaling this chocolate chip cookie recipe is simple. To halve the recipe, just divide all the ingredients by two, ensuring each portion maintains the same measurement accuracy to preserve texture and taste.
For larger gatherings, doubling or tripling the recipe is feasible as well. Be mindful of your mixing bowl size; it may require multiple batches if you increase the quantities significantly. Adjust baking times slightly if you’re using larger baking sheets or different oven racks to ensure consistent cooking.
Storing variations after scaling is essential. With increased yield, some cookies may require longer cooling times or extra care in packaging to keep them fresh for sharing.
Nutritional Deep Dive
Each chocolate chip cookie serves as a delightful treat but can also provide insight into nutritional balance. Typically, one cookie offers a combination of carbohydrates, fats, and proteins. For a single serving, a cookie may contain approximately 150 calories, depending on size and ingredients.
Analyzing the macronutrients, cookies primarily consist of simple sugars and fats, contributing to energy while offering little in terms of vitamins and minerals. Incorporating whole grain flour or adding nuts can enhance their nutritional value, providing fiber and essential nutrients.
For those conscious of their dietary needs, moderation is key. Understanding portion sizes and the balance of indulging can help maintain a healthy approach while enjoying the decadence of chocolate chip cookies. Keeping them as an occasional treat allows for guilt-free indulgence as part of a diversified diet.
Dietary Adaptations
Chocolate chip cookies can easily adapt to various dietary preferences without sacrificing flavor. For gluten-free versions, substitute all-purpose flour with almond flour or a gluten-free baking blend to create delicious cookies that everyone can enjoy.
For dairy-sensitive individuals or vegans, using plant-based butter and egg substitutes, like flaxseed meal or mashed bananas, can yield equally delightful cookies. The use of dairy-free chocolate chips ensures that no one misses out on this classic treat.
Keto and low-carb adaptations can switch high-carb ingredients with sugar alternatives like erythritol or stevia and use almond flour instead of traditional wheat flour. In addition, creating lower-sugar recipes can suit many diets without compromising on taste, ensuring delightful cookies suitable for all.
Troubleshooting Guide
If your chocolate chip cookies don’t come out as expected, there are solutions to common issues. For cookies that are too flat, check the butter temperature—melted butter can lead to excess spreading. Ensure you’re using softened, not melted butter, and chilling the dough can also help maintain shape.
In cases of dry or crumbly cookies, this often results from too much flour or overmixing. Ensure accurate measuring techniques and gently combine ingredients until just blended. The dough should remain slightly sticky to yield that desired chewy texture.
If cookies are not cooking evenly or are burnt on the edges, check your oven temperature with an oven thermometer. Oven discrepancies can lead to uneven baking, so rotating sheets during the baking process can enhance evenness.
Recipe Success Stories
Community engagement around chocolate chip cookies has flourished through shared experiences and adaptations. Many bakers have shared their personal variations, from unique flavor additions to healthier ingredient swaps, inspiring others to try new twists on the classic recipe.
Reader suggestions have also included creative baking methods, such as using a cast-iron skillet to create a giant cookie dessert shared among friends. Success stories often focus on the joy these cookies bring to gatherings, bringing people together to bond over baking adventures.
Photographers in the community love to showcase their homemade cookies, adding an artistic touch to a universally loved recipe. The visual appeal of beautifully baked cookies continues to ignite passion and creativity in home bakers everywhere.
Frequently Asked Questions
Can I freeze chocolate chip cookie dough?
Absolutely! You can portion cookie dough into balls, wrap them tightly, and store them in the freezer for up to three months. When ready to bake, just pop them straight into the oven without thawing for a fresh-baked experience.
Why are my cookies tough?
Tough cookies often result from overmixing the dough or using too much flour. Ensure you measure your ingredients accurately and mix just until combined for a tender texture.
What can I substitute for chocolate chips?
If you don’t have chocolate chips, consider using chunks of baking chocolate, white chocolate, peanut butter chips, or even dried fruits like raisins for a different spin.
How can I make my cookies chewier?
To achieve chewier cookies, try adding extra brown sugar and refrigerate the dough before baking. Baking slightly longer can also help create that perfect chewy texture.
Can I make gluten-free chocolate chip cookies?
Certainly! Substitute all-purpose flour with a gluten-free flour blend or almond flour for delicious gluten-free chocolate chip cookies.
How do I avoid flat cookies?
Ensure your butter is softened, not melted, and chill the dough before baking. Check your baking soda for freshness as well—the right leavening is key to perfect cookies!
Is it okay to use margarine instead of butter?
While butter provides better flavor and texture, margarine can be used as a substitute. Just make sure to use the stick variety for best results.
Can I add nuts to my cookie dough?
Yes, nuts add wonderful texture and flavor! Chopped walnuts or pecans work beautifully—just fold them into your cookie dough before baking.
What’s the best way to store cookies?
Store cookies in an airtight container at room temperature, and include a slice of bread to keep them moist. For longer storage, freeze them wrapped in foil or plastic.
Why are my cookies too sweet?
If your cookies are too sweet, adjust the sugar in your recipe next time. You can also balance sweetness by adding a touch of sea salt on top before baking.
Additional Resources
Explore other delicious cookie recipes that utilize simple ingredients with exciting flavor profiles. Techniques for mastering cookie baking, such as how to gauge doneness and perfecting your measuring skills, can help elevate your baking experience.
Learn about ingredient facts, including variations available for flour and sugar types to suit dietary needs, and find the best baking equipment to streamline the process. Additionally, discover seasonal variations that provide a fresh twist on your cookie game throughout the year.
Join the Conversation
Engage with us on social media to share your chocolate chip cookie creations! Post photos of your baked goods, sharing variations and special tips that made your cookies successful. We love to hear from our community members—join the conversation to share your experiences, tips, and suggestions for future recipes.
By sharing your story, you inspire others on their baking journeys. Let’s celebrate the joy of cookie baking together, creating a warm, welcoming environment for all dessert lovers!
The Recipe
Chocolate Chip Cookies
Serves: 24 cookies
Prep Time: 15 mins
Cook Time: 10 mins
Total Time: 25 mins
Kitchen Equipment Needed
Mixing bowl
Measuring cups and spoons
Baking sheets
Electric mixer or whisk
Spatula
Parchment paper (optional)
Ingredients
1 cup (2 sticks) unsalted butter, softened
3/4 cup granulated sugar
3/4 cup brown sugar, packed
1 teaspoon vanilla extract
2 large eggs
2 1/4 cups all-purpose flour
1 teaspoon baking soda
1/2 teaspoon salt
2 cups semi-sweet chocolate chips
Directions
Preheat your oven to 375°F (190°C).
In a mixing bowl, cream together the softened butter, granulated sugar, brown sugar, and vanilla extract until light and fluffy.
Add eggs, one at a time, beating well after each addition.
In a separate bowl, combine flour, baking soda, and salt. Gradually add to the butter mixture until fully mixed.
Stir in the chocolate chips until evenly distributed.
Drop rounded tablespoons of dough onto ungreased baking sheets.
Bake for 9 to 11 minutes or until golden brown around the edges but still soft in the center.
Allow to cool on the baking sheet for 2 minutes before transferring to wire racks to cool completely.
Recipe Notes
For thicker cookies, chill the dough before baking for at least 30 minutes.
Try mixing different types of chocolate chips or adding nuts to customize flavors.
Store baked cookies in an airtight container with a slice of bread to keep them soft.
Easy Churro Bites with Homemade Chocolate Dipping Sauce
Churros Bites: Irresistible Treats with Chocolate Dipping Sauce
⚖️
Difficulty
Easy
⏲️
Prep Time
20 mins
🕒
Cook Time
10 mins
⏱️
Total Time
30 mins
🍽️
Servings
4 servings
Churros bites are a delightful twist on the traditional Spanish pastry. These bite-sized treats are crisp on the outside while being soft and fluffy on the inside, perfect for satisfying your sweet cravings. The churros are rolled in cinnamon sugar and served with a rich and velvety chocolate dipping sauce that adds an indulgent touch. Whether enjoyed as a dessert, a snack, or a fun treat for a party, churros bites are guaranteed to steal the show.
The beauty of churros bites lies in their versatility. They can be made fresh and served warm, making them an excellent choice for any occasion. With minimal ingredients and simple preparation, these delicious little pastries can easily become a staple in your dessert repertoire. The combination of sugar and spice is sure to make every bite heavenly.
Quick Recipe Highlights
Flavor Profile: The churros have a sweet, buttery flavor accented by cinnamon, while the chocolate sauce adds a rich, decadent layer.
Texture: These treats feature a crispy exterior that gives way to a tender, airy interior, complemented by the smooth chocolate sauce.
Aroma: The warm scent of fried dough mingled with the sweetness of cinnamon creates an irresistible aroma in your kitchen.
Visual Appeal: Golden brown churros bites dusted with cinnamon sugar contrast beautifully with the glossy dark chocolate sauce.
Skill Level Needed: This recipe is beginner-friendly, making it easy for everyone to join in and whip up these delightful treats.
Special Equipment: A piping bag will help shape the churros, making the process even simpler and more fun.
Recipe Overview
Difficulty Level: The churros bites are easy to prepare, requiring only a few basic techniques like mixing, piping, and frying.
Category: This dessert is perfect for gatherings, family snacks, or as a sweet ending to a dinner party.
Cuisine: Originating from Spanish cuisine, churros have become popular worldwide and are loved for their unique flavor and texture.
Cost: This recipe is cost-effective, with minimal ingredients that are affordable and easy to find in any grocery store.
Season: Churros are delightful year-round but are particularly popular during festive occasions and holidays.
Occasion: Serve churros bites at birthday parties, holiday gatherings, or simple family get-togethers for a special treat.
Why You’ll Love This Recipe
These churros bites offer a magical combination of flavor and texture that makes them irresistible. The crispy coating contrasts wonderfully with the tender inside, creating an experience that is both satisfying and comforting. The cinnamon sugar adds warmth and sweetness, while the rich chocolate dipping sauce elevates the entire experience.
Convenience is another reason to adore this recipe. With straightforward preparation and frying, there’s little fuss involved in making these enticing bites. They can be whipped up quickly, making them an easy option for unexpected guests or cravings. Plus, the recipe can be made in advance and enjoyed fresh, or even reheated without losing that deliciousness.
Nutritionally, churros bites should be enjoyed in moderation as they are a treat. However, when made at home, you can control the ingredients, ensuring they are made with high-quality products free from preservatives.
Social gatherings become even more enjoyable with these churros bites. They’re perfect for sharing and can be presented beautifully on platters, encouraging people to mingle. Their appeal is universal, making them a hit at any event.
Lastly, this recipe is accessible and budget-friendly. With only a few pantry staples needed, churros bites can be made without breaking the bank, allowing you to indulge in a delicious treat on a budget.
Historical Background and Cultural Significance
Churros have centuries of history that trace their origins to Spain, where they were a popular breakfast item for farmers. Traditionally, they were served with hot chocolate for dipping, creating a classic combination that has stood the test of time. Over the years, churros have made their way into many cultures, including Latin American countries where they are often enjoyed as street food.
The cultural significance of churros is significant in Spanish-speaking countries, where they frequently appear in festivals and celebrations, symbolizing camaraderie and festivity. Many cities, such as Madrid and Barcelona, have their iconic churro shops that draw both locals and tourists alike.
As the recipe for churros evolved, variations began to emerge, incorporating different flavors and styles. In Latin America, some regions have adopted fillings, such as dulce de leche or chocolate, creating unique versions of this beloved treat.
Today, churros are recognized around the globe and can be found in various forms, from the classic shapes to innovative bites. This evolution attests to their lasting popularity and cultural impact across generations and borders.
Ingredient Deep Dive
Flour
Flour is the fundamental ingredient in churros that provides structure and support. Using all-purpose flour is common, which lends itself well to achieving that perfect chewy texture. It’s important to sift the flour to avoid any lumps and ensure a smooth batter. For those considering gluten-free options, substitutes like almond flour can be utilized, but they may require additional adjustments to achieve the desired texture.
Sugar
Sugar is what makes churros deliciously sweet. Granulated sugar is typically used for the dough, while a blend of granulated sugar and cinnamon coats the exterior. The sweetness is crucial to balancing the flavors and adds to the appearance of the churros. For health-conscious individuals, consider using stevia or coconut sugar as alternatives for a lower glycemic index.
Common Mistakes to Avoid
Not measuring ingredients accurately can lead to incorrect dough consistency, affecting the final product.
Failing to heat the oil to the proper temperature will result in greasy or unevenly cooked churros.
Skipping the resting period for the dough may prevent it from achieving the right texture when frying.
Piping the dough too thick can lead to uneven cooking, resulting in a doughy center.
Overcrowding the frying pan can lower the oil temperature significantly, leading to soggy churros.
Not rolling the churros in cinnamon sugar immediately after frying can make it stick to the surface, resulting in uneven coating.
Using a low-quality chocolate for the sauce can compromise the richness and flavor of the dipping experience.
Not allowing the churros to cool slightly before serving can result in burnt tongues. It’s best to wait just a moment!
Essential Techniques
One key technique for creating churros is the proper method of frying. Frying the churros at the right temperature is essential to achieve the ideal texture: golden and crispy on the outside while remaining fluffy on the inside. Use a candy thermometer to monitor the oil temperature, aiming for around 350°F (175°C).
Mastering the piping technique is also crucial for uniform churros. Using a large star-shaped piping tip creates the classic ridged surface that holds the cinnamon sugar well. Pipe the dough into straight lines or shapes, depending on your preference, but avoid lifting the piping bag too much to prevent air bubbles.
Pro Tips for Perfect Churros Bites
To ensure your churros bites turn out perfectly, always pipe the dough directly into hot oil to maintain its shape and structure. Use a sturdy piping bag for easy control and avoid any mess.
Keep an eye on the frying time, ensuring each batch is cooked to a golden brown without burning. Make sure to let the churros rest on paper towels after frying to remove excess oil.
Experiment with different spice blends in the sugar coating, adding nutmeg or cayenne for a twist on the classic flavor.
Enjoy churros bites warm from the fryer, as that is when they are at their best. Reheat leftover churros by placing them in a preheated oven to restore their crispiness.
Serving churros with a variety of sauces, like caramel or flavored pastry creams, can create an exciting tasting experience for everyone.
Consider using a blend of dark and milk chocolate for the dipping sauce, as this creates a balanced flavor without being overwhelming.
Brushing the churros lightly with melted butter before rolling them in sugar enhances the flavor and helps the spice mixture adhere better.
Variations and Adaptations
Churros bites can be adapted in various ways to cater to personal preferences. One popular variation includes adding a filling, such as chocolate or cream cheese, to the center of the churros. This creates a delightful surprise with each bite.
Seasonal adaptations are also possible. For example, pumpkin spice can be used in the sugar mixture during the fall, recruiting a warm, comforting flavor profile. Similarly, during holiday seasons, incorporating peppermint extract into the chocolate dipping sauce can create a festive treat.
Dietary modifications can make churros bites accessible to various diets. Gluten-free churros can be made using almond flour or gluten-free flour blends. Vegan options can replace eggs with flax seeds or a commercial egg substitute, ensuring everyone can enjoy these delightful treats.
Flavor variations can include adding citrus zest to the batter or infusing the chocolate dipping sauce with liqueur for a gourmet twist. Different textured modifications, such as filling time, can offer new experiences and elevate traditional churros to a new level.
Serving and Presentation Guide
When serving churros bites, presentation plays a vital role in elevating the dining experience. Consider plating churros upright in a decorative jar or cone for a fun, rustic aesthetic. Use a small bowl for the chocolate dipping sauce, garnished with chocolate shavings or a sprinkle of cinnamon for added appeal.
For garnishing ideas, a dusting of powdered sugar can add an element of elegance. A drizzle of caramel sauce alongside the chocolate can also provide an inviting visual that encourages tasting.
Traditionally, churros are served warm, as the texture and flavor are optimal at this temperature. However, they can also be enjoyed at room temperature for ease of serving in casual settings.
Portion control is important, especially when serving at parties. Individual servings can be prepared in smaller portions or given as favor bags. This approach not only emphasizes shareability but also encourages guests to try various flavors and dips.
Wine and Beverage Pairing
For a delightful pairing with churros bites, consider serving a sweet dessert wine like a late harvest Riesling or a sparkling Moscato. These wines offer a balance that complements the sugar and cinnamon flavor of the churros.
For non-alcoholic alternatives, hot chocolate is a classic choice that aligns perfectly with churros. The richness of creamy hot chocolate makes each bite even more luxurious.
Additionally, coffee lovers may appreciate bold espresso or a smooth cappuccino for dipping churros, providing an invigorating contrast to the sweetness.
Temperature considerations are also vital; ensure beverages served alongside churros bites are at optimal serving temperatures to enhance the overall experience.
Storage and Shelf Life
To maintain the freshness of your churros bites, they should be stored in an airtight container at room temperature. This will help preserve their texture, preventing them from becoming soft or chewy.
Leftover churros can last for 1-2 days at room temperature. For longer storage, consider freezing them. Store cooled churros in a freezer-safe container, ensuring they are wrapped tightly to avoid freezer burn.
When reheating, place frozen churros in a preheated oven at 350°F (175°C) for about 10 minutes, or until warmed through. Avoid using the microwave, as it can make the churros soggy.
Signs of spoilage typically include an off smell or changes in texture. If churros feel particularly soft or moist after a few days, it’s best to discard them to ensure safety.
Make Ahead Strategies
If preparing churros bites for a gathering, consider making the dough in advance and refrigerating it. This allows the flavors to deepen, and the dough will be ready to pipe and fry when you need them.
You can also pre-make the chocolate dipping sauce and store it in an airtight container in the refrigerator. Simply reheat it in a microwave or on the stovetop before serving to achieve a smooth consistency.
In terms of assembly, churros should be fried just before serving to ensure they maintain their crispy texture. Keep fried churros warm in a low oven until it’s time to serve, allowing you to prepare everything else beforehand.
Fresh elements can be added just before serving, such as a sprinkle of cinnamon sugar to revive the churros’ flavor and visual appeal.
Scaling Instructions
When scaling the churros recipe, simply double or triple the ingredient measurements according to the number of servings desired.
For halving the recipe, be cautious with cutting the cooking times, as smaller batches can cook faster. Maintaining consistent frying temperatures is crucial to ensure even cooking.
If altering quantities, consider the size of your kitchen equipment. A larger pot may be required for frying if making bigger batches to avoid overcrowding.
Keep in mind that timing may change when scaling. Monitor the churros closely to avoid overbrowning or undercooking.
Lastly, adjust your storage needs accordingly based on the new quantities. Prepare for more airtight containers to preserve freshness.
Nutritional Deep Dive
When considering the macros for churros bites, a typical serving includes carbohydrates from flour and sugar, making them a source of energy. The amounts can vary based on the recipe and portion size.
Micronutrient analysis shows that churros may provide some vitamins from eggs if included. However, they are primarily a treat and should be enjoyed in moderation.
Churros offer unique health benefits if made with whole grains or less sugar. By making smart ingredient choices, this classic treat can be adapted to better suit dietary needs.
Dietary considerations may take into account the consumption of fried foods. It’s best to balance churros with healthier meals throughout the day.
Weight management tips can include portion control, as enjoying smaller servings can satisfy cravings without overindulging.
Dietary Adaptations
For those following a gluten-free diet, churros can be successfully made using almond flour or a gluten-free flour blend. Adjustments may be needed for texture and moisture.
Dairy-free adaptations can be achieved by substituting milk with almond milk or coconut milk in the chocolate dipping sauce, ensuring all guests feel included.
Vegan modifications involve replacing eggs with a flaxseed mixture, allowing vegans to enjoy the sweetness of churros bites without sacrificing flavor.
Making churros bites low-carb often involves using almond flour and a sugar substitute, creating a delicious option for those following Keto or Paleo diets.
Low-FODMAP diets may be accommodated by focusing on gluten-free flour and avoiding added high-FODMAP ingredients in the chocolate sauce.
Troubleshooting Guide
Texture issues can often arise from not following the correct frying temperature. Over or under-frying can lead to churros that are either too crunchy or not cooked properly.
Flavor balance can be affected by excess cinnamon sugar coating. Using just enough to dust the outside enhances flavor without overwhelming the palate.
Temperature problems in frying can arise from too many churros cooking at once, leading to uneven temperatures. Always fry in smaller batches to maintain consistency.
Equipment challenges may emerge when using a low-voltage fryer. Ensure you’re using reliable tools that can maintain high temperatures to achieve the ideal churros.
Ingredient substitutions may alter the outcome if not chosen correctly. Stick to similar textures and moisture levels when altering key ingredients.
Timing concerns can affect both preparation and frying steps, as churros left in hot oil too long can become overly browned. Keeping a close eye on cooking times is essential.
Recipe Success Stories
Community feedback about churros bites often highlights their easy preparation and delightful flavor. Readers frequently share pictures of their churros, emphasizing their golden color and perfect texture.
Variation successes shine a light on innovative takes on the classic recipe. Many people have experimented by infusing unique flavors in the chocolate sauce or adding fillings, leading to delicious results.
Adaptation stories highlight how families have incorporated churros bites into special gatherings, making them a staple for celebrations. These moments create lasting memories as everyone enjoys the sweet treat.
Reader suggestions often lead to creative modifications, enhancing traditional recipes. Some have suggested alternate dipping sauces, sparking excitement among churros enthusiasts.
Photography tips encourage sharing pictures of the churros bites, capturing their charm and appeal, helping to inspire others to try the recipe themselves.
Frequently Asked Questions
Q: Can I make churros ahead of time?
A: While the churros are best enjoyed fresh, you can prepare dough in advance and refrigerate it. Fry them right before serving for the best texture.
Q: What is the best way to reheat churros?
A: To reheat churros, preheat your oven to 350°F (175°C) and bake them for about 10 minutes until warmed through for the best crispiness.
Q: Are churros gluten-free?
A: Traditional churros are not gluten-free, but you can use gluten-free flour alternatives to create a delicious version that meets dietary needs.
Q: How can I make vegan churros?
A: Vegan churros can be made by replacing eggs with flaxseed meal mixed with water and using plant-based alternatives in the dipping sauce.
Q: What type of chocolate is best for dipping sauce?
A: A combination of dark and milk chocolate often strikes the perfect balance, providing a rich yet sweet flavor that pairs beautifully with churros.
Q: Can I freeze churros?
A: Yes, churros can be frozen. Allow them to cool completely, store them in an airtight container, and enjoy them later by reheating in the oven.
Q: How do I avoid greasy churros?
A: To avoid greasy churros, ensure the oil is at the correct temperature before frying, and do not overcrowd the pan while cooking.
Q: What can I use instead of cinnamon?
A: If you prefer alternatives, consider using nutmeg or pumpkin spice for a different flavor profile in your sugar coating.
Q: How long do churros stay fresh?
A: Churros are best consumed within a couple of days; after that, they may lose their crispiness and flavor.
Q: What other sauces can I use for dipping?
A: Churros can be paired with various dipping sauces, such as caramel sauce, dulce de leche, or even fruit preserves for a twist.
Additional Resources
For those interested in enhancing their churros experience, check out related recipes such as Mexican hot chocolate or different ideas for sweet dips.
Technique guides on frying and piping can further improve your cooking skills while also ensuring your churros turn out perfectly each time.
Ingredient information on key components used in churros can deepen culinary understanding and influence future flavors.
Lastly, equipment recommendations will help make your churros journey more accessible, offering choices to aid your success.
Join the Conversation
We invite you to share your churros bites creations on social media, showing off your delicious results and engaging with fellow cooking enthusiasts. Share your photography tips or tag your favorite variations to inspire others in the community.
Your recipe reviews and comments provide valuable feedback and encourage others to try their hand at making churros bites. Join the discussion about favorite fillings or sauces, creating a dialogue around this beloved treat.
Let’s celebrate the joy of cooking together, diving into diverse adaptations, and learning from each other’s cooking experiences!
The Recipe
Churros Bites with Chocolate Dipping Sauce
Serves: 4 servings
Prep Time: 20 mins
Cook Time: 10 mins
Total Time: 30 mins
Kitchen Equipment Needed
Large pot for frying
Candy thermometer
Piping bag with star tip
Mixing bowl
Slotted spoon
Paper towels
Ingredients
1 cup water
1/2 cup unsalted butter
1 cup all-purpose flour
1/4 teaspoon salt
2 large eggs
1 teaspoon vanilla extract
1 cup granulated sugar (for coating)
2 teaspoons ground cinnamon (for coating)
1 cup semi-sweet chocolate chips (for dipping sauce)
1/2 cup heavy cream (for dipping sauce)
Directions
In a saucepan, combine water and butter and bring to a boil over medium heat.
Once boiling, stir in flour and salt, mixing until a dough forms and pulls away from the sides of the pan.
Remove from heat and allow to cool slightly. Add eggs one at a time, mixing well after each addition. Stir in vanilla extract.
Heat oil in a large pot to 350°F (175°C).
Transfer dough to a piping bag fitted with a star tip and pipe 4-inch strips into the hot oil, frying until golden brown on both sides.
Remove churros and let them drain on paper towels. Mix sugar and cinnamon in a shallow dish and roll the warm churros in the mixture until coated.
For the chocolate dipping sauce, heat heavy cream in a saucepan over medium heat and pour over chocolate chips in a bowl. Stir until melted and smooth.
Serve churros bites warm with the chocolate dipping sauce on the side.
Recipe Notes
For a unique twist, try adding orange zest to the churros dough.
Substitute chocolate with white chocolate or caramel for varied dipping sauces.
Serve with fresh fruit for a refreshing contrast.
Easy Churros Poppers with Cinnamon Sugar Coating
Churros Poppers: A Sweet Twist on a Classic Treat
⚖️
Difficulty
Medium
⏲️
Prep Time
30 mins
🕒
Cook Time
10 mins
⏱️
Total Time
40 mins
🍽️
Servings
20 pieces
Churros poppers are a delightful take on the classic Spanish treat, offering bite-sized joy with each crunchy and sugary bite. Combining the essence of traditional churros with a modern twist, these poppers are perfect for snacking or dessert. Every bite delivers a satisfying crunch from the outer layer, followed by a warm, soft interior that’s delicately sweetened and spiced, making them impossible to resist. Whether enjoyed at a festive gathering or as a decadent after-dinner treat, churros poppers are sure to impress.
What sets these delicious churros apart is not only their size but also the versatility in serving. Time and again, churros have been a favorite, but in popper form, they capture everyone’s attention. Enhanced with a dash of cinnamon sugar, and paired with rich chocolate sauce, they become a festive centerpiece, perfect for capturing the warm flavors associated with gatherings and celebrations.
Quick Recipe Highlights
Flavor Profile: Rich vanilla and cinnamon flavors take center stage in these churros poppers, complemented by a touch of nutmeg and orange zest when desired.
Texture: A perfect balance of crunchiness on the outside gives way to a soft, airy interior, creating a satisfying contrast in every bite.
Aroma: The sweet and warm aroma of frying dough mingled with cinnamon and sugar fills the air, inviting everyone to come closer.
Visual Appeal: Golden brown color on the outside dusted with white sugar makes these small treats visually irresistible.
Skill Level Needed: A medium skill level is required for frying and handling the dough, but clear instructions make it manageable for home cooks.
Special Equipment: A piping bag with a star tip for perfect shapes, and a deep fryer or heavy pot for frying are essential tools for this recipe.
Recipe Overview
Difficulty Level: The difficulty of making churros poppers is classified as medium, as it involves mixing, piping, and frying. While it may seem challenging, following the steps ensures success.
Category: This recipe falls into the dessert and snack categories, with applications as both a sweet treat or party food, perfect for all audiences.
Cuisine: This recipe is inspired by traditional Spanish churros, reflecting a rich culinary heritage centered around sweet fried dough treats often enjoyed at fairs and family gatherings.
Cost: The cost of ingredients is relatively low, primarily consisting of flour, sugar, and basic pantry staples, making it an affordable recipe for any occasion.
Season: Churros poppers can be enjoyed year-round, but are especially popular during winter holidays and festive occasions.
Occasion: Ideal for celebrations, gatherings, or even as a simple family dessert, churros poppers bring joy and sweetness wherever they appear.
Why You’ll Love This Recipe
Churros poppers not only tantalize your taste buds with their warm, sugary goodness but also provide a unique twist that’s perfect for sharing. Their comforting cinnamon flavor paired with a light and airy texture creates an irresistible snack that appeals to both kids and adults. Dipping them into rich chocolate sauce enhances the experience, turning every bite into a delightful treat.
Preparation is incredibly convenient—mix the dough, pipe it into small pieces, and fry until golden. With a total prep time of just 30 minutes, you could be serving fresh, homemade churros poppers in no time. They are festive without demanding hours in the kitchen and can easily be made ahead of any gathering.
Nutritionally, churros poppers can provide a moment of joy in moderation. While indulgent, they can be made with lighter ingredients when experimenting in the kitchen. Serving them in smaller portions allows for guilt-free enjoyment, ensuring you savor the flavor without overdoing it.
Churros poppers shine during social occasions, transforming any gathering into a festive experience. Whether it’s a holiday party or a simple get-together, serving these treats brings everyone together, creating memorable moments centered around good food and laughter.
Additionally, their affordability makes them an appealing option for feeding a crowd. With basic ingredients, you can whip up a large batch, ensuring everyone gets a taste of these delightful sweets without breaking the bank.
Historical Background and Cultural Significance
The origin of churros is a topic of debate, with many tracing their roots back to Spain. Traditionally enjoyed for breakfast or as a snack, churros have been a staple in Spanish culture and were often served with thick hot chocolate. Over time, they made their way to Latin America, where regional variations emerged, including the beloved filled churros.
Culturally, churros embody festivity and conviviality. They are commonly found at fairs and festivals, served alongside churros vendors selling their wares to eager patrons. Their presence at celebrations marks joy, community, and the sharing of sweet treats, making them an essential food during significant events.
As for the evolution of the churro, it has undergone numerous adaptations ranging from traditional to contemporary styles. From chocolate-filled delights to gourmet versions, the versatility of churros is a testament to their culinary significance, inspiring chefs who reinvent them time and again.
Regional variations have also given rise to unique interpretations of churros across the globe. From the long, straight types in Spain to the bite-sized churros poppers popular in today’s culinary landscape, every culture adds its twist, enriching the gastronomic tapestry that churros represent.
Ingredient Deep Dive
Flour: Flour is the foundation of the churro dough, providing the structure necessary. Traditionally, all-purpose flour is used, but variations can include whole wheat or gluten-free options for dietary restrictions. When selecting flour, look for a fine texture to help achieve a smooth dough. Proper storage in a cool, dry place ensures its freshness and longevity, while alternatives like almond flour can add an interesting flavor palette.
Butter: Butter brings richness and flavor to the churro dough. It contributes to a tender texture and enhances the overall taste experience. Opt for unsalted butter to control the saltiness of the final product. If avoiding dairy, alternatives such as coconut oil can be used, though the flavors will slightly change. Proper storage in the refrigerator applies to butter, keeping it fresh for future baking sessions.
Sugar: Both granulated and powdered sugar play a crucial role in churros. Granulated sugar adds sweetness to the dough, while powdered sugar is often the final touch for that classic churro coating. Always choose high-quality sugar for the best flavor, and store it in an airtight container to prevent clumping. For added diversity, consider utilizing coconut sugar for a more caramel-like sweetness.
Cinnamon: Cinnamon is the signature spice in churros, providing warmth and a nostalgic flavor. Ground cinnamon is typically used for easy incorporation into the dough and toppings, but using fresh cinnamon sticks can infuse a more robust flavor. Proper storage in a cool, dark place will maintain its potency, while alternatives like nutmeg can create delightful variations in taste.
Common Mistakes to Avoid
Skipping the dough chilling: Ensuring the dough is cool helps to maintain its shape while frying, preventing the poppers from losing form.
Overheating the oil: Hot oil can lead to overly browned or burnt churros, while too cool oil results in greasy poppers. Always maintain the right frying temperature, around 350°F (175°C).
Inadequate dough mixing: Not mixing the dough sufficiently can lead to clumps, which affects the texture. Aim for a smooth consistency before piping.
Piping with too large a tip: Using a large pastry tip will yield thicker poppers that may not cook evenly. Opt for a medium star tip to achieve classic churro shapes.
Overcrowding the frying pan: Frying too many pieces at once can lower the oil temperature, leading to uneven cooking. Fry in small batches for optimal results.
Underestimating cooling time: Allowing fried poppers to cool briefly before sugar coating ensures the sugar adheres better.
Neglecting flavoring options: Churros can be further enhanced with fillings or toppings. Experiment with different flavor combinations for added excitement!
Inadequate storage post-frying: Storing them improperly can ruin the texture. Keep them in a single layer on a plate or wire rack to maintain crispness.
Essential Techniques
Frying: Frying is critical for a perfect churro popper. To master this technique, ensure your oil is at the right temperature—ideally around 350°F (175°C). A thermometer is your best friend. Also, watch for your poppers to reach a deep golden brown hue for optimal crunch. One common pitfall is overcrowding the oil; fry in small batches allows for even cooking. Successful frying leads to a crispy outer layer that contrasts beautifully with the soft inside.
Piping: Mastering the art of piping dough is equally important. Employing a piping bag fitted with a star tip helps create the iconic churro shape. Start by filling the piping bag no more than halfway to avoid overflow. Squeeze tightly and smoothly for clean edges. A key hurdle is releasing the dough; practice steady pressure to prevent air bubbles, ensuring uniformly shaped poppers that cook evenly. Look for the dough to smoothly flow from the tip without being too thick.
Pro Tips for Perfect Churros Poppers
– Use parchment paper to pipe the dough if you don’t have a piping bag; it makes transferring the dough to the oil much easier.
– Infuse flavor into the dough by adding vanilla extract or orange zest; this will elevate the taste profile significantly.
– Prior to frying, let the dough rest for 10-15 minutes; this helps develop elasticity and improves the final texture.
– Maintain the oil temperature by adjusting the heat as necessary; too high will burn them, while too low will make them oily.
– Coat immediately after frying to ensure the cinnamon-sugar mixture adheres well and creates a delightful, sweet layer on top.
– Consider a chocolate dip or caramel sauce for a fun twist that brings a new layer of flavor to the poppers.
– Choose the right flour; all-purpose flour will yield the best results, providing the traditional texture we crave in churros.
– Experiment with different shapes and sizes, from bites to longer strips to cater to your festive needs while still capturing that classic churro essence.
Variations and Adaptations
Churros poppers have numerous regional variations that can be intriguing to explore. In various Latin American countries, churros might feature distinct spices or fillings, such as cajeta (a caramel-like sauce) or dulce de leche. Adapting the dough to include cocoa powder for a chocolate churro popper variation is also a delightful twist.
Seasonally, churros can be modified with festive flavors, such as pumpkin spice during fall or peppermint during winter holidays, allowing them to resonate with current trends and festive spirit. For those with dietary preferences, substituting traditional ingredients with gluten-free flour or other alternatives can help maintain the base recipe while ensuring everyone can enjoy them.
Flavor variations can be endless! Swap the typical cinnamon-sugar coating for a spicy chili powder-sugar mix for a sweet and spicy treat or try experimenting with citrus zest in the dough for a refreshing undertone. Additionally, filling variations can lend an unexpected twist, showcasing creative fillings such as cream cheese or chocolate ganache that ooze out as you take a bite.
In terms of texture, incorporating ingredients like crushed nuts can add a new crunch, while drizzling with cream or sauces can offer a creamy counterpart. Presenting churros on a vibrant plate or with fresh fruit can enhance visual appeal, ensuring these treats are as delightful to look at as they are to eat.
Serving and Presentation Guide
Churros poppers are a treat that can shine with simple yet elegant presentation techniques. Start with a clean serving platter; arranging your poppers in a circular fashion creates a dazzling centerpiece. Afriendly garnishing touch involves drizzling melted chocolate over the pile and sprinkling finely chopped nuts or edible flowers for a visually appealing result.
Traditional accompaniments enhance the experience—serving a small cup of hot chocolate or dulce de leche for dipping adds an interactive element to your dessert spread. When serving this snack, temperature is key; churros should be served warm and fresh to highlight their crispy exterior.
Don’t forget portion control; smaller serving sizes keep guests coming back for more without overindulging at once. Additionally, depending on the occasion, consider mini dessert cups or sticks for easy consumption during parties or gatherings. This fun and casual approach makes churros poppers a crowd-pleaser at any social event.
Wine and Beverage Pairing
Churros poppers pair beautifully with a variety of beverages for a complete indulgent experience. For wine lovers, a sweet dessert wine such as Moscato or a light sparkling wine can complement the sugary churros well, providing a refreshing contrast to the sweetness.
If you’re looking for non-alcoholic alternatives, fresh fruit juices, particularly orange or tropical blends, offer a bright crispness that can cut through the richness of churros. Coffee enthusiasts can enjoy a cup of freshly brewed espresso or a latte; the bold coffee flavors balance the sweetness while enhancing the overall fat content of the churros.
Tea lovers can opt for a light, aromatic herbal tea, such as chamomile or peppermint, providing a soothing counterpart to the crunchy sweetness. Remember to serve these beverages at the right temperature—cold drinks with churros poppers are best cooler while hot beverages should be served freshly brewed.
Storage and Shelf Life
Churros poppers, while best enjoyed fresh, can be stored for short periods if needed. Proper storage methods include placing them in an airtight container at room temperature to prevent them from becoming soggy. They generally last for about 1-2 days.
However, if you wish to keep them longer, consider freezing them. Lay the cooled poppers in a single layer on a baking sheet to prevent sticking, then transfer them to a freezer-safe container after they are frozen. They can last up to a month in the freezer. To enjoy, simply reheat in the oven at 350°F (175°C) for about 10 minutes.
Signs of spoilage include any unpleasant odors, excessive sogginess, or noticeable discoloration; if these occur, it’s best to discard the churros. Always strive for the freshest taste, as crispy churros will certainly provide the best experience.
Make Ahead Strategies
To prepare churros poppers strategically, consider making the dough ahead of time. You can chill the dough in the refrigerator for up to 24 hours before frying, ensuring that the flavors meld beautifully. If you prefer, pre-pipe the dough and freeze the shapes on a baking sheet, then transfer them to an airtight container, ready to fry directly from frozen for added convenience.
If you’re planning for a large gathering, consider frying churros poppers in batches and keeping them warm in the oven until ready to serve. This method minimizes stress during busy times, allowing you to focus on enjoying the party or event.
Lastly, refrigerate any leftover churros for easy reheating the next day. For optimal taste and quality, focus on adding freshly mixed toppings or sauces right before serving to enhance the flavors without compromising their crispness.
Scaling Instructions
When needing to adjust the serving size, scaling the churros poppers recipe is straightforward. To halve the batch, simply divide each ingredient measurement by two, and you’ll maintain the same ratios for quality results.
Doubling or tripling the recipe requires careful attention to equipment size; ensure your frying container can accommodate the increased batter. Timing may also adjust slightly, as larger batches may require more frying time to achieve that lovely golden color.
After frying, consider that the storage capacity of your containers will matter. More servings may require more significant or multiple containers to guarantee freshness and quality. Always assess and allow extra space between poppers to prevent them from sticking together.
Nutritional Deep Dive
Churros poppers, while undeniably a treat, can be examined nutritionally to understand their macro breakdown better. On average, each popper contains carbohydrates primarily derived from flour and sugar, contributing to a quick energy boost. The presence of butter provides fats, aiding in flavor development and texture.
However, it’s essential to consider portion size; one popper may not represent a larger servings approach. Balancing churros with more nutrient-dense foods in your meal plan enables you to enjoy indulgence without compromising overall health.
In terms of micronutrient analysis, churros contain small amounts of vitamins and minerals through ingredients like flour and butter. Exploring alternatives for flours or sweeteners can impact the nutritional profile, promoting healthier versions suitable for various dietary needs.
For those emphasizing weight management, mindful portion control remains key. Savoring a couple of poppers can create a fulfilling experience, focusing on the joy of sweet treats without excess.
Dietary Adaptations
For those following specific dietary preferences, churros poppers can be adapted accordingly. Gluten-free options often utilize rice flour or a blend of gluten-free all-purpose flour, maintaining flavor and texture while accommodating sensitive individuals.
For dairy-free variations, coconut oil can replace butter, and if trying to achieve a vegan-friendly version, consider plant-based milk options in the dough. Vegan butter substitutes will further guarantee no animal products are included without losing richness.
Low-carb or keto adaptations could involve swapping out regular flour for almond or coconut flour, adjusting binders and sweeteners to lower carbohydrate content while respecting flavor expectations.
Full of vibrant flavors, churros poppers can be modified based on seasonality, using fresh produce or spices to align with dietary restrictions and preferences, showcasing versatility while maintaining their beloved taste.
Troubleshooting Guide
For those encountering texture issues, be mindful of your oil temperature. Too cool oil can result in doughy centers, while overly high oil leads to burnt exteriors—maintain the ideal frying temp for optimal results.
Adjusting flavors can also present challenges; should your churros lack sweetness, consider additional sugar in the dough or rolling mixture. On the other hand, if too sweet, adding a pinch of salt or extra spices can help balance the flavor.
If your churros become overly greasy, the oil temperature wasn’t maintained. Retrying with a thermometer can prevent this pitfall. And if your dough feels too sticky, incorporating a bit more flour while mixing can help enhance consistency.
For ingredient substitutions, ensure ratios are kept in mind—using different flour types can affect the outcome, so familiarize yourself with how your specific substitutes perform when baked or fried.
Finally, if timing is an issue, such as frying them too early resulting in cold poppers, practice prepping and frying in small batches, ensuring that every group stays fresh and warm for your gatherings.
Recipe Success Stories
Community feedback often highlights the charm and accessibility of churros poppers. Many readers have shared how easy and enjoyable the recipe is, delighting friends and family with their unique take on classic churros.
Success stories depict varying interpretations of the recipe, particularly showcasing fillings and alternate spices that have been met with enthusiasm. Tips shared by readers, like experimenting with different dipping sauces or flavors, have opened up exciting culinary conversations and community engagement.
Photographic representations can inspire others, as readers avidly share their creations on social media, enjoying the visual storytelling through colorful plates and vibrant poppers. The adaptability of churros poppers invites creativity, proving that with some experimentation, they can be personalized to each chef’s taste.
Overall, this recipe continues to build a community of dessert lovers, all embracing their variations and sharing their own successes, enriching the narrative of churros poppers through shared experiences.
Frequently Asked Questions
Q: Can I bake churros poppers instead of frying?
A: While traditional churros are deep-fried for that classic crispy texture, you can certainly bake them as a healthier option. Bake them at 375°F (190°C) until golden, but note that the crunchiness may vary.
Q: How do I know when the oil is hot enough?
A: Using a thermometer is best for accuracy; oil should be around 350°F (175°C). Alternatively, drop a small piece of dough into the oil; if it sizzles and rises to the top, the oil is ready.
Q: Can I freeze churros poppers?
A: Yes! After frying, let them cool, then freeze in a single layer before transferring to a freezer-safe container. They’ll last about a month; reheat in the oven when ready to serve.
Q: What if I don’t have a piping bag?
A: A plastic bag with a snipped corner can work as an effective substitute for a piping bag, allowing you to squeeze the dough precisely without purchasing additional equipment.
Q: How can I achieve the perfect golden color?
A: Consistent oil temperature is key—ensure it’s properly heated. A quick fry test with a small piece of dough can also help determine readiness.
Q: Are churros poppers vegan-friendly?
A: They can be made vegan by replacing butter with a non-dairy alternative and not using eggs in the dough, making necessary modifications while keeping the essence of churros intact.
Q: Should I roll them in sugar right after frying?
A: Yes, rolling churros in sugar while they’re still warm helps the sugar adhere better, resulting in that delightful sweet coating that enhances their flavor.
Q: Can I flavor the filling inside the churros?
A: Absolutely! Consider adding chocolate ganache, fruity fillings, or pudding to create a unique twist that surprises your guests with every bite.
Q: How do I know when they’re fully cooked through?
A: A perfect churro popper will have a crispy exterior with a soft center; testing one who’s a bit larger can give you an idea of doneness.
Q: What is the best way to serve churros poppers?
A: Serve them warm with various dipping sauces like chocolate, caramel, or berry coulis, encouraging guests to customize their delicious bites.
Q: How long can churros poppers be kept before they spoil?
A: Ideally, churros should be consumed within 1-2 days at room temperature to maintain quality. Freezing extends their shelf life, perfect for longer storage.
Additional Resources
Explore other related recipes that compliment churros poppers, such as creamy dipping sauces or spiced hot chocolate to enhance your dessert spread. Technique guides on frying and baking will offer foundational skills for all kinds of treats.
Consider investing in high-quality equipment that contributes to your cooking success, such as reliable fryers or piping tools, ensuring a stress-free cooking experience. Seasonal variations, like pumpkin spice for fall or peppermint varieties for the winter holidays, can elevate your dessert offerings with delightful seasonal flavors.
Join the Conversation
We encourage sharing your churros poppers experiences on social media—upload your creations to inspire fellow bakers and join a community passionate about sweet treats. Photography tips for capturing these delicious bites can enhance your social media posts, showcasing the delightful golden colors and inviting textures.
Engage with others by leaving recipe reviews, suggesting your variations and adaptations, and encouraging interaction in recipe forums. Together, let’s transform the humble churros poppers into a delightfully shared culinary experience that everyone can enjoy.
The Recipe
Churros Poppers
Serves: 20 pieces
Prep Time: 30 mins
Cook Time: 10 mins
Total Time: 40 mins
Kitchen Equipment Needed
Deep fryer or heavy pot
Piping bag with star tip
Medium saucepan
Thermometer
Measuring cups and spoons
Airtight container for storage
Ingredients
1 cup water
1/2 cup butter
1 cup all-purpose flour
1/4 teaspoon salt
1 tablespoon granulated sugar
4 large eggs
Vegetable oil for frying
1/2 cup sugar (for coating)
1 tablespoon cinnamon (for coating)
Directions
In a medium saucepan, combine water, butter, salt, and sugar. Bring to a boil.
Add flour immediately, stirring vigorously until a dough forms and pulls away from the sides of the pan.
Remove from heat and let cool for a few minutes before mixing in eggs, one at a time, until fully incorporated.
Heat oil in a deep fryer or heavy pot to 350°F (175°C).
Transfer dough to a piping bag fitted with a star tip. Pipe small (2-inch) pieces directly into the hot oil.
Fry until golden brown, about 2-3 minutes, flipping halfway through.
Remove with a slotted spoon and drain on a paper towel.
In a separate bowl, mix sugar and cinnamon. Toss warm poppers in the mixture until well coated.
Serve immediately with dipping sauces of your choice.
Recipe Notes
Churros poppers are best served warm; for leftovers, follow proper storage guidelines.
Feel free to experiment with different flavorings in the dough, such as vanilla or zest.
Store unused dough in the refrigerator for up to 24 hours before frying.
Best Chocolate Chip Cookies – Soft, Chewy & Easy to Make
Delicious Chocolate Chip Cookies: The Ultimate Comfort Treat
⚖️
Difficulty
Easy
⏲️
Prep Time
15 mins
🕒
Cook Time
10 mins
⏱️
Total Time
25 mins
🍽️
Servings
24 cookies
Chocolate chip cookies are more than just a baked good; they are an experience. Imagine the aroma of vanilla and buttery dough wafting through your kitchen, beckoning everyone to gather. These cookies are the perfect balance of sweet chocolate and soft, chewy cookie dough that melts in your mouth. They can evoke memories of childhood, after-school treats, or cozy holiday gatherings. What’s even better is that they are incredibly easy to make, allowing you to create a batch within the span of just 25 minutes.
This recipe captures the essence of a classic chocolate chip cookie while allowing you to explore your individual taste preferences. Whether you enjoy them straight from the oven or dunked in milk, these cookies adapt to every occasion. The golden, slightly crispy edges contrast beautifully with the chewy center packed with semi-sweet chocolate chips. Each bite offers a delightful combination of rich flavors and textures, making every moment spent enjoying them pure bliss.
Quick Recipe Highlights
Flavor Profile: The sweet chocolate harmonizes beautifully with the buttery hints and hints of vanilla, making each bite irresistible.
Texture: Expect a perfect crispiness on the edges, giving way to a chewy, gooey center that holds the chocolate nicely.
Aroma: The scent of vanilla combined with melting chocolate creates a warm and inviting atmosphere in your kitchen.
Visual Appeal: Golden brown cookies speckled with gooey chocolate chips sit enticingly on a platter, ready to be enjoyed.
Skill Level Needed: This straightforward recipe requires only basic cooking skills, making it accessible for novice bakers.
Special Equipment: All you need is a mixing bowl, a baking sheet, and a spatula to create cookie magic.
Recipe Overview
Difficulty Level: This recipe is rated easy due to its simple steps and common ingredients, making it ideal for beginners.
Category: Chocolate chip cookies fit perfectly as a dessert or snack, enjoyable any time of day.
Cuisine: This treat has roots in American cuisine, popularized in the mid-20th century and loved nationwide ever since.
Cost: The approximate cost is affordable, with basic pantry staples making it a budget-friendly option.
Season: Ideal for any season, chocolate chip cookies are especially cherished during holidays like Christmas and family gatherings.
Occasion: Perfect for parties, lunchboxes, or just a cozy night in with your favorite movie.
Why You’ll Love This Recipe
When it comes to taste and texture, chocolate chip cookies are unrivaled in the dessert world. They combine the rich taste of semi-sweet chocolate with the decadent flavor of brown sugar, creating a symphony of sweetness that is hard to resist. The texture is just as delightful, with a scrumptiously chewy center and lightly crisp edges that provide the perfect contrast. Each bite delivers a satisfying sensation, making them a favorite among cookie lovers.
Another reason this recipe stands out is its convenience. You don’t need any fancy kitchen gadgets, just a mixing bowl and a few common utensils. In less than half an hour, you can fill your home with the intoxicating aroma of freshly baked cookies. Perfect for unexpected guests, this recipe can be whipped up on a whim for an easy sweet treat.
On the nutritional side, these cookies use basic ingredients that provide energy. While they are a treat and should be enjoyed in moderation, the use of ingredients like brown sugar and butter offers a more comforting option compared to highly processed sweets. You can also modify the recipe to include oats or nuts for added nutrition and texture.
Socially, baking chocolate chip cookies is a fantastic way to bring people together. Whether you are sharing them at a gathering or giving them as gifts, they spread joy and evoke happy memories. Deliciously soft and warm cookies foster a sense of community, making them perfect for sharing.
Lastly, the cost-effectiveness of this recipe makes it accessible to everyone. With basic ingredients that you likely already have in your pantry, you can create an entire batch without breaking the bank. This allows you to enjoy freshly baked cookies anytime, without the need for extravagant ingredients.
Historical Background and Cultural Significance
Chocolate chip cookies have a fascinating origin story that enhances their allure. They were invented in the 1930s by Ruth Wakefield, who owned the Toll House Inn in Massachusetts. Originally intended to be a chocolate butter drop cookie, the addition of chopped chocolate bars resulted in the creation of a beloved treat that quickly gained popularity across America.
The cultural significance of chocolate chip cookies can be seen in their prominence in American culture. They symbolize the comfort of home and nostalgia, often associated with childhood memories, family gatherings, and holidays. Their impact extends beyond just being a dessert; they are a staple in many American households and have found their way into countless traditions.
As the recipe evolved, it adapted to various tastes and preferences, leading to a myriad of adaptations and improvements. Today, they are featured in innovative variations worldwide, from gluten-free to vegan versions, which cater to diverse dietary needs while maintaining their classic appeal.
Regional variations of chocolate chip cookies highlight the diversity of American cuisine. From the crispy versions in New York to the thick and chewy styles commonly found in the Midwest, each region has put its spin on this classic cookie, showing how deeply ingrained they are in the country’s baking culture.
Ingredient Deep Dive
Creamy, rich butter serves as the foundational fat in these cookies. It’s essential for the soft texture and enhances flavor. When selecting butter, aim for high-quality unsalted butter to control the salt content. Store it in the refrigerator and cut it into pieces only when ready to use for maximum freshness.
Granulated sugar sweetens the dough and contributes to a crispy texture. Look for finely granulated sugar for the best results. When measuring, avoid packing it tightly in the measuring cup to ensure accuracy.
Brown sugar, with its unique moisture content, adds chewiness to the cookies and a hint of caramel flavor. For the best results, use light brown sugar to retain a balance of flavors without overpowering the chocolate. Store it tightly in an airtight container to prevent it from hardening.
All-purpose flour provides structure to the cookie. Sifting the flour as you measure can prevent clumps and help create light cookies. Be sure to store flour in a cool, dry place to increase its shelf life.
Semisweet chocolate chips are the star of the show, so opt for high-quality brands for the best flavor. Ensure they are stored in a cool, dry spot to maintain their texture, as heat can cause them to melt together.
Eggs serve as binding agents for the dough, bringing the ingredients together while adding moisture. Best practice is to use eggs at room temperature for better incorporation into the dough.
Baking soda is crucial for leavening and achieving the perfect texture, allowing your cookies to rise just right. Check the expiration date regularly, as fresh baking soda is key to successful baking.
Vanilla extract enhances the flavor profile, infusing the cookies with warmth. For the best results, use pure vanilla extract instead of imitation. Store any extras in a cool, dark cupboard.
Common Mistakes to Avoid
Not measuring flour accurately: Too much flour makes cookies dry, while too little can cause them to spread too much.
Overmixing the dough: This can lead to tough cookies; mix until just incorporated.
Chilling dough too long: While chilling helps solidify the butter, too long can dry it out.
Using cold ingredients: Ensure eggs and butter are at room temperature for a better mixture.
Underbaking or overbaking: Keep an eye on the baking time, and remember cookies continue to cook on the tray.
Skipping the salt: A pinch of salt enhances flavors; be sure not to omit it.
Using old chocolate chips: Freshness matters for flavor—check expiration dates.
Ignoring oven temperature: Make sure your oven is preheated to achieve the right consistency.
Not greasing the baking sheet: A well-greased pan helps prevent sticking, ensuring easy removal.
Ignoring personal preference: Adjust baking time to achieve your preferred level of chewiness or crispiness.
Essential Techniques
When baking chocolate chip cookies, mastering the creaming method is essential. This technique involves beating together butter and sugars until light and fluffy, creating air pockets for a tender texture. To achieve success, use room-temperature butter and mix well to avoid clumps. Look for a pale, airy consistency before adding the rest of your ingredients.
Proper measuring of ingredients is crucial for cookie success. Use precise measuring tools to ensure consistency in your baking. For dry ingredients like flour, scoop it into the measuring cup and level it off with a knife rather than packing it down. This approach prevents dry, crumbly cookies.
Chilling the dough is a key technique that leads to thicker, chewier cookies. This helps to solidify the fats, preventing the cookies from spreading too much while baking. Allow at least 30 minutes in the fridge before baking for the best results.
Baking in batches is helpful for achieving even results. If you have multiple trays of cookies, rotate them halfway through baking to ensure uniform cooking and prevent some cookies from browning too quickly.
Finally, cooling cookies properly on a wire rack ensures that they maintain their texture. Let them cool on the baking sheet for a few minutes before transferring to a rack. This process allows excess heat to escape, preventing sogginess while maintaining that perfect chewy center.
Pro Tips for Perfect Chocolate Chip Cookies
– Use cold eggs and butter for the best texture. The combination allows for a creamier dough that holds together well during baking.
– Don’t overlook vanilla extract; it enhances the overall flavor of the cookies, so use pure extract for optimal taste.
– For a gourmet touch, sprinkle a bit of sea salt on top before baking for an amazing balance of sweet and salty.
– Consider incorporating chopped nuts for added crunch and depth; walnuts and pecans are great complements.
– Experiment with different types of chocolate—milk chocolate or dark chocolate chips can create unique flavor profiles.
– Ensure your oven is properly preheated; an accurate temperature means consistent cooking throughout the batch.
– For an added dimension of flavor, consider browning your butter before mixing, which brings a nutty aroma.
– Don’t overcrowd the baking sheet; space cookies out to ensure they bake evenly without sticking together.
Variations and Adaptations
There are countless variations of chocolate chip cookies to explore. For a regional twist, try adding American peanut butter or even pretzels for a salty crunch, adapting to local tastes and preferences. Seasonal adaptations can include spices such as cinnamon or pumpkin spice during fall for a warm flavor.
Health modifications are also popular, like using almond flour for a gluten-free version or substituting coconut oil for a dairy-free alternative. Even sugar alternatives can be used, such as stevia or coconut sugar for a healthier spin.
For flavor variations, consider adding espresso powder to intensify the chocolate flavor without compromising sweetness. You can also experiment with add-ins like dried fruits or shredded coconut for a delightful twist. Texture modifications, such as using rolled oats, can create a chewier experience while enhancing nutritional value.
Finally, presentation alternatives include drizzling melted chocolate over cookies or serving them in jars layered with ingredients, creating a beautiful gift option that stands out.
Serving and Presentation Guide
When it comes to serving chocolate chip cookies, presentation plays a vital role. Utilize attractive platters, or arrange cookies in stacks to create visual appeal. You can enhance the experience by garnishing with chocolate shavings, a sprinkle of sea salt, or even fresh mint leaves for a pop of color.
Traditional accompaniments like glasses of milk or coffee work perfectly, but don’t hesitate to get creative. Pair cookies with ice cream to create delicious cookie sundaes or serve warm cookies alongside yogurt for a quick and tasty dessert.
Consider presentation techniques such as serving on tiered stands for parties or wrapping cookies in decorative paper for gifts. Temperature is essential; serve warm for the ultimate taste experience, ensuring the chocolate remains slightly melty.
Lastly, be mindful of portion control. Present cookies in smaller quantities to encourage guests to savor each bite and avoid feeling overwhelmed by the assortment.
Wine and Beverage Pairing
When it comes to pairing beverages with chocolate chip cookies, certain wines and drinks elevate the experience. A dessert wine like a late harvest Riesling complements the sweetness of the cookies beautifully, enhancing the overall taste profile.
For a non-alcoholic option, try pairing cookies with creamy vanilla-flavored almond milk or rich coffee. The nutty undertones of the almond milk harmonize well with the flavors in the cookie, while coffee provides a delightful bitterness that balances the sweetness.
Additionally, dark chocolate lovers may prefer a bold red wine, such as a Cabernet Sauvignon, which can enhance the chocolate flavors. Ensure your beverage is served at the appropriate temperature for the best experience—whites chilled and reds slightly room temp.
Leafy teas, such as a smooth Earl Grey, can also be a fantastic pairing, as their herbaceous notes enhance the vanilla and chocolate flavors within the cookies.
Storage and Shelf Life
To store chocolate chip cookies effectively, keep them in an airtight container at room temperature. This will help maintain their chewy texture for up to a week. If you prefer bakery-fresh cookies for longer, consider freezing them for up to three months.
To freeze, ensure the cookies cool completely, then place them in a single layer on a baking sheet. Once frozen, transfer them to a zip-lock bag or airtight container for longer-term storage. This method keeps them from sticking together and preserves their texture.
Signs of spoilage include a hard or dry texture, which indicates they are past their prime. If cookies develop an off smell or visible mold, they should be discarded. When reheating, a quick blast in the microwave for 10-15 seconds can restore soft, warm goodness without compromising the flavor.
Make Ahead Strategies
If you’re looking to streamline your cookie baking, several make-ahead strategies can be beneficial. Prepare the dough a day or two in advance, storing it in the refrigerator. Chilling the dough not only saves time but enhances flavor, as the ingredients meld together.
For even easier preparation, consider freezing the dough in pre-portioned balls. This allows you to pull out and bake only as many as you need at any time. Simply thaw them in the fridge overnight before baking.
Assess the quality of your prepped ingredients before storing; freshness impacts the overall taste. Also, plan to assemble with fresh elements like nuts or chocolate for added flavor when baking.
Lastly, skipping the additional mixing steps can seem appealing, but folding in your chocolate chips right before baking ensures the best chocolate distribution and freshness in each cookie.
Scaling Instructions
Scaling your chocolate chip cookie recipe is simple! To halve the recipe, reduce each ingredient by fifty percent, ensuring you only use half the amount of baking soda to maintain proper leavening.
When doubling or tripling, ensure you have sufficient mixing bowl space and a large baking sheet available. Oven space becomes important; consider baking in batches to achieve even results across multiple trays.
Timing may require adjustments; keep an eye on cookies to ensure even baking. Lastly, excess cookies can be stored easily in a container, maintaining their freshness for later enjoyment.
Nutritional Deep Dive
Understanding the nutritional profile of chocolate chip cookies is essential for informed indulgence. Each cookie typically contains carbohydrates, fats, and proteins, with a focus on macro breakdown being crucial for those mindful of their intake.
Exploring the micronutrient analysis reveals contributions from chocolate, eggs, and even flour. Enhanced nutrients like calcium from dairy and iron from chocolate provide added health benefits.
These cookies offer enjoyable energy, especially when served in moderation. Being mindful of portion sizes is essential, as they vary widely, impacting overall caloric intake.
For weight management, consider enjoying your treat in conjunction with healthier choices, balancing richer cookies with lighter meals throughout the day for a well-rounded diet.
Dietary Adaptations
Making chocolate chip cookies accessible for various diets involves simple adjustments. For gluten-free options, substitute all-purpose flour with almond flour or a gluten-free flour blend, yielding fantastic results without compromising taste.
Dairy-free variations can utilize coconut oil or dairy-free butter alternatives to replace traditional butter, ensuring all dietary needs are met. For those following a vegan lifestyle, replace eggs with flaxseed or chia seeds, maintaining moisture and binding.
Low-carb or keto approaches are achievable with ground almond flour and sugar substitutes, crafting a cookie that’s friendly for low-carb diets. Paleo adaptations also work well with almond flour and natural sweeteners.
Low-FODMAP variations may involve using maple syrup or coconut sugar as sweet alternatives and employing almond flour to create a cookie that’s gentle on digestion without sacrificing flavor.
Troubleshooting Guide
Common texture issues in chocolate chip cookies can usually be solved by adjusting ingredient measurements, especially flour and butter. For dry cookies, consider incorporating more egg or butter and mixing only until combined.
Flavor balancing is key; underseasoned cookies can be improved by adding a pinch more salt, enhancing the overall profile without making them taste salty. For overly sweet cookies, balance can come from adding a splash of coffee or espresso for depth.
If you encounter issues with cookie spread, ensure your butter is not overly melted when mixing, and utilize chilled dough to prevent excessive spreading during baking.
Equipment challenges may arise, especially using different ovens; take the time to assess your specific oven’s quirks for optimal cooking temperatures and times.
Ingredient substitutions can lead to problems if not matched correctly. Research suitable replacements to ensure a successful outcome while maintaining taste and texture.
Recipe Success Stories
As the recipe circulates, community feedback has been overwhelmingly positive. Many bakers share stories of success, particularly with children, who delight in both the baking process and the final product.
Numerous variations have become a tradition in many households, with some readers reporting successful adaptations, such as adding nuts or gluten-free options without compromising richness. These stories ignite creativity, encouraging others to experiment.
Photography tips abound, as many readers eagerly showcase their cookie creations on social media platforms, highlighting impressive baking skills that invite community engagement and inspire others to participate.
Reader suggestions often lead to new ideas, with adaptations ranging from additional spices to different types of chocolate. Each suggestion fosters a sense of community and motivates others to leave their culinary stamp on a classic recipe.
Frequently Asked Questions
1. Can I freeze chocolate chip cookie dough?
Yes! Freezing cookie dough is an excellent option for pre-portioning. Simply scoop the dough onto a baking sheet to freeze individual balls, then transfer to an airtight container for longer-term storage.
2. How long do baked cookies stay fresh?
Chocolate chip cookies typically stay fresh for about a week when stored in an airtight container at room temperature, but for longer freshness, consider freezing them.
3. Can I reduce the sugar in this recipe?
While it’s possible to decrease the sugar in chocolate chip cookies, doing so may alter the texture and flavor. Start by reducing the sugar by 10-20% if experimenting.
4. What’s the best way to measure flour?
The best way to measure flour is to spoon it into the measuring cup and then level it off without packing it down. This method ensures accurate measurement.
5. How can I make these cookies more chocolatey?
Add more chocolate chips or incorporate a mix of different types of chocolate, like dark and milk chocolate, to intensify the chocolate flavor.
6. Do I have to chill the dough?
Chilling the dough is highly recommended, as it helps prevent spreading while baking, resulting in thicker, chewier cookies.
7. Can I use other types of chocolate?
Absolutely! Feel free to use white chocolate chips, dark chocolate, or even butterscotch chips to create unique flavor profiles.
8. How do I achieve the perfect chewy texture?
Using a higher ratio of brown sugar plays a vital role in achieving chewiness. Additionally, baking just until golden but still soft in the center is key.
9. What’s the best type of chocolate for this recipe?
Semisweet chocolate chips are traditional, but experimenting with a mix of chocolates, including dark or milk chocolate, can give different flavor profiles!
10. Can I substitute ingredients easily?
Many ingredients can be swapped; for example, you can use coconut oil instead of butter or almond flour for gluten-free options. Just research suitable substitutions for the best results!
Additional Resources
For anyone interested in expanding their baking repertoire, consider exploring related recipes such as oatmeal cookies or peanut butter cookies. Technique guides on measuring ingredients, mastering the art of baking, and ingredient substitution charts can also provide further assistance.
In terms of equipment recommendations, investing in quality baking sheets and spatulas can significantly enhance your baking experience. Finally, keeping seasonal variations in mind, consider incorporating fruits or spices during holidays to keep your baking fresh and exciting.
Join the Conversation
We invite you to share your chocolate chip cookie experiences with us! Engage with us on social media, showcasing your baking successes or tips for even better cookies. Leave comments on what variations you’ve tried, along with photography that captures your cookie creations.
Your feedback is important to us; it fosters a vibrant community eager to learn and share. We appreciate recipe reviews and cooking suggestions that inspire others to join in the fun of baking.
The Recipe
Chocolate Chip Cookies
Serves: 24 cookies
Prep Time: 15 mins
Cook Time: 10 mins
Total Time: 25 mins
Kitchen Equipment Needed
Mixing bowl
Baking sheet
Spatula
Measuring cups and spoons
Stand mixer or hand mixer (optional)
Ingredients
1 cup unsalted butter, softened
1 cup granulated sugar
1 cup packed brown sugar
2 large eggs
2 teaspoons vanilla extract
3 cups all-purpose flour
1 teaspoon baking soda
½ teaspoon salt
2 cups semisweet chocolate chips
Directions
Preheat the oven to 350°F (175°C).
In a mixing bowl, cream together the butter, granulated sugar, and brown sugar until light and fluffy.
Add the eggs one at a time, mixing well after each addition. Stir in the vanilla extract.
In a separate bowl, whisk together the flour, baking soda, and salt. Gradually add to the butter mixture, mixing until just combined.
Fold in the chocolate chips using a spatula.
Drop rounded tablespoons of dough onto ungreased baking sheets, spacing them about 2 inches apart.
Bake for 9-11 minutes or until edges are golden. Remove from the oven and let them cool on the baking sheet for a few minutes before transferring to wire racks.
Recipe Notes
For a chewier cookie, chill the dough for at least 30 minutes before baking.
You can substitute chocolate chips with your favorite kind for different flavor profiles.
Store leftover cookies in an airtight container at room temperature for up to a week.
These cookies can also be frozen for up to three months — place them in a single layer in an airtight bag.
Best Chocolate Chip Cookies Recipe for Soft & Chewy Treats
Delicious Chocolate Chip Cookies: Irresistibly Soft and Chewy
⚖️
Difficulty
Easy
⏲️
Prep Time
10 mins
🕒
Cook Time
12 mins
⏱️
Total Time
22 mins
🍽️
Servings
24 cookies
Chocolate chip cookies are a timeless treat that delight both young and old alike. With each bite, you’re enveloped in a rich, warm chocolatey flavor that pairs perfectly with the soft, chewy texture of the cookie. A classic dessert that bakes up effortlessly, these cookies are perfect for sharing with family and friends or savoring solo with a big glass of milk. The balance of sweetness from the chocolate chips and a hint of vanilla creates an extraordinarily satisfying cookie that is sure to please.
The appeal of homemade chocolate chip cookies lies not only in their taste but also in the memories they evoke – perhaps a childhood kitchen filled with the aroma of fresh baking or gathering around the table with loved ones. This recipe offers a straightforward approach, ensuring that you can whip up a batch of these delicious cookies with minimal fuss. From the initial mixing of ingredients to the moment they come out of the oven, the process is filled with joy.
Quick Recipe Highlights
Flavor Profile: The rich, buttery flavor combined with dark chocolate wickedly tempts your taste buds.
Texture: Expect a perfect balance of soft centers with slightly crispy edges that melt in your mouth.
Aroma: The warm fragrance of baking cookies wafts through your home, reminiscent of cozy family gatherings.
Visual Appeal: Golden brown cookies studded with gooey chocolate create an inviting and delicious presentation.
Skill Level Needed: It’s easy for beginners and a fun way for experienced bakers to share the joy of creating.
Special Equipment: A mixing bowl, baking sheets, and an oven are all you need to get started!
Recipe Overview
Difficulty Level: This chocolate chip cookie recipe is classified as easy, perfect for beginner bakers or those looking to enjoy a quick baking session.
Category: These cookies make an excellent dessert or snack for any occasion, from casual afternoon treats to festive gatherings.
Cuisine: Rooted in American culinary tradition, the chocolate chip cookie has become a beloved favorite worldwide.
Cost: The ingredients are fairly inexpensive, ensuring you can bake an abundance of cookies without breaking the bank.
Season: Chocolate chip cookies are perfect year-round but are especially cherished during holidays and family gatherings.
Occasion: Ideal for holidays, birthday parties, or simply indulging after a long day, these cookies are a crowd-pleaser.
Why You’ll Love This Recipe
The taste and texture of these chocolate chip cookies are what truly set them apart. Each bite delivers a delightful combination of rich chocolate and buttery cookie that satisfies cravings and brings comfort. They’re perfectly sweetened, with a slight saltiness that enhances the chocolate flavor, making them irresistible.
Convenience is another significant advantage. This recipe allows for quick preparation and baking, so you won’t spend hours in the kitchen. The straightforward steps make it easy to involve kids or guests, turning baking into a joyous activity rather than a chore.
From a nutritional standpoint, you can also enhance this recipe with nutritious add-ins. Consider using dark chocolate chips to increase antioxidants or incorporating oats for added fiber. While they are a treat, these cookies can be slightly more nutritious with these adjustments.
Socially, chocolate chip cookies are fantastic for gatherings. They’re easy to share, perfect for potlucks, and everyone loves them. Baking them can create a heartwarming atmosphere where memories are made, stories are shared, and loved ones come together over a plate of fresh cookies.
Lastly, they are cost-effective. Basic pantry staples can be transformed into an enjoyable treat without needing specialty items, making them accessible for everyone. This simple recipe empowers any home baker to create delicious results without the worry of expense.
Historical Background and Cultural Significance
The origin of chocolate chip cookies dates back to the 1930s when Ruth Wakefield, the owner of the Toll House Inn, created them inadvertently while experimenting with chocolate cookies. She added chopped chocolate bars, which eventually led to the creation of the famous chocolate chip cookie, and they quickly became a staple in American households.
The cultural importance of chocolate chip cookies cannot be overstated. They have gained a reputation as an American icon, symbolizing comfort and home. This cookie has transcended generations, often being linked to childhood memories and family traditions of baking together.
Over the years, chocolate chip cookies have evolved, with new variations emerging practically every year. Bakers continually experiment with different types of chocolate and ingredients like nuts, oats, or even unique spices, redefining and enhancing the flavor profile while still holding true to the original concept of the treat.
You can also find regional variations of the chocolate chip cookie, from chewy to crispy textures across different parts of the U.S., each adding their flair. This delicious flexibility contributes to the cookie’s universal appeal, making them a beloved treat enjoyed by all.
Ingredient Deep Dive
– **All-Purpose Flour**: This ingredient is foundational in many baking recipes, providing structure to cookies. Selecting high-quality flour ensures a lighter texture. It is a source of carbohydrates and contributes to energy levels. Store it in a cool, dry place, and consider using whole wheat flour for added fiber.
– **Granulated Sugar**: Sugar not only sweetens but also affects the texture. It helps create a chewy consistency. Use organic sugar for better flavor, and be mindful of measuring accurately. Store in an airtight container and avoid humid environments to maintain its quality.
– **Brown Sugar**: Brown sugar adds moisture and a hint of caramel flavor, enhancing the overall taste. It contains molasses, which offers minerals and nutrients. Choose light or dark brown sugar based on preference, and remember to pack it tightly when measuring.
– **Unsalted Butter**: Butter provides richness and helps create a tender cookie. Using unsalted allows for better control of the saltiness. Select high-quality butter for the best flavor, and ensure it’s at room temperature for easier creaming. Store it in the fridge and allow it to soften before use.
– **Eggs**: Eggs are critical for binding ingredients and adding moisture. They help with the rise and contribute to flavor. Consider using organic eggs for better nutritional quality. Make sure to use eggs that are at room temperature for optimal mixing.
– **Vanilla Extract**: Pure vanilla enhances the flavor profile and adds depth. It contains antioxidants and can elevate a cookie from good to great. Opt for pure vanilla extract rather than imitation for the best results.
– **Baking Soda**: This leavening agent is vital for achieving a perfect texture and spread. Store it away from moisture, and remember to check expiration dates regularly as it loses potency over time.
– **Salt**: Salt enhances sweetness and balances the flavors in cookies. Use sea salt or kosher salt for the best flavor. Avoid over-salting as it can overpower the cookies.
Common Mistakes to Avoid
Using cold butter: Cold butter will not cream properly with sugar, leading to dense cookies. Always ensure your butter is at room temperature.
Overmixing the dough: Overmixing can develop gluten, making cookies tough instead of soft. Mix until ingredients are just combined for best results.
Skipping the chill time: Not chilling the dough can result in cookies that spread too much. Allow at least 30 minutes in the fridge for a better shape.
Incorrect oven temperature: An oven that is too hot can cause cookies to burn while the center remains raw. Always preheat your oven and use an oven thermometer if necessary.
Using expired baking soda: Old baking soda won’t help your cookies rise properly. Check the expiration date and replace it if it’s past its prime.
Not measuring ingredients correctly: Accurate measurements are crucial for baking. Use a kitchen scale for precision or proper measuring cups.
Baking directly on the oven rack: This can lead to uneven baking. Always use parchment paper or a silicone mat on your baking sheets.
Ignoring the cooling time: Cookies continue to bake on the sheet after being removed from the oven. Let them cool properly for the ideal texture.
Choosing the wrong chocolate: Using chocolate that doesn’t melt well can make for an unsatisfactory cookie. Aim for high-quality chocolate chips.
Forgetting to taste the dough: Sampling the cookie dough before baking can offer insights into necessary adjustments, increasing your cookie success.
Essential Techniques
– **Creaming Butter and Sugar**: This method is essential for creating air pockets that contribute to a light, fluffy cookie. To master it, start with room-temperature butter and mix until the mixture is light and pale, resembling a whipped texture. Avoid overmixing to prevent grainy texture.
– **Chilling the Dough**: This technique helps control spread during baking. Keep dough in the fridge for at least 30 minutes to help achieve that desirable chewy texture. Chilling also allows flavors to meld better for richer cookies.
– **Measuring Ingredients Accurately**: Baking is a science, so precision in measuring dry and wet ingredients is key. Use the spoon and level method for flour and a liquid measuring cup for wet ingredients. Inconsistent measurements can lead to poor texture and taste.
– **Baking in Batches**: Baking in small batches can help you monitor doneness more easily. This method also allows you to adjust baking time for subsequent batches based on the first batch results. Ensure even spacing on the baking sheet for consistent results.
Pro Tips for Perfect Chocolate Chip Cookies
– Always allow your butter to soften at room temperature; this ensures it aerates well with sugar.
– Experiment with different types of chocolate such as dark, semi-sweet, or even white chocolate for diversity in flavors.
– Adding a pinch of sea salt on top of baked cookies enhances the chocolate flavor.
– Use a cookie scoop for uniform sizes and even baking.
– For added depth, consider incorporating chopped nuts or oats into the dough.
– Swap half of the flour for whole wheat flour for a heartier texture and additional fiber.
– Remember to rotate your baking sheets midway through baking for consistent results.
– Keep an eye on the cookies during the last few minutes; they can go from perfect to overdone quickly.
Variations and Adaptations
– **Regional Variations**: In some areas, you’ll find chocolate chip cookies with a twist, like adding spices such as cinnamon or cardamom for warmth.
– **Seasonal Adaptations**: Consider using seasonal ingredients like pumpkin puree in the fall to create a spiced pumpkin chocolate chip cookie.
– **Dietary Modifications**: For gluten-free diets, substitute all-purpose flour with almond or coconut flour. Ensure to adjust the liquid content accordingly.
– **Flavor Variations**: Infuse additional flavors like orange zest or espresso powder into the dough for a gourmet touch.
– **Texture Modifications**: If you prefer crunchier cookies, bake for an additional few minutes until edges are browned.
– **Presentation Alternatives**: For a festive touch, create cookie sandwiches filled with frosting or ice cream for special occasions.
Serving and Presentation Guide
– **Plating Techniques**: Arrange cookies on a tiered stand for an appealing display at parties.
– **Garnishing Ideas**: Sprinkle with sea salt or drizzled chocolate on top for visual flair.
– **Traditional Accompaniments**: Serve with a glass of cold milk or coffee for the perfect pairing.
– **Modern Serving Suggestions**: Create ice cream sandwiches with two cookies and a scoop of ice cream in between for a fun treat.
– **Temperature Considerations**: Serve cookies warm for the best texture, as the chocolate will still be gooey and melt in your mouth.
– **Portion Control Tips**: If offering at a gathering, consider cutting cookies in half, allowing guests to try multiple flavors without feeling guilty.
Wine and Beverage Pairing
– **Wine Pairings**: Sweet dessert wines like Port or a rich red wine can complement the chocolate flavors beautifully.
– **Non-alcoholic Alternatives**: Fresh milk, herbal teas, or a rich hot chocolate can pair wonderfully with these treats.
– **Coffee/Tea Pairings**: A dark roast coffee or a chai latte provide a delicious contrast to the sweet cookie flavors.
– **Temperature Considerations**: Serve beverages at the right temperature; hot drinks should be steaming, and milk should be chilled.
– **Serving Suggestions**: Present the cookies with a variety of drinks to let guests choose their pairings based on personal preferences.
Storage and Shelf Life
– **Storage Methods**: Keep cookies in an airtight container at room temperature to maintain freshness.
– **Temperature Requirements**: Do not refrigerate unless your recipe includes cream cheese or frosting as this can dry them out.
– **Container Recommendations**: Glass containers work well for preserving moisture, while plastic can trap humidity.
– **Signs of Spoilage**: Look for changes in texture or an off smell indicating the cookies are no longer fresh.
– **Reheating Instructions**: To revive cookies, a quick 10-second zap in the microwave can warm up.
– **Freezing Guidelines**: Feel free to freeze unbaked dough in cookie scoops for up to three months, allowing a quick bake anytime.
Make Ahead Strategies
– **Prep Timeline**: You can prepare the dough and chill it a day ahead of time, making it convenient for entertaining.
– **Storage Between Steps**: After mixing, the dough can be stored in the fridge, allowing flavors to deepen and improve.
– **Quality Impact Assessment**: Storing dough overnight often leads to even tastier cookies as the gluten relaxes.
– **Assembly Tips**: Remember to bring the dough to room temperature for easier scooping if chilled overnight.
– **Reheating Guidelines**: Cookies that have cooled can be reheated promptly in the oven for a fresh-baked experience.
– **Fresh Element Additions**: Consider adding fresh nuts or toppings right before baking for a delightful crunch.
Scaling Instructions
– **Halving the Recipe**: Simply divide all ingredient amounts by two to make a smaller batch. Ensure proper mixing for consistent results.
– **Doubling or Tripling**: Multiply the ingredient amounts accordingly for larger gatherings, but be aware to monitor baking times carefully.
– **Equipment Adjustments**: Larger batches may require additional mixing bowls or sheet trays; adjust as necessary.
– **Timing Modifications**: When baking larger batches, cookies may need extra time, so check for doneness regularly.
– **Storage Considerations**: Ensure ample space for stored cookies if making larger batches, especially in fridges or freezers for freshness.
Nutritional Deep Dive
– **Macro Breakdown**: Each cookie contains sizeable carbohydrates from sugars and flour, with protein from eggs and some fat from butter.
– **Micronutrient Analysis**: Ingredients provide various vitamins like vitamin A from butter and mineral content from chocolate.
– **Health Benefits**: While chocolate chip cookies are treats, dark chocolate can provide antioxidants beneficial to heart health when consumed in moderation.
– **Dietary Considerations**: It’s important to keep portion sizes in check to maintain balance among snacks and meals.
– **Portion Analysis**: A standard cookie can contain around 150 calories; keeping an eye on intake can help with weight management.
– **Weight Management Tips**: Enjoy with a small glass of milk or paired with fruit to round out the snack nutritionally.
Dietary Adaptations
– **Gluten-free**: Replace all-purpose flour with gluten-free baking mix for a safe treat without compromising taste.
– **Dairy-free**: Use coconut oil or dairy-free butter alternatives for a delicious dairy-free version.
– **Vegan**: Swap the eggs with flaxseed meal or applesauce for a plant-based version, ensuring all other ingredients are dairy-free.
– **Low-carb**: Substitute flour for almond flour and use sugar alternatives for a low-carb chocolate chip cookie.
– **Keto**: Opt for sugar substitutes like erythritol and almond flour for a keto-friendly treat with minimal sugars.
– **Paleo**: Utilize natural sweeteners like honey combined with nut flours for paleo-compliant cookies.
– **Low-FODMAP**: Ensure all ingredients are compliant, using gluten-free options to keep in line with dietary restrictions.
– **Other specific diets**: Modify according to specific needs; always check ingredient labels for hidden sugars or gluten.
Troubleshooting Guide
– **Texture Issues**: If cookies are too crumbly, adding a splash of milk can help bind them better. Be cautious with flour measurements.
– **Flavor Balance**: If too sweet, consider reducing sugars next time, or add a pinch of salt to enhance flavors.
– **Temperature Problems**: If cookies spread too much, chilling the dough longer can help maintain shape while baking.
– **Equipment Challenges**: Ensure your baking sheets are insulated or lined well to prevent burning or sticking.
– **Ingredient Substitutions**: Substituting ingredients like coconut oil instead of butter can lead to different textures; experiment accordingly.
– **Timing Concerns**: Baking times can vary with different oven types; keep an eye on the first batch to gauge for future ones.
Recipe Success Stories
– Community feedback highlights how these cookies have been a staple in many homes for birthdays and seasonal holidays, celebrating togetherness and nostalgia.
– Many have reported success with flavor variations, acknowledging how adding chopped nuts or sea salt has enhanced their personal cookie traditions.
– Readers often share their artistic flair in photographing their creations, showcasing them on social media in beautiful settings.
– Suggestions come pouring in on how these cookies can be adapted; some even experiment with different chocolate ratios, leading to delicious outcomes.
– “We love how forgiving this recipe is,” reads numerous reviews, praising the ability to modify and still produce great results.
Frequently Asked Questions
Q: Can I use brown sugar instead of white sugar?
A: Absolutely! Using brown sugar will give your cookies a nice caramel flavor. Just remember, it may make them a bit chewier.
Q: How long can I store homemade cookies?
A: When placed in an airtight container, your cookies should last about a week at room temperature. For longer freshness, consider freezing them.
Q: Can I freeze the cookie dough?
A: Yes, you can! Just scoop it onto a baking sheet to freeze, then transfer the cookie dough balls to a freezer-safe container. They can last up to 3 months.
Q: Why did my cookies turn out flat?
A: This could be because the butter was too warm or your oven was too hot. Always use room temperature butter and preheat your oven correctly.
Q: Can I add different mix-ins to my cookies?
A: Definitely! Nuts, dried fruit, or other types of chocolate can be added to customize your cookies.
Q: What should I do if I want chewy cookies?
A: Underbake them slightly and chill the dough before baking to achieve that chewy texture you desire.
Q: What’s the best way to prevent cookies from sticking to the pan?
A: Line your baking sheets with parchment paper or a silicone mat to ensure easy release after baking.
Q: Can I use whole wheat flour?
A: Yes, whole wheat flour can be used, but you may need to adjust the liquid since it’s more absorbent than all-purpose flour.
Q: Is it important to sift the flour?
A: While not necessary for this recipe, sifting can aerate the flour and help avoid clumping; however, for cookies, it is often skipped.
Q: Can I make this recipe in advance?
A: Yes, the dough can be made in advance and refrigerated for up to 24 hours before baking, allowing for ready-to-bake cookies anytime.
Additional Resources
Exploring other related recipes can expand your dessert repertoire. Consider trying oatmeal cookies or peanut butter cookies that also showcase chocolate. Learning about baking techniques can enhance your skills, enabling you to experiment with flavors and textures confidently. Understanding ingredient substitutions allows you to cater your baking to specific dietary needs, ensuring that everyone gets to enjoy the treats you create. Don’t forget to check out kitchen equipment guides to ensure you’re fully equipped for your baking adventures. Seasonal variations can breathe new life into classic recipes, inspiring you to innovate and create.
Join the Conversation
Sharing your experience while making chocolate chip cookies can engage the community. Social media platforms are perfect for showcasing your cookie creations, and include hashtags for increased visibility. Photography plays a significant role in food blogging; capturing the warm, gooey goodness of your cookies can inspire others to dive into baking. Encourage friends and family to review your cookies, creating a friendly competition over who can make the best version. Invite others to share their adaptations of this timeless recipe, fostering a sense of community around this delightful treat.
The Recipe
Chocolate Chip Cookies
Serves: 24 cookies
Prep Time: 10 mins
Cook Time: 12 mins
Total Time: 22 mins
Kitchen Equipment Needed
Mixing bowl
Baking sheets
Measuring cups and spoons
Mixing spoon or electric mixer
Silicone spatula
Cookie scoop
Ingredients
2 1/4 cups all-purpose flour
1/2 teaspoon baking soda
1 cup unsalted butter, at room temperature
1/2 cup granulated sugar
1 cup packed brown sugar
1 teaspoon salt
2 teaspoons vanilla extract
2 large eggs
2 cups chocolate chips
Directions
Preheat the oven to 350°F (175°C) and line baking sheets with parchment paper.
In a small bowl, whisk together the flour and baking soda; set aside.
In a large bowl, cream together the butter, granulated sugar, brown sugar, and salt until smooth.
Add in the vanilla extract and eggs one at a time, mixing well after each addition.
Gradually stir in the flour mixture until just combined.
Fold in the chocolate chips gently, making sure not to overmix.
Scoop tablespoon-sized amounts of dough onto the prepared baking sheets, spacing them about 2 inches apart.
Bake for 10-12 minutes until the edges are golden brown and the centers are set but still soft.
Let cool on the baking sheets for a few minutes, then transfer to a wire rack to cool completely.
Recipe Notes
For a softer cookie, slightly underbake them and allow them to cool on the tray.
Experiment with dark chocolate chips for a richer flavor.
Store airtight for up to a week or freeze for longer shelf life.
Best Cinnamon Sugar Cruffins – Flaky and Irresistible Treat
Cinnamon Sugar Cruffins: A Delightful Pastry Experience
⚖️
Difficulty
Medium
⏲️
Prep Time
30 mins
🕒
Cook Time
25 mins
⏱️
Total Time
55 mins
🍽️
Servings
12 Cruffins
Cinnamon Sugar Cruffins are a delightful combination of croissants and muffins that will elevate your baking game. Picture this: soft, flaky layers of pastry with a sweet, aromatic cinnamon sugar filling. Every bite delivers a perfect blend of warmth and sweetness, making them a must-try! Whether you’re enjoying them for breakfast, brunch, or as a sweet afternoon treat, these cruffins will leave a lasting impression on all who taste them. They are simple to make, yet unique enough to be a standout dish at any gathering.
The uniqueness of cruffins lies in their beautiful layers and textures. When baked to perfection, they display a perfectly golden exterior which contrasts beautifully with the soft and fluffy interior. Imagine pulling apart a warm cruffin, the inside swirled with cinnamon sugar, and the bliss of buttery goodness melting in your mouth. Serve them warm for the best experience, and watch as your loved ones dive into these irresistible treats.
Quick Recipe Highlights
Flavor Profile: The harmonious blend of sweet cinnamon and sugar creates a comforting taste that is both familiar and exciting.
Texture: Flaky on the outside with a soft and tender inside, making every bite a delightful experience.
Aroma: The inviting scent of warm cinnamon and buttery pastry fills the kitchen, making it impossible to resist.
Visual Appeal: Golden brown tops sprinkled with cinnamon sugar create a stunning presentation that is sure to impress.
Skill Level Needed: With a medium difficulty level, these cruffins are perfect for bakers looking to challenge their skills.
Special Equipment: A muffin tin and rolling pin are essential to achieve the desired shape and layers of the cruffins.
Recipe Overview
Difficulty Level: While making Cinnamon Sugar Cruffins requires some techniques, such as rolling and folding dough, the steps are straightforward, making it an engaging challenge.
Category: These cruffins fit perfectly into the pastry category and are ideal for breakfast or brunch settings.
Cuisine: Cruffins boast a modern pastry style influenced by French croissant-making traditions, celebrating the art of layered dough.
Cost: With common ingredients like flour, sugar, and butter, the overall cost remains budget-friendly, making this an accessible treat for everyone.
Season: Enjoy Cinnamon Sugar Cruffins year-round, though they particularly shine in fall and winter as comforting treats.
Occasion: Perfect for social gatherings, brunches, or cozy family breakfasts, these cruffins are a crowd-pleaser.
Why You’ll Love This Recipe
The exquisite taste and texture of Cinnamon Sugar Cruffins make them a delightful addition to your recipe repertoire. Each cruffin is crafted with layers upon layers of flaky pastry, melding beautifully with cinnamon and sugar. This unique pastry transcends the traditional muffin experience, offering a combination of buttery, sweet, and aromatic elements in each bite. The balance of flavors keeps you coming back for more, making them perfect for any occasion.
Convenience is another reason to love these cruffins. While they require some time and patience to prepare, they are surprisingly easy to assemble, even for novice bakers. The basic ingredients are often household staples, allowing for spontaneous baking sessions. The cruffins can be made ahead of time and enjoyed warm from the oven or at room temperature, making them an excellent treat for any day of the week.
From a nutritional perspective, while they are a decadent treat, you can incorporate healthier ingredients, such as whole wheat flour or sugar substitutes, to make them more wholesome. Sharing these pastries can provide social interactions, making them perfect for communal settings. Whether served with coffee at a brunch or enjoyed alone for a sweet indulgence, they invite conversation and connection.
Cost-effectiveness adds another layer of love for this recipe. Since all the ingredients are simple and accessible, you can create a batch of Cinnamon Sugar Cruffins without breaking the bank. Their deliciousness doesn’t compromise your wallet, allowing you to impress guests or treat yourself without guilt.
Finally, these cruffins hold a special place in entertaining. Their impressive appearance and delectable flavor can elevate any gathering, from casual get-togethers to festive celebrations. Guests will be impressed, and you’ll become known as the go-to baker among friends and family.
Historical Background and Cultural Significance
Cruffins owe their origin to the fusion of two beloved pastries: croissants and muffins. Invented in Australia around 2013, the cruffin quickly took the culinary world by storm. The concept was to marry the flaky layers of a croissant with the delightful shape of a muffin, resulting in a unique texture and flavor profile that has since captivated many.
Culturally, cruffins reflect the trend of reimagining traditional pastries, allowing for creativity and experimentation in the kitchen. As they gained popularity, bakeries began to experiment by adding various fillings and toppings, further enhancing their appeal. This evolution has turned the cruffin into a canvas for flavors, from sweet to savory, showcasing cultural influences from around the world.
The adaptability of cruffins means they can incorporate regional ingredients or influences, allowing bakers to infuse personal touches into their creations. For example, in the United States, you might find pumpkin spice variations, while in other areas, local spices and flavors can be used.
As cruffins gain worldwide recognition, they symbolize a culinary journey that embraces creativity, tradition, and deliciousness. Their versatility invites bakers from all backgrounds to join in the fun, celebrating the joy of cooking together.
Ingredient Deep Dive
Flour is the backbone of any good pastry. Key to the structure and texture, flour provides essential gluten, which helps create the flaky layers in the cruffins. Choosing the right type—usually all-purpose or bread flour—can significantly impact the final product. Look for high-quality, unbleached flour for the best results. Store flour in a cool, dark place to prolong its freshness, and consider sifting it before adding to your dough for lighter results. For alternatives, consider using gluten-free blends or other flours depending on dietary needs.
Butter is another star ingredient, crucial for flavor and moisture. Its rich, creamy nature contributes to the delectable taste of the cruffins, while providing a tender crumb. Use unsalted butter for control over salt levels in your recipe. Fresh butter can be stored in the refrigerator for up to a month or frozen for longer periods. When substituting, options such as margarine or coconut oil may work, but the outcome may vary in taste and texture.
Cinnamon, the aromatic spice that ties everything together, plays a vital role in flavoring the cruffins. This beloved spice has historical significance in various cultures, used for both sweet and savory applications. Freshly ground cinnamon often has a stronger, punchier flavor than pre-ground. Store it in an airtight container away from heat to retain potency. As a substitute, consider other warming spices like nutmeg or allspice for a different twist.
Sugar is integral for sweetness and texture, helping to create that caramelized crust on top. Granulated sugar is commonly used, but brown sugar can add depth and moisture. There are also numerous alternatives available, including coconut sugar or honey. When selecting sugars, consider their moisture content and flavor profile, as these can significantly impact the final texture and taste of your cruffins.
Yeast is essential for rising and creating the light, airy texture characteristic of cruffins. Active dry yeast is the most commonly used type and should be stored properly to maintain its effectiveness. Always verify expiration dates, and keep it in a cool, dark place. If you’ve run out of traditional yeast, try baking powder for a quicker alternative, though results may vary.
Common Mistakes to Avoid
Not measuring ingredients accurately: Baking requires precision; using the wrong measurements can lead to disasters.
Skipping room temperature ingredients: Cold butter or eggs can hinder proper mixing and achieve the desired texture and rise.
Overworking the dough: Kneading too much can develop gluten excessively, leading to a tough cruffin rather than a flaky one.
Using stale ingredients: Always check the freshness of your yeast, flour, and spices to ensure the best flavors.
Not letting the dough rest: Allow time for the dough to rise; this step is crucial for developing flavor and texture.
Filling too much: Overfilling the cruffin cavities could lead to overflowing during baking and result in an unbalanced pastry.
Baking at the wrong temperature: Make sure your oven is preheated accurately; too low can lead to soggy pastries.
Skipping the cooling process: Allow cruffins to cool slightly before removing them from the pan to maintain their shape.
Cutting into warm cruffins immediately: While tempting, letting them rest enhances flavor and texture.
Neglecting to follow the recipe: Avoid improvising on your first attempt; following the recipe leads to better consistency and results.
Essential Techniques
Understanding lamination is essential for creating the flaky layers in cruffins. This technique involves folding butter into the dough multiple times, creating layers that puff during baking. Master lamination by ensuring your dough and butter are at the correct temperature—cold but pliable—and being thorough with each turn. Pay attention to visual cues; dough should become smooth and slightly elastic.
Proper proofing is another critical technique. Controlled fermentation enables dough to rise, developing deeper flavors and textures. Monitor the proofing environment, ensuring it is quiet and warm. Over-proofing can result in a collapse, while under-proofing leads to dense textures. Look for the dough to double in size; this indicates it’s time for the next stage.
Baking at the ideal temperature is vital for achieving the perfect cruffins. An even and consistent temperature allows the pastries to rise beautifully while creating a golden crust. Always preheat your oven, and consider using an oven thermometer to verify accurate temperatures. If the tops are browning too quickly, rotate the pan for even baking.
Pro Tips for Perfect Cinnamon Sugar Cruffins
1. Use high-quality, cold butter to ensure a nice flaky texture in your cruffins.
2. Allow your dough to rest properly after each step; patience is key in baking.
3. For added sweetness, sprinkle cinnamon sugar both inside the layers and on top before baking for maximum flavor.
4. Experiment with fillings, such as cream cheese or nutella, for a unique take on cruffins.
5. Keep your rolling surface lightly floured to prevent sticking while shaping the dough.
6. Use a sharp knife or bench scraper for clean folds while layering, ensuring precision.
7. If you’re short on time, consider using store-bought puff pastry for an easy shortcut while still achieving that flaky texture.
8. Serve warm for the best flavor experience and to enjoy the aroma that fills the room.
Variations and Adaptations
Cinnamon Sugar Cruffins can be customized through various regional adaptations and flavor combinations. For example, you can switch out traditional cinnamon for cardamom or nutmeg to lend a different aromatic profile. Adding fruits like berries or apples can also provide natural sweetness and texture.
When considering seasonal adaptations, think about Christmas spices, such as ginger or nutmeg, to give your cruffins a festive twist. Similarly, during summer, fresh fruit-based fillings or glazes can keep the recipe refreshing and light.
Dietary modifications are also possible. For a gluten-free version, use an all-purpose gluten-free flour blend, ensuring your ingredients are certified gluten-free. In a similar vein, to make a vegan cruffin, substitute dairy with plant-based alternatives, such as almond milk or coconut oil, and use flax eggs.
Flavor variations abound; experiment with adding citrus zest, chocolate chips, or nuts for added depth and texture. For an indulgent twist, infusing your butter with flavors such as vanilla or almond can create an unforgettable experience.
Lastly, thoughts on presentation can turn your cruffins into a visual feast. Consider dusting them with powdered sugar, serving them with whipped cream or a glaze, or placing them on a beautiful stand for a classy addition to any occasion.
Serving and Presentation Guide
Plating Cinnamon Sugar Cruffins can be an artful endeavor. Start with a simple cake stand, displaying the cruffins in an inviting manner. Consider stacking them for an impressive height or arranging them carefully in a rustic basket or on a wooden board, which adds warmth to your presentation.
Garnishing is another area where creativity shines. A sprinkle of powdered sugar or additional cinnamon sugar over the top can enhance visual appeal. Adding fresh berries or a drizzle of icing can elevate the dish to another level of sophistication.
Traditional accompaniments, such as a cup of coffee, tea, or hot chocolate can enhance the experience. Pairing with fresh fruit brings a refreshing balance to the sweetness of the cruffins.
Modern serving suggestions could involve serving alongside flavored butter, such as honey or cinnamon butter, for an indulgent touch that complements the cruffins beautifully. Consider how temperature can impact the experience; warm cruffins allow the flavors to shine, while cooled versions enable stronger texture contrasts.
Lastly, controlling portions is important. Cut each cruffin in half for sharing, allowing everyone to enjoy a taste, or serve one whole cruffin as a satisfying treat.
Wine and Beverage Pairing
When it comes to wine pairing, a light-bodied white wine like a Riesling or a sweet Moscato would complement the sweetness of Cinnamon Sugar Cruffins well. These wines enhance the flavor profile without overpowering the sweetness, creating a harmonious pairing.
For non-alcoholic alternatives, consider serving with freshly brewed chai tea, which beautifully matches the warm spices in the cruffins. Hot chocolate can also be an excellent option, especially during colder months, providing a cozy drinking experience.
If you enjoy coffee, a light roast or even a cappuccino would offer a nice contrast to the sweetness. Ensure the beverage is served hot—this will enhance the aroma and create a delightful contrast with the warm pastry.
Keep in mind temperature considerations when serving drinks. Warmer beverages work well with freshly baked cruffins, but serving them alongside iced options can cater to preferences during warmer seasons or gatherings.
Storage and Shelf Life
Proper storage of Cinnamon Sugar Cruffins begins with allowing them to cool completely after baking. Once cooled, keep them in an airtight container at room temperature if consuming within a day or two. To prolong their freshness, you can refrigerate them, though they are best consumed fresh.
For longer storage, consider freezing the cruffins. Wrap each cruffin individually in plastic wrap and then place them in a freezer-safe bag. This method can keep them fresh for up to 3 months. When you’re ready to enjoy, allow them to thaw at room temperature or warm them in the oven for a freshly-baked taste.
To identify signs of spoilage, look for off smells, uncontrolled moisture, or any signs of mold. If they haven’t been consumed within a few days and show any of these signs, discard them to ensure safety.
Reheating instructions involve using the oven for best results. Preheat the oven to 350°F and warm cruffins for about 5-10 minutes, allowing them to crisp up while maintaining their flaky texture. For a quicker method, microwave them for 10-15 seconds, keeping in mind this may result in softer, less flaky textures.
Freezing guidelines advise letting cruffins cool completely before packing them away. For optimal taste and texture, reheat only the amount you need to minimize the number of times they thaw and refreeze, preserving their quality.
Make Ahead Strategies
Cinnamon Sugar Cruffins can be made ahead of time, allowing for ease during busy days. Consider preparing the dough the night before, allowing it to refrigerate, and then shaping and filling it in the morning. This timeline saves you precious minutes while ensuring delicious cruffins are fresh for breakfast.
Storage between steps can be vital. After shaping, place the cruffins in the refrigerator to prevent them from becoming too soft before baking. Keeping them chilled ensures they hold their shape better during baking.
Assessing the impact on quality is important; dough can safely rest in the refrigerator for about 24 hours, minimizing loss of flavor or texture. When ready to bake, let the dough come back to a slightly warmer temperature before proceeding.
Assembly tips involve measuring and preparing ingredients ahead of time, so everything is ready for a smooth workflow when you’re ready to bake.
Consider adding fresh elements before serving, like a glaze or topping. This not only enhances flavor but also adds a burst of freshness to each cruffin, making them feel freshly made.
Scaling Instructions
When scaling the Cinnamon Sugar Cruffins recipe, halving it is simple; just divide all ingredient quantities by 2. This method still yields excellent results, perfect for intimate gatherings or small families. Remember to adjust baking times slightly, as a smaller batch could bake a bit quicker.
Doubling or tripling the recipe requires consideration of equipment adjustments—ensure you have enough pans or baking sheets on hand to accommodate the larger batch. The oven will also require careful monitoring, as larger volumes may need a few additional minutes for uniform baking.
Timing modifications are essential when scaling up or down. If you’re making a larger batch, bake multiple pans simultaneously, but rotate them halfway through for even baking.
Consider storage adjustments too. A larger batch will likely require more space in containers or refrigeration. Make sure you’re prepared with ample space for cooling and storing before diving into baking.
Nutritional Deep Dive
Analyzing the macros present in Cinnamon Sugar Cruffins reveals a balance of carbohydrates, fats, and proteins. The primary contribution comes from flour and sugar, providing essential energy. Each cruffin, while a treat, should be enjoyed in moderation, especially for those tracking caloric intake.
On the micronutrient side, the contributions from ingredients like flour and butter contain essential nutrients, although they may be lower in vitamins compared to other baked goods with fruits or nuts. Substituting whole grain flour for all-purpose can improve fiber content, enhancing digestive benefits.
Health benefits lie in moderation; while these cruffins are indulgent, enjoying them occasionally can help maintain a balanced diet. Pairing with protein-rich foods during meals can provide fuller satisfaction with lower sugar cravings afterward.
Portion analysis advises limiting consumption; while delicious, monitoring portion sizes can help prevent excess sugar intake and promote healthier habits. Sticking to one cruffin at a time can satisfy sweet cravings without overwhelming your dietary goals.
Lastly, weight management tips can incorporate these cruffins by considering them as part of a balanced lifestyle. Enjoying them in conjunction with physical activity or healthier meals later in the day enables you to indulge while maintaining overall wellness.
Dietary Adaptations
Creating a gluten-free version of Cinnamon Sugar Cruffins can be achieved by using gluten-free flour blends that mimic the properties of wheat flour. Ensure to check the mix for xanthan gum, which aids in binding.
For those on a dairy-free diet, substituting the butter with plant-based alternatives like coconut oil will work well. Additionally, using dairy-free milk can maintain the moisture in the dough without sacrificing flavor.
Vegan modifications can similarly replace eggs with flaxseeds or chia seeds, as they help bind ingredients while enhancing nutrition.
Low-carb options require significant adjustments; consider almond flour or coconut flour to replace traditional flour. However, the texture will differ, resulting in a denser product.
Keto-friendly adaptations not only involve using low-carb flour but also reducing overall sugar content. You may substitute granulated sweeteners like erythritol or stevia to cater to this diet.
Lastly, practicing a low-FODMAP version entails substituting butter with lactose-free options and ensuring other ingredients are compliant with FODMAP regulations, supporting those needing specific dietary attention.
Troubleshooting Guide
Managing texture issues can be solved by adjusting your dough hydration; if it feels too dry, slightly increase moisture, while a too-wet dough can be solved with flour additions. Make sure to mix without overworking to avoid creating tough layers.
Balancing flavors may sometimes require adjusting sugar levels. If cruffins taste bland, increasing sugar or cinnamon can enhance their sweetness and overall flavor profile. Tasting the filling before baking is a wise practice to ensure satisfaction.
Temperature problems during baking can often be resolved by rotating pans; if one side is browning too fast, simply switch their positioning in the oven. Checking oven thermometers can ensure even, accurate heat distribution.
For equipment challenges, if you lack a muffin tin, using ramekins or making freeform shapes on a baking sheet will yield some success, though they may need monitoring during cooking intervals.
If you’re making ingredient substitutions, remember they may alter the final flavor and texture. Study potential replacements first to ensure they align with your goals for the cruffins.
Lastly, timing concerns can arise when moving from one process to another; ensure you set timers for each phase and remain attentive, particularly while working with yeast, as proofing times can fluctuate.
Recipe Success Stories
Community feedback has highlighted successful adaptations of Cinnamon Sugar Cruffins, with baker’s experimenting with various fillings and toppings. From colorful sprinkles for children to elegant chocolate drizzles for adulthood celebrations, creativity is endless.
Variation successes often come from readers exploring local flavors. For example, infusing the dough with coffee flavor or spices popular in one’s cultural heritage can yield personalized cruffins that reflect their roots.
Adaptation stories frequently feature readers who share their explorations in the kitchen. One reader relayed their journey of discovering the perfect flaky crust after several attempts led to the right balance of butter and flour.
The photography tips shared by fellow bakers emphasize capturing the golden tops of cruffins, showcasing their enticing layers. Presenting them in beautiful natural light can bring out their inviting qualities, inspiring others to try this recipe.
Engaging in recipe reviews provides insight; common suggestions emerge from readers wondering about using healthier flour options or experimenting with less sugar, displaying a community eager to learn and develop.
Frequently Asked Questions
How do I know when my cruffins are done baking?
To check for doneness, lightly press the top of a cruffin – it should spring back. Additionally, a golden-brown color and fragrant smell are great indicators. Using a toothpick inserted into the center can also confirm that they’re fully baked.
Can I use frozen croissant dough for cruffins?
Yes! Frozen croissant dough is a great alternative if you’re short on time. Make sure to thaw it according to package instructions before rolling out and shaping your cruffins.
Can I make the dough a day ahead?
Absolutely! You can prepare the dough, let it rise, then wrap it tightly and store it in the fridge overnight. Just allow it to come to room temperature before rolling it out and proceeding with the recipe.
Can I add fruit to the filling?
Yes, feel free to incorporate fruits such as blueberries or diced apples. Reduce the sugar slightly in the filling to balance the sweetness from the fruit.
Do I need to grease the muffin pan?
While cruffins may release easily due to their buttery composition, it’s a good practice to lightly grease the muffin tin to ensure the pastries come out without sticking. You can also use muffin liners for convenience.
How can I store leftover cruffins?
Let them cool completely, then store in an airtight container at room temperature for 1-2 days. For longer storage, freeze them in plastic wrap, then in a freezer bag for up to 3 months. Thaw them at room temperature before serving.
Can I prepare a gluten-free version of these cruffins?
Yes, you can use a high-quality gluten-free flour blend to substitute traditional flour. Make sure to follow a recipe that specifically caters to gluten-free baking for the best results.
Will these cruffins be as flaky using whole grain flour?
While whole grain flour can add nutritional benefits, it may result in a denser texture. Consider using a mix of white and whole grain flour for a balance of flavor and texture.
What if my dough doesn’t rise properly?
Dough typically needs warm and moist conditions to rise. If it doesn’t rise, check the yeast’s expiration date, and ensure you’ve provided a warm environment. Sometimes dough needs extra time to rise during cooler months.
Can these cruffins be served warm?
Definitely! Serving cruffins warm from the oven enhances their flavor and texture. If you have leftovers, simply reheat them for a wonderful experience of fresh baked goods.
Additional Resources
For anyone interested in expanding their baking repertoire, consider exploring related recipes like chocolate croissants, Danish pastries, or muffins with seasonal flavors. Each offers unique insights into dough handling and flavor pairing.
Technique guides that focus on lamination, yeast preparation, and dough handling are invaluable for improving skills in pastry creation. By mastering these techniques, you can elevate your baking confidence significantly.
Ingredient information related to the various flours, sugars, and spices utilized helps in understanding key substitutions and varieties, enhancing your overall baking knowledge.
Equipment recommendations, such as high-quality mixing bowls, whisks, and muffin tins, can greatly impact the success of your baking endeavors. Investing in good tools can make a difference, particularly when it comes to consistency.
Lastly, seasonal variations can be fun; try adding pumpkin spice for fall or fresh berries for summer, allowing for the incorporation of seasonal ingredients and flavors that excite the palate year-round.
Join the Conversation
Sharing your baking journey on social media can inspire others and create a community around exploring Cinnamon Sugar Cruffins. Consider posting pictures of your creations, adjustments, and sharing what worked for you, becoming part of a passionate baking community.
For photography tips, natural light can accentuate the delightful textures and colors of your cruffins, creating mouthwatering visuals that entice viewers. Make sure to capture the layers and glossy tops to showcase your hard work.
Encouraging recipe reviews allows for collaborative exchanges; learn from others who have tried the recipe. Sharing successes and struggles about their cruffins creates connections between fellow bakers.
Engaging in community discussions adds a layer of fun to the baking experience. Connecting with others who share your love for cruffins can lead to finding new variations and tips that enhance your baking skills.
Lastly, exploring and challenging yourself with the recipe can bring new dimensions to your baking experiences; every twist and turn can lead to new favorite creations!
The Recipe
Cinnamon Sugar Cruffins
Serves: 12 Cruffins
Prep Time: 30 mins
Cook Time: 25 mins
Total Time: 55 mins
Kitchen Equipment Needed
Muffin tin
Rolling pin
Mixing bowls
Whisk
Sifting tools
Spatula
Pastry brush
Ingredients
2 cups all-purpose flour
1/4 cup granulated sugar
1/2 tsp salt
2 tsp instant yeast
1/2 cup warm milk (about 110°F)
1 large egg
1/4 cup melted butter
1 tbsp cinnamon
1/2 cup brown sugar
Additional melted butter for brushing
Directions
In a mixing bowl, combine flour, sugar, salt, and yeast. Mix well.
Add warm milk, egg, and melted butter to the dry ingredients. Mix until a dough forms.
Knead the dough on a floured surface for about 5 minutes until smooth. Let the dough rise for about 1 hour, or until doubled in size.
Once risen, roll the dough out on a lightly floured surface into a rectangle.
Brush the dough with melted butter, then generously sprinkle cinnamon and brown sugar mixture over the top.
Roll the dough carefully into a tight log, then cut into 12 equal pieces.
Place each piece into a greased muffin tin. Let rise for another 30 minutes while preheating the oven to 375°F.
Bake for approximately 25 minutes until golden brown. Brush with additional melted butter once out of the oven.
Allow to cool slightly before serving.
Recipe Notes
Feel free to experiment with fillings, such as nut butters or fresh fruit.
For a twist, try adding a glaze made from powdered sugar and milk after baking.
Store any leftovers in an airtight container at room temperature for up to 2 days or freeze.
Hi I'm Emy
I’m passionate about sharing a diverse collection of sweet and savory recipes that I’ve meticulously tested and perfected in my own kitchen.