“`html
Table of Contents
- Introduction: Your Family’s New Favorite Breakfast
- Ingredients You’ll Need
- Prep, Cook, and Enjoy: The Glorious Timing
- Let’s Make Magic: Step-by-Step Instructions
- Nutritional Snapshot
- Healthier Twists on a Classic
- Serving Suggestions: Elevate Your Meal
- Common Pitfalls to Avoid
- Storing Your Delicious Creation
- The Verdict: A Simple Way to Big Flavor
- Frequently Asked Questions

Introduction: Your Family’s New Favorite Breakfast
Are you looking for a breakfast that delivers comfort, flavor, and a touch of nostalgia, all without the fuss? Do you find yourself craving that hearty, soul-warming combination of fluffy biscuits and rich, creamy gravy? If so, you’re in the right place! This Easy Biscuits and Gravy Casserole recipe is designed to bring that classic diner experience right to your kitchen table, with a fraction of the effort. It’s the kind of meal that makes mornings special, perfect for lazy weekend brunches, family gatherings, or even a weeknight treat when you need a little extra comfort. Forget the separate pans and the constant stirring; this casserole streamlines the process, infusing every bite with that beloved biscuits and gravy goodness. Get ready to discover your new go-to breakfast dish!
Ingredients You’ll Need
To create this symphony of breakfast bliss, gather these simple yet essential ingredients. We’ll break them down by component to make your shopping and cooking as smooth as possible.
For the Biscuits
- 2 cans (16.3 oz each) refrigerated biscuit dough: Opt for flaky layers for the best texture. Easy to use and readily available, they form the delicious base of our casserole. (Substitution: You can make your own homemade biscuits from scratch if you’re feeling ambitious!)
- 1 large egg, beaten: This helps create a beautiful golden-brown crust on the biscuits.
- 1 tablespoon milk or water: Mixed with the egg for an effective egg wash.
For the Creamy Sausage Gravy
- 1 lb breakfast sausage (pork or turkey): Choose your favorite! Pork sausage offers a richer flavor, while turkey is a slightly leaner option. Ensure it’s bulk sausage for easy crumbling.
- 1/2 cup finely chopped yellow onion (optional): Adds a subtle sweetness and depth of flavor that complements the sausage beautifully.
- 1/4 cup all-purpose flour: This is our thickening agent, crucial for achieving that lusciously creamy gravy texture.
- 3 cups milk (whole or 2%): Whole milk provides the creamiest result, but 2% works well too. Warm milk incorporates more smoothly.
- 1 teaspoon black pepper: Freshly ground pepper offers the best spicy kick.
- 1/2 teaspoon salt, or to taste: Remember that sausage is already salty, so season carefully.
For the Casserole Assembly
- Shredded cheddar cheese (optional, about 1 cup): A sprinkle of cheese on top adds a delightful gooey, savory element. Or mix it directly into the gravy!
- Fresh parsley, chopped (for garnish): Adds a pop of color and a hint of freshness to the finished dish.
Prep, Cook, and Enjoy: The Glorious Timing
Compared to making traditional biscuits and gravy separately, which can involve managing multiple pans and more active cooking time, this casserole streamlines the process. While the average time for making biscuits and gravy from scratch can easily push past an hour (especially factoring in biscuit preparation), our casserole brings it down to under an hour, with minimal active kitchen time. This makes it an achievable weekday win or a relaxed weekend project.
Let’s Make Magic: Step-by-Step Instructions
Step 1: Preheat and Prep Your Casserole Dish
First things first, let’s get our oven ready for some baking magic! Preheat your oven to 375°F (190°C). While it’s heating up, grab a 9×13 inch baking dish. Give it a quick spray with non-stick cooking spray or grease it lightly with butter or oil to prevent any sticking emergencies later on. This is your blank canvas for deliciousness!
Step 2: Cook the Sausage
In a large skillet or Dutch oven over medium-high heat, add your breakfast sausage. Break it apart with a spoon and cook, stirring occasionally, until it’s beautifully browned and cooked through. If you’re adding chopped onion, toss it in during the last few minutes of cooking the sausage until it softens and becomes fragrant. Once the sausage is cooked, use a slotted spoon to transfer it to a plate lined with paper towels, leaving the drippings in the skillet. Don’t drain all those flavorful bits!
Step 3: Whip Up the Creamy Gravy
Reduce the heat to medium. Sprinkle the flour over the sausage drippings (and onions, if using) in the skillet. Whisk constantly for about 1-2 minutes to cook out the raw flour taste, creating a roux. Now, gradually pour in the milk, whisking continuously to ensure a super smooth, lump-free gravy. Bring the mixture to a simmer, and let it bubble gently, stirring often, until it thickens to a rich, creamy consistency – about 5-8 minutes. Season generously with black pepper and salt to taste. Remember, sausage is salty, so taste as you go!
Step 4: Prepare the Biscuits
Open your cans of biscuit dough. You have a couple of options here for assembly: you can either slice each biscuit in half horizontally to create thinner layers, or simply cut each biscuit into quarters. The goal is to have bite-sized pieces that will soak up the gravy and cook through. In a small bowl, whisk together the egg and milk to create an egg wash. Brush the tops of your biscuit pieces with this mixture for that irresistible golden sheen.
Step 5: Assemble the Casserole
Now for the fun part! Carefully spoon about half of the thickened gravy into the bottom of your prepared baking dish, spreading it evenly. Arrange the prepared biscuit pieces on top of the gravy layer, trying to distribute them evenly without overcrowding them too much. Pour or ladle the remaining gravy over the biscuits, ensuring that most of them are covered or at least well-coated. If you’re using cheese, sprinkle it evenly over the top of the gravy.
Step 6: Bake to Perfection
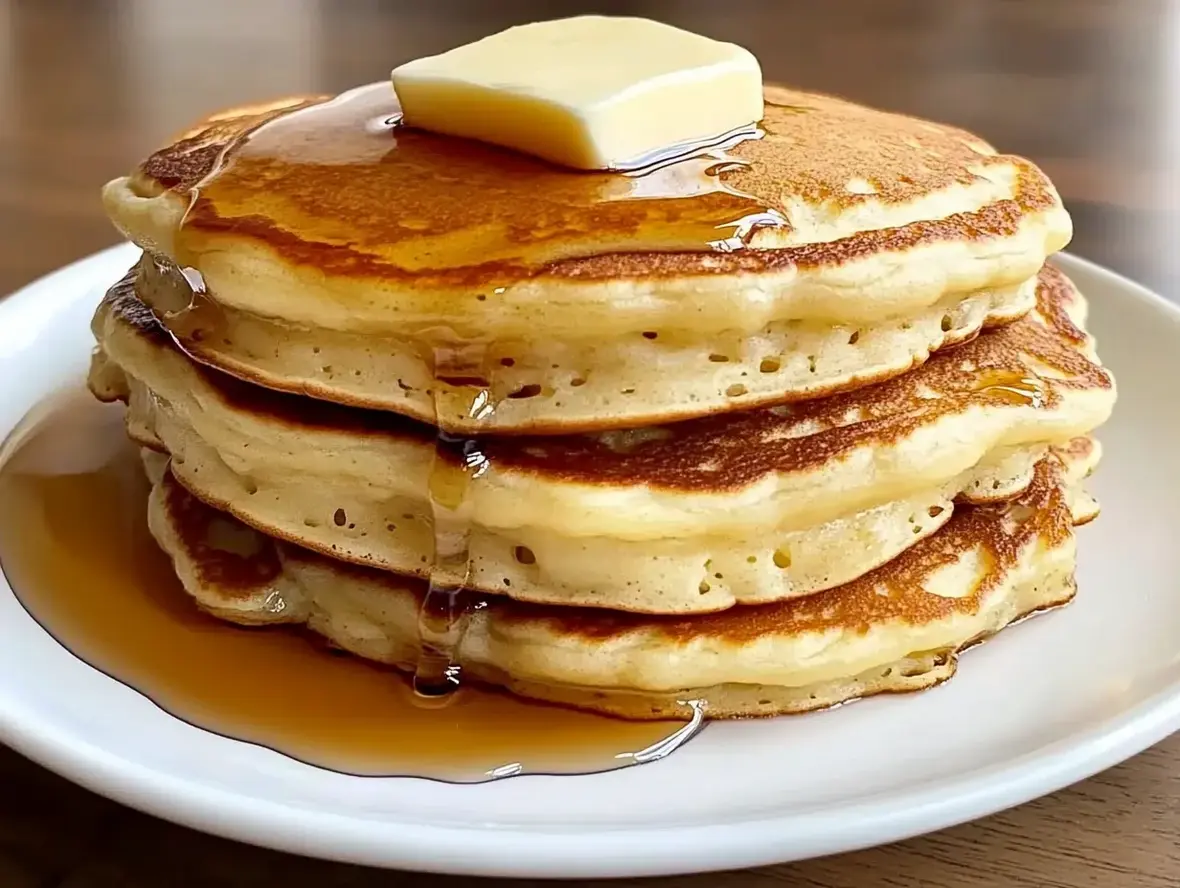
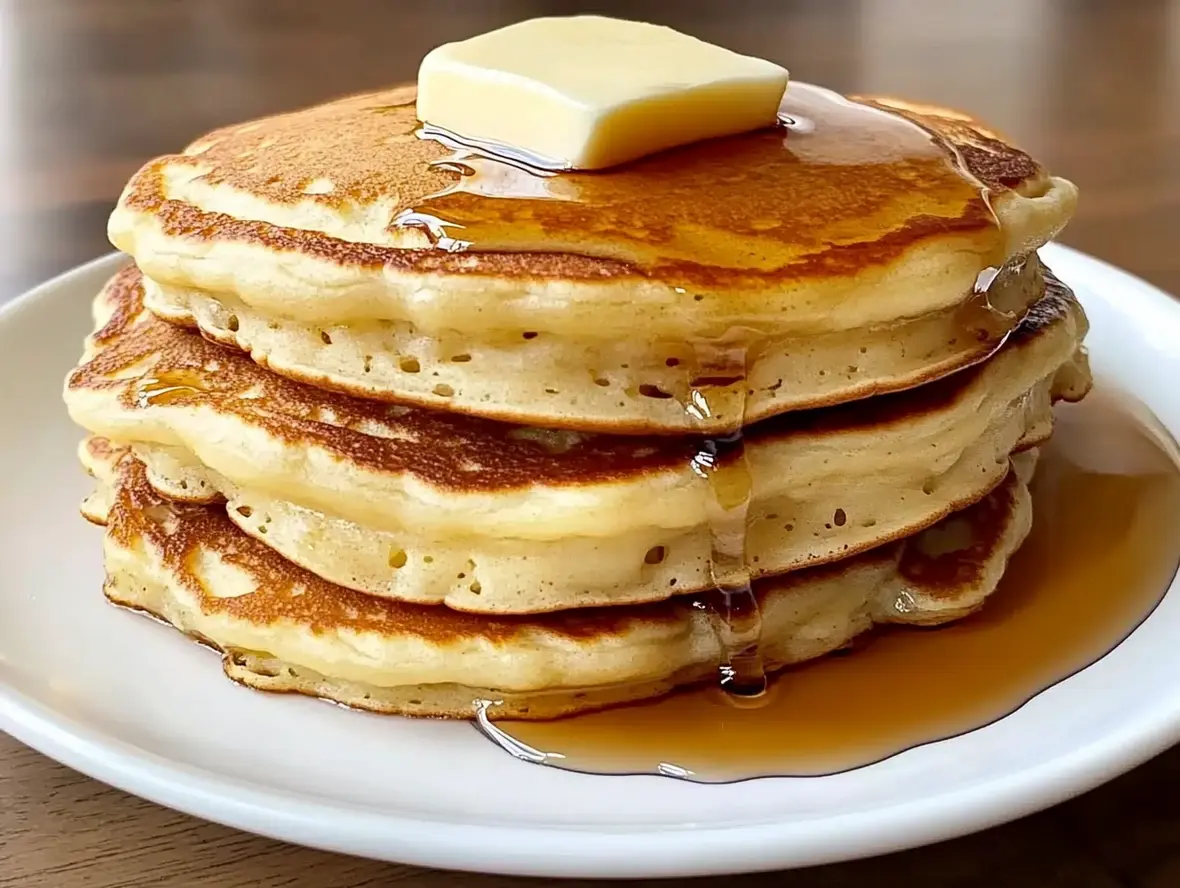
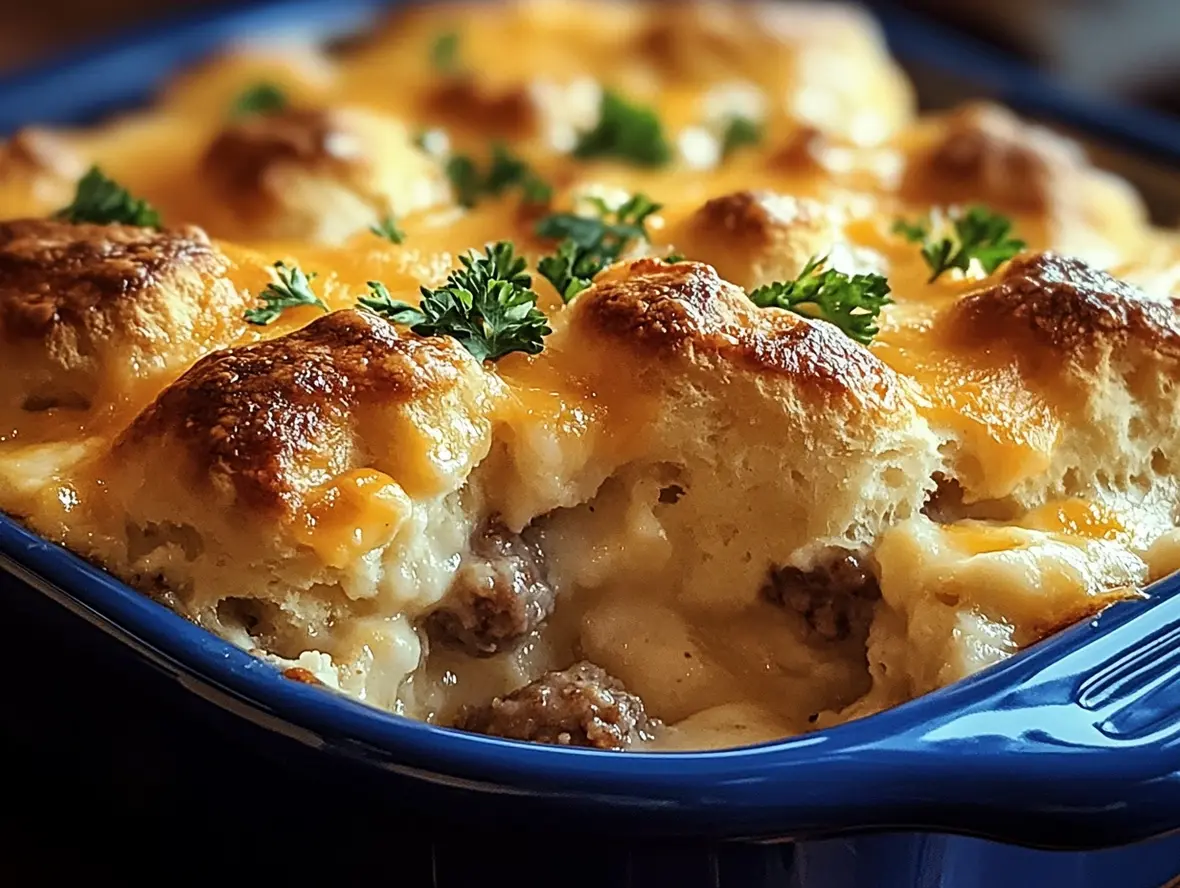
Pop the baking dish into your preheated oven. Bake for 30-35 minutes, or until the biscuits are puffed up, golden brown, and cooked through, and the gravy is bubbling around the edges. The aroma filling your kitchen at this point will be absolutely incredible – a true testament to comfort food done right.
Step 7: Rest and Serve
Once it’s perfectly baked, carefully remove the casserole from the oven. Let it rest for about 5-10 minutes before serving. This brief resting period allows the casserole to set slightly, making it easier to serve and preventing it from being too runny. Garnish with fresh chopped parsley for a touch of elegance and freshness.
Nutritional Snapshot
While this is undoubtedly a decadent treat, here’s a general idea of what you can expect per serving (assuming 6 servings). Keep in mind that actual values will vary based on the specific ingredients and brands used.
- Calories: Approximately 550-650 kcal
- Protein: 20-25g
- Fat: 35-45g (Saturated Fat: 15-20g)
- Carbohydrates: 35-45g (Sugars: 5-8g)
- Sodium: 1200-1500mg (highly dependent on sausage and added salt)
Note: This is an estimate. For precise information, calculate using your specific ingredients.
Healthier Twists on a Classic
Craving that biscuits and gravy goodness but want to lighten it up? You can make smart swaps without sacrificing too much flavor:
- Leaner Sausage: Opt for turkey breakfast sausage or a leaner pork sausage.
- Lower-Fat Milk: Use 2% or even skim milk in the gravy. You might need a touch more flour or a longer simmer to achieve a similar thickness.
- Whole Wheat Biscuits: Use canned whole wheat biscuit dough, or try making your own with whole wheat flour.
- Reduced Sodium: Choose lower-sodium sausage and be mindful of the salt added to the gravy.
- Vegetable Boost: Mix in sautéed mushrooms, bell peppers, or spinach into the gravy for added nutrients.
Serving Suggestions: Elevate Your Meal
This casserole is a hearty meal on its own, but here are a few ideas to round out your breakfast or brunch spread:
- Fresh Fruit Salad: A bright, refreshing contrast to the richness of the casserole.
- Scrambled Eggs: For an extra protein punch and a classic pairing.
- Crispy Bacon or Home Fries: Lean into the breakfast theme with more savory sides.
- A Dash of Hot Sauce: For those who love a little extra kick!
Common Pitfalls to Avoid
Even with a simple recipe, a few common mistakes can turn a great dish into a so-so one. Keep these in mind:
- Gravy too thin/thick: If your gravy isn’t thickening, simmer it longer, uncovered. If it’s too thick, whisk in a little more milk. The amount of flour and milk can vary slightly.
- Under-seasoning: Sausage and bacon can be salty, but they also need pepper and sometimes a bit more salt to balance the richness. Always taste and adjust seasoning.
- Biscuits not cooked through: Ensure your biscuit pieces are adequately coated in gravy and baked until golden and cooked through. If the top is browning too quickly, loosely tent with foil.
- Not resting the casserole: Patience is key! Letting it sit for a few minutes helps it set, preventing a soupy mess.
Storing Your Delicious Creation
Leftovers are a treasure! Once cooled, store any remaining biscuits and gravy casserole in an airtight container in the refrigerator for up to 3-4 days. Reheat gently in the oven or microwave until heated through. You can also freeze portions for later enjoyment.
The Verdict: A Simple Way to Big Flavor
This Easy Biscuits and Gravy Casserole is more than just a recipe; it’s an invitation to slow down, savor a comforting meal, and create lasting memories around the breakfast table. With minimal effort, you can achieve maximum flavor and satisfaction. It’s the perfect dish to impress your family and friends, or simply to treat yourself to a truly delicious experience. So, gather your ingredients, embrace the ease, and get ready to enjoy a breakfast classic that’s better than ever in casserole form!
Frequently Asked Questions
***Frequently Asked Questions***
***Is it possible to make this recipe ahead of time?***
Yes! You can assemble the casserole up to the point of baking, cover it tightly, and refrigerate it overnight. You may need to add a few extra minutes to the baking time if baking directly from the fridge.
***Can I use a different type of meat?***
Absolutely! While sausage is traditional, you could use cooked, crumbled bacon, ham, or even omit the meat for a vegetarian version, though it will change the flavor profile significantly. If using meat other than sausage, you may need to adjust the seasoning.
***What if I don’t have canned biscuits?***
You can definitely use homemade biscuits! Prepare your favorite biscuit recipe, cut them into bite-sized pieces, and proceed with the assembly. Ensure they are fully cooked when baked in the casserole.
***Why is my gravy not thick enough?***
The thickness of gravy can depend on the ratio of flour to milk and how long it simmers. If it’s too thin, continue to simmer it gently, uncovered, stirring occasionally, until it reaches your desired consistency. You can also melt a tablespoon of butter and whisk in another tablespoon of flour in a separate small bowl, then whisk this paste into the gravy to thicken it further.
***Can I add other ingredients to the casserole?***
Certainly! Get creative! Sautéed mushrooms, bell peppers, spinach, or even diced potatoes can be added to the gravy mixture for extra flavor and texture.

Biscuits and Gravy Hashbrown Breakfast Casserole
Description
This hearty and comforting breakfast casserole combines the flavors of classic biscuits and gravy with crispy hashbrowns, cheesy goodness, and fluffy eggs. It’s a crowd-pleaser perfect for brunch or family gatherings.
Ingredients
- 1lb (450 g) breakfast sausage1/4 cup(30 g) all-purpose flour2 cups(480ml) whole milk (for gravy)Salt and black pepper, to taste1(20 oz / 567 g) package frozen hashbrowns, thawed1 cup(100 g) shredded cheddar cheese6large eggs1/2 cup(120ml) milk (for eggs)1(16 oz / 450 g) can of refrigerated biscuit dough, cut into quarters
- 1/4 cup(30 g) all-purpose flour2 cups(480ml) whole milk (for gravy)Salt and black pepper, to taste1(20 oz / 567 g) package frozen hashbrowns, thawed1 cup(100 g) shredded cheddar cheese6large eggs1/2 cup(120ml) milk (for eggs)1(16 oz / 450 g) can of refrigerated biscuit dough, cut into quarters
- 2 cups(480ml) whole milk (for gravy)Salt and black pepper, to taste1(20 oz / 567 g) package frozen hashbrowns, thawed1 cup(100 g) shredded cheddar cheese6large eggs1/2 cup(120ml) milk (for eggs)1(16 oz / 450 g) can of refrigerated biscuit dough, cut into quarters
- Salt and black pepper, to taste1(20 oz / 567 g) package frozen hashbrowns, thawed1 cup(100 g) shredded cheddar cheese6large eggs1/2 cup(120ml) milk (for eggs)1(16 oz / 450 g) can of refrigerated biscuit dough, cut into quarters
- 1(20 oz / 567 g) package frozen hashbrowns, thawed1 cup(100 g) shredded cheddar cheese6large eggs1/2 cup(120ml) milk (for eggs)1(16 oz / 450 g) can of refrigerated biscuit dough, cut into quarters
- 1 cup(100 g) shredded cheddar cheese6large eggs1/2 cup(120ml) milk (for eggs)1(16 oz / 450 g) can of refrigerated biscuit dough, cut into quarters
- 6large eggs1/2 cup(120ml) milk (for eggs)1(16 oz / 450 g) can of refrigerated biscuit dough, cut into quarters
- 1/2 cup(120ml) milk (for eggs)1(16 oz / 450 g) can of refrigerated biscuit dough, cut into quarters
- 1(16 oz / 450 g) can of refrigerated biscuit dough, cut into quarters
Instructions
- 1️⃣Preheat the Oven:Preheat your oven to 375°F (190°C). Grease a 9×13-inch (23×33 cm) baking dish.2️⃣Make the Sausage Gravy:In a large skillet, cook the breakfast sausage over medium heat until browned and fully cooked. Do not drain the fat.Sprinkle the flour over the sausage and stir to coat. Cook for 1-2 minutes.Gradually pour in the milk while stirring constantly. Bring the mixture to a simmer and cook until the gravy thickens, about 3-5 minutes. Season with salt and pepper to taste. Remove from heat.3️⃣Assemble the Casserole:Spread the thawed hashbrowns evenly across the prepared baking dish.Pour the sausage gravy over the hashbrowns and spread it out evenly.Sprinkle the shredded cheddar cheese on top of the gravy layer.4️⃣Prepare the Egg Mixture:In a medium bowl, whisk together the eggs and 1/2 cup of milk. Season with salt and pepper to taste.Pour the egg mixture evenly over the casserole.5️⃣Add the Biscuits:Scatter the quartered biscuit dough pieces evenly across the top of the casserole.6️⃣Bake the Casserole:Bake in the preheated oven for 35-40 minutes, or until the biscuits are golden brown and cooked through, and the eggs are set.7️⃣Serve:Allow the casserole to cool for 5 minutes before serving. Enjoy warm, with additional gravy or hot sauce if desired.
- 2️⃣Make the Sausage Gravy:
- In a large skillet, cook the breakfast sausage over medium heat until browned and fully cooked. Do not drain the fat.Sprinkle the flour over the sausage and stir to coat. Cook for 1-2 minutes.Gradually pour in the milk while stirring constantly. Bring the mixture to a simmer and cook until the gravy thickens, about 3-5 minutes. Season with salt and pepper to taste. Remove from heat.3️⃣Assemble the Casserole:Spread the thawed hashbrowns evenly across the prepared baking dish.Pour the sausage gravy over the hashbrowns and spread it out evenly.Sprinkle the shredded cheddar cheese on top of the gravy layer.4️⃣Prepare the Egg Mixture:In a medium bowl, whisk together the eggs and 1/2 cup of milk. Season with salt and pepper to taste.Pour the egg mixture evenly over the casserole.5️⃣Add the Biscuits:Scatter the quartered biscuit dough pieces evenly across the top of the casserole.6️⃣Bake the Casserole:Bake in the preheated oven for 35-40 minutes, or until the biscuits are golden brown and cooked through, and the eggs are set.7️⃣Serve:Allow the casserole to cool for 5 minutes before serving. Enjoy warm, with additional gravy or hot sauce if desired.
- Sprinkle the flour over the sausage and stir to coat. Cook for 1-2 minutes.Gradually pour in the milk while stirring constantly. Bring the mixture to a simmer and cook until the gravy thickens, about 3-5 minutes. Season with salt and pepper to taste. Remove from heat.3️⃣Assemble the Casserole:Spread the thawed hashbrowns evenly across the prepared baking dish.Pour the sausage gravy over the hashbrowns and spread it out evenly.Sprinkle the shredded cheddar cheese on top of the gravy layer.4️⃣Prepare the Egg Mixture:In a medium bowl, whisk together the eggs and 1/2 cup of milk. Season with salt and pepper to taste.Pour the egg mixture evenly over the casserole.5️⃣Add the Biscuits:Scatter the quartered biscuit dough pieces evenly across the top of the casserole.6️⃣Bake the Casserole:Bake in the preheated oven for 35-40 minutes, or until the biscuits are golden brown and cooked through, and the eggs are set.7️⃣Serve:Allow the casserole to cool for 5 minutes before serving. Enjoy warm, with additional gravy or hot sauce if desired.
- Gradually pour in the milk while stirring constantly. Bring the mixture to a simmer and cook until the gravy thickens, about 3-5 minutes. Season with salt and pepper to taste. Remove from heat.
- 3️⃣Assemble the Casserole:Spread the thawed hashbrowns evenly across the prepared baking dish.Pour the sausage gravy over the hashbrowns and spread it out evenly.Sprinkle the shredded cheddar cheese on top of the gravy layer.4️⃣Prepare the Egg Mixture:In a medium bowl, whisk together the eggs and 1/2 cup of milk. Season with salt and pepper to taste.Pour the egg mixture evenly over the casserole.5️⃣Add the Biscuits:Scatter the quartered biscuit dough pieces evenly across the top of the casserole.6️⃣Bake the Casserole:Bake in the preheated oven for 35-40 minutes, or until the biscuits are golden brown and cooked through, and the eggs are set.7️⃣Serve:Allow the casserole to cool for 5 minutes before serving. Enjoy warm, with additional gravy or hot sauce if desired.
- Spread the thawed hashbrowns evenly across the prepared baking dish.Pour the sausage gravy over the hashbrowns and spread it out evenly.Sprinkle the shredded cheddar cheese on top of the gravy layer.4️⃣Prepare the Egg Mixture:In a medium bowl, whisk together the eggs and 1/2 cup of milk. Season with salt and pepper to taste.Pour the egg mixture evenly over the casserole.5️⃣Add the Biscuits:Scatter the quartered biscuit dough pieces evenly across the top of the casserole.6️⃣Bake the Casserole:Bake in the preheated oven for 35-40 minutes, or until the biscuits are golden brown and cooked through, and the eggs are set.7️⃣Serve:Allow the casserole to cool for 5 minutes before serving. Enjoy warm, with additional gravy or hot sauce if desired.
- Pour the sausage gravy over the hashbrowns and spread it out evenly.
- Sprinkle the shredded cheddar cheese on top of the gravy layer.4️⃣Prepare the Egg Mixture:In a medium bowl, whisk together the eggs and 1/2 cup of milk. Season with salt and pepper to taste.Pour the egg mixture evenly over the casserole.5️⃣Add the Biscuits:Scatter the quartered biscuit dough pieces evenly across the top of the casserole.6️⃣Bake the Casserole:Bake in the preheated oven for 35-40 minutes, or until the biscuits are golden brown and cooked through, and the eggs are set.7️⃣Serve:Allow the casserole to cool for 5 minutes before serving. Enjoy warm, with additional gravy or hot sauce if desired.
- 4️⃣Prepare the Egg Mixture:In a medium bowl, whisk together the eggs and 1/2 cup of milk. Season with salt and pepper to taste.Pour the egg mixture evenly over the casserole.5️⃣Add the Biscuits:Scatter the quartered biscuit dough pieces evenly across the top of the casserole.6️⃣Bake the Casserole:Bake in the preheated oven for 35-40 minutes, or until the biscuits are golden brown and cooked through, and the eggs are set.7️⃣Serve:Allow the casserole to cool for 5 minutes before serving. Enjoy warm, with additional gravy or hot sauce if desired.
- In a medium bowl, whisk together the eggs and 1/2 cup of milk. Season with salt and pepper to taste.
- Pour the egg mixture evenly over the casserole.5️⃣Add the Biscuits:Scatter the quartered biscuit dough pieces evenly across the top of the casserole.6️⃣Bake the Casserole:Bake in the preheated oven for 35-40 minutes, or until the biscuits are golden brown and cooked through, and the eggs are set.7️⃣Serve:Allow the casserole to cool for 5 minutes before serving. Enjoy warm, with additional gravy or hot sauce if desired.
- 5️⃣Add the Biscuits:Scatter the quartered biscuit dough pieces evenly across the top of the casserole.6️⃣Bake the Casserole:Bake in the preheated oven for 35-40 minutes, or until the biscuits are golden brown and cooked through, and the eggs are set.7️⃣Serve:Allow the casserole to cool for 5 minutes before serving. Enjoy warm, with additional gravy or hot sauce if desired.
- Scatter the quartered biscuit dough pieces evenly across the top of the casserole.
- 6️⃣Bake the Casserole:Bake in the preheated oven for 35-40 minutes, or until the biscuits are golden brown and cooked through, and the eggs are set.7️⃣Serve:Allow the casserole to cool for 5 minutes before serving. Enjoy warm, with additional gravy or hot sauce if desired.
- Bake in the preheated oven for 35-40 minutes, or until the biscuits are golden brown and cooked through, and the eggs are set.7️⃣Serve:Allow the casserole to cool for 5 minutes before serving. Enjoy warm, with additional gravy or hot sauce if desired.
- 7️⃣Serve:
- Allow the casserole to cool for 5 minutes before serving. Enjoy warm, with additional gravy or hot sauce if desired.
Notes
Make-Ahead Tip:Assemble the casserole the night before (except for the biscuits) and refrigerate. Add the biscuit dough right before baking.Cheese Options:Swap cheddar for pepper jack or Colby for a twist in flavor.Leftovers:Store in an airtight container in the refrigerator for up to 3 days. Reheat in the oven at 350°F (175°C) for best results.
Cheese Options:Swap cheddar for pepper jack or Colby for a twist in flavor.Leftovers:Store in an airtight container in the refrigerator for up to 3 days. Reheat in the oven at 350°F (175°C) for best results.
Leftovers:Store in an airtight container in the refrigerator for up to 3 days. Reheat in the oven at 350°F (175°C) for best results.
“`