Easy Strawberry Chocolate Thumbprint Cookies – Ready in 30 Minutes

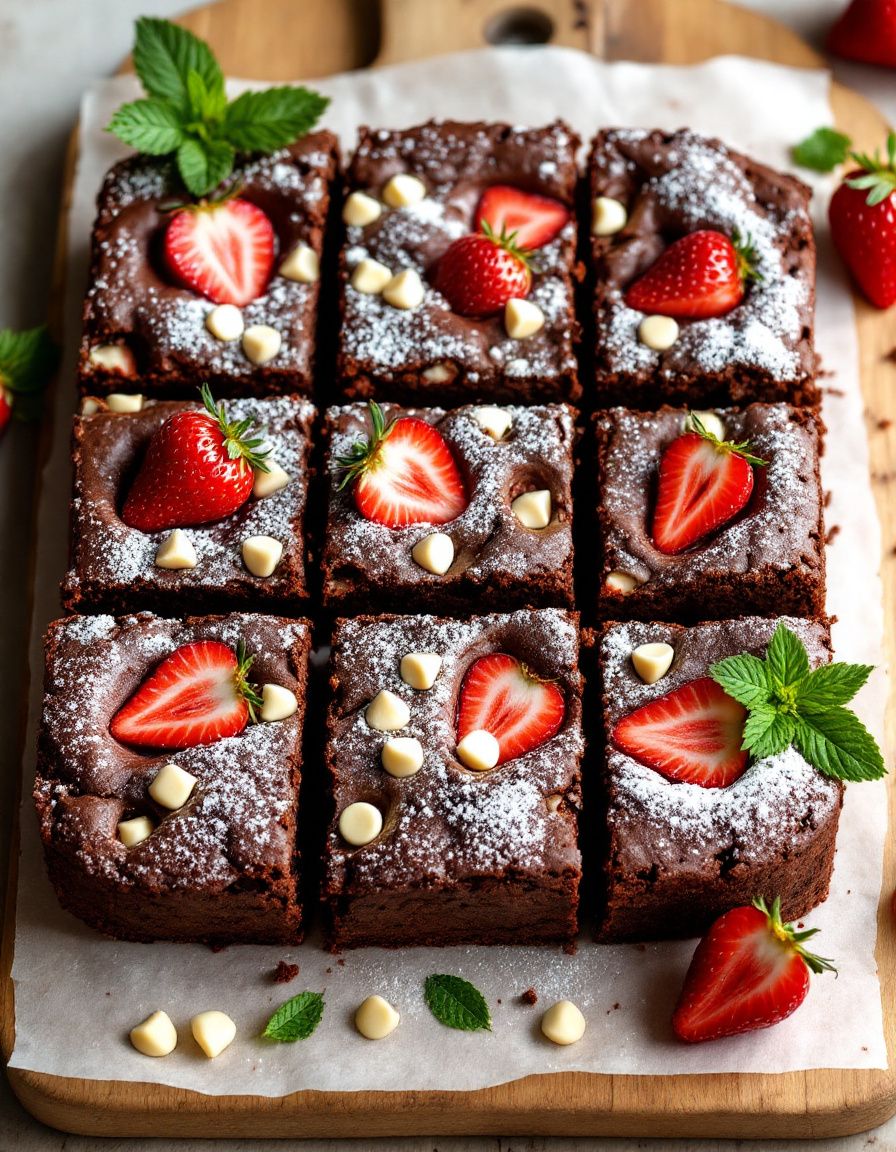
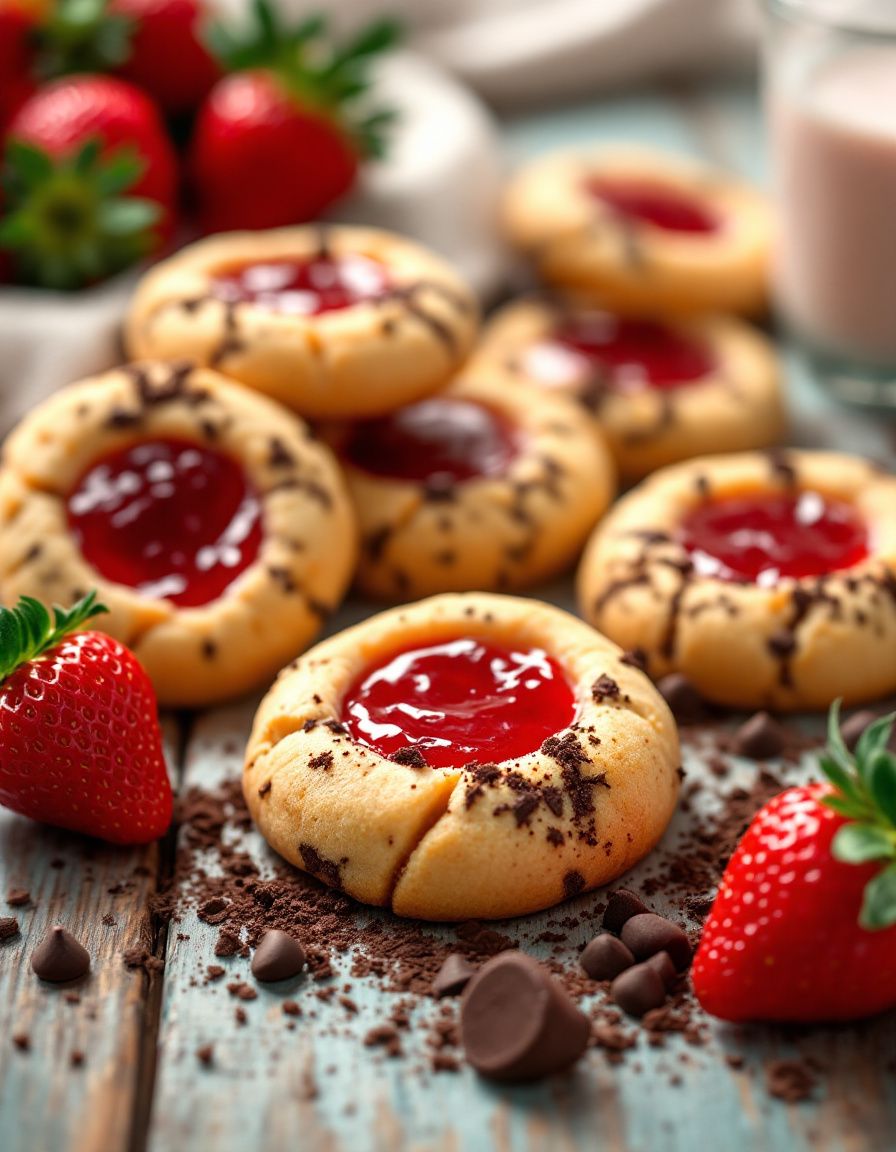
Strawberry Chocolate Thumbprint Cookies: A Perfect Treat

⚖️
Difficulty
Easy

⏲️
Prep Time
15 mins

🕒
Cook Time
12 mins

⏱️
Total Time
27 mins

🍽️
Servings
24 cookies

Indulge in the delightful combination of strawberries and chocolate with these Strawberry Chocolate Thumbprint Cookies. Perfect for any occasion, these cookies not only look gorgeous but also taste heavenly. The soft, buttery cookie base is a treat in itself, and the luscious strawberry jam combined with rich chocolate creates a flavor experience that will leave you wanting more. With each bite, you’ll enjoy a symphony of sweetness, balanced by the tartness of the strawberries, making it an unforgettable dessert that appeals to both the eyes and the taste buds.

Whether you are hosting a gathering, celebrating a special occasion, or simply craving something sweet, these Strawberry Chocolate Thumbprint Cookies are the perfect solution. They are simple to make, require minimal ingredients, and are bound to impress your family and friends. The bright red strawberry filling peeking through the chocolate glaze not only offers an inviting presentation but also promises a burst of flavor with every bite.

Quick Recipe Highlights

  • Flavor Profile: This delightful cookie features a sweet, buttery base paired with rich chocolate and tart strawberry jam, creating the perfect harmony of flavors.
  • Texture: Expect a soft and chewy cookie that contrasts beautifully with the thick chocolate topping and smooth strawberry filling.
  • Aroma: The aroma of baked cookies mingled with fresh strawberries fills the kitchen, making it hard to resist these cookies.
  • Visual Appeal: The vibrant red of the strawberry jam against the golden cookie and dark chocolate is sure to catch anyone’s eye.
  • Skill Level Needed: These cookies are easy to make, making them perfect for both beginner bakers and seasoned pros.
  • Special Equipment: You will need a mixing bowl, baking sheet, and a spoon for making the thumbprint indentations.

Recipe Overview

  • Difficulty Level: These cookies are classified as easy, making them a great choice for inexperienced bakers looking for a fun project.
  • Category: They serve as an excellent dessert, snack, or treat for parties and picnics.
  • Cuisine: Inspired by classic American baking traditions, thumbprint cookies have become a favorite across many households.
  • Cost: With affordable ingredients, these cookies can be made without breaking the bank, typically costing under $10.
  • Season: Strawberries peak in spring and summer, making this recipe ideal for those seasons when they are fresh and abundant.
  • Occasion: Perfect for birthdays, holidays, or casual get-togethers, these cookies are sure to delight at any event.

Why You’ll Love This Recipe

The taste and texture of these Strawberry Chocolate Thumbprint Cookies make them a standout dessert. The soft, buttery cookies provide a comforting base, while the rich dark chocolate ganache adds luxurious depth. Furthermore, the burst of tart strawberry jam in the center creates a delightful and unexpected contrast that keeps you coming back for more.

Convenience is another reason to love this recipe. It requires simple ingredients that you probably already have in your pantry. The preparation time is minimal, allowing you to whip up a batch in no time. This makes them an ideal option when you need a quick dessert for unexpected guests or just an afternoon treat.

Nutritionally, strawberries offer a wealth of benefits, being high in vitamin C and full of antioxidants. This makes these cookies not just a guilty pleasure, but also a treat that provides some nutritional value. Paired with the energy boost from the sugar and carbs in the cookies, they can satisfy your sweet tooth while giving you a little pick-me-up.

These cookies also hold great social and entertaining value; they are perfect for sharing. Their beautiful presentation makes them an eye-catching addition to any dessert table. When served at gatherings, they are sure to spark conversations and delight guests.

Finally, the cost-effectiveness of this recipe cannot be ignored. With basic ingredients, you can bake a large batch of cookies for a fraction of the cost of store-bought desserts. Additionally, they can be made ahead of time and stored, allowing you to always have a delicious treat at hand.

Historical Background and Cultural Significance

The origin of thumbprint cookies dates back centuries, with ties to various cultures that feature pressed or indented cookies filled with preserves. The technique is believed to have been perfected in Europe, particularly in Scandinavian countries, where they often used fruit jams in their baking.

Culturally, these cookies symbolize comfort and nostalgia, often associated with family gatherings and homemade treats. They evoke memories of baking with loved ones in cozy kitchens, making them a cherished recipe that many families pass down through generations.

Over time, the basic thumbprint cookie has evolved to include various fillings beyond just fruit jams, embodying the creativity of bakers worldwide. The introduction of chocolate and other flavors, like nut butters or cream cheeses, has allowed this cookie to maintain its popularity through the years.

Regional variations of thumbprint cookies are abundant. In some places, you might find them filled with chocolate ganache or even savory spreads, showcasing the versatility and adaptability of this simple, yet beloved treat.

Ingredient Deep Dive

Flour: Flour serves as the foundation for most baked goods. It is a major source of carbohydrates and provides structure to the cookies. When choosing flour, look for all-purpose flour for the best results; it’s versatile and essential in cookie baking.

Butter: Butter not only adds rich flavor but also contributes to the tender texture of the cookies. The fat in butter helps to create a crumbly, melt-in-your-mouth effect, essential for a delicious thumbprint cookie. Opt for unsalted butter to maintain control over the sweetness.

Sugar: Sugar plays a crucial role in sweetening while also impacting the overall texture of baked goods. Granulated sugar is typically used, but substituting with brown sugar can add moisture and a chewy texture, enhancing the flavor of the cookies.

Strawberry Jam: Fresh strawberry jam adds a fruity tartness that complements the sweetness of the cookies wonderfully. When selecting jam, aim for high-quality, low-sugar options to accentuate the natural flavor of strawberries.

Chocolate: Dark or semi-sweet chocolate enhances the flavor profile of these cookies, providing a rich and indulgent contrast to the sweet and fruity jam. Choose a quality chocolate bar or chocolate chips for the best results.

Common Mistakes to Avoid

  • Overmixing the Dough: Mixing too long can lead to tough cookies. Stir just until ingredients are combined for the best texture.
  • Not Chilling the Dough: Skipping the chill can result in cookies spreading too much. Always chill to maintain their shape.
  • Incorrectly Measuring Ingredients: Accurate measurements ensure consistent results. Use a kitchen scale for precision.
  • Skipping the Indentation: Pressing your thumb into the dough is key for holding the filling. Don’t skip this step!
  • Overbaking: Keep an eye on baking time; cookies should be golden but not hard. They will continue to cook as they cool.
  • Using Warm Jam: Let the jam cool before using. Warm jam may spread too much and lose its shape during baking.
  • Underestimating Cooling Time: Allow cookies to cool completely on the baking sheet before transferring to prevent breakage.
  • Not Using Quality Ingredients: Using subpar ingredients can result in a less flavorful cookie. Invest in quality to elevate your bake.

Essential Techniques

Measuring Flour: Properly measuring flour is crucial for baking success. Use a spoon to fluff and aerate the flour first before spooning it gently into the measuring cup—leveling off with a knife gives accurate amounts. This helps avoid dense cookies that can occur when too much flour is packed into the cup.

Creating the Thumbprint: The thumbprint is essential for holding the filling. When creating the indentation, use a clean thumb or the back of a spoon and press firmly but gently to avoid cracking the edges of the cookie dough, ensuring a nice, even shape.

Baking Evenly: To ensure your cookies bake evenly, rotate the baking sheets halfway through the cooking time. This helps account for any hot spots in your oven, allowing for golden, uniformly baked cookies.

Smoothing Chocolate: When melting chocolate, use a double boiler or microwave with short intervals to avoid scorched chocolate. Stir frequently to achieve a smooth consistency for drizzling or dipping, enhancing the overall visual appeal of the cookies.

Pro Tips for Perfect Strawberry Chocolate Thumbprint Cookies

– Use room temperature ingredients for easier mixing, leading to a smoother dough.
– Experiment with various fillings like raspberry or peach jams for different flavor profiles.
– For a twist, add chopped nuts or coconut to the dough for added texture.
– Ensure you let your cookies cool properly to avoid sogginess from the jam filling.
– Top with a sprinkle of sea salt after adding chocolate for a gourmet touch.
– Consider using larger thumbprints for more jam and chocolate – who wouldn’t want more filling?
– Use a piping bag for more control when filling the thumbprint with jam.
– Store cookies in an airtight container for freshness, protecting them from moisture.

Variations and Adaptations

For a twist on these classic Strawberry Chocolate Thumbprint Cookies, consider using different types of fruit preserves or jams. Choose seasonal fruits such as blueberry, raspberry, or even lemon curd, providing a refreshing change that brings new flavors to the table.

Seasonal adaptations can involve adding spices for the fall, such as cinnamon or nutmeg, offering a warm and inviting aroma and flavor. Alternatively, during the summer, enhance the cookie batter with zesty citrus zest for a bright and fresh taste.

Dietary modifications are also achievable; replace all-purpose flour with almond or coconut flour for a gluten-free alternative, ensuring that everyone can enjoy these delightful cookies. If looking to reduce sugar, opt for natural sweeteners like honey or maple syrup.

Flavor variations can include adding a splash of vanilla extract or almond extract for a fragrant and aromatic touch. Mixing in chocolate chunks or using milk chocolate instead of dark chocolate can create a sweeter profile that appeals to both kids and adults alike.

For presentation alternatives, consider dusting the cookies with powdered sugar or drizzling with white chocolate for an elegant finish. These small touches can elevate the cookies from homemade treats to gourmet delights.

Serving and Presentation Guide

When serving Strawberry Chocolate Thumbprint Cookies, presentation matters. Arrange them on a colorful platter, garnished with fresh strawberries or mint leaves for a fresh touch. Utilize tiered stands for an eye-catching display, especially for gatherings and parties, creating visual interest on the dessert table.

Garnishing with a light dusting of powdered sugar can enhance the cookies’ appearance while providing a touch of elegance. Chocolate drizzles offer a refined look—using a piping bag to present decorative patterns can elevate the gourmet feel.

Traditional accompaniments like a dollop of whipped cream can enhance the experience, especially when pairing with a hot drink. Modern serving suggestions might include pairing them with ice cream, which provides a delightful contrast in temperature and texture.

Keep in mind the temperature of the cookies when serving. They can be enjoyed warm or at room temperature, ensuring they maintain their texture. Finally, consider portion control, as these cookies are bite-sized treats that can be enjoyed in moderation without overwhelming guests.

Wine and Beverage Pairing

For an elegant pairing with Strawberry Chocolate Thumbprint Cookies, opt for a light-bodied rosé or sparkling wine. These beverages complement the sweetness of the cookies while enhancing the fruit notes from the strawberry jam.

If you prefer non-alcoholic alternatives, consider pairing with herbal or floral teas. Chamomile or hibiscus teas bring out the flavor of the fruit fillings nicely and create a refreshing experience.

For coffee lovers, a rich espresso or a mocha latte can serve as an excellent complement to the dark chocolate in the cookies, making for a satisfying dessert pairing. Consider serving chilled beverages, especially iced teas or flavored sparkling waters during warmer seasons, for a refreshing touch.

Storage and Shelf Life

To properly store Strawberry Chocolate Thumbprint Cookies, keep them in an airtight container at room temperature for up to five days. For longer shelf life, consider freezing them; ensure they are completely cooled, then place them in a freezer-safe bag or container.

When freezing, layer parchment paper between cookies to prevent sticking and maintain their shape. They can be frozen for up to three months, making them a great make-ahead option for future gatherings.

Signs of spoilage include unusual odors or excessive moisture. If you notice a change in texture, it’s best to discard any cookies showing signs of spoilage. When reheating, place them in the oven for a few minutes to restore their warmth and softness.

Make Ahead Strategies

Preparing these cookies in advance can save time during busy occasions. You can make the cookie dough a day ahead and store it in the refrigerator. This allows the flavors to meld and makes for easier rolling and shaping when you are ready to bake.

After baking, cookies can be made ahead and stored simply without the filling. Consider adding jam and chocolate just before serving to maintain optimal freshness. The chocolate will set beautifully and create a lovely, glossy top when applied right before serving.

For the best quality, consider preparing the thumbprints but waiting to fill them until the day of your event. This method maintains the integrity of the ingredients and keeps them fresh while still allowing for easy assembly.

Scaling Instructions

If you wish to halve or double the recipe, adjusting the ingredient amounts is straightforward. For instance, if you’re halving the recipe, simply use half the amount of flour, butter, sugar, and other elements. Remember to adjust the baking time slightly if you’re making a smaller batch, as they may bake quicker.

When tripling the recipe, ensure you have adequate space on baking sheets, and you may need to bake in batches. Always monitor the baking time carefully, as larger batches may require more time to cook evenly.

In cases of large gatherings or events, scaling in this way allows for consistent flavor and texture, keeping your cookies delightful for every batch you produce. Additionally, storage considerations should be planned if preparing large quantities; using multiple containers can help maintain freshness.

Nutritional Deep Dive

The macro breakdown for Strawberry Chocolate Thumbprint Cookies typically includes carbohydrates from flour, sugars, and butter. Each cookie holds a balanced amount of fat, primarily from butter, contributing to its rich taste. While cookies are indulgent treats, a single serving fits well within a balanced diet when consumed in moderation.

In terms of micronutrients, strawberries provide vitamin C, manganese, and folate, benefits that make these cookies slightly nutritious compared to other dessert options. Using high-quality ingredients can further enhance the nutritional profile of these beloved cookies.

Consider dietary considerations when enjoying these cookies, especially regarding portion control. Being aware of sugar content and total caloric intake can help those managing their diet achieve balance while indulging in treats occasionally.

For those looking to manage weight, enjoying a small cookie or two with a healthy meal can help satisfy sweet cravings while maintaining a balanced approach to eating.

Dietary Adaptations

For gluten-free adaptations of Strawberry Chocolate Thumbprint Cookies, consider using a gluten-free flour blend. Many blends mimic the texture of all-purpose flour well, ensuring delicious outcomes without gluten.

In crafting a dairy-free version, substitute regular butter with coconut oil or vegan butter. The texture might slightly alter, but the overall flavor will still shine through.

Switching to a vegan recipe can be achieved by replacing eggs (if used) with flaxseed meal or applesauce. Choose vegan chocolate chips for a fully plant-based treat that still captures the indulgence of traditional cookies.

For low-carb diets, experiment with almond flour and sugar substitutes like erythritol to create a cookie that aligns with keto or paleo lifestyles without losing flavor or satisfaction.

Troubleshooting Guide

If your cookies turn out too dry, check your flour measurement; it is crucial to get this right. Adding a touch more butter can help remedy this issue as well.

Should you encounter spreading cookies, ensure that your dough was adequately chilled before baking. If the butter was too warm during mixing, that can also lead to excessive spreading and flat shapes.

If the jam spills over during baking, press your thumb deeper to create a sturdier well for the filling. This helps keep jam contained and looks tidier.

For those experiencing chocolate that won’t melt smoothly, consider using a lower heat setting or adding a small amount of vegetable oil to provide creaminess and ease of flow when drizzling.

Recipe Success Stories

Our readers have shared numerous success stories when baking Strawberry Chocolate Thumbprint Cookies. Many have had great success experimenting with various jam flavors, from apricot to blackberry, bringing their unique twist to this classic recipe.

Photographic submissions show stunningly presented cookies that have become staples at family gatherings and bake sales. Many bakers report that these cookies were the star of the show at their events, prompting requests for the recipe from friends and family.

Reader suggestions include pairing these cookies with homemade ice cream, creating memorable dessert experiences. It’s also been noted that these cookies hold their shape beautifully, making them ideal for transporting to parties.

The feedback from various outlets has affirmed the simplicity and flavor of this cookie recipe, enriching the community with shared adaptations and modified ingredients crafted for dietary needs.

Frequently Asked Questions

Can I use frozen strawberries for the jam?

Yes, you can use frozen strawberries, but ensure that they are thawed and drained properly before making the jam to avoid excess moisture in the filling.

How do I keep my cookies soft after baking?

Storing cookies in an airtight container will help them retain moisture, keeping them soft. Adding a slice of bread in the container can also help absorb moisture and keep cookies chewy.

How do I prevent my chocolate from seizing?

To prevent chocolate from seizing while melting, ensure no water gets into the chocolate, and melt it at a low temperature, stirring constantly.

Can I make the dough ahead of time?

Yes, you can prepare the dough ahead of time. Wrap it tightly in plastic wrap and refrigerate for up to three days or freeze for up to three months.

Is it necessary to chill the dough?

Yes, chilling the dough helps prevent the cookies from spreading too much during baking, helping them maintain their shape and volume.

What other fillings can I use besides jam?

You can experiment with nut butters, chocolate ganache, or even pastry cream for a different flavor profile and texture in your cookies.

Why do my cookies spread too much?

Certain factors like warm dough or insufficient chilling may cause spreading. Ensure your dough is properly chilled and the butter is not too soft.

Can I freeze these cookies?

Yes, these cookies freeze well. Store them in a freezer-safe container, separated by parchment paper, for up to three months.

How can I enhance the flavor further?

Adding spices like cinnamon or nutmeg to the cookie batter can enhance overall flavor, along with a pinch of salt to balance sweetness.

How do I make these cookies gluten-free?

You can make gluten-free thumbprint cookies by substituting all-purpose flour with a gluten-free blend. Adjustments in the liquid ratios might be needed.

Additional Resources

Explore related recipes like Nutella Stuffed Cookies or Lemon Bars for more delightful baking inspiration. Technique guides on cookie baking can provide you with deeper knowledge on ingredient interactions and baking science.

Gathering ingredient information can also yield insight into quality versus quantity, leading to better baking outcomes. Consider investing in quality baking equipment, as the right tools can significantly improve your baking experience.

Seasonal variations can spice things up in the kitchen; for example, using pumpkin puree in the fall can create a seasonal twist for thumbprint cookies.

Join the Conversation

We encourage you to share your Strawberry Chocolate Thumbprint cookie experiences on social media. Join the conversation by posting photos, your unique variations, or any feedback you have on the recipe.

Engaging with the community can enrich your baking journey and inspire others to try these cookies. Also, be on the lookout for new ideas or suggestions from fellow bakers who share a passion for creating delightful desserts.

Help spread the joy of baking by leaving a review or sharing the recipe link with friends! Your experiences contribute to a collaborative and creative cooking community that thrives on delicious treats.

The Recipe

Strawberry Chocolate Thumbprint Cookies

Serves: 24 cookies

Prep Time: 15 mins

Cook Time: 12 mins

Total Time: 27 mins

Kitchen Equipment Needed

  • Baking sheet
  • Mixing bowl
  • Measuring cups and spoons
  • Whisk or electric mixer
  • Pastry bag (optional)

Ingredients

  • 1 cup unsalted butter, softened
  • 1 cup granulated sugar
  • 2 cups all-purpose flour
  • 1/2 cup strawberry jam
  • 1 cup dark chocolate chips
  • 1/2 teaspoon vanilla extract
  • 1/4 teaspoon salt

Directions

  1. Preheat the oven to 350°F (175°C) and line a baking sheet with parchment paper.
  2. In a mixing bowl, cream together the softened butter and granulated sugar until light and fluffy.
  3. Add the vanilla extract and mix to combine.
  4. Gradually add the flour and salt, mixing until a dough forms.
  5. Roll the dough into balls about 1 inch in diameter and place them on the baking sheet.
  6. Use your thumb or the back of a spoon to create an indentation in the center of each cookie.
  7. Fill each indentation with about 1/2 teaspoon of strawberry jam.
  8. Bake in the oven for 10-12 minutes or until the edges are lightly golden.
  9. While the cookies cool, melt the chocolate chips in a microwave or double boiler until smooth.
  10. Drizzle melted chocolate over each cookie and allow it to set before serving.

Recipe Notes

  • For a richer flavor, consider using brown sugar in place of some granulated sugar.
  • Feel free to substitute other types of fruit preserves if strawberries are unavailable.

Best Valentine Sugar Cookies – Easy and Ready in 30 Minutes

The Best Valentine Sugar Cookies: Sweet Treats for Your Loved Ones

⚖️
Difficulty
Easy

⏲️
Prep Time
20 mins

🕒
Cook Time
10 mins

⏱️
Total Time
30 mins

🍽️
Servings
24 cookies

Cookies are the perfect way to create lasting memories with your loved ones, especially on Valentine’s Day. These delightful Valentine Sugar Cookies are not just visually appealing with their heart shapes and vibrant colors, but they also boast a soft and buttery texture that melts in your mouth. The sweet aroma of vanilla and a hint of almond create an inviting atmosphere, making these cookies a must-have for love-filled celebrations. Whether you’re baking for your special someone, kids, or friends, these cookies are sure to impress and spread love.

Creating these sugar cookies is both fun and simple, making it an enjoyable activity to do with family or friends. The rewarding experience of decorating the cookies with royal icing and sprinkles adds a personal touch that makes each cookie unique. Plus, the joy of sharing these sweet treats symbolizes love and friendship, perfect for the occasion. Follow this recipe to whip up a batch of The Best Valentine Sugar Cookies that everyone will adore.

Quick Recipe Highlights

  • Flavor Profile: These sugar cookies have a sweet vanilla flavor with subtle hints of almond, making them irresistibly delicious.
  • Texture: Expect a soft, chewy center surrounded by a slightly crisp edge, providing a delightful bite.
  • Aroma: The warm scent of vanilla combined with fresh-baked cookies fills your kitchen, inviting everyone to indulge.
  • Visual Appeal: Vibrant pinks, reds, and sprinkles make these cookies a feast for the eyes, perfect for Valentine’s Day.
  • Skill Level Needed: Easy to prepare, these cookies are great for bakers of all skill levels, even beginners.
  • Special Equipment: A rolling pin, cookie cutters, and a baking sheet are essential for shaping and baking the cookies.

Recipe Overview

  • Difficulty Level: These cookies are easy to make and perfect for novice bakers. With clear step-by-step instructions, you’ll be surprised at how simple it is to create delightful cookies.
  • Category: These cookies fall under dessert and are perfect for special occasions like Valentine’s Day or any romantic dinner.
  • Cuisine: This recipe is rooted in American baking traditions, where sugar cookies are a beloved treat for various holidays and celebrations.
  • Cost: The ingredients are reasonably priced, making it affordable to bake a large batch without breaking the bank.
  • Season: The warm, sweet flavors make these cookies ideal for winter and early spring when Valentine’s Day is celebrated.
  • Occasion: Perfect for sharing with a valentine, giving as gifts, or serving at parties; these cookies are versatile and loved by many.

Why You’ll Love This Recipe

When it comes to sweet treats, taste and texture are paramount. These Valentine Sugar Cookies not only deliver on a sweet vanilla flavor but also provide a delightful chewy texture that makes them truly enjoyable. Each bite is filled with sweetness that leaves you reaching for more, making them the ideal choice for satisfying your sweet cravings during special occasions.

In addition to their deliciousness, these sugar cookies are incredibly convenient to make. The straightforward steps involved mean you can whip up a batch in under an hour, which is perfect for last-minute needs or spontaneous gatherings. The ability to customize these cookies with different colors and decorations based on your preference further enhances their appeal.

From a nutritional perspective, these cookies can be made with alternatives like whole wheat flour or natural sweeteners for a slightly healthier option. These substitutions not only meet dietary preferences but also add a different depth of flavor that can surprise and delight.

Socially, baking and sharing cookies is a wonderful way to bond over food, making them perfect for gatherings or celebrations. Attending a party with homemade cookies creates an inviting atmosphere and provides a great conversation starter. Just imagine the delighted expressions when you present a plate of beautifully decorated cookies to your friends or family!

Lastly, the cost-effectiveness of making sugar cookies is a significant advantage. Common ingredients like flour, sugar, and butter are usually staples found in most kitchens, meaning you likely won’t have to spend much to create this delightful dessert. This accessibility makes it fun to bake large batches to share, ensuring everyone can enjoy these sweet treats lovingly made from scratch.

Historical Background and Cultural Significance

The origins of sugar cookies can be traced back to the mid-1700s in early American kitchens, particularly in New England. These cookies, initially known as “Nazareth cookies” after the town in Pennsylvania, evolved from traditional European baking practices. They were designed for easier preservation and transportation, making them a popular choice for households amid changing culinary trends.

Culturally, sugar cookies have become an integral part of many celebrations, including Christmas, birthdays, and, of course, Valentine’s Day. Their versatility allows them to be customized for different events, each time inviting festive spirit and joy. Over the years, they have transformed from simple, plain cookies to beautifully decorated masterpieces that elevate any occasion.

As baking techniques and ingredients have improved, so has the evolution of sugar cookies. From basic butter and sugar combinations to enriched versions using modern flavorings like vanilla and almond, the cookie has stood the test of time. Moreover, the advent of royal icing has revolutionized how these cookies can be decorated, adding an extra layer of creativity to baking.

Regional variations also play a significant role in the history of sugar cookies. While classic sugar cookies remain popular across the U.S., specific states have their unique twists. For instance, some regions may incorporate local flavors, such as citrus or nuts, showcasing the diverse baking culture within the nation. These regional adaptations add to the richness and depth of sugar cookie history.

Ingredient Deep Dive

  • Flour: The backbone of any cookie, all-purpose flour is the most commonly used type. It provides structure and stability, working well with other ingredients. For a gluten-free option, almond or oat flour can be used. Ensure proper storage in a cool, dry place to maintain freshness.
  • Sugar: Granulated sugar lends sweetness to the cookies, forming the base of their flavor profile. Brown sugar can add a richer taste and moisture to the cookies. When selecting sugar, look for a fine texture that distributes evenly throughout the dough. Store it in an airtight container for longevity.
  • Butter: Butter adds richness and flavor to cookies. Using unsalted butter allows for better control over the salt in the recipe. The butter should be softened to room temperature for easier incorporation into the dough. Margarine can be a suitable substitute if necessary, but it may alter the texture.
  • Eggs: Eggs act as a binding agent and provide moisture in the dough. They also contribute to the cookies’ rise and texture. Although large eggs are the standard for baking, the option for egg substitutes like flax or apple sauce exists for vegan adaptations. Store eggs in their carton in the refrigerator for optimal freshness.
  • Vanilla Extract: Pure vanilla extract enhances the flavor profile, adding warmth and depth to the cookies. Though imitation vanilla exists, pure extract offers a more authentic flavor. The selection should prioritize high-quality extracts, ideally stored in a cool, dark space.
  • Almond Extract: This ingredient is optional but imparts an extra layer of flavor to the cookies. Care should be taken not to use too much, as it can overpower other flavors. Almond extract should be stored similarly to vanilla, avoiding heat and light.

Common Mistakes to Avoid

  • Not measuring ingredients accurately: Baking is a science! Using improper measurements can lead to dry or overly gooey cookies. Always use measuring cups and spoons for precision.
  • Overmixing the dough: Mixing the dough too much after adding the flour can create tough cookies. Mix until just combined for the best texture.
  • Using chilled butter: When creating the cookie dough, ensure the butter is at room temperature for a soft and pliable mix. Chilled butter can result in a dense cookie.
  • Neglecting to chill the dough: Chilling cookie dough helps the flavors meld and enhances texture. It also prevents them from spreading too much while baking.
  • Underbaking or overbaking: Keep a close eye on the cookies as they bake. Underbaked cookies will be too soft, while overbaked ones will be hard and dry. They should be lightly golden at the edges.
  • Oven temperature fluctuations: Ensure that your oven is preheated correctly and use an oven thermometer for accurate readings. Unevenly baked cookies can emerge from varying temperatures.
  • Not allowing cookies to cool before decorating: Decorating warm cookies can result in smudged icing. Allow cookies to cool completely before adding any decorative touches.
  • Skipping parchment paper: Using parchment or silicone baking mats helps prevent the cookies from sticking to the pan and ensures easy cleanup.
  • Not letting the cookies rest: Allowing cookies to rest for a few minutes after removing them from the oven helps with texture and allows them to firm up properly.
  • Ignoring ingredient temperature: Ingredients like eggs and butter should be at room temperature to ensure better emulsion, resulting in a uniform dough.

Essential Techniques

Mixing Dough
Proper mixing is crucial for achieving the right texture in your cookies. Start by creaming butter and sugar together until light and fluffy, ensuring even incorporation. Avoid overmixing once flour is added, as this can create dense cookies. Look for a smooth, homogenous dough and stop mixing as soon as no dry flour remains.

Chilling Dough
Chilling cookie dough allows flavors to meld and helps prevent excessive spreading during baking. Wrap the dough in plastic wrap and refrigerate for at least 30 minutes. A cold dough will hold its shape better, resulting in thicker cookies. If time allows, chilling for a few hours or overnight can enhance flavor even more.

Rolling and Cutting
When rolling out the dough, ensure it’s not too soft or sticky. Dusting your work surface and rolling pin with flour can help manage stickiness. Use cookie cutters to create desired shapes quickly, ensuring consistent sizes for even baking. If you’re making intricate designs, use a sharp knife for precise cuts.

Baking
Baking requires attention to time and temperature. Preheat your oven thoroughly and place cookies evenly on the baking sheet, leaving space for spreading. Bake until the edges are lightly golden, and the centers appear set. Remove from the oven and allow cookies to cool on the baking sheet for a few minutes before transferring to a wire rack.

Decorating
Decorating cookies is an opportunity for creativity. Use royal icing for a glossy finish, or opt for buttercream for a smoother, more indulgent layer. Allow your cookies to cool completely before decorating to prevent smudging. Consider using piping bags for intricate designs or an offset spatula for spreading icing.

Pro Tips for Perfect The Best Valentine Sugar Cookies

1. Always chill your dough for at least 30 minutes. This prevents cookies from spreading too much during baking and ensures they hold their shape well.
2. Use a mix of granulated and powdered sugar for a balanced sweetness; the powdered sugar will help create a softer cookie.
3. Experiment with extracts: Consider using different flavored extracts like lemon or coconut to enhance the cookie profile and surprise your taste buds.
4. Invest in high-quality food coloring for your icing. This makes a significant difference in the vibrancy of your decorations and the overall presentation.
5. Use a baking scale for measuring flour and sugar accurately. This ensures consistent dough every time and can lead to better results.
6. For finer details in your decorations, consider investing in a set of piping tips. They help create beautiful designs and add a professional touch.
7. Taste the dough! It should be balanced in sweetness and flavor before baking. Adjust as needed by adding more extract or sugar.
8. Store decorated cookies in an airtight container lined with parchment paper to prevent sticking and maintain their freshness.

Variations and Adaptations

These Valentine sugar cookies are incredibly adaptable to suit various tastes and dietary needs. For a seasonal variation, consider adding spices like cinnamon or nutmeg for a cozy touch during the winter months. You can also incorporate citrus zest, such as lemon or orange, to brighten the flavors.

For dietary modifications, gluten-free flour can be used in place of regular flour, allowing those with gluten sensitivities to enjoy these delicious treats. A dairy-free version can be created using vegan butter, and similar results can be achieved without compromising flavor.

Alternative flavors such as chocolate chip, peanut butter, or mint chocolate can elevate the basic sugar cookie into a delightful twist, aligning it more with personal tastes or preferences. Additionally, changing the shapes for holidays like Halloween or Christmas can make these cookies festive year-round.

For a more gourmet presentation, consider dipping the cookies in dark chocolate or drizzling melted chocolate over the top. This adds richness and depth while also being visually appealing.

Serving and Presentation Guide

When serving your Valentine Sugar Cookies, presentation is key. Consider stacking cookies in a clear glass jar with a ribbon tied around it for a charming display. Alternatively, arrange them on a decorative plate and sprinkle edible glitter or heart-shaped sprinkles on top for extra flair.

For gatherings, you can pair cookies with a selection of beverages. Milk or hot cocoa complements these cookies wonderfully, while a light tea can enhance their sweetness without overpowering your palate.

Temperature is important as well; cookies taste best at room temperature but can also be served warm right out of the oven for a gooey treat. Always aim for even portions throughout your batch to maintain uniformity and proportion on serving trays.

Consider individual packaging for take-home gifts, using cellophane bags or small boxes tied with twine. This not only makes your treats look professional but also shows extra thoughtfulness and care.

Wine and Beverage Pairing

Pairing beverages with your Valentine Sugar Cookies can elevate the dessert experience. A light, sweet white wine, such as Moscato or Riesling, perfectly complements the sweetness of sugar cookies, enhancing the overall flavor without overshadowing it.

For non-alcoholic options, consider serving the cookies alongside berry-infused sparkling water. This adds a refreshing touch while enhancing the fruity undertones of the cookies themselves.

If you prefer a warm beverage, chai tea or Earl Grey is an excellent pairing, as the spices complement the sweetness of the cookies and provide a comforting touch.

When serving tea, offer optional milk or cream, which can soften the flavors and balance the sweetness of your treats. Ensure beverages are served at ideal temperatures to maximize the flavor interaction with the cookies.

Storage and Shelf Life

To ensure your Valentine Sugar Cookies remain fresh, store them in an airtight container at room temperature. This helps maintain their soft texture for up to a week. If you plan to keep them longer, consider freezing for up to three months.

When freezing, place layers of cookies between parchment paper in a ziplock bag to prevent them from sticking together. Make sure to remove excess air to prevent frostbite.

Thaw cookies at room temperature when ready to enjoy, and avoid reheating in the microwave, as this can cause them to become tough. Instead, allow them to sit out for a few hours or warm them in the oven at 300°F for about 5-10 minutes for a freshly baked taste.

Regular checks on your cookies for signs of spoilage, such as changes in texture or off smells, will help you consume them while they are still at their best quality.

Make Ahead Strategies

Planning to bake cookies can be made simpler by preparing the dough ahead of time. You can make the sugar cookie dough up to 2 days in advance. Wrap it tightly in plastic wrap and refrigerate until you’re ready to roll it out.

You can also bake the cookies in advance and store them in an airtight container. This is especially useful for events or parties, allowing you to focus on other preparations as the date approaches.

When making these cookies ahead of time, consider waiting to decorate until just before serving. This maintains the quality of the icing and allows for a fresh presentation.

If you need to assemble cookie trays or gift packages, doing this the day before or the morning of an event will ensure everything looks gorgeous and is ready to go.

For quality impact, avoid putting frosting on warm cookies. Instead, let them cool completely before applying any decorative elements.

Scaling Instructions

If you want to adjust the quantity of The Best Valentine Sugar Cookies, halving or doubling the recipe is simple and straightforward. When halving, accurately measure ingredients to maintain balance and flavor.

When doubling or tripling, be aware of your equipment capacity. Ensure your mixing bowl and baking sheets can handle the larger quantity. Planning additional baking sessions or batches may be necessary.

Take note that baking times may vary slightly with larger batches. Keep an eye on the cookies towards the end of the recommended baking time and conduct the toothpick test to check for doneness.

Transitioning from one batch to the next may require cooling the baking sheets in between. Ensure sheets are adequately cooled to prevent any excess spreading on the second batch.

Nutritional Deep Dive

Each cookie provides a delightful mix of macros suitable for satisfying a sweet tooth. A standard sugar cookie contains around 70-100 calories, primarily from carbohydrates due to the sugar and flour content.

In terms of micronutrients, sugar cookies generally provide minimal vitamins and minerals but can offer small amounts of calcium and iron, primarily sourced from the butter and eggs used in the recipe.

Health benefits may be limited due to high sugar content; however, the joy from consuming a sweet treat can contribute positively to emotional wellness, especially during special occasions. Practicing moderation is key!

Dietary consideration for portion analysis suggests that enjoying one or two cookies with a balanced meal can fit well within most diet plans. It’s all about striking a balance and enjoying treats on occasion without guilt.

For those managing weight, considering alternatives like reduced sugar options or smaller portion sizes can help you enjoy these cookies while staying within your dietary goals.

Dietary Adaptations

These Valentine Sugar Cookies can easily accommodate various dietary restrictions. For a gluten-free option, substitute all-purpose flour with a 1:1 gluten-free baking blend, combining it with necessary binders for best results.

Those following a dairy-free diet can swap butter with vegan alternatives like coconut oil or dairy-free margarine. This maintains the rich texture and taste while aligning the recipe with plant-based needs.

Vegan adaptations are also straightforward; simply replace the egg with flaxseed meal mixed with water or unsweetened applesauce to preserve moisture and binding.

For low-carb or keto diets, consider using almond flour or coconut flour along with sugar substitutes like erythritol, ensuring careful adjustments to ingredient ratios for similar texture and flavor results.

Other diets like paleo can be accommodated by utilizing natural sweeteners like honey or maple syrup instead of granulated sugar, combining with almond flour for a wholesome treat.

Troubleshooting Guide

If your cookies turn out too dry, consider adding a bit more fat or monitoring your baking time. Overbaking can lead to a tough, crumbly texture that makes enjoyment difficult.

On the flip side, if cookies appear too wet or flattened, your ratio of fat to flour may need adjustment. Overmixing the dough may also cause excess spreading; ensure proper mixing techniques are followed.

If flavor balance is off, adjust by adding more vanilla or a pinch of salt to enhance sweetness if it feels flat. Experimenting can yield surprising results!

When faced with equipment challenges, such as cookie cutters not cutting through the dough, ensure they are dusted with flour to help navigate sticking issues. A sharp knife can also assist with intricate designs if needed.

Timing concerns may arise, especially if the dough is not frozen or chilled adequately. Ensure you plan for chill time, which will help inform baking sessions and maintain overall workflow.

Recipe Success Stories

Many home bakers have shared their joy in creating variations of The Best Valentine Sugar Cookies. Families have enjoyed customizing and decorating them as a bonding activity, capturing memorable moments on special occasions.

Adaptation stories from readers reflect innovative uses, such as incorporating seasonal flavors and unique decorations. From whimsical friends sharing heartfelt cookies to romance-filled dinners, these cookies have made a lasting impact.

Photography tips abound, with many keen bakers now showing off their decorated creations on social media. Readers are encouraged to capture those moments and share their cookie success with the world!

Cookie trays filled with DIY treats have also inspired gifting stories during events, reflecting shared love and artistry, making every batch a heartfelt gesture. Feedback from family members is often glowing, fostering a continuous cycle of baking and creativity.

Frequently Asked Questions

Q1: Can I use margarine instead of butter?

A1: Yes, margarine can be used in place of butter, but it may slightly alter the cookie texture. Aim for a brand with a higher fat content for the best results.

Q2: How can I make my cookies more flavorful?

A2: Consider adding a splash of almond extract or mixing in citrus zest to elevate flavor. Ensuring you use quality vanilla extract can also make a significant difference.

Q3: What’s the best way to store decorated cookies?

A3: Store decorated cookies in an airtight container lined with parchment paper to prevent sticking and retain freshness. Keep them at room temperature.

Q4: Can I freeze the cookie dough?

A4: Yes, you can freeze the cookie dough for up to three months. Wrap it tightly and make sure to label it with the date for easy identification.

Q5: Is it necessary to chill the dough?

A5: Chilling the dough is crucial for maintaining cookie shape during baking. It also helps enhance the flavors by allowing time for them to meld.

Q6: Can I use gluten-free flour?

A6: Yes, you can substitute all-purpose flour with gluten-free flour blends at a 1:1 ratio, ensuring successful cookie texture and taste.

Q7: How do I know when cookies are done baking?

A7: Cookies are done when the edges are set and lightly golden. They will continue to firm up after removing them from the oven.

Q8: How can I decorate cookies better?

A8: Use piping bags with different tips for detailed icing work. Consider using edible glitter or sprinkles for a fun, festive touch.

Q9: How can I reduce the sugar in the recipe?

A9: You can reduce sugar by up to 25% without significantly altering the texture. Experiment with sugar substitutes designed for baking as well.

Q10: What is the best way to ensure cookies are soft?

A10: Use room temperature ingredients, avoid overmixing, and bake until edges set with centers still slightly soft for a tender bite.

Q11: What if my dough is too sticky?

A11: If you find your dough is sticky, add a touch more flour. However, be cautious not to add too much to avoid dense cookies.

Q12: Can I use cookie cutters for other shapes?

A12: Absolutely! Feel free to use various shaped cookie cutters to make cookies for any occasion, ensuring a fun culinary experience!

Additional Resources

To further enhance your baking skills, explore related recipes for delectable treats that pair wonderfully with your sugar cookies. For example, consider creating a buttercream frosting or trying out chocolate chip cookies for a delightful assortment.

Technique guides on royal icing application or holiday-themed cookie decorating can elevate your dessert game to the next level. Learning about the various ingredient options available will help you become more versatile in the kitchen.

Additionally, exploring baking equipment recommendations ensures you have the perfect tools for cookie creation, from quality baking sheets to silicone mats for easier cleanup.

Look into seasonal variations that incorporate fresh flavors and colors; seasonal fruits like strawberries can inspire heart-shaped shortcakes, adding a romantic twist that mirrors these beautiful cookies.

Join the Conversation

We’d love to hear from you! Share your creations with us on social media, showing off your decorated cookies and inspiring others to join in.

Consider reviewing this recipe or providing feedback based on your experiences in the kitchen, whether they involved success stories or troubleshooting tips. This community engagement fosters creativity and helps others on their baking journey.

Recipe variations based on individual experiences are welcome, as they highlight everyone’s unique twists and preferences. Enjoy the process of baking and make each moment special with these wonderful Valentine Sugar Cookies!

The Recipe

The Best Valentine Sugar Cookies

Serves: 24 cookies

Prep Time: 20 mins

Cook Time: 10 mins

Total Time: 30 mins

Kitchen Equipment Needed

  • Mixing bowl
  • Baking sheets
  • Parchment paper
  • Rolling pin
  • Cookie cutters
  • Piping bags and tips (for decorating)

Ingredients

  • 2 3/4 cups all-purpose flour
  • 1 cup sugar
  • 1 cup unsalted butter, softened
  • 1 large egg
  • 1 teaspoon vanilla extract
  • 1/2 teaspoon almond extract
  • 1 teaspoon baking powder
  • 1/4 teaspoon salt
  • Royal icing for decorating
  • Sprinkles, optional

Directions

  1. Preheat the oven to 350°F (175°C) and line baking sheets with parchment paper.
  2. In a large mixing bowl, cream together the butter and sugar until light and fluffy.
  3. Add the egg, vanilla, and almond extracts, mixing until combined.
  4. In a separate bowl, whisk together the flour, baking powder, and salt.
  5. Gradually add the dry ingredients to the wet ingredients, mixing until a soft dough forms.
  6. Chill the dough for at least 30 minutes in the refrigerator.
  7. Roll out the dough on a floured surface to about 1/4 inch thick and cut into desired shapes using cookie cutters.
  8. Place the shapes on the prepared baking sheets and bake for 8-10 minutes or until the edges are lightly golden.
  9. Remove from the oven and let cool completely before decorating.

Recipe Notes

  • For best results, use room temperature ingredients.
  • Feel free to experiment with different flavors and decorations!
  • Store in an airtight container for up to a week.

Best Chocolate Raspberry Cupcakes – Perfect for Any Occasion

Chocolate Raspberry Cupcakes: A Decadent Dessert Experience

⚖️
Difficulty
Intermediate

⏲️
Prep Time
20 mins

🕒
Cook Time
25 mins

⏱️
Total Time
45 mins

🍽️
Servings
12 cupcakes

Chocolate Raspberry Cupcakes are a delightful combination of rich, moist chocolate cake and tart raspberry goodness. These treats not only tantalize your taste buds but also add a burst of color to any dessert table. With each bite, you’ll experience the sweet harmony of chocolate and raspberries, creating a luscious indulgence perfect for any occasion. Whether celebrating a birthday, hosting a gathering, or simply satisfying your sweet tooth, these cupcakes will become a beloved recipe in your baking repertoire.

Imagine holding a cupcake that features a velvety chocolate base topped with a luscious raspberry buttercream frosting. The brightness of the raspberries contrasts beautifully with the deep cocoa flavor, creating a dessert that is not only rich but also refreshing. Each cupcake is like a bite-sized piece of heaven, blending the sweetness of chocolate and the tanginess of raspberry to perfection.

Quick Recipe Highlights

  • Flavor Profile: Rich and indulgent chocolate paired with tart, juicy raspberries create a perfectly balanced taste experience.
  • Texture: These cupcakes offer a decadent, moist interior with a smooth frosting that melts in your mouth.
  • Aroma: The chocolate aroma mingles with the fresh scent of raspberries, promising a delicious treat.
  • Visual Appeal: Topped with vibrant raspberry frosting and garnished with fresh raspberries, these cupcakes are as beautiful as they are tasty.
  • Skill Level Needed: While achievable for any home baker, these cupcakes require some basic baking skills for the best results.
  • Special Equipment: A standard cupcake pan, mixing bowls, and a hand mixer are all you’ll need to create this delightful dessert.

Recipe Overview

  • Difficulty Level: Chocolate Raspberry Cupcakes are classified as intermediate because they require precise measurements and techniques for baking the perfect chocolate cake and frosting.
  • Category: These cupcakes fit into the dessert category, perfect for any sweet-centric occasion or event.
  • Cuisine: This recipe blends classic American baking traditions with a touch of European influence through the use of raspberries and elegant frosting techniques.
  • Cost: Expect an approximate cost ranging between $10 to $15 for the ingredients, depending on seasonal berry pricing.
  • Season: These cupcakes are ideal for spring and summer when raspberries are in season and flavorful.
  • Occasion: Perfect for birthdays, anniversaries, and potlucks, or as an elegant treat for an afternoon tea gathering.

Why You’ll Love This Recipe

The taste and texture appeal of Chocolate Raspberry Cupcakes is unmatched. The smooth and rich chocolate cake melts in your mouth, while the vibrant raspberry frosting offers a delightful tart contrast. Together, they create a fulfilling dessert experience that delights both chocolate lovers and fruit aficionados alike.

These cupcakes are incredibly convenient to prepare, requiring just over 30 minutes from start to finish. If you’re looking to impress guests without spending all day in the kitchen, this recipe is perfect. Plus, they can be made ahead of time, which means less stress on the day of your event.

Nutritionally, these cupcakes provide a small amount of antioxidants from the raspberries, which can contribute to a healthy diet. However, moderation is key when enjoying this sweet treat, as each cupcake is rich in flavors and calories.

Socially, serving Chocolate Raspberry Cupcakes opens the door to delightful conversations around dessert and nostalgia. They are eye-catching and wonderfully delicious, making them a fantastic centerpiece for gatherings and a great way to engage with family and friends.

Cost-effectiveness is also a strong pull for this recipe. Using basic ingredients, you can create an impressive dessert that feels luxurious without breaking the bank. This makes it an excellent choice for home bakers looking to craft something special at an affordable price.

Historical Background and Cultural Significance

The origin of chocolate cupcakes dates back to the late 18th century, becoming popular in America as bakers began experimenting with cocoa powders and baking methods. While raspberry cupcakes are a more modern creation, their inclusion in chocolate desserts hints at a long-standing appreciation for fruit-enhanced confections.

Within culinary traditions, chocolate desserts have always held a special place, often associated with indulgence and celebration. The pairing with raspberries adds an element of sophistication and freshness, making these cupcakes suitable for high-end occasions.

Over the years, variations of the chocolate and raspberry combination have emerged, paving the way for visionary bakers to explore flavors and textures. This recipe pays homage to that evolution, offering a straightforward approach while allowing room for creativity.

Regional variations of this cupcake can be seen in different parts of the world, where local fruits and chocolate styles create unique adaptations. By embracing this diversity, the recipe continues to resonate with people of different backgrounds and tastes.

Ingredient Deep Dive

Chocolate: This rich ingredient has a storied history, originating from ancient Mesoamerican cultures that revered cacao as sacred. Today, chocolate is recognized not only for its flavor profile but also for its health benefits, including antioxidants that may support cardiovascular health.

Selecting quality chocolate is paramount; opt for brands that highlight cocoa content and minimize additives. Proper storage of chocolate involves keeping it cool and dry, ideally wrapped in its original packaging. Substitutions for chocolate may include cocoa powder, albeit one must adjust for sweetness levels.

Raspberries: Recent studies highlight the impressive nutritional value of raspberries, as they are low in calories but high in fiber, vitamins, and antioxidants. These berries have a long cultivation history, celebrated in various cultural cuisines for their vibrant flavor and versatility.

When purchasing raspberries, look for plump, firm fruits with a bright color. Store them in the refrigerator and wash just before use to preserve freshness. Alternatives for raspberries in recipes may include other berries like strawberries or blackberries, but this will shift the overall flavor profile.

Common Mistakes to Avoid

  • Overmixing the batter: This can lead to tough cupcakes. Mix just until ingredients are combined for a tender crumb.
  • Incorrect oven temperature: Ensure your oven is preheated to the correct temperature to avoid undercooked or burnt cupcakes.
  • Not measuring ingredients properly: Baking is a science; use kitchen scales or measuring cups to ensure accuracy.
  • Skipping the frosting chill: Chilling the frosting before application makes it easier to spread and results in a smoother finish.
  • Ignoring cupcake liners: Skipping liners may result in sticking, so make sure to line your cupcake trays properly.
  • Frosting too early: Wait until the cupcakes are completely cool before frosting to prevent melting.
  • Using stale ingredients: Always check expiration dates on baking powder and baking soda, as they can affect rise.
  • Not rotating pans: Bake even cupcakes by rotating your pans halfway through the baking time.

Essential Techniques

Proper Mixing: Mixing your ingredients correctly is essential for even texture. Start with butter and sugar until creamy, add eggs, and then alternate wet and dry ingredients, mixing just until combined. Avoid overmixing to maintain lightness.

Frosting Consistency: Achieving the right buttercream consistency is key. Beat the butter until light and fluffy, then gradually add powdered sugar. If too thick, add a teaspoon of cream or milk; if too thin, incorporate more sugar gradually until you reach the desired texture.

Pro Tips for Perfect Chocolate Raspberry Cupcakes

1. Use high-quality cocoa powder for a richer chocolate flavor in your cupcakes.

2. Try adding a pinch of salt to your batter; it enhances the chocolate flavor and balances sweetness.

3. If you love extreme chocolate flavor, fold in chocolate chips or chopped chocolate into the batter.

4. For an extra kick, consider adding a splash of raspberry liqueur to your frosting for deeper flavor.

5. Allow cupcakes to cool in the pan for 5-10 minutes before transferring to a wire rack; this prevents sticking.

6. Experiment with various types of berries for the frosting; it can add unique flavors while maintaining the same beautiful color.

7. Use a piping bag for precise frosting application, giving your cupcakes a professional look.

8. For a fantastic garnishing idea, top each cupcake with a fresh raspberry and a sprig of mint for visually stunning presentation.

Variations and Adaptations

Consider regional variations like incorporating local fruits or adjusting flavor profiles to suit your preferences. Seasonal adaptations could include adding a hint of peppermint extract for winter or a touch of lime zest for summer freshness. Dietary modifications, such as using gluten-free flour or dairy-free butter, can create inclusive versions of this popular treat.

Flavor variations might include using lemon instead of raspberry for a zesty twist. Similarly, you can play with the textures by adding crunchy nuts or chips to the batter for added complexity. Presentation alternatives like using different frosting styles, such as decoratively drizzling chocolate or employing a marbled effect, can elevate your cupcakes visually.

Serving and Presentation Guide

When serving, consider creative plating techniques such as arranging the cupcakes on a beautiful cake stand adorned with fresh berries. Garnishing with edible flowers or sprigs of mint can add a delightful, appealing touch. Traditional accompaniments like whipped cream or a scoop of vanilla ice cream create a luxurious dessert experience.

Modern serving suggestions include pairing the cupcakes with a scoop of raspberry sorbet, enhancing the fruitiness of the dessert. Temperature-wise, serve the cupcakes at room temperature for best flavor retention, especially for the frosting, which can become overly soft when warm. Portion control tips suggest using one cupcake per person, allowing guests to enjoy this decadent treat without indulging too much.

Wine and Beverage Pairing

For wine pairings, consider a rich red wine, such as Cabernet Sauvignon or Merlot, to complement the deep chocolate flavors. A dessert wine, like a sweet Moscato, can also balance the tartness of the raspberries beautifully. If you prefer non-alcoholic alternatives, consider pairing with raspberry iced tea or sparkling water infused with lemon for a refreshing contrast.

When it comes to coffee or tea, a dark roast coffee can enhance the chocolate notes, while a mild herbal tea can provide a gentle flavor without overwhelming the cupcakes. Keep these beverages at optimum serving temperatures to ensure a pleasant tasting experience when enjoyed alongside your skillfully made cupcakes.

Storage and Shelf Life

To store your Chocolate Raspberry Cupcakes, keep them in an airtight container at room temperature for up to 3 days. If you need to extend their shelf life, refrigerate them for a week, ensuring they are adequately covered to prevent drying out.

For freezing, wrap each cupcake tightly in plastic wrap or aluminum foil before placing them in a freezer-safe bag. They can be frozen for up to 3 months. When ready to enjoy, thaw them in the fridge overnight and frost them just before serving. Watch for signs of spoilage, such as an off smell or any visual mold growth, as these indicate that the cupcakes should be discarded.

Make Ahead Strategies

Prepping these cupcakes a day in advance is a smart way to save time. You can bake the cupcakes the day before, allow them to cool completely, and store them in a sealed container overnight. Prepare the frosting separately and refrigerate it until ready to use.

When it comes time to serve, simply frost the cupcakes fresh in the morning to maintain optimal texture and flavor. Avoid adding fresh fruit to the top until serving to ensure it remains vibrant and does not deteriorate. Fresh creams can also be whipped just before serving for the best results, ensuring a delightful experience for your guests.

Scaling Instructions

To halve the recipe, simply divide the quantities of each ingredient by two, and you’ll have a smaller batch ready to enjoy. If doubling or tripling your recipe for larger gatherings, be aware of your oven capacity; you may need to bake in multiple batches for even results.

Consider equipment adjustments, such as using larger mixing bowls for substantial increases in quantities, and prepare for timing modifications, as a larger batch may require longer baking times. For storage, be sure to have additional containers ready for your increased yield.

Nutritional Deep Dive

Each Chocolate Raspberry Cupcake offers a balance of macronutrients, primarily carbohydrates from the flour and sugars, fats from butter, and minimal protein from eggs. When evaluating micronutrient content, consider the presence of vitamins and minerals derived from raspberries, which include vitamin C and dietary fiber.

Health benefits can be pronounced when enjoying these cupcakes in moderation, as chocolate and berries provide antioxidants that may support overall health. However, portion analysis suggests being mindful of indulgence, as cupcakes are calorie-dense, best suited for occasional treats rather than daily consumption.

Dietary Adaptations

For a gluten-free version of Chocolate Raspberry Cupcakes, you can use a gluten-free all-purpose flour that includes xanthan gum. This adaptation allows those with gluten sensitivities to savor deliciousness without compromise. Double-check all other ingredients to ensure they are gluten-free certified.

Dairy-free alternatives can include using coconut milk and dairy-free butter, providing a similar rich texture while accommodating lactose intolerance. Vegan adaptations incorporate flaxseed or chia seeds in place of eggs while ensuring the frosting remains plant-based by opting for vegan alternatives for butter and cream.

Troubleshooting Guide

If your cupcakes turn out dry, ensure you are precise with ingredient measurements and not overbaking them. If they collapse, check your leavening agents and oven temperature to ensure proper rising. For flavor balance, consider adjusting the sweetness of your frosting or adding a touch of lemon zest to elevate the taste.

In cases of ingredient substitutions leading to texture changes, it may be necessary to re-evaluate ratios, particularly when replacing eggs or fats. Timing concerns should also be watched; make sure your mixing duration aligns with recipe requirements to avoid under or over-mixing, which affects the final outcome.

Recipe Success Stories

Readers have raved about the simplicity and deliciousness of the Chocolate Raspberry Cupcakes. Many home bakers share stories of impressing family and friends at gatherings while experimenting with flavors and toppings based on seasonal ingredients.

Successes abound with variations; one reader added a hint of orange to the frosting, receiving raving reviews. Feedback often includes how these cupcakes evoke nostalgia, reminding many of family celebrations and special occasions where dessert was the highlight of the meal.

Frequently Asked Questions

Can I make the cupcakes gluten-free? Yes, you can substitute all-purpose flour with a gluten-free blend. Just ensure other ingredients are gluten-free too.

How long can I store leftovers? Chocolate Raspberry Cupcakes can be stored at room temperature for up to 3 days or in the refrigerator for a week.

Can I freeze these cupcakes? Absolutely! Wrap them tightly and freeze for up to 3 months. Thaw them overnight in the fridge when ready to eat.

Can I substitute fresh raspberries with frozen? Yes, however, ensure they aren’t soggy to maintain the structure of your frosting. It might be best to use them in the batter instead.

What if my cupcakes are too dry? This can happen if overbaked or ingredients weren’t measured correctly. Ensure you bake until a toothpick comes out clean but not overbaked.

What type of cocoa powder should I use? Use unsweetened cocoa powder for best results, as it adds the necessary chocolate flavor without additional sugars.

How do I achieve a smooth frosting? Start with room temperature butter and whip well before adding powdered sugar. Chilling the frosting slightly can help when applying.

Are these cupcakes suitable for children? Yes, when consumed in moderation. They contain ingredients suitable for kids, making them an enjoyable treat for all ages.

How can I enhance the chocolate flavor? Consider adding chocolate chips or a splash of espresso powder for a deeper flavor profile.

Can I make the cupcakes vegan? Yes, substitute eggs with flaxseed meal or applesauce and use dairy-free alternatives for butter and milk.

Additional Resources

For more delicious variations, check out recipes for Vanilla Bean Cupcakes, Red Velvet Cake, and Lemon Poppy Seed Muffins. Additionally, discover technique guides on how to bake the perfect cupcake and tips for making frostings at home.

Ingredient information can be found on our detailed guide to baking essentials, which outlines the importance of quality flour, sugars, and cocoa. Furthermore, explore seasonal variations that highlight tropical fruits in summer and cozy spices in winter recipes.

Join the Conversation

If you’ve enjoyed making these Chocolate Raspberry Cupcakes, share your experiences on social media! Don’t forget to tag us with your beautiful photos and any tweaks you made to the recipe. Join our community to exchange tips and variations, ensuring everyone has the chance to participate.

The Recipe

Chocolate Raspberry Cupcakes

Serves: 12 cupcakes

Prep Time: 20 mins

Cook Time: 25 mins

Total Time: 45 mins

Kitchen Equipment Needed

  • Cupcake pan
  • Mixing bowls
  • Measuring cups and spoons
  • Hand mixer or stand mixer
  • Piping bags

Ingredients

  • 1 1/2 cups all-purpose flour
  • 1 cup granulated sugar
  • 1/2 cup unsweetened cocoa powder
  • 1 tsp baking powder
  • 1/2 tsp baking soda
  • 1/2 tsp salt
  • 1/2 cup unsalted butter, softened
  • 2 large eggs
  • 1 tsp vanilla extract
  • 1 cup buttermilk
  • 1 cup fresh raspberries
  • 2 cups powdered sugar (for frosting)
  • 1/2 cup unsalted butter, softened (for frosting)
  • 1/4 cup fresh raspberries (for frosting)
  • 1-2 tbsp milk (if needed for frosting consistency)

Directions

  1. Preheat oven to 350°F (175°C) and line a cupcake pan with liners.
  2. In a large bowl, mix flour, sugar, cocoa powder, baking powder, baking soda, and salt.
  3. In another bowl, cream butter until fluffy, then add eggs and vanilla extract, mixing until smooth.
  4. Slowly add the dry ingredients, alternating with buttermilk, mixing just until combined.
  5. Gently fold in raspberries. Divide the batter among the prepared cupcake liners.
  6. Bake for 20-25 minutes or until a toothpick inserted in the center comes out clean.
  7. Allow cupcakes to cool in the pan for 5 minutes before transferring to a wire rack.
  8. For frosting, whip butter until light and creamy, then add powdered sugar and raspberries until fluffy.
  9. Frost cooled cupcakes as desired, and enjoy!

Recipe Notes

  • Substitute fresh raspberries with frozen if necessary, but be cautious of excess moisture.
  • Enhance frosting flavor with lemon or liqueur for a unique twist.
  • These cupcakes can be made ahead and frozen for later use; thaw before frosting.

Easy Red Velvet M&M Cake Mix Cookies – Ready in 30 Minutes

Delicious Red Velvet M&M Cake Mix Cookies: A Delightful Twist on a Classic Treat

⚖️
Difficulty
Easy

⏲️
Prep Time
10 mins

🕒
Cook Time
10 mins

⏱️
Total Time
20 mins

🍽️
Servings
24 cookies

Indulge in the deliciously rich flavors of Red Velvet M&M Cake Mix Cookies. These vibrant cookies are a delightful treat suitable for any occasion. By combining the classic taste of red velvet cake with the whimsical crunch of M&M candies, you create a fusion of flavors that captivates both the eyes and the palate. The result is not only a feast for your taste buds but also a visual delight that will brighten up your dessert table.

These Red Velvet M&M Cake Mix Cookies are incredibly easy to prepare, making them a perfect choice for bakers of all skill levels. With just a few simple ingredients and minimal kitchen equipment, you can whip up a batch in no time. The best part is how they embody the signature taste of traditional red velvet cake, enhanced by the colorful pop of M&Ms. They’re ideal for sharing with friends and family or keeping for yourself as a sweet treat to enjoy throughout the week.

Quick Recipe Highlights

  • Flavor Profile: Rich cocoa flavor blended with creamy vanilla hints, complemented by the chocolatey crunch of M&Ms.
  • Texture: Soft and chewy with a slightly crispy edge, offering a satisfying bite.
  • Aroma: The scent of warm cocoa and vanilla fills your kitchen, creating a cozy atmosphere.
  • Visual Appeal: Vivid red cookies adorned with colorful M&M candies create an eye-catching display.
  • Skill Level Needed: Perfect for beginners and experienced bakers alike, requiring just basic techniques.
  • Special Equipment: Only basic baking tools like a mixing bowl, baking tray, and parchment paper are required.

Recipe Overview

  • Difficulty Level: This recipe is categorized as easy, making it accessible to anyone who wants to indulge in homemade treats.
  • Category: These cookies are perfect for dessert but can also double as a sweet addition to parties and gatherings.
  • Cuisine: Inspired by classic American dessert traditions, particularly those focused on red velvet cake.
  • Cost: With budget-friendly ingredients, making these cookies is an affordable way to enjoy delicious sweets.
  • Season: These cookies are a great choice year-round, particularly for celebrations, holidays, or just to brighten your day.
  • Occasion: Perfect for birthdays, holiday gatherings, or as a delightful treat anytime you need a little sweetness.

Why You’ll Love This Recipe

Experience the perfect combination of taste and texture with these Red Velvet M&M Cake Mix Cookies. The rich, chocolatey goodness of the red velvet flavor harmonizes beautifully with the vibrant M&Ms, ensuring every bite is pure bliss. The cookies maintain a soft and chewy texture, with a slight crispness around the edges that adds to their appeal.

The convenience of this recipe makes it a favorite among busy bakers who want to enjoy a homemade treat without spending hours in the kitchen. With only a few steps and ingredients, you can have fresh cookies ready in about 20 minutes. This ease of preparation is perfect for on-the-go families or anyone wanting to whip up something sweet in a hurry.

Nutritionally, while these cookies are a treat, they can also be enjoyed in moderation. The use of cake mix provides a light texture while incorporating some of the flavors you’d expect from a traditional red velvet cake. Enjoying these cookies can offer a nostalgic taste experience that many people associate with celebrations and special occasions.

These cookies are also great for social gatherings. Their vibrant color and playful appearance make them an attractive option for parties, potlucks, or any event where you want to leave a lasting impression on your guests. They often become the star of dessert tables and are sure to delight both children and adults alike.

Finally, these cookies are budget-friendly. With affordable ingredients like cake mix and M&Ms, you can create a batch of delicious cookies without breaking the bank. This accessibility means that anyone can enjoy this delightful dessert right at home.

Historical Background and Cultural Significance

The origins of red velvet cake date back to the early 20th century, with roots traced to the Southern United States. Initially, red velvet cupcakes and cakes were considered elegant and were often served at special occasions. The red color was achieved using cocoa powder and a reaction with acids in buttermilk and vinegar, which contributed to its unique appearance and flavor.

Culturally, red velvet has become synonymous with celebration and indulgence. It is often featured in wedding receptions, birthday parties, and holiday gatherings. The vibrant color and luxurious taste evoke feelings of festivity, making it a popular choice for special occasions across the country.

As the recipe evolved, so did the versatility of red velvet. From cakes to cupcakes and now cookies, its popularity has led to innovations that keep this classic alive. Each variation brings a new method of enjoyment, allowing for endless creativity in the kitchen.

Regional variations have also emerged, influenced by local tastes and ingredients. Some variations incorporate cream cheese frosting, while others may spice it up with different flavors or textures. This adaptability ensures that red velvet remains a beloved choice in many households.

Ingredient Deep Dive

  • Cake Mix

    Cake mix provides the base for these cookies, offering convenience and a consistent flavor profile. The mix often contains flour, sugar, and leavening agents, which facilitate the baking process. When selecting a cake mix, look for high-quality brands that use natural colors and flavors. Store it in a cool, dry place to preserve its freshness. If you’re looking to make these cookies gluten-free, several gluten-free cake mix options are available on the market.

  • M&Ms

    M&Ms add a fun, colorful crunch to the cookies. These chocolate candies come in various flavors and colors, making them perfect for any holiday or special occasion. Nutritionally, M&Ms provide a small dose of chocolate, but they should be enjoyed in moderation due to their sugar content. When selecting M&Ms, consider the size and color for your desired presentation. If you’re looking for a alternative, dark chocolate chips or other candy-coated chocolates can easily be swapped in.

Common Mistakes to Avoid

  • Not measuring ingredients properly: Baking is a science; accurate ingredient measurement is key. Use a scale for best results.
  • Overmixing the dough: This can lead to tough cookies. Mix until just combined for a soft texture.
  • Skipping the chilling step: Chilling the dough helps the cookies maintain their shape while baking.
  • Not using parchment paper: Skipping parchment paper can cause cookies to stick and burn. Always line your baking sheet.
  • Overcrowding the baking sheet: Give cookies room to spread; overcrowding can lead to uneven baking.
  • Not preheating the oven: Skipping preheating can affect the cooking time and texture of your cookies.
  • Using expired ingredients: Always check the expiration dates on cake mix and other ingredients.
  • Ignoring the sensory cues: Pay attention to the color and texture of the cookies during baking to achieve perfection.
  • Serving them warm: Allow cookies to cool on a wire rack for the best texture before serving.
  • Not storing properly: Store cookies in an airtight container to maintain freshness and prevent them from drying out.

Essential Techniques

  • Mixing:

    Proper mixing is crucial for achieving the right cookie texture. Make sure to combine wet and dry ingredients until just integrated; overmixing can lead to tough cookies. Visual cues for success include a slightly sticky dough that remains soft yet holds its shape.

  • Baking:

    Even baking temperature is vital. Preheat your oven thoroughly and use an oven thermometer if necessary. Keep a close eye on the cookies; they’re done when the edges start to firm up yet the center remains slightly soft. Use a cooling rack to prevent steaming and sogginess.

  • Pro Tips for Perfect Red Velvet M&M Cake Mix Cookies

    • Use room temperature ingredients: This helps them blend better and results in a smoother dough.
    • Experiment with different types of M&Ms: Seasonal variations can add a festive touch.
    • Chill the dough before baking: This helps maintain the shape and prevents spreading too much in the oven.
    • Don’t overbake: Pull them out just before they look done for a chewy texture.
    • Use a cookie scoop: This ensures uniform cookies that bake evenly.
    • Add a pinch of salt to enhance the flavors: It can bring out the sweetness and balance the richness.
    • Consider adding nuts for texture and flavor: Pecans or walnuts can complement the sweetness nicely.
    • Serve warm with a scoop of ice cream for an indulgent treat: This creates a delicious dessert experience.

    Variations and Adaptations

    • Regional variations include adding shredded coconut or using different flavor cake mixes, such as chocolate or funfetti, for unique twists.
    • For seasonal adaptations, incorporate peppermint M&Ms for the holidays or pastel versions for spring celebrations.
    • Dietary modifications can include making them gluten-free by using gluten-free cake mix and checking M&M ingredients for allergens.
    • Flavor variations can include adding extracts like almond or hazelnut to the dough for a nuanced flavor profile.
    • Texture modifications can be achieved by adjusting the baking time and using different sugars for crunchiness.
    • Presentation alternatives may involve incorporating decorative frosting or sprinkles for special occasions.

    Serving and Presentation Guide

    • For plating, arrange cookies in stacks or on colorful platters to create a visually appealing display.
    • Garnishing ideas include a dusting of powdered sugar or drizzling melted white chocolate over the top.
    • Traditional accompaniments can include milk or coffee, enhancing the overall experience of enjoying these sweet treats.
    • Modern serving suggestions might incorporate à la mode presentations with ice cream alongside for an indulgent dessert.
    • Temperature considerations involve serving cookies warm for the best flavor experience, or allow them to cool for a firmer texture.
    • Portion control tips suggest serving them one at a time to savor each bite, without overindulging.

    Wine and Beverage Pairing

    • Wine pairings could include a sweet dessert wine like Moscato, complementing the sweetness of the cookies.
    • Non-alcoholic alternatives, such as chocolate milk or a rich hot cocoa, can enhance the chocolatey flavor.
    • If coffee or tea pairings are considered, a dark roast coffee or a spiced chai can bring out the cookies’ warmth.
    • Temperature considerations suggest serving beverages with cookies slightly warm for a delightful contrast.
    • Serving suggestions include presentation in stylish mugs alongside a beautiful plate of cookies for sharing at gatherings.

    Storage and Shelf Life

    • Proper storage involves keeping cookies in an airtight container at room temperature to maintain freshness.
    • Temperature requirements recommend storing cookies in a cool, dry place away from moisture.
    • Container recommendations include glass jars or plastic containers with tight-fitting lids to preserve texture.
    • Common signs of spoilage include unusual smells, discoloration, or hardening, indicating them should not be consumed.
    • For reheating, microwave cookies briefly to retain their softness, or warm them in the oven for a couple of minutes.
    • Freezing guidelines suggest wrapping cookies individually and placing them in a freezer bag for longer shelf life.

    Make Ahead Strategies

    • Prep timeline can be coordinated by making the dough a day in advance and refrigerating it until ready to bake.
    • Storage between steps involves keeping unbaked dough in the fridge for up to 48 hours for optimal freshness.
    • Quality impact assessment suggests that cookies taste best when baked fresh, but chilled dough maintains its flavor profile.
    • Assembly tips can include portioning out the dough into balls before refrigerating to alleviate stress when baking.
    • Reheating guidelines recommend allowing frozen cookies to sit out for a bit before warming to perfect the texture.
    • Fresh elements, such as adding frosting after baking, can elevate the cookies even when made ahead of time.

    Scaling Instructions

    • For halving the recipe, adjust each ingredient proportionately and monitor baking times to prevent overcooking.
    • Doubling or tripling the recipe requires larger bowl capacity and possibly additional baking sheets for an even bake.
    • Equipment adjustments may be necessary, particularly if using a smaller oven; bake in batches if needed.
    • Timing modifications can include checking for doneness slightly earlier when increasing the number of cookies baked at once.
    • Storage considerations suggest utilizing larger containers for any scaling, maintaining freshness and flavor.

    Nutritional Deep Dive

    • A macro breakdown reveals a healthy balance of carbohydrates from the cake mix, sugar and fats from any added ingredients.
    • Micronutrient analysis shows that while cookies are not primarily a health food, elements like iron may be present based on the cake mix.
    • Health benefits include the joy of indulging or sharing something homemade, which can enhance emotional well-being.
    • Dietary considerations highlight moderation as crucial, promoting incorporation into a balanced diet.
    • Portion analysis suggests sticking to one or two cookies per serving for a satisfying treat without excess calories.
    • Weight management tips may include tracking cookie intake or balancing with lighter meals throughout the day.

    Dietary Adaptations

    • For a gluten-free option, swap traditional cake mix for a gluten-free alternative widely available in stores.
    • Choosing dairy-free ingredients can be achieved using egg substitutes and plant-based M&Ms.
    • A vegan version can easily be created using plant-based butter and a suitable egg replacer in the dough.
    • Low-carb adaptations could incorporate almond flour instead of cake mix, along with alternative sweeteners.
    • Keto variations require careful ingredient selection and may use sugar substitutes while maintaining flavor.
    • Paleo adaptations could focus on using simple natural ingredients without processed mixes and sugars.
    • Low-FODMAP options can be considered by avoiding certain brands of cake mix known to contain high-FODMAP ingredients.
    • Other specific diets can see adaptations by prioritizing natural products and minimizing refined sugars.

    Troubleshooting Guide

    • If cookies are too dry or crumbly, consider adjusting the wet ingredients in the dough for balance.
    • If the flavor is unbalanced, adding a pinch of salt or vanilla extract can elevate the overall taste experience.
    • Temperature problems often result from incorrect oven settings, so use an oven thermometer for accurate readings.
    • Equipment challenges can arise with older baking sheets; consider investing in new, heavy-duty ones for even baking.
    • Ingredient substitutions should be made carefully to ensure that the overall balance and texture remain intact.
    • Timing concerns are often overlooked; set a timer to check on cookies a few minutes before the designated time.

    Recipe Success Stories

    • Community feedback often emphasizes the ease and deliciousness of this recipe, making it a popular choice among home bakers.
    • Variation successes have led to recipe adaptations shared on social media, inspiring others to experiment with flavors.
    • Adaptation stories include modifications made for dietary needs, showcasing creativity in keeping the original spirit intact.
    • Reader suggestions often highlight the joy of sharing these cookies, creating bonds over a shared love of baking.
    • Photography tips suggest natural lighting and colorful plates to enhance the visual appeal of your delicious creations.

    Frequently Asked Questions

    Q1: Can I use a different cake mix flavor?
    A1: Absolutely! Experimenting with different cake mix flavors can yield delightful variations of this recipe. Chocolate cake mix adds a deeper cocoa flavor, while vanilla can create a lighter cookie.

    Q2: How do I store leftover cookies?
    A2: Store your Red Velvet M&M Cake Mix Cookies in an airtight container at room temperature. They typically stay fresh for up to a week.

    Q3: Can I make the dough ahead of time?
    A3: Yes! You can prepare the dough in advance and refrigerate it for up to 48 hours before baking. Just make sure to let it sit at room temperature for a few minutes before scooping.

    Q4: What if I don’t have M&Ms?
    A4: If you don’t have M&Ms on hand, you can substitute with chocolate chips or your favorite candy. This can provide a similar texture and sweetness.

    Q5: Can I freeze these cookies?
    A5: Yes, these cookies freeze well. You can freeze them in a single layer then transfer to an airtight container. They are best enjoyed within a few months.

    Q6: How do I soften cookies that have become hard?
    A6: If your cookies have become hard, you can revive them by placing a slice of bread in the container with the cookies for a few hours. The moisture from the bread will soften the cookies.

    Q7: Are these cookies suitable for kids’ parties?
    A7: Definitely! These cookies are colorful and fun, making them a hit at kids’ parties. They’re easy to make and perfect for little hands.

    Q8: What’s the best way to add frosting?
    A8: If you want to top these cookies with frosting, use a piping bag for a fun design or simply spread it on top after the cookies have cooled.

    Q9: Can I add nuts to the recipe?
    A9: Yes! Adding crushed nuts like pecans or walnuts can enhance the texture and flavor of the cookies.

    Q10: What are some good add-ins for this recipe?
    A10: In addition to nuts and chocolate chips, consider adding shredded coconut, dried fruit, or flavored extracts for added complexity.

    Additional Resources

    • If you enjoyed this recipe, check out more delicious cookie recipes on our blog, including classics and seasonal specials.
    • Technique guides can help improve your baking skills, providing insights into mixing, folding, and baking techniques.
    • Ingredient information can empower you to choose better quality products for your baking adventures.
    • Equipment recommendations can help you find the right tools to make your baking experience easier and more enjoyable.
    • Seasonal variations highlight recipe alterations that celebrate the flavors of each time of year.

    Join the Conversation

    • Social media sharing of your baking successes encourages community engagement and inspires others to try the recipe.
    • Photography tips can help enhance your social media posts, making your creations shine.
    • Recipe reviews can contribute to a vibrant baking community, inviting feedback and encouraging others to share their experiences.
    • Community engagement fosters connections between bakers, offering opportunities for recipe swaps and collaborations.
    • Recipe variations shared in the comments enrich the experience, showcasing the creativity of the community.

    The Recipe

    Red Velvet M&M Cake Mix Cookies

    Serves: 24 cookies

    Prep Time: 10 mins

    Cook Time: 10 mins

    Total Time: 20 mins

    Kitchen Equipment Needed

    • Mixing bowl
    • Baking sheet
    • Parchment paper
    • Cookie scoop
    • Cooling rack

    Ingredients

    • 1 box of red velvet cake mix
    • 1/2 cup vegetable oil
    • 2 large eggs
    • 1 cup M&Ms (plus extra for topping)

    Directions

    1. Preheat your oven to 350°F (175°C) and line a baking sheet with parchment paper.
    2. In a large mixing bowl, combine the cake mix, oil, and eggs. Stir until fully blended.
    3. Gently fold in the M&Ms until evenly distributed throughout the dough.
    4. Using a cookie scoop, drop tablespoons of dough onto the prepared baking sheet, spacing them apart.
    5. Top each cookie with an additional M&M for decorative flair.
    6. Bake for 8-10 minutes or until the edges set but the centers are soft.
    7. Allow cookies to cool on the baking sheet for a few minutes before transferring them to a wire rack to cool completely.

    Recipe Notes

    • For a richer flavor, consider adding 1 teaspoon of vanilla extract to the dough.
    • Store in an airtight container at room temperature for up to one week.
    • These cookies can be frozen for up to 3 months; just thaw before serving.

    Easy Valentine’s Day Oreo Pops – No-Bake in 30 Minutes

    Valentine’s Day Oreo Pops: Sweet Treats to Melt Hearts

    ⚖️
    Difficulty
    Easy

    ⏲️
    Prep Time
    15 mins

    🕒
    Cook Time
    10 mins

    ⏱️
    Total Time
    25 mins

    🍽️
    Servings
    12 pops

    Valentine’s Day is the perfect occasion to indulge in sweet treats that symbolize love and affection. This Valentine’s Day Oreo Pops recipe combines the classic flavors of creamy Oreos and rich chocolate, creating delightful treats that are as fun to make as they are to eat. With their vibrant and colorful decorations, these pops are sure to impress your loved ones and add a festive flair to any celebration. Plus, they are simple enough for anyone to create, making them a great project for both kids and adults alike.

    The joy of biting into these Oreo pops lies not only in their taste but also in their visual appeal. Coated in luscious chocolate and adorned with sprinkles or heart-shaped toppings, each bite offers a satisfying crunch followed by the soft, creamy filling of the Oreo. These pops are a standalone treat, perfect for gift-giving or serving at parties. Whether you’re making them for a romantic evening or a fun family gathering, these Oreo Pops are a delightful way to celebrate love on Valentine’s Day.

    Quick Recipe Highlights

    • Flavor Profile: The combination of rich chocolate and the sweet, creamy Oreo filling creates a mouthwatering contrast that everyone will love.
    • Texture: Enjoy the crunch of the Oreo contrasted with the smooth, melted chocolate coating.
    • Aroma: The sweet scent of chocolate and vanilla wafts through the air, enticing everyone as they cool.
    • Visual Appeal: Brightly colored sprinkles or themed decor make these pops a joy to behold.
    • Skill Level Needed: This recipe is beginner-friendly and requires minimal cooking skills, perfect for novice bakers.
    • Special Equipment: You’ll need lollipop sticks and a microwave-safe bowl, making it accessible for everyone.

    Recipe Overview

    • Difficulty Level: The Oreo Pops recipe is easy to make, ideal for cooking with children or for those new to baking.
    • Category: These pops fall under the dessert category but are versatile enough to be served at various occasions.
    • Cuisine: Drawing from American snack traditions, Oreo Pops offer a fun twist on classic desserts.
    • Cost: Inexpensive to make, the ingredients can generally be found in any local grocery store.
    • Season: While perfect for Valentine’s Day, these treats can be enjoyed year-round for any celebration.
    • Occasion: Ideal for Valentine’s Day, birthday parties, or casual gatherings with friends and family.

    Why You’ll Love This Recipe

    Making Valentine’s Day Oreo Pops is not just about indulging in a delicious treat; it’s an experience that ticks all the boxes for taste and texture. The delightful contrast of crunchy cookies and smooth chocolate provides an irresistible mouthfeel that leaves taste buds wanting more. The moment you dip the Oreos in melted chocolate, you can almost taste the sweetness and decadence that awaits, making them a treat you’ll crave long after the holiday has ended.

    Convenience is another hallmark of this recipe. With a preparation time of merely 15 minutes, you can whip these up quickly, making them perfect for a last-minute treat or a fun project with the kids. The simplicity of the steps allows even inexperienced bakers to join in on the fun without the need for extensive cooking knowledge. Moreover, they can be made ahead of time and stored, reducing the pressure of last-minute preparations.

    Nutritionally, while these treats are an indulgent dessert, using high-quality chocolate and filling allows for a more enjoyable treat without compromising too much on quality. Although they’re rich, these Oreo Pops can be enjoyed in moderation as part of a balanced diet. Each pop offers a burst of flavor that can be a little reward for a job well done at work or school.

    Socially, these pops make for a delightful addition to any gathering. Their whimsical appearance is sure to elicit smiles and compliments, serving as a conversation starter. Whether you’re sharing them at a party or giving them as a gift, these sweet creations highlight the joy and love of the season.

    Lastly, their cost-effectiveness makes them an accessible enjoyment for everyone. Most ingredients are affordable and easy to find, allowing anyone to step into the kitchen and create these charming treats without breaking the bank. Plus, they can be easily customized with different decorations or dipping options, ensuring that each batch can cater to varied tastes and preferences.

    Historical Background and Cultural Significance

    The Oreo cookie, which has enjoyed immense popularity since its introduction in 1912, is the star of this specific recipe. Known for its unique twist of two chocolate wafers filled with sweet cream, the Oreo quickly became a classic in American households. The idea of turning these beloved cookies into pops is a modern take on an old favorite, infusing a fun and playful twist into celebratory treats.

    Culturally, desserts like these Oreo Pops become markers of celebration and affection, particularly on occasions like Valentine’s Day. The act of sharing sweets is deeply rooted in many cultures as a demonstration of love and friendship, transforming the mundane into something special. Making Oreo Pops also aligns with a growing trend of personalized and homemade gifts that express thoughtfulness, making them an excellent choice for personal gifts.

    Over the decades, the Oreo cookie has undergone numerous evolutions, leading to the creation of various flavors and types, from golden Oreos to seasonal varieties. This evolution provides endless opportunities for creativity, allowing bakers to customize their pops based on personal preference or the season. By incorporating the Oreo into pop form, a nostalgic boost is given to a classic while encouraging innovation.

    In many regions, the practice of making desserts for loved ones reflects community values of sharing and togetherness. Oreo Pops encapsulate this spirit beautifully, as they can be shared among family, friends, and loved ones, forging connections through the joy of sweetness, especially during Valentine’s Day.

    Ingredient Deep Dive

    – **Oreo Cookies**: As a cultural icon, Oreos represent nostalgia for many. Their unique flavor and texture have made them a staple in desserts. They are a great source of fun, with many creative ways to use them in baking. When selecting Oreos, look for fresh packages, and store them in a cool place to maintain their crispness. If you need a substitute, consider chocolate wafers for a similar taste and texture.

    – **Chocolate**: A universal favorite, chocolate represents indulgence and celebration. Its rich flavor and smooth texture are comforting and satisfying. For this recipe, use high-quality melting chocolate for the best results. Store chocolate in a cool, dry place. If you don’t have melting chocolate on hand, chocolate chips can be used, although their consistency may vary slightly.

    – **Sprinkles or Chocolate Decor**: These colorful additions provide visual appeal and creativity. They are a staple in dessert decoration and play an essential role in aesthetics. When selecting toppings, consider seasonal themes to match the occasion. Store sprinkles in airtight containers to keep them fresh. You can substitute with nuts or shredded coconut for additional texture and flavor.

    Common Mistakes to Avoid

    • Not letting the chocolate cool before dipping: If the chocolate is too warm, it can cause the Oreo to become soggy and lose its signature crunch. Always allow cooling for a perfect dip.
    • Dipping the whole Oreo in chocolate: Dipping the Oreo cream side first helps retain shape and ensures even coverage.
    • Overheating the chocolate: Microwaving chocolate without intervals can lead to burning. Always check and stir every 30 seconds for successful melting.
    • Forgetting to put in the sticks: Skipping adding lollipop sticks will make it impossible to enjoy the pops. Be sure to insert them while the chocolate is still soft.
    • Using stale Oreos: Fresh Oreos are essential for maintaining the crunchiness of your pops. Always check for freshness before using.
    • Not allowing enough cooling time: Letting the chocolate set for a sufficient time helps prevent melting and retains their shape.
    • Not decorating immediately: Sprinkles or toppings should be added to chocolate while it is still wet for adherence.
    • Choosing the wrong chocolate: Ensure that the chocolate used is ideal for melting. Chocolate chips are not recommended unless specially formulated for melting.
    • Cutting corners on quality: Using lower-quality chocolate can lead to disappointing results. High-quality options yield better taste and visuals.
    • Using oversized toppings: Ensure decorations aren’t too large, which can overwhelm the pops and affect the eating experience.

    Essential Techniques

    – **Melting Chocolate**: Melting chocolate properly is crucial for achieving a smooth, glossy finish on your Oreos. Use a microwave-safe bowl and melt in short bursts, stirring frequently to avoid scorching. The best visual cue is when the chocolate is just melted but still thick; if it looks overly runny, it may not set properly.

    – **Dipping Technique**: When dipping, use a fork to ensure full coverage while allowing excess chocolate to drip off. This technique prevents clumping and maintains a neat appearance. Master the art by practicing a smooth, single-layer dip for a consistent finish.

    – **Setting the Chocolate**: Properly setting the chocolate is essential to ensure a firm pop. Place the dipped pops on parchment paper, allowing for airflow. If the chocolate is shiny and hard to the touch after cooling, you’ve mastered this technique!

    Pro Tips for Perfect Valentine’s Day Oreo Pops

    1. Use high-quality chocolate chips or melting chocolate for the best results, as low-quality options may thin out and won’t set properly.
    2. Ensure your Oreo cookies stay intact during the dipping process; support them gently while dipping to avoid breakage.
    3. Consider pairing flavored chocolate with flavored Oreos for a unique taste experience, such as mint or peanut butter-flavored Oreos.
    4. If pressed for time, opt for pre-made chocolate melts specifically designed for quick melting and easy customization.
    5. Allow your creations to chill in the refrigerator for a few minutes after dipping to help set the chocolate faster.
    6. Be adventurous with toppings; try using edible glitter or themed sprinkles to enhance the visual appeal for holidays or events.
    7. Customize the pops with different types of Oreos, from limited editions like pumpkin spice to seasonal variations.
    8. Create a festive display for serving by arranging the pops in a decorative basket or vase, elevating their presentation.

    Variations and Adaptations

    The versatility of Oreo Pops is one of their many fabulous attributes. For a fun twist, consider creating regional variations by incorporating local flavors—like adding crushed peppermint for a festive touch during the winter season. You can also adapt these pops to align with seasonal themes, such as using pastel colors and flavors for spring celebrations.

    If you want to cater to specific dietary needs, there are plenty of options to consider. For instance, you can use gluten-free Oreos to ensure those with gluten sensitivities can enjoy them. Substituting vegan chocolate and incorporating dairy-free Oreo varieties allows for an inclusive dessert that caters to various dietary preferences.

    For an adventure with flavor, think outside the box with toppings and fillings. Drizzle caramel or use chopped fruits for surprising flavor bursts to elevate the classic Oreo taste further. Experimenting with various presentation styles, such as serving the pops on skewers or individually wrapped, can enhance their appeal at parties.

    Serving and Presentation Guide

    When serving your Valentine’s Day Oreo Pops, presentation is key. A beautiful array of pops can be achieved by placing them upright in a decorative vase filled with foam or rice. This adds a festive touch and makes it easy for guests to grab and enjoy.

    Garnishing with fresh fruit alongside the pops can provide a lovely contrast in colors and flavors, like strawberries or raspberries. Additionally, you might consider adding a sprinkle of cocoa powder or chocolate shavings around the base of the vase to give a professional look.

    Temperature is important: serving them cold allows for a firmer texture, while room temperature might make them softer and easier for everyone to enjoy. Lastly, be mindful of portion control; one pop per person is typically sufficient to satisfy a sweet tooth without going overboard.

    Wine and Beverage Pairing

    Pairing a beverage with Valentine’s Day Oreo Pops can enhance the overall experience. A light sparkling wine or Prosecco makes a lovely match, creating a delightful contrast to the desserts’ sweetness. The bubbles cleanse the palate between bites, allowing the rich flavors to shine.

    For those preferring non-alcoholic options, consider pairing the pops with fresh milk or hot chocolate, reminiscent of childhood favorites and providing a comforting backdrop to the rich chocolate. A flavored herbal tea, such as hibiscus or vanilla, can also complement the sweetness of the pops without overpowering them.

    If you desire an energizing option, serve chilled coffee or espresso with cream. The combined flavors with the chocolatey goodness of the pops create a delightful harmony, enhancing overall enjoyment.

    Storage and Shelf Life

    To maintain your Valentine’s Day Oreo Pops, proper storage is essential. These treats should be stored in an airtight container at room temperature for optimal freshness. Keeping them away from direct sunlight prevents the chocolate from melting or discoloring.

    If you plan to make them in advance, refrigerate them to extend their shelf life. However, be cautious with moisture; condensation can affect the chocolate coating. It’s best not to freeze these pops, as the texture may change upon thawing, resulting in a less enjoyable experience.

    Inspect for any signs of spoilage, such as off smells or changes in texture. In general, homemade Oreo Pops can last up to a week when stored correctly. Follow specific storing instructions if you select different ingredients, as some may have varying shelf lives.

    Make Ahead Strategies

    Making Valentine’s Day Oreo Pops ahead of time is a fantastic way to reduce stress. You can dip the Oreos and decorate them up to two days before serving. Store them in an airtight container to keep them fresh and ready to impress your guests.

    If you’re limited on time, prepare the chocolate mixture in advance, allowing you to dip the pops quickly when you’re ready to assemble. You can also pre-dip the Oreos and store them unadorned, adding the toppings just before serving for a fresh, vibrant look.

    Quality impact should be considered as well; ensure you aren’t compromising on taste to save time. Time your assembly appropriately, balancing between speed and maintaining the visual appeal that adds to the overall enjoyment.

    Scaling Instructions

    When scaling this recipe, it’s essential to consider that doubling or halving the amount is straightforward. Simply adjust the number of Oreos and chocolate accordingly. For larger gatherings, tripling can enhance the festive atmosphere.

    Ensure your equipment is adequate for any variations in batch size. A larger microwave-safe bowl or pot may be necessary for melting larger quantities of chocolate. Take care to adjust the melting time as well to avoid overheating.

    Timing is also critical; while the recipe’s essentials remain constant, keep an eye on cooling and setting time, as larger batches might require slightly longer. Finally, remember to store any pops not consumed immediately in appropriate containers, maintaining freshness.

    Nutritional Deep Dive

    Each Oreo Pop offers a delightful treat that balances enjoyment with indulgence. From a macronutrient perspective, these pops primarily consist of carbohydrates from the Oreos and sugar from the chocolate. Careful moderation of portion sizes is key to enjoying these treats without concern for excessive sugar intake.

    Micronutrient analysis indicates that while these pops are a fun dessert option, they are not rich in vitamins or minerals. However, using high-quality chocolate can introduce antioxidants, providing some health benefits. Reading ingredient labels enables informed choices that can enhance nutritional content when possible.

    Consider dietary guidelines when enjoying these pops—pairing them with fruits can add fiber and essential vitamins, helping to create a more balanced treat. Understanding portion analysis helps manage sweet cravings without overwhelming dietary restrictions, allowing for enjoyment with moderation.

    Dietary Adaptations

    For those with specific dietary needs, Oreo Pops can be adapted easily. Gluten-free Oreos are widely available for those avoiding gluten, ensuring everyone can partake in the fun.
    Dairy-free chocolate options open the door for vegan diets; brands specifically designed for melting without animal products are perfect for this recipe.

    People following a low-carb or keto lifestyle may also create their version with sugar-free Oreos and dark chocolate options. Exploring variations provides flexibility for all dietary constraints without sacrificing fun or taste.

    Low-FODMAP versions can focus on using lactose-free chocolate, ensuring that individuals with IBS can enjoy these delightful pops. Lastly, many modifications can enrich taste and ensure inclusivity for different preferences and needs.

    Troubleshooting Guide

    If your Oreo Pops do not set properly, the chocolate may have been too warm when dipped. Allow enough cooling time for the chocolate to firm up after dipping; placing them in the refrigerator can speed up this process.

    For flavor imbalances, consider adjusting your chocolate choice or toppings for a more cohesive taste. Strongly flavored sprinkles can overwhelm the subtle taste of the Oreo. Experiment with different combinations to find the right balance.

    If you encounter texture issues while making the pops, ensure that the Oreos are fresh and emerge from the coating properly. If they are crumbly, the dip might be too warm or not thick enough; adjust the chocolate melting process as needed.

    Selecting quality chocolate is essential; low-quality options may lead to unwanted texture variations. Ensure you have the right ingredients for a smooth and delicious finish.

    Recipe Success Stories

    Many readers have embraced the fun and ease of making Valentine’s Day Oreo Pops, sharing their personal stories and creative twists. One family reported success by incorporating seasonal flavors, creating unique mashups that delighted both children and adults at holiday gatherings.

    Children have enjoyed hosting friendly competitions to create the most visually appealing pops, enriching family cooking experiences. The bonding time spent in the kitchen has generated memories that extend beyond just enjoying the treats.

    Others have shared their successes in adapting flavors, incorporating fruits or nuts to enhance the overall eating experience. The encouraging feedback highlights the versatility and accessibility inherent in the recipe.

    Readers have contributed stunning photos and variations, transforming a classic treat into a canvas of creativity, and helping to inspire new bakers to enjoy the process of cooking at home.

    Frequently Asked Questions

    What chocolate should I use for dipping my Oreo Pops?

    It is best to use high-quality melting chocolate or chocolate wafers, which melt smoothly and set well once cooled. Avoid using regular chocolate chips, as they may not melt properly.

    Can I use flavors other than chocolate?

    Absolutely! While chocolate is traditional, you can experiment with candy melts in various colors or flavors to create unique pops that suit your taste preferences or themed events.

    How do I store leftover Oreo Pops?

    Store leftover pops in an airtight container at room temperature for up to a week. If stored in the fridge, allow them to come to room temperature before serving for the best taste.

    Can I use gluten-free Oreos?

    Yes! Gluten-free Oreos make an excellent substitute if you or someone you’re serving has gluten sensitivities. They maintain the same great flavor and texture.

    How do I keep the pops from sticking to each other?

    To prevent sticking, allow the chocolate to fully set before placing the pops in storage. Using parchment paper between layers also helps keep them separated.

    How can I make these Oreo Pops more visually appealing?

    Get creative with your decorations! Use colored chocolate for drizzling, edible glitter, heart-shaped sprinkles, or themed toppers that reflect the occasion for a vibrant look.

    How long can I make the Oreo Pops in advance?

    You can prepare the Oreo Pops up to two days in advance. Store them in an airtight container to maintain freshness until you are ready to serve.

    What is the best way to dip the Oreos without breaking them?

    Using a fork or skewer can help you dip the Oreos without manually handling them too much, reducing the risk of breakage. Gently support the Oreo while dipping for best results.

    Can I freeze Oreo Pops?

    Freezing is not recommended, as it may lead to undesirable texture changes. Instead, store them in a cool location or refrigerator, avoiding unwanted moisture.

    What are some great serving ideas for Oreo Pops?

    Serve the pops upright in a decorative vase, alongside themed plates, or in individual boxes for gifting. Enhance the display with colored tissue or candy scattering for a festive touch.

    Additional Resources

    For those excited about diving into the world of dessert making, explore related recipes that celebrate sweet indulgence. From classic chocolate-covered strawberries to whimsical cake pops, the possibilities are endless.

    Consult technique guides on skills like melting chocolate properly or decorating desserts beautifully to enhance your baking repertoire. Understanding ingredient selections can also lead to more delicious and accessible treats for every occasion.

    For those wanting to keep making desserts as seasons change, discover seasonal variations that coincide perfectly with each holiday or celebration, offering fun and creativity throughout the year.

    Join the Conversation

    Engage with fellow baking enthusiasts by sharing your Oreo Pop creations on social media. Use eye-catching photography to showcase your unique variations and inspire others in the community.

    Recipe reviews and feedback help improve techniques while building connections with other home bakers who share your passion. Consider hosting virtual baking sessions where you can all create and enjoy these Valentine’s Day treats together, creating a sense of community around a shared love for cooking!

    The Recipe

    Valentine’s Day Oreo Pops

    Serves: 12 pops

    Prep Time: 15 mins

    Cook Time: 10 mins

    Total Time: 25 mins

    Kitchen Equipment Needed

    • Microwave-safe bowl
    • Fork or skewer for dipping
    • Parchment paper for cooling
    • Airtight container for storage

    Ingredients

    • 12 Oreo cookies
    • 1 cup melting chocolate (dark or white)
    • 1/2 cup sprinkles for decoration
    • 12 lollipop sticks

    Directions

    1. Prepare your workspace by laying out all ingredients and tools.
    2. In a microwave-safe bowl, melt the chocolate in 30-second intervals until smooth, stirring frequently.
    3. Insert lollipop sticks into the creamy filling of each Oreo, ensuring they are secure.
    4. Dip each Oreo into the melted chocolate, allowing excess to drip off.
    5. Before the chocolate sets, sprinkle with your chosen decorations.
    6. Place the dipped Oreos on parchment paper and allow them to cool until the chocolate is set.
    7. Once set, your Oreo Pops are ready to be enjoyed or packaged as gifts!

    Recipe Notes

    • Feel free to experiment with various chocolate and sprinkle colors for different occasions.
    • For a richer flavor, try using flavored chocolate melts.
    • Store popped in an airtight container at room temperature for best results.

    Best Valentine’s Day Oreo m&m’s Cookies – Ready in 30 Minutes

    Valentine’s Day Oreo M&M’s Cookies: Sweet Treats for Your Loved Ones

    ⚖️
    Difficulty
    Easy

    ⏲️
    Prep Time
    15 mins

    🕒
    Cook Time
    10 mins

    ⏱️
    Total Time
    25 mins

    🍽️
    Servings
    24 cookies

    Celebrate love this Valentine’s Day with the delightful twist of Oreo M&M’s Cookies. These cookies are not only visually appealing with vibrant colors but also pack the delicious flavors of chocolate and cream. Picture yourself baking these scrumptious treats to share with your partner, family, or friends, filling your kitchen with the warm aroma of melting chocolate and buttery dough. Each bite brings a delightful crunch from the M&M’s and a rich, creamy burst from the Oreos, making them a perfect sweet indulgence for any occasion.

    Whether you are planning a romantic dinner, a sweet surprise for your kids, or simply want to indulge in a unique cookie, these Oreo M&M’s Cookies are a fantastic choice. Easy to make and packed with fun flavors, you can whip up a batch in no time. This enticing recipe combines the iconic flavors of Oreos with colorful chocolate candies, creating a cookie that is both festive and delicious, making it a sure hit for this Valentine’s Day.

    Quick Recipe Highlights

    • Flavor Profile: A delightful combination of rich chocolate from the Oreos and sweet, colorful bursts of chocolate from the M&M’s, creating a harmonious balance of flavors.
    • Texture: The cookies have a soft, chewy center with crispy edges, while the M&M’s add a satisfying crunch to each bite.
    • Aroma: The unmistakable scent of baked cookies mingles with the sweet aroma of chocolate, making it hard to resist indulging while they bake.
    • Visual Appeal: Bright, colorful M&M’s peek through the golden-brown cookie dough, making these cookies as pleasing to the eyes as they are to the taste buds.
    • Skill Level Needed: This recipe is beginner-friendly and perfect for anyone looking to bring joy to their kitchen without needing advanced baking skills.
    • Special Equipment: All you need is a mixing bowl, baking sheet, and an oven, making this a straightforward and accessible recipe.

    Recipe Overview

    • Difficulty Level: This cookie recipe is easy, making it suitable for bakers of all ages. Even if you are new to baking, you can confidently create delicious cookies that will impress your loved ones.
    • Category: Perfect as a dessert or snack, these cookies make a fantastic addition to any Valentine’s Day celebration, classroom treat, or family gathering.
    • Cuisine: This recipe is inspired by American baking traditions, where cookies are a staple in dessert offerings, especially during festive seasons.
    • Cost: The ingredients are budget-friendly, making this recipe both economical and accessible to everyone, regardless of culinary experience.
    • Season: While ideal for Valentine’s Day, these cookies can be enjoyed year-round, bringing joy in every season.
    • Occasion: Whether for a romantic date night, a fun baking session with kids, or a sweet surprise for friends, this recipe fits every occasion perfectly.

    Why You’ll Love This Recipe

    – Taste and texture appeal: The sweet, creamy chocolate from the Oreos meets the playful crunch of M&M’s, making for a cookie that is both satisfying and delightful. Each bite provides a burst of flavor and varied texture, drawing you back for more.

    – Convenience and preparation benefits: This simple recipe can be prepared quickly with minimal effort and clean-up. The straightforward mixing and baking process is perfect for those who want to enjoy homemade cookies without spending hours in the kitchen.

    – Nutritional advantages: While cookies are a treat, this recipe incorporates comforting ingredients that can be enjoyed in moderation. Chocolate can boost mood and energy levels, adding a sprinkle of happiness to your day.

    – Social and entertaining value: Cookies are a universal favorite, and bringing a batch of these colorful, attractive Oreos M&M’s Cookies to gatherings makes you the star of the party. They can spark conversations and create joyful memories.

    – Cost-effectiveness and accessibility: The ingredients are inexpensive and easy to find in any grocery store, making it a budget-friendly option for creating homemade goodies for loved ones.

    Historical Background and Cultural Significance

    The origins of classic cookies can be traced back to the early 7th century when the Arabs brought sugar and spice to Europe. Cookies have evolved over the centuries from simple baked goods to the plethora of options available today, including the delicious varieties using popular candies like Oreos and M&M’s.

    In America, cookies have become an integral part of the baking culture, especially during festive occasions. The introduction of Oreos in 1912 by Nabisco revolutionized the snacking experience, and the fun, vibrant M&M’s were created shortly after during World War II, making a sweet treat that could withstand heat.

    Over the years, as these beloved candies became staples in American households, their integration into cookie recipes sparked the creation of countless variants, with people adopting these combinations to suit their tastes, turning baking into a fun and creative act.

    Today, cookies are not only enjoyed at home but have become significant culinary representatives of celebration and community, strengthening bonds as families and friends come together to share homemade treats.

    Ingredient Deep Dive

    Oreos: Oreos, with their signature cream filling, offer a nostalgic flavor and texture. They provide a unique twist to traditional cookies, combining creamy and crispy elements. High in sugar but also a source of fun, Oreos can be selected based on individual preference, whether classic or seasonal varieties.

    M&M’s: M&M’s are colorful candy-coated chocolates known for adding brightness to any dessert. Their origins date back to the 1940s, and they are beloved for their crunch and sweetness. Packed with sugary calories, M&M’s can also be enjoyed in moderation, and they can be customized with various flavors or colors to suit specific occasions.

    Common Mistakes to Avoid

    • Not chilling the dough: Chilling helps the cookies maintain their shape and texture. Without it, the cookies may spread too much during baking.
    • Overmixing the dough: Overmixing can lead to tough cookies, so mix just until combined to keep them soft and chewy.
    • Using expired ingredients: Always check the expiration dates on baking soda and baking powder for optimal rise and flavor.
    • Rushing the baking time: Each oven is different, so keep an eye on the cookies and bake them until lightly golden.
    • Ignoring the baking sheet: Line the baking sheet with parchment paper or a silicone mat for easy removal and cleanup.
    • Using the wrong flour: Use all-purpose flour for the best texture and flavor in your cookies; avoid substituting with specialty flours without adjustments.
    • Not measuring ingredients correctly: Precision in measuring pouring ingredients such as flour is key to achieving the perfect cookie dough consistency.
    • Skipping the taste test: Always taste your dough before baking; if it isn’t good raw, it’ll likely not be good baked.

    Essential Techniques

    Chilling the Dough: Chilling the cookie dough is essential for creating the right texture and flavor. This can prevent excessive spreading during baking and enhance the final cookie’s taste. Mastering this technique will help ensure that every batch comes out perfectly rich and delicious.

    Proper Mixing: Mixing the dough properly ensures even distribution of the ingredients. Using a spatula or mixer until just combined prevents toughness. Visual cues for success include seeing no dry flour left and the dough appearing cohesive but not overly sticky.

    Pro Tips for Perfect Valentine’s Day Oreo M&M’s Cookies

    1. Use room temperature butter for easy creaming and a softer dough, leading to perfectly chewy cookies.
    2. Experiment with different types of M&M’s — try peanut or almond varieties for a unique flavor twist.
    3. For extra chocolate flavor, add mini chocolate chips into the cookie dough.
    4. If desired, drizzle melted chocolate over the baked cookies for an indulgent finish.
    5. Use high-quality ingredients, especially chocolate, for richer flavor in every bite.
    6. Ensure your oven is correctly preheated for the perfect baking experience and achieve optimal rise.
    7. Allow cookies to cool on the baking sheet for easy removal while retaining their shape.
    8. Store baked cookies in an airtight container to keep them soft and delicious for days.

    Variations and Adaptations

    For a fun twist, consider adding seasonal sprinkles during holidays or themed parties. For healthier variations, substitute regular Oreos with gluten-free options, or use dark chocolate M&M’s. You can also explore different flavor combinations, such as incorporating peanut butter or vanilla extract, to enhance the classic sweet and chocolatey flavor profile.

    If you are looking for a softer cookie, adjust the baking time slightly or experiment with different ratios of butter and sugar. For those who prefer a chewy texture, ensure not to overbake the cookies and try adding oats.

    Serving and Presentation Guide

    Plate your cookies on a decorative platter, stacking them for an inviting display. Consider garnishing with fresh fruit or a sprinkling of icing sugar for an elegant touch. Traditional accompaniments could also include a side of milk, enhancing the classic cookie and milk experience.

    For modern serving suggestions, place cookies individually in small boxes or bags tied with ribbon for personal gifts. When serving, ensure cookies are at room temperature for optimal flavor and texture.

    Wine and Beverage Pairing

    Pair these delicious cookies with a glass of sweet dessert wine, such as a Ruby Port or a fruity Moscato, which will enhance the sweetness of the Oreos and M&M’s. For non-alcoholic alternatives, serve with a rich hot chocolate or a classic, cold glass of milk.

    If you’re a coffee lover, a smooth latte or a lightly roasted coffee would complement the chocolate flavors beautifully. Be sure to serve beverages at moderate temperatures to enhance the overall tasting experience.

    Storage and Shelf Life

    Store your Oreo M&M’s Cookies in an airtight container at room temperature to maintain freshness. Properly stored, they can last up to a week, but be sure to consume them within 2-3 days for the best texture and flavor.

    You can also freeze unbaked cookie dough for later use; shape the dough into balls, freeze on a baking sheet, then transfer to a container or freezer bag. When ready to bake, simply add a couple of minutes to the baking time for freshly baked cookies at any time.

    Make Ahead Strategies

    To save time, prepare the cookie dough in advance and store it in the refrigerator for up to 3 days before baking. You can also roll out the dough into logs and freeze them for up to 2 months, allowing you to bake fresh cookies whenever the craving strikes.

    For best quality, let the dough come to room temperature before baking. This will ensure easy slicing and a more uniform cooking time, giving you the best texture and flavor from your cookies.

    Scaling Instructions

    To adjust the recipe for smaller or larger batches, simply halve or double the ingredient quantities. For larger servings, keep the baking sheets spaced adequately and use multiple sheets in the oven, rotating them halfway through for even baking.

    If doubling the recipe, consider using an electric mixer to save time and achieve a well-blended dough. Adjust baking times as needed, as larger batches may require extra time or multiple batches to bake thoroughly.

    Nutritional Deep Dive

    While these cookies are a treat, understanding their nutritional content can enhance your baking experience. Each cookie offers a balance of macronutrients, primarily carbohydrates from sugars and flour, along with fats from butter and chocolate.

    For those seeking health benefits, consider serving these cookies in moderation. They provide energy and can boost mood due to the chocolate and sugar, making them a delightful addition to balanced snack options.

    Dietary Adaptations

    For gluten-free associates, substitute all-purpose flour with an easily accessible gluten-free blend or almond flour. To create dairy-free cookies, use coconut oil in place of butter and almond milk for added moisture.

    To cater to vegan diets, replace the eggs with ground flaxseed mixed with water and use a dairy-free chocolate version of M&M’s. Creating a low-carb option may involve using almond flour and sugar replacements for a guilt-free indulgence that still satisfies.

    Troubleshooting Guide

    If you find your cookies spreading too much, review your chilling and butter temperature practices. Ensure the butter is soft but not melted, and rest the dough for adequate time.

    For cookies that are too dry, adjust baking times and consider adding a tablespoon of milk or water to improve moisture levels. If flavor seems off, reviewing ingredient freshness and correct measurements will help align taste expectations.

    Recipe Success Stories

    Readers have shared their love for these cookies, noting how they made their Valentine’s Day gatherings memorable and fun. Variations suggested by families have included integrating peanut butter and using other favorite candies with delicious results.

    Photography tips have emerged around capturing the vibrant colors of M&M’s, with many community members expressing joy in how visually appealing the cookies looked on their dessert tables.

    Frequently Asked Questions

    Can I use different types of M&M’s?

    Absolutely! Feel free to substitute regular M&M’s with peanut, almond, or even seasonal variations for a unique twist on this cookie recipe.

    Can I make these cookies ahead of time?

    Yes! You can prepare the dough in advance and refrigerate it for up to 3 days or freeze it for future baking. Just remember to allow the dough to come to room temperature before baking.

    What should I do if my cookies spread too much while baking?

    If your cookies spread, ensure you chill the dough as suggested. If they still spread, your butter may have been too warm; try refrigerating the dough before baking.

    How should I store leftover cookies?

    Store the cookies in an airtight container at room temperature for up to one week, or freeze them for longer storage options.

    Can I substitute the butter with something else?

    Yes, you can use coconut oil or a vegan butter alternative to replace regular butter in this recipe for those with dietary restrictions.

    What’s the best way to make the cookies chewy?

    To achieve a chewy texture, do not overbake the cookies and refrigerate the dough before shaping them. This helps maintain their shape and moisture.

    Is it necessary to use Oreos?

    While Oreos provide the classic flavor and texture, you can substitute them with other chocolate sandwich cookies to customize the taste, though the results may vary slightly.

    Can I freeze baked cookies?

    Yes, baked cookies can be frozen. Ensure they are cooled completely before wrapping them tightly in plastic wrap or placing them in an airtight container for freezing.

    How do I get the perfect cookie texture?

    To ensure a perfect texture, measure ingredients correctly, mix until just combined, and pay attention to baking time for a delicate balance of chewy and crisp.

    Can I use alternative flour?

    It is possible to use almond flour or other gluten-free flours, but you will likely need to adjust the ratios for the correct texture in the cookies.

    Additional Resources

    Explore more delightful recipes to bring joy to your baking experiences. Consider trying out other variations of cookie recipes that incorporate ingredients like nuts or fruit.

    Look into technique guides that showcase tips on mixing dough effectively or enhancing flavors. Gathering ingredient information can also provide insights into the best selections for maximum freshness when planning your next baking spree.

    Finally, take advantage of seasonal variations by tailoring your treats to the holidays, ensuring that each celebration is filled with creativity and deliciousness.

    Join the Conversation

    Engage with fellow bakers by sharing your Oreo M&M’s Cookies photos and experiences on social media. Don’t hesitate to give feedback on your cooking journey; every suggestion can inspire others to create new variations and adapt the recipe to their liking.

    Consider inviting friends to join in from time to time for a baking session. Exploring different flavors and cooking together can enhance the fun and foster community engagement while indulging in the lovely treats you create.

    The Recipe

    Valentine’s Day Oreo M&M’s Cookies

    Serves: 24 cookies

    Prep Time: 15 mins

    Cook Time: 10 mins

    Total Time: 25 mins

    Kitchen Equipment Needed

    • Mixing bowl
    • Baking sheet
    • Parchment paper
    • Electric mixer
    • Cookie scoop

    Ingredients

    • 1 cup unsalted butter, softened
    • 1 cup brown sugar
    • 1/2 cup granulated sugar
    • 2 large eggs
    • 2 teaspoons vanilla extract
    • 2 1/4 cups all-purpose flour
    • 1 teaspoon baking soda
    • 1/2 teaspoon salt
    • 20 Oreos, chopped
    • 1 cup M&M’s

    Directions

    1. Preheat your oven to 350°F (175°C) and line a baking sheet with parchment paper.
    2. In a large mixing bowl, cream together the softened butter, brown sugar, and granulated sugar until light and fluffy.
    3. Add the eggs one at a time, mixing well after each addition, followed by the vanilla extract.
    4. In a separate bowl, combine the flour, baking soda, and salt; gradually incorporate this dry mixture into the wet ingredients.
    5. Fold in the chopped Oreos and M&M’s until evenly distributed throughout the dough.
    6. Using a cookie scoop, drop rounded tablespoons of dough onto the prepared baking sheet, leaving space between each cookie.
    7. Bake in the preheated oven for 10-12 minutes or until the edges are lightly golden but centers remain soft.
    8. Allow cookies to cool on the baking sheet for 5 minutes before transferring them to a wire rack to cool completely.

    Recipe Notes

    • For softer cookies, reduce baking time slightly, taking them out when they are still slightly puffy.
    • Store cookies in an airtight container at room temperature for up to 1 week.
    • Feel free to substitute regular Oreos with any flavor of your choice for a unique twist.

    Best Oreo Cheesecake Cookies – Ready in 30 Minutes

    Delicious Oreo Cheesecake Cookies: A Creamy Delight

    ⚖️
    Difficulty
    Moderate

    ⏲️
    Prep Time
    20 mins

    🕒
    Cook Time
    10 mins

    ⏱️
    Total Time
    30 mins

    🍽️
    Servings
    24 cookies

    Indulge in the delightful world of Oreo Cheesecake Cookies, where rich and creamy cheesecake meets the beloved crunch of Oreo cookies. These cookies combine the best of both worlds: the iconic chocolate wafer cookie and a silky cheesecake filling. Perfectly sweet and just a tad tangy, each bite is an explosion of flavor that will have everyone reaching for seconds. Ideal for any occasion, whether it’s a casual family gathering or a festive celebration, these cookies are sure to impress.

    The texture of these cookies is a culinary masterpiece; crisp on the outside and soft on the inside, they boast a creamy center that melts in your mouth. Each cookie is studded with crumbled Oreo pieces, providing that signature cookie crunch that balances beautifully with the smoothness of the cheesecake filling. Their pleasing aroma of baked chocolate and cream cheese fills your kitchen, making it impossible to resist the temptation as they cool on the counter.

    Quick Recipe Highlights

    • Flavor Profile: Rich chocolate and creamy cheesecake create a harmonious blend that is irresistible.
    • Texture: The cookies offer a crispy bite with a soft, gooey center packed with Oreo chunks.
    • Aroma: A mouthwatering fragrance of vanilla and chocolate beckons as they bake.
    • Visual Appeal: The contrast of dark chocolate and creamy white filling makes these cookies visually stunning.
    • Skill Level Needed: Moderate skill is required, making these cookies ideal for home bakers looking to elevate their dessert game.
    • Special Equipment: A mixing bowl, baking sheet, and an electric mixer are essential for perfect results.

    Recipe Overview

    • Difficulty Level: These Oreo Cheesecake Cookies require basic baking skills and a careful approach to mixing and baking.
    • Category: Ideal for desserts or sweet snacks, they can also serve as a fun party treat.
    • Cuisine: While the cheesecake flavor is derived from classic American desserts, the inclusion of Oreos gives a uniquely nostalgic twist.
    • Cost: The ingredients are fairly affordable, making these cookies a budget-friendly choice.
    • Season: Enjoy these cookies year-round, although they are particularly delightful during holidays and family gatherings.
    • Occasion: Perfect for birthdays, bake sales, or simply as a sweet indulgence after dinner.

    Why You’ll Love This Recipe

    These Oreo Cheesecake Cookies deliver an incredible taste and texture duo that is hard to resist. The rich cheese filling perfectly complements the chocolate cookie base, providing a balance of flavors that tantalize the taste buds. With a delightfully soft center and a slight crunch from the Oreo bits, every bite is a treat that envelops your palate in creamy goodness.

    Convenience plays a big role as these cookies come together quickly. The dough doesn’t require extensive chilling, and they bake in a mere 10 minutes. This makes them perfect for those spontaneous cravings or last-minute dessert requests. They also hold well when stored, keeping their flavor intact for several days.

    From a nutritional perspective, the ingredients used can offer some benefits, such as calcium from the cream cheese and antioxidants from dark cocoa. While indulgent, they can be enjoyed in moderation as part of a balanced diet. You’re not just treating yourself, but also creating a memorable experience with each batch you bake.

    These cookies are also fantastic for entertaining. They are visually appealing and serve as a conversation starter at any gathering. Picture your guests indulging in these delightful treats, savoring flavors and textures that bring joy and satisfaction, fostering a social atmosphere filled with laughter and warmth.

    Affordability is another highlight. With just a handful of ingredients, you can whip up a large batch, making them an economical choice for gatherings. Plus, you can often find ingredients on sale, allowing you to stock up without breaking the bank.

    Historical Background and Cultural Significance

    The origin of Oreo Cookies can be traced back to 1912, and since their introduction, they have become an iconic American treat. The combination of Oreo cookies with cheesecake is a modern culinary invention that reflects current dessert trends where classic flavors are reinvented for contemporary tastes. The Oreo Cheesecake cookie continues to gain popularity, showcasing a fusion of beloved flavors that resonates across age groups.

    Culturally, Oreos have been embraced in various forms, from dunking them in milk to incorporating them into elaborate dessert recipes. The iconic dessert’s influence is far-reaching, and combining it with cheesecake is a natural progression, creating a new favorite in the line of American desserts. This dessert is more than just a culinary creation; it’s a part of celebrations, gatherings, and personal moments shared among family and friends.

    The recipe for Oreo Cheesecake Cookies has evolved with variations including adding different flavors or textures to cater to diverse palates. Some may add peanut butter or even mint extract, enhancing the versatility of this delightful treat and ensuring there is a variation to satisfy everyone’s preferences.

    Additionally, regional variations exist, influenced by local tastes and available ingredients. Some bakers might add spices or nuts to elevate the recipe, while others may focus on the minimalist approach to highlight the Oreo and cheesecake flavors prominently. This versatility illustrates the cookie’s adaptability, allowing it to remain relevant in the ever-evolving culinary landscape.

    Ingredient Deep Dive

    Oreos: The chocolate wafer cookies bring a delightful crunch and rich flavor, stemming from the combination of cocoa and vanilla. High in sugars and fats, they provide a flavor profile that balances the creamy cheesecake. When selecting Oreos, look for freshness, ensuring they’re not stale. Store them in an airtight container to maintain their crispness.

    Cream Cheese: A staple in cheesecake recipes, cream cheese offers a creamy texture and tangy taste. It’s rich in calcium and provides a smooth base that enhances the overall flavor profile. Always choose full-fat cream cheese for the best taste. It should be stored in the refrigerator and can be substituted with mascarpone for a richer flavor.

    Common Mistakes to Avoid

    • Using cold ingredients: Ensure that your cream cheese is at room temperature to avoid lumps and to achieve a smooth texture.
    • Overmixing the cookie dough: Overmixing can lead to tough cookies rather than soft and chewy ones, so mix just until combined.
    • Baking at the wrong temperature: Always preheat your oven; baking at a lower temperature can lead to cookies that spread too much.
    • Not measuring ingredients accurately: Baking is a science, so measuring ingredients precisely ensures the best results.
    • Baking on a cold pan: Always use a greased or lined baking sheet for even baking and to prevent sticking.
    • Ignoring cooling time: Allow cookies to cool on the baking sheet before transferring them to a wire rack, as they continue to cook slightly when removed from the oven.
    • Skipping the chilling step: Chilling the dough can enhance flavor and texture, making the cookies extra chewy.
    • Not checking for doneness: Keep an eye on bake time; cookies should be slightly golden at the edges and soft in the center when done.

    Essential Techniques

    Creting the Cookie Dough: Properly combining wet and dry ingredients is crucial. Start with softened cream cheese and sugar, mixing until smooth before incorporating dry ingredients. This step is vital to avoid lumps in your cookie dough, contributing to a consistent texture throughout.

    Chilling the Dough: Allowing your dough to chill enhances the flavor and prevents excessive spreading during baking. 30 minutes is usually sufficient. Monitoring the chilling time can dramatically improve the overall appearance and texture of your cookies, leading to a thicker, chewier result.

    Pro Tips for Perfect Oreo Cheesecake Cookies

    1. Opt for double-stuffed Oreos for an extra creamy filling that enhances the richness of your cookies.
    2. Experiment with other Oreo flavors, such as mint or peanut butter, for a unique twist on the classic recipe.
    3. Incorporate chocolate chips for added complexity in flavor and texture.
    4. Drizzle melted chocolate on top for an appealing presentation and intensified flavor.
    5. Try adding spices like cinnamon or nutmeg to the cookie dough for an unexpected flavor layer.
    6. Keep the cookies in an airtight container to maintain their freshness for up to a week.
    7. Allow the cookies to cool completely before storing them to prevent them from becoming soggy.
    8. Don’t forget to crush some Oreos to sprinkle on top before baking, adding a nice crunchy component.

    Variations and Adaptations

    For those interested in regional variations, consider adding flavors that celebrate local ingredients. For instance, adding crushed pistachios can offer a Middle-Eastern influence, while using coconut flakes can give an Island flair. Seasonal adaptations may include integrating pumpkin puree in fall or refreshing mint flavor in spring.

    Dietary modifications can also be made to fit various lifestyles. To create a gluten-free version, substitute regular Oreos with gluten-free cookies. Alternatively, for a dairy-free option, use vegan cream cheese and enjoy the same delightful flavors.

    Texture modifications can lead to fun new experiences; consider chilling the filled cookies before a final bake for a different mouthfeel and appearance. Lastly, traditional presentation can involve simply dusting the cookies with powdered sugar, while more modern ideas might include using edible flowers or flavored whipped cream to elevate the dessert.

    Serving and Presentation Guide

    When it comes to plating your Oreo Cheesecake Cookies, simplicity is key. Place them on a white platter to highlight their striking contrast of colors. For garnishing, consider adding a sprinkle of crushed Oreos or a drizzle of chocolate sauce over the top.

    Serving these cookies slightly warm enhances the creamy center, known to impress guests. For flavor balance, pair them with a scoop of vanilla ice cream or serve alongside a glass of cold milk, allowing for a classic experience reminiscent of childhood.

    Consider the cookie’s presentation on festive occasions, stacking them in a tall, clear cupcake tower for a stunning effect at parties. Always consider serving size, which can encourage moderation while allowing everyone a chance to enjoy a delicious treat.

    Wine and Beverage Pairing

    Pair your Oreo Cheesecake Cookies with a beautifully chilled glass of dessert wine, such as a Rich Merlot or a sweet Riesling, as they complement chocolate-based desserts remarkably well. The luscious notes of these wines accentuate the chocolate flavor of the Oreo while balancing the creamy richness of the cheesecake.

    For a non-alcoholic alternative, consider serving these cookies with a rich cappuccino or a creamy milkshake. Alternatively, hot chocolate can amplify the indulgence and warmth of soft cookies, creating a cozy treat perfect for any chilly evening.

    Being mindful of serving temperatures is crucial; ensure your beverages are prepared ahead of time for optimal pairing. This attention to detail can amplify your dessert experience, making it memorable for you and your guests.

    Storage and Shelf Life

    To store your Oreo Cheesecake Cookies, place them in an airtight container at room temperature if you’ll consume them within a few days. For longer storage, refrigerate them, where they can keep fresh for up to a week. When choosing your container, opt for one that allows a bit of space between cookies to avoid sticking together.

    Monitor signs of spoilage by keeping an eye out for changes in scent or texture. If cookies start to feel dry or overly hard, they are best discarded. For reheating, a quick microwave zap of 5-10 seconds can restore their original softness without compromising flavor.

    For those looking to prepare in advance, consider freezing the cookie dough. Form the dough into balls, freeze on a baking sheet, then transfer to a freezer-safe bag. When ready to bake, simply add a few extra minutes to your baking time for freshly baked cookies any time.

    Make Ahead Strategies

    Planning ahead can elevate your cookie-presentation game significantly. To prepare, mix the dough, and shape it into individual cookie balls, then freeze them. This way, you can bake fresh cookies whenever needed, without the upscale prep time.

    You can also prepare the cream cheese filling in advance. Store it in the fridge; blending it again before use ensures it remains fluffy and easy to incorporate. Assembling the cookies can happen in stages, allowing you to manage your time effectively while ensuring freshness.

    Take note of quality when making in advance; keep acidulated ingredients separate until you’re ready to serve. This keeps the flavors bright and vibrant, delivering an impressive taste experience every time.

    Scaling Instructions

    If you wish to halve or double the recipe, keep in mind that measurements must be precise to maintain the balance of flavors and textures. When increasing the ingredient quantities, consider the size of your baking sheets as crowding can lead to uneven baking.

    For a large party, tripling the recipe may require multiple baking sheets and rotating them halfway through, especially if you have a conventional oven. Keep a close eye on your cookies to prevent overbaking as batch sizes can affect temperature regulation.

    Always sum up the total baking time accordingly; testing cookies for doneness is essential, particularly when scaling. This attentiveness ensures each batch is perfectly baked no matter the size of the undertaking.

    Nutritional Deep Dive

    An analysis of the nutritional makeup of these Oreo Cheesecake Cookies reveals a balance of indulgence and energy. Each cookie packs calories primarily from sugars and fats, with dough calories averaging 150-200 per cookie. However, it’s important to consume these as a treat rather than a daily diet staple.

    Focusing on micronutrients, cream cheese is a good source of calcium, supporting bone health, while Oreos provide iron, which helps create red blood cells. Understanding serving sizes is crucial for maintaining a balanced intake, and moderation remains a central theme when enjoying such treats.

    For weight management, consider enjoying these cookies alongside healthier snacks to create a fulfilling yet balanced dessert experience. Combining richer desserts with lighter options can enhance enjoyment without the guilt while allowing for variety.

    Dietary Adaptations

    For gluten-free individuals, substituting Oreos with gluten-free cookies remains simple, ensuring the flavor experience isn’t lost. Make sure to use gluten-free flour for the cheesecake base if making it from scratch.

    Those adhering to a dairy-free diet can substitute regular cream cheese with vegan varieties or cashew cream. This maintains the rich texture while accommodating dietary needs, allowing everyone to enjoy a taste of this delicious dessert.

    Additionally, those on a keto diet can opt for lower-carb ingredients and sugar substitutes, allowing them to indulge without deviating from their dietary lifestyle. Keep portions small to satisfy sweet cravings while staying within nutritional guidelines, thus savoring the experience without worry.

    Troubleshooting Guide

    If your cookies are too tough, checking the mixing process is essential; overmixing can lead to a densified texture. Make sure creamy fillings are of optimal temperature before use as it influences the final consistency.

    Should your cookies spread too much, consider chilling your dough longer before baking while ensuring the oven temperature is accurate. A thermometer can assist in verifying that your oven heats correctly.

    Unbalanced flavors can ruin a delightful dessert experience; ensure you measure ingredients accurately, particularly the sugar and cream cheese ratios. Finally, if stuck, don’t hesitate to experiment with different ingredient cutbacks to find your perfect chocolate-cheesecake balance.

    Recipe Success Stories

    Readers have raved about how these Oreo Cheesecake Cookies bring joy to gatherings. Many share that they have successfully adapted the recipe for various celebrations, earning them rave reviews from family and friends. Suggestions on ingredient variations have inspired others, leading them to create their unique spins on the classic recipe, adding flavors like mint or even peanut butter.

    Photography tips have also been shared within the community, showcasing the cookie’s visual appeal that draws people in. By featuring these stunning treats on social media, bakers have spread the word about the joy of making and sharing Oreo Cheesecake Cookies.

    Additionally, user feedback highlights how these cookies have transformed ordinary occasions into exceptional ones, fostering friendships and ties over a shared love for delicious homemade desserts.

    Frequently Asked Questions

    Can I freeze Oreo Cheesecake Cookies?

    Yes, you can freeze these cookies! Store them in an airtight container or freezer bag, and they will last up to three months. Just let them thaw at room temperature before serving for the best texture.

    What adjustments should I make for high altitude baking?

    For high altitude baking, you may need to increase the oven temperature by 15-25°F and reduce the baking time slightly. Adding a tablespoon of flour can also help stabilize the dough.

    Can I use reduced-fat cream cheese?

    Yes, you can use reduced-fat cream cheese; however, it may slightly alter the texture and taste. Full-fat cream cheese typically yields a richer, creamier filling.

    What is the best way to store these cookies?

    Store the cookies in an airtight container at room temperature for up to five days, or refrigerate them for up to a week. If you freeze them, they can last for up to three months.

    Are there any nut-free substitutions for this recipe?

    This recipe is already nut-free, but if using alternative creams or ingredients, ensure that they are labeled nut-free to avoid any allergy issues when serving.

    How can I make these cookies dairy-free?

    To make these cookies dairy-free, substitute cream cheese with a dairy-free alternative such as cashew cream or vegan cream cheese. Use dairy-free Oreos for a complete dairy-free treat.

    Why are my cookies too soft?

    Your cookies may be too soft if they are underbaked. Check them around the baking time and let them cool slightly on the baking sheet, as they will firm up as they cool.

    How can I enhance the chocolate flavor?

    For an enhanced chocolate flavor, use dark chocolate Oreos, add cocoa powder to the dough, or sprinkle chocolate chips throughout the batter before baking.

    Can I make this dough ahead of time?

    Absolutely! You can prepare the dough in advance and refrigerate it for up to two days before baking. You can also freeze the dough, shaping it into balls and cooking when necessary.

    How do I know when the cookies are done baking?

    Cookies are typically done when they are golden around the edges but still soft in the center. They will continue to cook a bit after being removed from the oven, so it’s best not to overbake.

    Additional Resources

    If you enjoyed making Oreo Cheesecake Cookies, explore related recipes like classic cheesecake, other cookie variations, or even decadent cake recipes that feature similar flavors. There are countless technique guides available to enhance your baking skills, alongside ingredient information to help you understand the best choices for your baking endeavors.

    Consider investing in quality equipment that suits your baking style; a good mixer or silicone baking mats can provide an advantage. Exploring seasonal variations can introduce new excitement to your baking routine, ensuring you always have something fresh and delightful to share.

    Join the Conversation

    We’d love to hear about your experiences with these Oreo Cheesecake Cookies! Share your photos and adaptations with us on social media. Your feedback and variations contribute to a vibrant community of bakers eager to share and inspire. Enjoy experimenting and learning from each other, as every bake tells a story worth sharing.

    The Recipe

    Oreo Cheesecake Cookies

    Serves: 24 cookies

    Prep Time: 20 mins

    Cook Time: 10 mins

    Total Time: 30 mins

    Kitchen Equipment Needed

    • Mixing bowl
    • Electric mixer
    • Baking sheet
    • Measuring cups and spoons

    Ingredients

    • 1 cup cream cheese, softened
    • 1/2 cup granulated sugar
    • 1/2 cup brown sugar
    • 1 large egg
    • 1 teaspoon vanilla extract
    • 1 cup all-purpose flour
    • 1/2 cup cocoa powder
    • 1 teaspoon baking soda
    • 1/4 teaspoon salt
    • 15 Oreo cookies, crushed

    Directions

    1. Preheat the oven to 350°F (175°C) and line a baking sheet with parchment paper.
    2. In a mixing bowl, beat the softened cream cheese, granulated sugar, and brown sugar until creamy.
    3. Add the egg and vanilla extract, mixing until fully incorporated.
    4. In another bowl, whisk together the flour, cocoa powder, baking soda, and salt.
    5. Gradually add the dry ingredients to the cream cheese mixture, mixing until combined.
    6. Fold in the crushed Oreos gently to ensure even distribution.
    7. Drop tablespoon-sized mounds of dough onto the prepared baking sheet, spacing them apart.
    8. Bake for 10-12 minutes, until edges are set but centers are still soft.
    9. Allow cookies to cool on the baking sheet for 5 minutes before transferring to a wire rack to cool completely.

    Recipe Notes

    • For a thicker texture, refrigerate the dough before baking.
    • Feel free to experiment with different Oreo flavors for unique variations.

    Easy Strawberry Brownies with Just 5 Ingredients

    Delicious Strawberry Brownies: The Perfect Summer Treat

    ⚖️
    Difficulty
    Medium

    ⏲️
    Prep Time
    15 mins

    🕒
    Cook Time
    25 mins

    ⏱️
    Total Time
    40 mins

    🍽️
    Servings
    12 brownies

    Brownies are a beloved go-to dessert, but adding fresh strawberries creates a sensational twist that elevates the traditional treat into a summer delight. These Strawberry Brownies boast a rich chocolate base that is both fudgy and chewy, perfectly complementing the burst of juicy strawberry flavor that emerges from every bite. The combination results in a dessert that’s not just tasty but visually stunning—vibrant flecks of red against dark chocolate are sure to impress family and guests alike.

    Imagine sinking your teeth into a freshly baked brownie, the chocolate melting in your mouth, followed by the sweet and slightly tart explosion of strawberries. This recipe is perfect for summer picnics, backyard barbecues, or simply as a delightful way to treat yourself on a warm evening. Not only are these brownies a feast for your taste buds, but they also carry a nostalgic charm, reminding us of carefree days spent enjoying a sweet treat in the sunshine.

    Quick Recipe Highlights

    • Flavor Profile: These brownies offer a delightful mix of rich chocolate and sweet, tart strawberries.
    • Texture: They have a fudgy, moist interior that contrasts beautifully with the soft freshness of the strawberries.
    • Aroma: When baking, the sweet aroma of melting chocolate mingles with a lovely fragrance from the strawberries.
    • Visual Appeal: The deep chocolate hue, flecked with bright strawberry pieces, makes for an irresistible presentation.
    • Skill Level Needed: This recipe is approachable for beginner bakers, requiring basic mixing and baking skills.
    • Special Equipment: A mixing bowl, a baking pan, and an oven are all you need to whip up this delectable dessert.

    Recipe Overview

    • Difficulty Level: With straightforward steps and minimal ingredients, this recipe is easy enough for both novice and experienced bakers.
    • Category: These brownies fall under the dessert category, perfect for satisfying your sweet tooth.
    • Cuisine: While brownies are a classic American confection, adding strawberries provides a fresh twist common in many summer desserts.
    • Cost: The ingredients are affordable, making this a budget-friendly treat that doesn’t compromise on flavor.
    • Season: Strawberry Brownies are particularly wonderful in the summer when strawberries are at their peak freshness.
    • Occasion: These brownies are versatile enough for various occasions, from casual gatherings to special celebrations.

    Why You’ll Love This Recipe

    The allure of Strawberry Brownies lies in their delicious blend of flavors and textures that resonate with both kids and adults alike. The sweetness of strawberries harmonizes with the rich bitterness of the chocolate, creating a balanced dessert that is decadent yet refreshing. Each brownie is bursting with strawberries, ensuring that every piece is an experience of both chocolate and fruit.

    Not only is this recipe a treat for your taste buds, but it also boasts convenience, making it perfect for quick summer gatherings. You can prepare the batter in under 15 minutes, and the whole baking process takes just around 25 minutes. This quick turnaround allows you to enjoy freshly baked brownies without spending hours in the kitchen. Plus, they can be made ahead of time and served warm or at room temperature, giving you flexibility as you entertain.

    From a nutritional standpoint, adding strawberries to brownies brings a boost of vitamins, fiber, and antioxidants, making this dessert a tad healthier than its traditional counterpart. Fresh berries are a great source of vitamin C, manganese, and several antioxidants, which contribute to overall health. This means you can indulge in a sweet treat while still feeling good about the ingredients.

    Socially, Strawberry Brownies are a crowd-pleaser at any gathering. Whether it’s a birthday party, summer BBQ, or picnic, these brownies are sure to spark conversations and compliments. Their vibrant look is bound to invite guests to take a bite, and you’ll undoubtedly receive rave reviews.

    Cost-effectiveness is another attractive characteristic of this recipe. The basic pantry staples combine with fresh strawberries, which don’t break the bank. Seasonal fruits tend to be cheaper, especially in summer, allowing you to make a batch without stretching your budget. You can also easily double the recipe to serve larger groups, making it a smart choice for gatherings with family and friends.

    Historical Background and Cultural Significance

    Brownies have been a beloved treat in American cuisine since their inception in the late 19th century. The traditional brownie is thought to have originated in the United States with the first recipe debuting in cookbooks around the turn of the century. The exact origins are somewhat murky, with various claims on who truly created the decadent chocolate treat, but it quickly became a staple in American baking due to its ease of preparation and rich flavor.

    As recipes for brownies evolved, bakers began to experiment with different flavors and ingredients, leading to countless variations. Adding fruits like strawberries not only enhances the flavor but also celebrates seasonal produce, reflecting a culinary trend that seeks to utilize fresh, local ingredients. The introduction of strawberries into brownie recipes is a testament to how the culinary world adapts and thrives based on seasonal availability and consumer preferences.

    In various cultures, desserts made from similar ingredients, such as chocolate and fruits, have long held significant meaning. They are often tied to celebrations or familial gatherings, signifying a sense of comfort and togetherness. Incorporating strawberries into this classic American dessert not only adds freshness but also invites a touch of nostalgia for warm summer gatherings filled with laughter and joy.

    Over time, Strawberry Brownies have become a versatile dessert enjoyed at various occasions, from birthday parties to summer picnics. Their dual appeal as both a sweet indulgence and a fresh summer treat makes them a popular choice around the world, transcending cultural boundaries while creating new family traditions.

    Ingredient Deep Dive

    Strawberries

    Strawberries have been cherished for centuries, with cultural significance dating back to ancient times as symbols of purity and passion. These berries are not only delicious, but they also boast numerous health benefits, being low in calories and high in vitamins C and K, as well as antioxidants. When selecting strawberries, look for bright red, plump fruits with a natural sheen—these indicate freshness. To store, keep them in the refrigerator and avoid washing until just before use; this prolongs their shelf life. If strawberries are out of season, consider substituting with other berries like raspberries or blueberries.

    Cocoa Powder

    The use of cocoa powder originated from the cacao plant and has a rich history in culinary traditions dating back to ancient Mesoamerican cultures. It’s a powerful ingredient in creating the deep chocolate flavor in brownies, enriched with antioxidants that promote heart health. When buying cocoa powder, choose unsweetened varieties that are high in cacao content for the best flavor. Store cocoa in a cool, dry place to maintain freshness. Alternatives include using high-quality dark chocolate, which can enhance the texture and flavor profile of your brownies.

    Butter

    Butter plays a crucial role in creating the rich, fudgy texture of these brownies. With origins in ancient dairying practices, butter has woven itself into many cultures as a staple fat for cooking and baking. It adds flavor and moisture, essential for achieving a beautifully chewy brownie. When selecting butter, opt for unsalted to control the salt content in your baking. Store it in the refrigerator and use it within the specified date for maximum freshness. If a lactose-free option is preferable, consider using margarine or coconut oil as a substitute.

    Flour

    Flour is the backbone of many baked goods, including brownies, where it contributes to structure. The evolution of flour usage dates back thousands of years, where ancient civilizations ground grains into a fine powder for their breads and pastries. Choose all-purpose flour for a balanced result, but if you want gluten-free options, almond flour or coconut flour are excellent substitutes. Store flour in a cool, dry place to prevent spoilage. When using gluten-free flour, note that adjustments may be needed in the recipe’s liquid ratios.

    Common Mistakes to Avoid

    • Overmixing the batter: This can lead to tough brownies; mix just until ingredients are combined.
    • Not measuring ingredients accurately: Baking is a science; always use a kitchen scale for precision.
    • Using cold ingredients: Ensure your butter and eggs are at room temperature for better incorporation.
    • Not greasing the pan: Failing to grease or line the pan properly can make removal difficult.
    • Overbaking: Check brownies a few minutes before the recommended time for that fudgy texture.
    • Underestimating cooling time: Allow brownies to cool before cutting to prevent them from falling apart.
    • Using stale or old ingredients: Freshness matters for both flavor and texture.
    • Skipping the resting period: Allow time for flavors to meld and the texture to set after baking.

    Essential Techniques

    Folding Ingredients

    Folding is a delicate technique used to combine ingredients without deflating mixtures. It’s important when incorporating whipped egg whites or whipped cream into batters to maintain airiness. Use a spatula and a gentle motion to fold in, working to bring the mixture from the bottom up over itself. A common pitfall is over-mixing, leading to dense baked goods; visual cues include a uniform color without streaks.

    Melting Chocolate and Butter

    Melting chocolate and butter together creates a smooth base for brownies. This technique requires gentle heat to avoid seizing the chocolate; a bain-marie or microwave can be used. Stir regularly until melted. It’s crucial to allow it to cool slightly before mixing with other ingredients to prevent cooking them. Perfectly melted butter and chocolate should be glossy and will provide a luscious texture in your brownies.

    Baking Timing and Temperature

    Understanding your oven’s temperature is crucial for perfect brownies. An oven thermometer can help ensure accuracy. The right baking time can make or break your dessert; underbaked brownies may fall apart and overbaked ones can become dry. The brownies should look set around the edges but still slightly moist in the center. A toothpick test will help; it should come out with a few moist crumbs, not wet.

    Testing for Doneness

    Properly testing for doneness is essential to achieve that perfect brownie texture. Using a toothpick inserted into the center, check for moist crumbs; this indicates fudginess. If it comes out wet, they need more time. A common pitfall is relying solely on time; every oven is different, so visual and tactile checks are key for success.

    Pro Tips for Perfect Strawberry Brownies

    Using fresh, in-season strawberries will yield the best flavor and juiciness, enhancing the brownies immensely. Consider macerating the strawberries in a bit of sugar before folding them into the batter to intensify their sweetness. For an extra chocolatey experience, swap out some of the flour for cocoa powder. Be mindful of cooling time; letting them rest for at least an hour will allow the flavors to deepen and the texture to set. When serving, dust with powdered sugar or drizzle with chocolate sauce for visual appeal and additional flavor.

    Experimenting with toppings can enhance enjoyment too—try pairing them with vanilla ice cream or whipped cream to elevate your dessert experience. For an added dimension, consider incorporating nuts like walnuts or pecans for a satisfying crunch within your brownies. Lastly, making a double batch and freezing extras can be a convenient way to enjoy these treats any time.

    Variations and Adaptations

    For those looking to switch things up, consider regional variations such as using local berries or infusing spices like cinnamon for a warm flavor profile. Seasonal changes allow for adaptations, like swapping strawberries for raspberries or using apples in the fall. Dietary modifications can create gluten-free brownies by substituting traditional flour with almond or coconut flour. If you prefer a richer texture, adding cream cheese can create a delightful cheesecake brownie hybrid. For those who enjoy creative presentations, consider layering with whipped cream and serving in a dessert glass for an elegant dessert experience.

    Serving and Presentation Guide

    To serve Strawberry Brownies beautifully, consider plating them on a vibrant colored plate to contrast with the rich brown of the brownies. A simple dusting of powdered sugar offers a charming finish. Garnish with fresh mint leaves or a light drizzle of chocolate sauce to not only enhance the appearance but also add a flavor contrast. When plating, serve warm with a scoop of vanilla ice cream beside it for a visually stunning and appetizing dessert. Keep brownies neatly cut to maintain their shape, and if desired, cut them into fun shapes with cookie cutters for children’s parties or events.

    Wine and Beverage Pairing

    The rich flavors of Strawberry Brownies pair beautifully with a light red wine, such as a Pinot Noir, known for its fruity notes that complement the sweetness of the dessert. If you prefer non-alcoholic options, opting for a sparkling water with a hint of fruit essence can enhance the overall experience without the added sugar. For coffee aficionados, a robust espresso or a creamy latte works splendidly, trailing the rich chocolate flavor. When serving, remember to chill white wines and serve reds slightly below room temperature for optimal taste.

    Storage and Shelf Life

    To maximize freshness, store Strawberry Brownies in an airtight container at room temperature for up to three days. If you prefer to extend their shelf life, they can be frozen for up to three months if wrapped properly—try using plastic wrap followed by aluminum foil or a freezer-safe bag. Pay attention to signs of spoilage, like a change in smell or visible mold, and discard if in doubt. For reheating, a microwave can refresh their fudgy texture, but be careful to not overheat, as this can lead to dryness.

    Make Ahead Strategies

    Brownies benefit from a make-ahead approach, allowing flavors to deepen over time. You can prepare the batter a day in advance and refrigerate it to expedite baking time later. Additionally, consider baking the brownies one day before an event, as they taste even better the next day. If opting for a multi-step process, bake brownies but skip adding strawberries until just before serving to maintain their fresh flavor. This strategy allows you to have everything ready while saving the final touch for when guests arrive.

    Scaling Instructions

    You can easily adjust the quantity of Strawberry Brownies to accommodate your gathering’s needs. Halve the recipe for intimate get-togethers to avoid waste. Alternatively, doubling or tripling the recipe is convenient for larger crowds; simply ensure your baking equipment can accommodate the increased batter volume. Remember to adjust baking times slightly; larger batches may require extra baking time to ensure they set correctly. When scaling, keep note of ingredient freshness for optimal flavor.

    Nutritional Deep Dive

    Each Strawberry Brownie offers a satisfying treat that fits into various dietary patterns, thanks to the fruit infusions. The macros typically comprise a balanced ratio of fats, carbohydrates, and proteins, with the strawberries increasing fiber content and adding natural sweetness. Taking the time to analyze each ingredient can unveil the health benefits associated with them, allowing for delicious indulgence without compromising on nutritional value. Thoughtfully portioning these brownies can aid in mindful eating practices and promote weight management.

    Dietary Adaptations

    Making Strawberry Brownies more inclusive for dietary preferences is easily achievable. For gluten-free options, simply use almond flour or gluten-free flour blends to maintain texture while accommodating gluten-sensitive guests. Vegan options can be deployed by substituting eggs with flaxseed meal and utilizing vegan butter or oil, maintaining flavor while respecting dietary choices. Low-carb enthusiasts may also play around with sugar alternatives like erythritol while carefully adjusting for sweetness. These adaptations open up possibilities for everyone to enjoy this mouthwatering treat.

    Troubleshooting Guide

    Texture issues often arise with brownies and can typically be traced back to ingredient ratios or baking time. If your brownies are too cakey, it may indicate overmixing or excess flour; in contrast, overly dense brownies could result from underbaking or improper measurement. If flavor balance becomes a problem, a dash of salt can often enhance the chocolate flavor, bringing sweetness into balance. Pay attention to temperature concerns; if your brownies are not rising as expected, make sure your baking powder is fresh and correctly measured.

    Recipe Success Stories

    Community feedback around Strawberry Brownies often highlights their punchy flavor and ease, making them a family favorite. Readers frequently share delightful variations, whether adding walnuts for crunch or experimenting with different berries. Adaptation stories also emerge—a common suggestion is to layer brownies with cream cheese frosting, leading to scrumptious cheesecake brownie hybrids. Many enthusiastic bakers showcase their versions, capturing pictures for social media and inspiring others to recreate this delicious dessert.

    Frequently Asked Questions

    Can I use frozen strawberries instead of fresh?

    Absolutely! Frozen strawberries can work in this recipe, though they may be slightly mushier when baked. Thaw them first and drain excess moisture for best results.

    How do I know when my brownies are done baking?

    The perfect indicator is to use a toothpick; it should come out with a few moist crumbs, not wet batter, ensuring a fudgy center and baked edges.

    What’s the best way to cut brownies?

    For neat squares, allow your brownies to cool completely. Use a sharp knife, wiping it clean between cuts for a tidy presentation.

    Can I substitute the sugar in the recipe?

    Yes, alternatives like coconut sugar or brown sugar can replace granulated sugar, adjusting the flavor and texture slightly.

    Can these brownies be made ahead of time?

    Certainly! These brownies taste even better the next day; you can prepare the batter ahead and refrigerate or bake ahead and store.

    How should I store leftover brownies?

    Keep them in an airtight container at room temperature for up to three days or freeze for up to three months for longer preservation.

    What can I top these brownies with?

    Consider serving with whipped cream, vanilla ice cream, or a drizzle of chocolate sauce for an elevated dessert experience.

    Are there any dairy-free options for this recipe?

    Yes! You can replace butter with coconut oil or dairy-free margarine, while still achieving great results in your brownies.

    Is it possible to make these brownies gluten-free?

    Absolutely! Simply substitute all-purpose flour with almond flour or a gluten-free blend for delicious results.

    Can I add nuts to Strawberry Brownies?

    Definitely! Chopped nuts like walnuts or pecans can enhance flavor and texture; just fold them into the batter before baking.

    Additional Resources

    Explore more delightful recipes on our blog to expand your baking repertoire. Check out our technique guides for mastering brownie perfection or discover more about seasonal ingredients to enhance your dishes. We also recommend checking out our equipment suggestions to ensure you have the right tools for your baking adventures. Whether you’re looking to include seasonal fruits or experiment with new flavors, our additional resources will help you elevate your culinary experiences.

    Join the Conversation

    We love hearing from our readers! Share your experiences on social media and join our growing community of enthusiastic bakers. Post your pictures of these Strawberry Brownies using our hashtag, and connect with others who love baking and experimenting in the kitchen. Your feedback and suggestions for variations not only inspire us but also enrich our recipe community. We can’t wait to see how you make this delightful dessert your own!

    The Recipe

    Delicious Strawberry Brownies

    Serves: 12 brownies

    Prep Time: 15 mins

    Cook Time: 25 mins

    Total Time: 40 mins

    Kitchen Equipment Needed

    • Mixing bowl
    • Baking pan (9×13 inch)
    • Whisk or spatula
    • Measuring cups and spoons
    • Oven

    Ingredients

    • 1 cup unsalted butter
    • 2 cups granulated sugar
    • 4 large eggs
    • 1 teaspoon vanilla extract
    • 1 cup all-purpose flour
    • 1 cup cocoa powder
    • 1 cup chopped fresh strawberries
    • 1/2 teaspoon salt
    • 1/2 teaspoon baking powder

    Directions

    1. Preheat your oven to 350°F (175°C) and grease the baking pan.
    2. Melt the butter in a mixing bowl, then whisk in the sugar until smooth.
    3. Add the eggs one at a time, mixing well after each addition, then add the vanilla extract.
    4. In a separate bowl, whisk together the flour, cocoa powder, salt, and baking powder.
    5. Gradually combine the dry ingredients with the wet mixture until just mixed.
    6. Gently fold in the chopped strawberries.
    7. Pour the batter into the prepared baking pan and smooth the top.
    8. Bake for 25-30 minutes or until a toothpick inserted in the center comes out with moist crumbs.
    9. Let cool in the pan before transferring to a wire rack and cutting into squares.

    Recipe Notes

    • For a more intense chocolate flavor, you can substitute half of the flour with additional cocoa powder.
    • Store leftovers in an airtight container at room temperature for up to three days.
    • Feel free to sprinkle nuts or chocolate chips on top before baking for added crunch or richness.

    Best Tres Leches Cupcakes – Moist and Ready in 30 Minutes

    Tres Leches Cupcakes: A Rich and Creamy Delight

    ⚖️
    Difficulty
    Medium

    ⏲️
    Prep Time
    30 mins

    🕒
    Cook Time
    20 mins

    ⏱️
    Total Time
    50 mins

    🍽️
    Servings
    12 cupcakes

    Tres Leches Cupcakes are a delightful twist on the classic tres leches cake, offering a bite-sized version of this beloved Latin American dessert. These cupcakes are soaked in a rich blend of three kinds of milk, making each bite incredibly moist and bursting with flavor. The creamy topping, often whipped cream, adds a lightness that perfectly balances the sweetness of the cake, transforming a traditional dessert into an exciting new treat.

    The process of creating these cupcakes is an adventure in flavor and texture. From the moment you whip the egg whites to create a fluffy batter, to the moment you drizzle the milk mixture over the cupcakes, each step is an invitation to indulge in a creamy, dreamy experience. With their visually appealing look and inviting aroma, these cupcakes are perfect for any gathering or celebration, making them an instant favorite at parties or intimate family dinners.

    Quick Recipe Highlights

    • Flavor Profile: The cupcakes boast a perfect balance of sweetness, creaminess, and a hint of vanilla, enhanced by the rich, milky soak.
    • Texture: Expect a moist, tender crumb that melts in your mouth, contrasted with the light, airy whipped cream topping.
    • Aroma: The delightful aroma of vanilla and sweet milk wafts through the air, inviting everyone to come and enjoy.
    • Visual Appeal: Topped with freshly whipped cream and a sprinkle of cinnamon or fruit, these cupcakes are as beautiful as they are delicious.
    • Skill Level Needed: This recipe requires basic baking skills, including mixing, folding, and whipping techniques.
    • Special Equipment: Use standard cupcake pans, mixing bowls, and an electric mixer for the best results.

    Recipe Overview

    • Difficulty Level: These cupcakes are classified as medium in difficulty. While they require several steps, the process is straightforward, and the rewards are well worth the effort.
    • Category: Perfect for desserts, snacks, or special occasions, these cupcakes fit seamlessly into any celebratory menu.
    • Cuisine: Tres leches is a traditional Mexican dessert that has spread throughout Latin America, celebrated for its richness and unique texture.
    • Cost: Ingredients are generally affordable, making this a budget-friendly dessert option that impresses guests without breaking the bank.
    • Season: While these cupcakes are suitable year-round, they shine particularly in summer and spring, adding a refreshing treat to warm weather gatherings.
    • Occasion: Ideal for birthdays, anniversaries, or even casual get-togethers, these cupcakes are versatile and loved by many.

    Why You’ll Love This Recipe

    Tres Leches Cupcakes are a delicious treat, perfect for those who appreciate rich and creamy desserts. Each cupcake absorbs the milk soak, creating a heavenly texture that is both moist and tender. The fluffy whipped cream on top adds a light finish, making the entire experience incredibly satisfying and indulgent.

    One of the best aspects of this recipe is its convenience. With straightforward instructions, even novice bakers can achieve delicious results. The ability to prepare these cupcakes in advance is another huge plus—simply soak them and refrigerate until serving, freeing you to enjoy your event without stress.

    Nutritionally, while Tres Leches Cupcakes are a treat to be enjoyed occasionally, they provide an opportunity to use high-quality ingredients. By choosing organic dairy, you can enhance the taste while enjoying the benefits of better nutrition.

    Socially, these cupcakes are perfect for sharing. Their charming appearance and delightful flavor invite conversation and compliments, making them a highlight on any dessert table.

    Moreover, this recipe is economically accessible, as it does not require expensive ingredients. With just a few staples, you can create an impressive dessert that is sure to impress your friends and family.

    Historical Background and Cultural Significance

    The origins of Tres Leches Cake can be traced back to Latin America, with various countries claiming its creation. The cake is believed to have been inspired by the traditional dessert of soaking cakes in milk, likely dating back to the colonial period.

    Culturally, tres leches represents celebration and hospitality in many Latin American countries, frequently served on birthdays and significant holidays. Its creamy essence and rich flavors make it a classic that evokes nostalgia among those who grew up enjoying it.

    Over time, recipes for tres leches have evolved, adapting to regional tastes. Variations like adding fruit, nuts, or different flavored creams have emerged, contributing to its popularity.

    Regional differences have also led to variations in preparation methods; for instance, some areas prefer a denser cake texture, while others favor a lighter sponge. Each region takes pride in its unique approach to this beloved dessert.

    Ingredient Deep Dive

    • Flour: The base for cupcakes, flour provides structure. Opt for all-purpose flour for a balanced texture, and consider wheat flour for a nuttier flavor.
    • Flour is crucial in creating the right balance between tenderness and structure in cupcakes. It’s important to sift before measuring; this aerates the flour and leads to lighter cupcakes. Store flour in a cool, dry place to prolong its shelf life, and consider using it within six months for optimal freshness.

    • Milk: The heart of the tres leches, this is where the richness comes from. Whole milk adds the needed creaminess, while evaporated and condensed milk elevate flavors and sweetness.
    • Each type of milk contributes to a unique profile. Whole milk provides moisture, while sweetened condensed milk and evaporated milk add sweetness and depth. Look for products with no added preservatives, and once opened, store milk in the fridge. Substitute with coconut or almond milk for a non-dairy version.

    • Sugar: Essential for sweetness and moisture, sugar also helps with the cupcake’s browning and texture.
    • Sugar can be adjusted according to preference. Granulated sugar is standard, but brown sugar offers a richer taste. Keep sugar in a cool, airtight container to prevent clumping.

    Common Mistakes to Avoid

    • Overmixing the batter: This can lead to dense cupcakes instead of light, fluffy ones. Mix until just combined.
    • Not beating egg whites properly: Undermixed whites will prevent the cake from rising. Look for stiff peaks during whipping.
    • Skimping on soaking time: Allowing the cupcakes to soak adequately ensures each bite is rich and creamy.
    • Not refrigerating: Tres leches cupcakes taste best chilled. Don’t skip this essential step.
    • Skipping the whipped cream topping: This lightens the dessert and enhances the flavor; it’s an essential element.
    • Using low-fat dairy: Stick with whole milk and creams for the richest flavor.
    • Inaccurate measuring of ingredients: Use kitchen scales for precision, especially for flour and sugar.
    • Forgetting to check for doneness: Use a toothpick; if it comes out clean, the cupcakes are ready!

    Essential Techniques

    Whipping Egg Whites: Properly whipped egg whites are essential for creating a fluffy cupcake. Use a clean bowl and beaters, and ensure that there are no yolks mixed in. Whip until stiff peaks form, allowing the cupcakes to rise beautifully.

    Creaming Butter and Sugar: This technique incorporates air into the mixture, resulting in a lighter texture. Beat the butter until smooth before gradually adding sugar, mixing until fluffy. Avoid over-mixing once the eggs are added, to maintain aeration.

    Pro Tips for Perfect Tres Leches Cupcakes

    1. Use room temperature ingredients for a more even batter.
    2. Don’t rush the soaking process; patience results in ultimate flavor absorption.
    3. Chill the cupcakes for a couple of hours after soaking for the best taste.
    4. Experiment with infused creams, such as vanilla bean or coconut, for added flavor.
    5. Add a splash of rum or flavored extract for a unique twist.
    6. For added presentation, garnish with fresh fruit or chocolate shavings before serving.
    7. Use a serrated knife to slice off the tops if you plan to stack the whipped cream higher.
    8. Store leftovers covered in the fridge to ensure they stay moist.

    Variations and Adaptations

    This recipe lends itself beautifully to adaptations. Consider adding a tropical twist by incorporating coconut milk as part of the soaking mixture. Alternatively, chocolate lovers can add cocoa powder to the batter for a rich chocolate version. For a fruity variation, try adding a layer of strawberries or mangoes atop the whipped cream.

    For seasonal adaptations, pumpkin purée can be added to the batter during the fall months, giving a festive flavor to the cupcakes. Dietary modifications are also possible; gluten-free flour blends work well for those avoiding gluten, while a dairy-free milk option can replace traditional dairy.

    Presentation is flexible too; consider using mini cupcake liners for bite-sized treats perfect for parties, or layer cupcakes with fruit and cream in trifle dishes for a stunning dessert display.

    Serving and Presentation Guide

    When serving Tres Leches Cupcakes, consider using simple yet elegant plating techniques. Arrange cupcakes on a beautiful platter, and sprinkle with cinnamon or shredded coconut for added visual appeal. A dollop of whipped cream and fresh berries enhances presentation while adding flavor.

    Garnish ideas include mint leaves or citrus zest for a pop of color. Traditional accompaniments of fresh fruit, such as strawberries, serve to complement the flavors. For modern serving suggestions, use clear cups or jars to create individual servings with layers of cupcakes and cream.

    An important tip: serve these cupcakes chilled, as they taste best refreshing and cool, allowing the full flavor profiles to shine.

    Wine and Beverage Pairing

    When it comes to pairing beverages with Tres Leches Cupcakes, consider a light dessert wine, such as a Moscato or a sweet Riesling. The delicate sweetness of the wine enhances the flavor of the cupcakes without overpowering them.

    For a non-alcoholic alternative, try serving chilled hibiscus tea, which brings a refreshing tartness that pairs well with the rich creaminess of the cupcakes. For coffee lovers, a lightly brewed espresso or cappuccino serves as an excellent accompaniment, highlighting the dessert’s flavors.

    Consider the serving temperature of beverages; chilled options will maintain a refreshing balance against the rich cupcakes.

    Storage and Shelf Life

    Tres Leches Cupcakes are best stored in the refrigerator due to the whipped cream topping and milk soak. Store them in an airtight container to maintain moisture and prevent drying out. They will remain fresh for about three days in the fridge, making them perfect for make-ahead dessert options.

    If you notice any signs of spoilage, such as a sour smell or discoloration in the cream, it’s best to discard them. Freezing is not recommended due to the texture of the whipped cream but if necessary, cupcakes can be frozen before soaking for up to a month, ensuring freshness when you’re ready to prepare the dessert.

    Make Ahead Strategies

    Planning ahead is an excellent strategy when making Tres Leches Cupcakes. You can bake and cool the cupcakes a day in advance and leave them covered at room temperature. The soaking process can be done the day of serving, enhancing flavor without sacrificing texture as it absorbs the creamy mixture.

    Ensure to store the whipped cream separately before serving, as it helps maintain its texture. Once ready to serve, quickly top the cupcakes and chill them to ensure they are nice and cold.

    Scaling Instructions

    If you’re looking to accommodate more guests, scaling up this recipe is straightforward. Doubling the ingredients will yield 24 cupcakes, but ensure to bake in batches if your oven can’t handle full pans. The cooking time may vary slightly with more cupcakes in the oven, so check for doneness accordingly.

    For a smaller gathering, halving the recipe is an easy option. Simply divide all ingredients by two and adjust your pan size if necessary.

    Nutritional Deep Dive

    Each cupcake provides a delightful dessert experience, although they’re rich in calories and sugar. A macro breakdown shows a good source of carbohydrates and fats, thanks to the creamy toppings.

    Micronutrient analysis may vary, but including whole dairy adds essential vitamins like calcium and vitamin D.

    Enjoying each cupcake in moderation can fit well within a balanced diet, especially when shared among family and friends. For those monitoring portions, consider using mini cupcake liners to create smaller servings.

    Dietary Adaptations

    For a gluten-free version, substitute all-purpose flour with a gluten-free blend and ensure all other ingredients are also gluten-free certified.

    Those with dairy concerns can adapt the recipe using almond or coconut milk, and whipped coconut cream instead of traditional whipped topping.

    A vegan version can be achieved by swapping eggs for flaxseed meal or aquafaba, along with using non-dairy milk and cream.

    Low-carb or keto modifications can be made by utilizing almond flour and a sugar substitute, turning this tasty dessert into a low-carb treat without sacrificing flavor.

    Troubleshooting Guide

    A common issue with these cupcakes might be overly dense texture, often caused by overmixing the batter. Aim for minimal mixing after adding flour to keep the texture light.

    If the flavor lacks balance, consider adjusting sugar levels in the milk soak—taste it before pouring over the cupcakes.

    If your whipped cream doesn’t hold its shape, ensure to chill your bowl and beaters before whipping and avoid overwhipping.

    Timing can also be crucial; if they seem undercooked after the suggested time, do the toothpick test for doneness and adjust cooking times accordingly.

    Recipe Success Stories

    After sharing this delightful recipe, many bakers have raved about their results. From perfect texture to adjusted flavors, readers frequently comment on how this dessert has become a staple at family gatherings.

    Several have shared tips on personal adaptations, such as the inclusion of unique flavor profiles, showcasing how versatile the cupcakes can be.

    Readers have also expressed joy in capturing images of their creations, emphasizing how visually stunning the cupcakes are when garnished.

    Photographic tips have pinpointed the best angles and lighting to highlight the inviting layers of whipped cream and milky goodness, making it a feast for the eyes as well as the palate.

    Frequently Asked Questions

    Can I use any type of milk?

    A mix of whole milk, evaporated milk, and sweetened condensed milk is traditional, but you can substitute with alternatives like almond or coconut milk for a dairy-free variation.

    How do I know when my cupcakes are done baking?

    Insert a toothpick in the center of the cupcake; if it comes out clean or with a few crumbs, they are done. Be careful not to overbake.

    Can I make this recipe vegan?

    Yes, you can replace eggs with a flaxseed mixture and use vegan alternatives for the milk and whipped cream.

    How long will these cupcakes last?

    Stored in the fridge, they can last for about three days, but they are best enjoyed fresh.

    What can I use instead of whipped cream?

    You can use whipped coconut cream or a non-dairy whipped topping to suit dietary preferences.

    Can I freeze these cupcakes?

    It’s not recommended to freeze after soaking, but you can freeze the unsoaked cupcakes for later use.

    What is the best way to serve them?

    Serve chilled, topped with whipped cream and garnished with fresh fruit or toasted coconut for a beautiful presentation.

    How can I make the cupcakes more flavorful?

    Consider adding flavor extracts, such as almond or coconut, to the batter and soak for richer layers of flavor.

    Can I make mini versions of these cupcakes?

    Absolutely! Just reduce the baking time and adjust the soaking time as needed for smaller cupcakes.

    Are these cupcakes suitable for children?

    Yes, they are generally safe for children, but moderation is key due to their sweetness.

    Additional Resources

    For those looking to expand their dessert repertoire, consider exploring other Latin American flavors and dessert recipes. Recipes like flan or empanadas offer interesting variations that complement Tres Leches Cupcakes beautifully.

    Technique guides on whipping cream or baking cupcakes can provide deeper insights into perfecting your baking skills. Understanding ingredient selection and equipment recommendations can further enhance your baking endeavors.

    Consider exploring seasonal variations as well, aligning your baking with fresh ingredients to keep your offerings new and exciting.

    Join the Conversation

    We invite you to share your adventures in baking Tres Leches Cupcakes! Post pictures of your creations on social media, tag your friends, and inspire them to try this delightful recipe.

    Feedback, variations, and learning alongside fellow baking enthusiasts enrich our community. Whether it’s through comments, recipe reviews, or personal adaptations, your experiences help others in their culinary journeys.

    Let’s create a thriving community of dessert lovers who appreciate the rich history and delicious flavor of Tres Leches Cupcakes!

    The Recipe

    Tres Leches Cupcakes

    Serves: 12 cupcakes

    Prep Time: 30 mins

    Cook Time: 20 mins

    Total Time: 50 mins

    Kitchen Equipment Needed

    • Cupcake pan
    • Parchment paper liners
    • Mixing bowls
    • Electric mixer
    • Toothpick for testing

    Ingredients

    • 1 ½ cups all-purpose flour
    • 1 ½ tsp baking powder
    • ½ tsp salt
    • 1/3 cup unsalted butter, softened
    • 1 cup granulated sugar
    • 3 large eggs
    • 1 tsp vanilla extract
    • 1 cup whole milk
    • 1 cup sweetened condensed milk
    • 1 cup evaporated milk
    • 1 ½ cups heavy whipping cream

    Directions

    1. Preheat your oven to 350°F (175°C) and line a cupcake pan with liners.
    2. In a mixing bowl, sift together flour, baking powder, and salt.
    3. In another bowl, cream the softened butter and sugar until light and fluffy; add the eggs, one at a time, mixing well after each addition. Add vanilla extract.
    4. Gradually mix the dry ingredients into the wet ingredients, alternating with the whole milk until well combined.
    5. Fill cupcake liners about 2/3 full with batter and bake for 18-20 minutes or until a toothpick inserted comes out clean.
    6. Once cooled, mix the sweetened condensed milk, evaporated milk, and remaining whole milk in a bowl.
    7. Using a toothpick, poke holes in the cooled cupcakes and slowly drizzle the milk mixture over each cupcake, allowing it to soak.
    8. For the frosting, whip the heavy cream until stiff peaks form and frost the soaked cupcakes generously.
    9. Garnish with cinnamon or fresh fruit if desired.

    Recipe Notes

    • Adjust sweetness as needed based on personal preference.
    • Feel free to experiment with flavored extracts in the frosting.
    • These cupcakes are best served chilled and can be made a day in advance.

    Best Sugar Cookie Cake – Soft, Sweet, and Family Favorite

    Sugar Cookie Cake: The Ultimate Sweet Treat

    ⚖️
    Difficulty
    Easy

    ⏲️
    Prep Time
    15 mins

    🕒
    Cook Time
    25 mins

    ⏱️
    Total Time
    40 mins

    🍽️
    Servings
    12

    Making a Sugar Cookie Cake is not just about satisfying your sweet tooth; it’s an experience that brings confort and joy to any gathering. When you take that first bite, you are greeted with a soft, buttery sweetness that twirls on your palate, leading to the rich vanilla undertones that are simply irresistible. This cake combines the classic flavor of sugar cookies with the warmth and charm of cake, making it the perfect dessert for birthdays, family gatherings, or a cozy evening at home. Just imagine a warm slice of Sugar Cookie Cake, adorned with colorful sprinkles or a drizzle of icing, tempting you to enjoy every crumb!

    Not only is this cake delicious, but its texture is divine. The outer layer bakes to a gentle golden hue while the inside remains soft and moist. Each slice is visually stunning, making it a showstopper on your dessert table. The contrast of colors from sprinkles and icing brings an inviting vibe that tells a story of homemade love and care. You’ll find that the aroma of freshly baked sugar cookie cake fills your home with nostalgia, reminding you of baking days in your grandmother’s kitchen filled with laughter and joy. Enjoying a slice of this cake is like taking a warm hug, a perfect balance of taste and tenderness.

    Quick Recipe Highlights

    • Flavor Profile: The cake features a rich, buttery sweetness complemented by vanilla and almond extracts that enhance the classic sugar cookie flavor.
    • Texture: Expect a soft, moist interior with a slight crispness on the edges, making it a delightful experience with each bite.
    • Aroma: The aromatic notes of baked sugar cookies mingle with hints of vanilla, creating an inviting experience as it bakes.
    • Visual Appeal: The cake has a nice golden crust and can be topped with colorful sprinkles or icing for a festive touch.
    • Skill Level Needed: This is an easy recipe, perfect for both novice and experienced bakers looking to create something delightful.
    • Special Equipment: Only basic baking equipment is required, such as mixing bowls, a whisk, and a round cake pan.

    Recipe Overview

    • Difficulty Level: This Sugar Cookie Cake is designed for bakers of all skill levels, making it an ideal choice for those new to baking or experienced cooks wanting a simple yet rewarding treat.
    • Category: This delectable dessert falls under the category of cakes and cookies, perfect for celebrations and everyday treats alike.
    • Cuisine: While it takes inspiration from traditional American cookie recipes, this cake offers a versatile approach that can adapt to various culinary influences.
    • Cost: The cost of making this cake is quite budget-friendly, typically amounting to approximately $10, depending on ingredient availability.
    • Season: Sugar Cookie Cake is a favorite year-round; however, it shines during holidays and special occasions such as birthdays and festive gatherings.
    • Occasion: Ideal for birthdays, holidays, or simply as a sweet treat to brighten your day, this cake fits seamlessly into any celebration.

    Why You’ll Love This Recipe

    Sugar Cookie Cake is a delightful treat that not only satisfies your sweet cravings but also invites many flavor profiles that tantalize the taste buds. The harmonious blend of butter, sugar, and vanilla makes for an exquisite dessert that doesn’t overwhelm the palate. Enjoying this cake with friends and family creates cherished moments, as the familiarity of the flavors rekindles memories of joyful celebrations.

    The convenience of preparing this cake is a massive plus. With minimal prep time and easy steps, you can whip it up in no time. It requires no complicated techniques, making it accessible for baking enthusiasts at any level. Furthermore, the straightforward ingredients simplify grocery shopping, allowing you to focus more on the joy of baking rather than searching for exotic items.

    Nutritionally speaking, while Sugar Cookie Cake is a treat, it can also be paired with fruits or light creams to balance indulgence with nutrition. It’s a versatile dessert that can also be made healthier with simple substitutions like using whole wheat flour or natural sweeteners, making it suitable for various dietary preferences.

    Hosting an event? This cake serves as an attractive centerpiece that sparks joy among your guests. With its bright colors and inviting aroma, it opens conversations and creates a delightful atmosphere. Whether served at a birthday party or a cozy get-together, it’s sure to end your culinary experience on a high note.

    Cost-effective and accessible, Sugar Cookie Cake allows you to create an impressive dessert without breaking the bank. It’s a recipe you can easily scale up for larger gatherings, making it a staple in any baking repertoire. Whether it’s a casual family dinner or a festive celebration, you’ll find this delightful cake to be an approachable and enjoyable option.

    Historical Background and Cultural Significance

    The origins of sugar cookies date back to the early 18th century, where German settlers in America are credited with developing the recipe. Initially created to celebrate special occasions, sugar cookies quickly became a staple in American households. Over the decades, they transformed into various shapes and flavors, leading to the delightful Sugar Cookie Cake we enjoy today.

    Sugar cookie variations are widespread, with each culture infusing unique twists. In the United States, the festive traditions around sugar cookies have become synonymous with holidays, especially Christmas, where decorating them is a beloved family activity. The evolution of sugar cookies to cake form brings forth a new dimension of flavor while maintaining the beloved essence of traditional cookies.

    The cultural importance of sugar cookies extends beyond their deliciousness. They symbolize celebratory gatherings, communal baking sessions, and home-cooked love. This Sugar Cookie Cake version celebrates those moments, allowing people of all ages to indulge and connect over a shared favorite treat.

    In contemporary baking, the Sugar Cookie Cake showcases regional variations. From adding chocolate chips to using flavored extracts, the cake continues to evolve in homes across the globe. Each version tells a story and reflects the tastes and preferences of those who bake it, illustrating the cake’s flexibility and enduring appeal.

    Ingredient Deep Dive

    Flour: Flour not only provides structure to the Sugar Cookie Cake but also contributes to its texture. It’s essential to choose the right type; all-purpose flour works best for achieving that perfect balance. When selecting flour, look for a finely milled product, and store it in an airtight container to maintain freshness. If you need a gluten-free option, almond flour or a gluten-free blend can be excellent substitutes.

    Sugar: The sweetening agent in your sugar cookie cake provides the signature sweetness that everyone loves. White granulated sugar is typically used, but consider using brown sugar for a deeper flavor. Sugar has various health effects; while moderation is key, it also fuels our bodies. Aim for fresh sugar stored in a cool, dry place to prevent clumping and ensure its longevity.

    Butter: Unsalted butter is crucial in building your cake’s flavor, moisture, and richness. It’s important to allow your butter to soften at room temperature before mixing for optimal texture. This fat source provides essential nutrients, including Vitamin A, and should be stored properly to avoid spoilage. For a healthier substitute, coconut oil can be used, lending a unique flavor to your cake.

    Eggs: Eggs bind your ingredients together and provide moisture, contributing to a light and fluffy texture. Using fresh eggs ensures the integrity of your cake. If you’re vegan, consider flaxseed meal soaked in water as an alternative to eggs, maintaining the cake’s moisture and binding properties while adhering to dietary preferences.

    Common Mistakes to Avoid

    • Not measuring ingredients accurately can lead to a cake that is too dense or too dry. Always use a kitchen scale or measuring cups for precision.
    • Overmixing the batter is a critical error; it can result in a tough texture. Mix just until the ingredients are combined, and no flour pockets remain.
    • Using cold butter instead of softened can yield a dense cake. Make sure your butter is at room temperature before starting the mixing process.
    • Failing to preheat the oven can affect baking time and cake texture. Always preheat your oven before placing the cake inside.
    • Not allowing the cake to cool properly before serving can lead to crumbling. Patience is key for the best results!
    • Ignoring the ingredient substitution ratios may cause flavor changes. Always research how to substitute ingredients correctly.
    • Baking with expired ingredients can impact flavor and texture. Always check expiration dates for freshness.
    • Skimping on mixing time can lead to uneven batter and inconsistent baking. Pay attention to mixing to ensure all ingredients are evenly integrated.
    • Not using parchment paper can lead to sticking. Line your baking pan to achieve easy removal and perfect slices.
    • Overbaking can dry out the cake, while underbaking may lead to a gooey texture. Always keep an eye on your cake in the oven.

    Essential Techniques

    Measuring Ingredients: Measuring accurately is crucial to the success of your Sugar Cookie Cake. Use the right tools, such as dry and liquid measuring cups, to ensure precise portions. Common pitfalls include packing flour too tightly or misreading liquid measurements. Aim for consistency in measurements to avoid fluctuations in your cake’s texture.

    Mixing Batter: Blend your ingredients by starting at low speed to avoid flour clouds, then increase to a medium speed as the batter comes together. Look for a creamy consistency, ensuring everything is fully incorporated without mixing too much. The key is to stop when no dry ingredients are visible and avoid overworking the batter, which can affect the final texture.

    Pro Tips for Perfect Sugar Cookie Cake

    1. For added flavor, consider incorporating a dash of almond extract along with vanilla for a lovely twist on the traditional taste.
    2. Experiment with toppings! Spread a layer of cream cheese frosting or whipped cream for a decadent visual presentation.
    3. If you like texture, consider folding in some mini chocolate chips or nuts for added crunch.
    4. Allow the cake to chill for a short time before slicing; this helps maintain its shape and improves flavor development.
    5. Using a room-temperature egg creates a more homogenous batter, promoting a better rise and fluffy texture.
    6. For enhanced flavor, use browned butter instead of regular unsalted butter; this adds a rich, nutty taste that complements the cake beautifully.
    7. A light dusting of powdered sugar over the finished cake elevates its presentation and adds a touch of sweetness.
    8. Consider scaling the recipe to make mini cakes in muffin tins for delightful individual servings, perfect for parties!

    Variations and Adaptations

    Indulging in variations of the Sugar Cookie Cake can elevate its flavor and style. For a regional twist, add spices like cinnamon or nutmeg for a warm, aromatic experience. Seasonal adaptations also abound; for winter, consider adding peppermint extract or candy cane pieces for a festive flair, while in the summer, fresh berries can provide a refreshing bite.

    Dietary modifications allow everyone to enjoy this cake. For gluten-free enthusiasts, opt for a gluten-free flour mix that performs well in baking. Those on a dairy-free diet can utilize coconut or almond milk in place of regular milk and a plant-based butter substitute. Vegan eaters can replace eggs with flax or chia seeds, preserving texture while adhering to dietary preferences.

    Flavor variations can include lemon zest for a tangy touch or orange zest for brightness. You might also incorporate chocolate chips or dried fruits for an attractive texture. Explore adding different icings or glazes, such as vanilla bean or lemon glaze, to customize the cake to your taste preferences.

    For those looking to modify the presentation, consider going for a layered cake style with frosting in between each layer or creating a beautiful tiered design for parties. The possibilities are endless with this adaptable recipe format to suit personal tastes and celebrations!

    Serving and Presentation Guide

    To present your Sugar Cookie Cake beautifully, consider using a decorative cake stand. A simple yet elegant presentation can be achieved by lightly dusting powdered sugar over the top before serving or slicing fresh fruits to garnish the sides. For added flair, drizzle a sweet glaze or icing over the top, allowing it to pool slightly for a rustic look.

    When serving, consider portion sizes—slice into even pieces to ensure everyone receives a generous serving. Utilize fun, colorful plates that coordinate with the theme of your gathering for an inviting atmosphere. If serving at an event, providing forks and small takeaway boxes can allow guests to enjoy a slice later.

    Temperature is key! This cake can be enjoyed warm, so consider lightly warming slices in the microwave for about ten seconds before serving. Offering whipped cream or ice cream alongside creates a delightful contrast to the textural elements of the cake.

    Wine and Beverage Pairing

    Pairing nicely with Sugar Cookie Cake, consider a sweet white wine like Moscato or a light Pinot Grigio, which complement the cake’s sweetness without overwhelming it. For non-alcoholic options, a homemade vanilla cream soda or iced tea with lemon can refresh and enhance the overall experience.

    Coffee and tea enthusiasts can elevate their enjoyment of this cake with a cup of strong coffee or a smooth Earl Grey tea. The warm notes of coffee contrast perfectly with the sweet flavors of the cake. When pairing beverages, consider the serving temperature, ideally offering drinks slightly chilled or piping hot depending on your guest preferences.

    Storage and Shelf Life

    To store your Sugar Cookie Cake, wrap it in plastic wrap or aluminum foil to maintain its freshness. Keep it in an airtight container on the counter for up to three days; for longer shelf life, refrigeration is an option but may slightly change the texture.

    If you notice any moisture or signs of spoilage like unusual smells or a change in color, it’s best to discard it immediately. The cake can also be frozen for up to three months—just ensure it is well wrapped to prevent freezer burn. Before serving frozen slices, allow them to thaw at room temperature for a couple of hours, or warm them in the oven for the best texture.

    Reheating the cake is simple; place a slice in the microwave for about ten seconds or warm it in a preheated oven at 350°F for five minutes. These methods help maintain the delightful flavors of the cake.

    Make Ahead Strategies

    Planning to make your Sugar Cookie Cake ahead of time? You can prepare the batter and store it in the refrigerator for up to 24 hours before baking. Just ensure it’s covered tightly to prevent any drying or tainting from other odors.

    If you’ve baked the cake, letting it cool completely before wrapping it for storage will preserve texture and prevent sogginess. You can also bake the cake, let it cool, then freeze it for later, ensuring you enjoy the cake fresh when you need it.

    When assembling the cake, consider making frosting a day in advance as well, keeping it stored in the fridge. This strategy saves time and allows flavors to meld beautifully. Prior to serving, remember to re-whip the frosting for the best consistency and flavor.

    Scaling Instructions

    If you want to adjust the size of your Sugar Cookie Cake, halving the recipe is straightforward—just divide each ingredient accordingly, ensuring you monitor baking times as smaller cakes may cook faster.

    For those needing a larger cake for gatherings, doubling or tripling the recipe is easy. Use larger pans and be mindful that the baking time may increase slightly. It’s essential to test for doneness by inserting a toothpick into the center of the cake.

    Be prepared to adjust your mixing and baking equipment when scaling; utilize larger bowls and pans, and consider using two oven racks if baking multiple cakes simultaneously. Maintain consistency in baking times by rotating the pans halfway through the process if using multiple trays.

    Nutritional Deep Dive

    The Sugar Cookie Cake is a delightful indulgence that can be part of a balanced diet when eaten in moderation. With approximately 250-300 calories per serving, it can fit into a treat category while providing essential energy.

    Analyzing the macros, the cake typically includes fats from butter, which can be about 15 grams per slice, offering value when choosing quality ingredients. The cake contains around 35 grams of carbohydrates, primarily from sugars and flour, providing quick energy.

    Understanding the ingredients can also influence the nutritional benefits of the Sugar Cookie Cake. Using whole grain flour and reducing added sugars can enhance fiber content and nutritional value, contributing to better health outcomes when aiming for balanced indulgences.

    When enjoying, being conscious of portion sizes aids weight management. You can savor a small slice, allowing the rich flavors to satisfy your cravings without overindulgence, demonstrating that moderation can enhance your overall enjoyment without sacrificing taste.

    Dietary Adaptations

    For those with dietary restrictions, adapting the Sugar Cookie Cake can create an enjoyable treat for everyone. Gluten-free options abound; using almond flour or a gluten-free all-purpose blend can yield delicious results while ensuring those with sensitivities can partake.

    Dairy-free adaptations can include coconut cream for a whipped topping and non-dairy butter substitutes, allowing for both texture and flavor without compromising dietary needs. Vegan bakers can simply replace eggs with chia or flaxseed to maintain the desired structure without using animal products.

    Low-carb and keto enthusiasts may appreciate sugar alternatives like erythritol or monk fruit sweetener, coupled with almond flour, creating a dessert that fits into their eating plan while delivering delightful sweetness.

    For those aiming for low-FODMAP options, consider substituting certain sweeteners and monitoring specific ingredient ratios for compatibility while maintaining the cake’s delightful taste and texture.

    Troubleshooting Guide

    If you encounter texture issues, such as the cake being too dry, ensure that you are not overbaking. Always keep an eye on the clock and check for doneness a few minutes before the suggested baking time.

    Flavors that seem off can sometimes be improved with a pinch of salt, balancing sweetness and enhancing the overall flavor profile. Conversely, if the cake turns out too salty, consider pairing it with a sweeter frosting or glaze.

    Temperature problems, such as undercooked centers, can arise from incorrect oven settings. Always check your oven’s calibration and adjust the recommended temperature as needed.

    Equipment challenges can often stem from incorrect usage; for example, pan choices affect how evenly a cake cooks. Choosing the right material, such as a light-colored metal or glass, can impact baking outcomes.

    Additionally, when substituting ingredients, remember that results can significantly vary based on ratios; research how to alter liquid quantities if replacing any critical components. Timing concerns can be mitigated by using a timer and keeping a consistent eye while baking, making adjustments more manageable.

    Recipe Success Stories

    Reader feedback on the Sugar Cookie Cake highlights success in its flavor and adaptability, connecting with various baking enthusiasts. Many home bakers have shared their experiences of transforming this cake into delightful variations that suit individual palates, including adding chocolate chunks or nuts for a crunchy experience.

    Communities engage with this recipe not only by following instructions but also by showcasing their unique adaptations, reinforcing the idea that every baker can make this cake their own. Sharing photographs of their creations inspires others to try the recipe, fostering community encouragement in the kitchen.

    A multitude of bakers have reported cheering victories, from perfect rises to rave reviews at gatherings, showcasing the versatility of the Sugar Cookie Cake. Whether it’s a small family dinner or a big celebration, the success stories trickle in, emphasizing the cake’s universal appeal.

    Readers often share their photography tips for beautifully presenting the cake, recommending natural lighting for capturing vibrant colors. Additionally, feedback encourages explorers to document their variations, allowing others to witness their creativity and successes with the recipe.

    Frequently Asked Questions

    Can I make this cake ahead of time? Yes! You can bake the Sugar Cookie Cake a day in advance. Allow it to cool completely before wrapping it tightly in plastic wrap and storing it in an airtight container at room temperature.

    What can I use instead of butter? If you’re looking for a dairy-free option, you can substitute butter with coconut oil or vegan butter, which will still yield a soft texture and great flavor.

    How do I know when the cake is done baking? The best way to check is to insert a toothpick into the center of the cake. If it comes out clean or with a few crumbs, the cake is done.

    Can I freeze this cake? Absolutely! Wrap the cooled cake tightly in plastic wrap, then aluminum foil, and it can be frozen for up to three months. Just make sure to thaw it in the refrigerator before serving.

    What toppings do you recommend? For a delicious topping, try cream cheese frosting, whipped cream, or a simple glaze. Sprinkles or fresh fruit can also make for a visually appealing addition.

    Can I make this cake without eggs? Yes, you can substitute eggs with flaxseed or chia seeds mixed with water. This will help bind the ingredients as needed for the recipe.

    Is it possible to make mini versions of this cake? Yes! You can use a muffin tin to create mini cakes. Baking time will be shorter, so keep an eye on them while they are in the oven.

    How can I enhance the flavor of the cake? You can add extracts like almond or lemon for a different flavor profile, or mix in chocolate chips or nuts for additional texture and taste.

    What is the best way to mix the batter? Use a hand mixer or a stand mixer to combine all the ingredients thoroughly. Avoid overmixing to keep the cake light and airy.

    Is there a gluten-free option for this recipe? Yes! You can substitute regular flour with a gluten-free blend, ensuring that all other ingredients are also gluten-free for safety.

    Additional Resources

    If you enjoyed this Sugar Cookie Cake recipe, consider exploring similar recipes for delightful treats like Snickerdoodle Cake or Vanilla Butter Cake. Each of these options offers a unique twist on classic flavors that you may enjoy.

    Looking to expand your baking skills? Browse our technique guides related to mixing, measuring, and cake decoration to enhance your baking experience. Understanding the nuances of baking techniques can greatly improve your results.

    For ingredient information, delve into our comprehensive sections that break down the benefits and uses of different types of flour, sugars, and flavorings, helping you make informed choices in your baking endeavors.

    Additionally, consider equipment recommendations to help you in your baking journey. Investing in quality kitchen tools can lead to more consistent and enjoyable baking experiences.

    If seasonal baking is your passion, keep an eye out for variants of this cake that celebrate different flavors, such as pumpkin spice for fall or fresh berries in summer to create adaptable recipes suited for any occasion.

    Join the Conversation

    Join our community for fun discussions around your Sugar Cookie Cake experiences! Share your photographs, variations, and tips for others to see. Engaging with fellow baking enthusiasts brings a sense of joy and camaraderie, where you can celebrate successes or troubleshoot challenges together.

    Encourage others to leave reviews and feedback on this recipe. The more contributions we have, the better we can connect and improve our culinary skills as a community. Your insight could spark inspiration for someone else’s baking journey.

    Stay connected through our social media channels where you can share your creations and tag us in your delicious moments! Together, we can celebrate the joy of cooking and baking, one sweet treat at a time.

    The Recipe

    Sugar Cookie Cake

    Serves: 12

    Prep Time: 15 mins

    Cook Time: 25 mins

    Total Time: 40 mins

    Kitchen Equipment Needed

    • Mixing bowls
    • Electric mixer or whisk
    • Measuring cups and spoons
    • 8-inch round cake pan
    • Parchment paper (optional)

    Ingredients

    • 2 ¾ cups all-purpose flour
    • 1 ¼ cups granulated sugar
    • 1 cup unsalted butter, softened
    • 2 large eggs
    • 2 tsp vanilla extract
    • 1 tsp almond extract
    • 1 tsp baking powder
    • ½ tsp salt
    • Sprinkles or frosting for topping (optional)

    Directions

    1. Preheat your oven to 350°F (175°C) and grease the cake pan.
    2. In a medium bowl, cream together the softened butter and sugar until light and fluffy.
    3. Beat in the eggs one at a time, and then stir in the vanilla and almond extracts.
    4. In another bowl, whisk together the flour, baking powder, and salt.
    5. Gradually blend the dry ingredients into the wet mixture until just combined.
    6. Pour the batter into the prepared cake pan and smooth the top.
    7. Bake for 25-30 minutes, or until a toothpick inserted into the center comes out clean.
    8. Let it cool in the pan for 10 minutes before transferring it to a wire rack to cool completely.
    9. Once cool, top with sprinkles or frosting if desired.

    Recipe Notes

    • For a richer flavor, try browning the butter before mixing it into the batter.
    • You can use gluten-free flour for a gluten-free option!
    • Store leftover cake in an airtight container at room temperature for up to three days.
    • This cake can be frozen for up to three months; wrap well to avoid freezer burn.