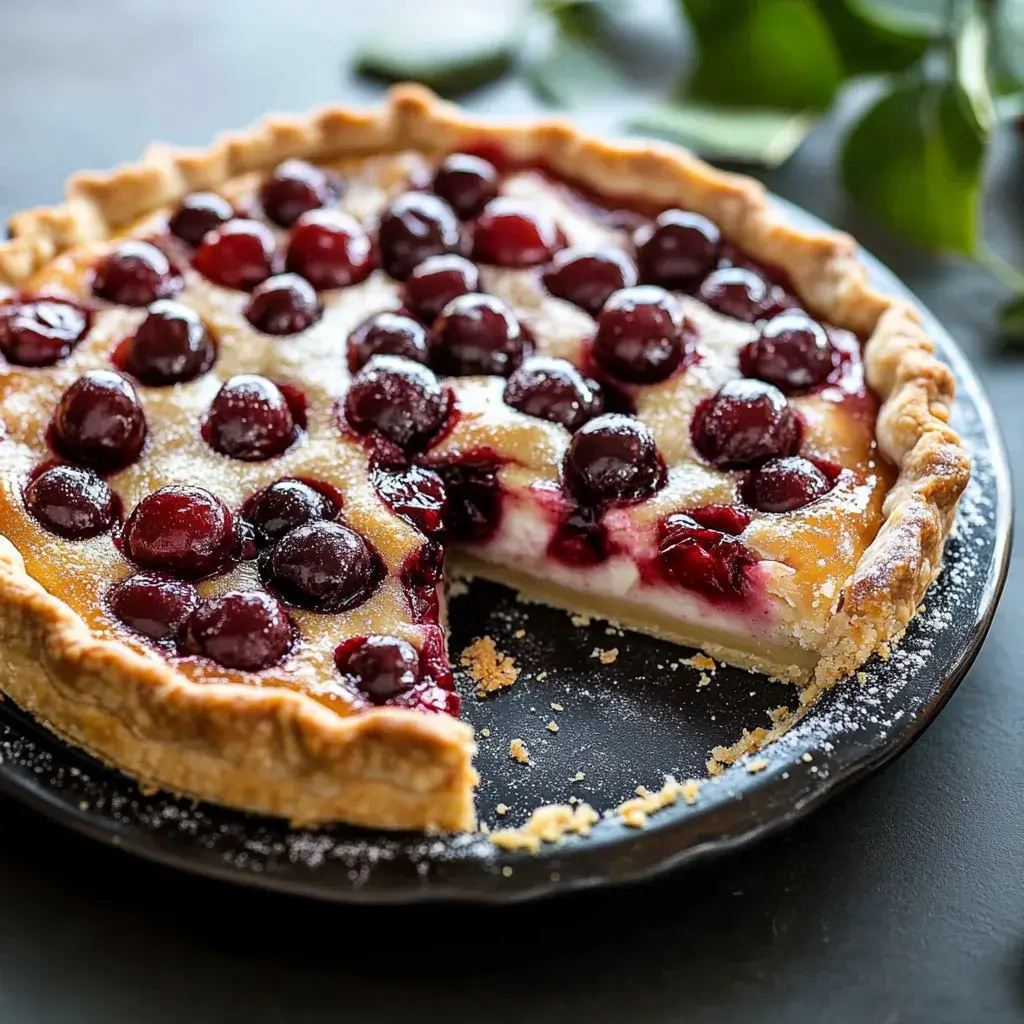
Best Apple Pumpkin Streusel Muffins Recipe

best-apple-pumpkin-streusel-muffins

Introduction

Is there anything more comforting than the warm, spiced aroma of baking that fills your kitchen on a crisp autumn morning? That feeling of cozy contentment is exactly what you get with these irresistible Apple Pumpkin Streusel Muffins. They perfectly capture the essence of fall in one delicious, handheld treat. Furthermore, they combine two seasonal favorites into a bakery-style masterpiece that will have everyone asking for the recipe. Ultimately, this is the muffin you have been dreaming of.

Apple Pumpkin Streusel Muffins are the ultimate fusion of two classic fall flavors. We start with a moist, spiced pumpkin muffin base, which we pack with tender chunks of sweet apple. Then, we generously top this delightful combination with a buttery, crunchy cinnamon streusel that bakes into a perfect, crumbly crown. This recipe matters because it delivers a gourmet coffee shop experience right in your own home, using simple ingredients and straightforward steps. Moreover, it fits our blog’s tone perfectly; we champion from-scratch baking that feels approachable yet yields spectacular results. These muffins are ideal for weekend brunches, holiday breakfasts, or as a sweet afternoon snack with a cup of coffee. For instance, if you love seasonal baking, you might also enjoy our popular Pumpkin Chocolate Chip Cookies. Additionally, this recipe is a fantastic way to use up any leftover pumpkin puree you might have from making other autumn favorites. The process is simple and rewarding, making it a great baking project for all skill levels. Consequently, you will create a treat that feels both special and familiar. For another great way to use autumn’s bounty, explore our guide on making the perfect Homemade Apple Cider.

Why I Love This Recipe

This recipe holds a special place in my heart because it reminds me of baking with my grandmother every October. We would go apple picking and then spend the afternoon in her warm kitchen, transforming our haul into various treats. The moment I smell the combination of cinnamon, nutmeg, and baking apples, I am instantly transported back to those happy times. These Apple Pumpkin Streusel Muffins truly embody the spirit of the season and the joy of sharing homemade food with the people you love.

Health and Nutrition

Why it’s good for your body

These Apple Pumpkin Streusel Muffins pack a powerful nutritional punch. First, pumpkin provides a fantastic source of vitamin A, which actively supports your vision and immune system. Furthermore, the apples contribute a healthy dose of fiber and vitamin C. Consequently, this combination helps you feel full and satisfied, making these muffins a smart snack choice.

Additionally, the warming spices like cinnamon and nutmeg do more than just add flavor. In fact, they offer their own anti-inflammatory properties. Therefore, every bite of these Apple Pumpkin Streusel Muffins delivers more than just delicious taste. Ultimately, you get a treat that genuinely fuels your body with good things.

Moreover, we use wholesome ingredients like whole wheat flour and natural sweeteners to boost the fiber content. As a result, these muffins support steady energy levels instead of causing a sugar crash. Finally, enjoying a freshly baked Apple Pumpkin Streusel Muffin means you are treating yourself to a dessert that loves you back.

How it fits in a healthy lifestyle

These muffins fit beautifully into a balanced eating plan. You can easily enjoy one as a satisfying morning snack with your coffee or as a pre-workout bite for sustained energy. They are also perfect for meal prep, so you always have a wholesome option on hand to avoid less healthy impulse choices.

For those following specific dietary needs, you can easily adapt this recipe. Simply use a 1:1 gluten-free flour blend to make them celiac-friendly. If you are exploring more ways to incorporate healthy fats into your baking, our guide to using healthy fats for baking offers great tips. Remember, balance is key. Pair a muffin with a source of protein like Greek yogurt for a complete and nutritious breakfast. For more ideas on building a nourishing morning routine, check out our post on quick and healthy breakfast ideas that keep you full all morning.

How to Prepare This Dish

Steps and time-saving tips

First, preheat your oven to 375Β°F and line a muffin tin with paper liners. Next, whisk together all your dry ingredients like flour, baking soda, and warm spices in one large bowl. Meanwhile, in another bowl, vigorously whisk the wet ingredientsβ€”the pumpkin puree, eggs, oil, and sugarsβ€”until they are perfectly smooth and emulsified. Consequently, you will create a beautifully rich, orange base for your Apple Pumpkin Streusel Muffins. Gently fold the dry mixture into the wet ingredients; however, be careful not to overmix. A few lumps in the batter are completely fine and will guarantee a tender crumb. Quickly stir in the finely diced apple pieces to distribute them evenly. For the crumbly streusel topping, simply use your fingers to mix cold butter with flour, oats, and brown sugar until clumps form. Generously sprinkle this over each muffin cup. Finally, bake for 20-25 minutes until a toothpick comes out clean. Let the muffins cool in the pan for just five minutes before moving them to a wire rack. This crucial step prevents them from becoming soggy.

Mistakes I’ve made and learned from

I have absolutely overmixed this batter in a rush, and sadly, it resulted in dense, tough muffins instead of the light, bakery-style treats we all love. Now, I mix just until the flour disappears, and the difference is incredible. Another common error? Using canned pumpkin pie filling instead of pure puree. The added sugars and spices completely throw off the flavor balance and sweetness of your Apple Pumpkin Streusel Muffins. I also learned the hard way that properly creaming your butter and sugar is a foundational step for many baked goods. For more on that essential technique, check out my guide on how to cream butter and sugar. Furthermore, if your streusel topping melts and disappears, your butter was likely too warm. Chilling the streusel for ten minutes before baking fixes this. For other common baking fixes, my post on common baking mistakes covers all these pitfalls so you can avoid them.

Cultural Connection and Variations

Where this recipe comes from

My grandmother’s kitchen always smelled of cinnamon and nutmeg in the fall. She would pull out her biggest mixing bowl and declare it was time for baking. Consequently, our family’s version of Apple Pumpkin Streusel Muffins was born from this beautiful collision of two harvests. We always had a surplus of apples from our trees and pumpkins from the patch. Meanwhile, her German heritage meant a streusel topping was non-negotiable for any worthy pastry.

Different regions put their own spin on this concept. For instance, in New England, bakers often favor a heavier spice blend, sometimes adding a pinch of clove. Alternatively, you might find a Southern version that incorporates pecans or a brown butter glaze for extra richness. Across the pond, British bakers may forgo the pumpkin entirely, creating a simpler apple muffin with a crumb topping. Ultimately, our Apple Pumpkin Streusel Muffins represent that classic American melting pot, blending available ingredients into something entirely new and comforting.

How it fits in today’s cooking

These muffins absolutely thrive in modern kitchens. They perfectly bridge the gap between a quick breakfast and a decadent dessert. Furthermore, they have become a staple for holiday mornings and Thanksgiving brunches, offering a cozy, spiced aroma that everyone loves. Today’s cooks often adapt the recipe to fit dietary needs, easily making them gluten-free or vegan without losing an ounce of flavor.

You can easily incorporate them into your weekly meal prep routine for a guaranteed crowd-pleaser. They pair wonderfully with a hot cup of coffee or as a sweet ending to a family dinner. For more inspiration on seasonal baking, explore our favorite fall baking ingredients. If you are looking for another great way to use pumpkin, our classic pumpkin cream cheese frosting is a fantastic recipe to try next. Ultimately, this treat continues to capture the essence of autumn in every single bite.

Taste and Texture

What makes it delicious

These Apple Pumpkin Streusel Muffins deliver a warm, fragrant aroma that fills your kitchen with the essence of fall. You first experience a crisp, buttery streusel topping that gives way to an incredibly moist and tender crumb. The spiced pumpkin base provides a creamy, earthy sweetness that perfectly complements the tender, tart apple chunks scattered throughout. Ultimately, each bite of these Apple Pumpkin Streusel Muffins offers a delightful harmony of cozy spices, rich pumpkin, and bright fruit.

Boosting the flavor

For an even more decadent experience, consider a simple ingredient swap. For instance, using brown sugar instead of white sugar in the batter deepens the molasses notes, which beautifully enhances the warm spices. Additionally, a drizzle of vanilla glaze or a dollop of cinnamon-spiced whipped cream right before serving creates a bakery-style treat. If you love the cozy spice profile in these muffins, you will adore our classic Pumpkin Bread recipe. Furthermore, for another fantastic way to enjoy autumn’s favorite fruit, try incorporating the techniques from our Apple Crisp topping for an extra crunchy finish.

Tips for Success

Best practices for results

First, always use room temperature ingredients for your Apple Pumpkin Streusel Muffins because they combine more smoothly and create a uniform batter. Furthermore, do not overmix the batter; simply stir until the wet and dry ingredients just come together for a tender crumb. Additionally, use a trigger-release ice cream scoop to fill your muffin liners evenly, which promotes consistent baking. Finally, press the streusel topping gently into the batter so it adheres perfectly during baking.

Mistakes to avoid

A common error involves overfilling the muffin cups, which causes the batter to spill over and creates a mess. Instead, fill each liner only two-thirds full to allow for the perfect rise. Moreover, avoid packing your flour into the measuring cup, as this leads to dense and dry muffins. For best results, lightly spoon the flour into the cup and level it off. Also, do not skip the step of letting the muffins cool in the pan for a few minutes; this helps them set properly and prevents them from breaking apart. If you are unsure about your oven’s temperature, use an oven thermometer to ensure accuracy. Remember, properly measured ingredients are key, so consider reviewing our guide on measuring ingredients for flawless Apple Pumpkin Streusel Muffins every time.

Serving and Pairing Suggestions

How to serve this dish

Warm your Apple Pumpkin Streusel Muffins slightly before serving. Consequently, they will release their incredible spiced aroma. For a beautiful presentation, arrange them on a rustic wooden board or a vintage cake stand. Furthermore, a light dusting of powdered sugar just before serving adds a lovely festive touch. These muffins truly shine during autumn brunches or as a thoughtful homemade gift during the holidays. Finally, always offer a basket of these Apple Pumpkin Streusel Muffins to make any morning feel special.

What goes well with it

A hot mug of spiced chai tea makes a perfect partner. Its warm spices beautifully echo the flavors in your Apple Pumpkin Streusel Muffins. For a creamy contrast, try a dollop of our lightly sweetened homemade vanilla whipped cream. Alternatively, balance the sweetness with a savory side. Specifically, a few slices of crispy bacon or a warm, comforting bowl of our creamy pumpkin soup creates a wonderful meal. Ultimately, these pairings turn your muffins into a complete and satisfying experience.

Can I make apple pumpkin streusel muffins ahead of time?

Absolutely! These muffins are an excellent make-ahead breakfast. They stay moist for up to 3 days when stored in an airtight container at room temperature. You can also freeze baked Apple Pumpkin Streusel Muffins for up to 3 months.

What is the best type of apple to use for apple pumpkin muffins?

For the best texture and flavor, use firm, tart apples that hold their shape when baked. Granny Smith apples are a popular choice as their tartness balances the sweetness of the muffin and streusel topping perfectly in Apple Pumpkin Streusel Muffins.

Can I substitute fresh pumpkin for canned in this recipe?

Yes, you can use homemade pumpkin puree. Ensure you cook and puree a sugar pumpkin (or pie pumpkin) until it’s very smooth and thick, then drain any excess liquid. Using one cup of homemade puree is equivalent to one 15-ounce can.

Why did my streusel topping sink into the muffins?

A sinking streusel usually means the topping mixture was too wet or the muffins were underbaked. Make sure your butter is cold and cut in until the mixture is crumbly, not pasty. Also, ensure the muffin batter is fully set before removing them from the oven.

Print
clock clock iconcutlery cutlery iconflag flag iconfolder folder iconinstagram instagram iconpinterest pinterest iconfacebook facebook iconprint print iconsquares squares iconheart heart iconheart solid heart solid icon

Apple Pumpkin Streusel Muffins


  • Author: Chef Mia

Description

Moist and flavorful muffins combining the sweetness of apples with the warmth of pumpkin, topped with a crunchy streusel.


Ingredients

Scale

For the Crust:

  • 1 1/2 cups all-purpose flour
  • 1 tsp baking powder
  • 1/2 tsp baking soda
  • 1 tsp ground cinnamon
  • 1/2 tsp ground nutmeg
  • 1/4 tsp salt
  • 1/2 cup pumpkin puree
  • 1/2 cup granulated sugar
  • 1/4 cup brown sugar
  • 1/3 cup vegetable oil
  • 2 large eggs
  • 1 tsp vanilla extract
  • 1 cup finely chopped apple
  • 1/2 cup rolled oats
  • 1/4 cup all-purpose flour
  • 1/4 cup brown sugar
  • 1/4 tsp cinnamon
  • 2 tbsp cold butter, cubed

Instructions

1. Prepare the Crust:

  1. Preheat oven to 375Β°F (190Β°C). Line a muffin tin with paper liners.
  2. In a medium bowl, whisk together 1 1/2 cups flour, baking powder, baking soda, 1 tsp cinnamon, nutmeg, and salt.
  3. In a large bowl, mix pumpkin puree, granulated sugar, 1/4 cup brown sugar, oil, eggs, and vanilla until smooth.
  4. Gradually fold dry ingredients into wet ingredients until just combined. Stir in chopped apples.
  5. For streusel: combine oats, 1/4 cup flour, 1/4 cup brown sugar, and 1/4 tsp cinnamon. Cut in butter until mixture is crumbly.
  6. Divide batter evenly among muffin cups. Sprinkle streusel topping over each. Bake for 20-25 minutes or until a toothpick comes out clean.

Notes

You can customize the seasonings to taste.

Easy Pumpkin Twists Recipe – Quick & Homemade

easy-pumpkin-twists-recipe

Introduction

Is there anything cozier than the warm, spiced scent of pumpkin and cinnamon wafting through your kitchen on a crisp autumn day? Honestly, that aroma alone feels like a hug. Furthermore, it signals the start of the best baking season. Today, I want to share a recipe that truly captures that magical feeling: these incredibly delicious Pumpkin Twists. They are the perfect project for a weekend morning. Ultimately, they will fill your home with an irresistible fragrance and your family with joy.

So what exactly are Pumpkin Twists? Essentially, they are a delightful, flaky pastry that beautifully combines a spiced pumpkin filling with a buttery, laminated dough. After that, you twist them into a gorgeous shape, which not only looks impressive but also creates wonderful layers of texture. This recipe matters because it elevates a simple baking session into a special occasion. Moreover, it fits the cozy, approachable gourmet tone of Exorecipes perfectly. We specialize in turning classic comfort foods into something extraordinary, much like our popular Homemade Cinnamon Rolls. These Pumpkin Twists offer that same satisfying, from-scratch achievement but with a festive, seasonal twist that celebrates autumn’s best flavors. They are not overly complicated, but the result feels incredibly special and is guaranteed to impress. Whether you are enjoying them with a cup of coffee or serving them at a holiday brunch, these pastries make any moment feel a bit more celebratory. They are the kind of treat that creates lasting memories in the kitchen, especially if you involve little helpers in the twisting process. For another fantastic baking project that the whole family can enjoy, consider our Classic Apple Pie recipe. Both dishes embody our mission to share recipes that are as fun to make as they are to eat.

Why I Love This Recipe

I have a deep personal connection to these Pumpkin Twists because they remind me of baking with my grandmother. She always believed the best conversations happened over rolled-out dough. Every time I shape the dough and smell that pumpkin spice baking, I feel that same sense of warmth and connection. I love how this recipe challenges me just enough to feel rewarding but remains utterly approachable. Most importantly, sharing a plate of these warm, glazed twists with my family creates a moment of pure, simple happiness that I cherish.

Health and Nutrition

Why it’s good for your body

Pumpkin twists offer a delicious way to nourish your body with essential vitamins. Importantly, pumpkin puree provides a powerful dose of vitamin A, which actively supports healthy vision and a strong immune system. Furthermore, the warming spices like cinnamon and nutmeg do more than just add flavor; they also deliver antioxidants that help combat oxidative stress in your body.

These wholesome twists also contribute to your daily fiber intake. Consequently, this helps promote healthy digestion and can keep you feeling satisfied for longer after you enjoy them. Additionally, when you bake Pumpkin Twists at home, you control the ingredients, allowing you to create a treat that is significantly lower in processed sugars than many store-bought alternatives. Ultimately, this makes every bite a smarter choice for your well-being without sacrificing an ounce of flavor.

How it fits in a healthy lifestyle

Pumpkin Twists fit beautifully into a balanced diet as a satisfying snack or a fun breakfast side. You can easily enjoy them as part of a mindful eating approach, pairing one with a source of protein like Greek yogurt for a complete and energizing meal. This combination helps maintain steady energy levels throughout your morning.

For those exploring specific dietary needs, you can adapt this recipe to be gluten-free by using a 1:1 gluten-free flour blend. If you are looking for more inspiration on baking with alternative flours, our guide on gluten-free baking tips is a fantastic resource. Remember, healthy living is all about balance and finding joy in your food. A warm Pumpkin Twist with a cup of tea is a perfect example of a wholesome indulgence. For more ideas on creating nutritious and delicious meals, explore our collection of healthy breakfast ideas that the whole family will love.

How to Prepare This Dish

Steps and time-saving tips

First, gather all your ingredients to make the process smooth. Meanwhile, preheat your oven to the correct temperature so it’s ready when you are. Next, whisk your dry ingredients together in a large bowl. In a separate bowl, cream the butter and sugar until the mixture becomes light and fluffy. Then, beat in the pumpkin puree, eggs, and vanilla until everything is perfectly combined. Gradually add your dry ingredients to the wet mixture, stirring just until the dough comes together. Importantly, do not overmix the dough to ensure your Pumpkin Twists stay tender. For a major time-saver, use a stand mixer with a dough hook attachment. Alternatively, you can prepare the dough the night before and simply chill it overnight. Finally, shape your dough into twists, place them on a lined baking sheet, and bake until golden. Let them cool slightly on a wire rack before enjoying their warm, spiced flavor.

Mistakes I’ve made and learned from

I have absolutely learned the hard way that using cold, hard butter straight from the fridge is a recipe for disaster. This mistake created a crumbly dough that was impossible to shape into those beautiful twists. Now, I always ensure my butter is properly softened at room temperature for the perfect consistency. Another common error I made was overbaking them, which resulted in dry pastries instead of soft, cake-like ones. I finally invested in a simple oven thermometer to verify the actual temperature, and it made a world of difference. For more on getting your ingredients just right, my guide on how to soften butter covers all the best methods. Furthermore, if your baked goods often turn out dry, my tips on preventing dry bakes will help you achieve moist results every single time.

Cultural Connection and Variations

Where this recipe comes from

My grandmother first introduced me to Pumpkin Twists in her cozy, flour-dusted kitchen every autumn. Consequently, the smell of warm spices and baking dough instantly transports me back to those crisp afternoons. This recipe, however, stretches far beyond our family table. Essentially, many cultures embrace similar sweet, spiced pastries. For instance, Eastern European countries often prepare something akin to these twists, frequently using pumpkin or potato dough for a tender, pillowy texture. Meanwhile, other bakers might add a dusting of crunchy pearl sugar or a drizzle of simple glaze for extra sweetness. In our home, we always preferred a generous cinnamon-sugar coating that caramelized in the oven. Ultimately, every family adds its own signature touch, making each batch of Pumpkin Twists a unique celebration of the season.

How it fits in today’s cooking

Pumpkin Twists fit perfectly into modern cooking because they offer a from-scratch baking project that feels both special and achievable. Furthermore, they bridge the gap between a festive holiday treat and a simple, satisfying snack with your afternoon coffee. Today’s bakers love adapting them; for example, some use pre-made dough for a quick version, while others might stuff them with a cream cheese filling. They also pair wonderfully with other seasonal favorites, like a slice of our incredibly moist pumpkin bread. Moreover, you can easily incorporate these twists into your weekend brunch spread. They complement a variety of dishes, especially a fluffy, classic buttermilk pancake breakfast. Ultimately, this timeless recipe continues to bring warmth and joy to any table, proving some traditions only get better with time.

Taste and Texture

What makes it delicious

These Pumpkin Twists deliver a wonderfully cozy and inviting experience. First, your kitchen fills with the warm, fragrant aroma of cinnamon and pumpkin spice as they bake. Each bite offers a delightful contrast; the exterior bakes to a satisfyingly crisp finish while the inside remains marvelously soft and tender. Furthermore, the rich, earthy sweetness of real pumpkin puree mingles perfectly with the buttery, flaky pastry. Ultimately, these twists feel like a warm hug in pastry form, making every Pumpkin Twists experience utterly comforting.

Boosting the flavor

For an extra flavor boost, consider brushing the twists with melted butter right after baking. Then, immediately roll them in a cinnamon-sugar mixture for a sparkling, crunchy crust. Alternatively, a simple cream cheese glaze drizzled on top adds a tangy sweetness that complements the spiced pumpkin beautifully. If you love that warm spice profile, explore our guide to the best baking spices to create your own custom blend. Moreover, serving these twists warm with a side of homemade whipped cream turns them into an irresistible dessert worthy of any celebration.

Tips for Success

Best practices for results

Always chill your dough thoroughly before shaping the twists because this step prevents spreading in the oven. Furthermore, use a light hand when rolling the dough to maintain a tender, flaky texture. For the best flavor, make sure your pumpkin pie spice is fresh. Additionally, brush the twists with an egg wash for a beautifully golden and glossy finish. Finally, do not skip the parchment paper as it guarantees your Pumpkin Twists will not stick and will bake evenly every single time.

Mistakes to avoid

A common error is using warm butter, which unfortunately creates a greasy dough that is difficult to handle. Instead, ensure all your ingredients are properly chilled for the best results. Moreover, avoid overworking the dough when you combine the wet and dry ingredients, as this will develop too much gluten and lead to tough twists. If your dough feels too sticky, you can learn how to fix it with our guide on how to fix sticky dough. Finally, do not overbake your Pumpkin Twists; consequently, you should pull them from the oven when they are just golden brown for a soft interior. For more baking guidance, always refer to a trusted resource like our oven temperature guide to ensure accuracy.

Serving and Pairing Suggestions

How to serve this dish

Present your freshly baked Pumpkin Twists on a rustic wooden board for a charming, homestyle feel. Alternatively, arrange them in a tall stack on a elegant cake stand to really showcase their beautiful shape. For a special touch, lightly dust them with powdered sugar or drizzle with a simple vanilla glaze just before serving. These twists absolutely shine at a holiday brunch or as a festive addition to your Thanksgiving breakfast spread. Ultimately, their warm aroma and golden color make them a visually stunning centerpiece for any autumn gathering.

What goes well with it

A hot mug of spiced chai tea wonderfully complements the cozy pumpkin spices in these twists. Furthermore, a cool and creamy glass of cold brew coffee provides a deliciously bitter contrast that cuts through the pastry’s sweetness. For a truly decadent experience, offer a side of our rich and smooth vanilla bean cream cheese frosting for dipping. Finally, consider serving these Pumpkin Twists alongside a savory option like our popular savory herb breakfast sausages to create a perfectly balanced meal that satisfies every craving.

What are Pumpkin Twists made of?

Pumpkin Twists are typically made from a simple dough that includes canned pumpkin puree, flour, butter, sugar, and warm spices like cinnamon and nutmeg. The dough is rolled out, coated with a cinnamon-sugar mixture, and then twisted into its signature shape before baking. This combination creates the soft, spiced, and slightly sweet flavor that makes Pumpkin Twists so popular.

How do you keep Pumpkin Twists soft?

The key to keeping your Pumpkin Twists soft is to avoid overbaking them; remove them from the oven as soon as they are set and lightly golden. Always store them in an airtight container at room temperature, which will prevent them from drying out and becoming stale. For the best texture, enjoy your Pumpkin Twists within 2-3 days of baking.

Can you freeze Pumpkin Twists?

Yes, you can absolutely freeze Pumpkin Twists for longer storage. Ensure they are completely cooled to room temperature, then place them in a single layer on a baking sheet to freeze solid before transferring to a freezer-safe bag or container. This method prevents them from sticking together. When you’re ready to enjoy, simply thaw at room temperature or warm them in the oven.

Are Pumpkin Twists the same as pumpkin cinnamon rolls?

No, Pumpkin Twists are different from pumpkin cinnamon rolls. While both are spiced pumpkin pastries, twists are made from a dough that is rolled, twisted, and baked individually, resulting in a firmer, breadstick-like texture. Cinnamon rolls are typically softer, baked together in a pan, and topped with a cream cheese frosting, whereas Pumpkin Twists are often finished with a simple glaze or more cinnamon sugar.

Print
clock clock iconcutlery cutlery iconflag flag iconfolder folder iconinstagram instagram iconpinterest pinterest iconfacebook facebook iconprint print iconsquares squares iconheart heart iconheart solid heart solid icon

Pumpkin Twists


  • Author: Chef Mia

Description

Deliciously spiced pumpkin dough twisted into a sweet, soft pastry perfect for autumn baking.


Ingredients

Scale

For the Crust:

  • 2 cups all-purpose flour
  • 1/2 cup canned pumpkin puree
  • 1/4 cup warm milk
  • 2 tbsp unsalted butter, melted
  • 3 tbsp brown sugar
  • 1 tsp active dry yeast
  • 1/2 tsp cinnamon
  • 1/4 tsp nutmeg
  • 1/4 tsp salt
  • 1 egg for egg wash
  • 2 tbsp coarse sugar for sprinkling

Instructions

1. Prepare the Crust:

  1. In a bowl, combine warm milk, yeast, and 1 tsp sugar. Let sit for 5 minutes until frothy.
  2. Mix in pumpkin puree, melted butter, remaining sugar, cinnamon, nutmeg, and salt. Gradually add flour until a soft dough forms.
  3. Knead dough on a floured surface for 5 minutes, then place in a greased bowl, cover, and let rise for 1 hour.
  4. Punch down dough and roll into a rectangle. Cut into strips, twist each strip, and place on a baking sheet. Brush with egg wash and sprinkle with coarse sugar.
  5. Bake at 375Β°F (190Β°C) for 12-15 minutes until golden. Cool on a wire rack before serving.

Notes

You can customize the seasonings to taste.

Best Vanilla Chai Pumpkin Spice Latte Cupcakes

best-vanilla-chai-pumpkin-cupcakes

Introduction

There is something truly magical about the moment autumn’s crisp air arrives. Suddenly, you crave those warm, spiced flavors that feel like a cozy hug. This year, why not capture that entire feeling in a single, delightful bite? These Vanilla Chai Pumpkin Spice Latte Cupcakes do exactly that. They combine everything you love about your favorite fall drinks into an irresistible dessert that will make your entire home smell incredible.

So, what exactly are Vanilla Chai Pumpkin Spice Latte Cupcakes? Essentially, they are a masterpiece of flavor fusion. We start with a supremely moist pumpkin spice cake base, which provides that classic, comforting autumn taste. Then, we elevate it with the warm, complex notes of vanilla chai, weaving those aromatic spices directly into the batter. Finally, we crown each cupcake with a luxurious latte-inspired frosting that’s smooth, creamy, and rich with coffee flavor. This dessert matters because it transforms your seasonal coffee run into a shareable, bakeable experience. It fits our blog’s tone perfectly as we always strive to create innovative yet approachable recipes that inspire joy in the kitchen. For instance, if you enjoy the spice profile here, you might also love our popular Pumpkin Spice Cinnamon Rolls. Furthermore, this recipe is ideal for everything from a quiet afternoon treat to the centerpiece of your holiday dessert table, much like our stunning Salted Caramel Apple Pie. Ultimately, baking these cupcakes creates an unforgettable sensory experience that celebrates the very best of the season.

Why I Love This Recipe

I have a deep personal connection to these cupcakes because they remind me of my favorite coffee shop moments with friends. Every time I bake them, the aroma of chai and pumpkin spice instantly transports me back to those laughter-filled afternoons. I love how the recipe allows me to bring that cozy cafΓ© feeling right into my own kitchen. Moreover, sharing these Vanilla Chai Pumpkin Spice Latte Cupcakes with loved ones has become my new autumn tradition, creating warm memories one batch at a time.

Health and Nutrition

Why it’s good for your body

These Vanilla Chai Pumpkin Spice Latte Cupcakes actually offer some surprising wellness perks. First, pumpkin puree provides a powerful dose of vitamin A, which actively supports healthy vision and a strong immune system. Moreover, the warming spices like cinnamon, ginger, and cloves do more than just create a cozy flavor; they also deliver antioxidants that help combat oxidative stress in your body.

Additionally, these cupcakes can give you a gentle energy lift. For instance, the black tea in the chai blend contains L-theanine, an amino acid that promotes calm focus alongside the natural caffeine. Consequently, you enjoy a more balanced pick-me-up compared to a sharp sugar rush. Ultimately, enjoying a Vanilla Chai Pumpkin Spice Latte Cupcake means you are treating yourself to a dessert that nourishes your body as well as your spirit.

How it fits in a healthy lifestyle

You can absolutely enjoy these cupcakes as part of a balanced diet. Think of them as a delightful treat within a framework of whole foods, not a forbidden pleasure. For a healthier twist, you can easily use whole wheat flour or a gluten-free blend to suit your dietary needs, and you can reduce the sugar slightly without sacrificing that wonderful spiced flavor.

Pairing a Vanilla Chai Pumpkin Spice Latte Cupcake with a source of protein, like a handful of almonds or a glass of milk, can help stabilize your blood sugar and keep you feeling satisfied longer. This approach aligns perfectly with our guide on creating balanced meals that fuel your day. Remember, a healthy lifestyle has room for joyful indulgences that bring people together, much like our tips for mindful eating during the holidays. It is all about intention and balance.

How to Prepare This Dish

Steps and time-saving tips

First, preheat your oven and line a muffin tin with your favorite liners. Meanwhile, whisk your dry ingredientsβ€”flour, baking powder, and warm spicesβ€”in one bowl. In a larger separate bowl, vigorously cream the softened butter and sugars until the mixture becomes light and fluffy. Next, beat in the eggs one at a time, followed by the rich pumpkin puree and vanilla extract. Gradually mix your dry ingredients into this wet batter, but take care not to overmix. Finally, swirl in the strongly brewed chai concentrate for that signature spiced flavor. Pro tip: use a cookie scoop to evenly distribute the batter into the liners for uniform baking and a professional look. Bake until the tops spring back to the touch, then let the cupcakes cool completely on a wire rack. This patience is crucial for the next step. While they cool, you can whip up your frosting. Whip the butter until it is perfectly smooth, then gradually add the powdered sugar and a splash of vanilla chai syrup. Once your cupcakes are entirely cool, pipe on that fluffy frosting. For an authentic latte finish, give each one a light dusting of pumpkin spice or a delicate drizzle of caramel.

Mistakes I’ve made and learned from

I have absolutely learned the hard way that impatience leads to a soupy mess. My biggest mistake was trying to frost my Vanilla Chai Pumpkin Spice Latte Cupcakes while they were still even slightly warm, which caused the beautiful buttercream to instantly melt and slide right off. Now, I always let them cool on a wire rack for a full hour, no exceptions. Another lesson was about measuring flour; I used to scoop directly from the bag, which packed in too much and resulted in dense, dry cupcakes. I finally learned the right way to measure flour, which is to spoon it into the cup and level it off. This one simple change makes all the difference for a perfectly tender crumb. Also, overmixing the batter was a culprit for toughness, so I now mix until the ingredients are just combined. For more frosting tips that won’t melt away, my guide on getting buttercream just right saved me countless times. And if you’re worried about dry cakes, my post on the secrets to a moist crumb every time is a must-read.

Cultural Connection and Variations

Where this recipe comes from

Our Vanilla Chai Pumpkin Spice Latte Cupcakes tell a delicious story of cultural fusion. Essentially, they merge three distinct beverage traditions into one perfect bite. The pumpkin spice latte, for instance, has its roots in American coffee shop culture, specifically becoming an autumnal icon in the early 2000s. Meanwhile, chai boasts a rich history in India, where families simmer black tea with a potent blend of spices like cardamom, ginger, and cinnamon for a daily ritual. Finally, we stir in vanilla, a flavor beloved globally for its warm, sweet, and comforting essence.

Consequently, bakers around the world might interpret this treat differently. In India, a home cook may use a fiercely aromatic, homemade chai masala for a more potent spice kick. Alternatively, a French patisserie might focus on the vanilla, perhaps even infusing the batter with seeds from a real vanilla pod for unparalleled depth. Some families, like mine, love adding a personal twist, such as a sprinkle of black pepper on the frosting to echo the gentle heat found in traditional masala chai. Ultimately, this recipe invites you to weave your own narrative into the baking process.

Every autumn, the scent of these Vanilla Chai Pumpkin Spice Latte Cupcakes baking truly feels like a warm embrace.

How it fits in today’s cooking

This cupcake recipe remains incredibly relevant today because it perfectly captures the cozy essence of modern fall. Furthermore, it brilliantly condenses the flavors of our favorite seasonal drinks into a portable, shareable dessert. People now actively seek out recipes that evoke nostalgia and comfort, making these spiced cupcakes a star at everything from Halloween parties to Thanksgiving feasts.

Modern cooks constantly adapt the formula to fit different dietary needs and busy routines. For example, many easily make it vegan by using our favorite plant-based substitutes for eggs and milk. Others might simplify the process by using a high-quality pre-made spice blend, ensuring they can enjoy the flavor without a long ingredient list. Moreover, this treat fits seamlessly into today’s baking trends, where global flavors and coffee shop classics inspire home bakers. If you adore these flavors, you must explore our complete guide to essential fall baking for more inspiration. Ultimately, these cupcakes celebrate how traditional flavors can find a vibrant new life in our contemporary kitchens.

Taste and Texture

What makes it delicious

First, your kitchen fills with the warm, fragrant aroma of baking spices and vanilla. Then, you bite into a supremely soft and moist crumb that simply melts in your mouth. The pumpkin puree delivers earthy sweetness and incredible tenderness, while the chai spices create a cozy, complex warmth. Furthermore, a creamy, spiced frosting provides a cool, velvety contrast to the fluffy cake. Ultimately, these Vanilla Chai Pumpkin Spice Latte Cupcakes offer a perfectly balanced symphony of autumnal flavors in every single bite.

Boosting the flavor

For an even more decadent experience, consider a simple ingredient swap. Alternatively, you can stir a tablespoon of instant espresso powder into the batter to deepen the latte flavor. Immediately after baking, brush the warm cupcakes with a spiced simple syrup to lock in extra moisture. Then, crown your creation with a fluffy cloud of cinnamon cream cheese frosting for a tangy twist. Finally, serve them alongside a hot beverage; a salted caramel mocha makes a wonderfully rich pairing. Consequently, you will elevate your dessert to a whole new level of deliciousness.

Tips for Success

Best practices for results

First, always bring your dairy ingredients to room temperature so they emulsify smoothly into your batter for an even crumb. Furthermore, use a cookie scoop to divide the batter evenly among the liners; this guarantees your Vanilla Chai Pumpkin Spice Latte Cupcakes will bake uniformly. For the most potent spice flavor, always bloom your chai spices in the warm milk before adding them to the mix. Finally, let the cupcakes cool in the pan for just five minutes before transferring them to a wire rack to prevent steaming.

Mistakes to avoid

A common error is overmixing the batter after adding the flour, which unfortunately develops too much gluten and leads to dense, tough cupcakes. Instead, mix just until you no longer see streaks of flour for a perfectly tender texture. Additionally, avoid overbaking them, as this will dry out your beautiful cupcakes. For more guidance on achieving perfect doneness, check out our tips on how to tell when cupcakes are done. Moreover, ensure your frosting is at the right consistency before piping; if it’s too warm, it will slide right off. If your buttercream seems loose, our tutorial on fixing runny buttercream offers a simple solution to get it back to the perfect piping texture.

Serving and Pairing Suggestions

How to serve this dish

Present your Vanilla Chai Pumpkin Spice Latte Cupcakes on a beautiful rustic wooden board for a cozy, inviting feel. Alternatively, arrange them on a elegant cake stand to instantly elevate any gathering. For a special finishing touch, lightly dust the tops with cinnamon or a pinch of chai spice right before serving. These cupcakes truly shine during holiday parties or a festive brunch. Moreover, they make a wonderful edible gift when boxed up with a ribbon.

Always serve your Vanilla Chai Pumpkin Spice Latte Cupcakes at room temperature. This allows the intricate flavors of the chai and pumpkin to fully bloom. Finally, consider adding a small dollop of freshly whipped cream on the side for those who adore an extra indulgent treat.

What goes well with it

A hot mug of spiced chai tea makes a perfect companion. Its warm notes beautifully echo the spices in the Vanilla Chai Pumpkin Spice Latte Cupcakes, creating a harmonious and cozy experience. For a cool contrast, a glass of cold milk wonderfully balances the cupcake’s rich warmth.

If you are planning a full dessert spread, consider pairing these cupcakes with a lighter option. Our classic Vanilla Bean Cupcakes offer a simple, creamy counterpart that pleases every palate. Furthermore, a scoop of our Salted Caramel Ice Cream alongside a slightly warmed cupcake creates an unforgettable sweet and salty combination.

Can I make Vanilla Chai Pumpkin Spice Latte Cupcakes ahead of time?

Absolutely! You can bake the cupcakes 1-2 days in advance. Let them cool completely, then store them in an airtight container at room temperature. For the best flavor and texture, frost your Vanilla Chai Pumpkin Spice Latte Cupcakes the day you plan to serve them.

What is a good substitute for the chai concentrate in this recipe?

If you don’t have prepared chai concentrate, you can use strongly brewed chai tea that has been cooled. Alternatively, you can mix 1 teaspoon of chai spice blend into a cup of milk or a milk alternative to infuse the flavor directly into your Vanilla Chai Pumpkin Spice Latte Cupcakes batter.

How do I prevent my cupcakes from becoming too dense?

To avoid dense cupcakes, be careful not to overmix the batter once you add the dry ingredients. Mix just until the flour is incorporated. Also, ensure your baking powder is fresh for proper leavening. These steps will help you achieve a light, fluffy crumb in your Vanilla Chai Pumpkin Spice Latte Cupcakes.

Can I make these cupcakes dairy-free or vegan?

Yes, you can easily adapt this recipe. Use a plant-based milk and vegan butter in both the cupcake and frosting. For the egg, a flax egg or commercial egg replacer works well. Just make sure your chai concentrate and pumpkin puree are also vegan to create delicious dairy-free Vanilla Chai Pumpkin Spice Latte Cupcakes.

Print
clock clock iconcutlery cutlery iconflag flag iconfolder folder iconinstagram instagram iconpinterest pinterest iconfacebook facebook iconprint print iconsquares squares iconheart heart iconheart solid heart solid icon

Vanilla Chai Pumpkin Spice Latte Cupcakes


  • Author: Chef Mia

Description

Moist pumpkin cupcakes infused with chai spices and topped with a creamy vanilla latte frosting.


Ingredients

Scale

For the Crust:

  • 1 3/4 cups all-purpose flour
  • 1 tsp baking powder
  • 1/2 tsp baking soda
  • 1/2 tsp salt
  • 2 tsp pumpkin pie spice
  • 1 tsp ground cinnamon
  • 1/2 tsp ground ginger
  • 1/4 tsp ground cardamom
  • 1/4 tsp ground cloves
  • 1 cup canned pumpkin puree
  • 1/2 cup granulated sugar
  • 1/2 cup brown sugar
  • 2 large eggs
  • 1/2 cup vegetable oil
  • 1/4 cup strong brewed chai tea
  • 1 tsp vanilla extract
  • 8 oz cream cheese, softened
  • 1/2 cup unsalted butter, softened
  • 3 cups powdered sugar
  • 1 tbsp instant coffee dissolved in 1 tbsp hot water
  • 1 tsp vanilla extract

Instructions

1. Prepare the Crust:

  1. Preheat oven to 350Β°F and line a muffin tin with cupcake liners.
  2. Whisk together flour, baking powder, baking soda, salt, and spices in a medium bowl.
  3. In a large bowl, mix pumpkin, sugars, eggs, oil, chai tea, and vanilla until smooth.
  4. Gradually add dry ingredients to wet ingredients, mixing until just combined.
  5. Divide batter evenly among cupcake liners and bake for 18-20 minutes. Cool completely.
  6. For frosting, beat cream cheese and butter until fluffy. Add powdered sugar, coffee mixture, and vanilla, beating until smooth.
  7. Frost cooled cupcakes and sprinkle with additional cinnamon if desired.

Notes

You can customize the seasonings to taste.

Best Apple Muffins with Crumb Topping Recipe

best-apple-muffins-crumb-topping

Introduction

Is there anything cozier than the smell of warm baking spices filling your kitchen? Honestly, that sweet, cinnamon-kissed aroma instantly wraps you in a sense of comfort and nostalgia. Today, we chase that perfect feeling with a batch of the most irresistible Apple Muffins with Crumb Topping. This recipe promises a moist, tender crumb packed with fresh fruit and crowned with a buttery, crunchy streusel that you will absolutely adore. Ultimately, it is the ultimate handheld treat for a crisp autumn morning or any time you need a little homemade happiness.

So what exactly are Apple Muffins with Crumb Topping? Fundamentally, they are a classic muffin batter, often spiced with cinnamon and nutmeg, that gets loaded with chunks of fresh apple. The real magic, however, happens on top with a generous layer of buttery crumb topping that bakes into a sweet, crunchy crust. This delightful contrast between the soft, spiced muffin and the crispy, sugary topping is what makes them so special and beloved. For anyone seeking a foolproof baking project, these muffins matter because they deliver impressive, bakery-quality results without any complicated techniques. They fit perfectly into the rhythm of a busy week, offering a from-scratch breakfast or snack that feels both wholesome and indulgent. If you find yourself with a bounty of fruit, this recipe is a fantastic way to use it up, much like our popular Apple Crisp. Furthermore, this recipe embodies our blog’s core mission: to share approachable, reliably delicious recipes that create genuine moments of joy around food. We firmly believe that baking should be a stress-free, enjoyable experience, and this recipe delivers exactly that. Whether you are a seasoned baker or just starting out, you will find the process straightforward and the results incredibly rewarding. For another simple yet stunning baked good, you might also enjoy our classic Banana Bread recipe.

Why I Love This Recipe

This recipe holds a special place in my heart because it reminds me of baking with my grandmother. She always had a way of turning simple ingredients into something magical, and the smell of these muffins baking instantly transports me back to her sunny kitchen. I love how the tart apples perfectly balance the sweet crumble, creating a flavor that is never too one-dimensional. Most importantly, sharing a warm batch with my own family now and seeing their faces light up continues that beautiful tradition of comfort and connection.

Health and Nutrition

Why it’s good for your body

These Apple Muffins with Crumb Topping offer a surprisingly wholesome treat. First, they pack a powerful punch of dietary fiber from the fresh apples and whole wheat flour. Consequently, this fiber helps to support healthy digestion and keeps you feeling full and satisfied for longer. Furthermore, apples provide essential vitamins like Vitamin C, which bolsters your immune system.

Additionally, the natural sweetness of the apples means you can often use less refined sugar in the batter. Moreover, cinnamon, a key spice in these muffins, boasts its own anti-inflammatory properties. Therefore, enjoying an Apple Muffin with Crumb Topping is a delicious way to give your body beneficial nutrients. Ultimately, this recipe transforms a simple snack into a supportive choice for your well-being.

How it fits in a healthy lifestyle

You can absolutely enjoy these Apple Muffins with Crumb Topping as part of a balanced diet. Think of them as a satisfying snack or a mindful dessert rather than an everyday breakfast. For instance, pairing half a muffin with a source of protein like Greek yogurt creates a perfectly balanced mini-meal that curbs cravings.

We love baking these ahead for quick, portion-controlled treats throughout a busy week. If you are exploring specific dietary needs, you can easily adapt this recipe. For a gluten-free version, simply try our trusted method for making a gluten-free flour blend. You can also reduce the sugar slightly if you are monitoring your intake. Remember, healthy eating is all about balance and joy. For more inspiration on incorporating treats wisely, check out our guide on easy healthy meal prep that the whole family will love.

How to Prepare This Dish

Steps and time-saving tips

First, preheat your oven to 375Β°F and line a muffin tin with paper liners. This simple step ensures your Apple Muffins with Crumb Topping won’t stick. Meanwhile, whisk together the flour, baking powder, cinnamon, and salt in a large bowl. In a separate bowl, combine the wet ingredients like oil, sugar, eggs, and vanilla. Then, pour the wet mixture into the dry ingredients and gently fold everything together. Importantly, do not overmix the batter; a few lumps are perfectly fine. Next, fold in the finely chopped apples until they are just distributed. For a major time-saver, use a box grater to shred your apples quickly; this also distributes their flavor more evenly throughout each muffin. Spoon the batter evenly into the prepared muffin cups. Now, make the irresistible crumb topping by mixing flour, brown sugar, cinnamon, and cold butter with your fingers until it resembles coarse sand. Generously sprinkle this mixture over each muffin cup. Finally, bake for 20-25 minutes until a toothpick comes out clean. Let the muffins cool in the pan for just five minutes before transferring them to a wire rack. This prevents the bottoms from getting soggy and ensures your Apple Muffins with Crumb Topping have the perfect texture.

Mistakes I’ve made and learned from

I used to make the classic mistake of overmixing my muffin batter, which resulted in tough, dense Apple Muffins with Crumb Topping instead of the light, tender crumb I craved. I learned that a few streaks of flour are totally okay; the batter should look a little shaggy. Another common error was using melted butter for the crumb topping. This created a paste that melted completely into the muffin instead of forming those delightful, crunchy clusters. Using cold butter is the absolute key to success. For more on getting textures just right, my guide on common baking mistakes dives deeper into these pitfalls. Also, if your fruit desserts sometimes turn out soggy, my tips for avoiding a soggy bottom in pies apply perfectly to ensuring your muffin bottoms bake up nice and dry.

Cultural Connection and Variations

Where this recipe comes from

Apple Muffins with Crumb Topping feel like a hug from your grandma’s kitchen, don’t they? Their story really begins with the humble apple crumble, a classic dessert that home cooks across Europe and North America have cherished for generations. Families would toss their autumn apple harvest with sugar and spices, then blanket it with a simple, buttery streusel. Consequently, someone brilliantly decided to take that beloved flavor combination and bake it into a portable, individual muffin. This was a stroke of genius.

Different regions put their own spin on this treat. In New England, for instance, bakers often use tart McIntosh apples and a hearty dose of cinnamon for a real taste of fall. Meanwhile, German bakers might incorporate nuts like hazelnuts into their streusel topping for extra crunch. My own family always adds a pinch of cardamom to the batter, a subtle nod to our Scandinavian heritage that makes the whole house smell incredible. Ultimately, every baker adds their own signature touch, making each batch of Apple Muffins with Crumb Topping uniquely their own.

How it fits in today’s cooking

This recipe absolutely thrives in modern kitchens. It seamlessly fits into our busy lives as the perfect grab-and-go breakfast or a satisfying afternoon snack. Furthermore, its cozy, spiced aroma makes it a staple for holiday mornings and crisp autumn weekends alike. Today’s health-conscious cooks often adapt it by using whole wheat flour, reducing the sugar, or even making them gluten-free, proving its incredible versatility.

Many people now include these muffins in their weekly meal prep routine for a guaranteed wholesome treat. They pair wonderfully with a cup of coffee, making them ideal for a leisurely weekend brunch. For another fantastic make-ahead breakfast idea, consider our popular Overnight Oats recipe. If you love the warm spices in these muffins, you will definitely adore the flavors in our Classic Pumpkin Bread. This classic comfort food continues to bring people together, one delicious muffin at a time.

Taste and Texture

What makes it delicious

These Apple Muffins with Crumb Topping deliver a perfect harmony of comforting flavors and contrasting textures. Firstly, the muffin itself is incredibly moist and tender, packed with sweet, slightly tart bites of soft apple. Meanwhile, the buttery crumb topping bakes into a delightfully crisp and crunchy shell. Warm spices like cinnamon and nutmeg create a fragrant aroma that fills your kitchen. Ultimately, each bite of these Apple Muffins with Crumb Topping offers a satisfying mix of soft, fruity interior and sugary, crisp perfection.

Boosting the flavor

You can easily elevate these muffins with a few creative twists. For instance, try swapping the vanilla extract for a dash of bourbon or rum to add a warm, deep undertone. Additionally, a simple drizzle of homemade vanilla glaze adds a sweet, creamy finish that complements the spices beautifully. Furthermore, consider serving them warm with a side of cinnamon whipped cream for an extra indulgent treat. Finally, a pinch of cardamom mixed with the cinnamon introduces a unique, aromatic complexity that makes every bite exciting.

Tips for Success

Best practices for results

Always chill your crumb topping for at least 15 minutes before baking, as this step helps it hold its shape and creates a delightful texture. For the best flavor, use a mix of tart and sweet apples to give your Apple Muffins with Crumb Topping a complex taste profile. Additionally, do not overmix the batter; instead, gently fold the dry ingredients into the wet ones until they are just combined for a tender muffin crumb.

Mistakes to avoid

A common mistake is using the wrong type of apple, which can lead to a soggy or overly mushy texture. For guidance on selecting the best fruit, explore our guide on how to choose apples for baking. Furthermore, many bakers accidentally overfill the muffin liners, which causes the batter to spill over and bake unevenly. To guarantee perfect portions every time, consider using a cookie scoop for even distribution.

Serving and Pairing Suggestions

How to serve this dish

Serve these Apple Muffins with Crumb Topping warm for the ultimate cozy experience. For a beautiful presentation, arrange them on a rustic wooden board or a vintage cake stand. Meanwhile, a light dusting of powdered sugar just before serving adds a touch of elegance. These muffins truly shine during weekend brunches or holiday mornings. Furthermore, placing a small pat of softened butter on the side allows everyone to add an extra layer of richness.

Consider toasting day-old muffins to revive that just-baked magic. Ultimately, the inviting aroma and homestyle look of Apple Muffins with Crumb Topping make them a visually appealing centerpiece for any table.

What goes well with it

A hot cup of coffee perfectly cuts through the sweetness of these Apple Muffins with Crumb Topping. Alternatively, a cold glass of milk provides a classic, comforting pairing that everyone loves. For a special brunch spread, serve them alongside a light and fluffy Spinach Feta Quiche to balance the meal.

If you want to lean into the dessert vibe, a scoop of vanilla bean ice cream turns them into a decadent treat. Finally, a smooth and creamy Vanilla Custard makes for an incredible dipping sauce that complements the warm spices.

What is the best apple for apple muffins?

For the best texture and flavor in your Apple Muffins with Crumb Topping, use firm, tart apples like Granny Smith or Honeycrisp. These varieties hold their shape during baking and provide a nice contrast to the sweet crumb topping. Avoid softer apples like Red Delicious, as they can become too mushy.

How do you make crumb topping for muffins?

A classic crumb topping is made by combining cold butter, flour, and brown sugar with your fingers or a fork until the mixture resembles coarse crumbs. For extra flavor, a pinch of cinnamon or nutmeg works wonderfully. This simple mixture creates the perfect crunchy, sweet layer for your Apple Muffins with Crumb Topping.

Can you freeze apple crumb muffins?

Yes, Apple Muffins with Crumb Topping freeze exceptionally well. Let the muffins cool completely, then store them in a single layer in a freezer-safe bag or container for up to 3 months. Thaw them at room temperature or warm them up in the oven to refresh that just-baked taste and texture.

Why are my apple muffins soggy?

Soggy muffins are often caused by too much moisture from the apples. To prevent this, toss your diced apple pieces in a little flour before folding them into the batter; this helps absorb excess liquid. Also, ensure you don’t overmix the batter, as this can lead to a dense, wet texture.

Print
clock clock iconcutlery cutlery iconflag flag iconfolder folder iconinstagram instagram iconpinterest pinterest iconfacebook facebook iconprint print iconsquares squares iconheart heart iconheart solid heart solid icon

Apple Muffins with Crumb Topping


  • Author: Chef Mia

Description

Moist and tender apple muffins topped with a sweet, buttery crumb topping. Perfect for breakfast or a snack.


Ingredients

Scale

For the Crust:

  • 2 cups all-purpose flour
  • 1/2 cup granulated sugar
  • 1/4 cup brown sugar
  • 2 tsp baking powder
  • 1/2 tsp salt
  • 1 tsp ground cinnamon
  • 1/4 tsp ground nutmeg
  • 1 cup milk
  • 1/2 cup unsalted butter, melted
  • 2 large eggs
  • 1 tsp vanilla extract
  • 1 1/2 cups finely chopped apples
  • For crumb topping: 1/2 cup flour, 1/4 cup brown sugar, 1/4 cup granulated sugar, 1/4 cup cold butter, cubed, 1/2 tsp cinnamon

Instructions

1. Prepare the Crust:

  1. Preheat oven to 375Β°F (190Β°C) and line a muffin tin with paper liners.
  2. In a large bowl, whisk together flour, sugars, baking powder, salt, cinnamon, and nutmeg.
  3. In another bowl, mix milk, melted butter, eggs, and vanilla. Pour into dry ingredients and stir until just combined. Fold in chopped apples.
  4. For the topping, combine flour, sugars, and cinnamon. Cut in cold butter until mixture resembles coarse crumbs.
  5. Fill muffin cups 2/3 full. Sprinkle crumb topping generously over each.
  6. Bake for 20-25 minutes or until a toothpick comes out clean. Cool in pan for 5 minutes, then transfer to a wire rack.

Notes

You can customize the seasonings to taste.

Easy Spiced Apple Fritter Bread for Fall

easy-spiced-apple-fritter-bread

Introduction

Is there anything more comforting than the smell of warm spices and baked apples wafting through your kitchen on a crisp autumn day? Honestly, this aroma instantly transports me to a place of pure coziness. Furthermore, it signals that something incredibly delicious is moments away from coming out of the oven. Today, we are making that feeling a reality with the ultimate seasonal treat: Spiced Apple Fritter Bread for Fall. This recipe masterfully combines the soft, tender crumb of a quick bread with the irresistible, sugary-cinnamon swirl of your favorite apple fritter donut. Ultimately, it is the perfect project for a relaxing weekend morning.

So what exactly is this Spiced Apple Fritter Bread for Fall? Essentially, it is a moist, spice-infused loaf cake packed with fresh, tender apple pieces and layered with a rich cinnamon sugar ribbon. During baking, this ribbon melts into a sweet, gooey swirl that makes every single slice absolutely irresistible. This recipe matters because it captures the very essence of the season in one delectable loaf. It transforms simple, wholesome ingredients into a spectacular bake that feels both special and wonderfully familiar. Moreover, it fits our blog’s tone perfectly as we always strive to share approachable recipes that deliver maximum flavor and comfort. This bread is a fantastic way to use a bounty of fall apples, and it fills your home with an aroma that is nothing short of magical. For another fantastic way to use seasonal fruit, you must try our classic Homemade Apple Pie. Additionally, this bread is incredibly versatile; you can enjoy it for breakfast with a cup of coffee, as an afternoon snack, or even as a simple dessert. It is the kind of bake that brings people together, creating warm memories around the kitchen table. If you adore cozy, spiced desserts, our Ultimate Pumpkin Bread is another must-make recipe for your autumn baking list.

Why I Love This Recipe

I have a deep personal connection to this Spiced Apple Fritter Bread for Fall. Every year, without fail, my family and I go apple picking, and we always come home with far more fruit than we know what to do with. Consequently, I am constantly experimenting with new recipes. This particular bread, however, quickly became our unanimous favorite. I love how the process of layering the cinnamon sugar and apples feels almost therapeutic, and the reward of pulling that golden, fragrant loaf from the oven is simply unbeatable. Most importantly, it reminds me of those sunny, crisp afternoons spent with my family in the orchard, and now the smell of it baking brings all those happy feelings right back into our home.

Health and Nutrition

Why it’s good for your body

This Spiced Apple Fritter Bread for Fall brings more than just incredible flavor to your table; it also offers some genuine nutritional perks. For instance, the star ingredient, apples, provides a solid dose of dietary fiber. This fiber supports healthy digestion and helps you feel satisfied longer after you enjoy a slice. Furthermore, apples contribute beneficial antioxidants and essential vitamins like vitamin C to support your immune system, which is especially important as the seasons change.

Moreover, the warming spices like cinnamon and nutmeg do more than just create that classic autumn aroma. In fact, cinnamon is well-known for its potential to help regulate blood sugar levels, adding a functional benefit to every delicious bite. Additionally, you can feel good about using ingredients like Greek yogurt, which often replaces some fats while adding a protein boost and a delightful moisture to the final product. Ultimately, this Spiced Apple Fritter Bread for Fall is a treat that thoughtfully balances indulgence with wholesome ingredients.

How it fits in a healthy lifestyle

You can absolutely enjoy this Spiced Apple Fritter Bread for Fall as part of a balanced diet. Think of it as a satisfying snack with your afternoon tea or a special weekend breakfast that feels decadent without derailing your goals. For a heart-healthy twist, you can easily use a light olive oil or swap in whole wheat pastry flour to increase the fiber content.

Pairing a slice with a source of protein, like a handful of almonds or a glass of milk, can make it an even more complete and sustaining meal. If you are exploring other ways to enjoy seasonal flavors healthfully, our guide to healthy baking substitutions offers fantastic tips. Remember, a healthy lifestyle is all about balance and enjoying the foods you love. For more inspiration on mindful eating, check out our thoughts on mindful eating practices that help you savor every single bite.

How to Prepare This Dish

Steps and time-saving tips

First, preheat your oven and generously grease a standard loaf pan. Meanwhile, whisk together all your dry ingredients in a large bowl. In a separate bowl, vigorously mix the wet ingredients like eggs, milk, and melted butter until they are perfectly smooth. Next, gently fold the wet mixture into the dry ingredients; however, be careful not to overmix the batter. A few lumps are absolutely fine and will guarantee a tender crumb. Now, toss your chopped apples with the cinnamon-sugar filling in a small bowl. Pour half of your batter into the prepared pan, then layer half of the spiced apples on top. Swirl them gently with a knife before repeating the layers. Finally, bake your Spiced Apple Fritter Bread for Fall until a toothpick inserted comes out clean. For a speedy cleanup, consider using the same bowl for your wet ingredients first. Additionally, you can prepare the cinnamon swirl mixture ahead of time. Let the loaf cool slightly before you drizzle the simple glaze on top. This Spiced Apple Fritter Bread for Fall fills your kitchen with an incredible aroma and makes breakfast feel special.

Mistakes I’ve made and learned from

I once rushed the mixing process for my Spiced Apple Fritter Bread for Fall and ended up with a tough, dense loaf. I learned that gently folding the batter just until combined is the true secret to a soft, bakery-style texture. Another time, I used apples that turned to mush during baking, which taught me to always choose firmer varieties like Granny Smith or Honeycrisp that hold their shape. Forgetting to properly grease the pan was also a frustrating lesson, resulting in a loaf that stubbornly stuck to the corners. Now, I swear by a thorough coating of butter and a parchment paper sling for a perfect release every time. If you’re new to baking, my guide on common baking mistakes can help you avoid these pitfalls. And for picking the perfect fruit, my post on the best apples for baking is a great resource. Trust me, learning from these errors will make your Spiced Apple Fritter Bread for Fall absolutely flawless.

Cultural Connection and Variations

Where this recipe comes from

This Spiced Apple Fritter Bread for Fall feels like a warm hug from generations past. It pulls inspiration from classic Dutch apple fritters, which families traditionally fry during cold months. However, we bake ours into a comforting loaf. This method captures all the cozy, spiced flavor without the fuss of a pot of hot oil. My own grandmother always made a similar version when the first crisp air arrived. She would use whatever apples her neighbors shared from their backyard trees. Consequently, every single loaf tasted just a little bit different, yet always magical.

Around the world, cultures celebrate the apple harvest with their own fried or baked treats. For instance, Polish communities enjoy pΔ…czki, a rich filled doughnut that often features apple. Meanwhile, in many Latin American countries, you might find empanadas filled with spiced apple. Our Spiced Apple Fritter Bread for Fall fits right into this global tradition of turning fresh fruit into something special. Some families add a handful of nuts for crunch, while others might swirl in a ribbon of caramel. Ultimately, this recipe welcomes your own personal touch, making it a beautiful and delicious part of your autumn story.

How it fits in today’s cooking

This bread absolutely earns its place in modern kitchens. It perfectly bridges the gap between a weekend baking project and an easy breakfast. Busy home cooks adore it because it delivers that classic fritter taste without the mess of deep frying. Furthermore, its incredible aroma of cinnamon and baked apples makes any morning feel like a holiday. You can easily enjoy a slice with your coffee or even serve it as a simple yet impressive dessert.

Many bakers now adapt the recipe to fit different dietary needs, using gluten-free flour or plant-based milks. It also pairs wonderfully with other seasonal favorites. For example, you can serve it alongside a slice of our popular Pumpkin Bread for a fantastic fall brunch spread. Additionally, its comforting nature makes it a fantastic choice for a cozy dessert, especially when paired with a scoop of our homemade Vanilla Ice Cream. This Spiced Apple Fritter Bread for Fall truly is a timeless treat that fits right into today’s cooking routines.

Taste and Texture

What makes it delicious

This Spiced Apple Fritter Bread for Fall greets you with an intoxicatingly warm aroma first. Fragrant cinnamon and nutmeg mingle with the sweet scent of baked apples. Each moist, tender slice delivers a delightful chew. Meanwhile, the brown sugar and apple ribbon creates pockets of gooey, caramel-like goodness. Ultimately, the crunchy cinnamon-swirl streusel topping provides a perfect textural contrast. This combination makes every bite of Spiced Apple Fritter Bread for Fall a cozy and satisfying experience.

Boosting the flavor

You can easily elevate this autumnal treat with a few creative twists. For instance, a simple vanilla glaze drizzled over the top adds a sweet, creamy finish that complements the spices beautifully. Alternatively, consider serving a warm slice alongside a scoop of vanilla bean ice cream for a decadent dessert. Furthermore, toasting a piece the next day revitalizes the crunchy topping and makes your kitchen smell amazing again. If you adore apple desserts, our classic Apple Crumble Cake offers another fantastic way to enjoy the season’s best flavors. For another baking project that fills your home with warmth, our Pumpkin Cinnamon Rolls are a must-try. Consequently, a small change can make your baking even more special.

Tips for Success

Best practices for results

Always use room temperature ingredients for your Spiced Apple Fritter Bread for Fall because they emulsify much better. Furthermore, make sure you properly measure your flour by spooning it into the cup and leveling it off. Consequently, you will avoid a dense and dry loaf. Additionally, do not overmix the batter once you add the dry ingredients; just mix until the streaks of flour disappear. Finally, let the bread cool in the pan for at least twenty minutes before transferring it to a wire rack.

Mistakes to avoid

Avoid using the wrong type of apple, as a mealy variety will become mushy during baking. Instead, choose a firm, tart apple like Granny Smith for the best texture and flavor in your Spiced Apple Fritter Bread for Fall. Moreover, do not skip the step of tossing the apples in the cinnamon-sugar mixture, since this ensures every bite is perfectly spiced. Also, never overfill your loaf pan, or the batter could spill over while baking. For more guidance on selecting the best ingredients, check out our guide on how to choose ingredients. Additionally, if your bread is browning too quickly, simply tent it with foil; this is a common issue we address in our common baking mistakes article.

Serving and Pairing Suggestions

How to serve this dish

Present your Spiced Apple Fritter Bread for Fall warm to maximize its incredible aroma. For a beautiful brunch centerpiece, dust the top with a light snowfall of powdered sugar. Alternatively, drizzle a simple vanilla glaze over each slice just before serving. This creates a stunning, glossy finish perfect for holiday gatherings. Serve it on a rustic wooden board for a cozy, autumnal feel that everyone will love.

Furthermore, consider toasting individual slices for a crispier texture. This method works wonderfully for a quick weekday breakfast. Ultimately, this Spiced Apple Fritter Bread for Fall brings joy to any table setting, from a casual family coffee break to a formal Thanksgiving dessert spread.

What goes well with it

A hot cup of coffee makes the ultimate partner for this bread. The robust bitterness of the brew beautifully cuts through the sweet, spiced notes of the Spiced Apple Fritter Bread for Fall. For a truly decadent experience, try a scoop of vanilla bean ice cream alongside a warm slice. The melting ice cream creates a luxurious sauce that soaks into the bread. Additionally, a sharp whipped cream cheese frosting can provide a delightful tangy contrast.

If you are serving it for a special occasion, pair it with a glass of chilled dessert wine. The wine’s sweetness will harmonize with the apples and cinnamon. Finally, consider a simple side of fresh fruit salad to add a light, refreshing element to your indulgent treat. This Spiced Apple Fritter Bread for Fall also pairs wonderfully with our creamy cinnamon honey butter for an extra layer of flavor.

What is the best type of apple to use for Spiced Apple Fritter Bread for Fall?

For the best flavor and texture in your Spiced Apple Fritter Bread for Fall, use firm, tart apples like Granny Smith or Honeycrisp. These varieties hold their shape during baking and provide a pleasant contrast to the sweet, spiced batter. Avoid apples that turn mushy easily, like Red Delicious, to ensure your bread has the perfect bite.

Can I make Spiced Apple Fritter Bread ahead of time?

Absolutely! This Spiced Apple Fritter Bread for Fall actually tastes even better the next day as the flavors have more time to meld. Let the loaf cool completely, then wrap it tightly in plastic wrap or store it in an airtight container at room temperature for up to 3 days for optimal freshness.

How do I prevent my apple bread from becoming soggy?

The key to avoiding a soggy loaf is to properly prepare your apples. Tossing the diced apple pieces in a little bit of the flour and spice mixture from the recipe helps to absorb excess moisture. This simple trick ensures your Spiced Apple Fritter Bread for Fall bakes up moist but never wet or dense.

Can I freeze Spiced Apple Fritter Bread?

Yes, this bread freezes beautifully. Allow the loaf to cool completely, then wrap it tightly in plastic wrap followed by a layer of aluminum foil. Freeze for up to 3 months. Thaw overnight in the refrigerator or at room temperature for a few hours for a delicious taste of fall anytime.

Print
clock clock iconcutlery cutlery iconflag flag iconfolder folder iconinstagram instagram iconpinterest pinterest iconfacebook facebook iconprint print iconsquares squares iconheart heart iconheart solid heart solid icon

Spiced Apple Fritter Bread for Fall


  • Author: Chef Mia

Description

A warm, spiced quick bread swirled with cinnamon-sugar apples and topped with a sweet glaze, perfect for autumn mornings.


Ingredients

Scale

For the Crust:

  • 2 cups all-purpose flour
  • 1 1/2 tsp baking powder
  • 1/2 tsp salt
  • 1/2 cup unsalted butter, softened
  • 3/4 cup granulated sugar
  • 2 large eggs
  • 1 tsp vanilla extract
  • 1/2 cup milk
  • 2 medium apples, peeled and diced
  • 1/3 cup brown sugar
  • 1 tsp ground cinnamon
  • 1/4 tsp nutmeg
  • 1/2 cup powdered sugar
  • 2 tbsp milk

Instructions

1. Prepare the Crust:

  1. Preheat oven to 350Β°F. Grease a 9Γ—5 inch loaf pan.
  2. In a bowl, mix diced apples with brown sugar, cinnamon, and nutmeg. Set aside.
  3. In another bowl, whisk flour, baking powder, and salt. In a separate bowl, cream butter and sugar until fluffy. Beat in eggs and vanilla.
  4. Alternately add flour mixture and milk to butter mixture, beginning and ending with flour. Fold in half the apple mixture.
  5. Pour half the batter into pan. Top with remaining apples, then remaining batter. Swirl gently with a knife.
  6. Bake 50-60 minutes until a toothpick comes out clean. Cool in pan 10 minutes, then transfer to a rack.
  7. Whisk powdered sugar and milk for glaze. Drizzle over cooled bread before serving.

Notes

You can customize the seasonings to taste.

Best Apple Cider Cookies – Soft and Chewy Recipe

best-apple-cider-cookies-recipe

Introduction

Is there anything more comforting than the warm, spiced aroma of apple cider filling your kitchen? Now, imagine capturing that cozy, autumnal feeling in every single bite of a perfectly soft and chewy cookie. These Apple Cider Cookies (Soft and Chewy Cookie Recipe) – Olives + Thyme do exactly that, offering a deliciously festive treat that feels like a hug from the inside. Ultimately, they are the ultimate edible celebration of fall, and I cannot wait for you to experience them.

These Apple Cider Cookies (Soft and Chewy Cookie Recipe) – Olives + Thyme are not your average cookie. They start with a dough infused with reduced apple cider, which concentrates its tangy, spiced flavor into a powerful syrup. This crucial step ensures every single cookie bursts with genuine apple cider taste. Additionally, we cream the butter and sugar to the perfect consistency for a delightfully chewy texture that stays soft for days. Consequently, the result is a bakery-style cookie with a crackly top and a tender, flavorful center that truly embodies the essence of the season. This recipe matters because it elevates a simple cookie into a special occasion dessert, perfect for holiday gatherings, Thanksgiving feasts, or simply savoring a quiet moment with a warm drink. Furthermore, it fits the Olives + Thyme blog perfectly, as we always strive to share approachable recipes with clear, tested instructions that guarantee success for every home baker. For another fantastic cookie idea that uses seasonal fruit, you must try our Apple Butter Snickerdoodles. Moreover, if you love the warm spices in these cookies, our Pumpkin Chocolate Chip Cookies are another fall favorite you will adore.

Why I Love This Recipe

I have a deep personal connection to these Apple Cider Cookies (Soft and Chewy Cookie Recipe) – Olives + Thyme. Every year, my family and I visit a local orchard to pick apples and drink fresh cider. I always wanted to create a recipe that captured that memory in a lasting way. These cookies are that recipe for me. The process of reducing the cider fills my home with the most incredible scent, and sharing the final warm cookies with my family creates a new tradition that we all cherish. They truly taste like autumn, and that is a feeling I love to bake into existence.

Health and Nutrition

Why it’s good for your body

These Apple Cider Cookies (Soft and Chewy Cookie Recipe) – Olives + Thyme offer more than just incredible flavor. First, they pack a powerful punch of apple cider, which provides beneficial antioxidants and polyphenols. These compounds actively help your body combat oxidative stress. Furthermore, the recipe uses warming spices like cinnamon and nutmeg. These spices not only create a cozy aroma but also support healthy digestion and have anti-inflammatory properties.

Additionally, this particular cookie recipe often calls for oats, which contribute soluble fiber. This fiber actively helps to maintain healthy cholesterol levels and promotes a feeling of fullness. Consequently, you can enjoy a satisfying treat that helps manage your appetite. Ultimately, choosing a wholesome treat like Apple Cider Cookies (Soft and Chewy Cookie Recipe) – Olives + Thyme means you indulge your sweet tooth while also giving your body some valuable nutrients. Finally, the use of real apple cider reduction means you get a concentrated flavor without relying solely on refined sugars.

How it fits in a healthy lifestyle

Enjoying these soft and chewy cookies fits perfectly into a balanced approach to eating. You can mindfully savor one or two as an afternoon snack with a cup of tea, providing a moment of comfort and a sustainable energy boost. This recipe also adapts beautifully to various dietary needs. For instance, you can easily use a 1:1 gluten-free flour blend to make them celiac-friendly.

Pairing a cookie with a source of protein, like a handful of almonds or a glass of milk, makes for a more complete and satisfying treat. Remember, a healthy lifestyle is all about balance and finding joy in your food. For more inspiration on creating wholesome treats, explore our guide on healthy baking substitutions. If you are looking for another delicious way to enjoy seasonal flavors, our favorite pumpkin muffins are a fantastic option. Baking these Apple Cider Cookies (Soft and Chewy Cookie Recipe) – Olives + Thyme at home allows you to control the ingredients, making them a smarter choice than most store-bought alternatives.

How to Prepare This Dish

Steps and time-saving tips

First, reduce your apple cider to intensify that signature flavor without making the dough wet. Simply simmer two cups in a saucepan until it becomes a thick, syrupy quarter cup; this crucial step concentrates the taste and guarantees a soft, chewy texture. Meanwhile, cream room temperature butter with both granulated and brown sugars until the mixture becomes light and fluffy; this process incorporates air, which is essential for the perfect cookie structure. Next, beat in your reduced cider, an egg, and vanilla extract until everything is just combined. In a separate bowl, whisk together your flour, baking soda, cinnamon, and salt to ensure the leavening agents and spices distribute evenly. Gradually add these dry ingredients to your wet mixture, stirring gently until no flour streaks remain. For a time-saving tip, use a cookie scoop to portion the dough onto your baking sheet; this guarantees uniformly sized cookies that bake at the same rate. Finally, chill the dough for at least thirty minutes to prevent excessive spreading in the oven. Bake until the edges are just set but the centers still look soft; they will firm up perfectly as they cool on the pan.

Mistakes I’ve made and learned from

I learned the hard way that skipping the reduction step for the apple cider creates a flat, cakey cookie instead of the soft and chewy texture we all love. The extra liquid from unp reduced cider activates too much gluten, leading to a disappointing bake. Another common error I made was using cold, hard butter straight from the fridge, which simply won’t cream properly with the sugars. This results in a dense cookie that doesn’t have that lovely light crumb. I also used to overmix the dough in a rush, which is a surefire way to develop too much gluten and create a tough cookie. Now, I always ensure my butter is perfectly softened, and I mix just until the ingredients combine. For more on why ingredient temperatures matter so much, my guide on common baking mistakes dives deeper. Trust me, taking the time to reduce the cider and properly cream your butter makes all the difference, much like getting your oven temperature exactly right for a perfect bake every single time.

Cultural Connection and Variations

Where this recipe comes from

Every autumn, apple orchards across the Midwest and New England burst into life. Consequently, communities celebrate the harvest with festivals, hayrides, and of course, gallons of fresh apple cider. This recipe for Apple Cider Cookies (Soft and Chewy Cookie Recipe) – Olives + Thyme directly captures that festive, cozy spirit in a single, spiced bite. My own version pulls from those memories, reducing fresh cider into a syrup that packs an incredible punch of flavor.

Meanwhile, different regions put their own spin on apple treats. For instance, Pennsylvania Dutch bakers might add a brown sugar swirl, while Southern cooks could incorporate a tangy buttermilk glaze. Some families swear by a cake-like texture, loading the batter with chopped apples. Ultimately, the goal remains the same: to bottle up the essence of fall. This particular recipe for Apple Cider Cookies (Soft and Chewy Cookie Recipe) – Olives + Thyme champions a soft, chewy texture that perfectly complements a crisp autumn day.

How it fits in today’s cooking

Today, these cookies absolutely thrive as a modern seasonal staple. They seamlessly fit into holiday cookie boxes, serve as a thoughtful homemade gift, and become the star of any cozy baking session. Furthermore, contemporary bakers love adapting them; some use gluten-free flour blends, while others might stir in white chocolate chips for extra sweetness.

This recipe also fits perfectly into today’s rhythm of comfort cooking. For example, baking a batch creates a warm, inviting aroma that makes any house feel like a home. Moreover, they pair wonderfully with a cup of coffee for an afternoon pick-me-up. If you enjoy these, you might also love exploring other creative desserts, like these stunning mirror glaze cakes for a special occasion. Ultimately, the tradition of baking with seasonal ingredients continues to connect us. Similarly, finding new favorites, perhaps a decadent chocolate hazelnut cake, keeps our culinary journeys exciting and delicious.

Taste and Texture

What makes it delicious

These Apple Cider Cookies (Soft and Chewy Cookie Recipe) – Olives + Thyme deliver a warm, spiced aroma that fills your kitchen with the essence of autumn. Each bite offers a wonderfully soft and chewy texture that contrasts with the crisp, sugary edges. Furthermore, the reduced apple cider packs a concentrated, tangy-sweet flavor that perfectly complements the warm notes of cinnamon and nutmeg. Ultimately, the rich brown sugar base creates a deep molasses undertone, making every mouthful a cozy and satisfying experience. You will absolutely adore the comforting taste and feel of these Apple Cider Cookies (Soft and Chewy Cookie Recipe) – Olives + Thyme.

Boosting the flavor

For an extra flavor boost, consider rolling your dough balls in a cinnamon-sugar mixture before baking; this creates a delightful sparkly crust. Alternatively, a simple vanilla glaze drizzled over the cooled cookies adds a sweet and creamy layer that enhances the spiced apple notes. If you love incorporating fruit into your desserts, try adding a handful of finely chopped dried apples for intensified flavor and a slight chew. Similarly, a pinch of cardamom can introduce a wonderful citrusy warmth to the spice profile. For another fantastic way to use reduced fruit flavors, explore our techniques for a strawberry reduction. Moreover, a scoop of homemade vanilla ice cream turns these warm cookies into an incredible Γ  la mode dessert.

Tips for Success

Best practices for results

Always chill your dough for a minimum of thirty minutes; consequently, this crucial step prevents the cookies from spreading too thin while baking. Use a cookie scoop for uniformly sized dough balls, which ultimately ensures they bake evenly. Furthermore, line your baking sheets with parchment paper to guarantee the bottoms of your Apple Cider Cookies (Soft and Chewy Cookie Recipe) – Olives + Thyme do not over-brown. Finally, let the cookies cool on the baking sheet for five minutes before transferring them, as this allows them to set perfectly.

Mistakes to avoid

Avoid measuring your flour incorrectly, since too much creates a dry and crumbly cookie; instead, gently spoon it into your measuring cup and level it off. Moreover, do not overmix your cookie dough after adding the dry ingredients, as this overdevelops the gluten and leads to a tough texture. If your cookies consistently come out flat, your butter was likely too soft; for more guidance, see our tips on how to cream butter and sugar properly. Additionally, ensure your baking soda is fresh for the right amount of lift; otherwise, your cookies might not puff up. For more solutions to common issues, our baking mistakes and fixes guide is incredibly helpful.

Serving and Pairing Suggestions

How to serve this dish

Present these warm Apple Cider Cookies (Soft and Chewy Cookie Recipe) – Olives + Thyme on a rustic wooden board for a cozy, autumnal feel. Alternatively, arrange them on a festive platter for your holiday gatherings. For a special touch, lightly dust them with powdered sugar or a simple cinnamon-sugar blend just before serving. This simple garnish makes them look as incredible as they taste. Furthermore, you can stack them high on a cake stand to create a beautiful centerpiece for your dessert table. Serve these cookies at your next brunch, package them as a heartfelt homemade gift, or simply enjoy them as a sweet ending to a family dinner.

What goes well with it

A hot mug of spiced chai tea makes a perfect companion for these cookies. The warm spices in the chai beautifully echo the cinnamon and apple flavors in every bite of these Apple Cider Cookies (Soft and Chewy Recipe) – Olives + Thyme. For a truly decadent treat, consider serving them alongside a scoop of vanilla bean ice cream. The cool, creamy ice cream creates a wonderful contrast with the soft, chewy cookie. Moreover, a glass of our homemade Slow Cooker Apple Cider doubles down on the cozy autumn essence. Finally, for another fantastic pairing, try them with a slice of our Apple Cider Pound Cake for an apple-themed dessert spread that will absolutely delight your guests.

How do you make apple cider cookies from scratch?

To make these Apple Cider Cookies (Soft and Chewy Cookie Recipe) – Olives + Thyme from scratch, you start by reducing apple cider into a concentrated syrup for intense flavor. Then, cream together butter and sugars, incorporate the reduced cider and an egg, and finally mix in the dry ingredients. The key to the soft and chewy texture is not overmixing the dough and slightly underbaking the cookies.

What is the secret to making soft and chewy cookies?

The secret lies in a few key techniques: using a higher ratio of brown sugar to white sugar for moisture, not over-baking them so they remain soft in the center, and allowing the dough to chill. This recipe for Apple Cider Cookies (Soft and Chewy Cookie Recipe) – Olives + Thyme is specifically designed to achieve that perfect tender and chewy texture.

Can I use apple cider vinegar instead of apple cider in cookies?

No, you cannot directly substitute apple cider vinegar for apple cider. Apple cider provides the sweet, spiced apple flavor and moisture, while vinegar is acidic and pungent. For the authentic taste of these Apple Cider Cookies (Soft and Chewy Cookie Recipe) – Olives + Thyme, reducing pure apple cider into a syrup is essential.

Why are my apple cider cookies cakey and not chewy?

Cookies turn cakey usually from using too much flour or overmixing the dough, which develops too much gluten. For a chewy result, carefully measure your flour using the spoon-and-level method and mix just until the ingredients are combined. Following the measurements in the Olives + Thyme recipe precisely will ensure your cookies are soft and chewy, not cakey.

Print
clock clock iconcutlery cutlery iconflag flag iconfolder folder iconinstagram instagram iconpinterest pinterest iconfacebook facebook iconprint print iconsquares squares iconheart heart iconheart solid heart solid icon

Apple Cider Cookies (Soft and Chewy)


  • Author: Chef Mia

Description

Soft, chewy cookies infused with warm apple cider flavor and topped with a sweet cinnamon glaze.


Ingredients

Scale

For the Crust:

  • 2 1/4 cups all-purpose flour
  • 1 tsp baking soda
  • 1/2 tsp salt
  • 1 tsp ground cinnamon
  • 1/4 tsp ground nutmeg
  • 3/4 cup unsalted butter, softened
  • 3/4 cup brown sugar
  • 1/4 cup granulated sugar
  • 1 large egg
  • 1 tsp vanilla extract
  • 1/2 cup reduced apple cider
  • 1 cup white chocolate chips

Instructions

1. Prepare the Crust:

  1. Preheat oven to 350Β°F (175Β°C). Line baking sheets with parchment paper.
  2. Whisk together flour, baking soda, salt, cinnamon, and nutmeg in a medium bowl.
  3. Cream butter and sugars until light and fluffy. Beat in egg and vanilla, then gradually mix in reduced apple cider.
  4. Gradually add dry ingredients to wet ingredients, mixing until just combined. Fold in white chocolate chips.
  5. Drop rounded tablespoons of dough onto prepared baking sheets. Bake for 10-12 minutes until edges are lightly golden.

Notes

You can customize the seasonings to taste.

Easy Crispy Air Fryer Apple Fries You’ll Love

easy-crispy-air-fryer-apple-fries

Introduction

Do you ever crave the warm, comforting taste of a classic apple dessert but feel deterred by the thought of deep frying and a lengthy cleanup? That familiar longing for something sweet, crispy, and wholesome is a feeling we know all too well. Fortunately, we have the perfect solution that will delight your taste buds without the guilt. Get ready to discover the magic of creating Crispy Air Fryer Apple Fries You’ll Love, a treat that transforms simple ingredients into an unforgettable snack in mere minutes.

So what exactly are Crispy Air Fryer Apple Fries You’ll Love? Essentially, they are tender apple strips, coated in a sweet cinnamon-spiced coating, and cooked to golden-brown perfection in your air fryer. This method creates an incredibly satisfying crunch without submerging them in oil, offering a healthier alternative to traditional fried desserts. This recipe matters because it delivers that iconic carnival or fairground flavor right in your own kitchen, but with a fraction of the fat and calories. Moreover, it fits our blog’s mission perfectly by providing a quick, easy, and family-friendly recipe that doesn’t sacrifice an ounce of taste. For anyone seeking a healthier dessert option, this is a fantastic place to start. You can easily pair these fries with a simple vanilla dip for an extra special touch. Furthermore, if you find yourself with an abundance of apples, consider using them in another fantastic recipe like our Apple Cinnamon Roll Bake for a cozy weekend breakfast. Ultimately, this approach to cooking celebrates how modern appliances like the air fryer can help us create better-for-you versions of our favorite indulgences. In fact, mastering your air fryer opens up a world of possibility, and our guide on How to Cook Frozen Chicken Tenders in the Air Fryer is another great example of a quick, healthy meal.

Why I Love This Recipe

I absolutely love this recipe because it turns an ordinary afternoon into a special occasion. The moment the cinnamon and apple aromas begin to waft through my kitchen, my entire family gathers with anticipation. This recipe reminds me of autumn fairs and family gatherings, yet I appreciate that I can whip it up any day of the week without any fuss. Ultimately, serving a dessert that everyone devours with smiles, while knowing it’s a smarter choice, brings me immense joy and makes this a permanent staple in my home.

Health and Nutrition

Why it’s good for your body

These Crispy Air Fryer Apple Fries You’ll Love pack a powerful nutritional punch. First, they deliver a solid dose of dietary fiber from the whole apples. Consequently, this fiber aids in digestion and helps you feel full and satisfied. Moreover, apples provide essential vitamins like Vitamin C, which supports a healthy immune system.

Unlike traditional deep-fried desserts, this recipe uses significantly less oil. Therefore, you enjoy a wonderfully crispy texture without the heavy, greasy aftermath. Additionally, the air frying process preserves more of the apple’s natural nutrients compared to other high-heat methods. You also get a natural sweetness from the apples themselves, which means you can reduce added sugars.

Ultimately, choosing this snack means you are making a smarter choice for your body. Each serving of Crispy Air Fryer Apple Fries You’ll Love offers a guilt-free way to satisfy a sweet craving. Furthermore, the cinnamon topping provides antioxidants that can help fight inflammation. So next time you want something sweet, remember that these apple fries fuel your body with good stuff.

How it fits in a healthy lifestyle

These apple fries perfectly complement a balanced diet. They serve as a fantastic alternative to high-calorie, processed snacks, helping you stick to your wellness goals without feeling deprived. Because the recipe is naturally gluten-free, it fits seamlessly into a variety of dietary needs. You can also easily pair it with a source of protein, like a dollop of Greek yogurt, for a more complete snack.

Incorporating smarter choices like this recipe into your routine makes healthy eating sustainable and enjoyable. For more inspiration on building a nutritious plate, explore our guide to creating a balanced diet. If you are exploring other gluten-free options that don’t sacrifice flavor, you will love our gluten-free baking guide. This approach to eating proves that you can absolutely enjoy delicious treats while nourishing your body.

How to Prepare This Dish

Steps and time-saving tips

First, grab two medium apples and slice them into uniform fry-shaped sticks. Immediately toss them in a little lemon juice to prevent browning. Meanwhile, set up your dredging station with three shallow bowls. Fill one with all-purpose flour, another with a couple of beaten eggs, and the third with a mix of panko breadcrumbs, cinnamon, and a pinch of sugar. Now, work in batches. Dredge a handful of apple sticks in the flour, shaking off any excess. Next, dip them into the egg wash, letting the extra drip back into the bowl. Finally, press them firmly into the panko mixture until they are fully coated. For a major time-saver, use a zip-top bag for the panko shake-and-coat method. Arrange your coated Crispy Air Fryer Apple Fries You’ll Love in a single layer in your air fryer basket; never overcrowd them. Lightly spritz or brush them with oil for that perfect golden finish. Air fry at 380Β°F for about 8-10 minutes, flipping them halfway through. They are ready when they turn golden brown and incredibly crispy. Serve them warm with a caramel dip for an instant treat everyone will love.

Mistakes I’ve made and learned from

I learned the hard way that slicing apples too thin is a recipe for disappointment. My first batch of Crispy Air Fryer Apple Fries You’ll Love turned into burnt, sad little sticks because they were practically see-through. Now, I aim for a sturdy, fry-like thickness that can hold up to the heat. Another big lesson was skipping the preheating step. I’d get impatient and load them into a cold basket, which resulted in a soggy mess instead of that satisfying crunch. Preheating your air fryer is non-negotiable for the best texture, a tip I picked up from my deep dive into air fryer hacks. And don’t even get me started on overcrowding! I’d pile them all in at once hoping to save time, but I just ended up steaming them. Cooking in single layers is the only way to go. For the perfect finishing touch, I finally mastered a salted caramel sauce after many failed, grainy attempts. Trust me, these small changes make all the difference.

Cultural Connection and Variations

Where this recipe comes from

My love for these Crispy Air Fryer Apple Fries You’ll Love actually has its roots in a Pennsylvania Dutch farm stand. I first tasted a version of this treat, simply called β€œapple fritters,” during an autumn trip. They were deep-fried, gloriously messy, and dusted with cinnamon sugar. The vendor told me families often prepared them as a way to use up the fall apple harvest. This practice of creating something special from abundant, simple ingredients resonates across so many cultures.

Indeed, you can find similar concepts worldwide. In India, they batter and fry fruit into pakoras, often spicing them with chili and turmeric. Meanwhile, in East Asia, you might find tempura-battered apples served with a delicate dipping sauce. My own family puts a simpler spin on it. We always baked apple slices with a streusel topping. The move to the air fryer, however, created that perfect crunch we craved without the oil. This recipe feels like a modern love letter to those global traditions and family kitchens.

Ultimately, it captures the universal joy of a warm, spiced apple dessert. Creating these Crispy Air Fryer Apple Fries You’ll Love connects me to that roadside stand, my grandmother’s kitchen, and home cooks everywhere who turn fruit into something magical.

How it fits in today’s cooking

This dish fits perfectly into our modern desire for healthier, quicker comfort food. The air fryer brilliantly delivers that satisfying crunch we adore, but with a fraction of the oil. Consequently, it makes indulging in a sweet treat feel almost guilt-free. Many readers tell me they now make a batch for a fun after-school snack or a light dessert after a weeknight dinner.

Furthermore, it has become a staple for seasonal and holiday gatherings. During fall, these apple fries bring the cozy aroma of cinnamon and baked apples into your home. They are a fantastic, crowd-pleasing addition to any Halloween or Thanksgiving spread. For a complete festive breakfast, people often pair them with our popular pumpkin pancakes. The combination is absolutely unbeatable.

Modern cooks also love to adapt the recipe to their dietary needs. For instance, many easily swap the flour for a gluten-free blend. Others experiment with different dipping sauces, moving beyond caramel to a tangy cream cheese frosting. This versatility ensures the recipe remains a beloved classic for years to come.

Taste and Texture

What makes it delicious

These Crispy Air Fryer Apple Fries You’ll Love deliver a fantastic contrast in every single bite. First, you experience a wonderfully crisp and golden-brown exterior that gives way to a soft, warm, and tender apple center. The natural sweetness of the cinnamon-kissed apples deepens during cooking, creating a fragrant and cozy aroma that fills your kitchen. Ultimately, each piece offers a satisfying crunch followed by a melt-in-your-mouth feel, making these Crispy Air Fryer Apple Fries You’ll Love an irresistible treat.

Boosting the flavor

For an extra flavor boost, consider serving your apple fries with a simple dipping sauce. A drizzle of warm caramel or a dollop of vanilla yogurt creates a delicious creamy contrast to the warm spice. Alternatively, you can amplify the cozy spice profile by adding a pinch of nutmeg or cardamom to the cinnamon sugar coating. If you enjoy making your own toppings, our homemade caramel sauce is surprisingly easy and pairs perfectly. Furthermore, for a fun breakfast twist, try serving them alongside a scoop of our classic French toast casserole.

Tips for Success

Best practices for results

Always slice your apples into uniform matchsticks for even cooking. Furthermore, thoroughly pat the apple fries dry before coating them; this crucial step helps the coating adhere much better. Use a light hand when applying cooking spray to achieve the perfect crispiness without sogginess. Finally, arrange your Crispy Air Fryer Apple Fries You’ll Love in a single layer with some space between each piece to ensure they all get wonderfully crispy.

Mistakes to avoid

Avoid overcrowding the air fryer basket because this will steam the fries instead of crisping them. Consequently, you will get a soft texture instead of the desired crunch. Additionally, do not skip preheating your air fryer; otherwise, the cooking time will be inconsistent. For more guidance on mastering your appliance, explore our tips on air fryer troubleshooting. Moreover, remember to shake the basket halfway through cooking; this simple action promotes even browning on all sides. If you are unsure about which apple variety to choose for the best texture and flavor, our guide on the best apples for baking offers fantastic advice.

Serving and Pairing Suggestions

How to serve this dish

Immediately serve your Crispy Air Fryer Apple Fries You’ll Love while they are still warm for the ultimate experience. For a stunning presentation, arrange them in a tall stack on a wooden board or in a charming paper-lined basket. Furthermore, a light dusting of powdered sugar or a sprinkle of cinnamon adds a beautiful finishing touch. These fries truly shine at holiday gatherings or as a special weekend brunch centerpiece. Ultimately, this simple yet impressive dish will captivate your guests.

What goes well with it

A creamy caramel dip is the classic partner for these warm apple treats. Alternatively, a rich chocolate hazelnut spread offers a decadent twist that everyone adores. For a beverage, a cold glass of milk or a hot mug of coffee perfectly cuts through the sweetness. Moreover, consider serving these apple fries alongside our popular Vanilla Bean Ice Cream for a delightful contrast in temperatures. Finally, a scoop of our creamy Salted Caramel Cheesecake makes for an indulgent dessert pairing that feels truly celebratory.

What are the best apples to use for air fryer apple fries?

For the crispiest results, use firm apples that hold their shape well during cooking. Granny Smith apples are the top choice for these Crispy Air Fryer Apple Fries You’ll Love because their tart flavor balances the sweetness of the coating. Fuji or Honeycrisp apples are also excellent alternatives if you prefer a sweeter fry.

How do you keep apple fries from getting soggy in the air fryer?

The key is to avoid overcrowding the basket and ensure your apple slices are thoroughly dried after cutting. Tossing them in a light coating of cornstarch or a flour-based batter helps absorb moisture and creates that perfect crispy exterior. Arranging them in a single layer with space between each fry guarantees the hot air circulates properly for ultimate crispiness.

What dipping sauce goes well with air fried apple fries?

A classic caramel sauce is the ultimate pairing, echoing the flavors of a caramel apple. For a lighter option, a vanilla Greek yogurt dip or a dusting of cinnamon sugar works wonderfully. These sauces perfectly complement the warm, crispy texture of these Air Fryer Apple Fries You’ll Love.

Can you make air fryer apple fries ahead of time?

You can prep the apple slices and keep them in a bowl of cold water with a squeeze of lemon juice to prevent browning for a few hours before cooking. However, for the best texture, they are meant to be enjoyed immediately after air frying while they are still hot and crispy. Reheating them will likely result in a softer, less satisfying texture.

Print
clock clock iconcutlery cutlery iconflag flag iconfolder folder iconinstagram instagram iconpinterest pinterest iconfacebook facebook iconprint print iconsquares squares iconheart heart iconheart solid heart solid icon

Crispy Air Fryer Apple Fries You’ll Love


  • Author: Chef Mia

Description

A healthier twist on a classic dessert, these apple fries are crispy on the outside, tender on the inside, and perfect for satisfying your sweet tooth.


Ingredients

Scale

For the Crust:

  • 2 large apples (such as Granny Smith or Honeycrisp)
  • 1/2 cup all-purpose flour
  • 2 large eggs, beaten
  • 1 cup panko breadcrumbs
  • 1 teaspoon ground cinnamon
  • 1/4 teaspoon nutmeg
  • Cooking spray
  • Optional: caramel sauce or powdered sugar for serving

Instructions

1. Prepare the Crust:

  1. Preheat air fryer to 375Β°F (190Β°C). Peel and core apples, then cut into 1/2-inch thick fry-shaped strips.
  2. Set up three bowls: one with flour, one with beaten eggs, and one with panko breadcrumbs mixed with cinnamon and nutmeg.
  3. Dredge each apple strip in flour, dip in egg, then coat evenly in the spiced breadcrumb mixture.
  4. Lightly spray the air fryer basket with cooking spray. Arrange apple fries in a single layer, ensuring they don’t overlap. Cook for 8-10 minutes, flipping halfway, until golden and crispy.
  5. Serve immediately with caramel sauce or a dusting of powdered sugar.

Notes

You can customize the seasonings to taste.

Best Pumpkin Brownies – Fudgy and Moist Recipe

best-pumpkin-brownies-fudgy-moist

Introduction

Is there anything better than the rich, chocolatey comfort of a brownie? Actually, yes. Imagine that same fudgy perfection meets the warm, spiced essence of autumn. These Pumpkin Brownies create the ultimate dessert mashup that feels like a cozy hug. They perfectly solve the age-old debate of choosing between chocolate and pumpkin pie. Furthermore, they fill your kitchen with an incredible aroma that promises something truly special. Ultimately, this recipe delivers a decadent treat that celebrates the best flavors of the season in every single bite.

Pumpkin Brownies are a fantastic seasonal twist on a classic dessert. Essentially, we combine a dense, moist chocolate brownie base with a swirl of spiced pumpkin puree. This creates a marbled effect that is as beautiful as it is delicious. The chocolate and pumpkin flavors complement each other surprisingly well instead of competing. The result is a deeply chocolatey experience with warm, aromatic notes of cinnamon, nutmeg, and pumpkin that shine through. This recipe matters because it offers a unique and impressive dessert for fall gatherings, holiday parties, or simply to enjoy as a special treat with a cup of coffee. It fits our blog’s tone perfectly as we always strive to share creative, approachable, and utterly delicious recipes that inspire home bakers. For instance, if you enjoy this fusion of flavors, you might also love our popular Pumpkin Cheesecake Bars. This recipe uses simple ingredients and straightforward steps, ensuring anyone can achieve bakery-quality results right at home. Moreover, it’s a great way to use up leftover pumpkin puree. You can easily adapt this recipe to be gluten-free by using a 1:1 baking flour, much like the one we recommend in our guide to Gluten-Free Baking. Ultimately, these brownies are a must-try for anyone who wants to elevate their autumn baking.

Why I Love This Recipe

I absolutely love this recipe because it brings back such fond memories of baking with my family during the holidays. The moment I smell that combination of melting chocolate and pumpkin spice warming in the oven, I instantly feel transported to my favorite time of year. These Pumpkin Brownies have become a non-negotiable tradition for our Thanksgiving dessert spread, and they always disappear first. Seeing the joy on my friends’ faces when they take that first surprising bite is the best reward. For me, this recipe is more than just a dessert; it is a little piece of seasonal magic.

Health and Nutrition

Why it’s good for your body

These pumpkin brownies offer a surprisingly nutritious twist on a classic dessert. First and foremost, pumpkin puree packs a powerful punch of vitamins and minerals. Consequently, you get a significant dose of vitamin A, which actively supports healthy vision and a strong immune system. Furthermore, pumpkin provides a wonderful source of fiber, which naturally aids digestion and promotes a feeling of fullness.

Additionally, the spices in these pumpkin brownies, like cinnamon, bring their own health benefits to the table. For instance, cinnamon may help support healthy blood sugar levels. Moreover, when you compare them to traditional recipes, these moist pumpkin brownies often require less overall sugar and fat. Therefore, you can indulge your sweet tooth while making a smarter choice for your body. Ultimately, enjoying a serving of these delicious pumpkin brownies means you are treating yourself to antioxidants and essential nutrients.

How it fits in a healthy lifestyle

These pumpkin brownies fit beautifully into a balanced eating plan. You can absolutely enjoy them as a mindful dessert after a nutritious meal or as a satisfying afternoon snack that curbs cravings. For anyone following a gluten-free diet, you can easily adapt this recipe by using your favorite gluten-free flour blend. The pumpkin adds moisture, so you never sacrifice that decadent texture.

Thinking about your overall wellness goals is key. Pairing a brownie with a source of protein, like a handful of almonds or a glass of milk, can help create a more balanced snack that keeps your energy levels stable. Remember, healthy eating is all about balance and finding ways to enjoy the foods you love. For more inspiration on nutritious baking, explore our guide to healthy baking substitutions. And if you’re looking for other ways to incorporate veggies into your treats, check out our ideas for veggie-packed desserts.

How to Prepare This Dish

Steps and time-saving tips

First, preheat your oven to 350Β°F and line an 8Γ—8 baking pan with parchment paper. Meanwhile, whisk your dry ingredients together in a medium bowl; this simple step ensures your spices and leavening agents distribute evenly. In a separate, larger bowl, vigorously whisk the pumpkin puree, eggs, and sugar until the mixture becomes smooth and slightly fluffy. Next, slowly drizzle in the melted coconut oil while continuously stirring. Gradually fold the dry ingredients into the wet batter, but be careful not to overmix. Finally, pour the thick batter into your prepared pan and use a spatula to spread it evenly. Bake for 25-30 minutes until the edges pull away and a toothpick comes out with a few moist crumbs. For a major time-saver, use a boxed brownie mix as your base and simply swirl in the pumpkin mixture. Additionally, you can prepare the entire batter the night before and simply bake it fresh in the morning. Let the brownies cool completely in the pan before slicing; this patience rewards you with perfectly clean cuts.

Mistakes I’ve made and learned from

I have definitely learned a few lessons the hard way with this recipe. Initially, I would impatiently slice into the brownies while they were still warm, creating a crumbly, messy disaster every single time. Now, I always let them cool completely, which feels like forever but makes all the difference. Another common error was overmixing the batter after adding the flour, which resulted in a tougher, cakier texture instead of the fudgy density we all love. I gently fold the flour in until it just disappears. For more on achieving that perfect texture, my guide on how to tell when brownies are done saved me from underbaking. Furthermore, accurately measuring your flour is absolutely crucial; I once scooped directly from the bag and ended up with dry, cake-like bars. I highly recommend using a kitchen scale for precision, a tip I picked up from my post on common baking mistakes and how to fix them. Trust me, learning from my errors will make your first batch a guaranteed success.

Cultural Connection and Variations

Where this recipe comes from

We often think of pumpkin pie for dessert, but Pumpkin Brownies carve out their own special niche. This recipe feels like a warm hug from autumn itself. My family always baked them as soon as the leaves started to turn. Consequently, the scent of spiced pumpkin and melting chocolate became our official signal that the cozy season had arrived. Different regions put their own spin on this treat, however. In some areas, bakers might swirl a thick cream cheese ribbon through the batter. Others might add a handful of toasted pecans or walnuts for a satisfying crunch. Ultimately, the goal remains the same: to celebrate the harvest in the most deliciously fudgy way possible. This particular version of Pumpkin Brownies is a testament to that tradition, blending two beloved flavors into one unforgettable bar.

Globally, people adapt the concept to use their local squash varieties. For instance, some cultures might use sweet potato or butternut squash for a similar texture and sweetness. The beauty of this dish lies in its flexibility. Therefore, feel free to make it your own. Whether you enjoy them with a glass of cold milk or a scoop of vanilla ice cream, these bars tell a story of seasonal celebration. Every bite of these Pumpkin Brownies connects you to a long history of home bakers welcoming fall.

How it fits in today’s cooking

Pumpkin Brownies absolutely hold their place in modern kitchens. They seamlessly bridge the gap between classic holiday tradition and everyday indulgence. Today, cooks love them for their surprisingly moist texture and seasonal flair. Furthermore, they are a fantastic way to add a vegetable to dessert, which resonates with contemporary baking trends. You can easily find them at fall potlucks, Halloween parties, or even as a sweet lunchbox treat. Many bakers now adapt the recipe to fit dietary needs, using gluten-free flour or a vegan chocolate base for inclusivity.

Their relevance extends beyond just taste. Ultimately, these brownies evoke a powerful sense of nostalgia and comfort. They fit perfectly into our routines, whether we’re hosting a festive gathering or simply craving a cozy night in. For another amazing seasonal dessert that captures this same spirit, you must try this incredible pumpkin cinnamon roll recipe. So, while cooking evolves, some recipes, like these brownies, become timeless classics we return to year after year.

Taste and Texture

What makes it delicious

These Pumpkin Brownies deliver a decadent and complex flavor profile. Rich, dark chocolate melds beautifully with warm pumpkin spice, creating a fragrant aroma that fills your kitchen. Furthermore, the texture is an incredible fusion of a classic fudgy brownie and a moist, cake-like crumb. Each bite feels incredibly indulgent, with the pumpkin puree ensuring the treat stays supremely moist and tender. Ultimately, the deep cocoa flavor and earthy pumpkin notes make these Pumpkin Brownies an unforgettable autumn dessert.

Boosting the flavor

Fortunately, you can easily elevate these brownies with a few creative tweaks. For instance, swirl a generous ribbon of creamy cream cheese frosting into the batter before baking for a tangy contrast. Alternatively, a sprinkle of flaky sea salt on top right after baking enhances the chocolate’s richness. For a serving suggestion, warm a brownie and pair it with a scoop of cold vanilla ice cream. Consequently, you create a delightful hot-and-cold dessert experience that truly highlights the warm spices.

Tips for Success

Best practices for results

First, always use room temperature ingredients for your Pumpkin Brownies to ensure a smooth, even batter that bakes consistently. Furthermore, line your baking pan with parchment paper, leaving an overhang on two sides for easy removal later. Do not overmix the batter once you add the dry ingredients; instead, gently fold them in until just combined to keep the texture perfectly fudgy. Finally, let the Pumpkin Brownies cool completely in the pan before slicing them with a sharp knife for those clean, beautiful edges everyone loves.

Mistakes to avoid

A common error involves using pumpkin pie filling instead of pure pumpkin puree, which will add unwanted spices and sweetness and throw off the entire flavor balance. For the best results, always double-check your can label. Additionally, avoid overbaking the brownies, as they will continue to set while cooling on the counter. You can test for doneness properly by following our guide on how to tell when baked goods are done. Moreover, if you find your brownies are too cakey, you might be measuring your flour incorrectly. For a guaranteed fudgy outcome, consider using a kitchen scale for baking to measure your dry ingredients by weight instead of volume.

Serving and Pairing Suggestions

How to serve this dish

For a beautiful presentation, always dust your Pumpkin Brownies with a light snowfall of powdered sugar. Furthermore, you can elevate each square with a dollop of freshly whipped cream or a scoop of vanilla bean ice cream. Consequently, these garnishes add a lovely visual contrast and a creamy texture. Serve these decadent Pumpkin Brownies warm at your next holiday gathering for a truly comforting dessert. Alternatively, package them in a cute box for a thoughtful homemade gift that everyone will adore.

What goes well with it

A hot cup of coffee beautifully cuts through the rich sweetness of these Pumpkin Brownies. Meanwhile, a glass of cold milk remains a classic pairing that never fails to please. For an extra special treat, consider serving them alongside a scoop of our velvety cinnamon ice cream; the spicy warmth complements the pumpkin flavor perfectly. Finally, if you are planning a full dessert spread, these brownies pair wonderfully with our classic apple crisp for a fantastic fall duo.

Can you taste the pumpkin in pumpkin brownies?

The pumpkin flavor in pumpkin brownies is typically subtle and acts more as a moistening agent than a dominant flavor. It pairs wonderfully with the warm spices like cinnamon and nutmeg, enhancing the overall autumnal taste rather than overpowering the rich chocolate. You’ll notice a hint of pumpkin, but the chocolate remains the star of the show.

How do you keep pumpkin brownies from getting soggy?

The key is to avoid adding too much pumpkin puree, as the excess moisture can make your brownies soggy. Always be sure to thoroughly wring out any excess liquid from your puree using a cheesecloth or paper towels. Properly measuring your ingredients and not overmixing the batter will also help ensure your pumpkin brownies have the perfect fudgy texture.

What is a good substitute for eggs in pumpkin brownies?

Pumpkin puree itself is an excellent egg substitute, using ΒΌ cup of puree for each egg. This substitution actually works perfectly for pumpkin brownies, as it doubles down on the flavor and moisture. Other great options include flax eggs or commercial egg replacers, which will still yield a deliciously dense and chewy brownie.

Can you freeze pumpkin brownies?

Yes, pumpkin brownies freeze exceptionally well. Allow them to cool completely, then wrap them tightly in plastic wrap and place them in an airtight container or freezer bag. They will keep for up to 3 months in the freezer, making them a perfect make-ahead treat for the fall season.

Print
clock clock iconcutlery cutlery iconflag flag iconfolder folder iconinstagram instagram iconpinterest pinterest iconfacebook facebook iconprint print iconsquares squares iconheart heart iconheart solid heart solid icon

Pumpkin Brownies


  • Author: Chef Mia

Description

Fudgy brownies swirled with spiced pumpkin puree for a delicious fall twist on a classic dessert.


Ingredients

Scale

For the Crust:

  • 1 cup all-purpose flour
  • 3/4 cup cocoa powder
  • 1/2 tsp baking powder
  • 1/4 tsp salt
  • 1 cup granulated sugar
  • 1/2 cup unsalted butter, melted
  • 2 large eggs
  • 1 tsp vanilla extract
  • 1/2 cup pumpkin puree
  • 1/2 tsp pumpkin pie spice
  • 1/4 cup brown sugar

Instructions

1. Prepare the Crust:

  1. Preheat oven to 350Β°F (175Β°C). Grease an 8Γ—8 inch baking pan.
  2. In a medium bowl, whisk together flour, cocoa powder, baking powder, and salt.
  3. In a large bowl, mix melted butter and granulated sugar. Add eggs one at a time, then vanilla. Gradually stir in dry ingredients until just combined.
  4. In a small bowl, combine pumpkin puree, pumpkin pie spice, and brown sugar.
  5. Spread 2/3 of brownie batter in pan. Drop spoonfuls of pumpkin mixture over top. Swirl with a knife. Bake 25-30 minutes until set.
  6. Cool completely before cutting into squares.

Notes

You can customize the seasonings to taste.

Perfect Pumpkin Cheese Pie with Gingersnap Crust

perfect-pumpkin-cheese-pie-gingersnap-crust

Introduction

Is there anything more comforting than the warm, spiced aroma of pumpkin pie filling your kitchen? Now, imagine that classic feeling elevated into something truly extraordinary. This season, we invite you to embrace a dessert that marries cozy tradition with dazzling, modern flair. We are utterly thrilled to share our show-stopping Pumpkin Cheese Pie with Gingersnap Crust ~ Rhubarb & Lavender, a creation that promises to become the new centerpiece of your holiday table and a recipe you will cherish for years to come.

So, what exactly is this Pumpkin Cheese Pie with Gingersnap Crust ~ Rhubarb & Lavender? Fundamentally, it is a magnificent hybrid that combines the rich, tangy creaminess of a classic New York cheesecake with the familiar, spiced soul of a pumpkin pie. This decadent filling rests upon a uniquely spiced crust made from gingersnap cookies, which provides a wonderfully snappy texture and a warm, molasses-kissed flavor that complements the pumpkin perfectly. However, the true magic happens with the elegant, swoon-worthy topping. A compote of fresh rhubarb, slowly cooked down with a touch of sweetness and a hint of culinary lavender, creates a beautifully balanced, tangy, and floral finish that cuts through the richness of the pie. This dessert matters because it transforms the expected into the exceptional, offering a sophisticated twist on beloved classics that will genuinely impress your guests. Moreover, it perfectly fits our blog’s tone of encouraging home bakers to explore creative flavor combinations and craft stunning, memorable dishes from scratch, much like our approachable guide to creating the perfect Classic French Macarons. Ultimately, this Pumpkin Cheese Pie with Gingersnap Crust ~ Rhubarb & Lavender is not just a recipe; it is an experience that celebrates the best of autumn baking with a touch of gourmet elegance.

Why I Love This Recipe

I personally adore this Pumpkin Cheese Pie with Gingersnap Crust ~ Rhubarb & Lavender because it beautifully tells a story on a plate. The process of making it, from crushing the gingersnaps for the crust to patiently simmering the rhubarb topping, feels like a heartfelt labor of love. Furthermore, it always reminds me of a cherished family gathering where I first served it, and the stunned, happy silence that followed the first bite is a memory I hold dear. The combination of flavors is pure nostalgia and innovation in every single slice, making it far more rewarding than any standard Decadent Chocolate SoufflΓ©. This pie truly embodies my philosophy that the best desserts are those that create lasting moments of joy around the table.

Health and Nutrition

Why it’s good for your body

This Pumpkin Cheese Pie with Gingersnap Crust ~ Rhubarb & Lavender offers more than just incredible flavor. For instance, pumpkin provides a powerful dose of beta-carotene, which your body converts into immune-supporting vitamin A. Moreover, the warming spices like those in the gingersnap crust often contain antioxidants. Consequently, each bite supports your overall wellness in a delicious way.

Additionally, the dairy in this dessert delivers a satisfying amount of calcium and protein. These nutrients are fundamental for maintaining strong bones and helping you feel full. Therefore, enjoying a slice of this Pumpkin Cheese Pie with Gingersnap Crust ~ Rhubarb & Lavender feels indulgent while still providing tangible benefits. The rhubarb compote also contributes a tangy brightness along with dietary fiber, which is excellent for digestive health.

Ultimately, this dessert creates a wonderful harmony of nutrients. Furthermore, the thoughtful combination of ingredients means you are treating your body right. So you can truly savor the experience of this Pumpkin Cheese Pie with Gingersnap Crust ~ Rhubarb & Lavender, knowing it brings both joy and goodness to your table.

How it fits in a healthy lifestyle

You can absolutely enjoy this beautiful pie as part of a balanced diet. Think of it as a celebratory centerpiece rather than an everyday snack. Savoring a single, mindful slice allows you to appreciate the complex flavors without overindulging. Pair it with a light meal to keep your day’s nutrition on track.

For those with specific dietary needs, you can easily adapt this recipe. Simply use your favorite gluten-free gingersnaps to make the crust celiac-friendly. If you are exploring more nutritious dessert options, our guide on healthy baking substitutions offers fantastic tips for reducing sugar or fat without sacrificing taste. Remember, balance is key. A wholesome lifestyle always includes room for special, lovingly made treats like this one. Planning your meals helps you accommodate these moments of sweetness; check out our weekly meal prep ideas for inspiration on creating a flexible and satisfying menu.

How to Prepare This Dish

Steps and time-saving tips

First, preheat your oven to 350Β°F. Then, let’s make the crust. Simply pulse the gingersnap cookies in a food processor until they become fine crumbs. Next, mix the crumbs with melted butter and a pinch of salt. Press this mixture firmly into the bottom and up the sides of a 9-inch pie dish. Consequently, you will want to pre-bake this for about 8 minutes to set it. Meanwhile, prepare the filling. In a large bowl, beat the cream cheese until it’s perfectly smooth. Gradually add the pumpkin puree, sugar, eggs, and warm spices. However, be careful not to overmix after adding the eggs. Pour this luxurious filling into your warm crust. Finally, bake your Pumpkin Cheese Pie with Gingersnap Crust ~ Rhubarb & Lavender for 45-50 minutes until the center is just set. For a brilliant time-saving tip, use store-bought gingersnap cookies. Additionally, you can make the rhubarb compote up to three days ahead. After baking, let the pie cool completely on a wire rack. Then, you must chill it for at least four hours, or ideally overnight. This crucial step ensures the perfect sliceable texture. Top each serving with the rhubarb-lavender compote just before serving.

Mistakes I’ve made and learned from

I learned the hard way that overmixing the filling incorporates too much air, which then causes the Pumpkin Cheese Pie with Gingersnap Crust ~ Rhubarb & Lavender to crack as it cools. Now, I just mix until the ingredients combine, and my pies come out beautifully smooth every time. Another common blunder? Using cold cream cheese straight from the fridge. It never blends smoothly and leaves you with a lumpy filling. I always take the time to let my ingredients properly come to room temperature now, which makes a world of difference. I also once pulled the pie from the oven too early, resulting in a wobbly, underbaked center. I rely on the jiggle test; the edges should be set while the center has a slight, gentle movement. For more on nailing that perfect bake, my post on common baking mistakes covers all the pitfalls. Trust me, a little patience leads to a flawless dessert.

Cultural Connection and Variations

Where this recipe comes from

This Pumpkin Cheese Pie with Gingersnap Crust ~ Rhubarb & Lavender recipe feels like a warm hug from my grandmother’s kitchen, yet it tells a much bigger story. Many cultures, from the American South to the English countryside, cherish the tradition of combining creamy cheeses with sweet, spiced fillings. My version, however, takes a delightful detour by marrying the classic pumpkin cheesecake with a gingersnap crust and a surprisingly elegant rhubarb-lavender compote.

Families across the Midwest might stick to a traditional graham cracker base, while others may forgo the dairy entirely for a silken tofu filling. In my home, we always served this pie as the grand finale to our autumn harvest dinners. The sharp tang of the rhubarb cuts through the richness beautifully, creating a symphony of flavors that celebrates the very best of the season. Ultimately, this Pumpkin Cheese Pie with Gingersnap Crust ~ Rhubarb & Lavender represents a beautiful fusion, a dessert that honors its roots while proudly wearing a modern, floral crown.

How it fits in today’s cooking

Today, this pie perfectly bridges the gap between nostalgic tradition and contemporary eating habits. It remains a superstar at Thanksgiving, but its appeal doesn’t end there. Modern home cooks enthusiastically feature it at dinner parties to showcase seasonal, from-scratch baking. Furthermore, many are adapting the recipe to fit dietary needs, easily swapping in gluten-free gingersnaps or a plant-based cream cheese alternative without losing any of its magic.

Its components also make it a fantastic make-ahead dessert, which fits seamlessly into our busy lives. You can prepare the compote and crust days in advance, streamlining the final assembly. This approach to cooking, focusing on building layers of flavor, is something we celebrate in many of our recipes, like our guide to mastering the perfect classic French crepe. Ultimately, the Pumpkin Cheese Pie with Gingersnap Crust ~ Rhubarb & Lavender continues to earn its place on our tables because it delivers both comfort and sophistication in every single bite, much like the beloved simplicity of a easy homemade biscuit.

Taste and Texture

What makes it delicious

This Pumpkin Cheese Pie with Gingersnap Crust ~ Rhubarb & Lavender delivers a symphony of flavors and textures in every single bite. Initially, your fork cracks through the crisp, spicy gingersnap crust. Then, it sinks into the impossibly creamy, dense pumpkin cheesecake filling. The pumpkin and warming spices like cinnamon and nutmeg create a familiar, cozy aroma. Meanwhile, the swirl of rhubarb introduces a bright, tangy sharpness that cuts through the richness perfectly. Finally, a subtle floral note from the lavender lingers elegantly in the background. Ultimately, this Pumpkin Cheese Pie with Gingersnap Crust ~ Rhubarb & Lavender balances sweet, spicy, tangy, and floral notes for a truly unforgettable dessert experience.

Boosting the flavor

You can easily amplify this dessert with a few creative tweaks. For instance, try adding a dollop of freshly whipped cream or a scoop of vanilla bean ice cream to introduce a cool, creamy contrast. Alternatively, a drizzle of salted caramel sauce will deepen the sweetness and add a lovely salty kick. Furthermore, consider serving it with a side of macerated berries for an extra burst of juicy flavor. If you love experimenting with spices, a pinch of cardamom in the filling can wonderfully complement the existing warmth. For more inspiration on crafting the perfect dessert pairing, explore our guide on perfect dessert pairings. Additionally, if the rhubarb has you hooked, you must try our favorite rhubarb recipes for other delicious ways to use this vibrant ingredient.

Tips for Success

Best practices for results

Always press your gingersnap crust firmly and evenly into the pan to create a stable base that holds together when sliced. Furthermore, make sure all your ingredients, especially the cream cheese, reach room temperature before you begin mixing; this simple step guarantees a luxuriously smooth and lump-free filling for your Pumpkin Cheese Pie with Gingersnap Crust ~ Rhubarb & Lavender. Additionally, bake the pie until the edges are set but the center still has a slight jiggle, as it will continue to firm up during the crucial chilling time.

Mistakes to avoid

Avoid overmixing the filling once you add the eggs, as this can incorporate too much air and potentially cause the pie to crack while baking. Instead, mix on low speed just until the ingredients combine. Moreover, do not skip the step of cooling your pie completely at room temperature before refrigerating it; otherwise, sudden temperature changes can also lead to cracks. For a perfect set, follow our guide on how to tell if your cheesecake is done. Finally, remember to let your beautiful Pumpkin Cheese Pie with Gingersnap Crust ~ Rhubarb & Lavender thaw slightly on the counter for about 20 minutes before serving for the best texture and flavor, a pro tip we detail in our article on the best ways to store cheesecake.

Serving and Pairing Suggestions

How to serve this dish

For a stunning presentation, serve each slice of Pumpkin Cheese Pie with Gingersnap Crust ~ Rhubarb & Lavender chilled on a white plate. Consequently, you can elevate the visual appeal with a delicate dusting of cinnamon or a small dollop of freshly whipped cream. Moreover, a candied ginger garnish or a few fresh lavender sprigs beautifully echo the flavors within the pie.

This dessert truly shines during holiday gatherings, especially for Thanksgiving or autumn dinner parties. Alternatively, you can offer it as the grand finale for a special brunch. Ultimately, the rich colors and elegant profile of this Pumpkin Cheese Pie with Gingersnap Crust ~ Rhubarb & Lavender make it a show-stopping centerpiece for any dessert table.

What goes well with it

A hot cup of spiced chai tea makes a wonderful companion. Its warm, aromatic spices perfectly complement the gingersnap crust and the creamy pumpkin filling. Furthermore, the floral notes in the tea harmonize beautifully with the subtle lavender in the pie.

For a delightful contrast, consider pairing a slice with a small side of tart berries. Additionally, a scoop of vanilla bean ice cream provides a classic, creamy counterpoint to the dense, spiced pie. If you enjoy crafting complete menus, this pie pairs wonderfully with our Cozy Autumn Appetizers to start your meal. Finally, for another decadent dessert option, explore our famous Decadent Chocolate Truffle Cake.

What is the best way to make a gingersnap crust?

For the best gingersnap crust, use high-quality, crisp gingersnap cookies and pulse them into fine crumbs in a food processor. Combine the crumbs with melted butter and a pinch of salt, then press firmly into your pie dish and pre-bake for about 10 minutes to set. This creates the perfect sturdy and flavorful base for your Pumpkin Cheese Pie with Gingersnap Crust.

Can I make this pumpkin cheese pie ahead of time?

Absolutely, this dessert is an excellent make-ahead option. You can prepare the Pumpkin Cheese Pie with Gingersnap Crust up to two days in advance; simply keep it covered and refrigerated until you’re ready to serve. The flavors often deepen and meld together beautifully after a day, making it even more delicious.

What does rhubarb and lavender add to the pie?

The rhubarb and lavender introduce a sophisticated sweet-tart and floral complexity that perfectly complements the warm spices and creamy pumpkin filling. The tangy rhubarb compote cuts through the richness of the cheese layer, while the lavender adds a subtle, aromatic note that makes this Pumpkin Cheese Pie with Gingersnap Crust truly unique.

How do you prevent a cheesecake pie from cracking?

To prevent cracking, avoid overmixing the batter once the eggs are added, as this incorporates too much air. Bake the pie in a water bath to provide gentle, even heat and ensure you cool it gradually by turning the oven off and leaving the door slightly ajar for an hour before chilling. These steps help ensure a smooth, beautiful surface for your Pumpkin Cheese Pie.

Print
clock clock iconcutlery cutlery iconflag flag iconfolder folder iconinstagram instagram iconpinterest pinterest iconfacebook facebook iconprint print iconsquares squares iconheart heart iconheart solid heart solid icon

Pumpkin Cheese Pie with Gingersnap Crust and Rhubarb Lavender Compote


  • Author: Chef Mia

Description

A creamy pumpkin cheesecake pie with a spiced gingersnap crust, topped with a tangy rhubarb and lavender compote.


Ingredients

Scale

For the Crust:

  • 2 cups gingersnap cookie crumbs
  • 6 tablespoons unsalted butter, melted
  • 16 oz cream cheese, softened
  • 1 cup canned pumpkin puree
  • 3/4 cup granulated sugar
  • 2 large eggs
  • 1 teaspoon vanilla extract
  • 1 teaspoon ground cinnamon
  • 1/2 teaspoon ground ginger
  • 1/4 teaspoon ground nutmeg
  • 2 cups diced rhubarb
  • 1/2 cup water
  • 1/4 cup sugar
  • 1 teaspoon dried culinary lavender

Instructions

1. Prepare the Crust:

  1. Preheat oven to 350Β°F. Mix gingersnap crumbs with melted butter and press into a 9-inch pie dish. Bake for 8 minutes, then cool.
  2. Beat cream cheese until smooth. Add pumpkin, sugar, eggs, vanilla, and spices. Mix until well combined.
  3. Pour filling into crust. Bake for 35-40 minutes until set. Cool completely, then refrigerate for at least 4 hours.
  4. For compote: Combine rhubarb, water, sugar, and lavender in a saucepan. Simmer for 15 minutes until rhubarb is soft. Cool before serving over pie.

Notes

You can customize the seasonings to taste.

Easy Whipped Pumpkin Spice Honey Butter Recipe

whipped-pumpkin-spice-honey-butter

Introduction

Is there anything cozier than the scent of pumpkin spice wafting through your kitchen? Honestly, it just feels like a warm hug on a crisp autumn day. Now, imagine capturing that entire feeling into one irresistibly creamy, spreadable delight. This magical creation is our Whipped Pumpkin Spice Honey Butter, and it will absolutely transform your fall breakfasts and baked goods from simple to spectacular. Furthermore, it is incredibly easy to make with just a handful of simple ingredients. Ultimately, you will wonder how you ever enjoyed the season without it.

Whipped Pumpkin Spice Honey Butter is a fluffy, spreadable condiment that combines rich butter, sweet honey, and the warm, aromatic spices we all associate with fall. Essentially, it is autumn in a bowl. This butter matters because it elevates the most basic items into festive treats. For example, a simple slice of toast or a plain dinner roll becomes a special occasion with a generous swipe of this homemade butter. Moreover, it embodies the heart of our blog, which focuses on creating approachable recipes that deliver maximum flavor and comfort. This Whipped Pumpkin Spice Honey Butter fits that mission perfectly, as it requires no special skills or equipment. In fact, you can whip up a batch in mere minutes. Additionally, it is incredibly versatile. You can use it on our classic Buttermilk Pancakes or melt it over a stack of warm Fluffy French Toast. Consequently, it becomes a secret weapon for holiday gatherings and cozy weekend brunches alike. This recipe truly celebrates how a few quality ingredients can create something memorably delicious.

Why I Love This Recipe

I genuinely adore this recipe because it connects me to my favorite family traditions. Every year, as soon as the leaves begin to change, my grandmother and I would make our first batch of pumpkin butter together. Consequently, the smell instantly brings me back to her sunny kitchen. I love how this Whipped Pumpkin Spice Honey Butter allows me to carry that tradition forward in my own home. Furthermore, its simplicity brings me so much joy. I actually love that I can quickly make a jar to give to friends and neighbors as a little taste of the season. Ultimately, it is more than just a recipe. It is a container for happy memories and a way to create new ones.

Health and Nutrition

Why it’s good for your body

Whipped Pumpkin Spice Honey Butter offers a surprisingly nutritious twist on a classic spread. First, pumpkin puree delivers a powerful dose of vitamin A, which actively supports healthy vision and a strong immune system. Furthermore, the natural spices like cinnamon and nutmeg bring their own anti-inflammatory properties to every bite.

Unlike many processed alternatives, this butter uses honey as a natural sweetener. Consequently, you get a subtle sweetness without the empty calories of refined sugars. Moreover, the whipping process incorporates air, which creates a wonderfully light and fluffy texture. As a result, a little bit of Whipped Pumpkin Spice Honey Butter satisfies your craving generously.

Additionally, the healthy fats from real butter help your body absorb the fat-soluble vitamins found in the pumpkin. Finally, enjoying wholesome ingredients you can pronounce always benefits your overall well-being. Ultimately, this delicious spread turns a simple snack into a nutrient-rich experience.

How it fits in a healthy lifestyle

Whipped Pumpkin Spice Honey Butter fits perfectly into a balanced and mindful eating pattern. You can enjoy it as part of a nutritious breakfast, perhaps spread on a slice of whole-grain toast or swirled into your morning oatmeal for a flavorful boost. This approach helps you start your day with satisfaction, reducing the urge to reach for less healthy options later on.

For those following specific dietary needs, this homemade butter is naturally gluten-free. It also complements a heart-healthy lifestyle when used in moderation as part of a diet focused on whole foods. If you are looking for more inspiration on using whole ingredients, our guide to gluten-free baking offers fantastic tips. Remember, the key is mindful enjoyment. A small amount of this delicious butter can elevate a healthy snack without derailing your goals. Explore our collection of healthy snack ideas for more ways to enjoy nutritious and tasty treats every day.

How to Prepare This Dish

Steps and time-saving tips

First, gather all your ingredients and let your butter soften completely at room temperature. This crucial step ensures your Whipped Pumpkin Spice Honey Butter will become light and airy instead of lumpy. Meanwhile, measure your pumpkin puree, honey, and spices. Then, simply add everything to a medium-sized mixing bowl. Use an electric hand mixer on medium speed to combine everything for about two minutes. Consequently, the mixture will transform from a loose collection of ingredients into a beautifully pale orange, fluffy cloud. Scrape down the sides of the bowl halfway through to guarantee a perfectly smooth consistency. For an even richer flavor, let the finished Whipped Pumpkin Spice Honey Butter rest for thirty minutes before serving. This allows the warm spices to fully bloom and meld together. Finally, transfer your creation into a nice jar or container with a tight-fitting lid. Store it in the refrigerator, but remember to take it out about fifteen minutes before you need it so it can soften up again for easy spreading.

Mistakes I’ve made and learned from

I have definitely learned a few lessons the hard way with this recipe. Initially, I used cold, hard butter straight from the fridge and tried to force it with my mixer. The result was a splattered, grainy mess that never came together smoothly. Now, I know patience is key for that perfect, spreadable texture. Another common error I made was using an untested pumpkin pie spice blend that was far too heavy on cloves. It completely overpowered the delicate honey and made the entire batch bitter. I highly recommend making your own pumpkin pie spice so you can control the balance of flavors perfectly. Trust me, it makes a world of difference. Also, if your butter seems to separate or looks a bit greasy after whipping, don’t panic. This usually happens if the butter was a bit too warm. Simply pop the bowl into the refrigerator for about ten minutes to firm it up slightly, then whip it again for another minute. For more troubleshooting tips on creamy desserts, my guide on fixing whipped cream applies here too.

Cultural Connection and Variations

Where this recipe comes from

We can trace the cozy roots of Whipped Pumpkin Spice Honey Butter straight back to the heart of American fall traditions. Families have long celebrated the harvest by preserving summer’s bounty and warming their kitchens with autumnal spices. This particular recipe, however, feels like a modern love letter to that heritage. My own grandmother always kept a crock of softened butter and honey on her table, but she never thought to add pumpkin and warming spices. I like to think she would have adored this version. Meanwhile, different cultures approach similar concepts with their own unique twists. In France, for instance, cooks might create a sophisticated compound butter with herbs de Provence for savory applications. Across various European traditions, people often enrich their breads with nutty browned butter or sweet fruit preserves. Our Whipped Pumpkin Spice Honey Butter uniquely combines these ideas into one irresistibly spreadable treat that perfectly captures the essence of the season.

How it fits in today’s cooking

Fortunately, this butter absolutely thrives in modern kitchens. It seamlessly bridges the gap between nostalgic holiday cooking and our current desire for simple, from-scratch ingredients. Today’s home cooks constantly adapt it, perhaps using it to elevate a simple weeknight batch of buttermilk pancakes into a special autumnal breakfast. Furthermore, it remains a superstar during the holidays, making an unforgettable appearance on the Thanksgiving table. People now also get creative with its uses, swirling it into oatmeal or melting it over roasted sweet potatoes. Its versatility and make-ahead nature perfectly suit our busy lifestyles. Ultimately, a dollop of this butter transforms the ordinary into something celebratory. It pairs just as beautifully with your morning toast as it does with a stunning classic vanilla cake, proving some traditions only get better with time.

Taste and Texture

What makes it delicious

This Whipped Pumpkin Spice Honey Butter delivers a uniquely smooth and airy texture that spreads like a dream. Initially, you experience the rich, creamy sweetness of honey and butter, which then gives way to the warm, fragrant spices of cinnamon, nutmeg, and ginger. Ultimately, each bite finishes with the cozy, earthy essence of real pumpkin. The overall sensation is incredibly light and fluffy, melting luxuriously on warm toast or a fresh muffin. You will absolutely adore the complex, autumnal flavor profile of this Whipped Pumpkin Spice Honey Butter.

Boosting the flavor

For an even more decadent experience, consider a few simple tweaks. First, try swapping the honey for pure maple syrup to introduce a deeper, caramel-like sweetness. Alternatively, a tiny pinch of flaky sea salt on top just before serving creates a wonderful sweet-and-salty contrast that highlights all the warm spices. Furthermore, this butter pairs beautifully with our classic Pumpkin Bread, soaking into every pore for an unforgettable treat. Finally, for a true breakfast masterpiece, slather it on a stack of our Fluffy Pancakes and watch it melt into sweet, spicy pools.

Tips for Success

Best practices for results

Always use room temperature butter for the smoothest, fluffiest texture. Furthermore, thoroughly whip the butter for a full two to three minutes to incorporate plenty of air. Consequently, this step creates a wonderfully light and spreadable Whipped Pumpkin Spice Honey Butter. Additionally, use pure pumpkin puree, not pumpkin pie filling, for the best flavor. Finally, taste and adjust the spice level to your personal preference.

Mistakes to avoid

Avoid using melted or overly soft butter, as it will result in a greasy and runny consistency. Instead, ensure your butter is just soft enough to leave a slight indent when pressed. Moreover, do not skip the tasting step; otherwise, you might end up with a bland or overly spiced batch. For more guidance on getting flavors just right, check out our guide on how to measure ingredients correctly. Additionally, if your butter seems too soft after mixing, simply chill it for 15 minutes to help it firm up. This easy fix prevents a soupy texture and ensures your Whipped Pumpkin Spice Honey Butter is perfect for spreading on our favorite classic buttermilk pancakes.

Serving and Pairing Suggestions

How to serve this dish

Present your Whipped Pumpkin Spice Honey Butter in a beautiful ramekin or a small glass bowl for a truly special touch. Furthermore, always let it soften at room temperature for about fifteen minutes before serving so it spreads like a dream. For a festive garnish, sprinkle a little extra cinnamon or drizzle a tiny bit of honey on top. This simple step makes it look absolutely irresistible. Serve this delightful condiment at your next holiday brunch or Thanksgiving dinner. It instantly elevates any breakfast spread into a celebratory feast. Your guests will adore the warm, inviting aroma and flavor of this Whipped Pumpkin Spice Honey Butter.

What goes well with it

Firstly, slather this butter on warm, freshly baked goods for an incredible treat. It melts perfectly into the nooks and crannies of our favorite pumpkin pancakes, creating a symphony of autumn flavors. Additionally, a hot beverage makes a wonderful companion. A steaming mug of chai tea or a pumpkin spice latte beautifully echoes the warm spices in the Whipped Pumpkin Spice Honey Butter. Finally, consider it for your dessert board. It pairs wonderfully with sweet, dense breads like banana nut loaf or our classic banana bread recipe. The combination is simply unforgettable.

What do you eat whipped pumpkin spice honey butter with?

Whipped Pumpkin Spice Honey Butter is incredibly versatile. It’s perfect spread on warm biscuits, toast, pancakes, or waffles. You can also use it as a delicious topping for oatmeal, sweet potatoes, or even as a flavorful swirl in your morning coffee.

How long does homemade pumpkin honey butter last?

When stored in an airtight container in the refrigerator, homemade Whipped Pumpkin Spice Honey Butter will stay fresh for up to two weeks. Always use a clean utensil to scoop it out to prevent contamination and extend its shelf life.

Can I use canned pumpkin for pumpkin butter?

Yes, canned pure pumpkin puree is actually the best and most convenient option for making Whipped Pumpkin Spice Honey Butter. Ensure you use 100% pure pumpkin puree, not pumpkin pie filling, which already contains added sugars and spices.

Can you freeze pumpkin spice honey butter?

Absolutely! This Whipped Pumpkin Spice Honey Butter freezes very well for longer storage. Portion it into an airtight container or freezer-safe bag, and it will keep for up to 3 months. Thaw it overnight in the refrigerator before using.

Print
clock clock iconcutlery cutlery iconflag flag iconfolder folder iconinstagram instagram iconpinterest pinterest iconfacebook facebook iconprint print iconsquares squares iconheart heart iconheart solid heart solid icon

Whipped Pumpkin Spice Honey Butter


  • Author: Chef Mia

Description

A smooth, fluffy, and flavorful spread combining the richness of butter with the warm spices of pumpkin and the sweetness of honey.


Ingredients

Scale

For the Crust:

  • 1 cup unsalted butter, softened
  • 1/4 cup honey
  • 1/4 cup pumpkin puree
  • 1 teaspoon pumpkin pie spice
  • 1/4 teaspoon ground cinnamon
  • Pinch of salt

Instructions

1. Prepare the Crust:

  1. In a mixing bowl, combine the softened butter, honey, pumpkin puree, pumpkin pie spice, cinnamon, and salt.
  2. Using an electric mixer, whip the mixture on medium-high speed for 3-4 minutes until light, fluffy, and well combined.
  3. Transfer the whipped butter to an airtight container and refrigerate for at least 1 hour to allow flavors to meld before serving.

Notes

You can customize the seasonings to taste.