Table of Contents
Strawberry Mousse Recipe: The Only Recipe You’ll Ever Need
Imagine transforming a handful of fresh strawberries into an extra creamy Strawberry Mousse Recipe that’s light, airy, and bursting with natural sweetness—perfect for impressing guests at your next summer gathering. This Strawberry Mousse Recipe is not just easy; it’s a game-changer for home cooks seeking a luxurious dessert without the fuss. With its melt-in-your-mouth texture, it’s ideal for anyone wanting a refreshing treat that feels indulgent yet simple to prepare in under 15 minutes of active time. Whether you’re a beginner or a seasoned chef, this Strawberry Mousse Recipe delivers foolproof results every time, making it the ultimate go-to for fresh strawberry desserts. By the end of this post, you’ll discover our chef’s secret to achieving that extra creamy consistency that sets this version apart from the rest.
The allure of this Strawberry Mousse Recipe lies in its sensory delights that transport you to a sun-kissed strawberry field. Picture the vibrant ruby hue of blended strawberries swirling into freshly whipped cream, creating a velvety texture that’s both fluffy and decadent. Each spoonful offers a burst of tangy-sweet flavors from ripe berries, balanced by the subtle richness of vanilla, while the mousse’s lightness dances on your palate. The aroma of fresh strawberries mingles with hints of vanilla as it sets, evoking memories of warm summer days. This extra creamy Strawberry Mousse Recipe isn’t just visually appealing; it’s a textural masterpiece that feels cool and silky smooth, making every bite an irresistible experience.
What makes this Strawberry Mousse Recipe from cookingwithemy.com the single best resource on the internet is our commitment to thorough testing and expert tips that ensure your success in the kitchen. We’ve refined every step to highlight its extra creamy quality, drawing from years of recipe development to address common pitfalls. In this comprehensive guide, you’ll learn the chef’s secret for achieving that perfect, airy consistency, along with ingredient spotlights, step-by-step instructions, and practical advice for serving and storage. By the end, you’ll feel confident whipping up this fresh strawberry mousse whenever the craving strikes, making it a staple in your dessert repertoire.
Why This Strawberry Mousse Recipe is a Game-Changer
The chef’s secret behind this extra creamy Strawberry Mousse Recipe is the precise incorporation of unflavored gelatin, which we dissolve just until cooled to prevent any graininess, ensuring a silky-smooth base that elevates the dessert to professional levels. This technique locks in the whipped cream’s volume while allowing the fresh strawberry puree to blend seamlessly, creating an unparalleled creaminess that makes every bite luxuriously rich without being heavy. Unlike basic recipes, our method focuses on gently folding ingredients to maintain air pockets, resulting in a mousse that’s the epitome of light and airy perfection.
The unbeatable texture of this Strawberry Mousse Recipe comes from the science of whipping heavy cream to soft peaks and then carefully integrating the gelatin-stabilized strawberry mixture. The fat content in the heavy cream forms a stable emulsion with the fruit’s natural pectin, which helps the mousse set firmly yet remain extra creamy. This balance prevents separation or sogginess, ensuring a fluffy consistency that holds its shape beautifully, thanks to the cooling process that allows proteins in the cream to set properly.
This Strawberry Mousse Recipe is foolproof for a reason—it’s been tested multiple times in our kitchen to guarantee consistent results, even for novice cooks. We’ve accounted for variables like strawberry ripeness and room temperature, making adjustments to deliver a reliable, extra creamy outcome every time. With clear instructions and tips, you’ll avoid common errors and achieve dessert success with confidence.
Ingredient Spotlight: Quality Makes the Difference
Fresh strawberries are the star of this Strawberry Mousse Recipe, providing the vibrant flavor and natural sweetness that define its extra creamy appeal. Use only ripe, in-season strawberries for the best results, as their high juice content ensures a smooth puree that infuses the mousse with authentic berry essence. Quality matters here because unripe fruit can lead to a tart, watery texture; opt for organic varieties to enhance the fresh strawberry mousse experience. If strawberries are unavailable, a tested substitution is frozen ones, but thaw and drain them first to maintain the recipe’s creamy consistency.
Granulated sugar plays a crucial role in balancing the tartness in this Strawberry Mousse Recipe, allowing the extra creamy texture to shine without overwhelming the natural flavors. Adjust the amount to taste based on your strawberries’ sweetness, as this helps draw out their juices for a more integrated puree. High-quality sugar ensures even dissolution, preventing graininess in the final product. For a healthier twist, substitute with honey or a natural sweetener like stevia, but reduce the liquid slightly to keep the mousse’s airy structure intact.
Heavy cream is essential for achieving the extra creamy body in this Strawberry Mousse Recipe, whipping up to soft peaks that incorporate air for that signature lightness. Choose a high-fat cream (at least 36% fat) for optimal results, as it stabilizes better and enhances the dessert’s luxurious mouthfeel. Chilling your tools beforehand maximizes volume, and for dairy-free options, a tested substitution is full-fat coconut cream, which mimics the richness while keeping the fresh strawberry mousse vegan-friendly.
Vanilla extract adds a subtle depth to this Strawberry Mousse Recipe, complementing the extra creamy profile with warm, aromatic notes that elevate the overall flavor. Always use pure vanilla extract rather than imitation for authentic taste, as synthetic versions can introduce off-flavors. A little goes a long way, so measure precisely to avoid overpowering the strawberries. If you’re out, substitute with vanilla bean paste for a more intense flavor, ensuring it dissolves fully into the whipped cream.
Unflavored gelatin powder is the key stabilizer in this Strawberry Mousse Recipe, providing the structure that makes it extra creamy and set perfectly without becoming rubbery. Opt for a reliable brand to ensure even blooming, as poor-quality gelatin can result in a lumpy texture. For vegetarian adaptations, agar-agar is a great substitution—use half the amount and dissolve it similarly to maintain the mousse’s light consistency.
Water might seem mundane, but in this Strawberry Mousse Recipe, it’s vital for dissolving the gelatin evenly, ensuring the extra creamy result doesn’t have any clumps. Use filtered water at the right temperature to activate the gelatin properly, as tap water’s minerals can affect the set. There’s no direct substitution, but if needed, a splash of strawberry juice can enhance flavor while serving the same purpose.
Step-by-Step Instructions for Strawberry Mousse Recipe
Step 1: Preparing the Strawberries
Start by hulling 2 cups of fresh strawberries and adding them to a blender. Blend on high speed until you achieve a smooth puree, then transfer it to a bowl and mix in 1/2 cup of granulated sugar. Let the mixture sit for 10 minutes to allow the sugar to dissolve and draw out the strawberries’ juices, enhancing their natural sweetness for a more flavorful base.
Pro Tip: Always use a high-speed blender for even pureeing to avoid fibrous bits, which can disrupt the extra creamy texture of your Strawberry Mousse Recipe.
Step 2: Whipping the Cream
In a chilled mixing bowl, pour in 1 cup of heavy cream and add 1 teaspoon of vanilla extract. Whip the mixture using an electric mixer on medium speed until soft peaks form, which usually takes about 2-3 minutes. This step incorporates air, creating the light and airy foundation for your mousse.
Common Mistake to Avoid: Over-whipping the cream can turn it grainy, so stop as soon as soft peaks form to preserve the extra creamy quality in your Strawberry Mousse Recipe.
Step 3: Combining the Mixtures
Gently fold the strawberry puree into the whipped cream using a spatula, doing so in a slow, circular motion to maintain the volume and avoid deflating the mixture. This ensures the flavors meld without losing the airy texture.
Pro Tip: Use a wide, flat spatula for folding to incorporate the puree evenly, maximizing the extra creamy consistency of your Strawberry Mousse Recipe.
Step 4: Incorporating the Gelatin
In a small bowl, sprinkle 1 tablespoon of unflavored gelatin powder over 3 tablespoons of warm water. Let it sit for a minute to bloom, then gently heat it until fully dissolved—about 10-15 seconds in the microwave. Allow it to cool slightly before mixing it into the strawberry-cream mixture, stirring until just combined.
Common Mistake to Avoid: Adding hot gelatin directly can melt the whipped cream, so always cool it first to keep your Strawberry Mousse Recipe extra creamy and properly set.
Step 5: Setting the Mousse
Pour the prepared mousse mixture into individual serving glasses or bowls, dividing it evenly among your servings. Cover and refrigerate for at least 4 hours, or until fully set, to achieve that perfect, firm-yet-creamy texture.
Pro Tip: For faster setting, place the glasses in the coldest part of your fridge and avoid opening the door frequently to ensure the best results for your Strawberry Mousse Recipe.
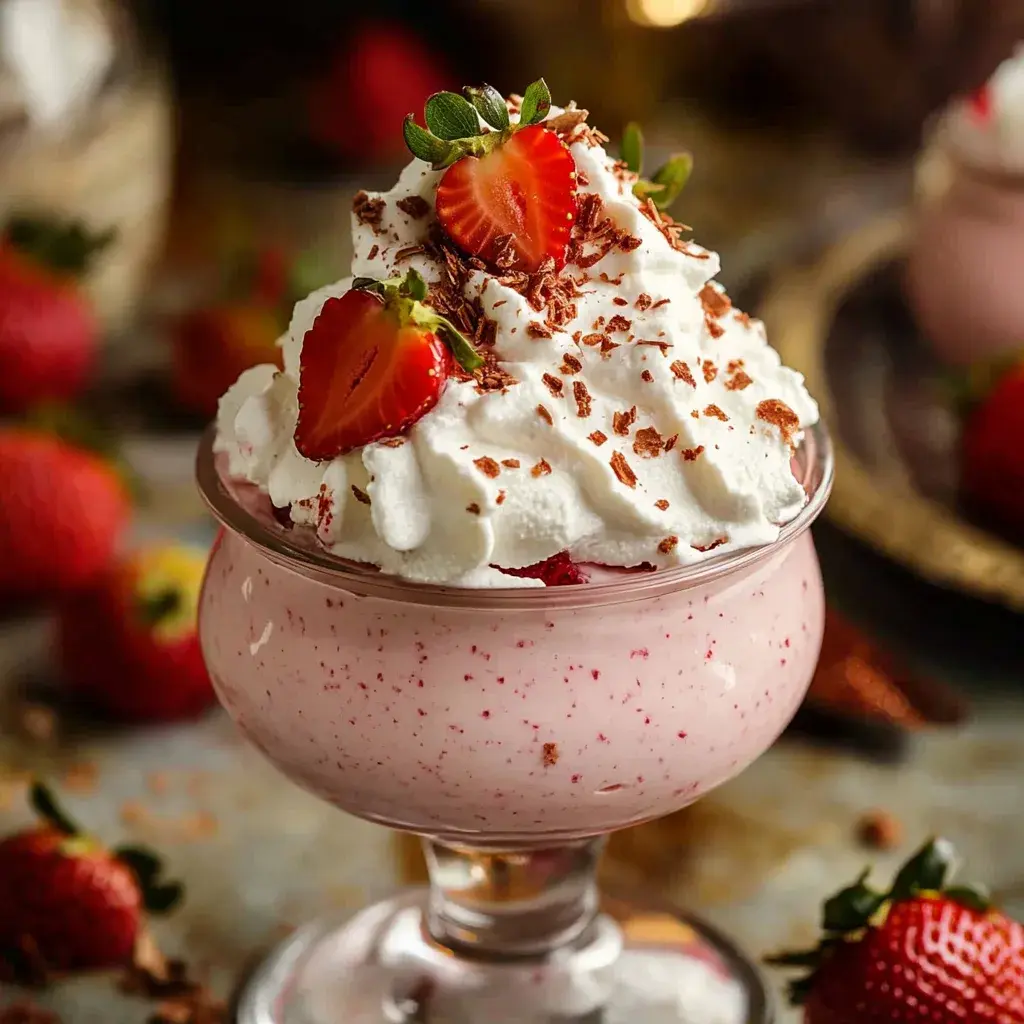
Serving & Presentation
Elevate your Strawberry Mousse Recipe by layering it in elegant glassware for a visually stunning presentation that highlights its extra creamy texture. Top with fresh strawberry slices or a dollop of whipped cream for a pop of color and added indulgence, making it an eye-catching centerpiece. Pair this light dessert with complementary options like shortbread cookies or a fruit salad to balance its richness, or serve it alongside a light meal such as grilled chicken salad for a refreshing end to a summer dinner.
Make-Ahead & Storage Solutions
For make-ahead convenience, prepare the strawberry puree and whip the cream up to 3 days in advance, storing them separately in airtight containers in the fridge; combine and add gelatin just before serving to maintain the extra creamy texture of your Strawberry Mousse Recipe.
To store leftovers, cover the mousse tightly with plastic wrap or transfer to an airtight container and refrigerate for up to 2 days, as exposure to air can cause it to weep. For freezing, portion into individual containers and freeze for up to a month, but thaw overnight in the fridge to preserve the fresh strawberry mousse’s original lightness.
The best way to reheat is actually to let it thaw gently in the refrigerator, then serve chilled to restore the extra creamy consistency without altering the texture—avoid microwaving, as it can make the mousse watery.
Frequently Asked Questions (FAQ)
How long does it take to prepare a Strawberry Mousse Recipe?
While this isn’t a baked recipe like a chocolate cake, preparing a Strawberry Mousse Recipe involves about 15 minutes of active prep time, with an additional 4 hours of refrigeration to set properly. The total time is around 4 hours 15 minutes, making it a quick and easy fresh strawberry dessert option for unplanned occasions.
What are some good substitutions for ingredients in a Strawberry Mousse Recipe?
For this Strawberry Mousse Recipe, you can substitute granulated sugar with honey for a natural twist, heavy cream with coconut cream for a dairy-free version, or unflavored gelatin with agar-agar for vegetarians. Always adjust quantities slightly when substituting to maintain the extra creamy texture, and test for taste, as these changes might alter the flavor profile slightly.
How can I make a Strawberry Mousse Recipe more moist and fluffy?
To achieve an even more moist and fluffy Strawberry Mousse Recipe, ensure your heavy cream is very cold before whipping, and fold in the strawberry puree gently to trap air. Using extra ripe strawberries enhances natural moisture, and chilling your bowl beforehand can boost fluffiness, resulting in that signature extra creamy consistency.
What are the best ways to serve and store a Strawberry Mousse Recipe?
Serve your Strawberry Mousse Recipe chilled in decorative glasses, garnished with fresh berries for an elegant touch, and pair it with light biscuits or fruits. For storage, keep it refrigerated in an airtight container for up to 2 days, or freeze for a month and thaw slowly to preserve its extra creamy texture.
Can I make this Strawberry Mousse Recipe vegan?
Yes, you can easily make this Strawberry Mousse Recipe vegan by substituting heavy cream with full-fat coconut cream and unflavored gelatin with agar-agar. Use a plant-based sugar if desired, and ensure your vanilla extract is alcohol-free; these swaps will keep the extra creamy texture intact while making it dairy-free and suitable for vegan diets.
Is this Strawberry Mousse Recipe suitable for kids?
Absolutely, this Strawberry Mousse Recipe is kid-friendly with its natural fruit flavors and light texture, but monitor sugar levels if serving to children. You can reduce the sugar for a healthier version, and it’s a great way to introduce them to fresh strawberry desserts without artificial additives.
Tried This Recipe? Leave a Comment!
Did you make this Strawberry Mousse Recipe? I’d love to hear how it turned out! Please leave a comment and a rating below. Your feedback helps other home cooks and supports cookingwithemy!
For more delicious inspiration, follow me on Pinterest!
Strawberry Mousse Recipe
Description
Indulge in a delightful experience with this easy Strawberry Mousse Recipe. This light and airy dessert combines fresh strawberries and whipped cream, creating a luxurious treat that melts in your mouth. Perfect for summer gatherings or cozy dinners, it captures the essence of ripe strawberries in each spoonful. With straightforward steps and simple ingredients, you can impress your family and friends without spending hours in the kitchen. Garnish with fresh berries or whipped cream for an extra touch of elegance. Enjoy this luscious mousse that brings joy to any occasion!
Ingredients
- 2 cupsfresh strawberries, hulled
- 1/2 cupgranulated sugar (adjust to taste)
- 1 cupheavy cream
- 1 teaspoonvanilla extract
- 1 tablespoonunflavored gelatin powder
- 3 tablespoonswater
Instructions
- Blend hulled strawberries until smooth; mix with sugar and let sit for 10 minutes.
- Whip heavy cream with vanilla until soft peaks form.
- Gently fold the strawberry puree into the whipped cream.
- Dissolve gelatin in warm water, cool slightly, then mix into the mousse.
- Pour into serving glasses; refrigerate for at least 4 hours or until set.
Notes
Use only ripe strawberries for the best flavor.
Chill your mixing bowl and beaters before whipping the cream.
Experiment by adding other fruits like raspberries or blueberries for variety.
Nutrition
- Calories: 180
- Sugar: 18g
- Fat: 10g
- Carbohydrates: 21g
- Protein: 2g
Conclusion
In conclusion, this recipe offers a delightful blend of sweet and fresh flavors that make it perfect for a quick breakfast or a fun dessert, bringing joy to any mealtime. Whether you’re serving it to family on a lazy weekend or adding a twist with seasonal fruits for variety, it’s sure to become a favorite in your kitchen. If you’re craving more irresistible treats, be sure to try our Strawberry Kiss Cookies or Delicious Strawberry Shortcake Pancakes Recipe for even more fruity inspiration.