No Bake Pineapple Coconut Bars: A Tropical Delight
Indulge in the tropical flavors of our No Bake Pineapple Coconut Bars! This delightful treat perfectly marries the sweetness of fresh pineapple with the creamy richness of coconut, creating a symphony of delightful flavors in every bite. Ideal for warm days, these bars make for a perfect snack or dessert that doesn’t require an oven—allowing the delicious taste of summer to come alive any day of the year.
These No Bake Pineapple Coconut Bars are not just delicious; they are also easy to whip up and require minimal preparation. With just a handful of ingredients, you can create a dessert that’s refreshing, satisfying, and utterly irresistible. Picture yourself at a sunny beach, savoring these bars, and with each mouthful, you’ll be whisked away to paradise. Let’s dive right into the recipe to enjoy these tropical treats!
Quick Recipe Highlights
- Flavor Profile: The vibrant sweetness of ripe pineapples blends beautifully with the creamy, nutty notes of coconut, giving these bars a well-rounded tropical flavor.
- Texture: The bars have a chewy yet crumbly texture that holds together beautifully, enhanced by the crunchiness of shredded coconut.
- Aroma: A delightful tropical aroma wafts from these bars as you slice into them, making them incredibly enticing for both your taste buds and your senses.
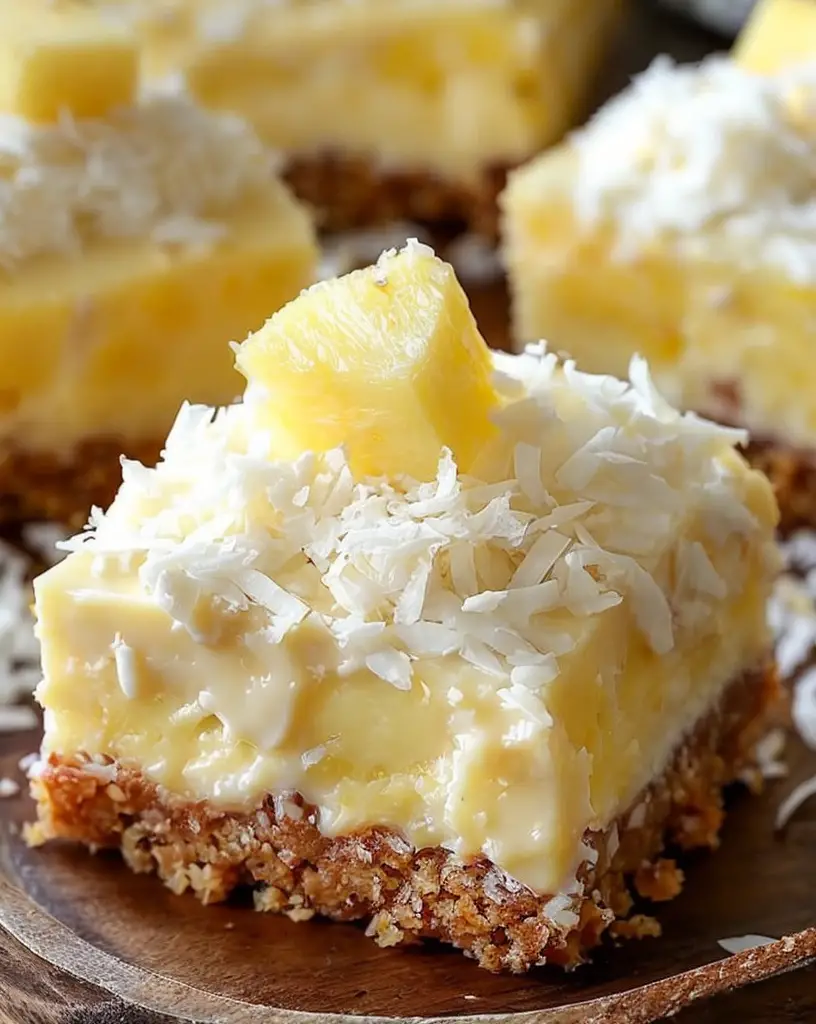
- Visual Appeal: With their bright yellow color from pineapple and the speckled white of coconut, these bars look as delightful as they taste, making them perfect for any occasion.
- Skill Level Needed: This recipe is beginner-friendly, requiring no baking skills, making it a great choice for novice bakers.
- Special Equipment: You only need a mixing bowl and a baking dish to prepare these delicious no-bake bars.
Recipe Overview
- Difficulty Level: This recipe is incredibly easy, making it accessible to anyone, regardless of cooking experience.
- Category: These bars are perfect as a snack, dessert, or even as a light breakfast option on busy mornings.
- Cuisine: This recipe is inspired by tropical cuisine, commonly associated with warm, sunny locales, and embodies the essence of island living.
- Cost: The ingredients are affordable, with an approximate cost of around $10 to make a generous batch of bars.
- Season: Best enjoyed in the spring and summer months when tropical fruits are at their peak, but they can be savored year-round.
- Occasion: Perfect for picnics, potlucks, or just as a delightful treat for family gatherings.
Why You’ll Love This Recipe
The No Bake Pineapple Coconut Bars are not only delicious but provide a wonderful taste and texture appeal. The sweetness of the pineapple hits your palate immediately, followed by the rich and creamy flavor of coconut, making for a harmonious blend that leaves you wanting more. The chewiness from the oats gives a satisfying bite while the coconut adds a delightful crunch, providing a unique mouthfeel designed for pleasure.
One of the biggest advantages of this recipe is its convenience. With just a mix-and-press method, you can have these bars ready to chill in mere minutes. There’s no scorching stove, no complicated techniques, just simple preparation that allows you to focus on flavor rather than fussiness. This ease of preparation means you can enjoy these bars even on your busiest days!
Nutritionally, the combination of coconut and pineapple offers a wealth of benefits. Pineapple is rich in vitamins, particularly vitamin C, which boosts your immune system while helping your body absorb iron. Coconut contributes healthy fats and fiber, promoting digestion and providing sustained energy. Together, they form a wholesome treat that’s both flavorful and healthy.
When it comes to entertaining, these No Bake Pineapple Coconut Bars are a hit! They’re easy to serve, look stunning on a platter, and can please a crowd without the need for elaborate preparation. Just cut them into bars, and you have an eye-catching, delicious treat that your guests will love.
Cost-effectiveness is another significant factor, as this recipe is quite budget-friendly. The ingredients are common pantry items and tropical fruits that are often on sale during their peak seasons. Enjoy a scrumptious, healthy dessert without breaking the bank!
Historical Background and Cultural Significance
The origin of pineapple and coconut desserts dates back centuries to tropical regions where these fruits thrive. Coconuts have long held cultural significance in many Pacific Island societies, where they symbolize sustenance and wealth. Pineapples, often regarded as a sign of hospitality, have been a key ingredient in traditional tropical desserts.
In many cultures, these fruits are celebrated in festivals and gatherings, representing abundance and joy. The combination of pineapple and coconut in desserts often symbolizes the fun and relaxation associated with beach life, bringing with it the essence of summer regardless of the actual season.
Over time, the recipe for No Bake Pineapple Coconut Bars has evolved from traditional preparations into modern variations suited for quick and easy preparation. While classic desserts may have involved complicated processes, today’s recipes encourage creativity and simplicity.
Different regions have introduced their unique twists to the basic recipe, showcasing local ingredients and preferences. For instance, some cultures might incorporate additional tropical fruits, while others may experiment with nuts and other flavorings to enhance the bars’ taste even further.
Ingredient Deep Dive
Pineapple: Pineapples are not only a delicious tropical fruit but are also culturally significant, often symbolizing hospitality and welcome. Nutritionally, they are packed with vitamin C and bromelain, an enzyme that aids in digestion. When selecting a pineapple, look for a fragrant scent and firm skin, indicating ripeness. Store whole pineapples at room temperature, and once cut, refrigerate in an airtight container.
Coconut: The coconut is a remarkable fruit with a rich history in tropical regions worldwide. Coconut is an excellent source of healthy fats, fiber, and several essential minerals. When buying shredded coconut, check for freshness and unsweetened varieties if you’re looking to control sugar intake. Store in an airtight container in a cool, dark place to maintain its flavor, and consider using fresh coconut for a more vibrant taste in your bars.
Common Mistakes to Avoid
- Using overly ripe pineapple can make the bars too watery, compromising the texture. Always select solid pineapples.
- Not chilling the bars long enough may result in a crumbly texture. Allow ample time for them to set in the fridge.
- Overmixing the ingredients can lead to a dense consistency. Mix just until combined for the best results.
- Substituting unsweetened coconut for sweetened can alter the flavor profile significantly, so be cautious with your substitutions.
- Forgetting to line the baking dish with parchment paper can make removing the bars difficult, so always prepare your pan before starting.
- Not cutting the bars with a sharp knife may result in uneven shapes; use a warm knife for clean edges.
- Storing the bars at room temperature can lead to a mushy texture; be sure to keep them refrigerated.
- Using too much liquid sweetener can result in overly sticky bars, so balance it well with dry ingredients.
- Skipping the oat layer could make the bars less filling, so don’t skip important ingredients.
- Not allowing the bars to rest before serving can impact the overall flavor; patience is key!
Essential Techniques
Mixing: Proper mixing is crucial to ensure all ingredients are evenly distributed, leading to balanced flavor and texture in your No Bake Pineapple Coconut Bars. To master this, use a spatula to fold the ingredients gently without overmixing. The goal is just to combine them until no dry ingredients remain visible. Common pitfalls include mixing too aggressively, leading to a dense final product. A gentle folding technique will prevent this and help maintain a light texture.
Pressing the Mixture: Pressing the mixture firmly is essential for ensuring your bars hold their shape once cut. Use the back of a measuring cup or your fingers to compact the mixture evenly into the pan. Visual cues such as slight compression and a flat surface will indicate success. A common mistake is not applying enough pressure, resulting in crumbly bars that fall apart. Take your time with this step for the best outcome!
Pro Tips for Perfect No Bake Pineapple Coconut Bars
– Ensure your ingredients are at room temperature for better mixing and flavor integration.
– Use fresh pineapple for a more vibrant and lush flavor that is worth the effort.
– Consider adding a pinch of salt to balance the sweetness of the bars and enhance the flavors.
– Swap regular oats for gluten-free oats to cater to dietary needs without sacrificing taste.
– For a touch of indulgence, drizzle melted dark chocolate over the bars before serving.
– Experiment with a scoop of vanilla or coconut yogurt on the side for added creaminess and flavor.
– Always allow the bars to chill for at least 2 hours to fully set before slicing.
– Use a pizza cutter for quick and efficient slicing of your cooled bars.
Variations and Adaptations
Try experimenting with different flavor profiles by incorporating various fruits like mango or kiwi for a unique twist. Seasonal adaptations could include using pumpkin puree in the fall or citrus zest during winter for a refreshing contrast.
For dietary modifications, consider making these bars vegan by using maple syrup instead of honey. Low-carb variations can be achieved by substituting granola with nut flour. If you enjoy different textures, add chopped nuts or seeds to create a delightful crunch. Presentation can also be varied by layering the bars with alternative fruit purees for a striking visual effect.
Serving and Presentation Guide
Plating your No Bake Pineapple Coconut Bars can enhance their appeal. For an elegant presentation, cut the bars into neat squares and arrange them on a colorful platter. Garnish with fresh pineapple slices, shredded coconut, or mint leaves for a burst of color. Serve them chilled alongside a dollop of whipped cream or coconut yogurt for a delightful pairing.
Consider temperature when serving; these bars are best served cold, which keeps them firm and refreshing. For portion control, cut small, bite-sized portions, making them perfect for sharing at gatherings.
Wine and Beverage Pairing
Pair your No Bake Pineapple Coconut Bars with a chilled glass of Moscato or Riesling for a fruity complement that enhances the tropical flavors. If you prefer non-alcoholic options, a sparkling coconut water or a pineapple-based smoothie would pair beautifully. If you’re a coffee lover, try a light iced coffee or vanilla latte to balance the sweetness of the bars.
Storage and Shelf Life
To maintain the freshness of your No Bake Pineapple Coconut Bars, store them in an airtight container in the refrigerator. They typically last up to one week, but quality is best within the first few days when they’re most flavorful. Ensure they are kept chilled, as they can become mushy if left at room temperature for extended periods.
For longer storage, consider freezing the bars. Wrap them tightly in plastic wrap and aluminum foil to prevent freezer burn. Thaw them in the refrigerator before serving.
Make Ahead Strategies
To streamline preparation, consider making your No Bake Pineapple Coconut Bars a day in advance. This allows the flavors to meld and the bars to set perfectly. Assemble the mixture and store it in the refrigerator until you’re ready to press it into the pan.
If you’re preparing other elements for your gathering, store the bars between steps in the fridge to maintain quality. For optimal freshness, look to add any toppings or garnishes just before serving.
Scaling Instructions
This recipe can be easily scaled to meet your needs. To halve it, adjust the quantities of each ingredient accordingly, and you may also want to use a smaller dish for pressing. If wanting to double or triple the recipe, ensure you have a large enough mixing bowl and consider using multiple pans to accommodate the quantity.
When scaling, keep an eye on the setting time—the larger the batch, the longer it may require in the refrigerator. Always store leftovers according to the storage guidelines provided.
Nutritional Deep Dive
The No Bake Pineapple Coconut Bars are balanced in macros, delivering around 150 calories per serving. They are a wholesome treat with proteins from the nuts and healthy fats from the coconut, contributing to a filling snack. Additionally, they provide significant vitamins from the fresh pineapple, pairing well with the overall nutritious profile.
For those mindful of their dietary goals, controlling portion sizes becomes essential. These bars offer a satisfying sweetness that can curb sugar cravings without compromising health.
Dietary Adaptations
Making these No Bake Pineapple Coconut Bars gluten-free is straightforward; simply use gluten-free oats. For a dairy-free version, ensure the coconut or additional ingredients used do not contain dairy.
Vegan adaptations can include replacing honey with maple syrup or agave nectar. Low-carb or keto options may involve substituting traditional sweeteners with stevia or erythritol while using nut flours instead of oats.
For those following a paleo diet, omit any processed sweeteners and focus on using clean, whole ingredients. This flexibility makes the bars accessible for a variety of dietary preferences and needs.
Troubleshooting Guide
Common texture issues may arise if the bars feel too soft upon slicing. This often results from insufficient chilling time; ensure they rest in the fridge long enough to set completely.
Flavor balance can be adjusted if the bars taste overly sweet; one way to enhance flavor without additional sweetness is by adding a pinch of salt or a splash of citrus juice to brighten up the taste.
If you face temperature problems, always ensure your ingredients are fused at room temperature before mixing; cold ingredients can cause clumping.
Equipment challenges arise if you don’t have a proper baking dish; substitute any loaf or square pan according to your preferred shape.
When swapping ingredients due to availability, be cautious with ratios to avoid altering the desired outcome dramatically. Timing concerns can affect setting; ensure you’re mindful of the time allocated for chilling in the fridge.
Recipe Success Stories
Community feedback has consistently praised the No Bake Pineapple Coconut Bars for their irresistible taste and simple preparation method. Many readers have celebrated the versatility of this recipe, sharing adaptations that led to unique flavor profiles, such as adding chocolate or nut butters.
Adaptation stories from the community have highlighted successful substitutions, where individuals crafted nut-free or lower-sugar versions without sacrificing flavor. Others have shared stunning photographs of their finished bars, showcasing how visually appealing these treats can be.
Recipe reviews often note the rave-worthy responses received from guests at gatherings, reinforcing the bars’ success among family and friends. Readers repeatedly comment on the joy of making these bars, turning a simple recipe into a beloved family tradition.
Frequently Asked Questions
Yes, you can use canned pineapple, but be sure to drain it well to avoid excess moisture that could make the bars soggy. Fresh pineapple is typically preferred for the best flavor.
How long will these bars last in the refrigerator?
When stored properly in an airtight container, the bars will last for about one week in the refrigerator. Their texture is best within the first few days.
Can I substitute the coconut in this recipe?
Absolutely! While coconut adds a unique flavor, you can substitute it with nuts or seeds. Simply adjust the quantities to maintain texture.
Is there a way to make these bars gluten-free?
Yes, to make these bars gluten-free, use gluten-free oats instead of regular oats. This adjustment ensures that you can still enjoy these treats without gluten.
What can I do if the bars are too sticky?
If the mixture is too sticky, try adding a little more oats or coconut to absorb the excess moisture. Chilling them longer can also help firm them up.
Can I freeze these bars?
Yes, you can freeze the bars for up to two months. Ensure they are wrapped tightly in plastic wrap and aluminum foil to prevent freezer burn.
How do I know when the bars are set?
The bars should feel firm to the touch and hold their shape when cut. If they’re too soft, give them more time in the fridge to set properly.
Can I use alternative sweeteners in this recipe?
Definitely! You can substitute honey with maple syrup, agave nectar, or stevia, just be mindful of adjusting the quantities as needed.
What should I do if I don’t have a mixing bowl?
If you don’t have a mixing bowl, a large pot or any container suitable for mixing can be used. Just ensure it has enough space to stir the ingredients well.
Can I make these bars without oats?
While oats are a crucial part of the texture, you can experiment with using nut flour or ground almonds to create a base, though this alters the flavor and consistency.
Additional Resources
If you loved these No Bake Pineapple Coconut Bars, check out other tropical-inspired recipes on our blog for a variety of delicious treats. We also offer technique guides on making the best no-bake desserts and ingredient information focusing on tropical fruits. For those interested, our equipment recommendations section has everything you need for easy and successful baking, ensuring you’re prepared for any recipe.
Join the Conversation
We’d love to hear your thoughts on this No Bake Pineapple Coconut Bars recipe! Share your photos, variations, and feedback on social media, and connect with fellow food enthusiasts. Feel free to leave reviews or engage in discussions about your favorite tropical recipes, exchanging tips and experiences in the kitchen.
The Recipe
No Bake Pineapple Coconut Bars
Serves: 16 bars
Prep Time: 15 mins
Cook Time: 0 mins
Total Time: 15 mins
Kitchen Equipment Needed
- Mixing bowl
- Baking dish (8×8 inch)
- Spatula or spoon
- Knife for slicing
- Parchment paper
Ingredients
- 1 cup finely chopped fresh pineapple
- 1 cup shredded unsweetened coconut
- 1 cup rolled oats
- 1/3 cup honey or maple syrup
- 1/4 cup coconut oil melted
- 1 tsp vanilla extract
Directions
- In a mixing bowl, combine finely chopped pineapple, shredded coconut, rolled oats, honey (or maple syrup), melted coconut oil, and vanilla extract.
- Mix until fully combined and the mixture holds together when pressed.
- Prepare an 8×8 inch baking dish by lining it with parchment paper.
- Transfer the mixture into the dish, pressing it evenly into all corners using a spatula.
- Cover the dish and refrigerate for at least 2 hours until set.
- Remove from refrigerator, lift out of the dish using the parchment paper, and slice into bars.
- Enjoy immediately or store in an airtight container in the refrigerator.
Recipe Notes
- For added texture, consider mixing in some chopped nuts or seeds.
- Feel free to drizzle melted chocolate on top for an indulgent touch.
- Bars can be frozen if you’re looking to enjoy them later; just ensure they are well-wrapped.