“`html
Table of Contents
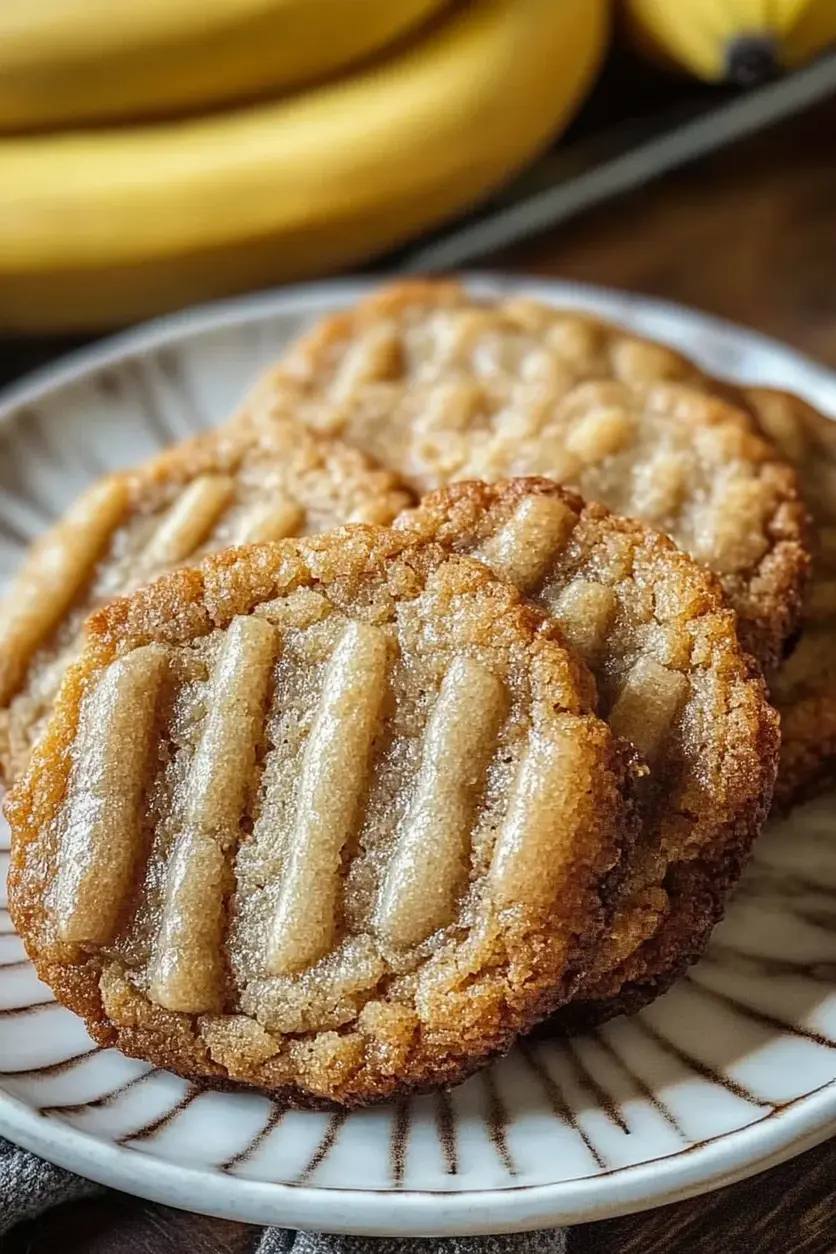
Whipped Shortbread Cookies: Holiday Favorite
Why Are Whipped Shortbread Cookies a Holiday Favorite?
When the air turns crisp and the scent of pine fills the season, what are the quintessential treats that beckon? If you’re like millions of home bakers, the answer likely includes a melt-in-your-mouth cookie that embodies pure, unadulterated comfort. Specifically, have you ever wondered if there’s a cookie that offers both incredible ease and an irresistibly delicate texture, making it a go-to for holiday gatherings and thoughtful gifts alike? These Whipped Shortbread Cookies are precisely that. They’re not just a recipe; they’re a tradition, a buttery, crumbly delight that melts on your tongue, begging for another bite. Their simplicity belies their elegance, making them a perfect canvas for festive decorations and a welcome addition to any cookie platter. Get ready to discover why this recipe consistently earns a spot on holiday baking lists year after year.
The Magic Behind the Melt: Ingredients
The beauty of whipped shortbread lies in its straightforward ingredient list. These aren’t complex concoctions; they’re simple staples transformed into something extraordinary. The key is using high-quality ingredients and ensuring they are at the right temperature for optimal creaming.
- Unsalted Butter: 1 cup (2 sticks), softened to room temperature. This is the heart of your shortbread, providing that rich, buttery flavor and tender crumb. If you only have salted butter, reduce the added salt in the recipe.
- Powdered Sugar (Confectioners’ Sugar): 1/2 cup, sifted. Unlike granulated sugar, powdered sugar dissolves more easily and contributes to the cookie’s signature delicate texture. Sifting prevents lumps.
- Vanilla Extract: 1 teaspoon. Pure vanilla extract adds a warm, aromatic depth that complements the butter beautifully.
- Salt: 1/4 teaspoon. Salt balances the sweetness and enhances the other flavors, making the butter’s richness truly sing.
- All-Purpose Flour: 2 cups, sifted. The structure of the cookie comes from flour. Sifting ensures it’s light and aerated, contributing to the whipped texture.
Timing is Everything: Prep, Bake, and Enjoy!
One of the most appealing aspects of these whipped shortbread cookies is how quickly they come together. Compared to many intricate holiday cookies, this recipe is a breath of fresh air for busy bakers.

Step-by-Step Instructions: Crafting Your Holiday Delight
Let’s get baking! Follow these simple steps to create a batch of melt-in-your-mouth whipped shortbread that will impress everyone at your holiday table.
Step 1: Cream the Butter and Sugar
In a large bowl, using an electric mixer (stand mixer with paddle attachment or hand mixer), beat the softened unsalted butter on medium speed until it’s light and fluffy, about 2-3 minutes. Gradually add the sifted powdered sugar and continue to beat until the mixture is pale yellow and very airy. This “whipping” process is what gives these cookies their signature light and delicate texture.
Step 2: Add the Vanilla and Salt
Add the vanilla extract and salt to the butter and sugar mixture. Beat on low speed until just combined, scraping down the sides of the bowl as needed. Be careful not to overmix at this stage.
Step 3: Incorporate the Flour
With the mixer on low speed, gradually add the sifted all-purpose flour, about a third at a time, beating until just incorporated after each addition. Stop mixing as soon as the flour streaks disappear. Overmixing can develop the gluten in the flour, resulting in a tougher cookie.
Step 4: Shape the Dough
The dough will be soft and a bit sticky. You have a few options for shaping:
- Piping: Transfer the dough to a piping bag fitted with a large star or round tip. Pipe small rounds or swirls onto parchment-lined baking sheets, leaving about 1 inch between them.
- Cookie Press: Use a cookie press with your desired disc. Press cookies onto parchment-lined baking sheets.
- Rolling and Cutting (less common for “whipped”): Chill the dough for 30-60 minutes if you prefer to roll it out (about 1/2 inch thick) and cut into shapes. However, this method might produce a slightly less “whipped” texture.
Step 5: Bake to Perfection
Preheat your oven to 350°F (175°C). Bake for 18-22 minutes, or until the edges are just beginning to turn a very light golden brown. The centers should still appear pale. They will continue to firm up as they cool.
Step 6: Cool and Decorate
Let the cookies cool on the baking sheets for about 5 minutes before carefully transferring them to a wire rack to cool completely. Once cool, you can indulge in their simple perfection or get creative with decorations! Drizzle with melted chocolate, add festive sprinkles, or use them as a base for S’mores treats by topping with a marshmallow and a quick broil.
Nutritional Snapshot
While these cookies are a delightful indulgence, here’s a general idea of their nutritional profile. (These are approximate values and can vary based on exact ingredients and portion size).
- Calories: ~100-120 per cookie (depending on size)
- Fat: ~7-9g
- Carbohydrates: ~9-11g
- Sugar: ~5-7g
- Protein: <1g
Mindful Indulgences: Healthier Alternatives
Looking to lighten up this classic? You can make subtle swaps while largely preserving that delightful flavor and texture.
- Butter Swap: Consider using half butter and half a plant-based butter alternative that bakes well. Some recipes also experiment with a portion of coconut oil (solidified), though this can alter the flavor slightly.
- Sugar Reduction: You can try reducing the powdered sugar by a tablespoon or two. The cookies might be slightly less sweet and perhaps a tad less tender, but still delicious.
- Flour Alternatives: For gluten-free options, a good gluten-free all-purpose flour blend (that contains a binder like xanthan gum) can often be used successfully.
Serving Suggestions: Elevate Your Cookies
These cookies are delightful on their own, but here are a few ways to make them even more special:
- Drizzle with Chocolate: Melt dark, milk, or white chocolate and drizzle over the cooled cookies. Add sprinkles for extra festivity.
- Jam-Filled: Bake small rounds, then sandwich two together with a dollop of your favorite jam (raspberry or strawberry are classics).
- S’mores Twist: Top a plain cookie with a mini marshmallow, then briefly broil until golden. Immediately top with a small piece of chocolate and let it melt.
- Coffee or Tea Companion: Their delicate sweetness makes them the perfect partner for a warm beverage.
Common Mistakes to Avoid
Even simple recipes have potential pitfalls. Here’s how to ensure your whipped shortbread comes out perfectly every time:
- Butter Not Softened: Cold butter won’t cream properly, leading to a dense, greasy dough. Ensure it’s truly softened to room temperature.
- Overmixing the Flour: This is crucial for tenderness. Mix only until combined to avoid tough cookies.
- Baking Too Long: Whipped shortbread cooks quickly. Overbaking will result in hard, dry cookies rather than tender, melt-in-your-mouth treats. Watch for those lightly golden edges.
- Not Cooling Properly: Allowing them to cool on the baking sheet briefly helps them set, while cooling completely on a wire rack prevents sogginess.
Storing Your Whipped Shortbread
Proper storage ensures these delicate cookies stay fresh and delicious. Allow them to cool completely before storing. Store in an airtight container at room temperature for up to 5-7 days. If decorated with chocolate, ensure the chocolate is fully set before stacking.

Ready to bake up some holiday cheer? These Whipped Shortbread Cookies are a guaranteed hit, offering a taste of pure comfort and festive joy. Don’t just bake them for the holidays; make them a year-round treat!
Frequently Asked Questions
What makes shortbread “whipped”?
The “whipped” texture comes from creaming the butter and powdered sugar for an extended period until very light and airy. This incorporates extra air into the dough, resulting in a more delicate, tender cookie compared to traditional shortbread that uses granulated sugar and is often just mixed until combined.
Can I use salted butter?
Yes, you can use salted butter. If you do, I recommend omitting the 1/4 teaspoon of salt from the recipe or reducing it to a pinch to avoid making the cookies too salty.
Why are my cookies spreading too much?
Spreading can occur if your butter is too warm (margarine will also cause spread), if you overmix the flour, or if your oven temperature is too low. Ensure your butter is softened, not melted, and that you don’t overwork the dough after adding the flour. Chilling the dough briefly before baking can also help prevent excessive spreading.
Can I add other flavors?
Absolutely! You can add 1/2 teaspoon of other extracts like almond or lemon for a different flavor profile. You could also add finely chopped nuts or zest to the dough. For chocolate versions, consider adding cocoa powder (you might need to slightly adjust flour) or dipping/drizzling in chocolate.
Why do my cookies have dark brown bottoms?
This usually means your oven temperature is too high, or your baking sheets are too dark. Try reducing the oven temperature by 25°F (about 15°C) and consider using lighter-colored baking sheets or lining them with parchment paper, which also helps with even baking.
Enjoy these delightful cookies!
Print
Whipped Shortbread Cookies Recipe: Melt-in-Your-Mouth Holiday Perfection
Description
Melt-in-your-mouth Whipped Shortbread Cookies are a holiday classic made with just four simple ingredients. These buttery, light, and delicate cookies can be customized with sprinkles, jam, or chocolate for a festive touch. Perfect for gifting or indulging with a warm drink!
Ingredients
- 3 cupsunsalted butter, softened
- 1 1/2 cupspowdered sugar, sifted
- 4 1/2 cupsall-purpose flour (spoonand sweep method)
- 1 1/2 cupscornstarch
- Optional: sprinkles, candies, melted chocolate, or jam for decoration
Instructions
- Preheat theovento 300°F (150°C) and line baking sheets withparchment paper.
- Using astand mixerwith a paddle attachment, cream the softened butter and powdered sugar until light and fluffy.
- Sift together the flour and cornstarch in a separate bowl. Gradually mix the dry ingredients into the butter mixture in three additions.
- Scoop tablespoons of dough, roll into balls, and place on prepared baking sheets, leaving 1 inch of space between each cookie.For pressed cookies: Flatten gently with a fork and decorate with sprinkles.For thumbprint cookies: Create an indentation with your thumb and fill with jam or leave empty to fill post-baking.
- For pressed cookies: Flatten gently with a fork and decorate with sprinkles.
- For thumbprint cookies: Create an indentation with your thumb and fill with jam or leave empty to fill post-baking.
- Bake for 20 minutes, then let the cookies cool on the pan before moving.
- Drizzle with melted chocolate or additional decorations if desired.
Notes
For best results, use softened but not overly melted butter.
Customize with extracts like vanilla or almond for added flavor.
Store in an airtight container for up to 7 days or freeze for up to 3 months.
Nutrition
- Calories: 100
- Sugar: 3g
- Fat: 7g
- Carbohydrates: 8g
- Protein: 0,5g
“`