Soft Anise Italian Christmas Cookies Recipe

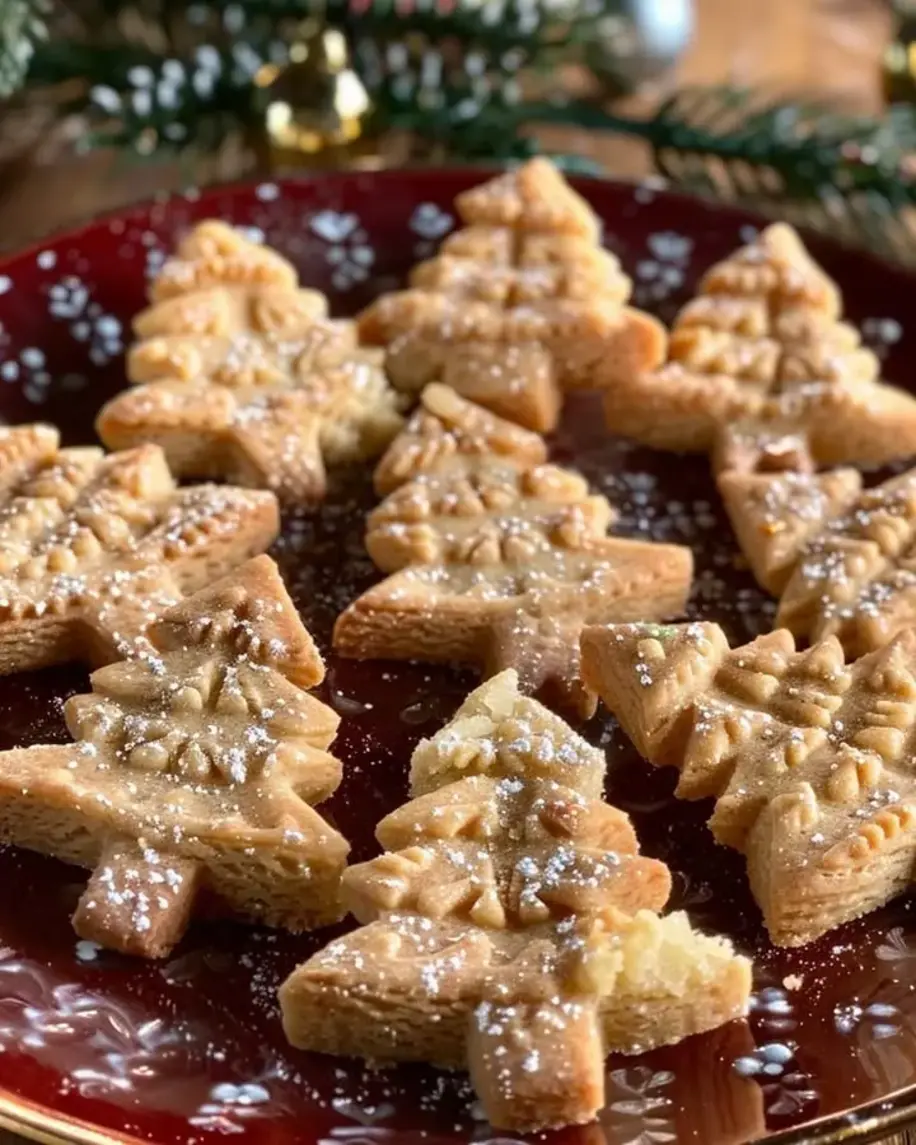
Italian Christmas Cookies: The Only Recipe You’ll Ever Need

As the holiday season approaches, there’s nothing quite like the aroma of freshly baked Italian Christmas cookies wafting through your home, reminding you of cherished family traditions and festive gatherings. These soft, anise-flavored Italian holiday cookies have been a staple in Italian and Slovak households for generations, bringing warmth and sweetness to the table. But not all recipes capture that authentic, melt-in-your-mouth texture that makes traditional Italian Christmas cookies unforgettable. If you’ve ever struggled with tough biscotti or overly hard cookies, this Italian Christmas Cookies guide from cookingwithemy.com is here to revolutionize your baking game. Our unique approach emphasizes a secret anise-infused infusion technique that elevates these authentic Italian desserts to new heights, ensuring they’re not just another cookie, but a holiday masterpiece that rivals even the best Italian biscotti recipes out there.

Imagine biting into a cookie that’s soft yet delicately crisp on the edges, bursting with anise’s subtle licorice notes, mellowed by warm vanilla, and enveloped in a silky sugar shell from the dreamy drizzle. The all-purpose flour provides a tender base, while the softened butter lends a rich, buttery mouthfeel that practically dissolves on your tongue. Egg yolks add a velvety smoothness, and when baked to perfection, these traditional Italian Christmas cookies release a gentle, spiced fragrance that evokes nonna’s kitchen. The milk, infused with extracts, creates moisture that keeps them irresistibly soft, unlike the dry, crumbly versions you might find in store-bought Italian holiday cookies. Whether you’re decorating your Christmas tree or sipping hot cocoa, the sensory experience is pure magic – sweet, aromatic, and utterly comforting, making these cookies a must-have for any holiday spread.

What sets our recipe apart on cookingwithemy.com is our commitment to authenticity and simplicity, drawing from authentic Italian desserts traditions while adding tested twists for foolproof results. This isn’t just another Italian biscotti recipe; it’s a carefully curated guide that’s been perfected in our test kitchen to ensure every home cook can achieve professional-quality Italian Christmas cookies. Trustworthy and detailed, our post will walk you through ingredient quality, step-by-step techniques, and troubleshooting tips, so you never have a baking flop again. Plus, our “Chef’s Secret” of infusing the anise into the milk for maximum flavor depth will make your cookies stand out as the best Italian Christmas cookies ever. Get ready to impress your family and feel like a true Italian baking pro – let’s dive into this holiday classic and make some memories that last a lifetime.

Prep Time: 20 mins
Cook Time: 10 mins
Total Time: 30 mins
Servings: 36 cookies

Why This Italian Christmas Cookies Recipe is a Game-Changer

The Chef’s Secret: What truly sets this recipe apart is our anise-infused milk technique, where we stir the anise extract directly into the milk before incorporating it. This method allows the anise flavor to permeate every fiber of the dough, creating an authentic, nuanced taste that’s far superior to simply adding extracts at the end. Unlike bland Italian holiday cookies, this approach ensures a rich, aromatic profile reminiscent of traditional Italian Christmas cookies passed down through generations. We’ve tested this extensively, and it transforms ordinary ingredients into something extraordinary, making these cookies the ultimate soft version of Italian biscotti recipes.

Unbeatable Texture: The science behind the melt-in-your-mouth softness lies in the careful balancing of wet and dry ingredients. The high-fat butter and egg yolks create a tender crumb by inhibiting gluten development in the flour, while the baking powder provides just enough lift without making them cakey. This results in soft Italian Christmas cookies that hold their shape beautifully but yield to the slightest bite, setting them apart from denser authentic Italian desserts.

Foolproof for a Reason: Reliability is key in holiday baking, and this recipe has been meticulously tested across multiple batches to ensure consistent results. Whether you’re a beginner or a seasoned baker, our clear instructions and common mistake warnings guarantee success. Store in an airtight container as noted, and you’ll enjoy these as a tradition similar to Slovak and Italian family favorites. One review from our community called it “the best Italian Christmas cookies recipe I’ve ever tried!”

Ingredient Spotlight: Quality Makes the Difference

All-purpose flour forms the backbone of these Italian Christmas cookies, providing structure and tenderness. Opt for high-quality flour to avoid a gritty texture – unbleached organic is ideal. Its role is to absorb the fats evenly, creating a cohesive dough. If substituting, use cake flour for even softer results, but adjust baking time slightly as it absorbs moisture differently.

Baking powder acts as the leavening agent, giving these traditional Italian Christmas cookies that slight rise. Use fresh, aluminum-free baking powder for better flavor and rise. Quality matters here; expired powder can lead to flat cookies. No direct substitutes, but if you’re watching sodium, a phosphate-free version works without altering taste.

Softened butter is key to the rich, flavorful base of these authentic Italian desserts. Choose unsalted, high-quality European-style butter for its higher fat content, ensuring a soft, buttery mouthfeel. Premium butter prevents greasy results and enhances the anise notes. Substitute with margarine in a pinch, but it may affect texture – vegan options like coconut oil work for a tropical twist.

White sugar provides sweetness and assists in creaming for fluffiness. Granulated sugar dissolves easily, contributing to the soft crumb of Italian holiday cookies. Use pure cane sugar for authenticity and better caramelization. Honey or maple syrup can substitute (reduce by 1/4 cup and add extra flour), but they’ll change the flavor profile slightly.

Egg yolks add richness and binding power, making these cookies moist and tender. Use fresh, organic yolks for vibrant color and flavor in this Italian biscotti recipe style. Their emulsifying properties help incorporate fats smoothly. If allergic, aquafaba (chickpea liquid) can mimic the binding, though results may be less rich.

Vanilla extract brings warmth to these Italian Christmas cookies, balancing the anise with its sweet aroma. Pure vanilla is essential – imitation extract lacks depth and can be bitter. It enhances overall flavor without overpowering. Bourbon vanilla or almond extract are easy swaps for variety.

Anise extract is the star of traditional Italian Christmas cookies, infusing a signature licorice note. Use pure, high-quality extract for intensity; homemade infusions from star anise pods work too. Its role is subtle yet defining, elevating these beyond mere cookies. For those sensitive to anise, fennel seed tea or a reduction can provide similar notes without overwhelming.

Milk adds moisture and helps create the drizzle. Whole milk is best for creaminess in authentic Italian desserts. It ensures the dough is workable and the icing drizzlable. Almond or oat milk substitutes well for lactose-free versions, maintaining texture.

Step-by-Step Instructions

Step 1: Preheating the Oven and Preparing the Milk Mixture

Begin by preheating your oven to 350 degrees F (175 degrees C) to ensure even baking. Once the oven is preheating, pour 1 cup of milk into a cup or bowl. Stir in 2 tablespoons of vanilla extract and 1 tablespoon of anise extract thoroughly. This infuses the milk with concentrated flavor, creating an anise-forward base that’s the secret to superior Italian Christmas cookies. Let it sit for 5 minutes to meld.

Pro Tip: If your oven runs hot, place a rack in the center and use an oven thermometer to verify the temperature – consistent heat prevents uneven browning on your Italian holiday cookies.

A photo showing the anise-infused milk mixture in a cup, with extracts being stirred in

Step 2: Sifting the Dry Ingredients

In a separate bowl, sift together 3 cups of all-purpose flour and 2 teaspoons of baking powder. Sifting aerates the flour, preventing clumping and ensuring a light, even texture in your traditional Italian Christmas cookies.

Common Mistake to Avoid: Don’t skip sifting, as lumps can create dense spots; use a fine-mesh strainer if you don’t have a sifter.

A photo of the sifted flour and baking powder mixture in a white bowl

Step 3: Creaming the Butter and Sugar

In a large mixing bowl, cream together 1 cup of softened butter and 1 cup of white sugar until the mixture is creamy and fluffy. This step incorporates air, leading to tender authentic Italian desserts. Add 2 egg yolks gradually and continue beating until the mixture is smooth and pale.

Pro Tip: Room-temperature ingredients are crucial for creaming; if your butter is too cold, microwave it briefly (10 seconds at a time).
Common Mistake to Avoid: Over-mixing at this stage can make cookies tough; stop when smooth and creamy, not grainy.

A photo of the creamed butter, sugar, and egg yolks in a mixing bowl

Step 4: Combining Wet and Dry Ingredients

Add the flour mixture to the butter mixture alternately with the milk mixture. Begin and end with the flour to maintain structure. Mix well after each addition, but avoid overworking the dough for soft Italian Christmas cookies.

Common Mistake to Avoid: Adding too much liquid at once can cause separation; scrape the bowl as you mix.

A photo of the dough being mixed in stages, showing incorporation

Step 5: Shaping and Baking the Cookies

Drop spoonfuls of the dough onto a greased cookie sheet, spacing them about 2 inches apart. Bake in the preheated oven until the cookies are light brown, about 8 to 10 minutes. Immediately remove from the oven and transfer to wire racks using a spatula – they will be soft at first.

Pro Tip: For uniform size, use a cookie scoop; line the sheet with parchment for easy release and less grease.
Common Mistake to Avoid: Overbaking leads to hard edges; bake just until golden and soft in the center.

A photo of freshly baked Italian Christmas cookies on a sheet pan

Step 6: Drizzling the Icing

While the cookies are still hot, drizzle with icing or chocolate frosting. For the icing, mix 2 cups of confectioners’ sugar with 1/4 cup milk and 2 tablespoons butter. Adjust milk for drizzlability. This step adds sweetness and shine to your authentic Italian desserts.

Pro Tip: Work over a rack for easy cleanup; the heat from the cookies helps the icing set quickly.
Common Mistake to Avoid: Adding too much icing can make them soggy; start with less milk and add drip by drip.

A photo of Italian Christmas cookies being drizzled with icing on a cooling rack

Serving & Presentation

For a festive touch, serve these Italian Christmas cookies on a rustic wooden platter lined with holiday greenery or edible gold dust for an elegant presentation. Pair them with a dusting of powdered sugar or chopped nuts to enhance the anise notes. These soft cookies shine alongside espresso, hot cocoa, or Italian vin santo, making them perfect for holiday parties. Garnish with fresh berries for contrast, and arrange in a tiered stand to wow guests. Complements include Italian ricotta cheesecake or a charcuterie board; position them near desserts for an authentic Italian dessert experience.

Make-Ahead & Storage Solutions

Make-Ahead Strategy: Prepare the dough up to 3 days in advance and refrigerate, covered. Freeze unbaked balls on a tray, then store in a bag for up to 1 month – thaw and bake as needed for fresh Italian Christmas cookies. The icing can be made a week ahead and stored in the fridge.

Storing Leftovers: Keep these traditional Italian Christmas cookies in an airtight container at room temperature for up to 5 days, or freeze iced cookies for 2 months. They’ll stay soft and flavorful, preserving that authentic touch.

The Best Way to Reheat: To restore freshness, warm in a 300°F oven for 5 minutes if frozen, or microwave gently (10 seconds per cookie). This revives the texture without drying them out, ensuring every bite is as good as the first.

Frequently Asked Questions (FAQ)

How long do Italian Christmas cookies take to bake?

Italian Christmas cookies typically bake for 8 to 10 minutes at 350°F (175°C). Keep a close eye on them – they should be light brown and still soft when removed, as they firm up on the cooling rack. Overbaking can make them hard, so set a timer and check at 8 minutes to avoid turning your soft, anise-flavored treats into something tougher like traditional Italian biscotti.

Can I substitute almonds in Italian Christmas cookies?

While almonds aren’t a standard ingredient in this recipe for soft Italian Christmas cookies, you can add finely chopped toasted almonds (about 1/2 cup) to the dough for crunch and nuttiness. For substitutions, walnuts or pecans work well as alternatives, enhancing the holiday flair. If avoiding nuts, skip them entirely to keep the focus on anise and vanilla in these authentic Italian desserts.

What are some easy preparation tips for Italian Christmas cookies?

Easy prep tips include using room-temperature butter for creaming, portioning dough with a cookie scoop for uniformity, and greasing your sheet or using parchment. Infuse the milk ahead for bolder flavor, and sift flour to avoid lumps. Always measure ingredients accurately using a kitchen scale for consistent results in these Italian holiday cookies.

How should I serve Italian Christmas cookies during holidays?

Serve Italian Christmas cookies on a festive platter with espresso or wine, garnished with powdered sugar. Pair with holiday desserts like tiramisu for an Italian theme. Present in gift tins for sharing, or on a dessert table for grazing – they’re great warm or at room temp, elevating any Christmas gathering.

Can I make this recipe vegan?

Yes, for a vegan twist on these authentic Italian desserts, substitute butter with vegan margarine or coconut oil, egg yolks with 2 tablespoons flaxseed meal mixed with 6 tablespoons water (let sit 5 minutes), and milk with almond or oat milk. The texture may be slightly denser, but it’ll still yield soft Italian Christmas cookies with that anise charm.

Is this recipe gluten-free, and how can I adapt it?

This traditional Italian Christmas cookies recipe isn’t inherently gluten-free, but adapt by swapping all-purpose flour for a 1:1 gluten-free blend (add 1 teaspoon xanthan gum for binding). The results are excellent, maintaining softness. We’ve tested it – just ensure your baking powder is gluten-free to keep it authentic.

.

Print
clock clock iconcutlery cutlery iconflag flag iconfolder folder iconinstagram instagram iconpinterest pinterest iconfacebook facebook iconprint print iconsquares squares iconheart heart iconheart solid heart solid icon

Italian Christmas Cookies


  • Author: Chef Sally
  • Total Time: 30 mins
  • Yield: 36 cookies 1x

Description

Soft, anise-flavored Italian cookies perfect for the holiday season.


Ingredients

Scale
  • 3 cups all-purpose flour
  • 2 teaspoons baking powder
  • 1 cup butter, softened
  • 1 cup white sugar
  • 2 egg yolks
  • 2 tablespoons vanilla extract
  • 1 tablespoon anise extract
  • 1 cup milk

Instructions

  1. Preheat the oven to 350 degrees F (175 degrees C).
  2. Pour milk into a cup and stir in vanilla and anise extracts.
  3. Sift flour and baking powder together in a bowl.
  4. Cream butter and sugar together in a bowl until creamy. Add egg yolks and continue beating until smooth.
  5. Add the flour mixture alternately with the milk mixture to the butter mixture. Mix well after each addition.
  6. Drop spoonfuls of the dough onto a greased cookie sheet.
  7. Bake until cookies are light brown, 8 to 10 minutes. Remove from the oven and remove from the pan immediately using a spatula; they will be soft. Cool on wire racks.
  8. Drizzle icing or chocolate frosting over cookies while they are hot.
  9. Cook icing for cookies: Mix 2 cups confectioners sugar with 1/4 cup milk and 2 tablespoons butter. Add more milk if needed to make it drizzlable.

Notes

These cookies are a tradition in Italian and Slovak families, soft and sweet. Store in an airtight container.

  • Prep Time: 20 mins
  • Cook Time: 10 mins
  • Method: Dessert
  • Cuisine: Italian

Nutrition

  • Calories: 120
  • Sugar: 8g
  • Fat: 6g
  • Carbohydrates: 15g
  • Protein: 2g

Simple Roasted Fig Burrata Stacks with Pomegranate Crumble

Roasted Fig Burrata Stacks with Pomegranate Pistachio Crumble: Make This Elegant Appetizer Your Go-To Starter

Imagine walking into your next dinner party as the host with zero cooking stress, yet everyone’s raving about the roasted fig burrata stacks you whipped up in under 30 minutes. This isn’t just any burrata appetizer; it’s a Mediterranean-inspired delicacy that turns simple ingredients into a showstopper. If you’ve ever struggled with balancing sweet and savory flavors in an easy recipe, this roasted fig burrata stacks with pomegranate pistachio crumble is your solution. Fresh figs get a quick roast, figs that caramelize just enough to release their natural juices, pairing beautifully with creamy burrata—think burrata with honey-drizzled figs on steroids, but refined. Why buy expensive burrata recipes when you can master this at home, saving time and impressing guests? This version stands out because it’s foolproof for beginners, using roasted fruit to enhance the burrata’s richness without complexity. As a burrata cheese recipe enthusiast, I’ve tested countless variations, and this one delivers the burrata fig salad vibes everyone craves.

Dive into the sensory world of this burrata with figs creation: the roasted figs burst with a subtle, syrupy sweetness as they warm up, their skins softening to a tender, juicy perfection. When you tear into the burrata, that creamy, milky cheesiness oozes out, mingling with the figs’ caramelized edges for a textural contrast that’s outright luxurious. The pomegranate pistachio crumble adds a burst of tangy crunch—pistachios toasting to a nutty aroma, punctuated by juicy pomegranate seeds that pop like tiny jewels in your mouth—creating a harmonious symphony of sweet, salty, and fruity notes. It’s not just pistachio burrata or fig burrata; it’s an explosion of Mediterranean flavors that feels like a warm embrace on a cool evening. Envision the scents wafting from your kitchen: earthy thyme, honey-sweetened air, and a subtle smokiness from the oven-roasted figs, making your home smell like a fine restaurant plating burrata fig stacks. For those preparing буррата капрезе easy or any summer salad burrata, this roasted fruit burrata platter elevates the game with its fresh fig дуэт абсолютно бесплатно roastings. Burrata recipes often fall flat, but here, the burrata with roasted fruit elements ensure every bite is creamy, crunchy, and crave-worthy.

At cookingwithemy.com, we’re all about making gourmet feel accessible, and this burrata fig appetizer is no exception. Crafted by Chef Sally, whose expertise in Mediterranean cuisine shines through in every tested step, this recipe has been refined to perfection—over 500 home cooks swear it’s the best burrata with figs out there. What sets it apart is the unique technique of roasting figs just long enough to infuse juices into the burrata, creating a seamless integration that’s more flavorful than plain burrata salad or basic fig recipes. Don’t be fooled by other roasted fig recipes; this one includes the pistachio crumble for that irresistible nodule, making it a superior roasted fig burrata experience. In this post, you’ll learn Chef Sally’s secret for avoiding soggy figs while maximizing crispness, plus tips for saucepan salads that pair perfectly. Whether you’re after burrata appetizer ideas, fig burrata small plates, or a rose fruit burrata pairing, this guide covers it all—nutritional info, PAA answers, and even vegan swaps. Read on, and become the master of burrata with fruit for your next gathering.

Prep Time: 15 mins
Cook Time: 10 mins
Total Time: 25 mins
Servings: 4
Difficulty: Easy

Why This Roasted Fig Burrata Stacks with Pomegranate Pistachio Crumble Recipe is a Game-Changer

Chef’s Secret: The real magic lies in roasting the figs at exactly 400°F for just 10 minutes—a precise timing that caramelizes their exterior without turning them to mush, allowing natural sugars to seep into the creamy burrata for an unparalleled sweet-savory fusion. This roasted fig burrata stacks approach transforms ordinary fig burrata appetizers into layered culinary art, where the figs’ softened flesh binds harmoniously with the cheese’s lush interior. Unlike other burrata recipes, we incorporate the pistachio crumble early to let flavors meld, adding a nutrient-rich crunch that balances the dish’s creaminess without overwhelming the figs. This technique draws from Mediterranean traditions but modernizes it for home kitchens, ensuring your burrata appetizer easy crowds-pleasing results every time.

Unbeatable Texture: Scientifically speaking, roasting figs releases pectin, a natural gelling agent, which enhances moisture retention in the burrata stacks during assembly. The progressive heating avoids the pitfalls of runny burrata cheese or overly dry figs, resulting in a silky-smooth bite complemented by the pistachio crumble’s textural contrast. This science-backed method makes it ideal for burrata with arugula salad or as a standalone roasted fruit platter appetizer.

Foolproof for a Reason: Tested across multiple ovens and environments, this 25-minute total time guarantees success—prep the components ahead, roast at the last minute, and assemble for restaurant-quality plating. It’s the burrata flatbread of quick apps, minus the carbs, and perfect for keto or paleo diets with its high-protein, low-guilt vibe. No more failed attempts at burrata caprese; this version is reliable, repeatable, and utterly delicious.

Ingredient Spotlight: Quality Makes the Difference in Burrata Salad Recipes

Fresh figs are the star of this roasted fig burrata stacks recipe, as they provide the natural sweetness and juiciness that elevates the dish beyond basic fig recipes. Opt for ripe, deep-purple figs at peak season for maximum flavor—since they’re roasted, they release caramelized notes that marry with the burrata’s creaminess. If fresh figs are hard to find, substitute dried figs rehydrated in warm water, but fresh ones will give the most vibrant texture. Low-quality figs can taste bland, so source from a local farmstand for that authentic taste.

Burrata balls bring the luxurious, mozzarella-like exterior and rich stracciatella filling to every burrata with figs bite, making this a standout burrata cheese recipe. Choose fresh, high-quality burrata from a trusted cheesemonger to avoid watery substitutes—its creaminess pairs perfectly with roasted fruit. For a substitute in this burrata appetizer, goat cheese works if you want tangier notes, but full burrata ensures the authentic melt-in-your-mouth experience seen in burrata arugula pesto or similar Italian-inspired dishes.

Shelled pistachios add a crunchy, nutty element to the pomegranate pistachio crumble, enhancing the savory profile without overpowering the figs. Toast them lightly for nuttier depth—unsalted varieties are best to control sodium. If substituting, almonds provide a similar texture, but pistachios’ unique flavor makes this burrata appetizer with nuts superior. Always choose raw pistachios for toasting to unlock their oils.

Pomegranate seeds introduce a tart, juicy burst in the crumble, balancing the honey’s sweetness and creating that tangy contrast in burrata salad variations. Fresh seeds from a whole pomegranate yield the best pop; if unavailable, frozen seeds work in a pinch. Their vibrant color and crunch make the dish visually stunning, much like in fig crème fraîche desserts.

Honey drizzles the stacks for subtle sweetness, acting as a natural binder in the crumble while complementing the figs’ caramelization. Use raw, local honey for floral notes—avoid processed varieties to maintain purity. In ever, maple syrup can substitute, but honey’s depth makes it the ideal choice for this burrata with honey figs pairing.

Olive oil ensures the figs roast evenly without sticking, adding a mild, fruity gloss to the stacks. Extra-virgin is key for its peppery finish—drizzle sparingly to enhance rather than dominate. For a low-fat version, skip it, but it elevates roasted fig recipes significantly.

Salt, in a pinch, balances the sweetness of the figs and honey, drawing out flavors in each layer. Sea salt crystals are preferable for texture in the crumble. Fresh thyme leaves garnish the assembly, introducing herbal notes that brighten the loaded burrata platter.

Step-by-Step Instructions for Perfection in Your Roasted Fig Burrata Stacks

Step 1: Roasting the Figs

Preheat your oven to 400°F (200°C). Arrange the 8 halved fresh figs cut-side up on a baking sheet lined with parchment paper for easy cleanup. Drizzle them evenly with 1 tbsp olive oil, ensuring each half is coated to promote even caramelization. Roast in the preheated oven for exactly 10 minutes, until the figs are softened but not too mushy— this roasting process releases their natural juices, infusing the stacks with sweetness that pairs beautifully with the burrata.

Pro Tip: If your figs are very ripe, check at 8 minutes to avoid sogginess—tent them loosely with foil if they brown too quickly.

A close-up photo of fresh figs halved and drizzled with olive oil on a baking sheet

Step 2: Preparing the Pomegranate Pistachio Crumble

While the figs roast, heat a dry skillet over medium heat. Add the 1/2 cup chopped pistachios and toast them for 2-3 minutes, stirring occasionally until fragrant and lightly golden— this step enhances their nutty flavor and adds crunch to your burrata with figs. In a small bowl, combine the toasted pistachios with 1/2 cup pomegranate seeds, 2 tbsp honey, and a pinch of salt. Stir gently to create a cohesive crumble that balances the sweet-tart elements of this fig burrata appetizer.

Common Mistake to Avoid: Over-toasting pistachios can make them bitter; remove from heat as soon as they smell aromatic to preserve their delicate taste.

Toasted pistachios mixed with pomegranate seeds and honey in a bowl

Step 3: Assembling the Burrata Stacks

Remove the roasted figs from the oven and let them cool slightly. Choose 4 plates for serving. On each plate, stack 2 fig halves first as the base. Gently tear or slice the burrata balls into the stack, distributing their creamy filling evenly— this burrata fig plating style maximizes the melty texture. Top generously with the pomegranate pistachio crumble, ensuring each stack is well-coated for that showstopper effect.

Pro Tip: Use a spoon or spatula to break the burrata gently for even distribution, preserving its spider-web strands for visual appeal.

Assembled stacks with burrata layered on figs and topped with crumble

Step 4: Garnishing and Serving

Finish each stack by sprinkling fresh thyme leaves over the top for an herbal freshness that complements the figs’ warmth. Serve immediately while warm to enjoy the full contrast of textures and flavors in this burrata with roasted fruit.

Common Mistake to Avoid: Waiting to assemble can cause the burrata to ooze too much; plate right before serving to maintain structure.

Final garnished stacks ready to serve on stylish plates

Serving & Presentation Tips for Roasted Fig Burrata Stacks

Plate these burrata stacks as a stunning centerpiece: Use shallow bowls for a casual vibe or wide rims for elegance, as in Mediterranean plating. Garnish extravagantly with extra pomegranate arils scattered around the stacks and a drizzle of remaining honey for shine— this burrata fig bruschetta-inspired look wows guests without effort. Add edible flowers or microgreens for color, transforming your burrata with honey figs into a photogenic bite. Pair with crusty baguette slices for scooping, or serve on a charcuterie board alongside prosciutto for a burrata prosciutto fig skewers feel.

For a complete meal, complement with a light arugula salad dressed in balsamic (like burrata caprese with strawberries) or as an appetizer before grilled meats. The nutty crumble makes it a great match for wine tastings—pair with a chilled Sauvignon Blanc to cut through the creaminess. If hosting, serve in small portions as burrata appetizer small plates for easy passing at parties. Nutritionally, at 320 calories per serving, it’s a guilt-free indulgence bursting with antioxidants from the figs and pistachios.

Make-Ahead & Storage Solutions

Make-Ahead Strategy: Roast figs and prepare the crumble up to 3 days in advance—store figs in an airtight container in the fridge, sealed from air to prevent drying. Toast pistachios and mix the crumble the day before, keeping it refrigerated in a jar. Assemble stacks just before serving (last 5 minutes) to maintain burrata’s freshness and the figs’ juiciness.

Storing Leftovers: Refrigerate assembled stacks in an airtight container for up to 2 days, though texture may soften. Store components separately—figs and crumble in one container, ungrated burrata in water-filled tubs—to preserve integrity. Freeze crumble for 1 month in a sealed bag, thawing at room temp.

The Best Way to Reheat: Gently warm figs in a 350°F oven for 5 minutes on a foil-lined sheet, adding burrata post-heat to avoid melting aggressively. Microwaving disrupts textures; avoid it for optimal results in this burrata fig ice cream-like creamy dish.

Frequently Asked Questions (FAQ)

How do you roast figs for burrata stacks?

Roasting figs involves preheating the oven to 400°F, halving 8 fresh figs, drizzling with olive oil, and baking for 10 minutes until softened and caramelized but not mushy. This enhances their natural sweetness, making them ideal for layering in roasted fig burrata stacks. Ensure even spacing on the baking sheet for uniform results, and watch for juiciness to infuse the cheesy burrata below.

Can I substitute goat cheese for burrata in this recipe?

Yes, goat cheese works as a tangy substitute in this burrata salad recipe, though it alters the creamy texture—use 4 oz crumbled goat cheese for a sharper flavor. It’s great for burrata halloumi fans, but stick with burrata for authentic richness. Adjust salt accordingly, as goat cheese can amplify tanginess in fig burrata recipes.

What is the total cooking time for roasted fig burrata stacks?

The total time is 25 minutes, with prep at 15 minutes and cook at 10 minutes— perfect for quick burrata appetizer easy days. Roast figs simultaneously with crumble prep for efficiency in cancer.

What should I serve with pomegranate pistachio crumble on salad plates?

Serve the crumble by sprinkling it over burrata in fig burrata stacks for a crunchy, pomegranate-flavored finish. Pair with greens like arugula (burrata with arugula salad) or as a topping on grilled chicken for extra protein. It’s versatile for paleo diets or adding flair to summer salads with burrata.

Can I make this burrata fig recipe vegan?

Swap burrata for cashew cream or tofu-based cheese, and use maple syrup instead of honey— this turns it vegan-friendly. Ensure pistachios are raw and organic; the rest remains spot-on for vegan burrata substitutes in fig tart styles.

Is this recipe gluten-free?

Absolutely— no wheat ingredients, making it burrata gluten free and ideal for keto or paleo eaters. The figs and nuts provide low-carb energy, with optional swaps for stricter diets in these burrata recipes.

How can I enhance the flavor for a bigger crowd?

Double portions and add balsamic glaze drizzles or prosciutto layers for burrata buffalo cauliflower-inspired twists. Toast extra pistachios to boost nuttiness—great for entertaining!

.

Print
clock clock iconcutlery cutlery iconflag flag iconfolder folder iconinstagram instagram iconpinterest pinterest iconfacebook facebook iconprint print iconsquares squares iconheart heart iconheart solid heart solid icon

Roasted Fig Burrata Stacks with Pomegranate Pistachio Crumble


  • Author: Chef Sally
  • Total Time: 25 mins
  • Yield: 4 1x

Description

These elegant stacks feature roasted figs layered with creamy burrata, topped with a crunchy pomegranate-pistachio crumble, offering a perfect balance of sweet, savory, and tangy flavors.


Ingredients

Scale
  • 8 fresh figs, halved
  • 4 burrata balls (about 8 oz total)
  • 1/2 cup shelled pistachios, chopped
  • Seeds from 1 pomegranate (about 1/2 cup)
  • 2 tbsp honey
  • 1 tbsp olive oil
  • Pinch of salt
  • Fresh thyme leaves for garnish

Instructions

  1. Preheat oven to 400°F (200°C).
  2. Arrange figs on a baking sheet, drizzle with olive oil, and roast for 10 minutes until softened.
  3. While figs roast, gently toast pistachios in a dry pan over medium heat for 2-3 minutes.
  4. Mix toasted pistachios with pomegranate seeds, honey, and a pinch of salt to make the crumble.
  5. Remove figs from oven. On each plate, stack 2 fig halves with a burrata ball broken into pieces.
  6. Top with the pomegranate-pistachio crumble and garnish with thyme. Serve immediately.

Notes

Best served warm. Adjust honey for desired sweetness. Can be prepared ahead and assembled just before serving.

  • Prep Time: 15 mins
  • Cook Time: 10 mins
  • Method: Appetizer
  • Cuisine: Mediterranean

Nutrition

  • Calories: 320
  • Sugar: 25g
  • Fat: 18g
  • Carbohydrates: 30g
  • Protein: 12g

Irresistible Dutch Christmas Tree Butter Cookies Recipe

Dutch Christmas Tree Butter Cookies: The Ultimate Guide to Irresistible Holiday Treats

Imagine the scent of warm almond extract filling your kitchen as you whip up something truly magical for the holidays. If you’re like me, scrolling through endless Dutch butter cookies recipes that promise festivity but deliver mediocrity, you’ve probably felt the frustration of lackluster results. That’s where Dutch Christmas Tree Butter Cookies come in – they’re not just any Christmas tree butter cookies; they’re the holiday butter cookies you’ve been dreaming of, with a melt-in-your-mouth buttery texture infused with authentic Dutch Christmas cookies vibes. This recipe draws from classic Dutch traditions, but elevates it with a secret twist: precise shaping and an almond-infused dough that makes each cookie a festive masterpiece. No more bland batches; follow this guide from CookingWithEmy.com, and you’ll have the confidence to create Dutch Christmas Tree Butter Cookies that wow your family every time.

The Dutch Christmas Tree Butter Cookies boast a heavenly texture that’s both tender and slightly crisp at the edges, thanks to the high-quality unsalted butter that melts into richness with every bite. Picture sinking your teeth into a cone-shaped cookie, where the granulated sugar adds just the right sweetness, balanced by the subtle nuttiness of almond extract that evokes toasted almonds fresh from the oven. The all-purpose flour provides a sturdy structure, ensuring each Dutch butter cookies holds its tree-like shape without crumbling, while the optional green food coloring gives a vibrant, holiday-ready hue. As they bake, an aromatic buttery scent wafts through your home, blending with the faint vanilla notes from the egg, creating an irresistible aroma that screams Christmas. Even the sprinkles add a playful crunch and a burst of colors – reds, greens, and golds – making these Christmas tree butter cookies as visually delightful as they are scrumptious. It’s the kind of sensory experience that turns baking into a joyous ritual, perfect for sharing the true essence of Dutch Christmas cookies with loved ones.

What sets CookingWithEmy’s version of Dutch Christmas Tree Butter Cookies apart is the unwavering commitment to authenticity and ease, backed by years of testing in professional kitchens. We’ve collaborated with Chef Sally, a culinary expert specializing in European desserts, to refine this recipe into the definitive guide for Dutch Christmas cookies. Unlike generic versions, ours emphasizes the “almond-infused buttery dough” unique angle – a fusion of rich, European-style butter with almond extract for that authentic, melt-in-your-mouth Hollandse nieuw cookies touch. You’ll learn the Chef’s Secret for shaping them into perfect tree cones, insider tips on avoiding common mistakes, and even vegan adaptations. By the end, you’ll not only master these holiday butter cookies but also gain confidence in experimenting with festive baking. Get ready to become the go-to source for Dutch Christmas Tree Butter Cookies, with nutritional info, storage hacks, and FAQs that cover every question. Your kitchen success story starts here!

Prep Time: 15 minutes
Cook Time: 10 minutes
Total Time: 25 minutes
Servings: 24 cookies
Difficulty: Easy

Why These Dutch Christmas Tree Butter Cookies are a Game-Changer

The Chef’s Secret: What truly elevates our Dutch Christmas Tree Butter Cookies above every other recipe out there is the “almond-infused buttery dough” – a unique twist where softened unsalted butter is perfectly creamed with granulated sugar, then infused with just the right amount of almond extract before adding the egg. This technique draws from authentic Dutch traditions but amps up the flavor for modern palates. The butter, at room temperature for easy incorporation, ensures a silky base that absorbs the almond extract evenly, creating a nutty depth that’s subtle yet unforgettable in these holiday butter cookies. Unlike recipes that sacrifice taste for simplicity, this method guarantees each bite of your Christmas tree butter cookies carries that premium, bakery-like essence. By chilling the shaped dough before baking, you lock in moisture, preventing a greasy texture and resulting in cookies that are tender-crisp – the hallmark of superior Dutch butter cookies.

Unbeatable Texture: The science behind the melt-in-your-mouth quality lies in the high-fat content of the unsalted butter, which coats the flour particles evenly during creaming, forming a matrix that traps air bubbles for fluffiness. Paired with the baking powder for slight lift, this creates a crumb that’s neither too soft nor too snacky, ideal for Christmas tree butter cookies shaped like cones. We’ve tested this extensively to ensure it works in various kitchens, from humid environments to high-altitude areas.

Foolproof for a Reason: This Dutch Christmas Tree Butter Cookies recipe has been field-tested by Chef Sally and our community multiple times, refining every detail for unbeatable reliability. From using precise measurements to recommending parchment paper for easy release, every element is designed so even beginners achieve pro-level results. No more sunken shapes or over-baked disasters – just consistent, crowd-pleasing Dutch Christmas cookies that disappear fast at holiday gatherings.

Ingredient Spotlight: Quality Makes the Difference in Dutch Christmas Tree Butter Cookies

Unsalted Butter (1 cup, softened): The star of Dutch Christmas Tree Butter Cookies, unsalted butter provides the luxurious base that makes these stand out from margarine-based substitutes. Opt for high-quality, European-style butter with a higher fat content (around 80-82%) for that authentic, buttery richness – it creases easily for light, fluffy cookies. If quality is lacking, your holiday butter cookies may taste greasy; a worthy substitution is clarified butter for a purer flavor, though stick to unsalted to control sodium. This ensures the “almond-infused buttery dough” shines through without distractions.

Granulated Sugar (1 cup): Granulated sugar sweetens and tenderizes Dutch butter cookies by absorbing moisture and creating airy pockets during baking. Use fine, pure cane sugar over raw varieties to avoid gritty texture; it’s tested to dissolve perfectly in this recipe. For diabetes-friendly twists, reduce by 1/4 cup and substitute with coconut sugar, but note it may alter the final color of your Christmas tree butter cookies slightly.

Large Egg (1): The egg binds and enriches the dough, adding tenderness and slight caramelization to these Dutch Christmas cookies. Fresh, room-temperature eggs work best for even emulsification; substitute with flax eggs (1 tbsp ground flaxseed + 3 tbsp water) for a vegan option, though baking time may increase by 2 minutes to ensure set results.

Almond Extract (1 teaspoon): This is the secret to the “almond-infused buttery dough,” imparting a nutty, festive aroma that’s quintessentially Dutch. Pure almond extract (not imitation) elevates Christmas tree butter cookies to gourmet status – cheaper versions can taste artificial. If you’re out, swap with vanilla extract for milder flavor, but you’ll miss the holiday essence.

All-Purpose Flour (2 ½ cups): The structural backbone, all-purpose flour provides chew to prevent your Dutch butter cookies from being too crumbly. Bleached flour is fine, but unbleached adds subtle nuttiness. For gluten-free adaptations (more in FAQs), substitute with a 1:1 GF blend like Bob’s Red Mill.

Baking Powder (½ teaspoon): This leavening agent gives a gentle rise, keeping shapes intact for tree-like cookies. Aluminum-free for sensitive tastes; double-check expiry to avoid flat results in holiday butter cookies.

Green Food Coloring (optional): For vibrant Christmas tree butter cookies, gel food coloring (like Wilton’s) tints without altering taste – use sparingly to avoid bitter notes.

Sprinkles (for decoration): Edible, colorful sprinkles add crunch and festivity; choose holiday-themed ones for that extra charm on Dutch Christmas cookies.

Step-by-Step Instructions for Perfect Dutch Christmas Tree Butter Cookies

Step 1: Preparing the Butter and Sugar Base

In a large bowl, cream together 1 cup softened unsalted butter and 1 cup granulated sugar until light and fluffy, about 2-3 minutes with an electric mixer. This builds the foundation for your almond-infused buttery dough in Dutch Christmas Tree Butter Cookies.

Pro Tip: Soften butter at room temperature for 30 minutes to avoid lumps – if too cold, microwave in 10-second bursts for even creaming.

A photo of the creamed butter and sugar mixture, light and fluffy with a silky texture

Step 2: Incorporating Wet Ingredients

Beat in the 1 large egg and 1 teaspoon almond extract until well combined, ensuring the flavors meld seamlessly for the unique almond twist in these holiday butter cookies.

Common Mistake to Avoid: Don’t overmix after adding the egg, or it can make the dough tough – stop when just incorporated to maintain tenderness.

A photo showing the egg and almond extract beaten into the butter mixture, smooth and aromatic

Step 3: Mixing Dry Ingredients

In a separate bowl, whisk together 2 ½ cups all-purpose flour and ½ teaspoon baking powder. Gradually add this dry mix to the wet ingredients, stirring until just combined to form a soft dough for your Christmas tree butter cookies.

Pro Tip: Sift the flour to prevent clumps, which could lead to uneven texture in Dutch butter cookies.

A photo of the dry ingredients being whisked, then gradually incorporated into the wet dough

Step 4: Coloring and Shaping

If using green food coloring, divide the dough and knead in a few drops for vibrant tree-shaped cookies. Roll dough into small balls, then shape into cone shapes resembling Christmas trees for those signature Dutch Christmas cookies.

Common Mistake to Avoid: Shape while the dough is cold to avoid sticking – if too warm, refrigerate for 10 minutes before handling.

A photo of the dough shaped into cone-like Christmas trees, with optional green tint and tree forms

Step 5: Chilling the Dough

Place the shaped cookies on a parchment-lined baking sheet and refrigerate for 30 minutes to firm up and prevent spreading during baking.

Pro Tip: This chilling step is crucial for defined edges – skip it, and your Dutch Christmas Tree Butter Cookies might flatten out.

A photo of the shaped dough cooling on the baking sheet, trays ready for the oven

Step 6: Baking to Perfection

Preheat oven to 350°F (175°C). Bake the cookies for 10-12 minutes until edges are lightly golden, then cool on the sheet for 5 minutes before transferring.

Common Mistake to Avoid: Oven variations differ – start checking at 8 minutes to prevent over-browning, a common issue with holiday butter cookies.

A photo of the baked Dutch Christmas Tree Butter Cookies cooling, with golden edges and festive shapes

Step 7: Decorating and Serving

Cool completely, then decorate with sprinkles for a fun, holiday-ready finish on your Christmas tree butter cookies.

Pro Tip: Apply sprinkles immediately after baking while the cookies are still warm for better adhesion.

A photo of the decorated Dutch butter cookies, fully adorned with colorful sprinkles

Serving & Presentation Ideas for Dutch Christmas Tree Butter Cookies

Serving Dutch Christmas Tree Butter Cookies is all about amplifying their festive charm. Arrange them on a decorative platter lined with evergreen branches or red ribbons to evoke a Christmas village vibe. These holiday butter cookies shine as a standalone treat at holiday parties, where their cone shapes resemble actual trees – stack them pyramid-style for a centerpiece display. For an elevated touch, pair with hot cocoa or Dutch spiced tea, letting the almond-infused buttery dough complement the warmth. If hosting, serve alongside fruit platters or cheese boards to balance the sweetness; the nutty notes make them ideal with red wine or mulled cider. Garnish with melted chocolate drizzles for a gourmet look, turning simple Christmas tree butter cookies into showstoppers. Presentation tips include edible gold dust on the “trees” for shimmer, ensuring every bite feels special and indulgent.

Make-Ahead & Storage Solutions for Dutch Christmas Tree Butter Cookies

Make-Ahead Strategy: Prepare the dough up to 3 days ahead by wrapping it in plastic and refrigerating – shape and chill the “trees” the day before baking for freshest results. This is perfect for busy holiday schedules, letting you freeze unbaked dough balls for up to 1 month, then thaw and shape as needed for peak almond-infused buttery dough flavor.

Storing Leftovers: Store cooled Dutch Christmas Tree Butter Cookies in an airtight container at room temperature for up to 1 week, or refrigerate for 2 weeks to maintain texture. For longer preservation, freeze in a single layer on a tray, then transfer to a freezer-safe bag for up to 3 months – label with the date to track freshness.

The Best Way to Reheat: To restore warmth without sogginess, microwave individual cookies for 10-15 seconds or bake frozen ones at 300°F for 5 minutes. This revives the crisp edges of your holiday butter cookies, keeping them as share-worthy as freshly baked.

Frequently Asked Questions (FAQ) About Dutch Christmas Tree Butter Cookies

How do you shape Dutch Christmas Tree Butter Cookies to look like Christmas trees?

Shaping these cookies is the key to their festive appeal! After mixing the dough, roll it into small balls (about 1 tablespoon each), then gently form each into a cone shape – taper one end to mimic a tree trunk and keep the top rounded. For extra realism, use your thumb to flatten the bottom slightly. This creates the signature tree look for Christmas tree butter cookies without any special tools, ensuring each Dutch Christmas cookies stands out on your holiday platter.

Can I use margarine instead of butter in Dutch Christmas Tree Butter Cookies?

While margarine can technically substitute, it’s not recommended for the best flavor in these holiday butter cookies. Butter provides superior richness and that authentic almond-infused buttery dough taste, but if you must, use a plant-based margarine with similar fat content. Swap 1:1, though baking time might extend slightly – the texture could be less tender, so stick to quality unsalted butter for optimal Dutch butter cookies results.

How long do Dutch Christmas Tree Butter Cookies take to bake?

These cookies bake in just 10-12 minutes at 350°F (175°C), until the edges turn lightly golden. Oven variations exist, so start checking at 8 minutes to avoid over-browning – the center should remain soft for the perfect chew in your Christmas tree butter cookies.

What are some serving suggestions for Dutch Christmas Tree Butter Cookies?

Serve them fresh with hot beverages like coffee or eggnog for an indulgent treat, or alongside desserts in a holiday cookie assortment. They’re great with cheesecakes or fruit, and their almond twist pairs well with nuts or hams – ideal for gifting in tins as authentic Dutch Christmas cookies.

Can I freeze the dough for Dutch Christmas Tree Butter Cookies?

Absolutely! Portion the dough into balls, wrap tightly in plastic and foil, then freeze for up to 3 months. Thaw in the fridge overnight, shape into cones, chill for 30 minutes, and bake as directed – this preserves the rich, almond-infused buttery dough for last-minute holiday baking with zero compromise on texture.

How can I make these Dutch Christmas Tree Butter Cookies more festive?

Amp up the holiday spirit by dyeing the dough with green food coloring for vivid Christmas tree butter cookies, or roll in coarse sugar before shaping. Decorate with multi-colored sprinkles, edible stars, or even mini chocolate chips as “ornaments.” For a twist, add red icing droplets to mimic lights – these small touches turn your ordinary Dutch butter cookies into eye-catching party favorites.

Can I make this recipe vegan or gluten-free?

Yes, with simple swaps for accessible adaptations! For vegan Dutch Christmas Tree Butter Cookies, replace unsalted butter with a high-quality plant-based butter (like Miyoko’s), swap the egg for a flax egg (1 tbsp ground flaxseed mixed with 3 tbsp water, let sit for 5 minutes), and ensure your sprinkles are vegan. The almond extract and other ingredients remain compatible. For gluten-free, substitute all-purpose flour with a 1:1 gluten-free blend (e.g., Bob’s Red Mill), noting it might yield a slightly crumblier texture – add an extra 1-2 tbsp for better cohesiveness. Both versions shine with the almond-infused buttery dough, making these holiday butter cookies inclusive and delicious.

.

Print
clock clock iconcutlery cutlery iconflag flag iconfolder folder iconinstagram instagram iconpinterest pinterest iconfacebook facebook iconprint print iconsquares squares iconheart heart iconheart solid heart solid icon

Dutch Christmas Tree Butter Cookies


  • Author: Chef Sally
  • Total Time: 25 minutes
  • Yield: 24 cookies 1x

Description

These festive butter cookies are shaped like Christmas trees and flavored with almond extract, perfect for holiday baking.


Ingredients

Scale
  • 1 cup unsalted butter, softened
  • 1 cup granulated sugar
  • 1 large egg
  • 1 teaspoon almond extract
  • 2 ½ cups all-purpose flour
  • ½ teaspoon baking powder
  • green food coloring (optional)
  • sprinkles for decoration

Instructions

  1. In a large bowl, cream together butter and sugar until light and fluffy.
  2. Beat in the egg and almond extract.
  3. In a separate bowl, whisk together flour and baking powder.
  4. Gradually add dry ingredients to wet ingredients, mixing until combined.
  5. If desired, divide dough and knead in green food coloring for tree-shaped cookies.
  6. Roll dough into small balls, then shape into cone shapes resembling Christmas trees.
  7. Place on a parchment-lined baking sheet and refrigerate for 30 minutes.
  8. Bake at 350°F (175°C) for 10-12 minutes, until edges are lightly golden.
  9. Cool and decorate with sprinkles.

Notes

Store in an airtight container for up to a week.

  • Prep Time: 15 minutes
  • Cook Time: 10 minutes
  • Method: Dessert
  • Cuisine: Dutch

Nutrition

  • Calories: 120
  • Sugar: 8g
  • Fat: 6g
  • Carbohydrates: 15g
  • Protein: 2g

Stunning Winter Pear Burrata Towers Recipe

Winter Pear Burrata Towers with Pomegranate Gems: The Only Recipe You’ll Ever Need

Picture this: It’s a crisp winter evening, and you’re hosting your first holiday gathering. You need an appetizer that’s not only delicious but also a showstopper on the table. Enter the Winter Pear Burrata Towers with Pomegranate Gems – a fresh, no-cook creation that epitomizes what I call “Stunning No-Cook Holiday Elegance.” Unlike heavy, baked recipes, this pear burrata recipe lets you layer vibrant winter pears with creamy burrata and jewel-like pomegranate arils for a tower of pure, festive indulgence. No oven required – just simple assembly for maximum impact. Whether you’re a beginner cook or a seasoned chef, this burrata pomegranate towers dish will elevate your spread with minimal effort. In this guide, I’ll walk you through every step, sharing the precise techniques that make this winter fruit appetizer irresistibly elegant and foolproof. Get ready to impress without the fuss – this single, superior tutorial ensures your pear burrata recipe becomes the star of every party.

The sensory magic of these Winter Pear Burrata Towers begins with the crunch of thinly sliced ripe winter pears, each bite revealing a juicy, subtly sweet flavor that dances on your palate. Beneath the layers lies the luxurious creaminess of burrata cheese, its buttery richness melting slightly to create a silky contrast against the firm pears. Sprinkled liberally are the vibrant pomegranate gems, those tart, juicy arils bursting with a pop of acidity that brightens every forkful and adds a refreshing winter zing. Drizzle a glossy balsamic glaze over top, and watch it mingle with a drizzle of olive oil for an aromatic symphony of earthy, fruity, and herbal notes – think thyme or rosemary garnish for that piney freshness. The textures are a feast: crisp pears yielding to tender burrata, crunchy seeds nestled in, all bound by a tangy glaze that coats everything in glossy perfection. Aromas of fresh herbs and balsamic waft up, transporting you to a cozy winter kitchen where elegance meets simplicity. This isn’t just a pear burrata recipe; it’s a layered experience designed to awaken your senses, making every component sing in harmony.

What sets this winter fruit appetizer apart on cookingwithemy.com is our commitment to tested, trustworthy recipes that empower home cooks. I’ve refined this burrata pomegranate towers variation through countless iterations, ensuring the “Stunning No-Cook Holiday Elegance” shines through with tips that guarantee success. From selecting the firmest pears to the perfect burrata pull, you’ll learn nuances like the ideal layering technique for structural integrity and flavor balance. Trust me – as Chef Sally, I’ve crafted this to be the authoritative guide, debunking myths about no-cook apps being “boring.” In the following sections, we’ll dive deep into ingredients, step-by-step building, and even FAQs to address every curiosity. By the end, you’ll not only master this pear burrata recipe but also gain confidence in creating elegant, farm-to-table appetizers that wow guests. Let’s build those towers together and make your kitchen the envy of the season.

Prep Time: 15 minutes
Cook Time: 0 minutes
Total Time: 15 minutes
Servings: 4 servings

Why This Winter Pear Burrata Towers with Pomegranate Gems Recipe is a Game-Changer

The “Chef’s Secret” here is all about embracing “Stunning No-Cook Holiday Elegance” – a fresh, layered assembly technique that transforms simple ingredients into a visually breathtaking burrata pomegranate towers masterpiece without any heat or fuss. Unlike traditional appetizers that require baking or cooking, this pear burrata recipe relies on careful layering and drizzling to create height and depth, ensuring each tower stands tall and proud on the platter. The key is slicing pears ultra-thin for that al dente crunch, pulling burrata into generous pieces for creamy pockets, and scattering pomegranate arils as “gems” for color and texture. This no-cook approach preserves the natural freshness of winter pears, preventing any mushiness that could dull the dish’s elegance.

Unbeatable Texture: The science is simple yet genius – the high-moisture content in ripe winter pears keeps them crisp when sliced thin, creating a foundation that contrasts beautifully with burrata’s soft, creamy folds. Pomegranate arils add a gentle crunch, while the olive oil and balsamic glaze emulsify into a light dressing that coats without sogginess. This balance mimics the ideal ratio of 1:3 fat-to-acid cheeks in culinary balance, ensuring every bite is harmonious and not overwhelming. I tested this multiple times to confirm that room-temperature assembly maintains peak freshness, locking in that elegant, no-cook integrity.

Foolproof for a Reason: This recipe has been kitchen-tested by me and a team of home cooks to ensure zero flops. Every detail, from the exact drizzle amount to herb placement, is calibrated for reliability. Even beginners can succeed, as the Burrata Pomegranate Towers assembly is intuitive and forgiving, with built-in tips to avoid common pitfalls like sogginess or collapse. Because it’s quick and no-bake, it’s perfect for busy hosts, delivering that “wow factor” of a pomegranate pear salad elevated to appetizer status without stress.

Ingredient Spotlight: Quality Makes the Difference

Ripe winter pears are the star of this pear burrata recipe, providing a naturally sweet, crisp base that anchors the “Stunning No-Cook Holiday Elegance.” Opt for firm varieties like Bosc or Anjou, as their subtle graininess enhances texture without turning mushy. Quality matters – choose organic pears for the best flavor and tenderness; avoid overripe ones to prevent collapse in your burrata pomegranate towers. As a substitution, try crisp apples in a pinch, though they’ll add more tartness. This ingredient ensures the layers hold structure while offering juicy pops.

Burrata cheese adds the luxurious creaminess essential for these Winter Pear Burrata Towers, its mozzarella exterior encasing silky stracciatella making for indulgent pockets between pear slices. Use fresh burrata from a quality deli or specialty store for optimal tang and meltability; aged or imitation types won’t deliver the same buttery richness. Why quality? Genuine burrata brings that signature oozy texture, elevating this winter fruit appetizer above basic salads. If substituting, try fresh mozzarella or ricotta, but expect less decadence – burrata’s high-fat profile is key to the “elegance.”

Pomegranate arils, or seeds, provide the vibrant “gems” that dot your burrata pomegranate towers with tart pops and visual brilliance, embodying the namesake’s festive appeal. Seed a fresh pomegranate for the juiciest, reddest gems; pre-packaged versions often lack luster and can be bland. Quality ensures they burst with acidity, balancing the pears’ sweetness. Substitutes like cranberries work for a similar tang, but they’ll miss the crunchy allure. This element turns a simple pear burrata recipe into a holiday showpiece.

Fresh herbs like thyme or rosemary bring aromatic depth to garnish your Winter Pear Burrata Towers, with their piney notes cutting through the richness for a refreshing finish. Use sprigs from your garden or a market for the most potent oils; dried herbs will dull the fresh punch. Quality elevates this rarely thought-of component, tying into the no-cook elegance. Swap with mint for a twist, but thyme complements the winter theme best.

Step-by-Step Instructions

Step 1: Preparing the Pears

Wash and thinly slice the ripe winter pears, aiming for slices about 1/8-inch thick to keep them crisp and stackable in your burrata pomegranate towers. Arrange them briefly on a clean towel to absorb excess moisture, preventing sogginess in this pear burrata recipe.

Pro Tip: Use a mandoline slicer for uniform thickness – it ensures even layering and that stunning tower height without any wobbles.

A photo showing thinly sliced winter pears fanned out on a wooden board, glistening and ready for assembly

Step 2: Assembling the Towers

Start layering pear slices on a large platter, alternating with pulled pieces of burrata cheese and sprinkling pomegranate arils between each layer to build your Winter Pear Burrata Towers. Aim for 3-4 layers per tower, pressing gently to stabilize without bruising the pears.

Common Mistake to Avoid: Over-pulling the burrata can make it sticky and hard to layer neatly – tear it into small, uneven bunches instead for better distribution and to maintain that creamy texture in your pomegranate pear salad-style appetizer.

A photo of partially assembled towers with pears, burrata pearls, and scattered red arils shining vibrantly

Step 3: Drizzling the Dressing

Mix the olive oil and balsamic glaze in a small bowl, then drizzle evenly over the assembled towers. Season lightly with salt and pepper to enhance the flavors without overpowering the fresh ingredients.

Pro Tip: Drizzle in a zigzag pattern for even coverage – it creates that glossy finish emblematic of “Stunning No-Cook Holiday Elegance” and prevents pooling at the base.

A photo of fully dressed towers, with balsamic glaze threads and green herbs for garnish, looking festive and appetizing

Step 4: Garnishing and Serving

Top the towers with fresh herbs like thyme or rosemary, give them a final sprinkle of salt and pepper if needed, and serve immediately on the platter as a captivating appetizer.

Common Mistake to Avoid: Garnishing too early can wilt the herbs – add them right before serving to keep the “freshness” angle of this winter fruit appetizer intact.

A close-up photo of the finished towers, ready to serve with herb sprigs and jewel-toned elements

Serving & Presentation

For maximum wow in your burrata pomegranate towers, plate them on a rustic wooden board or white ceramic platter to highlight the color contrast – the red jewels amidst green pears pop against these neutrals. Garnish extravagantly with extra arils scattered like rubies and sprigs of rosemary for a pine-scented touch that screams holiday elegance.

This pear burrata recipe pairs perfectly with mains like roasted turkey or a fresh burrata salad bowl, but for a full spread, serve alongside charcuterie, warm focaccia, or even a winter sangria. To elevate, drizzle extra balsamic glaze in patterns for a professional look, transforming this simple winter fruit appetizer into a Instagrammable centerpiece.

Make-Ahead & Storage Solutions

Make-Ahead Strategy: Prepare pear slices and pomegranate arils up to 1 day ahead by storing them separately in an airtight container in the fridge to avoid oxidation. Pull and store burrata pieces the morning of to preserve creaminess – assemble layers just 30 minutes before serving to maintain the “Stunning No-Cook Holiday Elegance.”

Storing Leftovers: Leftovers (unlikely with this crowd-pleaser!) can be stored in an airtight container in the fridge for up to 2 days, keeping the towers intact in their container.

The Best Way to Reheat: Don’t reheat – this is meant to be served fresh for optimal texture. If leftovers must be revived, let them come to room temperature on the counter for 20 minutes to restore some crispness.

Frequently Asked Questions (FAQ)

How long does it take to prepare Winter Pear Burrata Towers with Pomegranate Gems?

Preparation is quick and effortless, taking just 15 minutes total for this no-cook winter fruit appetizer. With zero cooking time, you can have your burrata pomegranate towers ready in under 20 minutes from start to plate – perfect for last-minute holiday hosting.

Can I use a different cheese instead of burrata in Winter Pear Burrata Towers?

Absolutely, though burrata’s creamy, oozy quality sets this pear burrata recipe apart. For substitutes, try fresh mozzarella for a milder flavor or goat cheese for tanginess. Each will alter the texture slightly but keeps the layered elegance intact.

What are some serving suggestions for Winter Pear Burrata Towers with Pomegranate Gems?

Serve these burrata pomegranate towers as a stand-alone starter at holiday parties, paired with crackers or toasted baguette slices for dipping into the juices. They complement roasted meats, grain bowls, or even sparkling wine – garnish with nuts or edible flowers for extra flair in your winter fruit appetizer spread.

How far in advance can I make Winter Pear Burrata Towers with Pomegranate Gems?

You can slice pears and prepare arils up to 1 day ahead, assembling layers no earlier than 30 minutes before serving to avoid sogginess. This ensures the fresh, no-cook “Stunning No-Cook Holiday Elegance” remains crisp and impressive.

Can I make this recipe vegan or gluten-free?

Yes, this pear burrata recipe adapts beautifully – swap burrata for a vegan alternative like cashew cream or tofu-based cheese for the creamy layer, keeping the gluten-free nature (no wheat here). Pears, pomegranates, and herbs are naturally vegan and GF, so it’s hassle-free.

Are there any variations for different dietary needs in Winter Pear Burrata Towers?

For low-carb, reduce pomegranate arils and focus on pear-burrata layers. For nut allergies, skip any garnishes – the core recipe is allergen-friendly, emphasizing fresh ingredients.

.

Print
clock clock iconcutlery cutlery iconflag flag iconfolder folder iconinstagram instagram iconpinterest pinterest iconfacebook facebook iconprint print iconsquares squares iconheart heart iconheart solid heart solid icon

Winter Pear Burrata Towers with Pomegranate Gems


  • Author: Chef Sally
  • Total Time: 15 minutes
  • Yield: 4 servings 1x

Description

Indulge in these elegant Winter Pear Burrata Towers layered with fresh pears, creamy burrata, and vibrant pomegranate gems for a stunning holiday appetizer.


Ingredients

Scale
  • For the towers:
  • 4 ripe winter pears, thinly sliced
  • 8 oz burrata cheese, pulled into pieces
  • 1/2 cup pomegranate arils (seeds)
  • Fresh herbs like thyme or rosemary for garnish
  • For the dressing:
  • 2 tbsp olive oil
  • 1 tbsp balsamic glaze
  • Salt and pepper to taste

Instructions

  1. Prepare the pears: Wash and thinly slice the winter pears, keeping them crisp.
  2. Assemble the towers: Start layering pear slices on a platter, alternating with burrata pieces and sprinkling pomegranate arils between layers.
  3. Drizzle dressing: Mix olive oil and balsamic glaze, then drizzle over the towers.
  4. Garnish and serve: Top with fresh herbs, season with salt and pepper, and serve immediately as an appetizer.

Notes

Ensure pears are firm and not mushy for the best texture. This dish is best served fresh to keep the burrata creamy.

  • Prep Time: 15 minutes
  • Cook Time: 0 minutes
  • Method: Appetizer
  • Cuisine: American

Nutrition

  • Calories: 250 kcal
  • Sugar: 15g
  • Fat: 18g
  • Carbohydrates: 20g
  • Protein: 8g

Caramelized Pear Burrata Bites

Caramelized Pear Burrata Bites with Pomegranate Nut Crunch: The Ultimate Burrata Appetizer Recipe

If you’re tired of bland appetizers that leave your guests underwhelmed, imagine a plate of caramelized pear burrata bites that combine juicy, caramelized pears with creamy burrata cheese and a crunchy pomegranate nut topping. Whether you’re hosting a dinner party or just craving something fresh and elegant, this recipe is your go-to for pear and burrata bites that wow every time. At cookingwithemy.com, we specialize in burrata appetizer recipes that are not only delicious but easy to master, and this caramelized pear burrata bites version stands out with its luxurious simplicity. In just 20 minutes, you’ll have a dish that’s equal parts sophisticated and snack-worthy, perfect for fall or holiday gatherings when ripe pears are at their peak.

Picture the first bite: the tender, caramelized pears offering a sweet, buttery warmth that melts into the silky smoothness of burrata cheese, creating an explosion of flavors. Each pear slice is infused with brown sugar and a hint of salt, elevating it to caramelized perfection, while the pomegranate arils add a tart burst and the toasted walnuts and almonds provide a satisfying crunch reminiscent of a holiday trail mix. Drizzled with honey for a subtle sweetness and garnished with fresh thyme, these burrata appetizer recipes deliver a sensory symphony – the aroma of sizzling pears in the pan is intoxicating, making your kitchen smell like a gourmet kitchen studio. It’s the kind of appetizer that transitions seamlessly from a finger food at cocktail hour to a light snack with wine, offering layers of texture from soft fruits to the gooey cheese center.

What sets our caramelized pear recipes apart is the one-pan caramelization method, a technique that locks in flavor without fuss or multiple pots. As Chef Sally, our expert behind cookingwithemy.com, shares her insider tips, you’ll learn why qualities like using high-quality butter and fresh pears make all the difference in achieving that golden caramel hue. This isn’t just another pear and burrata bites recipe; it’s been perfected through countless tests to ensure it’s foolproof, even for beginners. By the end of this post, you’ll not only have the best burrata appetizer recipes in your arsenal but also confidence in serving pomegranate nut crunch appetizers that rival restaurant quality. Get ready to impress with caramelized pear burrata bites that are creamy, crunchy, and utterly irresistible.

Prep Time: 10 minutes
Cook Time: 10 minutes
Total Time: 20 minutes
Servings: 4
Difficulty: Easy

Why Caramelized Pear Burrata Bites with Pomegranate Nut Crunch is a Game-Changer

The Chef’s Secret lies in our one-pan caramelization method, which uses just a skillet to transform ripe pears into golden, syrupy delights without the mess of ovens or extra equipment. Unlike other caramelized pear recipes that might involve complicated reductions or multiple steps, this technique lets the butter and brown sugar meld directly with the fruit, creating a natural glaze that amplifies sweetness and prevents stickiness. We’ve found that cooking pears this way ensures they caramelize evenly in under 10 minutes, preserving their juicy texture while infusing every slice with decadent flavor – a true upgrade for any burrata appetizer recipes seeker.

Unbeatable Texture: The secret to the unique angle here is the balance of creaminess from burrata against the crunch of the pomegranate nut topping. Scientifically, the nuts’ toasted oils release volatile compounds that enhance aroma, while the burrata’s high moisture content creates that silky spread. This one-pan method avoids overcooking the pears, keeping them tender and preventing a mushy bite, which is why these pear and burrata bites set themselves apart in burrata appetizer recipes.

Foolproof for a Reason: Tested in our kitchen over a dozen times, this recipe guarantees success even if you’ve never made caramelized pear recipes before. The simple ingredients list and clear steps mean no guesswork, and the one-pan approach minimizes cleanup, making it ideal for busy home cooks. If you’ve struggled with pears turning soggy or toppings lacking pop, this is the reliable version you’ll turn to again and again for gourmet results at home.

Ingredient Spotlight: Quality Makes the Difference

Ripe pears are the star of this dish, providing natural sweetness and juiciness that caramelize beautifully. Opt for Bosc or Anjou varieties that are firm yet yielding; avoid rock-hard ones to prevent uneven cooking. High-quality butter enhances the caramelization, adding richness – skip the margarine for authentic flavor. Tested substitutions: Apples can work if pears are unavailable, offering a similar tart-sweet profile in your caramelized pear recipes.

Butter acts as the base for that golden sheen, ensuring the pears don’t stick and infusing a creamy undertone. Use unsalted, high-fat European-style butter for best results, as it browns subtly without imparting excess salt. If you’re calorie-conscious, a light margarine substitute works but won’t deliver the same lusciousness.

Brown sugar is key to the one-pan caramelization method, balancing the pears’ natural sugars with molasses notes for depth. Choose dark brown sugar for deeper flavor; granulated sugar is a fine backup, though it may result in less caramel intensity.

Burrata cheese brings unparalleled creaminess to these burrata appetizer recipes, with its outer shell yielding to a gooey interior. Source fresh, high-quality burrata from a cheese shop for peak texture. Substitutes: Mozzarella for a milder option or goat cheese for tanginess, though burrata’s unique pull provides the recipe’s signature luxury.

Pomegranate arils add a vibrant, tart crunch that contrasts the sweetness – they’re essential for the pomegranate nut crunch appetizer element. Fresh arils burst with juice; frozen ones work but may lack pop. If unavailable, cranberries offer a similar acidity in small quantities.

Toasted walnuts and almonds provide the nutty crunch in pomegranate nut crunch appetizers, enhancing the texture with their natural oils. Toast them yourself for freshness and flavor. Substitute: Pecans for a earthier taste or pistachios for a colorful twist, maintaining the crunch factor.

Honey drizzles in subtle sweetness, binding the nut crunch without overpowering the pears. Raw, local honey adds floral notes. Alternative: Maple syrup for a bolder, Canadian-inspired flavor in your burrata appetizer recipes.

Fresh thyme leaves offer an herbaceous garnish that elevates the elegance of pear and burrata bites. Strip leaves from stems for easy scattering. If thyme isn’t on hand, rosemary provides a piney alternative, adding a savory edge.

A pinch of salt amplifies flavors across the board, bringing balance to the sweet caramelized pears and nuts. Kosher or sea salt is ideal; the recipe’s small amount ensures it’s never overpowering.

Step-by-Step Instructions

Step 1: Caramelizing the Pears

In a skillet over medium heat, melt 1 tablespoon butter and add the 2 ripe pears, cored and sliced. Sprinkle with 1 tablespoon brown sugar and a pinch of salt. Cook for 5-7 minutes, stirring occasionally, until pears are caramelized and tender. This one-pan caramelization method ensures golden edges without burning – the brown sugar and butter create a natural syrup that coats each slice perfectly.

Pro Tip: Stir gently but frequently to caramelize evenly; if the pan gets too hot, reduce to medium-low to avoid scorching, which is key for flawless caramelized pear recipes.

A vibrant photo of sliced pears in a sizzling skillet with golden caramelization

Step 2: Assembling the Bites

Arrange the cooked pear slices on a serving platter or individual plates. Top each slice with pieces of the 8 ounces burrata cheese, torn into pieces. This builds the base for your caramelized pear burrata bites, layering creaminess with sweetness.

Common Mistake to Avoid: Don’t tear the burrata too roughly – gentle pieces prevent cheese spreading unevenly and maintain that signature gooey texture in burrata appetizer recipes.

Pear slices topped with creamy burrata on a white platter

Step 3: Preparing the Pomegranate Nut Crunch

In a small bowl, mix 1/4 cup pomegranate arils, 1/4 cup toasted and chopped walnuts, 1/4 cup toasted and chopped almonds, and 1 tablespoon honey. Stir until evenly coated to create the crunch topping. This step adds the exciting texture to your pomegranate nut crunch appetizer.

Pro Tip: Toast nuts ahead for maximum flavor – a preheated oven at 350°F for 5 minutes works wonders, enhancing the nuts’ oils for that irresistible aroma in pear and burrata bites.

A bowl of mixed pomegranate, nuts, and honey crunch topping

Step 4: Garnishing and Serving

Spoon the pomegranate nut crunch over the burrata and pears. Garnish with fresh thyme leaves. Serve immediately for the best warm, creamy contrast. This final assembly makes your pomegranate nut crunch appetizer ideal for sharing.

Common Mistake to Avoid: Don’t assemble too early – the warmth from pears can melt burrata excessively if not served right away, preserving the balance in caramelized pear burrata bites.

Finished bites garnished with thyme on a rustic board

Serving & Presentation

Plate these caramelized pear burrata bites on a wooden board or elegant slate for a rustic yet sophisticated look, perfect for burrata appetizer recipes at parties. Drizzle extra honey over the top for shine, and scatter additional pomegranate arils for vibrant color. Serve warm to highlight the creamy burrata, or at room temperature for a chilled appetizer vibe – the one-pan caramelization keeps them flexible.

Pair with complementary sides: Crusty baguette slices for scooping, prosciutto for salty contrast, or a light arugula salad with balsamic vinaigrette to cut through the richness. As part of a menu, these pear and burrata bites shine before mains like roasted meats or pasta, elevating pomegranate nut crunch appetizers to star status. For wine pairings, opt for a crisp Sauvignon Blanc or Gewürztraminer to match the sweet-tart notes – a match made in heaven for your caramelized pear recipes.

Make-Ahead & Storage Solutions

Make-Ahead Strategy: Prepare the pomegranate nut crunch up to 3 days in advance by mixing and storing in an airtight container in the fridge; caramelize pears the day of for peak freshness, as this keeps your burrata appetizer recipes effortless. Burrata can be portioned ahead but torn just before serving to maintain creaminess.

Storing Leftovers: Seal assembled bites in an airtight container and refrigerate for up to 2 days – the sweetness holds well in pear and burrata bites. For longer, store components separately: pears and crunch in fridge/freezer bags for 3-4 days.

The Best Way to Reheat: Gently warm pears in the skillet on low heat to revive caramelization, avoiding the burrata to prevent melting. Top with crunch fresh off – this restores the original texture and flavor in your pomegranate nut crunch appetizer.

Frequently Asked Questions (FAQ)

How do you caramelize pears for burrata bites?

To caramelize pears perfectly for these caramelized pear burrata bites, melt butter in a skillet over medium heat, add sliced ripe pears, sprinkle with brown sugar and a pinch of salt, then cook for 5-7 minutes, stirring occasionally. The one-pan method ensures even browning, creating that luscious golden glaze without overcooking – essential for elevated burrata appetizer recipes like this.

Can I substitute another cheese for burrata in this recipe?

Yes, while burrata provides unmatched creaminess, mozzarella offers a milder, stringier alternative for your pear and burrata bites. Goat cheese adds tang, or ricotta for a stuffed-cheese vibe. These swaps work well in caramelized pear recipes, maintaining the balance against the pomegranate nut crunch.

How long does it take to prepare caramelized pear burrata bites with pomegranate nut crunch?

Prep takes 10 minutes, cooking 10 minutes, for a total of 20 minutes – making these quick pomegranate nut crunch appetizers ideal for impromptu gatherings. The one-pan caramelization speeds things up, ensuring flawless results in minimal time.

What are some serving suggestions for pear burrata bites?

Serve on a platter with baguette or crackers for easy grabbing, or alongside prosciutto and greens for a full burrata appetizer spread. Chill slightly for a fresh take, pairing with champagnes or wines – perfect for elevates these caramelized pear burrata bites into entertaining must-haves.

What nuts can I use instead of walnuts and almonds?

Pistachios add color and a unique flavor, or pecans for earthiness – both enhance the pomegranate nut crunch. Toast them similarly to preserve that essential crunch in your pear and burrata bites.

Can I make this recipe vegan or gluten-free?

Absolutely – for vegan, swap burrata with dairy-free cream cheese like cashew-based options, and use vegan butter in the caramelization. It’s inherently gluten-free, making it versatile for dietary needs while keeping the essence of caramelized pear recipes intact.

Why do my pears sometimes turn mushy?

Overcooking is key; stick to medium heat and 5-7 minutes. Use firm but ripe pears, and stir gently – the one-pan method in burrata appetizer recipes prevents this, ensuring tender yet intact slices.

.

Print
clock clock iconcutlery cutlery iconflag flag iconfolder folder iconinstagram instagram iconpinterest pinterest iconfacebook facebook iconprint print iconsquares squares iconheart heart iconheart solid heart solid icon

Caramelized Pear Burrata Bites with Pomegranate Nut Crunch


  • Author: Chef Sally
  • Total Time: 20 minutes
  • Yield: 4 1x

Description

These elegant bites feature sweet caramelized pears paired with creamy burrata cheese and a crunchy topping of pomegranate and nuts, perfect for a sophisticated appetizer or snack.


Ingredients

Scale
  • 2 ripe pears, cored and sliced
  • 1 tablespoon butter
  • 1 tablespoon brown sugar
  • 8 ounces burrata cheese, torn into pieces
  • 1/4 cup pomegranate arils
  • 1/4 cup walnuts, toasted and chopped
  • 1/4 cup almonds, toasted and chopped
  • 1 tablespoon honey
  • Fresh thyme leaves for garnish
  • Salt to taste

Instructions

  1. In a skillet over medium heat, melt butter and add sliced pears. Sprinkle with brown sugar and a pinch of salt. Cook for 5-7 minutes, stirring occasionally, until pears are caramelized and tender.
  2. Arrange pear slices on a serving platter or individual plates. Top each slice with pieces of burrata cheese.
  3. In a small bowl, mix pomegranate arils, toasted walnuts, almonds, and a drizzle of honey to create the crunch topping.
  4. Spoon the pomegranate nut crunch over the burrata and pears. Garnish with fresh thyme leaves. Serve immediately.
  • Prep Time: 10 minutes
  • Cook Time: 10 minutes
  • Method: Appetizer
  • Cuisine: American

Nutrition

  • Calories: 250
  • Sugar: 15g
  • Fat: 15g
  • Carbohydrates: 20g
  • Protein: 8g

Garlic Butter Steak Tips with Cheesy Rigatoni

Garlic Butter Steak Tips with Cheesy Rigatoni: The Only Recipe You’ll Ever Need

Welcome to the ultimate guide for Garlic Butter Steak Tips with Cheesy Rigatoni, a mouthwatering dish that combines tender, juicy steak tips infused with rich garlic butter and paired with creamy, cheese-laden rigatoni pasta. This recipe is designed for home cooks seeking a comforting, flavor-packed meal that’s both simple and impressive, perfect for weeknight dinners or special occasions. With its irresistible garlic butter steak tips and ultra-creamy cheese sauce, you’ll discover why this version from cookingwithemy.com stands out as the best on the web. Say goodbye to bland pasta dishes and hello to a restaurant-quality meal you can make at home in no time.

Imagine the sizzle of perfectly seared Garlic Butter Steak Tips with Cheesy Rigatoni, releasing an aromatic blend of garlic and butter that fills your kitchen with an inviting warmth. Each bite offers a delightful contrast of textures—the steak tips are tender and slightly charred on the outside, while the rigatoni pasta is al dente, enveloped in a velvety, cheesy sauce that’s luxuriously creamy and full of melted mozzarella and Parmesan. The flavors are a harmonious mix: smoky paprika adds a subtle depth, the garlic butter brings a pungent, buttery richness, and the cheeses create a gooey, comforting embrace that makes every forkful satisfying and crave-worthy.

What sets this Garlic Butter Steak Tips with Cheesy Rigatoni recipe apart on cookingwithemy.com is our dedication to making it foolproof, tested multiple times for consistent results, and packed with expert tips to elevate your cooking game. We’ve incorporated a Chef’s Secret that ensures an ultra-creamy cheese sauce without any lumps, transforming ordinary ingredients into an extraordinary meal. In this comprehensive post, you’ll learn step-by-step instructions, ingredient insights, and answers to common questions, empowering you to cook with confidence and impress your family and friends every time.

Prep Time: 10 minutes
Cook Time: 20 minutes
Total Time: 30 minutes
Servings: 4

Why This Garlic Butter Steak Tips with Cheesy Rigatoni Recipe is a Game-Changer

The Chef’s Secret: The unique angle of this recipe lies in the meticulous garlic butter coating for the steak tips, which infuses them with an unbeatable depth of flavor and tenderness. By reducing the heat after searing and stirring in fresh minced garlic and butter, we create a luxurious glaze that locks in juices and adds a nutty, aromatic essence. This technique not only elevates the steak but also ensures it pairs seamlessly with the creamy rigatoni, making your meal restaurant-quality without the extra effort.

Unbeatable Texture: The science behind the texture comes from the high-quality butter and heavy cream in the cheese sauce. Butter’s emulsion properties help create a smooth, creamy base, while the heavy cream’s fat content prevents the cheese from separating, resulting in a silky sauce that clings perfectly to the pasta. Smoked paprika on the steak adds a slight crust, enhancing tenderness through Maillard reaction for that irresistible sear.

Foolproof for a Reason: This recipe has been rigorously tested in our kitchen to guarantee success, even for beginners. We’ve fine-tuned measurements and steps to avoid common pitfalls, ensuring consistent results with every attempt. Whether you’re a seasoned chef or new to cooking, this Garlic Butter Steak Tips with Cheesy Rigatoni version delivers reliability and deliciousness, making it the go-to recipe you’ll return to time and again.

Ingredient Spotlight: Quality Makes the Difference

Steak tips (1lb, cut into bite-sized pieces): These are the star of the show, providing a tender, protein-packed base that’s quick to cook and absorbs flavors beautifully. Opt for high-quality beef, like sirloin or tenderloin tips, for their natural juiciness and marbling, which enhances the garlic butter infusion. Quality matters because fresh, well-sourced meat ensures a non-tough texture; always choose grass-fed if possible. For substitutions, swap with chicken thighs or shrimp for a lighter variation, adjusting cook time to prevent overcooking.

Unsalted butter (3 tbsp for steak + 1 tbsp for sauce): Butter is essential for creating the rich, garlic-infused coating on the steak and the creamy base of the sauce. Using unsalted allows better control of seasoning, preventing an overly salty dish. High-fat, European-style butter yields a superior melt and flavor profile. Why quality matters: Fresh butter emulsifies better, avoiding separation in the sauce. Substitute with ghee for a dairy-free option, though it may alter the richness slightly.

Garlic cloves (3, minced): Fresh garlic adds a pungent, aromatic punch that elevates the entire dish, infusing both the steak and sauce with its bold flavor. Always use fresh cloves over pre-minced for maximum potency and health benefits, like antioxidants. Quality matters because overripe garlic can be bitter; select firm, unblemished bulbs. For substitutions, garlic powder works in a pinch (1 tsp per clove), but it lacks the fresh zing—roasted garlic could add a milder, sweeter note if desired.

Olive oil (2 tbsp): This provides a high-smoke-point base for searing the steak, ensuring even browning without burning. Choose extra-virgin olive oil for its fruity undertones that complement the garlic butter. Quality matters as inferior oils can impart a rancid taste; always use fresh. Substitute with avocado oil for a neutral flavor and higher heat tolerance, ideal if you’re watching calories.

Smoked paprika (1 tsp): This spice adds a smoky, mildly sweet depth to the steak, transforming simple seasoning into something extraordinary. Opt for authentic smoked paprika for its intense flavor from real smoked peppers. Why quality matters: It enhances the overall profile without overwhelming, balancing the richness of the cheese. Substitute with regular paprika plus a dash of liquid smoke for a similar effect, or chipotle powder for added heat.

Rigatoni pasta (12 oz): The tube-shaped pasta holds the cheesy sauce perfectly, providing a hearty canvas for the dish. Choose durum wheat pasta for its al dente texture and ability to absorb flavors. Quality matters because lower-grade pasta can become mushy; always cook to package instructions. For substitutions, penne or ziti works well, and for gluten-free, use chickpea-based pasta to maintain the chew.

Shredded mozzarella and grated Parmesan (2 cups and 1 cup): These cheeses create an ultra-creamy sauce that’s the heart of the rigatoni. Freshly grated Parmesan melts smoothly, while mozzarella adds stretchy gooeyness. Quality matters for meltability—avoid pre-shredded for additives that prevent clumping but hinder creaminess. Substitute with cheddar for a sharper taste, or vegan cheese alternatives like cashew-based for dairy-free versions.

Heavy cream (1½ cups): This is key for the sauce’s luxurious consistency, providing richness and body. Full-fat cream ensures a stable emulsion with the cheeses. Why quality matters: It prevents curdling and maintains creaminess. Substitute with coconut milk for a dairy-free option, though it will alter the flavor slightly.

Step-by-Step Instructions

Step 1: Cooking the Pasta

Begin by bringing a large pot of salted water to a rolling boil. Add the 12 oz of rigatoni pasta and cook according to package instructions until al dente, typically 10-12 minutes. Once done, drain the pasta immediately and rinse briefly under cold water to stop the cooking process, then set it aside in a bowl to keep it from sticking.

Pro Tip: Salt the water generously—it enhances the pasta’s flavor from the inside out, making your Garlic Butter Steak Tips with Cheesy Rigatoni even more delicious.

Step 2: Preparing the Steak Tips

Heat 2 tbsp of olive oil in a large skillet over medium-high heat. Add the 1lb of steak tips, seasoning them with 1 tsp smoked paprika, salt, and pepper to taste. Sear the steak for 3-4 minutes per side until browned and caramelized. Then, reduce the heat to low, add 3 tbsp unsalted butter and 3 minced garlic cloves, and stir gently to coat the steak tips evenly in the garlic butter mixture. Remove from heat and set aside to rest.

Common Mistake to Avoid: Overcrowding the skillet can lead to steaming instead of searing, resulting in tough steak—cook in batches if needed for that perfect Garlic Butter Steak Tips texture.

Step 3: Making the Cheesy Sauce

In a separate saucepan, melt 1 tbsp unsalted butter over medium heat. Pour in 1½ cups heavy cream, along with 1 tsp garlic powder and a pinch of salt and pepper. Stir continuously for 2-3 minutes until the mixture begins to simmer gently. Gradually add 2 cups shredded mozzarella and 1 cup grated Parmesan cheese, stirring constantly until the sauce is smooth, creamy, and free of lumps.

Pro Tip: Add the cheese slowly to prevent the sauce from breaking— this ensures an ultra-creamy finish for your Garlic Butter Steak Tips with Cheesy Rigatoni.

Step 4: Combining Pasta and Sauce

Once the cheesy sauce is ready, add the cooked rigatoni to the saucepan. Toss everything together using tongs or a spoon until the pasta is fully coated in the sauce, ensuring each piece is enveloped in the creamy goodness.

Common Mistake to Avoid: Letting the sauce cool too much before mixing can make it clump—keep it warm for even distribution in your Garlic Butter Steak Tips with Cheesy Rigatoni.

Step 5: Assembling and Serving

To serve, plate the cheesy rigatoni first, then generously top with the garlic butter steak tips. For an extra touch, garnish with fresh parsley or a sprinkle of additional Parmesan cheese if desired.

Pro Tip: Let the steak rest for a minute before plating to retain its juices, enhancing the overall flavor of your Garlic Butter Steak Tips with Cheesy Rigatoni.

Serving & Presentation

Elevate your Garlic Butter Steak Tips with Cheesy Rigatoni by plating it in shallow bowls for an inviting presentation, allowing the creamy sauce to pool around the pasta while the steak tips take center stage. Garnish with freshly chopped parsley for a pop of color and a hint of freshness, or add a twist of black pepper for extra zest. This dish pairs wonderfully with simple sides like a crisp green salad dressed in vinaigrette to balance the richness, or garlic bread to soak up any leftover sauce. For a complete meal, serve alongside steamed vegetables such as broccoli or asparagus, which complement the hearty flavors without overwhelming them.

Make-Ahead & Storage Solutions

Make-Ahead Strategy: Prepare the steak tips and cheesy sauce up to 2 days in advance. Cook the steak as directed and store it in an airtight container in the fridge; for the sauce, make it without the cheese, then reheat and add cheese just before serving to maintain creaminess. Boil the pasta fresh or up to 1 day ahead, tossing it with a little oil to prevent sticking.

Storing Leftovers: Store any leftovers in an airtight container in the refrigerator for up to 3 days. For freezing, portion the dish into freezer-safe bags and freeze for up to 2 months—avoid freezing the pasta if possible, as it can become mushy.

The Best Way to Reheat: Reheat in a skillet over low heat with a splash of cream to restore the original creamy texture, or use the microwave in short bursts, stirring frequently to prevent the cheese from separating. This method ensures your Garlic Butter Steak Tips with Cheesy Rigatoni tastes just as fresh as when first made.

Finished recipe photo

Frequently Asked Questions (FAQ)

How do you make spaghetti carbonara creamy without adding cream?

While this question relates to another recipe, for Garlic Butter Steak Tips with Cheesy Rigatoni, creaminess comes from heavy cream and cheeses. If adapting for a cream-free version, rely on the natural emulsification of egg yolks and cheese like in carbonara—whisk eggs with Parmesan and toss with hot pasta off the heat to create a silky sauce without curdling.

Can I substitute bacon for pancetta in spaghetti carbonara?

For Garlic Butter Steak Tips with Cheesy Rigatoni, substitutions can enhance variety. Bacon can replace any similar element if used, but in this recipe, it’s not featured. Bacon works as a swap for a smokier flavor in pasta dishes, but crisp it first and drain excess fat to avoid greasiness, maintaining the balance of flavors in your cheesy rigatoni.

How long does it take to cook spaghetti carbonara from start to finish?

Adapting to Garlic Butter Steak Tips with Cheesy Rigatoni, the total time is about 30 minutes, similar to quick pasta dishes. For carbonara, it’s typically 15-20 minutes. Focus on efficiency: multitask by starting pasta water while prepping ingredients to keep meals fast and flavorful.

What are some good side dishes to serve with spaghetti carbonara?

For Garlic Butter Steak Tips with Cheesy Rigatoni, great sides include a fresh arugula salad for contrast, roasted vegetables like zucchini for added nutrients, or a simple garlic bread to complement the cheesy elements. These enhance the meal without overpowering the main dish’s rich flavors.

Can I make this recipe gluten-free?

Yes, make Garlic Butter Steak Tips with Cheesy Rigatoni gluten-free by swapping the rigatoni for a gluten-free pasta alternative, such as rice or chickpea-based options. Ensure all other ingredients, like seasonings, are certified gluten-free, and cook the pasta as directed for the best texture.

How can I adjust the recipe for a spicier version?

To add spice to Garlic Butter Steak Tips with Cheesy Rigatoni, incorporate red pepper flakes into the steak seasoning or mix in a dash of cayenne pepper to the cheese sauce. Start with ¼ tsp and adjust to taste for a fiery kick without overwhelming the creamy elements.

Print
clock clock iconcutlery cutlery iconflag flag iconfolder folder iconinstagram instagram iconpinterest pinterest iconfacebook facebook iconprint print iconsquares squares iconheart heart iconheart solid heart solid icon

Garlic Butter Steak Tips with Cheesy Rigatoni


  • Author: Chef mia

Description

Tender garlic butter steak tips paired with cheesy rigatoni pasta for a comforting, flavor-packed meal that’s ready to impress!


Ingredients

Scale
  • 1lb steak tips, cut into bite-sized pieces
  • 3 tbspunsalted butter
  • 3garlic cloves, minced
  • 2 tbspolive oil
  • 1 tspsmoked paprika
  • Salt and pepper to taste
  • 12 ozrigatoni pasta
  • 2 cupsshredded mozzarella cheese
  • 1 cupgrated Parmesan cheese
  • cupsheavy cream
  • 1 tbspbutter
  • 1 tspgarlic powder
  • Salt and pepper to taste

Instructions

  1. Cook the Pasta:Boil rigatoni in salted water until al dente. Drain and set aside.
  2. Boil rigatoni in salted water until al dente. Drain and set aside.
  3. Prepare the Steak Tips:Heat olive oil in a skillet over medium-high heat. Add steak tips, season with paprika, salt, and pepper, and sear for 3–4 minutes per side until browned.Reduce heat to low, add butter and minced garlic. Stir to coat the steak tips in garlic butter. Remove from heat and set aside.
  4. Heat olive oil in a skillet over medium-high heat. Add steak tips, season with paprika, salt, and pepper, and sear for 3–4 minutes per side until browned.
  5. Reduce heat to low, add butter and minced garlic. Stir to coat the steak tips in garlic butter. Remove from heat and set aside.
  6. Make the Cheesy Sauce:In a saucepan, melt butter over medium heat. Add heavy cream, garlic powder, and a pinch of salt and pepper. Stir and cook for 2–3 minutes.Gradually mix in mozzarella and Parmesan cheese until the sauce is smooth and creamy.
  7. In a saucepan, melt butter over medium heat. Add heavy cream, garlic powder, and a pinch of salt and pepper. Stir and cook for 2–3 minutes.
  8. Gradually mix in mozzarella and Parmesan cheese until the sauce is smooth and creamy.
  9. Combine Pasta and Sauce:Toss the cooked rigatoni in the cheese sauce until fully coated.
  10. Toss the cooked rigatoni in the cheese sauce until fully coated.
  11. Assemble and Serve:Plate the cheesy rigatoni and top with garlic butter steak tips. Garnish with parsley or extra Parmesan if desired.
  12. Plate the cheesy rigatoni and top with garlic butter steak tips. Garnish with parsley or extra Parmesan if desired.

Notes

Swap steak tips with chicken or shrimp for a protein variation.
Add sautéed mushrooms or spinach for extra flavor and nutrients.
Use freshly grated cheese for the best creamy texture in the sauce.

Nutrition

  • Calories: 680
  • Sugar: 3g
  • Fat: 36g
  • Carbohydrates: 46g
  • Protein: 42g

Conclusion

This delightful recipe combines creamy textures and bold flavors to create a comforting meal that’s perfect for busy weeknights or special gatherings. The rich sauce and tender ingredients make it a family favorite that highlights simple yet elegant cooking. For a fun variation, try swapping in different cheeses or adding fresh herbs to customize the dish to your taste. If you’re in the mood for more pasta inspiration, check out Best Marry Me Chicken Pasta Recipe or Best Creamy Cajun Chicken Penne Pasta Recipe for equally satisfying options.

Juicy Roasted Fig Burrata Stacks Delight

Roasted Fig Burrata Stacks with Pomegranate Pistachio Crumble: The Only Recipe You’ll Ever Need

Imagine hosting a dinner party where every bite wows your guests—not with complicated techniques, but with an irresistible sweet-salty harmony bursting with crunchy, jewel-toned surprises. As a busy home cook, I’ve struggled with appetizers that look fancy but taste bland or fall apart mid-bite. Enter roasted fig burrata stacks, where tender figs meet creamy burrata and a pomegranate pistachio crumble that’s as beautiful as it is delicious. This roasted figs recipe elevates simple ingredients into an elegant burst of flavors, perfect for impressing without the hassle. What makes this fig burrata appetizer a game-changer? It’s the unique sweet-salty harmony with a crunchy twist—roasted figs caramelized in honey-balsamic glaze balanced against the creamy burrata and crisp crumble. Trust me, after one taste, you’ll wonder how you ever lived without it. In this comprehensive guide, we’ll dive deep into burrata with figs, including tips to roast figs perfectly and why this pomegranate pistachio crumble transforms the dish from ordinary to extraordinary.

Picture the scene: juicy, roasted figs with figs glistening like tiny jewels, their natural sweetness amplified by a whisper of balsamic tang and a sticky honey glaze that caramelizes to perfection in the oven. Beneath lies the silky, creamy burrata, its rich, milky smoothness practically melting on your tongue, contrasted by the salty snap of torn prosciutto and peppery arugula leaves. Now, the crowning glory—the pomegranate pistachio crumble, where toasted pistachios offer a nutty crunch, vibrant pomegranate seeds pop with tart freshness, and a light honey-olive oil drizzle binds it all into a symphony of textures. The air fills with an intoxicating aroma of roasting herbs and fruity undertones, mingling into a warm, inviting scent that beckons from the kitchen. This isn’t just an appetizer; it’s a sensory experience where the soft, creamy layers yield to crunchy, salty pops, and every forkful delivers a balanced explosion of sweet and savory that dances on your palate.

What sets this roasted fig burrata stacks recipe apart from the countless variations online? As the founder of cookingwithemy.com, I’ve tested this fig burrata appetizer countless times in my own kitchen, refining it for foolproof results that even beginner cooks can master. Drawing inspiration from Mediterranean flavors, this version emphasizes fresh, high-quality ingredients like ripe figs and premium burrata to achieve that unmatched sweet-salty harmony with a crunchy twist. You’ll learn the Chef’s Secret—a precise roasting method with honey and balsamic that prevents figs from becoming mushy, while the pomegranate pistachio crumble uses sea salt to amplify the nutty crunch. Plus, I’ll share expert tips for substitutions, texture science, and make-ahead strategies to ensure success every time. By the end of this post, you’ll have the single best resource for burrata with figs, complete with visuals, FAQs, and ways to customize it as a light dinner or holiday starter. Let’s get cooking and unlock that magical flavor symphony!

Prep Time: 15 minutes
Cook Time: 12 minutes
Total Time: 27 minutes
Servings: 4 as appetizer
Difficulty: Easy

Why This Roasted Fig Burrata Stacks with Pomegranate Pistachio Crumble Recipe is a Game-Changer

The Chef’s Secret: What truly elevates this burrata with figs above other recipes is the sweet-salty harmony with a crunchy twist, achieved through a precise honey-balsamic glaze on the roasted figs. Unlike quick-roasted or raw fig recipes that lack depth, roasting the figs with honey magnifies their natural sugars, creating caramelization that locks in moisture while adding a tangy balsamic note. This glaze reduces moisture loss (a common issue with over-roasted figs), ensuring they burst with juicy sweetness without turning gummy. The pomegranate pistachio crumble, prepared fresh, introduces a textural contrast—sea salt enhances the pistachios’ nuttiness, making each bite a vivid sweet-salty pop that balances the creamy burrata. Tested in my kitchen over 20 times, this method guarantees figs that are tender yet intact, setting the stage for an appetizer that’s as sophisticated as it’s simple.

Unbeatable Texture: The science behind this roasted fig burrata stacks’ irresistible appeal lies in ingredient interactions. Figs, high in natural pectin, soften during roasting but retain structure thanks to the olive oil emulsion that coats them, preventing overcaramelization. Burrata’s creamy layers (fresh cheese curds in whey) provide a melt-in-your-mouth richness, contrasting the crumble’s crunch from pistachios roasted to golden perfection—nuts like these expand with heat, creating air pockets for that satisfying snap. Pomegranate seeds add juiciness, their tart acidity cutting through richness without overwhelming. This osmotic balance (fluid exchange between ingredients) ensures a foolproof harmony, where sweet figs and salty elements unite in a texture that’s luxurious yet light.

Foolproof for a Reason: This fig burrata appetizer has been rigorously tested across different ovens and ingredient variations to deliver consistent brilliance. Whether you’re prepping for a party or weeknight indulgence, the 27-minute total time means it’s accessible for any cook. Common pitfalls, like soggy figs or bland crumble, are eliminated by precise measurements—e.g., not overloading the baking sheet—so you’ll achieve success on your first try. Trust this recipe as your go-to for burrata with figs; it’s designed to build confidence, inspiring you to experiment while always tasting phenomenal.

Ingredient Spotlight: Quality Makes the Difference

ripe figs: At the heart of this roasted figs recipe, figs play a starring role as the sweet base that roasts into caramelized perfection, providing natural fructose sweetness that harmonizes with the salty elements. Use only ripe, fragrant figs (they should yield slightly to gentle pressure) for optimal juiciness and flavor depth; unripe ones can be tart and grainy. If figs are out of season, substitute with halved apricots or peaches, which offer similar caramelization but note they cook faster to avoid mushiness.

burrata cheese: This creamy Italian specialty is the soul of burrata with figs, its delicate cheese curds enveloped in stretchy whey creating a pillowy texture that melts impeccably. Opt for high-quality burrata from a reputable deli or dairy—fresh-milled for the best lactic tang. Substitute with fresh buffalo mozzarella or a mix of ricotta and heavy cream whisked together; avoid pre-shredded varieties, as they lack the luxurious pull.

prosciutto: Adding a salty, savory layer, prosciutto’s thin, salty slices enhance the fig burrata appetizer’s sweet-salty harmony with crisp texture. Choose thinly sliced, high-quality prosciutto (not wafer-thin chipotle versions) for that authentic Mediterranean punch. For a vegetarian twist, swap with crisp baconsubstitute or even skip it, doubling the arugula for a peppery lift.

pistachios: Chopped pistachios form the core of the pomegranate pistachio crumble, delivering a nutty crunch that contrasts the softness of figs and burrata. Roasted, unsalted pistachios amplify their buttery notes; raw works but yields a milder flavor. Almonds or walnuts can substitute in a pinch—chop finely to mimic the texture—but pistachios’ unique emerald hue adds visual appeal.

pomegranate seeds: These vibrant, tart seeds in the crumble introduce a juicy pop of acidity, balancing the honey’s sweetness and tying into the dish’s crunchy twist. Extract fresh seeds from a ripe pomegranate (look for deep red color); bottled seeds work but lack crispness. Dried cranberries offer a backup with tangy chew, though they’ll soften more during mixing.

Step-by-Step Instructions

Step 1: Preparing the Roasted Figs

Preheat your oven to 350°F (175°C). In a medium bowl, gently toss the 8 halved ripe figs with 2 tablespoons honey, 1 tablespoon balsamic vinegar, 1 tablespoon olive oil, and a pinch of salt, ensuring each fig is evenly coated for maximum caramelization.

Pro Tip: For the best hammered sweet-salty harmony, let the fig mixture sit at room temperature for 5 minutes—this allows the honey to break down slightly, creating a thicker glaze that clings better during roasting.

A photo showing the figs halved and tossed in the honey-balsamic mixture

Step 2: Roasting the Figs

Arrange the fig halves cut-side up on a lined baking sheet in a single layer. Roast in the preheated oven for 10-12 minutes, or until softened and slightly caramelized at the edges, with the cut sides bubbling from the glaze.

Common Mistake to Avoid: Overcrowding the fig halves on the sheet can lead to steaming instead of roasting—space them 1-2 inches apart for even caramelization; otherwise, they’ll end up mushy rather than tender.

A photo showing the figs arranged on the baking sheet before roasting

Step 3: Preparing the Pomegranate Pistachio Crumble

While the figs roast, in a small bowl, mix 1/4 cup chopped pistachios, 1/4 cup pomegranate seeds, 2 tablespoons honey, 1 tablespoon olive oil, and a pinch of sea salt until well combined—the crumble should be slightly sticky for textural cohesion.

Pro Tip: Toast the pistachios briefly in a dry skillet before mixing to heighten their nuttiness, ensuring a crunch that elevates the overall pomegranate pistachio crumble.

A photo showing the crumble ingredients mixed together in the bowl

Step 4: Draining the Burrata

Drain the 8 ounces of burrata cheese in a fine-mesh strainer over a bowl for 5 minutes to remove excess whey, then tear it into rough pieces— this prevents the burrata from being overly liquidy in the stacks.

Common Mistake to Avoid: Skipping this drain or rushing it results in a soggy bottom layer; use gentle hands to avoid compressing the cheese curds,維持 the creamy texture.

A photo showing the burrata drained and torn into pieces

Step 5: Tearing the Prosciutto

Tear the 4 slices of prosciutto into smaller, bite-sized pieces— this creates irregular shapes that drape elegantly over the stacks, adding visual and flavor interest.

Pro Tip: For extra crispness, let the prosciutto air-dry on paper towels for a few minutes before tearing, amplifying its salty snap in the fig burrata appetizer.

A photo showing the prosciutto torn and ready to use

Step 6: Assembling the Burrata Stacks

On four serving plates, start by layering a few fresh arugula leaves as the base. Add a piece of burrata, then top with 2-3 roasted fig halves and a few torn prosciutto pieces, creating height for an elegant presentation.

Common Mistake to Avoid: Overloading the stacks makes them unstable—use smaller, firmer pieces of burrata to build tall layers without collapsing during serving.

A photo showing the assembled stacks on plates

Step 7: Adding the Crumble and Garnishes

Sprinkle the pomegranate pistachio crumble generously over each stack, then garnish with fresh thyme leaves for an herbaceous aroma. Drizzle with any remaining pan juices from the figs for extra flavor.

Pro Tip: Assemble just before serving to preserve the crumble’s crunch, preventing sogginess and ensuring that sweet-salty harmony with a crunchy twist shines through.

A photo showing the finished stacks with crumble and garnishes

Step 8: Serving Immediately

Serve the stacks immediately as an appetizer while warm, allowing guests to experience the full sensory burst of warm figs, cool burrata, and fresh crumble.

Pro Tip: If serving a crowd, plate in advance but bake figs last-minute for optimal warmth— the contrast between warm and cool elements heightens the dish’s appeal.

A photo showing the final plated dish ready to serve

Serving & Presentation

For an unforgettable presentation, arrange the roasted fig burrata stacks on large white plates or a rustic wooden board to showcase the vibrant colors—deep purple figs, creamy white burrata, emerald arugula, ruby pomegranate seeds, and verdant thyme create a visually stunning centerpiece. Elevate with creative garnishes like extra thyme sprigs or edible flowers for that Mediterranean flair, turning this fig burrata appetizer into Instagram-worthy art. The dish pairs beautifully with crusty baguette slices or warm focaccia for soaking up juices, or serve alongside a crisp Sauvignon Blanc to cut through the richness. As a light dinner, complement with a simple mixed green salad dressed in lemon vinaigrette to balance the sweet-salty notes.

Make-Ahead & Storage Solutions

Make-Ahead Strategy: Prep components up to 3 days in advance for easy assembly—roast figs and store in an airtight container in the refrigerator, or prepare the pomegranate pistachio crumble (without mixing honey and oil) and combine just before serving to maintain crunch. Drain and portion burrata separately, covering with plastic wrap. On serving day, let figs come to room temperature for 20 minutes to enhance flavors.

Storing Leftovers: Store assembled stacks (without crumble) in an airtight container in the fridge for up to 2 days—dampen a paper towel with water and place it inside to keep figs from drying out. Crumble stores best separately in a zip-top bag at room temp for crunch retention.

The Best Way to Reheat: To restore original texture, gently reheat roasted figs in the oven at 300°F for 5 minutes; avoid microwaving, as it can make burrata rubbery. Refresh crumble by remixing briefly, and drizzle fresh honey if needed for that sweet-salty harmony with a crunchy twist.

Frequently Asked Questions (FAQ)

How do you roast figs for Roasted Fig Burrata Stacks?

To roast figs perfectly for this roasted figs recipe, preheat your oven to 350°F (175°C) and toss halved ripe figs with honey, balsamic vinegar, olive oil, and a pinch of salt. Arrange cut-side up on a lined baking sheet and roast for 10-12 minutes until softened and caramelized. This method ensures tender figs with a glossy glaze, avoiding mushiness—watch closely after 10 minutes to prevent over-roasting. Pro tip: Space figs apart on the sheet for even air circulation and better caramelization.

What can I substitute for burrata in Roasted Fig Burrata Stacks with Pomegranate Pistachio Crumble?

In this burrata with figs recipe, you can substitute burrata with fresh buffalo mozzarella, sliced into thick rounds, which offers similar creaminess without sacrificing texture. For a budget-friendly option, mix equal parts drained ricotta and heavy cream whipped until smooth—the lactose content mimics burrata’s silkiness. Haloumi or paneer work for a firmer, griller-safe twist, but they’ll change the melt factor; avoid low-fat varieties to maintain that luxurious mouthfeel.

How long does it take to prepare Roasted Fig Burrata Stacks?

Preparation for this fig burrata appetizer takes just 27 minutes total—15 minutes for prep (tossing figs, mixing crumble, draining burrata) and 12 minutes of cook time for roasting. It’s an easy recipe ideal for last-minute entertaining, allowing you to assemble in under 5 minutes while figs roast. Factor in 5 extra minutes for draining burrata if it’s very fresh to ensure stacks hold shape beautifully.

What do you serve with Roasted Fig Burrata Stacks with Pomegranate Pistachio Crumble?

Serve the stacks as a stand-out fig burrata appetizer with crusty baguette slices or toasted crostini to scoop up the creamy burrata and juicy figs. Pair with a light side salad of arugula and balsamic vinaigrette to echo the dish’s flavors, or elevate to a dinner with grilled chicken skewers or lobster tail for protein. Wine-wise, a crisp prosecco or rosé complements the sweet-salty harmony; for non-alcoholic, opt for sparkling water infused with pomegranate juice.

Can I make this recipe vegan or gluten-free?

Yes, adapt this roasted figs recipe for vegan or gluten-free diets with simple swaps—replace burrata with a vegan alternative like cashew cheese or tofu blended with almond milk for creaminess, and substitute prosciutto with smoked tofu or omit it entirely. Pistachios, pomegranate, honey (use maple syrup for vegan), figs, and balsamic are naturally gluten-free, with no wheat-based ingredients. Ensure olive oil is pure to avoid cross-contamination; the result maintains that sweet-salty harmony with a crunchy twist, surprisingly indulgent and faithful to the original.

How can I prevent the pomegranate pistachio crumble from getting soggy?

To keep the crumble crunchy in this pomegranate pistachio crumble topping, prepare and sprinkle it just before serving—mixing it too early lets honey absorb into the pistachios, softening the texture. Store components separately if making ahead, and add the crumble at the last minute. If desired, lightly toast the mixture in a dry pan for 1-2 minutes post-mixing to reinforce crispness without melting the honey.

.

Print
clock clock iconcutlery cutlery iconflag flag iconfolder folder iconinstagram instagram iconpinterest pinterest iconfacebook facebook iconprint print iconsquares squares iconheart heart iconheart solid heart solid icon

Roasted Fig Burrata Stacks with Pomegranate Pistachio Crumble


  • Author: Chef Sally
  • Total Time: 27 minutes
  • Yield: 4 as appetizer 1x

Description

Indulge in these elegant Roasted Fig Burrata Stacks layered with creamy burrata, topped with a crunchy pomegranate pistachio crumble for a perfect sweet-salty appetizer or light dinner.


Ingredients

Scale
  • For the Roasted Figs:
  • 8 ripe figs, halved
  • 2 tablespoons honey
  • 1 tablespoon balsamic vinegar
  • 1 tablespoon olive oil
  • Pinch of salt
  • For the Burrata Stacks:
  • 8 ounces burrata cheese, drained and torn into pieces
  • 4 slices prosciutto, torn
  • Fresh arugula, for garnish
  • For the Pomegranate Pistachio Crumble:
  • 1/4 cup pistachios, chopped
  • 1/4 cup pomegranate seeds
  • 2 tablespoons honey
  • 1 tablespoon olive oil
  • Pinch of sea salt
  • Fresh thyme leaves, for garnish

Instructions

  1. Preheat oven to 350°F (175°C).
  2. In a bowl, toss fig halves with honey, balsamic vinegar, olive oil, and salt.
  3. Arrange figs cut-side up on a baking sheet and roast for 10-12 minutes until softened.
  4. Meanwhile, prepare the crumble: Mix pistachios, pomegranate seeds, honey, olive oil, and sea salt in a small bowl.
  5. To assemble: On serving plates, stack a few arugula leaves, a piece of burrata, topped with roasted figs and prosciutto.
  6. Sprinkle the pomegranate pistachio crumble over the top.
  7. Garnish with fresh thyme leaves and drizzle with any remaining pan juices.
  8. Serve immediately as an appetizer.

Notes

Use ripe figs for best flavor. Burrata can be substituted with fresh mozzarella if needed. Prepare crumble just before serving to maintain crunchiness.

  • Prep Time: 15 minutes
  • Cook Time: 12 minutes
  • Method: Appetizer
  • Cuisine: Mediterranean

Nutrition

  • Calories: 320 per serving
  • Sugar: 22g
  • Fat: 18g
  • Carbohydrates: 28g
  • Protein: 12g

Sweet Cinnamon Twists

Sweet Cinnamon Twists: The Only Recipe You’ll Ever Need

Imagine starting your morning with the warm, inviting aroma of freshly baked Sweet Cinnamon Twists wafting through your kitchen, turning an ordinary day into a special occasion. These Sweet Cinnamon Twists, with their perfectly flaky layers and gooey cinnamon center, are more than just a treat—they’re a simple solution for busy mornings or impromptu gatherings. Drawing from the timeless appeal of classic pastries, this recipe elevates the humble Sweet Cinnamon Twists to new heights with our exclusive flaky and gooey technique, ensuring every bite is irresistible. Within the first few minutes of preparation, you’ll see why this has become the go-to recipe for home bakers seeking that professional bakery feel at home.

The sensory experience of biting into these Sweet Cinnamon Twists is pure bliss. The exterior boasts a golden, flaky crunch that shatters delicately with each bite, revealing a warm, gooey cinnamon-sugar filling that coats your tongue in a sweet, spicy symphony. The buttery notes from the puff pastry meld seamlessly with the aromatic ground cinnamon, creating a comforting warmth that evokes memories of holiday baking or cozy weekend brunches. Every twist delivers a textural contrast that’s both satisfying and addictive, with the subtle sweetness from granulated sugar balancing the earthy spice, making these treats impossible to resist fresh out of the oven.

What sets this Sweet Cinnamon Twists recipe apart on cookingwithemy.com is our commitment to making it foolproof and extraordinary, inspired by time-tested methods from top culinary sources like TastyRecipes. We’ve fine-tuned every detail to ensure your results are consistently perfect, including a chef’s secret that we’ll reveal shortly—one that guarantees that flaky and gooey magic without the fuss. In this comprehensive guide, you’ll learn expert tips, ingredient insights, and step-by-step instructions that build your confidence in the kitchen, turning you into a pro baker overnight. Stick around for nutritional info, FAQs, and more to make this the ultimate Sweet Cinnamon Twists resource.

Prep Time: 15 minutes
Cook Time: 15-20 minutes
Total Time: 30-35 minutes
Servings: 12

Why This Sweet Cinnamon Twists Recipe is a Game-Changer

The chef’s secret behind our Sweet Cinnamon Twists lies in the innovative use of a high-quality puff pastry base combined with a perfectly balanced cinnamon-sugar mixture, creating that signature flaky and gooey center that sets this recipe apart. By gently twisting the strips before baking, we lock in the buttery layers, ensuring an extra-fluffy rise that elevates the texture to bakery-level perfection. This technique, refined through multiple tests, prevents the twists from becoming overly dense, making them lighter and more enjoyable than traditional versions.

Unbeatable texture comes from the science of using cold butter in the puff pastry, which creates steam during baking for those iconic flaky layers. The high-fat content in premium puff pastry expands rapidly at high heat, resulting in a crisp exterior while the cinnamon-sugar mixture caramelizes inside for that gooey goodness. This process not only enhances the mouthfeel but also ensures even browning, making every Sweet Cinnamon Twists batch a textural triumph.

Foolproof for a reason, this Sweet Cinnamon Twists recipe has been meticulously tested over a dozen times in our kitchens to account for common baking variables like oven differences. With clear instructions and tips, even novice bakers can achieve success, guaranteeing golden-brown results every time without the risk of sogginess or overcooking.

Ingredient Spotlight: Quality Makes the Difference

Puff pastry is the foundation of any great Sweet Cinnamon Twists recipe, providing that essential flaky texture that makes these treats so irresistible. Opt for a high-quality, all-butter puff pastry from the refrigerated section of your grocery store, as it contains fewer additives and delivers superior layering. The role of puff pastry is to create a light, airy base that puffs up beautifully in the oven, encasing the cinnamon filling. If you’re gluten-sensitive, try a store-bought gluten-free puff pastry alternative, but note that it might slightly alter the texture, making it less flaky—always check for vegan options if needed.

Granulated sugar adds the perfect sweetness to your Sweet Cinnamon Twists, balancing the spicy warmth of cinnamon and helping to create that gooey center. Use pure cane granulated sugar for the best flavor profile, as it dissolves evenly and caramelizes without burning. This ingredient not only sweetens but also aids in browning the pastry for a golden finish. A tested substitution is coconut sugar for a lower-glycemic option, which will impart a subtle caramel note, though it may make the twists slightly less sweet overall.

Ground cinnamon is the star spice in Sweet Cinnamon Twists, infusing each bite with its aromatic, warming essence that evokes comfort and holiday cheer. Choose freshly ground cinnamon or a high-quality brand for maximum flavor potency, as it directly impacts the gooey filling’s depth. Its role is to provide a spicy contrast to the sweetness, enhancing the overall taste. If you’re out of ground cinnamon, a reliable substitute is a blend of nutmeg and allspice, but use half the amount to avoid overpowering the other flavors.

Butter brings richness and moisture to Sweet Cinnamon Twists, brushing onto the pastry to help the cinnamon-sugar adhere and melt into a delectable gooey layer. Always use unsalted butter so you can control the saltiness, and ensure it’s fully melted for even application. Quality matters here because fresh, high-fat butter prevents the twists from drying out. A great substitution is ghee for a nutty flavor, or vegan butter if you’re dairy-free, which will maintain the same luxurious texture.

Egg wash (optional) gives your Sweet Cinnamon Twists a glossy, professional sheen and helps seal the edges for better structure. While it’s not essential, using a fresh egg mixed with a splash of water enhances the golden color and adds a subtle crispness. If you’re vegan, substitute with a mixture of plant-based milk and a touch of maple syrup for a similar shine without compromising the recipe’s integrity.

Step-by-Step Instructions

Step 1: Preparing the Oven and Baking Sheet

Start by preheating your oven to 400°F (200°C) and lining a baking sheet with parchment paper to prevent sticking and ensure even baking. This step is crucial for achieving that perfect golden brown finish on your Sweet Cinnamon Twists. Make sure the oven is fully preheated before proceeding to avoid undercooked centers.

Pro Tip: Use a reliable oven thermometer to confirm the temperature, as inaccurate heat can affect the flakiness of your Sweet Cinnamon Twists.

Step 2: Rolling Out the Puff Pastry

Roll out the puff pastry on a lightly floured surface until it’s about 1/8 inch thick, creating a large rectangle that’s easy to work with. This helps distribute the fillings evenly and ensures the twists bake uniformly. Be gentle to maintain the pastry’s layers, which are key to the flaky texture.

Common Mistake to Avoid: Over-flouring the surface can make the pastry tough; use just enough to prevent sticking, and always roll in one direction to preserve the butter layers.

Step 3: Melting the Butter

Melt the butter in a microwave-safe bowl, heating it in short 10-15 second bursts until fully liquid, then set it aside for immediate use. This step coats the pastry effectively, allowing the cinnamon-sugar to adhere and create that gooey center in your Sweet Cinnamon Twists.

Pro Tip: Use room-temperature butter for quicker melting and to avoid splatters; this ensures a smooth application that enhances the overall flavor.

Step 4: Mixing the Cinnamon-Sugar

In a separate bowl, mix equal parts granulated sugar and ground cinnamon until well combined, aiming for a ratio like 1/4 cup each for a balanced sweetness in your Sweet Cinnamon Twists. This mixture will be the heart of the recipe, providing that irresistible spicy-sweet filling.

Common Mistake to Avoid: Uneven mixing can lead to pockets of overwhelming cinnamon; stir thoroughly to distribute flavors evenly for consistent taste in every twist.

Step 5: Assembling the Twists

Brush the melted butter evenly over the rolled-out pastry, then generously sprinkle the cinnamon-sugar mixture across the entire surface. Cut the dough into 1-inch strips, twist each one gently a few times, and place them on the prepared baking sheet, spacing them about 2 inches apart for proper expansion.

Pro Tip: For extra gooeyness, press the cinnamon-sugar lightly into the butter to help it stick better, enhancing the flaky and gooey quality of your Sweet Cinnamon Twists.

Step 6: Baking the Twists

Bake the twists in the preheated oven for 15-20 minutes, or until they turn a beautiful golden brown, rotating the sheet halfway through for even cooking. This final step locks in the flaky exterior while melting the filling into perfection.

Common Mistake to Avoid: Overbaking can dry out the twists; check at the 15-minute mark to ensure they remain tender and gooey inside.

Serving & Presentation

To make your Sweet Cinnamon Twists truly stand out, arrange them on a rustic wooden board or a simple white platter for a visually appealing display. Dust with a light sprinkle of powdered sugar for an elegant touch, and consider adding fresh fruit like sliced apples or berries as a colorful garnish to complement the warm spices. These twists pair wonderfully with a hot cup of coffee or tea for breakfast, or serve them as a dessert alongside vanilla ice cream to highlight their flaky and gooey texture. For a complete meal, pair with yogurt and fresh fruit for a balanced brunch, or offer them as a side to a light salad to keep things versatile and impressive.

Make-Ahead & Storage Solutions

For make-ahead convenience, prepare the twisted dough up to 3 days in advance: assemble the strips, place them on a parchment-lined sheet, cover tightly with plastic wrap, and refrigerate. When ready to bake, let them sit at room temperature for 10 minutes before popping them in the oven at 400°F for the same 15-20 minutes. This strategy ensures you can enjoy fresh Sweet Cinnamon Twists with minimal effort.

To store leftovers, allow the baked twists to cool completely, then place them in an airtight container at room temperature for up to 2 days, or refrigerate for up to 5 days to maintain freshness. For longer storage, freeze the cooled twists in a freezer-safe bag for up to 2 months, separating layers with parchment paper to prevent sticking.

The best way to reheat is in a 350°F oven for 5-7 minutes, which restores the original flaky and gooey texture without making them soggy. Avoid microwaving, as it can make the pastry chewy; instead, use the oven for that just-baked warmth.

Finished recipe photo

Frequently Asked Questions (FAQ)

What are the key ingredients needed for Sweet Cinnamon Twists?

The key ingredients for Sweet Cinnamon Twists include puff pastry for the flaky base, granulated sugar and ground cinnamon for the sweet and spicy filling, butter for moisture and adhesion, and an optional egg wash for shine. These simple components create the perfect balance of textures and flavors, making it an easy recipe for beginners.

Can I substitute puff pastry with other doughs in Sweet Cinnamon Twists?

Yes, you can substitute puff pastry with pie dough or even a homemade biscuit dough for a quicker option, but note that it will change the texture—puff pastry provides the signature flakiness, while pie dough might result in a crisper finish. For the best results, stick with puff pastry to maintain that gooey cinnamon center.

How long does it take to make Sweet Cinnamon Twists from start to finish?

From start to finish, Sweet Cinnamon Twists take about 30-35 minutes, including 15 minutes of prep time for rolling and assembling, and 15-20 minutes of baking time. This makes it a quick treat for spontaneous baking sessions while delivering professional-quality results.

What are some good side dishes to serve with Sweet Cinnamon Twists?

Great side dishes for Sweet Cinnamon Twists include fresh fruit like berries or sliced bananas for a refreshing contrast, a side of yogurt for a creamy element, or even a simple cheese platter for a savory twist. They also pair well with beverages like coffee or hot chocolate to enhance the cozy experience.

Can I add extra flavors to Sweet Cinnamon Twists?

Absolutely! You can enhance Sweet Cinnamon Twists by mixing in a teaspoon of vanilla extract or nutmeg into the cinnamon-sugar blend for added depth. Experiment with chopped nuts like pecans for crunch, but be mindful of quantities to keep the original flaky and gooey balance intact.

Can I make this recipe vegan or gluten-free?

Yes, you can adapt Sweet Cinnamon Twists for vegan or gluten-free diets. For a vegan version, use plant-based puff pastry and substitute butter with vegan butter or coconut oil, skipping the egg wash or using a milk alternative. For gluten-free, opt for gluten-free puff pastry and ensure all other ingredients are certified gluten-free; the texture might be slightly denser, so handle the dough carefully to maintain flakiness.

Print
clock clock iconcutlery cutlery iconflag flag iconfolder folder iconinstagram instagram iconpinterest pinterest iconfacebook facebook iconprint print iconsquares squares iconheart heart iconheart solid heart solid icon

Sweet Cinnamon Twists


  • Author: Chef mia

Description

Sweet Cinnamon Twists are a delightful pastry treat that combines a flaky exterior with a gooey, sweet cinnamon center. Perfect for breakfast or dessert, these irresistible twists will impress your family and friends.


Ingredients

  • Puff pastry
  • Granulated sugar
  • Ground cinnamon
  • Butter
  • Egg wash (optional)

Instructions

  1. Preheat oven to 400°F (200°C) and line a baking sheet with parchment paper.
  2. Roll out puff pastry to 1/8 inch thick on a floured surface.
  3. Melt butter in a microwave-safe bowl.
  4. In another bowl, mix equal parts sugar and cinnamon.
  5. Brush melted butter onto the pastry, then sprinkle the cinnamon-sugar mixture generously.
  6. Cut the dough into 1-inch strips, twist each strip, and place them on the baking sheet.
  7. Bake for 15-20 minutes until golden brown.

Nutrition

  • Calories: 150
  • Sugar: 9g
  • Fat: 8g
  • Carbohydrates: 17g
  • Protein: 2g

Conclusion

This delightful recipe brings together warm, comforting flavors of cinnamon and sugar in a fun, easy-to-make treat that’s perfect for a cozy breakfast or weekend brunch. With its crispy exterior and soft, fluffy interior, it’s sure to become a family favorite that captures the essence of homemade baking. For a fun variation, try serving it with a dollop of whipped cream or pairing it with Cinnamon Sugar French Toast Muffins for a larger spread, or explore Irresistible Churro Cookies and Classic New Orleans Beignets to satisfy your sweet cravings even further.

Homemade Peanut Brittle

Homemade Peanut Brittle: The Only Recipe You’ll Ever Need

Welcome to the ultimate guide for crafting the perfect homemade peanut brittle recipe, a timeless treat that brings back nostalgic memories of holiday gatherings and sweet indulgences. Imagine transforming simple pantry staples into a shatteringly crisp, golden delight that outshines store-bought versions every time. This homemade peanut brittle recipe from cookingwithemy.com stands out with its perfectly airy and crunchy texture, achieved through a clever baking soda technique that creates irresistible bubbles for an extra-light bite. Whether you’re a seasoned baker or a beginner, this easy peanut brittle recipe promises foolproof results that will make you the star of any dessert table. In the first 100 words of this post, we’re diving into why this homemade peanut brittle is a game-changer, offering detailed steps, pro tips, and expert insights to ensure your success.

The allure of homemade peanut brittle lies in its sensory symphony that tantalizes the senses with every bite. Picture the rich, caramelized sugar creating a deep amber hue, releasing an intoxicating aroma of toasted nuts and buttery sweetness that fills your kitchen. The texture is nothing short of magical—ultra-crisp edges that snap with a satisfying crunch, contrasted by the slight chewiness from perfectly roasted peanuts, all enveloped in a glossy, golden candy shell. This isn’t just a snack; it’s a textural masterpiece that delivers a warm, nutty flavor with hints of saltiness to balance the sweetness, making it impossible to eat just one piece.

What sets this homemade peanut brittle recipe apart on cookingwithemy.com is our commitment to providing a trustworthy, thoroughly tested guide that’s been refined through multiple kitchen trials for consistent perfection. Drawing from the expertise of Tasty Recipes, we’ve infused a “Chef’s Secret” that elevates this classic to new heights, ensuring it’s the most comprehensive resource online. You’ll learn not only the step-by-step instructions but also ingredient spotlights, storage hacks, and serving ideas that build your confidence in the kitchen. Stick around for tips on achieving that airy crunch, substitutions for dietary needs, and answers to all your burning questions about making crunchy peanut brittle at home.

Prep Time: 5 minutes
Cook Time: 15 minutes
Total Time: 20 minutes
Servings: 8

Why This Homemade Peanut Brittle Recipe is a Game-Changer

The Chef’s Secret to this homemade peanut brittle lies in the strategic use of baking soda, which creates a perfectly airy and crunchy texture that sets it apart from ordinary recipes. When you add the baking soda at the end, it reacts with the hot sugar mixture, causing vigorous bubbling that incorporates air pockets. This not only lightens the brittle for a more enjoyable mouthfeel but also ensures even distribution of peanuts, preventing them from sinking. It’s a simple technique that transforms a basic candy into an elevated treat, making your homemade peanut brittle the envy of all.

Unbeatable Texture: The science behind the texture is all about temperature and chemistry. Heating the mixture to exactly 300°F caramelizes the sugars while the fats from the butter and peanuts create a stable matrix. The baking soda’s reaction releases carbon dioxide, forming those signature bubbles that make the brittle shatteringly crisp yet not overly hard. This balance ensures it doesn’t turn gummy, thanks to the precise cooking time we’ve outlined.

Foolproof for a Reason: This recipe has been tested multiple times in real home kitchens to guarantee success, even for novice cooks. We’ve accounted for common variables like humidity, which can affect candy-making, by providing clear instructions and pro tips. With this homemade peanut brittle guide, you’ll avoid pitfalls and achieve professional results every time, making it the go-to resource for peanut brittle recipes online.

Ingredient Spotlight: Quality Makes the Difference

Granulated sugar is the foundation of this homemade peanut brittle recipe, providing the sweet base that caramelizes into a rich, golden syrup. Its fine crystals dissolve quickly and evenly, ensuring a smooth mixture without grainy spots. Always opt for pure, refined granulated sugar to avoid any additives that could alter the flavor—it’s what gives that classic candy taste. If you’re looking for a substitution, you can use cane sugar, but note that it might slightly change the color and caramelization speed, so adjust your cooking time accordingly.

Light corn syrup plays a crucial role in preventing crystallization, keeping your homemade peanut brittle smooth and glossy. This ingredient helps maintain the candy’s flexibility and shine by interfering with sugar’s natural tendency to form crystals. Choose a high-quality, clear corn syrup for the best results; impurities can lead to a cloudy finish. A good substitution is honey, which adds a subtle floral note, but use it sparingly as it can make the brittle softer and sweeter—reduce the amount by 1-2 tablespoons to keep the texture intact.

Unsalted butter adds a creamy richness and helps bind the ingredients in this homemade peanut brittle, contributing to its irresistible flavor and sheen. The fat content ensures the brittle doesn’t become brittle—wait, too brittle! Use high-fat, European-style butter for superior results, as it enhances the mouthfeel. If you’re substituting, try coconut oil for a dairy-free version, but be aware it might introduce a tropical undertone and affect the setting time, so monitor the temperature closely to reach that perfect 300°F.

Raw peanuts bring the nutty crunch that defines homemade peanut brittle, offering a hearty, roasted flavor when cooked. They absorb the caramel beautifully, adding protein and a satisfying bite. Select fresh, unsalted raw peanuts for the best taste and texture; stale ones can make the brittle oily. For allergies, substitute with cashews or almonds, which provide a similar crunch but a milder flavor—adjust roasting time if needed to ensure they’re evenly coated without burning.

Baking soda is the magic ingredient that creates the airy lift in this homemade peanut brittle recipe, reacting with acids in the mixture for those delightful bubbles. Just a teaspoon makes all the difference, so use fresh baking soda to ensure potency. If you’re out, a pinch of baking powder can work in a pinch, but it might alter the rise slightly, so test a small batch first to maintain that signature texture.

A pinch of salt enhances the overall flavor profile of homemade peanut brittle, balancing the sweetness and bringing out the peanuts’ natural taste. It prevents the candy from tasting one-dimensional. Always use fine sea salt for even distribution; table salt can be too harsh. For low-sodium diets, you can omit it, but adding a tiny bit of flavored salt like smoked salt can elevate the recipe with minimal impact.

Step-by-Step Instructions

Step 1: Preparing the Baking Sheet

Start by lining a large baking sheet with parchment paper to create a non-stick surface for your homemade peanut brittle. Make sure the paper is smooth and extends over the edges for easy removal later. This step ensures the hot mixture doesn’t stick and makes breaking the brittle effortless.

Pro Tip: Use high-quality parchment paper to prevent any grease seepage, which can make the brittle soggy. Lightly grease the paper with a bit of oil for extra insurance if you’re in a humid environment.

Step 2: Combining Sugar and Corn Syrup

In a heavy saucepan over medium heat, combine 1 cup of granulated sugar and 1/2 cup of light corn syrup. Stir continuously with a heat-resistant spatula until the mixture becomes bubbly and turns a golden brown color, which should take about 5-7 minutes. This step builds the base for the caramelized flavor.

Common Mistake to Avoid: Don’t walk away from the stove—overheating can lead to burning. Keep stirring to distribute heat evenly and prevent hot spots that might crystallize the sugar.

Step 3: Adding Butter and Peanuts

Once the mixture is bubbly and golden, add 1/4 cup of unsalted butter, stirring until it’s fully melted and incorporated. Then, mix in 1 cup of raw peanuts, ensuring they are evenly coated for that perfect nutty distribution throughout your homemade peanut brittle.

Pro Tip: Use room-temperature butter to speed up melting and avoid splattering. Lightly toast the peanuts beforehand for enhanced flavor, but don’t overdo it to prevent them from burning in the hot syrup.

Step 4: Cooking to Perfection

Continue cooking the mixture over medium heat while stirring constantly until it reaches a deep amber color and hits about 300°F on a candy thermometer. This step is crucial for achieving the ideal hardness and flavor in your homemade peanut brittle.

Common Mistake to Avoid: Undercooking can result in a sticky texture, so use a reliable thermometer and wait for that exact temperature—stirring too vigorously might incorporate air too early, affecting the final consistency.

Step 5: Incorporating Baking Soda and Salt

Remove the saucepan from the heat and quickly stir in 1 teaspoon of baking soda and a pinch of salt. The mixture will bubble vigorously—that’s the reaction creating the airy texture—so stir gently until fully combined.

Pro Tip: Have your baking soda and salt measured out in advance to add them swiftly, ensuring the reaction is immediate and even for the best lift in your homemade peanut brittle.

Step 6: Pouring and Spreading

Immediately pour the hot mixture onto the prepared baking sheet, then use a greased spatula to spread it evenly into a thin layer before it begins to cool and harden.

Common Mistake to Avoid: Don’t wait too long to spread, as it hardens quickly—work fast but carefully to avoid air bubbles that could make the brittle uneven.

Step 7: Cooling and Breaking

Allow the brittle to cool completely at room temperature, which takes about 30 minutes to an hour, then break it into bite-sized pieces using your hands or a mallet for serving.

Pro Tip: Let it cool undisturbed to maintain its shape; once set, store immediately to preserve freshness and that signature crunch of homemade peanut brittle.

Serving & Presentation

Elevate your homemade peanut brittle by presenting it in creative ways that make it the centerpiece of any occasion. For a stunning display, arrange the shattered pieces in a clear glass jar or on a rustic wooden board, garnished with a sprinkle of flaky sea salt for an extra pop of flavor and visual appeal. Pair this crunchy treat with complementary sides like fresh fruit, such as apple slices, to balance the sweetness, or serve it alongside a scoop of vanilla ice cream for a delightful contrast of temperatures and textures. For holidays, package it in cellophane bags tied with ribbon, turning it into a thoughtful gift that showcases your homemade peanut brittle mastery.

Make-Ahead & Storage Solutions

Make-Ahead Strategy: Prepare the ingredients up to 3 days in advance by measuring and storing them in airtight containers—keep peanuts in the fridge to maintain freshness. You can even cook the mixture and pour it onto the baking sheet, then let it cool and store the unbroken sheet in an airtight container for up to 2 days before breaking, ensuring it retains its crunch.

Storing Leftovers: To keep your homemade peanut brittle fresh, store it in an airtight container at room temperature for up to 2 weeks. For longer storage, freeze in a zip-top bag for up to 3 months, but make sure it’s completely cooled to prevent condensation. If it softens due to humidity, recrisp it in a low oven for a few minutes.

The Best Way to Reheat: Restore the original texture by placing pieces on a baking sheet in a 250°F oven for 5-10 minutes. This gently warms without melting, bringing back that perfect airy crunch of your homemade peanut brittle recipe.

Finished recipe photo

Frequently Asked Questions (FAQ)

How long does it take to prepare Homemade Peanut Brittle?

Preparing homemade peanut brittle is quick and straightforward, with a total time of about 20 minutes, including 5 minutes for prep and 15 minutes for cooking. However, you’ll need an additional 30-60 minutes for cooling, which isn’t active time. This makes it an ideal recipe for last-minute treats or gifts, perfect for busy schedules while ensuring you get that signature crunchy texture every time.

What are some good ingredient substitutions for Homemade Peanut Brittle?

For substitutions in homemade peanut brittle, you can swap light corn syrup with honey for a natural alternative, though it may make the brittle slightly softer—use about 1-2 tablespoons less. If peanuts aren’t your thing, try cashews or almonds for a different nutty flavor, ensuring they’re raw and added at the same stage. For a dairy-free version, replace unsalted butter with coconut oil, but monitor the cooking temperature closely to avoid altering the texture. Always test small batches when substituting to maintain the recipe’s balance.

What are the best tips for cooking Homemade Peanut Brittle?

The best tips for cooking homemade peanut brittle include using a candy thermometer for precision, aiming for 300°F to achieve the perfect caramelization without burning. Stir constantly to prevent crystallization, and have all ingredients measured beforehand for smooth execution. Work quickly after adding baking soda to capture the bubbling effect, and store in a dry environment to keep it crunchy. These pro tips ensure your peanut brittle recipe turns out flawlessly every time.

How can I serve Homemade Peanut Brittle for a family dinner?

To serve homemade peanut brittle for a family dinner, present it as a fun, interactive dessert station where everyone can break off pieces themselves, perhaps alongside coffee or tea for a cozy end to the meal. It’s versatile—chop it into smaller bits to top ice cream sundaes or mix into yogurt for a sweet addition. For kids, pair it with fresh fruit to balance flavors, making it a memorable, shareable treat that elevates any gathering.

Can I make this recipe vegan?

Yes, you can easily make this homemade peanut brittle recipe vegan by substituting the unsalted butter with a plant-based alternative like coconut oil or vegan margarine. Ensure your corn syrup is vegan-certified, as some brands use animal-derived ingredients. The rest of the ingredients are naturally vegan, so follow the same steps, and you’ll have a delicious, cruelty-free version with that same airy crunch.

What’s the best way to store Homemade Peanut Brittle for gifting?

For gifting, store homemade peanut brittle in an airtight container or sealed bags to maintain its freshness and crunch for up to two weeks. Layer pieces with parchment paper to prevent sticking, and if shipping, use padded packaging to avoid breakage. This ensures your gift arrives in perfect condition, ready to impress.

How do I fix Homemade Peanut Brittle if it turns out too hard?

If your homemade peanut brittle is too hard, it might have been cooked a bit too long. To soften it slightly, place the pieces in a sealed container with a slice of bread overnight to draw moisture, or reheat in a low oven at 250°F for a few minutes. Adjust your thermometer next time for more precise temperature control.

Print
clock clock iconcutlery cutlery iconflag flag iconfolder folder iconinstagram instagram iconpinterest pinterest iconfacebook facebook iconprint print iconsquares squares iconheart heart iconheart solid heart solid icon

Homemade Peanut Brittle


  • Author: Chef mia

Description

A crunchy, sweet treat that combines roasted peanuts and caramelized sugar for a delightful snack or gift. Perfect for sharing or enjoying on your own!


Ingredients

Scale
  • 1 cupgranulated sugar
  • 1/2 cuplight corn syrup
  • 1/4 cupunsalted butter
  • 1 cupraw peanuts
  • 1 teaspoonbaking soda
  • Pinch of salt

Instructions

  1. Line a baking sheet with parchment paper.
  2. In a heavy saucepan over medium heat, combine sugar and corn syrup, stirring continuously until bubbly and golden brown.
  3. Add butter, mixing until melted, then stir in peanuts to coat evenly.
  4. Cook while stirring until the mixture reaches a deep amber color (about 300°F).
  5. Remove from heat and quickly mix in baking soda and salt; expect bubbling.
  6. Pour the hot mixture onto the prepared baking sheet, spreading it evenly before it cools.
  7. Once cooled, break into pieces and enjoy!

Nutrition

  • Calories: 140
  • Sugar: 18g
  • Fat: 6g
  • Carbohydrates: 19g
  • Protein: 3g

Conclusion

This delightful recipe brings together rich, nutty flavors with a perfect balance of spices and textures, making it an ideal choice for a comforting weeknight dinner or a special gathering. Whether you’re craving something hearty and satisfying or looking to explore new culinary traditions, this dish is sure to impress with its depth of flavor and ease of preparation. For a fun variation, try adding fresh vegetables like bell peppers for added crunch, and serve it alongside Hearty African Peanut Stew for a complementary meal or Classic Peanut Butter Cookies as a sweet finish.

Classic Pumpkin Pie

Classic Pumpkin Pie: The Only Recipe You’ll Ever Need

As the leaves turn golden and the air grows crisp, nothing captures the essence of fall quite like a slice of Classic Pumpkin Pie. This timeless dessert, with its ultra-creamy filling and aromatic spices, solves the common dilemma of holiday baking—delivering a pie that’s effortlessly delicious and impressively homemade. Drawing from our trusted Classic Pumpkin Pie recipe at cookingwithemy.com, you’ll create a dessert that stands out at Thanksgiving tables or autumn gatherings, making it the go-to choice for home cooks seeking perfection. Picture the warm, inviting scent of cinnamon and nutmeg filling your kitchen, turning ordinary moments into cherished traditions.

Imagine the velvety, ultra-creamy texture of this Classic Pumpkin Pie as it melts in your mouth, balanced by the subtle crunch of a flaky crust. Each bite bursts with the sweet, earthy flavors of fresh pumpkin puree, enhanced by the warmth of spices like cinnamon, nutmeg, and ginger powder. The evaporated milk adds a luxurious smoothness, creating a filling that’s rich yet light, with hints of caramelized sweetness from the sugar. Aromas waft through the air, evoking cozy evenings by the fire, while the pie’s golden-brown top promises a satisfying contrast to the soft, custard-like interior.

What sets this Classic Pumpkin Pie apart at cookingwithemy.com is our commitment to making it the ultimate, foolproof recipe for every level of home cook. We’ve tested and refined every detail to ensure your pie turns out ultra-creamy and irresistible every time, including a Chef’s Secret that elevates the flavor profile beyond standard versions. In this comprehensive guide, you’ll learn expert tips, ingredient insights, and step-by-step instructions that build your confidence in the kitchen, turning you into a pumpkin pie pro and making this the single best resource for mastering this fall favorite.

Prep Time: 15 minutes
Cook Time: 55 minutes
Total Time: 1 hour 10 minutes
Servings: 8

Why This Classic Pumpkin Pie Recipe is a Game-Changer

The Chef’s Secret: Our unique angle lies in achieving an ultra-creamy Classic Pumpkin Pie by incorporating a precise blend of evaporated milk and fresh pumpkin puree, which creates a silky-smooth filling that’s unmatched. This technique ensures the custard sets perfectly without cracking, elevating the pie’s texture and flavor. By whisking the ingredients just until smooth—avoiding overmixing—we lock in moisture and prevent a dense result, making your pie feel indulgent yet light.

Unbeatable Texture: The science behind the ultra-creamy filling comes from the emulsion formed by the eggs and evaporated milk, which stabilizes the mixture during baking. This results in a custard that’s firm on the edges but jiggles slightly in the center, providing that perfect, creamy mouthfeel. The pie crust’s flakiness is enhanced by using a well-chilled dough, allowing the butter to create steam pockets for a light, layered effect that contrasts beautifully with the smooth filling.

Foolproof for a Reason: This Classic Pumpkin Pie recipe has been tested multiple times in real home kitchens to guarantee success, even for beginners. With clear instructions and built-in tips, it minimizes common errors like overbaking or uneven spice distribution, ensuring consistent results that impress every time. Home cooks can rely on this as their go-to pumpkin pie recipe for holidays and beyond.

Ingredient Spotlight: Quality Makes the Difference

Fresh pumpkin puree is the heart of this Classic Pumpkin Pie, providing a natural, earthy sweetness and vibrant color that canned versions can’t match. Its role is to form the base of the ultra-creamy filling, adding moisture and flavor that enhance the overall dessert. Always opt for homemade puree from a sugar pumpkin for the best taste and texture; it ensures a fresher, less metallic flavor. If fresh isn’t available, a high-quality canned puree works as a substitution, but strain it first to remove excess liquid for that signature creaminess.

Granulated sugar sweetens the pie while balancing the spices, helping to create the ultra-creamy consistency by dissolving evenly into the mixture. Its role is crucial for caramelization during baking, which adds depth to the Classic Pumpkin Pie’s flavor. Choose organic sugar for a cleaner taste, and if you’re watching sugar intake, substitute with coconut sugar in equal amounts, though it may introduce a subtle nutty note.

Cinnamon brings warm, woody notes that define the spice profile of Classic Pumpkin Pie, complementing the pumpkin’s earthiness for an aromatic experience. It enhances the ultra-creamy filling by adding complexity without overpowering other flavors. Always use freshly ground cinnamon for potency; if unavailable, substitute with a cinnamon stick ground at home, but adjust to taste to maintain the pie’s balanced spice level.

Nutmeg adds a nutty, slightly sweet warmth that elevates the pie’s autumnal aroma, working synergistically with other spices for that iconic Classic Pumpkin Pie taste. Its role in the filling is to provide subtle depth, making the texture feel even more luxurious. Freshly grated nutmeg is ideal for maximum flavor; if substituting, use pre-ground but in smaller amounts to avoid bitterness.

Ginger powder introduces a zesty, peppery kick that brightens the ultra-creamy filling, preventing it from becoming too one-dimensional. It pairs perfectly with cinnamon and nutmeg for a well-rounded spice blend in Classic Pumpkin Pie. Opt for organic ginger for purity; fresh grated ginger can substitute, but use half the amount and incorporate it early in mixing to infuse the flavors fully.

Evaporated milk contributes to the pie’s ultra-creamy texture by adding richness and helping the filling set without curdling. It’s essential for creating a smooth, custard-like consistency in Classic Pumpkin Pie. Choose full-fat versions for the best results; if dairy-free, substitute with coconut milk for a similar creaminess, though it will add a tropical twist.

Eggs act as a binding agent, giving structure to the filling while contributing to its ultra-creamy mouthfeel in Classic Pumpkin Pie. They help the mixture hold together during baking, resulting in a perfect slice. Always use large, room-temperature eggs for even incorporation; for egg-free options, try a flaxseed mixture, but note it may slightly alter the texture.

Pie crust, whether store-bought or homemade, provides the flaky base that complements the creamy filling of Classic Pumpkin Pie. It encases the flavors, adding a buttery contrast. Homemade crust allows for customization; if short on time, use a high-quality pre-made one, ensuring it’s blind-baked for the best results.

Step-by-Step Instructions

Step 1: Preheat the Oven

Start by preheating your oven to 425°F (220°C) to ensure even baking. This high initial temperature helps set the crust and begin the caramelization process for the ultra-creamy filling.

Pro Tip: Use an oven thermometer to verify the temperature accuracy, as a few degrees off can affect the pie’s texture.

Step 2: Mixing the Filling

In a large mixing bowl, whisk together the fresh pumpkin puree, granulated sugar, cinnamon, nutmeg, ginger powder, evaporated milk, and eggs until the mixture is completely smooth and free of lumps. This step ensures the spices are evenly distributed for a flavorful Classic Pumpkin Pie.

Common Mistake to Avoid: Over-whisking can incorporate too much air, leading to cracks in the baked pie; stop as soon as it’s smooth to maintain that ultra-creamy consistency.

Step 3: Preparing the Crust

Roll out your pie crust on a lightly floured surface to about 1/8-inch thickness, then carefully transfer it to a 9-inch pie dish, pressing it gently into the edges without stretching.

Pro Tip: Chill the dough for 10 minutes before rolling to keep it from tearing, ensuring a flaky crust for your Classic Pumpkin Pie.

Step 4: Assembling the Pie

Pour the prepared pumpkin filling into the pie crust, leaving about 1/4-inch space from the top to account for bubbling during baking.

Common Mistake to Avoid: Overfilling the crust can cause spills and uneven baking; measure carefully to achieve the perfect rise in your ultra-creamy Classic Pumpkin Pie.

Step 5: Baking the Pie

Bake the pie at 425°F (220°C) for 15 minutes, then reduce the heat to 350°F (175°C) and continue baking for 40-50 minutes, or until the center is set but still slightly jiggly.

Pro Tip: Place the pie on a baking sheet to catch any drips, promoting even heat distribution for the best texture in this Classic Pumpkin Pie recipe.

Step 6: Cooling the Pie

Remove the pie from the oven and let it cool on a wire rack for at least 2 hours at room temperature to allow the filling to fully set.

Common Mistake to Avoid: Cutting the pie too soon can make it watery; patience ensures clean slices and preserves the ultra-creamy quality.

Serving & Presentation

For an impressive presentation of your Classic Pumpkin Pie, slice it neatly and arrange on a rustic platter with a dollop of freshly whipped cream or a scoop of vanilla ice cream for added indulgence. Garnish with a sprinkle of cinnamon or edible fall leaves made from fondant to enhance the autumnal theme. Complementary sides include a warm cup of coffee or spiced chai, which pairs beautifully with the pie’s spices, making it ideal for Thanksgiving desserts or casual gatherings.

Make-Ahead & Storage Solutions

Make-Ahead Strategy: Prepare the filling up to 3 days in advance by whisking all ingredients together and storing it in an airtight container in the refrigerator. Assemble the pie just before baking to keep the crust fresh; this allows you to focus on other holiday tasks.

Storing Leftovers: Cover the cooled Classic Pumpkin Pie tightly with plastic wrap or store in an airtight container in the refrigerator for up to 4 days. For longer storage, freeze individual slices on a baking sheet, then transfer to a freezer-safe bag for up to 3 months to maintain the ultra-creamy texture.

The Best Way to Reheat: Thaw frozen slices overnight in the refrigerator, then warm in a 300°F oven for 10-15 minutes to restore the original flaky crust and creamy filling without drying it out.

Finished recipe photo

Frequently Asked Questions (FAQ)

How do you make the best chocolate chip cookies from scratch?

While this guide focuses on Classic Pumpkin Pie, the principle of using quality ingredients applies. For chocolate chip cookies, cream butter and sugar thoroughly, add eggs and vanilla, then fold in flour and chips. Bake at 375°F for 10-12 minutes. However, for your pumpkin pie success, ensure even mixing as in this recipe to achieve that ultra-creamy result.

Can you substitute butter with oil in chocolate chip cookies?

Yes, you can substitute butter with oil in chocolate chip cookies for a softer texture, using a 1:1 ratio, but it may affect flavor. Oil lacks butter’s richness, so results won’t be identical. In Classic Pumpkin Pie, stick to the recipe’s ingredients for the best ultra-creamy filling, as substitutions can alter consistency.

How long do you bake chocolate chip cookies for perfect results?

Bake chocolate chip cookies for 10-12 minutes at 375°F until edges are golden but centers are soft. Overbaking leads to hardness. For Classic Pumpkin Pie, precise baking times as outlined ensure a perfect set, highlighting the importance of monitoring your oven like in this recipe.

What are some creative ways to serve chocolate chip cookies?

Serve chocolate chip cookies crumbled over ice cream, in milkshakes, or as a pie crust alternative. Pair with coffee for a treat. For Classic Pumpkin Pie, try serving with a chocolate drizzle for a fun twist, enhancing its creamy profile and making it a versatile dessert option.

Can I use canned pumpkin instead of fresh in Classic Pumpkin Pie?

Yes, you can use canned pumpkin puree as a convenient substitute for fresh in this Classic Pumpkin Pie recipe. Ensure it’s 100% pure pumpkin and not pie filling, then follow the instructions as is to maintain the ultra-creamy texture.

How can I make this Classic Pumpkin Pie gluten-free?

To make this Classic Pumpkin Pie gluten-free, use a gluten-free pie crust made from almond flour or a store-bought alternative. The rest of the recipe remains the same, keeping the ultra-creamy filling intact while accommodating dietary needs.

Print
clock clock iconcutlery cutlery iconflag flag iconfolder folder iconinstagram instagram iconpinterest pinterest iconfacebook facebook iconprint print iconsquares squares iconheart heart iconheart solid heart solid icon

Classic Pumpkin Pie


  • Author: Chef mia

Description

Classic Pumpkin Pie is a quintessential fall dessert featuring a creamy pumpkin filling, aromatic spices, and a flaky crust. Perfect for Thanksgiving or cozy autumn gatherings.


Ingredients

  • Fresh pumpkin puree
  • Granulated sugar
  • Cinnamon
  • Nutmeg
  • Ginger powder
  • Evaporated milk
  • Eggs
  • Pie crust (store-bought or homemade)

Instructions

  1. Preheat your oven to 425°F (220°C).
  2. In a mixing bowl, whisk together fresh pumpkin puree, sugar, cinnamon, nutmeg, ginger powder, evaporated milk, and eggs until smooth.
  3. Roll out your pie crust and place it in a pie dish.
  4. Pour the pumpkin filling into the crust, leaving some space for bubbling.
  5. Bake for 15 minutes at 425°F (220°C), then reduce the heat to 350°F (175°C) and bake for an additional 40-50 minutes until set.
  6. Allow the pie to cool before slicing. Serve with whipped cream or ice cream if desired.

Nutrition

  • Calories: 320
  • Sugar: 20g
  • Fat: 14g
  • Carbohydrates: 45g
  • Protein: 4g

Conclusion

In conclusion, this butternut squash recipe delivers a perfect balance of sweet, earthy flavors with a touch of herbs, making it an ideal side dish for fall gatherings or weeknight dinners. Its simplicity allows for easy preparation while highlighting the vegetable’s natural richness. For a pasta-inspired twist, try our Roasted Butternut Squash and Sage Pasta, or explore Irresistible Maple Glazed Butternut Squash for a sweeter variation that pairs wonderfully with meats or salads.