Delicious White Chocolate Cranberry Cookies Recipe for Any Occasion

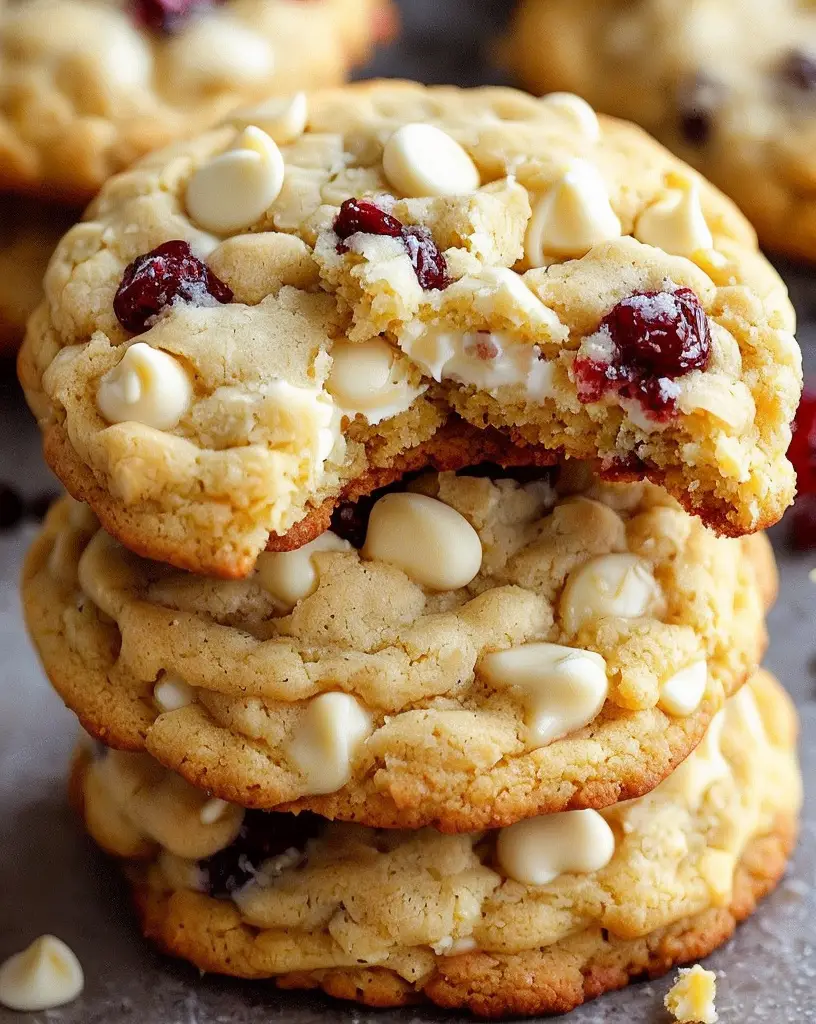
White Chocolate Cranberry Cookies: A Delightful Treat for Every Occasion

⚖️
Difficulty
Easy

⏲️
Prep Time
15 mins

🕒
Cook Time
10 mins

⏱️
Total Time
25 mins

🍽️
Servings
24 cookies

Indulge in the luxurious combination of creamy white chocolate and tart cranberries with these delightful White Chocolate Cranberry Cookies. This recipe brings together the sweetness of white chocolate and the chewy texture of dried cranberries, creating an irresistible treat that’s perfect for any occasion. Whether you’re celebrating a holiday, hosting a gathering, or simply satisfying your sweet tooth, these cookies are a crowd-pleaser that everyone will love.

The warm, inviting aroma of these cookies baking in your oven fills the kitchen with a sense of warmth and nostalgia. Each bite offers a delicious balance of flavors—sweet, tangy, and rich. The soft, buttery texture of the cookies pairs beautifully with the chewy cranberries, making them an enjoyable treat for both kids and adults alike. Bake a batch today and experience the delight they bring!

Quick Recipe Highlights

  • Flavor Profile: The cookies feature a delightful mix of sweet white chocolate and tart cranberries, complemented by a hint of vanilla.
  • Texture: Each cookie strikes a perfect balance between soft and chewy, with the white chocolate adding a smooth creaminess.
  • Aroma: The smell of melted white chocolate combined with baking cookies creates an irresistible scent that fills the air.
  • Visual Appeal: The contrast of bright red cranberries against the pale white chocolate results in a visually stunning cookie.
  • Skill Level Needed: This recipe is perfect for bakers of all levels, making it suitable for beginners and seasoned pros alike.
  • Special Equipment: All you need is a mixing bowl, baking sheet, and parchment paper to get started.

Recipe Overview

  • Difficulty Level: This White Chocolate Cranberry Cookies recipe is categorized as easy, making it accessible for anyone who wants to create delicious treats in no time.
  • Category: Perfect as a dessert or snack, these cookies make a sweet addition to your afternoon tea or holiday party spread.
  • Cuisine: This recipe blends traditional American baking with a modern twist through the introduction of white chocolate and dried fruit.
  • Cost: The ingredients are affordable, generally costing under $10 for a batch that yields 24 cookies, making it a budget-friendly choice.
  • Season: These cookies are delightful year-round, though especially popular during the fall and winter months for their festive colors and flavors.
  • Occasion: Ideal for holiday parties, cookie exchanges, or even as a thoughtful homemade gift for friends and family.

Why You’ll Love This Recipe

The allure of White Chocolate Cranberry Cookies lies not just in their flavor but also in their texture. Each bite delivers a heavenly combination of chewy cranberries and creamy white chocolate, creating a satisfying taste experience. The sweetness of the cookies is perfectly balanced by the tartness of the cranberries, making this treat a delightful indulgence. Whether enjoyed with a glass of milk or served at a celebratory occasion, these cookies are sure to impress.

Convenience and preparation benefits make this recipe a winner. With just a handful of easy-to-follow steps, you can whip up a batch in under 30 minutes. Perfect for last-minute gatherings or a quick family dessert, the uncomplicated process makes baking accessible for everyone, even those who may not have much experience in the kitchen.

Not only delicious, but these cookies also offer nutritional advantages. Dried cranberries are known for their antioxidant properties, contributing a bit of health benefits to your sweet treat. While best enjoyed in moderation, they do offer a slight nutritional boost, making it easier to justify indulging.

Social and entertaining value is another great reason to love these cookies. They are perfect for sharing at parties, family gatherings, or even around the holiday table. Their vibrant appearance and delectable taste inspire conversation and compliments, making them a favorite among guests.

Cost-effectiveness and accessibility further enhance the appeal of this recipe. With simple ingredients that you can find at any grocery store, baking these cookies won’t break the bank. You can share them generously, ensuring no one leaves the table without enjoying a sweet bite.

Historical Background and Cultural Significance

White chocolate cranberries represent a modern twist on traditional cookie recipes that have been enjoyed for generations. The origins of cookies can be traced back to the 7th century in Persia, where sugar was used in baked goods. As culinary techniques evolved, different cultures began incorporating their local ingredients, resulting in the vast array of cookies we enjoy today.

Culturally, cookies symbolize comfort and joy. They often hold special memories—from baking with a loved one to sharing them during family gatherings. In many households, making cookies together is a cherished family tradition that brings generations together.

Over the years, the recipe for cookies has adapted to include various flavors and textures, reflecting regional tastes and preferences. The introduction of additives like white chocolate and fruit showcases a successful evolution that maintains the cookie’s beloved essence while allowing for creative expression.

In terms of regional variations, while cranberry adds a unique flair to American baking, differents cultures utilize local ingredients for their own versions of cookies. From Italian biscotti to French madeleines, cookies around the world are transforming traditional baking into delightful experiences.

Ingredient Deep Dive

Dried Cranberries
Dried cranberries carry a rich history as a staple in North American diets, particularly among Indigenous peoples who utilized them for their nutritional benefits. Loaded with antioxidants, they have been noted for their potential to support heart health and urinary tract function. When selecting dried cranberries, look for those that are unsweetened or minimally processed to retain their natural benefits. Store them in a cool, dry place, ideally in a sealed container to ensure freshness. If you find yourself out of cranberries, raisins or cherries can be substituted without losing the cookie’s appeal.

White Chocolate
White chocolate is made from cocoa butter, sugar, and milk solids, providing a creamy base that contrasts beautifully with tart cranberries. Though some debate its classification as “chocolate,” it has become a beloved baking ingredient. Nutritionally, white chocolate contains less caffeine than dark chocolate but still offers a rich source of energy and sweetness, perfect for baked goods. When choosing white chocolate, look for high-quality brands with a higher cocoa butter content for the best flavor. Store it in a cool place and avoid exposure to moisture. If you prefer to experiment, dark chocolate or even butterscotch chips can serve as alternative options in the recipe.

Common Mistakes to Avoid

  • Not measuring ingredients properly: Precision is key in baking, and inaccurate measurements can lead to cookies that don’t turn out right. Always use the correct measuring tools.
  • Baking at the wrong temperature: Make sure your oven is preheated to the correct temperature before baking. An oven thermometer can help verify its accuracy.
  • Overmixing the dough: Overmixing can lead to tough cookies. Mix just until the ingredients are combined to maintain a tender texture.
  • Underbaking the cookies: While cookies may appear soft when you take them out, they will continue to cook on the baking sheet. Follow the recommended baking time closely.
  • Ignoring the cooling time: Allow cookies to cool properly on a wire rack to reach their optimal texture and flavor.
  • Using stale ingredients: Always check the expiration dates on ingredients, especially baking powder and soda, to ensure they are fresh.
  • Not chilling the dough if required: If the recipe suggests chilling the dough, it’s important to follow this step to prevent the cookies from spreading too much while baking.
  • Not lining the baking sheet: Using parchment paper or silicone mats keeps cookies from sticking and allows for easier cleanup.
  • Substituting ingredients without knowing the impact: Not all ingredients are interchangeable. Research before substituting to ensure the taste and texture aren’t compromised.
  • Neglecting to rotate the baking sheets: For even baking, consider rotating the baking sheet halfway through the baking time, especially if your oven has hot spots.

Essential Techniques

Measuring Ingredients
Accurate measuring is crucial for successful baking. Always use the right tools—dry measuring cups for solids and liquid measuring cups for liquids. Spoon ingredients into measuring cups without packing them down to avoid over-measuring. Learning to scale your recipes accurately ensures consistent results, allowing for adoration of your cookie-making prowess.

Mixing Techniques
Understanding when and how to mix your ingredients makes a significant difference in texture. For your cookie dough, cream the butter and sugar until light and fluffy before adding eggs and dry ingredients. This technique incorporates air into the mixture, giving your cookies a tender crumb. Keep an eye on the mixture’s appearance for desired consistency without overmixing.

Pro Tips for Perfect White Chocolate Cranberry Cookies

1. Use room-temperature butter for easy creaming with sugar, which results in better consistency.
2. For a more complex flavor, consider adding a teaspoon of vanilla extract or almond extract to the dough.
3. If you enjoy a touch of spice, try incorporating a pinch of cinnamon to enhance the overall flavor profile of your cookies.
4. When cooling cookies, transfer them to a wire rack to prevent sogginess on the baking sheet.
5. Experiment with chilling the cookie dough for 30 minutes to an hour before baking, which can enhance the flavor and texture.
6. Incorporate chopped nuts, like pecans or walnuts, for added crunch and a richer flavor.
7. If you prefer a sweeter cookie, roll the balls of dough in sugar before baking for a delightful sugary crust.
8. Keep a close eye on baking times, as ovens can vary; start checking for doneness a few minutes earlier than the suggested time.

Variations and Adaptations

For a seasonal twist, try adding spiced pumpkin to the dough for a fall-inspired version of these cookies. During the summer months, swap cranberries for dried cherries or blueberries to give the cookies a burst of fruity freshness. Gluten-free flour can substitute traditional all-purpose flour for those needing wheat alternatives, ensuring everyone can enjoy this delightful treat.

Dairy-free options are becoming increasingly popular; opt for coconut oil instead of butter and dairy-free chocolate chips for a deliciously inclusive treat. If you’d like more added texture, consider experimenting with oats to create a chewy oatmeal cookie version.

Presentation alternatives can also elevate the experience—consider drizzling melted white chocolate over finished cookies or garnishing with additional dried cranberries to enhance their aesthetic appeal.

Serving and Presentation Guide

When serving your White Chocolate Cranberry Cookies, presentation plays a key role. Arrange cookies on a decorative platter, and consider adding fresh cranberries or greens as garnishes for a festive touch. You can also serve cookies with a side of whipped cream or ice cream for an indulgent dessert that satisfies cravings.

To enhance the experience, warm the cookies slightly before serving—they’ll be at their best with a gooey center. Pay attention to portion control by serving 2-3 cookies per person to keep your treat enjoyable without overindulgence.

Wine and Beverage Pairing

Pairing these delightful cookies with beverages can enhance the overall experience. A glass of late harvest Riesling complements the sweet and tart flavors beautifully, providing a refreshing balance. For those preferring something non-alcoholic, a sparkling apple cider or a cup of chai tea rounds out the flavor profile nicely.

Should you enjoy coffee, a light roast with hints of caramel complements the cookies’ sweetness. For a comforting pairing, consider a warm cup of cocoa or latte to enjoy with your fresh-baked cookies during the colder months.

Storage and Shelf Life

For optimal freshness, store your White Chocolate Cranberry Cookies in an airtight container at room temperature. They will stay delicious for up to one week. If you need to store them longer, consider freezing them. Wrap each cookie in plastic wrap and place them in a freezer-safe container or bag, where they can last up to three months.

Be mindful of signs of spoilage; if your cookies appear dry or hard, they may need to be discarded. To reheat frozen cookies, simply pop them in the oven at 350°F (175°C) for about 5-7 minutes until warmed through or enjoy them straight from the freezer for a delightful chilled treat.

Make Ahead Strategies

Planning to make these cookies ahead of time? Prepare the dough in advance, cover it well, and refrigerate for up to three days. When ready to bake, simply remove the dough from the fridge, shape the cookies, and bake as directed. This preparation strategy not only saves time but also enhances the flavor as the dough rests.

If you prefer to bake ahead, underbake the cookies slightly, allowing them to stay soft. Once cooled, store them in an airtight container, and they will taste as fresh as the day you baked them. To maintain the taste and quality, consider adding a slice of bread to the container, which helps retain moisture.

Scaling Instructions

Scaling your White Chocolate Cranberry Cookies recipe is simplified with a little math. For half the recipe, simply reduce each ingredient by 50%. For doubling or tripling the recipe, retain the same ratios to maintain the final flavor and texture.

Be aware of your baking equipment when scaling; using multiple baking sheets may be necessary if a larger batch is made. Adjust baking times by checking the cookies earlier to prevent overbaking, especially since larger batches often require more attention to ensure even cooking.

Nutritional Deep Dive

Analyzing the macros of a typical White Chocolate Cranberry cookie, you can expect approximately 120 calories per cookie. The primary contributors are carbohydrates from the sugar and flour, fats from the butter and white chocolate, and minimal proteins.

Micronutrient-wise, cranberries stand out with Vitamin C and fiber, while the white chocolate offers a small dose of calcium. While these cookies can be sweet, consuming them in moderation makes it easier to enjoy without compromising dietary goals. Including them as a part of a balanced diet is key to maintaining wellness and satisfaction.

Dietary Adaptations

For those following a gluten-free diet, opt for gluten-free all-purpose flour in place of regular flour. This simple substitution allows anyone to indulge without worry. For dairy-free versions, substitute butter with coconut oil and ensure the white chocolate is dairy-free.

If you want to cater to vegan diets, use a vegan butter alternative and replace the white chocolate with equivalent vegan options. Low-carb and keto-friendly adaptations could involve using almond flour and sugar alternatives to reduce carbohydrate content significantly.

For those on a strict Paleo or other specialized diets, research and source ingredients that fall within your dietary restrictions, ensuring an inclusive experience for everyone involved in your cookie enjoyment.

Troubleshooting Guide

If your cookies turn out harder than you expected, it may be due to overbaking. Next time, reduce the baking time and monitor closely for a perfect texture. Should you find the dough too sticky, chilling it for 30 minutes helps in easily forming cookie shapes.

Lack of flavor can be resolved by checking the freshness of your baking ingredients, particularly the baking powder or soda. Adjust quantities of flavorings such as vanilla to increase richness. For spread-out cookies, try chilling your dough before baking to retain shape.

If you’re facing any ingredient substitutions, research the best alternatives that maintain consistency in texture and taste, such as using applesauce for fats or coconut sugar for sweetness. Problem-solving will ensure fantastic results.

Recipe Success Stories

Community feedback often highlights how these cookies became a hit during cookie swaps and family gatherings. Many fans advocate for the seasonal variations, particularly how the addition of cinnamon makes them festive. Adaptation success stories abound, especially for those experimenting with gluten-free substitutes resulting in their friends requesting the recipe.

Readers share photography tips emphasizing the importance of good lighting and presentation techniques, showcasing their unique spins on the recipe. With each success story comes an opportunity for others to adapt and create their own cookie masterpieces!

Frequently Asked Questions

Can I use fresh cranberries instead of dried?
No, fresh cranberries are too tart and have high moisture content that could affect the texture. Dried cranberries are perfect for this cookie to provide the right flavor balance.

How do I store leftover cookies?
Store cookies in an airtight container at room temperature for up to a week. For longer storage, wrap them individually and freeze them.

Can I add nuts to the recipe?
Yes! Chopped pecans or walnuts work beautifully with the white chocolate and cranberries. Just keep the total dry ingredients in balance.

What can I substitute if I don’t have white chocolate?
You can replace the white chocolate with dark chocolate or butterscotch chips for a different flavor profile.

How do I know when the cookies are done?
Cookies should be lightly golden at the edges. Remember, they will continue to cook once removed from the oven, so avoid overbaking.

Can I make the dough in advance?
Yes, the dough can be made ahead of time and refrigerated for up to three days before baking.

What’s the best way to freeze these cookies?
Allow cookies to cool completely, then wrap each individually in plastic wrap and place in a freezer bag. They can last up to three months.

How can I make these cookies vegan?
Use plant-based butter and substitute the white chocolate with vegan chocolate chips to create a delicious vegan version.

Can I use oatmeal in this recipe?
Yes, adding rolled oats for an oatmeal twist can create a hearty texture while maintaining the cookie’s delightful flavor.

How many cookies does this yield?
This recipe yields approximately 24 cookies, depending on the size of the dough balls you form.

Additional Resources

For those interested in further expanding their baking repertoire, check out related recipes like Oatmeal Raisin Cookies, Chocolate Chip Cookie Bars, and Pumpkin Snickerdoodles. Understanding foundational techniques like creaming butter and sugar or mastering dough consistency can aid in producing excellent baked goods across the board.

Insight into ingredient information, particularly regarding varieties of chocolate, offers foundation knowledge that elevates your baking skills. Invest in quality equipment that enhances your baking experience, such as silicone baking mats and high-quality mixing bowls to streamline the process.

Seasonal variations can inspire new baking adventures; try incorporating gingerbread spices for winter treats or fresh citrus zest in summer delights to keep your cookies exceptional throughout the year.

Join the Conversation

We encourage you to share your baking experiences and variations of this White Chocolate Cranberry Cookies recipe with us! Post your photos on social media using our specific hashtags, ensuring to engage with our community. Share your personal touches or adaptations, inspiring others to try new twists on this beloved treat.

Your feedback and suggestions could help others achieve their cookie-making dreams. Don’t shy away from sharing your successes—or even failures. Each experience contributes to our collective culinary journey, enhancing our love for baking together!

The Recipe

White Chocolate Cranberry Cookies

Serves: 24 cookies

Prep Time: 15 mins

Cook Time: 10 mins

Total Time: 25 mins

Kitchen Equipment Needed

  • Mixing bowl
  • Baking sheet
  • Parchment paper
  • Whisk
  • Rubber spatula
  • Measuring cups and spoons

Ingredients

  • 1 cup unsalted butter, softened
  • 1 cup granulated sugar
  • 1 cup brown sugar, packed
  • 2 large eggs
  • 2 teaspoons vanilla extract
  • 2 ¾ cups all-purpose flour
  • ¾ teaspoon baking soda
  • ½ teaspoon salt
  • 2 cups dried cranberries
  • 1 cup white chocolate chips

Directions

  1. Preheat your oven to 350°F (175°C) and line a baking sheet with parchment paper.
  2. In a mixing bowl, cream together the softened butter, granulated sugar, and brown sugar until light and fluffy.
  3. Add in the eggs one at a time, mixing well after each addition. Incorporate the vanilla extract.
  4. In a separate bowl, whisk together the flour, baking soda, and salt.
  5. Gradually add the dry ingredients to the wet ingredients, mixing until just combined.
  6. Fold in the dried cranberries and white chocolate chips until evenly distributed throughout the dough.
  7. Drop tablespoon-sized balls of dough onto the prepared baking sheet, spacing them about 2 inches apart.
  8. Bake for 10-12 minutes, or until the edges are lightly golden.
  9. Remove from the oven and let cool on the baking sheet for a few minutes before transferring to a wire rack to cool completely.

Recipe Notes

  • For a deeper flavor, consider chilling the dough for an hour before baking.
  • Feel free to add cinnamon or nuts for extra flavor and texture.
  • Store cooled cookies in an airtight container for optimal freshness.

Deliciously Fluffy Pumpkin Cream Cheese Swirl Muffins Recipe

Fluffy Pumpkin Cream Cheese Swirl Muffins: A Delicious Fall Treat

⚖️
Difficulty
Easy

⏲️
Prep Time
15 mins

🕒
Cook Time
20 mins

⏱️
Total Time
35 mins

🍽️
Servings
12 muffins

Get ready to embrace the true essence of fall with these Fluffy Pumpkin Cream Cheese Swirl Muffins! Bursting with the rich flavors of pumpkin spice and the creamy tang of cream cheese, these muffins are a delightful treat that perfectly resonates with the cozy vibes of autumn. Picture this: a warm muffin fresh from the oven, its aromatic scent enveloping your kitchen, promising a tender, moist interior complemented by a luscious cream cheese swirl. It’s not just a muffin; it’s an experience that captures the heart of the season!

These muffins are not only delicious but incredibly easy to make. They’re perfect for breakfast, a snack, or even dessert! You can enjoy them while sipping on your morning coffee or as an afternoon pick-me-up. With their beautiful golden hue and enticing swirl, these muffins make for a delightful centerpiece at your fall gatherings. You’ll find them so irresistible that they will have you reaching for seconds—each bite is an explosion of flavor that beckons you back to the table!

Quick Recipe Highlights

  • Flavor Profile: A harmonious blend of pumpkin, cinnamon, and cream cheese, creating a rich, comforting flavor.
  • Texture: Light and fluffy with a delightful creamy swirl, offering a perfect balance of softness and bite.
  • Aroma: Fills your kitchen with the warm scent of pumpkin spice, invoking the essence of fall.
  • Visual Appeal: Beautifully golden muffins adorned with a swirled cream cheese topping, making them as pleasing to the eye as they are to the palate.
  • Skill Level Needed: Suitable for all skill levels, these muffins can be whipped up quickly by both novice and experienced bakers.
  • Special Equipment: A muffin tin and an electric mixer are handy but optional for mixing by hand.

Recipe Overview

  • Difficulty Level: These muffins are easy to prepare, making them an ideal baking project for beginners.
  • Category: Perfect for breakfast or as a snack, these muffins fit seamlessly into any meal plan.
  • Cuisine: This recipe embraces traditional American flavors associated with fall, spotlighting pumpkin as a seasonal staple.
  • Cost: Ingredients are relatively inexpensive, typically costing less than $10 for a full batch.
  • Season: Best enjoyed in the fall, these muffins bring the warmth of autumn into your home.
  • Occasion: They make an excellent addition to brunches, holiday gatherings, or just a cozy family afternoon.

Why You’ll Love This Recipe

These Fluffy Pumpkin Cream Cheese Swirl Muffins are a delightful combination of flavors and textures that are sure to please any palate. The tender crumb infused with pumpkin pie spices creates a warm, comforting taste, while the cream cheese swirl adds a rich, luscious touch. Together, they make for an indulgent treat that feels like a hug in muffin form.

Convenience is key when it comes to baking these muffins. With minimal prep time and simple ingredients, you can have a batch fresh out of the oven in just 35 minutes. This recipe also allows room for creativity—feel free to experiment with variations like adding nuts or chocolate chips, ensuring that each batch is uniquely yours.

Nutritionally, pumpkin is a powerhouse ingredient filled with vitamins A and C, antioxidants, and dietary fiber. Using cream cheese in moderation lends a creamy texture without overwhelming your muffin with excess sugar. Plus, these muffins can easily be modified for various dietary needs, making them accessible to everyone.

Socially, these muffins are perfect for sharing! Whether you bring them to a potluck, serve them at a family gathering, or enjoy them while chatting with friends, they create a warm, inviting atmosphere. It’s hard not to smile when delicious, homemade pastries grace the table.

Lastly, their cost-effectiveness cannot be overlooked. Pumpkin is often affordable during the fall, and being able to make a dozen muffins for a minimal investment means having a treat that won’t break the bank.

Historical Background and Cultural Significance

Pumpkin has a rich history in American cuisine, with its origins tracing back to Native American tribes, who cherished this versatile gourd long before European settlers arrived. Pumpkins were a vital source of nutrition, providing sustenance through harsh winters.

As culinary traditions evolved, pumpkin became synonymous with autumn and harvest festivals. Recipes utilizing pumpkin in various forms began surfacing, notably in pies and bread, as home bakers explored its sweetness and adaptability. These Fluffy Pumpkin Cream Cheese Swirl Muffins continue this cherished tradition, showcasing the beloved squash.

Over time, the recipe for pumpkin muffins has evolved with countless adaptations, including the addition of spices and various fillings. Today, pumpkin-based baked goods are popular in the fall, symbolizing comfort and nostalgia, often associated with holiday celebrations and cozy gatherings.

Regional variations of pumpkin recipes highlight how communities celebrate their local flavors, incorporating spices or ingredients that reflect local farms and traditions. This muffin recipe pays homage to that rich tapestry of American food culture, merging flavors that make it suitable for all tables.

Ingredient Deep Dive

Pumpkin: Pumpkins are not just decorations in the fall; they offer a wealth of nutritional benefits, being high in vitamins, minerals, and fiber. When selecting pumpkins for baking, opt for sugar pumpkins or those labeled for cooking. Store in a cool, dark area, and once opened, keep refrigerated.

All-Purpose Flour: This pantry staple is essential for achieving the desired muffin texture. It provides structure while maintaining a light and fluffy consistency. To select the best flour, look for a finely milled option and store it in a cool, dry place. It can be substituted with whole wheat flour for a healthier option.

Cream Cheese: This ingredient gives the muffins their signature swirl and creamy texture. High-quality cream cheese enhances the overall flavor. Store unopen packages in the refrigerator, and once opened, use within a couple of weeks. For a lighter option, consider using neufchâtel cheese.

Cinnamon: A key spice in this recipe, cinnamon not only adds warmth but also boasts several health benefits, including anti-inflammatory properties. When purchasing, choose a fresh product, and store it in a cool, dry environment for maximum flavor.

Common Mistakes to Avoid

  • Overmixing the batter can result in tough muffins. Aim to mix just until combined.
  • Using canned pumpkin pie filling instead of pure pumpkin puree can alter the flavor profile significantly.
  • Not preheating your oven can lead to uneven baking. Always preheat to the desired temperature.
  • Baking for too long can dry out your muffins. Keep a close watch during the last few minutes.
  • Skipping the cream cheese swirl may lead to an incomplete flavor experience—don’t skip it!
  • Using expired baking powder or soda can affect rise; always check freshness before baking.
  • Storing muffins improperly can make them stale quickly; opt for airtight containers.
  • Ignoring the cooling time can lead to soggy tops; let them cool before storing.

Essential Techniques

Mixing: The key to fluffy muffins lies in proper mixing techniques. Use the muffin method—combine wet and dry ingredients separately, then mix just until incorporated. This prevents gluten overdevelopment, which can make muffins dense.

Swirling: When adding the cream cheese, use a knife or a skewer to create distinct swirls without fully incorporating it into the batter. This gives the muffins their signature look and buttery flavor.

Pro Tips for Perfect Fluffy Pumpkin Cream Cheese Swirl Muffins

1. Use room temperature ingredients for easier mixing and a better texture.
2. Lightly flour your cream cheese to prevent it from sinking in the batter.
3. For extra flavor, add in chocolate chips or nuts to the batter.
4. Experiment with different spices like nutmeg or ginger for a unique flavor twist.
5. Use a cookie scoop for evenly sized muffins, ensuring they bake evenly.
6. Don’t forget to test the muffins with a toothpick; they should come out clean when done.
7. Allow muffins to cool completely before glazing or storing to retain texture.
8. Serve them warm with a dollop of extra cream cheese frosting for an indulgent treat!

Variations and Adaptations

Regional variations often call for local spices or nuts to enhance the flavor profile. For example, adding pecans can give a delightful crunch reminiscent of Southern baking traditions.

Seasonal adaptations like incorporating apple or pear in the batter can freshen the flavors, bringing a new twist to the classic recipe, while still keeping that cozy fall feeling.

For those with dietary restrictions, substitutions like gluten-free flour can be used without sacrificing flavor or texture. Plant-based cream cheese allows everyone to enjoy these muffins, making them versatile for different diets.

Flavor variations can incorporate cocoa powder for chocolate pumpkin muffins or chai spices for a unique infusion. Adding a splash of vanilla or maple syrup can elevate the taste even further.

Texture modifications, like using oats instead of some flour, introduce a chewy element. Lastly, consider presentation alternatives like dusting muffins with powdered sugar or serving with a drizzle of caramel for a gourmet touch.

Serving and Presentation Guide

For plating your Fluffy Pumpkin Cream Cheese Swirl Muffins, consider using a decorative muffin stand or a vibrant platter to showcase their beautiful appearance. Garnishing with a sprinkle of cinnamon or a light glaze of icing adds a delightful touch.

Traditional accompaniments such as cream cheese frosting elevate these muffins to bakery status. For a modern twist, consider pairing with fresh seasonal fruits or a scoop of vanilla ice cream for dessert.

When serving, consider the temperature; these muffins are best served warm or at room temperature. For portion control, slice a muffin in half to expose its lovely swirl, making it perfect for sharing.

Wine and Beverage Pairing

Pairing suggestions for these aromatic muffins include a glass of sweet white wine, such as Riesling, which complements the pumpkin flavors without overpowering them.

For non-alcoholic options, consider a spiced apple cider served warm, enhancing the overall cozy experience.

If coffee is your preference, a freshly brewed cup of strong coffee or a spiced chai latte pairs beautifully, enhancing the muffins’ warm spices.

Temperature considerations are essential; ensure your beverages serve alongside warm muffins for the ultimate cozy treat.

Storage and Shelf Life

To maintain freshness, store your Fluffy Pumpkin Cream Cheese Swirl Muffins in an airtight container at room temperature for up to 3 days.

For extended shelf life, consider freezing muffins; they last for up to 3 months frozen. Use resealable bags, removing as much air as possible to prevent freezer burn.

When thawing, allow muffins to sit at room temperature or pop them in the microwave for a quick warm-up. Signs of spoilage include a change in smell or mold; always inspect before consuming.

Make Ahead Strategies

To make ahead, prepare the muffin batter a day in advance and refrigerate. Just remember to allow it to come to room temperature before baking.

You can also prepare swirls of cream cheese in advance, keeping them refrigerated until ready to use.

When planning for events, muffins can be baked, cooled, and stored. Then, add any garnishing just prior to serving for freshness.

If you want to add a fresh element before serving, consider placing fresh whipped cream or a dusting of powdered sugar right before plating.

Scaling Instructions

To halve the recipe, simply divide all the ingredient quantities by two and adjust baking times slightly, as smaller batches may bake quicker.

When doubling or tripling the recipe, make sure you have a larger mixing bowl and more muffin tins ready.

Equipment adjustments may include using multiple pans or batch-baking if you don’t have enough muffin tins.

Timing modifications will depend on the oven; check for doneness a couple of minutes earlier than the standard recipe calls for, as larger quantities can change baking dynamics.

Store extra muffins in an airtight container as instructed to keep them fresh.

Nutritional Deep Dive

In terms of macros, each muffin is surprisingly balanced, offering complex carbohydrates from the pumpkin and flour.

Micronutrient analysis indicates that pumpkins provide Vitamin A, essential for immune function, and iron, which supports healthy blood circulation.

Health benefits include high fiber content, supporting digestive health while also promoting a sense of fullness.

For those being mindful of dietary considerations, pumpkin is naturally low-calorie and nutrient-dense, ideal for those managing their weight.

Portion analysis recommends enjoying one muffin as a satisfying treat, ensuring it fits into a balanced diet.

Dietary Adaptations

These muffins can easily cater to various dietary needs. Using gluten-free flour allows gluten-sensitive individuals to enjoy them, maintaining similar texture and flavor.

For dairy-free options, substitute dairy milk for almond or oat milk and use vegan cream cheese. This ensures no one feels left out during fall festivities!

To cater to a vegan audience, use flaxseed meal as an egg substitute and soy yogurt in place of cream cheese for the swirl.

Low-carb and keto adaptations may involve substituting traditional flour with almond flour or coconut flour to reduce carbohydrate content while maintaining moisture and flavor.

Paleo enthusiasts can also find joy by using almond meal and replacing sweeteners with honey or maple syrup.

Troubleshooting Guide

For texture issues, like denser muffins, check that you’re not overmixing the batter; mixing just until combined is key.

Flavor balance can be adjusted by experimenting with spice levels; adding more cinnamon can enhance warmth, while a pinch of salt can elevate sweetness.

Temperature problems might arise if the oven isn’t calibrated; using an oven thermometer ensures accuracy.

If you encounter equipment challenges, like sticking muffins, ensure your muffin tins are appropriately greased or lined.

For ingredient substitutions, try applesauce instead of vegetable oil for moistness or buttermilk for tanginess without compromising flavor.

Timing concerns can be addressed by checking for doneness earlier, especially when scaling up or down, as oven times may vary based on edition or size differences.

Recipe Success Stories

Community feedback on these Fluffy Pumpkin Cream Cheese Swirl Muffins reflects how they’ve quickly become a favorite among bakers of all skill levels. Many readers rave about their light texture and warm flavors.

Variation successes highlight incorporating unique ingredients, with some sharing tips for successful adaptations, like adding chopped pecans or cranberries for an extra burst of flavor.

Readers offer suggestions ranging from lowering sugar content to experimenting with the cream cheese blend, prompting interesting discussions and exchanges in the comments section.

For photography tips, several bakers include beautiful images of their muffins, encouraging others to showcase their creations and making this recipe a true community favorite.

Frequently Asked Questions

1. Can I use fresh pumpkin instead of canned?
Yes! Fresh pumpkin can be cooked and pureed, but for convenience, canned puree is often recommended. Make sure it’s pure pumpkin, not pie filling.

2. How do I store leftover muffins?
Store them in an airtight container at room temperature for up to 3 days, or freeze for longer storage.

3. Can I make these muffins vegan?
Absolutely! Substitute the eggs with flaxseed meal and the cream cheese with a dairy-free alternative.

4. What can I do if my muffins come out too dense?
Overmixing can lead to dense muffins. Mix just until combined for the best texture.

5. Can I substitute the flour with a gluten-free alternative?
Yes! Use a gluten-free all-purpose flour blend, ensuring the texture remains light and fluffy.

6. How long should I cool the muffins before serving?
It’s best to cool them in the pan for 5-10 minutes, then transfer to a wire rack to cool completely for optimal texture.

7. Can I add other spices to the muffins?
Definitely! Feel free to add nutmeg, ginger, or allspice for a more complex flavor profile.

8. How do I know when the muffins are done baking?
Insert a toothpick in the center of a muffin; it should come out clean or with a few moist crumbs.

9. Is it necessary to use an electric mixer?
No, you can mix by hand. An electric mixer makes it easier, but the recipe can be done without one.

10. Can I use a different filling instead of cream cheese?
Yes! You can substitute with chocolate ganache or fruit preserves if you want to switch it up.

Additional Resources

For those interested in expanding their baking repertoire, explore related recipes like pecan pie muffins or apple cinnamon muffins—both perfect for autumn gatherings.

Technique guides on muffin-making detail the best practices for achieving airy, fluffy results.

Ingredient information can enhance your knowledge about pumpkin’s versatility across cuisines and dishes, making you a well-versed home cook.

Equipment recommendations can help ensure you have the right tools, from high-quality muffin tins to mixing bowls that make the process smoother.

Finally, seasonal variations often inspire new collaborations among bakers eager to incorporate the freshest local ingredients.

Join the Conversation

We invite you to share your thoughts and experiences with Fluffy Pumpkin Cream Cheese Swirl Muffins! Comment below with your variations or photos to inspire others.

Connect with us on social media to share your creations, and don’t forget to use the hashtag #PumpkinCreamCheeseMuffins for a chance to feature in our community spotlight!

Your feedback helps us refine our recipes and create an engaging foodie community. Together, let’s celebrate flavors, share tips, and keep the love for baking alive!

The Recipe

Fluffy Pumpkin Cream Cheese Swirl Muffins

Serves: 12 muffins

Prep Time: 15 mins

Cook Time: 20 mins

Total Time: 35 mins

Kitchen Equipment Needed

  • Muffin tin
  • Mixing bowls
  • Electric mixer or whisk
  • Rubber spatula
  • Measuring cups and spoons

Ingredients

  • 1 cup pumpkin puree
  • 1/2 cup vegetable oil
  • 1 cup sugar
  • 2 large eggs
  • 1 teaspoon vanilla extract
  • 1 and 1/2 cups all-purpose flour
  • 1 teaspoon baking powder
  • 1/2 teaspoon baking soda
  • 1 teaspoon cinnamon
  • 1/2 teaspoon salt
  • 8 oz cream cheese, softened
  • 1/4 cup powdered sugar

Directions

  1. Preheat your oven to 350°F (175°C) and grease a muffin tin or line with muffin liners.
  2. In a large bowl, combine pumpkin puree, vegetable oil, sugar, eggs, and vanilla extract. Mix well.
  3. In another bowl, whisk together flour, baking powder, baking soda, cinnamon, and salt.
  4. Gradually add the dry ingredients to the wet mixture, stirring until just combined.
  5. In a small bowl, mix softened cream cheese and powdered sugar until smooth.
  6. Fill each muffin cup halfway with batter, add a teaspoon of cream cheese mixture on top, and cover with more batter.
  7. Using a toothpick or knife, swirl the cream cheese mixture into the batter lightly.
  8. Bake in the preheated oven for 20-25 minutes or until a toothpick inserted in the center comes out clean.
  9. Allow muffins to cool in the tin for 5 minutes before transferring to a wire rack to cool completely.

Recipe Notes

  • Feel free to substitute with gluten-free flour if needed.
  • Add chocolate chips or nuts for extra flavor.
  • Muffins can be frozen for up to 3 months—thaw before serving.
  • Enhance the cream cheese mixture with a splash of vanilla for added flavor.

Delicious Chocolate-Covered Ice Cream Bars for a Sweet Treat

Delicious Chocolate-Covered Ice Cream Bars: The Ultimate Treat for Any Occasion

⚖️
Difficulty
Easy

⏲️
Prep Time
30 mins

🕒
Cook Time
0 mins

⏱️
Total Time
30 mins

🍽️
Servings
6 bars

Indulging in a creamy Chocolate-Covered Ice Cream Bar is a delightful experience that evokes a sense of nostalgia and joy. Picture biting into a smooth, chilled treat, where the rich, velvety chocolate coating gives way to a luscious ice cream center. This classic dessert is perfect for hot summer days or as a sweet treat any time of the year. Whether you’re celebrating a special occasion or simply craving a refreshing snack, these ice cream bars can bring smiles to faces young and old.

The combination of creamy ice cream and a crunchy chocolate shell creates a harmonious balance of textures and flavors that tantalizes your taste buds. The sweetness of the chocolate complements the coolness of the ice cream perfectly, while a hint of vanilla or any flavor you choose elevates this treat into a delicious experience. You can customize the flavors to suit your preferences or to impress your guests with something truly special.

Quick Recipe Highlights

  • Flavor Profile: Rich dark chocolate pairs beautifully with creamy vanilla ice cream.
  • Texture: The bars feature a crunchy chocolate shell and a soft, creamy ice cream interior.
  • Aroma: The enticing aroma of melting chocolate hints at the delightful flavors within.
  • Visual Appeal: The glossy finish of the chocolate coating makes these bars a feast for the eyes.
  • Skill Level Needed: Even beginner cooks can master this easy and fun recipe!
  • Special Equipment: A cookie sheet, parchment paper, and a heatproof bowl for melting chocolate are all you need.

Recipe Overview

  • Difficulty Level: This Chocolate-Covered Ice Cream Bars recipe is easy to follow, requiring no baking skills, making it suitable for home chefs of any level.
  • Category: These bars fall under the dessert category, specifically a frozen dessert offering satisfaction and sweetness.
  • Cuisine: Ice cream bars are popular in various cuisines worldwide, often representing summer and festive occasions.
  • Cost: Making these delicious bars at home is cost-effective, generally costing much less than store-bought varieties.
  • Season: Enjoy these Ice Cream Bars any time of the year, but they are especially refreshing during the warm summer months.
  • Occasion: Perfect for birthdays, barbecues, or simply as a treat to cool off after a long day.

Why You’ll Love This Recipe

The appeal of Chocolate-Covered Ice Cream Bars is undeniable. The delightful taste of rich chocolate combined with cold, creamy ice cream creates a perfect balance, providing a satisfying treat. Each bite offers a refreshing experience, making them an excellent choice for summer indulgence. You can experiment with different flavors of ice cream – from classic vanilla to exotic mango, every variation delights with its unique taste.

The convenience of making Chocolate-Covered Ice Cream Bars at home also adds to their charm. With easy preparation and straightforward steps, you can whip up a batch in under thirty minutes, which means spontaneous treats are always an option. Not only do they allow for customization, but they also encourage quality family time in the kitchen, making them a great addition to family gatherings.

Nutritionally, while indulgent, these bars can be made with healthier ingredients, including dairy-free or low-sugar alternatives. This flexibility gives you the power to treat yourself healthily. You can also introduce homemade variations that can sneak in nutritious elements, creating a sweet experience without a hefty guilt factor.

Socially, Chocolate-Covered Ice Cream Bars are a hit at gatherings and parties. Everyone loves homemade treats, and these bars tend to stir up fond memories and create new ones. Sharing these with friends and family makes for delightful moments in building connections. They also serve as excellent conversation starters, allowing for the exchange of personal recipes and favorite ice cream combinations.

Lastly, making these bars can be incredibly cost-effective. Purchasing commercial ice cream bars can add up, whereas creating your own at home can save you money. The ingredients are easy to source, and with minimal preparation, you can stock up these delicious treats, prepared fresh and tailored to your taste preferences.

Historical Background and Cultural Significance

Ice cream bars have become a beloved dessert, with origins tracing back to the early methods of freezing sweetened cream or flavored concoctions. The rise of chocolate as a popular coating in the 20th century transformed ice cream into a portable and shareable treat, paving the way for modern variations.

Culturally, chocolate-covered ice cream bars symbolize celebration and joy in many communities, often associated with summer festivals, birthday parties, and family gatherings. Their popularity can be attributed to their ability to bring people together, sharing a moment of delight and indulgence in a world of fast-paced living.

Over the decades, as refrigeration technology improved, the evolution of this dessert began to flourish with the introduction of new flavors and fillings. From standard chocolate and vanilla to innovative combinations involving nuts, fruit, and even gourmet chocolates, the recipe has been redefined for various palates.

Regional variations of ice cream bars showcase local flavors and preferences around the globe. For instance, in some countries, there are bars filled with traditional desserts or even spices that reflect cultural heritage, offering rich and diverse experiences.

Ingredient Deep Dive

  • Chocolate: Chocolate’s rich history dates back to ancient Mesoamerica, where it was consumed as a bitter beverage. Today, it is celebrated for its versatility in sweet recipes, providing both flavor and a satisfying crunch in desserts. It’s crucial to select high-quality chocolate to ensure a delicious coating for your ice cream bars, choosing between dark, milk, or white chocolate based on personal preference. Store untempered chocolate in a cool, dry place and consider using it within a year for the best flavor. If out of chocolate, you can substitute with carob or a blend of cocoa and coconut oil.
  • Ice Cream: This beloved frozen treat has roots that date back centuries, originating from the blending of cream and flavorings. Ice cream provides a creamy contrast to the crunchy chocolate coating and can be made from milk, cream, or even nut-based alternatives for a dairy-free option. When selecting ice cream for your bars, consider aspects like flavor intensity and base ingredients. Store homemade ice cream in an airtight container at a consistent temperature, and substitute with sorbet or yogurt for lighter variations.

Common Mistakes to Avoid

  • Not letting the chocolate cool properly before dipping, resulting in a soft coating that won’t set.
  • Using regular chocolate chips instead of high-quality chocolate bars, which may not melt smoothly.
  • Not freezing the ice cream bars long enough, causing them to melt quickly when coated.
  • Leaving the bars out too long before serving, leading to messy, drippy desserts.
  • Skipping parchment paper, resulting in difficult clean-up and potential damage to your bars.
  • Overdipping in chocolate, making it difficult to get the coating to adhere properly.
  • Using unflavored ice cream that lacks the rich taste needed for balance with the chocolate.
  • Not varying the ice cream flavors, which can lead to uniformity and lackluster results.
  • Forgetting to check for the right temperature when melting chocolate, resulting in burnt chocolate.
  • Neglecting to let the bars set properly after coating, causing chocolate to smudge or chip off.

Essential Techniques

To achieve the ideal chocolate coating on your ice cream bars, tempering is a crucial technique. Tempering chocolate stabilizes cocoa butter crystals, ensuring a shiny finish and snap when bitten into. To master this, slowly melt your chocolate in a bowl over simmering water, and monitor the temperature for accuracy, pulling it off the heat once it reaches the right point. Common pitfalls include overheating the chocolate; keep it under 120°F for best results.

Properly freezing your ice cream bars is vital for a successful coating. Ensure that your bars are well-frozen for at least 4 hours before dipping to avoid melting and destruction. Use a good quality ice cream that can hold its form. Look for ice cream with a higher fat content for excellent structural integrity, and keep an eye out for loose protein or emulsifiers that might affect the final outcome.

Pro Tips for Perfect Chocolate-Covered Ice Cream Bars

1. Choose the right chocolate based on your desired flavor—milk for sweetness, dark for richness, or white for a creamy touch.
2. Melt your chocolate using a double boiler to ensure precise temperature control and prevent scorching.
3. Freeze the ice cream bars for several hours ahead of coating to maintain their form when dipped.
4. Dip the bars quickly into the chocolate for even coverage, using a gentle swirl to allow excess chocolate to fall away.
5. Sprinkle toppings, like crushed nuts or sprinkles, immediately after coating while the chocolate is still wet for optimal adhesion.
6. Use a fork or skewer to easily dip the bars, avoiding messy hands and ensuring perfect chocolate coverage.
7. Store any leftover bars in an airtight container in the freezer to maintain quality and extend shelf life.
8. Experiment with different ice cream flavors and chocolate combinations for unique and exciting results.

Variations and Adaptations

There are many exciting ways to mix things up with Chocolate-Covered Ice Cream Bars. Try incorporating local and seasonal ingredients, such as adding a layer of berry jam or a splash of caramel sauce in the center for a fruity or caramel twist. During holidays, think of swapping chocolate for seasonal candies like crushed peppermint or festive-themed sprinkles.

For those with dietary restrictions, plenty of adaptations can be made. Substituting regular ice cream with dairy-free or vegan options can cater to a broader audience without sacrificing taste. Consider using gluten-free cookies or alternative sweeteners to make the bars suitable for gluten-free or sugar-free diets.

Culinary modifications can also be endlessly creative! With a variety of toppings, consider rolling your bars in toasted coconut, crushed pistachios, or cookie crumbs before the chocolate solidifies. Each variation not only adds a different flavor and texture but can create a visually stunning dessert.

For presentation, sample different serving styles, such as serving your bars in a decorated cup or alongside fresh fruit. Transform your traditional dessert into an artistic plate, creating a feast for the eyes as well as the palate.

Serving and Presentation Guide

The presentation of your Chocolate-Covered Ice Cream Bars can elevate any gathering. Begin with a clean, crisp white plate to make the colors pop. Consider placing the bars upright in a small vase or decorative cup, making them visually striking. Alternatively, meticulously arrange them on a platter with fresh fruit or drizzles of chocolate sauce for an elegant effect.

Garnishing is key; consider adding fresh mint leaves or a dusting of cocoa powder for appeal. If you have time, creating a homemade chocolate sauce and drizzling it across the plate offers the finishing touch, enhancing flavor and drawing the eye.

Depending on the occasion, choosing appropriate accompaniments enhances the experience. A scoop of sorbet or a dollop of whipped cream may be refreshing complements, while a side of fruit, such as strawberries or raspberries, offers a fresh burst of flavor. Pay attention to serving temperatures, ensuring the ice cream remains cold while the chocolate is not too hard—just the right texture for savoring.

Finally, portion control can be a consideration. If serving guests, cut the bars into smaller segments for easy consumption or pair them with mini cones for a fun sharing experience.

Wine and Beverage Pairing

Finding the right beverage to pair with your Chocolate-Covered Ice Cream Bars can enhance the overall experience. For wine lovers, a rich Cabernet Sauvignon or a Malbec pairs beautifully with chocolate due to its deep, fruity notes bridging the sweetness. If self-judging, opt for sweeter dessert wines like Port or Ice Wine to complement the dessert’s richness.

For non-alcoholic options, consider pairing your ice cream bars with a classic milkshake or a rich hot chocolate. The textures of cold and hot drinks together create an enjoyable contrast, enhancing each component.

If you’re a coffee drinker, a dark roast cappuccino or a mocha can serve as a perfect accompaniment, as the deep coffee flavor balances the sweetness of the dessert. Ensure the drinks are served at a comfortable temperature to prevent any inconsistency in enjoyment.

While serving, think about layering flavors; consider using flavored teas, such as chai or hibiscus, boasting aromatic properties that could help cleanse the palate between bites, keeping things light and refreshing.

Storage and Shelf Life

Storing Chocolate-Covered Ice Cream Bars properly is essential for maintaining their taste and quality. Keep your bars in an airtight container in the freezer to prevent freezer burn and ice crystals from forming. They can typically last in the freezer for up to two months but are best enjoyed within two weeks for optimal flavor.

To ensure freshness, avoid repeatedly removing the bars from the freezer—as this can expose them to temperature fluctuations. When you do remove them, serve immediately or return to storage as soon as possible.

If packaged correctly, signs of spoilage may include freezer burn on the chocolate coating or an off-taste from the ice cream. In such cases, it’s better to discard rather than risk any unpleasant flavors when serving.

In cases of leftovers after serving, store completed ice cream bars back in their container promptly. To reheat for revived flavor, simply allow the bars to thaw in the fridge for a couple of minutes.

Make Ahead Strategies

To maximize efficiency, these Chocolate-Covered Ice Cream Bars can easily be made ahead of time. Start by preparing the ice cream base—a homemade option may be prepared days in advance and stored in the freezer. Once your ice cream has been frozen solid, remove it and cut it into bars before you coat them in chocolate.

After the chocolate has been added, allow the bars to set completely in the freezer before wrapping or storing. This technique ensures fresh bars on hand for last-minute gatherings or casual weeknight treats.

Take stock of the timeline; make the bars a day or two in advance, allowing flavors to mature. It’s also a good practice to plan the assembly so you can enjoy the finishing touches. If interested, consider adding fresh garnishes just before serving to enhance appeal!

Remember, you can always add final touches, such as temperatures—serving in chilled bowls enhances texture and taste upon presentation.

Scaling Instructions

Scaling the Chocolate-Covered Ice Cream Bars recipe is quite straightforward. To make fewer servings, simply halve the ingredient quantities and prepare as directed. This approach allows you to customize the number of bars based on your needs.

Should you decide to double or triple the recipe for gatherings, ensure you have ample freezer space to accommodate the additional bars. Consider using larger baking sheets for melting and setting the ice cream bars, allowing them to freeze efficiently.

Time adjustments may be required when scaling; keep a close watch during the freezing phase, as larger batches might need extra time to reach the ideal firmness. When preparing, be mindful of your workspace—ensuring you have enough room to move around will help streamline the process.

Afterward, follow proper storage considerations, ensuring you label and date containers to keep track of freshness.

Nutritional Deep Dive

Understanding the nutritional breakdown of your Chocolate-Covered Ice Cream Bars can refine your dessert experience. The macro breakdown typically includes carbohydrates from the ice cream, sugars from both chocolate and sweetened bases, and fats, primarily from cream or nuts used in the ice cream.

Micronutrient analyses show that chocolate can deliver valuable antioxidants, while certain ice creams provide calcium along with essential vitamins depending on the base ingredients. Low-sugar and low-fat options are available for those who may still want to indulge without overdoing it.

Health benefits can be significant with moderation in mind, particularly when ingredients like dark chocolate provide heart-healthy properties when consumed in reasonable portions.

Portion control can help with weight management, and by monitoring serving sizes, you can maintain the balance between enjoying desserts and maintaining a healthy lifestyle.

Dietary Adaptations

For those following specific dietary needs, adapting the Chocolate-Covered Ice Cream Bars is truly feasible. Gluten-free options can be crafted using certified gluten-free products, ensuring everyone can enjoy a delicious treat without worry.

Dairy-free individuals can substitute recipes using coconut milk or almond milk to create softer, creamier ice creams. The flavor profiles remain delightful while meeting dietary restrictions.

Vegan adaptation can follow suit, offering a complete plant-based approach. Utilizing alternative sweeteners and ensuring all ingredients are sourced without animal products provides conscientious consumption while ensuring a delicious experience.

Incorporating low-carb options can transform the ice cream using coconut cream, hidden sweeteners, and sugar-free chocolate, producing an enjoyable experience for those on keto diets.

Paleo-friendly adaptations allow for caveman-inspired elements—utilizing honey or maple syrup to sweeten, while precluding refined sugars can push these bars into more ancient flavor profiles.

Troubleshooting Guide

If you encounter texture issues, such as graininess in your chocolate, review your melting technique. Ensure your chocolate is tempered and melted gently—high heat leads to burned chocolate and unusual textures.

Flavor balances may need adjusting if the chocolate tastes bitter; add a touch of sugar or opt for milk chocolate for sweetness. Always taste your chocolate before using, ensuring the selected recipe aligns with your preferences.

Temperature problems are common when melting chocolate or freezing ice cream bars too quickly. Make adjustments to your method, and remember to allow ample time for chilling, particularly when layered lasagna-style.

Equipment challenges arise unexpectedly; if your freezer isn’t freezing efficiently, double-check temperature settings and consider relocating to a space where airflow is optimal.

Ingredient substitutions may impact end taste; adjust future recipes based on what flavors shine through. In case of timing concerns while battering and freezing, remember that preparation ahead of schedule helps ease any pressure.

Recipe Success Stories

Many home cooks have shared feedback about their experience preparing Chocolate-Covered Ice Cream Bars. Numerous individuals appreciate the ease of creating these bars, allowing customization alongside family and friends each summer.

Variations have flourished; one individual successfully replaced traditional chocolate with a vibrant matcha coating, enthralling audiences with unique flavors. Others have enjoyed integrating local honey into the ice cream base, enhancing sweetness while supporting local farmers.

Adaptation stories resonate where dietary restrictions intersected with creativity, enabling those with lactose intolerance or gluten allergies to indulge alongside others, creating a more inclusive atmosphere during gatherings.

Readers frequently suggest photography tips, sharing insights to capture the glossy sheen of chocolate-covered bars against bright fruits or rustic wooden backgrounds, showcasing the inviting nature of this beloved dessert.

Frequently Asked Questions

1. Can I use store-bought ice cream for this recipe?

Absolutely! Store-bought ice cream works perfectly for these Chocolate-Covered Ice Cream Bars. Choose your favorite flavor for easy preparation, but feel free to experiment with homemade ice cream for a custom twist.

2. How long do the bars take to freeze?

Typically, the ice cream bars need about 4 hours to freeze solid. Ensure they are adequately frozen before dipping to maintain their shape while coating them with chocolate.

3. What is the best type of chocolate to use?

The best chocolate to use depends on your preferences. Dark chocolate delivers a rich experience, while milk chocolate offers sweetness. For a lighter option, consider using white chocolate or compounds made for easy melting.

4. Can I make these bars ahead of time?

Yes! You can prepare ice cream bars ahead of time and store them in the freezer for up to two months. Enjoying them fresh is best, but they’ll maintain quality if sealed properly.

5. What’s the best way to store leftover bars?

Store leftover Chocolate-Covered Ice Cream Bars in an airtight container in the freezer. They can last for up to two months, but it’s best to consume them within two weeks for optimal taste.

6. Can I use different toppings?

Yes! Feel free to experiment with various toppings such as nuts, sprinkles, coconut flakes, or crushed cookies for added flavor and texture before the chocolate sets.

7. What can I substitute for chocolate?

If you’re looking for an alternative to chocolate, caramel sauce or yogurt could be possible substitutes, but note that the texture and flavor profile will differ from the original recipe.

8. Can these bars be made vegan?

Certainly! Substitute dairy-free ice cream and use vegan chocolate chips for a delicious plant-based treat without compromising the delightful taste.

9. Is it possible to add flavorings to the chocolate?

Yes, you can add flavorings such as vanilla extract, peppermint extract, or sea salt to enhance the chocolate’s flavor before coating the bars for added depth.

10. What should I do if the chocolate isn’t coating evenly?

If your chocolate isn’t coating evenly, check its consistency. It may need to be melted again or thinned with a bit of coconut oil for a smoother application.

Additional Resources

If you loved creating these Chocolate-Covered Ice Cream Bars, explore related dessert recipes to continue your culinary journey. Try out different frozen desserts such as fruit sorbets or homemade popsicles for refreshing concepts. You can dive deeper into technique guides and learn how to master the art of tempering chocolate to enhance various recipes.

Discover ingredient information that crosses over into different desserts for useful kitchen knowledge. Additionally, identify equipment recommendations for perfect bar-making to ensure you have all necessary tools on hand. Finally, seasonal variations like pumpkin spice or peppermint-infused bars can be perfect for holiday celebrations.

Join the Conversation

We encourage you to share your experiences with Chocolate-Covered Ice Cream Bars on social media and engage with our community! Use hashtags to showcase your culinary creations along with photos that capture the essence of this delightful treat. Review your take on this recipe and provide your unique twists to inspire others.

Don’t hesitate to comment on variations you’ve tried or suggestions that stood out to you during the process. Let’s cultivate a vibrant, interactive community that celebrates the joy of cooking and creativity in the kitchen!

The Recipe

Chocolate-Covered Ice Cream Bars

Serves: 6 bars

Prep Time: 30 mins

Cook Time: 0 mins

Total Time: 30 mins

Kitchen Equipment Needed

  • Cookie sheet
  • Parchment paper
  • Heatproof bowl
  • Spatula
  • Ice cream scoop

Ingredients

  • 2 cups of your favorite ice cream
  • 1 1/2 cups semi-sweet chocolate chips
  • 1 tablespoon coconut oil (optional, for smoother chocolate)
  • Toppings: chopped nuts, sprinkles, or crushed cookies (optional)

Directions

  1. Line a cookie sheet with parchment paper. Scoop ice cream onto the parchment, forming bars.
  2. Freeze the bars for at least 4 hours until solid.
  3. Melt the chocolate chips in a heatproof bowl over simmering water, stirring until smooth. Add coconut oil for a thinner consistency if desired.
  4. Dip each ice cream bar into the melted chocolate, allowing excess to drip off.
  5. For added flavor, roll the bars in your choice of toppings immediately after dipping.
  6. Return the coated bars to the cookie sheet and freeze again until the chocolate is hard, about 15 minutes.
  7. Serve and enjoy your delightful chocolate-covered ice cream bars!

Recipe Notes

  • Feel free to substitute different flavors of ice cream or toppings based on your preferences.
  • Use a double boiler for melting chocolate to prevent scorching.
  • If you want a dark chocolate flavor, opt for high-quality dark chocolate bars.

Indulge in This Easy Butterfinger Caramel Crunch Fudge Recipe

Butterfinger Caramel Crunch Fudge Recipe: Easy Holiday Dessert Idea

⚖️
Difficulty
Easy

⏲️
Prep Time
15 mins

🕒
Cook Time
30 mins

⏱️
Total Time
45 mins

🍽️
Servings
24 pieces

Indulge your senses this holiday season with our delightful Butterfinger Caramel Crunch Fudge Recipe. This easy holiday dessert combines the rich, creamy sweetness of fudge with the irresistible crunch of Butterfinger candy bars and smooth caramel. Each bite is a symphony of flavors that brings smiles and warmth to any gathering. The combination is not only delicious but also visually appealing, making this fudge a perfect centerpiece for your holiday dessert table.

Imagine a soft, velvety fudge that melts in your mouth, offering the crunch you crave. The sweet, nutty flavor of the Butterfinger pairs perfectly with the buttery, sweet notes of caramel, creating a flavor explosion that is simply irresistible. This fudge can be prepared quickly and is a fantastic way to share the joy of the season with friends and family. Whether you’re hosting a festive party or searching for the ideal homemade gift, this fudge is sure to impress everyone.

Quick Recipe Highlights

  • Flavor Profile: This fudge offers a delectable mix of chocolate, caramel, and buttery toffee notes from Butterfinger that will tantalize your taste buds.
  • Texture: Experience the smooth creaminess of fudge layered with the crunchy bits of Butterfinger, providing an exciting contrast.
  • Aroma: The sweet smell of melted chocolate and caramel fills your kitchen, promising a treat that is as fragrant as it is delicious.
  • Visual Appeal: The gorgeous swirls of chocolate and caramel create an eye-catching display, perfect for any festive occasion.
  • Skill Level Needed: Even novice bakers can successfully make this fudge, making it an accessible treat for all.
  • Special Equipment: A saucepan and a baking dish are all you need—no fancy tools required!

Recipe Overview

  • Difficulty Level: The simplicity of this Butterfinger Caramel Crunch Fudge makes it suitable for beginner cooks, while still delighting seasoned bakers looking for a quick treat.
  • Category: This recipe falls under the dessert category, perfect for celebrations, holidays, or as a sweet snack.
  • Cuisine: Although it pulls inspiration from classic American desserts, the rich flavors give it a gourmet twist beloved by many.
  • Cost: This recipe is budget-friendly, using common ingredients that won’t break the bank, making it an economic choice for holiday treat-making.
  • Season: Although ideal for the holiday season, its delicious flavor makes it a year-round favorite.
  • Occasion: Perfect for holiday gatherings, parties, or as a thoughtful gift for friends and family.

Why You’ll Love This Recipe

The incredible taste and texture of Butterfinger Caramel Crunch Fudge are sure to win over your palate. Each bite blends the creaminess of classic fudge with the delightful crunch of Butterfinger, making for an addictively delicious treat. It’s not just about the flavor; the smooth caramel complements the sweet chocolate, creating a luscious mouthfeel. The balance of flavors is so perfect that you might find yourself going back for seconds— or thirds!

Convenience is another reason you’ll adore this recipe. With only a handful of ingredients and minimal preparation time, you can whip up this fudge in no time. It requires no baking, and with careful attention, anyone can achieve perfect results. The ability to prepare this treat ahead of time also makes it an excellent choice for busy holiday schedules.

Not only is this fudge delicious, but it also has some nutritional benefits. The chocolate provides a burst of antioxidants, and the Butterfinger adds a hint of protein due to its nut content, striking a balance between indulgence and nourishment. While you wouldn’t exactly call this a health food, it does offer a touch of sweetness without sacrificing too much in the way of nutrition.

Social gatherings become more vibrant with homemade treats like this fudge. Sharing food strengthens bonds, and this Butterfinger Caramel Crunch Fudge provides a fantastic conversation starter and a joyful experience. Guests will be thrilled to enjoy a homemade dessert, creating lasting memories together.

Lastly, this fudge is incredibly cost-effective. The ingredients are readily available and inexpensive, allowing you to bake a large batch without overspending. Plus, its delightful packaging makes it a great gift, adding a personal touch to your holiday celebrations.

Historical Background and Cultural Significance

The history of fudge as a dessert dates back to the late 19th century, originating in United States culinary traditions. Fudge quickly became popular for its creamy texture and rich flavor and has been a beloved treat during the holidays ever since. This recipe takes inspiration from these roots while incorporating beloved components like Butterfinger candy bars for an unexpected twist.

Culturally, desserts like fudge have significant importance in American households, often homemade and shared during family gatherings and celebrations. These treats foster connection and nostalgia, bringing loved ones together during festive seasons. As the holidays approach, families often share favorite recipes, and this Butterfinger Caramel Crunch Fudge is a splendid modern addition to any tradition.

Over the years, the evolution of fudge recipes has seen various adaptations and flavors, reflecting the diverse palates of those who enjoy it. From classic chocolate fudge to creative variations incorporating caramel and crunchy elements, fudge now boasts numerous takes that cater to different tastes and preferences.

Regional variations of fudge exist across the nation, some experimenting with local ingredients that add a unique twist, while others stay true to the original chocolate flavor. No matter the version, fudge remains a cherished dessert among Americans, symbolizing warm hospitality and festive spirit.

Ingredient Deep Dive

Chocolate

Chocolate is a staple ingredient in countless desserts and carries a rich cultural significance, being enjoyed worldwide for over three thousand years. Not only is chocolate beloved for its decadent taste, but it’s also packed with antioxidants that may provide various health benefits. When selecting chocolate for fudge, opt for high-quality baking chocolate for optimal melting and flavor. Store chocolate in a cool, dry place, and be aware that it can last for several months when stored properly.

Butterfinger

Butterfinger bars are a classic candy that brings a nostalgic taste to many. These bars feature a unique combination of chocolate coating and a distinctively crunchy peanut butter core. Nutritionally, Butterfinger offers a small amount of protein due to the peanuts, adding a crunchy texture to fudge that elevates the taste experience. When purchasing Butterfinger bars, look for fresh items free of damage. They can be stored in their original wrappers at room temperature but are ideally kept in a cool spot.

Caramel

Caramel, made by heating sugar, has its roots deep in various culinary traditions worldwide. Its rich, sweet profile adds depth to desserts like fudge. In terms of nutrition, caramel is primarily sugar, so it’s essential to enjoy it in moderation. Look for high-quality caramel sauces that contain real ingredients over those with artificial additives. Store left-over caramel in airtight containers in the fridge, but be sure to use it within a week for the best quality.

Common Mistakes to Avoid

  • Skipping Ingredient Measurement: Accurate measuring is crucial in baking; using too much or too little can affect your fudge’s outcome.
  • Overheating the Chocolate: Chocolate can seize or become grainy if overheated. Melt slowly and gently over low heat for the best results.
  • Ignoring Temperature: Ensure the fudge cools completely before cutting to maintain its structure and prevent it from crumbling.
  • Using Subpar Ingredients: Always choose high-quality chocolate and caramel; less expensive varieties can negatively impact the taste.
  • Not Greasing the Pan: Always grease the baking dish well; otherwise, your fudge may stick and be difficult to cut.
  • Rushing the Cooling Process: Patience is key in allowing the fudge to set properly—don’t rush this step.
  • Forgetting to Mix Ingredients: Combine well while melting to avoid uneven textures in your fudge.
  • Storing Incorrectly: Once set, store fudge in a cool, dry place away from direct sunlight to maintain freshness.

Essential Techniques

The key technique for making Butterfinger Caramel Crunch Fudge is the melting of chocolate. It’s important because evenly melted chocolate ensures a smooth texture for your fudge. To master this technique, use a double boiler or a microwave, melting in short intervals and stirring frequently. Visual cues for success include a shiny, smooth consistency without any lumps. Always start at a lower power to prevent overheating.

Another essential technique is folding in the Butterfinger and caramel gently. This process allows you to create a beautiful mixture without breaking apart the candies. To avoid common pitfalls, don’t mix too vigorously; otherwise, you risk turning everything into a mushy mess. The result should be a beautiful blend of fudge, caramel, and crunchy bits peeking throughout.

Pro Tips for Perfect Butterfinger Caramel Crunch Fudge

Use the highest quality chocolate to ensure rich flavor and creamy texture.
Plan ahead: Allow plenty of time for the fudge to cool completely before cutting.
Try mixing mini marshmallows into the fudge for added chewiness.
Top the fudge with extra Butterfinger pieces for a decorative touch.
Experiment with different chocolate types, like dark or white chocolate, to create a unique flavor.
Store leftovers in an airtight container to prolong freshness and flavor.
Gently heat any hard leftover fudge in the microwave for a few seconds before serving to soften it slightly.
Consider adding a pinch of sea salt on top to enhance the sweetness of the fudge.

Variations and Adaptations

For regional variations of this fudge, you might consider incorporating nuts such as pecans or walnuts, which add a delightful crunch and flavor contrast. Seasonal adaptations may include adding peppermint extract around the holidays, making it a festive treat for winter gatherings. If dietary restrictions arise, this fudge can be modified into gluten-free and dairy-free versions using appropriate substitutes, like coconut cream or dairy-free chocolate.

Flavor variations are endless; try adding a hint of espresso powder for an alluring coffee twist that complements the chocolate beautifully. For texture modifications, consider blending in marshmallows or adding a base of rice cereal for an extra crunch. Finally, presentation alternatives can include cutting the fudge into different shapes, such as squares or festive holiday shapes, and adding garnishes like colorful sprinkles.

Serving and Presentation Guide

When plating Butterfinger Caramel Crunch Fudge, consider using a decorative serving platter or tiered stand to showcase its beauty. Garnishing with additional crushed Butterfinger on top adds a finished touch and entices guests. Traditional accompaniments, such as coffee or milk, enhance the flavor experience and cater to guest preferences. Serving the fudge at room temperature allows all flavors to shine.

Temperature considerations matter, as serving slightly warm fudge offers a delightful melt-in-your-mouth experience. Portion control plays a role in serving sizes; cutting the fudge into small squares ensures everyone enjoys this rich dessert without overindulging.

Wine and Beverage Pairing

Pairing wine with Butterfinger Caramel Crunch Fudge can enhance your dessert experience. A rich dessert wine, like a Port or a late harvest Riesling, complements the sweetness of the fudge beautifully. For non-alcoholic alternatives, consider hot chocolate or a spiced chai latte, both of which will echo the luscious chocolate tones.

Additionally, coffee or espresso offers a bold flavor that balances the sweetness of the fudge nicely. Be sure to serve these beverages warm, enhancing the overall cozy and inviting atmosphere this dessert promotes.

Storage and Shelf Life

To properly store Butterfinger Caramel Crunch Fudge, place it in an airtight container in a cool, dry location away from sunlight. This helps maintain the fudge’s freshness for up to two weeks. For optimal flavor, refrigerating the fudge is a great option, although it may become firmer.

When checking for signs of spoilage, look for an off smell or changes in texture. Should you need to reheat the fudge, a brief time in the microwave will soften it back to its original state. For longer storage, consider freezing the fudge in individual portions wrapped in plastic wrap. Allow it to thaw in the refrigerator before enjoying.

Make Ahead Strategies

If you’re looking to make your Butterfinger Caramel Crunch Fudge ahead of time, consider preparing it a week in advance. Store it in an airtight container to maintain freshness. When planning, a prep timeline of a couple of hours before serving is ideal; this allows sufficient time for cooling and cutting while also keeping the fudge fresh.

If baking in stages, consider melting the chocolate and preparing the rest of the ingredients first. Once cooled, the fudge can be cut, and individual pieces wrapped for gifting or saved for future enjoyment. Allow the fudge time to reach room temperature before serving, ensuring that the flavors are vibrant.

Scaling Instructions

To halve the Butterfinger Caramel Crunch Fudge recipe, simply cut all ingredient measurements in half. This is an easy way to test the recipe or make a smaller batch for an intimate gathering. Conversely, when doubling or tripling the recipe, ensure you use a larger baking dish to allow for even cooking and setting.

Adjust baking times slightly if using multiple pans; you may need to rotate the dishes halfway through. Be mindful of storage considerations; you will need more space for larger batches, especially if you plan to freeze portions.

Nutritional Deep Dive

Analyzing the macros in Butterfinger Caramel Crunch Fudge shows that it is high in carbohydrates, mainly from sugar and chocolate components. While enjoying this treat, being mindful of calorie intake and portion sizes is essential. The fudge does not provide significant protein, but the inclusion of Butterfinger offers some nutritional balance.

Micronutrient analysis reveals some trace minerals from the peanuts in Butterfinger, as well as antioxidants from the chocolate. Enjoying this dessert in moderation is key for those mindful of their dietary habits. For those aiming for weight management, consider cutting the fudge into smaller pieces to enjoy without excessive indulgence.

Dietary Adaptations

For gluten-free adaptations of Butterfinger Caramel Crunch Fudge, simply ensure the chocolate and other ingredients used are certified gluten-free. For those seeking a dairy-free option, plant-based chocolate and coconut cream can create a similar delicious result without dairy.

Vegan adaptations are achievable by using egg-free chocolate and substitutes for heavy cream. For low-carb and keto-friendly variations, consider sugar-free chocolate and a substitute for traditional sweeteners. Paleo aficionados can adapt the fudge using raw or natural sweeteners like honey, drastically altering the end flavor profile.

This versatility allows any dietary restrictions to be met without sacrificing flavor or enjoyment—a real win for inclusive dessert options.

Troubleshooting Guide

If your Butterfinger Caramel Crunch Fudge comes out gritty, it may be due to overheating the sugar or chocolate. Ensure gentle, slow heating to achieve a smooth consistency. If the fudge doesn’t set, try refrigerating for a longer period; you can also add a dusting of confectioners’ sugar to help bind the mixture if it remains too soft.

For flavor balance issues, adding a pinch of salt can enhance sweetness and round out the overall flavor. If using substitutions, be cautious; certain ingredients may behave differently when melted or cooled.

If you encounter issues with the fudge sticking to the pan, ensuring proper greasing before adding the mixture will help. Lastly, for those experiencing challenges with cutting clean pieces, try warming your knife slightly before slicing through the chilled fudge.

Recipe Success Stories

Feedback from the community on Butterfinger Caramel Crunch Fudge has been overwhelmingly positive. Home bakers appreciate how simple it is to make, noting it as a go-to holiday recipe. One reader shared their variation by swapping the Butterfinger for a mix of their favorite candies, resulting in a delightful and colorful fudge.

Others have shared photos showcasing creative ways to gift the fudge. From elegant boxes to festive wrapping, this fudge has become a crowd-pleaser among friends and family. This underscores the versatility and charm of sharing homemade treats during the holidays, making memory-making even sweeter.

Tips from the community on photography highlight the aesthetic beauty of this fudge, with plenty of suggestions for garnishing options that enhance the visual appeal and taste experience. Overall, Butterfinger Caramel Crunch Fudge has garnered a reputation for being as rewarding to share as it is to indulge in.

Frequently Asked Questions

Can I use other candy bars instead of Butterfinger?
Yes! Feel free to experiment with other candy bars like Snickers or Milky Way for different flavor experiences.

How long will the fudge last?
The fudge can last up to two weeks when stored in an airtight container, though it’s best fresh.

Can this fudge be frozen?
Yes, you can freeze it for up to two months. Just ensure it’s wrapped well to avoid freezer burn.

Do I have to use sweetened condensed milk?
While it adds a creamy sweetness, you can substitute with homemade caramel or other sweeteners if desired.

What can I do if my fudge is too soft?
If the fudge is too soft, try refrigerating it longer or re-melting, then re-setting it again in the pan.

Is there a vegan version of this fudge?
Yes! Use dairy-free chocolate and coconut cream as substitutes for traditional ingredients.

How do I know when the fudge is set?
The fudge will be firm to the touch and will have a matte finish on top once completely set.

Can I use microwave instead of stovetop for melting?
Yes, microwave melting is perfectly acceptable; just ensure to do it in increments to avoid burning.

What type of chocolate is best to use?
Opt for high-quality semi-sweet or dark chocolate for the richest flavor.

Can I add nuts to the fudge?
Absolutely! Chopped nuts can add a wonderful crunch and enhance the texture of your fudge.

Additional Resources

If you loved making Butterfinger Caramel Crunch Fudge, you might want to try related recipes such as classic chocolate fudge, rocky road, or peanut butter fudge. Consider exploring technique guides that focus on melting chocolate or making candy, which can be beneficial for any home baker.

Ingredient information is readily available to help you choose the best products, and equipment recommendations can make your baking experience more enjoyable. Seasonal variations can inspire other holiday treats that you can share alongside this delicious fudge, celebrating the flavors of the season in every bite.

Join the Conversation

We encourage our readers to share their experiences making Butterfinger Caramel Crunch Fudge! Engage with us on social media by sharing your photos, tips, or recipe variations. Your feedback is invaluable, and photography tips can inspire others to showcase this delightful recipe.

Recipe reviews help create a sense of community, allowing other home bakers to see the magic possible with Butterfinger Caramel Crunch Fudge. Share your stories and celebrate the joy of homemade treats this holiday season!

The Recipe

Butterfinger Caramel Crunch Fudge

Serves: 24 pieces

Prep Time: 15 mins

Cook Time: 30 mins

Total Time: 45 mins

Kitchen Equipment Needed

  • Medium saucepan
  • Wooden spoon
  • 9×9 inch baking dish
  • Parchment paper (optional for easy removal)

Ingredients

  • 2 cups semi-sweet chocolate chips
  • 1 cup sweetened condensed milk
  • 1 cup Butterfinger candy bars, crushed
  • 1/2 cup caramel sauce
  • 1 teaspoon vanilla extract

Directions

  1. In a medium saucepan, melt the chocolate chips and sweetened condensed milk over low heat, stirring frequently until smooth.
  2. Remove from heat and stir in vanilla extract and crushed Butterfinger bars until well combined.
  3. Pour half of the mixture into the prepared baking dish and spread evenly.
  4. Drizzle caramel sauce over the fudge layer and swirl gently with a knife.
  5. Top with remaining fudge mixture and smooth the top.
  6. Refrigerate for at least 2 hours or until set. Once set, cut into squares and serve.

Recipe Notes

  • Store fudge in an airtight container in a cool place for up to 2 weeks.
  • Feel free to substitute with your favorite candy bars for added variety.

Indulge in This Easy and Delicious Chocolate Milkshake Recipe

Ultimate Chocolate Milkshake: A Creamy Indulgence

⚖️
Difficulty
Easy

⏲️
Prep Time
10 mins

🕒
Cook Time
0 mins

⏱️
Total Time
10 mins

🍽️
Servings
2

Indulge in the delight of a classic chocolate milkshake that tantalizes your taste buds. This scrumptiously creamy drink is a perfect blend of rich chocolate and velvety ice cream, making it the ideal treat for any occasion. Whether you’re celebrating a special moment or simply wishing to cool down on a hot day, this chocolate milkshake recipe will surely bring a smile to your face.

With the perfect balance of sweetness and creaminess, this milkshake not only satisfies your chocolate cravings but also evokes cherished childhood memories. Its rich, decadent flavor is enhanced by generous whipped cream and a drizzle of chocolate syrup, making it a visually appealing dessert that’s just as delicious as it looks.

Quick Recipe Highlights

  • Flavor Profile: A luxuriously smooth sweetness with deep chocolate undertones.
  • Texture: Creamy and thick with a luscious mouthfeel that coats the palate.
  • Aroma: A delightful chocolate scent that fills the air, inviting you to take a sip.
  • Visual Appeal: A glossy, chocolatey beverage topped with fluffy whipped cream and a cherry.
  • Skill Level Needed: This recipe requires no special culinary skills, making it accessible to all.
  • Special Equipment: A blender and a tall glass are all you need for this chocolate delight.

Recipe Overview

  • Difficulty Level: This chocolate milkshake is easy to prepare, perfect for both novice and experienced cooks alike.
  • Category: This delicious drink fits perfectly in the dessert category but can also be enjoyed as a snack.
  • Cuisine: Rooted in American culinary tradition, milkshakes have become a beloved treat worldwide.
  • Cost: This recipe is budget-friendly, with ingredients that are affordable and easy to find.
  • Season: Ideal for any season, it especially shines in summer when a cold drink is most refreshing.
  • Occasion: Great for casual gatherings, birthday parties, or just a delightful treat on a regular day.

Why You’ll Love This Recipe

Indulge in a chocolate milkshake that is not only delectable but also comforting. Each sip offers a rich, creamy texture that melts in your mouth, leaving a satisfying sweetness that lingers beautifully. The combination of chill and sweetness serves as an instant mood booster, perfect for when you need a little pick-me-up.

One of the best aspects of this recipe is the simplicity of its preparation. Within just ten minutes, you can whip up this treat, making it an effortless choice for spontaneous cravings or casual get-togethers with friends and family. The ease of preparation allows anyone to get involved, turning simply creating a chocolate milkshake into a fun activity for experience levels across the board.

From a nutritional standpoint, this milkshake can provide a small boost of energy thanks to the combination of ice cream and milk. While it’s best enjoyed as an occasional treat, the use of quality ingredients means you’re indulging in something more fulfilling than average fast-food offerings.

Gathering around to enjoy a milkshake brings an element of social delight to the experience. Preparing and presenting this drink can easily turn a lone snack into a shared moment of joy and conversation, making it ideal for gatherings, date nights, or even family film nights.

Finally, the cost-effectiveness of this homemade chocolate milkshake cannot be overstated. With inexpensive core ingredients, you can create a batch that rivals any milkshake shop, but with the added satisfaction of having crafted it yourself.

Historical Background and Cultural Significance

The origin of the milkshake can be traced back to the late 19th century, where it originally served as a wholesome drink made with whiskey and eggs. However, it wasn’t until the early 1900s that ice cream began to creep into the equation, turning milkshakes into the delightful dessert we know today.

Culturally, the chocolate milkshake has solidified itself as an American classic, often associated with diners and soda fountains. Throughout decades, the popularity of milkshakes has evolved, particularly with the rise of fast-food chains that offered their versions of this iconic drink.

This recipe showcases the evolution of a classic chocolate milkshake while remaining true to its roots. The adaptability of the chocolate milkshake means you’ll find variations worldwide, each featuring local ingredients and flavors that resonate with different cultures.

Regional variations abound, from the thick, creamy versions served at Southern diners to more tropical takes seen in coastal areas using fresh fruits. These variations highlight how adaptable and beloved the chocolate milkshake continues to be in contemporary cuisine.

Ingredient Deep Dive

Chocolate Syrup: Chocolate syrup is a kitchen staple that brings the unmistakable flavor of chocolate to your milkshake. Often used in desserts, its history dates back to the early 1900s in America, becoming a favorite topping for ice cream. The rich, sweet flavor pairs perfectly with the creaminess of the milkshake.

For selection, look for syrup with quality cocoa content for a deeper flavor. Store it in a cool, dry place and always check for a proper seal to maintain freshness. If you’re in a pinch, there are many homemade chocolate syrup recipes to explore!

Ice Cream: The essence of a chocolate milkshake lies in its ice cream base. Typically made from a mixture of cream, sugar, and flavorings, the deliciously cold treat has been a favorite since its invention in the 18th century. A solid chocolate ice cream provides the foundation for a rich and creamy milkshake.

When choosing ice cream, opt for high-quality, full-fat varieties to ensure a silky texture. Keep it stored in the freezer and watch the time to avoid freezer burn. For health-conscious modifications, sorbets or non-dairy ice creams can also be used as alternatives.

Common Mistakes to Avoid

  • Using warm ingredients: Always use chilled ingredients for a refreshing chocolate milkshake; warm ingredients will ruin the creamy texture.
  • Blending too long: Over-blending will result in a watery milkshake. Blend just until everything is combined.
  • Not adjusting sweetness: Taste the mixture before serving; if it’s not sweet enough, add more chocolate syrup or sugar gradually.
  • Using low-quality ice cream: Poor-quality ice cream can lead to a less satisfying flavor; choose full-fat varieties when possible.
  • Skipping the toppings: Don’t forget about presentation! A simple whipped cream topping and cherry make it visually appealing.
  • Ignoring serving temperature: Serve immediately after blending for the best texture and cooling experience.
  • Being afraid to experiment: Feel free to add other flavors, like vanilla, mint, or peanut butter, to elevate your chocolate milkshake.
  • Overloading with toppings: Adding too many toppings can overwhelm the flavor of the milkshake itself; keep it simple.

Essential Techniques

Blending: This technique is pivotal in achieving the perfect consistency for your chocolate milkshake. Ensuring all components are well blended contributes to a smooth and creamy mouthfeel without any lumps. Aim for a thick yet pourable texture.

**Visual Cue**: The ideal blended milkshake should be thick enough to keep its shape, and should smoothly flow out when poured.

Garnishing: Presentation can greatly enhance the enjoyment of your milkshake. Use whipped cream, chocolate shavings, or sprinkles for a delightful appearance. A well-garnished shake not only looks good but also entices taste buds before the first sip.

**Visual Cue**: Aim for a tall serving glass, allowing garnishes to be showcased atop the creamy shake for aesthetic appeal.

Pro Tips for Perfect Chocolate Milkshake

– Always chill your glass beforehand to keep the shake cold as you consume it.
– Balance your sweetness by starting with less chocolate syrup and adjust to taste for optimal flavor.
– For an even richer experience, combine chocolate milk with vanilla ice cream in your blender.
– Add a pinch of sea salt before blending to elevate the flavor complexity.
– Experiment with a dash of espresso for a mocha twist, perfect for coffee lovers.
– Use full-fat dairy products for a creamier texture that enhances the mouthfeel.
– If you prefer a healthier option, consider using frozen bananas for natural sweetness and texture.
– Serve with a wide straw for an enjoyable sipping experience, enabling you to soak in the flavors fully.

Variations and Adaptations

Explore an array of delicious adaptations for your chocolate milkshake. Consider incorporating seasonal ingredients like fresh mint or raspberries for added flavor. For a more indulgent experience, try adding malt powder that gives the shake a reminiscence of vintage diners.

If you wish to make this chocolate milkshake dairy-free, substitute regular milk and ice cream with almond or coconut versions. Blending dairy-free products allows everyone to enjoy this treat without dietary constraints.

Flavor variations can be sparked with a touch of peanut butter, caramel, or a hint of chili powder to create an exciting twist. The possibilities are endless!

For a lower-calorie version, replace regular ice cream with yogurt to keep the creamy texture but reduce the overall fat content.

To enhance the experience further, explore different ice cream flavors like cookies and cream or mint chocolate chip for new interpretations.

Serving and Presentation Guide

Serving your chocolate milkshake elegantly can enhance the overall experience. Use tall, clear glasses to showcase the delightful layers of chocolate and whipped cream. Consider invoking a rustic charm with mason jars for a vibe that’s both cozy and casual.

Garnish with a dollop of whipped cream, a drizzle of chocolate syrup, or shaved chocolate. For an extra layer of indulgence, consider a sprinkle of crushed nuts or colorful sprinkles as a finishing touch.

Traditional accompaniments like chocolate cookies or chocolate cake can elevate the dessert experience further. For modern flair, consider serving a side of chocolate-covered strawberries, perfect for dipping.

Ensure your milkshake is served at an ideal cold temperature for optimal enjoyment. Encourage portion control by serving in smaller, shorter glasses that still captivate and impress guests.

Wine and Beverage Pairing

Pairing your chocolate milkshake with complementary beverages adds depth to the dining experience. A sweet red wine like a port or a dessert wine harmonizes well with the rich flavors of chocolate.

Alternatively, a strong cup of coffee contrasts beautifully with the sweetness of the shake, enhancing the overall experience with a wonderful balance of flavors.

For non-alcoholic options, consider classic root beer floats, which can echo the creamy texture while adding a new flavor dimension. Opt for well-chilled beverages to maintain the perfect refreshment alongside your milkshake.

Pay attention to your serving temperatures; it’s crucial that both chocolate milkshake and accompanying beverages remain cool, creating a refreshing treat.

Storage and Shelf Life

Storing your chocolate milkshake is simple, but it’s best consumed fresh. However, if you need to store leftovers, keep them in an airtight container in the freezer for up to one week.

To ensure the best flavors, avoid leaving your shake at room temperature for extended periods. Signs of spoilage include separation of liquids and changes in texture; if it begins to look grainy or curdled, it’s best to discard it.

Reheating is not recommended as it diminishes texture and flavor; instead, blending with ice will refresh a stored shake. Avoid freezing too long to maintain the optimal taste profile.

For freezing guidelines, pour the milkshake into an appropriate container, leaving space for expansion and ensuring to seal it tightly to avoid freezer burn.

Make Ahead Strategies

Preparing your chocolate milkshake ahead of time can be seamlessly done. Consider pre-measuring ingredients like chocolate syrup and ice cream and storing them in the freezer until ready to blend.

While you can prepare your ingredients in advance, it’s best to blend the milkshake just before serving to preserve its texture and flavor. Store the blended milkshake in the fridge for up to 30 minutes if needed, but be wary that it may thicken slightly.

To keep flavors refreshing, refrain from adding garnishes like whipped cream until you’re ready to serve. This ensures every sip remains as delightful as the first.

If you want to add fresh elements later, consider chilling glasses with a sprinkle of cocoa powder to brighten the entire drink with each sip.

Scaling Instructions

Scaling your chocolate milkshake recipe is easy and adaptable for larger gatherings. Halving can be done effortlessly; just divide each ingredient in half and blend as usual.

For bigger batches, triple or quadruple the measurements while ensuring your blender can accommodate the volume—consider blending in two rounds for optimal texture.

Timing adjustments remain straightforward; allow for additional blending time if using a larger quantity to ensure all ingredients get incorporated smoothly.

Be mindful of storage considerations if preparing a large batch; keep leftover shakes sealed in the fridge or reheated only if necessary.

Nutritional Deep Dive

When analyzing the nutritional components of a chocolate milkshake, focus on macro breakdowns including calories, fat, carbohydrates, and proteins. A standard milkshake may contain around 400-600 calories per serving depending on the richness of the ingredients used.

Micronutrients from chocolate, dairy, and any additional flavor enhancers contribute to calcium, antioxidants, and vitamins, lending some health benefits while still being a indulgent treat.

For those mindful of their diet, portion control becomes key—consider serving smaller amounts to satisfy cravings without overwhelming caloric intake.

Evaluate dietary considerations based on personal health goals. If mindful of sugar intake, alternative sweeteners can be used without sacrificing taste.

Finally, for those looking to manage weight, enjoy chocolate milkshakes in moderation and as part of a balanced diet for a satisfying indulgence.

Dietary Adaptations

Dietary adaptations for chocolate milkshakes ensure everyone can enjoy this dessert. For gluten-free options, all listed ingredients are naturally gluten-free, allowing for easy inclusivity.

Dairy-free or vegan variations can be made with almond milk or coconut milk alongside dairy-free ice creams, providing similar textures and flavors without compromising dietary restrictions.

Low-carb and keto enthusiasts can substitute traditional ingredients with low-carb sweeteners and sugar-free ice creams, maintaining a delicious taste profile while adhering to dietary needs.

Paleo modifications could include using raw cocoa and natural sweeteners like honey for a healthier twist that aligns with paleo principles.

A careful selection of ingredients enables both delicious results and compliance with dietary guidelines, ensuring everyone participates in the fun.

Troubleshooting Guide

If encountering texture issues, often attributed to using overly soft ice cream—opt for firmer ice cream to maintain that perfect milkshake consistency. Blending for a shorter duration can also prevent a watery result.

For flavor balance, if the milkshake is too sweet, consider a hint of salt or a splash of vanilla extract to rebalance the flavors effectively.

Confront temperature problems by ensuring all ingredients are adequately chilled before blending; warm products can lead to a less satisfying result.

If your blender struggles with the desired thickness, adding less liquid or ice during blending can help achieve a more desirable consistency.

Ingredient substitutions should always be done cautiously; flavors like vanilla could enhance the classic chocolate taste if using flavored ice cream.

Timing concerns often relate to blending duration and preparation—focus on balancing both to ensure an efficient and flavorful outcome.

Recipe Success Stories

Community feedback regarding this chocolate milkshake has highlighted various successes, particularly with personal tweaks that enhance the recipe. Readers often share how they incorporated unique toppings reflecting their tastes or dietary preferences.

Through variations, users have joyfully embraced adaptations that cater to health-conscious lifestyles without sacrificing flavor, showcasing their creativity in the kitchen.

Photography insights reveal many enjoy capturing their milkshake moments; whether it’s a fun family event or a chilled summer afternoon, sharing these experiences has launched a new wave of enthusiasm for the recipe.

Engaging with the recipe allows for community connection, where followers can pass on tips and tricks from their personal kitchen adventures, uniting around a shared love for this classic dessert.

Frequently Asked Questions

Can I use dairy-free ingredients?
Yes! You can substitute regular milk and ice cream with almond or coconut alternatives to create a delicious dairy-free chocolate milkshake without losing flavor.

How long does a milkshake last in the fridge?
While it’s best to consume it immediately, a milkshake can last for about 30 minutes in the fridge before it begins to separate or lose its appealing texture.

What can I add for extra flavor?
Feel free to experiment with add-ins such as peanut butter, caramel, or a hint of mint or vanilla extract to enhance the taste profile of your chocolate milkshake.

Can I make it ahead of time?
Yes! You can pre-measure your ingredients and blend them right before serving to ensure the best texture and flavor. However, avoid blending too far in advance to maintain quality.

What types of ice cream work best?
Full-fat chocolate or vanilla ice cream works best for achieving that luscious, creamy texture. You can also try unique flavors like cookies and cream for a twist.

Is there a way to make it healthier?
Absolutely! Using lower-calorie ice cream, adding fruits like bananas, or using alternative sweeteners can all help create a healthier variation of your chocolate milkshake.

What equipment do I need?
A high-speed blender, measured cups, and a tall glass for serving are necessary. An ice cream scooper can be helpful for precise portions as well.

Is it necessary to garnish?
While not required, garnishing your milkshake with whipped cream, chocolate syrup, or a cherry adds visual appeal and enhances the indulgent experience of your drink.

Can I freeze my chocolate milkshake?
Yes, however, keeping it thick benefits from freezing in an airtight container for up to a week. Just be aware that it may need some blending afterward to regain texture.

Can I customize the sweetness?
Certainly! Start with lesser amounts of chocolate syrup and adjust to your taste for a sweet treat that suits your preferences.

Additional Resources

If you’re eager to expand your dessert repertoire, delve into related recipes that might excite your palate. Look for milkshake variations, including strawberry, banana, or even matcha flavors to diversify your chocolate milkshake experience.

Explore technique guides that cover essential blending methods or ingredient substitutions to enhance your cooking skills further. Tools for preparation like quality blenders can also make your milkshake-making journey smoother.

Discover more about ingredients, especially cocoa powder types, to find out what best suits your chocolate desires. Understanding how each ingredient interacts can be key in perfecting your recipes.

Lastly, keep the seasonal variations in mind! Fresh fruits or aromatic spices can easily be adapted into your chocolate milkshake to showcase seasonal delicacies.

Join the Conversation

Engaging with your audience about the chocolate milkshake recipe leads to wonderful community sharing. Encourage readers to share their personal stories or variations on social media, creating a community centered around delight and satisfaction.

Photography can enhance recipe sharing, and providing tips on capturing the perfect shot of a tempting milkshake may inspire others to join in on the creativity.

Encouraging recipe reviews can foster an atmosphere of appreciation, inspiring confidence in readers to experiment with their takes on the chocolate milkshake.

Lastly, community engagement allows for recipe modifications and suggestions, enabling everyone to share tips that can make this classic even more enjoyable.

The Recipe

Chocolate Milkshake

Serves: 2

Prep Time: 10 mins

Cook Time: 0 mins

Total Time: 10 mins

Kitchen Equipment Needed

  • Blender
  • Ice cream scoop
  • Tall glasses for serving
  • Measuring cups
  • Optional: Straw and whipped cream dispenser

Ingredients

  • 2 cups chocolate ice cream
  • 1 cup milk (any variety)
  • ¼ cup chocolate syrup
  • Whipped cream for garnish
  • Chocolate shavings or sprinkles for garnish (optional)

Directions

  1. In a blender, combine chocolate ice cream, milk, and chocolate syrup.
  2. Blend on medium speed until smooth and creamy, about 30 seconds.
  3. If the mixture is too thick, add a little more milk and blend again.
  4. Pour the milkshake into tall glasses and top with whipped cream.
  5. Garnish with chocolate shavings or sprinkles if desired.
  6. Serve immediately and enjoy your delicious chocolate milkshake!

Recipe Notes

  • For a thicker shake, reduce the amount of milk.
  • Add additional flavorings like vanilla or mint for a different twist.
  • Store any leftovers in the freezer, blending again before serving if necessary.

Delicious Homemade French Butter Cookies: Simple Recipe Inside!

Homemade French Butter Cookies Recipe: A Delightful Treat for Any Occasion

⚖️
Difficulty
Easy

⏲️
Prep Time
20 mins

🕒
Cook Time
12 mins

⏱️
Total Time
32 mins

🍽️
Servings
24 cookies

Indulging in Homemade French Butter Cookies brings an enchanting experience right to your kitchen. With rich buttery flavors and a melt-in-your-mouth texture, these cookies are a true testament to French baking. Each bite offers a perfect balance of sweetness and a delightful crumb that is sure to evoke feelings of warmth and comfort. These cookies can easily elevate any tea time or dessert spread with their elegant simplicity.

To create an inviting atmosphere, consider pairing these Homemade French Butter Cookies with a steaming cup of tea or coffee. Their buttery aroma fills the air as they bake, enticing your senses and promising a delightful treat. Perfectly golden and lightly crisped at the edges, these cookies not only taste delightful but look stunning on any platter, making them an excellent addition to celebrations or casual gatherings alike.

Quick Recipe Highlights

  • Flavor Profile: These cookies have a rich, buttery flavor complemented by a hint of vanilla, creating a perfect sweet treat.
  • Texture: Expect a tender, crumbly texture that melts in your mouth with every bite.
  • Aroma: A warm, buttery aroma fills your kitchen as they bake, making them irresistible.
  • Visual Appeal: Golden brown edges and a soft, pale center present a visually appealing dessert for any occasion.
  • Skill Level Needed: This easy recipe is suitable for bakers of all levels, making it beginner-friendly yet delightful for experienced cooks.
  • Special Equipment: A good quality baking sheet and parchment paper are essential for optimal baking.

Recipe Overview

  • Difficulty Level: This recipe’s simplicity makes it accessible for anyone. The straightforward steps and familiar ingredients help build confidence in novice bakers.
  • Category: Ideal for snacks, desserts, or tea time; these cookies fit a variety of edible categories.
  • Cuisine: French butter cookies, or “Sables,” are a classic French treat, showcasing the culinary tradition’s love for rich, indulgent flavors.
  • Cost: With minimal and affordable ingredients, you can create these luxurious cookies without breaking the bank.
  • Season: These cookies can be enjoyed anytime but especially shine during holidays and festive seasons.
  • Occasion: Perfect for birthdays, tea parties, or simply as a sweet treat at home, they suit multiple occasions.

Why You’ll Love This Recipe

The taste and texture of Homemade French Butter Cookies are unmatched. With their rich butter flavor enveloped in a light, crumbly exterior, each cookie delivers an exquisite sensation that both comforts and delights. The perfect sweetness complements a variety of beverages and makes every bite a moment of joy.

For those who love convenience, this recipe stands out. With a prep time of only 20 minutes, you can easily whip up a batch of cookies without extensive efforts. The process is straightforward, allowing you to engage in other activities while your cookies bake to perfection.

Nutritionally, while Homemade French Butter Cookies are definitely a treat, they can be enjoyed in moderation, offering a bit of joy without major guilt. The butter brings a richness that satisfies cravings effectively.

Socially, these cookies serve as an excellent addition to gatherings. Their classy appearance and delectable taste can ignite conversations and create joyful experiences. Whether you’re hosting friends or indulging with family, they’re sure to impress.

Cost-effectiveness is another bonus, as this recipe requires only a handful of basic ingredients. You won’t need to splurge on specialty items, making it accessible for everyone looking to enjoy a sophisticated dessert without monetary strain.

Historical Background and Cultural Significance

Homemade French Butter Cookies have a storied history that takes you on a journey through French culinary traditions. Originating in the 18th century, these cookies reflect the French love for butter and sugar in simple yet elegant treats. They demonstrate the French emphasis on elevating everyday ingredients into delightful confections.

The cultural significance of these cookies is profound, as they represent French baking’s artistic flair. Often enjoyed during gatherings and celebrations, they carry a sense of nostalgia and comfort that resonates across generations. Their presence in French literature and art further emphasizes their role in the nation’s cultural fabric.

Over the years, the recipe for these cookies has evolved, with several variations developing in different regions of France. Some locales impart unique flavors or shapes, but the essence remains the same—rich, buttery goodness.

Regional variations often include ingredients like chocolate or citrus zest, adding a local touch to the basic recipe. Each reinterpretation offers a glimpse into the unique culinary identities they represent, showcasing the versatility of this classic cookie.

Ingredient Deep Dive

The primary ingredient, butter, is the heart of the cookie, contributing not only flavor but also a tender texture. Historically, butter has been associated with indulgence and luxury in many cultures, including France, where the amount and quality of butter can greatly affect the final outcome of baked goods. Nutritionally, it provides fats that are essential for energy, but selection should focus on high-quality, unsalted butter for the best flavor.

Sugar, another key ingredient, serves not only as a sweetener but also as a tenderizer, helping to create the delicate crumb of the cookies. It has historical roots in ancient civilizations where it was considered a precious commodity. For optimal results, using granulated sugar allows for proper solubility and texture.

All-purpose flour is essential for structure, providing the necessary gluten formation to hold the cookies together. It’s widely used due to its versatility and availability. Whole wheat flour can be a healthier substitute, offering more fiber and nutrients, but may slightly alter the texture.

Vanilla extract adds aromatic depth to the cookies, embodying the essence of classic baking. This ingredient, derived from vanilla beans, carries a strong cultural significance in desserts, enhancing the overall sensory experience while offering its own unique health benefits, such as antioxidant properties.

Eggs play a crucial role in binding ingredients together, offering moisture and richness. Their use in cookies dates back centuries, making them a staple in baking. Understanding their role can help in selecting whether to use whole eggs or to substitute with eggless options for vegan recipes.

Common Mistakes to Avoid

  • Using cold butter: Ensure the butter is at room temperature for easy creaming, which leads to a light texture.
  • Overmixing the dough: This can result in tough cookies; mix just until combined.
  • Not chilling the dough: Skipping the chilling step can lead to cookies that spread too much during baking.
  • Ignoring oven temperature: A preheated oven ensures even baking and optimal cookie rise.
  • Baking on ungreased sheets: Use parchment paper to prevent sticking and promote even baking.
  • Wrong ingredient measurements: Always level ingredients accurately to ensure consistency in results.
  • Overbaking: Watch closely and remove cookies when they are lightly golden to retain their tenderness.
  • Storing improperly: Keep cookies in airtight containers to maintain their freshness and texture.

Essential Techniques

To achieve perfectly baked Homemade French Butter Cookies, mastering the creaming technique is paramount. Creaming butter and sugar until light and fluffy incorporates air, leading to a soft, light texture. Avoid the common pitfall of over-creaming, which can result in overly fluffy cookies rather than a tender crumb.

Another important technique is proper baking time management. Familiarize yourself with visual cues such as the color of the edges and the texture change of the cookies to determine doneness. Allow them to rest on the baking sheet briefly post-baking to firm up before transferring them to a cooling rack.

Pro Tips for Perfect Homemade French Butter Cookies

1. Use high-quality butter for the best flavor—real butter really makes a difference in taste.
2. Chill the cookie dough for at least 30 minutes before baking to prevent excessive spreading.
3. Experiment with flavorings—try almond extract or citrus zest for a unique twist.
4. Ensure even cookie size by using a cookie scoop for consistent portioning.
5. Store cookies in a cool, dry place to maintain freshness and prevent them from becoming stale.
6. For a decorative touch, sprinkle the tops with coarse sea salt before baking.
7. Double the batch and freeze half for a quick last-minute treat.
8. Try incorporating chocolate chips or nuts for added texture and taste variety.

Variations and Adaptations

To broaden the appeal of your Homemade French Butter Cookies, consider regional variations. In some French regions, spices like cinnamon or nutmeg can be incorporated for a warm flavor profile. During the holiday season, adding seasonal spices can enliven the classic cookie taste.

For a healthier adaptation, you could substitute part of the all-purpose flour with almond or oat flour. This modification can enhance nutrition while bringing a delightful nutty flavor to the cookies.

Dietary restrictions also allow for significant adaptations. Creating a vegan version by using plant-based butter, flaxseed meal, or applesauce as egg substitutes will lead to equally delicious results for dairy-free enthusiasts.

Texture modifications can be achieved by changing the baking time or experiment with the thickness of the dough when shaping cookies. Thicker cookies generally take longer to bake while remaining softer inside, while thinner ones will crisp up.

Additionally, consider seasonal adaptations by incorporating cranberries or pumpkin spice during fall, or lemon zest and blueberries in warmer months to create cookies that reflect their surroundings.

Serving and Presentation Guide

For a beautifully presented display of Homemade French Butter Cookies, consider using tiered serving platters to elevate their appearance. Garnish with fresh mint or edible flowers to enhance the visual appeal.

Offering additional accompaniments like chocolate dips or gourmet teas can enhance the overall experience. Plating techniques can include arranging cookies in a fan shape, or neatly stacking them, allowing guests easy access while adding visual interest.

Serve the cookies at room temperature, allowing the rich flavors to shine. For added enjoyment, consider portioning them into small boxes or bags tied with ribbons as charming take-home gifts for gatherings or special occasions.

Wine and Beverage Pairing

Pair your Homemade French Butter Cookies with a light dessert wine, such as a Moscato or a late harvest Riesling, which complements the sweetness of the cookies beautifully.

For a non-alcoholic alternative, serve them with a refreshing herbal tea, such as chamomile or peppermint, which contrasts nicely with the rich butter flavor.

If sharing these cookies with coffee lovers, consider brewing a classic espresso, as its boldness balances the sweetness. Ensure that all beverages served are at optimal temperatures to enhance the tasting experience.

Storage and Shelf Life

Homemade French Butter Cookies can be stored in an airtight container at room temperature for up to a week. If you wish to prolong their freshness, keeping them in the refrigerator can extend their shelf life.

For longer-lasting storage, these cookies freeze beautifully. Enter airtight freezer bags or containers, allowing you to enjoy a taste of homemade goodness even after weeks post-baking. Just ensure they are completely cooled before freezing to prevent condensation.

Signs of spoilage to look for include a change in texture or an off smell. When reheating, allow them to come to room temperature or give a quick burst in the microwave to revive their original softness.

Make Ahead Strategies

For those busy days, preparing Homemade French Butter Cookies can be made easier with strategic planning. You can prepare the dough in advance and keep it chilled in the refrigerator for a day before baking. This strategy not only saves time but also enhances the flavor as the dough rests.

Another option includes forming the cookies into shapes and freezing them before baking. This method means you can bake fresh cookies on a whim; just add an extra minute or two to the baking time.

Quality is maintained even when prepared ahead of time. Just remember to store any freshly baked cookies in airtight containers to maintain their texture and prevent staleness.

Scaling Instructions

If you’d like to adjust the quantity of your Homemade French Butter Cookies, scaling the recipe is straightforward. Halving the recipe is as simple as dividing the ingredients while maintaining the same ratios.

For larger gatherings, doubling or even tripling the recipe is easy. Just ensure you have enough oven space and baking sheets to accommodate larger batches, potentially requiring staggered baking times.

Equipment adjustments may involve larger mixing bowls and utensils to manage increased ingredient quantities. Timing modifications should be minimal, but be attentive to visual cues for doneness, as larger batches may require adjustments in baking time.

Nutritional Deep Dive

Understanding the nutritional profile of Homemade French Butter Cookies can help inform your enjoyment. Each cookie generally contains primarily carbohydrates and fats, with a balance of protein from butter and eggs. This combination provides a satisfying bite.

Micronutrient analysis can vary depending on added ingredients, but generally, cookies will lack substantial vitamins and minerals. To make them healthier, consider substituting some flour with whole grains or adding nuts for extra nutritional value.

Health benefits are mainly derived from moderation. When part of a balanced diet, these cookies can offer comfort and satisfaction without excessive calorie consumption.

Understanding portion sizes is beneficial for maintaining weight management goals. Consider enjoying a couple of cookies alongside a piece of fruit to create a balanced treat that satiates cravings without overindulgence.

Dietary Adaptations

For those following gluten-free diets, substituting traditional flour for a gluten-free blend or almond flour can yield delicious results without sacrificing taste. Ensure all other ingredients are also certified gluten-free.

Dairy-free versions can be achieved using plant-based butter and flaxseed eggs to replace traditional eggs, maintaining the flavor profile while adhering to dietary restrictions.

Vegans can delight in these cookies by utilizing similar substitutions, offering a rich and creamy taste without the use of animal products. Low-carb and keto adaptations could involve using almond flour and erythritol instead of granulated sugar.

For those with specific dietary needs, such as a low-FODMAP diet, consider adjusting the ingredient list to remove high FODMAP items while sticking to flavors that are gentle on the digestive system.

Troubleshooting Guide

Encountering problems while baking Homemade French Butter Cookies may seem daunting, but many issues are easily resolved. If your cookies turn out too tough, it’s likely due to overmixing the dough or adding too much flour. Ensuring proper measuring techniques and only mixing just until combined can help.

For flat cookies, check if your butter was too warm out of the fridge, leading to spreading during baking. Chilling your dough can help in achieving desired thickness.

If the flavors are off-balance, the addition of sweeteners or flavoring extracts may be necessary. Just a pinch of salt can elevate the overall flavor profile as well.

Texture issues can arise if the dough is not adequately chilled before baking. Adopting a chilling step in the preparation can ensure a better final outcome.

Recipe Success Stories

Listeners’ feedback on Homemade French Butter Cookies has been overwhelmingly positive! Many bakers report success with this recipe, raving about its simplicity and delectable taste. Variations using nut flours or citrus zest have garnered additional praise, highlighting the flexibility of this classic cookie.

Photography enthusiasts have also shared stunning images of their cookies, showcasing their golden-brown hue and elegant presentation. Homemade French Butter Cookies have become a crowd-pleaser at family gatherings, with stories of friends requesting the recipe after sampling these delightful treats.

Readily adaptable, bakers have experimented with various flavors, turning what began as a straightforward recipe into personal favorites, affirming that everyone should try to make these delicious cookies at home.

Frequently Asked Questions

Can I substitute the butter with margarine?

It is possible to substitute butter with margarine; however, the flavor and texture may not be as rich or authentic. If you choose to do so, opt for high-quality margarine to achieve better results.

How can I ensure my cookies are soft and chewy?

To achieve soft and chewy cookies, avoid overbaking. Remove them from the oven when they’re slightly underbaked; this allows them to continue cooking on the baking sheet.

Can I add chocolate chips to the dough?

Absolutely! Adding chocolate chips or chunks is an excellent way to customize the recipe and create variations that satisfy different taste preferences.

Is it necessary to chill the dough before baking?

Chilling the dough helps eliminate excess spreading, which results in cookies that are a more appealing shape. While not strictly necessary, it is highly recommended.

How should I store leftover cookies?

Store leftover cookies in an airtight container at room temperature for up to a week or freeze them for longer storage. Make sure they are completely cooled before storing.

What can I do if my cookies spread too much while baking?

If your cookies spread too much, try chilling the dough for longer before baking or reducing the amount of butter slightly in your next batch to see if it helps.

Can I use a different kind of flour?

Yes, you can use whole wheat flour for a healthier alternative, but be aware that it may slightly alter the texture and flavor. Gluten-free flour blends are also an option.

How do I know when the cookies are done baking?

Look for the edges to turn golden brown while the centers remain pale. The cookies should look slightly underbaked, as they will continue to set while cooling.

Can I freeze the cookie dough before baking?

Yes, you can freeze cookie dough! Shape it into balls, freeze them on a baking sheet, then transfer to an airtight container or bag for longer storage.

What is the best way to serve these cookies?

Presenting the cookies on a tiered platter with fresh herbs or flowers creates an inviting display. Pair them with tea or coffee for a delightful experience.

Additional Resources

For those eager to further explore baking, consider checking out related recipes for classic French pastries such as Madeleines or éclairs. These recipes carry similar techniques and flavors, making them excellent companions to your cookie-making experience.

Also, check out technique guides on how to create different dough textures or incorporating flavors into baking. Understanding your ingredients can also elevate your baking success, so delve into ingredient information, learning how butter, flour, and sugar interact.

If you’re fascinated by seasonal baking, explore recipes that reflect the changing seasons, combining fresh produce or festive spices to inspire your next baking adventure.

Join the Conversation

We love hearing from you! Share your experiences, tips, and photos of your Homemade French Butter Cookies on social media. Join our community of baking enthusiasts and engage in recipe discussions, share modifications, and inspire each other with creativity.

Post your cookies using dedicated hashtags for a chance to be featured, and offer your insights on variations that have worked well for you. Whether you’ve experimented with flavors or decorations, your feedback enriches our baking community!


The Recipe

Homemade French Butter Cookies

Serves: 24 cookies

Prep Time: 20 mins

Cook Time: 12 mins

Total Time: 32 mins

Kitchen Equipment Needed

  • Baking sheets
  • Parchment paper
  • Mixing bowls
  • Electric mixer or whisk
  • Cookie scoop (optional)

Ingredients

  • 1 cup unsalted butter, softened
  • 1/2 cup granulated sugar
  • 1/4 cup powdered sugar
  • 1 teaspoon vanilla extract
  • 2 cups all-purpose flour
  • 1/4 teaspoon salt

Directions

  1. Preheat your oven to 350°F (175°C) and line baking sheets with parchment paper.
  2. In a mixing bowl, cream together the softened butter, granulated sugar, and powdered sugar until light and fluffy.
  3. Add in the vanilla extract and mix until combined.
  4. Gradually add the all-purpose flour and salt to the mixture, folding until just combined.
  5. Chill the dough for 30 minutes in the refrigerator.
  6. Using a cookie scoop or spoon, drop rounded tablespoons of dough onto the prepared baking sheets, spacing them about 2 inches apart.
  7. Bake for 10-12 minutes, or until the edges are lightly golden.
  8. Remove from the oven and let cool on the baking sheets for a few minutes before transferring to wire racks to cool completely.

Recipe Notes

  • For added flavor, consider adding lemon or orange zest to the dough before baking.
  • For a decorative touch, sprinkle cookies with coarse sugar before baking.
  • Cookies can be stored in an airtight container for up to a week.

Delicious Lemon Coconut Cheesecake Cookies Recipe to Try Today

Lemon Coconut Cheesecake Cookies: A Delightful Treat for Any Occasion

⚖️
Difficulty
Easy

⏲️
Prep Time
15 mins

🕒
Cook Time
10 mins

⏱️
Total Time
25 mins

🍽️
Servings
24 cookies

These Lemon Coconut Cheesecake Cookies are a delightful fusion of flavors that combines the tangy brightness of lemon with the creamy richness of cheesecake and the tropical essence of coconut. Picture taking a bite and being greeted by the soft, chewy texture that melts in your mouth, followed by the refreshing zing of lemon. These cookies evoke the feeling of a sunny day at the beach, perfect for enjoying as a midday snack or serving at your next gathering.

The simplicity of this cookie recipe makes it a fantastic choice for bakers of all skill levels. Whether you’re a seasoned baker or just getting started, this recipe allows you to create impressive sweet treats without the need for exhaustive techniques. The combination of flavors offers a wonderful sensory experience that’s sure to delight your taste buds and impress your guests.

Quick Recipe Highlights

  • Flavor Profile: These cookies boast a perfect blend of zesty lemon and creamy coconut flavors, sweetened just right for an irresistible dessert.
  • Texture: The chewy texture combined with a hint of crunch from the edges creates a delightful contrast that enhances the overall experience.
  • Aroma: The cookies emit a wonderful aroma of fresh lemon and toasted coconut, inviting you into the kitchen and making it hard to resist.
  • Visual Appeal: The pale yellow color from the lemon zest and the sprinkle of shredded coconut on top offer an inviting look, making them visually appealing for any dessert table.
  • Skill Level Needed: With easy-to-follow steps, this cookie recipe is perfect for beginners while still offering enough charm for the experienced baker.
  • Special Equipment: All you need are basic baking tools, including mixing bowls, a baking sheet, and a whisk—no fancy gadgets required!

Recipe Overview

  • Difficulty Level: This recipe is classified as easy because it requires minimal steps and ingredients, making it approachable for novice bakers.
  • Category: Perfect for dessert, snacks, or even as a delightful treat with afternoon tea, these cookies can fit into various meal categories.
  • Cuisine: Inspired by tropical flavors, these cookies reflect influences from both American and tropical cuisine, marrying the best of both worlds.
  • Cost: The ingredients for these cookies are affordable, making them a cost-effective choice for delicious homemade sweets.
  • Season: The bright lemon flavor makes these cookies ideal for spring and summer, bringing a refreshing twist during warmer months.
  • Occasion: Perfect for birthday parties, potlucks, or simple tea gatherings, these cookies are sure to be a crowd-pleaser at any event.

Why You’ll Love This Recipe

The combination of tastes and textures in these Lemon Coconut Cheesecake Cookies will elevate your snacking experience. The bright citrus notes offer a refreshing contrast to the rich, creamy undertones of the cheesecake flavor, satisfying any dessert craving. With each bite, the touch of coconut adds a satisfying chewiness that complements the cookie’s overall structure.

One of the best aspects of this recipe is its convenience. With a quick preparation and baking time, you can enjoy freshly baked cookies in less than half an hour. This fast-paced process is perfect for those impromptu dessert cravings or when unexpected guests arrive. The simplicity of the recipe also allows for easy clean-up, leaving you with more time to relax and enjoy your delectable treats.

Nutritionally, these cookies offer a mix of carbohydrates from the sugar and flour, along with healthy fats from the coconut. While they are indulgent, using fresh lemon juice can contribute a slight boost of vitamin C, making them a sweet treat you can feel good about enjoying in moderation.

From a social aspect, these cookies are fantastic for sharing with friends and family. Their vibrant flavors spark conversations and create happy memories, whether enjoyed during a casual get-together or a festive occasion. Baking together provides an excellent bonding opportunity, and presenting a platter of these cookies is sure to impress.

Lastly, the cost-effectiveness of this recipe is another reason to love it. The ingredients are widely available and inexpensive, enabling you to whip up a delicious batch without breaking the bank. Even better, you can easily double the recipe for larger gatherings, making these cookies a reliable choice for entertaining.

Historical Background and Cultural Significance

The origin of cookies like these Lemon Coconut Cheesecake Cookies can be traced back to the fusion of traditional baking practices with modern tastes. While cookies have long been embedded in various cultures, the combination of cheesecake and cookies reflects a craze for miniaturized desserts that are both convenient and shareable.

Culturally, desserts have a significant role in celebrations and gatherings. In many societies, sweets signify happiness and unity, making them an integral part of festive occasions. The introduction of tropical flavors like coconut illustrates how global ingredients can come together to create something uniquely delightful, resonant with many culinary heritages.

The evolution of dessert styles has led to a broad adaptation of flavors in baked goods. By integrating cheesecake elements with cookies, this recipe taps into a trend that highlights the popularity of rich yet approachable desserts. As baking enthusiasts continue to experiment, variations of this recipe will likely surface, showcasing different flavor profiles inspired by local ingredients.

Regional variations can be embraced in these cookies, inspiring creative twists tied to seasonal ingredients or local preferences. This adaptability ensures that the recipe can remain relevant and exciting across various cultures and cuisines.

Ingredient Deep Dive

Lemon
Lemons have a rich history, originating in Asia and becoming a staple in culinary practices around the world. In this recipe, fresh lemon juice and zest provide a vibrant flavor that balances sweetness with acidity. Nutritionally, lemons are low in calories and a great source of vitamin C, enhancing the immune system. When selecting lemons, opt for firm, bright, and heavy fruits, as these have more juice. Store them at room temperature for short periods, or refrigerate for longer freshness. You can also substitute fresh lemons with bottled lemon juice, although fresh yields a more robust flavor.

Coconut
Coconut has long been celebrated, particularly in tropical regions, for its versatility and health benefits. It is rich in medium-chain triglycerides, which can provide quick energy. When choosing coconut for this recipe, opt for unsweetened shredded coconut for better control over sweetness. Proper storage involves keeping coconut in an airtight container to maintain freshness. Unsweetened coconut can be substituted with sweetened varieties, but remember to adjust the sugar content in your overall recipe. This versatile ingredient can also be incorporated in various forms, such as coconut flour or milk, adding unique textures and flavors to multiple dishes.

Common Mistakes to Avoid

  • Overmixing the batter: This can lead to dense cookies; mix just until the ingredients are combined.
  • Not chilling the dough: If the dough isn’t allowed to cool, the cookies may spread too much while baking.
  • Underbaking: Cookies should be golden around the edges but soft in the center when removed from the oven.
  • Using stale ingredients: Always check the freshness of your baking powder, baking soda, and flour for the best results.
  • Skipping the zest: Adding lemon zest is essential for that extra burst of flavor; don’t leave it out!
  • Incorrect oven temperature: Always preheat your oven and use an oven thermometer to ensure accurate baking.
  • Not spacing the cookies properly: Leaving adequate space between cookies allows them to rise and bake evenly.
  • Ignoring cooling time: Let the cookies cool on the baking sheet for a few minutes before transferring them to a wire rack.

Essential Techniques

Mixing Ingredients
Proper mixing is crucial to ensure your cookies achieve the right texture. Be careful not to overmix once you add the dry ingredients to avoid tough cookies. Mix just until combined, and you’ll achieve a delightful chewiness.

Chilling the Dough
Chilling the dough is a fundamental step that allows the flavors to meld and prevents excessive spreading during baking. Aim for at least 30 minutes of chilling time in the refrigerator before baking your cookies.

Pro Tips for Perfect Lemon Coconut Cheesecake Cookies

1. Use fresh ingredients, especially lemons, to enhance the overall flavor profile of your cookies.
2. Avoid using cold butter; let it come to room temperature for better incorporation into the dough.
3. Experiment with adding more coconut or lemon zest for an intensified flavor experience.
4. For a tropical twist, consider adding macadamia nuts for an interesting crunch.
5. Ensure even baking by rotating your baking tray halfway through the cooking time.
6. If you’re a fan of cream cheese, consider swirling some into the dough for extra richness.
7. For a gluten-free option, substitute regular flour with gluten-free all-purpose flour.
8. Store any leftovers in an airtight container to keep them fresh longer.

Variations and Adaptations

These Lemon Coconut Cheesecake Cookies can easily be adapted to suit your preferences. For a regional variation, consider adding tropical fruits like pineapple or mango to introduce a refreshing sweetness. Seasonal adaptations might include incorporating spices such as cinnamon or nutmeg during the fall months for a cozy twist.

Dietary modifications can make this cookie suitable for different diets. For a vegan option, substitute the butter with coconut oil and use plant-based cream cheese. You may also experiment with low-carb alternatives to suit a keto diet, replacing sugar with erythritol or another suitable sweetener.

Flavor variations can also be achieved by swapping the lemon for lime or orange to create different citrus profiles. If you’re looking for altered textures, consider pressing some crushed graham crackers into the dough to evoke a classic cheesecake crust.

Finally, presentation can be enhanced by drizzling melted white chocolate on top of the cookies or tossing in colorful sprinkles to celebrate special occasions.

Serving and Presentation Guide

To serve your Lemon Coconut Cheesecake Cookies beautifully, consider using a decorative platter that highlights their bright colors. Place the cookies in clusters or stacks for a visually appealing display. A light dusting of powdered sugar adds a touch of elegance and can enhance their tropical look.

For garnishing, you might top each cookie with a thin slice of lemon, a sprig of mint, or a sprinkle of shredded coconut for an extra pop of color. Traditional accompaniments such as a scoop of vanilla ice cream will elevate your treat to a whole new level, or consider serving with a refreshing glass of iced tea.

Modern serving suggestions might include offering these cookies with craft cocktails or mocktails that complement their citrus flavors. If serving warm, ensure they cool just enough to avoid burnt fingers, as warm cookies have a beautiful, gooey texture that delights.

Don’t forget portion control; if hosting a gathering, consider cutting larger cookies in half to allow guests to enjoy a variety of tastes without overindulgence.

Wine and Beverage Pairing

When it comes to pairing beverages with Lemon Coconut Cheesecake Cookies, opt for light wines that complement the citrus profile. A chilled Riesling or Sauvignon Blanc would be fantastic, with their fruity notes enhancing the flavor of the cookies.

For a non-alcoholic alternative, iced herbal teas or lemon-infused sparkling water create refreshing refreshments that mirror the cookies’ flavor. Additionally, pairing with a chilled Earl Grey tea can introduce floral notes that enhance the overall experience.

If you’re keen on coffee, consider offering a light roast that balances the cookie’s sweetness. Serving these cookies slightly warm with a shot of espresso or cappuccino can create a delightful contrast between hot and cold, thick and creamy.

Storage and Shelf Life

To keep your Lemon Coconut Cheesecake Cookies fresh, store them in an airtight container at room temperature for up to a week. If you want to prolong their shelf life, you can refrigerate them for more extended freshness, although they may lose some of their chewy texture.

If you need to freeze your cookies, ensure they are completely cool before placing them in a freezer-safe container with layers of parchment paper to prevent sticking. They can be frozen for up to three months. When you’re ready to enjoy them, simply thaw at room temperature or pop them into a microwave for a few seconds.

Always watch for signs of spoilage, including changes in texture or discoloration. If they start to smell off or dry out, it’s best to discard them.

Make Ahead Strategies

To make these Lemon Coconut Cheesecake Cookies ahead of time, prepare the dough and refrigerate for up to 24 hours before baking. This not only enhances the flavor but also makes the baking process quicker on the day you plan to serve them.

If you prefer, you can scoop the dough into balls and freeze. When ready to bake, take them out of the freezer and add a couple of minutes to the baking time. This strategy maintains the freshly baked experience even when you’re short on prep time.

For keeping the cookies fresh after baking, allow them to cool completely before storage to prevent moisture accumulation. Consider storing them in separate layers, separated by parchment paper, to maintain their texture and flavor.

Scaling Instructions

If you wish to halve the recipe for a smaller batch, simply divide all ingredient amounts by two. This is a fast and straightforward way to make fewer cookies while still enjoying the delightful flavor.

For those looking to double or triple the recipe, ensure you have sufficient baking trays and space in your oven. It’s also wise to adjust baking times as larger batches may need a bit longer.

Keep in mind that some adjustments might affect the cooking times—always monitor your cookies as they bake, looking for visual cues such as color and texture to determine doneness.

When scaling, consider storage concerns as well. Provide ample storage containers to accommodate additional cookies to keep them fresh and delicious.

Nutritional Deep Dive

Lemon Coconut Cheesecake Cookies are a delightful dessert that can be enjoyed as part of a balanced diet. In terms of macronutrients, they are primarily composed of carbohydrates from flour and sugar, providing a quick source of energy. The inclusion of coconut also adds healthy fats, contributing to the cookie’s overall richness.

Micronutrient analysis reveals that these cookies offer small amounts of vitamins and minerals, particularly from the lemon juice, which is a good source of vitamin C. Though they are indulgent, having them in moderation can add joy without significantly impacting your overall nutrient intake.

For health-conscious consumers, portion control is essential when enjoying these cookies. By keeping an eye on serving sizes, you can appreciate the flavors without overindulging. They can also satisfy your sweet tooth more effectively than higher-calorie treat options when enjoyed in smaller amounts.

Additionally, Lemon Coconut Cheesecake Cookies can serve as a rewarding treat for physically active individuals seeking a quick source of energy after exercise.

Dietary Adaptations

For those requiring gluten-free options, substitute regular flour with a gluten-free all-purpose blend to ensure a delightful texture. Ensure that all other ingredients are also gluten-free to maintain safety and enjoyment.

For dairy-free diets, utilize coconut oil in place of butter and a vegan cream cheese alternative, which will allow you to enjoy the creaminess without the dairy.

Vegans can also enjoy these cookies by choosing plant-based substitutes without sacrificing flavor. Exploring low-carb choices, such as almond flour or coconut flour, can cater to those on keto or paleo diets while delivering a similar taste experience.

To accommodate low-FODMAP diets, replace regular sugar with suitable alternatives and watch ingredient selections carefully to ensure compliance.

Troubleshooting Guide

Texture issues can arise if the dough is overly mixed. Always mix until just combined to preserve a soft texture. Flavor balance can be adjusted by tweaking the lemon juice or sugar levels, ensuring a perfect taste for the recipe.

Temperature problems often occur when an oven isn’t adequately preheated; invest in a good oven thermometer to avoid this common pitfall. Equipment challenges should involve checking your baking sheets and parchment paper choices to prevent sticking.

Ingredient substitutions may lead to unexpected results—research adequate replacements if trying something new, as not all ingredients interact the same way. Be mindful of timing concerns, particularly when making larger batches; always watch for visual cues for doneness.

Recipe Success Stories

Community feedback around these Lemon Coconut Cheesecake Cookies has been overwhelmingly positive. Many home bakers have reported that they were a hit at gatherings, with requests for the recipe flowing in post-party. Others have shared variations where they successfully substituted different citrus flavors, showcasing the versatility of the recipe.

Variation successes also include the addition of nuts and other fruits, earning rave reviews for how they enhanced the cookie’s textural appeal. Readers have suggested clever plating ideas and accompaniment options that have helped make these cookies the star of the show.

Suggestions for photography tips and social media sharing have contributed to community engagement, making it easy to join the conversation and give a personal touch to baking experiences.

Frequently Asked Questions

Can I use bottled lemon juice instead of fresh?

While bottled lemon juice can work in a pinch, fresh lemon juice provides a brighter flavor and more aromatic experience that truly enhances these cookies. To maintain the best results, opt for fresh lemons when possible.

How do I store leftovers?

Store leftover cookies in an airtight container at room temperature for up to a week. If they’re not consumed within that time, consider refrigerating or freezing for longer storage options.

Can I freeze the cookie dough?

Yes, you can freeze the cookie dough! Scoop the dough into balls and freeze them on a baking sheet. Once solid, transfer them to an airtight container for up to three months. When ready to bake, add a couple of extra minutes to the baking time.

What can I substitute for coconut if I don’t like it?

If you’re not a fan of coconut, you can omit it entirely or consider adding finely chopped nuts, like walnuts or pecans, or try using a different type of flavored extract to adjust the taste to your preference.

What if my cookies spread too much while baking?

If your cookies spread too much while baking, it could be due to the dough being too warm. Ensure you chill the dough for at least 30 minutes before baking to help them maintain shape.

Can I use whole wheat flour instead of all-purpose flour?

Yes, you can use whole wheat flour, but it might alter the texture slightly, making them denser. Start by substituting half of the all-purpose flour with whole wheat flour to maintain some lightness in the cookies.

Are these cookies gluten-free?

These cookies are not gluten-free as written, but you can easily make them gluten-free by replacing the all-purpose flour with a gluten-free flour blend. Just ensure all other ingredients are also gluten-free.

Can I add chocolate chips to the recipe?

Absolutely! Adding white chocolate chips or even dark chocolate chunks can offer an exciting dimension to these cookies, creating a flavor combination that complements the lemon and coconut beautifully.

What is the best way to serve these cookies?

These cookies are best served fresh but can also be enjoyed with a side of coffee, tea, or even a scoop of ice cream for an indulgent treat.

Can I double the recipe?

Yes, you can double the recipe to make a larger batch. Just ensure you have enough baking sheets available and keep an eye on the cooking time as it may vary with larger batches.

Additional Resources

For those looking for related recipes, consider checking out other citrus-infused desserts or those featuring coconut, like Coconut Macaroons or Key Lime Pie. Technique guides on cookie baking can help refine your skills further, addressing common issues and improving the overall outcome.

Ingredient information also plays a crucial role in cookie baking; understanding the properties of your key ingredients can significantly impact textures and flavors. Finally, equipment recommendations can lead you to the best baking sheets and mixing tools to facilitate your baking adventures.

Join the Conversation

We encourage you to share your baking experiences with these Lemon Coconut Cheesecake Cookies on social media. Use hashtags to connect with fellow bakers and inspire others with your beautiful cookie creations. Photography tips can help you showcase your work, whether for personal memories or social sharing.

Recipe reviews are also a great way to engage within the community, offering feedback that can help improve variations and adaptations of this recipe. Let’s create a vibrant community of bakers sharing and celebrating delicious cookie moments together!

The Recipe

Lemon Coconut Cheesecake Cookies

Serves: 24 cookies

Prep Time: 15 mins

Cook Time: 10 mins

Total Time: 25 mins

Kitchen Equipment Needed

  • Mixing bowls
  • Whisk
  • Baking sheet
  • Parchment paper
  • Measuring cups and spoons

Ingredients

  • 1 cup all-purpose flour
  • 1/2 cup unsweetened shredded coconut
  • 1/2 cup sugar
  • 1/4 cup butter, softened
  • 1/4 cup cream cheese, softened
  • 1 egg
  • 1 tablespoon lemon zest
  • 2 tablespoons fresh lemon juice
  • 1/2 teaspoon baking powder
  • 1/4 teaspoon salt

Directions

  1. Preheat your oven to 350°F (175°C) and line a baking sheet with parchment paper.
  2. In a mixing bowl, beat the softened butter and cream cheese until creamy.
  3. Add the sugar, egg, lemon zest, and lemon juice to the mixture, and combine well.
  4. In a separate bowl, whisk together the flour, shredded coconut, baking powder, and salt.
  5. Gradually add the dry ingredients to the wet mixture, stirring until just combined.
  6. Scoop tablespoon-sized portions of the dough onto the prepared baking sheet, spacing them about 2 inches apart.
  7. Bake for 10-12 minutes or until the edges are lightly golden.
  8. Remove from the oven and let the cookies cool on the baking sheet for a few minutes before transferring them to a wire rack to cool completely.

Recipe Notes

  • For a richer flavor, consider adding white chocolate chips to the dough.
  • Store any leftovers in an airtight container to maintain freshness.
  • For gluten-free options, use a gluten-free flour blend and check other ingredients for gluten.

Indulge in Heavenly Millionaire’s Cheesecake: A Decadent Delight

Heavenly Millionaire’s Cheesecake: A Decadent Delight for Every Occasion

⚖️
Difficulty
Intermediate

⏲️
Prep Time
30 mins

🕒
Cook Time
1 hour

⏱️
Total Time
1 hour 30 mins

🍽️
Servings
8 servings

Indulge in the rich, creamy layers of our Heavenly Millionaire’s Cheesecake. This dessert is a true showstopper, combining the best elements of a classic cheesecake with a luxurious chocolate and caramel topping. Imagine cutting into a slice, revealing the beautiful layers that celebrate both the sweetness of the caramel and the earthy richness of the chocolate. Perfect for special occasions or whenever you want to treat yourself, this cheesecake is sure to impress your friends and family.

This Heavenly Millionaire’s Cheesecake not only satisfies your sweet tooth but also offers a balance of flavors that are both decadent and delightful. The smooth cheesecake layer is complemented by a buttery crust and finished with a luscious chocolate-caramel topping that creates an unforgettable taste experience. Each bite is a heavenly combination of flavors and textures, making it a favorite among cheesecake lovers.

Quick Recipe Highlights

  • Flavor Profile: This cheesecake features a harmonious blend of sweet caramel, rich chocolate, and creamy cheesecake flavors that tantalize the taste buds and leave you wanting more.
  • Texture: With its creamy filling, crunchy crust, and silky caramel topping, the texture of this cheesecake is truly out of this world.
  • Aroma: The delightful aroma of baked chocolate and warm caramel fills your kitchen, inviting everyone to indulge in this blissful treat.
  • Visual Appeal: The stunning layers and glossy caramel topping create an impressive dessert that will be the centerpiece of your table.
  • Skill Level Needed: While this recipe may seem complex, with careful attention to each layer, even novice bakers can achieve remarkable results.
  • Special Equipment: You’ll need a springform pan, mixer, and a few mixing bowls to prepare this decadently delightful cheesecake.

Recipe Overview

  • Difficulty Level: The Heavenly Millionaire’s Cheesecake is classified as intermediate due to the multiple layers and steps involved, making it perfect for those looking to challenge their baking skills.
  • Category: This decadent cheesecake fits perfectly in the dessert category, ideal for celebrations or as a sweet ending to a meal.
  • Cuisine: While it draws inspiration from classic American desserts, elements such as caramel and chocolate give it a luxurious twist that transcends traditional borders.
  • Cost: Though ingredients like cream cheese and good-quality chocolate may be slightly pricier, the results justify the splurge for a special occasion.
  • Season: This cheesecake shines during festive seasons, making it a favored choice for holidays like Christmas and Thanksgiving.
  • Occasion: Whether it’s a birthday celebration, holiday gathering, or dinner party, this cheesecake is perfect for any special moment.

Why You’ll Love This Recipe

The Heavenly Millionaire’s Cheesecake is a true delight, offering a unique taste profile that combines sweetness with richness, making it irresistible for dessert lovers. The creamy texture of the cheesecake provides an indulgent contrast to the crunchy crust and luscious caramel layer, making each bite a joyous experience. It’s not just a dessert; it’s a celebration on a plate, perfect for making memories with family and friends.

In addition to its mouthwatering flavors, this cheesecake is a convenient dessert that can be prepared in advance. This makes it a great option for busy hosts looking to impress guests without spending all day in the kitchen. Simply prepare the cheesecake ahead of time, refrigerate it, and serve it chilled, providing a refreshing treat that balances well with rich flavors.

Nutritionally, while desserts should be enjoyed in moderation, the ingredients in this dessert can provide some benefits. Cream cheese contains beneficial calcium, while using high-quality chocolate won’t just elevate the taste but can also offer antioxidants if used in moderation. Thus, while enjoying this dessert, you can indulge your sweet tooth with a touch of guilt-free pleasure.

When hosting, desserts like this Heavenly Millionaire’s Cheesecake take center stage, inviting guests to indulge and connect. The delight it brings promises that everyone at the table will be talking about it long after the meal is over, truly creating memorable moments that enhance the overall dining experience.

Finally, this cheesecake is cost-effective, as a single recipe yields multiple servings. With just a few key ingredients, you can whip up a dessert that seems gourmet without breaking the bank, proving that delicious doesn’t have to be expensive. This combination of flavor, convenience, nutrition, social value, and affordability is what makes this cheesecake a treasured recipe in many households.

Historical Background and Cultural Significance

The origin of cheesecake can be traced back to ancient Greece, where it was served to athletes during the first Olympic Games. Cheesecake has evolved over centuries, with various cultures adding their unique twists. The American-style cheesecake, enriched with cream cheese and often baked, has become a beloved version enjoyed around the world.

In cultural significance, cheesecake often represents celebration and indulgence. It’s a favorite dessert for special occasions such as birthdays, holidays, and family gatherings, symbolizing joy and festivity. Creating and sharing a cheesecake is often a way for families to bond and create cherished memories.

Throughout the years, the recipe has transformed significantly, with countless variations emerging, from New York-style to no-bake cheesecake. Each variation retains the core elements of a delicious cheesecake while adapting to local tastes and ingredients.

Regional variations often include different flavorings or toppings, such as fresh fruits in America, while some European countries might opt for a lighter, less rich texture. The diversity in cheesecake recipes reflects the creativity in cooking and the importance of dessert in numerous culinary cultures.

Ingredient Deep Dive

Cream Cheese: A staple in cheesecake, cream cheese adds the necessary richness and creaminess that makes the cheesecake so luxurious. Originating in the United States in the 19th century, it has gained a cultural significance in creating various desserts beyond just cheesecake. Nutritionally, cream cheese offers protein and calcium, but it’s essential to use it in moderation due to its fat content. Always opt for high-quality brands for the best flavor, and store it in the refrigerator to maintain freshness.

Chocolate: High-quality chocolate not only enhances the flavor but adds a rich, indulgent quality to the cheesecake. Chocolate has a long history, dating back to ancient Mesoamerica, and is known for its mood-enhancing properties. When selecting chocolate for this recipe, go for 60% cacao or higher for a bittersweet flavor. Store chocolate in a cool, dry place, and it can also be substituted with cocoa powder or dairy-free alternatives if needed.

Common Mistakes to Avoid

  • Overmixing the Batter: Many bakers mistakenly overmix the cheesecake batter, leading to cracks. Mix just until combined for a smooth texture.
  • Not Soften Cream Cheese: Using cold cream cheese can create lumps. Allow it to soften at room temperature before mixing.
  • Ignoring the Water Bath: Skipping the water bath can result in a dry cheesecake. This technique helps cook the cake evenly.
  • Baking at the Wrong Temperature: Baking at a temperature that’s too high can cause cracks. Bake at a low temperature for best results.
  • Not Cooling Gradually: Rapidly cooling cheesecake can cause it to crack. Turn off the oven and let it sit for a while before cooling completely.
  • Cutting Too Soon: Cutting the cheesecake before it’s fully chilled leads often to a messy slice. Be patient and allow it to set in the fridge.
  • Overbaking: Always keep an eye on your cheesecake; overbaking can result in a dry texture. Look for a slight jiggle in the center.
  • Failing to Prepare the Pan: Not properly greasing or lining your pan can lead to sticking. Be sure to use parchment paper or butter for a clean release.

Essential Techniques

Preparing the Crust: Making a solid crust is essential for the cheesecake’s stability. Use a mixture of crushed graham crackers and butter, pressing it firmly into the bottom of the springform pan. Compaction is key—if it’s too crumbly, the crust will fall apart. Bake for a short period to set and allow it to cool completely before adding the filling.

Mixing the Filling: To achieve a smooth, creamy texture, mix the filling on low speed. It’s important to scrape down the sides of the bowl often to ensure even mixing. This prevents air from being introduced, which can lead to cracks. Remember, softer cream cheese will provide the best results, allowing for a seamless batter.

Pro Tips for Perfect Heavenly Millionaire’s Cheesecake

1. Use room-temperature ingredients: Allow all ingredients to reach room temperature before mixing for a smoother batter.

2. Incorporate flavor: Don’t hesitate to add a teaspoon of vanilla extract to enhance the overall flavor profile of your cheesecake.

3. Opt for high-quality chocolate: Invest in good chocolate for the topping; it can significantly impact the flavor.

4. Refrigerate overnight: Chilling the cheesecake overnight allows it to set properly and improves the flavor.

5. Serve with fresh fruit: Pairing the cheesecake with fresh berries can add a refreshing balance to the richness.

6. Consider using a food processor: For a finely crushed graham cracker crust, a food processor can save you time and ensure an even texture.

7. Decorate creatively: Enhance visual appeal by drizzling extra caramel or chocolate on top before serving.

8. Adjust baking time for altitude: If you bake at high altitude, adjust the baking time and temperature as needed.

Variations and Adaptations

For those looking to mix things up, consider trying a fruit-flavored cheesecake by folding in pureed strawberries or raspberries into the cream cheese mixture. This adds a refreshing element and bright color; perfect for summer gatherings. Alternatively, for a salty-sweet twist, sprinkle crushed pretzels on the crust to add a new textural dimension and flavor contrast.

During holiday seasons, switch up the flavor with pumpkin puree and spices for a festive twist that resonates with flavors of fall. Similarly, experiment with different nut crusts, such as pecan or almond, for a gluten-free alternative that still provides crunch and flavor.

For those with dietary preferences, why not make a vegan version using cashews and coconut cream? A combination of plant-based alternatives can achieve a similarly luscious consistency without dairy.

Serving and Presentation Guide

When it comes to serving your Heavenly Millionaire’s Cheesecake, consider plating techniques that enhance its elegance. Use a sharp knife dipped in hot water for clean cuts, allowing each slice to display its beautiful layers. Garnish with a dollop of whipped cream and a drizzle of chocolate or caramel sauce for an extra touch.

Traditional accompaniments like fresh fruit or mint leaves offer a pop of color and freshness, balancing the richness of the cheesecake. For modern serving suggestions, consider serving the cheesecake in small jars or dessert cups for individual portions that are both charming and convenient, allowing guests to enjoy them without the mess.

Wine and Beverage Pairing

For a delightful pairing, consider serving your cheesecake with a sweet dessert wine such as Sauternes or a late-harvest Riesling. These wines complement the sweetness of the cheesecake and enhance its flavors. If you’re looking for a non-alcoholic option, a sparkling apple cider provides a refreshing contrast and vibrant flavor balance.

If you enjoy coffee, serve the cheesecake alongside a rich espresso or creamy cappuccino. The bitterness of coffee pairs beautifully with the creamy sweetness of the cheesecake, creating a well-rounded dessert experience.

Storage and Shelf Life

To store your Heavenly Millionaire’s Cheesecake, wrap it tightly in plastic wrap and refrigerate. Properly stored, it can last up to a week in the fridge without losing its deliciousness. For longer shelf life, you can freeze slices of cheesecake; simply place them in an airtight container for up to three months. When ready to serve, let them thaw in the fridge overnight.

Keep an eye on your cheesecake for any signs of spoilage, such as an off smell or changes in texture. If the cheesecake appears dry or crystalline in texture, it’s best to discard it to maintain quality. Reheating is not recommended, as it can alter the texture; instead, enjoy it chilled straight from the fridge.

Make Ahead Strategies

One of the great advantages of the Heavenly Millionaire’s Cheesecake is its make-ahead potential. You can prepare the crust and filling a day in advance, reducing stress on the day of your event. Just remember to chill it overnight to set properly. If you plan to serve the cheesecake for a big gathering, making it two days beforehand allows the flavors to deepen.

While in the preparation phases, store each component in airtight containers if making ahead, ensuring they remain fresh. This allows you to assemble the cheesecake without compromising quality on the big day. Just be sure to add the topping prior to serving for peak freshness and presentation.

Scaling Instructions

For those looking to adjust the quantities, halving the recipe is straightforward—simply divide all ingredients by two, making sure to use a smaller springform pan. Should you wish to double or triple the recipe, ensure adequate oven space and potentially stagger baking times.

Although the mixing and baking times may not change significantly, be sure to check for doneness slightly earlier than suggested. Storing considerations should also be taken into account; larger batches may require larger containers or more shelf space in the refrigerator or freezer.

Nutritional Deep Dive

The nutritional profile of the Heavenly Millionaire’s Cheesecake varies by recipe version, but a standard slice contains essential macronutrients, including fats and carbohydrates. While indulgent, it’s possible to serve this dessert in moderation…

… to enjoy the flavor without packing on excess calories. Analyzing micronutrients such as calcium and protein present in the cream cheese offers insights into the health aspects of the dessert.

Dietary Adaptations

For those requiring gluten-free options, substitute the graham cracker crust with blended nut flour or gluten-free cookie options. This ensures everyone can enjoy the dessert without dietary concerns.

For a dairy-free twist, use cashew cream in place of cream cheese. You can also replace traditional toppings with dairy-free chocolate and nut-based caramel substitutes, ensuring flavor and texture remain intact.

Troubleshooting Guide

Common issues with cheesecake may include cracks, which often arise from sudden temperature changes or overmixing. Make sure to cool the cheesecake gradually and mix at low speeds to avoid incorporating too much air.

If the cheesecake doesn’t set, it may require additional chilling time. Sometimes, undissolved sugar can create a gritty texture; carefully mix until smooth before baking to ensure a perfect outcome.

Recipe Success Stories

Countless bakers have found joy in creating their own Heavenly Millionaire’s Cheesecake, sharing their delightful success stories in various online communities. Many report that the joy of serving this dessert at family gatherings has turned their loved ones into instant fans.

Feedback often highlights the transformative power of flavor combinations in this recipe, with some bakers experimenting with flavors and achieving their own versions. There’s a sense of community among those who share the journey of making, decorating, and savoring every slice.

Frequently Asked Questions

Can I use a different type of cheese?

While cream cheese is typically used for cheesecakes due to its texture and flavor, alternatives like mascarpone or ricotta can work, but the texture and flavor may differ. Ensure that any substitutions balance out with sugar amounts, as different cheeses have varying sweetness levels.

How long should I chill my cheesecake?

To achieve the best flavor and texture, it’s recommended to chill your cheesecake at least 4-6 hours, but overnight chilling provides optimal results for setting and flavor development.

Can I make this cheesecake dairy-free?

Absolutely! Substitute the cream cheese with cashew or soy-based cream cheese, and ensure any chocolate or toppings are dairy-free. This can create a delicious vegan version without sacrificing taste.

What toppings can I use?

Consider drizzling with chocolate ganache, caramel sauce, or even fresh fruits to enhance the flavors. Whipped cream or crushed nuts can also add a delightful crunch when sprinkled atop each slice.

How can I tell if my cheesecake is done?

When done, the edges of the cheesecake will be set while the center remains slightly jiggly. It will continue to firm as it cools; avoid baking until totally firm to prevent cracks.

Can I freeze cheesecake?

Yes, cheesecake freezes well! For best results, place it in an airtight container or wrap it tightly in plastic wrap and foil. It can last up to 3 months in the freezer; when ready to eat, allow it to thaw in the fridge overnight.

What should I do if my cheesecake cracks?

Cracking can occur due to rapid temperature changes or overbaking. To avoid cracks, ensure proper temperature control while baking, and allow it to cool gradually in the oven. You can cover cracks with toppings as a quick fix!

Is there a gluten-free version?

Yes! Use gluten-free graham cracker crumbs or alternative crust options to make the dessert accessible for those with gluten sensitivities.

How can I make my cheesecake fluffier?

Beat the ingredients until smooth but avoid excessive mixing. Adding eggs one at a time will also incorporate air without overmixing, resulting in a lighter texture.

What if I overbaked my cheesecake?

If you suspect overbaking, recognize that the texture will be denser. To counter this, serve with extra toppings—think whipped cream or berry sauce—to enhance-moisture that might have been lost.

Additional Resources

To further enrich your baking journey, explore related cheesecake recipes that bring new flavors to the table. Dive into guides covering essential baking techniques for cheesecakes and ingredient information to optimize your culinary skills.

Look into seasonal variations that follow the produce calendar, using fresh fruits or spices to mix in dynamic flavors based on the season, enhancing your recipe selection.

Join the Conversation

Share your own experiences with this Heavenly Millionaire’s Cheesecake recipe! Post pictures and reviews on social media platforms, inviting others to join in the fun. Engage with fellow bakers by exchanging tips and stories, creating a community around this delicious dessert.

The Recipe

Heavenly Millionaire’s Cheesecake

Serves: 8 servings

Prep Time: 30 mins

Cook Time: 1 hour

Total Time: 1 hour 30 mins

Kitchen Equipment Needed

  • Springform pan
  • Mixer
  • Mixing bowls
  • Measuring cups and spoons
  • Spatula

Ingredients

  • 2 cups graham cracker crumbs
  • 1/2 cup unsalted butter, melted
  • 4 packages (8 ounces each) cream cheese
  • 1 cup granulated sugar
  • 3 large eggs
  • 1 teaspoon vanilla extract
  • 1 cup heavy cream
  • 1 cup chopped chocolate for topping
  • 1/2 cup caramel sauce

Directions

  1. Preheat your oven to 325°F (160°C).
  2. In a mixing bowl, combine graham cracker crumbs and melted butter. Press the mixture into the bottom of the springform pan and bake for 10 minutes.
  3. In another bowl, mix cream cheese and sugar until smooth. Add eggs, one at a time, mixing well between each addition, along with the vanilla extract.
  4. Pour the cheese mixture over the crust and bake for 55-60 minutes until the edges are set and the center is slightly jiggly.
  5. Let the cheesecake cool in the oven with the door ajar to prevent cracking. Refrigerate for at least 4 hours before serving.
  6. For the topping, melt the chocolate and stir in heavy cream. Drizzle over the chilled cheesecake, then add caramel sauce on top.
  7. Slice and serve cold, garnished with whipped cream and/or berries if desired.

Recipe Notes

  • For best flavor, use high-quality chocolate and fresh ingredients.
  • This cheesecake can be made a day in advance; the flavors intensify overnight.
  • Experiment with toppings, such as fresh fruit or different flavored sauces.

Indulge in Black Forest Cookie Dough Brownie Bombs Today

Indulgent Black Forest Cookie Dough Brownie Bombs

⚖️
Difficulty
Moderate

⏲️
Prep Time
30 mins

🕒
Cook Time
30 mins

⏱️
Total Time
60 mins

🍽️
Servings
12 Bombs

Prepare to indulge in the ultimate dessert experience with these decadent Black Forest Cookie Dough Brownie Bombs. Combining the rich flavors of chocolate and cherry, each bite is a delightful explosion of creamy cookie dough encased in a fudgy brownie layer. The iconic Black Forest cake flavors take center stage, making this dessert a perfect choice for celebrations or a sweet treat to satisfy your cravings.

Imagine biting into these brownie bombs: the outer shell is a perfectly baked brownie, while the inner core surprises with a luscious cookie dough texture, subtly flavored with cocoa and studded with chocolate chunks. The tartness of cherry comes through, making each morsel a delicious harmony of taste. This recipe is not just about eating; it’s a gourmet experience, inviting friends and family to gather and enjoy something truly special.

Quick Recipe Highlights

  • Flavor Profile: These bombs deliver a delightful blend of rich chocolate, buttery cookie dough, and tart cherries.
  • Texture: Enjoy a dual experience with a soft brownie exterior and a gooey cookie dough center.
  • Aroma: The sweet aroma of brown sugar mingled with decadent chocolate will fill your kitchen.
  • Visual Appeal: The shiny chocolate coating and bright cherry accents make for an eye-catching dessert.
  • Skill Level Needed: Moderate; requires basic baking skills and some patience.
  • Special Equipment: You’ll need a mixing bowl, measuring cups, and a baking dish to create these delicious bombs.

Recipe Overview

  • Difficulty Level: Moderately challenging; great for those familiar with baking.
  • Category: Dessert, Treats, Party Food; perfect for gatherings.
  • Cuisine: Inspired by traditional German Black Forest cake, featuring chocolate and cherries.
  • Cost: Generally inexpensive; costs range from $10 to $15 based on local prices.
  • Season: Ideal for all seasons, especially holidays and celebrations.
  • Occasion: Perfect for birthdays, potlucks, or holiday parties.

Why You’ll Love This Recipe

The taste and texture of Black Forest Cookie Dough Brownie Bombs are a match made in heaven. The chocolate brownie crust provides a rich and chewy exterior that combines perfectly with the sweet, soft cookie dough center, offering a delightful contrast. Each bite is filled with chocolate chunks and a hint of cherry, reminiscent of the classic Black Forest cake.

Assembling these brownie bombs is a breeze. With just a few simple steps, you can whip up a batch quickly, making them a convenient dessert option. Plus, they can be made ahead, ensuring you have a delicious treat at the ready for unexpected guests or late-night cravings.

Nutritionally, while these bombs are indulgent, the use of quality ingredients allows you to feel good about treating yourself. The chocolate provides antioxidants, and the cherries add a burst of vitamin C. Serving these sweet delights at your next gathering will make them a hit, as everyone appreciates a creative spin on traditional desserts.

Socially, Black Forest Cookie Dough Brownie Bombs foster a sense of togetherness. Whether enjoyed during a holiday gathering, a family reunion, or a casual get-together with friends, these desserts are perfect for sharing. Their fun shape and rich flavors are bound to spark conversation and smiles.

Cost-effective and accessible to prepare, this recipe doesn’t require extravagant ingredients or equipment, making it friendly on both your wallet and kitchen. With just a few pantry staples, you can create a delightful dessert that everyone will adore, without stretching your budget.

Historical Background and Cultural Significance

The origins of the Black Forest dessert are deeply rooted in German culture, particularly influenced by the Black Forest region in southwestern Germany. Traditionally, the Black Forest cake, known as Schwarzwälder Kirschtorte, showcases layers of chocolate sponge, cherries, and whipped cream, representing the beauty and flavors found in this picturesque locale. The dessert pays homage to the area’s rich cherry-growing tradition.

Over the decades, the popularity of the Black Forest cake has led to numerous adaptations and interpretations. Its central elements—chocolate, cherries, and cream—have transcended into various forms and styles, inspiring countless desserts, including these brownie bombs. This evolution showcases the ability of traditional recipes to adapt while maintaining core cultural significance.

Regionally, variants of the Black Forest treats can be found, with some incorporating additional flavors like almond or coffee, emphasizing local ingredients and tastes. These adaptations highlight the diversity of German baking and its widespread appeal, reminding us that delicious food has a universal language.

The rise of modern dessert trends has propelled the Black Forest flavor profile into new realms. Creating innovations like these brownie bombs honors the classic while introducing new techniques and culinary creativity, making old recipes feel fresh and exciting for new generations to enjoy.

Ingredient Deep Dive

Chocolate: Chocolate has a rich history, originating from the cacao trees of Central America. Not only does it add an irresistible flavor to desserts, but it also boasts health benefits such as improving heart health. When selecting chocolate for this recipe, opt for high-quality dark chocolate for the best results. Store it in a cool, dry place, and consider substituting with cocoa powder if needed.

Cherries: Cherries are often associated with summer and are known for being a staple in many desserts, especially in the Black Forest cake. Packed with vitamins and antioxidants, they offer significant health benefits. Look for fresh, ripe cherries, and if they’re out of season, frozen cherries are a great alternative and can be stored for extended periods.

Common Mistakes to Avoid

  • Using low-quality chocolate can lead to a less flavorful brownie bomb. Always opt for good-quality chocolate.
  • Overmixing the cookie dough can make it tough; mix until just combined to ensure softness.
  • Baking at too high a temperature can result in dry brownies, so adhere to temperature recommendations.
  • Not allowing the brownie bombs to cool before slicing may result in messy serving; patience is key!
  • Skipping the chilling process can lead to the bombs losing shape; always chill appropriately.
  • Forgetting to line your baking pan can make cleanup a hassle. Use parchment paper for easy removal.
  • Using too much flour when measuring can lead to dry bombs; always measure accurately.
  • Not checking the freshness of cherries can result in a less tasty dessert, so use ripe produce.
  • Overbaking can dry out the bombs, so keep an eye on the timing towards the end of baking.
  • Using too little salt can mute flavors; a pinch elevates the overall taste of chocolate.

Essential Techniques

Mixing Cookie Dough: It’s crucial to mix the cookie dough well, but not too much. The key is to combine ingredients until they just come together, which ensures a soft and chewy end result. Look for a thick consistency that holds shape without being crumbly.

Chilling and Shaping: Chilling the filled brownie bombs allows the dough to firm up, making them easier to shape and ensuring they hold together during baking. When shaping, ensure they’re compact and smooth to prevent any cracks during baking.

Pro Tips for Perfect Black Forest Cookie Dough Brownie Bombs

1. Use room temperature ingredients for the brownie base to achieve a smoother batter, which will enhance the overall texture.

2. Substitute half of the chocolate with white chocolate for a contrasting flavor that looks stunning and tastes fabulous.

3. Prior to serving, dust the tops with powdered sugar for an elegant finish that adds a special touch.

4. Experiment with different nuts like walnuts or pecans for a crunchy contrast to the chewy cookie dough.

5. Serve these bombs with a cherry sauce drizzled over the top for added pizzazz and an extra layer of flavor.

6. Consider using mini muffin tins for perfectly portioned brownie bombs that are great for gatherings.

7. Allow the brownie bombs to chill overnight for deeper flavors and a denser, chewier texture.

8. Pair with vanilla ice cream to take this treat over the top!

Variations and Adaptations

Black Forest Cookie Dough Brownie Bombs can be tailored to fit regional flavors; adding a hint of almond extract can evoke the nutty flavors commonly associated with traditional German desserts. Seasonal adaptations could incorporate seasonal fruits, like blueberries, instead of cherries for a refreshing summer treat.

For dietary modifications, consider using gluten-free flour blends to make this treat gluten-free without sacrificing taste. Additionally, modifying the sweetness by using alternative sweeteners can cater to those with dietary restrictions. Experimenting with different chocolate types, such as mint chocolate or caramel swirls, can create exciting flavor profiles that resonate with various audiences.

Serving and Presentation Guide

When plating your Black Forest Cookie Dough Brownie Bombs, consider using a simple yet elegant presentation. Arrange them on a white platter to highlight their colors and textures. Garnishing with fresh mint leaves or a drizzle of chocolate sauce adds a beautiful finishing touch.

Portion control can be achieved by cutting the bombs into halves or quarters, making them perfect bite-sized treats for parties. Serving at room temperature enhances the flavors, but pair them with a scoop of ice cream for an elevated dessert experience.

Wine and Beverage Pairing

When selecting wine to pair with these indulgent brownie bombs, a fruity Merlot enhances the flavors beautifully. The light acidity complements the sweetness of the dessert, while its rich berry notes echo the cherries in the recipe.

For non-alcoholic alternatives, consider serving a sparkling cherry soda, which will add a refreshing twist, or a classic iced tea infused with cherry flavor for a refreshing option. For coffee lovers, a strong espresso can provide a delightful contrast to the richness of the brownies without overwhelming the taste.

Storage and Shelf Life

Black Forest Cookie Dough Brownie Bombs can be stored in an airtight container at room temperature for up to 3 days or in the refrigerator for up to a week. To maintain freshness, it is best to keep them away from direct sunlight and excessive moisture.

If you need to prolong their shelf life, consider freezing the brownie bombs. Individually wrap each bomb in plastic wrap and place them in a freezer-safe bag. They can be frozen for up to 3 months; when ready to eat, simply let them thaw at room temperature or briefly warm them in the microwave for a few seconds.

Make Ahead Strategies

To simplify your entertaining plans, you can prepare these brownie bombs a day in advance. Follow the complete recipe up until the baking stage, and then chill them overnight. Bake them the next day for fresh-from-the-oven deliciousness.

You can also prepare the cookie dough ahead of time and keep it refrigerated for up to 48 hours before using. This allows you to save time during the actual baking process, ensuring that you’re ready to serve these delightful treats whenever needed.

Scaling Instructions

This Black Forest Cookie Dough Brownie Bombs recipe is easily scalable. For smaller gatherings, simply halve the ingredient measurements, ensuring that you adjust your baking time accordingly. You can also double or triple the recipe to satisfy larger crowds—just make sure to use a larger baking dish or multiple pans to accommodate the increased volume.

Timing modifications might be necessary depending on your oven; keep a close eye on the baking process to ensure perfect results. Moreover, consider using multiple racks in the oven to optimize baking efficiency, taking care to rotate the pans for even cooking.

Nutritional Deep Dive

The Black Forest Cookie Dough Brownie Bombs contain a mix of macronutrients, predominantly carbohydrates due to the sugars and flour. The chocolate and eggs contribute protein, while the cherries add beneficial sugars and fiber, enhancing digestion.

For those mindful of their diets, understanding the nutritional content can help with portions. While these bombs are indulgent, savoring a small piece can provide satisfaction, allowing for treats in moderation without straying from dietary goals. Consider using nutritional apps to track your intake if following a specific plan.

Dietary Adaptations

For those on a gluten-free diet, using gluten-free flour blends ensures that everyone can enjoy these brownie bombs without worry. Vegan versions are possible by substituting eggs with flax eggs and using dairy-free chocolate.

Other modifications could involve reducing sugar to cater to keto or low-carb diets. By replacing regular sugar with natural sweeteners such as stevia or erythritol, you can enjoy a guilt-free version of these delicious brownie bombs.

Troubleshooting Guide

If you encounter texture issues, ensure you’re not overbaking, as this can lead to dryness. If your cookie dough seems too crumbly, a touch of milk can help bring it back together. For flavor balance, a pinch of salt can enhance sweetness and prevent overwhelming chocolate richness.

Temperature problems can arise if the brownies don’t bake through; use a toothpick to check for doneness. If relying on older equipment, consider an oven thermometer to ensure your baking environment is accurate. For ingredient substitutions, keep in mind the ratios to avoid altering the recipe too dramatically.

Recipe Success Stories

Our community loves sharing their experiences with Black Forest Cookie Dough Brownie Bombs. Many have adapted the recipe with local ingredients, such as using fresh berries in place of the cherries, resulting in delightful outcomes.

Readers have enjoyed experimenting with different nuts, sharing their successes in adding crunchy texture while keeping the overall flavor intact. The feedback highlights the creativity these bombs inspire, making each batch a unique culinary delight.

Frequently Asked Questions

Can I make the dough ahead of time?

Yes, you can prepare the cookie dough a couple of days in advance. Just refrigerate it until you’re ready to bake.

How should I store the brownie bombs?

Store them in an airtight container at room temperature for up to 3 days or refrigerate for up to a week.

Can I use frozen cherries instead of fresh?

Absolutely! Frozen cherries work great and maintain that delicious fruity flavor in your brownie bombs.

Are these brownie bombs gluten-free?

You can make them gluten-free by using a suitable flour blend. Just ensure that all other ingredients you use are gluten-free.

What is the best way to reheat them?

For reheating, place them in the microwave for about 10-15 seconds. This warms them without drying them out.

Can I modify the chocolate type?

Yes! You can use white chocolate or milk chocolate for different flavor profiles, or even a mix!

How do I prevent the brownie bombs from sticking?

Using parchment paper in your baking pan will help prevent sticking, ensuring easy removal once baked.

What if my brownie bombs are too dry?

Ensure you measure your ingredients accurately. Moisture can be added by serving with a drizzle of chocolate sauce or whipped cream.

Can I double the recipe?

Yes, you can easily double the recipe. Just keep an eye on the baking time, as it may vary.

Are these suitable for kids?

Definitely! Kids love these tasty treats, but consider moderating the amount for younger children.

Additional Resources

For those interested in exploring more dessert recipes, consider checking out our other blog posts featuring delightful treats like chocolate lava cakes and strawberry shortcakes. Baking technique guides, such as mastering ganache or understanding chocolate tempering, can enhance your dessert-making skills.

We also provide resources on ingredient selection, ensuring you know how to pick the best chocolate or cherries for your recipes. Seasonal variations keep your dessert game fresh year-round, with alternatives that celebrate the flavors of each season.

Join the Conversation

We love hearing from our readers! Share your experiences with our Black Forest Cookie Dough Brownie Bombs on social media, and don’t forget to tag us in your photos! Your feedback and creative adaptations inspire other bakers to try new variations.

Consider leaving a review or commenting on the recipe post to connect with fellow dessert lovers. Your suggestions help create a vibrant community around our shared love for baking. Join the conversation and let your culinary creativity shine!

The Recipe

Black Forest Cookie Dough Brownie Bombs

Serves: 12 Bombs

Prep Time: 30 mins

Cook Time: 30 mins

Total Time: 60 mins

Kitchen Equipment Needed

  • Mixing bowl
  • Measuring cups
  • Baking dish
  • Electric mixer or whisk
  • Cookie scoop
  • Cooling rack

Ingredients

  • 1 cup all-purpose flour
  • 1/2 cup unsweetened cocoa powder
  • 1/2 cup granulated sugar
  • 1/2 cup brown sugar, packed
  • 1/2 cup unsalted butter, softened
  • 2 large eggs
  • 1 teaspoon vanilla extract
  • 1 cup semi-sweet chocolate chips
  • 1 cup cherries, pitted and halved

Directions

  1. Preheat the oven to 350°F (175°C) and grease a baking dish.
  2. In a mixing bowl, combine flour, cocoa powder, and sugars. Mix well.
  3. Add the softened butter, eggs, and vanilla extract to the dry ingredients. Beat until combined.
  4. Fold in the chocolate chips and cherries gently.
  5. Transfer half of the batter to the prepared baking dish and spread evenly.
  6. Chill the mixture in the refrigerator for 15 minutes to allow it to firm up.
  7. After chilling, form the brownie mixture into small balls and place them on a baking sheet.
  8. Bake the brownie bombs for 20-25 minutes, or until a toothpick comes out clean.
  9. Let them cool on a wire rack before serving.

Recipe Notes

  • Feel free to substitute fresh cherries with frozen or omit them entirely for a chocolate-only version.
  • For an added crunch, sprinkle chopped nuts over the brownie batter before baking.
  • Store any leftovers in an airtight container to maintain freshness.

Indulge in Big Fat Pecan Sticky Buns for Breakfast

Big Fat Pecan Sticky Buns: A Sweet Indulgence for Any Occasion

⚖️
Difficulty
Intermediate

⏲️
Prep Time
45 mins

🕒
Cook Time
30 mins

⏱️
Total Time
1 hr 15 mins

🍽️
Servings
12 servings

Big Fat Pecan Sticky Buns are the ultimate treat for those who love a sweet, gooey breakfast pastry. These buns are enveloped in a rich, buttery dough that’s infused with cinnamon, while the pecan-studded caramel topping adds an irresistible crunch and depth of flavor. Each bite delivers a perfect balance of sweetness and nuttiness, making it hard to resist reaching for just one more! Whether you’re celebrating a special occasion or treating yourself on a lazy Sunday morning, these sticky buns are guaranteed to bring joy to your breakfast table.

Imagine the aroma wafting through your kitchen as these sticky buns bake to golden perfection. The combination of sugary caramel and toasted pecans creates a mouthwatering scent that will make everyone eager to dig in. Warm, decadent, and utterly satisfying, these Pecan Sticky Buns are more than just a dish; they are a heartfelt invitation to indulge and savor life’s sweet moments.

Quick Recipe Highlights

  • Flavor Profile: Sweet, buttery, and nutty with delightful cinnamon notes.
  • Texture: Soft and fluffy with a gooey center and a crunchy topping.
  • Aroma: Heady scent of cinnamon, caramel, and toasted pecans.
  • Visual Appeal: Golden-brown buns drizzled with shiny caramel and speckled with pecans.
  • Skill Level Needed: Suitable for intermediate bakers who enjoy a bit of a challenge.
  • Special Equipment: Stand mixer, baking dish, and parchment paper.

Recipe Overview

  • Difficulty Level: This recipe is classified as intermediate due to the multiple steps involved, including yeast dough preparation and caramel sauce making.
  • Category: These buns are perfect for breakfast, brunch, or as a sweet treat at any time.
  • Cuisine: Heavily influenced by American baking traditions, especially popular in Southern cuisine.
  • Cost: Prepare these buns with moderate expenses, mainly for the ingredients like pecans and butter.
  • Season: Ideal for any season, but especially delightful during fall and winter when warm, comforting flavors are craved.
  • Occasion: Perfect for family gatherings, weekend brunches, or festive celebrations.

Why You’ll Love This Recipe

The taste and texture of Big Fat Pecan Sticky Buns are simply irresistible. Each piece is a harmonious blend of sweet and nutty that can elevate your morning routine. The soft and fluffy dough, combined with the crunchy topping, creates an experience that is both satisfying and decadent, making your taste buds sing.

Not only are these sticky buns delicious, but they’re also relatively easy to prepare. The recipe follows straightforward steps that allow even novice bakers to shine. The preparation involves simple techniques like mixing, proofing, and baking, making the process enjoyable and rewarding for home cooks.

When it comes to nutrition, these buns can be a comforting indulgence in moderation, thanks to wholesome ingredients like pecans, which provide healthy fats and protein. They can be a part of a balanced breakfast when paired with fruit or yogurt.

Sticky buns are perfect for sharing and are sure to impress family and friends. Whether served at brunch or during holiday gatherings, they serve as a delightful centerpiece that encourages togetherness and joy.

Lastly, making these at home is cost-effective compared to buying them from a bakery. Utilize common pantry staples and elevate them to create an indulgent treat that rivals any bakery specialty.

Historical Background and Cultural Significance

The origin of sticky buns dates back centuries, with various forms present in different cultures. Initially resembling a Swiss pastry called “Schnecken,” the American version adopted unique elements, often using pecans, a staple in Southern kitchens. The evolution of the sticky bun showcases how regional tastes influence beloved recipes.

Culturally, sticky buns symbolize sweetness and togetherness, often served during significant life events like weddings and holidays. They represent a moment to pause and enjoy life’s pleasures, a tradition that has been cherished for generations.

The recipe for sticky buns has evolved over the years, incorporating local ingredients and preferences, such as the inclusion of nuts or dried fruits. As trend shifts continue to influence cooking, many adaptations speak to current tastes while honoring the traditional roots.

Regionally, variations abound, from cinnamon rolls drizzled with caramel in the Midwest to the signature use of pecans in the South. Each area brings its own flair, contributing to the rich tapestry of sticky bun history.

Ingredient Deep Dive

Pecans: A beloved nut in Southern cuisine, pecans are not just tasty but also rich in healthy fats, fiber, and protein. When selecting, look for fresh, plump nuts and store them in a cool place to maintain their flavor. They can be substituted with walnuts if necessary.

Butter: The key to rich and flavorful sticky buns, butter enhances both the dough and caramel topping. Always use unsalted butter for greater control over flavor. Store butter in a cool place, and it can be frozen for longer shelf life.

Common Mistakes to Avoid

  • Not letting the dough rise sufficiently can result in dense buns. Always follow the rise times based on your kitchen’s temperature.
  • Using too much flour can lead to tough dough; instead, use a light hand when measuring.
  • Forgetting to preheat the oven may lead to uneven baking.
  • Skipping the caramel sauce; it’s what makes sticky buns, well, sticky!
  • Overbaking the buns will lead to dryness; keep an eye on them during the final minutes.
  • Not cooling buns slightly before serving, as they can be very hot to the touch.
  • Using cold ingredients straight from the fridge can inhibit yeast activation; let them come to room temperature first.
  • Mismatched baking dish size can affect baking time and results; always use the recommended size.

Essential Techniques

Yeast Activation: The most critical step, ensuring the yeast is activated properly leads to yeast dough rising beautifully. To master it, warm liquid and sugar can be mixed with yeast and left for 5-10 minutes until foamy.

Caramel Making: A pivotal technique for achieving that gooey topping; caramel needs patience. Cook over medium heat, stirring continuously until the sugar dissolves, avoiding burning by watching the color change closely.

Pro Tips for Perfect Big Fat Pecan Sticky Buns

1. Use fresh yeast for better rising results; expired yeast can ruin your dough.

2. Feel the dough; it should be soft and slightly tacky but not overly sticky. Adjust flour as needed.

3. For added flavor, toast the pecans lightly before adding them to the caramel.

4. Always check buns a few minutes before the suggested bake time; ovens vary, and you want them just golden.

5. Allow the sticky buns to cool in the pan for a few minutes before inverting to prevent breakage.

6. Use a serrated knife when slicing the buns; it helps keep their shape.

7. Drizzle extra caramel over the top just before serving for that additional indulgence.

8. Enjoy leftovers; they can be reheated in the microwave for a few seconds for a warm treat the next day.

Variations and Adaptations

Consider seasonal variations like adding apple or pumpkin puree for a fall-inspired version. During Easter, chocolate chips can be folded into the dough for a festive twist. For those who prefer less sugar, substitute with honey in the caramel sauce. Gluten-free alternatives can also be achieved using specialized baking flour that suits your dietary needs.

Serving and Presentation Guide

For serving, consider using a beautiful platter or a wooden cutting board for a rustic touch. Drizzle the warm caramel sauce over each bun and sprinkle extra pecans on top for visual appeal. Pair with a side of fresh fruit or whipped cream for an elegant finish.

Wine and Beverage Pairing

Pair your sticky buns with a light sparkling wine or a creamy coffee for an indulgent breakfast. A sweet Riesling goes well with the pecan flavors, while a rich coffee balances the sweetness beautifully. Alternatively, offer herbal teas for a refreshing contrast.

Storage and Shelf Life

Store leftover sticky buns in an airtight container at room temperature for up to 2 days. For longer storage, wrap them tightly and freeze for up to 2 months. Reheat directly from the freezer in a warm oven until heated through.

Make Ahead Strategies

To simplify your baking, consider preparing the dough the night before and letting it rise in the fridge overnight. The next morning, you can easily shape and bake your sticky buns fresh from the oven.

Scaling Instructions

If you want to make a smaller batch, simply halve the ingredients. For larger gatherings, double the recipe and use two baking dishes to ensure even cooking.

Nutritional Deep Dive

Understanding the macro breakdown of these sticky buns reveals that they offer a mix of carbohydrates, fats, and proteins. This balance, when consumed in moderation, can be part of a fulfilling breakfast. Incorporate protein-rich pairings, like yogurt, to enhance your meal.

Dietary Adaptations

For a gluten-free version of Big Fat Pecan Sticky Buns, substitute traditional flour with a gluten-free all-purpose blend. Ensure all ingredients, especially the baking powder, are gluten-free. For a dairy-free option, use plant-based butter and non-dairy milk alternatives in the recipe.

Troubleshooting Guide

If your sticky buns are too dense, it might be due to insufficient rising time or overworking the dough. Ensure that both factors meet the requirements for a light texture. If caramel seizes up, gently reheating while stirring can often revive the sauce.

Recipe Success Stories

Read through feedback from our community who have successfully made these buns, sharing tips and variations that worked well for them. Adaptations have included everything from chocolate additions to different nut choices, all of which provide a unique twist on this classic recipe.

Frequently Asked Questions

Q1: Can I use a different nut? A1: Yes! Feel free to substitute pecans with walnuts or almonds, tailoring the recipe to your preference.

Q2: How do I know when the buns are properly baked? A2: The tops should be golden brown, and a toothpick inserted in the center should come out clean.

Q3: Can I prepare the dough in advance? A3: Absolutely! You can prepare the dough the night before and let it rise in the refrigerator overnight.

Q4: What should I do if my dough doesn’t rise? A4: Ensure your yeast is active and your environment is warm. If it’s cold, consider placing it in a warm area.

Q5: Can these buns be made vegan? A5: Yes! You can substitute eggs with flax eggs and use plant-based butter and milk.

Q6: Is it okay to freeze the buns? A6: Yes! They can be frozen for up to 2 months and reheated in the oven when you’re ready to enjoy them.

Q7: How do I store leftovers? A7: Store in an airtight container at room temperature for up to 2 days, or freeze for longer storage.

Q8: How can I make them more decadent? A8: Consider adding a drizzle of cream cheese frosting for an extra treat.

Q9: Can I add fruit to the filling? A9: Indeed, adding diced apples or raisins can enhance flavor and texture. Just be cautious with moisture levels.

Q10: What kind of flour should I use? A10: All-purpose flour works best, but you can also use bread flour for a chewier texture.

Additional Resources

Explore related recipes like cinnamon rolls or other sweet pastries to enrich your baking repertoire. Check out guidebooks on yeast dough techniques and ingredient substitutions to further enhance your baking skills.

Join the Conversation

Engage with our community by sharing photos of your sticky buns along with your tips and variations. Discuss your favorite flavor combinations and how this recipe turned out for you! Join the conversation on social media platforms where our baking family shares inspirations and successes.

The Recipe

Big Fat Pecan Sticky Buns

Serves: 12 servings

Prep Time: 45 mins

Cook Time: 30 mins

Total Time: 1 hr 15 mins

Kitchen Equipment Needed

  • Stand mixer
  • Baking dish
  • Parchment paper

Ingredients

  • For the dough: 4 cups all-purpose flour, 1 packet active dry yeast, 1/4 cup sugar, 1/2 cup milk, 1/2 cup butter, 2 eggs, and pinch of salt.
  • For the filling: 1/2 cup brown sugar, 2 tablespoons ground cinnamon, 1/4 cup melted butter.
  • For the topping: 1 cup chopped pecans, 1 cup caramel sauce.

Directions

  1. In a saucepan, warm milk and butter until melted; let cool to 110°F. Sprinkle yeast and sugar over the mixture, set aside for 10 minutes.
  2. In a large bowl, combine flour and salt. Add the yeast mixture and eggs; mix until a dough forms.
  3. Knead the dough for about 8 minutes until smooth. Place in a greased bowl and let rise for about 1 hour, or until doubled in size.
  4. Preheat the oven to 350°F and grease your baking dish with butter.
  5. On a floured surface, roll out dough into a rectangle. Spread melted butter, sprinkle brown sugar and cinnamon over it, then roll tightly.
  6. Cut into slices and place in the prepared baking dish, sprinkle with chopped pecans.
  7. Combine caramel sauce with a splash of cream and pour over buns. Bake for 30 minutes, until golden brown.
  8. Allow buns to cool slightly before inverting onto a serving platter; enjoy warm.

Recipe Notes

  • Feel free to experiment with different types of nuts or add raisins or chocolate chips to the filling.
  • For a fun twist, drizzle a glaze over the top once cooled.