Indulge in Decadence with Triple Chocolate Mousse Cake Recipe

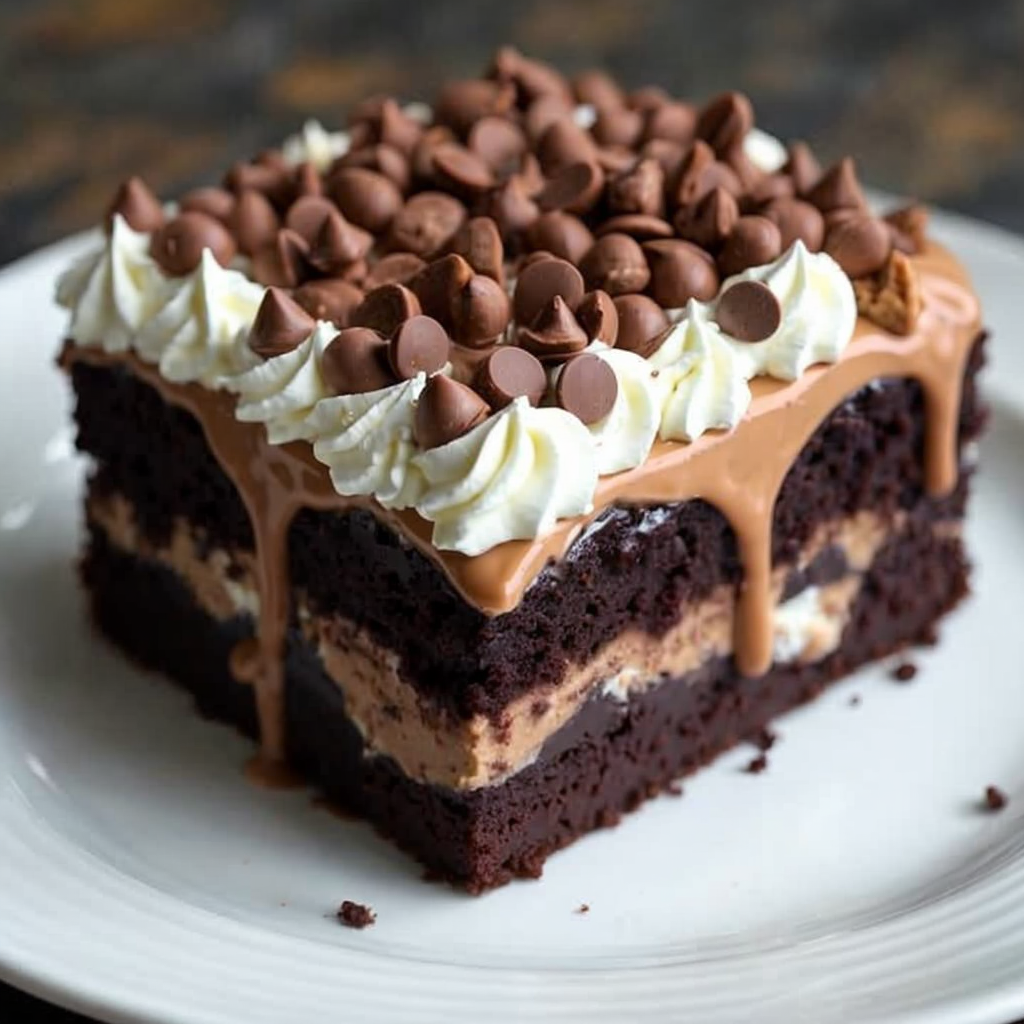
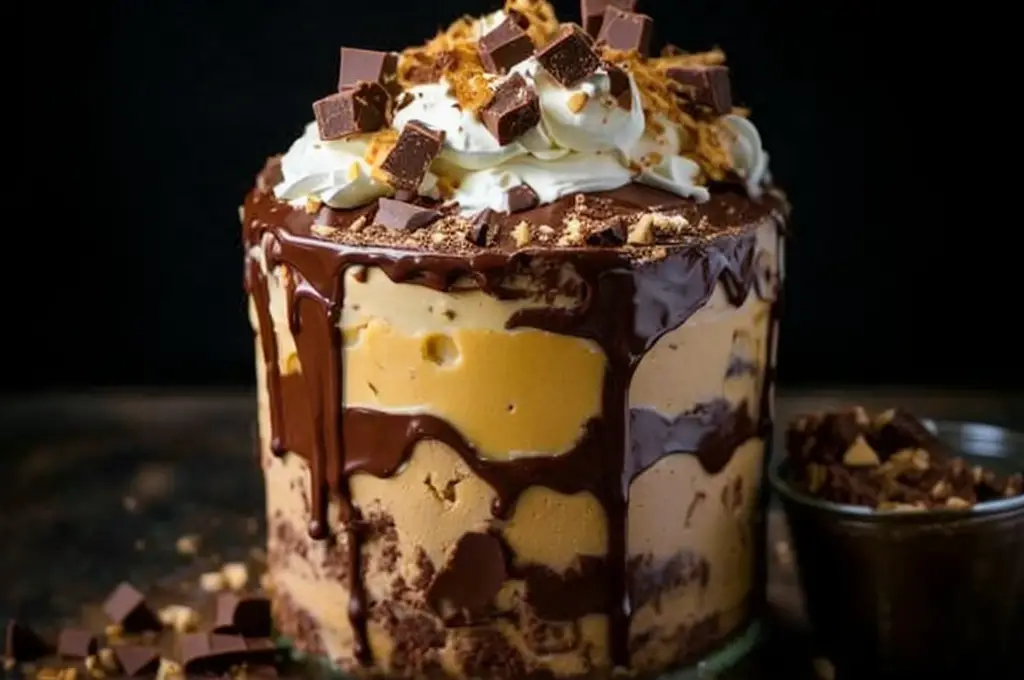
Decadent Triple Chocolate Mousse Cake: A Heaven for Chocolate Lovers

⚖️
Difficulty
Advanced

⏲️
Prep Time
30 mins

🕒
Cook Time
60 mins

⏱️
Total Time
90 mins

🍽️
Servings
10

Indulge your senses with this Triple Chocolate Mousse Cake, a dessert that embodies richness and sophistication. This cake is designed for true chocolate aficionados, layering dark, milk, and white chocolate to create a delectable trifecta. The velvety mousse texture melts in your mouth, providing a luxurious experience that is both pleasing to the palate and eye.

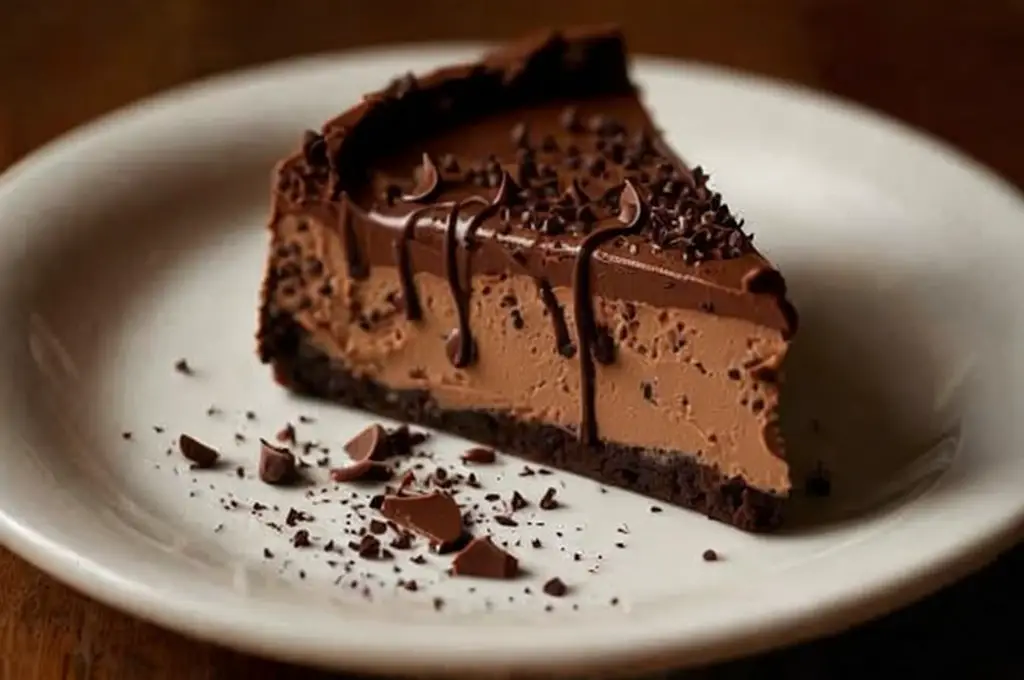
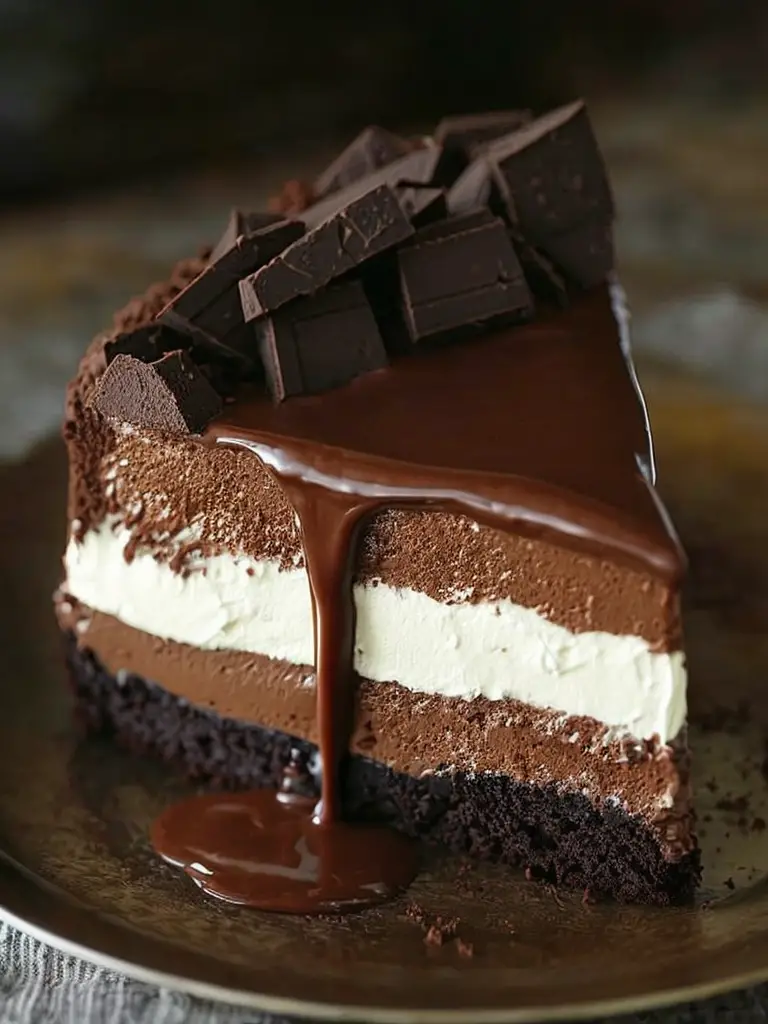
The moment you slice into this cake, you unveil three distinct layers of luscious chocolate, enticing everyone for a taste. The combination of flavors—bitter dark chocolate, sweet milk chocolate, and creamy white chocolate—plays perfectly together, offering a round, harmonious taste that leaves a lingering sweetness. It’s an impressive showpiece that’s perfect for special occasions or a decadent treat at home.

Quick Recipe Highlights

  • Flavor Profile: Experience a rich blend of dark, milk, and white chocolates that create a symphony of chocolatey goodness.
  • Texture: The mousse layers are light yet rich, providing a delightful contrast to the chocolate cake base.
  • Aroma: The bouquet of melted chocolate, buttery notes, and hints of vanilla fill the air as you prepare this dessert.
  • Visual Appeal: This cake showcases stunning layers of chocolate, each layer contrasting beautifully with the others, topped with elegant chocolate shavings.
  • Skill Level Needed: This advanced recipe requires precision and attention to detail but is absolutely worth the effort.
  • Special Equipment: A springform pan and a mixer are essential for achieving that perfect mousse consistency.

Recipe Overview

  • Difficulty Level: This recipe is classified as advanced due to the need for careful technique in layering and working with multiple types of chocolate.
  • Category: This dessert falls under the category of cakes and is perfect for celebratory events.
  • Cuisine: Rooted in French culinary tradition, the mousse technique adds an air of elegance to this delightful cake.
  • Cost: The approximate cost includes premium chocolate and quality ingredients, totaling around $30.
  • Season: Ideal for any time of year, it’s especially popular during holidays and special celebrations.
  • Occasion: Perfect for birthdays, anniversaries, and dinner parties where you want to impress guests with a stunning dessert.

Why You’ll Love This Recipe

This Triple Chocolate Mousse Cake is a remarkable dessert that promises to tantalize taste buds with its rich and layered chocolate flavors. Every bite offers a delightful texture, providing a perfect balance between creaminess and lightness. Not only does it satisfy a chocolate craving, but it also serves as a showstopper for any occasion, making it a favorite among guests.

The convenience in preparing the mousse separately allows for an organized approach to baking. Although it’s an intricate process, each component can be made ahead of time and assembled just before serving. This cakes offers impressive nutritional benefits thanks to the antioxidants present in dark chocolate, promoting heart health while indulging in a treat.

Beyond its taste and preparation ease, this cake also serves as a fantastic centerpiece for social gatherings. The experience of sharing a beautiful dessert, coupled with conversation, adds warmth to any occasion. It’s an enticing dessert that invites everyone to partake in the joy and celebration of culinary creativity.

Cost effectiveness is another appealing aspect of this recipe. By choosing high-quality ingredients, you enhance the flavor while still being mindful of your budget. With portions allowing for sharing, this dessert spreads joy without breaking the bank.

Finally, the versatility of flavors means that this recipe is adaptable. You can easily modify the chocolate types, experiment with additions like fruit or spices, and create variations that suit your preferences or dietary needs, making it a cherished recipe you’ll enjoy time and again.

Historical Background and Cultural Significance

Chocolate mousse originated in France and has since captivated dessert lovers around the globe. Dating back to the 18th century, the word ‘mousse’ translates to ‘foam’ in French, referring to its light, airy texture that was revolutionary for the time. This dessert quickly became popular among the elite, prized for its richness and creamy consistency.

Over the years, the preparation of mousse evolved from a simple blend of chocolate and cream to more intricate variations, allowing for creativity in flavors and presentations. As culinary techniques advanced, recipes began to incorporate different types of chocolate, leading to delightful creations like the Triple Chocolate Mousse Cake we cherish today.

Culturally, this cake represents indulgence and celebration. It is often featured at gatherings and significant events, allowing hosts to showcase their culinary skills and elevate any dining experience. The cake embodies joy and the sweetness of life, making it a traditional favorite for moments of festivity.

Local variations of mousse can be found across many countries, with each culture adding its unique twist. From rich chocolate to fruity or coffee-infused versions, the basic concept remains constant—creating a luxurious dessert that embodies the art of indulgence and celebration.

Ingredient Deep Dive

Dark Chocolate

Dark chocolate is the star ingredient in this mousse cake, renowned for its rich flavor and health benefits. Originating from the cacao bean, dark chocolate is lower in sugar compared to its counterparts, making it the healthiest chocolate choice. It boasts a high antioxidant content, which can help reduce inflammation and improve heart health. When selecting dark chocolate, look for one that contains at least 70% cocoa for the richest flavor.

Proper storage of dark chocolate is essential to maintain its quality; keep it in a cool, dry place to avoid moisture absorption. If you need a substitute, consider using semi-sweet chocolate, but be aware this will alter the flavor profile.

Milk Chocolate

Milk chocolate brings a creamier, sweeter element to this recipe, creating balance among the chocolate layers. Known for its smooth texture and comforting flavors, it is loved by many and plays a crucial role in reducing the overall richness of the cake. Milk chocolate contains less cocoa than dark, but it still offers some health benefits, particularly due to its calcium content.

When choosing milk chocolate, opt for higher-quality brands as they tend to have better flavor and texture. Proper storage involves keeping it in a temperature-controlled environment to prevent blooming. If you wish to modify this cake, you could substitute white chocolate for a different flavor profile.

White Chocolate

While often debated, white chocolate has its place in this cake for its sweetness and smooth mouthfeel. It consists of cocoa butter, sugar, and milk solids, absent of cocoa solids, which gives it its unique creamy texture. It offers a lovely visual and flavor contrast to the darker chocolates, elevating the overall appeal.

Rather than focusing on the health benefits of white chocolate, consider it for enjoyment purposes. Properly store it in a cool, dry place away from strong odors. You can replace white chocolate with vanilla or butterscotch chips if you desire a twist, though this will change the flavor.

Common Mistakes to Avoid

  • Overheating Chocolate: Always melt chocolate gently to prevent it from seizing. Use a double boiler or low microwave settings.
  • Not Folding Properly: When incorporating whipped cream, fold gently to maintain the airy texture of the mousse.
  • Using Subpar Ingredients: Quality chocolate makes a significant difference; always use the best you can find for great results.
  • Ignoring Temperature: Ensure your eggs and cream are at room temperature for optimal mixing.
  • Skipping Chilling: Allowing the mousse to chill is essential, as it helps it set and develop flavors.
  • Overmixing: Mixing mousse too aggressively can deflate it, leading to poor texture.
  • Not Tasting: Always taste your mousse mixtures before final assembly to adjust sweetness or chocolate intensity.
  • Unbalanced Layers: Be mindful of thickness when layering; aim for an even distribution for visual appeal.
  • Improper Pan Preparation: Always line your springform pan well to facilitate easy removal after chilling.
  • Using a Thin Knife: Use a hot knife for slicing to ensure clean, beautiful layers when serving.

Essential Techniques

One key technique in this recipe is melting chocolate smoothly. Chocolate can easily seize if overheated; to master this, always melt at low temperatures, and avoid direct heat. A double boiler is an excellent tool for this, as it allows for gentle heating without burning.

Another essential technique is whipping cream. The goal is to achieve soft peaks without overwhipping, which can turn cream into butter. When whipping, start at a slower speed and gradually increase to maintain an even consistency. Stop when soft peaks form, and remember that it will be folded into the mousse, so it shouldn’t be overly stiff.

Pro Tips for Perfect Triple Chocolate Mousse Cake

1. Use high-quality chocolate for an intense flavor that shines through each layer.
2. Warm your mixing bowl slightly before whipping cream to help it whip faster.
3. Chill the cakes before assembly for easier layer handling and better structure.
4. If you want a glossy finish, consider glazing the top with ganache after chilling.
5. Let each layer cool completely before adding the next to avoid melting the mousse layer below.
6. For an added touch, sprinkle cocoa powder or grated chocolate on top before serving.
7. Always use room temperature eggs for a more stable mousse structure.
8. Use a serrated knife to slice the cake cleanly, enhancing the presentation.

Variations and Adaptations

You can explore many regional variations of this Triple Chocolate Mousse Cake. For instance, in Italy, mascarpone cheese can be added to the mousse for a richer texture and a hint of flavor. Seasonal adaptations might include incorporating fresh fruit, like raspberries or strawberries, which pair wonderfully with chocolate and add a burst of freshness.

For dietary modifications, consider making a vegan version using plant-based chocolate and aquafaba as a substitute for whipped cream. Flavor variations can be achieved by adding espresso, spices, or liqueurs like Kahlua for an adult twist. Texture modifications can involve adding a layer of crunchy nuts or a biscuit crust for a delightful contrast.

Finally, presentation alternatives include serving mousse in individual glasses instead of a cake format, which is perfect for parties and gatherings to create an elegant touch.

Serving and Presentation Guide

For an exquisite presentation of your Triple Chocolate Mousse Cake, consider using a decorative cake stand. When plating, place a slice of cake at an angle on the plate to create a visually appealing display. You can garnish each slice with chocolate curls, fresh berries, or a dollop of whipped cream for an elegant touch.

Traditional accompaniments like vanilla ice cream or a berry coulis can enhance the overall flavor profile. Warm chocolate sauce drizzled over the top or the side can elevate the dessert experience. Note that temperature plays a crucial role; serve this cake cold from the refrigerator to maintain its mousse texture and flavors.

For portion control, consider slicing the cake into smaller, bite-sized pieces, especially if serving alongside other desserts. This allows guests to enjoy a variety of treats without feeling overwhelmed.

Wine and Beverage Pairing

Pairing wine with your Triple Chocolate Mousse Cake can enhance the dessert experience. A rich Cabernet Sauvignon or a fruity Merlot complements the deep flavors of the dark chocolate, bringing out its nuances. Alternatively, a dessert wine like Port or a sweet Sherry will harmonize beautifully, accentuating the cake’s sweetness.

For non-alcoholic options, consider serving a rich hot chocolate or a coffee brewed with chocolate notes. Herbal teas can also provide a lovely palate cleanser to accompany the dessert. Ensure that drinks are served at the right temperature; warm beverages tend to contrast well with the chilled mousse.

Finally, for those coffee lovers, a smooth espresso can enhance the richness of the chocolate, creating a delightful combination of flavors that rounds off the dessert beautifully.

Storage and Shelf Life

To ensure your Triple Chocolate Mousse Cake stays fresh, store it in an airtight container in the refrigerator. This dessert generally lasts for about 3-5 days, but for the best flavor experience, it’s best enjoyed within the first couple of days.

Avoid leaving the cake exposed to air as this can lead to drying out. When freezing, wrap the cake in plastic wrap and aluminum foil to prevent freezer burn; it can last up to 1 month. However, note that the texture may change slightly after thawing.

When reheating, allow the cake to come to room temperature before serving, as the mousse is best enjoyed chilled. Keep an eye on the cake for any signs of spoilage, which might include an off smell or a change in texture.

Make Ahead Strategies

This dessert is an excellent make-ahead option. Begin by preparing the mousse layers in advance — they can be made up to a day ahead and kept in the fridge. Bake the cake layers the day before serving, allowing them to cool completely before storing.

Assembling the cake can also be done a few hours before serving, allowing you to focus on other elements of your meal. Carefully layer the mousse and cake, and chill the assembled cake to ensure stability. If desired, add any garnishes right before serving for an elegant finish.

Before serving, consider adding fresh elements, such as whipped cream or fresh fruit, to enhance presentation and flavor. Just remember that freshness is essential for the best-tasting dessert experience.

Scaling Instructions

Scaling this Triple Chocolate Mousse Cake recipe can be done without much complication. If halving the recipe, maintain proportions for the mousse and cake for best results; each layer should remain consistent for texture and flavor.

To double or triple the cake, ensure your equipment can accommodate the increased volume. Larger mixing bowls and pans will be necessary. Timing modifications may also be required, as larger cakes could take longer to bake and chill completely.

When considering storage, be mindful of increased batch sizes. Layered cakes may require additional cooling time, so prepare accordingly to enjoy this delectable dessert without compromising quality.

Nutritional Deep Dive

A thorough analysis of the nutritional content of the Triple Chocolate Mousse Cake reveals a rich dessert loaded with unique benefits. The macronutrient breakdown shows a balance of carbohydrates primarily from sugar and flour, fats from chocolate and cream, and a modest amount of protein from eggs.

Micronutrients offer beneficial elements; dark chocolate is particularly high in magnesium and antioxidants. However, due to its rich ingredients, it’s worth noting this cake is high in calories, so moderation is key when indulging.

For dietary considerations, it’s essential to acknowledge portion sizes when enjoying this decadent dessert. A small slice can be surprisingly satisfying due to the rich flavor, making it easy to control intake while still enjoying this luscious treat.

Dietary Adaptations

The Triple Chocolate Mousse Cake can be adapted for various dietary needs. A gluten-free option can be achieved by substituting traditional flour with almond flour or gluten-free flour blends, allowing for the same texture without compromising flavor.

For a dairy-free version, use plant-based chocolates and creams; ensure all ingredients are free from dairy preservatives. Vegan adaptations can include egg replacements like flaxseed or chia seeds, along with an emphasis on plant-based creams to create the mousse.

Low-carb and keto options might consider using sugar substitutes and almond flour, reducing carbohydrates while maintaining flavor. Keep in mind that these adaptations may slightly alter the flavor and texture, but experimentation can yield worthwhile results.

Troubleshooting Guide

If your mousse turns out grainy, it might be due to overheating the chocolate. To avoid this, melt chocolate gently and ensure it cools slightly before mixing with whipped cream. If your mousse is too runny, consider re-whipping the cream to add more volume.

Issues with separation in the layers can arise from improperly folding ingredients. Always fold gently to incorporate without losing air, as this is crucial for a proper mousse. If the cake layers collapse during assembly, ensure that they are adequately cooled before layering.

Timing concerns, such as mousse not setting, often stem from not chilling long enough. Allow the cake to chill adequately before serving to ensure each layer holds well. Lastly, if you find the flavor lacks richness, adjust by adding a bit more dark chocolate or a touch of espresso.

Recipe Success Stories

Community feedback on this Triple Chocolate Mousse Cake recipe has been overwhelmingly positive. Many home bakers have shared their joyful experiences of creating this dessert for special occasions, noting how it consistently impresses friends and family.

Some have successfully experimented with flavor variations, incorporating hazelnuts or coffee to enhance the chocolate, garnering rave reviews. Others have expressed satisfaction with the presentation, finding that the layered approach makes for a stunning centerpiece.

Readers suggest taking photos throughout the baking journey and sharing those with their social media communities, fostering engagement and showcasing the cake’s beauty. Each success story reiterates that this cake is more than just dessert; it’s a celebratory experience.

Frequently Asked Questions

Can I use different types of chocolate for the mousse?

Yes! You can customize the flavors by using various types of chocolate such as milk, dark, and even flavored chocolates like mint or orange. Just ensure that the ratios are balanced to maintain the structure of the mousse.

How do I know when the cake is properly baked?

A toothpick inserted in the center should come out clean or with a few moist crumbs attached. Avoid overbaking, as this can dry out the cake.

Is it necessary to chill the mousse before assembling?

While it’s not strictly necessary, chilling the mousse will help it to firm up, making the assembly process much easier and less messy.

Can I make this cake gluten-free?

Absolutely! Substitute the flour with a gluten-free blend or almond flour to achieve a similar texture without gluten.

How long does the mousse cake last in the fridge?

The cake can last about 3-5 days in the fridge when stored properly in an airtight container. For the best quality, enjoy it within the first couple of days.

Can I freeze the mousse cake?

Yes, this cake can be frozen! Wrap it well in plastic wrap and aluminum foil, and it can last for about a month in the freezer. Thaw it in the fridge before serving for the best texture.

What if my chocolate mousse is too thick?

If the mousse seems too thick, you can gently fold in a bit of whipped cream until you reach your desired consistency. This helps maintain the lightness of the mousse.

Can I use whipped topping instead of homemade whipped cream?

While you can use whipped topping, homemade whipped cream provides a fresher taste and better texture. If you’re short on time, though, whipped topping is a convenient alternative.

What’s the best way to serve this cake?

Serving the cake chilled is best. Consider garnishing with berries, chocolate shavings, or a drizzle of chocolate sauce to enhance the presentation and flavor.

Can I add fruit to this recipe?

Yes, fresh fruit such as raspberries or strawberries can be added between the layers or used as a garnish. They provide a refreshing contrast to the richness of the chocolate.

Additional Resources

For those looking to explore more, consider trying other chocolate-centered recipes like rich brownies, chocolate lava cake, or even a classic chocolate mousse. Each recipe offers a different take on the beloved ingredient and provides wonderful options for various occasions.

You might also be interested in technique guides focusing on mastering the art of baking cakes or creating different types of mousses. Familiarizing yourself with these techniques can enhance your skills and give you confidence in the kitchen.

Exploring ingredient information about high-quality chocolates and how to select the best ones can significantly impact your baking results. Additionally, seasonal variations might inspire unique adaptations to align flavors with changing seasons.

Finally, recommending essential baking equipment can enhance your kitchen toolkit, allowing you to create professional desserts from the comfort of home.

Join the Conversation

We’d love to hear about your experiences with the Triple Chocolate Mousse Cake! Share your creations on social media and tag us to showcase your delicious versions. Photography offers a great opportunity for beautiful presentation, so don’t forget to capture your culinary masterpieces.

Engage with our community by sharing your thoughts, tips, and suggested variations. Encourage others to try their hand at this decadent recipe, creating a dish that not only pleases the palate but also fosters connections during gatherings. Your feedback and experiences contribute to a collective journey of culinary exploration and joy.

The Recipe

Triple Chocolate Mousse Cake

Serves: 10

Prep Time: 30 mins

Cook Time: 60 mins

Total Time: 90 mins

Kitchen Equipment Needed

  • Springform pan
  • Double boiler
  • Mixing bowls
  • Hand or stand mixer
  • Rubber spatula
  • Serrated knife

Ingredients

  • 8 oz dark chocolate, chopped
  • 8 oz milk chocolate, chopped
  • 4 oz white chocolate, chopped
  • 4 large eggs, separated
  • 1 cup heavy cream
  • 1 cup powdered sugar
  • 1 teaspoon vanilla extract
  • 1/2 cup all-purpose flour
  • 1/2 cup unsweetened cocoa powder

Directions

  1. Preheat oven to 350°F (175°C) and grease a springform pan.
  2. Melt dark chocolate over a double boiler, then let it cool slightly.
  3. In a mixing bowl, whisk together egg yolks and half of the sugar until pale and creamy.
  4. Fold in the melted dark chocolate and cocoa powder into the egg mixture.
  5. In another bowl, whip the egg whites until soft peaks form, gradually adding the remaining sugar.
  6. Gently fold the whipped egg whites into the chocolate mix until fully combined.
  7. Pour mixture into the prepared pan and bake for 25-30 minutes. Let it cool.
  8. Repeat the process for the milk and white chocolate layers.
  9. For mousse, whip cream until soft peaks and fold into cooled chocolate mixtures layer by layer.
  10. Chill each layer at least 1 hour before stacking them together.
  11. Serve with toppings as desired.

Recipe Notes

  • You can replace chocolates with different flavors as desired.
  • Ensure each layer is cool before frosting to avoid melting.
  • Be creative with decorations; fresh berries or mint make festive garnishes.

Delicious Orange Jam Recipe: Brighten Your Breakfast Table

Delicious Orange Jam Recipe: A Sweet Citrus Delight

⚖️
Difficulty
Easy

⏲️
Prep Time
15 mins

🕒
Cook Time
30 mins

⏱️
Total Time
45 mins

🍽️
Servings
5 jars

Indulge in the bright and zesty flavors of homemade Orange Jam, a delightful spread that captures the essence of fresh citrus in every jar. This luscious jam not only adds a pop of color to your breakfast table but also brings a burst of flavor that can brighten up your mornings. Imagine slathering this sweet, tart jam on warm toast or using it as a filling for pastries; every bite is like a sunny day in a jar.

In this recipe, we will guide you through the simple process of making this delicious Orange Jam, which captures the sweet and tangy notes of oranges sweetened just right. Whether you spread it on pancakes, pair it with cheese, or enjoy it right out of the jar, this jam is guaranteed to become a household favorite. Plus, the preparation is straightforward, making it a perfect activity to do with family or friends.

Quick Recipe Highlights

  • Flavor Profile: This Orange Jam strikes a perfect balance between the sweet notes of ripe oranges and the tangy undertones that citrus lovers adore.
  • Texture: The jam boasts a luscious consistency, smooth yet filled with small bits of pulp that deliver excitement in every spoonful.
  • Aroma: The aromatic fragrance of fresh oranges fills the kitchen, invoking memories of sun-soaked orchards.
  • Visual Appeal: The vibrant orange color of the jam is not only eye-catching but also suggests the freshness and quality of the ingredients used.
  • Skill Level Needed: This recipe is suitable for beginners, requiring just basic kitchen skills and minimal oversight.
  • Special Equipment: All you need is a pot, a wooden spoon, and canning jars to store your delicious creation.

Recipe Overview

  • Difficulty Level: Making Orange Jam is easy and enjoyable, perfect for beginners looking to try their hand at preserving fruit.
  • Category: This recipe falls under breakfast spreads and is ideal for both sweet and savory pairings.
  • Cuisine: Orange Jam has roots in various culinary traditions, often found in both European and American kitchens, celebrating the sweetness of citrus fruits.
  • Cost: The cost of making your Orange Jam is minimal, primarily consisting of fruit and sugar, making it a budget-friendly option.
  • Season: While oranges are available year-round, winter is the peak season when they are at their sweetest and most flavorful.
  • Occasion: Perfect for breakfast gatherings, holiday brunches, or as homemade gifts, this Orange Jam fits any occasion delightfully.

Why You’ll Love This Recipe

The taste and texture of this Orange Jam are simply irresistible. Each spoonful is a blend of sweetness with a hint of tartness, reminiscent of a sunny day. The smooth consistency makes it delightful to spread, whether on toast or as a filling for desserts. Enjoying this homemade jam feels rewarding, knowing you crafted this delightful treat from scratch using simple ingredients.

Convenience is key when preparing this recipe. With just a few ingredients and minimal kitchen tools required, anyone can seize the opportunity to make flavorsome homemade jam. Unlike store-bought varieties loaded with additives, this Orange Jam is made entirely of fresh oranges, preserving their natural goodness and vibrant flavors.

Nutritionally, oranges are packed with vitamins, particularly vitamin C, which is essential for boosting your immune system. The inclusion of natural fruit in your diet, through delicious jams like this, adds beneficial nutrients and can enhance overall well-being.

Socially, sharing homemade jam is an excellent way to connect with others. Whether you gift a jar or serve it to guests at a breakfast gathering, people appreciate the effort and love that goes into homemade treats. This jam can also serve as a fascinating discussion piece regarding your culinary endeavors.

Finally, the cost-effectiveness of making your Orange Jam cannot be overlooked. With the ability to produce several jars at minimal expense, you have an endless supply of this flavorful spread ready to enjoy anytime. Why not indulge while saving money?

Historical Background and Cultural Significance

The origin of Orange Jam can be traced back to ancient civilizations that recognized the sweetness of fruits and the importance of preserving them to enjoy year-round. Citrus fruits, particularly oranges, were revered for their health benefits and flavorful contributions to diets across cultures.

In culinary history, preserving fruits as jams and jellies became popular during the 18th century, particularly in Europe, where it allowed households to make the most of seasonal fruits. Families utilized traditional methods passed down through generations, showcasing the significance of resourcefulness and creativity in cooking.

As recipes evolved, regions began to develop their unique variations of Orange Jam. Some traditions introduce spices like cinnamon or ginger, while others explore combining citrus with different fruits, resulting in diverse flavors and textures.

Today, the cultural significance of Orange Jam continues as people embrace homemade cooking, celebrating nostalgia and the connection to family heritage. This jam stands as a testament to the joy of preserving seasonal produce for future enjoyment.

Ingredient Deep Dive

Oranges: The star ingredient in this Orange Jam, oranges are rich in history and cultural importance, symbolizing fertility and prosperity in many cultures. They are packed with nutritional benefits, including vitamin C, folate, and antioxidants, which support immune health and overall wellness. When selecting oranges, opt for firm, brightly colored fruit that gives slightly when pressed, indicating freshness. For storage, keep them in a cool, dry place, and use them within a week or two of purchase for optimal flavor. If you have surplus oranges, consider freezing them for later use, or substituting them with other citrus like grapefruits or lemons for a unique twist.

Sugar: A vital ingredient in preserving fruit, sugar not only sweetens the jam but also acts as a preservative, helping to maintain the jam’s consistency and preventing spoilage. From a nutritional standpoint, sugar provides quick energy; however, moderation is encouraged in any diet. When choosing sugar, granulated white sugar is typically preferred, but brown sugar can lend a slight difference in taste. Store sugar in an airtight container in a cool, dry location where it can last indefinitely. Consider using alternative sweeteners, such as honey or maple syrup, for a unique flavor, but adjust quantities accordingly to achieve the desired sweetness.

Common Mistakes to Avoid

  • Using overripe oranges can lead to a jam that ferments rather than preserves. Ensure your fruit is fresh and firm for a successful outcome.
  • Not measuring ingredients accurately will affect the balance of sweetness and acidity, altering the flavor profile of your jam.
  • Skipping the sterilization of jars can lead to spoilage. Ensure that jars are sterilized before filling them with jam.
  • Cooking the jam for too long can create a caramelized flavor that may not be desirable. Monitor closely to achieve perfect consistency.
  • Not properly sealing jars can cause contamination. Make sure the seals are intact to extend shelf life.
  • Overcooking the mixture can lead to a jelly-like texture instead of a spreadable consistency. Cook just until the setting point is reached.
  • Ignoring proper storage methods can result in spoilage. Store your sealed jars in a cool, dark place.
  • Not tasting during the cooking process may miss the chance to adjust sweetness or acidity to your liking.
  • Using a non-stick pot may prevent proper caramelization and texture. Opt for a heavy-bottomed pot for even cooking.
  • Not allowing the jam to cool before storing could cause steam to build up, leading to condensation and spoilage.

Essential Techniques

Preparing the Fruit: Properly washing and peeling the oranges is essential to ensure no pesticides or impurities remain. Master this step by using a soft brush under running water. Look for shiny skin with no blemishes for the best results.

Cooking Techniques: Understanding the importance of cooked sugar is crucial in making jam. The sugar should be dissolved completely before the mixture reaches the boiling point. To master this, maintain medium heat and stir regularly. Use a thermometer to check for proper temperatures; visual cues like bubbling and thickening indicate success.

Pro Tips for Perfect Orange Jam

1. Always select ripe, seasonal oranges for the best flavor; avoid using overripe or inferior quality fruit.
2. Experiment with adding zest from the oranges to intensify the citrus flavor; just a teaspoon can make a significant difference.
3. Consider adding a splash of lemon juice for a hint of acidity; this can balance the sweetness beautifully.
4. Stir the mixture continuously while cooking to prevent it from sticking to the bottom of the pot and burning.
5. Test for consistency by spooning a small amount onto a cold plate; it should hold its shape without running.
6. Be creative with spices; adding a pinch of cinnamon or nutmeg can introduce an exciting twist to your jam.
7. Store opened jars in the refrigerator for maximum freshness and use within a couple of months.
8. Share the love; gift jars of your homemade jam to friends and family for a personal touch.

Variations and Adaptations

For a regional twist, consider adding spices like ginger or cardamom for warmth. Seasonal adaptations could include mixing in berries when they are ripe in summer, creating unique flavor combinations. For dietary modifications, this Orange Jam is easily adaptable to accommodate lower sugar needs by substituting half of the sugar with a sweetener like stevia. For flavor variations, try incorporating vanilla extract or zest from lime alongside the oranges, enhancing the tropical essence. Texture modifications can be achieved by finely chopping the pulp for a smoother jam or leaving it chunkier for added bite. Presentation alternatives could involve canning the jam in themed jars for holidays or special occasions.

Serving and Presentation Guide

Plating your Orange Jam beautifully can elevate the experience. Serve it in a neat glass jar for a rustic touch at breakfast. Consider garnishing with fresh mint leaves for a pop of color. Traditional accompaniments include warm scones or biscuits, while modern serving suggestions may feature a cheese platter, pairing well with soft cheeses. Serving the jam alongside tea or coffee should see it consumed while still slightly warm. Be mindful of portion control, ensuring the jam is available in small servings to keep it fresh and enjoyable for longer.

Wine and Beverage Pairing

When pairing wine with Orange Jam, sweet wines such as Moscato or Late Harvest Riesling complement the citrus flavors nicely. For non-alcoholic alternatives, consider serving it with mint-infused iced tea or sparkling water for a refreshing twist. If enjoying with breakfast, a rich cup of freshly brewed coffee or tea provides a delightful contrast to the sweet jam. Serve beverages chilled to enhance the overall dining experience.

Storage and Shelf Life

Proper storage of your Orange Jam is essential for longevity. Once sealed, store the jars in a cool, dark place away from direct sunlight. After opening, keep your jam refrigerated and consume it within 2-3 months for the best flavor. Use glass containers or BPA-free plastic jars to minimize spoilage risks. Signs of spoilage include mold growth or an off odor; if either occurs, discard the jam immediately. If you need to store your jam longer, consider freezing it in airtight containers but note that texture may change slightly upon thawing.

Make Ahead Strategies

To streamline your cooking process, prepare the oranges a day in advance. This allows flavors to meld before cooking. Store them in an airtight container in the fridge to retain freshness. Consider making large batches and sterilizing jars well in advance; this allows you to create a stockpile of jam that’s ready to enjoy anytime. When reheating, be gentle, warming to just the right temperature without compromising the flavor. Briefly warm the jam before serving to enhance its spreadability, especially after taking it from the fridge.

Scaling Instructions

Should you want to halve or double your Orange Jam recipe, use equal parts sugar and oranges according to the new total. Ensure equipment size adjustment as necessary; larger batches may require more substantial cookware. Note that doubling the recipe may also require longer cooking time to reach the proper consistency. When scaling, always account for the same STM (setting temperature method) to guarantee the perfect final product.

Nutritional Deep Dive

In terms of macronutrient breakdown, this Orange Jam contains carbohydrates primarily from sugar, with little protein or fat. Each serving offers a burst of vitamin C, supporting immune function and skin health. The inclusion of fresh oranges also provides fiber, contributing positively to digestive health. For those mindful of dietary considerations, portion sizes are critical; moderation is encouraged due to sugar content, making up approximately 12-15 grams per tablespoon. Being aware of these factors is essential for maintaining a balanced diet while still enjoying this sweet, citrusy delight.

Dietary Adaptations

Making this Orange Jam can be easily adapted to suit various dietary restrictions. For gluten-free diets, this recipe naturally fits as it contains no gluten-containing ingredients. For dairy-free options, the jam fits perfectly, requiring no adjustments. To cater to vegan preferences, use a plant-based sweetener like coconut sugar in place of traditional sugar. Low-carb and keto options can utilize erythritol or monk fruit sweeteners instead of standard sugar without sacrificing flavor. Those following Paleo diets can enjoy adapted recipes that involve using natural sweeteners, keeping the ingredients clean and simple.

Troubleshooting Guide

For texture issues, if the jam is too runny, re-cook it while continuously stirring until it thickens. If too thick, loosen it with a bit of orange juice. For flavor balance, consider that spoilage can occur if the citrus isn’t sweet enough; adjust sweetness with additional sugar. Temperature problems can arise during cooking; ensure you maintain consistent heat throughout the process to prevent scorching. If you encounter equipment challenges, using the right pot for the recipe is essential; a heavy-bottomed pot is preferred. Lastly, for timing concerns, always use a timer; preserve a balance between cooking too long or too short.

Recipe Success Stories

Many readers have expressed their delight in preparing this Orange Jam. The simplicity of the recipe, paired with fantastic results, made it a favorite during family gatherings. One reader shares how they introduced this jam to their friends at a brunch, receiving praise for its fresh taste and versatility. Others have successfully adapted the recipe to include different fruits, showcasing the recipe’s flexibility and encouraging experimentation. Photography enthusiasts also highlight that the vivid colors of the jam make for stunning visuals, encouraging them to share their creations on social media.

Frequently Asked Questions

1. Can I use other fruits in this jam? Yes! While this recipe is for Orange Jam, you can mix in other fruits like lemons or grapefruits to create unique blends. Ensure you adjust sugar levels accordingly to match the tartness of the added fruits.

2. How long can I store the jam? Unopened jars can last many months when stored in a cool, dark place. Once opened, refrigerate and use within 2-3 months for the best quality.

3. Can I can this jam for long-term storage? Definitely! Proper canning techniques will allow your Orange Jam to be stored safely for an extended period. Make sure to use sterilized jars and seals.

4. What if I don’t have any canning jars? You can store the jam in any airtight container; glass containers with lids work well as an alternative for short-term storage.

5. How do I know when the jam is set? Use the cold plate test: spoon a small amount of jam onto a plate and place it in the freezer for a minute. If it holds its shape, it’s ready.

6. What can I do with leftover pulp? Leftover pulp can be used in baking, stirred into yogurt, or incorporated into smoothies for added flavor and nutrients.

7. Is there a sugar-free alternative? Yes, you can replace sugar with sweeteners like stevia or erythritol, but follow the manufacturer’s instructions for substitution ratios to maintain sweetness.

8. How can I enhance the flavor of this jam? Add spices like cinnamon or cardamom during cooking, or incorporate flavored liqueurs for a more sophisticated jam.

9. Can I freeze this jam? Yes, Orange Jam freezes well in airtight containers. Just remember to leave some space at the top for expansion.

10. Can I adjust the thickness of the jam after cooking? If it’s too runny, reheat and simmer to evaporate some liquid. For a thicker jam, mix in pectin while boiling.

Additional Resources

If you enjoyed this Orange Jam recipe, you might also try other jam recipes, like strawberry or raspberry. Explore our technique guides on preserving fruits or making fruit butters for more delicious homemade ideas. Look into ingredient information to learn more about the health benefits of citrus fruits. Recommendations for essential kitchen equipment can help streamline your cooking journey and enhance your culinary skills.

Join the Conversation

We’d love to hear from you! Share your experiences making Orange Jam on social media by tagging us and using our recipe hashtag. We also encourage you to share your photography tips and variations of the recipe. Engaging with the community through reviews and feedback enriches our culinary adventures and inspires others to try their hand at this delightful jam recipe.

The Recipe

Orange Jam

Serves: 5 jars

Prep Time: 15 mins

Cook Time: 30 mins

Total Time: 45 mins

Kitchen Equipment Needed

  • Heavy-bottomed pot
  • Wooden spoon
  • Chopping board
  • Knife
  • Measuring cups
  • Jars with lids

Ingredients

  • 4 medium-sized oranges
  • 1 cup granulated sugar
  • 1/4 cup lemon juice
  • 1/2 cup water

Directions

  1. Wash and peel the oranges, removing any seeds, and chop them into coarse pieces.
  2. In a heavy-bottomed pot, combine the orange pieces, sugar, lemon juice, and water, stirring to dissolve the sugar.
  3. Bring the mixture to a boil over medium heat, stirring frequently.
  4. Reduce heat and simmer for about 30 minutes, stirring occasionally, until the mixture thickens.
  5. Test for set by placing a spoonful on a cold plate; if it holds its shape, it’s ready.
  6. Pour the hot jam into sterilized jars, leaving a bit of space at the top before sealing.
  7. Allow the jars to cool completely at room temperature, then store them in a cool, dark place.

Recipe Notes

  • For a more intense flavor, consider adding orange zest to the mixture.
  • This jam pairs wonderfully with cream cheese on bagels or melted into a glaze for meats.
  • Feel free to customize by adding other citrus or spices to enhance the flavor profile.

Delicious Butter Pecan Fudge Recipe: A Sweet Treat to Savor

Butter Pecan Fudge Recipe: A Sweet Indulgence for Any Occasion

⚖️
Difficulty
Medium

⏲️
Prep Time
15 mins

🕒
Cook Time
25 mins

⏱️
Total Time
40 mins

🍽️
Servings
24 pieces

Butter Pecan Fudge is a delightful treat that combines the rich flavors of butter and brown sugar with the crunchy texture of pecans. This fudge is not only a sweet indulgence but also an impressive dessert that is perfect for sharing with family and friends. Whether you’re preparing for a holiday gathering or simply looking for a delicious snack, this Butter Pecan Fudge is sure to please.

As you take a bite, you’ll experience the creamy sweetness melting in your mouth, complemented by the slightly salty, toasted flavor of pecans. Each piece delivers a satisfying crunch that balances the rich, buttery fudge perfectly. With its appealing golden hue and inviting aroma, this fudge is as visually pleasing as it is tasty, making it an excellent choice for special occasions.

Quick Recipe Highlights

  • Flavor Profile: The combination of buttery sweetness and nutty pecans creates a delightful contrast that is both comforting and indulgent.
  • Texture: This fudge features a creamy base with a smooth mouthfeel, punctuated by crunchy bits of pecans.
  • Aroma: The fudge boasts rich notes of caramelized sugar and toasted nuts, filling your kitchen with an irresistible scent as it cooks.
  • Visual Appeal: Its golden, glossy finish and speckled pecan pieces make this fudge visually striking and inviting to serve.
  • Skill Level Needed: With simple techniques, this fudge is accessible even for novice bakers looking to impress.
  • Special Equipment: A candy thermometer is recommended for ensuring perfect consistency but is not strictly necessary.

Recipe Overview

  • Difficulty Level: Butter Pecan Fudge is rated medium. While the recipe is straightforward, careful attention is needed to bring the mixture to temperature without burning.
  • Category: This recipe falls under desserts and confections, making it ideal for sweet cravings and celebrations.
  • Cuisine: As a beloved American treat, fudge has roots in traditional candy-making but has evolved into numerous variations reflecting regional flavors.
  • Cost: Ingredients for this fudge are budget-friendly, typically costing less than $10 to make a batch that serves 24 pieces.
  • Season: Perfect for all seasons, this fudge shines at holiday gatherings, potlucks, and sunny picnics alike.
  • Occasion: Serve it during family gatherings, as thank-you gifts, or even at weddings for a sweet touch.

Why You’ll Love This Recipe

Butter Pecan Fudge is not just a dessert; it’s an experience. The harmonious blend of buttery caramel and toasted pecans creates a flavor explosion that is both nostalgic and comforting. Each bite is decadent, yet the crunchy pecans provide a satisfying crunch that elevates the texture to a new level of enjoyment. This rich treat is sure to put a smile on anyone’s face, making it a perfect choice for celebrations or just a cozy night in.

What’s more, this fudge is easily accessible for all home bakers. The straightforward steps and minimal prep time mean you can whip up a batch quickly, even on short notice. It requires simple ingredients that are often staples in your pantry, making it an efficient choice for those spontaneous sweet cravings. Plus, it keeps well, meaning you can prepare it ahead of time for parties or holiday festivities.

Health-conscious individuals will appreciate that this recipe can be tailored to incorporate healthier alternatives. You could use organic ingredients or adjust the sugar content to suit your dietary preferences. The nuts add a beneficial protein boost, making this treat a bit more nourishing compared to other confections.

Socially, Butter Pecan Fudge serves as a wonderful conversation starter at gatherings. Its beautiful appearance and delightful taste make it a favored treat among friends and family. Sharing this fudge with others creates lasting memories and sparks joy, whether enjoyed at a holiday party or shared as gifts for special occasions.

Lastly, this recipe is incredibly cost-effective. With minimal ingredients that yield a generous portion, it provides great value. You can satisfy your sweet tooth without breaking the bank, allowing you to indulge in a truly delightful treat successfully without feeling guilty.

Historical Background and Cultural Significance

The origin of fudge can be traced back to the early 19th century in the United States. The process of boiling sugar and butter together was likely discovered by accident, leading to the creation of this smooth, creamy confection. The name “fudge” itself is thought to have originated from the Southern dialect, as vendors began selling it in candy shops across the country.

Culturally, fudge became a popular treat among families and was often made during the holidays. This tradition continues today, with many families passing down their own recipes through generations. Butter Pecan Fudge honors the original recipe while adding a delightful twist with its unique flavor combination that celebrates Southern culinary traditions.

As fudge evolved, different regions began to introduce their unique spin on the classic treat. In the South, the addition of pecans is particularly beloved, reflecting the region’s abundance of this nut. These local variations help to preserve the cultural significance of fudge as a sweet emblem of regional culinary identity.

Today, Butter Pecan Fudge remains a popular choice during celebrations and holidays throughout the year. Its delightful flavors evoke nostalgia and warmth, making it a cherished sweet that brings people together, reinforcing its place in both American culture and the hearts of those who enjoy it.

Ingredient Deep Dive

Butter: Butter is an essential ingredient in fudge, contributing to its rich flavor and silky texture. Historically, butter has been used in confections to enhance flavor and mouthfeel. It contains healthy fats that provide energy, but it is important to use it sparingly at times to maintain balance in your diet. When selecting butter for this recipe, always choose high-quality, unsalted butter for the best flavor. Store butter in the refrigerator, ensuring it stays fresh for longer. If you’re out of butter, you can substitute with margarine, although the flavor may differ slightly.

Pecans: Pecans are not only delicious but also add a crunch that complements the creamy fudge. This nut has deep cultural roots in Southern cuisine and has been enjoyed for generations. Pecans are packed with antioxidants, healthy fats, and vitamins, making them a nutritious addition to your diet. When selecting pecans, look for ones that are firm and aromatic. For storage, keep them in a cool, dry place or refrigerate them to maintain freshness. If you don’t have pecans, walnuts or almonds can be used as substitutes, providing a different but delightful texture.

Common Mistakes to Avoid

  • Not using a candy thermometer: One of the most common mistakes is failing to measure the temperature of the fudge. This can lead to either a too-soft or overly hard texture. Always have a good-quality candy thermometer on hand to achieve the right consistency.
  • Overcooking the mixture: Cooking the fudge too long results in a grainy texture. Stop cooking as soon as the mixture reaches the soft-ball stage, around 234°F (112°C).
  • Under-mixing: When all ingredients are combined, it’s essential to mix thoroughly to ensure air is incorporated. Otherwise, the fudge can harden unevenly.
  • Using cold utensils: If using cold pans or utensils, the fudge may not set correctly. Always warm your equipment slightly to achieve better results.
  • Not letting the fudge cool properly: Be patient and don’t rush the cooling process. If you cut it while it’s too warm, it won’t hold its shape.
  • Skipping the buttering of the pan: Fudge can stick if the pan isn’t adequately greased. Always line your pan with parchment paper or butter it well to ensure easy removal.
  • Failing to toast the pecans: Toasting pecans enhances their flavor. Many home cooks skip this step, which can lead to a less robust taste.
  • Not allowing time to set: Leaving fudge to cool for adequate time is crucial. Cutting it too soon can ruin its structure and texture.
  • Choosing low-quality ingredients: As fudge is a simple recipe, using high-quality butter, sugar, and nuts makes a noticeable difference in the final taste.
  • Ignoring humidity levels: High humidity can affect the texture of your fudge, making it sticky or too soft. Adjust cooking conditions accordingly.

Essential Techniques

Temperature Control: This technique is crucial in candy making. The sugar mixture must be heated to the right temperature, as too low and it won’t set, too high will cause it to harden. To master this, use a reliable candy thermometer and check the temperature as you cook.

Mixing: Proper mixing is essential to create a uniform fudge. Once the mixture reaches the right temperature, remove it from the heat and stir vigorously. This helps to incorporate air and allows the fudge to set properly.

Cooling: Allowing the fudge to cool in the pan stabilizes its structure. After pouring it into the prepared pan, avoid cutting it until it cools and sets—around two hours. This technique ensures you get clean edges when you cut it.

Ingredient Preparation: Preparing ingredients beforehand can streamline the fudge-making process. For example, chopping pecans and measuring out ingredients in advance helps maintain focus and prevents rushing when the mixture is hot.

Tasting and Adjusting: Since every palate is unique, be sure to taste your fudge base before it sets. This ensures the balance of flavors is to your liking, allowing you to make adjustments if necessary.

Pro Tips for Perfect Butter Pecan Fudge

1. Always measure sugar accurately to prevent inconsistencies in texture.
2. Consider using brown sugar for added depth of flavor and richness in your fudge.
3. Toast your pecans before adding them for enhanced nuttiness.
4. Use a heavy-bottom pan to help distribute heat evenly and prevent scorching.
5. Pour the fudge into the lined pan while it’s hot for the best set.
6. Allow the fudge to cool at room temperature rather than in the refrigerator, as this ensures better texture.
7. For a chocolate twist, consider swirling in melted chocolate just before pouring the fudge into the pan.
8. Store leftover fudge in an airtight container at room temperature to retain its softness.

Variations and Adaptations

Throughout the years, variations of Butter Pecan Fudge have emerged, each adding a unique twist to this classic. For instance, you can incorporate different nuts such as walnuts or almonds, allowing for a diverse flavor profile. Seasonal adaptations can include adding spices like cinnamon or nutmeg during fall, lending warmth to the fudge.

For dietary modifications, consider making the fudge dairy-free by swapping butter for coconut oil or vegan butter. If you’re looking for a lower-carb option, you can substitute sugar with erythritol or other sugar alternatives to maintain sweetness without the added calories.

Flavor variations can be achieved by incorporating extracts like vanilla or maple. These small tweaks add complexity and richness to your fudge. Additionally, you can adjust the texture by opting for coarsely chopped pecans for a more rugged appearance or finely cut nuts for a smoother finish.

Serving and Presentation Guide

When serving Butter Pecan Fudge, presentation plays a key role in enhancing the dining experience. Cut the fudge into uniform squares for an elegant look, and consider stacking them on a cake stand for a showcase effect. Garnishing with a sprinkle of sea salt or a drizzle of melted chocolate can elevate the visual appeal significantly.

Traditional accompaniments like homemade whipped cream or ice cream can complement the rich flavors beautifully. For a modern touch, consider serving it with fresh fruits like strawberries or slices of orange to provide a refreshing balance.

Temperature considerations are important; serve the fudge at room temperature to allow its texture to shine. When hosting, remember to offer appropriate portion sizes. Small squares are perfect for satisfying the sweet tooth, leaving room for guests to enjoy other treats.

Wine and Beverage Pairing

Pairing Butter Pecan Fudge with the right beverages can enhance its flavors remarkably. A rich, sweet dessert wine like a late harvest Riesling or a tawny port offers complementary sweetness and texture. The nutty notes in the fudge resonate beautifully with these wines, making for a perfect match.

In addition to wine, consider non-alcoholic alternatives like a rich hot chocolate topped with whipped cream. Alternatively, a balanced espresso contrasts the sweet fudge nicely, enhancing its creamy richness. When serving, ensure the beverages are chilled or brewed to the perfect temperature to complement the fudge seamlessly.

Storage and Shelf Life

Proper storage is key to preserving the freshness of Butter Pecan Fudge. Keep the fudge in an airtight container at a cool room temperature away from direct sunlight. This helps it maintain its soft texture and sweet flavor for about 1 to 2 weeks.

If you want to extend its shelf life, consider refrigerating it. Although it is still safe to eat after a few weeks in the refrigerator, be mindful of the texture—refrigerated fudge may become a bit crumbly. Ensure you wrap it well to prevent any moisture loss and keep it tasting fresh.

For longer-term storage, you can freeze the fudge. Wrap it tightly in plastic wrap and place it in a freezer-safe container. It can last up to three months in the freezer. Just ensure to thaw it in the refrigerator overnight before serving.

Make Ahead Strategies

If you’re planning to serve Butter Pecan Fudge for a special occasion, consider making it ahead of time. Preparing the fudge a day or two in advance allows the flavors to meld, creating a more intense taste. Just ensure that it has sufficient time to cool and set fully, enhancing its texture and consistency.

While waiting for the fudge to set, you can store it in the fridge or at room temperature, depending on your serving timeline. Once set, it can be cut into squares and stored in an airtight container, ready for immediate serving.

If you’re worried about artificial elements when reheating or serving, keep a few added ingredients on hand—like freshly toasted pecans or coarse sea salt—to sprinkle on top just before serving for added texture and interest. This way, you enhance both presentation and freshness.

Scaling Instructions

Scaling Butter Pecan Fudge is quite easy. If you find yourself in need of fewer or more pieces, simply adjust the measurements proportionately. Halving the recipe is straightforward; just make sure your pan size reflects the change to maintain the right thickness.

If you decide to double or triple the recipe, be mindful of adjusting cooking times slightly, as larger batches may take longer to reach the desired temperature. Utilizing larger pots can help with maintaining the proper temperature while stirring continuously.

Store any extra fudge in airtight containers as mentioned previously, ensuring that it retains its freshness during storage. By following these simple guidelines, you can adapt the recipe to fit any occasion seamlessly.

Nutritional Deep Dive

Butter Pecan Fudge may be a treat, but understanding its nutritional data is important for mindful indulgence. Each square typically contains a healthy dose of fats from the butter and nuts, contributing to a satisfying, energy-boosting snack. However, it’s important to enjoy it in moderation due to its high sugar content.

Looking into micronutrients, pecans provide essential vitamins E and B6, along with protein and fiber, which can be beneficial for overall health. This makes Butter Pecan Fudge not just a sweet treat but a source of some nutritional value, especially when made with high-quality ingredients.

When considering dietary preferences, be cautious of portions, especially for those watching sugar or calorie intake. Remember that even a small piece can offer a rich, satisfying sweetness that feels indulgent while keeping caloric impact in check.

Dietary Adaptations

For those with dietary restrictions, Butter Pecan Fudge can be tailored in various ways. If you seek a gluten-free version, simply ensure that all sugar and additional ingredients are certified gluten-free; the core recipe is naturally gluten-free.

Dairy-free alternatives are also easily incorporated, swapping butter out for plant-based options such as coconut oil or vegan buttery spreads. Additionally, nut varieties can be adjusted for nut-free adaptations, using seeds like sunflower seeds or pumpkin seeds in their place.

For those adhering to a low-carb or keto diet, implementing sugar substitutes can yield a fudge that won’t derail your dietary goals. Options like erythritol, monk fruit sweetener, or stevia can provide the sweetness without unwanted carbs.

Troubleshooting Guide

If you encounter texture issues with your Butter Pecan Fudge, the most common reasons are either overcooking or under-mixing. If the fudge feels grainy, it’s usually due to the sugar crystallizing—this can happen if the mixture is stirred too vigorously while cooling. Ensure you mix gently and avoid water intrusion during the cooking stage.

When it comes to flavor balance, if the fudge tastes too sweet, consider adding a pinch of salt to enhance its flavors. This can surprisingly lower perceived sweetness while bringing out the depth of the buttery notes.

Temperature problems can arise if your stovetop varies widely in heat. Use a heavy-bottomed pot for more even distribution. If your fudge isn’t setting, it’s likely due to undercooking; check the temperature closely next time and ensure it reaches at least 234°F (112°C).

Equipment challenges can arise if pots are too small, causing spills. Always choose appropriately sized cookware for the batch size. If ingredient substitutions are made, double-check ratios; not all sweeteners or butters convert directly.

Timing concerns often occur when trying to rush the cooling phase. Always allow the fudge adequate time to set—it’s tempting to hurry but waiting enables a much neater cut.

Recipe Success Stories

Butter Pecan Fudge has received numerous praises from home cooks who have tried this recipe. Many found success with variations, sharing stories of experimenting with flavor additions like coconut or chocolate swirls that delighted guests at their gatherings.

Readers have described adaptations of the original recipe, swapping in healthier sweeteners that still yielded wonderful results without sacrificing taste. These adaptations inspire others in the community to try their hand at making their unique versions.

Photography tips have also flooded in, as many bakers seek to capture the deliciously rich appearance of their fudge. Simple styling tips like using contrasting backgrounds or garnishing with a dusting of powdered sugar create inviting visuals that highlight the creamy texture and crunch of the pecans.

Countless success stories demonstrate how adaptable and beloved this fudge has become, making it a staple recipe in many homes eager to share sweet memories with loved ones.

Frequently Asked Questions

How do I ensure my fudge sets properly?

To ensure your fudge sets properly, make sure to reach the right temperature during cooking; ideally, around 234°F (112°C). Allow it adequate time to cool before cutting, as this will help maintain its structure and prevent it from becoming too soft.

What can I do if my fudge turns out grainy?

If your fudge turns out grainy, it often means that the sugar crystallized during cooking. To avoid this, avoid stirring the mixture too vigorously while it is cooling, and ensure to keep moisture away from your sugar mixture as it cooks.

Can I freeze Butter Pecan Fudge?

Yes, Butter Pecan Fudge freezes beautifully. Wrap it tightly in plastic wrap and store it in an airtight container in the freezer. It can be kept for up to three months. Just thaw in the refrigerator before serving.

What other nuts can I use in this recipe?

While pecans are the classic choice, you can substitute them with walnuts, almonds, or even cashews for different flavor profiles and textures. Just be mindful of how the substitute affects your overall flavor balance.

What’s the best way to cut fudge?

To cut fudge neatly, allow it to set at room temperature first. Using a hot knife (dip in hot water and dry) can help create smooth cuts without the fudge sticking to the blade.

How long does Butter Pecan Fudge last?

When stored properly in an airtight container at room temperature, Butter Pecan Fudge can last around 1 to 2 weeks. It can also be refrigerated to extend its shelf life without losing flavor.

Can I add chocolate to this fudge?

Yes! You can incorporate chocolate by swirling melted chocolate into the fudge mixture just before pouring it into the pan. This will create a delightful combination of flavors and textures.

Is it possible to make this fudge without a candy thermometer?

While a candy thermometer is recommended for accuracy, you can do without it by testing the soft-ball stage by dropping a small amount of the mixture into cold water to see if it forms a soft ball.

What’s the best way to store leftover fudge?

The best method is to store leftover fudge in an airtight container at room temperature for up to 1 week or refrigerate it for up to 2 weeks. Just ensure it’s wrapped well to avoid drying out.

Can I use sugar substitutes for a healthier version?

Absolutely! You can use sugar substitutes like erythritol or monk fruit sweetener to reduce sugar content while maintaining sweetness. Just ensure to account for any differences in measurement and taste.

What other flavors can I add to customize this fudge?

Aside from nuts, consider adding flavors such as vanilla extract, maple syrup, or even spices like cinnamon for a unique twist. These additions can elevate the fudge and tailor it to your preferences.

Additional Resources

For those eager to dive deeper into the world of confections, there are plenty of resources available. Check out related recipes such as Chocolate Fudge, Peanut Butter Fudge, or Nut Brittle for even more indulgent treats. Additionally, technique guides on candy making offer invaluable insights into mastering the art of sweet creations.

Online ingredient information resources can help you understand the best ingredients to use for your fudge. Consider finding equipment recommendations to ensure that you only invest in the best quality tools for your kitchen.

Seasonal variations provide fresh inspiration; think about incorporating seasonal spices or flavors for the holidays, or using fresh ingredients for a summer take on fudge.

Join the Conversation

We love hearing from our readers! Share your experiences or adaptations of the Butter Pecan Fudge recipe. Engage with us on social media by posting your fudge-making adventures and tagging us in your photos. You can provide valuable tips, feedback, and even suggestions for new recipe ideas based on your baking triumphs.

Your photography can also inspire others; show off your stunning platters and unique presentations. Whether you’ve switched up the nuts or introduced exciting flavors, your variations are what keep our community vibrant and creative. We look forward to seeing your sweet creations!

The Recipe

Butter Pecan Fudge

Serves: 24 pieces

Prep Time: 15 mins

Cook Time: 25 mins

Total Time: 40 mins

Kitchen Equipment Needed

  • Heavy-bottom saucepan
  • Candy thermometer
  • Wooden spoon or spatula
  • Baking pan (8×8 inches)
  • Parchment paper (for lining)

Ingredients

  • 2 cups granulated sugar
  • 1/2 cup unsalted butter
  • 1/2 cup heavy cream
  • 1 cup chopped pecans
  • 1 teaspoon vanilla extract
  • 1/4 teaspoon salt

Directions

  1. In a heavy-bottom saucepan, combine sugar, butter, and cream. Heat over medium heat, stirring until the sugar dissolves.
  2. Attach a candy thermometer to the pan and bring the mixture to a boil. Allow it to cook without stirring until it reaches the soft-ball stage (234°F or 112°C).
  3. Remove from heat and let it cool for about 5 minutes. Stir in vanilla extract, salt, and toasted pecans.
  4. Pour the mixture into a greased or parchment-lined baking pan. Spread it evenly with a spatula.
  5. Allow the fudge to cool at room temperature for at least 2 hours before cutting it into squares.

Recipe Notes

  • For richer flavor, consider using dark brown sugar in place of granulated sugar.
  • Experiment with different nuts or chocolate swirls for personalized flavor.
  • Store in an airtight container to maintain freshness.

Indulge in Swiss Roll Black Forest Chocolate Cherry Delight

Swiss Roll Meets Black Forest Charm – A Chocolate & Cherry Masterpiece

⚖️
Difficulty
Medium

⏲️
Prep Time
30 mins

🕒
Cook Time
20 mins

⏱️
Total Time
50 mins

🍽️
Servings
8 servings

If you’re looking to impress your family and friends with a dessert that embodies the charm of European baking, the Swiss Roll Meets Black Forest Charm is a decadent blend of rich chocolate cake and luscious cherries, finished with whipped cream. This delightful roll cake not only pleases the eye with its beautiful presentation but also captivates the palate with layers of flavor. Each slice reveals a swirl of chocolate sponge intertwined with sweet cherry filling, topped with fluffy cream that transforms it into a show-stopping dessert.

This recipe is more than just a treat for your taste buds; it’s an experience that invokes a sense of nostalgia for classic cherry desserts. The combination of dark chocolate and tart cherries creates a harmonious symphony that resonates with anyone who has a sweet tooth. Whether it’s a birthday, holiday celebration, or simply a Sunday family gathering, this chocolate and cherry masterpiece brings joy and indulgence to any occasion.

Quick Recipe Highlights

  • Flavor Profile: Rich chocolate cake paired with tart cherries and sweet cream create a delightful blend of sweet and slightly tangy notes.
  • Texture: This cake features a light and airy sponge with a creamy filling, offering a satisfying contrast that melts in your mouth.
  • Aroma: The inviting aroma of freshly baked chocolate mingles with the sweet scent of cherries, creating an irresistible fragrance.
  • Visual Appeal: A stunning roll swirled with vibrant cherries and topped with a generous layer of whipped cream, making it a feast for the eyes.
  • Skill Level Needed: This recipe is medium in difficulty, requiring some baking skills and an understanding of rolling cakes.
  • Special Equipment: A baking sheet, parchment paper, and an electric mixer are essential for crafting this delightful dessert.

Recipe Overview

  • Difficulty Level: The difficulty is marked as medium because it requires baking a sponge cake and rolling it delicately without cracking.
  • Category: This recipe falls under dessert and is perfect for both casual and formal meals.
  • Cuisine: The Swiss Roll and Black Forest cake are rooted in German culinary tradition, celebrated across various cultures.
  • Cost: The ingredients are relatively affordable, with chocolate and cherries being the primary components.
  • Season: Enjoy this dessert year-round, but it is particularly popular in spring and summer when cherries are in peak season.
  • Occasion: Ideal for birthdays, picnics, or any festive gathering that calls for an impressive dessert.

Why You’ll Love This Recipe

The Swiss Roll Meets Black Forest Charm is not just exceptional in taste and presentation but offers a unique blend of flavors and textures. The light, fluffy chocolate sponge pairs wonderfully with the tartness of cherries, creating a complex yet harmonious flavor profile. Each bite provides a delightful experience, making it a dessert you’ll want to share and enjoy repeatedly.

Moreover, its convenience and versatility make it a popular choice. You can prepare it in advance, allowing the flavors to meld overnight, making it a time-saver for busy days. The finished roll can elegantly adorn your dessert table, giving you more time to spend with your guests.

Nutritionally, this dessert can be made with whole ingredients, which means it brings in the goodness of fruits and is a delightful spoonful of happiness without the guilt. The cherries provide antioxidants while the cake gives you that comforting feel of indulgence.

This Swiss Roll is not only delicious but a great conversation starter when hosting dinner parties. Its beautiful presentation and delectable taste will leave your guests asking for the recipe, creating a social atmosphere around the dining table.

Cost-effective, too, the ingredients won’t break the bank. The recipe’s affordability coupled with its stellar taste makes it a great addition to your baking repertoire.

Historical Background and Cultural Significance

The origins of the Swiss roll date back to the 15th century, but its popularity surged in England during the Victorian era. Known as “jelly roll” at the time, it was a beloved treat offering a fun twist to traditional sponge cakes. The incorporation of a Black Forest theme pays homage to the famous German Black Forest cake, which highlights the region’s plentiful cherries and cream.

Culturally, these desserts represent celebration and indulgence across many traditions. The Swiss roll, for instance, showcases baking artistry, while the Black Forest cake emphasizes the rich agrarian heritage of Germany where cherries thrive.

Throughout history, variations of both desserts have emerged, influencing each other. The Swiss roll has evolved to include a variety of fillings, from fruits to creams and even savory options, keeping its essence alive while catering to modern tastes.

Regional variations like the Swiss cherry roll or the American jelly roll carry this culinary heritage into today’s kitchens, inviting bakers worldwide to put their spin on these classic desserts.

Ingredient Deep Dive

Chocolate

Chocolate has deep cultural roots, originating in ancient Mesoamerica and being revered as a divine drink. In baking, chocolate offers rich flavor and numerous nutritional benefits like antioxidants and minerals. Choose high-quality dark chocolate for the best flavor. When storing, keep it in a cool, dry place to prevent melting or blooming. If you’re out of chocolate, cocoa powder blended with a small amount of fat can serve as a substitute.

Cherries

Cherries are a fruit rich in history, with roots in both Asia and Europe. Their tartness complements desserts perfectly and offers health benefits such as anti-inflammatory properties and high vitamin C content. When selecting cherries, opt for deep-colored, firm fruits. Store them in the fridge, and for long-term use, freeze them. If fresh cherries are unavailable, frozen or canned cherries can be used in this recipe.

Whipped Cream

Whipped cream has become a traditional topping for desserts, combining air with heavy cream for a fluffy texture. It enhances sweetness and adds richness to cakes and pastries. Always use cold cream for whipping, and avoid over-whipping to prevent turning it into butter. Store whipped cream in the fridge for short-term freshness. For a dairy-free alternative, coconut cream can achieve a similarly luscious texture.

Common Mistakes to Avoid

  • Overmixing the batter: This can result in a dense cake rather than a light and airy sponge. Mix just until the ingredients are combined.
  • Not cooling the cake properly: A hot cake will crack when rolling. Allow it to cool completely before rolling it up.
  • Using stale ingredients: Fresh eggs and flour are crucial for optimal texture and flavor.
  • Skipping the parchment paper: This prevents the cake from sticking to the pan, making it easier to roll and remove.
  • Rolling too tightly: While it’s important to roll tightly, too much force can break the cake; a gentle touch is key.
  • Not letting the cake set after rolling: Allow it to cool fully before unrolling to help retain its shape after filling.
  • Using warm filling: Always allow the filling to cool so it doesn’t melt the cake as you assemble.
  • Skipping chilling time: Placing the roll in the fridge allows flavors to meld and solidify the structure.
  • Ignoring cake cracks: If cracks occur when rolling, don’t worry; just use whipped cream to cover imperfections during presentation.
  • Using incorrect measuring techniques: Always measure accurately for the right consistency and texture.

Essential Techniques

Baking the Sponge Cake

Baking the sponge cake is essential to achieving the perfect texture. Use room temperature ingredients for a better mix, and watch for the cake to slightly spring back when touched for doneness. A toothpick should come out dry. Avoid overbaking as this can dry out the cake and make rolling difficult.

Rolling Technique

Rolling the cake can be tricky. Start from the shorter end and use the parchment to help guide it tightly without air pockets. Allow the cake to rest in this rolled shape to set before unrolling for filling, which helps maintain its structure.

Filling and Frosting

For the best results, spread the filling evenly to all edges, allowing for a delightful bite every time. For frosting, whipping the cream to soft peaks will yield a luscious texture; be careful not to over-whip, as it can turn grainy.

Chilling the Cake

Chilling your assembled cake is a crucial step. It not only helps enhance flavors but also ensures your cake keeps its shape when slicing. Cover it lightly with plastic wrap and refrigerate for at least 30 minutes before serving.

Pro Tips for Perfect Swiss Roll Meets Black Forest Charm

  • Use fresh, quality ingredients for the best flavor. Organic cherries and premium chocolate can make a significant difference.
  • Test your oven temperature with an oven thermometer to prevent overheating or underbaking your cake.
  • Consider adding a splash of cherry liqueur to the cherry filling for a sophisticated flavor twist.
  • Serve with a dusting of cocoa powder or chocolate shavings for an elegant finish.
  • Use a serrated knife for slicing to ensure clean cuts and beautiful presentation.
  • Experiment with different filling options such as almond extract or vanilla for varied flavors.
  • Dress the cake with whole cherries or fresh mint leaves for a beautiful garnishing touch.
  • Pair with coffee or dessert wine for a complementary experience.

Variations and Adaptations

The Swiss Roll Meets Black Forest Charm can be tailored to suit various tastes and dietary needs. For regional adaptations, consider incorporating local fruits such as raspberries or strawberries. Seasonal modifications can include adding spices like cinnamon or nutmeg during the holiday seasons to create warmth and comfort.

For dietary modifications, try making the cake gluten-free with alternatives such as almond flour or a store-bought gluten-free blend. Vegan adaptations can be achieved by substituting eggs with flaxseed meal and using aquafaba for whipped cream.

Flavor variations can include adding orange zest to the cake for a citrusy brightness or using white chocolate for a contrast against the dark sponge. If you prefer a different texture, consider mixing crunchy nuts into the filling.

For garnishing, use edible flowers or fruit coulis drizzled on the plate for a modern presentation. You can even create individual-sized rolls for a more unique serving style at your next gathering.

Serving and Presentation Guide

When serving your Swiss Roll Meets Black Forest Charm, consider plating techniques that showcase the beautiful swirls. Position the cake on a decorative platter and sprinkle cocoa powder lightly over the top. For garnishing, freshly whipped cream dollops beside each slice along with whole cherries will elevate its appeal.

Traditional accompaniments include coffee, tea, or sweet dessert wines, which complement the rich chocolate and cherries beautifully. If serving warm, consider a rich chocolate ganache drizzle over the top before placing in the refrigerator for a few minutes to set.

Temperature is essential; serve it chilled or at room temperature for the best flavors to shine. Ensure slices are generous without overwhelming guests, keeping portion control in mind for a balanced dessert experience.

Wine and Beverage Pairing

When it comes to wine pairings, a rich red such as a pinot noir complements the chocolate notes while bringing out the zestiness of the cherries. You might also consider a dessert wine like a late-harvest Riesling for a sweet contrast.

For non-alcoholic alternatives, try a tart cherry juice spritzer, which joys in both drink and dessert interplay. If coffee or tea is preferred, an espresso can cut through the sweetness and balance the dessert exceptionally.

Temperature considerations matter; serve chilled wines slightly colder than room temperature to highlight the flavors distinctly. Decanting the wine can also enhance its aromas, allowing guests to savor both the dessert and drink completely.

Storage and Shelf Life

Store any leftover Swiss Roll in an airtight container in the fridge for up to three days. To maintain texture, wrap it tightly in plastic wrap to prevent it from drying out. If freezing, slice individual portions and keep in freezer-safe bags, consuming within three months for optimal flavor.

Signs of spoilage include an off-smell or a change in texture. Reheating is best done gently in the oven at a low temperature or the microwave for a few seconds to prevent drying out. Remember, whipped cream should not be reheated but can be freshly dolloped upon serving.

Make Ahead Strategies

Preparation can be done a day in advance. Bake and cool the cake, wrap it well, and store it in the fridge overnight. Similarly, you can prepare the cherry filling ahead of time and keep it stored as well. Assembly can be done the next day, ensuring a fresher presentation for your guests.

In terms of quality impact, pre-prepared elements develop flavors better when allowed to meld. Just ensure you assemble within a few hours of serving for the freshest taste and texture. For additional fresh elements, consider adding freshly whipped cream right before serving to wow your guests with its lightness and flair.

Scaling Instructions

This recipe can be easily adapted according to your needs. Halving the batch is straightforward, while doubling or tripling may require larger baking sheets or both ovens if space allows. Adjust baking times accordingly, watching for visual cues of doneness.

Storing considerations for larger batches include ensuring adequate cooling space before wrapping any leftovers to prevent moisture buildup. Don’t hesitate to create smaller, personalize rolls if you’d like to cater to individual preferences.

Nutritional Deep Dive

This dessert can be surprisingly nutritious, provided you keep an eye on your portions. Loaded with cherries, you’ll benefit from fiber and antioxidants. In terms of macronutrients, the focus tends to lean towards carbohydrates and fats from the chocolate and whipped cream.

The micronutrient analysis reveals that cherries contribute vitamin C, while dark chocolate offers iron and magnesium. For weight management, it’s advisable to keep portions reasonable, making this a delightful treat that fits within a balanced diet while still being indulgent.

Dietary Adaptations

For those needing gluten-free options, swap out standard flour for gluten-free blends or almond flour. With proper substitutions, this dessert can cater to nearly any dietary requirement.

For a dairy-free alternative, replace heavy cream with coconut cream, and utilize plant-based margarine in the cake. Additionally, to make it vegan, replace eggs with flaxseed mix. Adjusting the sweetness profile might be necessary depending on the substitutes used.

Troubleshooting Guide

Common texture issues include a dense cake; this can often be attributed to overmixing or not incorporating enough air when whipping egg whites. Ensuring accurate oven temperatures and not opening the oven door too frequently also helps avoid baking inconsistencies.

For flavor balance, taste your filling and adjust sweetness or tanginess after each ingredient addition. The chocolate can overshadow other flavors; consider enhancing with extracts or zests.

If you experience cooling troubleshoot issues, ensure your roll is in an appropriate cooling place, as drafts or inadequate cooling time can affect its overall shape.

Equipment challenges, such as not having the right size pans, may require you to adjust cooking times or layer accordingly. Experiment with baking times based on oven characteristics.

Recipe Success Stories

Community feedback surrounding this delightful cake has been overwhelmingly positive, with many sharing their adaptations and unique flavors incorporated. Variations such as adding orange zest or experimenting with other berries have particularly been a big hit.

Readers often find that sharing their journey of baking this cake, along with tips for improvement and troubleshooting, fosters a deeper sense of accomplishment and connection within the baking community.

Photography tips shared highlight the use of natural light, ensuring that cake layers and fillings are beautifully presented when captured, enticing others to try their hands at this wonderful chocolatey cherry indulgence.

Frequently Asked Questions

Q: Can I use frozen cherries instead of fresh?
A: Absolutely! Frozen cherries work wonderfully; just thaw them and drain excess liquid before use.

Q: How should I store leftover Swiss Roll?
A: Wrap it well in plastic wrap or store in an airtight container, and keep it in the fridge for up to three days.

Q: Is it necessary to cool the cake before rolling?
A: Yes! Cooling is vital to prevent cracking and ensure the cake holds its shape when rolling.

Q: Can I make this cake gluten-free?
A: Yes! Substitute regular flour with a gluten-free blend or almond flour for the sponge.

Q: How can I prevent my cake from sticking to the pan?
A: Always line your baking sheet with parchment paper and lightly grease it for added security.

Q: Can I make this in advance?
A: Yes! You can prepare the components a day ahead and assemble it before serving for the freshest taste.

Q: What’s the best way to slice the Swiss Roll?
A: Use a serrated knife to ensure clean cuts without squishing the layers.

Q: How can I add more flavor to the whipped cream?
A: Whip in some vanilla extract or a splash of cherry liqueur for an enhanced flavor.

Q: Can I add more filling ingredients?
A: Certainly! Feel free to experiment by adding nuts like almonds or crushed cookies to your filling.

Q: How do I know when my cake is done baking?
A: When the cake springs back when touched lightly or when a toothpick inserted comes out clean, it’s done!

Additional Resources

Explore related recipes featuring cherries, chocolate, and other delightful desserts. Techniques like cake rolling and frosting can refine your skills further, ensuring your confidence grows in baking.

Ingredient information is extensive in our resource section, detailing how to select and store fresh cherries, chocolates, and creams for optimal use. Equipment recommendations guide you in choosing the best tools for your kitchen endeavors.

Join the Conversation

We invite you to share your creations on social media, using hashtags to join a community of bakers. Your photos and variations can inspire others to create their renditions of this beautiful Swiss Roll.

Engage with fellow bakers by sharing your tips and tricks or leave a review about your experience. Let’s create a vibrant, supportive baking community that celebrates creativity and deliciousness in every dessert!

The Recipe

Swiss Roll Meets Black Forest Charm

Serves: 8 servings

Prep Time: 30 mins

Cook Time: 20 mins

Total Time: 50 mins

Kitchen Equipment Needed

  • Baking sheet
  • Parchment paper
  • Mixing bowls
  • Electric mixer
  • Serrated knife

Ingredients

  • 1 cup all-purpose flour
  • 3/4 cup granulated sugar
  • 1/4 cup unsweetened cocoa powder
  • 4 large eggs
  • 1 teaspoon vanilla extract
  • 1/4 teaspoon salt
  • 1 cup heavy whipping cream
  • 2 cups cherries, pitted and chopped
  • Powdered sugar for dusting

Directions

  1. Preheat your oven to 350°F (175°C). Line a baking sheet with parchment paper.
  2. In a bowl, beat eggs and granulated sugar until fluffy and pale.
  3. In another bowl, whisk together flour, cocoa powder, and salt.
  4. Fold the dry ingredients into the egg mixture carefully until just combined.
  5. Pour batter into the prepared pan, spreading evenly.
  6. Bake for 15-20 minutes or until the cake springs back when touched.
  7. Allow to cool slightly before rolling the cake with the parchment.
  8. Whip the heavy cream until soft peaks form, then gently fold in cherries.
  9. Once cooled, unroll the cake, fill with cherry cream, and roll it back up.
  10. Chill for at least 30 minutes and then slice, dusting with powdered sugar before serving.

Recipe Notes

  • For added flavor, consider incorporating almond extract into your whipped cream.
  • Make sure all ingredients are at room temperature for best results.
  • This dessert keeps well in the refrigerator for up to three days.

Master the Art of Traditional Holiday Fruit Cake Baking

⚖️
Difficulty
Moderate

⏲️
Prep Time
20 mins

🕒
Cook Time
120 mins

⏱️
Total Time
140 mins

🍽️
Servings
12

Creating a traditional holiday fruit cake is more than just baking; it’s about building memories, laced with the warmth and love of festive gatherings. This moist, rich cake, filled with an array of fruits and nuts, is a beloved centerpiece of holiday celebrations around the world. Whether served at Christmas dinner or wrapped up as a delightful gift, this cake carries the essence of the holiday spirit in every slice.

The medley of flavors in a traditional holiday fruit cake is truly enchanting. From the sweetness of dried fruits like raisins and apricots to the warmth of spices such as cinnamon and nutmeg, each bite is a reminder of cherished holiday traditions. The aroma wafting from the oven as the cake bakes is enough to bring the whole family together, filling hearts and homes with excitement and cheer.

Quick Recipe Highlights

  • Flavor Profile: The cake combines sweet and tangy dried fruits with the rich notes of spices, creating a symphony of flavors.
  • Texture: With its moist crumb and chewy fruit pieces, the cake offers a delightful contrast that makes it addictive.
  • Aroma: Aromatic spices like cinnamon, mixed with the sweetness of dried fruits create a nostalgic scent that is synonymous with the holiday season.
  • Visual Appeal: The vibrant colors of the fruits against the brown background of the cake make for a beautiful holiday display.
  • Skill Level Needed: While slightly complex, anyone can master this traditional recipe with careful attention and practice.
  • Special Equipment: A sturdy mixing bowl and a loaf or bundt pan are essential for crafting this fruit cake.

Recipe Overview

  • Difficulty Level: Moderate; this recipe involves multiple steps but is achievable with some baking experience.
  • Category: Desserts; perfect for holiday gatherings and special occasions.
  • Cuisine: Drawing from European culinary traditions, fruitcakes have been adored for centuries across various cultures.
  • Cost: The ingredients may vary, but overall, it remains an economical choice for special occasions.
  • Season: Best enjoyed during the holiday season when dried fruits are plentiful and flavors are intensified.
  • Occasion: Ideal for Christmas, Thanksgiving, or any festive gathering that calls for a celebration.

Why You’ll Love This Recipe

This traditional holiday fruit cake brings a multitude of taste and texture experiences. It perfectly balances sweetness from dried fruits with hints of spice, creating a harmonious flavor journey in every bite. The cake’s moistness, combined with the chewy fruits and crunchy nuts, offers a delightful mouthfeel that makes it difficult to resist.

Preparing this fruit cake is not just about the end product; it’s an enjoyable and convenient process for every baker. The mixing and blending of ingredients can be a therapeutic experience, allowing time for relaxation and reflection. Plus, its long shelf life means you can enjoy it over several weeks, making it a worthy investment of your time.

Aside from its delightful taste, this cake also brings nutritional benefits. Dried fruits are rich in vitamins, minerals, and fiber while nuts contribute healthy fats and protein. It’s a dessert that offers not only sweetness but also a satisfying nutritional boost.

Sharing this traditional holiday cake at family gatherings or with friends elevates its value, fostering community and celebrating togetherness. It is a conversation starter and often leads to stories of family traditions and cherished memories.

Additionally, the cost-effectiveness of this recipe makes it accessible for everyone. With relatively inexpensive ingredients, it can be made in large batches, making it an excellent choice for holiday gifting or large family celebrations.

Historical Background and Cultural Significance

The origin of fruitcake can be traced back to ancient Rome, where it was made with barley, pomegranate seeds, nuts, and raisins. Over time, this simple creation evolved, incorporating honey and wine, eventually becoming the rich holiday treat we know today. As it traveled through Europe, each region developed its own variations, integrating local fruits and spirits.

Culturally, the fruitcake has significant importance, often symbolizing prosperity and celebration. Traditionally, fruitcakes were favored for weddings and special occasions, as they were believed to bring good fortune to the couple. This significance has made it a staple at holiday celebrations as well.

With time, the evolution of ingredients and preferences led to regional variations. In some cultures, spirits like rum or brandy are added to keep the cake moist, while others may use more fresh fruit. These variations reflect the local tastes and customs that have shaped fruitcake recipes worldwide.

Fruitcake’s cultural footprint is particularly strong in the UK and the US, where it is often associated with Christmas. This rich history serves to enhance the charm of hiding a slice of tradition in every bite, connecting us to our roots and the generations before us.

Ingredient Deep Dive

Dried Fruits
Dried fruits are the heart of any traditional fruitcake, contributing sweetness and texture. Historically, they were a method to preserve fruits for winter, making them an essential part of many cultures’ culinary traditions. Rich in vitamins and minerals, they offer a healthy alternative to processed sugars. When selecting dried fruits, look for those without added sugars or preservatives, which can detract from the cake’s flavor. Storing them in a cool, dark place extends their shelf life, while convenience allows for easy substitutions, should you prefer apricots or dates over the more traditional raisins and currants.

Nuts
Nuts add not only texture but also healthy fats and protein to the cake. Almonds, walnuts, and pecans are popular choices. Historically associated with good luck, nuts bring rich, nutty flavors that balance the sweetness of the fruits. When selecting nuts, opt for fresh, raw varieties for the best taste. Store nuts in an airtight container in the fridge or freezer to preserve their flavor and prevent rancidity. For those with nut allergies, seeds or additional dried fruits can serve as great alternatives.

Common Mistakes to Avoid

  • Not soaking fruits: Failing to soak dried fruits can lead to a dry cake. Soak them in rum or juice to enhance moisture.
  • Incorrect measuring: Baking is precise; always measure ingredients accurately to ensure the right consistency.
  • Not preheating the oven: An unpreheated oven can skimp on the initial rise and create a dense cake.
  • Overmixing the batter: Gently fold ingredients together to avoid activating gluten, which can make the cake tough.
  • Using stale ingredients: Always check that your baking powder and spices are fresh for the best flavor.
  • Ignoring storage conditions: Storing the cake in a warm area can cause spoilage; always keep it cool and dry.
  • Skimping on flavor: Don’t be afraid to experiment with spices; a pinch of clove or cardamom can elevate your cake.
  • Not letting the cake mature: For the best flavor, allow the fruitcake to sit for a few days before serving.

Essential Techniques

Soaking Fruits
Soaking the dried fruits before baking allows them to absorb moisture and enhances their flavor in the cake. This technique is crucial as it ensures the fruits become plump and flavorful, marrying beautifully with the batter during baking. To master this, soak fruits overnight or at least for a few hours in your choice of juice or alcohol.

Proper Mixing
How you mix your batter can profoundly affect the final outcome. Overmixing can lead to a dense texture, while undermixing can result in an uneven cake. Blend ingredients until just combined, ensuring you mix well but gently fold in the flour to keep the cake light and airy.

Pro Tips for Perfect Traditional Holiday Fruit Cake

1. Use high-quality dried fruits and nuts for a tastier cake.
2. Allow your fruitcake to mature for at least a week before serving; it enhances the flavors significantly.
3. Experiment with spices to create a unique flavor profile; just a touch of ground cardamom can add a delightful twist.
4. When baking, line your cake pan with parchment paper for easy removal and prevention of sticking.
5. Monitor the cake closely as it bakes to avoid overcooking; a toothpick inserted should come out clean.
6. If the top browns too quickly, cover it loosely with aluminum foil to ensure even baking.
7. Store your cake in an airtight container to maintain moisture and flavor over time.
8. Consider glazing the fruitcake with a light syrup to add shine before serving.

Variations and Adaptations

Exploring regional variations of traditional fruitcake can be a delightful culinary adventure. For instance, a Caribbean fruitcake often incorporates rum-soaked fruits and is richly spiced, giving it a unique tropical vibe. In contrast, a British Christmas cake tends to be denser, often topped with marzipan and royal icing, creating a beautiful presentation.

Seasonal adaptations can also enhance your loaf; try adding spiced apples for a fall twist or citrus zest in the summer for a refreshing note. For dietary modifications, consider making a gluten-free version by swapping all-purpose flour for a dedicated blend or almond flour, catering to those with specific dietary needs.

Flavor variations can be as simple as switching up fruits; consider using cherries or mangoes for a fruit-forward version. Texture modifications can include incorporating shredded coconut for added chewiness or using finely chopped candied ginger for spice.

Lastly, presentation alternatives can include dusting the cake with powdered sugar or serving it with a dollop of whipped cream for a festive touch.

Serving and Presentation Guide

Serving your traditional holiday fruit cake beautifully elevates any gathering. For plating, consider slicing the cake with a serrated knife to maintain its integrity. A simple garnishing option is to dust the top with powdered sugar or drizzle a light glaze that complements the fruit flavors.

Traditional accompaniments often include a side of whipped cream or a scoop of vanilla ice cream, enhancing the experience with a creamy contrast. Modern serving suggestions might involve pairing the cake with spiced tea or a rich hot chocolate, perfect for chilly gatherings.

When it comes to temperature, serving the cake at room temperature enhances its flavors all around. As for portion control, slice into generous pieces as this cake is rich and often enjoyed in moderation.

Wine and Beverage Pairing

Pairing beverages with your traditional holiday fruit cake can elevate the experience. A rich, fruity red wine like a port complements the cake’s sweetness beautifully. Alternatively, a light sparkling wine or champagne offers a refreshing contrast that can cleanse the palate.

For non-alcoholic alternatives, consider pairing with spiced apple cider or a warming herbal tea infused with cinnamon and ginger, enhancing the cake’s festive flavors. If opting for coffee or tea, remember to serve them at a warm temperature to match the richness of the fruit cake, making for a comforting and delightful treat.

Storage and Shelf Life

To ensure your holiday fruit cake remains delicious, proper storage is crucial. Wrap the cake tightly in plastic wrap and store it in an airtight container in a cool, dark place. This method can extend its shelf life up to several weeks.

For those wanting to enjoy it longer, consider freezing the cake. Slice it, wrap individual pieces tightly in plastic wrap, and store in a resealable freezer bag. You can enjoy it for several months; just remember to thaw it in the fridge overnight when you’re ready to indulge.

Signs of spoilage can include unusual odors or mold; if either is present, it’s time to discard the cake. Reheating slices in the oven briefly can revive their original texture and flavors beautifully.

Make Ahead Strategies

Preparing your traditional fruit cake in advance can help ease holiday stress. You can soak your dried fruits a few days before you bake, allowing them to absorb moisture and flavors. Additionally, mixing the cake batter can be done one day ahead; just refrigerate it and allow it to come to room temperature before baking.

If you’re short on time, consider baking the cake one or two weeks prior to the occasion. Store it according to proper guidelines to preserve freshness. For optimal taste, add any fresh topping or glaze just before serving to keep its integrity.

When reheating, ensure you do so gently at lower temperatures to maintain moisture. Fresh elements like whipped cream or zest can be added right before serving for an invigorating touch.

Scaling Instructions

Whether for an intimate gathering or a large party, knowing how to scale your traditional holiday cake is essential. If halving the recipe, divide all ingredients equally, and use a smaller baking pan for even cooking.

In case you want to double or triple the recipe, ensure that your mixing equipment is large enough to handle the increased volume. As with any baking, timing adjustments may be necessary; monitor your cake closely as larger quantities tend to take longer to bake through.

Also, storage considerations should be accounted for when scaling; larger portions may require more space in your refrigerator or pantry and may impact the serve-ready timeline.

Nutritional Deep Dive

Delving into the nutritional aspects of your traditional fruit cake reveals a balanced profile. The macros generally feature carbohydrates primarily from the flour and dried fruits, with modest contributions from healthy fats in nuts.

Micronutrient analysis shows an array of vitamins and minerals from both nuts and dried fruits, which can offer health benefits including improved digestion and energy boosts. Keeping portion analysis in mind is vital; moderation can provide an indulgent treat without straying from a balanced diet.

For those mindful of weight management, this cake can be enjoyed in smaller slices, allowing for a satisfying dessert experience while keeping calories in check.

Dietary Adaptations

For those needing gluten-free options, simply substitute traditional flour with almond flour or a gluten-free all-purpose blend, maintaining the rich texture while accommodating dietary needs.

Those on a dairy-free diet can create a vegan version by replacing eggs with flaxseed meal or applesauce. Adjust the liquid ratios to prevent the cake from drying out.

For a low-carb or keto approach, use almond flour and sugar alternatives like erythritol, maintaining sweetness without the carbs. Paleo adherents might appreciate using dried fruits and nuts that fit within their dietary framework.

Each of these adaptations ensures that everyone can enjoy a slice of holiday spirit, regardless of dietary restrictions.

Troubleshooting Guide

In baking, texture issues can arise if the cake is too dense. This often indicates an overmixed batter; gently fold ingredients together to avoid this. If the flavor balance seems off, consider adding a splash of citrus for brightness.

Temperature problems can occur if the oven isn’t properly calibrated; using an oven thermometer can aid in achieving the correct baking temperature. Ingredient substitutions may alter the outcome; for instance, using unsweetened applesauce instead of sugar can lead to moisture differences.

Timing concerns, such as underbaking, can be adjusted with an additional few minutes in the oven, ensuring the toothpick test yields clean results.

Recipe Success Stories

The community response to traditional holiday fruit cake recipes has been overwhelmingly positive. Many have shared personal stories about how making this cake has become a cherished family tradition, passed down through generations.

Successes vary from new bakers mastering the delicate art of fruitcake to seasoned chefs trying out innovative variations, celebrating how personal tweaks and modernization breathe new life into the classic recipe.

Readers have also suggested their favorite ingredient combinations, opening doors for creativity, while photography tips encourage showcasing the cake’s vibrancy on social media platforms, creating a wave of interest among aspiring bakers.

The adaptability of this recipe means that everyone can find their own success story, adding their unique twist on an age-old classic.

Frequently Asked Questions

1. Can I make the fruitcake ahead of time?
Yes, fruit cakes can be made well in advance. In fact, they often taste better when allowed to sit for a week or two, as the flavors meld together beautifully.

2. How do I store my fruitcake?
Wrap your fruitcake tightly in plastic wrap and store it in an airtight container. Store it in a cool, dry place to maintain freshness.

3. Can I freeze fruitcake?
Yes, fruitcake freezes well. Slice it, wrap it tightly in plastic wrap, and store it in a freezer-safe bag. It can last for several months in the freezer.

4. What liquors pair well with fruitcake?
Dark rums, brandies, and whiskey pair wonderfully with fruitcake, adding depth and complexity to its flavors.

5. Can I use fresh fruits instead of dried fruits?
Fresh fruits are not recommended as they add excess moisture, which can lead to a soggy cake. Stick to dried fruits for best results.

6. Is it normal for fruitcake to be heavy?
Yes, fruitcakes are denser due to the rich ingredients packed into them, so don’t expect a light cake like a sponge.

7. Can I add different spices?
Absolutely! This recipe is quite versatile; feel free to experiment with spices like nutmeg, cardamom, or even ginger for added warmth.

8. Should I use salted or unsalted nuts?
Unsalted nuts are recommended to control the saltiness of the cake; however, if you prefer slightly salted, it can add an interesting depth of flavor.

9. How can I make my fruitcake more visually appealing?
Consider decorating the top with additional dried fruits, nuts, or even a light glaze for shine. A dusting of powdered sugar can also be festive!

10. Can I make a vegan fruitcake?
Yes, you can substitute eggs with flaxseed meal or applesauce, and be sure to use plant-based ingredients for the best results.

Additional Resources

If you loved this traditional holiday fruit cake, you might enjoy exploring related recipes that embody the spirit of the season. Consider trying carrot cake or pumpkin bread, both of which feature similar flavors and textures.

For more techniques, check out guides on baking methods or the secrets of ingredient substitutions. Ingredient information, especially on dried fruits and nuts, can help refine your next fruitcake iteration, while recommendations for kitchen equipment can enhance your baking experience.

Lastly, keeping track of seasonal variations can inspire your future baking endeavors, encouraging you to explore new flavors and experiences together with friends and family.

Join the Conversation

We invite you to share your experiences with our traditional holiday fruit cake! Join us on social media for vibrant photography, enticing flavors, and delightful feedback from fellow bakers. Your reviews and suggestions can guide others, creating a collaborative atmosphere where culinary secrets can be exchanged.

Your unique twists and variations on this classic recipe also have the potential to inspire those around you. We encourage community engagement that brings bakeries together in sharing their passion for cooking. Let’s celebrate the joy of baking this holiday season, creating lasting memories one slice at a time!

The Recipe

Traditional Holiday Fruit Cake

Serves: 12

Prep Time: 20 mins

Cook Time: 120 mins

Total Time: 140 mins

Kitchen Equipment Needed

  • Mixing bowl
  • Loaf or bundt pan
  • Serrated knife for slicing
  • Measuring cups and spoons
  • Whisk

Ingredients

  • 2 cups mixed dried fruits
  • 1 cup chopped nuts
  • 1 ½ cups all-purpose flour
  • 1 cup sugar
  • ½ cup unsalted butter, softened
  • 3 large eggs
  • 1 teaspoon baking powder
  • 1 teaspoon cinnamon
  • ½ teaspoon nutmeg
  • ½ teaspoon salt
  • ¼ cup rum (optional)

Directions

  1. Preheat the oven to 325°F (165°C) and grease your baking pan.
  2. In a mixing bowl, soak the dried fruits in rum (if using) for about an hour.
  3. In another bowl, cream together the butter and sugar until light and fluffy.
  4. Add the eggs, one at a time, to the butter mixture, mixing well after each addition.
  5. In a separate bowl, whisk together the flour, baking powder, spices, and salt.
  6. Gradually add the dry ingredients to the wet mixture, folding it in gently.
  7. Fold in the soaked fruits and nuts until evenly distributed.
  8. Pour the batter into the prepared pan and smooth the top.
  9. Bake for about 120 minutes, or until a toothpick comes out clean.
  10. Allow the cake to cool in the pan for 10 minutes before transferring it to a wire rack to cool completely.

Recipe Notes

  • For additional moisture, you can brush the cake with more rum or syrup as it cools.
  • Store wrapped in plastic to maintain freshness for up to several weeks; it only gets better with time!
  • For vegan options, substitute eggs with flaxseed meal or applesauce, optimizing for moisture content.

Delicious Lemon Zucchini Cake with Cream Cheese Filling Recipe

Lemon Zucchini Cake with Cream Cheese Filling: A Refreshing Delight

⚖️
Difficulty
Medium

⏲️
Prep Time
30 mins

🕒
Cook Time
40 mins

⏱️
Total Time
1 hr 10 mins

🍽️
Servings
12

Indulging in a slice of Lemon Zucchini Cake with Cream Cheese Filling is like enjoying a slice of sunshine! This delightful cake combines the refreshing zesty flavor of lemon and the light, moist texture of zucchini, offering a truly unique dessert experience. Each bite showcases the sweet tanginess of lemon paired with the creamy richness of the cream cheese filling, making it a perfect dessert for spring and summer gatherings.

The addition of zucchini not only adds moisture but also packs this cake with extra nutrients, making it a guilt-free treat. The bright, cheerful flavors and the beautifully layered aesthetic cater to both the eye and the palate, making it a hit at any celebration, from birthday parties to casual afternoon tea.

Quick Recipe Highlights

  • Flavor Profile: This cake features a splendid balance of sweet and tart, with the citrusy lemon brightening the overall taste.
  • Texture: The cake is tender and moist thanks to the zucchini, complemented by the silky smooth cream cheese filling.
  • Aroma: The aroma is inviting and fresh, with the scent of lemon zest filling your kitchen as it bakes.
  • Visual Appeal: With its vibrant yellow colors and white cream cheese layers, this cake is visually stunning and sure to impress.
  • Skill Level Needed: This recipe is perfect for home bakers with some experience, given its layering technique and baking time.
  • Special Equipment: A stand mixer and a good quality cake pan are essential to achieve perfect results.

Recipe Overview

  • Difficulty Level: The recipe requires a medium skill level due to the multiple components, including the cake and the filling.
  • Category: This cake fits perfectly into the dessert category and is great for both casual and formal occasions.
  • Cuisine: Combining traditional American baking with a fresh citrus twist, it’s an ideal representation of modern dessert trends.
  • Cost: Ingredients like zucchini, flour, and cream cheese are reasonably priced, making this cake a cost-effective choice.
  • Season: Best enjoyed in the warmer months when zucchini is plentiful and lemons are at their prime.
  • Occasion: Ideal for picnics, potlucks, or family celebrations, this cake will be a delightful centerpiece.

Why You’ll Love This Recipe

This Lemon Zucchini Cake with Cream Cheese Filling delivers both taste and texture that seems to dance on your palate. The harmonious blend of lemon’s brightness and the zucchini’s moisture creates a cake that’s soft yet sturdy. Perfect for birthdays or brunches, this cake is sure to get rave reviews from all ages. It doesn’t just taste great; its beautiful layers make it a showstopper at any gathering.

Beyond its amazing flavor, the recipe is relatively straightforward, allowing you to whip it up even on a busy day. You can prepare the cake and filling in under an hour, then let it cool while you set the table or prepare other dishes. This added convenience makes it a beloved recipe in many households.

Nutritionally, the zucchini adds a boost of fiber and vitamins, making this cake a heartier option compared to traditional cakes. It’s a simple way to sneak in vegetables without compromising indulgence.

Socially, sharing this dessert invites smiles and compliments from friends and family, sparking conversations and creating lasting memories around the dinner table.

Finally, considering the cost-to-reward ratio, it’s an accessible recipe that won’t break the bank but promises to impress guests with its delightful flavor and intricate presentation.

Historical Background and Cultural Significance

The Lemon Zucchini Cake has roots in traditional American baking but has evolved into a modern favorite. Zucchini is often used in various baked goods, commonly seen in muffins and bread, as a way to utilize an abundant summer crop.

Culturally, this cake stands as a symbol of resourcefulness in baking, marrying the often-overlooked vegetable into a dessert that everyone can enjoy. The trend of using vegetables in sweets not only showcases creativity but also reflects a movement towards healthier eating habits while enjoying indulgent treats.

As with many recipes, this Lemon Zucchini Cake has seen variations through the years, with bakers adding their twists, such as incorporating nuts or varying the icing. Each homemade version tells a story, contributing to a communal history where food brings people together.

Regionally, different areas might lean towards specific spices or techniques, emphasizing local tastes and trends which make every Lemon Zucchini Cake a unique creation based on where one is located.

Ingredient Deep Dive

The star of the show, zucchini, holds a significant place in American gardens and kitchens. This versatile vegetable is not just low in calories but adds moisture and a slight tenderness to baked goods. When selecting zucchini, look for firm, bright green skin without blemishes. Store your zucchini in the fridge, where it will remain fresh for up to a week. This ingredient can easily be substituted with yellow squash if needed.

Another key ingredient is lemon, which contributes its zesty flavor and aroma to the cake. Lemons are high in Vitamin C and have numerous health benefits, including boosting the immune system. Choose organic lemons if possible, as their zest often has more flavor. Store lemons in a cool, dark place or refrigerate them to maintain freshness.

Lastly, cream cheese is the foundation for the luxurious filling. Rich in calcium, it elevates the texture of the cake. When selecting cream cheese, opt for full-fat for a creamier texture. It can be stored in the fridge and used within two weeks. You can explore vegan cream cheese alternatives if desired for dairy-free options.

Common Mistakes to Avoid

  • Not squeezing excess moisture from the zucchini can lead to a soggy cake. Always grate and press the zucchini before adding it to your batter.
  • Overmixing the batter can cause a dense cake; mix until just combined to keep it light and fluffy.
  • Using stale baking powder may prevent the cake from rising properly; always check the expiration date.
  • Forgetting to preheat the oven can lead to uneven baking. Always ensure your oven is at the right temperature before baking.
  • Allowing the cake to cool in the pan for too long can make it stick. Transfer it to a wire rack after a few minutes.
  • Skipping the cream cheese filling or not letting it chill can result in a runny consistency—be patient for the best effect.
  • Not adjusting baking times for different oven types can affect your cake; always use a toothpick to test for doneness.
  • Neglecting to grease and flour the cake pans can cause sticking, making it difficult to layer.

Essential Techniques

Mastering the art of grating zucchini is crucial for preparing this cake. Use a box grater for consistency and remember to squeeze out excess moisture for a firmer texture. This will help prevent the cake from turning out soggy.

Another technique is the proper creaming of butter and sugar. This step incorporates air into the mixture, contributing to a light and airy cake. Beat until the mixture is pale and fluffy, typically 4-5 minutes for optimal results.

Layering the cake may seem daunting, but it’s essential for a professional finish. Ensure each layer is evenly spread with filling, maintaining balance with the top layer. Using a turntable can help achieve neat edges.

Lastly, chilling the cream cheese filling before spreading helps it maintain its shape and texture, making it easier to layer without spilling.

Pro Tips for Perfect Lemon Zucchini Cake

– Use freshly grated lemon zest for a more potent flavor against the zucchini’s subtleness.
– For an added twist, incorporate lemon juice into the cake batter to enhance the citrus flavor throughout.
– If the cake layers rise unevenly, trim the tops to create a flat surface before layering with cream cheese.
– Chill the cake after assembling so that the filling firms up and holds together for easier slicing.
– Consider adding chopped walnuts or pecans for a delightful crunch that contrasts with the soft cake.
– For decorative purposes, dust powdered sugar on top before serving for that professional bakery look.
– Always use room temperature ingredients for a smoother batter and more consistent baking.
– Test the cake’s doneness by inserting a toothpick; it should come out clean or with a few moist crumbs.

Variations and Adaptations

You can experiment with this cake by replacing the lemon with lime, offering a different yet equally refreshing citrus experience. Seasonal adaptations could include adding cranberries or blueberries, providing natural sweetness and vibrant color.

For those with dietary restrictions, a gluten-free flour blend can work perfectly in place of all-purpose flour, while coconut cream can serve as a dairy-free alternative for the filling.

Flavor variations are endless; consider infusing the cream cheese with vanilla or almond extract for a twist on traditional flavor profiles. You can also enhance the cake with a layer of lemon glaze for extra sweetness and shine.

When presenting the cake, consider serving it as mini-cakes or cupcakes for easy handling at gatherings, creating a beautiful dessert table display.

Serving and Presentation Guide

Achieving beautiful presentation starts with careful slicing of the cake; use a serrated knife for clean edges. Plating can be enhanced by placing a slice on a colorful dish and garnishing with fresh berries or mint sprigs for added color.

Traditional accompaniments like a scoop of vanilla ice cream or whipped cream can elevate the experience. For creative modern serving, consider layering the cake in a glass jar for individual servings—the layered look will showcase the vibrant colors.

Temperature-wise, serving the cake chilled enhances its flavors, making each bite refreshing and irresistible, particularly on hot days.

For portion control, cut smaller slices as this cake is rich in flavor and filling, ensuring guests can savor without feeling overwhelmed. Remember, presentation is key; a sprinkle of lemon zest on top can give a lovely finishing touch.

Wine and Beverage Pairing

When it comes to wine pairings, consider a light, crisp white wine like Sauvignon Blanc, which complements the citrus flavors beautifully. This refreshing choice enhances the cake’s zesty notes while balancing its richness.

For non-alcoholic alternatives, a refreshing lemonade or iced herbal tea can serve as a delightful accompaniment, mirroring the cake’s refreshing qualities.

If you’re a coffee lover, pairing a slice with a light roast coffee can bring out the sweetness of the cake and provide a contrasting experience to its tartness.

Ensure that beverages are served chilled to maintain that refreshing vibe which the Lemon Zucchini Cake embodies.

Storage and Shelf Life

To keep your Lemon Zucchini Cake fresh, store it in an airtight container at room temperature for up to two days. For longer storage, keep it in the refrigerator, where it can last up to a week.

For freezing, wrap individual slices in plastic wrap and then in aluminum foil to avoid freezer burn. Thaw in the fridge overnight before serving for the best texture.

Signs of spoilage include an off smell, visible mold, or a change in texture. If the filling appears watery or separated, it’s best to discard.

Reheating slices in the microwave for a few seconds can restore that fresh-out-of-the-oven warmth, making for a comforting treat any time.

Make Ahead Strategies

To streamline your baking process, consider preparing the zucchini and lemon zest ahead of time, storing them in the fridge until you’re ready to bake.

You can bake the layers a day in advance and store them wrapped tightly in plastic wrap—this actually improves the texture of the cake! Allow the layers to cool completely before wrapping to avoid condensation.

As for the cream cheese filling, it can be made ahead and chilled; this will make it easier to spread when assembling.

Once assembled, the cake can be stored in the refrigerator for 1-2 days, blending the flavors as it rests. Just add any decorative elements right before serving, ensuring freshness.

Scaling Instructions

If you need to halve the recipe, simply reduce all ingredients by half, ensuring you still match egg sizes and ratios where possible. This is perfect for smaller gatherings.

Doubling or tripling the recipe for larger events requires adjusting your baking pans accordingly; larger pans may need longer baking times, so keep an eye on doneness with toothpick tests.

For equipment adjustments, ensure your mixer can handle larger batches to maintain consistency across layers. Timing may vary, so be prepared to test for readiness consistently.

Leftover batter can be stored in the refrigerator for a short period but is best used immediately for optimal freshness.

Nutritional Deep Dive

The macros of Lemon Zucchini Cake vary depending on portion size, but a single slice typically contains around 250-300 calories, making it a satisfying yet reasonable dessert.

Micronutrient analysis shows that each slice provides a good dose of Vitamin C from the lemon, while zucchinis contribute potassium and several B vitamins.

Health benefits extend beyond vitamins; the fiber from zucchini can aid digestion, making this dessert an unexpectedly nutritious indulgence.

When considering portion sizes, moderation is key—enjoying a slice (or two) in the context of an overall balanced diet can be classified as a nice treat without overspending calories.

Weight management remains feasible when incorporating such delightful cakes; simply ensure you’re pairing with healthy meals overall.

Dietary Adaptations

For gluten-sensitive individuals, using a gluten-free flour blend will allow enjoyment of this Lemon Zucchini Cake without dietary stress.

Dairy-free modifications can be achieved with plant-based alternatives to cream cheese, ensuring all guests can indulge without discomfort.

Vegan bakers can replace eggs with flaxseed meal or applesauce, adapting moisture while preserving the cake’s integrity.

Low-carb and keto modifications can involve substituting regular flour with almond or coconut flour, coupled with a sugar substitute to maintain sweetness.

For those following a Paleo lifestyle, consider using almond flour combined with honey as a natural sweetener, keeping the cake wholesome and clean.

If you’re following a low-FODMAP diet, using lactose-free cream cheese will make this dessert suitable for your needs without sacrificing flavor.

Troubleshooting Guide

Texture issues might arise if zucchini is not properly drained; ensure it’s grated and squeezed thoroughly for the best results.

Flavor balance problems can often result from over-sweetening—if this happens, include a pinch of salt or an extra squeeze of lemon to brighten it up.

Temperature problems can be addressed by checking your oven’s accuracy; an oven thermometer can ensure even baking times.

If you face equipment challenges, familiarize yourself with your tools prior to starting, ensuring your mixer is up to the task of blending properly.

Ingredient substitutions can be tricky; be aware that replacing key ingredients may change both flavor and texture, often requiring careful assessment.

Timing concerns can lead to dense layers; make sure to follow instructions closely and check for doneness several minutes before the expected time.

Recipe Success Stories

Feedback from the community highlights how this Lemon Zucchini Cake has delighted many with its refreshing flavor.

Variation successes from readers showcase the versatility of the recipe—from adding nuts for crunch to incorporating different fruit purees for a unique twist.

Adaptation stories reveal how bakers adjusted the sweetness levels, making the recipe more suited to their taste preferences without compromising the overall experience.

Photography tips from bakers suggest utilizing natural light to capture the cake’s vibrant colors and intricate layers, making the cake even more appealing.

Reader suggestions often include serving with a scoop of ice cream or fresh fruits, enhancing the cake’s delectability and presentation on social media.

Frequently Asked Questions

Can I use frozen zucchini in this recipe?

While fresh zucchini is preferred for its moisture content, frozen zucchini can be used. Just be sure to thaw and drain it well before adding to the batter.

What’s the best way to store leftovers?

The best way to store leftover Lemon Zucchini Cake is in an airtight container in the refrigerator, where it will stay fresh for up to a week.

Can I make this cake in advance?

Yes! You can bake the cake layers a day in advance and refrigerate them. Just add the filling before serving for the best texture.

How can I make this cake more lemony?

To enhance the lemon flavor, consider adding more lemon zest and juice into the batter, or use lemon extract for a more potent flavor.

Is it necessary to peel the zucchini?

No, it’s not necessary! The skin adds color and nutrients without affecting the flavor. Just ensure it’s well washed before grating.

Can other fruits be added to this cake?

Yes, diced apples, blueberries, or raspberries can be added to the batter for extra flavor and variety. Adjust the sugar according to the fruit’s sweetness.

What is the best way to ice the cake?

For a beautiful finish, use a piping bag to apply the cream cheese filling between layers and along the top. You can also use a spatula for a more rustic look.

How can I make this cake gluten-free?

Simply substitute regular flour with a good quality gluten-free flour blend that works for baking, and follow the recipe as directed.

Can I freeze this cake?

Yes, this cake freezes well! After slicing, wrap it individually and freeze. When ready to eat, thaw overnight in the refrigerator.

How long does the cream cheese filling last?

The cream cheese filling can be stored in the fridge for up to a week. Always check for freshness before use.

Additional Resources

This Lemon Zucchini Cake pairs well with other recipes, such as light summer salads and refreshing cold soups. Check out our other dessert recipes to complement your meal.

For mastering the art of making cake layers, consider our technique guide on baking and layering cakes for professional results every time.

Information regarding ingredient substitutions can help you understand how to modify recipes for dietary needs or preferences.

To ensure your baking experience is enjoyable, be sure to check our equipment recommendations to find the best-quality tools for your kitchen.

Lastly, explore seasonal variations throughout the year to see how you can integrate fresh produce into your baking recipes, enhancing flavors and textures.

Join the Conversation

We want to hear about your experiences with making our Lemon Zucchini Cake! Share your photos and thoughts on social media—tagging us for a chance to be featured.

Engage with the community by leaving reviews for the recipe, suggesting your adaptations, and sharing tips that could help others.

Photography tips can elevate your food photography, helping you capture the essence of your baking creations beautifully.

Whether you’ve made this cake or are inspired to adapt it, sharing your stories creates a lively interaction among fellow baking enthusiasts.

Let’s celebrate the joy of sharing delicious food and the love of baking together!

The Recipe

Lemon Zucchini Cake with Cream Cheese Filling

Serves: 12

Prep Time: 30 mins

Cook Time: 40 mins

Total Time: 1 hr 10 mins

Kitchen Equipment Needed

  • Stand mixer
  • Grater
  • Two 9-inch round cake pans
  • Offset spatula
  • Wire cooling rack

Ingredients

  • 1 ½ cups all-purpose flour
  • 1 tsp baking powder
  • ½ tsp baking soda
  • ½ tsp salt
  • ½ cup unsalted butter, softened
  • 1 cup granulated sugar
  • 2 large eggs
  • 1 tsp vanilla extract
  • 1 cup finely grated zucchini
  • 1 tbsp lemon zest
  • ½ cup whole milk

Cream Cheese Filling

  • 8 oz cream cheese, softened
  • 1 cup powdered sugar
  • 1 tbsp lemon juice
  • 1 tsp lemon zest

Directions

  1. Preheat your oven to 350°F (175°C). Grease and flour two 9-inch round cake pans.
  2. In a bowl, whisk together flour, baking powder, baking soda, and salt. Set aside.
  3. In a stand mixer, beat butter and sugar until light and fluffy. Add eggs one at a time, mixing well after each addition.
  4. Mix in vanilla extract, lemon zest, and grated zucchini until well combined.
  5. Gradually add dry ingredients and milk, alternating between them. Start and end with dry ingredients. Mix until combined.
  6. Pour batter evenly into prepared pans and bake for 25-30 minutes or until a toothpick comes out clean.
  7. Let cakes cool in pans for 10 minutes before transferring them to a wire rack to cool completely.
  8. For the filling, beat softened cream cheese until smooth. Gradually add powdered sugar, lemon juice, and zest until combined.
  9. Once cakes are cool, spread cream cheese filling between the layers. Top with remaining cake layer and frost the top and sides if desired.
  10. Chill the assembled cake for 20-30 minutes before slicing and serving.

Recipe Notes

  • For added flavor, consider adding poppy seeds to the cake batter.
  • You can substitute the zucchini for a similar amount of grated carrot in a pinch.
  • This cake can be decorated with fresh berries or lemon wedges for a festive look.

Indulge in Italian Amaretto Pistachio Fudge Delightfully Easy Recipe

Italian Amaretto Pistachio Fudge: A Sweet Indulgence

⚖️
Difficulty
Easy

⏲️
Prep Time
15 mins

🕒
Cook Time
20 mins

⏱️
Total Time
35 mins

🍽️
Servings
16 pieces

Indulge in the exquisite flavors of Italian Amaretto Pistachio Fudge, a sweet treat that captures the essence of Italy with every bite. This delightful fudge melds the nutty flavors of pistachio with the warm, almond-rich notes of Amaretto liqueur, creating a decadent dessert that’s perfect for any occasion. Whether served at a festive gathering or enjoyed as a simple afternoon treat, this fudge will leave your taste buds dancing with joy.

With its creamy texture and rich flavor profile, Italian Amaretto Pistachio Fudge is not only a dessert but also a conversation starter. The vibrant green of the pistachios adds a visually appealing touch, making it an attractive addition to your dessert platter. In this blog post, we will explore the recipe, sharing not only the steps to create this delicious fudge but also insights into its flavor, texture, and the cultural significance behind one of Italy’s beloved indulgences.

Quick Recipe Highlights

  • Flavor Profile: This fudge highlights the delightful balance of nutty pistachios and the sweet, aromatic essence of Amaretto, creating a harmonious blend that’s rich yet not overwhelming.
  • Texture: The fudge boasts a smooth, creamy consistency that melts in your mouth, complemented by the slight crunch of chopped pistachios, offering an enjoyable textural contrast.
  • Aroma: The warm, inviting aroma of Amaretto marries beautifully with the buttery scent of the fudge, making it irresistible as it bakes.
  • Visual Appeal: Its striking pale green hue combined with the glistening texture of the fudge creates an eye-catching dessert perfectly suited for any table setting.
  • Skill Level Needed: Making this fudge is simple, requiring basic cooking techniques, making it accessible for both novice and experienced bakers.
  • Special Equipment: A heavy-bottomed saucepan is essential for smooth melting, along with a baking dish lined with parchment paper for easy removal.

Recipe Overview

  • Difficulty Level: This Italian Amaretto Pistachio Fudge is classified as easy, allowing even beginner bakers to feel confident while creating this delicious treat.
  • Category: As a dessert, this fudge shines during celebrations but can equally serve as a sweet snack or an after-dinner treat.
  • Cuisine: Italian cuisine often features rich, indulgent desserts, and this fudge embraces that tradition, highlighting the country’s love for creamy sweets and nut flavors.
  • Cost: The approximate cost of ingredients is relatively low, making this a budget-friendly recipe that doesn’t compromise on flavor.
  • Season: This fudge is perfect for year-round enjoyment but shines especially during festive seasons, lending a touch of elegance to holiday gatherings.
  • Occasion: Whether for holiday celebrations, birthdays, or simply because you deserve a treat, this fudge fits perfectly into any occasion.

Why You’ll Love This Recipe

The Italian Amaretto Pistachio Fudge captivates your palate with every bite, offering a delightful balance of sweetness and warmth. The fusion of amaretto and pistachios creates a distinctive flavor that sets it apart from ordinary fudge. Each piece delivers a rich, buttery taste while the chopped pistachios provide a fun crunch that complements the smoothness of the fudge, making it an irresistible dessert.

Preparation is a breeze, allowing you to whip up this fudge in just a short amount of time. Although it sets in the refrigerator, the active cooking time is minimal, making it convenient for busy bakers. This simplicity invites everyone to enjoy the process, gathering friends or family to craft their own version of this delicious treat, fostering shared moments over a delightful experience.

Beyond the irresistible taste and ease of preparation, this fudge also offers nutritional benefits thanks to the presence of pistachios, which are packed with protein, healthy fats, and essential vitamins. This makes each bite not just a tempting indulgence but also a treat that aligns with a balanced diet.

Socially, this fudge can elevate any gathering, serving not just as dessert but also as a stunning centerpiece. Its rich colors and flavors will entice guests, sparking conversations and enhancing the mood of joyful celebrations. Sharing this fudge is a wonderful way to connect with others through good food and shared experiences.

Lastly, given its affordability and easy-to-source ingredients, the Italian Amaretto Pistachio Fudge provides an accessible way for everyone to enjoy a touch of gourmet indulgence at home without breaking the bank. You can savor the luxury of homemade fudge right from your kitchen.

Historical Background and Cultural Significance

The roots of fudge can be traced back to the confectionery innovations of the 19th century, primarily within American culture. However, the inspiration for Italian Amaretto Pistachio Fudge draws heavily on Italy’s culinary traditions, known for blending flavors harmoniously. Amaretto, originating in Saronno, Italy, is believed to be a sweet liqueur dating back to the Renaissance, illuminating the country’s penchant for craft and rich taste experiences.

Culturally, Italian desserts, particularly those involving nuts and sweet liqueurs, are popular choices for celebrations and gatherings across Italy. Nuts embody prosperity and abundance, values highly cherished in Italian culture. Incorporating pistachios into fudge celebrates this tradition of using local ingredients to create flavorsome sweets that everyone can indulge in.

The evolution of this recipe reflects a growing appreciation for fusion desserts, combining elements from different culinary backgrounds to create unique and playful treats. Today, innovations like the Italian Amaretto Pistachio Fudge pave the way for creative adaptations of traditional recipes, attracting food enthusiasts eager to experience something new yet rooted in tradition.

Regional variations abound in Italy, where different locales favor distinct nuts and liqueurs. In Sicily, for instance, you might find similar fudge featuring almonds or other local nuts. These adaptations exhibit how culinary traditions can blur and blend across boundaries, enriching our dessert repertoire with diverse flavors and textures.

Ingredient Deep Dive

Pistachios hold a significant place in culinary traditions, particularly within Mediterranean cuisines, known not only for their unique flavor but also their nutritional benefits. Rich in healthy fats, protein, and fiber, pistachios also contain essential vitamins like vitamin B6 and minerals such as copper. When selecting pistachios for this fudge, opt for shelled and unsalted varieties to maintain the balance of sweetness in the dessert. Store them in an airtight container in a cool, dry place to preserve freshness and prevent them from becoming rancid.

Amaretto liqueur, another star ingredient, has roots in Italian heritage with a rich history tied to 1525. Made from almonds and sugary spirits, it adds an unmistakable flavor to desserts, elevating their taste. This liqueur provides not just sweetness but aromatic notes reminiscent of marzipan. When selecting Amaretto for this recipe, quality matters—rich, artisanal brands will yield the best results. Store it upright in a cool place, and it can last for years if unopened.

Sweetened condensed milk serves as the creamy base for this fudge, granting it an indulgent texture. It’s known for its convenience and versatility in baking, often providing a creamy element that can’t be obtained through regular milk alone. When purchasing, look for brands with no preservatives to ensure your fudge remains a pure treat. Store any leftover condensed milk in an airtight container in the refrigerator for up to a week.

Butter plays a fundamental role in the fudge, enhancing its creaminess and richness. Choose unsalted butter to allow better control over the overall flavor. Freshly sourced butter will yield the best results, contributing its creamy goodness to the fudge. It’s best to store butter in the fridge and keep it tightly wrapped to maintain its quality.

Common Mistakes to Avoid

  • Overheating the Mixture: One of the most critical mistakes when making fudge is overheating the sugar and butter mixture, which can lead to a grainy texture. Stir consistently and monitor the temperature.
  • Not Stirring Enough: Insufficient stirring can result in uneven melting and lumps. Ensure you are mixing continuously for uniform texture.
  • Skipping the Cooling Step: Allowing the fudge to cool for the recommended time is vital for achieving the right setting consistency. Patience pays off for a perfect fudge.
  • Improper Measurements: Baking is a science, so accurate measurements are crucial. Use measuring cups and spoons for precision.
  • Not Using Parchment Paper: Skipping parchment paper can lead to difficulties removing the fudge from the dish. Always line the pan to ensure easy release.
  • Choosing Low-Quality Ingredients: Using subpar quality ingredients can affect the taste significantly. Invest in high-quality pistachios and Amaretto for the best results.
  • Overmixing After Adding the Nuts: Adding pistachios and immediately overmixing can break them down too much. Gently fold them in to maintain their integrity.
  • Neglecting to Allow for Proper Cooling: Allow the fudge to sit at room temperature to set properly; otherwise, you may end up with a gooey fudge instead of a nice, firm texture.
  • Storing Improperly: Fudge should be stored in a cool, dry place. Don’t store it in a hot environment, as that can cause it to melt and lose its shape.
  • Not Chilling the Fudge Long Enough: Be patient in allowing the fudge to chill for at least a few hours before slicing for better texture and easy cutting.

Essential Techniques

Fudge making often seems intimidating, but mastering the art is simply about understanding a few essential techniques. One key technique is the low and slow heating method. This technique ensures that sugar crystals dissolve correctly, preventing graininess. To master this, keep a close watch on the temperature, using a candy thermometer, and always stir constantly until the desired consistency is achieved.

Another essential technique is correct cooling. Once the mixture has been combined, allow it to cool sufficiently to develop a smooth surface. After pouring it into the prepared dish, lightly tap the pan to release any air bubbles, ensuring an even texture throughout. Look for visual cues such as clarity in the fudge before it goes into the fridge to chill.

Additionally, incorporating nuts like pistachios requires careful consideration. Toasting the nuts can elevate their flavor and texture immensely, allowing their natural oils to enhance the overall taste of the fudge. For perfect results, watch them closely in the oven, as nuts can quickly move from perfectly toasted to burnt.

Pro Tips for Perfect Italian Amaretto Pistachio Fudge

1. **Use Quality Ingredients:** Always choose the best pistachios and a high-quality Amaretto liqueur; the better the ingredients, the better the fudge will taste.

2. **Precise Temperature Control:** Use a candy thermometer to monitor the temperature of your fudge mix to prevent it from overheating, which leads to graininess.

3. **Chill in Layers:** If you want layers of different flavors or colors, allow each layer to set slightly in the fridge before adding the next.

4. **Don’t Rush the Cooling Process:** For the best results, allow your fudge to cool to room temperature before putting it in the fridge to set.

5. **Chop Nuts Finely:** For a more delicate texture, finely chop the pistachios instead of adding whole pieces; this allows the flavor to spread throughout the fudge.

6. **Experiment with Flavors:** Consider mixing in other flavors like orange zest or a hint of espresso for a more complex taste profile.

7. **Use Parchment Paper for Easy Removal:** To prevent sticking, always line your pan with parchment paper; this also makes cleanup a breeze.

8. **Slice Carefully:** Wait until the fudge has set completely in the fridge before slicing it to maintain clean edges and an attractive presentation.

Variations and Adaptations

Italian Amaretto Pistachio Fudge is versatile and open to experimentation. One popular variation is the addition of chocolate; simply swirl in melted dark chocolate before the fudge sets for an extra layer of flavor. Additionally, one can adapt the recipe by swapping pistachios for other nuts such as almonds or hazelnuts, which offer different flavor profiles while still harmonizing with Amaretto.

Seasonal adaptations can also enhance this recipe; consider introducing dried cranberries or orange zest during the winter holidays to bring in flavors of the season. For those with dietary restrictions, gluten-free versions are simple to achieve, as this recipe naturally fits gluten-free diets. Opting for sugar-free condensed milk is another way to cater to those seeking lower sugar options without sacrificing flavor.

You can also play with the proportions of the nuts or create a domed presentation by using a rounded mold instead of a flat tray, adding visual interest. Experimenting with different liqueurs, such as Irish cream or hazelnut liqueur, can offer delightful twists to this already unique flavor combination.

Serving and Presentation Guide

Presentation plays a significant role in enjoying your Italian Amaretto Pistachio Fudge. For an elegant serving option, cut the fudge into neat squares and arrange them on a beautiful platter or tiered stand. Dusting the fudge with a light sprinkle of powdered sugar can add an attractive contrast, making it visually appealing.

For an added touch, garnish each piece with a whole pistachio or a drizzle of melted chocolate for that gourmet look. When serving, include small tasting spoons for guests to easily enjoy a portion without too much fuss. This method can enhance the experience at parties or gatherings.

Consider pairing your fudge with classic Italian coffee or espresso for an indulgent dessert experience, or serve with ice cream for a delightful contrast of flavors and textures. Don’t forget temperature considerations; serving the fudge just slightly chilled can enhance the creamy texture.

Controlling portion sizes is also essential. Each square should represent a satisfying amount—neither too small to be hit or too large to be overwhelming. Aim for 1-inch squares, making it easy for guests to take one or two without guilt.

Wine and Beverage Pairing

When it comes to pairing wine with Italian Amaretto Pistachio Fudge, consider a sweet dessert wine such as Vin Santo, which complements the sweetness of the fudge beautifully. The nutty character of Vin Santo harmonizes with the pistachios, enhancing the overall tasting experience.

For a non-alcoholic option, a creamy almond milk latte can provide a lovely balance, mirroring the almond notes of Amaretto while also offering a soothing complement to the richness of the fudge.

If you prefer coffee, an espresso served alongside the fudge creates a wonderful contrast, intensifying both the chocolate and pistachio flavors. Alternatively, pair it with a tea like chamomile or ginger, which can bring out subtle flavors in the fudge.

Temperature consideration is also crucial—serve the dessert wine slightly chilled, while the fudge should sit at room temperature for the best consistency. This way, you can truly enjoy each delicious layer of flavor, enhancing the gourmet experience.

Storage and Shelf Life

To keep your Italian Amaretto Pistachio Fudge fresh, store it in an airtight container. This will protect it from prevalent moisture or odors in your kitchen. Properly stored, the fudge can last for up to two weeks at room temperature or up to a month if refrigerated.

It’s important to monitor it for signs of spoilage, such as an off smell, which indicates it may no longer be safe to consume. If you notice any changes in texture or color, it’s better to err on the side of caution and dispose of it.

For longer storage, consider freezing the fudge. Cut it into squares, place parchment paper between layers, and then store it in a freezer-safe container. It should maintain its quality for up to three months in the freezer. To enjoy, simply bring the fudge to room temperature before serving.

Reheating the fudge is not necessary; however, if you choose to warm it slightly for a more gooey texture, be careful to do so gently in a microwave or on the stovetop.

Make Ahead Strategies

Preparing Italian Amaretto Pistachio Fudge ahead of time is easy and allows you to enjoy the dessert stress-free during gatherings. Plan to make the fudge at least a day in advance, allowing it ample time to set.

You can prepare it two to three days ahead, storing it in an airtight container in the refrigerator. Ensure you wrap it well to keep it from absorbing any refrigerator odors. Consider creating larger batches; fudge refrigerates and freezes well, enabling you to serve it as needed without the hassle of repeated preparations.

When you require a fresh element upon serving, consider topping the fudge with chopped pistachios or fine sea salt just before presenting for an inviting touch. This simple addition can elevate the overall experience, keeping each serving deliciously fresh.

Scaling Instructions

For those wanting to adjust this Italian Amaretto Pistachio Fudge recipe, scaling it up or down is straightforward. If halving the recipe, simply reduce all ingredients proportionately but keep in mind the timing may shift slightly depending on your cooking pan size and oven power.

If you’re doubling or tripling the batch, it’s best to use a larger saucepan and prepare in batches if necessary, as attempting to cram too much mixture into one pan can lead to uneven cooking. Use the same cooking time based on recipe consistency, but be prepared to adjust based on visual cues.

Additionally, if scaling up, consider investing in a larger storage container to accommodate the increase in fudge volume, ensuring it’s sealed properly to maintain freshness.

Nutritional Deep Dive

When analyzing the nutritional content of Italian Amaretto Pistachio Fudge, an emphasis on balance is key. Each piece delivers a rich dose of flavor due to its combination of condensed milk, sugar, pistachios, and butter. A standard piece includes about 200 calories, primarily from the healthy fats in pistachios, and sugar content from the fudge base.

Pistachios not only contribute to the taste but also to the nutritional profile, providing essential nutrients like protein, potassium, and fiber, while the Amaretto enhances flavor without adding significant calories. While enjoyable, moderation is essential, especially for those monitoring their sugar intake.

For a more robust understanding, consider breaking down individual ingredients, noting their unique contributions. For instance, condensing the calories from sugar and checking the protein content from nuts can help create dietary guidelines. Serving sizes also play an important role. One or two squares may satisfy a sweet tooth without compromising a balanced diet.

Dietary Adaptations

This Italian Amaretto Pistachio Fudge can be easily adapted for various dietary preferences. For a gluten-free option, the recipe is already free of gluten-containing ingredients; just ensure all mixers and nuts are certified gluten-free.

For a dairy-free version, you can use full-fat coconut milk in place of condensed milk, and coconut oil instead of butter, which will still yield a creamy consistency while catering to those avoiding dairy.

Vegans can replicate the recipe by using plant-based alternatives for butter and honey or maple syrup instead of the usual sugar, ensuring it remains free of animal products while keeping the flavors intact.

Low-carb and keto diets can modify this fudge using sugar substitutes such as erythritol or monk fruit, reducing the overall carbohydrates without sacrificing taste. Additionally, paleo followers will appreciate substituting regular sugar with raw honey or coconut sugar to align with their dietary values.

These dietary modifications allow everyone to enjoy Italian Amaretto Pistachio Fudge, bringing people together over a delicious, inclusive dessert.

Troubleshooting Guide

If you encounter texture issues while making fudge, they can often be remedied by adjusting your heating approach. If the fudge is too grainy, it’s likely that too much heat caused the sugar to crystallize. To avoid this, be mindful of the temperature and stir continuously.

Flavor balance can also pose a challenge; if the fudge is too sweet, try incorporating a pinch of salt to elevate the flavors. A little salt can enhance the sweetness without making the fudge taste salty, creating a delightful contrast.

Temperature problems might arise if the fudge doesn’t set properly. If it remains too gooey, leaving it to chill longer in the refrigerator can rectify this. Conversely, if it’s rock solid, gently reheat and add a touch of creamy liquid to soften.

Equipment challenges are common too. If using a non-stick saucepan, ensure it’s suitable for high heat to avoid burning. If you notice your fudge sticking, consider using a better-quality non-stick or switching to a heavy-bottomed stainless steel pan.

Ingredient substitutions can lead to unexpected flavors. If you switch out types of nuts or liqueurs, know that it can alter the overall flavor aspect. So, always taste as you go, especially with highly flavored items like alcohol.

Timing concerns generally arise when preparing fudge to set. Always allow enough time in the refrigerator; checking texture periodically ensures it’s not overly firm or too soft before slicing.

Recipe Success Stories

Over the years, Italian Amaretto Pistachio Fudge has garnered numerous compliments from friends and family who have tried it. Many appreciate the ease of preparation, with several sharing that they successfully replicated the recipe for seasonal gatherings, receiving rave reviews from guests.

Readers have also expressed their excitement at how well the fudge holds up for events. It becomes a conversation starter due to its unique flavor profile, leading to gratifying discussions, especially among dessert aficionados. One reader noted how their family requested it for every birthday and holiday celebration, further underlining its charm.

Adaptation stories abound, with several individuals experimenting by adding their favorite flavors, like dark chocolate or coconut, enhancing the versatility of the original recipe. These personalized touches have resulted in a newfound appreciation for an already beloved treat.

Photography tips from our readers have suggested arranging the fudge in festive settings, using contrasting plates and garnishes to highlight its vibrant colors. This attention to detail elevates the serving experience, enticing others to want to try the fudge.

Encouraged by its success, many have started a tradition of gifting portions of this fudge, delighting friends and family with homemade treats, further reinforcing its status as a cherished recipe in their households.

Frequently Asked Questions

What makes this fudge different from traditional fudge?
Traditional fudge typically uses chocolate, while this recipe highlights Amaretto and pistachios, giving it a unique flavor profile that differentiates it from the classic variant.

Can I leave out the Amaretto?
Yes, you can replace Amaretto with milk or a different flavored syrup if you prefer a non-alcoholic option, although it will alter the taste slightly.

How should I store the fudge?
Store it in an airtight container at room temperature or in the refrigerator. Properly stored, it can last up to two weeks.

Can I freeze this fudge?
Absolutely! Cut the fudge into squares, place parchment paper in between layers, and store in a freezer-safe container. It can last up to three months.

Can I use different nuts?
Yes! Feel free to substitute pistachios with almonds, hazelnuts, or even walnuts for a different flavor experience.

Is this fudge gluten-free?
The recipe is naturally gluten-free, making it suitable for those with gluten sensitivities or celiac disease.

How can I ensure the fudge sets properly?
Allow it to cool at room temperature and then refrigerate it for at least a few hours to ensure it sets correctly.

What’s the best way to cut the fudge?
Use a sharp knife to cut the fudge after it has been chilled thoroughly. Running the knife under hot water beforehand can help achieve cleaner cuts.

Can I make this fudge vegan?
Definitely! Substitute dairy ingredients with plant-based alternatives like coconut cream and vegan butter.

How can I add more flavor to the fudge?
Experimenting with extracts or spices, like vanilla, coffee, or cinnamon, can add depth to the flavor profile while maintaining the original integrity.

Additional Resources

For those wanting to learn more about making desserts, consider checking out related recipes on fudge variations or explore other Italian desserts like Tiramisu or Panna Cotta. Technique guides on chocolate tempering and candy-making can also enhance your dessert skills.

Investing in essential kitchen equipment like a candy thermometer and high-quality non-stick pans assures better results in your dessert-making adventures. Exploring seasonal variations can spark creativity, offering you chances to try out new ingredients and flavors throughout the year.

Join the Conversation

We love hearing from our readers! Share your experiences with making Italian Amaretto Pistachio Fudge on social media, showcasing your beautiful creations with photos. Engaging with our community and offering feedback on the recipe helps inspire others to give it a try.

If you’ve made any unique adaptations, feel free to share them and inspire the next baker! We encourage recipe reviews as they not only serve as guidance for fellow bakers but also help refine our recipes further based on crowd feedback.

Don’t forget to follow us for more delectable recipes and food photography tips that bring your sweet creations to life. Join the conversation today!

The Recipe

Italian Amaretto Pistachio Fudge

Serves: 16 pieces

Prep Time: 15 mins

Cook Time: 20 mins

Total Time: 35 mins

Kitchen Equipment Needed

  • Heavy-bottomed saucepan
  • Spatula
  • 8×8 inch baking dish
  • Parchment paper
  • Candy thermometer

Ingredients

  • 1 cup shelled pistachios, chopped
  • 1 cup sweetened condensed milk
  • 1/2 cup unsalted butter
  • 2 cups sugar
  • 1/2 cup Amaretto liqueur
  • 1 teaspoon vanilla extract
  • Pinch of salt

Directions

  1. Prepare an 8×8 inch baking dish by lining it with parchment paper. Set aside.
  2. In a heavy-bottomed saucepan, combine the sweetened condensed milk, sugar, and butter. Cook over medium heat, stirring constantly until the mixture comes to a boil.
  3. Once boiling, reduce the heat and continue to cook, stirring for an additional 5 minutes. Remove from heat.
  4. Stir in the Amaretto liqueur, vanilla extract, salt, and chopped pistachios until well combined.
  5. Pour the mixture into the prepared baking dish, spreading it out evenly.
  6. Let it cool to room temperature, then refrigerate for at least 2 hours or until set.
  7. When fully chilled, lift the fudge from the baking dish using the parchment paper, and cut it into squares. Enjoy!

Recipe Notes

  • Store leftovers in an airtight container at room temperature for up to 2 weeks or in the refrigerator for up to a month.
  • Feel free to experiment with different types of nuts or liqueurs for unique flavor variations.

Indulge in Decadent Chocolate Hazelnut Cheesecake Trifle Recipe

Delicious Chocolate Hazelnut Cheesecake Trifle: A Decadent Dessert Experience

⚖️
Difficulty
Medium

⏲️
Prep Time
30 mins

🕒
Cook Time
15 mins

⏱️
Total Time
45 mins

🍽️
Servings
6-8 servings

Indulge in the rich and creamy layers of this Chocolate Hazelnut Cheesecake Trifle, a dessert that beautifully combines the nutty flavor of hazelnuts with decadent chocolate. Perfect for gatherings or as a special treat at home, this trifle layers luscious cheesecake filling, whipped cream, and cookie crumbles, allowing you to savor every delightful bite. The harmonious interplay of textures and flavors creates a dessert experience that is both satisfying and elegant.

The Chocolate Hazelnut Cheesecake Trifle not only appeals to the palate with its sweet and nutty crochet but also captivates the eyes with its stunning presentation. Each layer showcases the rich chocolate and creamy cheesecake, all crowned with a sprinkling of crushed hazelnuts, inviting you to dig in. This dessert encapsulates the essence of indulgence while being simple enough to prepare for any occasion.

Quick Recipe Highlights

  • Flavor Profile: A perfect balance of sweet, nutty chocolate and creamy cheesecake.
  • Texture: The delightful crunch from cookie crumbles contrasts with the smooth cheesecake layers.
  • Aroma: Aromatic notes of chocolate and roasted hazelnuts entice your senses as this dessert bakes.
  • Visual Appeal: The layered presentation in a clear dish creates an eye-catching centerpiece.
  • Skill Level Needed: This recipe is suitable for home chefs with basic baking skills.
  • Special Equipment: A trifle dish or glass bowl works best for showcasing the layers.

Recipe Overview

  • Difficulty Level: The Chocolate Hazelnut Cheesecake Trifle is classified as medium difficulty, requiring several steps but no advanced techniques.
  • Category: This is a dessert, perfect for special occasions or holiday gatherings—an impressive addition to any festive table.
  • Cuisine: Drawing inspiration from both American and European desserts, this trifle marries classic cheesecake with a gourmet twist.
  • Cost: The estimated cost for the ingredients is moderate, making it accessible for home bakers.
  • Season: Ideal for year-round enjoyment, especially during holidays when rich desserts are favored.
  • Occasion: Perfect for birthdays, holidays, or dinner parties where a show-stopping dessert is desired.

Why You’ll Love This Recipe

The taste of this Chocolate Hazelnut Cheesecake Trifle is undeniably luxurious, with each bite offering a perfect blend of rich chocolate, creamy cheesecake, and nutty hazelnuts. The layers create an enchanting burst of flavor that delights both your palate and your senses. Each component—from the smooth cheesecake to the crunchy biscuit layer—works in harmony to provide a dessert that is anything but ordinary.

Convenience and ease are at the forefront of this recipe. You can prepare the cheesecake filling in advance, allowing you to assemble the trifle when guests arrive. This means you can spend more time enjoying their company rather than being stuck in the kitchen. The no-bake aspects of the cheesecake filling make it a hassle-free option, further enhancing its appeal.

Nutritional advantages can be savored too. The combination of hazelnuts adds a hearty dose of healthy fats and fiber while maintaining the fun of a decadent dessert. Although indulgent, when served in moderation, it can be part of a balanced diet.

Sharing this trifle with friends and family can elevate your gatherings. The visual appeal and delicious flavors spark conversation and create a memorable experience. It’s perfect for serving at events where you want to impress your guests. The versatility of this trifle also encourages sharing at various occasions, from casual family dinners to more formal celebrations.

Cost-effectiveness is another reason to love this recipe. You can make this Chocolate Hazelnut Cheesecake Trifle for about the same price as store-bought desserts while delivering a house-made treat that far exceeds expectations. Additionally, the use of simple, widely available ingredients ensures that creating this delightful masterpiece is financially accessible.

Historical Background and Cultural Significance

The roots of the cheesecake can be traced back to ancient Greece, where it was served to athletes during the first Olympic games. Over the centuries, this dessert has evolved into numerous variations, influenced by different cultures and regions. The incorporation of chocolate and hazelnuts is a nod to contemporary twists that reflect modern baking trends and consumer preferences.

In many European countries, trifles are a traditional dessert, often layered with fruits, creams, and sweets. This format provides not only a pleasing visual experience but also allows for endless creative possibilities. The Chocolate Hazelnut Cheesecake Trifle beautifully marries these traditions, incorporating the beloved flavors of chocolate and hazelnuts into a cohesive dish loved by many.

Traditionally, trifles symbolize celebration and indulgence. They evoke a sense of togetherness and joy, often served at family gatherings and holidays. The various layers represent the complexities of life, where sweet and savory moments intermingle, much like the flavors and textures found in this dessert.

Regional variations of chocolate desserts often showcase unique ingredients or techniques. For instance, a common variation might include adapting the cheesecake filling by using local nuts or flavored liqueurs, emphasizing the versatility and cultural significance of desserts like this trifle.

Ingredient Deep Dive

Chocolate: Chocolate has a rich history dating back to the ancient Mesoamericans who used it as a beverage. Nutritionally, chocolate is known for its antioxidants and potential heart benefits. When selecting chocolate for baking, opt for high-quality dark chocolate with at least 60% cocoa for depth of flavor. Store chocolate in a cool, dry place, and consider using cocoa powder as a substitute in recipes that call for melted chocolate.

Hazelnuts: Hazelnuts are celebrated globally, particularly in Italian cuisine where they complement sweets and pastries. They are beneficial for heart health, high in healthy fats, and offer protein and fiber. When selecting hazelnuts, look for fresh, whole nuts that have not been roasted for maximum flavor. Store hazelnuts in an airtight container in a cool, dark place, and consider substituting pecans or almonds if necessary.

Cream Cheese: Cream cheese is a staple ingredient in many desserts and originated in the U.S. It provides richness and creaminess in recipes. It’s high in protein and calcium but can be high in fat. Choose full-fat cream cheese for the best texture and flavor. Store cream cheese in the refrigerator and consume it by the expiration date. Greek yogurt can be used as a lighter alternative in many recipes.

Common Mistakes to Avoid

  • Overmixing cream cheese can lead to a grainy texture in your cheesecake layers. Mix just until smooth for creamy results.
  • Not chilling the cheesecake filling long enough can cause it to be too soft, making layering difficult.
  • Using stale cookies for the crust can ruin the texture; always ensure the ingredients are fresh.
  • Neglecting to taste your filling can lead to a bland cheesecake; be sure to adjust flavors as necessary.
  • Assembling the trifle too early results in soggy layers as the cookies absorb moisture; assemble just before serving.
  • Using the wrong binder can make your cheesecake layers unstable; ensure the right ratio of ingredients for best results.
  • Not using a clear dish can disguise the beautiful layers; opt for a trifle dish or clear glass bowl for presentation.
  • Not allowing the trifle to set properly can lead to a messy dessert; patience pays off in achieving a perfect trifle.

Essential Techniques

Layering: Proper layering is crucial for presenting your chocolate hazelnut cheesecake trifle. Ensure each layer is evenly distributed to create a beautiful visual contrast. Start with cookie crumbles, followed by the cream layer, and repeat. Visually check the layers after assembly; if necessary, use a spoon to gently readjust the layers for an aesthetically pleasing presentation.

Chilling: Allowing the cheesecake filling to chill is important for flavor melding and textural improvement. The filling will become firmer, making it easier to layer within the trifle. To master this technique, remember to let the cheesecake mixture sit for at least 4 hours or overnight. Look for a smooth and spreadable consistency before using.

Pro Tips for Perfect Chocolate Hazelnut Cheesecake Trifle

– Use high-quality chocolate for richer flavor; the better the chocolate, the more intense the flavor.
– Crush your cookies in a food processor for a finer crumb that binds better with melted butter.
– Let your cheesecake mixture come to room temperature before whipping; this helps in achieving a smooth consistency.
– Don’t skip the chilling steps; the texture and flavor improve significantly with time.
– Offer a variety of toppings—think whipped cream or chocolate shavings to elevate the presentation and flavor profiles.
– Consider making individual servings in small cups for a fun and elegant party option.
– If using store-bought cookies, taste them first to adjust sweetness accordingly, as some brands can be sweeter than others.
– For a twist, add a splash of hazelnut liqueur to the cheesecake mix for an extra layer of flavor.

Variations and Adaptations

There are numerous ways to adapt the Chocolate Hazelnut Cheesecake Trifle to suit different tastes. For regional variations, consider incorporating local nuts or seasonal fruits, which can add a unique twist. Instead of hazelnuts, feel free to use almonds or pecans for a different flavor profile.

Seasonal adaptations could involve infusing the cheesecake with seasonal flavors; for example, adding pumpkin spice in the fall or peppermint in winter. For dietary modifications, turning this dessert gluten-free is simple with gluten-free cookies, while vegan options can utilize coconut cream in place of cream cheese.

Flavor variations can also greatly enhance this dessert. Try adding espresso powder to accentuate the chocolate flavors or incorporate fresh berries for a fruitier version. Texture modifications can involve varying the type of cream used—like whipped coconut cream for a dairy-free spin.

For presentation alternatives, consider serving the trifle in mason jars for a rustic touch or layer it in a tiered dessert stand for a stunning display at events.

Serving and Presentation Guide

Presentation is key for any dessert, especially for something as visually appealing as a trifle. A clear glass bowl allows the layers to shine; arrange the layers thoughtfully, providing an enticing view of the chocolate and cheesecake. For plating, consider using small individual dishes or cups to create a more personal touch.

You might garnish the top with a dollop of whipped cream and sprinkle with crushed hazelnuts to enhance visual appeal. For modern serving suggestions, try adding a side of chocolate sauce or fresh berries to enhance the flavor profile and offer an interactive element to each serving.

Temperature considerations are essential; serve the trifle slightly chilled for a refreshing experience. Additionally, use a spatula or spoon for careful portion control, allowing guests to savor every layer without overwhelming them.

Wine and Beverage Pairing

When pairing beverages with the Chocolate Hazelnut Cheesecake Trifle, dessert wines tend to work beautifully. A rich port or a sweet dessert wine like Sauternes can elevate the indulgence. Alternatively, consider pairing it with a coffee cocktail, blending the flavors of chocolate and coffee for a delightful finish.

For non-alcoholic options, a rich hot chocolate or a creamy chai latte could complement the flavors perfectly. If serving with tea, consider a robust black tea that can stand up to the richness of the trifle, while herbal teas can offer a lighter contrast.

Temperature considerations are important for serving these beverages; serve wines chilled or at room temperature, and ensure hot beverages are at an optimal sipping temperature to enhance the overall experience.

Storage and Shelf Life

For storage methods, keep the assembled Chocolate Hazelnut Cheesecake Trifle in an airtight container in the refrigerator. This dessert can last up to 3-4 days when stored correctly; however, the cookie layers may become softer over time due to moisture.

Maintaining temperature requirements is vital. Always refrigerate the trifle and ensure it is consumed within the suggested storage time. Use a clear container for visibility, allowing you to monitor any changes in freshness.

Signs of spoilage include off-odors or mold, which should immediately indicate that the dessert is no longer safe to consume. If reheating is necessary, consider only reheating portions of individual servings rather than the entire trifle, as the texture may suffer when heated.

If freezing is desired, do so before assembly; freeze the cheesecake mixture in an airtight container and the cookie layers separately. Defrost prior to assembling and enjoy at a later date.

Make Ahead Strategies

Planning ahead is easy with the Chocolate Hazelnut Cheesecake Trifle. You can prepare the cheesecake filling up to two days in advance, allowing the flavors to meld beautifully in the fridge. This pre-preparation saves you time on the day of an event.

When making this trifle, store each component separately until you’re ready to assemble for best results. This approach will ensure that your cookie layers remain crunchy while your cheesecake filling stays silky smooth.

Quality is crucial; consider the impact of storage solutions on overall freshness. Use airtight containers for individual components, and safeguard against any cross-flavors to keep the integrity of each ingredient.

When assembling, make sure to layer the components efficiently, starting with cookies at the base to avoid sogginess. Follow with the cheesecake layer, cream, and repeat to achieve striking visual layers. Fresh elements like whipped cream should be added right before serving for optimal taste and texture.

Scaling Instructions

Adapting the Chocolate Hazelnut Cheesecake Trifle for different servings is straightforward. To halve the recipe, simply adjust each ingredient proportionately and use a smaller dish. For doubling or tripling, ensure you have adequate bowl size to accommodate larger quantities, and increase preparation times as necessary to stay on track.

Adjusting timing is also crucial. While the cooking time remains mostly the same, assembly may take longer with larger volumes of fillings and layers. Allow extra time for chilling to ensure the layers set properly.

As you scale, be mindful of ingredients; some may need personal adjustments for flavor intensity. For instance, when doubling chocolate, experiment with ratios to prevent overpowering sweetness. Lastly, ensure proper storage considerations as larger batches may require larger containers.

Nutritional Deep Dive

The chocolate hazelnut cheesecake trifle provides a delightful combination of macros. It contains a balance of carbohydrates from sugar and cookies, protein from cream cheese, and healthy fats from hazelnuts. Managing portion sizes can help control caloric intake while still enjoying this confection.

Micronutrient analysis shows interesting benefits from the hazelnuts, which offer vitamin E, magnesium, and fiber. These nutrients contribute to overall wellness and heart health, making the dessert a more informed indulgence.

Health benefits extend beyond the flavors. The presence of antioxidants in dark chocolate can enhance cardiovascular function, providing health-conscious consumers ways to enjoy dessert guiltlessly. Understanding these benefits can help inform decisions for those mindful of dietary habits.

In terms of dietary considerations, this dessert offers flexibility. For those managing their weight, adjusting portion sizes can allow for a treat without exceeding caloric goals, making indulgence both enjoyable and manageable.

Dietary Adaptations

For gluten-free adaptations, substitute traditional cookies with gluten-free alternatives, ensuring that all ingredients are certified gluten-free. This way, those with gluten sensitivities can fully enjoy this dessert without any worries.

Dairy-free options can be created using cream cheese alternatives like cashew cream or silken tofu blended until smooth. Coconut cream can serve as a replacement for whipped cream, delivering a similar texture without dairy.

For vegan modifications, use plant-based cream cheese and replace eggs in any other recipes with flax or chia eggs, maintaining the integrity of the dish while making it vegan-friendly.

Low-carb and keto-friendly variations can employ almond flour for the cookie base and sugar substitutes to maintain the dessert’s sweetness without the carbs. This adaptability allows more individuals to join in on the chocolate hazelnut cheesecake trifle experience.

Paleo-friendly versions can utilize natural sweeteners and unprocessed ingredients throughout the recipe. Using these alternative paths allows for creative culinary options across various dietary needs.

Troubleshooting Guide

For common texture issues, like a grainy cheesecake layer, be mindful of the mixing process. Overmixing can lead to undesirable textures; only mix until fully combined and smooth. Additionally, ensure that your cream cheese is at room temperature when you mix to avoid lumps.

Flavor balance can occasionally misfire—should your trifle turn out too sweet, incorporating a touch of salt in your cream cheese mixture can counteract excessive sweetness and enhance overall flavor.

Temperature problems crop up when serving desserts cold. If suggested chill times are not met, the trifle may not set properly, making it challenging to serve. Always ensure adequate chilling time for the creamiest results.

For equipment challenges, if you lack a trifle dish, layer the dessert in clear glass bowls or individual cups to achieve a similar effect; make sure the contents are visible.

Ingredient substitutions can lead to unexpected results; if you’re swapping ingredients, test small batches first to avoid wasting food.

Timing concerns may arise if the trifle is prepared too far in advance. Always check for best quality and flavor, serving it chilled but not frozen to ensure optimal enjoyment.

Recipe Success Stories

Community feedback around the Chocolate Hazelnut Cheesecake Trifle often highlights its impressive presentation, leading to numerous requests for the recipe. Many home cooks share their successes with variations, like adding different flavors or attempting to create individual servings.

Variation successes showcased new flavor profiles, including raspberry or espresso layered with traditional chocolate. Reader suggestions frequently include innovative garnishing ideas, incorporating edible flowers or chocolate curls for an artistic touch.

Photography tips often include using natural light, which can create beautiful highlights and shadows on the trifle layers, capturing the dessert’s rich complexity.

For many, this dessert has become a family favorite, passed around during gatherings, reinforcing a sense of community and shared joy in dessert-making.

Frequently Asked Questions

Can I make this trifle ahead of time? Yes, you can prepare the cheesecake filling and cookie layers ahead of time. Just assemble the trifle closer to serving time to maintain the texture of the cookie layers.

What can I use instead of hazelnuts? If you’re unable to use hazelnuts, feel free to substitute with almonds, pecans, or any nut you prefer that resonates with your taste.

Is there a way to make this dessert gluten-free? Absolutely! Use gluten-free cookies in place of traditional cookies to maintain the dessert while accommodating gluten-sensitive diets.

What can I do if my cheesecake filling is too runny? If the filling is too runny, ensure that the cream cheese is well-beaten and at room temperature, and consider chilling it longer to help it firm up.

How can I store leftovers of the trifle? Store any leftover trifle in an airtight container in the refrigerator for up to four days to maintain freshness.

Can I freeze the trifle? It’s best to freeze the components separately. The assembled trifle may not hold its texture well once defrosted.

What type of chocolate should I use? Use high-quality dark chocolate with a cocoa content of at least 60% for the richest flavor.

Can you adapt this recipe for keto diets? Yes, by substituting sugar with low-carb sweeteners and using almond flour for the cookie base, you can create a keto-friendly version.

How many servings does this recipe yield? This recipe serves approximately 6 to 8 people, depending on portion sizes.

What is a good substitution for cream cheese? For dairy-free options, use silken tofu blended until smooth or dairy-free cream cheese as a substitute.

Additional Resources

If you’re looking for related recipes, consider exploring variations of cheesecake, such as no-bake or fruit-topped desserts. Comprehensive technique guides for dessert making can enhance your skills, while ingredient-focused articles can expand your knowledge on chocolate and nuts.

For equipment recommendations, investing in quality mixing bowls, food processors, and trifle dishes can ease your baking experiences and improve outcomes. Exploring seasonal variations of this trifle during various holidays can also provide new culinary fun and adventure in your kitchen.

Join the Conversation

We invite you to share your experiences with the Chocolate Hazelnut Cheesecake Trifle! Use social media to showcase your delicious creations, and provide feedback or suggestions based on your personal adaptations. Photography tips can require practice, but they can greatly enhance your food presentation.

Engage with the community by discussing your variations or favorite dessert recipes. Each contribution adds to the rich tapestry of baking storytelling, enhancing the overall experience for all enthusiasts.

The Recipe

Chocolate Hazelnut Cheesecake Trifle

Serves: 6-8 servings

Prep Time: 30 mins

Cook Time: 15 mins

Total Time: 45 mins

Kitchen Equipment Needed

  • Trifle dish or clear glass bowl
  • Mixing bowls
  • Electric mixer
  • Spatula
  • Food processor (optional)

Ingredients

  • 8 oz cream cheese, softened
  • 1 cup heavy whipping cream
  • ½ cup powdered sugar
  • ½ cup chocolate hazelnut spread (like Nutella)
  • 1 cup crushed cookies (like Oreos or chocolate wafers)
  • ½ cup chopped hazelnuts
  • 1 tsp vanilla extract
  • Optional toppings: whipped cream, chocolate shavings

Directions

  1. In a mixing bowl, beat the cream cheese until smooth.
  2. Gradually mix in the chocolate hazelnut spread and vanilla extract until combined.
  3. In another bowl, beat the heavy whipping cream and powdered sugar until stiff peaks form.
  4. Gently fold the whipped cream into the cream cheese mixture until fully integrated.
  5. In a trifle dish, start layering with cookie crumbs, followed by the cheesecake filling. Repeat the layers until all ingredients are used.
  6. Top with chopped hazelnuts and optional whipped cream or chocolate shavings.
  7. Chill for at least 2 hours before serving to allow layers to settle.

Recipe Notes

  • For a decadent touch, drizzle with additional chocolate hazelnut spread before serving.
  • To make it gluten-free, use gluten-free cookies.
  • Consider individual servings in small glasses for a fun presentation.

Indulge in Decadence with This Chocolate Fudge Brownie Cake

Decadent Chocolate Fudge Brownie Cake: A Rich Delight

⚖️
Difficulty
Moderate

⏲️
Prep Time
20 mins

🕒
Cook Time
30 mins

⏱️
Total Time
50 mins

🍽️
Servings
12

Indulging in a slice of Chocolate Fudge Brownie Cake is more than just enjoying dessert; it’s an experience that speaks to the heart of chocolate lovers everywhere. This cake combines the rich, dense texture of brownies with the fluffiness of cake, creating a unique treat that is both satisfying and delightful. Imagine the first bite melting in your mouth, a perfect blend of chocolatey goodness enhanced with a moist crumb that leaves you yearning for more. Each layer is crafted to perfection, ensuring that every slice is an indulgence you won’t soon forget.

What sets this Chocolate Fudge Brownie Cake apart is not only its rich flavor but also the way it envelops you in a warm embrace of childhood memories and joyful moments. It’s perfect for celebrations, casual gatherings, or even a cozy night in with a cup of tea or coffee. The aroma wafting through your kitchen as it bakes is intoxicating, whisking you away to a world of chocolatey delights. Each moment spent preparing this cake is filled with anticipation for the bliss it promises to deliver.

Quick Recipe Highlights

  • Flavor Profile: This cake features rich chocolate notes complemented by a hint of vanilla, making every bite an exquisite experience.
  • Texture: The chewy, fudgy center contrasted by a slight crispiness on the edges delivers a delightful mouthfeel.
  • Aroma: The irresistible scent of chocolate baking wafts through the air, creating an inviting atmosphere for everyone.
  • Visual Appeal: The glossy frosting and dense layers exude elegance, making it a stunning centerpiece for any occasion.
  • Skill Level Needed: While this recipe is moderately difficult, it’s still accessible for home bakers looking to impress.
  • Special Equipment: You’ll need a 9-inch round cake pan and an electric mixer to achieve the perfect consistency.

Recipe Overview

  • Difficulty Level: This recipe is classified as moderate due to the precise measurements and timing required to achieve that signature fudginess.
  • Category: Ideal for dessert lovers, this Chocolate Fudge Brownie Cake falls into the dessert and special occasion categories.
  • Cuisine: Rooted in classic American baking, this recipe highlights the tradition of chocolate desserts that unite people.
  • Cost: With standard ingredients, this recipe is cost-effective, averaging about $10-15 for the entire cake.
  • Season: Best enjoyed throughout the year, but particularly popular during the cooler months when warm, comforting desserts are desired.
  • Occasion: Perfect for birthdays, holidays, or any gathering where chocolate is a must-have.

Why You’ll Love This Recipe

Embracing the rich taste and luxurious texture of this Chocolate Fudge Brownie Cake makes every bite an adventure. The layers are sinfully delicious, combining the best attributes of brownies and cake to create a decadent dessert that satisfies cravings. The sweetness is perfectly balanced, allowing the chocolate to shine without overpowering other flavors.

Not only is this cake a show-stopper, but its convenience in preparation is another reason to love it. The straightforward steps make it accessible even for novice bakers. You’ll quickly find that this cake can be whipped together in no time, with minimal mess and preparation required, making it an outstanding option for spontaneous gatherings or celebrations.

Nutritionally, while this cake is undeniably indulgent, it can be made using high-quality ingredients that add comfort without compromising flavor. Using options like dark chocolate can enhance the richness, providing antioxidants and a deep flavor profile that elevates the overall taste.

Socially, this Chocolate Fudge Brownie Cake acts as a wonderful conversation starter, encouraging sharing and laughter. Its presentation speaks volumes, making it the centerpiece of any dessert table and inviting guests to indulge in a slice. It seamlessly integrates into gatherings, adding a touch of warmth and celebration.

Finally, the cost-effectiveness of this recipe cannot be overstated. With readily available ingredients and a straightforward approach, this cake stands out as an impressive treat that does not break the bank. You can bake something extraordinary at home that rivals expensive bakery offerings, allowing everyone to enjoy a taste of luxury on a budget.

Historical Background and Cultural Significance

The origins of the brownie date back to the late 19th century in the United States, and as the dessert evolved, various interpretations emerged, leading to the creation of the Chocolate Fudge Brownie Cake. Historically, brownies were conceived as a simpler dessert, offering a dense chocolate experience without the need for complicated techniques.

The cultural significance of brownies can be observed in their status as a comfort food across many American households. They symbolize home baking and nostalgia, creating a link to family gatherings and celebrations over the decades. The transition from traditional brownies to cakes signals an evolution that embraces creativity, allowing bakers to experiment while retaining classic elements.

As the recipe further evolved, regional variations began to emerge. Different parts of the United States developed unique twists on the traditional brownie, with some regions favoring nuts, while others leaned towards richer chocolate frosting, highlighting America’s diverse culinary landscape.

Ultimately, the Chocolate Fudge Brownie Cake embodies a fusion of tradition and innovation, making it a beloved choice in modern kitchens while paying homage to its humble beginnings.

Ingredient Deep Dive

Dark Chocolate
Dark chocolate serves as the backbone of this cake, providing a rich flavor and deep color. It’s believed to have ancient origins, dating back to the Olmecs in Mesoamerica. Nutritionally, dark chocolate is rich in antioxidants and promotes heart health. When selecting dark chocolate for baking, opt for high-quality brands with a cocoa content of at least 70%. Store it in a cool, dry place and consider substitutions such as cocoa powder if needed.

Butter
Butter contributes to the rich flavor and chewy texture of the cake. It has been a staple in baking for centuries, celebrated for its ability to enhance the flavor profile of desserts. Butter is a good source of vitamins A and D but should be used in moderation. Choose unsalted butter for baking, as it allows better control over the cake’s saltiness. For storage, keep butter in the fridge for freshness or freeze it for long-term use.

Common Mistakes to Avoid

  • Overmixing the batter: Overmixing results in a tough cake. Mix until just combined for a tender texture.
  • Not measuring ingredients accurately: Use a kitchen scale or measuring cups for precision, as baking is a science.
  • Using cold ingredients: Room temperature ingredients mix more evenly; make sure eggs and butter are not cold.
  • Skipping the lining of the pan: Failing to line your baking pan can lead to sticking, ruining your cake’s presentation.
  • Baking at the wrong temperature: Always preheat your oven to the correct temperature; this is vital for even baking.
  • Using the wrong pan size: Different sizes affect bake time and texture; ensure you use the correct dimensions.
  • Underbaking or overbaking: Check for doneness with a toothpick; the cake should be moist but not gooey.
  • Not letting the cake cool properly: Cutting a warm cake can lead to crumbling; allow it to cool completely in the pan.

Essential Techniques

To achieve a perfect Chocolate Fudge Brownie Cake, mastering the art of melting chocolate is critical. Gently warm the chocolate using a double boiler or microwave at low power. Avoid overheating, as burnt chocolate can ruin your dessert. Look for a smooth texture and glossy finish as cues for success.

Additionally, understanding how to fold ingredients can make a difference. Use a spatula to gently combine mixtures without deflating them. Practicing this technique ensures that your cake remains airy and fluffy while maintaining its moist fudginess.

Pro Tips for Perfect Chocolate Fudge Brownie Cake

1. Use the best quality ingredients available for the richest flavor.
2. Experiment with different chocolate types for a unique taste profile.
3. Allow the cake to cool completely before frosting for better adherence.
4. For an extra touch, sprinkle sea salt on top of the frosting for contrast.
5. Layer the cake with ganache for an exquisite finish.
6. Store leftovers in an airtight container to maintain freshness.
7. Consider using a silicone baking mat for easy removal from the pan.
8. Experiment with mix-ins like nuts or chocolate chips to customize your cake.

Variations and Adaptations

Chocolate Fudge Brownie Cake can be easily adapted to suit various occasions and tastes. For regional variations, consider adding spices like cinnamon or even a dash of espresso powder to enhance the chocolate flavor.

Seasonal adaptations can include adding grated zest from oranges or limes for a refreshing twist. For dietary modifications, use almond or coconut flour for gluten-free options and incorporate dairy-free chocolate for a vegan version.

Flavor variations can also include playing around with different extracts like peppermint or almond to introduce new savory dimensions. For a textural modification, incorporating crushed cookies or adding a layer of textured frosting creates a unique presentation that intrigues guests.

Serving and Presentation Guide

When it comes to serving your Chocolate Fudge Brownie Cake, presentation matters. Plate each slice elegantly, perhaps adding a scoop of vanilla ice cream alongside for a delightful contrast. Drizzling chocolate sauce or caramel over the top enhances visual appeal and adds flavor depth.

Garnishing the cake with fresh berries or mint leaves not only adds color but also freshness that balances the richness. For a classic touch, dusting powdered sugar over the top can give a charming, rustic finish.

Consider serving at room temperature or slightly warmed, allowing the gooey texture to shine through. Portion control is key; cut generous slices that invite indulgence without overwhelming guests, ensuring everyone can savor the chocolate experience.

Wine and Beverage Pairing

Pair your Chocolate Fudge Brownie Cake with rich beverages to enhance the chocolate’s flavor. A full-bodied red wine, like a Cabernet Sauvignon, complements the cake’s richness beautifully. For a non-alcoholic option, espresso or dark roast coffee enhances the chocolate experience.

If preferred, consider a sweet dessert wine, such as Port, which harmonizes with the cake’s sweetness. Serve these beverages slightly chilled or at room temperature for the best flavor profiles.

Storage and Shelf Life

Proper storage ensures your Chocolate Fudge Brownie Cake remains fresh and delicious. Store the cake in an airtight container at room temperature for up to three days. For longer storage, refrigerate the cake, but it’s best enjoyed fresh.

Signs of spoilage include an off smell or changes in texture; avoid consuming if in doubt. Reheating slices in a microwave for a few seconds brings back that delightful warmth. For long-term storage, consider freezing, wrapping slices in plastic wrap, and placing them in a freezer bag.

Make Ahead Strategies

This cake can easily be made ahead of time, saving you stress on the day of your event. Prepare the batter a day in advance, storing it in the fridge, and bake just before serving for the freshest taste.

Storage between steps can help as well. Allow the baked cake to cool completely, then wrap it tightly and refrigerate for several days, or freeze for up to a month. Quality remains intact if properly stored. When ready to serve, simply frost and enjoy, adding any fresh elements just prior to serving.

Scaling Instructions

Scaling the Chocolate Fudge Brownie Cake is simple. If you want to halve the recipe, use smaller cake pans or ensure even baking in a single larger pan without overfilling. Doubling or tripling the recipe necessitates larger pans and may require longer bake times.

Adjustments in baking times may be necessary based on pan sizes; monitor the cake closely and perform testing with a toothpick for doneness. For storage considerations, ensure that larger batches are adequately wrapped to retain moisture and flavor.

Nutritional Deep Dive

The Chocolate Fudge Brownie Cake delivers protein and healthy fats, largely from the eggs and butter. However, it is important to enjoy it in moderation due to its sugar content. Each slice can be high in calories, so it’s essential to consider portion sizes when indulging.

Micronutrients are also present; chocolate contains minerals like iron, magnesium, and zinc. For those watching their diet, being mindful of the cake’s calorie density may promote better weight management goals. Enjoying in moderation allows you to savor without excessive guilt.

Dietary Adaptations

Creating a gluten-free Chocolate Fudge Brownie Cake is simple with a few ingredient adjustments, such as using gluten-free flour blends. Dairy-free versions are achievable by substituting standard butter and cream with coconut oil and almond milk, respectively.

For vegans, replacing eggs with flaxseed meal and ensuring all chocolate products are dairy-free makes this indulgent cake accessible. Those following low-carb or keto diets can experiment with sugar substitutes while utilizing nut flours for a low-carb twist.

Paleo and low-FODMAP adaptations can also be accomplished with minimal adjustments, providing versatile options for various dietary needs.

Troubleshooting Guide

For texture issues, ensure accurate flour measurements; too much flour can lead to a dry cake. Achieving the right flavor balance may require adjusting the sugar levels, especially if you’re using dark chocolate.

Temperature issues can arise; an oven thermometer ensures your oven is at the correct temperature for optimal baking. If using substitutions, familiarize yourself with how each ingredient affects the final product, particularly regarding timing and moisture.

If encountering equipment challenges, always read through your recipe beforehand to ensure proper tool availability. Ingredient substitutions should be tested prior to serving to gauge flavor outcomes, and timing should also be adjusted to account for different baking methods.

Recipe Success Stories

Community feedback highlights the creativity baked into this Chocolate Fudge Brownie Cake. Home bakers have reported delightful variations, swapping chocolate types and incorporating nuts, leading to unique versions that wow guests.

Photography tips shared by enthusiasts showcase the cake’s luscious layers and frosting techniques, inspiring others to capture the beauty of their baking. Success stories feature connection tales, with families celebrating milestones through this shared dessert.

Reader suggestions for modifying the recipe encouraged collaboration, creating a sense of community among those who appreciate chocolate desserts. Each adaptation fosters creativity and spreads joy, making this cake a true favorite.

Frequently Asked Questions

Can I make this cake ahead of time?

Absolutely! You can bake the cake a day in advance, store it properly, and frost it just before serving for the freshest taste.

What’s the best way to store leftovers?

Store the cake in an airtight container at room temperature for up to three days or refrigerate it for longer freshness.

Can I freeze the cake?

Yes, you can freeze the unfrosted cake. Wrap it tightly in plastic wrap and store it in a freezer bag to maintain freshness.

What can I substitute for eggs?

You can use flaxseed meal or unsweetened applesauce as a substitute for eggs in this recipe, especially for vegan adaptations.

How can I enhance the chocolate flavor?

Add a teaspoon of espresso powder to deepen the chocolate flavor without adding coffee taste.

Is this recipe suitable for dietary restrictions?

Yes! The recipe is adaptable for gluten-free, dairy-free, and even vegan diets with simple ingredient swaps.

What type of chocolate works best?

Using high-quality dark chocolate (70% cocoa or higher) will yield the best flavor and texture for this cake.

How do I know when the cake is done baking?

Test for doneness by inserting a toothpick in the center; it should come out with a few moist crumbs but no wet batter.

Can I add mix-ins like nuts or chocolate chips?

Absolutely! Adding nuts or chocolate chips can enhance the flavor and texture of your cake. Just fold them in gently.

How long does it take to bake?

The baking time for this cake is approximately 30 minutes, but always check for doneness toward the end of the cooking time.

Additional Resources

If you enjoyed this Chocolate Fudge Brownie Cake, consider exploring other related recipes such as molten chocolate lava cake or classic brownies. Technique guides on baking basics can enhance your skills in crafting perfect desserts.

For a deeper understanding of ingredients, detailed information about chocolate and its varieties will broaden your knowledge. Additionally, investing in good baking equipment can make a significant difference in your baking journey, ensuring that you have everything you need at your fingertips.

Join the Conversation

We invite you to share your baking experiences and variations of this Chocolate Fudge Brownie Cake! Post your pictures on social media, tagging us so we can see your creations. We’d love to hear your feedback and how the recipe turned out for you.

Engaging with our community not only inspires fellow bakers but fosters a love for baking that unites us all. Share your tips, tricks, and personal touches to this recipe and encourage others in their culinary adventures.

The Recipe

Chocolate Fudge Brownie Cake

Serves: 12

Prep Time: 20 mins

Cook Time: 30 mins

Total Time: 50 mins

Kitchen Equipment Needed

  • 9-inch round cake pans
  • Electric mixer
  • Mixing bowls
  • Spatula
  • Cooling rack

Ingredients

  • 1 cup unsalted butter
  • 8 ounces dark chocolate, chopped
  • 2 cups granulated sugar
  • 4 large eggs
  • 1 teaspoon vanilla extract
  • 1 cup all-purpose flour
  • 1/2 teaspoon salt

Directions

  1. Preheat your oven to 350°F (175°C) and grease the cake pans.
  2. Melt the butter and dark chocolate together in a double boiler, stirring until smooth.
  3. Remove from heat and mix in the sugar until well combined.
  4. Add the eggs, one at a time, then stir in the vanilla extract.
  5. Gradually fold in the flour and salt until just combined.
  6. Pour the batter evenly into the prepared pans and smooth the tops.
  7. Bake for 30 minutes or until a toothpick inserted in the center comes out with few moist crumbs.
  8. Allow cakes to cool in pans for 10 minutes, then transfer to a cooling rack to cool completely.
  9. Once cooled, frost and decorate as desired.

Recipe Notes

  • For a richer flavor, try using different types of chocolate.
  • Feel free to add nuts or chocolate chips to the batter for added texture.
  • This cake can be made a day ahead and frosted before serving.

Indulge in Decadent Chocolate Chip Cookie Dough Mousse Recipe

Delicious Chocolate Chip Cookie Dough Mousse: A Decadent Dessert

⚖️
Difficulty
Easy

⏲️
Prep Time
20 mins

🕒
Cook Time
0 mins

⏱️
Total Time
20 mins

🍽️
Servings
6 servings

Chocolate Chip Cookie Dough Mousse is the perfect fusion of two beloved desserts: creamy mousse and bite-sized cookie dough treats. This decadent chocolate mousse is laced with chunks of soft, chewy cookie dough that melt in your mouth. The combination of rich chocolate, brown sugar sweetness, and buttery vanilla creates a dessert experience that is equal parts indulgent and comforting. It’s the ultimate treat for cookie lovers seeking a new twist on their favorite flavors.

Not only is this mousse incredibly delicious, but it’s also quick and easy to prepare. With no baking required, you can whip it up in just 20 minutes, making it perfect for last-minute gatherings or weekday treats. The fluffy texture of the mousse contrasts beautifully with the firm cookie dough bites, creating a pleasing mouthfeel that will leave your guests craving more. Serve it in individual cups for a stylish presentation that showcases both the color and the enticing layers of cookie dough and chocolate.

Quick Recipe Highlights

  • Flavor Profile: Rich chocolate harmonizes with the nostalgic taste of raw cookie dough, creating a delightful dessert that satisfies both cravings.
  • Texture: The mousse is smooth and velvety, while the cookie dough provides a chewy, satisfying element.
  • Aroma: The fragrant blend of vanilla, chocolate, and brown sugar creates an irresistible aroma that will fill your kitchen.
  • Visual Appeal: Layers of creamy mousse and chunks of cookie dough make for an inviting dessert presentation.
  • Skill Level Needed: This recipe requires basic mixing and folding skills, making it accessible for beginners.
  • Special Equipment: You’ll need mixing bowls, a hand mixer or stand mixer, and serving cups or bowls.

Recipe Overview

  • Difficulty Level: This Chocolate Chip Cookie Dough Mousse is categorized as easy due to its simple preparation steps, allowing even beginner cooks to succeed.
  • Category: This dessert falls under the “no-bake” category, perfect for warm weather or when you want to minimize oven usage.
  • Cuisine: While it has American roots, this mousse brings together classic dessert elements recognizable in many global cuisines.
  • Cost: The approximate cost of this dessert is relatively low, making it a budget-friendly option for gatherings.
  • Season: This dessert is perfect for all seasons, offering a refreshing and indulgent sweet treat year-round.
  • Occasion: Ideal for parties, birthdays, or casual gatherings, it adds a touch of elegance to any dessert table.

Why You’ll Love This Recipe

The taste and texture of Chocolate Chip Cookie Dough Mousse are truly irresistible. Imagine creamy, luscious chocolate that melts in your mouth, perfectly complemented by bites of sweet and soft cookie dough scattered throughout. Each spoonful delivers a delightful burst of flavor that satisfies every sweet tooth. The carefully balanced chocolate richness ensures that your palate is delighted without being overwhelmed, making this dessert a favorite for all ages.

Convenience is another aspect that makes this mousse a winner. With no baking necessary, you can prepare this delicious dessert in under 30 minutes. It’s perfect for those unexpected guests or when you’re in a rush. Just mix, layer, and chill! Additionally, it’s a make-ahead dessert, allowing you to prepare it a day in advance, saving time on the day of your event.

From a nutritional standpoint, while this treat is indulgent, there are ways to balance it out with ingredient choices. Using high-quality chocolate can provide antioxidants. The cookie dough includes butter and brown sugar, which can be enjoyed in moderation for a sweet treat that doesn’t completely derail your diet.

Socially, Chocolate Chip Cookie Dough Mousse is a crowd-pleaser that sparks conversation and delight. Sharing this dessert not only brings joy to your guests but also encourages connection and laughter as they indulge in this comforting treat. Whether it’s a dinner party or a family gathering, this mousse is bound to elicit smiles and satisfied sighs.

Cost-effectiveness is inherent in this recipe as many of the ingredients are pantry staples. Chocolate chips, cream, and basic baking ingredients make this dessert accessible without straining your budget, proving that you don’t need to spend a fortune to create something magical.

Historical Background and Cultural Significance

Chocolate chip cookies, a quintessential American treat, originated in the 1930s with Ruth Wakefield’s famous recipe. The cookie dough concept often enjoyed adventures in popular culture, leading to delightful adaptations like this mousse. The allure of raw cookie dough has become a beloved indulgence, creating nostalgia and joy, particularly in childhood memories shared among friends and family.

The cultural significance of chocolate chip cookie dough is rooted in its comfort food status. As a dessert loved in American households, it evokes warmth and connection during gatherings and celebrations. The advent of cookie dough in various forms, including ice cream and edible variations, showcases its versatility and enduring popularity.

Over the years, the evolution of the recipe has expanded beyond traditional cookies. Innovative dessert makers have fused flavors and textures, leading to exciting new treats like this mousse. The pairing of silky chocolate with chewy cookie dough creates a fresh way to enjoy a classic favorite while exploring new dessert realms.

Regional variations of cookie dough recipes can be fascinating. Many cultures have adopted similar concepts, introducing unique ingredients based on local tastes. The explosion of dessert trends featuring cookie dough-based items has made this once simple recipe a culinary sensation across the globe.

Ingredient Deep Dive

Chocolate Chips: High-quality chocolate chips are essential for achieving a rich and satisfying flavor in your mousse. Dark chocolate offers a more intense cocoa kick and pairs excellently with the sweetness of cookie dough. The health benefits of dark chocolate, such as antioxidants and heart health, make it a preferable option. When shopping, seek out chocolate chips that have a high cocoa content and check for fair trade certifications. Store your chocolate in a cool, dry place to maintain its freshness, and look out for brands that offer chocolate alternatives suitable for various dietary needs.

Cookie Dough: The cookie dough in this mousse typically includes butter, sugar, flour, and chocolate chips. Each of these ingredients contributes to the overall flavor and texture. The butter imparts a rich base, while the sugar adds sweetness and moisture. To cater to different dietary preferences, consider using alternatives like coconut flour or almond flour for gluten-free options. Storing cookie dough is easy; keep it in an airtight container, and check for signs of spoilage like off smells or discoloration. When making substitutions, note that ingredient ratios might need adjustments to maintain the desired cookie dough texture.

Common Mistakes to Avoid

  • Not chilling the mousse long enough: Chilling is crucial for the mousse to set properly and achieve the desired texture. Plan to allow for adequate refrigeration time.
  • Using low-quality chocolate: The quality of chocolate greatly influences the flavor of the mousse. Opt for high-quality chocolate for the best results.
  • Overmixing the mousse: Gentle folding is essential to maintain the light and airy texture. Overmixing can lead to a dense mousse.
  • Skipping the sifting step for dry ingredients: Sifting helps incorporate air into the dry ingredients, preventing clumps and ensuring a smooth mousse.
  • Insufficient cream whipping: Make sure the heavy cream is whipped to stiff peaks to ensure the mousse maintains its structure.
  • Using too much flour in the cookie dough: This can yield a dry texture; stick to the precise measurement for a chewy finish.
  • Not allowing the mousse to rest: Letting the mousse rest enhances flavor as the ingredients meld together.
  • Serving too soon: While the temptation may be strong, letting it chill allows flavors to develop and the texture to improve.
  • Skipping the taste test: Always taste the mixture before serving; adjusting sweetness levels may be necessary as personal preferences vary.
  • Ignoring dietary restrictions: Be mindful of guests’ dietary needs and consider alternatives when preparing the mousse.

Essential Techniques

To create the perfect mousse, mastering the art of whipping cream is critical. It adds volume and lightness to the dessert. Begin with a chilled bowl and beat the cream at medium speed, gradually increasing to high. The goal is to achieve stiff peaks while avoiding overwhipping. The right visual cue is when the cream holds its shape and maintains a glossy sheen.

Folding is another key technique. It involves gently incorporating whipped cream into the chocolate mixture without deflating it. Using a spatula, fold the mixture in a gentle motion, cutting through the center and turning over. Common pitfalls include heavy-handed mixing which can ruin the mousse’s light texture. Look for well-integrated but airy results as your cue for success.

Pro Tips for Perfect Chocolate Chip Cookie Dough Mousse

Start with all ingredients at room temperature to ensure proper incorporation. Chilled heavy cream whips better, so keep that in the fridge until you’re ready to use it. For added flavor depth, consider using vanilla bean paste instead of extract. Optional toppings like whipped cream or chocolate shavings can enhance presentation. Layering the mousse and cookie dough in serving glasses not only looks beautiful but also allows guests to appreciate the contrast of textures. Ensure proper chilling time before serving to achieve the best flavor and consistency. Finally, don’t forget to enjoy the preparation process, as it can be just as delightful as consuming the dessert!

Variations and Adaptations

For regional variations, consider incorporating local flavors; for instance, adding spices like cinnamon can give the mousse a warm twist reminiscent of certain cultural desserts. Seasonal adaptations might involve infusing the mousse with peppermint extract during winter holidays or adding fresh berries in summer for a refreshing burst. Dietary modifications can cater to gluten-free lifestyles by substituting traditional flour for almond or coconut flour in the dough. Flavor variations could include using butterscotch chips instead of chocolate or adding caramel swirls in the mousse for a salted caramel effect. Texture modifications can take the form of incorporating crushed cookies or nuts into the layers for added crunch, while presentation alternatives can showcase the mousse in jars, parfait-style, for a trendy touch.

Serving and Presentation Guide

Plating techniques can elevate your dessert’s visual appeal. Use clear glasses to showcase the beautiful layers of chocolate mousse and cookie dough. Garnishing with whipped cream, chocolate shavings, or drizzles of caramel or chocolate sauce adds a special touch. Traditional accompaniments like fresh fruit can brighten the plate, while modern serving suggestions might include a side of espresso for a sophisticated pairing. Serve the mousse chilled but not ice-cold; aim for a refreshing temperature that enhances flavor without dulling it. Portion control is essential, especially when serving at parties; consider serving in smaller cups to encourage guests to enjoy multiple flavors.

Wine and Beverage Pairing

Pair the rich taste of Chocolate Chip Cookie Dough Mousse with a luscious dessert wine, such as a late harvest Riesling or a ruby port. These choices complement the mousse’s sweetness and enhance its chocolatey depth. For non-alcoholic alternatives, serve with a creamy iced coffee or a rich hot chocolate, echoing the dessert’s flavors. If pairing with tea, opt for a sweet chai or a vanilla-infused herbal tea that matches the mousse’s warmth. Always consider temperature upon serving; chilled wines should be slightly cooler than room temperature to highlight the desired sweetness without overwhelming flavors.

Storage and Shelf Life

To store Chocolate Chip Cookie Dough Mousse, keep it in airtight containers in the refrigerator. It can last up to three days while maintaining its freshness and integrity. Temperature requirements should be strictly maintained, ensuring the mousse remains chilled. For ease of access, consider separating the mousse and cookie dough into different containers if you anticipate leftovers. Signs of spoilage include separation and a change in texture or color, both clear indicators that it’s time to discard. If you need to reheat the dessert—though it is traditionally served chilled—make sure to do it gently to maintain texture and flavor balance. Freezing is not recommended due to the high cream content, which can alter texture upon thawing.

Make Ahead Strategies

Plan your prep timeline by making the mousse a day in advance. This allows optimal chilling time for flavors to mature. Store the mousse in the fridge while keeping the cookie dough separate until it’s time to serve to prevent moisture from affecting texture. To assess quality impact, prepare a small test batch to explore flavors and creaminess before serving at an event. When assembling, layer elements gradually to maintain visual appeal and texture integrity. If needed, components can be prepped and stored separately. Fresh elements, like whipped cream, can be added just before serving for a vibrant touch.

Scaling Instructions

Scaling this recipe can be easily done. To halve the recipe, divide each ingredient’s measurement by two, ensuring you keep the same method for preparation. Doubling or tripling the recipe is also simple; just multiply the ingredient quantities accordingly. However, consider adjusting the mixing bowl size and chilling containers to accommodate larger batches. Timing modifications may be necessary when increasing volume; while the prep remains the same, give extra time for chilling to ensure each portion sets adequately. For storage, be mindful that larger volumes might not fit within standard fridge arrangements.

Nutritional Deep Dive

From a macro perspective, this mousse primarily consists of carbohydrates from the cookie dough, fats from cream and butter, and some protein from milk. Micronutrient analysis reveals vitamins and minerals present in chocolate and dairy, while the sugar content should be monitored due to its high level. Remember the health benefits of dark chocolate and the need for balanced portion sizes to enjoy indulgent desserts without exceeding caloric intake. Weight management tips include savoring smaller portions and pairing the mousse with fresh fruit for added fiber to balance the dessert experience.

Dietary Adaptations

For gluten-free options, consider using almond flour or gluten-free all-purpose blends in place of traditional flour in the cookie dough. For dairy-free adaptations, vegan butter and coconut cream can create similar textures while maintaining flavor. This recipe can be made vegan by substituting aquafaba for whipped cream and using dairy-free chocolate chips. Low-carb variations may use sugar alternatives and reduce the flour. Keto enthusiasts can adapt the recipe further by opting for almond flour and low-carb sweeteners. Ensure to check each ingredient label for hidden allergens when catering to dietary needs.

Troubleshooting Guide

If you encounter texture issues, overwhipping the cream can lead to a grainy mousse, while underwhipping can yield a liquidy consistency—aim for stiff peaks. Flavor balance problems may arise from excessive sweetness; consider adding a pinch of salt or acid (like lemon juice) for contrast. If the mousse doesn’t set, ensure adequate chilling time is provided. Equipment challenges might include mixers malfunctioning; always have backups or hand-whisking as alternatives. Ingredient substitutions can lead to unexpected outcomes; rely on verified adaptations for the best results. Adjust timing based on the scale of your recipe, ensuring proper cooking and resting times for the best outcome.

Recipe Success Stories

The success of this recipe has led to rave reviews from the community, with many praising the delightful blend of flavors and textures. Variations of the mousse have inspired readers to create their twists, from adding mint to using white chocolate for unique presentations. User-generated variations have often resulted in catchy hashtags and social media shares, spreading the joy of this dessert beyond your kitchen. Photography tips include capturing the layered effect clearly to evoke the mousse’s deliciousness, showcasing its creamy texture and cookie pieces prominently.

Frequently Asked Questions

Can I use store-bought cookie dough? Absolutely! Using store-bought cookie dough is a time-saver and will still yield a delicious mousse.

Can this mousse be frozen? It is not recommended to freeze the mousse as it can alter the texture. It’s best enjoyed freshly made.

How can I make this mousse less sweet? You can reduce the sugar in both the mousse and cookie dough, or add a bit of salt for balance.

Can I make this recipe gluten-free? Yes! Use gluten-free flour blends or almond flour to replace regular flour.

What is the best way to serve this mousse? Serve in individual cups or jars for an elegant presentation, topped with whipped cream or chocolate shavings.

Can I add other mix-ins? Definitely; consider adding nuts, dried fruits, or using different chocolate varieties for unique flavors.

How long does this mousse stay fresh? This mousse can last up to three days in the refrigerator when stored properly in an airtight container.

Is this recipe suitable for kids? Yes! This mousse is a fun treat for kids; just ensure parents are aware of the ingredients used.

What’s the best way to store leftovers? Keep the mousse in an airtight container in the fridge to maintain its freshness.

Can I customize the chocolate? Certainly! You can use dark, milk, or white chocolate based on your preference.

Additional Resources

Explore related recipes such as classic chocolate mousse or no-bake desserts for more delightful treats. Technique guides on whipping cream and folding aerated mixtures provide foundational skills for dessert preparation. Ingredient information can enhance your understanding and choice among varieties, especially in chocolate types. Equipment recommendations for mixers and measuring tools can improve accuracy and ease during prep. Seasonal variations can inspire you to infuse seasonal fruits or spices into your dessert.

Join the Conversation

Share your creations on social media and engage with fellow dessert lovers by tagging photos of your Chocolate Chip Cookie Dough Mousse. Photography tips can enhance your recipe sharing, capturing the beautiful layers and inviting textures. Recipe reviews are vital for community engagement, allowing others to learn from your experiences. Feel free to suggest variations or adaptations that you’ve tried, as they can spark new ideas among fellow cooks. Invite others to share their thoughts or tips, building a community around this delicious dessert.

The Recipe

Chocolate Chip Cookie Dough Mousse

Serves: 6

Prep Time: 20 mins

Cook Time: 0 mins

Total Time: 20 mins

Kitchen Equipment Needed

  • Mixing bowls
  • Hand mixer or stand mixer
  • Spatula
  • Serving cups

Ingredients

  • 1 cup heavy cream
  • 1/2 cup granulated sugar
  • 1/2 cup brown sugar
  • 1 cup chocolate chips
  • 1/2 cup butter, softened
  • 1 cup flour
  • 1 tsp vanilla extract
  • 1/4 tsp salt

Directions

  1. In a large bowl, whip the heavy cream until stiff peaks form.
  2. In another bowl, mix the softened butter, granulated sugar, brown sugar, and vanilla until well combined.
  3. Gradually add the flour and salt to the butter mixture, mixing until combined.
  4. Fold in the chocolate chips to the cookie dough mixture.
  5. Gently fold the whipped cream into the chocolate mixture until just combined.
  6. Layer cookie dough and mousse in individual serving cups.
  7. Chill for at least 1 hour before serving.

Recipe Notes

  • Feel free to add nuts or additional flavorings!
  • To make gluten-free, use gluten-free flour for the cookie dough.
  • For a richer flavor, use dark chocolate chips.