Easy Cheesy Pepperoni Stromboli Recipe for Weeknight Dinners

Cheesy Pepperoni Stromboli: A Flavorful Twist on a Classic

⚖️
Difficulty
Medium

⏲️
Prep Time
20 mins

🕒
Cook Time
25 mins

⏱️
Total Time
45 mins

🍽️
Servings
4 servings

Cheesy Pepperoni Stromboli is a delightful dish that brings together the comforting flavors of pizza in a portable, hand-held form. Imagine biting into a golden-brown crust that gives way to a luscious mix of gooey mozzarella, savory pepperoni, and zesty marinara sauce. Perfectly suited for parties, game days, or a cozy family dinner, this stromboli promises to deliver satisfaction in every slice. It’s not just a meal; it’s a culinary experience that appeals to both kids and adults alike, making it a favorite for any occasion.

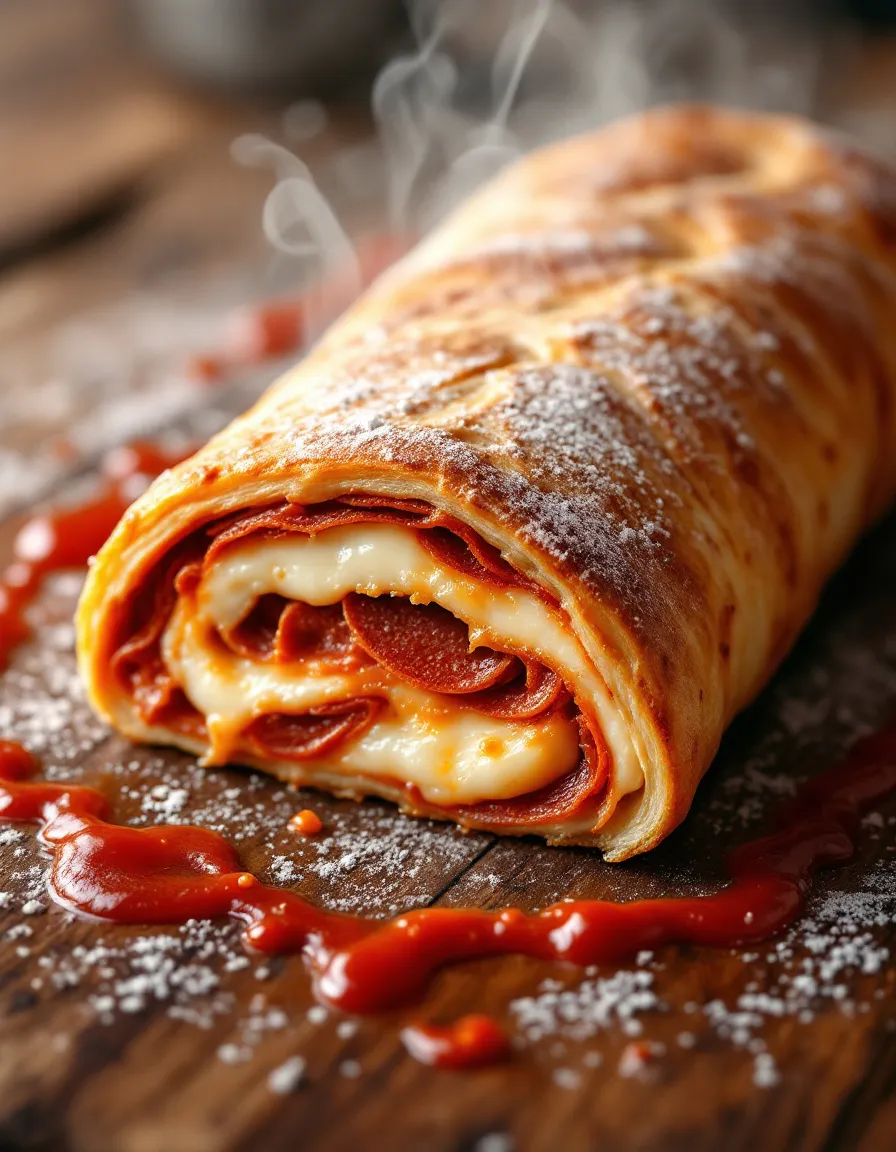
What makes this Cheesy Pepperoni Stromboli stand out is its incredible blend of textures and flavors. The rich cheese melts beautifully within the flaky, crispy outer dough, creating a mouthwatering harmony that keeps you coming back for more. There’s a wonderful contrast not only in taste but also in texture, with the combination of crunchy crust and soft, stringy interior capturing the unique essence of comfort food. Its aromatic profile, filled with notes of herbs and spices, fills your kitchen with an inviting scent that prepares you for a true treat.

Quick Recipe Highlights

  • Flavor Profile: A harmonious blend of savory pepperoni, creamy mozzarella, and a hint of fragrant Italian herbs.
  • Texture: Flaky, crispy crust with a warm and gooey interior that delivers a satisfying bite.
  • Aroma: Inviting scent of freshly baked bread with hints of garlic and Italian seasoning.
  • Visual Appeal: Beautifully golden-brown exterior, topped with enticing cheese and pepperoni peeking through.
  • Skill Level Needed: Perfect for home cooks of all levels, requiring basic dough preparation skills.
  • Special Equipment: A baking sheet or pizza stone for optimal cooking results.

Recipe Overview

  • Difficulty Level: This recipe is considered medium difficulty due to the dough preparation and assembly, making it perfect for those looking to elevate their cooking skills.
  • Category: A versatile dish, this stromboli fits comfortably within the categories of appetizers, snacks, or even a main course.
  • Cuisine: Drawing inspiration from Italian cuisine, stromboli has evolved to become a popular choice in American households, often tailored to suit various tastes.
  • Cost: With simple ingredients like pizza dough and cheese, this recipe remains budget-friendly while delivering maximum flavor.
  • Season: Cheesy Pepperoni Stromboli is perfect year-round, but it’s particularly enjoyable during the colder months when comfort food is a must.
  • Occasion: Ideal for casual gatherings like sports events, family dinners, and birthday parties.

Why You’ll Love This Recipe

Cheesy Pepperoni Stromboli offers an extraordinary taste and texture experience that will immediately satisfy your cravings. Each bite delivers an explosion of pepperoni and melted cheese wrapped in a crispy, soft crust. The combination of the savory and cheesy filling is impeccable, making this dish a true crowd-pleaser. Whether served as a snack or a main course, its delicious appeal is undeniable.

In terms of convenience, Cheesy Pepperoni Stromboli fits seamlessly into busy lifestyles. It can be made ahead of time and easily reheated, making it perfect for meal prep or last-minute gatherings. You can easily whip up this recipe on a weeknight, or prep it over the weekend to enjoy throughout the week. Plus, its fun, hand-held nature makes it great for sharing.

This dish is not only delicious but also offers nutritional benefits. The protein from the pepperoni and cheese, combined with nutrients from the dough, makes it a hearty option. You can also customize the filling with vegetables or leaner meats to make it more nutritious, accommodating various dietary preferences.

Socially, Cheesy Pepperoni Stromboli is fantastic for gatherings. It’s shareable and pairs beautifully with an array of dips, making it a hit at parties. The interactive nature of pulling apart the stromboli enhances the dining experience, encouraging conversation and enjoyment.

Finally, the cost-effectiveness of this dish is one of its greatest attributes. With common ingredients that are often on hand and minimal preparation, you can serve a delicious homemade meal without breaking the bank. It’s a delightful option for families looking to feed everyone without overspending.

Historical Background and Cultural Significance

The origin of stromboli traces back to the Italian immigrant communities in the United States. It is believed to have been created in the mid-20th century, particularly around the Philadelphia area, where pizzas and flatbreads were already popular. The name ‘stromboli’ is likely derived from the volcanic island of Stromboli in Italy, suggesting a fiery essence to this delightful creation.

Culturally, stromboli represents the fusion of traditional Italian flavors with the American penchant for convenience and portability. It captures the essence of Italian comfort food but has been adapted to meet the needs of American lifestyles, where quick and easy meals reign supreme.

Over the years, the recipe has evolved, with variations including different fillings, sauces, and even dough types. From classic pepperoni and cheese to adventurous combinations like buffalo chicken or vegetarian styles, stromboli showcases the creativity of home cooks and chefs alike.

In various regional adaptations, stromboli has taken on a life of its own. Different areas have their unique spin, whether it’s the addition of local specialties or the use of specific toppings, reflecting the diverse tastes found across the country.

Ingredient Deep Dive

Dough

The dough is the star of any stromboli, directly influencing the overall texture and flavor profiles. Traditionally, it reflects the rich history of Italian bread-making, characterized by its yeast-leavened properties. Nutritionally, homemade dough can offer better control over the ingredients, leading to a healthier option compared to store-bought varieties. When selecting dough, look for options with high-protein flour, resulting in a chewy yet crisp crust. Store any leftover dough in an airtight container in the refrigerator or freeze for later use.

Pepperoni

As a quintessential pizza topping, pepperoni adds a robust flavor that resonates through the entire stromboli. This cured sausage, rich in history, has become a staple in American cuisine. It’s rich in protein and provides a satisfying, savory element to your dish. When selecting pepperoni, aim for high-quality brands that use natural ingredients. Store them in the refrigerator, and they can last for weeks. If you’re looking for alternatives, turkey or vegetarian pepperoni can serve as delightful substitutes.

Cheese

The choice of cheese is crucial for achieving that gooey, melty interior, with mozzarella being the expeced star. With its mild flavor and incredible melting properties, mozzarella not only enhances the taste but also adds protein and calcium. Always choose fresh mozzarella for the best results, which can be stored in water or vacuum-sealed packaging. Options such as provolone or a blend of cheeses can also elevate flavor variations.

Marinara Sauce

A good marinara sauce can take your Cheesy Pepperoni Stromboli to the next level. With its rich and zesty profile, it complements the filling beautifully. A homemade sauce often features tomatoes, garlic, and herbs, providing nutritional benefits like antioxidants. When choosing marinara, opt for low-sugar varieties to maintain a healthy dish. Store homemade sauce in the fridge for up to a week or freeze for future use, adding convenience to your cooking.

Common Mistakes to Avoid

  • Not allowing the dough to rest: Skipping this step can lead to tough dough, making it hard to roll out.
  • Overfilling the stromboli: Adding too much filling can cause it to burst during baking.
  • Using cold ingredients: Ingredients like cheese and pepperoni should be at room temperature for the best melt.
  • Skipping preheating the oven: A hot oven ensures that your stromboli cooks evenly and crisps up nicely.
  • Not sealing the edges properly: A good seal prevents any leakage of the filling during baking.
  • Cutting too soon: Allow the stromboli to rest briefly before slicing; this helps maintain its shape and integrity.
  • Using low-fat cheese: While healthier, low-fat options may not melt as well, affecting the texture.
  • Neglecting to adjust baking time: If you’re making mini strombolis, they will require less time than a full-sized one.
  • Filling the dough when it’s still cold: This prevents proper cooking and can lead to soggy bread.
  • Not utilizing parchment paper: Parchment helps in easy removal and prevents sticking during baking.

Essential Techniques

The key technique to mastering Cheesy Pepperoni Stromboli is dough handling. Understanding how to knead and stretch the dough properly will ensure a perfect texture. Kneading develops gluten, which gives the stromboli its structure. To master this, perform the kneading on a floured surface and use the heel of your hand to push the dough away before folding it over itself – repeat this for about 10 minutes. The dough should be elastic and smooth when done.

Sealing the stromboli is critical for a successful bake. To achieve an airtight seal, pinch the edges of the dough together firmly and fold them down. This prevents any leakage of your delicious filling. A visual cue for success is a shiny, well-sealed edge that keeps the shape intact during baking. If you’re unsure, you can always use a fork to crimp the edges for added security.

Pro Tips for Perfect Cheesy Pepperoni Stromboli

1. For an extra crispy crust, place a baking stone in the oven while preheating.
2. Always use fresh ingredients for the best flavor impact; this changes the dish dramatically.
3. Sprinkle some Italian seasoning directly on the filling for enhanced flavor.
4. Experiment with different cheeses to create unique flavor profiles.
5. Brush the top of the stromboli with olive oil or melted butter for a beautiful finish.
6. If available, use a pizza peel to transfer the stromboli for easier handling.
7. Let the stromboli rest after baking before slicing; this makes for cleaner cuts.
8. Serve with a side of warm marinara sauce for dipping to enhance the overall experience.

Variations and Adaptations

Cheesy Pepperoni Stromboli is incredibly adaptable. You can swap out traditional pepperoni for other proteins like turkey or salami, or even go meatless with roasted vegetables for a vegetarian version. Consider a spicy twist by incorporating jalapeños or spicy sausage.

Seasonal adaptations can also bring freshness; during summer, adding seasonal vegetables like zucchini or bell peppers brightens up the dish. For holidays, festive spices or flavors—think cranberry and turkey for Thanksgiving—can revamp the dish while keeping its core elements intact.

Dietary modifications are simple; for a gluten-free option, use gluten-free flour or purchase pre-made gluten-free dough. Those on a low-carb diet can replace dough with cauliflower crust for a healthier twist.

If you want to adjust the cooking texture, consider baking the stromboli on a higher heat for a shorter time. Lastly, for unique presentation alternatives, cut the stromboli into pinwheels after baking for fun appetizers.

Serving and Presentation Guide

To expertly plate Cheesy Pepperoni Stromboli, consider slicing it diagonally to display the beautiful filling, revealing the gooey cheese and pepperoni within. Garnishing with fresh basil or parsley adds a vibrant pop of color and indicates freshness. Pair with small bowls of marinara sauce for dipping to enhance the overall experience.

Traditional accompaniments such as a side salad or antipasto platter create a balanced meal, while modern suggestions might include a charcuterie board showcasing different cheeses, meats, and olives. Pay attention to serving temperature, as stromboli is best enjoyed warm. Finally, consider portion control by suggesting each guest take one or two slices to avoid food waste and encourage sharing.

Wine and Beverage Pairing

For wine pairings, a medium-bodied red like Chianti complements the flavors of the pepperoni and cheese beautifully, enhancing the taste without overwhelming it. If you prefer white, a crisp Pinot Grigio offers a refreshing contrast that balances the richness of the stromboli.

For non-alcoholic alternatives, consider a sparkling water with lemon or a light Italian soda, echoing the fresh flavors found within the dish. If you want to pair with coffee or tea, an herbal tea like chamomile will provide a soothing balance post-meal, making it your perfect end to a hearty dish.

Storage and Shelf Life

For optimal storage, store leftover Cheesy Pepperoni Stromboli in an airtight container in the fridge, where it can last for up to three days. When reheating, placing it in a hot oven helps to restore the crispy texture. If you notice any signs of spoilage, such as unusual odors or mold, ensure to discard any questionable portions.

If you prefer to freeze, allow the stromboli to cool completely before wrapping it tightly in plastic wrap, followed by aluminum foil. This method prevents freezer burn and can extend its shelf life to about three months. When ready to eat, let it thaw in the refrigerator overnight and reheat as desired.

Make Ahead Strategies

If you’re planning to make Cheesy Pepperoni Stromboli ahead of time, prepare the dough and fillings a day in advance. You can also assemble the stromboli and store it wrapped in the fridge for up to 24 hours before baking, which enhances the flavors as they mingle.

Consider a prep timeline where you mix your dough in the morning, let it rise, and prepare your fillings while it rests. Assembly can be completed in the evening before you’re ready to bake. Pre-baked stromboli can be reheated or fresh elements, such as fresh herbs or a sprinkle of cheese, can be added before serving for a pop of freshness.

Scaling Instructions

If you’re looking to halve or double the Cheesy Pepperoni Stromboli recipe, adjust the ingredient measurements accordingly. For larger gatherings, consider tripling the recipe while ensuring there’s ample baking space for all the stromboli.

With equipment, ensure that you have enough trays or a larger baking sheet to accommodate the increased quantity, and keep an eye on the baking time, as larger amounts may require slight adjustments. Storing leftover dough will ensure you’ll have fresh, ready-to-use ingredients awaiting your next cooking day.

Nutritional Deep Dive

A typical serving of Cheesy Pepperoni Stromboli provides a good balance of macronutrients, offering protein from cheese and pepperoni, carbohydrates from the dough, and fats from the cheese. Each serving can contribute significantly to daily nutrient needs, providing energy for active lifestyles.

In terms of micronutrient analysis, this dish contains several vitamins and minerals essential for health, such as calcium and iron from cheese and pepperoni, supporting bone health and oxygen transport within the body. The variety of ingredients also enables the incorporation of vegetables for additional vitamins and fiber.

When considering dietary needs, portion control is crucial. This recipe can be quite filling; therefore, consider serving it alongside salads to reinforce nutritional intake; it helps to manage portion sizes and balance meals effectively. Lastly, Cheesy Pepperoni Stromboli can fit into a weight management plan if prepared with leaner meats or using whole wheat dough.

Dietary Adaptations

If you seek to adapt your Cheesy Pepperoni Stromboli for gluten-free diets, consider using almond flour or a gluten-free pizza dough substitute, ensuring the same delicious experience without compromising dietary needs. For those who are lactose intolerant, dairy-free cheese can work well, maintaining flavor and satisfaction.

Vegans can swap the pepperoni with plant-based alternatives, and nutritional yeast can provide a cheesy flavor without using animal products. Individuals following low-carb or keto diets can use a cauliflower crust to replace traditional dough, creating a light yet filling option.

For paleo followers, making a crust from almond flour or coconut flour provides a healthy alternative, while those on a low-FODMAP diet can use lactose-free cheese and gluten-free dough to enjoy this tasty treat.

Troubleshooting Guide

If you encounter texture issues with your Cheesy Pepperoni Stromboli, it may be due to over-kneading the dough, which can make it quite tough. For future bakes, ensure you knead just until the dough is elastic and smooth.

Flavor balance is important, so if your stromboli tastes bland, consider adding extra seasonings and experimenting with different cheese combinations to elevate the flavor profile. If you notice that the interior is undercooked while the exterior is perfectly browned, lower the heat and increase the cooking time gradually to ensure even cooking.

If equipment challenges arise, such as trouble rolling out the dough, remember to increase the flour on your workspace to prevent sticking. Time concerns can also be a factor; if pressed for time, consider using store-bought dough to streamline preparation without sacrificing flavor.

Recipe Success Stories

Cheesy Pepperoni Stromboli has garnered enthusiastic feedback from home cooks across various culinary communities. Many have customized the recipe, sharing their success stories of using unique fillings and flavors, turning this classic dish into something personal.

Readers love the flexibility of adapting the dish for family preferences, be it a favorite vegetable mix or different proteins. Plus, social media buzz has generated excitement around sharing photos of beautifully baked stromboli, showing just how accessible and fun this dish can be.

Community members have found great joy in hosting ‘stromboli nights,’ where friends and family gather to make their own variations. This personalized experience fosters connections and sparks creativity around cooking, reinforcing the recipe’s role in creating lasting memories.

Frequently Asked Questions

Can I use frozen dough for the stromboli?

Yes, you can use frozen dough. Just be sure to thaw it completely in the refrigerator before using it as directed in the recipe.

How do I store leftover stromboli?

Store leftover Cheesy Pepperoni Stromboli in an airtight container in the refrigerator for up to three days. Reheat in the oven for the best texture.

Can I make the stromboli ahead of time?

Absolutely! You can assemble the stromboli up to 24 hours in advance and refrigerate it before baking, making meal prep convenient.

What can I substitute for pepperoni?

If you’re looking for alternatives, turkey or chicken pepperoni, or even veggies can create a delicious twist on this classic dish.

Is it possible to freeze the stromboli?

Yes, you can freeze Cheesy Pepperoni Stromboli before or after baking. Wrap it tightly and store in the freezer for up to three months.

Can this recipe be made gluten-free?

Certainly! Use gluten-free dough or alternatives like almond flour for a gluten-free version of your Cheesy Pepperoni Stromboli.

How do I prevent the filling from leaking?

Make sure to seal the edges well. You can crimp them or brush with egg wash for an extra hold.

Can I add vegetables to the filling?

Yes! Adding vegetables like spinach, mushrooms, or peppers can enhance flavor and nutrition. Just be sure to chop them finely.

What is the best way to reheat stromboli?

For the best results, reheat in an oven set to 350°F (175°C) for about 10-15 minutes until warmed through.

Can this be served cold?

While Cheesy Pepperoni Stromboli is best served warm, you can enjoy it cold as a delightful snack or appetizer.

Additional Resources

For more delicious recipes similar to Cheesy Pepperoni Stromboli, explore our collection of homemade pizza recipes and creative pasta dishes. If you’re interested in perfecting your dough-making technique, check out our comprehensive guide on dough history and its utilization in various cuisines. For cooking enthusiasts, essential kitchen tools like pizza stones and mixing bowls can elevate your cooking game.

Join the Conversation

We’d love to hear about your Cheesy Pepperoni Stromboli experiences! Share your success stories and variations on social media, and participate in our community discussions. Don’t forget to share your photography tips or unique plating ideas, so we can all enjoy the vibrant journey of cooking together!

The Recipe

Cheesy Pepperoni Stromboli

Serves: 4 servings

Prep Time: 20 mins

Cook Time: 25 mins

Total Time: 45 mins

Kitchen Equipment Needed

  • Baking sheet or pizza stone
  • Mixing bowl
  • Rolling pin
  • Oven mitts
  • Knife or dough scraper

Ingredients

  • 1 pound pizza dough
  • 1 cup shredded mozzarella cheese
  • 1/2 cup sliced pepperoni
  • 1/2 cup marinara sauce
  • 1 tablespoon olive oil
  • 1 teaspoon Italian seasoning
  • Salt and pepper to taste

Directions

  1. Preheat your oven to 375°F (190°C) and prepare your baking sheet with parchment paper.
  2. Roll out the pizza dough on a floured surface into a rectangle shape.
  3. Layer the mozzarella cheese evenly over the dough, leaving about an inch around the edges.
  4. Add the sliced pepperoni on top of the cheese, followed by a drizzle of marinara sauce.
  5. Sprinkle Italian seasoning, salt, and pepper over the filling.
  6. Carefully roll the dough from one end to the other, sealing the edges tightly as you go.
  7. Place the stromboli seam-side down on the prepared baking sheet and brush with olive oil.
  8. Bake for 25-30 minutes or until golden brown and cooked through.
  9. Remove from the oven, let cool slightly, then slice and serve with more marinara sauce.

Recipe Notes

  • For added flavor, sprinkle grated Parmesan cheese on top before baking.
  • You can substitute pepperoni with your choice of meats or vegetables.
  • Feel free to add more spices according to your tastes.

Ultimate Crab and Shrimp Seafood Bisque – Creamy and Flavorful

Crab and Shrimp Seafood Bisque: A Luxurious Comfort Recipe

⚖️
Difficulty
Medium

⏲️
Prep Time
30 mins

🕒
Cook Time
30 mins

⏱️
Total Time
1 hr

🍽️
Servings
4 servings

Experience the ocean’s bounty with our Crab and Shrimp Seafood Bisque, a luxurious comfort food that warms both the soul and palate. This rich and creamy bisque captures the essence of fresh seafood, combined with aromatic herbs, spices, and a hint of decadence. Picture yourself enjoying this velvety soup, packed with tender crab and shrimp, while savoring every mouthful filled with savory flavors. This bisque not only satisfies your taste buds but also brings a sense of indulgence perfect for cozy family dinners or elegant gatherings.

The allure of this Crab and Shrimp Seafood Bisque lies in its complexity and depth of flavor. Infused with fragrant garlic, onions, and a touch of white wine, the base elicits a rich aroma that beckons you to dive in. Each spoonful envelops you with its creaminess, enhanced by a splash of sherry or brandy that leaves a delightful warmth. Not to mention the visual appeal, as the bright colors of the seafood contrast beautifully with the bisque’s creamy hue. Prepare to impress your guests with this culinary masterpiece!

Quick Recipe Highlights

  • Flavor Profile: This bisque features a delightful balance of sweetness from the crab, slight brininess from the shrimp, complemented by savory and umami-rich notes.
  • Texture: The bisque is luxuriously smooth, with tender pieces of seafood adding a pleasing contrast that makes each bite satisfying.
  • Aroma: Expect an enchanting aroma from sautéed onions and garlic paired with fresh seafood, creating a tantalizing invitation to enjoy your dish.
  • Visual Appeal: The presentation includes vibrant pieces of shrimp and crab floating in a creamy sea of bisque, garnished with fresh herbs for an elegant touch.
  • Skill Level Needed: While it’s a bit challenging for beginners, with careful attention to detail, anyone can master this exquisite seafood dish.
  • Special Equipment: A high-quality pot for simmering, an immersion blender for smooth consistency, and a fine mesh strainer to achieve that perfect texture.

Recipe Overview

  • Difficulty Level: This Crab and Shrimp Seafood Bisque presents a medium difficulty due to multiple cooking techniques involved, but it rewards you with beautiful results.
  • Category: It can be categorized as an appetizer or main course, perfect for special occasions or seafood lovers alike.
  • Cuisine: Originating from French culinary traditions, this dish showcases sophistication with its rich flavors and creamy texture, fusing techniques from classic bisques.
  • Cost: Expect to spend around $30, primarily on fresh seafood, which is worth the investment for a remarkable dining experience.
  • Season: Ideal for colder seasons, autumn and winter, when comforting flavors are most appealing and seafood is fresh.
  • Occasion: Perfect for hosting dinner parties, family gatherings, or as a standalone dish to impress your loved ones.

Why You’ll Love This Recipe

The Crab and Shrimp Seafood Bisque is not just a meal; it’s a delightful sensory experience. The marriage of flavors in the soup delivers a comfort that soothes the soul while tantalizing the palate. The sweet notes of fresh crab meet the briny complexity of shrimp, creating a balance that excites every sense. The garnish of herbs adds a burst of freshness that elevates the dish. Each bowlful is like a warm hug on a chilly evening.

When it comes to convenience, this seafood bisque is a winner. Preparing it is straightforward, allowing you to celebrate special moments without feeling overwhelmed in the kitchen. The ingredients can be easily sourced, and while the preparation is detailed, many steps can be completed in parallel. With a bit of organization, this dish comes together effortlessly, allowing you to spend more time enjoying it with friends and family.

Nutritionally, seafood is loaded with essential nutrients providing a wealth of health benefits. Packed with omega-3 fatty acids, vitamins, and minerals, enjoying crab and shrimp in bisque form means indulging in a delicious and nourishing meal. The creamy base provides additional comfort, making your seafood experience even more delightful.

This dish is also perfect for entertaining, whether it’s a holiday feast or a casual dinner with friends. The appealing presentation and rich aroma create an inviting atmosphere, making guests feel special. Sharing a luxurious bisque makes for conversational moments as you discuss flavors, ingredients, and your culinary adventures.

Lastly, the cost-effectiveness of this recipe makes it accessible for many households. While fresh seafood can be pricier, the use of ingredients like seasonings, broth, and cream keeps the overall cost manageable. In the end, cooking and enjoying this luxurious Seafood Bisque is not only a treat for you and your loved ones, but it also leaves you with a rewarding culinary experience without breaking the bank.

Historical Background and Cultural Significance

The origins of bisque can be traced back to the French coastal regions, where it was first made from fish stock in the early 18th century. As culinary techniques evolved, chefs began creating bisques using a broader range of seafood, leading to the development of crab and shrimp varieties. This versatile dish became a popular staple among seafood enthusiasts, highlighting the rich flavors found in coastal cooking.

In French culture, bisques symbolize a connection to the sea and the art of cooking. Traditionally reserved for special occasions or gatherings, bisque represents both indulgence and appreciation for fine ingredients. It embodies a spirit of hospitality and celebration, often taking center stage during intimate dinners or festive feasts.

Over time, various adaptations of seafood bisque emerged, reflecting local tastes and available ingredients. Different regions infused distinctive spices and cooking methods, creating a culinary tapestry showcasing seafood’s bounty. Whether it’s a lobster bisque from Maine or a creamy crab version from the Gulf Coast, each variant tells a unique story of its place and heritage.

In contemporary cuisine, seafood bisque has evolved further, with modern chefs experimenting with textures, flavors, and presentation. The integration of creative elements has made cream-based bisques popular on restaurant menus, transforming traditional recipes into innovative gastronomic experiences. As we savor each spoonful of Crab and Shrimp Seafood Bisque, we’re indulging in not just a meal but in the rich tapestry of history it represents.

Ingredient Deep Dive

Crab, a star ingredient in this bisque, is celebrated not only for its sweet and delicate flavor but also for its nutritional benefits. Rich in protein and minerals like zinc and selenium, crab is a powerhouse of health. When selecting crab, look for fresh, sweet-smelling options, ideally sourced from sustainable fisheries. Store fresh crab in the refrigerator and consume it within a couple of days or opt for frozen to extend its shelf life.

Shrimp adds another layer of flavor and texture to the bisque. Known for being an excellent source of low-calorie protein, shrimp also contains vital nutrients such as iodine and vitamin B12. When choosing shrimp, look for firm, translucent flesh without a strong odor. Proper freezing and thawing of shrimp are essential for maintaining its quality; store in an airtight container to prevent freezer burn.

  • **Avoid overcooking seafood:** Overcooked shrimp and crab can become rubbery. Cook seafood just until it’s opaque and cooked through.
  • **Don’t skip the aromatics:** Ingredients like garlic and onions build a flavorful base. Sauté them adequately for a rich flavor.
  • **Watch the cream temperature:** Adding cold cream directly can curdle it. Temper the cream by slowly whisking in some of the hot bisque base.
  • **Use fresh seafood:** Fresh crab and shrimp yield the best flavor. Avoid pre-cooked options unless necessary.
  • **Blend carefully:** When pureeing, blend to your desired consistency; avoid over-blending if you want some texture.
  • **Adjust seasonings:** Taste your bisque periodically and adjust the seasoning to achieve the desired flavor balance.
  • **Utilize quality stock:** A rich seafood stock will significantly enhance the depth of flavor in your bisque.
  • **Garnish thoughtfully:** Don’t overlook garnish; adding fresh herbs at the end brightens the dish.

Essential Techniques

Sautéing aromatics is integral to building the flavor base of your seafood bisque. Proper sautéing releases the essential oils from onions and garlic, creating a fragrant foundation for your soup. To master this technique, always start with pre-heated oil in a sturdy pot, allowing the vegetables to soften and caramelize before proceeding with the recipe. Visual cues, such as a slight golden color, indicate readiness and enhance your overall flavor.

Blending the bisque to a silky smooth consistency is key to achieving the luxurious texture associated with seafood bisques. Using an immersion blender allows you to control the smoothness while incorporating all ingredients evenly. Blend gradually and check the texture often, avoiding the common pitfall of over-blending, which can lead to a gummy or overly processed consistency. Aim for a creamy soup with visible bits of seafood in each spoonful.

Pro Tips for Perfect Crab and Shrimp Seafood Bisque

1. Invest in high-quality seafood for the best flavor and freshness. Look for seasonal offerings and local sources when possible.

2. Use homemade seafood stock for a richer, more complex flavor; it elevates the bisque dramatically.

3. Season throughout the cooking process, tasting and adjusting as you go to build layered flavors.

4. Finish the bisque with a splash of sherry or brandy to add depth; it harmonizes beautifully with seafood.

5. For added texture, reserve some cooked shrimp and crab to stir in just before serving.

6. Garnish with freshly chopped herbs or microgreens for a pop of color and an herbal aroma.

7. Consider adding a touch of cayenne or hot sauce for a kick that contrasts beautifully with the creamy bisque.

8. Serve with crusty bread for dipping, enhancing the experience of your luxurious bisque.

Variations and Adaptations

Regional variations of seafood bisque can include different types of crustaceans, such as lobster or crayfish, reflecting the local seafood culture. In certain coastal regions, chefs might incorporate local shellfish, highlighting the unique flavors found in their waters. Seasonal adaptations may also feature vegetables like corn or tomatoes to complement the bisque, adding freshness depending on what’s in season.

For those with dietary needs, adaptations are possible as well. Making a lighter version with almond or coconut milk can cater to those seeking dairy-free alternatives without sacrificing too much creaminess. Alternatively, you could create a vegan version by using plant-based seafood alternatives in combination with a rich vegetable broth.

Serving and Presentation Guide

For the perfect presentation, consider using wide, shallow bowls to showcase the luxurious bisque, allowing the seafood morsels to be visible. Garnishing is essential; a sprinkle of freshly chopped parsley or chives not only enhances the visual appeal but also adds a fresh burst of flavor that cuts through the richness. Traditional accompaniments such as crusty baguette slices or garlic bread are perfect for dipping into the luscious bisque.

When serving, ensure the bisque is piping hot, which adds to the overall comforting experience. Consider offering an array of toppings, such as lemon wedges or unique spices, allowing guests to personalize their servings. This interactive approach not only makes a lovely impression but also enhances the communal experience of enjoying this luxurious dish.

Wine and Beverage Pairing

A crisp white wine, such as Sauvignon Blanc or a buttery Chardonnay, pairs beautifully with crab and shrimp bisque, elevating the dining experience. The acidity in white wine complements the creaminess of the soup and the natural sweetness of seafood, creating a harmonious balance. For non-alcoholic alternatives, a sparkling water with a splash of lemon can refresh the palate without overpowering the dish’s flavors.

For coffee lovers, a rich espresso or a light herbal tea can serve as a delightful finish. The warmth from these beverages can comforting counterpoints to the creamy bisque. When serving beverages, consider temperature; whites should be chilled, while coffee and tea should always be hot to enhance enjoyment.

Storage and Shelf Life

Proper storage is vital to maintaining the quality of your seafood bisque. Store leftovers in an airtight container in the refrigerator for up to three days. To avoid spoilage, ensure the bisque cools completely before sealing it. For longer storage, consider freezing; seafood bisque can be frozen for up to three months, maintaining its flavor and texture.

When reheating, do so gently over low heat, stirring frequently to avoid curdling the cream. If the bisque has thickened upon cooling, add a splash of seafood stock or water during reheating to reach the desired consistency. Always check for signs of spoilage before consuming leftovers; if there’s an off smell or unusual texture, it’s best to discard it.

Make Ahead Strategies

To streamline your cooking process, consider preparing components of the bisque ahead of time. The base stock and aromatics can be cooked and stored in the refrigerator up to a day in advance. This allows flavors to meld and enhances the overall taste.

When making ahead, assemble the bisque but refrain from adding seafood until you are ready to serve. This ensures the seafood stays tender and fresh. When you’re ready to enjoy, reheat the base, add your seafood, and cook until friendly and heated through, ensuring a delightful dining experience.

Scaling Instructions

If you wish to halve the recipe, simply divide all ingredients by two, ensuring to maintain the same techniques. Doubling or tripling the recipe is also straightforward; however, be cautious with the size of your cooking pot, ensuring enough room for all ingredients.

When scaling up the recipe, you may need to adjust cooking times slightly; larger quantities can take longer to heat and simmer. A larger batch may require more seasoning, so taste throughout the cooking process to achieve a balanced flavor.

Nutritional Deep Dive

This Crab and Shrimp Seafood Bisque is not only indulgent but also nutritious. A standard serving contains about 350 calories, rich in protein courtesy of the crab and shrimp while also supplying healthy fats from the cream. The seafood also contributes essential minerals and vitamins, making it a nutrient-dense option ideal for seafood lovers.

Incorporating seafood into your diet provides numerous health benefits, including heart health support due to the omega-3 fatty acids found in both crab and shrimp. Additionally, these lean proteins can assist in weight management, making this bisque a delicious yet health-conscious choice. When enjoying this dish, portion control is key, as it is rich and filling.

Dietary Adaptations

For those on a gluten-free diet, simply ensure that any broths or additional ingredients used are labeled gluten-free. You can create a creamy bisque without the use of flour for thickening. Instead, blending the bisque until creamy naturally provides the desired consistency.

For a dairy-free adaptation, consider using coconut milk or almond milk instead of heavy cream; this substitution keeps the bisque creamy without dairy products. If you’re looking for a vegan option, explore plant-based seafood alternatives that mimic the texture and taste of crab and shrimp, allowing you to enjoy a plant-forward twist.

Troubleshooting Guide

If you encounter texture issues, such as a grainy mouthfeel, it may stem from the cream being added too quickly. Always temper your cream before adding it to the hot mixture, ensuring that it blends smoothly. If the bisque seems too thin, you can simmer it down until it reduces to your desired consistency.

For flavor imbalance, ensure adequate seasonings are added throughout the cooking process. If it feels bland, a splash of vinegar or citrus can brighten the flavors effectively. Pay attention to temperature problems when reheating; it’s crucial to reheat gently over low heat to avoid curdling any dairy ingredients.

Recipe Success Stories

Community feedback has been overwhelmingly positive for this Crab and Shrimp Seafood Bisque. Many cooks share how impressed their families have been with the flavors and presentation, often receiving requests for the recipe. Variations like adding a touch of saffron or a splash of lemon juice have also sparked creative ideas in the kitchen.

Readers have actively contributed their suggestions, with some adding their twists—like introducing spices for a kick or incorporating seasonal vegetables. These adaptations not only enhance the original recipe but also foster excitement and innovation among home cooks.

Frequently Asked Questions

Can I make this seafood bisque ahead of time?
Yes! The bisque can be made ahead, allowing flavors to meld. It’s best to add seafood right before serving for optimal freshness.

What can I substitute for crab?
If crab is unavailable, consider using lobster or other shellfish, or even a mix of seafood, to maintain depth of flavor.

How long does the bisque last in the refrigerator?
Stored in an airtight container, the bisque will last up to three days in the refrigerator.

Can I freeze the bisque?
Yes, this seafood bisque freezes well for up to three months. Ensure it’s cooled completely before sealing and freezing.

Is this bisque spicy?
No, this bisque has a mild flavor, but feel free to spice it up with cayenne or hot sauce to your liking!

What type of seafood works best?
Fresh crab and shrimp are ideal, but feel free to experiment with other seafood types like scallops or clams.

Do I have to use a blender?
Yes, blending helps achieve the creamy texture desired in bisque. An immersion blender is recommended for convenience.

How can I make it dairy-free?
You can replace cream with coconut or almond milk, creating a delicious dairy-free version while still maintaining creaminess.

What dishes pair well with this bisque?
This bisque pairs wonderfully with crusty bread or a light salad, making for a lovely dinner experience.

Can I add more vegetables?
Absolutely! Feel free to incorporate vegetables like corn or bell peppers for added flavor and nutrition.

How can I ensure my seafood is fresh?
Buy seafood from reputable suppliers, checking for clear eyes, fresh smell, and firm texture to ensure quality.

Additional Resources

Explore related recipes that celebrate the flavors of the sea, including Lobster Roll Sliders or Shrimp Scampi. Consider delving into preparation techniques for seafood to enhance your cooking skills. Furthermore, familiarize yourself with the health benefits of various seafood options to expand your culinary knowledge and optimize your meal planning.

Join the Conversation

Engage with us by sharing your versions of this Crab and Shrimp Seafood Bisque on social media. Use the hashtag #SeafoodBisqueSuccess to connect with fellow culinary enthusiasts. Don’t forget to capture mouthwatering photos showcasing your finished dish. We love hearing your feedback, and together we can create a community of recipe lovers eager to experiment and learn!

The Recipe

Crab and Shrimp Seafood Bisque

Serves: 4 servings

Prep Time: 30 mins

Cook Time: 30 mins

Total Time: 1 hr

Kitchen Equipment Needed

  • Large pot
  • Immersion blender (or regular blender)
  • Fine mesh strainer
  • Wooden spoon

Ingredients

  • 1 lb fresh crab meat
  • 1 lb shrimp, peeled and deveined
  • 1 medium onion, chopped
  • 2 cloves garlic, minced
  • 1/4 cup dry white wine
  • 4 cups seafood stock
  • 1 cup heavy cream
  • 2 tablespoons olive oil
  • Salt and pepper to taste
  • Fresh herbs for garnish (parsley or chives)

Directions

  1. In a large pot, heat olive oil over medium heat. Add onions and garlic, sautéing until translucent.
  2. Pour in white wine, allowing it to simmer until reduced by half.
  3. Add seafood stock and bring to a gentle boil.
  4. Reduce heat and stir in heavy cream, simmering for 10 minutes.
  5. Use an immersion blender to puree the bisque until smooth, or transfer in batches to a regular blender.
  6. Add crab and shrimp to the pot, cooking until shrimp are pink and crab is heated through.
  7. Adjust seasonings with salt and pepper, then serve hot garnished with fresh herbs.

Recipe Notes

  • For spiciness, consider adding cayenne pepper while sautéing the onions.
  • Any leftover bisque can be refrigerated for up to three days; reheat gently.
  • Consider using frozen seafood if fresh is unavailable; the quality will still hold up.
  • Feel free to customize with seasonal vegetables for added nutrition.

Delicious Creamy Spicy Buffalo Ranch Pasta Recipe to Savor

Creamy Spicy Buffalo Ranch Pasta: A Flavor-Packed Delight

⚖️
Difficulty
Easy

⏲️
Prep Time
10 mins

🕒
Cook Time
20 mins

⏱️
Total Time
30 mins

🍽️
Servings
4 servings

Creamy Spicy Buffalo Ranch Pasta is a deliciously easy dish that combines the rich flavors of buffalo sauce, ranch dressing, and tender pasta for a satisfying meal. This recipe is perfect for any night of the week, offering vibrant flavors that excite your taste buds. Creamy cheese mingled with the heat of buffalo sauce creates a comforting yet zesty pasta dish that everyone will crave, making it a go-to for family dinners or casual get-togethers.

The intriguing blend of spices and creamy textures in this pasta dish make it a guaranteed crowd-pleaser. Each bite is a delightful orchestration of creamy and spicy elements that will have your guests reaching for seconds. Not only does this pasta embody wholesome flavors, but it also provides a great opportunity to experiment with textures, enhancing the overall dining experience.

Quick Recipe Highlights

  • Flavor Profile: Bold, creamy, and tangy with a kick of spice from the buffalo sauce.
  • Texture: Silky smooth sauce enveloping al dente pasta provides an exquisite mouthfeel.
  • Aroma: Savory notes of garlic and onion mingle with spicy buffalo undertones.
  • Visual Appeal: Vibrant orange sauce beautifully contrasts with the white pasta.
  • Skill Level Needed: Ideal for beginners and seasoned cooks alike; this recipe requires minimal techniques.
  • Special Equipment: Simply require a pot for boiling pasta and a skillet for sauce preparation.

Recipe Overview

  • Difficulty Level: This creamy spicy buffalo ranch pasta is touted as easy, allowing cooks of all skill levels to shine.
  • Category: Perfect for main dishes or hearty sides, it suits any meal occasion.
  • Cuisine: Influenced by American comfort food with a twist, it resonates with buffalo wing enthusiasts.
  • Cost: Easily prepared with affordable ingredients, keeping your budget intact.
  • Season: Enjoyable year-round, but especially comforting during cooler months.
  • Occasion: Delightful for game days, casual dining, or potluck gatherings.

Why You’ll Love This Recipe

This creamy spicy buffalo ranch pasta is more than just a meal; it’s a celebration of flavor and convenience. The spiciness of the buffalo sauce celebrates the culinary boldness, while the creaminess speaks to the comfort of home. Every forkful delivers an enjoyable combination of zest and satisfaction that few other pasta dishes can match.

The preparation process is remarkably easy, with no complicated techniques required. In just 30 minutes, you can create a dish that feels gourmet yet is simple enough for busy weeknights. With just a few ingredients, the high reward to preparation time ratio makes it a favorite in every kitchen.

Nutritionally, this dish is balanced – it features carbohydrates from the pasta, protein from any added chicken or shrimp, and healthy fats from the creamy sauce. This makes it a great meal option that can keep you energized throughout the day.

Creamy spicy buffalo ranch pasta also excels in its social and entertaining value, making it a hit when serving friends or family. Whether it’s a casual dinner or a special occasion, this dish offers a warm, inviting touch that keeps guests coming back for more.

Finally, the cost-effectiveness of the recipe cannot be overlooked. The straightforward ingredients are inexpensive yet yield a rich, satisfying meal that feels indulgent.

Historical Background and Cultural Significance

Buffalo sauce originated in Buffalo, New York, and has quickly become a staple in American cuisine. Its roots can be traced back to the iconic Buffalo wings created in the 1960s at a local bar. This dish – creamy spicy buffalo ranch pasta – is a modern twist on the classic flavors found in those wings, giving pasta lovers a taste of that tradition.

The cultural significance of buffalo sauce cannot be overstated; it represents a fusion of American culinary innovation and comfort food. Over the years, it has evolved from a bar snack into a culinary phenomenon incorporated into everything from dips to gourmet entrees.

As culinary creativity blooms, adapting buffalo flavors into pasta showcases the evolution of comfort food. This recipe takes a traditionally savory flavor and reimagines it for family-style dining, breathing new life into how we enjoy these cherished tastes.

Regional variations of buffalo sauce are abundant, with each area putting its unique spin on the basic recipe. This gives rise to many flavorful adaptations, allowing cooks from all backgrounds to incorporate their personal taste into the dish.

Ingredient Deep Dive

Buffalo Sauce: Initially made with just three ingredients – hot sauce, butter, and vinegar – buffalo sauce has become an essential condiment in many households. Its importance lies in delivering a fiery punch that transforms dishes and enhances flavors. When choosing a buffalo sauce, look for varieties without high fructose corn syrup for a healthier option.

Pasta: The backbone of this recipe, pasta offers numerous health benefits, being a great source of carbohydrates. When selecting pasta, opt for whole grain or vegetable-infused options for additional nutrients. Proper cooking results in a satisfying texture, making it essential to monitor the cooking time closely.

Common Mistakes to Avoid

  • Using too much buffalo sauce can overwhelm the dish. Start with a small amount and add more to taste.
  • Overcooking the pasta makes it mushy. Always follow the package instructions for al dente results.
  • Not letting the sauce simmer long enough can lead to a watery consistency. Allow it to thicken for a richer flavor.
  • Skipping the seasoning can result in bland pasta. Taste and adjust seasonings during the cooking process for depth.
  • Not using fresh herbs or last-minute garnishes can affect presentation. Fresh chives or parsley enhance both flavor and appearance.
  • Rushing the preparation – the sauce benefits from a few extra minutes to develop flavor.
  • Using cold ingredients can hinder the sauce’s emulsification. Make sure your ingredients are at room temperature before combining.
  • Neglecting to turn off the heat when adding dairy can lead to curdling—always reduce the heat before adding cream or cheese.
  • Not tasting along the way means missing opportunities to customize the flavors.
  • Not pairing it with appropriate sides can leave an incomplete meal; consider a salad or bread to complement.

Essential Techniques

Cooking Pasta: Cooking pasta properly is vital for the best texture. Always use plenty of boiling salted water, adding pasta only once it reaches a full boil. Stir occasionally to prevent sticking, and taste periodically to achieve your desired doneness. The perfect pasta should be firm yet tender.

Making a Creamy Sauce: Creating a creamy sauce requires balancing heat with the addition of dairy. Gradually whisk in heavy cream or cheese over low heat to prevent curdling. Emulsifying the sauce can lead to a luscious consistency, ensuring a cohesive blend of flavors.

Pro Tips for Perfect Creamy Spicy Buffalo Ranch Pasta

1. Use freshly shredded cheese for better melting and flavor compared to pre-packaged alternatives.
2. Customize the heat level by adjusting the amount of buffalo sauce—and consider adding a touch of honey if you prefer it sweeter.
3. Enhance depth by adding sautéed onions and garlic to the butter before incorporating the buffalo sauce.
4. For extra crunch, top with panko breadcrumbs toasted in a little olive oil before serving.
5. Experiment with different pasta shapes to change the eating experience; small shells or penne can hold sauce beautifully.
6. Add cooked chicken or shrimp for extra protein and a heartier meal.
7. Allow leftovers to sit overnight in the fridge; the flavors deepen significantly.
8. For a vegetarian version, use roasted vegetables like bell peppers or zucchini.

Variations and Adaptations

For a regional twist, consider adding green chiles for a southwestern flavor. You could switch out pasta for spiralized zucchini for a healthy, low-carb alternative. For seasonal adaptations, toss in fresh, sautéed spring vegetables like asparagus or peas when they are at their peak.

If you’re watching your dietary intake, substitute regular pasta with gluten-free options and incorporate dairy-free cream for a vegan version. Using turkey or vegan buffalo sauce can cater to specific dietary preferences without sacrificing flavor.

For a gourmet touch, consider finishing the dish with a sprinkle of blue cheese or crumbled feta, enhancing both taste and presentation.

Serving and Presentation Guide

Elegant plating can elevate this dish significantly. Use a large shallow bowl to showcase your creamy spicy buffalo ranch pasta. Garnish each serving with a sprinkle of fresh herbs for color and flavor, or add a swirl of extra buffalo sauce for visual appeal.

Passing around garlic bread or a crisp salad can round out the meal beautifully, making it a complete dining experience. Consider serving it warm, as the dish is best enjoyed fresh, allowing the creamy sauce to shine. Portion control is also key; aim for even servings to keep guests satisfied without overwhelming them.

Wine and Beverage Pairing

For those who enjoy wine, consider a chilled Riesling or a Sauvignon Blanc that can enhance the dish’s spicy notes. The sweetness of the Riesling complements the buffalo sauce nicely. Non-alcoholic options could include sparkling lemonade or a refreshing iced tea to balance the meal’s richness.

If you’re a coffee enthusiast, a dark roast brew served at a cooler temperature can provide an interesting contrast to buffalo flavors. Remember to serve your beverages chilled, ensuring a refreshing counterpoint to the dish.

Storage and Shelf Life

To store leftover creamy spicy buffalo ranch pasta, allow it to cool initially before transferring it to an airtight container. It can be kept in the fridge for up to 3-4 days. Ensure it is reheated adequately, either in the microwave or on the stove with a splash of cream for added moisture.

If you need to store it longer, consider freezing it in meal-sized portions. Ensure to use freezer-safe containers, labeling them with the date for reference. Thaw overnight in the fridge before reheating for optimal quality.

Make Ahead Strategies

To lighten the load on busy nights, prepare parts of the dish ahead of time. Cook the pasta and sauce separately, storing them in the fridge. When you’re ready to eat, combine them in a skillet until warmed through.

Alternatively, you can make the entire dish a day in advance. Many people find that letting the flavors meld improves the overall depth of the dish. Just be aware that you may need to add a little extra cream when reheating to maintain the sauce’s original consistency.

Scaling Instructions

If you’re looking to half the recipe, simply adjust the ingredients accordingly and maintain the same cooking times, as the process remains the same. For larger gatherings, doubling or tripling the recipe might be necessary; consider using a larger pot to fit more pasta and sauce comfortably.

Adjust your cooking times slightly if needed, ensuring not to overcrowd the pan while preparing the sauce. Planning storage for leftovers can be crucial as well, ensuring you have the right containers ready for whatever portion size you prepare.

Nutritional Deep Dive

With a perfect mix of macronutrients, this creamy spicy buffalo ranch pasta primarily consists of carbohydrates from the pasta, fats from the creamy sauce, and proteins if meat is added. Each component plays a role in providing energy, aiding in muscle repair, and representing a well-balanced meal.

Micronutrient analysis will vary depending on the specific ingredients used. This dish can provide calcium from dairy, vitamin A from vegetables and sauces, and a healthy amount of fiber based on pasta choice. Understanding each ingredient’s role can help in tailoring servings to meet dietary needs.

Dietary Adaptations

Creating a gluten-free version of creamy spicy buffalo ranch pasta is doable by using gluten-free pasta substitutes. For those avoiding dairy, try substituting regular cream with coconut or cashew cream to keep the recipe creamy without dairy.

For vegans, simply omit chicken and use plant-based buffalo sauce alongside hearty vegetables for texture. Making it low-carb is feasible by using zucchini noodles or spaghetti squash as alternatives to traditional pasta, allowing for a nutritious, flavorful meal.

Troubleshooting Guide

If your pasta turns out too sticky, ensure you are using enough boiling water and stirring occasionally while cooking to prevent clumping. For a bland sauce, consider adding a pinch of salt or fresh herbs to brighten flavors.

In case the sauce is too thick, adding a bit of pasta water can help loosen it without losing flavor. An overly spicy dish can benefit from a dollop of sour cream or yogurt to balance the heat.

Recipe Success Stories

The creamy spicy buffalo ranch pasta has garnered rave reviews from friends and family alike for its delightful taste and easy preparation. Many have successfully adapted the recipe to cater to their dietary preferences, sharing personal twists that retain the essence of the dish.

Readers often recommend pairing it with sides like garlic bread or salads to create a complete meal experience. Those who share their culinary photos on social media highlight the vibrant colors and creamy texture, showcasing how visually appealing this pasta can be.

Frequently Asked Questions

Can I make this creamy spicy buffalo ranch pasta ahead of time? Yes, you can prepare the pasta and sauce separately and combine them just before serving, or make the dish a day in advance and reheat before serving.

Is there a vegetarian version of this recipe? Absolutely, simply omit any meat or chicken and incorporate more vegetables for texture. You can also explore plant-based buffalo sauce.

What kind of pasta works best with this dish? Any pasta shape can work well, but penne or fusilli are fantastic as they hold onto the sauce effectively.

Can I freeze the leftovers? Yes, this dish freezes well. Just ensure it cools completely before transferring it to an airtight container for long-term storage.

How can I make it less spicy? Reduce the amount of buffalo sauce used or add creamy elements like sour cream to cool it down.

What can I serve with this pasta? Complement the dish with a simple green salad, garlic bread, or steamed vegetables for a complete meal.

How long can I keep leftovers in the fridge? Leftovers can typically be stored in the refrigerator for about three to four days.

Can I substitute the ranch dressing? Yes, you can use any creamy dressing, including Caesar or blue cheese, depending on preference.

Is this dish kid-friendly? Yes, the creamy sauce and pasta appeal to children, making it a family-friendly option, especially if the spice level is adjusted.

Can I add protein to this pasta? Definitely! Grilled chicken, shrimp, or even beans can be delicious additions enhancing nutritional value and flavor!

Additional Resources

Looking for more flavor-packed recipes? Check out our section on pasta dishes or explore a collection of sauces to elevate your next meal. Consider reading guide articles about essential cooking techniques or a deep dive into pantry staples to ensure a well-stocked kitchen.

Engaging with reader communities could also lead to discovering new adaptations of your favorite dishes, nurturing recipes that bring people together.

Join the Conversation

We invite you to share your experiences with this creamy spicy buffalo ranch pasta! Post pictures on social media, leave reviews for others, and engage with fellow cooking enthusiasts. Your suggestions for variations might inspire others to discover their favorite adaptations of this delightful pasta recipe.

Gathering feedback encourages continued experimentation, allowing everyone to find joy in the kitchen creating personalized versions of this exquisite dish.

The Recipe

Creamy Spicy Buffalo Ranch Pasta

Serves: 4 servings

Prep Time: 10 mins

Cook Time: 20 mins

Total Time: 30 mins

Kitchen Equipment Needed

  • Pasta pot
  • Skillet
  • Measuring cups and spoons
  • Colander
  • Whisk

Ingredients

  • 12 oz pasta of choice
  • 1 cup buffalo sauce
  • 1 cup ranch dressing
  • 1 cup heavy cream
  • 1 cup shredded cheese (cheddar or mozzarella)
  • Salt and pepper to taste
  • Optional: cooked chicken, shrimp, or veggies for added protein

Directions

  1. Cook the pasta according to package instructions until al dente.
  2. In a skillet over medium heat, combine buffalo sauce, ranch dressing, and heavy cream. Stir to emulsify.
  3. Bring to a simmer, allowing it to thicken slightly while stirring occasionally.
  4. Add shredded cheese gradually, mixing until melted and creamy.
  5. Toss the cooked pasta into the sauce, coating evenly with flavor.
  6. Serve warm, garnished with additional cheese or herbs if desired.

Recipe Notes

  • Adjust the level of buffalo sauce based on your heat preference.
  • Can be made ahead and stored in the refrigerator for up to 4 days.
  • For added nutrition, consider tossing in seasonal vegetables when pasta is combined with the sauce.

Easy Baked Salmon Meatballs with Creamy Avocado Sauce

Baked Salmon Meatballs with Avocado Sauce: A Flavor-Packed Delight

⚖️
Difficulty
Medium

⏲️
Prep Time
20 mins

🕒
Cook Time
15 mins

⏱️
Total Time
35 mins

🍽️
Servings
4

Discover the delightful combination of flavors and textures with these Baked Salmon Meatballs served alongside a creamy avocado sauce. With their golden-brown exterior and tender, flaky interior, these meatballs offer a comforting yet nutritious twist on traditional meatballs. The freshness of the avocado sauce not only enhances the flavor but provides a healthful element, making this dish a perfect choice for both casual family dinners and elegant gatherings. These salmon meatballs are an incredible, protein-rich meal that everyone will love!

The Baked Salmon Meatballs are not only delicious but also easy to make. The succulent bites of salmon paired with a vibrant avocado sauce create an appealing meal that’s perfect for any occasion. Each meatball is made with fresh garlic, herbs, and a hint of lemon, ensuring that every bite is bursting with flavor. You’ll also be amazed at how quickly these come together—ideal for busy weeknights or last-minute entertaining!

Quick Recipe Highlights

  • Flavor Profile: Rich salmon meets a zesty fresh avocado sauce.
  • Texture: Juicy meatballs with a velvety smooth sauce complement each bite.
  • Aroma: Inviting scents of baked fish mingled with fresh herbs permeate the kitchen.
  • Visual Appeal: Bright green sauce beautifully contrasts with the golden meatballs.
  • Skill Level Needed: Suitable for home cooks with basic kitchen skills.
  • Special Equipment: Baking sheet, mixing bowls, and a food processor for the sauce.

Recipe Overview

  • Difficulty Level: These meatballs require some technique in mixing and shaping, but are accessible to novice cooks.
  • Category: Perfect for main dishes or appetizers, these meatballs fit seamlessly into any meal.
  • Cuisine: Inspired by healthy Mediterranean flavors, this dish highlights fresh, wholesome ingredients.
  • Cost: The ingredients are budget-friendly, coming together for a deliciously affordable meal.
  • Season: Enjoy these meatballs year-round, ideal for summer barbecues or cozy winter dinners.
  • Occasion: Great for family meals, dinner parties, or potluck gatherings, these meatballs impress without causing stress.

Why You’ll Love This Recipe

The Baked Salmon Meatballs with Avocado Sauce are the perfect balance of taste and texture. The succulent salmon meatballs are seasoned with fresh herbs and spices, which enhances their natural flavor while keeping them moist and tender. When paired with the creamy avocado sauce, every bite delivers a satisfying experience, making this dish irresistible for both salmon lovers and newcomers alike.

One of the key advantages of this recipe is its convenience. These meatballs can be prepared in advance, allowing you to enjoy a nutritious meal with minimal effort. Whether it’s a hectic weekday or a special occasion, having these on hand makes cooking a breeze, giving you more time to savor delicious moments with your loved ones.

From a nutritional standpoint, salmon is loaded with omega-3 fatty acids and protein, contributing to a heart-healthy diet. Paired with avocado, which is rich in monounsaturated fats, this meal is not only satisfying but also highly beneficial for overall wellness, making it a guilt-free indulgence that you can relish.

These meatballs are also ideal for social gatherings and entertaining. Their versatility allows you to serve them as an appetizer or a main dish, adaptable to various palates and preferences. Guests will be delighted to indulge in a dish that feels gourmet yet is surprisingly simple to prepare!

Lastly, the cost-effectiveness of baking these salmon meatballs rivals that of takeout, yet the flavor far exceeds expectations. Making them at home allows you the creativity and freedom to adjust flavors and ingredients according to personal preferences, ensuring that this dish is always a crowd-pleaser without breaking the bank.

Historical Background and Cultural Significance

Salmon has been a staple in diets across coastal communities for centuries, with its rich nutritional profile making it a valuable food source. The tradition of creating meatballs from fish may stem from various cultural influences, often seen in Scandinavian and Mediterranean recipes where seafood is a primary ingredient in comfort food.

In various cultures, seafood meatballs represent adaptability in cooking, allowing for the combination of flavors and textures, showcasing local herbs and spices. The Baked Salmon Meatballs can be seen as a modern twist on these traditional recipes, offering a contemporary take on a beloved classic.

The evolution of this dish reflects the changing views on health and wellness, with more people seeking nutrient-dense meals without sacrificing taste. As diets have shifted toward more sustainable seafood options, recipes like Baked Salmon Meatballs are gaining popularity, connecting diners to their culinary roots while focusing on modern values.

Regional variations often include the use of spices and sauces that reflect local tastes, with the avocado sauce adding a vibrant twist rooted in Latin American cuisine. Such adaptations not only enhance the dish but also bring a fusion of flavors that resonate with today’s evolving palates.

Ingredient Deep Dive

Salmon: Rich in history, salmon has sustained indigenous peoples and coastal towns for generations. Known for its high omega-3 fatty acid content, salmon supports heart health, brain function, and is an excellent source of protein. When selecting salmon, opt for wild-caught varieties when available, as they tend to be less fatty and more flavorful. For storage, keep salmon refrigerated, and consume within one to two days, or freeze for up to three months.

Avocado: Native to Central America, avocado is celebrated for its creamy texture and unique flavor. Packed with nutrients, including potassium and fiber, avocados support various health benefits, including healthy digestion and improved cholesterol levels. Look for avocados that yield slightly to gentle pressure for peak ripeness. Store them at room temperature until ripe, then refrigerate to prolong freshness.

Common Mistakes to Avoid

  • Overmixing the Meatball Mixture: Overhandling the meat mixture can lead to tough meatballs. Mix just until combined to retain a light texture.
  • Using Old Salmon: Freshness is key to flavor. Always check for a clean smell and firm, moist flesh with vibrant color.
  • Not Preheating the Oven: Skipping the preheating step can lead to uneven cooking, affecting the final texture of the meatballs.
  • Overcooking the Meatballs: Monitor cooking time closely; overcooked salmon meatballs can become dry. They should reach an internal temperature of 145°F.
  • Ignoring the Sauce Seasoning: The avocado sauce deserves seasoning too; fresh lemon juice, salt, and pepper enhance its flavor significantly.
  • Skipping Step by Step Instructions: Follow the recipe closely for the best results; missing steps can alter the outcome dramatically.
  • Using Unripe Avocado: An unripe avocado will result in a chunky, bitter sauce. Choose avocados that are just ripe for optimal creaminess.
  • Neglecting Cooking Equipment Setup: Ensure you have all equipment ready, as this contributes to a smooth cooking process and reduces stress.

Essential Techniques

Mixing Ingredients: Proper mixing ensures consistent flavor and texture in the salmon meatballs. Begin with your dry ingredients, adding wet components slowly, and then gently combine. Avoid overworking the mixture, looking for a uniform texture without excessive mashing.

Baking Meatballs: Baking is a healthier alternative to frying, allowing for a beautiful crust while keeping the interior moist. Arrange meatballs on a baking sheet ensuring some space between them for even cooking. Watch for a golden color, indicating they are done cooking.

Pro Tips for Perfect Baked Salmon Meatballs

1. Use high-quality salmon, whether fresh or frozen. If using frozen, thaw it completely for the best texture.

2. Experiment with fresh herbs like dill or cilantro to elevate the flavor profile of the meatballs.

3. Allow the mixture to chill for about 10 minutes after mixing—this helps the meatballs hold their shape.

4. For added moisture, consider incorporating grated zucchini or cooked quinoa into the meatball mixture.

5. Brush the meatballs with a light coat of olive oil before baking for added crispiness.

6. Ensure your baking sheet is lined with parchment paper to prevent sticking.

7. Serve the meatballs warm, as the flavors bloom best at that temperature.

8. Don’t be shy with the seasoning; a pinch of salt can amplify all the other ingredients’ natural flavors.

Variations and Adaptations

For a spicy kick, add diced jalapeño to the meatball mixture for heat. Alternatively, for a Mediterranean twist, try incorporating sun-dried tomatoes and feta cheese for a bold flavor profile. If you’re in the mood for a seasonal adaptation, consider adding fresh herbs like basil or parsley in the summer or using pumpkin spice in the fall months.

For dietary modifications, substitute breadcrumbs with gluten-free alternatives, or switch to ground turkey or chicken for a lighter version. Additionally, experiment with different herbs based on seasonal availability or your personal preferences.

Serving and Presentation Guide

For an elegant presentation, use a large platter and arrange meatballs around a bowl of avocado sauce for dipping. Add a sprinkle of fresh herbs on top of the meatballs for a pop of color. Pair the dish with lemon wedges for an additional hint of freshness. Consider serving with a side salad for a balanced meal, or include some crusty bread to scoop up the sauce.

Wine and Beverage Pairing

For an ideal pairing, a crisp Sauvignon Blanc works beautifully with the richness of the salmon meatballs. Its acidity complements the dish, balancing the creamy avocado sauce. If you prefer non-alcoholic options, consider serving sparkling water with a splash of lime or a refreshing iced tea to cleanse the palate.

Storage and Shelf Life

To store leftover salmon meatballs, place them in an airtight container and refrigerate for up to three days. When reheating, ensure they reach an internal temperature of 165°F for safe consumption. Freezing is also an excellent option; meatballs can be frozen for up to three months. To reheat, thaw overnight in the fridge and warm in the oven.

Make Ahead Strategies

For a smoother cooking experience, prepare the meatball mixture a day ahead and store it in the refrigerator. This not only saves time but allows flavors to meld beautifully. When ready to cook, simply form the balls and bake. Prepare the avocado sauce just before serving to maintain its vibrant color and freshness.

Scaling Instructions

If you want to halve the recipe, simply divide each ingredient in half, and it will yield two servings. For larger gatherings, double or triple the recipe, adjusting the baking time slightly while ensuring even cooking. Always keep an eye on the appearance and internal temperature to determine doneness.

Nutritional Deep Dive

The Baked Salmon Meatballs provide a robust macro breakdown, with a significant protein source from the salmon, paired with the healthy fats found in avocado. Each serving can offer impressive amounts of omega-3 fatty acids, beneficial for heart and brain health. With additional vitamins and minerals from various herbs, this dish also supports overall wellness.

Dietary Adaptations

For a gluten-free version, substitute breadcrumbs with ground oats or crushed gluten-free crackers. If you wish to make this dish dairy-free, avoid any cheese additions and use a citrus-based seasoning for flavor. A vegan adaptation could involve using a blend of chickpeas and flaxseed meal to mimic the texture and bind ingredients in place of salmon.

Troubleshooting Guide

If your meatballs are falling apart, consider adding an additional binding agent such as an egg or more breadcrumbs. For meatballs that are too dry, incorporating a bit of olive oil or additional avocado can help regain moisture. Monitoring cooking time is crucial; avoid towering overcooking to preserve flavor and texture.

Recipe Success Stories

Many home cooks have raved about the simplicity and delectable flavors of these Baked Salmon Meatballs. One reader shared a success story about transforming the recipe into bite-sized appetizers for a party, receiving overwhelmingly positive feedback. Others have experimented with different sauces, illustrating the dish’s adaptability and potential for customization.

Frequently Asked Questions

Can I prepare the meatballs in advance? Yes! You can mix the ingredients and form the meatballs a day before and bake them when ready to serve.

What’s the best way to reheat leftovers? For best results, warm the meatballs in the oven instead of the microwave to retain texture.

Can I use canned salmon instead? Absolutely! Just ensure it’s well-drained, and if possible, skin and bone-free for the best texture.

How can I reduce the calories in this dish? Use less oil in the sauce and consider baking without oil on the meatballs for a lighter option.

Are these meatballs freezer-friendly? Yes! They freeze well in an airtight container for up to three months.

Can I add other ingredients like veggies? Certainly! Chopped spinach or bell peppers can be added to enhance nutrition.

What are some ideal side dishes to pair with these meatballs? A fresh salad, quinoa, or whole grain pasta make excellent complementary sides.

What’s the nutritional value per serving? Each serving offers about 250 calories, with high omega-3, protein, and healthy fats content.

Is there a way to make this more kid-friendly? Adjust the seasoning and serve with a side of dip or sauce they enjoy to encourage trying new flavors.

How do I know when the meatballs are done? They should be golden brown on the outside and have an internal temperature of 145°F.

Additional Resources

Explore related recipes such as Spicy Fish Tacos or Herb-Crusted Salmon for more seafood delight. To enhance your cooking skills, check out technique guides on baking fish and creating homemade sauces. For ingredient information, dive into our resources on choosing the freshest seafood and herbs available to you. Don’t forget to consider seasonal variations of your favorite recipes to keep meals exciting.

Join the Conversation

If you love preparing this Baked Salmon Meatballs recipe, share your culinary adventure on social media with friends and fellow food enthusiasts. Whether it’s through pictures or recipe reviews, engaging with the community can lead to new ideas and adaptations. Explore and experiment with variations yourself; your twists could inspire others!

The Recipe

Baked Salmon Meatballs with Avocado Sauce

Serves: 4

Prep Time: 20 mins

Cook Time: 15 mins

Total Time: 35 mins

Kitchen Equipment Needed

  • Baking sheet
  • Mixing bowls
  • Food processor
  • Measuring cups and spoons
  • Meatball scooper or spoon

Ingredients

  • 1 lb fresh salmon, skinless and boneless
  • 1/2 cup breadcrumbs
  • 1/4 cup fresh parsley, chopped
  • 1/4 cup grated Parmesan cheese
  • 1 large egg
  • 3 cloves garlic, minced
  • 1/2 tsp salt
  • 1/4 tsp black pepper
  • 1 avocado
  • 2 tbsp fresh lime juice
  • Salt to taste
  • 1/4 cup Greek yogurt (optional)

Directions

  1. Preheat your oven to 400°F (200°C) and line a baking sheet with parchment paper.
  2. In a large bowl, combine the chopped salmon, breadcrumbs, parsley, Parmesan, egg, garlic, salt, and pepper. Mix until just combined.
  3. Form the mixture into meatballs about 1.5 inches in size and place them on the prepared baking sheet, leaving space between each.
  4. Bake the meatballs for 12-15 minutes, until golden brown and cooked through.
  5. Meanwhile, prepare the avocado sauce by blending the avocado, lime juice, and Greek yogurt (if using) in a food processor until smooth. Season with salt to taste.
  6. Serve the warm meatballs with a generous drizzle of avocado sauce on top and enjoy!

Recipe Notes

  • For a gluten-free option, substitute breadcrumbs with gluten-free alternatives.
  • Feel free to add other herbs like dill or cilantro for extra flavor.
  • The avocado sauce can be made ahead and stored in the refrigerator for a few hours.
  • These meatballs can also be frozen for up to three months—perfect for meal prep!

Ultimate Cheesy Loaded Meatloaf Casserole with Potatoes

Cheesy Loaded Meatloaf Casserole: A Comforting Dinner Delight

⚖️
Difficulty
Easy

⏲️
Prep Time
15 mins

🕒
Cook Time
50 mins

⏱️
Total Time
65 mins

🍽️
Servings
6 servings

This Cheesy Loaded Meatloaf Casserole is the perfect dish for a cozy family dinner or a gathering with friends. Imagine diving into layers of savory meatloaf mixed with rich cheeses and an array of delectable toppings, all coming together to create a comforting, warm meal. Each bite bursts with flavor, from the juicy ground beef to the melted cheese, making it a memorable dining experience that begs for seconds.

Whether you’re serving this casserole up on a chilly evening or during a festive occasion, it captivates everyone at the table. Easy to prepare, this dish boasts the heartwarming elements of traditional meatloaf while delivering the melty, cheesy goodness that so many love. With simple ingredients and a straightforward cooking method, it’s as accessible as it is delicious.

Quick Recipe Highlights

  • Flavor Profile: The Cheesy Loaded Meatloaf Casserole combines savory ground beef, rich cheddar cheese, and a subtle blend of spices, resulting in a taste that’s both comforting and satisfying.
  • Texture: Expect a bracket of textures, from the juicy meatloaf’s tender bites contrasted with the creamy, gooey cheese topping, creating a delightful mouthfeel.
  • Aroma: The dish emits inviting aromas of roasted meat blended with melted cheese and hints of herbs, making it irresistible while it bakes.
  • Visual Appeal: With its golden-brown cheese crust and vibrant toppings, this casserole is a feast for the eyes, making it a standout centerpiece on your dining table.
  • Skill Level Needed: This recipe is designed for home cooks of all skill levels, making it easy to follow with clear steps.
  • Special Equipment: You’ll need a casserole dish and a mixing bowl to bring this delightful dish together.

Recipe Overview

  • Difficulty Level: This easy casserole dish is accessible to everyone, making it perfect for beginner cooks and busy families alike.
  • Category: This Cheesy Loaded Meatloaf Casserole fits perfectly into the dinner category, ideal for family meals and casual gatherings.
  • Cuisine: Rooted in traditional American comfort food, this dish represents a fusion of flavors that resonate with many culinary backgrounds.
  • Cost: An economical choice, this recipe uses affordable ingredients typically found in any household, ensuring value without compromising flavor.
  • Season: Perfect for any season, this hearty casserole particularly shines during fall and winter months when comfort food is most desired.
  • Occasion: Serve this dish during festive occasions, family gatherings, or even casual weeknight dinners to impress your guests.

Why You’ll Love This Recipe

Imagine a dish that marries classic comfort food with a twist that keeps you coming back for more. The Cheesy Loaded Meatloaf Casserole offers a savory taste anchored by the comforting flavors of meatloaf, combined with the indulgence of melted cheese. Each forkful creates a delightful contrast of soft and gooey textures, providing a satisfying bite every time.

Preparation is a breeze, allowing you to spend more time enjoying your meal and the company around you. This recipe is straightforward, requiring minimal effort and just a few kitchen tools. With manageable prep and cooking times, you can easily whip it up even on the busiest of evenings.

Nutrition-wise, this casserole is a balanced choice that delivers protein from the ground beef and wholesome ingredients that can be tailored to suit your dietary needs. Its filling nature ensures that everyone leaves the table satisfied, making it an ideal fit for growing families.

Socially, it serves as an outstanding centerpiece for gatherings, inviting conversation and connection over plates piled high with deliciousness. As friends and family dig in, the warmth of the casserole radiates not just through taste but also through the experiences shared around the table.

Cost-effectiveness is one of the standout features of this dish. Utilizing common ingredients means you won’t break the bank while ensuring a filling, delicious meal that pleases a crowd. Everyone can enjoy the layered textures and flavors without a hefty grocery bill.

Historical Background and Cultural Significance

The origins of meatloaf can be traced back centuries, with various versions appearing in cultures worldwide. It has long been a staple in American cuisine, especially during the Great Depression, when households sought affordable meal solutions. By using ground beef, families could stretch their food budget while preparing a comforting dish.

The Cheesy Loaded Meatloaf Casserole represents a modern twist on this classic favorite. Over the years, recipes have evolved, incorporating diverse ingredients and styles. Adding cheese, for example, is a nod to the American love for cheese-laden dishes, making it a popular choice for family events and potlucks.

Culturally, this dish embodies the essence of comfort food — nostalgic flavors that evoke feelings of home and warmth. It’s common to find variations across different American households, as everyone has their unique take on the traditional meatloaf. Whether it’s the spices used or the additional toppings added, each recipe passes down stories of family and heritage.

Regional variations can also be found; some families opt for spicy cheese blends, while others might incorporate vegetables or alternate meats. These adaptations signify how important the dish is to American culture, representing not just sustenance but also shared memories and diverse culinary backgrounds.

Ingredient Deep Dive

For each main ingredient, explore its significance and benefits to understand how it enhances the Cheesy Loaded Meatloaf Casserole:

**Ground Beef**: This is the star ingredient, providing protein and richness while offering a satisfying bite. When selecting ground beef for this recipe, look for 80/20 blends for the best balance of flavor and fat, ensuring a juicy meatloaf. Store it in the refrigerator if used within a couple of days, or freeze it for longer periods. Ground turkey or chicken can serve as a lighter alternative.

**Cheddar Cheese**: This gooey topping adds an incredible layer of flavor to the casserole. Cheddar is not only beloved for its sharp taste, but it also melts beautifully. For optimal flavor, choose aged cheddar; however, feel free to substitute with your preferred cheese if you’re looking for a different twist. Store shredded cheese in an airtight container in the fridge to maintain freshness.

**Breadcrumbs**: They serve as a binding agent in the meatloaf, giving the dish structure. Opting for plain or seasoned breadcrumbs can subtly alter the flavor profile. Ensure that any leftover breadcrumbs are stored in a cool, dry place to maintain their crispness. They can often be substituted with crushed crackers or oats if desired.

**Condiments**: Ingredients like ketchup or Worcestershire sauce enhance the flavor of the casserole, adding a subtle sweetness and umami depth. You can keep these condiments in your pantry, as they have a long shelf life. Experiment with homemade versions or various store-bought styles for unique flavor profiles.

Common Mistakes to Avoid

  • Using lean ground beef: While it might seem healthier, lean meat can lead to dry meatloaf. Opt for a fattier blend, around 80/20, to ensure moistness.
  • Overmixing the meat: When combining ingredients, mix just until incorporated to avoid a tough texture. Overworking the meat activates the proteins too much.
  • Skipping the resting period: Allow your casserole to sit for a few minutes once baked. This lets the juices redistribute, resulting in a better texture for serving.
  • Not checking doneness: Use a meat thermometer to ensure the internal temperature reaches 160°F. Cutting into the meatloaf to check can lead to moisture loss.
  • Piling on too many toppings: While extras add flavor, too much can overwhelm the dish. Balance toppings to allow for the meatloaf’s flavors to shine through.
  • Poor-quality cheese: Using low-quality cheese can lead to undesirable flavor and texture. Select higher-quality cheese for a significantly better outcome.
  • Omitting seasoning adjustments: Taste your mixture before baking, and adjust the spices to your preference. Remember, it’s easier to add than to fix an overly seasoned dish!
  • Not greasing the baking dish: Prevent sticking by properly greasing your dish or using parchment paper. This makes serving easier and maintains the casserole’s shape.

Essential Techniques

**Mixing Meatloaf**: This step is crucial as it combines flavors and binds the ingredients. Use your hands for gentle mixing, ensuring not to overwork the meat. Visual cues include a well-integrated mixture without visible breadcrumbs.

**Layering Flavors**: Begin with a base layer of meatloaf and evenly distribute toppings. This technique is essential for achieving balanced flavor in every bite. Aim for a visually appealing arrangement, where ingredients are recognizable.

**Baking**: Preheat your oven adequately before baking, and always use a loaf pan or casserole dish to retain shape. A good visual cue is when the cheese turns golden brown and bubbly.

Pro Tips for Perfect Cheesy Loaded Meatloaf Casserole

1. **Customize It**: Don’t hesitate to explore different meats or flavorings in your meatloaf base for unique variations. Adding spices like smoked paprika can enhance the depth of flavor.

2. **Use Fresh Herbs**: Incorporating fresh herbs into the mix can uplift the flavor profile, giving it a freshness that contrasts beautifully with the richness of the cheese.

3. **Experiment with Cheese Types**: While cheddar is a classic choice, try mixing cheeses like mozzarella and pepper jack for a zesty twist on the traditional recipe.

4. **Prep Ahead**: Assemble your casserole in advance, letting the flavors meld before baking. This can make weeknight cooking much simpler and more efficient.

5. **Let It Rest**: Allow your casserole to rest for at least 5-10 minutes before slicing; this helps it maintain its shape and makes serving easier.

6. **Serve with Sides**: Complement your casserole with steamed veggies or a fresh salad for a balanced meal that brightens up the plate.

7. **Watch the Baking Time**: Ovens may vary, so keep an eye on the casserole as it bakes. If the top begins to brown too quickly, cover it with aluminum foil to prevent burning.

8. **Portion and Store**: Cut remaining casserole into portions for quick weekday lunches or dinners; it reheats well and is even better the next day!

Variations and Adaptations

**Regional Variations**: In the southern U.S., adding jalapeños or other peppers brings a delightful kick. Alternatively, in the Midwest, you might encounter variations incorporating barbecue sauce instead of ketchup.

**Seasonal Adaptations**: Consider using seasonal vegetables as part of your topping mix, like roasted zucchini in summer or roasted butternut squash in fall for additional flavor and nutrition.

**Dietary Modifications**: For more health-conscious eaters, try turkey or chicken breast instead of beef for a leaner dish. For a vegetarian option, explore chickpea or lentil-based mixtures baked similarly.

**Flavor Variations**: Incorporate fun extras like barbecue sauce or salsa into the meat mixture for a unique flavor twist. Experimentation is encouraged in the kitchen!

**Texture Modifications**: For a crunchier topping, include crushed tortilla chips or fried onions. These additions can elevate the presentation and add dimension to the casserole.

**Presentation Alternatives**: Instead of serving in a dish, consider individual servings in ramekins. This adds elegance to your gathering and makes plating easier.

Serving and Presentation Guide

For an appealing presentation of your Cheesy Loaded Meatloaf Casserole, consider using colorful garnishes like chopped parsley or green onions. Arrange the casserole on a vibrant serving platter for an inviting display.

Incorporate side dishes around the casserole for a wholesome meal that looks inviting. Traditional accompaniments can include mashed potatoes or roasted vegetables, allowing guests to build their personalized plates.

When serving, ensure portions are even, and discuss the unique flavors within each layer to engage with your guests. Offer serving utensils that complement the dish’s rustic charm, enhancing the experience.

Pay attention to serving temperature; this dish is best enjoyed warm, so be mindful not to let it cool for too long. Provide smaller side plates to encourage sampling of the casserole and any added sides effectively.

Lastly, maintain portion control to prevent waste, especially if the casserole is rich in flavor. By providing smaller servings, you encourage your guests to try multiple items without feeling overwhelmed!

Wine and Beverage Pairing

When choosing the perfect wine to accompany your Cheesy Loaded Meatloaf Casserole, consider a full-bodied red wine such as Cabernet Sauvignon or Merlot. These wines’ robust flavors complement the meatiness of the dish beautifully.

For those preferring white wine, a buttery Chardonnay can harmonize with the cheese’s richness. If non-alcoholic options are more appealing, serve sparkling water with lemon or an iced tea to cleanse the palate effectively.

Temperature matters, too. Serve red wine slightly below room temperature (around 60°F) for the best experience. When it comes to non-alcoholic selections, chilled drinks enhance the comfort food vibe, especially on warmer days.

For a unique twist, pair with a malty beer like a brown ale for a cozy arrangement that matches the warm, cheesy essence of the casserole, making it a delightful combination.

Storage and Shelf Life

To store your Cheesy Loaded Meatloaf Casserole properly, ensure it’s fully cooled before transferring it to an airtight container. This helps maintain freshness and prevent moisture loss. When refrigerated, it can last up to 3-4 days.

If you longer-term storage is needed, consider freezing leftover portions. Wrap them tightly in aluminum foil or freezer-safe containers. It can hold up well for up to 2-3 months. Ensure you label the containers with the date to monitor freshness.

Signs of spoilage include any off-smell or discoloration, indicating that it may no longer be safe to consume. When reheating, ensure the casserole reaches an internal temperature of 165°F to ensure safety.

For reheating, the microwave is a quick option, but consider the oven for better results, as it helps maintain the casserole’s texture. Cover it with foil to prevent the cheese from burning while retaining moisture.

Lastly, when freezing, consider portioning out servings beforehand so that you can easily defrost one at a time, ensuring that every meal is fresh and enjoyable.

Make Ahead Strategies

To streamline your cooking process, consider prepping your Cheesy Loaded Meatloaf Casserole ahead of time. You can mix the ingredients the night before and store them in the refrigerator, allowing the flavors to meld overnight.

For even better efficiency, prepare individual servings and freeze them before cooking. Thaw them overnight in the fridge before baking for fresh, evenly cooked meals ready at your convenience.

If you want a fresh element added right before serving, consider preparing a light side salad or a homemade sauce to accompany the casserole, enhancing the meal without requiring extra effort.

Be mindful that certain elements are best added right before baking, such as cheese toppings or breadcrumbs, as they retain their texture better when exposed to heat directly.

Lastly, document any adjustments made to prep times and methods for future clarification, ensuring consistency in your cooking method each time.

Scaling Instructions

When it comes to scaling your Cheesy Loaded Meatloaf Casserole recipe, halving the ingredients is as simple as cutting all measurements in half. However, be aware of baking time adjustments; check for doneness slightly earlier if reducing the quantity.

If you wish to double or triple the recipe for larger gatherings, ensure you use appropriately sized pans. This may require baking in batches if oven space is limited.

Monitor the cooking time and use a meat thermometer to ensure the inside reaches 160°F, regardless of how much larger the meal becomes. The key visual cue remains a nicely browned top with visible bubbles from the melted cheese.

Additionally, remember that when modifying portion sizes, it’s often more efficient to cook a single larger batch rather than trying to perfect several smaller counts simultaneously.

Lastly, store any leftovers according to the guidelines provided to preserve flavor and safety.

Nutritional Deep Dive

When analyzing the nutritional value of your Cheesy Loaded Meatloaf Casserole, consider the macro breakdown: you’re looking at a healthy serving of protein from the beef, carbohydrates from the breadcrumbs, and fats from the cheese. These components come together to create a well-rounded meal.

Micronutrient analysis shows that the dish is also rich in essential vitamins and minerals, especially if you include vegetables as toppings. Ingredients like onions and peppers can boost nutrient content, providing dietary fiber and antioxidants.

The casserole offers notable health benefits due to its protein content, which is necessary for muscle repair and growth, while also aiding in satiety. Pairing it with vegetables can further enhance its nutritional profile.

In terms of dietary considerations, it is helpful to adjust ingredient types based on individual needs such as gluten-free or dairy-free variations.

For portion analysis, serving sizes play a crucial role in balancing indulgence with dietary goals, allowing you to enjoy the comforting elements without excess.

Weight management tips involve being mindful of portion sizes, balancing the meal with lighter sides, and adjusting ingredient types to suit your goals while still enjoying a comforting dining staple.

Dietary Adaptations

For those needing gluten-free adaptations, consider utilizing gluten-free breadcrumbs or even oats in place of standard breadcrumbs without sacrificing texture and stability.

Dairy-free variations can be achieved by selecting vegan cheese options. Ensuring balance in flavors can maintain the dish’s integrity while fitting different dietary restrictions.

For a vegan alternative, replace ground beef with lentils or a plant-based meat substitute, and explore options like chickpeas, mushrooms, or other legumes, which provide similar texture and protein.

On low-carb diets, like Keto, simply reduce the breadcrumbs or sub with almond flour while maintaining flavor through seasoning adjustments.

Other dietary modifications can be integrated for low-FODMAP by selecting lactose-free dairy options and avoiding certain high-FODMAP vegetables.

Be sure to assess each option based on personal dietary needs and preferences to create satisfying iterations of this cherished recipe.

Troubleshooting Guide

If you notice texture issues like dryness in the meatloaf, consider adjusting the fat content or ensuring a proper ratio of breadcrumbs to meat. Using an appropriate mix can enhance the moisture retention.

Flavor balance disparities can arise; don’t hesitate to adjust seasoning levels while mixing for personalized taste. Conduct small taste tests as you go to hit your desired flavor more accurately.

Temperature problems during baking may indicate an oven calibration issue. Investing in an oven thermometer can help you accurately assess internal heat while baking.

Equipment challenges can fall into the category of using unsuitable dishes; ensure your casserole dish is appropriate for the oven temperature and material to avoid breakage.

Ingredient substitution adjustments may be necessary; if you swap meats, check cooking times and temperature needs to accommodate for differences in cooking characteristics.

Timing concerns during the recipe process are common; always keep an eye on visual cues like bubbling cheese or browning meat that indicate readiness instead of solely relying on timers.

Recipe Success Stories

Our readers have shared numerous success stories with the Cheesy Loaded Meatloaf Casserole, highlighting how it became a family favorite. Families have reported that their kids devoured the dish, often requesting it weekly, emphasizing its kid-friendly flavor and satisfaction.

Unique adaptations have emerged from the community, with variations being tailored to local tastes, including spicy versions featuring jalapeños or swapped meats like turkey or chicken.

Photographers within the community have captured stunning images of their casseroles, often receiving high engagement on social media, celebrating the dish’s visual appeal. Sharing these culinary creations has fostered a sense of community among fellow food lovers.

Encouragement has also been given for swapping ingredients based on dietary needs, reinforcing that the core concept of the dish remains comforting and fulfilling, regardless of variations.

Overall, the dish stands testament to its versatility and warm reception within homes, as well as its success in sparking meaningful connections over shared meals.

Frequently Asked Questions

Can I freeze the Cheesy Loaded Meatloaf Casserole?

Yes! After completely cooling the casserole, wrap it tightly in foil or transfer to a freezer-safe container. It can be frozen for up to 3 months. Ensure you label it with the date for reference.

How do I know when the casserole is done baking?

The best way to check doneness is by using a meat thermometer. It should read 160°F for safety. Visually, the top should be browned, and you’ll see bubbling cheese.

What can I serve with Cheesy Loaded Meatloaf Casserole?

This dish pairs wonderfully with sides like mashed potatoes, green beans, or a fresh salad. These complement the rich flavors of the casserole nicely.

Can I make this casserole vegetarian?

Absolutely! Substitute ground beef with lentils or a plant-based meat alternative. Adjust the seasoning to maintain flavor balance and enhance the final product.

Would adding vegetables make this healthier?

Definitely! Adding veggies like spinach, bell peppers, or shredded carrots can enhance the nutrition profile while adding flavor and color to the dish.

How long does the casserole last in the fridge?

When properly stored in the fridge in an airtight container, the Cheesy Loaded Meatloaf Casserole can last 3-4 days. Reheat thoroughly before consuming.

What can I use instead of breadcrumbs?

Alternative options include crushed crackers, panko, or even oats for added texture. These can easily substitute standard breadcrumbs without sacrificing flavor.

Can I use ground turkey instead of beef?

Yes, ground turkey is a great substitute! It creates a lighter version of the dish while still being delicious. Just ensure you season it well to keep flavors rich!

What’s the best way to reheat leftovers?

The best method is to reheat in the oven at 350°F until warmed through, usually about 20-30 minutes. Cover it with foil to retain moisture.

Can I make this in an Instant Pot?

While the traditional method is delish, you can adapt the recipe for an Instant Pot by following specific cooking times and pressure settings. Just ensure it’s a proper recipe conversion!

Are there any low-carb versions available?

Yes! You can replace breadcrumbs with almond flour or flaxseed meal. This adjustment maintains the structure while lowering carb content, making it Keto-friendly.

Additional Resources

If you’re intrigued by the Cheesy Loaded Meatloaf Casserole, consider exploring related recipes that highlight comforting staples. Examples include classic shepherd’s pie or scalloped potatoes with cheese.

Further, check out detailed technique guides for meat preparation and breadcrumb alternatives to enhance your cooking skills. Understanding how to select quality ingredients will enrich your culinary journey.

Explore ingredient information to learn about the nutritional value of common produce used in cooking, helping you make informed decisions for future meals.

Consider investing in kitchen equipment recommendations, such as baking dishes, that are conducive to preparing casseroles for optimal results.

Finally, keep an eye on seasonal variations in grocery stores; selecting fresh, in-season vegetables can make your dish shine even brighter.

Join the Conversation

We would love to hear from you! Share your experience with the Cheesy Loaded Meatloaf Casserole on social media, and don’t forget to tag us for a chance to be featured!

Capturing photography of your finished dish can inspire others and foster a community around shared recipes. Your unique spins on the dish might become a trending topic within our cooking circles.

Engage with fellow cooks by exchanging tips and feedback on variations of the recipe. Sharing your suggestions can create a dialogue that enhances future cooking endeavors.

Don’t hesitate to leave reviews and comments on this recipe as we encourage community engagement. Your input not only helps others but also strengthens connections over the love of cooking.

Let’s keep the flavors alive and share the joy of cooking together!

The Recipe

Cheesy Loaded Meatloaf Casserole

Serves: 6 servings

Prep Time: 15 mins

Cook Time: 50 mins

Total Time: 65 mins

Kitchen Equipment Needed

  • Casserole dish
  • Mixing bowl
  • Meat thermometer
  • Measuring cups
  • Spatula or spoon

Ingredients

  • 1 ½ lbs ground beef
  • 1 cup breadcrumbs
  • 2 eggs
  • 1 cup shredded cheddar cheese
  • ½ cup ketchup
  • 1 tbsp Worcestershire sauce
  • 1 small onion, diced
  • 2 cloves garlic, minced
  • 1 tsp salt
  • 1 tsp pepper
  • ½ tsp dried oregano
  • Additional cheese for topping (optional)

Directions

  1. Preheat the oven to 350°F (175°C).
  2. In a large mixing bowl, combine the ground beef, breadcrumbs, eggs, cheese, ketchup, Worcestershire sauce, onion, garlic, salt, pepper, and oregano.
  3. Mix until just combined, being careful not to overwork the meat.
  4. Transfer the mixture into a greased casserole dish and shape it into a loaf.
  5. Top with additional cheese if desired. Bake for about 50 minutes, or until the internal temperature reaches 160°F.
  6. Let the casserole rest for 10 minutes before slicing. Serve warm and enjoy!

Recipe Notes

  • Feel free to add vegetables like bell peppers or mushrooms to the meat mixture for added flavor and nutrition.
  • You can use any cheese you prefer, such as mozzarella or pepper jack, for different flavor profiles.
  • This casserole is great for meal prep; leftovers can be stored in the fridge for up to 4 days.

Best Garlic Parmesan Chicken Meatloaves – Easy Weeknight Dinner

Garlic Parmesan Chicken Meatloaves: A Flavorful Family Favorite

⚖️
Difficulty
Easy

⏲️
Prep Time
15 mins

🕒
Cook Time
25 mins

⏱️
Total Time
40 mins

🍽️
Servings
4 servings

Garlic Parmesan Chicken Meatloaves are a delightful twist on a classic dish that brings comfort and satisfaction to the dining table. Infused with the aromatic flavor of garlic and the rich taste of Parmesan cheese, these meatloaves are both delectable and nutritious. The juicy chicken mingles beautifully with herbs and spices, making each bite a burst of flavor, perfect for families or gatherings.

The appealing presentation and the warm aroma that fills your kitchen while these meatloaves bake will have everyone eagerly waiting for dinner. Imagine slicing into a golden-brown loaf, its savory scent wafting through the air, creating a cozy atmosphere that invites everyone to gather around. With easy preparation and wholesome ingredients, this recipe is perfect for weeknight meals or special occasions.

Quick Recipe Highlights

  • Flavor Profile: The garlic gives a robust kick balanced by the creamy, nutty notes of Parmesan cheese, making each bite incredibly flavorful.
  • Texture: The chicken is tender yet cohesive, with a slight crunch on the outside—thanks to the baking process, making each slice satisfying to the bite.
  • Aroma: The delightful scent of roasted garlic and melted cheese fills your kitchen, enticing everyone to the dinner table.
  • Visual Appeal: The meatloaves are golden brown with flecks of green parsley, making for a visually attractive dish when served.
  • Skill Level Needed: This recipe is simple and straightforward, making it accessible for beginners and enjoyable for seasoned cooks alike.
  • Special Equipment: A baking dish or a loaf pan is all you need, with no complex equipment required.

Recipe Overview

  • Difficulty Level: With easy-to-follow steps and minimal cooking techniques, making Garlic Parmesan Chicken Meatloaves is a great way to gain confidence in the kitchen.
  • Category: This dish serves perfectly as a main course for lunch or dinner, complementing well with various side dishes.
  • Cuisine: Inspired by classic comfort food traditions, this recipe combines familiar ingredients with a modern twist, appealing to a wide range of tastes.
  • Cost: The affordability of chicken and pantry staples means you can whip up this hearty dish without breaking the bank.
  • Season: Enjoy these meatloaves year-round, as they provide warmth and comfort no matter the weather outside.
  • Occasion: Ideal for family dinners, gatherings, or meal prep, they’ll please everyone at the table.

Why You’ll Love This Recipe

Garlic Parmesan Chicken Meatloaves are a revelation in taste and texture, appealing to everyone from kids to adults. The combination of ground chicken seasoned perfectly with garlic and combined with the savory punch of Parmesan cheese is hard to resist. Furthermore, these meatloaves retain juiciness while delivering a satisfying crunch, creating a delightful mouthfeel that enhances the dining experience.

One of the standout benefits of this recipe is its convenience. Preparing meatloaves is straightforward, allowing you to spend quality time with family while the delicious aroma fills your home. The leftovers can easily be stored or reheated, providing delicious meals throughout the week, making it a practical choice for busy families.

Nutritionally, Chicken is a great source of lean protein, making these meatloaves a healthier alternative to traditional red meat options. With the addition of fresh herbs and spices, you’re introducing essential vitamins without sacrificing flavor, creating a wholesome meal that nourishes the body.

When it comes to social gatherings, these meatloaves shine as a crowd-pleaser. They can be easily served with various sides, making them adaptable to any event—whether it’s a casual family dinner or a festive gathering with friends. Everyone can enjoy this comforting dish, creating a sense of community around the dinner table.

Finally, Garlic Parmesan Chicken Meatloaves are a cost-effective dish. With readily available ingredients, you can create a fulfilling meal that’s budget-friendly. Cooking at home allows you to control the quality of your ingredients while enjoying delicious food that won’t strain your wallet.

Historical Background and Cultural Significance

The history of meatloaf can be traced back to ancient cuisines, where various cultures would combine ground meats with grains and spices to create hearty meals. The modern meatloaf, particularly in American cuisine, made a significant mark during the Great Depression as a way to stretch limited resources, allowing families to make meals that satisfied.

Culturally, the meatloaf holds a special place in many homes as the ultimate comfort food, invoking memories of family dinners during childhood. This hearty dish fosters a sense of nostalgia and connection, reinforcing family traditions that revolve around gathering to share meals and catch up on life.

Over time, this classic has evolved, with ingredients being adapted to suit regional tastes and preferences. The introduction of flavor highlights like garlic and Parmesan cheese in this recipe reflects the growing trend of combining familiar dishes with contemporary culinary influences, showing how traditions can adapt and flourish.

Various regional variations of meatloaf showcase local flavors. Some might incorporate barbecue sauces, while others draw from Italian influences with herbs or adding marinara sauce. These adaptations highlight the flexibility of the meatloaf and its ability to integrate into various culinary landscapes.

Ingredient Deep Dive

Garlic is one of the primary ingredients in Garlic Parmesan Chicken Meatloaves. It has been revered for its health benefits and flavor. Garlic contains allicin, which is famous for its anti-inflammatory and antioxidant properties. When cooking, choose fresh cloves for the best flavor; store them in a cool, dry place. Garlic powder can be used as a substitute, though the flavor might be less robust.

Parmesan cheese adds depth and creaminess to the meatloaf. This cheese, rich in calcium and protein, dates back to Italy’s Middle Ages, where it became a staple in regional cooking. When purchasing Parmesan, opt for a block to grate at home to retain its freshness. Store it in the fridge, wrapped tightly, to prevent mold growth. For a non-dairy option, consider using nutritional yeast.

Ground chicken is not only a leaner alternative to beef in meatloaf but also versatile. It can be easily flavored and cooked. Rich in protein and B-vitamins, ground chicken is an excellent choice for wholesome meals. When selecting, look for the freshest options at your butcher or market. Store it in the coldest part of your fridge and use it within 1-2 days of purchase.

Common Mistakes to Avoid

  • Over-mixing the meat mixture: This can lead to tough meatloaves. Mix just until combined to ensure tenderness.
  • Not letting the meatloaf rest: Give your meatloaf a few minutes to rest before slicing; this helps retain moisture.
  • Using too much filler: Adding too many breadcrumbs can dry out the meatloaf. Balance is key for a moist loaf.
  • Poor temperature monitoring: Ensure your meatloaf is cooked to a safe temperature of 165°F to avoid undercooked chicken.
  • Skipping the seasoning step: Make sure you season every layer generously for the best flavor payoff.
  • Not preheating the oven: This mistake can cause uneven baking; always start with a preheated oven.
  • Assuming all meatloaves cook the same: Cooking times can vary; always monitor your specific recipe.
  • Neglecting to line the pan: Lining your loaf pan makes for easier cleanup and prevents sticking.
  • Not considering variations: Feeling stuck? Experimenting with different spices or sauces can refresh the dish.
  • Ignoring cooling times: Cutting too early can make your meatloaf fall apart; patience pays off in presentation.

Essential Techniques

One key technique to master with meatloaf is the mixing method. It’s essential to combine ingredients just enough to incorporate flavors without overworking the meat. Over-mixing leads to denser, chewy textures. Look for a slight stickiness to the mixture while keeping it light and airy.

Another vital technique is forming the loaf. Use your hands to shape the meat mixture into a loaf, ensuring it’s compact yet maintains some air pockets for the best texture. Avoid flattening the loaf too much. A golden-brown crust on the outside signals that you’ve achieved a perfect bake while also allowing moisture to escape, enhancing flavor.

Pro Tips for Perfect Garlic Parmesan Chicken Meatloaves

To maximize flavor, consider marinating your chicken for a couple of hours before mixing it into the meatloaf. You can use olive oil, lemon juice, and garlic for an intensified taste. Be sure to check seasoning levels throughout to adjust to your personal preference.

For added moisture, incorporate sautéed onions or bell peppers into the mix. This step not only adds flavor but enhances the overall texture, making each bite succulent.

If you want a crispy topping, use panko crumbs mixed with Parmesan to create a crunchy crust on top. This addition enhances the texture contrast, giving you a delightful experience with each slice.

Basting the meatloaf with a glaze of ketchup mixed with brown sugar during the last ten minutes of baking provides a sweet and tangy finish that complements the savory flavors beautifully.

Always allow the meatloaf to rest before serving. This simple step allows the juices to redistribute and makes slicing easier, leading to better presentation.

Considering leftovers? Wrap portions tightly and store them in the fridge for up to four days, or freeze them for future meals without sacrificing quality.

Variations and Adaptations

Regional variations of meatloaf can offer exciting twists on the classic recipe. Consider adding Italian herbs like oregano and basil for an Italian flair, or create a Southwestern version with zesty chipotle seasoning and black beans for a fun departure from the original.

Seasonal adaptations can also elevate the dish. In the fall, adding finely chopped apples or cranberries brings a sweet, seasonal taste, while fresh herbs in the spring can provide a vibrant, fresh note to the flavors.

For dietary modifications, you can craft a gluten-free version by substituting breadcrumbs with ground oats or gluten-free panko. Additionally, opting for ground turkey can create a leaner meatloaf without sacrificing flavor.

Flavor variations are endless; incorporate barbecue sauce or hot sauce into the mixture for added depth and excitement, or experiment with different cheeses to find your favorite, whether it’s feta, cheddar, or something unexpected.

Texture modifications can also bring new life to this dish. For instance, incorporating finely grated vegetables, such as zucchini or carrot, not only heightens nutritional value but also contributes moisture and texture to the meatloaf.

Finally, presentation alternatives can include forming mini meatloaves or meatballs instead of a standard loaf. This can create fun, single-serving options that are easy for parties or gatherings, elevating the dining experience.

Serving and Presentation Guide

Enhancing the visual appeal of your Garlic Parmesan Chicken Meatloaves starts with plating techniques. Present slices of the meatloaf on a colorful platter to contrast the golden-brown exterior, garnished with fresh parsley for an added pop of color.

Consider nature-inspired garnishing ideas by serving with roasted seasonal vegetables, which not only enhance flavors but add richness to the presentation. A drizzle of balsamic reduction can elevate the overall dish, providing a gourmet touch that impresses guests.

In terms of traditional accompaniments, classic mashed potatoes or a fresh garden salad serve as perfect side dishes, complementing the meatloaf’s flavors beautifully. For modern serving suggestions, pairing with a smooth risotto or quinoa salad can create a sophisticated meal.

Temperature considerations are crucial; serving the meatloaf warm allows the flavors to shine, while cool slices make excellent additions to a cold lunch platter. For portion control, one to two slices per serving is recommended, with ample vegetables on the side to create a balanced meal.

Wine and Beverage Pairing

When pairing wine with Garlic Parmesan Chicken Meatloaves, a medium-bodied white wine, such as Chardonnay, complements the dish wonderfully. Opt for unoaked varieties that balance the richness without overwhelming the flavors of garlic and cheese.

For a red wine option, a light Pinot Noir enhances the overall experience without overpowering the dish, offering a fruity contrast to the savory meatloaf.

Non-alcoholic alternatives, such as sparkling water with a hint of lemon or an herbal iced tea, can refresh the palate and provide a nice contrast to the richness of the meatloaf.

If considering coffee or tea pairings, serve a mild black tea or a light roast coffee that harmonizes with the savory notes, ensuring it does not overshadow the flavors of the meal.

Storage and Shelf Life

When it comes to storing Garlic Parmesan Chicken Meatloaves, allow them to cool completely before transferring to airtight containers. Keep them in the refrigerator for up to four days or freeze for longer storage.

Temperature requirements are crucial; aim to keep your meatloaf below 40°F to prevent bacterial growth. It’s best to store wrapped slices individually in freezer-safe bags to maintain quality when freezing.

Signs of spoilage include an off odor, discoloration, or an unusual texture. Always check before consuming leftovers to ensure they’re still fresh.

Reheating instructions are essential; gently warm the meatloaf in the oven to preserve texture. Cover with foil to prevent drying out. The microwave is an option for quicker heating, but it may result in a less favorable texture.

For freezing guidelines, consider slicing and wrapping portions in plastic wrap followed by aluminum foil for best results. Label your containers with storage dates to monitor freshness easily.

Make Ahead Strategies

Preparing Garlic Parmesan Chicken Meatloaves ahead of time can streamline your cooking process. Mix the meat and ingredients a day prior and store it in the refrigerator, allowing the flavors to meld beautifully before baking.

When it comes to storage between steps, consider forming the loaves and covering them tightly before refigerating overnight. This ensures a flavorful meal with minimal effort come mealtime.

Quality impact assessment should be considered; while the meatloaf will maintain good flavor, consider adding fresh herbs or cheeses before baking for best taste results.

Assembly tips include measuring out and prepping ingredients ahead of time, leading to a smoother cooking experience. For example, chopped garlic or mixed seasoning can save valuable time during actual preparation.

Reheating guidelines indicate that meatloaves can be enjoyed without losing their quality, making this dish not only delicious fresh but also a remarkable leftover option.

Don’t forget to add fresh elements upon reheating, such as a quick toss of fresh herbs or a drizzle of sauce, revitalizing the meatloaf’s flavors.

Scaling Instructions

Scaling the Garlic Parmesan Chicken Meatloaves recipe is simple. For halving the recipe, use the same method but reduce the ingredient amounts proportionally to maintain the same texture and flavor profile.

Doubling or tripling the recipe is straightforward, but cooking times may increase. Ensure that you test for doneness in the center and adjust temperatures as needed for larger portions.

Equipment adjustments are necessary when scaling; using larger baking trays or pans may be required for larger quantities. Ensure that the cooking method remains consistent for even results.

Timing modifications should be made based on the number of loaves. Allow additional baking time for larger batches to ensure each loaf cooks evenly throughout without undercooking.

Storage considerations are important regardless of how you scale. Be sure to keep unused portions securely wrapped and label them accordingly to maintain quality and freshness.

Nutritional Deep Dive

The macro breakdown of Garlic Parmesan Chicken Meatloaves reveals a high protein content due to the chicken, balanced by healthy fats from the cheese. This dish offers a satisfying protein-rich option for maintaining energy throughout your day.

Micronutrient analysis shows a range of nutrients, including calcium from the cheese and B vitamins from the chicken. The inclusion of herbs and garlic adds antioxidants, supporting overall health and wellness.

Health benefits include the reliance on lean meats, providing lower fat content than typical beef meatloaf. High protein levels support muscle maintenance and weight management, making it an excellent choice for health-conscious individuals.

Dietary considerations allow this recipe to be adapted for low-carb or gluten-free diets by replacing breadcrumbs with suitable alternatives, such as almond flour or gluten-free panko.

Portion analysis suggests serving one to two slices per person, along with a generous side of vegetables or salad, creating a balanced plate that contributes towards daily nutritional goals.

For weight management tips, consider pairing the meatloaf with fibrous sides that enhance satiety, such as steamed vegetables or salads, to create a fulfilling meal without excess calories.

Dietary Adaptations

Making this recipe gluten-free is easy; simply substitute traditional breadcrumbs with crushed gluten-free crackers or oats, ensuring those with gluten sensitivities can enjoy this delectable dish.

For a dairy-free version, swap out Parmesan cheese for nutritional yeast or vegan cheese alternatives, allowing those with lactose intolerance or dairy allergies to savor the flavors.

A vegan adaptation can be achieved by substituting ground chicken with lentils or chickpeas, combining them with a plant-based binder like flaxseed meal or mashed tofu, maintaining the integrity of the meal while catering to plant-based diets.

Low-carb or keto diets find a wonderful ally in this recipe by eliminating breadcrumbs and using vegetables such as zucchini or mushrooms to maintain flavor while luring carbohydrate content significantly.

On a paleo diet? Focus on using natural ingredients and simply replacing breadcrumbs with ground nuts or seeds for that comforting texture without added grains.

Lastly, low-FODMAP adaptations could involve careful selection of garlic substitutes or using garlic-infused oils for flavor, ensuring that those managing digestive sensitivities can enjoy this recipe without distress.

Troubleshooting Guide

If you experience texture issues, the most common culprit is overmixing. Resist the urge to overwork the meat mixture as it leads to denser loaves. Aim for a gentle mix to retain air pockets.

Flavor balance problems may arise if insufficient seasoning is employed. Always taste the mixture before cooking, and adjust seasoning levels accordingly, enhancing flavor entirely.

Temperature problems can occur if your oven runs hot or cold. Invest in an oven thermometer to ensure accurate cooking temperatures and adjust as necessary to achieve proper doneness.

Equipment challenges might involve an issue with your loaf pan or baking dish; ensure your chosen vessel is the right size for your recipe. A too-large pan can cause drying, while a too-small one can lead to uneven cooking.

When making ingredient substitutions, ensure you choose options with similar moisture and fat content to maintain flavor and texture integrity in the meatloaf.

Timing concerns, especially with larger loaves, can be monitored with a meat thermometer to check for doneness. Adjust your baking time based on the size of your meatloaf.

Recipe Success Stories

In the realm of community feedback, many have expressed joy in discovering how versatile Garlic Parmesan Chicken Meatloaves can be. Variations like adding spinach or different cheeses have won rave reviews, showing how adaptable the recipe truly is.

Adaptation stories abound, showcasing how readers have transformed this classic into personal favorites; one particular reader led a meet-up where group members shared their unique takes on the recipe, celebrating creativity in the kitchen.

Feedback around texture has surpassed expectations, with many noting how the meatloaf remains moist and tender without effort. The method of letting it rest before slicing has been credited as crucial for achieving an enviable texture every time.

Photography tips have prompted those trying the recipe to share their own creations on social media. The meatloaf’s inviting look often becomes a highlight of people’s meals, encouraging others to dive into their culinary adventures.

Overall, the enthusiastic reception of Garlic Parmesan Chicken Meatloaves cemented its place as a beloved recipe that sparks not only delicious meals but joyful memories as well.

Frequently Asked Questions

Q1: Can I make these meatloaves ahead of time?
A1: Yes, you can prepare the meatloaves and refrigerate them before baking for up to 24 hours. This allows flavors to meld. Just be sure to bake them before serving.

Q2: What’s the best way to store leftovers?
A2: Allow the meatloaf to cool, then store it in an airtight container in the refrigerator for up to four days. Alternatively, you can freeze it wrapped tightly for up to three months.

Q3: Can I substitute ground turkey or beef?
A3: Absolutely! Feel free to use ground turkey or beef as alternatives, noting that cooking times might vary slightly based on the meat’s fat content.

Q4: How do I know when my meatloaf is done?
A4: Use a meat thermometer; the internal temperature should reach 165°F. If you don’t have one, the meat should be no longer pink in the center.

Q5: Can I freeze meatloaf before cooking?
A5: Yes, you can form the loaves and freeze them unbaked. Once you’re ready to cook, simply place them in a preheated oven for a bit longer than normal to ensure they’re heated through.

Q6: What’s the best way to reheat meatloaf?
A6: Reheat in the oven at 350°F for about 15-20 minutes, covered with foil to retain moisture, or microwave the slices on low power until heated through.

Q7: What can I serve with meatloaf?
A7: Creamy mashed potatoes, sautéed green beans, or a fresh salad can complement meatloaf nicely, providing a balanced meal.

Q8: Can I add vegetables to the meatloaf?
A8: Yes, finely chopped vegetables such as carrots, bell peppers, or spinach can be added to enhance nutrition and flavor without compromising the texture.

Q9: Is this a good recipe for meal prep?
A9: Yes! These meatloaves store well, making them perfect for meal prep. They can be made in batches and frozen for quick meals on busy nights.

Q10: What’s the best way to serve meatloaf?
A10: Slice the meatloaf and serve warm on a platter, garnished with fresh herbs, and accompanied by your favorite sides for a complete meal.

Additional Resources

For those inspired by Garlic Parmesan Chicken Meatloaves, consider exploring related recipes, such as turkey burgers, chicken meatballs, or even variations on traditional meatballs. These alternatives retain similar flavors while keeping meal options fresh.

Technique guides on proper mixing or oven temperature adjustments can help you build foundational cooking skills. Investing time in understanding cooking methods is invaluable in attaining optimum results every time.

Dive further into ingredient information focusing on ground meats and cheese options; understanding these elements enhances cooking confidence and ensures the best flavor outcomes in every recipe.

Invest in quality kitchen equipment like loaf pans or thermometers to refine your cooking process, resulting in consistently successful meals that impress family and friends.

Stay attuned to seasonal variations when crafting your meatloaf to ensure you’re using the freshest ingredients, resulting in vibrant and flavor-packed meals that resonate with current culinary trends.

Join the Conversation

Engage with us on social media to share your photos and adaptations of Garlic Parmesan Chicken Meatloaves! Join our community conversations to exchange tips or unique variations that celebrate this classic dish.

When sharing your culinary experiences, consider offering photography tips that capture the dish’s essence and show your creative flair in the kitchen. Your variations not only inspire others but foster a rich community of home cooks.

Encourage recipe reviews; these insights provide value for both new and seasoned cooks. Sharing successes, challenges, and improvements creates an enriching environment where all can learn and grow.

Lastly, your individuality in recipes shines through when you join discussions. Explore flavors, textures, and presentations that extend beyond traditional norms, making mealtime an exciting adventure for everyone.

The Recipe

Garlic Parmesan Chicken Meatloaves

Serves: 4 servings

Prep Time: 15 mins

Cook Time: 25 mins

Total Time: 40 mins

Kitchen Equipment Needed

  • Loaf pan or baking dish
  • Mixing bowl
  • Meat thermometer
  • Knife and cutting board

Ingredients

  • 1 lb ground chicken
  • 1/3 cup breadcrumbs (or gluten-free alternative)
  • 1/3 cup grated Parmesan cheese
  • 2 cloves garlic, minced
  • 1 tsp Italian seasoning
  • 1 egg
  • Salt and pepper to taste
  • Optional: fresh parsley for garnish

Directions

  1. Preheat the oven to 375°F (190°C).
  2. In a mixing bowl, combine the ground chicken, breadcrumbs, Parmesan cheese, minced garlic, Italian seasoning, egg, salt, and pepper until well mixed.
  3. Transfer the mixture into a lightly greased loaf pan, forming it into a loaf shape.
  4. Bake in the preheated oven for 25-30 minutes, or until the internal temperature reaches 165°F.
  5. Remove from the oven and let rest for 5 minutes before slicing.
  6. Garnish with fresh parsley if desired and serve warm.

Recipe Notes

  • Try experimenting with different herbs and spices to customize flavor.
  • For a spicy kick, add some crushed red pepper flakes to the mixture.
  • Feel free to adjust the recipe based on available ingredients or dietary needs.

Easy Garlic Parmesan Chicken Meatloaves for Weeknight Dinners

Garlic Parmesan Chicken Meatloaves: A Comforting Twist on a Classic Dish

⚖️
Difficulty
Easy

⏲️
Prep Time
15 mins

🕒
Cook Time
30 mins

⏱️
Total Time
45 mins

🍽️
Servings
4

Garlic Parmesan Chicken Meatloaves are a delightful fusion of comforting flavors and nutritious ingredients. This family-friendly recipe not only boasts the aromatic blend of garlic and parmesan but also offers a tender texture that’s irresistible. Imagine sinking your fork into these juicy meatloaves that are oozing with cheesy goodness, complemented by the fragrant hints of garlic. This dish is perfect for weeknight dinners, ensuring your family enjoys a hearty meal that is both flavorful and fulfilling.

The beauty of Garlic Parmesan Chicken Meatloaves lies in their simplicity and versatility. With just a handful of ingredients, you can whip up a satisfying dish that rivals any gourmet meal. These meatloaves are not only easy to prepare but also allow you to customize additional spices or herbs according to your family’s preferences. Whether served with a side of mashed potatoes or a crisp salad, this recipe brings warmth to your dinner table and creates lasting memories with every bite.

Quick Recipe Highlights

  • Flavor Profile: This delicious recipe combines the savory richness of parmesan cheese with the robust flavor of garlic, creating an aroma that will have your mouth watering.
  • Texture: The meatloaves are tender and juicy on the inside while maintaining a slightly crispy exterior, each bite offering perfect balanced mouthfeel.
  • Aroma: The scent of roasted garlic mingling with melted cheese fills the kitchen with an enticing fragrance, making it hard to resist.
  • Visual Appeal: Golden-brown on the outside and soft white inside, these meatloaves are a feast for the eyes, presenting beautifully on any dinner plate.
  • Skill Level Needed: This recipe is perfect for beginners as it requires minimal techniques, making it accessible to all cooking enthusiasts.
  • Special Equipment: You’ll need a mixing bowl, a baking sheet, and a meat thermometer to ensure proper cooking without complication.

Recipe Overview

  • Difficulty Level: This recipe is considered easy, making it suitable for novice cooks and busy parents who want to create a homemade meal without spending hours in the kitchen.
  • Category: Garlic Parmesan Chicken Meatloaves fit perfectly into the comfort food category, bringing joy and warmth to any family meal.
  • Cuisine: This dish is inspired by American cuisine but is influenced by Italian flavors, particularly through the use of parmesan cheese and garlic.
  • Cost: The cost to make these meatloaves is quite economical, with affordable ingredients making it a budget-friendly meal option.
  • Season: These meatloaves are a year-round favorite, providing comfort regardless of the season, but shine brightly during the colder months.
  • Occasion: Perfect for family dinners, casual get-togethers, or even a potluck, where it’s sure to be a hit with everyone.

Why You’ll Love This Recipe

Garlic Parmesan Chicken Meatloaves are deliciously satisfying, tantalizing your taste buds with every bite. The combination of garlic and creamy parmesan gives a rich flavor that appeals to both adults and children alike. The tender, juicy meat melts in your mouth, while the crispy outer layer adds irresistible texture. For those who enjoy a comforting meal on chilly nights, these meatloaves are a must-try.

In terms of convenience, this recipe is designed for simplicity. With a quick prep time, you can have dinner on the table in under an hour. The meatloaves can be assembled ahead of time, allowing you to bake them straight from the fridge when you’re ready to eat. This makes it an excellent option for busy weeknights when everyone is on the go but still wants a home-cooked meal.

The nutritional benefits of these meatloaves are noteworthy as well. By using lean ground chicken, you’re opting for a healthier protein source that delivers essential nutrients without excess fat. The addition of garlic not only enhances flavor but also provides health benefits, supporting immune function and promoting cardiovascular health. You can enjoy this guilt-free meal while knowing you’re fueling your body right.

Socially, these meatloaves are an excellent dish for entertaining friends and family. Serve them in a cozy setting, and watch conversations unfold as everyone enjoys the rich flavors together. Their universal appeal makes them a crowd-pleaser at any gathering, allowing you to create lasting memories around the dinner table.

Finally, the cost-effectiveness of this recipe cannot be overstated. With budget-friendly ingredients and minimal cooking techniques, Garlic Parmesan Chicken Meatloaves provide a fulfilling meal without breaking the bank. It’s a healthy option that brings together the best of comfort food at an accessible price point.

Historical Background and Cultural Significance

The origins of meatloaf date back to the 5th century in Europe, as cultures began combining various ground meats with fillers such as bread or grains. In America, this beloved dish evolved significantly during the Great Depression, becoming a staple for families looking to stretch their meals further. By introducing Garlic Parmesan flavors, we pay homage to diverse culinary influences while keeping a classic alive.

Culturally, meatloaf holds a special place in the hearts of many Americans. It is often viewed as a homemade comfort food, evoking nostalgia for family gatherings and simple meals shared with loved ones. The unique twist of garlic and parmesan adds an Italian flair, reflecting the rich tapestry of American cuisine that has absorbed influences from various cultures over the years.

Over the years, Garlic Parmesan Chicken Meatloaves have evolved from traditional beef versions to more health-conscious adaptations. As cooking techniques and diets have progressed, the inclusion of lean meats and flavorful herbs is becoming increasingly popular. This evolution preserves the integrity of the dish while appealing to modern tastes and nutritional preferences.

Regional variations of meatloaf exist throughout the United States, from Southern-style with sweet sauce glazes to the Chicago-style with an Italian twist. Each adaptation adds its flair, yet the core concept remains intact—a hearty meal that brings people together.

Ingredient Deep Dive

Ground Chicken: Ground chicken is a leaner alternative to traditional ground beef, making it a healthier protein choice. High in protein and low in fat, ground chicken provides essential amino acids needed for muscle repair and overall health. When selecting ground chicken, look for fresh meat with a pink color and minimal fat. For storage, keep it refrigerated and use it within 1-2 days or freeze it for later use.

Parmesan Cheese: A staple in Italian cuisine, parmesan cheese adds a rich, nutty flavor to dishes. It’s made from cow’s milk and known for its hard, granular texture. Nutritionally, parmesan is rich in calcium and phosphorus, important for bone health. When choosing parmesan, opt for the aged variety for the best flavor. Store it in an airtight container in the fridge and grate only what you need to keep it fresh.

Garlic: Garlic is celebrated for its robust flavor and numerous health benefits. Known for its anti-inflammatory and antibacterial properties, garlic can enhance immune health and cardiovascular function. Always select fresh garlic bulbs; they should be firm and free of sprouts. Store garlic in a cool, dry place away from direct sunlight. If you need a substitution, garlic powder can be used, but fresh garlic is preferred for optimal flavor.

Common Mistakes to Avoid

  • Overmixing the meat mixture: This can result in dense and tough meatloaf. Gently combine ingredients until just mixed.
  • Under-seasoning: Don’t skimp on salt or spices; adequate seasoning is crucial for flavor development.
  • Not using a meat thermometer: Skipping this step can lead to undercooked meatloaf. Aim for an internal temperature of 165°F.
  • Baking on the wrong rack: Positioning the meatloaf too high or low can lead to uneven cooking. Ensure it’s in the center of the oven.
  • Opening the oven too frequently: This can disturb the temperature and cooking process. Check only when necessary.
  • Inadequate resting time: Not allowing the meatloaf to rest may cause it to fall apart when slicing. Let it rest for at least 5 minutes.
  • Choosing the wrong ground chicken: Avoid meat that is overly lean, as this can lead to a dry meatloaf. A mix of dark and white meat is recommended.
  • Using stale bread crumbs: Fresh bread crumbs contribute a better texture and flavor. Always use fresh ingredients for best results.
  • Inconsistent loaf shape: Make sure to form the loaves uniformly to ensure even cooking throughout.
  • Ignoring flavor variations: Don’t hesitate to experiment with herbs and spices to customize flavors.

Essential Techniques

Proper Mixing: It’s crucial to mix the ingredients gently to prevent the meat from becoming tough. Use your hands for effective mixing, being careful not to compact the mixture. Aim for a uniform texture without overworking the dough. Look for a consistency where all ingredients are evenly distributed.

Shaping the Loaves: Shaping the meatloaves uniformly ensures even cooking. Use wet hands to shape the meat into loaves to prevent sticking. Aim for a medium thickness of about 1.5 inches, which will allow them to cook through without drying out. Keep an eye on the edges for a nice golden-brown finish.

Pro Tips for Perfect Garlic Parmesan Chicken Meatloaves

1. Always preheat your oven to the correct temperature for even cooking and to prevent sogginess.
2. Experiment with different cheeses for a variety of flavors, such as mozzarella or feta.
3. Add finely chopped vegetables, like bell peppers or spinach, to incorporate more nutrients.
4. Brush a little olive oil on top before baking for an extra crispy outer layer.
5. Allow your meatloaf to rest before slicing to maintain juiciness.
6. For a savory glaze, mix ketchup with a dash of Worcestershire sauce and brush it on during the last 10 minutes of baking.
7. Consider making mini meatloaves in muffin tins for quicker cooking and individual servings.
8. Store leftover meatloaf in airtight containers to retain freshness and flavor.

Variations and Adaptations

Garlic Parmesan Chicken Meatloaves can easily be customized to fit regional flavors. For a zesty Mexican twist, add taco seasoning and diced jalapeños, topped with cheddar cheese. Seasonal adaptations could include incorporating chopped spinach and pumpkin in the fall for a more hearty profile. For dietary modifications, consider making a gluten-free version by using gluten-free breadcrumbs or oats instead.

Flavor variations could also incorporate different herbs such as thyme or rosemary for an aromatic touch. For a unique texture, try incorporating finely grated vegetables like zucchini or carrots into the meat mixture. Presentation can be enhanced by serving with a homemade herb sauce or on a bed of creamy mashed cauliflower.

Serving and Presentation Guide

Plating Garlic Parmesan Chicken Meatloaves can elevate your dinner experience. For an elegant touch, slice the meatloaf into thick, even slices and arrange them on a rectangular platter. Garnish with fresh parsley or chives for a pop of color. Pair with seasonal vegetables roasted alongside the meatloaf to create a beautiful color contrast on the plate.

Traditional accompaniments such as mashed potatoes or a fresh garden salad add balance to your meal. For modern serving suggestions, consider serving with quinoa or a hearty grain salad for a nutritional boost. Be mindful of temperature; meatloaf is best enjoyed warm, so allow it to rest briefly before serving to retain heat.

Wine and Beverage Pairing

For wine pairing, a medium-bodied red like Chianti complements the flavors of Garlic Parmesan Chicken Meatloaves beautifully. The acidity in the wine balances the richness of the meatloaf while enhancing its savory flavors. If you prefer white wine, a chilled Sauvignon Blanc also works well, providing a refreshing contrast.

For non-alcoholic options, consider pairing with sparkling water infused with lemon or a light herbal iced tea to keep the meal refreshing. If coffee or tea is applicable, a cup of smooth, rich coffee could serve as a comforting finish to your meal, especially in cooler months. Serve these beverages chilled or warm, as preferred, for a well-rounded dining experience.

Storage and Shelf Life

To store Garlic Parmesan Chicken Meatloaves, let them cool to room temperature before transferring to airtight containers. They can be stored in the fridge for 3-4 days or frozen for up to 3 months. Ensure they’re properly wrapped to prevent freezer burn. It’s best to slice the meatloaf before freezing for easy portioning.

For signs of spoilage, check for off-smells or unusual color changes. When reheating, strive to reheat until the internal temperature reaches 165°F to ensure food safety. Use the microwave or oven for reheating; if using the oven, cover with foil to maintain moisture.

Make Ahead Strategies

Consider preparing your Garlic Parmesan Chicken Meatloaves the night before. Mix all ingredients and form the loaves, then cover and store them in the fridge until ready to bake. This allows the flavors to meld and makes for a quick dinner preparation.

If you’d like, you can also bake them ahead and store cooked meatloaves in the fridge. When ready to serve, simply reheat in the oven. For optimal freshness, add a bit of fresh garnish or sauce upon serving.

Scaling Instructions

For scaling Garlic Parmesan Chicken Meatloaves, halving or doubling the recipe works seamlessly. Just adjust the cooking time slightly if making larger batches; larger meatloaves may require additional time to reach the desired doneness.

Adjust equipment as needed; for instance, use two baking sheets if making double the recipe. Always ensure to check the internal temperature of your meatloaf. For storage considerations, larger portions may need more airtight containers or zip-top bags for freezer storage.

Nutritional Deep Dive

When analyzing the nutritional value of Garlic Parmesan Chicken Meatloaves, focus on the macro breakdown of proteins, carbohydrates, and fats. Ground chicken provides ample protein while keeping fat levels manageable, making it a suitable option for health-conscious diners.

Micronutrient analysis reveals significant levels of important vitamins and minerals, including calcium from parmesan and various B-vitamins from chicken. Both of these contribute to improved metabolism and neurological health. These meatloaves are an excellent choice for any healthy meal plan, providing the essential nutrients needed for balanced living.

Consider dietary considerations for allergies or specific restrictions. With easy substitutions, Garlic Parmesan Chicken Meatloaves can be manipulated to fit various diets without sacrificing flavor. For those managing weight, serving sizes can be adjusted by cutting smaller portions for a satisfying meal without excess calories.

Dietary Adaptations

For gluten-free adaptations, replace breadcrumbs with gluten-free oats or almond flour. Test different types of ground meat or plant-based alternatives to cater to both meat lovers and vegetarians alike.

Those requiring dairy-free options can omit parmesan or use nutritional yeast for a cheesy flavor without the dairy. For low-carb or keto diets, consider replacing breadcrumbs with crushed pork rinds or finely chopped mushrooms.

Paleo enthusiasts may enjoy these meatloaves made with fresh herbs and spices, excluding dairy and grains entirely. Lastly, low-FODMAP diets could incorporate garlic-infused oil instead of whole garlic for flavor without discomfort, ensuring everyone can enjoy this delicious dish.

Troubleshooting Guide

If you find your meatloaf is falling apart, this often indicates it was not mixed properly or lacked sufficient binding agents. Adding more breadcrumbs or an egg can help bind the mixture better.

For flavor balance, if the meatloaf tastes bland, consider increasing seasoning or adding a splash of Worcestershire sauce for an umami boost. If the interior is too moist, reduce the amount of liquid ingredients or extend cooking time slightly.

If temperature problems arise, either undercooking or overcooking, invest in a meat thermometer to ensure proper doneness. For equipment challenges, make sure your oven is calibrated correctly, as inconsistent temperatures can alter cooking times.

For ingredient substitutions, consult reliable references to mimic flavors effectively, and don’t hesitate to experiment with quantities to achieve desired textures.

Recipe Success Stories

Readers have shared heartwarming stories about their families enjoying Garlic Parmesan Chicken Meatloaves. Many have reported that their kids, who are typically picky eaters, devoured the meal, asking for seconds—truly a testament to the flavorful combination of garlic and cheese within this recipe.

Variations have become a fun point of creativity, with one reader customizing the dish with spicy Italian sausage for an extra kick, while another swapped out chicken for turkey. These adaptations highlight the dish’s versatility, enabling home cooks to make the recipe their own with ease.

Photography tips from the community emphasize the importance of styling and presentation. Utilizing fresh herbs for decoration or using vibrant plates can enhance visuals, making the dish all the more appealing during family dinners or gatherings.

Engagement in recipe discussions enhances the community spirit, as many share their tweaks and alternative ingredients, sparking ideas for new variations to explore. This collaborative atmosphere fosters connection through a mutual appreciation of delicious food.

Frequently Asked Questions

1. Can I freeze Garlic Parmesan Chicken Meatloaves? Yes, absolutely! You can either freeze them before or after cooking. Wrap them tightly in plastic wrap and then in aluminum foil to prevent freezer burn. They can last up to 3 months in the freezer.

2. How can I tell when the meatloaf is done? The best way to check doneness is by using a meat thermometer. The internal temperature should reach 165°F. Additionally, the juices should run clear when punctured.

3. What can I use instead of breadcrumbs? If you need a substitute for breadcrumbs, crushed crackers, oats, or even grated parmesan cheese can work well; all help bind the meatloaf while adding texture.

4. Is it okay to use breast meat only for the meatloaf? While using solely chicken breast is an option, the texture may be drier. Mixing in some dark meat helps maintain moisture and richness.

5. Can I use a different type of cheese? Certainly! Feel free to experiment with cheeses like mozzarella, cheddar, or even a spicy pepper jack to give your meatloaf a unique twist.

6. What can I serve with Garlic Parmesan Chicken Meatloaves? They pair wonderfully with mashed potatoes, roasted vegetables, or a light salad. Feel free to get creative with sides that complement the dish.

7. Can I make mini meatloaves instead? Yes! Simply divide the mixture into smaller portions and shape them like mini loaves or use a muffin tin. Bake for a shorter time, around 20-25 minutes.

8. How do I store leftovers? After allowing the meatloaf to cool, store leftovers in an airtight container in the refrigerator for 3-4 days. Reheat gently in the oven or microwave.

9. Can I use ground turkey instead of chicken? Yes! Ground turkey can be a healthier alternative with great flavor. Just make sure to monitor moisture levels, as turkey can dry out if overcooked.

10. How long do I need to rest the meatloaf after baking? Let the meatloaf rest for at least 5-10 minutes after baking before slicing. This allows juices to redistribute for a juicier and more flavorful outcome.

Additional Resources

For those looking to further expand their cooking skills, consider browsing additional recipes featuring ground meats. Techniques surrounding meatloaf preparation, such as flavor profiling and effective meat mixing, can help enhance culinary expertise. Investigating the properties of various ingredients can reveal exciting new twists to classic favorites.

Investing in quality kitchen equipment can also streamline the cooking process. Essential tools such as a reliable meat thermometer or sturdy mixing bowls can improve results. Lastly, seasonal variations can inspire creativity in the kitchen, encouraging experimentation with fresh, local produce to elevate your Garlic Parmesan Chicken Meatloaves.

Join the Conversation

We encourage you to share this recipe on social media using hashtags related to your cooking journey. Sharing your photos and variations can inspire others and lead to interesting discussions about meal preparation. Engage with fellow food enthusiasts by leaving comments and personal stories about how this recipe has brought joy to your table. Your feedback not only helps refine the recipe but also fosters a sense of community in the culinary world.

The Recipe

Garlic Parmesan Chicken Meatloaves

Serves: 4

Prep Time: 15 mins

Cook Time: 30 mins

Total Time: 45 mins

Kitchen Equipment Needed

  • Mixing bowls
  • Baking sheet
  • Meat thermometer
  • Parchment paper (optional)

Ingredients

  • 1 lb ground chicken
  • 1 cup breadcrumbs
  • 1/2 cup grated parmesan cheese
  • 2 cloves garlic, minced
  • 1/2 cup diced onion
  • 1 tbsp Worcestershire sauce
  • 1 large egg
  • Salt and pepper to taste
  • Fresh parsley, chopped (for garnish)

Directions

  1. Preheat your oven to 375°F (190°C).
  2. In a large mixing bowl, combine ground chicken, breadcrumbs, parmesan cheese, minced garlic, onion, Worcestershire sauce, and the egg.
  3. Season with salt and pepper and mix until just combined.
  4. Shape the mixture into meatloaves and place them on a lined baking sheet.
  5. Bake for 30 minutes, or until the internal temperature reaches 165°F (75°C).
  6. Let rest for 5 minutes before slicing, and garnish with fresh parsley before serving.

Recipe Notes

  • Feel free to add additional herbs or spices to enhance the flavor.
  • These meatloaves freeze well; wrap tightly and store for future meals.
  • Experiment with different types of cheese for added flavor variations.

Delicious Ooey-Gooey Cream Cheese Corn Bake for Any Occasion

Ooey-Gooey Cream Cheese Corn Bake: A Comfort Food Delight

⚖️
Difficulty
Easy

⏲️
Prep Time
15 mins

🕒
Cook Time
30 mins

⏱️
Total Time
45 mins

🍽️
Servings
6

The Ooey-Gooey Cream Cheese Corn Bake is a delightful dish that brings warmth and comfort to any table. This rich and creamy corn bake combines sweet corn with the velvety texture of cream cheese, creating a dish that’s both indulgent and satisfying. It’s perfect for family gatherings, potlucks, or even a simple weeknight dinner. With its enticing flavor and easy preparation, this corn bake becomes a household favorite that will have everyone asking for seconds.

As the dish bakes, the aromas wafting through your kitchen will entice your family and guests, making their mouths water in anticipation. The golden, bubbly top promises exceptional flavor that’s both savory and slightly sweet. Once it’s out of the oven, the creamy filling beckons to be tasted, creating an unforgettable experience that you’ll want to revisit again and again.

Quick Recipe Highlights

  • Flavor Profile: This dish offers a perfect balance of sweetness from the corn and creaminess from the cheese, enhanced with a touch of seasoning.
  • Texture: The Ooey-Gooey Cream Cheese Corn Bake features a luscious and creamy interior punctuated by a lightly crispy top that creates a wonderful contrast.
  • Aroma: The baking process releases a fragrant mix of sweet corn and creamy cheese that is nothing short of irresistible.
  • Visual Appeal: On serving, the dish boasts a golden, bubbling surface that is visually stunning, making it a centerpiece for any meal.
  • Skill Level Needed: Even beginner cooks can master this recipe with ease, making it an ideal choice for anyone wanting to impress without too much effort.
  • Special Equipment: A simple baking dish and mixing bowl are all you need to whip up this delightful treat.

Recipe Overview

  • Difficulty Level: This recipe is categorized as easy, making it suitable for cooks of all skill levels. It involves straightforward steps and minimal ingredients, so you’ll feel confident as you prepare it.
  • Category: This is a side dish that complements a variety of main courses, perfect for family meals or barbecues.
  • Cuisine: Drawing influences from classic American comfort food, this corn bake incorporates traditional flavors while adding a modern twist.
  • Cost: With easily sourced ingredients, this recipe remains budget-friendly, costing around $10 to make with common pantry staples.
  • Season: While delightful year-round, this dish shines particularly during the summer months when sweet corn is at its peak freshness.
  • Occasion: It’s ideal for celebrations like Thanksgiving, barbecues, or casual family dinners, adding flair to any gathering.

Why You’ll Love This Recipe

This Ooey-Gooey Cream Cheese Corn Bake delights the palate with its comforting taste and creamy texture. Each bite is a harmonious blend of sweet corn and tangy cream cheese, making it a must-try dish for comfort food lovers. With just the right amount of seasoning, this corn bake elevates simplicity to new heights, ensuring flavor-packed enjoyment in every spoonful.

Convenience is a significant perk of this recipe. With minimal prep time and required cooking techniques, it allows busy home cooks to produce a delicious dish quickly. The straightforward process ensures even novice chefs can whip up this tasty corn bake without getting overwhelmed in the kitchen.

Nutritionally, this dish can provide a good source of dietary fiber and protein. While still considered comfort food, it enables you to incorporate vegetables into your meals without compromising on taste, making it a guilt-free indulgence.

When entertaining guests, this creamy corn bake stands out as a thoughtful and generous addition to your table. Its ooey-gooey nature invites sharing and conversation, creating a warm atmosphere that enriches gatherings and family meal times alike.

Finally, its cost-effectiveness makes it a desirable recipe for all occasions. Simple yet original, this corn bake is an accessible dish that everyone can enjoy, allowing you to serve a crowd without breaking the bank.

Historical Background and Cultural Significance

The origins of the corn bake can be traced back to traditional American kitchens, where recipes highlighted the bounty of local produce. Corn, a staple in the American diet, has been celebrated in various forms throughout history. The inclusion of cream cheese gives this dish a contemporary twist, elevating it from a standard corn casserole to a beloved comfort food.

Culturally, this corn bake represents the warmth of home cooking, often prepared for family gatherings and holiday feasts. It serves as a reminder of simpler times spent around a dinner table, showcasing the importance of sharing food with loved ones. The dish has evolved over the years, adapting to ingredient availability and family preferences while retaining its core essence.

As the Ooey-Gooey Cream Cheese Corn Bake has gained popularity, variations have sprouted across regions, each adding its unique spin. Some might introduce spices or additional vegetables to the mix, while others may swap out cheese varieties to reflect local tastes, showcasing how food can bring communities together while also keeping tradition alive.

Ultimately, this corn bake isn’t just a recipe; it’s a piece of cultural history that continues to evolve, just as generations have passed down cherished family recipes, ensuring that the love of cooking and sharing meals endures through time.

Ingredient Deep Dive

Corn: Sweet corn is a delicious summer staple with deep roots in American cuisine. Known for its high fiber content and natural sweetness, it’s utilized in various dishes. When selecting corn for this recipe, look for fresh, plump ears with bright green husks. For storage, keep it in the fridge and use it within a few days for optimal sweetness. If fresh is unavailable, frozen corn makes a great substitute without sacrificing flavor.

Cream Cheese: This rich ingredient is a versatile staple in many households, providing a creamy texture to both sweet and savory dishes. Historically, cream cheese has been part of American cuisine for over a century, making it a trustworthy choice for adding richness. Nutritionally, it offers protein and calcium, although it should be enjoyed in moderation due to its fat content. Consider using low-fat versions to reduce calories while maintaining indulgence.

Common Mistakes to Avoid

  • Using old corn: Always use fresh or well-freezed corn to avoid a waxy and bland taste.
  • Overmixing: Mix just until combined to preserve the tender texture of the bake; overmixing can lead to a gummy result.
  • Skipping seasoning: A pinch of salt and pepper can elevate the flavors significantly, so don’t skip this step.
  • Ignoring baking time: Keep an eye on the bake to prevent over-browning; it should be golden and bubbly, not burnt.
  • Not letting it cool: Allow the dish to set for a few minutes before serving for easier slicing and serving.
  • Substituting with low-quality cheese: Invest in good cream cheese for the best flavor and texture.
  • Baking it in a cold oven: Preheat your oven to ensure even cooking and proper texture.
  • Incorrectly storing leftovers: Store carefully in airtight containers to prevent drying out and maintain freshness.

Essential Techniques

Baking is an essential technique in making the Ooey-Gooey Cream Cheese Corn Bake. Achieving that perfect golden-brown crust requires proper oven temperature control and timing. Preheating your oven is crucial to help the dish cook evenly and create a desirable texture. Look for visual cues, such as bubbling edges and a golden top, which indicate that it’s finished cooking.

Mixing is another key technique. Proper mixing combines the ingredients without overworking the batter. Use a spatula to fold in the cream cheese and corn carefully; watching for uniform distribution while ensuring a tender texture. Avoid beaters or whisks to prevent incorporating too much air, which can lead to a dense bake.

Pro Tips for Perfect Ooey-Gooey Cream Cheese Corn Bake

1. For added flavor, consider mixing in herbs like chives or dill.
2. Try adding jalapeños for a spicy kick that complements the sweetness of corn.
3. Use room-temperature cream cheese for easier blending and a smoother texture.
4. Top with breadcrumbs before baking for a crunchy contrast to the creamy filling.
5. Let the dish sit briefly after baking; this helps set the texture and makes it easier to serve.
6. For a cheesy upgrade, sprinkle extra cheese on top during the last few minutes of baking.
7. Ensure even cooking by placing the dish in the center of the oven, away from direct heat sources.
8. Customize the dish by adding roasted vegetables or a protein source for a complete meal.

Variations and Adaptations

Regional variations abound for this corn bake; Southern versions often incorporate spices such as cayenne or smoked paprika, while Midwestern takes might focus on sweet corn’s natural flavors. Seasonal adaptations can include adding fresh squash or zucchini during the summer months, making it a versatile dish for various occasions.

For dietary modifications, consider substituting the cream cheese with a dairy-free cream cheese alternative to create a vegan version. Low-carb enthusiasts can use cauliflower rice instead of corn for a similar texture without the carbs. Additionally, for those who enjoy bold flavors, consider using flavored cream cheeses, such as garlic herb, to personalize the taste.

Variations in presentation can be achieved by serving the corn bake in individual ramekins or layering it with sides like a salad or grilled meat for an impressive dinner plate. Elevate the visual appeal by garnishing with fresh herbs or a sprinkle of paprika right before serving.

Serving and Presentation Guide

Plating techniques can enhance the visual appeal of your Ooey-Gooey Cream Cheese Corn Bake. Consider using a vibrant, contrasting plate to allow the golden color of the bake to shine. You can cut the bake into wedges for an elegant serving style or use a scoop to serve individual portions.

Garnishing enhances the dish’s appeal; fresh herbs like parsley or green onions add color and freshness to the baked corn. Traditional accompaniments include a side salad or cornbread, complementing the texture and flavors. For modern serving suggestions, try pairing it with grilled meats or tacos to give your meal an exciting twist.

Temperature considerations are essential; serve the corn bake warm for optimal flavor and texture. Leftovers can be plated in a visually appealing manner, layered with fresh ingredients or paired with complementary dipping sauces for an appetizing presentation. Lastly, remember portion control; generous servings are delightful, but striking a balance ensures everyone gets a taste.

Wine and Beverage Pairing

When selecting a wine to accompany your Ooey-Gooey Cream Cheese Corn Bake, consider a lightly oaked Chardonnay. Its buttery flavor harmonizes with the creaminess of the dish while balancing the sweetness of the corn. For a red option, a light Pinot Noir works nicely without overpowering the corn bake’s delicate flavors.

For non-alcoholic alternatives, a homemade lemonade or iced tea provides refreshing acidity that pairs wonderfully with this rich dish. If you’re considering coffee pairings, a creamy latte can complement the texture and flavor profile, providing a satisfying finish to your meal.

Temperature considerations are crucial when serving beverages. Chilled wines, refreshing iced drinks, and warm coffee can all add an enjoyable dynamic to the meal, enhancing the overall dining experience.

Storage and Shelf Life

Proper storage methods for your Ooey-Gooey Cream Cheese Corn Bake are essential for maintaining its delightful flavor and texture. Store leftovers in an airtight container in the refrigerator, where they can last for up to 3-5 days. Make sure to let the bake cool completely before sealing to prevent moisture buildup inside the container.

For better quality, freezing is an option, but make sure to place it in a freezer-friendly container. When properly frozen, it can last up to 2 months. Reheating should be done gradually in the oven to preserve texture; consider covering it with foil to prevent over-browning while it warms through.

Signs of spoilage to watch for include an off smell or changes in color. If you notice anything amiss, it’s safer to discard the leftovers. Reheating should be done thoroughly to an internal temperature of 165°F (74°C) for safety.

Make Ahead Strategies

Preparing the Ooey-Gooey Cream Cheese Corn Bake in advance is simple, making it an excellent choice for busy families. Begin by assembling your ingredients a day ahead; mix the filling and store it in the fridge until you’re ready to bake. This helps infuse flavor and saves valuable time on the day of serving.

Quality remains a priority; however, avoid combining your ingredients until just before baking. If prepped too soon, the corn can release moisture, impacting the final texture of the bake. In this case, store the assembled dish but bake it fresh to enjoy the best outcomes.

Reheating guidelines are essential; should you bake ahead and store it, consider allowing it to come to room temperature before popping it back in the oven to reheat uniformly. For freshness, add any garnishes or sides just before serving to ensure they stay vibrant and appealing.

Scaling Instructions

Scaling the Ooey-Gooey Cream Cheese Corn Bake is easy, whether you want to halve or double the recipe. When halving, ensure you use a smaller baking dish to maintain the intended texture. For larger gatherings, doubling the recipe is straightforward, but be mindful of baking times; larger quantities may require additional time to cook thoroughly.

Equipment adjustments might include using two dishes if doubling, as stacking them can lead to uneven cooking. Timing modifications will be necessary, as doubling the recipe can increase cooking time significantly, so always check for the golden bubbling indication before serving.

Storage considerations after scaling are crucial; be sure to allow ample cooling time before sealing any leftovers. Properly transfer remaining corn bake into suitable containers if serving more than once to maintain quality.

Nutritional Deep Dive

A macro breakdown of the Ooey-Gooey Cream Cheese Corn Bake reveals a satisfying balance of carbohydrates, protein, and fats. Sweet corn provides essential carbs, while cream cheese delivers protein and fat, making this dish a filling side that can hold its own in any meal. This balance can help keep you satisfied and energized throughout your day.

Micronutrient analysis indicates that you’ll benefit from vitamin A, vitamin C, and fiber found in corn. These essential nutrients help boost your immune system, promote gut health, and improve overall well-being. It’s an easy way to sneak in essential nutrients while enjoying a comforting dish.

Health benefits are evident; while synonymous with comfort food, this recipe can also promote a sense of satisfaction without excessive guilt. As with any recipe, portion control is key, so enjoy it mindfully to stay aligned with your dietary goals.

Weight management tips involve being mindful of ingredients; using low-fat cream cheese can help reduce overall calories while keeping the dish delicious. Pairing this bake with a side salad or lean protein can create a balanced meal that supports health goals without sacrificing taste.

Dietary Adaptations

For gluten-free adaptations, this recipe is naturally gluten-free, as none of the primary ingredients contain wheat. Nevertheless, always check for packaged ingredients to ensure they meet gluten-free standards.

If you need a dairy-free or vegan version, substitute cream cheese with a plant-based cream cheese alternative and adjust seasoning accordingly. For a low-carb option, you can use riced cauliflower instead of corn, providing a similar texture without the high carbohydrate content.

Keto and paleo diets can be accommodated by focusing on whole ingredients; reduce the cheese quantity and increaseother vegetables, allowing a variety of flavors while staying within dietary restrictions. Lastly, those following a low-FODMAP diet can substitute regular cream cheese with lactose-free cream cheese options.

Troubleshooting Guide

For texture issues, if your bake turns out too dry, consider covering it with foil during baking next time to retain moisture. Conversely, if it is too gooey, ensure you’re not overmixing to maintain lightness in the dish.

Flavor balance can be adjusted; if the bake tastes bland, adding a pinch of salt to help enhance flavor before baking can work wonders. If it’s too salty, adding more cream cheese can help balance it out.

For temperature problems, check your oven calibration—an oven thermometer can ensure true cooking temperatures. If your oven runs hot or cold, adjust baking times accordingly.

Equipment challenges are common; if you don’t have a baking dish, a cast-iron skillet works nicely, but adjust baking times to account for different materials. Ingredient substitutions can impact flavor and texture, so follow recommended changes closely for optimal results.

Timing concerns can arise if preparing the dish ahead; to avoid overbaking, monitor the dish closely during the final minutes of cooking, using visual cues to gauge readiness.

Recipe Success Stories

Community feedback on the Ooey-Gooey Cream Cheese Corn Bake has highlighted its status as a go-to comfort dish for many families. Readers often share how this recipe has become a treasured addition to their holiday tables, bringing smiles and complimenting many loved ones.

Variation successes abound, with numerous home cooks experimenting by incorporating their favorite vegetables or spices, resulting in personal adaptations that resonate with their family’s taste preferences. These suggestions provide inspiration for others to customize and create their unique dishes.

Readers often suggest photography tips, such as capturing the bubbling goodness right out of the oven, to showcase the inviting textures and colors. Sharing these dishes on social media has amplified the reach and appreciation for this recipe.

Adaptation stories tell of families discovering various flavor profiles through experimenting with different cheeses or incorporating meats, creating a larger meal that’s still easy to make. Engaging with these new interpretations brings a logistical and flavorful twist to this already beloved recipe.

Frequently Asked Questions

Q: Can I use frozen corn instead of fresh?

A: Absolutely! Frozen corn is a great substitute, just make sure to thaw it before mixing it with other ingredients to avoid excess moisture.

Q: Is this recipe gluten-free?

A: Yes, the Ooey-Gooey Cream Cheese Corn Bake is naturally gluten-free, making it suitable for those with gluten sensitivities.

Q: How do I store leftovers?

A: Store the leftovers in an airtight container in the refrigerator for up to 3-5 days, or freeze for longer storage.

Q: Can I prepare this dish ahead of time?

A: Yes, you can mix the ingredients and refrigerate them until you’re ready to bake for convenience!

Q: What can I serve this dish with?

A: The corn bake pairs well with grilled meats, salads, or even as a part of a potluck spread.

Q: Can I make this dish vegan?

A: Yes, for a vegan option, simply substitute the cream cheese with a plant-based alternative.

Q: What if my bake is too dry?

A: Ensure you’re not overbaking it next time and consider adding a bit more cream cheese to keep moisture.

Q: How long does it take to bake?

A: A typical bake time is about 30 minutes in a preheated oven, or until the top is golden and bubbly.

Q: Can I add meat to this recipe?

A: Yes! Cooked crumbled bacon or sausage can be added for an extra savory flavor.

Q: What’s the best way to reheat leftovers?

A: Reheat it in the oven at 350°F (175°C) for about 15-20 minutes or until warmed throughout.

Q: Can I use another type of cheese?

A: Yes! Feel free to experiment with different cheese varieties, such as cheddar or pepper jack, for unique flavors.

Additional Resources

Explore further with other related recipes, such as classic cornbread or savory casseroles that complement your meal. Technique guides on mastering baking basics can also boost your cooking confidence. Learn more about the nutritional benefits of corn and cream cheese, ensuring you’re informed on the ingredients you’re using.

For equipment recommendations, find the best mixing bowls and baking dishes that help achieve optimal results. Seasonal variations based on the corn harvest can enhance your experience, allowing for fresh, farm-to-table approaches to this timeless dish.

Join the Conversation

Engage with us by sharing your cooking experiences on social media! We love hearing your feedback and adaptations of the Ooey-Gooey Cream Cheese Corn Bake. Post your photos and tag us to inspire others in the community.

Your insights on recipe variations and successes provide valuable encouragement to fellow cooks, so don’t hesitate to share. Come, be part of an encouraging cooking community that cherishes creativity and fosters the joy of home-cooked meals.

The Recipe

Ooey-Gooey Cream Cheese Corn Bake

Serves: 6

Prep Time: 15 mins

Cook Time: 30 mins

Total Time: 45 mins

Kitchen Equipment Needed

  • Baking dish
  • Mixing bowl
  • Spatula
  • Oven mitts
  • Measuring cups and spoons

Ingredients

  • 2 cups sweet corn (fresh or frozen)
  • 8 oz cream cheese, softened
  • 1/2 cup sour cream
  • 1/4 cup milk
  • 1 cup shredded cheddar cheese
  • 1/2 tsp garlic powder
  • 1/2 tsp onion powder
  • 1/4 tsp salt
  • 1/4 tsp black pepper
  • 1/2 cup breadcrumbs (optional)

Directions

  1. Preheat your oven to 350°F (175°C).
  2. In a large mixing bowl, combine the cream cheese, sour cream, milk, garlic powder, onion powder, salt, and black pepper. Mix until smooth.
  3. Add the corn and half of the cheddar cheese, folding carefully until everything is well combined.
  4. Transfer the mixture to a greased baking dish and spread evenly.
  5. Top with the remaining cheese and breadcrumbs if using.
  6. Bake in the preheated oven for 30 minutes or until golden brown and bubbly.
  7. Let cool for a few minutes before serving. Enjoy!

Recipe Notes

  • For a spicier version, add diced jalapeños to the corn mixture.
  • Feel free to swap in different cheeses to suit your taste!
  • This dish is perfect for meal prep; it can be made ahead and stored in the refrigerator before baking.

Delicious Crock Pot Green Enchilada Chicken Soup Recipe

Crock Pot Green Enchilada Chicken Soup: A Flavorful Twist on a Classic

⚖️
Difficulty
Easy

⏲️
Prep Time
15 mins

🕒
Cook Time
6 hrs

⏱️
Total Time
6 hrs 15 mins

🍽️
Servings
6 servings

Crock Pot Green Enchilada Chicken Soup is a delightful and hearty dish perfect for cozy evenings or when you’re entertaining guests. Infused with rich flavors of green enchilada sauce, tender chicken, and a medley of vegetables, this soup is a meal that will warm you from the inside out. The slow-cooking process allows the ingredients to meld together beautifully, creating a dish that’s not only comforting but also incredibly satisfying.

As you approach this luscious soup, the aroma of cumin and green chilies fills the air, inviting you into the kitchen. Each spoonful offers a balance of creamy textures and zesty brightness, highlighting the unique combination of Mexican-inspired ingredients. Garnished with cilantro and lime, this soup doesn’t just nourish the body; it also excites the palate, making it a flavorful choice for family dinners or festive gatherings.

Quick Recipe Highlights

  • Flavor Profile: This soup boasts a bright, tangy taste from the green enchilada sauce and a hint of spice from jalapeños, balanced by the richness of creamy ingredients.
  • Texture: Velvety soup filled with tender chicken pieces and crunchy vegetables creates a delightful contrast in each bite.
  • Aroma: The enticing scent of spices such as cumin and the freshness of cilantro wake up your senses as it simmers.
  • Visual Appeal: Vibrant green hues combined with colorful toppings make it visually appealing and perfect for any table setting.
  • Skill Level Needed: This dish is simple enough for beginners, allowing anyone to create a delicious soup with minimal fuss.
  • Special Equipment: A reliable crock pot is essential for achieving the rich flavors that develop over the long cooking period.

Recipe Overview

  • Difficulty Level: Easy; this recipe is very forgiving and perfect for novice cooks who want to impress guests without extensive culinary skills.
  • Category: Comfort food; ideal for cold days or casual gatherings that invoke warmth and shared moments.
  • Cuisine: This dish is deeply rooted in Mexican cuisine, reflecting the rich flavors and robust culinary traditions of the region.
  • Cost: Affordable ingredients such as chicken, canned sauces, and vegetables make this dish budget-friendly for families.
  • Season: Best enjoyed in cooler months, this warming soup is a go-to dish for chilly autumn and winter days.
  • Occasion: Perfect for weeknight dinners, potlucks, or any festive occasion where comfort food is appreciated.

Why You’ll Love This Recipe

Crock Pot Green Enchilada Chicken Soup is utterly tantalizing, with a harmonious blend of spicy, savory, and creamy elements that excite the taste buds. Each spoonful delivers a satisfying warmth, encapsulating the essence of comfort food. The combination of green enchilada sauce with tender chicken results in a flavorful profile that is hard to resist, making it not just a meal but an experience.

The convenience of using a crock pot means you can toss everything together, set it, and forget it. While you go about your day, the slow cooking melds all the flavors together so that when mealtime arrives, you have a delicious, hearty soup waiting for you. This recipe allows for easy meal preparation, suitable for busy lifestyles without compromising on taste.

Nutritionally, the ingredients in this soup are packed with health benefits. Chicken provides a lean protein, while beans add fiber that keeps you satiated longer. Additionally, choosing ingredients like low-sodium broth and fresh vegetables adds to your nutrient intake without excess calories, making it a wholesome choice.

Serving this soup fosters a warm and inviting atmosphere, perfect for gatherings. Friends and family can gather around with bowls in hand, sharing stories and laughter as they enjoy a hearty meal together. The communal feeling of serving a dish that is both filling and flavorful enhances the dining experience and creates lasting memories.

Finally, this recipe stands out for its cost-effectiveness. Using budget-friendly staples means you can enjoy a delicious meal without overspending. This accessibility is appealing for both busy families and anyone looking for economical meal solutions without sacrificing quality or flavor.

Historical Background and Cultural Significance

The origins of green enchilada chicken soup can be traced back to traditional Mexican cuisine, which often features slow-cooked soups that highlight local ingredients and cultural flavors. Enchiladas themselves have a rich history, with evidence of rolled tortillas filled with meat or cheese dating back to pre-Columbian times. This soup, while not a traditional dish in its own right, brings together elements of enchiladas and hearty chicken soup into a comforting, Americanized staple.

In Mexican culture, flavor is paramount, and the use of green sauces demonstrates the celebration of fresh ingredients such as tomatillos and green chilies. The soup serves not only as nourishment but also as a means of preserving culinary traditions that bring communities together. Historically, soups have been a practical solution to utilize various leftovers and ingredients, making it a cornerstone of family meals.

The evolution of green enchilada chicken soup reflects changing culinary practices in American households, where convenience meets tradition. As families became busier, the adaptation of slow-cooked meals gained popularity, allowing for intimate family gatherings around the dinner table with minimal fuss in preparation. This blend of cultural influences highlights how traditional recipes can be reimagined for modern lifestyles.

Regional variations have sprouted, with many cooks adding their own unique spins; some incorporate different beans, spices, or toppings based on local preferences. These adaptations speak to the creativity found within home kitchens across the United States, showcasing how food can be both personal and communal.

Ingredient Deep Dive

Chicken is one of the primary proteins in this recipe, renowned for its versatility in various cuisines worldwide. It is a source of high-quality protein that supports muscle growth and overall health. When selecting chicken for the soup, opt for boneless thighs or breasts for tenderness, and ensure proper storage by keeping it in the coldest section of the fridge for up to two days or freezing for longer preservation.

Green enchilada sauce adds the distinctive flavor this soup is known for. Typically made with tomatillos and green chilies, this sauce is low in calories yet rich in taste. Aim for varieties without added sugars or preservatives. Store unopened cans in a cool, dry place and use within a week after opening.

Black beans bring not only flavor and texture to the dish but also a powerhouse of nutrition. They are an excellent source of fiber, which aids digestion and helps maintain stable blood sugar. Look for canned varieties that are low in sodium, rinse them well before using, and store leftovers in airtight containers in the fridge.

Fresh vegetables such as bell peppers, onions, and corn enrich the soup with both flavor and nutrition. When selecting bell peppers, choose ones that are firm and vibrant in color, storing them in the crisper drawer of the fridge. Corn adds natural sweetness, bringing a delightful contrast to the savory elements of the soup.

Cilantro, a fragrant herb commonly used in Mexican cuisine, adds brightness to the overall dish. Use fresh, vibrant leaves and avoid overly wilted greens. Storing cilantro in a jar with water helps maintain freshness for a longer duration, enhancing the overall presentation and flavor of your soup.

Common Mistakes to Avoid

  • Not seasoning adequately: Always taste and adjust seasoning while cooking, especially with slow cooker recipes, as flavors can become muted.
  • Using low-quality ingredients: High-quality chicken and sauce make a significant difference in flavor; avoid overprocessed options.
  • Overcooking vegetables: Add sensitive vegetables like bell peppers towards the end of cooking to retain their texture and flavor.
  • Ignoring the sauce consistency: If the soup becomes too thick, adjust the consistency with broth or water instead of serving it as is.
  • Not letting it sit: Flavors develop more when soup rests; allow it to sit off heat before serving for deeper taste.
  • Skipping garnishes: Fresh herbs and lime brighten the dish; don’t overlook these simple additions for presentation.
  • Overfilling the pot: Stick to recommended ingredient amounts to ensure proper cooking and prevent overflow.
  • Neglecting to check for leftovers: This soup stores well, so always save extras for a quick meal later in the week.

Essential Techniques

To master slow-cooking, it’s vital to layer flavors by sautéing onions and spices before adding to the pot. This technique enhances the depth of your dish, making it much more flavorful. Be mindful of cooking settings and don’t rush the process, as flavors only develop with time.

When shredding chicken post-cooking, ensure you use two forks to easily pull apart the meat while it’s still warm. Practice makes perfect here; a visual cue is the meat should be easily torn without resistance.

Pro Tips for Perfect Crock Pot Green Enchilada Chicken Soup

1. Sear chicken before placing it in the crock pot for added depth of flavor.
2. Use homemade green enchilada sauce if you can for a fresher, personalized touch.
3. Add an extra can of beans for more protein and fiber without increasing the number of meat servings.
4. Experiment with different vegetables, like zucchini or spinach, for a nutritious upgrade.
5. Adjust the level of heat by adding jalapeños for spice or keep it mild for the kids.
6. Stir in a dollop of sour cream or a splash of cream before serving for a creamier texture.
7. Allow the soup to cool down before refrigerating for better integrity and flavor retention.
8. Consider garnishing with avocado slices to add rich creaminess and nutritional benefits.

Variations and Adaptations

Regional variations of this dish can greatly enhance its flavor profile. In the Southwest, you might incorporate roasted green chiles for an earthy flavor, while in Texas, adding a hint of barbecue sauce can provide a surprising twist. Seasonal adaptations can also be introduced depending on what’s fresh in your area. In the summer, consider adding fresh corn and diced tomatoes for a bright, refreshing contrast.

If you’re looking for dietary modifications, consider utilizing a plant-based chicken substitute for a vegan option. Opt for low-fat dairy to transform it into a healthier version without sacrificing flavor. To enhance flavors, add smoked paprika for a depth of taste or even swap traditional corn with sweet corn for a delightful sweetness that complements the spicy elements.

When it comes to presentation, serving in individual bowls can make the dish feel special. Top with crispy tortilla strips and a sprinkle of cheese for an appealing crunch and contrast in texture.

Serving and Presentation Guide

Plating this soup elegantly begins with serving it in warm bowls to enhance the overall experience. Layer fresh herbs like cilantro or scallions on top for a pop of green and freshness. Drizzle sour cream or yogurt artistically on each bowl before serving, which not only looks appealing but also adds a tangy flavor profile.

Traditional accompaniments include tortilla chips or freshly baked cornbread, which can be served on the side to provide varied textures that complement the soup. For modern servings, consider beautiful wooden trays or rustic vessels to evoke a comfortable, homey feel.

Keep in mind that temperature plays a crucial role: Serve the soup hot, right from the crock pot, allowing guests to enjoy its comforting warmth. Portion control is also essential; offer generous servings while keeping in mind that this dish is filling, encouraging guests to savor every last bite.

Wine and Beverage Pairing

When it comes to wine pairings, a chilled Sauvignon Blanc harmonizes perfectly with green enchilada flavors, enhancing the dish’s herbal and citrus notes. If you prefer red wine, opt for a light-bodied Pinot Noir that won’t overpower the soup’s subtle spices.

For non-alcoholic options, serve lime-infused sparkling water which provides a refreshing contrast to the hearty soup. If enjoying this dish during colder months, consider a warm spiced apple cider that complements the soup’s warmth beautifully.

Tea lovers can choose a mild chamomile or mint tea that can refresh the palate after each bite and enhance the overall dining experience with its soothing characteristics.

Storage and Shelf Life

To ensure the best quality and flavor retention of your Crock Pot Green Enchilada Chicken Soup, store it in an airtight container in the refrigerator for up to three days. Make sure to cool it quickly to avoid bacterial growth.

For longer shelf life, consider freezing the soup. Transfer cooled portions into freezer-safe bags or airtight containers, marking the date for reference. When reheating, thaw in the refrigerator overnight or submerge the bag in cold water before warming in the microwave or on the stove.

Be mindful of spoilage signs: Off odors, changes in texture, or signs of frost in the freezer indicate it’s time to dispose of it. Reheat thoroughly before serving, ensuring the soup is heated to at least 165°F for safe consumption.

Make Ahead Strategies

Preparing in advance can enhance the ease of enjoying this delightful soup. Chop your vegetables and store them in an airtight container in the refrigerator the night before; this saves valuable time on the day of cooking.

You can also pre-measure dry and wet ingredients, ensuring everything is ready to mix without delay. Assemble all ingredients in the crock pot liner to make the process seamless on the day of cooking, just before turning it on.

The flavor of the soup deepens as it sits, so if you prepare it a day in advance, allow it to meld overnight before serving. When reheating, simply add a little broth or water to revive the consistency and up the freshness by adding new herbs or garnishes before serving.

Scaling Instructions

If you want to halve the recipe for a smaller gathering, simply adjust the ingredient quantities accordingly and shorten the cooking time if using high temperatures. Always taste and adjust seasonings to match the final amount.

For those needing larger quantities, doubling or tripling ingredients is straightforward. Just ensure your crock pot can accommodate the larger amount without overflowing. If needed, split the mixture across two pots and maintain the same cooking time for even heating.

Equipment adjustments may be necessary: larger pots or additional containers can manage increased volumes smoothly. Always monitor the soup closely, checking for doneness and flavors throughout the extended cooking period.

Nutritional Deep Dive

This dish is loaded with macros that will keep you feeling strong and satisfied. The protein from the chicken provides essential amino acids necessary for muscle repair and growth. Enjoyed with beans, the dish becomes even more nourishing, providing significant fiber content which is beneficial for digestive health.

Micronutrient analysis also reveals a host of essential vitamins and minerals from the diverse vegetables used—from vitamin C in bell peppers to potassium in beans. The addition of cilantro contributes antioxidants, which play a crucial role in rectifying bodily inflammation.

Considering portion analysis, a standard serving of this soup is rich in flavor yet moderate in calories, offering an excellent choice for those managing their diet. Adjusting your serving size can help maintain balanced energy levels throughout the day while indulging in this delicious meal.

Dietary Adaptations

For those looking to make this soup gluten-free, simply check your green enchilada sauce and use certified gluten-free broth to maintain flavor without gluten content. Substitution of beans for any grains often suffices in maintaining the dish’s integrity.

Dairy-free individuals can skip the cheese and sour cream, replacing them with cashew cream or other dairy-free alternatives that add the right texture and flavor. Vegan options are also possible by substituting chicken with tempeh or seitan, enhancing protein richness.

Low-carb diets can benefit from skipping beans entirely and focusing on low-carb veggies such as zucchini or cauliflower to maintain the heartiness without the starches. Keto variations might include adding more fat through cheese or cream while limiting higher-carb ingredients.

For those following paleo diets, replacing beans with more vegetables alongside a fresh, homemade enchilada sauce incorporates clean and whole food principles aligning with this eating philosophy.

Troubleshooting Guide

If you experience texture issues where the soup feels too thin, consider blending a portion to thicken it up while keeping it flavorful. In contrast, if it’s too thick, adding a splash of broth or water can restore the right consistency.

In regards to flavor balance, if you find the soup lacks punch, add additional lime juice or seasonings towards the end of the cooking process to refresh the taste without overpowering the original recipe.

Temperature problems might arise if the soup is either too hot or too cold; always maintain an eye on heating and ensure proper reheating guidelines are followed after storing.

For equipment challenges, if your crock pot isn’t performing well, consider experimenting with different settings or checking if replacements are needed. Timing concerns can arise; adjust your cooking time and allow for additional check-ins throughout if cooking longer than expected.

Recipe Success Stories

Community feedback on this delicious soup has been overwhelmingly positive, with many praising its easy preparation and adaptability. Readers have shared how they personalized the recipe with their own ingredient twists, such as adding extra spices or new veggies.

Variation successes include adding unique toppings; some suggest crushed tortilla chips for added texture, while others recommend garnishing with fresh avocado and lime. Readers appreciate that it accommodates various dietary needs, allowing for broad enjoyment of this dish.

Those who shared photographs highlighted how visually appealing the final dish can be, showcasing vibrant colors that reflect the freshness of each ingredient. Tips on recipe adaptations have led many to discover new favorites.

It’s these adaptations and shared experiences that create an engaged and supportive cooking community around this beloved recipe, inspiring everyone to find joy and creativity in the kitchen.

Frequently Asked Questions

Can I use frozen chicken in this recipe? Yes, you can use frozen chicken. Just ensure to extend the cooking time slightly until the chicken is cooked through and tender.

What can I substitute for green enchilada sauce? You may make your own sauce using tomatillos, jalapeños, garlic, and spices, or opt for a store-bought green salsa verde as an alternative.

How do I store leftovers? Keep leftovers in an airtight container in the refrigerator for up to three days. Always cool the soup completely before storing.

Can I make this soup ahead of time? Absolutely! This soup can be made ahead of time and tastes even better the next day when flavors have merged and developed.

Is this soup spicy? It has a mild level of heat from the green enchilada sauce. You can adjust spice levels by adding more or less chili or jalapeño.

What toppings do you recommend? Fresh cilantro, lime wedges, diced avocado, sour cream, and cheddar cheese are great topping options for added flavor and texture.

Can I use other meats instead of chicken? Certainly! Turkey, pork, or even beef can be used in place of chicken for a different flavor profile.

How long does it take to cook in a high setting? Cooking on high usually takes about 3 to 4 hours. Adjust according to your time constraints.

Can I add more vegetables to this soup? Yes! Feel free to include additional vegetables like zucchini, carrots, or even spinach for added nutrition and flavor.

Is there a vegetarian version of this soup? You can replace chicken with plant-based proteins and ensure the broth used is vegetable-based for a delicious vegetarian version.

Additional Resources

If you’re looking for similar recipes, consider exploring our collection of comforting soups, which include variations like chicken tortilla soup or spicy black bean soup. For technique guides, delve into our sections on slow cooking and ingredient pairing, which will enhance your culinary skills.

For ingredient information, resource guides are available to help you learn more about the nutrients each ingredient provides. If you’re interested in equipment recommendations, consider exploring the best crock pots and kitchen gadgets that simplify meal preparation.

A focus on seasonal variations allows you to adapt this recipe to include fresh ingredients, making it relevant year-round. Incorporating local produce enhances the flavors and supports sustainable eating habits.

Join the Conversation

We love to hear from our readers! Share your experiences cooking this Crock Pot Green Enchilada Chicken Soup, including any personal adaptations or unique plating ideas. Engaging in social media conversations can inspire others and foster a community of food enthusiasts.

Photography tips are always welcomed, so don’t hesitate to share your best soup shots using the hashtag provided. If you enjoyed this recipe, consider writing a review or rating it to help fellow home cooks discover its appeal.

Your voices contribute to our vibrant foodie community, exploring different variations and sharing tips to enhance this beloved dish further.

The Recipe

Crock Pot Green Enchilada Chicken Soup

Serves: 6

Prep Time: 15 mins

Cook Time: 6 hrs

Total Time: 6 hrs 15 mins

Kitchen Equipment Needed

  • Crock pot
  • Cutting board
  • Sharp knife
  • Measuring cups and spoons
  • Wooden spoon

Ingredients

  • 1 lb boneless, skinless chicken breasts
  • 1 can (10 oz) green enchilada sauce
  • 1 can (15 oz) black beans, drained and rinsed
  • 1 cup corn (frozen or canned)
  • 1 cup diced bell peppers
  • 1 cup chopped onion
  • 2 cloves garlic, minced
  • 2 cups chicken broth
  • 1 tsp cumin
  • 1 tsp chili powder
  • Salt and pepper to taste
  • Fresh cilantro for garnish
  • Lime wedges for serving

Directions

  1. Place chicken breasts in the bottom of the crock pot.
  2. Add green enchilada sauce, beans, corn, bell peppers, onion, garlic, chicken broth, cumin, chili powder, salt, and pepper.
  3. Stir to combine all ingredients and ensure chicken is covered with the sauce.
  4. Cover the crock pot and cook on low for 6 hours or high for 3-4 hours until the chicken is tender.
  5. Once cooked, remove the chicken and shred it with two forks.
  6. Return the shredded chicken to the soup and stir well to combine.
  7. Serve hot, garnished with fresh cilantro and lime wedges.

Recipe Notes

  • Feel free to add more veggies based on your personal preference.
  • This soup freezes well; store in airtight containers for up to 3 months.
  • For a creamier texture, stir in a dollop of sour cream just before serving.

Best Italian Penicillin Soup Recipe for Cozy Comfort

Italian Penicillin Soup: A Comforting Culinary Hug

⚖️
Difficulty
Easy

⏲️
Prep Time
15 mins

🕒
Cook Time
30 mins

⏱️
Total Time
45 mins

🍽️
Servings
4

Italian Penicillin Soup is the ultimate comfort food, blending hearty ingredients and nurturing spices that evoke feelings of warmth and home. Known for its medicinal qualities in folklore, this soup is more than just a meal; it’s a soothing remedy for the soul. Imagine a bowl filled with vibrant vegetables, tender chicken, and aromatic herbs simmered together to create a flavorful elixir. Each spoonful of this Italian-inspired dish is designed to provide comfort and well-being, making it an ideal choice for cold days or whenever you’re feeling under the weather.

This delightful Italian soup stands out not only for its taste but also for its rich heritage. Its roots in traditional Italian cooking combine rustic flavors with modern accessibility, allowing anyone to recreate this culinary masterpiece at home. Whether enjoyed with friends on a chilly evening or savored alone for some self-care, Italian Penicillin Soup is sure to become a favorite in your kitchen.

Quick Recipe Highlights

  • Flavor Profile: The soup boasts a delightful combination of savory chicken broth, earthy vegetables, and aromatic herbs, providing a taste that’s both rich and comforting.
  • Texture: Expect a hearty, soup-like consistency with tender chunks of chicken and vegetables that create a pleasing mouthfeel.
  • Aroma: The aroma is inviting, with hints of garlic, thyme, and rosemary creating a warming scent that’s hard to resist.
  • Visual Appeal: The vibrant colors of the vegetables against the golden broth make it visually enticing and appetizing.
  • Skill Level Needed: This soup is easy to make, perfect for beginner cooks looking to develop their skills without complexity.
  • Special Equipment: You’ll need a large pot or Dutch oven for simmering, along with basic kitchen utensils like cutting boards and knives.

Recipe Overview

  • Difficulty Level: This Italian Penicillin Soup is categorized as easy, perfect for novice cooks or families seeking a weekend project.
  • Category: It fits perfectly within the soup category, providing a wholesome meal option in any household.
  • Cuisine: Rooted in Italian culinary traditions, this soup reflects the heartfelt approach of Italian cooking—simple yet flavorful.
  • Cost: The ingredients are budget-friendly, making this dish an economical choice for families or gatherings.
  • Season: Ideal for colder months, offering a cozy and warming experience when the temperatures drop.
  • Occasion: Excellent for family dinners, casual gatherings, or as a restorative dish when someone is feeling under the weather.

Why You’ll Love This Recipe

Taste and texture appeal: This Italian Penicillin Soup captivates with its heartwarming flavor and textured components. You will find tender chicken and fresh vegetables harmoniously merging in a broth that’s rich and savory. The incorporation of herbs elevates every bite, ensuring an indulgent experience that evokes feelings of nostalgia.

Convenience and preparation benefits: The simplicity of preparation means this soup can be put together quickly, making it an excellent choice for busy weeknights or impromptu gatherings. The one-pot cooking method minimizes dishwashing and creates a seamless cooking experience, allowing you to focus more on enjoying the meal.

Nutritional advantages: Packed with proteins from the chicken, fiber from the vegetables, and vitamins from the aromatic herbs, this soup is as nutritious as it is delicious. It’s a well-rounded meal that supports immune function, making it not only comforting but good for your health too.

Social and entertaining value: Sharing a pot of Italian Penicillin Soup with loved ones becomes a memorable experience, fostering togetherness and conversation. The inviting aroma fills the room, encouraging everyone to gather and enjoy a heartwarming meal that brings comfort to the table.

Cost-effectiveness and accessibility: Utilizing readily available ingredients, this soup is budget-friendly. It’s a great way to use up leftover vegetables or pantry staples, showcasing how delicious meals can be created without straining your wallet or resources.

Historical Background and Cultural Significance

Origin story: The roots of Italian Penicillin Soup trace back to traditional Italian kitchens, where comfort food was crafted with love and care. Often showcased in family gatherings, this dish has been passed down through generations, representing familial bonds and warmth.

Cultural importance: This recipe holds a significant place in Italian culture, where food is synonymous with healing. It symbolizes nurturing, showing how a simple bowl of soup can provide comfort during hard times or illness. It speaks to the Italian philosophy of ‘cucina povera,’ focusing on frugality and resourcefulness in cooking.

Evolution of the recipe: Over the years, variations of Italian Penicillin Soup have sprouted across different regions of Italy. Each region adds its unique twist, leading to diverse flavors while maintaining the comforting essence of the original recipe.

Regional variations: From creamy broth versions to hearty tomato-based takes, the beauty of this soup lies in its adaptability. Different provinces claim their variations, showcasing local ingredients and culinary preferences that highlight Italy’s vibrant food culture.

Ingredient Deep Dive

Chicken: Chicken serves as the main protein in this Italian Penicillin Soup. Rich in protein, it contributes to muscle strength and overall health. Opt for organic chicken for the best flavor, and ensure proper storage in the refrigerator or freezer to keep it fresh. If desired, substitutes such as turkey or plant-based options are available or can be adjusted based on dietary preferences.

Carrots: These vibrant vegetables add sweetness and color to the soup. Carrots are rich in beta-carotene, which is essential for eye health. When selecting carrots, choose firm and brightly colored ones, and store them in a cool refrigerator environment for longevity. They can also be easily replaced with parsnips for an intriguing twist.

Celery: Celery brings a delightful crunch and aromatic essence to the Italian Penicillin Soup. It’s low in calories yet high in fiber, promoting digestive health. When purchasing celery, look for crisp stalks and avoid ones with wilted or brown edges. Additionally, you can substitute celery with fennel for a unique flavor profile.

Herbs (thyme, rosemary, parsley): Fresh herbs elevate the dish, enhancing the bouquet of flavors and contributing to its visual appeal. They are rich in antioxidants and can provide various health benefits. For the freshest experience, use herbs that are vibrant with no wilting leaves; otherwise, you can store them wrapped in a damp paper towel in the fridge.

Common Mistakes to Avoid

  • Not seasoning adequately: Many novice cooks forget to season their broth and ingredients properly, resulting in a bland soup. Always taste as you go and adjust seasoning levels as necessary.
  • Using overcooked vegetables: Overcooked vegetables can become mushy and lose their nutritional benefits. Aim for tender yet slightly firm vegetables to retain their texture.
  • Skipping the aromatics: Aromatics like garlic and onions provide depth of flavor, yet are often overlooked. Sauté them first to unlock their full potential before adding other ingredients.
  • Overcrowding the pot: Too many ingredients at once can prevent even cooking. Cook in batches when necessary to maintain a balanced texture and flavor.
  • Ignoring simmering times: Boiling soup too aggressively can result in tough meats and overcooked vegetables. Gently simmer to achieve melting tenderness.
  • Not allowing flavors to meld: Leaving the soup to rest enhances the flavor significantly. Always allow it to simmer for a sufficient time for the ingredients to fully integrate.
  • Improper storage: If not stored correctly, leftovers can spoil quickly. Utilize airtight containers and refrigerate or freeze promptly to maintain freshness.
  • Forgetting to garnish: A simple garnish can elevate your dish’s presentation and taste. Consider topping with fresh herbs, a drizzle of olive oil, or a sprinkle of cheese for added appeal.

Essential Techniques

Sautéing: Sautéing is vital for infusing flavors into your soup. Start by adding aromatics and vegetables to hot oil, stirring continuously until they soften and fragrant. This technique ensures a flavorful base for your dish, helping to build depth.

Simmering: Simmering allows flavors to meld, making it crucial for a successful soup. Cook your soup on low heat to reach a gentle bubbling, which extracts flavors from the ingredients while preserving tenderness.

Taste Testing: Regularly taste your soup during the cooking process to ensure seasoning is on point. It’s essential to adjust flavors during cooking rather than waiting for the final product to understand what’s needed.

Garnishing: Lovely presentation enhances the dining experience. Sprinkle chopped herbs or drizzle good quality olive oil on top before serving; this adds flavor and visual interest to the soup.

Pro Tips for Perfect Italian Penicillin Soup

Start with quality ingredients: Using fresh, organic, and high-quality ingredients significantly improves the flavor profile of your Italian Penicillin Soup. Choose seasonal vegetables for the best taste and health benefits.

Make it a day in advance: Allowing the soup to rest overnight amplifies the flavors. Store it in an airtight container and reheat it gently the next day for a comforting meal.

Experiment with spices: Don’t be afraid to add your favorite spices or experiment with different herbs like oregano or basil to customize your soup’s flavor.

Cook the noodles separately: If adding pasta, consider cooking them separately and adding them to each bowl upon serving. This prevents them from becoming mushy and allows for a better texture.

Use a Dutch oven: A heavy-bottomed pot like a Dutch oven ensures even heating and minimizes the risk of burning the soup, resulting in a perfect cook every time.

Strain before serving: For a cleaner soup, use a strainer to remove excess solids before serving, giving you a smoother texture without losing flavor.

Garnish for flair: Elevate the dish with creative garnishes like a drizzle of pesto, a sprinkle of parmesan, or fresh parsley to enhance both flavors and appearance.

Add a splash of lemon: A touch of lemon juice right before serving adds brightness to the soup, enhancing the overall flavor and balance.

Variations and Adaptations

Regional variations: Italian Penicillin Soup can be adapted to reflect local flavors, such as using regional cheeses or herbs unique to specific areas of Italy. For example, incorporating a bit of Pecorino Romano can add a delightful twist.

Seasonal adaptations: In summer, consider incorporating fresh zucchini or peas for a lighter version, while in winter months, root vegetables like parsnips or squash can add depth and heartiness.

Dietary modifications: To cater to gluten-free diets, opt for gluten-free pasta or eliminate it altogether. A vegetarian version can easily be made by substituting chicken with lentils or chickpeas and using vegetable broth.

Flavor variations: Enhance the soup with different flavor profiles by incorporating spices like cumin or smoked paprika for an exotic twist, or even adding a splash of white wine for depth.

Texture modifications: For a creamier version, blend a portion of the soup after cooking to create a thick, velvety consistency while leaving some ingredients intact for texture.

Presentation alternatives: Consider serving the soup in rustic bread bowls for an inviting presentation or with sides of crusty garlic bread for an authentic Italian experience.

Serving and Presentation Guide

Plating techniques: Choose wide, shallow bowls for serving to enhance the presentation of your Italian Penicillin Soup. A sprinkle of fresh herbs in the center provides a vibrant pop of color.

Garnishing ideas: Top your soup with freshly grated parmesan cheese, croutons, or a drizzle of olive oil to elevate flavors and make it visually appealing.

Traditional accompaniments: Pair with a slice of crusty Italian bread or grilled cheese sandwiches for a nostalgic, comforting duo that complements the soup beautifully.

Modern serving suggestions: Serve in mason jars for a casual, trendy presentation for gatherings. This approach adds charm and ease to entertaining guests.

Temperature considerations: Ensure the soup is piping hot when served to release its rich aromas and flavors, enhancing the overall dining experience.

Portion control tips: Use ladles for even serving sizes while plating to maintain a consistent look across bowls, ensuring everyone enjoys a similar experience.

Wine and Beverage Pairing

Wine pairings: A crisp white wine like Pinot Grigio complements the light flavors of the Italian Penicillin Soup beautifully. For a red option, a Chianti brings out the robust flavors while remaining refreshing.

Non-alcoholic alternatives: Pair your soup with a sparkling water or herbal tea such as chamomile for a refreshing contrast that enhances the meal’s comforting qualities.

Coffee/tea pairings: A light chamomile or mint tea can cleanse the palate beautifully after a hearty bowl of soup, balancing flavors and aiding digestion.

Temperature considerations: Serve wine chilled to enhance its refreshing qualities, ensuring it complements the warmth of the soup without being overwhelming.

Serving suggestions: Serve wine in elegant glasses to elevate your dining experience. Consider a small cheese platter on the side for an added touch of sophistication and flavor variety.

Storage and Shelf Life

Storage methods: Allow the leftover Italian Penicillin Soup to cool completely before transferring it to airtight containers. This prevents condensation and maintains its freshness.

Temperature requirements: Store the soup in the refrigerator if consuming within three days. For prolonged preservation, opt for freezing to maintain quality for up to three months.

Container recommendations: Glass containers are excellent for storage, allowing you to monitor contents easily. Ensure they’re labeled with dates for easy tracking.

Signs of spoilage: Look for signs like off smells, discoloration, or undesirable texture changes as indicators of spoilage, and discard if any of these arise.

Reheating instructions: Reheat the soup gently on the stove over low heat to preserve flavor and texture. Avoid using a microwave, which can create uneven heating.

Freezing guidelines: If freezing, consider portioning the soup into individual servings for convenient reheating. Ensure containers are airtight to prevent freezer burn.

Make Ahead Strategies

Prep timeline: Chopping vegetables and measuring out ingredients can be done a day in advance. Store prepped elements in airtight containers to save time before cooking.

Storage between steps: If you wish to prepare the broth a day ahead of time, allow it to cool and store in the refrigerator. Combine with fresh ingredients on the day of serving for optimal flavors.

Quality impact assessment: Although making ahead is convenient, ensure you account for taste and texture. Cooking fresh vegetables enhances their nutrients and keeps the soup vibrant.

Assembly tips: Assemble all ingredients before cooking to streamline the process. This saves time and helps maintain focus during preparation.

Reheating guidelines: When reheating made-ahead soup, gently warm on the stove while stirring to evenly distribute the heat. Adjust flavor as necessary upon reheating.

Fresh element additions: Consider sautéing fresh herbs or vegetables just before serving for an added burst of flavor and to enhance presentation.

Scaling Instructions

Halving the recipe: If you need a smaller batch, simply halve the ingredients. This maintains the soup’s integrity and ensures every dish is flavorful.

Doubling or tripling: Increase ingredient quantities cautiously when scaling the recipe. Monitor cooking times closely, as larger quantities may require extra simmering for flavors to develop.

Equipment adjustments: If you’re preparing a larger batch, consider using a bigger pot or batch-cooking in stages to prevent overcrowding and maintain flavor distribution.

Timing modifications: Keep an eye on cooking times when adjusting quantities. Larger volumes take longer to reach optimal temperatures, often requiring additional simmering.

Storage considerations: When scaling recipes, calculate storage needs accordingly. Use multiple containers to avoid overcrowding and ensure even cooling of leftovers.

Nutritional Deep Dive

Macro breakdown: This Italian Penicillin Soup is a balanced meal with protein from chicken, complex carbohydrates from vegetables, and healthy fats if olive oil is used in preparation.

Micronutrient analysis: Key nutrients in this soup include Vitamin A from carrots, Vitamin C from various vegetables, and potassium from the broth, contributing to overall health and wellness.

Health benefits: Beyond its comforting taste, this soup supports hydration, provides immune-boosting nutrients, and helps in recovery due to its vitamin-enriched ingredients.

Dietary considerations: It is suitable for various diets, including balanced eating plans, due to its mix of lean proteins and vibrant vegetables, making it ideal for different health goals.

Portion analysis: Serving sizes can be tailored according to individual dietary requirements. Monitoring portion sizes ensures a health-conscious approach to enjoying rich flavors without overindulgence.

Weight management tips: This soup is a perfect inclusion for weight management plans. It’s filling due to high fiber content, making it a hearty meal without excessive calories.

Dietary Adaptations

Gluten-free: To adapt this recipe for gluten-free diets, use gluten-free pasta or omit pasta altogether, substituting it with more vegetables instead.

Dairy-free: Ensure the soup remains creamy by using plant-based milk options or nutritional yeast for an added cheesy flavor without dairy.

Vegan: Create a wholesome vegan option by replacing chicken with chickpeas or lentils and ensuring the broth is vegetable-based.

Low-carb: For a low-carb twist, eliminate the pasta and additionally swap starchy vegetables for non-starchy options such as leafy greens or broccoli.

Keto: Maintain a keto-friendly approach by keeping the ingredients low in carbohydrates and rich in healthy fats; consider adding avocado or olive oil for extra nutrition.

Paleo: Adhere to a paleo diet by utilizing natural and whole ingredients, avoiding grains, and focusing on fresh vegetables and lean meats.

Low-FODMAP: Ensure the soup caters to low-FODMAP diets by replacing garlic and onions with chives and ensuring no triggers are included.

Other specific diets: This soup can be easily tailored to suit many dietary needs by focusing on specific ingredient adjustments or substitutions based on individual preferences.

Troubleshooting Guide

Texture issues: If the soup comes out too thin, consider thickening it with cornstarch or arrowroot mixed with water. If it’s too thick, add more broth to balance the consistency.

Flavor balance: Struggling with a lack of flavor? Adding salt incrementally or a squeeze of citrus at the end enhances and brightens flavors that may seem flat.

Temperature problems: If the soup is too hot, let it cool down naturally before serving. Alternatively, if it’s too cold, reheating it gently over low heat will restore warmth without compromising texture.

Equipment challenges: Limited kitchen tools? Cooking in batches with limited utensils can effectively get the job done without sacrificing quality.

Ingredient substitutions: If you’re missing an ingredient, like chicken, consider using seasonal vegetables or legumes for a wholesome alternative, retaining the essence of the soup.

Timing concerns: Don’t rush the simmering time; allow the soup to rest and meld flavors properly to ensure every bowl is a rich representation of your effort.

Recipe Success Stories

Community feedback: Many readers have shared their joy in recreating this Italian Penicillin Soup, highlighting its comforting qualities and how it brings families together.

Variation successes: From adding spicy Italian sausage to experimenting with fresh veggies, readers report their own unique twists that amplify the flavor.

Adaptation stories: One cooking enthusiast shared how their grandmother taught them to prepare this soup, passing down family traditions, making it an emotional favorite.

Reader suggestions: Several readers recommend ingredient variations that cater to dietary requirements, demonstrating the versatility and love for this dish.

Photography tips: Community members have shared stunning photos of their soup creations online, inspiring others to explore this recipe and showcase their own presentation ideas.

Frequently Asked Questions

Can I make this soup vegetarian?

Absolutely! Simply replace the chicken with legumes like chickpeas or lentils and use vegetable broth instead of chicken broth. This maintains the heartiness while catering to a vegetarian diet.

How can I store leftovers?

Leftover soup can be stored in an airtight container in the refrigerator for up to three days. For longer storage, it can be frozen for up to three months. Ensure it cools completely before freezing.

Can I use frozen vegetables?

Yes, frozen vegetables can be a great time-saver. Just be sure to cook them properly in the broth to retain flavors and textures when using them in your Italian Penicillin Soup.

Is this soup gluten-free?

To ensure that your Italian Penicillin Soup is gluten-free, use gluten-free pasta if desired and check that your broth does not contain any gluten-based ingredients.

What herbs work best?

Thyme, rosemary, and parsley are traditional choices, but feel free to experiment with basil or oregano, depending on your flavor preferences and what you have on hand.

How can I make this soup spicy?

To add heat, you can incorporate red pepper flakes, diced jalapeños, or spicy sausage for a kick. Adjust according to your preference for spice levels.

Can I make it in advance?

Yes, the Italian Penicillin Soup actually benefits from sitting. Flavor develops over time, making it a great candidate to be made a day in advance.

What’s the best way to reheat the soup?

The best way to reheat Italian Penicillin Soup is gently on the stovetop over low heat. This preserves the integrity of the ingredients and ensures even heating throughout.

Can I add pasta to the soup?

Yes! If you enjoy pasta, consider adding it directly before serving for the best texture. You may also cook it separately and add individual portions when serving.

What should I serve with the soup?

This soup pairs wonderfully with garlic bread, a fresh salad, or a side of crusty Italian bread for dipping, enhancing the overall dining experience.

Additional Resources

If you’re looking to expand your culinary repertoire, explore more related recipes, including various types of soups, stews, and comfort foods. Check out technique guides for mastering skills essential in the kitchen, and don’t forget to learn about seasonal ingredients and their preparation. Utilize resource-rich ingredient information to enhance your cooking confidence and flavor outcomes.

Join the Conversation

We love hearing from you! Share your experiences and photos of your Italian Penicillin Soup creations on social media. Engage with fellow cooking enthusiasts through your own variation stories and feedback, contributing to a vibrant community of food lovers. Your reviews not only inspire others but foster a welcoming environment as we all share in the appreciation of culinary delights.

The Recipe

Italian Penicillin Soup

Serves: 4

Prep Time: 15 mins

Cook Time: 30 mins

Total Time: 45 mins

Kitchen Equipment Needed

  • Large pot or Dutch oven
  • Cutting boards
  • Sharp knives
  • Ladle

Ingredients

  • 1 lb chicken breast, diced
  • 2 carrots, chopped
  • 2 celery stalks, chopped
  • 1 onion, diced
  • 4 cups chicken broth
  • 2 cups water
  • 1 tsp thyme
  • 1 tsp rosemary
  • Salt and pepper to taste
  • Fresh parsley for garnish

Directions

  1. In a large pot, sauté the onions, carrots, and celery until they soften.
  2. Add the diced chicken and cook until it’s browned on all sides.
  3. Pour in the chicken broth and water, then bring to a simmer.
  4. Add thyme, rosemary, salt, and pepper, and let simmer for 30 minutes.
  5. Adjust seasonings as needed, then serve hot, garnishing with fresh parsley.

Recipe Notes

  • Feel free to add your favorite vegetables for a personalized twist!
  • This soup can be frozen for up to three months; just thaw and reheat when ready to enjoy.
  • For a creamier soup, consider adding a splash of cream before serving.