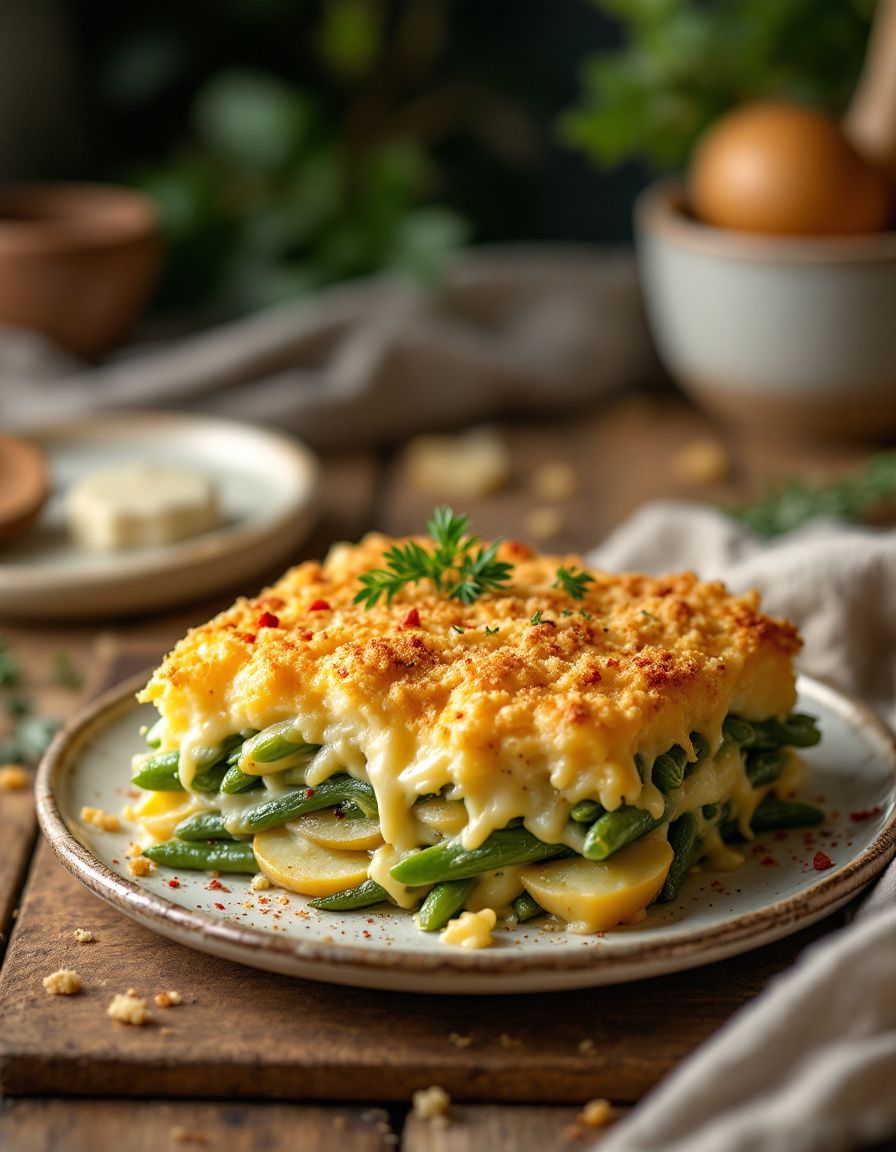
Spice Up Your Dinner with Thai Curry Chicken Skewers Recipe

Thai Curry Chicken Skewers: A Deliciously Exotic Dish

⚖️
Difficulty
Easy

⏲️
Prep Time
20 mins

🕒
Cook Time
15 mins

⏱️
Total Time
35 mins

🍽️
Servings
4

Thai Curry Chicken Skewers are a delightful fusion of spicy, savory, and slightly sweet flavors that capture the essence of Thai cuisine. Grilled to perfection, these skewers allow the mouthwatering aroma of coconut milk, curry paste, and lemongrass to fill your kitchen. This easy yet elegant dish is perfect for family gatherings or a simple weeknight dinner. Plus, the vibrant colors of the skewered ingredients create a feast for the eyes.

Quick Recipe Highlights

  • Flavor Profile: A harmonious blend of spicy, savory, and slightly sweet flavors that define classic Thai cuisine.
  • Texture: Succulent chicken with crispy charred edges contrasts with tender vegetables.
  • Aroma: Freshly chopped lemongrass and aromatic curry paste create an enchanting fragrance.
  • Visual Appeal: The combination of the vibrant red curry and green herbs dazzles on the plate.
  • Skill Level Needed: Basic grilling skills and familiarity with skewering techniques are sufficient.
  • Special Equipment: Simple skewers and a grill pan or BBQ are all you need for this recipe.

Recipe Overview

  • Difficulty Level: Designed for simplicity, this recipe makes it easy to master bold Thai flavors at home with minimal expertise.
  • Category: Ideal for appetizers, light dinners, or a delightful addition to a summer barbecue.
  • Cuisine: Deeply rooted in Thai culinary traditions, this dish seamlessly marries spices with fresh ingredients.
  • Cost: Economical ingredients such as chicken, coconut milk, and fresh herbs make this recipe budget-friendly.
  • Season: Perfect for summer grilling, yet enjoyable year-round, thanks to its balanced flavor profile.
  • Occasion: Suitable for casual gatherings, family meals, or a unique menu highlight at dinner parties.

Why You’ll Love This Recipe


Thai Curry Chicken Skewers tantalize your taste buds with a vibrant and exotic blend of flavors. The tender, juicy chicken absorbs a fragrant mix of coconut milk and red curry paste, while fresh lemongrass and ginger provide a refreshing contrast. The ease and quickness of preparing this dish will impress without overwhelming you, making it perfect for both weekday dinners and weekend parties.

Convenience is key, as this recipe allows for pre-preparation steps that make cooking a breeze. Simply marinate the chicken in advance, and all that remains is to grill the skewers to delicious perfection, saving you precious time during busy weeknights.

Nutritionally, this dish is packed with protein from the chicken and beneficial antioxidants from the herbs and spices, offering a balanced meal option. It’s low in processed ingredients, aligning with a healthier diet plan while indulging in rich, vibrant flavors.

Adding social and entertaining value, Thai Curry Chicken Skewers become the center of attention at social gatherings and cookouts, igniting culinary curiosity among friends and family. The unique aroma alone invites people to gather and enjoy the communal grilling process.

Finally, the cost-effectiveness and accessibility of ingredients make this recipe not just a treat for your palate but also for your wallet. You’ll easily find needed ingredients in your local grocery store, ensuring you can bring a taste of Thailand into your home without any hassle.

Historical Background and Cultural Significance


Emerging from the rich culinary traditions of Thailand, curry skewers are a modern take on age-old flavors. Thai cuisine, celebrated for its intricate balance of taste sensations, has captivated palates worldwide due to its inventive use of native herbs and spices. The fusion of sweet, salty, sour, and spicy elements in this dish reflects the hallmark of Thai food culture, which has evolved over centuries.

Culturally, curry dishes maintain profound significance in Thailand, often associated with celebratory occasions and family gatherings. The introduction of the skewer, a traditionally Middle Eastern cooking method, marks a global culinary exchange, demonstrating the adaptability and creativity of Thai chefs in presentation and technique.

This recipe is the evolution of traditional curry into a format more manageable for home cooks seeking exotic flavors without the intricate processes traditionally required. The dish encapsulates the heart of Thai cooking, where simplicity meets depth, resonating with a global audience embracing fusion cuisines.

Regional variations of curry also contribute to this recipe’s cultural richness, with adaptations incorporating local tastes while maintaining core elements. Each regional spin upholds the valued culinary practice of using seasonal produce, underscoring Thailand’s connection with its agricultural roots and varied ecosystems.

Ingredient Deep Dive


Chicken: In Thai culture, chicken symbolizes prosperity and abundance, making it a common choice for family meals and gatherings. Nutritionally, chicken provides a lean source of protein, essential for muscle repair and growth. When selecting, choose fresh, organic chicken for the best quality and flavor. Store chicken at a cool temperature and cook thoroughly to eliminate bacteria risks. To substitute, use tofu or tempeh for a vegetarian twist.

Red Curry Paste: Originating from central Thailand, red curry paste is a culinary staple, revered for its bold flavor. It consists of aromatic herbs and spices like red chilies, garlic, ginger, and lemongrass, offering antioxidants and anti-inflammatory benefits. Opt for fresh paste over canned for superior flavor. Keep your paste refrigerated and use it within a week to preserve its freshness. For a milder variant, use green curry paste or suspend chili content according to personal heat tolerance.

Common Mistakes to Avoid

  • Over-marinating the chicken can lead to an overpowering taste. Stick to the suggested marinating time for optimal flavor balance.
  • Using low-fat coconut milk might not provide the rich, creamy texture associated with traditional Thai curries.
  • Forgoing the use of fresh herbs significantly diminishes the fragrance and authentic taste of the skewers.
  • Incorrect skewer soaking can lead to burning and scorching on the grill.
  • Overcrowding the skewers prevents even cooking and crisp edges.
  • Grilling on too high heat might char the exterior while leaving the inside undercooked.
  • Neglecting to rest the chicken skewers after they’re cooked can result in less juicy meat.
  • Substituting key ingredients like lemongrass with less fragrant options reduces depth of aroma and flavor.
  • Essential Techniques


    Marinating: Marinating the chicken infuses it with deep, robust flavors. Use a resealable bag to ensure the chicken is thoroughly coated and marinate for a minimum of 30 minutes. Patience is key to achieving tender, juicy results. Avoid metal containers as they can react with the marinade ingredients.

    Grilling: Mastering the grill involves attention to heat levels and timing. Preheat the grill to medium, and always grease it before placing the skewers to prevent sticking. Cook on each side for about 4–5 minutes, looking for grill marks as a juicy doneness indicator, while avoiding frequent turning.

    Skewering: Soak wooden skewers in water for at least 30 minutes to prevent burning. Thread chicken and vegetables evenly, ensuring no overcrowding to allow even browning. Firmly secure each piece for an attractive presentation.

    Pro Tips for Perfect Thai Curry Chicken Skewers


    For an extra layer of flavor, brush the chicken with additional curry paste during the last few minutes of grilling. This enhances the dish’s visual appeal and adds a glaze-like texture to the skewers.

    Consider adding a squeeze of lime and a sprinkle of fresh cilantro upon serving to boost freshness and the citrusy profile that brightens the entire dish.

    When selecting vegetables for the skewers, think color variety. Bell peppers, red onions, and zucchini not only add flavor diversity but also make for a stunning presentation.

    To enhance the creamy texture, mix coconut cream into your marinade, ensuring each piece of chicken is lusciously coated.

    If time allows, marinate your chicken overnight in the refrigerator. This additional time intensely mingles the flavors.

    Use a kitchen thermometer to ensure internal chicken temperature reaches 165°F, preventing overcooking and ensuring safety.

    Variations and Adaptations


    Regional Variations: Embrace regional Thai influences by incorporating ingredients like tamarind paste or kaffir lime leaves to create different flavor nuances.

    Seasonal Adaptations: Swap in seasonal vegetables, such as summer squash or cherry tomatoes, to add a local, seasonal twist to your skewers.

    Dietary Modifications: To make this dish vegan-friendly, replace chicken with tofu or seitan. For a keto option, pair the skewers with low-carb vegetables.

    Flavor Variations: Experiment with paste heat levels by adding fresh chili peppers or using more lemongrass for a fragrant citrus hit.

    Texture Modifications: For crispier chicken, grill over a higher temperature for a shorter time but monitor closely to avoid charring.

    Presentation Alternatives: Present skewers over a bed of jasmine rice or a fresh Thai salad for a complete meal presentation.

    Serving and Presentation Guide


    Plating Techniques: Arrange skewers on a platter in a fan shape for an appealing centerpiece. Garnish with lime wedges and fresh basil to complement the meal visually.

    Garnishing Ideas: Top with chopped peanuts for a crunchy lift, adding experience to both taste and texture.

    Traditional Accompaniments: Thai sticky rice or a side of fresh spring rolls are excellent companions, enhancing the meal’s Thai authenticity.

    Modern Serving Suggestions: Serve as a wrap using lettuce leaves or flatbread for an innovative approach to enjoy the skewer’s flavors.

    Temperature Considerations: Serve skewers hot off the grill to maximize their freshly grilled aroma and tenderness.

    Portion Control Tips: One or two skewers per person, complemented by sides, ensure balanced meal distribution without waste.

    Wine and Beverage Pairing


    Wine Pairings: Pair with a crisp white wine like Sauvignon Blanc or a floral Riesling to balance the dish’s robust flavors with a refreshing finish.

    Non-Alcoholic Alternatives: For a non-alcoholic option, serve with Thai iced tea or a fresh lemongrass and ginger iced drink.

    Coffee/Tea Pairings: If serving at brunch, consider accompanying the meal with a light, citrus-infused green tea.

    Temperature Considerations: Keep beverages chilled, particularly when serving in warm climates or during outdoor gatherings.

    Serving Suggestions: Present in chilled glasses for wines, or in elegant, clear glassware to showcase non-alcoholic pairings professionally.

    Storage and Shelf Life


    Storage Methods: Once cooled, store skewers in an airtight container to preserve moisture and prevent odor absorption in the fridge.

    Temperature Requirements: Maintain at or below 40°F in the refrigerator to ensure freshness and longevity for up to three days.

    Container Recommendations: Use stackable containers with minimal airspace to maintain flavor profile and texture intact.

    Signs of Spoilage: Look out for any off-odors or changes in color to ensure the dish remains appetizing and safe to consume.

    Reheating Instructions: Reheat on a grill or oven to retain the freshly-charred texture. Avoid microwaves as they can toughen the chicken.

    Freezing Guidelines: While fresh is best, you can freeze cooked skewers for up to a month. Thaw in the fridge overnight before gently reheating.

    Make Ahead Strategies


    Prep Timeline: Prepare and marinate the chicken a day in advance for easy day-of cooking, liberating your schedule and reducing stress.

    Storage Between Steps: Keep marinated chicken sealed in airtight containers in the fridge to maintain freshness.

    Quality Impact Assessment: The marinade deepens in flavor over time, enhancing the dish rather than degrading its quality.

    Assembly Tips: Skewer the marinated chicken and vegetables shortly before cooking, stabilizing their structure and minimizing mess.

    Reheating Guidelines: Pre-grill skewers up to a day ahead, then finish on the grill to crisp up and heat through, ensuring meal freshness.

    Fresh Element Additions: Add garnishes and fresh herbs right before serving to maintain brightness in flavor and color.

    Scaling Instructions


    Halving the Recipe: Simply halve ingredient quantities for smaller servings without impacting flavor or texture balance.

    Doubling or Tripling: Increase marinade quantities proportionally when increasing recipe size to maintain flavor consistency.

    Equipment Adjustments: Utilize larger trays or grilling racks to accommodate more skewers without sacrificing cooking quality.

    Timing Modifications: Adjust grill time slightly for larger batches to ensure each skewer achieves proper doneness.

    Storage Considerations: When prepping in bulk, consider additional storage containers to separate each serving batch to maintain freshness.

    Nutritional Deep Dive


    Macro Breakdown: High in protein thanks to lean chicken, this recipe supports muscle growth and repair, with moderate fat from coconut milk.

    Micronutrient Analysis: Packed with vitamins from fresh herbs and spices, these skewers boost immune function and overall health.

    Health Benefits: Infused with fiber and antioxidants from vegetables, this dish contributes to a balanced, health-supportive diet.

    Dietary Considerations: Low in carbohydrates, primarily due to vegetable inclusion. Adjustable to support various dietary needs.

    Portion Analysis: Adjustable based on dietary goals, each skewer offers a manageable serving of macronutrients.

    Weight Management Tips: Pair with a large salad or steamed vegetables to add bulk and satiety without excessive calories.

    Dietary Adaptations


    Gluten-Free: This recipe naturally aligns with gluten-free diets. Verify that all sauces and spices you use are certified gluten-free.

    Dairy-Free: Ensure that the coconut milk used is full-fat and free of any dairy contamination.

    Vegan: Replace chicken with tofu or seitan for a vegan-preferred version without sacrificing the core flavor elements.

    Low-Carb: Adjust vegetable selections to low-carb options like cauliflower or green beans while retaining the flavorful curry base.

    Keto: Moderate consumption fits keto requirements by maintaining low-carb inclusiveness and nutrient-dense ingredients.

    Paleo: Embrace this dish in the paleo lifestyle, focusing on wholesome, unprocessed components.

    Low-FODMAP: Utilize low-FODMAP garlic substitutes and limit onion use for an adaptable, gut-friendly interpretation.

    Troubleshooting Guide


    Texture Issues: If the chicken is too tough, reassess marination time or check internal temperature during grilling.

    Flavor Balance: If overly spicy, calibrate heat elements by balancing with more coconut milk or substituting milder curry paste.

    Temperature Problems: Maintain grill at medium heat; spikes or low temperature can affect chicken moisture retention.

    Equipment Challenges: Use proper grill utensils and ensure skewers are adequately soaked to prevent burning.

    Ingredient Substitutions: Should ingredients be unavailable, focus on matching flavor profiles with similar alternatives like Thai basil for cilantro.

    Timing Concerns: Adjust cooking schedules if marinating or assembling tightly in your timeline by completing prep steps in advance.

    Recipe Success Stories


    Community Feedback: Many readers have shared how these skewers have become a staple at their summer barbecues, citing great approval from both kids and adults.

    Variation Successes: One reader successfully substituted shrimp for chicken, adding a maritime twist delighting seafood aficionados.

    Adaptation Stories: A gluten-free kitchen adapted the recipe using tamari instead of soy sauce, achieving excellent flavor harmony.

    Reader Suggestions: Long-time readers suggest adding pineapple chunks for a sweet, tropical flavor boost.

    Photography Tips: Highlight vibrant contrasts by photographing skewers on a dark slate plate for ultimate visual impact.

    Frequently Asked Questions

    Can I use a different type of meat for this recipe?

    Yes, this recipe is versatile. Pork, beef, or shrimp can replace chicken to suit your preference, keeping adjustments to marinade times in mind for optimal flavor absorption.

    How can I make the dish less spicy?

    Simply reduce the amount of red curry paste or add extra coconut milk to dilute the spiciness while maintaining the creamy consistency.

    What type of skewers are best to use?

    Both metal and bamboo skewers work, but bamboo must be soaked in water to prevent burning when grilled.

    Is there a gluten-free alternative for soy sauce?

    Tamari or coconut aminos are excellent gluten-free substitutes that won’t compromise on taste.

    How do I keep the meat juicy during grilling?

    Make sure to maintain medium grill heat and avoid overcooking, ensuring tasty, succulent chicken.

    Can I prepare the skewers in advance for a party?

    Absolutely, prep the day before and store marinated chicken in the fridge to save time during the event.

    What should I do if I can’t find fresh lemongrass?

    Substitute with lemongrass paste, adjusting for intensity, or lemon zest with a hint of ginger as a last resort.

    What’s the best way to reheat leftovers?

    Gently reheat on a grill or oven to revitalize texture and flavor, steering clear of microwaves which can toughen chicken.

    Can I freeze leftover skewers?

    Yes, freeze them in an airtight container, then thaw thoroughly before reheating to preserve texture.

    What can I pair with this dish for a complete meal?

    Pair with jasmine rice, cucumber salad, or Thai spring rolls for a satisfying, complementary menu.

    Additional Resources


    Explore Related Recipes: Interested in exploring more Thai cuisines? Try our classic Pad Thai or fragrant Tom Yum Soup recipes, both showcasing authentic flavors of Thailand.

    Technique Guides: New to grilling? Our beginner’s guide to grilling offers tips, tricks, and techniques to help you achieve perfect results every time.

    Ingredient Information: Visit our pantry staple guide for a comprehensive list of Asian ingredients along with their uses and storage tips.

    Equipment Recommendations: Obtain a tried and trusted grill pan and bamboo skewers that withstand frequent use to ensure high-quality cooking.

    Seasonal Variations: Curious about adjusting flavors based on seasonality? Discover our summer to winter transformation guide for adaptable recipes.

    Join the Conversation


    Social Media Sharing: Share your Thai Curry Chicken Skewers on social media using #ThaiSkewerDelight to feature on our page and inspire others.

    Photography Tips: Capture the beauty of your dish by utilizing natural light and a simple background, focusing on vibrant colors and textures.

    Recipe Reviews: Let us know your thoughts and experiences with this dish in our comments section, engaging with other culinary enthusiasts.

    Community Engagement: Join our online community for cookbook giveaways, cooking challenges, and opportunities to showcase your cooking adventures.

    Recipe Variations: Have your creative version? Share it with us, showcasing your unique adaptations and flavorful inspirations.

    The Recipe

    Thai Curry Chicken Skewers

    Serves: 4

    Prep Time: 20 mins

    Cook Time: 15 mins

    Total Time: 35 mins

    Kitchen Equipment Needed

    • Mixing bowl
    • Grill or grill pan
    • Wooden or metal skewers
    • Basting brush

    Ingredients

    • 500g chicken breast, cut into 1-inch pieces
    • 3 tablespoons red curry paste
    • 1/2 cup coconut milk
    • 2 tablespoons fish sauce
    • 1 tablespoon brown sugar
    • 1 stalk of lemongrass, finely chopped
    • 1 tablespoon ginger, grated
    • 1 red bell pepper, diced
    • 1 zucchini, sliced
    • Fresh cilantro for garnish
    • 4 bamboo skewers, soaked

    Directions

    1. In a mixing bowl, combine red curry paste, coconut milk, fish sauce, brown sugar, lemongrass, and ginger. Mix well.
    2. Add the chicken pieces to the marinade, ensuring they are fully coated. Marinate for at least 30 minutes or overnight for stronger flavor.
    3. Prepare the grill to medium heat.
    4. Thread chicken pieces alternately with red bell pepper and zucchini onto each skewer.
    5. Place skewers on the grill and cook for about 5-7 minutes on each side, until chicken is fully cooked and charred edges appear.
    6. Garnish with chopped fresh cilantro and serve hot.

    Recipe Notes

    • For deeper flavor, marinate the chicken overnight.
    • Balance spiciness by adjusting red curry paste according to taste.
    • Feel free to add pineapple for a hint of sweetness.

    Delicious Turkey Cranberry Meatballs with Homemade Cranberry BBQ Sauce

    Turkey Cranberry Meatballs with Cranberry BBQ Sauce: A Festive Delight

    ⚖️
    Difficulty
    Moderate

    ⏲️
    Prep Time
    15 mins

    🕒
    Cook Time
    25 mins

    ⏱️
    Total Time
    40 mins

    🍽️
    Servings
    4

    Experience the heartwarming flavors of the holidays with our Turkey Cranberry Meatballs drizzled in a luscious Cranberry BBQ Sauce. Combining the lean richness of ground turkey with the tartness of cranberries, this recipe captures the essence of festive dining with a twist. The Cranberry BBQ Sauce adds another layer of complexity, offering sweet, tangy, and smoky notes that complement the meatballs perfectly. Whether you’re entertaining guests or enjoying a cozy meal at home, these meatballs promise to be a highlight on your table.

    The dish begins with juicy turkey meat, renowned for its light flavor and nutritional benefits. Finely chopped cranberries are blended into the meat mixture, ensuring every bite bursts with a subtle tartness. As you cook, the aromatic journey unfolds — warm spices mingle with the scent of roasting turkey, creating an inviting atmosphere. Once plated, the vibrant red sauce cloaks the meatballs in a glossy, appetizing finish, boosting both flavor and visual appeal.

    Best of all, these turkey cranberry meatballs are straightforward enough for a weekday meal yet impressive enough for holiday gatherings. Even novice cooks can master this dish, making it an excellent recipe for those looking to expand their culinary horizons.

    Quick Recipe Highlights

    • Flavor Profile: These meatballs boast a delightful balance of savory turkey and tangy cranberries, enhanced by a sweet and smoky BBQ sauce.
    • Texture: Expect a juicy interior with a firm outer crust, complimented by the smooth, rich sauce.
    • Aroma: The meatballs offer inviting aromas of roasted turkey and spices, with a sweet undertone from the sauce.
    • Visual Appeal: Serve these vibrant, red-glazed meatballs for an eye-catching presentation that delights the senses.
    • Skill Level Needed: Culinary skills required are basic chopping and mixing, alongside simple baking.
    • Special Equipment: Basic kitchen appliances like a baking sheet and mixing bowl suffice for this recipe.

    Recipe Overview

    • Difficulty Level: The recipe’s moderate skill level grants you the opportunity to practice forming meatballs and adjusting oven settings, all of which are foundational cooking skills.
    • Category: This dish fits perfectly into the main course category, especially on festive and holiday tables.
    • Cuisine: While inherently American, the influences of BBQ sauce introduce elements of Southern cuisine.
    • Cost: Typically affordable, the main ingredients like ground turkey, cranberries, and BBQ sauce are budget-friendly, especially in season.
    • Season: Best enjoyed in the fall and winter months when cranberries are fresh and Thanksgiving gatherings abound.
    • Occasion: Ideal for holiday celebrations, family dinners, or casual get-togethers requiring a cozy and flavor-packed meal.

    Why You’ll Love This Recipe


    The harmony of taste and texture in Turkey Cranberry Meatballs with Cranberry BBQ Sauce is truly unforgettable. The earthiness of turkey marries exceptionally well with the cranberry’s sharp tang, creating a dynamic flavor profile that dances on the palate. Texturally, the meatballs are moist and tender with just the right amount of firmness, enveloped in a luscious sauce that spreads in warm waves across your tongue.

    Convenience is a standout feature of this recipe. Within 40 minutes, you can have a holiday-worthy dish that doesn’t demand hours of preparation. The meatballs are baked, reducing the mess typically associated with frying, and the sauce can be made ahead of time, freeing you to focus on other aspects of dinner preparation.

    Nutritionally, this meal is a winner. Turkey is a lean protein, low in fat but high in essential nutrients, making it an excellent choice for those mindful of health. Cranberries contribute antioxidants, while the homemade sauce allows for controlled sweetness and sodium levels compared to store-bought alternatives.

    When it comes to social gatherings, these meatballs shine. They are an impressive appetizer or main course, sparking conversation and satisfying diverse culinary preferences, from children to adults. The recipe can be easily doubled to accommodate larger groups, making it a perennial favorite for entertainers.

    Finally, the accessibility and cost-effectiveness of the ingredients make it a go-to option for any home cook. You won’t struggle to find turkey and cranberries, especially as their popularity peaks during the fall. This recipe’s simplicity ensures you won’t overspend, and it can be made from readily available pantry staples, keeping your grocery list manageable.

    Historical Background and Cultural Significance


    The love affair with turkey and cranberries is deeply entrenched in American culinary history, marking a cornerstone of traditional Thanksgiving feasts. Turkey, native to North America, has been a symbol of bounty long before it graced the Pilgrim’s table. Coupled with cranberries, another indigenous ingredient, the pairing was inevitable and harmonious, overcoming centuries to remain a staple today.

    Cranberries, initially used by Native American tribes for culinary and medicinal purposes, gained traction in European-influenced dishes soon after the settlers arrived. The cranberry sauce, as we know it, didn’t become mainstream until the 19th century, aligning with Thanksgiving’s rise in popularity as an official holiday.

    Turkey meatballs provide a modern twist on these age-old ingredients, showcasing the evolution of American culinary traditions. They embody the nation’s diverse gastronomic influences, from European immigrants to regional American cuisine innovations such as BBQ sauce, which hints at Southern inspiration.

    While traditionally featured during the colder months, regional variations of turkey cranberry dishes have appeared across the country, each reflecting local tastes and available ingredients. From New England’s more straightforward preparations to the hearty, spiced variations seen further south, this pairing has seamlessly adapted, maintaining its relevance through centuries of cuisine transformation.

    Ingredient Deep Dive


    Turkey serves as the heart of this recipe, chosen for its lean protein that is lower in cholesterol compared to red meat. It has been a dietary staple across many cultures, celebrated for its versatility and ability to capture flavors. When selecting turkey, opt for ground turkey to ensure an even mix of dark and lean meat, offering an ideal balance of moisture.

    Cranberries lend color and a tangy zest to the meatballs, acting as a natural tenderizer and flavor enhancer. They are rich in antioxidants, which contribute to cardiovascular health and boast anti-inflammatory properties. For the best flavor, use fresh or frozen cranberries, avoiding dried versions that contain added sugar, which might overpower the dish’s balance.

    The Cranberry BBQ Sauce is the key differentiator here, contributing layers of flavor. When crafting this sauce, the quality of the base BBQ sauce is crucial — look for a brand with recognizable ingredients and lower sugar content to perfectly complement the cranberries. Adding fresh cranberries into the mix helps in amplifying the tartness while providing texture.

    To ensure the perfect texture, a binding agent such as breadcrumbs is essential. Opt for panko breadcrumbs for a lighter texture and superior moisture retention, ensuring your meatballs are juicy and cohesive. For added flavor depth, experiment with fresh herbs like thyme or sage, harmonizing with the dish’s savory notes.

    Common Mistakes to Avoid

    • Overmixing: Avoid overmixing the turkey mixture, which can result in tough and dry meatballs.
    • Using Low-Quality Ingredients: The quality of the cranberries and BBQ sauce directly affects the overall taste.
    • Cooking at High Temperature: Higher heat might cook the exterior too fast, leaving the inside undercooked.
    • Skipping Binding Agents: Not using enough breadcrumbs can cause the meatballs to fall apart.
    • Undercooking: Ensure the meatballs reach an internal temperature of 165°F to guarantee they’re fully cooked.
    • Not Seasoning Enough: Failing to season the meat means missing out on depth and richness in flavor.
    • Ignoring Sauce Consistency: A too-thick or too-thin sauce can disrupt the desired balance and texture.
    • Missing the Resting Step: Allow meatballs to rest briefly after baking to help flavors meld.

    Essential Techniques


    Perfect rolling is crucial for uniform cooking. Use clean hands or a scoop to ensure each meatball is the same size, allowing them to cook evenly and maintain a consistent texture. If they’re too big or small, the cooking time will vary, and consistency will suffer.

    Preparation of the Cranberry BBQ Sauce is another key technique. Simmer the sauce until it’s reduced to your preferred thickness. Reduction naturally thickens the sauce, intensifying its flavors without the need for artificial thickeners. Taste as you go, adjusting sugar and spices to suit personal preferences but avoiding overpowering the sour notes.

    Baking instead of frying is both a health-conscious choice and a method to achieve a consistent brown crust while keeping the interior juicy. Preheat your oven fully before baking to ensure the meatballs cook through evenly. Use a wire rack on top of a baking tray to allow air circulation, ensuring even browning.

    Temperature control is another fundamental aspect. While the meatballs bake, monitor your sauce’s simmering heat; too high, it will burn or reduce too quickly. A gentle simmer is ideal for a sauce with a rich, deep flavor.

    Pro Tips for Perfect Turkey Cranberry Meatballs

    Adding a small amount of fat to the turkey helps prevent dryness, offering moisture and flavor. Consider blending a dash of olive oil or melted butter into the mixture.

    When forming meatballs, lightly wetting your hands prevents sticking and helps create a smooth, consistent surface texture.

    Fresh parsley or cilantro sprinkled as a finishing touch not only enhances aesthetics but brightens the flavor profile, cutting through the richness of the inbuilt sauce.

    Testing  one meatball before committing to the entire batch can serve as an invaluable checkpoint, refining seasoning to taste and texture to your exact preference.

    Chill the meatball mixture briefly before rolling; this makes handling easier and helps the balls retain their shape while baking.

    Infusing the sauce with a hint of smoked paprika adds depth of flavor, mimicking the barbecue taste in the absence of an actual grill.

    Serving your dish alongside a vibrant green vegetable, such as roasted Brussels sprouts or broccolini, balances the meal nutritionally and complements the red hue of the sauce beautifully.

    Variations and Adaptations

    For a regional Southern-inspired twist, integrate smoked sausage into the meat mixture, introducing a smoky undertone that complements the BBQ sauce beautifully.

    In the summer, swap out cranberries for fresh cherries, offering a sweeter, less tart variant that still delivers a strong flavor punch.

    Low-carb and gluten-free enthusiasts can substitute almond flour for breadcrumbs, maintaining the binding function while adhering to dietary restrictions.

    A flavor twist can be achieved by incorporating hints of orange zest into the sauce, adding a citrus contrast that brightens the overall dish.

    For those preferring a spicier version, try infusing the sauce with chili flakes or cayenne pepper to introduce heat and keep the profile interesting.

    Modify the meatball texture with the addition of finely diced vegetables, such as zucchini or mushrooms, which add moisture and depth to each bite.

    < br >

    Serving and Presentation Guide

    Embrace using a white platter with ample space to arrange the meatballs in a circle or neat rows, complementing their rich color with a stark backdrop for visual contrast.

    Generously ladling the Cranberry BBQ Sauce over the meatballs right before serving ensures they remain succulent and beautifully glazed.

    Consider traditional garnishes such as freshly chopped parsley or chives, offering a splash of color and adding subtle flavor notes.

    For modern twists, a sprinkle of toasted sesame seeds or crumbled feta over the meatballs can offer unexpected textures and flavors.

    When serving with accompaniments, think beyond cranberry sauce alone, integrating options like mashed sweet potatoes or a grain medley for a well-rounded meal alongside the turkey delights.

    Serve the dish at a warm, but not too hot, temperature to ensure the sauce maintains its consistency and does not run excessively, detracting from presentation.

    Wine and Beverage Pairing

    The mild sweetness and acidity of a Pinot Noir pair seamlessly with these meatballs, balancing out the tart cranberry and rich turkey flavors without overshadowing them.

    For non-alcoholic alternatives, a spiced cranberry iced tea or berry-infused seltzer water can provide refreshing undertones that complement the dish’s profile.

    In cooler months, consider serving a warm mulled cider or spiced cranberry punch, which echoes the festive notes in the Cranberry BBQ sauce and enhances the meal’s feel.

    For lighter pairings, a sparkling white wine or dry rosé can offer crispness and a clean finish, refreshing the palate between bites and enhancing the dining experience.

    Storage and Shelf Life

    Store leftover meatballs in an airtight container within two hours of cooking to maintain freshness; they typically last up to three days in the refrigerator.

    Ensure the Cranberry BBQ Sauce is also stored separately in a sealed container to maintain its consistency and flavor without cross-contamination.

    When freezing, position meatballs individually on a lined baking sheet to prevent sticking, then transfer them to a freezer bag once solid. They can be stored frozen for up to three months.

    Signs of spoilage include off odors, changes in texture, or color, indicating they should not be consumed and are better discarded.

    For reheating, use a low oven or steam to gently warm through, ideally introducing additional sauce to maintain moisture.

    Make Ahead Strategies

    Prepare the meatball mixture up to a day in advance, storing it in the refrigerator to allow flavors to meld and make assembly on cooking day smoother.

    Pre-made sauce can be refrigerated for up to a week or frozen for up to a month, allowing reheating during the meal assembly stage for added convenience.

    Quality is not compromised by making the Cranberry BBQ Sauce ahead, as its flavors intensify over time, allowing a deeper, richer taste.

    Reheat the sauce separately in a saucepan on low heat rather than combining it during the meatball warming process to retain its intended texture and flavor.

    Adding fresh elements like a sprinkle of fresh herbs or a squeeze of citrus juice right before serving can reinvigorate the dish and maintain an appealing taste.

    Scaling Instructions

    Halving the recipe is straightforward, just adjust all measured ingredients accordingly while maintaining original cooking times and temperatures.

    Doubling or tripling ensures dinner party success, but be mindful of oven space, potentially cooking in batches to prevent overcrowding.

    Adjust equipment appropriately, ensuring larger bowls or pans are available to accommodate increased ingredient quantities without compromising on mixture quality.

    Extended cooking times might be necessary for larger batches, particularly in oven baking steps, requiring regular internal temperature checks to ensure thorough cooking.

    Ensure ample storage space if preparing ahead in larger quantities, considering airtight containers or freezer space for optimal preservation.

    Nutritional Deep Dive


    Turkey cranberry meatballs deliver a balance of macronutrients, offering high protein from turkey alongside fiber and carbohydrates from cranberries and sauce.

    Micronutrient benefits include B vitamins, iron, and selenium from turkey, alongside vitamin C and antioxidants from cranberries, supporting immune health and energy levels.

    Health benefits stem from lean protein intake, supporting muscle repair and growth at lower fat levels than red meats, appealing to a broad spectrum of dietary preferences.

    Portion-wise, each serving delivers a satisfying meal without excess, aligning with balanced diets and healthy eating goals.

    Those conscious of weight management will find this dish meets needs through lean protein and balanced, flavorful components that satisfy without overconsumption.

    Dietary Adaptations

    For a gluten-free adaptation, substitute gluten-free breadcrumbs without compromising meatball structure or flavor.

    Achieve a dairy-free version effortlessly as the recipe inherently lacks dairy requirements, maintaining its approachability for those with lactose intolerance.

    Explore vegan avenues by substituting turkey with plant-based meat alternatives and using flaxseed or chia seeds in place of eggs for binding.

    For keto preferences, replace breadcrumbs with almond meal to meet low-carb guidelines while sustaining essential binding qualities.

    Paleo adaptations involve utilizing almond flour and ensuring BBQ sauce ingredients align with grain and refined-sugar-free criteria, adjusting as necessary.

    A Low-FODMAP adaptation focuses on removing garlic and onion usually present in BBQ sauce, opting for certified low-FODMAP alternatives instead.

    Troubleshooting Guide

    Texture concerns often arise from overmixing turkey, so ease off once ingredients are combined to prevent graininess within the mixture.

    Flavor imbalances can be corrected by gradually incorporating additional seasoning or spices, but begin with minimal increases to avoid overpowering the natural flavors.

    Overcooking can be solved by sticking to the recommended baking times and utilizing a meat thermometer to avoid exceeding 165°F internal temperature.

    Equipment challenges, such as uneven browning, can be rectified by rotating the baking tray midway through the cooking process for consistent heating.

    If ingredients appear incompatible, consider additional binding agents like eggs or panko to achieve desired coherence within the meatball structure.

    Proper timing is addressed by preparing ingredients in advance, ensuring everything is prepped and ready for cooking, avoiding unforeseen delays during assembly.

    Recipe Success Stories

    Our readers have shared delightful experiences with this turkey cranberry meatball recipe, often noting its adaptable nature to various festive menus.

    Numerous adaptations have involved substituting cranberries with other seasonal fruits, like pomegranate arils or currants, each offering a unique tangy twist.

    Particular success stories come from those experimenting with sauces, introducing jalapeno or mustard variations for an added layer of complexity and personal touch.

    Photography enthusiasts contribute insights, highlighting how the vibrant reds and greens of garnishes dramatically elevate presentation, making it an Instagram-worthy dish.

    Shared suggestions emphasize the versatility of side options, ranging from creamy mash to grain salads, each complementing the succulent meatballs differently.

    Frequently Asked Questions

    Q: Can I prepare the meatballs in advance?
    A: Absolutely! The meatball mixture can be prepared a day ahead and stored in the refrigerator until ready to cook. The assembled balls can also be frozen for meal prep ease.

    Q: Are there alternatives for cranberries if they are out of season?
    A: Fresh or frozen cranberries are best, but alternatives like tart cherries or apricots can offer a different yet delightful twist. Dried versions can work but note the sweetness adjustments needed.

    Q: How can I make this recipe spicier?
    A: Incorporating chili flakes or cayenne pepper into the sauce or mixture will heighten the heat level, adding a subtle kick ideal for spice lovers.

    Q: Do I need to oil the baking sheet?
    A: For easier cleanup and to prevent sticking, using parchment paper on the baking tray is recommended, negating additional oil requirements.

    Q: What’s the best way to serve the meatballs at a large party?
    A: Consider serving them in a slow cooker to maintain warmth throughout the duration, with the sauce kept in a separate dish for guests to add as they prefer.

    Q: Can leftover sauce be repurposed?
    A: Absolutely, it’s a versatile sauce that pairs wonderfully with grilled chicken, ribs, or even as a flavorful base in sandwiches.

    Q: How do I prevent the meatballs from drying out when reheating?
    A: Reheat with a portion of sauce in a covered dish or gently steam them to retain moisture. Avoid microwaving directly, as this might overcook them.

    Q: Is it suitable for themed parties?
    A: Given the recipe’s vibrant colors and versatile flavor, it complements Thanksgiving or Christmas gatherings, but can symbolize any fall-themed event.

    Q: What if I’m allergic to cranberries?
    A: Substitute cranberries with other tart fruits or create a different complementary sauce using fruit you’re not allergic to.

    Q: Do these freeze well?
    A: Yes, they freeze exceptionally well. Lay them on a tray to freeze individually before transferring them to a storage container, ensuring they remain intact and quality is preserved.

    Additional Resources

    For similar meat-based recipes, explore our section on festive meatloaf variations, offering unique spins on classic comfort food.

    Our BBQ sauce guide dives into a range of barbecue sauce styles, helping refine your homemade sauce skills and encouraging experimentation.

    Visit ingredient breakdowns that delve into turkey and cranberry’s history to appreciate their traditional and modern roles within American cuisine.

    Harness the knowledge of professional kitchen equipment recommendations here, aligning your adventures in home cooking with useful and effective appliances.

    If seasonal variations interest you, explore our ultimate season-based recipe collection, highlighting perfect dishes for holiday tables and cool-weather feasting.

    Join the Conversation

    Join our community of cooking enthusiasts by sharing your turkey cranberry meatball creations on social media, utilizing the hashtag #TurkeyCranberryCreatives for a chance to be featured.

    For photography tips, reference our article on capturing the essence of food beauty, guiding you to showcase the vibrant colors and textures of your culinary efforts engagingly.

    We encourage you to leave recipe reviews, documenting your personal adaptations of this dish, or connecting with others who share your love for home-cooked meals.

    Engage with our network by adopting and modifying this recipe, recognizing your twists and turns in our community portal for shared innovation and culinary exploration.

    Finally, if new ideas for side dishes intrigue you, connect with our latest posts, offering pairing suggestions from the seasonal harvest to round out your Turkey Cranberry Meatball meal.

    The Recipe

    Turkey Cranberry Meatballs with Cranberry BBQ Sauce

    Serves: 4

    Prep Time: 15 mins

    Cook Time: 25 mins

    Total Time: 40 mins

    Kitchen Equipment Needed

    • Baking sheet
    • Mixing bowls
    • Wire rack
    • Small saucepan
    • Measuring spoons
    • Spoon or scoop for forming meatballs

    Ingredients

    • 1 lb ground turkey
    • 1/2 cup chopped fresh cranberries
    • 1/4 cup panko breadcrumbs
    • 1 egg, lightly beaten
    • 2 cloves garlic, minced
    • 1 teaspoon salt
    • 1/2 teaspoon black pepper
    • 1 cup BBQ sauce
    • 1/2 cup fresh cranberries, for sauce
    • 1 tablespoon brown sugar
    • 1 teaspoon smoked paprika

    Directions

    1. Preheat your oven to 375°F (190°C) and line a baking sheet with parchment paper.
    2. In a mixing bowl, combine turkey, chopped cranberries, breadcrumbs, egg, garlic, salt, and pepper. Mix until just combined.
    3. Form the mixture into 1-inch meatballs using a spoon or scoop, arranging them evenly on the prepared baking sheet.
    4. Bake for 20-25 minutes until the meatballs are browned and cooked through.
    5. Meanwhile, prepare the Cranberry BBQ Sauce: In a small saucepan over medium heat, combine the BBQ sauce, 1/2 cup cranberries, brown sugar, and smoked paprika.
    6. Simmer, stirring occasionally until the cranberries burst and the sauce thickens slightly, about 10 minutes.
    7. Remove the cooked meatballs from the oven and toss them in the prepared Cranberry BBQ Sauce, ensuring they’re well-coated before serving.

    Recipe Notes

    • For a richer flavor, consider adding a couple of tablespoons of diced onions or bell peppers to the meat mixture.
    • Leftover sauce can be refrigerated and used within a week; it pairs wonderfully with grilled meats or sandwiches.
    • Ensure meatballs are evenly sized for consistent cooking results.

    Experience the Ultimate Hawaiian Grilled Teriyaki Chicken Delight Today

    Tremendous Hawaiian Grilled Teriyaki Chicken Feast: A Flavorful Adventure

    ⚖️
    Difficulty
    Medium

    ⏲️
    Prep Time
    30 mins

    🕒
    Cook Time
    20 mins

    ⏱️
    Total Time
    50 mins

    🍽️
    Servings
    4

    Embark on a gastronomic journey with our Tremendous Hawaiian Grilled Teriyaki Chicken Feast, a culinary delight that brings the exotic flavors of the Pacific Islands straight to your table. This dish combines succulent, juicy chicken marinated in a rich blend of teriyaki sauce, infused with pineapple’s sweet notes, and grilled to perfection, producing a visually stunning and palate-pleasing masterpiece. Experience the harmony of sweet, savory, and tangy flavors, bound to make your taste buds dance with joy.

    The tropical aroma of our Tremendous Hawaiian Grilled Teriyaki Chicken Feast is irresistible, making it an ideal choice for both casual family dinners and festive gatherings alike. The visually striking presentation—featuring a glossy teriyaki glaze and vibrant garnishes—is guaranteed to wow your guests and transport them to a tropical paradise with every bite. Prepare to indulge in a meal that offers the perfect blend of flavor, texture, and aroma.

    Quick Recipe Highlights
    – Flavor Profile: This dish marries the sweetness of pineapple with the savory undertones of soy, enriched with ginger and garlic for a delightful Asian-inspired taste.
    – Texture: The chicken boasts a moist interior with a slightly crispy exterior, courtesy of the caramelized teriyaki glaze.
    – Aroma: The fragrant notes of ginger and garlic paired with the smoky hint from the grill create an aromatic bouquet that fills the kitchen.
    – Visual Appeal: Featuring a glossy, caramelized finish with vibrant pineapple and scallion garnishes, this dish is a feast for the eyes.
    – Skill Level Needed: Intermediate; requires knowledge of marinating and grilling techniques for optimal results.
    – Special Equipment: A grill or grill pan is essential for achieving the ideal char and glaze on the chicken.

    Recipe Overview
    – Difficulty Level: This recipe is medium in difficulty, perfectly balancing the need for timing precision in marinating and grilling with simple ingredient preparation.
    – Category: Entree, Main Dish
    – Cuisine: Origins span both Hawaiian and Japanese influences, with teriyaki traditional in Japanese cuisine and pineapple providing a Hawaiian twist.
    – Cost: Reasonably inexpensive, with ingredients like chicken and pineapple being budget-friendly and readily available.
    – Season: Best enjoyed during warmer months or summer, aligning with grilling season for an authentic outdoor cooking experience.
    – Occasion: Ideal for barbecues, family dinners, or festive summer gatherings.

    Why You’ll Love This Recipe
    Taste and Texture Appeal
    Our Tremendous Hawaiian Grilled Teriyaki Chicken Feast provides a delightful taste and texture combination that captivates every palate. The sweet and tangy teriyaki sauce complements the juicy, tender chicken perfectly, offering a balanced taste that is both daring and comforting. The texture contrasts between the tender interior and the mildly crispy exterior create an enjoyable eating experience, leaving you craving more with every bite.

    Convenience and Preparation Benefits
    Despite its impressive presentation, this dish is surprisingly straightforward to prepare. With simple, easily accessible ingredients and a few household staples, this recipe can be put together with minimal effort. The marinade can be made in advance, allowing for efficient planning and preparation, ensuring a hassle-free cooking experience.

    Nutritional Advantages
    This dish boasts a nutritious profile, high in protein from the lean chicken, with added vitamins from the pineapple and scallions. It offers a healthy option, especially when paired with whole grains or a fresh salad, making it an ideal choice for balanced, wholesome meals.

    Social and Entertaining Value
    Hosting a barbecue or party becomes an effortless affair with the introduction of this recipe. Its exotic flavors and eye-catching presentation are a surefire way to impress guests, sparking conversations and creating a memorable dining experience. Whether it’s a backyard family gathering or a festive celebration, this dish is a guaranteed crowd-pleaser.

    Cost-effectiveness and Accessibility
    The ingredients for this recipe are budget-friendly and widely available, making it an accessible option for all households. With such a cost-efficient dish, you can host festive feasts without the worry of overspending, ensuring quality flavor and nutritional value within an affordable range.

    Historical Background and Cultural Significance
    Origin Story
    Teriyaki is a staple in Japanese cuisine, characterized by its glossy sweetness and savory profile. Originally, the technique involved broiling fish with soy sauce, mirin, and sugar, later evolving to accommodate chicken and beef, making it a versatile culinary delight.

    Cultural Importance
    In Hawaii, the fusion of teriyaki with local ingredients like pineapple is a testament to the state’s rich cultural tapestry, where Asian and Pacific Islander culinary influences meld seamlessly into a unique gastronomic tradition.

    Evolution of the Recipe
    The blending of traditional teriyaki sauce with locally grown Hawaiian produce marks its evolution, morphing from a Japanese staple into a beloved island classic. Its adaptability over time showcases the innovative spirit of Hawaiian cuisine, popularizing teriyaki beyond its origins to a global audience.

    Regional Variations
    Globally, teriyaki-inspired dishes vary in spices and sweetening agents. In some regions, honey or brown sugar replace traditional mirin for a distinct flavor twist, while others incorporate regional ingredients for a personalized culinary signature reflective of local tastes.

    Ingredient Deep Dive
    Chicken
    Chicken holds significant value across various cultures due to its versatility and affordability. Rich in protein and low in fat, it serves as a primary source of essential nutrients, making it a focus in many health-conscious diets. Selecting fresh, quality chicken enhances the overall flavor, with free-range varieties offering superior taste and texture.

    Cultural Significance and History
    In Hawaiian cuisine, chicken is often roasted or grilled, celebrating the traditional cooking techniques of Pacific Island culture. Its role in diverse dishes showcases its adaptability, proving its enduring presence in kitchen traditions worldwide.

    Selection Tips
    Choose fresh, plump chicken with no discoloration for the best results. Opt for skinless, boneless cuts for easy preparation and consistent cooking.

    Storage Recommendations
    Chicken should be refrigerated promptly and consumed within a couple of days. For longer storage, freezing it in an airtight container maintains its quality.

    Substitution Options
    Turkey or tofu can serve as alternative protein options, offering similar texture and versatility for dietary preferences.

    Common Mistakes to Avoid
    1. Skipping the Marinade: The key to flavorful teriyaki chicken is adequate marination. Allow enough time for the marinade to work its magic.
    2. Overcooking: Watch your grill time to avoid drying out the chicken. Aim for a juicy, moist consistency.
    3. Inconsistent Cutting: Ensure even-sized chicken cuts for uniform cooking.
    4. Neglecting Resting Time: Allow the chicken to rest before serving to preserve its juices.
    5. Using Low Heat: High heat ensures a crispy outer texture while retaining moisture inside.
    6. Incorrect Storage: Store leftovers properly to avoid spoilage and maintain texture.
    7. Ignoring Temperature: Use a meat thermometer to ensure chicken is cooked to 165°F for safety.
    8. Rushing the Process: Take your time to enjoy the cooking process; patience will reward you with a rich flavor profile.

    Essential Techniques
    Grilling Mastery
    Grilling requires precision to achieve the right level of char without overcooking. Opt for medium-high heat and monitor closely, flipping once halfway through. Visual cues include distinct grill marks and a slightly caramelized sauce for a picture-perfect outcome.

    Marination Perfection
    Effective marination infuses the chicken with flavor, enhancing every bite. Combine soy sauce, pineapple juice, ginger, garlic, and brown sugar for a balanced base. Let the chicken soak for at least 30 minutes, allowing flavors to penetrate evenly.

    Pro Tips for Perfect Tremendous Hawaiian Grilled Teriyaki Chicken Feast
    1. Use a meat mallet to flatten chicken breasts for even grilling.
    2. Allow chicken to marinate overnight for deeper flavor infusion.
    3. Refrigerate leftover marinade for a flavor-enhancing basting sauce.
    4. Pat chicken dry before grilling for better charring.
    5. Introduce unique flavors with grilled pineapples as a side dish.
    6. Let chicken rest under foil post-grilling to retain juices.
    7. Serve with a touch of fresh lime juice for an added zesty finish.
    8. Experiment with different wood chips for a smoky flavor twist.

    Variations and Adaptations
    Regional Variations
    Incorporate tropical fruits like mango or papaya into the marinade for a refreshing flavor twist, highlighting a fusion of regional tastes from the Pacific Islands.

    Seasonal Adaptations
    During cooler months, consider broiling as an alternative to grilling, ensuring residual warmth maintains a cozy dining ambiance.

    Dietary Modifications
    For a low-sodium version, use reduced-sodium soy sauce and minimize additional salt. Try tofu for a vegetarian adaptation, preserving protein-rich benefits while accommodating dietary preferences.

    Flavor Variations
    Enhance the flavor profile with chili flakes or sriracha for a subtle spice, introducing a heat element for those who enjoy bolder tastes.

    Texture Modifications
    Add corn flour to the marinade for a thicker glaze, catering to those who prefer a more substantial coating.

    Presentation Alternatives
    Serve over a bed of jasmine rice or coconut-infused quinoa for a fusion of flavors, offering a sophisticated dining experience with varied textures and taste complexities.

    Serving and Presentation Guide
    Plating Techniques
    Arrange the grilled chicken slices artfully over rice with pineapple chunks for a vibrant plate, highlighting the colorful contrast of ingredients.

    Garnishing Ideas
    Finish with a sprinkle of toasted sesame seeds and chopped green onions for added texture and flavor, offering a visually pleasing garnish.

    Traditional Accompaniments
    Serve with classic Hawaiian sides like mac salad or coleslaw for a balanced feast, presenting a harmony of tastes and textures.

    Modern Serving Suggestions
    Introduce avocado slices and seaweed salad for a contemporary Hawaiian dish, expanding the flavor palette with varied taste profiles.

    Temperature Considerations
    Serve warm for optimal flavor; cold servings diminish aromatic notes, affecting overall enjoyment.

    Portion Control Tips
    Slice servings to half a breast per person, pairing with ample sides for a satisfying meal without overindulgence.

    Wine and Beverage Pairing
    Wine Pairings
    Opt for a crisp, chilled Riesling to balance the sweet and savory notes of teriyaki with its floral undertones, enhancing the dish’s dynamic flavors.

    Non-alcoholic Alternatives
    Infuse sparkling water with lime and mint for a refreshing complement, offering a clean, citrusy finish that enhances flavors.

    Coffee/Tea Pairings
    A light, floral green tea pairs seamlessly, accentuating the dish’s aromatic qualities while providing a balanced palate cleanse.

    Temperature Considerations
    Serve beverages chilled or at room temperature for optimal refreshment, aligning with the meal’s tropical flair.

    Serving Suggestions
    Consider meticulously laying of drinks and garnishes alongside the dish for a curated dining aesthetic, enhancing the overall sensory experience.

    Storage and Shelf Life
    Storage Methods
    Store grilled chicken in an airtight container in the refrigerator, retaining freshness and flavor for up to 3 days.

    Temperature Requirements
    Maintain a consistent fridge temperature to preserve quality, avoiding fluctuations that could compromise taste and texture.

    Container Recommendations
    Choose shallow, airtight containers for even cooling and preventing moisture loss, safeguarding flavor integrity.

    Signs of Spoilage
    Watch for off-odors, slime, or discoloration as spoilage indicators, ensuring safe consumption by spotting these signs early.

    Reheating Instructions
    Microwave on low heat to prevent drying out, or warm gently in an oven covered with foil to maintain moisture.

    Freezing Guidelines
    Allow chicken to cool before freezing; secure in double-wrapped foil or freezer bags to prevent freezer burn, preserving taste and consistency.

    Make Ahead Strategies
    Prep Timeline
    Prepare the marinade and start soaking the chicken the night before for maximum flavor absorption, streamlining meal preparation.

    Storage Between Steps
    Store marinated chicken in the refrigerator until needed, minimizing last-minute rush and allowing the plan to progress smoothly.

    Quality Impact Assessment
    Shortening marination time can impact flavor depth, but using fresh, quality ingredients ensures satisfaction despite time constraints.

    Assembly Tips
    Slice garnishes and prepare sides ahead, storing in separate containers to maintain freshness, enabling swift final assembly.

    Reheating Guidelines
    Warm leftovers carefully to restore original quality, using a gentle approach that retains moisture and ensures culinary enjoyment.

    Fresh Element Additions
    Incorporate fresh herbs or diced fruits just before serving, elevating the appearance and taste by introducing elements of brightness.

    Scaling Instructions
    Halving the Recipe
    Adjust ingredient quantities accordingly, maintaining consistency across sections, but don’t alter marination time, which remains vital for flavor.

    Doubling or Tripling
    Ensure adequate marination space in containers and consider grill capacity, cooking in batches if necessary, to maintain quality.

    Equipment Adjustments
    For expanded versions, larger mixing bowls or grilling surfaces ensure efficiency in preparation and cooking processes.

    Timing Modifications
    When multiplying recipes, maintain consistent timing but increase monitoring frequency for perfect grilling precision.

    Storage Considerations
    Ensure ample storage space for scaled portions, considering freezer or fridge capacity based on portion increases.

    Nutritional Deep Dive
    Macro Breakdown
    High in protein, moderate fat, and low carbohydrate content, this dish provides balanced energy and supports muscle development and maintenance.

    Micronutrient Analysis
    Packed with vitamins C from pineapple and B6 from chicken, this dish also delivers key minerals, supporting overall well-being.

    Health Benefits
    Rich in lean protein and vitamins, the dish supports muscle growth and a healthy immune system, aiding an active lifestyle.

    Dietary Considerations
    Low in low-carbohydrate, suitable for gluten-intolerance with gluten-free soy sauce, aligns with multiple dietary regimes.

    Portion Analysis
    Each serving delivers nutrient density and maintains calorie control, making it ideal for balanced, nutritional intake.

    Weight Management Tips
    Portion control is crucial; maintain balance by pairing with plant-based sides, sustaining energy without excess calorie consumption.

    Dietary Adaptations
    Gluten-Free
    Opt for gluten-free soy sauce, preserving the traditional flavor while accommodating gluten sensitivities without compromising taste.

    Dairy-Free
    The recipe is naturally dairy-free—perfect for those avoiding lactose or seeking allergy-friendly options.

    Vegan
    For plant-based diets, substitute tofu for chicken, using the same flavorful marinade to accommodate personal preferences.

    Low-Carb
    Reduce pineapple for a low-carb version, focusing on protein-dense chicken and maintaining flavor integrity without excess sugars.

    Keto
    Emphasize high-fat vegetable pairings, such as avocado or olive oil-based dressings, for keto dining without compromising richness.

    Paleo
    Use coconut aminos instead of soy sauce, aligning with paleo principles for a healthier, primal-friendly delight.

    Low-FODMAP
    Omit garlic and onion for low-FODMAP compliance, still delivering rich flavor through suitable substitute marinades.

    Other Specific Diets
    Adjust salt or sweetening elements for a heart-friendly version, enhancing health outcomes while retaining taste.

    Troubleshooting Guide
    Texture Issues
    Ensure adequate marination; the chicken should be juicy, not rubbery. Monitor grill temperature to avoid overcooking, which can toughen the meat.

    Flavor Balance
    Balance sweetness with soy sauce and acid from the pineapple; adjust quantities based on personal preference, avoiding excessive sugar.

    Temperature Problems
    Monitor cooking time, ensuring chicken reaches 165°F internally for safety and optimal tenderness.

    Equipment Challenges
    Ensure your grill is adequately heated before use for effective searing. Preheat adequately, ensuring consistent cooking conditions.

    Ingredient Substitutions
    Maintain flavor by opting for equivalent taste substitutes; for soy sauce, use coconut aminos as a gluten-free alternative.

    Timing Concerns
    Account for adequate marination time to impart a rich profile, hurried preparations compromise depth of flavor.

    Recipe Success Stories
    Community Feedback
    Readers rave about the simplicity and vibrant flavors, praising the meal’s ability to transform ordinary meals into an exotic dining experience.

    Variation Successes
    Culinary enthusiasts share creative adaptations, incorporating regional herbs for personalized taste profiles and showcasing global adaptation.

    Adaptation Stories
    From smoked versions to slow-cooked adaptations, readers creatively navigate cooking methods, extending the recipe’s versatility.

    Reader Suggestions
    Utilize reader feedback to enhance recipes, offering collective insights for shared culinary successes and improved outcomes.

    Photography Tips
    Capture the colorful, glazed finish under natural light for authenticity, emphasizing gloss and vibrant garnishes for visual appeal.

    Frequently Asked Questions

    What is the best chicken type for this recipe?
    Use skinless, boneless chicken breasts for even cooking and optimal marinade absorption, ensuring a tender, juicy finish.

    Can I prepare this recipe without a grill?
    Yes, a grill pan or broiler can replicate the desired textures, offering similar flavor notes through an indoor cooking setup.

    Is it okay to use canned pineapple?
    Fresh pineapple contributes superior flavor, but canned is an acceptable substitute, ensuring an equally satisfying outcome.

    What can I serve as sides?
    Pair this dish with jasmine rice, mac salad, or grilled vegetables, supplying complementary textures and flavors for a balanced meal.

    How do I avoid a burnt glaze?
    Moderate heat and attentive grilling prevent excessive caramelization, preserving a bite-worthy texture without bitterness.

    Why is my chicken not absorbing the marinade?
    Marinate sufficiently and ensure the chicken is fully submerged, allowing flavors to penetrate evenly for enhanced taste.

    Can this recipe be adapted for children?
    Adjust soy sauce and pineapple quantities for a milder flavor, providing a kid-friendly meal that satisfies all palates.

    How long will leftovers last?
    Stored adequately in an airtight container, leftovers maintain quality for up to 3 days, providing convenient meal options.

    Is reheating safe?
    Reheat gently, reaching an internal temperature of 165°F for food safety standards, ensuring flavorful, safe consumption.

    Which other fruits pair well with this dish?
    Add mango or papaya for a tropical twist, enhancing the dish’s fruity contrasts and offering varied texture components.

    Additional Resources
    Related Recipes
    Explore other Hawaiian-inspired dishes, such as Kalua pork or lomi-lomi salmon, for a comprehensive culinary experience.

    Technique Guides
    Learn expert grilling tips through specialized guides, enhancing proficiency and understanding of the cooking style exemplified in this recipe.

    Ingredient Information
    Dive into the history and nutritional value of key ingredients, understanding the elements’ roles in elevating your cooking.

    Equipment Recommendations
    Discover recommended grilling accessories for flawless execution, ensuring optimal outcomes and enriched cooking experiences.

    Seasonal Variations
    Adapt this recipe according to ingredient availability, aligning your dining experiences with seasonal bounty and logical adjustments.

    Join the Conversation
    Social Media Sharing
    Share your versions via social platforms, showcasing unique adaptations and gaining inspiration through community exchanges.

    Photography Tips
    Capture the essence of this dish through strategic photography, emphasizing vibrant hues and mouthwatering textures for captivating imagery.

    Recipe Reviews
    Contribute feedback for continued refinement, supporting collective recipe development through shared experiences and successful cookery.

    Community Engagement
    Join discussions surrounding Hawaiian culinary creations, encouraging collaborative dialogue and expanding your gastronomical knowledge base.

    Recipe Variations
    Introduce your personal touches to the recipe, increasing family appeal or adapting to dietary needs, demonstrating culinary creativity.

    The Recipe

    Tremendous Hawaiian Grilled Teriyaki Chicken Feast

    Serves: 4

    Prep Time: 30 mins

    Cook Time: 20 mins

    Total Time: 50 mins

    Kitchen Equipment Needed

    • Grill or grill pan
    • Mixing bowl
    • Sharp knife
    • Cutting board
    • Meat thermometer

    Ingredients

    • 4 boneless, skinless chicken breasts
    • 1 cup teriyaki sauce
    • 1/2 cup pineapple juice
    • 1 tablespoon soy sauce
    • 1 tablespoon brown sugar
    • 1 tablespoon minced garlic
    • 1 tablespoon grated ginger
    • 1 tablespoon olive oil
    • 1/2 teaspoon black pepper
    • 1/2 cup fresh pineapple chunks
    • Chopped green onions, for garnish

    Directions

    1. In a mixing bowl, combine teriyaki sauce, pineapple juice, soy sauce, brown sugar, garlic, ginger, olive oil, and black pepper to form the marinade.
    2. Add chicken breasts to the marinade, ensuring they are fully submerged. Marinate for at least 30 minutes, or overnight for best flavor.
    3. Preheat grill to medium-high heat. Remove chicken from marinade and let excess drip off.
    4. Grill chicken for 6-7 minutes on each side, or until cooked through and grill marks appear. Use a meat thermometer to ensure internal temperature reaches 165°F.
    5. During the final minutes of grilling, add fresh pineapple chunks to the grill for 2-3 minutes until caramelized.
    6. Arrange grilled chicken on a serving platter and top with grilled pineapple and chopped green onions. Serve immediately.

    Recipe Notes

    • For extra flavor, reserve some marinade before soaking the chicken to basting or serve as a dipping sauce.
    • Adjust the chili flakes to taste for a spicier kick.

    Savory Parmesan Garlic Beef Cheeseburger Lasagna Recipe Delight

    Parmesan Garlic Beef Cheeseburger Lasagna: A Flavorful Fusion

    ⚖️
    Difficulty
    Moderate

    ⏲️
    Prep Time
    30 mins

    🕒
    Cook Time
    60 mins

    ⏱️
    Total Time
    90 mins

    🍽️
    Servings
    8

    Embark on a culinary adventure with our Parmesan Garlic Beef Cheeseburger Lasagna! Combining the hearty essence of a classic beef cheeseburger with the comforting layers of lasagna, this dish is a testament to flavorful innovations. Each bite presents a cascade of gooey cheese, savory beef, and aromatic garlic, solely crafted to delight your taste buds.

    The Parmesan Garlic Beef Cheeseburger Lasagna isn’t just about blending flavors; it’s about creating an experience. The savory beef layer mingles with rich tomato sauce and fragrant roasted garlic, while shredded Parmesan adds a sharp, irresistible finish. The combination honors both beloved classic flavors and the creativity needed to bring them together.

    Unique and wholly satisfying, this lasagna reinterpretation is perfect for gatherings or family dinners when you want to impress without spending the entire day in the kitchen. Let’s dive in and discover the glory of this innovative, flavor-packed masterpiece.

    Quick Recipe Highlights

    • Flavor Profile: Enjoy the savory fusion of beefy cheeseburger flavors elevated by aromatic garlic and nutty Parmesan.
    • Texture: Relish the perfect balance of melty cheese, juicy beef layers, and tender pasta.
    • Aroma: The dish is highlighted by rich, roasted garlic notes blended with a symphony of cheese and fresh herbs.
    • Visual Appeal: Gleaming layers of cheese and sauce, with a golden-brown gratin top, make this lasagna an eye-catching centerpiece.
    • Skill Level Needed: Moderate cooking skills required, focusing on sauce preparation and proper layering techniques.
    • Special Equipment: Use a deep baking dish, spatula, and whisk to achieve restaurant-quality lasagna results.

    Recipe Overview

    • Difficulty Level: This recipe’s moderate complexity stems from its layering process and the balance of beef to cheese ratio, requiring attention to detail.
    • Category: Perfect for main dishes, this lasagna adds a gourmet twist to traditional comfort food.
    • Cuisine: A beautiful blend of Italian and American cuisines, melding the essence of homemade lasagna with cheeseburger deliciousness.
    • Cost: Expect moderate costs due to quality cheeses and beef, but it’s worth the indulgence given its flavorful richness.
    • Season: Ideal for all-year cooking due to its versatility but pairs especially well in colder months as a hearty dish.
    • Occasion: Perfect for family dinners, potlucks, or whenever you’re looking to serve a comforting, indulgent meal.

    Why You’ll Love This Recipe


    Indulge your senses with the divine taste and texture of Parmesan Garlic Beef Cheeseburger Lasagna. This dish presents a savory profile that combines beefy richness with aromatic garlic-infused cheese that will have you reaching for seconds. Each forkful brings a satisfying blend of flavors—creating a dish that is both familiar and excitingly new.

    Convenience is key with this lasagna, offering impressive results without hours in the kitchen. The process is simplified by preparing everything in advance, leaving you time to enjoy your meal without stress. The layers bake into perfection, making it ideal for meal prep or creating impressive leftovers.

    Not only delicious, this recipe also delivers nutritional benefits from high-quality protein sources like beef and cheese, alongside garlic’s health-boosting compounds. Serve alongside a fresh salad to balance the meal, providing both indulgence and balanced nutrition.

    Sharing is caring, and this lasagna is a crowd-pleaser. Whether you’re hosting a dinner party or catering a casual gathering, its universal appeal ensures everyone’s delight. Its comforting nature invites guests to relish the combination of beloved flavors with a gourmet twist.

    Cost-effectiveness stands out when you consider the flavor explosion and multiple servings this recipe provides. With affordable ingredients easily available at your local market, enjoy gourmet flavors without hitting the fine-dining price bracket.

    Historical Background and Cultural Significance


    This recipe has an intriguing origin story: It starts with the lasagna, a beloved dish with origins in Ancient Greece and Rome, evolving over centuries into the iconic Italian staple known today. Known for its comforting layers and hearty fillings, lasagna continues to win hearts worldwide with its adaptability.

    Part of the cultural importance comes from lasagna’s role in bringing people together over shared meals. Its variations across Italy and beyond highlight regional culinary diversity while offering a cozy, unified dining experience. This version taps into that tradition by adding a modern twist with cheeseburger motifs.

    Evolution plays a role as lasagna reached American shores, adapting to local tastes and culinary trends. The cheeseburger variation is a testament to food fusion, combining Italy’s beloved pasta dish with America’s obsession with the humble burger—creating a dish rich in history and flavor.

    Regional variations abound, from seafood-infused coastal versions to meat-focused inland mixes, but the Parmesan Garlic Beef Cheeseburger Lasagna holds its ground as a delicious invention, reflecting a balance between tradition and novelty while packing a flavorful punch.

    Ingredient Deep Dive


    Let’s take a closer look at Parmesan cheese, a critical component in this recipe. A staple of Italian cuisine, Parmesan offers a tangy depth that transforms the dish’s savory profile. It’s aged for months, developing umami-rich flavors essential to culinary excellence.

    Nutritionally, Parmesan is a powerful source of calcium, contributing to bone health and low in lactose, making it suitable for many dietary needs. Its substantial protein content also makes it an effective addition to muscle-building diets.

    When selecting Parmesan, always opt for authentic Parmigiano-Reggiano, known for its superior taste and quality. Choose cheese based on the pattern on its rind and its consistent, natural color, ensuring freshness and quality in your dish.

    Store Parmesan wrapped in wax paper inside an airtight container in the fridge. Grate as needed, extending its shelf life and maintaining flavor. If unavailable, Pecorino Romano is a fantastic substitute while preserving the dish’s essence.

    Common Mistakes to Avoid

    • Overcooking the pasta: Cook until al dente to prevent mushy textures in your lasagna layers.
    • Using too much tomato sauce: Excess liquid creates a soggy final dish, so balance your sauce quantities carefully.
    • Adding cold cheese: Ensure your cheese reaches room temperature for even melting throughout the lasagna.
    • Not seasoning adequately: Every layer needs seasoning to enhance the depth of flavors.
    • Layering unevenly: Achieve proportional layers for consistent baking and a uniform bite.
    • Skipping the resting period: Allow the lasagna to set after baking before serving for cleaner slices and flavors maturation.
    • Not using foil while baking: Cover for the first half of baking to prevent drying while allowing the cheese on top to golden later.
    • Rushing preparation steps: Take your time layering meticulously, ensuring that each step contributes to the harmonious final dish.

    Essential Techniques


    Master the art of sauteing beef by breaking it up evenly as it cooks, creating a crumbly, well-browned base ideal for layering in lasagna. This ensures the beef stays tender and flavorful, imparting rich juiciness to the overall dish.

    Cheese layering is crucial in this recipe, ensuring even distribution between the beefy, saucy layers. Shred cheese just before use to preserve its creamy texture upon melting, elevating the experience of each forkful.

    Layering lasagna is a critical technique. Begin with sauce, followed by pasta, beef, cheese, and repeat, ending with cheese to encourage a crisply browned top crust. Intermittent checks during baking ensure the perfect timing to remove foil and finish the dish.

    Perfect your garlic preparation technique by roasting whole bulbs or mincing and gently sautéing for incorporation into sauces. This releases its rich aroma and sweetness, balancing naturally with savory components like beef and cheese.

    Pro Tips for Perfect Parmesan Garlic Beef Cheeseburger Lasagna


    Under-salting pasta water is a common oversight; proper seasoning allows your lasagna pasta layers to pop with flavor. Use abundant salted water to boil the pasta for the best impact.

    To prevent sticking, pre-grease your baking dish lightly with olive oil or use parchment paper. This ensures smooth serving and flawless slices when presenting your lasagna masterpiece.

    Use a mix of mozzarella alongside Parmesan for added creaminess in your cheese layers, providing an even melt and flavor with the lasagna’s comforting components.

    Let the lasagna cool extensively before cutting. This minor detail maintains presentation aesthetics, ensuring each serving holds its form and showcases the beautiful layer contrasts.

    Balance acidity with a pinch of sugar if tomatoes are particularly tangy. It rounds out flavors for a harmonious tomato sauce, appealing to all palates.

    Prepare ahead by assembling the lasagna a day in advance. Refrigeration encourages mingling of flavors, developing a richer taste profile before that delightful serving experience.

    Variations and Adaptations


    Regionally, explore adding pancetta to enhance the dish’s Italian authenticity further, introducing pleasant smokiness to the mix, which pairs beautifully with beef and Parmesan.

    Adapt this recipe for seasonal enjoyment by including fresh garden vegetables in summer, like zucchini slices or eggplant, adding a new texture and flavor profile to the lasagna.

    Modify for dietary needs using gluten-free pasta and dairy-free cheese alternatives. Flavor accents of garlic and quality beef ensure maintaining robustness and depth minus the gluten or dairy.

    Spice it up with jalapeños or red pepper flakes, adding heated notes to contrast the savory and cheesy layers, creating a bolder lasagna experience.

    Experiment with texture by swapping traditional lasagna noodles for thin layers of potato or using different cheese textures, such as ricotta for contrast.

    Presentation alternatives include preparing individual-sized ramekin portions for personalized servings—a modern twist on the lasagna classic, perfect for dinner parties.

    Serving and Presentation Guide


    Plating techniques elevate your lasagna’s appeal. Serve slices on contrastive colored dinnerware to accentuate its vibrant layers, adding visual sophistication.

    Garnish with a sprinkle of freshly chopped parsley or basil leaves, introducing iconic Italian colors and flavors to every slice and enticing the dining experience further.

    Traditional pairings provide authenticity. Serve with a side of Caesar salad or garlic bread for a complementary dining journey, uniting various textures and flavors.

    For modern presentation, serve with balsamic-glazed roasted vegetables, juxtaposed against the savory beef lasagna’s richness, creating a balanced meal.

    Always consider temperature: Lasagna should be piping hot with cooled salad or chilled wine to contrast, delighting the palate with diverse sensations.

    Practice portion control by using measured slices for portion consistency and fair serving distribution, harmonizing plate arrangements stylishly.

    Wine and Beverage Pairing


    A robust red wine is a perfect partner, offering a harmonious balance to the lasagna’s rich, savory notes. Consider a Chianti or Cabernet Sauvignon for body and depth.

    Non-alcoholic alternatives complement nicely with a bubbly, non-alcoholic spritzer with citrus tones or a well-brewed iced herbal tea, balancing cheese richness.

    Coffee or tea can pair surprisingly well—opt for a strong Italian brew or an earthy black tea, blending beautifully with the layers’ complex flavors when serving post-feast.

    Temperature consistency is key. Chilled whites and rosés meant for balance and freshness, entwining harmoniously with the lasagna’s garlic fragrance.

    Serve wine or beverages in appropriate glassware to highlight color and aroma, enhancing the overall consumption experience in your lasagna meal celebration.

    Storage and Shelf Life


    To store successfully, cool the lasagna entirely before transferring it to airtight containers. Refrigeration keeps flavors linked and quality intact for up to 3-5 days.

    Optimum storage requires a covered dish to prevent moisture loss and flavor leaks. Specialized lasagna storage sets with tight-lid mechanisms are ideal options.

    Watch for signs of spoilage, such as discoloration, sour smell, or texture changes. Properly rejecting these slices ensures a quality dining experience.

    When reheating, opt for thorough heating throughout. Preheat ovens for uniform distribution, or use microwave-safe high settings for convenience while maintaining texture.

    Freezing extends shelf life up to three months. Thaw overnight in the fridge before heating, preserving quality while ensuring even warming and freshness driven satisfaction.

    Make Ahead Strategies


    Planning is essential. Assemble the lasagna a day before serving, conserving efforts for day-of activities while securing maximum flavor development.

    Store prepared components, like browned beef or tomato sauce, separately in sealed containers in the fridge, retaining freshness and saving preparation time.

    Achieve quality consistency through layered assembly while monitoring layering pressure incites secure bake outcomes. Relaxation is vital for unhindered meal delight.

    When reheating, remove from fridge to approximate room temperature before entering ovens—maintaining texture integrity and ensuring even blissful heating endeavors.

    For freshness, introduce village-crisp salads or crusty warm bread alongside, creating a completed meal from contrasting yet complementary dishes.

    Scaling Instructions


    Halving this lasagna recipe is simple. Use smaller baking ware and fewer ingredients proportionally, preserving flavors and presentation consistency without loss.

    Doubling the recipe requires larger cooking tools and baking pans, accounting for increased ingredient volumes and achieving uniform results across servings.

    Adjust cook times minimally; continued attention aids completion optimization in timing dynamics, ensuring even cheese melting and complete sauce absorption.

    Consider spacious refrigeration solutions for excess servings or advance provisions upon scaling, aligning storage strategies with diverse consumption needs.

    Nutritional Deep Dive


    An exploration of nutrition reveals this dish’s macro: High protein beef, rich in meaty goodness; compatible cheese intensifies flavors, achieving desired balance.

    Micronutrients—garlic’s allicin empowers immune function while carefully seasoned tomatoes introduce antioxidants, nourishing body and palate symbiotically.

    Foster health achieved through balanced flavors, enjoying moderation mindfulness intertwined with savor longevity. Complement with greens for equilibrium unlocks.

    Mind portion, ensuring weight management aids practice. Restatement keeps servings steady for mindful healthalties achievable with joyful regularity.

    Dietary Adaptations


    Modify the recipe for gluten-free needs using gluten-free pasta variations, offering excellent achievement while reserving taste-centered delight intact.

    Dairy-free options abound through plant-based cheese replacements. Maintain harmony in flavors, experiencing comprehensive enjoyment within accommodating boundaries.

    Vegan adaptations require plant substitutes for cheese, establishing novel interpretations, celebrating taste through creatively non-meatened artistic richness.

    Low-carb transitions flow with full veggie swap, embracing health-centric assembly; substantial creative adaptability shines through alternative arrangements.

    Keto guided exploration uses zucchini noodles for reduced-carbohydrate intake; beef’s quality liberates irresistible taste satisfaction within ketogenic realms.

    Troubleshooting Guide


    Texture concerns resolve through proper pasta preparation. Cook to al dente avoids mush, while thorough layering solidifies dish singular interpretations.

    Achieve flavor balance through nuanced seasoning practices; assure every layer’s evenness. Adjust sweetness against tangy with subtle sugar applications.

    Temperature issues arise due to overheating. Assess evenly distributed warmth across oven racks, offering the top-heat finish for visual golden-browned effects.

    Overcome challenges with subpar equipment substitution with sturdy staples, encouraging quality through reliable culinary machinery attainment.

    Innovate further through ingredient adaptation. Assess compatible replacements across varied constraints, ensuring an opportunistic dynamic meets challenges faced.

    Recipe Success Stories


    Culinary communities share exuberance in exploration. Engaging couples undertake creative endeavors, delighting in distinctive successes magnificently.

    Readers play with substitutions, rejoicing in uniquely crafted blends, empowering originality while nurturing shared experiences within this beloved creation.

    Further adaptation fostered surprise reveals—chefs recraft aesthetics through insightful techniques, discovering versatile reinvention opportunities joyously.

    Accumulate tips from photography enthusiasts capturing colorful contrast; highlight hidden aspects illuminating iconic layers appetizingly.

    Feedback fosters collective appreciation—culminating unspoken community ties thriving over shared culinary experimentations rewarding excellence.

    Frequently Asked Questions

    1. Can I use store-bought cheese sauce instead of homemade? For convenience, store-bought options suffice while personalizing enhancements drive custom flavor elevation.

    2. How do I make it spicier? Integrate crushed pepper or jalapeño slices amongst layers, orchestrating heat emotively while maintaining balanced excellence.

    3. Can this lasagna be made vegetarian? Certainly! Swap beef with hearty vegetables, lending robust depth through zucchini or mushrooms achieving desired vibrant flavors.

    4. Should I let it cool before cutting? Yes, allow deliberate cooling, ensuring stabilized slices into charmingly maintained presentations.

    5. Can I freeze leftovers effectively? Absolutely! Wrapping tightly for lengthy preservation, safeguard subsequent savor best experienced through methodical reheating.

    6. What tomatoes should I use for the sauce? Choose ripe, flavorful options like Roma or canned crushed tomatoes—fostering consistent taste lavishly aligning superior joy.

    7. Is there a way to cut fat content? Utilize lean beef alternatives and reduced-fat cheese ensuring preferred calorie shedding while preserving nuanced flavors.

    8. Will more garlic spoil flavors? Increased incorporation adventures towards aromatic extravagance; moderation assists while guarding against overpowerment.

    9. What is the best way to layer lasagna evenly? Practice orchestrated precision, striking balance across every component, cultivating harmonious results through careful alignment.

    10. Can mozzarella be skipped altogether? While optional, mozzarella enriches gooey consistency; Parmesan yields lone vibrancy, sustaining a flavorful transition.

    Additional Resources


    Discover related recipes that extend joy beyond lasagna, enriching varied influences capturing culinary imagination collectively inspiring fulfillment.

    Guides divulge integral techniques for strategic excellence. Mastery of customs ushers artistic skill emergence while transcending gastronomic limitations triumphantly.

    Ingredient exploration unveils versatile application sanctity—unearthing unexpected combination realms fostering endless experiential delight and integration.

    Equipment acumen ensures proficient practice, investing in trusted kitchens sets supporting proficient execution transcending traditional boundaries magnificently.

    Adaptation encourages reinterpretation for unexamined fruition, seasonal variations harmonizing sought authenticities plus propelled artistry accomplished.

    Join the Conversation


    Join the social media collective excitedly sharing creativity. Dish out surprises while welcoming inspiring cohort conversations that invigorate experiences.

    Capture lasagna’s luscious appeal through photography, articulating lusciousness; preparing visual masterpieces heralds attentions contributing captivating showcases.

    Reviews foster communal bond cultivation—welcoming myriad appreciations expanding enthusiasm tapping exhilarating shared explorations exuberantly.

    Engage community dynamics, learning vibrant adaptations redefining flavor endeavors informed by innovative disparities relishing inclusive collectivities.

    Reflect on rich diversities, offering value through visual storytelling disseminating culinary transformations realized beyond typical expectations cheerfully.

    The Recipe

    Parmesan Garlic Beef Cheeseburger Lasagna

    Serves: 8

    Prep Time: 30 mins

    Cook Time: 60 mins

    Total Time: 90 mins

    Kitchen Equipment Needed

    • Large skillet
    • Deep baking dish
    • Whisk
    • Spatula
    • Aluminum foil

    Ingredients

    • 12 lasagna noodles
    • 1 pound ground beef
    • 2 cups marinara sauce
    • 1 cup shredded mozzarella cheese
    • 1/2 cup grated Parmesan cheese
    • 3 cloves garlic, minced
    • 1 tablespoon olive oil
    • Salt and pepper to taste

    Directions

    1. Preheat the oven to 375°F (190°C). Cook the lasagna noodles according to package instructions. Drain and set aside.
    2. In a large skillet over medium heat, add olive oil and sauté garlic until fragrant. Add ground beef, season with salt and pepper, and cook until browned. Drain excess fat.
    3. Stir in the marinara sauce with the beef and allow to simmer for 5 minutes.
    4. In a deep baking dish, spread a thin layer of meat sauce. Place a layer of lasagna noodles over it, then add more meat sauce, mozzarella, and Parmesan cheese. Repeat layers ending with cheese.
    5. Cover the dish with aluminum foil and bake for 30 minutes.
    6. Remove foil and bake for an additional 15 minutes until the cheese is golden brown and bubbly.
    7. Allow the lasagna to rest for at least 10 minutes before slicing and serving. Garnish with more Parmesan cheese, if desired.

    Recipe Notes

    • Feel free to add layers of sautéed mushrooms or bell peppers for extra flavor and nutrition.
    • For a spicier version, incorporate red pepper flakes into the beef sauce.

    Irresistibly Crispy Philly Cheesesteak Egg Rolls with Melty Cheese

    Crispy, Cheesy Philly Cheesesteak Egg Rolls: An Irresistible Flavor Fusion

    ⚖️
    Difficulty
    Medium

    ⏲️
    Prep Time
    20 mins

    🕒
    Cook Time
    25 mins

    ⏱️
    Total Time
    45 mins

    🍽️
    Servings
    8

    Philly cheesesteak egg rolls are a delightful culinary creation blending the savory flavors of a classic Philly cheesesteak with the satisfying crunch of an egg roll wrapper. With tender strips of beef, gooey cheese, and the perfect balance of onions and peppers, each bite is an explosion of rich flavors encased in a crispy, golden shell. Whether you’re craving an inventive appetizer for your next party or a comforting snack to satisfy your tastebuds, these egg rolls are sure to impress.

    The magic of this recipe lies in its seamless combination of textures and flavors. The egg roll’s outer shell is exquisitely crispy, offering a satisfying crunch that complements the hearty steak filling inside. The cheese melts perfectly, creating a luscious gooeyness that binds the filling together. The aroma is simply enticing, with savory notes wafting through the kitchen as they cook, bringing a sense of warmth and comfort to your home. Beyond its fantastic flavor and texture, this recipe is the epitome of ease, making it accessible to home cooks of various skill levels.

    Quick Recipe Highlights

    • Flavor Profile: Savory and rich with the distinctive taste of beef and cheese, accented by mild sweetness from caramelized onions and bell peppers.
    • Texture: Crispy exterior paired with a soft, juicy interior full of melty cheese and tender steak pieces.
    • Aroma: Mouthwatering aromas from sautéed beef, cheese, and vegetables that fill your kitchen with comforting warmth.
    • Visual Appeal: Golden brown egg roll shells encasing colorful, cheesy filling make for an inviting presentation.
    • Skill Level Needed: Intermediate skills are beneficial for assembling and frying the egg rolls to golden perfection.
    • Special Equipment: Requires a deep fryer or heavy-duty skillet for frying, and sharp knives for slicing and chopping.

    Recipe Overview

    • Difficulty Level: While not overly complicated, this recipe requires attention to detail when it comes to frying and assembling the egg rolls for the best results.
    • Category: Perfect as an appetizer, snack, or party finger food, these egg rolls are versatile for a range of dining occasions.
    • Cuisine: Inspired by American cuisine with a Chinese twist, bringing Philly flavors to a unique format.
    • Cost: Affordable ingredients, primarily involving cheese, steak, and vegetables, making it a cost-effective indulgence.
    • Season: Best enjoyed year-round, but particularly comforting in colder months when longing for warm, hearty foods.
    • Occasion: Ideal for game days, parties, or simple family gatherings where fun and flavorful foods are appreciated.

    Why You’ll Love This Recipe

    This recipe is an explosion of taste and texture that will captivate any food lover. The contrast between the crunchy egg roll wrapper and the creamy cheese-filled center creates a delightful bite every time. These crispy, cheesy Philly cheesesteak egg rolls are the perfect way to channel your love for two cuisines in one easy-to-eat package.

    Preparation is straightforward, requiring only basic chopping and frying skills, making it a convenient choice for busy weeknights or impressing guests without spending hours in the kitchen. Plus, the ingredients are readily accessible in most local grocery stores, ensuring you can whip these up with minimal hassle.

    Besides being utterly delicious, this recipe offers the indulgence of classic comfort foods with controlled portion sizes, making each roll a satisfying and reasonable treat. Perfect for social settings, these egg rolls can spark conversation and please a crowd, offering a fun twist on traditional party offerings. They’re also easy on the wallet, combining high-impact flavors with budget-friendly components.

    Historical Background and Cultural Significance

    The idea of merging Philly cheesesteaks and egg rolls is a testament to culinary innovation, blending beloved American and Asian flavors. Originating in Philadelphia, the classic cheesesteak sandwich is a cultural icon known for its hearty simplicity and flavorful satisfaction. This dish honors that famed taste while introducing a Chinese-American element through the egg roll, popular in American-Chinese cuisine for its crispy, fried appeal.

    Over time, creative cooks sought to combine these comforting staples, resulting in unique fusion dishes like this one. Philly cheesesteak egg rolls first emerged in American kitchens, bringing excitement to traditional palettes by combining the hearty sandwich with an iconic appetizer format. Their popularity has since spread far beyond their regional roots, embracing a nationwide audience eager for inventive culinary experiences.

    With each iteration, these egg rolls have adapted to local tastes and preferences, reflecting the diverse flavor profiles found across the country. This fusion symbolizes America’s rich tapestry of cultures, drawing from various culinary traditions to create harmony in diversity on the plate.

    Ingredient Deep Dive

    For a successful dish, high-quality beef is crucial. Authentic Philly cheesesteaks use ribeye steak for its rich flavor and tenderness, making it an ideal choice in this recipe. It’s rich in protein and essential vitamins, providing a savory, nutritious core to our egg roll filling.

    Cheese, particularly mild provolone or American cheese, brings creaminess and a distinct taste to the egg roll. While conforming to personal preferences, these cheeses melt well and provide richness without overpowering other flavors.

    When it comes to vegetables, onions and bell peppers are classic additions. Onions bring natural sweetness and aromatic depth, while peppers add a slight crunch and a hint of sweetness. Both are nutritious, adding fiber, vitamins, and minerals to the dish.

    The choice of wrapper is equally important. Traditional egg roll wrappers become deliciously crispy when fried, providing the perfect contrast to the juicy filling inside.

    Common Mistakes to Avoid

    • Overfilling the wrappers can lead to bursting during frying, so adhere to suggested portions.
    • Ensure oil is at proper temperature before frying to achieve that perfect golden brown crust.
    • Insufficient draining can leave rolls greasy, so allow them to rest on absorbent paper post-frying.
    • Be cautious not to overcook the steak, preserving its tenderness inside the roll.
    • Cut vegetables uniformly to ensure even cooking and consistent texture distribution.
    • Avoid skipping cheese as it binds the ingredients, preventing filling from spilling out.
    • Ensure egg roll edges are well-sealed with egg wash or water to avoid leakage.
    • Do not overcrowd the fryer, as it will affect cooking temperature and the final result.

    Essential Techniques

    The art of frying is crucial for this recipe’s success. Proper oil temperature is vital in achieving an evenly golden and crispy exterior. Keep a thermometer handy to maintain the temperature around 350°F.

    Learning to roll with the right tightness will ensure that each egg roll holds its shape without breaking during frying. Pay attention to sealing edges using water or egg wash to prevent undesired leaks.

    Correctly cooking the steak to medium ensures tenderness and maximum flavor, making each bite more enjoyable. The beef should be sliced thinly against the grain for optimum texture and chew.

    Pro Tips for Perfect Crispy, Cheesy Philly Cheesesteak Egg Rolls

    Opt for high-smoke point oils like vegetable or canola for frying to achieve that desired crispness. Allow the filling to cool slightly before assembling to improve handing and reduce sogginess from steam.

    Always squeeze air out of rolls before sealing them to prevent bursting during frying. When adding cheese, slightly fold over edges to ensure minimal spillage into the oil.

    To boost flavor, season the filling generously before wrapping, considering that some flavors become muted during frying. Freeze prepared rolls on a baking sheet prior to frying to ensure a neat shape and even cooking.

    Variations and Adaptations

    Integrate regional variations by experimenting with cheeses like cheddar for a bolder, tangy twist or swap in hot peppers for a spicy kick.

    Connect with seasonal produce by incorporating vegetables like mushrooms in winter or adding fresh corn in summer for additional texture and flavor contrasts.

    Adapt the recipe to dietary needs with gluten-free wrappers and dairy-free cheeses, making it inclusive without missing out on essential flavor profiles.

    For a more filling meal, serve rolls atop a bed of fresh greens, enhancing nutritional value while maintaining focus on the zesty flavor combination.

    Serving and Presentation Guide

    Present your Philly cheesesteak egg rolls on a rustic wooden board for an appealing visual contrast, accompanied by ramekins of dipping sauces like spicy ketchup or cheese dip to amplify flavors.

    Consider garnishing with chopped fresh herbs or sesame seeds for added color interest and a hint of earthy freshness. Allow plenty of room between rolls to spotlight individual presentation and provide easy serving access for guests.

    Pair with sides like coleslaw or a light salad to balance their richness, picking elements that enhance the bold flavors at play while contributing to an overall vibrant platter.

    Wine and Beverage Pairing

    Pair with a bold red wine such as cabernet sauvignon to complement the rich, beefy flavors found within each roll’s filling.

    Offer non-alcoholic options like sparkling water with a twist of lemon for a refreshing palate cleanser between bites, or try iced tea for its gentle sweetness.

    For coffee lovers, a smooth, medium-bodied brew with earthy tones can offer an unexpected but delightful pairing that enhances the cheesesteak notes.

    Storage and Shelf Life

    For best results, store uncooked egg rolls in a zipper-sealed bag in the refrigerator for up to two days to preserve freshness, ensuring separation with parchment to prevent sticking.

    When refrigerating leftovers, place them in a container to prevent moisture loss, and reheat in an oven or air fryer to regain crispiness.

    Avoid freezing already cooked rolls to maintain texture but freezing raw rolls is perfect for future convenience and indulgence.

    Make Ahead Strategies

    To streamline your cooking process, prepare the filling in advance and refrigerate it until final assembly, simplifying your on-the-day tasks.

    Emphasize freshness by frying rolls just before serving and topping with chopped scallions or peppers at the last moment for added vibrancy.

    Complete all prep work a day before serving to save time and minimize cleanup, while preserving the dish’s original flavors and enticing textures.

    Scaling Instructions

    For half the quantity, adjust quantities proportionately, retaining richness by balancing cheese and meat ratios carefully.

    If scaling up, consider frying in batches to ensure consistent cooking and crispiness, and monitor temperature closely between cycles.

    Remember to position frying baskets carefully to avoid overcrowding, which leads to undesirable sogginess and cooling of oil.

    Ensure proper cooling space for larger batch processing, utilizing racks or drying stations to streamline timing when serving.

    Nutritional Deep Dive

    These egg rolls boast a balanced blend of proteins, fats, and carbohydrates, ensuring satisfaction through diversity and rich taste.

    A typical serving offers valuable nutrients essential for energy, growth, and maintenance, providing wholesome delight with every bite.

    They provide invaluable dietary fibers from vegetables included in the filling while adding vitamins that support core immune functions.

    Careful portion control can be leveraged to align with weight management objectives without overconsumption risk yet maintaining full flavor indulgence.

    Dietary Adaptations

    To satisfy gluten-free needs, explore gluten-free wrappers available on the market, maintaining versatility and accessibility for everyone to enjoy.

    For dairy-free eating, substitute standard cheese with nutritious vegan-friendly options widely available at grocery stores, ensuring melted silkiness stays part of your dining experience.

    Low-carb pathways can be achieved with alternative wrappers or indulging moderation, allowing this renowned dish to sustain—and excite—within varied diets.

    Engage with these thoughtful adaptations to relish within any restrictions encountered while staying true to the spirit of these delectable egg rolls.

    Troubleshooting Guide

    If rolls are too oily, ensure the oil is always at the correct temperature or allow sufficient post-frying drain time.

    For uneven-thickness filling, carefully chop meat and vegetables uniformly, resulting in consistent cooking throughout.

    Uneven frying levels can improve by maintaining enough space between egg rolls during cooking, ensuring they aren’t touching.

    Should fillings spill during wrapping, verify all ingredients are pre-cooked and set before assembling rolls tightly using wet seals.

    Recipe Success Stories

    Our readers have shared numerous stories of community dining experiences vastly improved by including these rolls, perfectly suited for parties or relaxed gatherings.

    Numerous variations have successfully resulted in intriguing adaptations, demonstrating the versatility of this recipe to suit different taste preferences across diverse audiences.

    Readers delighted with its appeal have suggested serving ideas, inventive pairings, and shared photographs celebrating stunning presentations, offering tips and inspiration for others to replicate seamlessly.

    Amplify your experience by following their innovations or adding individual twists that redefine cherished culinary experiences within your own circle.

    Frequently Asked Questions

    Q: Can I use a different type of cheese?
    A: Yes, you can substitute with your favorite cheese, though melting cheeses like provolone, mozzarella, or gouda work best for maintaining structure and gooey goodness.

    Q: Are there vegetarian alternatives for the beef?
    A: Definitely! Replace steak with portobello mushrooms or grilled eggplant for a harmonious flavor match, offering equally satisfying textures in your egg rolls.

    Q: What’s the best way to reheat leftovers?
    A: Use an oven or air fryer for reheating, ensuring rolls regain their crispy exterior while retaining warmth and flavor within.

    Q: Can these be baked instead of fried?
    A: Indeed, baking provides a healthier alternative; brush rolls with oil lightly and bake at 400°F, rotating for even crispness.

    Q: Is it possible to pre-cook egg rolls before an event?
    A: Absolutely! Prepare and fry rolls beforehand, storing them in the refrigerator. Simply reheat using recommended techniques before serving.

    Q: How do I keep the rolls from coming undone?
    A: Properly wet edges when sealing, and ensure enough air is expelled during rolling to prevent filling from expanding in the fryer.

    Q: Can this recipe be frozen after cooking?
    A: It’s advisable to freeze uncooked rolls to maintain freshness. Thawing and frying them fresh ensures optimal texture and flavor.

    Q: How do I optimize seasoning in this dish?
    A: Taste and adjust filling flavor during creation; consider adding herbs or spices like garlic powder, ensuring savory satisfaction.

    Q: Are air fryers effective for cooking these egg rolls?
    A: Indeed, air fryers provide excellent results, using minimal oil for crisp, satisfying rolls with easier cleanup and faster preparation.

    Q: Can I prepare the filling a day in advance?
    A: Absolutely, preparing and resting your filling develop robust flavors, streamlining assembly with added efficiency on serving days.

    Q: What should I serve with them?
    A: Complement with dips like salsa, cheese dip, or tangy sauces, and pair with sides like crisp salad greens or roasted vegetable medleys.

    Q: How do I ensure my rolls have even cooking?
    A: Monitor oil temperature consistently, ensuring saturation isn’t excessive; use medium-large frying bowls to promote comprehensive, uniform cooking pursuit.

    Additional Resources

    Explore handcrafted guides on effective frying techniques, ensuring your culinary prowess achieves crisp perfection. Discover tips on sourcing quality Asian ingredients and maximizing flavor depths when preparing this fusion classic.

    Develop your skills further by exploring companion recipes such as traditional egg rolls or Philly cheesesteak sandwiches, expanding on fundamental dishes in your repertoire.

    Utilize engaging equipment reviews focused on frying aids or tips for delightful plating and presentation enhancement, ensuring you confidently execute every step with finesse.

    Join the Conversation

    We invite you to share your thoughts, adaptations, or creativity displayed with these egg rolls across community channels, sparking dialogue and sparking inspiration. Immerse yourself deeper into food photography techniques to capture stunning visuals of your culinary creations, enhancing social media presence.

    Engage with this recipe by leaving reviews, offering feedback, and contributing further improvements for others to enjoy, encouraging a collaborative culinary journey.

    For those desiring personal touches, explore community discussions centering around suggested pairings, plating ideas, and diverse, adaptable techniques to attain even greater heights within the subject of culinary innovation.

    The Recipe

    Crispy, Cheesy Philly Cheesesteak Egg Rolls

    Serves: 8

    Prep Time: 20 mins

    Cook Time: 25 mins

    Total Time: 45 mins

    Kitchen Equipment Needed

    • Deep fryer or heavy-duty skillet
    • Sharp knife
    • Cutting board
    • Slotted spoon
    • Paper towels
    • Tongs

    Ingredients

    • 1 lb ribeye steak, thinly sliced
    • 1 cup shredded provolone cheese
    • 1 bell pepper, thinly sliced
    • 1 onion, thinly sliced
    • 1 pack of egg roll wrappers
    • Salt and pepper, to taste
    • Oil for frying
    • 1 egg, beaten (for sealing)

    Directions

    1. Heat oil in a skillet, add steak slices, bell peppers, and onions, sautéing until veggies are tender and steak is cooked.
    2. Season the filling with salt and pepper, then cool slightly before stirring in the shredded cheese until melted.
    3. Lay an egg roll wrapper on a clean surface. Place 2 tablespoons of filling in the center.
    4. Brush wrapper edges with beaten egg, fold in sides, then roll up tightly to enclose filling.
    5. Heat oil in a deep fryer to 350°F. Fry rolls in batches until golden brown and crispy, about 2-3 minutes per roll.
    6. Remove with a slotted spoon, drain on paper towels to remove excess oil before serving.

    Recipe Notes

    • Substitute beef with mushroom for a vegetarian version.
    • Achieve more vibrant flavor by adding hot sauce to the filling.
    • For extra crispiness, consider double frying the rolls.

    Spice Up Your Lunch with Jalapeño Cheddar Grilled Cheese Recipe

    Jalapeño Cheddar Grilled Cheese: A Spicy Twist on a Classic

    ⚖️
    Difficulty
    Easy

    ⏲️
    Prep Time
    10 mins

    🕒
    Cook Time
    15 mins

    ⏱️
    Total Time
    25 mins

    🍽️
    Servings
    2

    There’s nothing quite like a perfectly made grilled cheese sandwich, with its gooey center and crispy edges. But when you add a few slices of jalapeño and a generous amount of cheddar, this everyday comfort food transforms into a Jalapeño Cheddar Grilled Cheese masterpiece that tantalizes your taste buds. This spicy variation captures the classic essence of grilled cheese while introducing bold new flavors that elevate the dish. Perfect for weekday lunches or cozy dinner nights, this sandwich is simple to assemble and captures both heat and cheesy bliss in each bite.

    The Jalapeño Cheddar Grilled Cheese is a must-try for those who appreciate the fine art of spicy food. The jalapeños deliver a kick of heat that is beautifully complemented by the rich, creamy texture of melted cheddar cheese. Moreover, the contrast between the crunchy bread and the soft cheese creates an inviting experience for any grilled cheese enthusiast. Whether you’re gathering with friends or looking for a delightful meal for yourself, this recipe promises to be both fun to make and delicious to devour.

    Quick Recipe Highlights

    • Flavor Profile: This sandwich features a harmonious blend of spicy jalapeños and tangy cheddar cheese, creating a delightful mix of flavors that are both savory and slightly fiery.
    • Texture: The outer layer of perfectly toasted bread provides a satisfying crunch, while the melted cheddar cheese is creamy and luscious, harmonizing the textures.
    • Aroma: The smell of toasted bread mingled with jalapeños and melted cheese conjures warmth and comfort, making it hard to resist.
    • Visual Appeal: The vibrant green specks of jalapeños against the golden, buttery bread make for a visually tempting dish that’s sure to please.
    • Skill Level Needed: With basic cooking skills, anyone can master this recipe by following simple steps, making it accessible for novice cooks.
    • Special Equipment: A good non-stick skillet or a griddle and a spatula are essential tools for achieving the perfect toast and ensuring everything melds together seamlessly.

    Recipe Overview

    • Difficulty Level: This recipe is rated as easy due to its straightforward technique of assembling ingredients and toasting them until golden brown. It is a perfect choice for beginners who wish to advance their culinary skills without an extensive cook time.
    • Category: Ideal for quick lunches or casual dinners, this grilled cheese fits perfectly within the sandwich category bestowed with an exciting twist.
    • Cuisine: While inherently American in its roots, this version introduces a Southwest twist with the addition of jalapeños, bringing a touch of Tex-Mex flavor to a timeless favorite.
    • Cost: This recipe is budget-friendly, with simple ingredients like bread, cheese, and jalapeños being inexpensive yet effective in delivering bold flavors.
    • Season: Best enjoyed year-round, especially in colder months when warmth and comfort meals are appreciated. Perfect for indoor dining or enjoying by the fireplace.
    • Occasion: Suitable for informal gatherings, casual lunches, or as a delightful mid-week meal. It’s versatile enough for a quick snack yet satisfying for a full meal.

    Why You’ll Love This Recipe
    Grilled cheese sandwiches are the food of comfort and nostalgia, but introducing a fiery element like jalapeño offers an adventurous departure from the norm. This Jalapeño Cheddar Grilled Cheese brings together the allure of a classic with a modern twist that spices up your meal times. You’ll love this recipe for the way it blends bold flavors with a texture that satisfies both crunchy and chewy cravings. It’s a sensory feast with aromatic jalapeños that shine against the smoothness of molten cheddar.

    Convenience is another strong point; the preparation requires minimal effort, and it comes together quickly, making it a convenient option for any day of the week. Perfect for when you need a meal ready in a flash that doesn’t compromise on taste or satisfaction. Additionally, this dish can accommodate various sides or be enjoyed on its own. With a handful of ingredients and simplicity in technique, it is ideal for those pressed for time but eager to enjoy a homemade meal.

    Nutritionally, this grilled cheese offers a balance of fats, proteins, and carbohydrates. The cheddar cheese provides a good source of calcium and protein, while jalapeños add a dose of vitamin C. Rather than being just a cheese sandwich, this combination provides vital nutrients and tasty delight in each slice. For those mindful of dietary intake, full-fat cheese may be substituted with a reduced-fat version without losing its flavor integrity.

    Socially, this Jalapeño Cheddar Grilled Cheese is a hit at casual gatherings, requiring little time for preparation while making a big impression. Whether it’s a weekend brunch or game night, its universal appeal to spice-loving guests makes it an ideal accompaniment for social interactions. Consider pairing this grilled cheese with a spicy dip or serving alongside a cool beverage to offer a balanced flavor profile that guests will appreciate.

    Finally, this recipe excels in its cost-effectiveness. With just a few inexpensive ingredients, you can create a gourmet feel at home without the price tag. Accessibility to ingredients is straightforward, and most are staple pantry items, ensuring you won’t need to hunt down specialty components. In a culinary world where flavors compete, this recipe delivers on taste and economy, leaving both your palate and pocketbook pleased.

    Historical Background and Cultural Significance
    Grilled cheese has a rich history dating back to World War II, where it became a popular ration meal due to its simple components and filling nature. Combining melted cheese and bread has always equaled culinary comfort, and its evolution has seen many variations over the years. Jalapeño-infused versions highlight the ever-growing love for spice and the creativity that home cooks and chefs alike infuse into traditional recipes.

    Its cultural significance lies in both its everyday occurrence in American kitchens and its place in the hearts of those who love uncomplicated yet deeply enjoyable meals. A staple in diners, cafeterias, and homes across the country, the grilled cheese offers familiarity with room for experimentation, making it a bond-builder over shared meals. The combination with jalapeños also nods to the blending of culinary traditions, enhancing the depth of flavor while respecting its roots.

    Over time, grilled cheese sandwiches have moved beyond just cheddar and white bread to incorporate global ingredients, reflecting society’s broader palates and innovative cooking styles. With the inclusion of jalapeños, the sandwich not only acquires added taste dimensions but connects people through shared culinary explorations. As our world continues to mesh culturally, dishes like this demonstrate how traditional comfort foods can adapt and thrive in new flavorful landscapes.

    Regional variations proliferate as local ingredients and preferences shape unique versions. While in the American Southwest, jalapeños are a celebrated addition due to their readiness and cultural fusion, in other regions, one might find a pepperjack cheese or other elements reflecting local tastes. Despite these differences, at its core, a Jalapeño Cheddar Grilled Cheese remains a testament to culinary adaptability and the timeless appeal of melted cheese on toast.

    Ingredient Deep Dive

    Cheddar Cheese: Cheddar’s origins trace back to Somerset, England, providing a cheese that ranges from mild to sharp, catering to various palates. Its rich and creamy texture, along with a slightly tangy flavor, makes it a go-to for melted dishes. Cheddar is rich in calcium, essential for bone health, and contributes protein to the dish.

    When choosing cheddar, opt for a block version and grate it yourself for better meltability. Store tightly wrapped in the fridge, and before it hardens, freeze any unused parts for prolonged freshness. Substitute options include gouda or mozzarella for varying flavors without compromising the dish’s integrity.

    Jalapeños: Originating from Mexico, jalapeños are widely used in spice-centric cuisines. Their mild to moderate heat level is perfect for introductory spice in dishes, providing capsaicin which is known for its metabolism-boosting properties. Opt for firm, unblemished jalapeños with deep color during selection. Store in the fridge for up to a week or slice and freeze for longer shelf life. If heat isn’t desired, consider substituting with bell peppers for similar crunch sans spice.

    Bread: A universal staple, the bread used in grilled cheese typically ranges from sourdough to white, providing the perfect vessel for grilling and cheese stuffing. Bread contributes carbohydrates and fibers to this meal, balancing the nutritional profile. Select a sturdy loaf that can withstand the pressure of grilling without falling apart. Storing in a cool, dry place ensures it remains fresh longer. As a variation, whole grain or seed bread can add texture and slightly nutty tones to the dish.

    Common Mistakes to Avoid

    • Not preheating the pan: Ensure the skillet is hot enough before placing the sandwich to attain a crispy outside without the risk of sogginess.
    • Choosing overly thick bread: Overly thick slices may hinder cheese melting, leading to an imbalanced sandwich.
    • Using too little cheese: Don’t shy away from a generous cheese layer to ensure oozy goodness.
    • Overloading with jalapeños: Balance is crucial; too many jalapeños can overpower the cheese, so moderate usage is key.
    • Skipping buttering the bread: Spread butter evenly on the outside for optimal crunch and flavor.
    • Cooking on high heat: Lower to medium heat assures cheese melts properly while bread achieves toasty perfection.
    • Not grating cheese: Pre-sliced cheeses may not melt as well; opt for grating for best results.
    • Impatience: Let the sandwich rest a moment off the heat for cheese to settle and flavors meld together.

    Essential Techniques
    Grating Cheese: Grate cheese for a more even melt that integrates well with other ingredients. Grated cheese covers the sandwich uniformly, ensuring rapid meld during cooking.

    Balancing Heat: Adjust heat levels to moderate during cooking to avoid burning the outer layer while ensuring adequate internal warmth. Conquer patience while flipping to achieve a golden-brown, crunchy exterior.

    Pre-Heating: Blackening at inopportune timings can spoil flavors. Preheat your skillet sufficiently to start with a good sear on contact, forming the perfect toast hue and beautiful crusting for your sandwich.

    Pro Tips for Perfect Jalapeño Cheddar Grilled Cheese
    1. Use a shredder blade to create fine cheese crumbs, which melt more evenly and quickly.
    2. Add a lid for a few moments mid-cook to trap heat, aiding cheese melt securely without increasing stove heat.
    3. Sprinkle bread with Parmesan before grilling for a savory crust.
    4. Consider adding a slice of tomato or avocado post-toast for added freshness and dimension.
    5. Allow resting post-cooking to unify flavors and avoid chasing cheese off your plate.
    6. If dairy-rich cheddar is too rich, swap for an aged variety to mitigate fat content while enhancing flavor.
    7. Butter bravely: Your bread deserves hearty coverage for the crunchiest result possible.
    8. Test jalapeño slices for spice intensity beforehand to gauge the right balance for personal taste.

    Variations and Adaptations

    Regional Variations: Incorporate pepper jack cheese or Monterey jack for a different take on spiced cheese. The jalapeño can be replaced with poblano peppers for less heat but more charred flavor.

    Seasonal Adaptations: In colder months, add a splash of hot sauce for warming spice or pair with a seasonal soup. In warmer weather, pair with fresh lime juice or light spinach.

    Dietary Modifications: For a gluten-free version, opt for gluten-free bread varieties and check labels on cheeses for any gluten cross-contamination processes.

    Flavor Variations: Consider adding a smokey element with smoked cheddar or bacon to enhance the natural grilled notes. Fold in slices of roasted poblano or red pepper for added complexity.

    Texture Modifications: For a softer texture, use a panini press, compressing the sandwich while grilling. Alternatively, use different breads for unique crust yields.

    Presentation Alternatives: Cut in diagonal halves for a triangular presentation or serve as mini squares as finger food for parties.

    Serving and Presentation Guide
    Plating Techniques: Arrange on a rustic wooden board for a homey feel, enhancing the sandwich’s artisanal nature. Use colorful plates to highlight the golden shades of grill marks.

    Garnishing Ideas: Garnish with fresh herbs like cilantro or parsley for a touch of color and aroma. A drizzle of balsamic glaze can add aesthetic appeal and a hint of sweetness.

    Traditional Accompaniments: Serve alongside classic tomato soup or a light mixed green salad to balance flavors and textures.

    Modern Serving Suggestions: Pair with chopped pickles or charred corn as a complementary side, ensuring each bite enhances the main dish’s enjoyment.

    Temperature Considerations: Serve warm, ensuring the cheese remains gooey. Room temperature sandwiches may lose textural appeal.

    Portion Control Tips: For smaller appetites, serve as half sandwiches with lighter side courses to avoid excess fullness.

    Wine and Beverage Pairing

    Wine Pairings: For a classic match, serve with a Chardonnay that balances the cheese’s creaminess and jalapeño’s spice, offering a smooth palate experience.

    Non-Alcoholic Alternatives: Consider lime-infused iced tea or sparkling water with a lemon wedge to refresh and contrast flavorful heat.

    Coffee/Tea Pairings: For brunch settings, pair with a chamomile or green tea; their calm flavors work well against the cheese’s richness.

    Temperature Considerations: Chill beverages to balance the sandwich’s warm offering, enhancing the sensory variety at mealtime.

    Serving Suggestions: Coordinate glassware and pour just prior to serving for optimal tasting alignment.

    Storage and Shelf Life
    Storage Methods: Wrap tightly in plastic wrap or foil, then place in an airtight container to keep fresh for up to two days in the fridge.

    Temperature Requirements: Maintain refrigeration at consistent temperatures to prevent spoilage from cheese warmer than 32-40°F.

    Container Recommendations: Use glass containers for better airtight seals, preserving flavor and texture.

    Signs of Spoilage: Discoloration in lactate fats or a sour smell can indicate spoilage; discard the sandwich if these arise.

    Reheating Instructions: Warm gently on a skillet or in an oven to restore freshness. A short microwave zap can yield gooey re-melted cheese.

    Freezing Guidelines: Freeze prepared sandwiches before grilling to extend life, cooking directly from frozen without thawing for convenience.

    Make Ahead Strategies
    Prep Timeline: Prepare components up to a day in advance, keeping bread and cheese separate until grilling time to maintain freshness.

    Storage Between Steps: Store pre-assembled sandwiches with parchment paper in between if sandwich stacking is required in the fridge to prevent them from sticking.

    Quality Impact Assessment: Cheese may absorb more bread moisture if pre-stored in assembled form; aim for sameday assembly for quality assurance.

    Assembly Tips: Pre-assemble with precision to ensure cheese evenness throughout, avoiding sandwich lopsidedness during grilling.

    Reheating Guidelines: Employ a stovetop reheat, utilizing moderate heat and slow warming to refresh the crisp-to-soft texture ratio.

    Fresh Element Additions: Add fresh herbs or raw vegetables post-heat to reinstate refreshing textures and flavors if reheated.

    Scaling Instructions
    Halving the Recipe: For single servings, cut ingredient proportions in half, maintaining balance of spice and cheese relative to bread slice size.

    Doubling or Tripling: Scale gracefully with parallel adjustments to seasoning balance; thicker cuts of jalapeño may accompany increased cheese volume.

    Equipment Adjustments: Larger skillet/griddle assists increased volume; consider batch cooking for extreme multiples.

    Timing Modifications: If scaled, initial heat absorbance may require marginal additional cook time; be vigilant to avoid burning.

    Storage Considerations: Large batches should still be assembled just within need unless whole batch intentions call for single-day consumption.

    Nutritional Deep Dive
    Macro Breakdown: Each serving approximately consists of 400 calories, with a balanced mix of carbohydrates, fats, and proteins.

    Micronutrient Analysis: Rich in calcium from cheese, distribution toward daily calcium needs can prove advantageous while moderated by accompanying fresh side servings.

    Health Benefits: Calcium supports bone health, while jalapeños can contribute to potential metabolism boost benefits.

    Dietary Considerations: Moderation is key within a balanced diet, ensuring components align with personal dietary specifications when adapted specifically.

    Portion Analysis: Maintaining portion control relative to pairing dishes can ensure the meal remains within desired caloric boundaries.

    Weight Management Tips: Monitor cheese type for lower-fat varieties to tailor an ideal calorie count without losing cheesy allure.

    Dietary Adaptations

    Gluten-Free: Substitute standard bread for gluten-free, ensuring all preparation surfaces are sanitized and celiac-friendly processes are observed.

    Dairy-Free: Use dairy-free cheese options, especially nut-based cheeses, to maintain desired melted texture while serving lactose intolerant or dairy-free individuals.

    Vegan: Dairy-free vegan cheese coupled with plant-based butter affords preparation for those following vegan diets without compromise.

    Low-Carb: Utilize low-carb bread options, integrating cheese varieties that align with low-sugar protocols contributing to meal classification.

    Keto: Align bread and cheese choices favoring keto specifications, allowing incorporation of higher-fat dairy within declared dependencies.

    Paleo: Adapting paleo options may involve using paleo cheese alternatives coupled with almond-based bread variants.

    Low-FODMAP: Monitor cheese and bread types for low-FODMAP specifications, considering advisability across dietary contexts with detailed observations.

    Other Specific Diets: Tailor ingredient selection for specialized diets ensuring cross-compliance with nutritional restrictions or enhancements.

    Troubleshooting Guide

    Texture Issues: If cheese is insufficiently melted, ensure fine grating and appropriate pan coverage when heating to enhance outcomes.

    Flavor Balance: To moderate spice, slice jalapeños thinner and adjust the number of slices used; additional cheese or alternative peppers soothe spice levels.

    Temperature Problems: Measure stove temperature ensuring compatibility as excessive outputs may compromise outcomes with under-cooked interior.

    Equipment Challenges: For non-stick limitations, additional butter assures easy flipping without charring edges or stickiness under heat.

    Ingredient Substitutions: Reviewing cheese meltability ensures proper selections conducive to desired finished melting standards.
    Timing Concerns: Over-cooking cheese results in hard, crispy cheese edges rather than gooeyness; maintain diligent checks during cooking to negate timing misalignments.

    Recipe Success Stories
    Bringing classic grilled cheese into a gourmet light, this inventive pairing captived audiences and reader storyboards featuring experiences involving party canapés to loud picnics. With creative reader adaptations echoing variations and successes like the introduction of caramelized onions or smoky paprika chips, each unique input testifies to Jalapeño Cheddar Grilled Cheese’s versatile acclaim. With photo guidance from shared culinary chronicles to visual revelations, all engage seamlessly in the recipe narrative, showcasing its impact beyond the blog’s own storytelling.

    Frequently Asked Questions

    Can I make this sandwich ahead of time?
    Yes, you can assemble the sandwich and store it in the refrigerator. When ready to serve, cook on a skillet until golden brown and the cheese melts perfectly.

    How spicy is the sandwich?
    The level of spice depends on the quantity of jalapeños. Adjust according to your heat preference, with more slices increasing spice levels.

    What’s the best bread to use?
    A sturdy bread with a good crumb, such as sourdough or ciabatta, is ideal. It holds together well and crisps nicely on the grill.

    Can I add other ingredients?
    Absolutely! Ingredients such as tomatoes, bacon, or avocado could make delicious additions without overpowering the existing flavors.

    Is there a low-calorie version?
    Use low-fat cheese and light bread to reduce calorie content, keeping jalapeños intact for flavor without adding additional calories.

    What’s the best substitute for cheddar?
    Gouda or mozzarella can be excellent alternatives, offering creamy textures that pair well with jalapeños.

    How do I prevent soggy bread?
    Ensure your skillet is properly preheated and your bread is lightly buttered for a perfect, crisp exterior.

    Can it be made in a toaster oven?
    Yes, assemble as directed and use a toaster oven set at medium heat for uniformly golden results.

    What should the cooking temperature be?
    Medium heat is ideal for achieving a good balance between a melty inside and crisp outside without burning the bread.

    How do I slice jalapeños evenly?
    A mandolin ensures consistency in thickness, offering even heat distribution across bites, or use a sharp knife for more control.

    What can I pair this with for balance?
    A fresh salad or bowl of tomato soup accommodates the sandwich nicely, offering a light accompaniment without overwhelming flavors.

    Is grilled cheese healthy?
    Moderation is key; when enjoyed alongside nutritious sides, it can form part of a balanced diet. Opt for whole-grain bread and low-fat cheese for a healthier version.

    Additional Resources
    For those fascinated by the art of grilled cheese, delve into our array of related recipes, such as the classic tomato-basil grilled cheese combination, balancing creaminess with light garden freshness. Explore further technique guides that offer kitchen navigation pointers, especially effective for grilled sandwiches. Supplement ingredient notes with firsthand culinary expressions alongside exciting seasonal variations designed to fit evolving culinary seasons.

    Join the Conversation
    Engage with us on social media platforms featuring your own Jalapeño Cheddar Grilled Cheese takes, enjoying community-driven discourse around inventive variations. Share your photography and hashtag our feed, enriching collective creativity. Write reviews and adaptations extending your voice and witness how small variations can infuse unique depth into versatile classics. Engage personally through shared moments, making dining an experience beyond mere consumption through uniting gastronomy around a shared table.

    The Recipe

    Jalapeño Cheddar Grilled Cheese

    Serves: 2

    Prep Time: 10 mins

    Cook Time: 15 mins

    Total Time: 25 mins

    Kitchen Equipment Needed

    • Non-stick skillet or griddle
    • Spatula
    • Grater
    • Knife
    • Cutting board

    Ingredients

    • 4 slices of bread (sourdough or choice)
    • 1 cup cheddar cheese, grated
    • 2 jalapeños, sliced thinly
    • 2 tbsp butter

    Directions

    1. Preheat the skillet over medium heat.
    2. Butter one side of each slice of bread generously.
    3. Place two slices, buttered side down, on the skillet.
    4. Evenly spread grated cheddar over each slice.
    5. Layer jalapeño slices atop the cheese.
    6. Top with remaining bread slices, buttered side up.
    7. Cook until bottom slice is golden brown, about 3-4 minutes.
    8. Carefully flip, cooking the other side until similarly golden and cheese melted.
    9. Remove from heat and let cool slightly before serving.

    Recipe Notes

    • Adjust jalapeño levels according to spice preference.
    • Try adding bacon or other cheeses for additional layers of flavor.
    • Serve with tomato soup for a classic pairing.

    Delicious Parmesan Crusted Salmon Recipe for a Quick Gourmet Meal

    Parmesan Crusted Salmon: A Flavorful Delight for Any Occasion

    ⚖️
    Difficulty
    Easy

    ⏲️
    Prep Time
    10 mins

    🕒
    Cook Time
    20 mins

    ⏱️
    Total Time
    30 mins

    🍽️
    Servings
    4

    Dive into a sensory feast with this delectable Parmesan Crusted Salmon recipe, a true crowd-pleaser that tantalizes the palate with its rich flavors and crunchy texture. Combining the perfect blend of seasoned breadcrumbs and freshly grated parmesan, this dish elevates simple salmon fillets into a gourmet dinner masterpiece. Paired with the aromatic allure of fresh herbs, the result is a symphony of taste that promises to satisfy.

    Strong yet subtle, Parmesan Crusted Salmon is a comforting dish, perfect for those who relish both flavor and simplicity. In under 30 minutes, you can transform ordinary ingredients into an exceptional meal that’s perfect for busy weeknights or an impressive dinner party entrée.

    Quick Recipe Highlights

    • Flavor Profile: This dish combines the savory richness of parmesan cheese with the mild sweetness of salmon for an irresistible taste.
    • Texture: Delight in the contrast between the crispy crust and the tender, flaky salmon fillet.
    • Aroma: Enjoy the mouthwatering aroma of freshly grated parmesan mingling with herbs and baked salmon.
    • Visual Appeal: A golden-brown crust atop a delicately pink salmon fillet creates a feast for the eyes.
    • Skill Level Needed: Even beginners can nail this recipe, as it requires only basic baking skills and a few straightforward steps.
    • Special Equipment: All you need is a baking sheet and a grater for the parmesan cheese.

    Recipe Overview

    • Difficulty Level: Its straightforward preparation makes this an easy yet satisfying dish suitable for all home cooks.
    • Category: This salmon recipe fits seamlessly into the seafood, dinner, or healthy eating categories.
    • Cuisine: Drawing from Italian influences, it pairs well with Mediterranean side dishes, emphasizing fresh and natural flavors.
    • Cost: With salmon and parmesan as the main costs, this dish is an affordable luxury.
    • Season: Perfect year-round, its hearty warmth is suited for winter, while the lightness complements summer meals.
    • Occasion: Ideal for weeknight dinners or festive occasions, its elegance will enhance any meal setting.

    Why You’ll Love This Recipe


    The taste and texture of Parmesan Crusted Salmon offer a fantastic culinary experience. The joyful crunch of the parmesan coating provides a perfect textural counterpart to the juicy salmon within. It’s a delightful dish that leaves a lasting impression on the taste buds, ensuring it becomes a staple in your meal planning.

    Convenience is a significant benefit; this recipe requires minimal preparation and uses simple, readily available ingredients. It’s a practical choice for those nights when you crave something delicious without the hassle of a complicated dish.

    Parmesan Crusted Salmon isn’t just about flavor; it’s also rich in nutrients. Salmon is an excellent source of omega-3 fatty acids and high-quality protein, while parmesan offers a boost of calcium and vitamin D, making this recipe both delicious and nutritious.

    Apart from being an inviting main course, this recipe offers social value, making it perfect for entertaining guests. It elevates any gathering with its gourmet appearance and delightful flavors, sparking conversations and leaving guests impressed.

    This dish is accessible, economical, and requires minimal ingredients to achieve maximum impact. The unique combination of affordability and flavor means you can enjoy a restaurant-quality meal without leaving home.

    Historical Background and Cultural Significance


    The origin of Parmesan Crusted Salmon is rooted in the rich culinary traditions of the Mediterranean, where fresh ingredients and simple cooking techniques create high-quality, flavorful foods. This dish embodies Italian cuisine, known for integrating parmesan into a variety of meals, highlighting its versatility and deep savory notes.

    Over time, the recipe has grown in popularity across global kitchens, adapting to local tastes while retaining its key elements. Its success at bridging simplicity and flavor mirrors cultural exchanges, celebrating the melding of culinary techniques and regional ingredients.

    The Parmesan Crusted Salmon recipe represents a modern reinterpretation of traditional parmesan and seafood pairings. Such evolution demonstrates food’s ability to transform, adapting to contemporary palates without losing its essence.

    Today, this dish enjoys regional variants, each lending its unique twist, whether it’s incorporating local herbs or accompanying sauces. These variations ensure that while the foundation remains consistent, there’s room for creative expression in its preparation and presentation.

    Ingredient Deep Dive


    Parmesan cheese, with its origins in Italy dating back to the Middle Ages, symbolizes quality and authenticity. Known for its deep, nutty flavor, it adds complexity to various dishes. Its nutritional benefits include high calcium and protein content, promoting bone health and muscle repair.

    Selection is crucial for premium parmesan; look for a well-aged cheese with a firm rind. Store in an airtight container to prevent moisture loss. If unavailable, Asiago or Pecorino Romano can be suitable substitutes.

    Salmon, celebrated for its health benefits and culinary flexibility, offers rich omega-3 fats vital for heart health. Choose firm, bright fillets with a fresh sea aroma and store in the coldest part of your fridge to maintain freshness. Trout or cod can serve as alternatives if salmon is not an option.

    Common Mistakes to Avoid

    • Neglecting to preheat the oven can result in uneven cooking, leading to an undercooked center or a soggy crust.
    • Using low-quality parmesan may not achieve the desired depth of flavor, compromising the dish’s integrity.
    • Overcrowding the baking sheet can trap moisture, softening the crust instead of allowing it to crisp up.
    • Skipping the breadcrumb mixture’s preparation leads to a bland topping; seasoning is essential for balance.
    • Using wet salmon fillets can dilute the crust ingredients—pat them dry before applying the mixture.
    • Not using parchment paper might cause the fish to stick to the baking sheet, disrupting presentation.
    • Baking salmon beyond its optimal time results in dryness; keep a close watch to maintain juiciness.
    • Forgetting to grate parmesan fresh often leads to pre-grated cheese with additives affecting texture.
    • Ignoring resting time can make the crust fall apart when serving; allow the salmon to sit briefly post-cooking.
    • Rushing the process without proper preparation impacts the final flavor profile and presentation.

    Essential Techniques


    A critical step in perfecting Parmesan Crusted Salmon is evenly coating the fillet with the breadcrumb mixture. This requires diligent application to ensure every inch of the salmon is covered. Tamping down the mixture lightly with your fingers secures it in place, ensuring a consistent texture post-baking.

    Proper oven calibration is indispensable for achieving a crispy crust. Preheating ensures that the salmon cooks evenly throughout. A visual cue of a crisp, golden-brown exterior signals it’s ready, while remaining vigilant ensures you don’t overcook the fish.

    Fresh parmesan must be used for grating. This technique ensures optimal flavor and melts more uniformly, integrating seamlessly with the breadcrumbs. Opt for a fine grater to achieve a delicate texture that coats the salmon well.

    Pro Tips for Perfect Parmesan Crusted Salmon


    For the best results, purchase wild-caught salmon, which tends to have a richer flavor and firmer texture than farmed varieties. This quality enhances the overall taste profile of the dish.

    Include fresh herbs like dill or parsley in the breadcrumb mixture; they add aromatic depth and complement the salmon’s natural flavors. These herbs also provide a vibrant, green hue, enhancing visual appeal.

    When seasoning, consider lemon zest to the mix to impart a fresh, citrus note, balancing the richness of the cheese and fish. This subtle addition brightens the dish, creating a well-rounded flavor.

    Allow your salmon to sit at room temperature for 10-15 minutes before cooking. This step promotes even heat distribution throughout the fish during baking, ensuring perfectly cooked fillets.

    Utilize a baking rack over a lined sheet. This lifts the salmon, allowing air to circulate, which crisps the crust uniformly and prevents sticking to the pan.

    Finally, let the salmon rest for a couple of minutes post-baking. This resting period solidifies the crust, making it easier to serve without breaking apart.

    Variations and Adaptations


    Regional variations offer exciting possibilities. Introduce Asian elements by incorporating miso paste into the crust mixture for umami complexity. This version honors the original recipe while exploring new flavor dimensions.

    Seasonal adaptations include adding spring vegetables as a bedding for the salmon before baking, creating a one-pan meal that celebrates the season’s freshness and reduces cleanup.

    For dietary alterations, swap out regular breadcrumbs for almond flour or crushed nuts, making the recipe gluten-free while adding a subtle nutty flavor and distinct texture contrast.

    To adapt to personal preferences, consider different flavor infusions such as garlic or paprika, enhancing the dish’s depth. This flexibility allows for creativity without straying too far from the core concept.

    Texture modifications can involve doubling the breadcrumb mixture for an extra-crunchy exterior, appealing to those who love a hearty bite with each forkful.

    For presentation, serve atop a vibrant, pureed base like sweet potato or pea puree, adding a color dimension and enhancing the dish’s visual appeal, perfect for formal dinners.

    Serving and Presentation Guide


    Opt for an oval white plate to showcase the salmon prominently. Its vivid colors contrast beautifully against the neutral plate palette, making it stand out visually.

    Garnish with a sprig of fresh herbs or a slice of lemon for an elegant, simple finish. This not only adds appeal but also acts as a quick refresher when paired with the dish.

    Serve traditionally with steamed greens or new potatoes, invoking a classic pairing that’s light yet fulfilling, complementing the rich flavors of the salmon perfectly.

    Modernize with a side of quinoa salad infused with cranberries and nuts, offering textural contrast and adding layers of flavor and nutrition.

    Consider serving at a slightly warmer than room temperature, as this highlights the flavors more starkly and ensures the juicy succulence of the fillet is appreciated.

    To control portions and maintain the dish’s integrity, consider pre-slicing the salmon into individual servings before baking, ensuring equal distribution and maintaining the crust’s adherence.

    Wine and Beverage Pairing


    A crisp Chardonnay complements Parmesan Crusted Salmon superbly, its rich flavors and oak nuances pairing beautifully with the parmesan’s nuttiness. This choice enhances the dish without overwhelming the palate.

    For a non-alcoholic option, iced green tea with a hint of citrus delivers a refreshing balance, cutting through the oiliness of the salmon while introducing slight acidity and sweet herbal notes.

    Consider white coffee or cinnamon-spiced black tea as a post-meal treat, aligning with the salmon’s light finish and providing a soothing palate cleanser.

    When serving wine, refrigeration is key; keep it chilled but not overly cold to highlight the grape’s nuances. Serve in wide-brimmed glasses to enhance tasting.

    Sparkling water with lemon is an excellent accompaniment, offering a palate-refresher and contrast to the dish’s richness, ensuring each bite remains exciting.

    Storage and Shelf Life


    Store leftover Parmesan Crusted Salmon in an airtight container within the refrigerator to maintain freshness for up to three days. This containment prevents the crust from absorbing moisture and ensures the core remains flavorful.

    Optimal storage is achieved by placing the dish on the top shelf, ensuring the container rests on a stable surface to avoid disturbances that could affect the crust’s integrity.

    Monitor for signs of spoilage, such as an off-odor or a change in color and texture. In these instances, it’s best to discard to ensure health safety.

    Reheat gently in the oven at a low temperature to rejuvenate the salmon without drying it out. This gentle reheating method preserves the delicate flavors and textures.

    For longer preservation, wrap individual portions in foil and freeze for up to one month. This method keeps the crust intact and prevents ice crystal formation.

    Make Ahead Strategies


    Prepare and assemble the breadcrumb mixture a day ahead, storing it in an airtight container to save time and concentrate on the more active cooking components later.

    Cook up to step three of the recipe, then cover and refrigerate the salmon overnight, allowing flavors to meld. This step makes preparation stress-free on the day of serving.

    Maintaining quality involves ensuring the salmon is stored properly during these steps. Use fresh, covered containers to prevent any unwanted moisture impact.

    When reheating, avoid microwaves; opt for ovens to retain the desired texture and moisture levels, ensuring a satisfying dining experience.

    Add fresh elements like herbs or lemon slices just before serving to elevate the dish and introduce freshness, masking any day-old impurities in flavor.

    Scaling Instructions


    Halving the recipe is straightforward; reduce ingredient quantities proportionally while maintaining the cooking time, ensuring the texture and flavor remain consistent.

    For doubling the recipe, use a larger sheet pan or two smaller ones to prevent overcrowding, allowing the crust to crisp evenly. Adjust cooking time slightly, but monitor to prevent overcooking.

    Equipment adjustments might involve using an extra-wide grater for the parmesan to facilitate prep time when scaling up the recipe size.

    Consider timing modifications when scaling, with more salmon fillets possibly extending cooking time slightly. Always check with a fork for doneness.

    Preserving storage considerations involves portioning leftovers into individual servings, making it more convenient to reheat and ensure even distribution of the crust ingredients.

    Nutritional Deep Dive


    Parmesan Crusted Salmon offers a well-rounded macronutrient profile, balancing healthy fats, protein, and low carbohydrates, catering to a wholesome diet plan.

    Micronutrient analysis reveals valuable contributions from salmon, including vitamin B12, D, and selenium, coupled with parmesan’s calcium and phosphorus, supporting strong bones and robust immune function.

    Sourcing high-quality salmon ensures optimal omega-3 content, supporting cardiovascular health, while parmesan’s active cultures promote gut health and digestion.

    Although flavorsome, portion control is crucial due to the high-calorie density, ensuring a healthy balance within dietary limits while savoring this rich dish in moderation.

    For weight management, couple servings with low-calorie, high-nutrient sides like leafy salads to offset the caloric intake without sacrificing freshness and fullness.

    Dietary Adaptations


    Gluten-free diners can enjoy this by substituting regular breadcrumbs with gluten-free options or finely ground nuts, ensuring a satisfying crunch without the wheat content.

    Dairy-free adaptations involve omitting parmesan and using nutritional yeast as a savory alternative, maintaining the recipe’s inherent flavor without allergic components.

    For a vegan twist, replace salmon with marinated tofu fillets, adjusting cooking times to accommodate for different textures, and utilize plant-based cheese for the crust.

    Low-carb enthusiasts will appreciate using almond or coconut flour in the crust, reducing carbohydrate content while enhancing flavor complexity.

    Keto adherents can relax as salmon naturally aligns with ketogenic macronutrient ratios, but ensure adherence with crust modifications mentioned in low-carb adaptations.

    Those following Paleo principles can mimic the dish by focusing on the fresh, natural components and utilizing paleo-approved ingredients for a flavorful journey aligned with their dietary philosophy.

    Troubleshooting Guide


    For texture issues like soggy crusts, confirm your oven calibration and ensure preheating is completed. This simple check can drastically improve outcome consistency.

    If flavor balance skew towards the milder side, ensure adequate seasoning of the breadcrumb mixture; fresh herbs and lemon zest can amplify complexity and satisfaction.

    Temperature problems arise from imbalanced baking duration; use a meat thermometer to guarantee internal salmon temperature aligns with safe and tasty standards.

    Equipment challenges include ensuring pans or baking sheets are reliable, elevating your salmon if necessary for even cooking and efficient heat circulation.

    To accommodate ingredient substitutions, consider alternative spices or nuts that maintain the envisioned flavor profile while catering to dietary specifics.

    Address timing concerns by adhering strictly to suggested timelines; frequent observations play a key role in adapting to individual oven performance intricacies.

    Recipe Success Stories


    Community feedback lauds the Parmesan Crusted Salmon for its “perfect blend of flavors and textures,” with many commenting on its simplicity and impressive presentation.

    Variations have seen successful incorporation of regional spices, with chili flakes or rosemary gracing versions that cater to cultural preferences, opening avenues for culinary exploration.

    Adaptation stories abound, showcasing the dish’s flexibility; from festive gatherings to intimate brunches, its adaptability ensures satisfaction and praise across occasions.

    Reader suggestions often praise the addition of vine-ripe tomatoes alongside the salmon, adding a sweet contrast and enhancing plate vibrancy and taste complexity.

    Photography tips to highlight the dish’s beauty include using natural light to accentuate the crust’s sheen, emphasizing colors with strategically placed garnishes, creating visual interest.

    Frequently Asked Questions

    Q: Can I use frozen salmon fillets for this recipe?
    A: Yes, but ensure they are fully thawed and patted dry to avoid excess moisture which can affect the crust texture.

    Q: What is a good substitute for parmesan cheese?
    A: You can use Pecorino Romano for a similar flavor or nutritional yeast for a dairy-free alternative while retaining savory notes.

    Q: Will using whole-grain breadcrumbs alter the result?
    A: Whole-grain breadcrumbs will add a nuttier taste and slightly denser texture, but are a healthy swap for regular breadcrumbs.

    Q: How do I prevent the crust from falling off during serving?
    A: Allow the salmon to rest for a few minutes post-baking, which helps firm the crust and aids in smooth transfer to plates.

    Q: How can I add more flavor to the crust?
    A: Mix in herbs like dill or oregano, along with garlic powder or lemon zest, to deepen the flavor without overpowering the salmon.

    Q: Is it essential to line the baking sheet with parchment paper?
    A: While not mandatory, parchment prevents sticking and makes cleanup easier.

    Q: Can I prepare the crust mixture in advance?
    A: Yes, prepping it a day ahead and storing it in an airtight container is an excellent way to streamline cooking on busy days.

    Q: Will reheating affect the dish’s quality?
    A: Reheating in the oven at a low temperature preserves quality, though slightly less crisp than fresh from the oven, the flavor remains rich.

    Q: How do I know when the salmon is perfectly cooked?
    A: Check for an internal temperature of 145°F; just pressing gently for flakiness indicates doneness too.

    Q: What can I serve alongside for a full meal?
    A: Pair with steamed vegetables or a light salad to complement and balance the dish’s rich flavors.

    Q: Does using fresh parmesan make a big difference?
    A: Indeed, fresh parmesan infuses the crust with superior flavor and meltability, vital for achieving a luxurious finish.

    Q: How long can leftovers be stored in the refrigerator?
    A: Stored properly in an airtight container, leftovers can last up to three days for optimal freshness.

    Additional Resources


    Explore related recipes like Lemon Herb Salmon for another simple yet flavorful seafood option—perfect if you’re seeking variety while sticking to easy, wholesome meals.

    Technique guides offer additional insights, particularly in honing fish-baking skills that extend beyond this recipe to enhance overall culinary repertoire.

    Dive into ingredient information detailing parmesan’s historical background and nutritional profile, informing choices that align with health goals.

    Explore equipment recommendations for efficient kitchen organization, ensuring you have the right tools to support successful meal preparations across culinary endeavors.

    Seasonal variations spotlight the freedom in adapting staple dishes to reflect seasonal produce, allowing conscious, flavor-driven meal adaptations.

    Join the Conversation


    Share your experiences with Parmesan Crusted Salmon on social media, tagging me for a chance to feature your creation, fostering a community that celebrates culinary exploration.

    Photography tips focus on capturing the dish’s essence; play with angles and light to express your personal style and highlight technique effectiveness.

    Leave a recipe review sharing your unique twist or how this dish fits your family dinner repertoire, helping others incorporate it into their homes.

    Engage with a community of food enthusiasts by swapping adaptations; your feedback adds value, contributing to a collective bank of culinary knowledge.

    View recipe variations others have tried and liked—this interchange leads to new ideas and inspiration, enriching the joy of cooking shared at home or with guests.

    The Recipe

    Parmesan Crusted Salmon

    Serves: 4

    Prep Time: 10 mins

    Cook Time: 20 mins

    Total Time: 30 mins

    Kitchen Equipment Needed

    • Baking sheet
    • Parchment paper
    • Grater
    • Meat thermometer

    Ingredients

    • 4 salmon fillets
    • 1 cup freshly grated parmesan cheese
    • 1/2 cup breadcrumbs
    • 2 tablespoons olive oil
    • 1 tablespoon lemon zest
    • 1 tablespoon finely chopped fresh parsley
    • Salt and pepper to taste

    Directions

    1. Preheat your oven to 400°F (200°C) and line a baking sheet with parchment paper.
    2. In a small bowl, combine grated parmesan, breadcrumbs, lemon zest, parsley, salt, and pepper. Mix well.
    3. Place salmon fillets on the prepared baking sheet and brush lightly with olive oil on top.
    4. Evenly distribute the parmesan mixture over each fillet, pressing down gently to adhere properly.
    5. Bake in the preheated oven for 15-20 minutes, or until the crust is golden brown and the salmon is cooked through.
    6. Allow the salmon to rest for 3-4 minutes before serving for the best texture and flavor.

    Recipe Notes

    • For an added kick, consider mixing in a pinch of cayenne pepper with the parmesan mixture.
    • If a deeper crust is desired, consider using panko breadcrumbs for extra crunch and texture.
    • Lemon wedges make an excellent garnish, complementing the dish with a fresh zing.

    Indulge in Gourmet Filet Mignon with Shrimp and Lobster Sauce

    Filet Mignon with Shrimp and Lobster Cream Sauce: A Luxurious Surf and Turf Delight

    ⚖️
    Difficulty
    Intermediate

    ⏲️
    Prep Time
    20 mins

    🕒
    Cook Time
    25 mins

    ⏱️
    Total Time
    45 mins

    🍽️
    Servings
    4

    Indulge in a truly decadent culinary experience with this Filet Mignon with Shrimp and Lobster Cream Sauce recipe. Perfect for those special occasions or when you simply wish to treat yourself, this dish combines the buttery tenderness of filet mignon with the succulent sweetness of shrimp, all draped in a rich, velvety lobster cream sauce. The savory flavors merge beautifully to create a symphony for your taste buds. Whether you’re aiming to impress dinner guests or savoring an intimate meal at home, this recipe is a surefire way to elevate your dining experience.

    The key to an unforgettable Filet Mignon with Shrimp and Lobster Cream Sauce is in the balance of flavors and textures. The filet mignon remains luscious and juicy, cooked to perfection, while the lobster cream sauce offers a luxurious, indulgent touch with its rich, creamy consistency. The shrimp adds a pop of ocean-fresh flavor that complements both the steak and the sauce perfectly. Garnish with fresh herbs for a touch of color and freshness, and you’re ready to delight in a meal that’s as impressive as it is delicious.

    Quick Recipe Highlights

    • Flavor Profile: This dish combines a trio of savory, sweet, and creamy with a delightful balance, featuring the tenderness of filet mignon and the sweet, briny notes of shrimp, all enveloped in a rich lobster cream sauce.
    • Texture: Enjoy the tender, juicy filet mignon paired with the succulent, firm texture of shrimp, all enhanced by the velvety smoothness of a perfectly crafted cream sauce.
    • Aroma: Immerse in the rich aromas of seared steak, buttery cream, and subtle hints of seafood that come together to create an intoxicating scent that fills the kitchen.
    • Visual Appeal: A stunning presentation with vibrant pink shrimp nestled against golden-brown filet mignon, draped in a creamy, pale sauce, garnished with vibrant herbs.
    • Skill Level Needed: An intermediate-level recipe that requires some cooking expertise, particularly in achieving the perfect sear on the filet and crafting a smooth sauce.
    • Special Equipment: While no extraordinary tools are necessary, a heavy skillet for searing and a small saucepan for the sauce are essential for optimal results.

    Recipe Overview

    • Difficulty Level: This recipe is classified as intermediate due to the techniques involved in cooking the filet mignon to the desired doneness and preparing a seamless lobster cream sauce without curdling.
    • Category: This dish fits into the main course category, offering a gourmet surf and turf experience that’s sure to impress.
    • Cuisine: With influences from French cuisine due to the creamy sauce and classic American steak, this recipe combines the best of both culinary traditions.
    • Cost: Slightly on the higher end due to premium ingredients like filet mignon and seafood, yet worth every penny for a special meal.
    • Season: Best enjoyed in colder months when hearty, luxurious meals are particularly satisfying, though perfect for any celebratory occasion year-round.
    • Occasion: Ideal for elegant dinners, anniversaries, holidays, or celebratory gatherings where you wish to offer a meal as special as the moment itself.

    Why You’ll Love This Recipe

    The taste and texture of this Filet Mignon with Shrimp and Lobster Cream Sauce are a match made in heaven. The filet is melt-in-your-mouth tender, contrasted by the slightly firm texture of the shrimp, all underlined by a silken cream sauce that ties every element together flawlessly. These distinct layers of flavor and mouthfeel ensure a dining experience that feels luxurious in every bite.

    Despite its luxurious look and flavor, this recipe is relatively straightforward to prepare. With about 20 minutes of prep time and 25 minutes of cooking, you can create a dish that looks like it requires hours in the kitchen. The steps are designed to be clear and manageably paced, allowing enough time to achieve each element to perfection without feeling rushed.

    This recipe brings nutritional benefits, striking a balance between protein from the steak and shrimp and healthy fats from the lobster cream sauce. While decadent, it’s a high-quality dish comprising nutritionally dense ingredients that will leave you feeling satisfied and nourished.

    In social settings or entertainments, serving such a sophisticated dish guarantees to wow your guests. Visually, it sets the stage for a memorable meal, and its symphony of flavors makes it an undeniable topic of conversation. It’s the perfect centerpiece for a dinner party, celebrating a memorable moment, or simply sharing good times with loved ones.

    Even with premium ingredients, the recipe’s scalability allows it to fit different budgets, making it an accessible indulgence. The use of quality, whole ingredients makes this dish not only a culinary triumph but an economical choice when calculated per serving compared to dining out.

    Historical Background and Cultural Significance

    The concept of surf and turf brings together land and sea, a pairing that celebrates both the earth and ocean’s bounty. It speaks to opulence dating back to the 1960s, when such combinations were first celebrated in upscale dining establishments as a symbol of luxury and indulgence.

    Bold flavor combinations, such as those in this dish, have long been a cornerstone in French culinary tradition, known for infusing meals with richness and depth. The integration of seafood with steak further emphasizes French influence, often seeking balance and completeness in flavor.

    Over time, surf and turf interpretations evolved, with different regional techniques and ingredients, but the combination of beef and seafood remains a dominant theme. This flexibility and range of variation rooted in history allow for adaptations that align with modern palates and preferences.

    Regional interpretations have extended the concept globally, incorporating local seafood varieties or alternative protein options. Regardless of its form, the surf and turf theme persists as a culinary way of elevating meals and celebrating special occasions, merging sophistication with flavor complexity.

    Ingredient Deep Dive

    Filet mignon, prized for its exceptional tenderness, is a top choice in high-end dining and revered globally as a premium cut of beef. Brandishing a history enriched by culinary tradition, it symbolizes luxury and special occasion dining due to its melt-in-the-mouth nature.

    Nutritionally, filet mignon is a powerhouse of protein and vital nutrients such as iron. Selection is key – seek out well-marbled cuts with rich color from reputable sources. Storage should involve refrigeration within oxygen-permeable packaging until ready to cook.

    Shrimp add the brine-like sweetness perfectly balancing the succulent filet. Often harvested globally, it plays an important role in both economic and cultural food practices across continents. Sourcing fresh, sustainably farmed shrimp ensures the finest flavor and texture.

    Rich in protein, shrimp also provide antioxidants like astaxanthin. Buy fresh or frozen, flushing raw shrimp in cold water before storage. Substitute options include scallops, another nuanced seafood choice complementing beef.

    Common Mistakes to Avoid

    • Overcooking the filet mignon can lead to dryness, sacrificing its natural juiciness. Use a meat thermometer to ensure precise doneness.
    • Not patting shrimp dry before cooking might result in a watery texture. It’s crucial for a good sear.
    • Curdling the cream sauce. Cook gently and avoid boiling to keep a smooth consistency.
    • Skipping the resting period for the steak can lead to juice loss. Allow meat to rest for optimal flavor development.
    • Under-seasoning the sauce can lead to a bland flavor. Taste and adjust seasoning towards the end of cooking.
    • Using butter that’s too hot can lead to scorch marks, particularly in sauce preparation.
    • Not heating the skillet sufficiently before searing meat can prevent proper Maillard reaction, affecting flavor.
    • Choosing low-quality ingredients could detract from the dish’s overall impact. Opt for the freshest and best available.

    Essential Techniques

    For filet mignon, mastering the sear is key; a hot skillet is crucial. Developing a crust ensures flavor locking. Start with a sizzling hot pan and turn steak occasionally for even cooking, letting the aroma of browning enrich the dish.

    The art of a perfect lobster cream sauce lies in gentle heat. Maintain moderate heat to prevent splitting while occasionally whisking, ensuring a well-integrated, creamy sauce. Watch for sensorily satisfying thickness over time without rushing the process.

    Pooling techniques like choosing the right fat for searing can subvert dryness. Use high-quality butter or olive oil, controlling the heat level to avoid burning, allowing meat to absorb the right amount of flavorful fat during cooking.

    Pro Tips for Perfect Filet Mignon with Shrimp and Lobster Cream Sauce

    Select prime-grade filet for unparalleled tenderness and taste. Consider timing, incorporating shrimp cooking to align with the filet, ensuring a harmonious merge when combined with the sauce.

    A heavy-based, oven-proof skillet supports great searing without sacrificing flavor balance. The even heat distribution elevates browning, crucial to preparing the steak. Avoid overcrowding to maintain temperature and consistency.

    For the cream sauce, reach for high-fat cream that will yield the best mouthfeel while minimizing the risk of splitting under heat. Patience is key in sauce preparation — allow flavors to meld and develop deeply.

    Enhance shrimp flavor with a light marinade of lemon and spice. This mitigates the richness while injecting a zestiness balanced by the creamy sauce.

    Ensure tight covering while resting the steak post-cooking. This step traps moisture within, resulting in juicier cuts once plated, redistributing flavors naturally.

    Experiment with herbal garnish beyond basic parsley. Intersperse fresh thyme or chervil to accentuate the dish’s seasoning profile while adding visually delightful elements.

    Variations and Adaptations

    Regional surf and turf takes may explore different seafood pairings — incorporating things like scallops or oysters to alter the Mediterranean-inspired notes in the dish. This enlargement of seafood options broadens the palette of combined flavors.

    Seasonal adaptations can take the form of incorporating additional sides congruent with current produce availability — radishes or spring onions interspersed during warmer months add another fresh dynamic that pairs with the dish’s nature.

    Dietary modifications can be introduced through the use of plant-based cream substitutes like coconut or cashew cream if dairy sensitivity is present. These alternatives still confer the creaminess essential to the sauce’s character.

    Flavor variations introduce the opportunity to utilize distinct spice profiles, such as cajun or even lemon-pepper seasoning, infusing unique dimensions while reflecting personal taste preferences.

    Texture modifications are possible via different cooking approaches like sous vide for filet uniformity, creating a tender consistency. Its inherent precision ensures meat cooked through a gentle process.

    Presentation alternatives provided by mold shaping the lobster cream sauce into delicate circles around the centerpiece steak and shrimp allow clean aesthetics and encourage a dining experience noted for its elegance.

    Serving and Presentation Guide

    Refined plating techniques are instrumental in the dish’s presentation. Layer the shrimp neatly atop each filet before drizzling sauce for consistency. Intermittent sprigs of microgreens provide sophisticated contrast against the velvet sauce.

    Garnishing ideas can introduce edible flowers or herb-infused drizzles. Bright colors offset the rich tones present within the plate, providing visual interest.

    Consider traditional accompaniments like a tender asparagus or roasted potatoes — bolstered yet simple side choices that emphasize the main flavors without overwhelming them.

    Modern serving suggestions might include plating tender filet morsels onto wooden boards for rustic refinement, particularly with gatherings where casual elegance is desired.

    Temperature considerations call for pre-warmed plates to maintain sauce and meat warmth, crucial during moments of presentation, extending diners’ enjoyment.

    Portion control tips emphasize striking the perfect balance between ample surf and turf elements per serving, offering diners the ability to equally savour both domains of flavors while mindful of excess.

    Wine and Beverage Pairing

    A medium-bodied Pinot Noir serves the filet and cream sauce effectively, navigating between the richness of the cream and the delicate steak. Its balance harmonizes, highlighting each element memorably.

    Non-alcoholic alternatives might explore flavors like chilled raspberry iced tea, which forms a complement with the shrimp’s sweetness while maintaining its refreshing effect next to the creamy textures.

    Coffee or tea pairing may involve a robust black tea to accompany the dish in the absence of wine, interplaying nuances of each element without overshadowing flavor dynamics.

    Temperature considerations of such drinks are vital. Chill whites properly and serve reds slightly above room temperature, ensuring drinks remain inviting and balanced alongside the meal.

    Ensure serving suggestions emphasize glassware suited to correctly aerate wines, such as large-bowled options accommodating fuller-bodied choices, enhancing aromatic expression.

    Storage and Shelf Life

    To preserve leftovers, tightly wrap components separately in airtight containers. Ideal refrigeration temperatures support freshness and a prolonged shelf life up to 3 days, provided quick storage after cooling.

    Container recommendations favor glass for holding deep flavors intact without risk of altering from the material itself. Opt for those with tight-sealing lids to maintain moisture retention without interference by external conditions.

    Signs of spoilage to watch for may involve sulfuric odors or textural changes within the cream base, proceeding cautiously if such signs arise to avoid compromised bites.

    Reheating instructions should feature gentle reheating through steaming or lower oven temperatures responsible for sustaining tenderness in both steak and sauce, avoiding high heat which can turn textures rubbery or split the sauce.

    Freezing guidelines call for the sauce to be frozen separately— reveal smaller quantities conducive to rethawing appropriately without risking overthawing such luxurious elements.

    Make Ahead Strategies

    An extended prep timeline can unfold through early seasoning and marinating, promoting deep flavor infusion ahead of cooking, cutting prep time significantly when meals occur.

    Storage between steps relies on refrigeration, maintaining manageable temperatures that prevent protein spoilage while keeping ingredients primed for next-stage preparation.

    Quality impact assessments should check for texture fluctuation or taste compromise, ensuring presentation and sensory pleasure meet expected standards despite time differentials when consumed fresh.

    Assembly tips focus on aligning previously prepped elements seamlessly together — an understanding of natural pairings leads to cohesive integration worthy of fresh creations despite earlier sectioning.

    Reheating guidelines stress the cautious approach; emphasizing gentle increments ensures consistency remains close to freshly cooked presentations.

    Fresh elements added post-reheating return that liveliness sought originally, enriching experience by introducing layers of contrast atop prepared textures.

    Scaling Instructions

    Scaling logistics must consider halving recipes accommodates smaller groups desirous of the offering without sacrificing intricacies by merely adapting ingredient quantities.

    Doubling or even tripling requires consideration for proportional spice balance — facilitating flavor harmony across larger yields through careful measurement.

    Equipment modifications emphasize adopting larger skillets to accommodate increased steak portions; maintaining cooking style proportions aids consistency.

    Timing alterations may necessitate minor tweaks, like staggered starts or extended cooking time for thicker selections to ensure full evenness without undue elements undercooked amidst larger formats.

    Storage accommodations require larger containers, maintaining sealing effectiveness as quantities adapt—stacking formats maximize storage availability without overlapping scents inadequately.

    Nutritional Deep Dive

    Macro breakdown positions filet mignon and shrimp prominently within protein sources—offering approximately 40g of protein per serving, encouraging muscle growth and repair applications.

    Micronutrient analysis within lobster cream sauces showcases calcium and vitamin-A presence, beneficial for bone strength and immune system function reinforcing indulgence with meaningful contributors.

    Health benefits appear as iron-rich filet complements blood health, partnered by antioxidants inherent within shrimp granting skin and heart protection.

    Dietary considerations highlight potential sensitivities toward rich cream levels within, mindful substitutions accommodate lactose-intolerant individuals or those pursuing lighter intakes respectfully.

    Portion analyses favor balanced serving patches placed strategically, allowing controlled delight rather than overlooking quantity engagement—portion sizes mindful of nutritional frameworks.

    Weight management tips adhere to visible conscious combinations without excess fat beyond healthful parameters, fostering prudent flavors appreciative of the dish’s luxurious niche.

    Dietary Adaptations

    Those observing gluten-free practices need not fear—standard preparation requires no gluten inherent ingredients, ensuring celiac dietary matchings naturally.

    Dairy-free requests might foster coconut-driven sauce alternatives, introducing sweetness alongside compatibility with exhibit strength beyond standard expectations without milk-induced intricacies.

    Adapting this dish for vegans requires deep consideration. Plant proteins replace filet necessities—often involving marinated, grilled mushrooms satisfying umami cravings with distinct flair complementing traditional shrimp takes.

    Low-carb interests need not compromise flavors: creative cauliflower sides interpose with richer intentions without carb-heavy bases lingering beside filet offerings knowingly.

    Keto consciousness makes headway by excluding starches within sauces, exploring different bases enhancing richness without impacting ketosis significantly during the intake.

    Paleo matches through non-dairy choices yield comparable satisfactions—explore modified fats like ghee aligning with respective forms when maintaining the primal palette connection proudly.

    Low-FODMAP adaptations may involve precautions against high lactose influences while focusing on permissible amounts; balance consideration stimulates sustained comfort post-meal.

    Troubleshooting Guide

    Texture issues occurring from overcooking instruct using thermometers to guide as standard practice, using heat-based signals for optimal pinpoint accuracy externally.

    Flavor balance tips focus on ingredient proportions—herbs like Thai basil interspersed for aromatic uplift amidst luxuriously scented creams, ensuring robust flavor presence noteworthy.

    Temperature importance extends through seating steaks reconfirms moderate warm settings holding patience, especially during fluctuating environments favoring subtle heating extends appeal.

    Equipment biases necessitate caution through tool-dependent results; choose sturdy well-made pans providing thermal conduction and uniform heat applications without quirks.

    Ingredient substitutions arise within rarer scenarios, copying easy-access changes without corner-cutting—preserve freshness-driven merit.

    Timing concerns arise from streamlining precise searing expectations while monitoring form atop recognizing rhythmic pulls defining exact temperatures ideal pairs during distinct stages.

    Recipe Success Stories

    Community feedback lights up networks, celebrating spreads capturing charm both literally and visually, establishing proud owner narratives who famous selections revived beloved dishes dynamically.

    Variation successes exemplifying imaginative approaches extend heritage across global domains leveraging venomous entries cleverly concocted thereby, reinforcing joyful experimentation anew.

    Adaptation stories thrive substantively through common themes—each narrative showcases distinctly those who’ve retold stunning triumphs blending seamlessly whilst supporting personal palate-worthy preferences over standardization.

    Reader suggestions cultivate content benefiting dynamic lively discussion: commenting remains invigorated, illuminating contributions painting broader support beneath flourishing feedback.

    Photography tips convey nuances of snapping aesthetically pleasing warm feelings around bright, lasting colors seen despite less-than-ideal vantage points transversed however. A welcome credential emanates proudly with enthusiastic sharing, capturing enthrallment visually eager.

    Frequently Asked Questions

    Q: Can I prepare the lobster cream sauce in advance?

    A: Yes, prepare the lobster cream sauce up to a day in advance. Chill it properly and reheat gently over low heat, stirring to recombine without splitting right before serving.

    Q: What wine pairs best with filet mignon?

    A: A medium-bodied Pinot Noir or a gentle Chardonnay complements the flavors in filet mignon beautifully, helping balance elements without overpowering tender textures.

    Q: How should I store leftover filet mignon?

    A: Store leftover filet mignon in an airtight container in the refrigerator, ensuring it retains its original juice. Consume within 3 days for optimal quality and taste safety.

    Q: Can I substitute shrimp with another shellfish?

    A: Certainly! Substituting scallops or crab can extend flavor variations, enhancing the pairing alongside steak through briny sweetness or succulent richness.

    Q: What should I serve alongside this dish?

    A: Consider complementary sides like roasted potatoes or seasonal vegetables. A light arugula salad also offers a fresh crunch, balancing the dish’s richer elements elegantly.

    Q: What can I do if my cream sauce curdles?

    A: If curdling occurs, remove from heat immediately. Stir gently and whisk in small amounts of cold cream until smoothness returns. Adjust taste and consistency as needed.

    Q: How can I make this dish gluten-free?

    A: This dish is inherently gluten-free since it doesn’t incorporate gluten-containing ingredients. Ensure ingredient labels confirm gluten-free status when planning selections.

    Q: What is the best way to sear filet mignon for maximum flavor?

    A: Start with a very hot pan, add a butter or oil base, and sear the steak undisturbed for 2-3 minutes on each side. This method encourages optimal crust formation while maintaining internal tenderness.

    Q: I’m running out of time, can I cut steps?

    A: Streamline prep by preparing the sauce while shrimp and steak cook simultaneously. Consider serving cold side dishes to save time otherwise expended on hot accompaniments.

    Q: How do I prevent shrimp overcooking?

    A: Cook shrimp only until pink and opaque, roughly 2-3 minutes per side over medium heat. Rapid high heat causes rapid toughness escalation, so careful moderation remains crucial.

    Q: Can I use frozen shrimp for this recipe?

    A: Yes, ensure to thaw them thoroughly under cool water, pat them dry thoroughly before use, maintaining favorable texture and flavor integration seamlessly.

    Q: What is a good non-alcoholic wine alternative?

    A: A lightly sparkling apple or pear juice may introduce refreshing semblances to non-alcoholic pairing options, apt for balancing flavors without overpowering dish intent.

    Additional Resources

    Related recipes that pair well include dishes like Lemon Herb Butter Salmon or Garlic Mashed Potatoes, echoing harmonized sentiments to extend multi-course dining engagements.

    Technique guides can illuminate essential steps needed for searing perfection or crafting fantastic cream sauces, both primary traits meeting recipe threshold demands proficiently.

    Ingredient information aligns neatly through highlighting foundational insights into sourcing premium steaks or alternative seafood possibilities, maximizing outcome peace of mind through such preparation.

    Equipment recommendations advocate suitable tool predicates, like non-stick or cast iron pans, convening ample bluff for continued meal accomplishment ventures.

    Seasonal variations merit attention possibilities contrasting anticipated cold months dancing across new promising avenues in warmer transitions, inviting subsequent understanding unfoldings.

    Join the Conversation

    Social media sharing facilitates connection among fellow dining enthusiasts. Capture photos that capture your unique results; empower collective storytelling to flourish beneath shared interests fully.

    Photography tips sprinkle light; use natural lighting whenever possible to unveil the meal’s striking appearance, capturing every nuanced flavor on display arrestingly.

    Recipe reviews exist to stimulate constructive feedback channels favorably, endorsing support where needed or progressed elements fortifying greater understanding together.

    Community engagement shines bright; diving into comment sections to share perspectives enriches both creators and enjoyers, embracing discreet pleasantness found distinctly.

    Recipe variations bring forth signals inviting interaction, echoing previously discovered aspirations inflected warmly robotic bonds transposed triumphantly under shared laughter thus.

    The Recipe

    Filet Mignon with Shrimp and Lobster Cream Sauce

    Serves: 4

    Prep Time: 20 mins

    Cook Time: 25 mins

    Total Time: 45 mins

    Kitchen Equipment Needed

    • Heavy skillet
    • Small saucepan
    • Meat thermometer
    • Whisk
    • Serving platter

    Ingredients

    • 4 filet mignon steaks, about 1 1/2 inches thick
    • 12 large shrimp, peeled and deveined
    • 2 tablespoons butter
    • 1 cup heavy cream
    • 1/2 cup lobster stock or broth
    • 2 tablespoons olive oil
    • Salt and pepper to taste
    • Fresh herbs for garnish

    Directions

    1. Preheat your skillet over medium-high heat. Season filet mignon steaks generously with salt and pepper.
    2. Add butter and olive oil to the skillet. Once hot, place steaks in the skillet for approximately 3 minutes per side for medium-rare. Adjust based on desired doneness. Remove steaks and let them rest.
    3. In the same skillet, add shrimp and cook for 2-3 minutes on each side until pink and opaque. Set aside with the steaks.
    4. In a saucepan on medium-low heat, combine heavy cream and lobster stock. Simmer gently while whisking, ensuring a smooth consistency.
    5. Return shrimp to the skillet with filet mignon and pour the lobster cream sauce over the top.
    6. Let everything warm through for a minute before garnishing with fresh herbs and serving immediately.

    Recipe Notes

    • For a richer sauce, add a splash of cognac just before serving, allowing the alcohol to evaporate.
    • Resting the steak allows juices to redistribute, ensuring juicier cuts upon serving.
    • Prawns can substitute for shrimp, adding an even sweeter flavor dimension.

    Ultimate Salisbury Steak Recipe for a Delicious Homemade Dinner

    Salisbury Steak Recipe: A Comforting Classic for Every Dinner Table

    ⚖️
    Difficulty
    Easy

    ⏲️
    Prep Time
    15 mins

    🕒
    Cook Time
    25 mins

    ⏱️
    Total Time
    40 mins

    🍽️
    Servings
    4

    Dive into a plateful of comfort with this sumptuous Salisbury Steak recipe. Rich in flavor and easy to prepare, this dish captures the essence of home-cooked goodness. The juicy beef patties, bathed in a savory mushroom gravy, evoke warmth and satisfaction with every bite. Perfect for family dinners or intimate gatherings, this classic American dish is sure to impress.

    Quick Recipe Highlights

    • Flavor Profile: Savory and rich with hints of umami from the mushrooms
    • Texture: Tender beef patties with a smooth, velvety gravy
    • Aroma: Earthy and inviting, with a hint of garlic and onion
    • Visual Appeal: Golden-brown patties drizzled with glossy gravy
    • Skill Level Needed: Simple; ideal for novice cooks
    • Special Equipment: None; a skillet and mixing bowl suffice

    Recipe Overview

    • Difficulty Level: Easy due to its straightforward ingredients and steps
    • Category: Main Course; perfect for lunch or dinner
    • Cuisine: American with a touch of classic diner charm
    • Cost: Economical, using basic pantry staples and affordable ground beef
    • Season: Ideal year-round, especially in cooler months
    • Occasion: Great for weeknight dinners or casual gatherings

    Why You’ll Love This Recipe


    The Salisbury Steak recipe is beloved for its depth of flavor and comforting appeal. The beef patties are juicy and well-seasoned, paying homage to timeless flavors that satisfy the senses. The convenience of preparation cannot be overstated, with simple steps that even a beginner can master quickly. On the nutritional front, this dish provides protein and essential vitamins while being adaptable to various dietary needs. It’s a social centerpiece, bringing family and friends together around the table for laughter and shared stories. Moreover, this recipe is cost-effective and relies on easily accessible ingredients, making it wallet-friendly and accessible to all.

    Historical Background and Cultural Significance


    Salisbury Steak traces its origins to Dr. James Salisbury, a 19th-century physician who advocated meat consumption as part of a healthy diet. Widely popularized in America, the dish has been a staple in homes and diners across the country. Its cultural importance lies in its simplicity and the comforting nostalgia it evokes. The recipe has evolved since its inception, adapting to modern palates and available ingredients. Regionally, variations include different gravies and seasoning blends, showcasing local preferences and traditions.

    Ingredient Deep Dive


    Beef is the star of Salisbury Steak, offering rich flavor and protein. Traditionally, ground beef complements the savory profile of the dish. Select high-quality beef, lean enough to hold up during cooking but fatty enough for flavor. Store fresh beef in the fridge and consume within a few days for the best taste. Consider using turkey or plant-based alternatives for a healthier twist, adjusting seasoning to enhance flavor.

    Mushrooms contribute umami and depth to the gravy, elevating the dish beyond basic meat and potatoes. Rich in antioxidants, they add nutritional value. Choose firm, fresh mushrooms and store them in a paper bag in the refrigerator. Substitute with oyster or portobello mushrooms for a distinct taste variation, or use dried mushrooms rehydrated in broth for added intensity.

    Common Mistakes to Avoid

    • Over-mixing the meat can lead to tough patties; mix ingredients until just combined.
    • Not searing patties properly can result in lackluster flavor; ensure a golden crust forms.
    • Using too much flour in the gravy thickens it excessively; aim for a balanced consistency.
    • Failing to deglaze the pan leaves flavors behind; scrape up those tasty bits for the gravy.
    • Under-seasoning is a common error; generously salt and pepper throughout cooking.
    • Neglecting to rest the meat before serving can cause juices to escape; let patties breathe after cooking.
    • Overcrowding the pan lowers the temperature; cook in batches if necessary.
    • Adding gravy ingredients too quickly can create lumps; whisk gradually and steadily.
    • Choosing excessive heat on the stove may burn the gravy; maintain medium heat for control.
    • Ignoring the importance of sampling can lead to imbalance; taste-test for seasoning adjustments.

    Essential Techniques


    Searing the beef patties is crucial for flavor development. Achieve a crusty exterior by heating the skillet to medium-high, ensuring it’s hot enough to seal juices immediately upon contact. Balance this with an internal temperature check, keeping patties juicy and cooked through without overcooking.

    Gravy-making requires patience and precision. Begin by deglazing the pan with the choice liquid, releasing burnt-on bits essential for flavor. Gradually incorporate flour for thickening, stirring continuously to prevent lumps. Watch for a creamy consistency, adjusting liquid quantity as needed for the perfect texture.

    Pro Tips for Perfect Salisbury Steak


    Shape the patties evenly to ensure consistent cooking and prevent dryness. Use uniform pressure, pressing gently to avoid compacting the meat excessively.

    To boost the savory profile of your dish, incorporate Worcestershire sauce in both the patties and gravy. This adds depth and sophistication without overpowering primary flavors.

    Let the patties rest after cooking to consolidate juices, yielding a succulent bite every time. Cover loosely with foil to retain warmth.

    Test the flavor balance of the gravy regularly, adjusting seasoning in small increments to avoid over-spicing.

    Incorporate fresh herbs like parsley or thyme for an aromatic lift. These can be stirred into the gravy at the end of cooking or sprinkled over the dish as a garnish.

    Consider using a mix of beef and pork for the patties, providing a smoother texture and enhanced flavor richness.

    Variations and Adaptations


    Regional variations of Salisbury Steak can include incorporating spices like smoked paprika or cumin for an earthy undertone. In Tex-Mex adaptations, add jalapenos and serve with salsa for a spicy kick.

    For seasonal adaptations, swap mushrooms for seasonal vegetables like zucchini in summer or squash in autumn, adjusting cooking times to accommodate these differences.

    Dietary modifications can include using ground turkey for a leaner option or selecting gluten-free breadcrumbs to cater to those with gluten sensitivities.

    To adapt flavor variations, experiment with additional herbs and spices to tailor the dish to your liking. A touch of cayenne pepper or garlic powder can introduce a unique twist.

    For texture modifications, consider finishing the patties with a light panko coating to provide an added crunch. This can transform the mouthfeel and offer dietary diversity.

    Presentation alternatives could explore serving the beef patties on a bed of greens for a lighter touch or accompanied by a veggie medley for color and nutritional enhancement.

    Serving and Presentation Guide


    Plate the Salisbury Steak on a wide, shallow dish to maximize the visual impact and allow gravy to pool attractively.

    Garnish with fresh parsley for a splash of color that complements the dish’s savory tones. Pair with mashed potatoes or roasted vegetables for a complete meal.

    Traditional accompaniments include buttery mashed potatoes that soak up the flavorful gravy or a classic side of green beans for contrasting texture.

    Modern serving suggestions could incorporate a bed of quinoa or couscous to offer a contemporary twist on timeless flavors.

    Temperature considerations involve serving the dish hot, as the warmth unlocks the full depth of flavors and ensures a satisfying dining experience.

    Portion control tips help maintain balance, suggesting a patty per person for a modest serving or up to two for heartier appetites.

    Wine and Beverage Pairing


    Pair Salisbury Steak with a bold red wine like Cabernet Sauvignon, whose tannins complement the robust beef flavors.

    Non-alcoholic alternatives include a deep, rich tea like Assam or a flavored sparkling water to cleanse the palate between bites.

    For coffee pairings, opt for a strong, brewed espresso that contrasts the rich savory notes, enhancing the overall meal experience.

    Temperature considerations suggest serving beverages slightly cooler than room temperature, preventing overpowering of the dish’s subtleties.

    Serve wine in wide-bowled glasses to aerate and release its intrinsic characteristics, enhancing both aroma and flavor perception.

    Storage and Shelf Life


    Store leftovers in an airtight container in the refrigerator to maintain freshness, typically keeping for up to three days.

    Temperature requirements emphasize refrigeration below 40°F (4°C), ensuring safety and preventing bacterial growth.

    Use glass or BPA-free plastic containers to eradicate flavor transfer and prefer stackable options for space-saving storage.

    Signs of spoilage include an off-odor or changes in texture, indicating degradation due to exposure or aging.

    Reheat in a saucepan over low heat or in the microwave, adding a splash of water or broth to revitalize the gravy’s consistency.

    Freezing guidelines stress cooling completely before transferring to a freezer-safe bag, with suggested consumption within two months to maintain quality.

    Make Ahead Strategies


    Prepare patties and gravy ahead of time, storing them separately to be combined before serving for the highest quality.

    Storage between steps involves refrigerating components separately in airtight containers, ensuring freshness upon assembly.

    Quality impact assessment reveals slight texture changes, corrected by gentle reheating while stirring to blend and refresh.

    Assembly tips include arranging patties in the pan before adding heated gravy to maintain moisture levels and presentation style.

    Reheating guidelines recommend low temperatures to avoid over-cooking or drying out, introducing a small amount of liquid if necessary.

    Fresh element additions focus on final garnishes like herbs or sliced vegetables to introduce vibrancy and nutrition to the reheated meal.

    Scaling Instructions


    Halving the recipe requires a precise reduction in ingredient quantities, carefully maintaining balance to retain flavor integrity.

    Doubling or tripling involves incremental seasoning checks to avoid overpowering, as flavors are heightened in larger batches.

    Equipment adjustments suggest using larger pans or additional skillets to ensure even cooking and efficient space management.

    Timing modifications will depend on quantity, with potentially extended cooking times for increased batch sizes, achieving uniform results.

    Storage considerations include proper containment in larger servings, labeling with date and portion details for organized, accessible consumption.

    Nutritional Deep Dive


    The macro breakdown highlights Salisbury Steak as protein-dense, with moderate fat content and lower carbohydrate levels.

    Micronutrient analysis celebrates essential vitamins and minerals like iron and zinc, crucial for metabolic health and bodily functions.

    Health benefits encompass muscle growth and repair facilitated by high-quality protein sources present in the beef patties.

    Dietary considerations ensure adaptability, accommodating various dietary needs through thoughtful ingredient substitutions such as low-sodium broth or lean meats.

    Portion analysis recommends moderation, emphasizing balance through accompanying vegetables or grains to complete the meal.

    Weight management tips favor portion control and balanced meals, integrating Salisbury Steak with greens or whole grains for a nourishing, satisfying experience.

    Dietary Adaptations


    Gluten-free adaptations remove bread crumbs or use gluten-free versions to prevent any wheat-related issues.

    For a dairy-free Salisbury Steak, swap milk in recipes involving cream or milk-based sauces with lactose-free alternatives.

    To make it vegan, substitute meat patties with plant-based ones and adjust seasonings to highlight the alternative flavors.

    A low-carb alternative involves removing flour in gravy or adding more vegetables to dilute carbohydrate content.

    For a keto-friendly dish, prioritize high-fat ingredients such as butter over flour for gravy thickening, maintaining ketosis alignment.

    Paleo options replace any processed items, using fresh herbs and vegetables to configure flavor naturally and healthily.

    Low-FODMAP adaptations omit onions and garlic, substituting with infused oils for flavor without digestive concerns.

    Other specific diets may guide substitutions or exclusions based on personal restrictions, ensuring all dietary needs are comfortably met.

    Troubleshooting Guide


    Solve texture issues by adjusting cooking duration; dry patties suggest overcooking, requiring careful heat management and timing.

    Balance flavor by monitoring seasoning during preparation, making small adjustments gradually to reach the optimal taste.

    Temperature problems involve accurate gauging; use an instant-read thermometer to ensure thorough cooking without overdoing.

    For equipment challenges, work with accessible tools, adapting skillet size to batch count for even execution.

    Ingredient substitutions should honor flavor profiles, using comparable alternatives like turkey for beef or almond flour for regular flour.

    Confront timing concerns through pre-preparation and steady practice, understanding each step’s role and rhythm for consistent results.

    Recipe Success Stories


    Community feedback praises the hearty flavors of Salisbury Steak, highlighting its success as a weeknight staple across homes.

    Variation successes include regional twist adaptations, incorporating local spices and seasonal vegetables for distinct personality.

    Adaptation stories tell of reader-inspired innovations, introducing new flavors through herbs and spice adjustments that resonate personally.

    Reader suggestions bring forth creative pairings like non-traditional sides that accompany Salisbury Steak harmoniously.

    Photography tips underscore visual enhancements, capturing the dish’s richness with clear photos emphasizing the enticing visual scope.

    Frequently Asked Questions

    What can I substitute for mushrooms in the gravy? Replace mushrooms with caramelized onions or bell peppers for different flavor elements. Opt for cooked lentils to maintain earthiness while replacing traditional textures.

    How do I store leftovers? Store in an airtight container in the fridge for up to three days, ensuring freshness and flavor retention or freeze for longer storage.

    Can I use turkey instead of beef? Yes, ground turkey is an excellent substitute, providing lower fat content while maintaining taste integrity when seasoned well.

    What side dishes pair well with Salisbury Steak? Traditional options include mashed potatoes or steamed vegetables. Consider serving with quinoa or a refreshing side salad to introduce contrasting textures.

    How can I thicken the gravy if it’s too thin? Mix cornstarch with cold broth and gradually add while stirring over medium heat to achieve the desired consistency without clumping.

    Are there gluten-free alternatives for this recipe? Use gluten-free breadcrumbs or omit them in the patties, and replace all-purpose flour with cornstarch in the gravy for a gluten-free dish.

    How do I make the patties more flavorful? Incorporate Worcestershire sauce or soy sauce into the beef mixture for enhanced umami, and add fresh herbs like parsley for brightness.

    Can I prepare this recipe ahead of time? Yes, cook the patties in advance and store them alongside the gravy separately; reheat and combine them right before serving for the best taste and texture.

    What is the best way to reheat Salisbury Steak? Gently reheat on the stovetop over low heat to avoid drying out the patties, adding a splash of broth or water to maintain moisture.

    Is Salisbury Steak healthy? Salisbury Steak can be part of a balanced diet when paired with vegetables or grains, offering protein and nutrients with the flexibility for healthier adaptations.

    Additional Resources


    Explore related recipes such as Meatloaf or Shepherd’s Pie for similar flavor profiles and hearty appeal. Consider diving into technique guides on grilling or pan-searing to master similar recipes comfortably.

    Ingredient information provides insights into substitutions and storage, ensuring ingredient freshness and availability year-round. Equipment recommendations support efficient preparation and cooking, optimizing comfort and time management in the kitchen.

    Within seasonal variations, experiment with ingredient swaps inspired by food trends or local harvests, bringing freshness and diversity to your culinary exploration.

    Join the Conversation


    Share your Salisbury Steak experiences on social media, showcasing your plate with creative food photography that captures the mouthwatering allure. Offer recipe reviews sharing valuable insights and personal adaptations for others to try.

    Engage with the community through comments, posting creative spin-offs or advice that enhances the broader cooking experience. Exchange ideas and celebrate the joy of Salisbury Steak, fostering culinary connections globally.

    The Recipe

    Salisbury Steak

    Serves: 4

    Prep Time: 15 mins

    Cook Time: 25 mins

    Total Time: 40 mins

    Kitchen Equipment Needed

    • Mixing bowl
    • Skillet
    • Wooden spoon
    • Spatula
    • Whisk

    Ingredients

    • 1 lb ground beef
    • 1/2 cup breadcrumbs
    • 1/4 cup milk
    • 2 tbsp Worcestershire sauce
    • 1 small onion, finely chopped
    • 3 cloves garlic, minced
    • 1 cup mushrooms, sliced
    • 2 cups beef broth
    • 2 tbsp all-purpose flour
    • Salt and pepper to taste

    Directions

    1. In a mixing bowl, combine ground beef, breadcrumbs, milk, half of the Worcestershire sauce, garlic, salt, and pepper.
    2. Shape the mixture into four equally sized patties.
    3. Heat a skillet over medium heat, adding a drizzle of oil. Sear patties until browned, about 4 minutes per side. Remove and set aside.
    4. In the same skillet, sauté onions and mushrooms until golden and fragrant.
    5. Sprinkle flour over the vegetables, stirring to blend completely. Gradually add beef broth and remaining Worcestershire sauce, whisking to prevent lumps.
    6. Return patties to the skillet, simmering in gravy for 10-15 minutes until cooked through.
    7. Adjust seasoning if necessary, then serve hot over mashed potatoes or rice.

    Recipe Notes

    • Substitute beef with turkey for a lighter version.
    • Use gluten-free breadcrumbs for dietary adaptations.
    • Add a splash of cream to the gravy for extra richness.

    Savory Smothered Pork Chops: A Comfort Food Classic Recipe

    Smothered Pork Chops: A Comfort Food Delight

    ⚖️
    Difficulty
    Medium

    ⏲️
    Prep Time
    15 mins

    🕒
    Cook Time
    45 mins

    ⏱️
    Total Time
    60 mins

    🍽️
    Servings
    4

    Indulge your taste buds with our delightful Smothered Pork Chops. This recipe fuses tender pork with rich, savory gravy that evokes the essence of home-cooked comfort food. The creamy sauce complements the juicy pork perfectly, making this dish the ideal meal for both weeknight dinners and special occasions. With each bite, you’re transported to a realm of flavors and memories that define warmth and tradition.

    The main keyword in this dish is Smothered Pork Chops, which are synonymous with southern comfort and culinary satisfaction. This time-honored recipe captures the heart of soulful cooking by delivering a balance of textures and a depth of taste that is both exciting and soothing. Whether preparing it for yourself or sharing with loved ones, these pork chops are bound to impress.

    Quick Recipe Highlights

    • Flavor Profile: A robust mix of savory beef stock, aromatic onions, and earthy spices.
    • Texture: Juicy, tender pork chops with a creamy, silky gravy.
    • Aroma: Heady fragrance of browned meat melded with onions and soothing spices.
    • Visual Appeal: Golden-brown pork adorned with a luxurious pale brown sauce.
    • Skill Level Needed: Intermediate culinary skills for browning meat and managing sauces.
    • Special Equipment: Cast iron skillet for perfect searing, a whisk for smooth gravy.

    Recipe Overview

    • Difficulty Level: This dish requires intermediate skills to perfectly balance and thicken the sauce while ensuring the pork remains tender.
    • Category: Entrees that grace both casual family settings and formal dining tables.
    • Cuisine: Rooted in classic southern American heritage with comforting flavors and simple cooking techniques.
    • Cost: Affordable ingredients that deliver gourmet flavor without breaking the bank.
    • Season: Ideal for cozy fall and winter dinners, but a year-round favorite.
    • Occasion: Perfect for family dinners, holiday gatherings, and Sunday lunches.

    Why You’ll Love This Recipe


    Smothered Pork Chops offer a delightful balance of tender meat and creamy sauce, creating a taste sensation that is both comforting and hearty. This dish shines with its seamless blend of well-seasoned pork enveloped in a rich gravy, making each bite a truly indulgent experience. The texture is soft, yet its flavors are robust, providing a satisfying meal that is sure to please any palate.

    Convenience is another benefit of this recipe. The steps are straightforward, with each stage achievable without overwhelming complexity. The preparation process, though requiring some attention, is rhythmic and rewarding, creating anticipation for the delicious results. Cooking these pork chops fills the kitchen with a warm, inviting aroma that enhances the overall experience.

    Nutritionally, this recipe incorporates lean cuts of pork, offering protein and essential nutrients. By using low-sodium broths and fresh spices, you can control the flavor and nutritional content, ensuring a hearty meal without unnecessary additives. Additionally, paired with vegetables or salads, it provides a balanced diet rich in fibers and vitamins.

    In a social setting, Smothered Pork Chops can be the centerpiece of a memorable meal. They encourage conviviality and the sharing of good food among family and friends. Whether serving a classic Sunday roast or a special occasion dinner, this recipe adapts to the mood, ensuring delightful company and unfettered joy around the table.

    Lastly, this dish is economically accessible, making it an excellent choice for families looking to maximize their grocery budget without sacrificing flavor or nutrition. The ingredients are both basic and versatile, allowing substitutions that cater to varying taste preferences and dietary needs.

    Historical Background and Cultural Significance


    The origin of Smothered Pork Chops is steeped in southern American cuisine, traditionally crafted by home cooks who discovered the beauty of combining humble ingredients to create soul-satisfying dishes. This southern classic stands as a testament to the creativity and adaptability of early cooks who utilized available resources to craft delicious meals.

    Culturally, this dish is part of a broader narrative that showcases the richness of American comfort food. It reflects the tradition of nurturing through food, symbolizing community, togetherness, and love shared amongst family. As a staple in many households, its preparation often marks a connection to heritage and a nod to past generations of cooks.

    As times changed, Smothered Pork Chops have evolved, adapting to contemporary palates while retaining their quintessential charm. Home cooks have added their twists over time, yet the essence remains unaltered—a dish that brings warmth and satisfaction to all who partake.

    Regional variations abound, with slight differences in spice blends and thickeners used in the gravy. Across the southern states, you’ll find diverse renditions, each city or town adding their unique touch, whether through the inclusion of local ingredients or cooking techniques that speak to their specific culinary influences.

    Ingredient Deep Dive


    Pork chops, the star of this dish, are rich in protein and many vital nutrients like thiamin, selenium, and phosphorus. Historically, pork has been a versatile choice in many cultures due to its adaptability in various recipes.

    When selecting pork chops, choose cuts that are evenly sized, with some marbling and a small rim of fat, which ensures tenderness and flavor during cooking. Bone-in chops often provide a juicier finished product. Store them in the refrigerator for up to three days or freeze them if using later.

    The savory onion plays a crucial role, adding sweetness and depth to the gravy. Onions have been a staple in global cuisines due to their robust flavor and accessibility.

    Selecting fresh, firm onions ensures a stronger aroma and taste. Store them in a cool, dry environment away from sunlight. They can be substituted with shallots for a milder flavor or red onion for a more pronounced bite if needed.

    Common Mistakes to Avoid

    • Overcooking the pork chops can lead to dry and tough meat. Always monitor internal temperatures.
    • Using too much flour in the gravy. This can result in a gluey texture and an overwhelming taste.
    • Not adequately browning the pork chops can cause a lack of depth in flavor.
    • Skipping the deglazing step means missing out on incorporating fond into the sauce.
    • Rushing the simmering process could result in an unevenly thickened gravy.
    • Using highly salted broth may result in an overly salty dish.
    • Adding cold liquids to your gravy, which can cause lumps.
    • Neglecting to taste and adjust seasoning at various steps.
    • Failing to rest the meat post-cooking, compromising the juices.
    • Using a pan that’s too small can cause steaming rather than browning your chops.

    Essential Techniques


    Browning the pork chops creates a caramelized crust that enhances the flavor of the dish. This technique involves searing the meat at a high temperature until colored on both sides. Mastery requires patience and a properly heated skillet to avoid sticking.

    The perfect gravy is smooth and luscious; whisking is the key. This technique requires diligent attention to achieve a lump-free consistency. Watching for the mixture to thicken appropriately is crucial.

    Pro Tips for Perfect Smothered Pork Chops


    – Use a blend of spices, including paprika and thyme, for enhanced flavors.
    – Allow the pork chops to rest after cooking to absorb moisture, enhancing juiciness.
    – A little butter in the skillet adds richness and aids in browning.
    – Cook over medium heat to prevent burning while ensuring a steady simmer.
    – Taste your sauce continuously to balance flavors well before serving.
    – Let the gravy thicken slowly rather than forcing it to boil rapidly.

    Variations and Adaptations


    Regional variations of Smothered Pork Chops often include Cajun spices to infuse a bit of heat or apples for a sweeter note. For seasonal adaptions, consider adding mushrooms in fall for earthiness or fresh herbs in spring to brighten the plate.

    Dietary modifications include using coconut milk for lactose-intolerant diets or almond flour to create a gluten-free version.

    Flavor variations can include adding a splash of soy sauce for umami depth or mustard for a tangy bite. For a crunchier texture, consider breading the chops before cooking.

    Serving and Presentation Guide


    Serve your Smothered Pork Chops on a rustic platter with vibrant greens like steamed broccoli or kale. Drizzle extra gravy generously for allure. Garnish with chopped parsley or chives to add color contrast.

    Traditional accompaniments include mashed potatoes or buttery rice, while modern variations may use quinoa or barley. Ensure serving at a warm temperature for ultimate comfort.

    Adjust portioning to ensure a single pork chop per guest for easy dining.

    Wine and Beverage Pairing

    Pair Smothered Pork Chops with an aromatic white wine like a Chardonnay, which balances the dish’s creamy sauce. For red wine lovers, a light Pinot Noir complements the dish without overpowering its essence.

    Non-alcoholic options like iced tea or a sparkling water with a slice of lemon can enhance the overall dining experience.

    Consider serving black coffee post-meal to cleanse the palate or a warm herbal tea that soothes.

    Storage and Shelf Life

    Store leftovers in an airtight container in the refrigerator for up to three days. Ensure that the gravy covers the pork to avoid drying. Freezable for up to two months, though sauce texture may be compromised post-thaw.

    Reheat gently in a skillet to retain moisture. Adding a splash of broth can revive the sauce, maintaining its lusciousness.

    Make Ahead Strategies

    Prepare the gravy a day in advance, storing it separately can infuse more flavor over time. Pre-cooked pork chops should be immersed in the gravy during reheating to prevent drying.

    A well-paced assembly involves balancing the sauce while browning the meat.

    Fresh elements like herbs should be added just before serving to ensure vibrancy.

    Scaling Instructions

    Halve the recipe for intimate dinners. Adjust seasoning gradually during taste tests to avoid overpowering small portions.

    Doubling or tripling requires a larger skillet and possibly adjusting cooking times to ensure even doneness.

    Consider equipment size and batch cook if necessary to prevent overcrowding and ensure proper browning of the chops.

    Nutritional Deep Dive

    A single serving of Smothered Pork Chops provides a balanced macro profile of protein and fats, essential for muscle repair and energy.

    Micronutrients like B vitamins and selenium promote immune function and cellular health. Use lean-pork cuts to maintain a healthy fat intake.

    Portion control remains vital to enjoy this rich dish responsibly, aiding in balanced diet adherence and weight management.

    Dietary Adaptations


    For a gluten-free version, ensure the use of a gluten-free thickener like cornstarch instead of flour. A dairy-free alternative swaps traditional cream with coconut or almond milk, adding a hint of tropical flavor.

    Keto-diet followers can replace traditional flour with almond flour in small amounts to avoid carbs. For a paleo twist, rely on arrowroot powder to thicken the gravy.

    Troubleshooting Guide

    Address texture issues by monitoring internal temperature closely to ensure the meat’s tenderness. Balancing flavor requires tasting frequently and adjusting spices accordingly.

    Temperature problems often arise from incorrect equipment use; ensure a properly fitting lid or reduce heat when necessary. Overcome ingredient substitution concerns with a pantry check to ensure appropriate swaps such as almond flour for standard flour.

    Timing dilemmas involve pre-measurements and organizing ingredients ahead to streamline the cooking process.

    Recipe Success Stories


    Feedback from our community has shared delightful stories of modifying the recipe with their family’s secret ingredients. Variations like adding smoked paprika or using heritage pork cuts have been highlighted as successful adaptations.

    Photographing the golden-brown chops has inspired our readers to capture the beauty of their creations, sharing vibrant images that bring the recipe to life across social media platforms.

    Frequently Asked Questions

    Can I use boneless pork chops?

    Yes, boneless chops work well, though bone-in typically results in juicier meat due to the marrow’s contribution during cooking.

    Can this recipe be prepared in a slow cooker?

    Absolutely, simmer on low for 6-8 hours for well-infused flavors and fall-apart tenderness.

    Is it gluten-free?

    The dish can be made gluten-free by using cornstarch or arrowroot instead of flour for the gravy.

    What can I use to substitute heavy cream?

    For a lactose-free option, coconut milk works wonderfully, adding a subtle sweetness.

    How can I add more spicy flavors?

    Include cayenne pepper or red pepper flakes to taste, enhancing the heat without altering texture quality.

    Can I freeze this dish?

    Yes, but expect the gravy’s consistency to change slightly. Thaw in the fridge before reheating gently in a skillet.

    How do I prevent the gravy from being too thick?

    Gradually add stock or milk during cooking to adjust viscosity slowly. Whisk continuously for a smooth mix.

    How should I store leftovers?

    Store in an airtight container; ensure the pork is covered completely with gravy to maintain moisture.

    What’s the best cut of pork for this recipe?

    Bone-in loin chops are excellent for this dish due to their flavor and moisture retention.

    Can leftovers be reheated without drying?

    Reheat in a skillet on a low flame with extra broth, covering the meat to ensure steam keeps the pork moist.

    Additional Resources

    For more culinary inspiration, explore our other comforting recipes like Classic Meatloaf or Creamy Chicken Pot Pie. Delve into detailed technique guides, such as mastering the perfect sear or creating lump-free sauces, available in our cooking essentials section.

    Discover the profiles of key ingredients featured in our pantry must-haves, providing additional background and usage tips. Join our community on social media platforms where fellow food lovers share their creations, tips, and variations.

    Join the Conversation

    We invite you to share your experiences with Smothered Pork Chops by tagging us in your culinary adventures on social media. Contribute to our blog with feedback or recipe variations, show us how you present the dish, or suggest enhancements. Engage with our community in discussing your favorite comfort foods, challenging us to create adaptable recipes catering to all preferences.

    The Recipe

    Smothered Pork Chops

    Serves: 4

    Prep Time: 15 mins

    Cook Time: 45 mins

    Total Time: 60 mins

    Kitchen Equipment Needed

    • Heavy skillet (preferably cast iron)
    • Whisk
    • Chef’s knife
    • Cutting board
    • Meat thermometer

    Ingredients

    • 4 bone-in pork chops
    • 1 cup all-purpose flour
    • 2 cups beef broth
    • 1 large onion, thinly sliced
    • 1 tablespoon garlic powder
    • 1 teaspoon paprika
    • Salt and pepper to taste
    • 2 tablespoons olive oil
    • 1 tablespoon butter

    Directions

    1. Season the pork chops with salt, pepper, garlic powder, and paprika.
    2. Dust the chops with flour, shaking off any excess.
    3. Heat olive oil in a large skillet over medium-high heat and sear the pork chops until browned on both sides. Remove and set aside.
    4. Lower the heat, add butter, and sauté the onions until translucent.
    5. Sprinkle remaining flour over cooked onions and stir for a minute to cook out the raw flavor.
    6. Gradually whisk in beef broth, scraping up any fond, and bring to a simmer until slightly thickened.
    7. Return pork chops to the pan, spooning gravy over them. Cover and simmer on low heat for about 30 minutes, until chops reach desired doneness.

    Recipe Notes

    • Optionally garnish with fresh thyme leaves for added flavor.
    • For creamier gravy, incorporate a splash of heavy cream at the last step.
    • Adjust seasoning during simmering for personal taste preferences.