Parmesan Baked Potatoes: A Crispy Delight for Every Table
Parmesan Baked Potatoes are an irresistible dish that combines the comforting heartiness of potatoes with the savory richness of melted cheese. Imagine crispy, golden potatoes developing a beautiful crust while remaining fluffy on the inside. Their rich flavor is perfectly complemented by the nutty notes of aged Parmesan cheese, creating a delightful experience for your taste buds. Whether served as a side dish or a satisfying main course, these Parmesan Baked Potatoes are sure to impress family and friends.
The preparation is straightforward, making it a fantastic dish for both novice and experienced cooks. Every bite delivers a crunch, followed by the soft texture of the fluffy insides, providing a lovely contrast that makes you want to reach for just one more. Essentially, these potatoes transform a simple ingredient into an exquisite dish fit for any dining occasion.
Quick Recipe Highlights
- Flavor Profile: Parmesan Baked Potatoes deliver a heavenly blend of savory cheese and creamy potato, with hints of garlic adding depth.
- Texture: Enjoy the satisfying crunch of the golden-baked exterior paired with a soft, creamy interior that melts in your mouth.
- Aroma: The aromatic blend of garlic and baked cheese will fill your kitchen, enticing everyone to gather around.
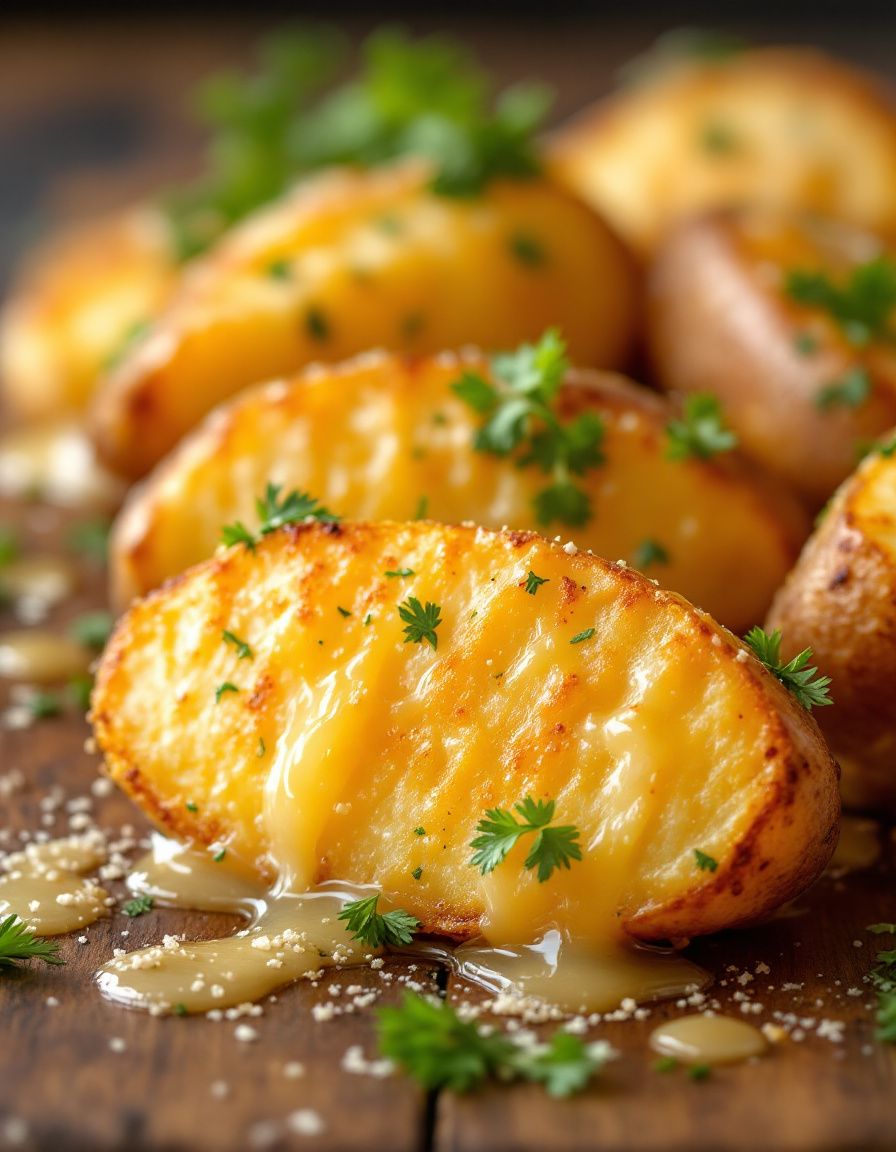
- Visual Appeal: These potatoes emerge from the oven with a crispy, golden-brown hue, beautifully garnished with herbs, making them visually stunning.
- Skill Level Needed: This recipe is beginner-friendly, as it requires minimal cooking techniques.
- Special Equipment: You’ll need a baking sheet and parchment paper for easy cleanup.
Recipe Overview
- Difficulty Level: The easy preparation methods make this dish approachable for everyone, regardless of experience. The steps are simple and nearly foolproof, ensuring your success.
- Category: These baked potatoes work well as a side dish for dinner or as part of a brunch spread, making them versatile for any meal.
- Cuisine: Inspired by classic Italian flavors, this dish showcases the richness of Parmesan cheese in a delightful potato base that transcends culinary boundaries.
- Cost: Ingredients are budget-friendly, typically costing under $10 for a family-sized serving, making this a cost-effective meal option.
- Season: Appreciate these potatoes any time of the year; however, they shine particularly in the cooler months where comfort food takes center stage.
- Occasion: Perfect for family gatherings, casual dinner parties, or even a cozy night in, these potatoes fit seamlessly into any scenario.
Why You’ll Love This Recipe
The allure of Parmesan Baked Potatoes lies in their incredible taste and texture. Each bite is a celebration of crispiness intertwined with the creamy softness of the potato. The cheese’s nutty flavor elevates the dish, adding that extra layer of deliciousness. Not only do they satisfy your cravings, but they also impress your guests with their gourmet appearance and delightful aroma that wafts through your kitchen.
Convenience reigns supreme with this recipe. The prep is minimal, allowing you to prepare other parts of your meal without feeling overwhelmed. With just a handful of ingredients and straightforward instructions, you can have a delectable side dish ready to go while engage with guests. Plus, they can easily be made ahead of time for simple reheating, making entertaining stress-free.
Nutritionally, potatoes are a filling source of carbohydrates, providing energy while remaining relatively low in calories when prepared without excessive butter or cream. Adding Parmesan introduces protein and introduces beneficial nutrients such as calcium, making it an option that balances enjoyment with health.
From social gatherings to family dinners, Parmesan Baked Potatoes bring people together – they’re best shared alongside stories and laughter. Their appealing presentation makes them an instant hit at any gathering, bringing joy and warmth to the dining experience.
Cost-effectiveness is not to be overlooked. The ingredients are standard pantry items that won’t break the bank, and you get fabulous flavor without extravagant expenses. You can easily make enough to feed a crowd without sacrificing quality or taste.
Historical Background and Cultural Significance
Originating from Europe, potatoes have held a place of prominence in the culinary sphere for centuries. As a staple in many households, their versatility allows them to adapt and shine in numerous dishes, including our beloved Parmesan Baked Potatoes. The use of cheese, particularly Parmesan, reflects Italian influences, accentuating the simplicity and quality of ingredients. Historically, these ingredients were often combined to bring out the best flavors while providing sustenance.
In Italian cuisine, potatoes and cheese create a cultural tapestry where comfort food thrives. Dishes like “Pasta al Forno” combine similar flavors, showcasing Italian traditions of blending textures and tastes in easy-to-make recipes. Parmesan Baked Potatoes symbolize the heart of Italian cooking, centered around quality ingredients that evoke warmth and family gatherings.
Over the years, this recipe has evolved from a homespun dish to one frequently found in restaurant meals. Regional variations might include different herbs or even alternative cheeses, allowing every cook to add their personal touch. The adaptability of the recipe speaks to its widespread popularity and acceptance across culinary cultures, inviting everyone to enjoy hearty meals irrespective of background.
In various regions, you might find these baked potatoes served with local twists, introducing spices or ingredients unique to the area. The recipe invites creativity while still honoring the basic concept of combining potatoes with delicious toppings, ensuring it stays relevant in modern meals while retaining its authentic roots.
Ingredient Deep Dive
Potatoes are a key ingredient in Parmesan Baked Potatoes. They have a rich history, having been cultivated for thousands of years in South America before becoming a global staple. Nutritionally, potatoes are high in vitamins C and B6, potassium, and fiber, making them a healthy choice. When selecting potatoes, look for firm ones without any sprouting or bruises. Store them in a cool, dark place to prolong freshness. Should you find yourself short on time, sweet potatoes can make a delightful substitute offering a different flavor profile while retaining a healthful composition.
Parmesan cheese plays a crucial role in this dish, adding an extraordinary umami flavor that elevates the baked potatoes. This cheese has its roots in Italy, known for its aging process which enhances its flavor and promotes a crust when melted. Nutritionally, Parmesan is high in protein and calcium but should be used in moderation due to its sodium content. For selection, look for authentic Parmigiano-Reggiano for the best quality. Store it in an airtight container in the refrigerator, and for alternatives, you might consider Pecorino or Grana Padano.
Garlic adds depth and a pungent aroma to the dish. This bulb has been used for centuries in various culinary traditions. It is known for its health benefits, including boosting the immune system and supporting heart health. When choosing garlic, select firm bulbs with no signs of sprouting. Store it in a cool, dry place. You can substitute garlic powder if you’re in a pinch, but fresh garlic will always deliver superior flavor.
Common Mistakes to Avoid
- Using old potatoes can lead to an unpleasant taste and texture. Always inspect your potatoes for freshness before cooking.
- Not preheating the oven can cause uneven cooking, so ensure the oven reaches the desired temperature before placing the dish inside.
- Neglecting to properly season your potatoes prior to baking will result in blandness. Don’t forget to season with salt and pepper!
- Overcrowding the baking sheet can lead to steaming instead of roasting. Give your potatoes ample space for optimal crispy results.
- Not letting the potatoes cool slightly before serving may mask their flavors; allow a moment for them to rest.
- Skipping the final broil can diminish the crispy texture. A quick broil at the end is essential for that golden-brown finish.
- Using pre-grated cheese can yield less flavor and a less appealing texture than freshly grated Parmesan. Opt for the real deal if possible.
- Forgetting to flip the potatoes halfway through cooking can prevent even browning; rotate them for the best results.
- Not checking for doneness can leave you with either undercooked or overbaked potatoes, so test with a fork for tenderness.
- Serving without garnishing can make the dish look less appealing; consider sprinkling fresh herbs for an attractive finish.
Essential Techniques
Baking is a fundamental technique for achieving the crispy and tender texture we love in Parmesan Baked Potatoes. Firstly, it allows the moisture inside the potatoes to evaporate, creating a fluffy interior. Master your oven settings; start with a high temperature to aid the initial crust formation, and then reduce a bit if necessary for even cooking.
Proper seasoning is vital to flavor enhancement. Salt not only brings out the inherent taste of the potatoes but helps draw moisture out, contributing to that beautiful texture. Learn to salt generously; season before baking and, if desired, add extra salt to taste when you serve.
Grating cheese effectively is also important. Use a box grater or a food processor for the right consistency that melts beautifully. Avoid pre-grated varieties as they contain anti-caking agents that can prevent melting. Consistency in size will ensure even melting and flavor throughout the dish.
Pro Tips for Perfect Parmesan Baked Potatoes
1. Choose waxy potatoes for optimal texture, as they retain moisture better and create a creamy interior when baked.
2. Allowing the potatoes to rest before slicing them will help them maintain their structure; avoid cutting them while they’re too hot.
3. If you crave extra flavor, consider adding herbs like rosemary or thyme directly to the potato mix before baking.
4. Experiment with rosmary garlic butter for brushing the potatoes before baking; the flavors combine beautifully with the Parmesan.
5. Consider finishing your potatoes with a drizzle of olive oil right before baking for an added depth of flavor and extra crispiness.
6. Utilize parchment paper on your baking sheet; it not only aids in easy cleanup but also prevents sticking and promotes even browning.
7. Always taste and adjust salt levels just before serving; freshly roasted potatoes respond beautifully to a sprinkle of coarse salt.
8. Experiment with other cheeses for flavor variations – gouda or cheddar can create distinct profiles while retaining that yummy texture.
Variations and Adaptations
Regional variations of Parmesan Baked Potatoes might include specific herbs native to areas, such as oregano or tarragon. Seasonal adaptations could involve adding seasonal vegetables and spices for an autumn feel or brightening them with spring herbs for freshness. Dietary modifications are also an option; for a lower-calorie version, consider using less cheese, or for a vegan alternative, nutritional yeast can deliver a cheesy flavor without dairy.
Flavor variations can be explored by adding ingredients like bacon bits or caramelized onions, providing new dimensions of taste and texture. Texture modifications could involve par-boiling the potatoes beforehand to create a fluffier interior. Finally, presentation alternatives, such as serving in individual ramekins, can provide a gourmet touch often appreciated by guests.
Serving and Presentation Guide
When plating your Parmesan Baked Potatoes, aim for a beautiful presentation that captures attention. Start by arranging them on a warm serving platter to maintain their inviting aroma. Garnish each potato with a sprinkle of fresh parsley or chives to add a pop of color and freshness. Drizzling lightly with olive oil just prior to serving can lend a glossy finish and enhance both look and flavor.
Consider complementing the potatoes with traditional sides, such as a fresh salad or sautéed greens, creating a balance of flavors and textures on the plate. Alternatively, presenting Parmesan Baked Potatoes in individual cast iron skillets can elevate the dining experience, giving it a rustic flair.
Temperature management is essential; serve them hot for the best experience. When portioning, keep in mind the dietary preferences of your guests; cut larger potatoes into halves or quarters for a pleasing serving size.
Wine and Beverage Pairing
Pairing wine with Parmesan Baked Potatoes can enhance your dining experience. A crisp Chardonnay or a Sauvignon Blanc complements the rich, cheesy flavors brilliantly, offering a refreshing balance. If you prefer a red, consider a light Pinot Noir or Gamay, as their fruitiness can contrast beautifully with the savory notes of the dish.
For those not consuming alcohol, consider pairing with sparkling water infused with fresh lemon or mint for a refreshing palate cleanser. Herbal iced teas can also create a delightful effect, harmonizing with the garlic and cheesy goodness. Should coffee be your preference, a smooth espresso can serve as an interesting pairing, matching the dish’s richness while providing a robust finish.
Storage and Shelf Life
Proper storage is vital to maintaining the integrity of your Parmesan Baked Potatoes. Allow them to cool completely before placing them in an airtight container to prevent condensation. Store them in the refrigerator for up to three days for optimal freshness. If space allows, consider refrigerating them in the baking dish they were prepared in, covering them tightly with foil or plastic wrap.
Signs of spoilage include an off smell or slimy texture, indicating the potatoes have gone bad. When reheating, ensure they reach an internal temperature of 165°F to ensure they are safe to consume. For longer storage, consider freezing the baked potatoes; wrap them tightly in foil and store in a freezer-safe bag for up to two months.
When ready to enjoy again, reheat directly from frozen in the oven at 375°F for about 25-30 minutes, allowing them to become crisp once more.
Make Ahead Strategies
To enjoy Parmesan Baked Potatoes at their best, consider preparing components in advance. You can wash and peel the potatoes a day before, storing them in water in the refrigerator to prevent browning. This allows the final cooking step to be quicker on the day of serving.
Another option is to season and oil the potatoes earlier in the day, leaving them ready to bake. As for assembly, you can par-bake them slightly, cool, and store until you’re ready to finish them off with the final bake, only requiring about 20 minutes when you’re ready.
When reheating, avoid adding fresh toppings until just before serving; this preserves the integrity of herbs and cheeses, ensuring they maintain their intended flavor.
Scaling Instructions
Scaling Parmesan Baked Potatoes up or down is straightforward, as the recipe adapts well to varying serving sizes. For halving the recipe, reduce the number of potatoes while maintaining seasoning ratios, which will still provide flavor without stretching too thin.
If you’re considering a larger batch, simply adjust your baking sheets. For instance, when doubling or tripling, ensure the potatoes are laid out in a single layer, avoiding stacks, to guarantee even cooking. You may also need to rotate your sheets halfway through baking if using multiple trays due to varying oven temperatures.
Timing adjustments may be necessary with larger quantities; add 5-10 minutes of cooking time to ensure all potatoes are cooked through. Store any extras to enjoy later, maintaining quality with proper storage.
Nutritional Deep Dive
Analyzing the nutrition in Parmesan Baked Potatoes reveals they can be a balanced part of your diet. Each serving provides an excellent source of carbohydrates, fueling energy with dietary fiber that promotes digestive health. The addition of Parmesan offers protein, while vitamins and minerals from potatoes add significant nutritional value.
The macro breakdown typically includes moderate carbohydrates, beneficial fats if olive oil is used, and satisfying protein from the cheese. Micronutrient analysis shows the presence of potassium, Vitamin C, and calcium, essential for muscular and overall health.
Regarding dietary considerations, adjusting the cheese or adding vegetables can cater to various lifestyles while ensuring the dish remains delicious. With portion control, enjoying this dish can fit excellently into weight management strategies while still delighting in flavors.
Dietary Adaptations
For those needing gluten-free options, Parmesan Baked Potatoes naturally fit the bill, as they contain no gluten. For a dairy-free variant, consider using a lactose-free cheese or nutritional yeast as an alternative, providing a cheesy flavor while being safe for those with dairy sensitivities.
Vegan adaptations could include using plant-based margarine alongside nutritional yeast, enhancing the cheesy essence without dairy interference. Low-carb eaters might enjoy substituting traditional potatoes with cauliflower or rutabagas for a comparable texture with significantly fewer carbs.
Keto adaptations could involve eliminating the cheese altogether and seasoning with herbs to maintain flavors without carbohydrates. Finding a middle ground for paleo followers could also be done utilizing olive oil and fresh herbs, maintaining healthy fats while keeping it simple.
Low-FODMAP diets can eliminate garlic from the recipes or replace it with garlic-infused olive oil. Each adaptation ensures the enjoyment of flavors without sacrificing dietary requirements.
Troubleshooting Guide
In handling texture issues with Parmesan Baked Potatoes, remember that undercooked potatoes will yield a gummy finish; check for doneness with a fork before removing from the oven. Conversely, overcooked ones can become too mushy; always watch closely and test a couple of pieces.
Flavor balance can be tricky; should your potatoes end up tasting bland, consider adding more salt or herbs after baking. Temperature problems may arise; make sure to preheat your oven adequately and check for hot spots that might unevenly cook your dish.
Ingredient substitutions can be a lifesaver. If you lack Parmesan, alternatives such as Pecorino or Grana Padano make excellent replacements. Timing concerns involve using smaller potatoes so they cook faster; otherwise, you can start with a microwave for partial cooking and finish in the oven.
Recipe Success Stories
Community feedback on Parmesan Baked Potatoes often includes comments on how easy it is to impress guests with this dish. Many home cooks share variations that introduce delightful ingredients like bacon or different types of cheese. Adapting this recipe is easy, as several readers have successfully turned it into a main course by pairing it with salad or grilled meats.
Those who have documented their journey typically praise the presentation; the golden crust and garnished herbs are perfect for sharing on social media. Photography tips from readers have helped others render the dish’s beauty, encouraging them to maximize their cooking experience with engaging visuals.
Sharing helpful tips amongst a community has proven successful, with many offering varied toppings that enhance flavor profiles, ultimately prompting discussions about their culinary adaptations and personal stories with the dish.
Frequently Asked Questions
A1: Yes, you can prep the potatoes and keep them in water overnight. Bake them fresh the next day for the best texture.
Q2: What’s the best way to store leftovers?
A2: Place cooled leftovers in an airtight container and store in the refrigerator for up to three days, reheat in the oven for the best results.
Q3: What potatoes are best for baking?
A3: Waxy potatoes like Red or New potatoes are recommended for their creamy texture once baked, but Russets are also excellent for a fluffier outcome.
Q4: Can I use different cheeses?
A4: Absolutely! Cheeses such as cheddar or Gruyère can introduce unique flavors while ensuring the dish remains delightful.
Q5: How can I make this dish healthier?
A5: Reduce the amount of cheese and use olive oil instead of butter; you can also enhance nutritional value by mixing in vegetables.
Q6: What’s the cooking time for smaller potatoes?
A6: Smaller potatoes may take approximately 30-35 minutes; make sure to check for tenderness with a fork to avoid overcooking.
Q7: Can these potatoes be frozen?
A7: Yes, you can freeze baked potatoes wrapped tightly in foil. When ready to eat, reheat directly from frozen in the oven.
Q8: What’s the best method for reheating?
A8: For the best texture, reheat in the oven rather than the microwave. Set to 375°F and warm until heated through.
Q9: Can I make it vegan?
A9: Yes, replace the cheese with nutritional yeast and use plant-based butter for a delightful vegan version.
Q10: Do I need to peel the potatoes?
A10: Peeling is optional; leaving the skin on adds nutritional value and enhances texture, so choose based on your preference.
Additional Resources
For more culinary delight, consider browsing related recipes such as garlic mashed potatoes or loaded potato skins. Technique guides can enhance your skills in baking and seasoning vegetables, while ingredient information on potatoes and cheeses can deepen your understanding of these staples. Equipment recommendations for optimal baking can help streamline your cooking processes and improve the results. Seasonal variations allow for exciting adaptations as fresh produce becomes available, easily adaptable to suit your meals year-round.
Join the Conversation
Engage with our community through social media sharing! Post your versions of Parmesan Baked Potatoes online, showing off your creativity. Share photos and get recipe reviews, sparking dialogue about this delicious dish. Your variations could inspire others to try something new or explore different cooking techniques. Discussing personal stories around meals creates a communal atmosphere that celebrates the joy of cooking and dining together. We welcome your unique insights!
The Recipe
Parmesan Baked Potatoes
Serves: 4 servings
Prep Time: 15 mins
Cook Time: 45 mins
Total Time: 60 mins
Kitchen Equipment Needed
- Baking sheet
- Parchment paper
- Mixing bowl
- Grater
- Fork
Ingredients
- 4 medium potatoes
- 1 cup grated Parmesan cheese
- 3 tablespoons olive oil
- 3 cloves garlic, minced
- Salt and pepper to taste
- Fresh herbs (such as parsley or chives) for garnish
Directions
- Preheat the oven to 400°F (200°C).
- Wash and dry the potatoes, then pierce them with a fork several times.
- In a mixing bowl, combine olive oil, minced garlic, salt, and pepper.
- Brush the garlic oil mixture over each potato, ensuring they are well coated.
- Roll each potato in the grated Parmesan cheese until fully coated.
- Place the coated potatoes on a baking sheet lined with parchment paper.
- Bake in the preheated oven for 30 minutes. Flip the potatoes midway through cooking.
- After 30 minutes, check for doneness by inserting a fork; they should be tender.
- If desired, broil for an additional 5 minutes to achieve a golden crust.
- Remove from the oven, garnish with fresh herbs, and serve hot.
Recipe Notes
- Feel free to experiment with other cheeses, such as cheddar or gouda, for a different flavor.
- If you prefer a softer texture, try wrapping potatoes in foil before baking.
- Make sure to adjust seasoning based on personal taste, adding more herbs or spices for additional flavor.