Best Street Corn Chicken Rice Bowl for Easy Weeknight Dinners

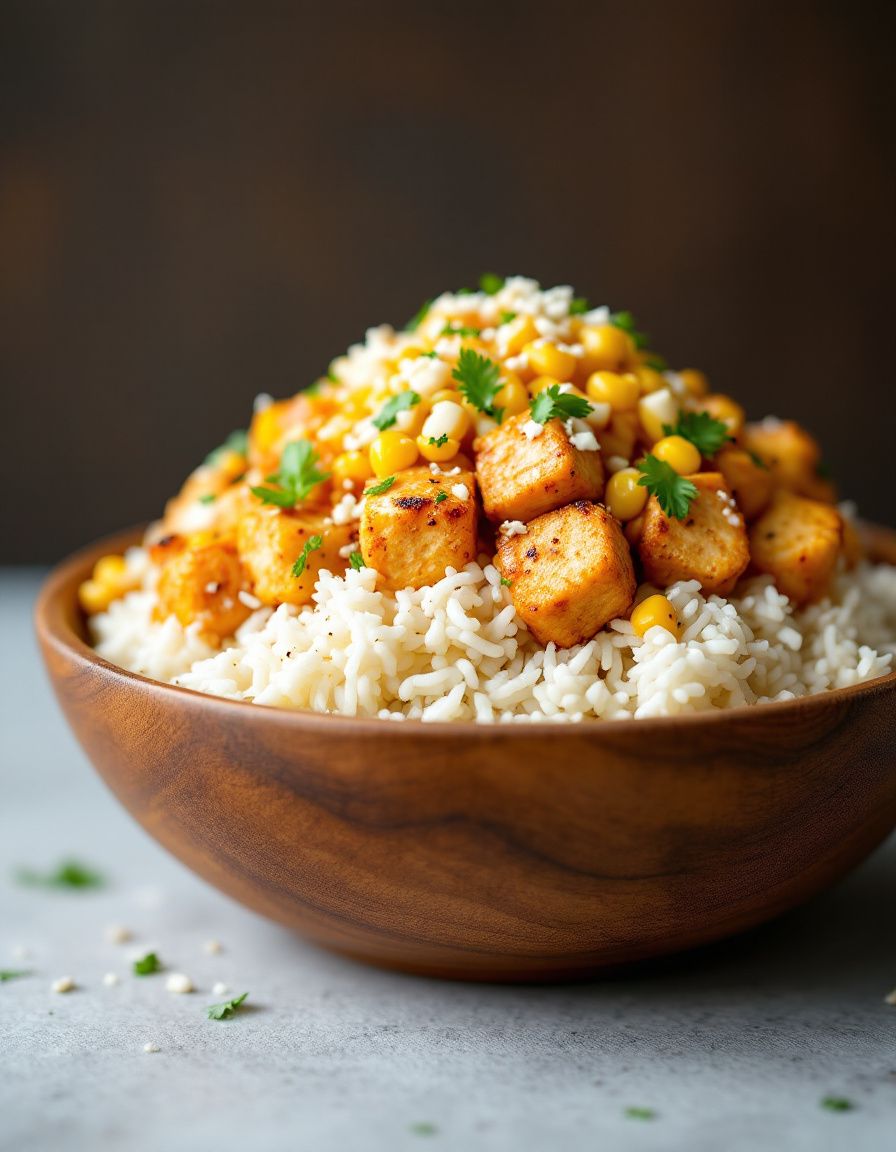
Street Corn Chicken Rice Bowl: A Flavorful Fiesta in a Bowl

⚖️
Difficulty
Intermediate

⏲️
Prep Time
15 mins

🕒
Cook Time
30 mins

⏱️
Total Time
45 mins

🍽️
Servings
4

If you’re looking for a tastebud explosion, this Street Corn Chicken Rice Bowl is just what you need. Combining the savory elements of grilled chicken, the sweet crunch of street corn, and the heartiness of rice, this dish brings a fiesta to your dining table. It’s not just a meal; it’s an experience that invokes the vibrant streets of Mexico with every bite. The creaminess from the cheese and the zest from the lime elevate the flavors, turning a simple dinner into a flavorful celebration that you’ll want to recreate every week.

This bowl is perfect for anyone who loves a healthy yet indulgent meal. The street corn adds a touch of nostalgia and warmth, reminiscent of summer nights spent at fairs and food stalls. As you dig into the layers of seasoned chicken, sweet corn, and fluffy rice, you’ll appreciate the depth of flavors and textures that make this bowl a hit among family and friends. With minimal preparation and a quick cooking time, you can easily whip this up as a weeknight dinner or an impressive meal for guests.

Quick Recipe Highlights

  • Flavor Profile: The mouthwatering mix of smoky grilled chicken, sweet corn, and zesty lime creates an irresistible flavor combination that dances on your palate.
  • Texture: With tender chicken, crunchy corn, and fluffy rice, this dish showcases a delightful play of textures that enhance every bite.
  • Aroma: The enticing aroma of charred corn, seasoned chicken, and fresh cilantro will fill your kitchen, making it hard to resist diving right in.
  • Visual Appeal: The vibrant colors of yellow corn, green herbs, and white cheese create a visually appealing dish that’s as attractive as it is delicious.
  • Skill Level Needed: This recipe is suitable for intermediate cooks but is accessible enough for enthusiastic beginners with basic cooking skills.
  • Special Equipment: You will need a grill or a grill pan to get that perfect char on the chicken and corn.

Recipe Overview

  • Difficulty Level: This dish is categorized as intermediate due to the grilling technique and flavor layering required, though it’s manageable with careful attention.
  • Category: This recipe falls under dinner bowls, perfect for a filling meal that brings different elements together in one dish.
  • Cuisine: Influenced by Mexican street food, this recipe showcases the vibrant flavors of corn and spices typical of traditional Latin cuisine.
  • Cost: The ingredients for this dish are fairly economical, usually amounting to around $15 to $20 for four servings, depending on local prices.
  • Season: Enjoy this dish year-round, but it’s especially favored in the warmer months when fresh corn is in season.
  • Occasion: Ideal for casual family dinners, potlucks, or summer gatherings where you want to impress without spending hours in the kitchen.

Why You’ll Love This Recipe

This Street Corn Chicken Rice Bowl excels in taste and texture, offering layers of deliciousness that keep you coming back for more. The combination of ingredients works in harmony to create a satisfying dish that is both filling and refreshing. The smoky and sweet notes from the grilled corn and chicken complement the bright lime perfectly, ensuring that each forkful is bursting with flavor.

Convenience is at the heart of this recipe. With just 15 minutes of prep and 30 minutes of cooking time, you can have a wholesome dinner ready to serve without the fuss. The ingredients can easily be prepared ahead of time, making this a go-to recipe for busy weeknights or when entertaining guests.

This dish is not only flavorful but also packed with nutritional advantages. Chicken provides a lean protein source while the corn adds fiber and essential vitamins. The fresh toppings, like cilantro and lime juice, contribute additional nutrients, making it a wholesome and well-balanced meal.

Featuring a vibrant presentation and colorful ingredients, this bowl makes for a stunning centerpiece at any gathering. The dish’s social appeal is undeniable, inspiring lively conversations and shared experiences around the dinner table that create lasting memories with family and friends.

Cost-effectiveness is key for many home cooks. The ingredients are straightforward and affordable, and they yield generous portions that can easily feed a family or a small crowd. This means you can enjoy a gourmet-style dish at home without breaking the bank.

Historical Background and Cultural Significance

The origins of street corn, known as “elote,” can be traced back to Mesoamerica, where corn was a staple food. Influential in Mexican culture, elote has evolved from simple grilled corn on the cob to a variety of preparations, often garnished with spices, cheese, and mayonnaise. This Street Corn Chicken Rice Bowl embraces these traditional flavors while adapting them into a contemporary meal.

This dish exemplifies the cultural importance of sharing food and the joy derived from communal meals in Mexican traditions. Festivals and street fairs often showcase elote as a beloved dish, inviting people to gather for a taste of authentic street food that carries deep cultural roots.

Over the years, the preparation of street corn has evolved, leading to regional variations throughout Mexico and beyond. Each region adds its unique twist, using locally sourced ingredients and flavors, making elote a versatile dish enjoyed by many.

Ingredient Deep Dive

Chicken: A major protein source in many cultures, chicken is prized not only for its versatility but also for its health benefits. Rich in protein and low in fat, it aids muscle growth and overall health. When selecting chicken, look for fresh, high-quality pieces, preferably organic when available. Storage is simple; keep it in the fridge for up to two days or freeze it for longer. You can substitute with turkey for a similar texture and flavor.

Corn: Corn holds significant cultural importance, especially in Mesoamerican societies, where it was revered as a vital food source. Nutritionally rich in fiber and essential vitamins, corn is also a good source of antioxidants. When selecting corn, fresh, plump kernels are best, and for storage, keep them in the husk and refrigerate. Frozen corn can also be a great alternative when fresh corn isn’t available.

Rice: As a staple food worldwide, rice brings carbohydrates and energy to this dish. It’s gluten-free, making it accessible for various diets. Opt for long-grain varieties like Basmati or Jasmine for added flavor. Proper storage involves keeping rice in a cool, dry place, and you can use brown rice for more fiber. If you want a quicker option, precooked rice can practically cut down on prep time.

Cilantro: This herb is a staple in many cuisines thanks to its fresh and bright flavor. Adding a burst of freshness, cilantro is low in calories and high in antioxidants. Choose fresh leaves with a vibrant green color and store them wrapped in a damp paper towel in the fridge. You can substitute with parsley if you’re not a fan of cilantro’s strong taste.

Common Mistakes to Avoid

  • Overcooking the chicken: This can lead to dry meat. Make sure to monitor the internal temperature and remove the chicken once it reaches 165°F.
  • Not seasoning the rice: Some may forget to season the rice while cooking, leading to blandness. Season with salt or broth for extra flavor.
  • Skipping the marination: Failing to marinate the chicken can result in less flavor. Allow at least 30 minutes to soak in the spices.
  • Using frozen corn directly: If you use frozen corn without cooking it first, the dish may lack the grilled flavor. Sauté the corn before adding it to the bowl.
  • Overloading on toppings: Too many toppings can distract from the main flavors. Choose a few key toppings for balance.
  • Improperly storing leftover corn: If you’re saving leftover corn, make sure to cool it quickly and store it in an airtight container.
  • Choosing overcooked corn: Overcooked corn can become mushy and unappetizing. Cook just until tender for the best texture.
  • Ignoring freshness of ingredients: Fresh ingredients yield a better taste. Avoid using wilted herbs or expired produce.

Essential Techniques

Grilling Chicken: Master the art of grilling chicken to achieve that perfect balance of smoky flavor and juiciness. Ensure that your grill is preheated and well-oiled before placing the chicken on it to prevent sticking. Look for visual cues such as grill marks and a slight char to signify doneness.

Cooking Rice: Cooking the rice appropriately guarantees a fluffy texture that’s essential for this bowl. Rinse the rice before cooking to remove excess starch, which can lead to clumping. The ratio of water to rice is also crucial; typically, 1 1/2 cups of water per cup of rice works best. Timing is key; avoid lifting the lid too often to ensure even cooking.

Pro Tips for Perfect Street Corn Chicken Rice Bowl

1. Marinate the chicken a few hours ahead to deepen flavors, even overnight for best results.

2. Opt for fresh cobs of corn during peak season for the sweetest flavor; frozen corn can be substituted as needed.

3. Serve the rice warm, but not hot, to maintain the dish’s diverse texture and help other components shine through.

4. Use a cast-iron skillet to sear the chicken if you don’t have a grill, achieving a crispy, browned exterior.

5. Experiment with different cheeses; queso fresco is traditional, but feta or cotija also work wonderfully.

6. A drizzle of cilantro-lime crema can enhance the creaminess and add freshness to your dish.

7. Don’t skip the lime juice; it brightens flavors and balances the richness of the bowl.

8. Make it a meal prep option—prepare the components in advance for easy assembly.

Variations and Adaptations

Regional variations of this dish can include flavors from different cuisines. For instance, you might add a spicy kick by incorporating pickled jalapeños or swapping the grilled chicken for shrimp marinated in chili lime seasoning. Seasonal adaptations allow for adding roasted seasonal vegetables, making this a great fall or winter dish.

Dietary modifications can cater to different needs; for a vegan option, replace the chicken with spiced tofu or jackfruit and use cashew cheese instead. Low-carb variations may utilize cauliflower rice instead of traditional rice, providing a lower-calorie alternative while maintaining the delicious flavors.

Flavor variations can be introduced by using different spices. Experimenting with smoked paprika, cumin, or adding a chipotle sauce can enhance the dish. For those who enjoy added textures, consider incorporating toasted nuts such as almonds or pepitas for a crunch.

Presentation alternatives can vary the dining experience. Consider serving the components separately in a build-your-own format for a fun, interactive meal. Create a colorful display using vibrant plates that contrast the beautiful yellows and greens of the dish.

Serving and Presentation Guide

When plating your Street Corn Chicken Rice Bowl, start by layering the rice at the bottom for a stable base. Gently arrange the grilled chicken slices on top, followed by the sautéed corn. Use sprigs of fresh cilantro and lime wedges for garnish, adding a pop of color and freshness. For added sophistication, consider using a ring mold to create layers before removing it for a beautifully structured presentation.

Garnishing ideas include crumbled cheese, a drizzle of crema, or a sprinkle of chili powder for that extra zing. Pair the bowl with traditional accompaniments, such as tortilla chips or a fresh salad to enhance the meal experience. Pay attention to the serving temperature; serve warm for optimal flavor and texture satisfaction. Portion control is important; aim for balanced amounts of each component to promote well-rounded servings that guests will love.

Wine and Beverage Pairing

When pairing wine with your Street Corn Chicken Rice Bowl, opt for a chilled Sauvignon Blanc or a light-bodied red like a Pinot Noir to complement the flavors. The natural acidity of these wines cuts through the richness of the dish, creating a harmonious experience. For non-alcoholic alternatives, consider serving a refreshing lemonade or iced tea infused with fresh herbs for a vibrant drink option.

Coffees and teas might not be a traditional pairing but can be included in a meal loop. A light, refreshing herbal tea can aid digestion and cleanse the palate post-meal. Always server beverages chilled to keep that refreshing vibe throughout your dinner.

Storage and Shelf Life

To store your Street Corn Chicken Rice Bowl leftovers, allow them to cool completely before transferring to an airtight container. This will help retain freshness and prevent spoilage. Store in the refrigerator for up to 3 days. For longer storage, consider freezing individual portions. Just be sure to label the containers with the date.

When reheating, ensure the dish is heated thoroughly to the internal temperature of 165°F. Microwaving is convenient; just cover the bowl to retain moisture. Alternatively, warming it over medium heat on the stovetop can enhance the flavors again. Signs of spoilage include off smells or discoloration, so always use your judgment before consuming leftovers.

Make Ahead Strategies

To save time during busy weeks, consider prepping ingredients ahead of time. Marinate the chicken and store it in the fridge overnight. You can also grill the corn ahead, allowing it to cool and be stored separately until you’re ready to assemble the bowl. Cook the rice in advance and refrigerate; it warms up nicely without losing flavor.

For assembly, set aside fresh elements like cilantro and lime until just before serving to maintain their texture and brightness. Reheating the chicken and corn should be done gently to ensure they stay juicy and flavorful. When serving, consider adding elements fresh from the market, like avocados or tomatoes, to elevate the freshness.

Scaling Instructions

Should you want to halve the recipe, simply reduce all ingredient quantities by 50%. For doubling or tripling, be sure to adjust not only the ingredients but also cooking times. Larger quantities may require longer cook times, particularly for the chicken. Be mindful of space when using a grill or oven; batches may be required for larger groups.

When scaling the recipe, equipment adjustments such as larger pans or multiple baking sheets may be necessary. Ensure even cooking by positioning items correctly in the grilling or baking area. Also, consider storage for leftovers from larger batches; airtight containers will help them stay fresh for the next day.

Nutritional Deep Dive

A breakdown of the macro nutrients reveals that this Street Corn Chicken Rice Bowl is a well-rounded meal. Each serving typically contains approximately 30 grams of protein from the chicken, supporting muscle health and growth. Carbohydrates from the rice provide essential energy, while the corn contributes dietary fiber that aids digestion.

Micronutrient analysis shows that the dish provides a wealth of vitamins and minerals, including vitamin C from the lime, vitamin A from the corn, and calcium from added cheeses. These nutrients contribute to overall health and wellbeing, making this dish not only delicious but beneficial.

Health benefits extend to heart health as well, primarily due to the lean protein and healthy fats used in the recipe. It fits well into many dietary considerations, being gluten-free and adaptable for other dietary needs.

For portion analysis, consider serving sizes based on individual energy needs; larger portions may mean more energy-dense choices. Including a salad or side of fresh fruit can balance out the meal nicely for those seeking lighter options while still indulging in the bowl.

Dietary Adaptations

For those following gluten-free diets, this recipe naturally fits as it includes no gluten-containing ingredients; just be cautious with any added sauces. Dairy-free adaptations can substitute typical cheeses with nut or dairy-free alternatives without sacrificing flavor.

Vegans can easily replace chicken with grilled or sautéed tofu, tempeh, or chickpeas for a protein boost, making this dish enjoyable for all. Low-carb options may include cauliflower rice instead of traditional rice while maintaining all the delightful flavors.

Keto followers will find this dish adaptable by reducing carbohydrates from rice and corn, leaning more on protein-rich foods and non-starchy vegetables. Paleo eaters can enjoy this bowl by avoiding processed ingredients and opting for whole, unrefined foods that align with the lifestyle.

Other specific diets, such as Low-FODMAP, can also be catered to with attention to specific ingredients, particularly in avoiding garlic and certain beans. Adjust according to personal preferences while retaining the delightful essence of the recipe.

Troubleshooting Guide

If you encounter texture issues with the chicken, excess moisture may cause it to steam rather than grill. Ensure you dry the chicken thoroughly before marinating and grilling to promote that sought-after char. If your corn is mushy, it’s possible it was overcooked; aim for a firm, crisp kernel for optimal bite.

Flavor imbalance may arise if not enough seasoning is used or if a component is left out. Ensure to taste as you go, adding salt and acid to bring out the overall balance. In cases of over-seasoned rice, adding a touch of unsalted broth can help mellow the flavors.

For temperature problems, ensure your grill or pan is fully preheated before cooking chicken and corn. Even heating rotates components when needed; if parts are cooking too quickly, adjust the heat accordingly.

Equipment challenges typically involve grilling mishaps; ensure your grill is clean for even cooking and to prevent sticking. If you experience ingredient substitution failures, go for like-for-like swaps whenever possible to maintain intended flavor profiles.

Timing concerns may also arise; space prep time or cooking methods effectively to prevent last-minute rushes. Don’t be afraid to adjust cooking times based on portions or type when working with larger batches!

Recipe Success Stories

Community feedback has praised this bowl for its versatility and flavor. Many families have shared how this recipe has become a staple in their weekly rotation, where each person can customize their own elements. The shared adaptations often highlight exciting variations, from additional toppings to unique marinating techniques.

Adaptation stories often center around dietary needs or preferences, such as those with gluten sensitivities or vegans who found success swapping out key ingredients while retaining the heart of the dish. The creativity showcased by home cooks demonstrates its adaptability while also celebrating the original flavors assigned to the recipe.

Reader suggestions encourage adding their favorite sauces, like a spicy aioli or zesty vinaigrette for extra depth of flavor, illustrating communal engagement in recipe refinement — a true hallmark of recipe success.

For photography tips, many community members have recommended vibrant plating ideas and natural light for showcasing the colorful layers of the bowl, underscoring the importance of visual appeal in food blogging and sharing.

Frequently Asked Questions

Can I make this bowl vegetarian? Absolutely! You can replace the chicken with grilled vegetables or remove it entirely for a delicious vegetarian meal.

How do I keep the corn fresh? Store leftover corn in an airtight container in the fridge for 3-4 days or freeze for longer storage periods.

Is there a good substitute for rice? Quinoa is a great substitute, adding a protein boost while still providing a similar texture to rice.

Can I make this dish ahead of time? Yes, you can prepare all components beforehand, storing them separately and assembling just before serving for freshness.

What sides pair well with this bowl? Consider a fresh green salad or tortilla chips for crunch, alongside the main dish for a well-rounded meal.

Can I grill the corn before adding it to the bowl? Absolutely! Grilled corn enhances the dish’s flavor profile and brings out its natural sweetness.

What is the best way to reheat leftovers? Microwaving is convenient, but reheating gently in a pan may preserve texture better.

Is this recipe suitable for meal prep? Yes! Prep the ingredients and assemble as needed during the week for easy and healthy meals.

How do I adjust for spice levels? Adjust the chili powder or add spicy toppings to customize the heat level according to personal preference.

Can I use frozen corn in this recipe? Yes, frozen corn can be a great option; just make sure to cook it properly for optimal flavor.

Additional Resources

For more delicious recipes, check out our collection of dinner bowls which cater to various tastes and preferences. You might also explore technique guides on grilling and marinating meats for added insights in preparing flavors. Ingredient information sections on corn and chicken can enhance your understanding and appreciation of the core components in this dish.

Join the Conversation

We invite you to share your experiences with this recipe on social media. Post photos, tag friends, or leave comments about your favorite variations and techniques. Create your recipe reviews for others to see how this dish has transformed your dining experience into a flavorful fiesta!

The Recipe

Street Corn Chicken Rice Bowl

Serves: 4

Prep Time: 15 mins

Cook Time: 30 mins

Total Time: 45 mins

Kitchen Equipment Needed

  • Grill or grill pan
  • Rice cooker or saucepan
  • Mixing bowls
  • Measuring cups and spoons
  • Knife and cutting board

Ingredients

  • 1 lb chicken breast
  • 2 cups corn kernels (fresh or frozen)
  • 2 cups cooked rice
  • 1 cup cilantro, chopped
  • 1/2 cup cheese, crumbled (queso fresco or cotija)
  • Juice of 2 limes
  • 1 tsp chili powder
  • Salt and pepper to taste
  • Olive oil for cooking

Directions

  1. Preheat the grill or grill pan over medium-high heat.
  2. Season the chicken with olive oil, chili powder, salt, and pepper, and let it marinate for at least 30 minutes.
  3. Grill the chicken for about 6-8 minutes per side or until fully cooked.
  4. Grill or sauté the corn until slightly charred. Remove from heat and mix with lime juice and half of the chopped cilantro.
  5. Assemble the bowls by layering rice at the bottom, followed by sliced chicken, grilled corn, remaining cilantro, and cheese.
  6. Drizzle additional lime juice and serve immediately.

Recipe Notes

  • Substitute chicken with grilled vegetables for a vegetarian option.
  • You can add avocado or salsa for extra flavor and freshness.
  • This dish is great for meal prep; prepare components in advance and combine when ready to eat.
  • Experiment with different cheeses or spicy sauces to customize your bowl.

Best Garlic Butter Steak with Creamy Parmesan Rigatoni

Garlic Butter Steak with Creamy Parmesan Rigatoni: A Flavorful Delight

⚖️
Difficulty
Intermediate

⏲️
Prep Time
15 mins

🕒
Cook Time
30 mins

⏱️
Total Time
45 mins

🍽️
Servings
4

Garlic Butter Steak with Creamy Parmesan Rigatoni is a heavenly dish that marries juicy, tender steak with the richness of creamy, flavorful pasta. The tantalizing blend of garlic butter and savory Parmesan creates an irresistible sauce that clings to the rigatoni in a comforting embrace. This dish is perfect for a special occasion or a cozy evening at home, as it impresses with both looks and flavor.

Imagine cutting into a perfectly seared steak, its juices mingling with the silky sauce of the Parmesan rigatoni underneath. The aromas of garlic and fresh herbs fill your kitchen, creating an inviting atmosphere that makes it hard to resist digging in straight from the pan. As you savor each bite, the textures balance beautifully— the slight crunch of the steak’s crust, juxtaposed with the creamy pasta that melts in your mouth.

Quick Recipe Highlights

  • Flavor Profile: This dish offers a perfect combination of rich butter and savory garlic balanced by the sharpness of Parmesan, making each bite wonderfully satisfying.
  • Texture: The steak’s crispy exterior contrasts with its tender interior, while the rigatoni provides a creamy, smooth mouthfeel that complements the protein well.
  • Aroma: The fragrant blend of garlic and butter fills your kitchen, combined with the earthy notes of fresh herbs.
  • Visual Appeal: The dish is a feast for the eyes, with the golden-brown steak resting atop a bed of creamy, cheesy pasta, garnished with fresh herbs for a pop of color.
  • Skill Level Needed: While the techniques involved are intermediate, the steps are straightforward enough for most home cooks to master.
  • Special Equipment: A quality skillet and a pot for boiling pasta are essential to executing this recipe perfectly.

Recipe Overview

  • Difficulty Level: The Garlic Butter Steak with Creamy Parmesan Rigatoni is classified as intermediate due to the need for careful cooking of the steak and balancing of flavors, but is achievable for most home cooks.
  • Category: This dish fits perfectly into dinner or special occasions, providing an elegant yet comforting meal option.
  • Cuisine: Influenced by Italian comfort food, this dish showcases classic flavors typically found in Italian-American households.
  • Cost: Expect to spend around $20 to $30 on quality ingredients, offering excellent value for an impressive meal.
  • Season: Ideal for year-round dining, this dish can be particularly comforting during colder seasons.
  • Occasion: A fantastic choice for date nights, family gatherings, or celebrations where you want to impress your guests.

Why You’ll Love This Recipe

Garlic Butter Steak with Creamy Parmesan Rigatoni delivers a taste experience unlike any other. The steak, cooked to your preferred doneness, creates an explosion of savory flavors that is complemented beautifully by the creamy rigatoni. The dish strikes a delightful balance between richness and indulgence, making it perfect for a special dinner.

Preparation is streamlined, allowing you to whip up this sumptuous meal in just 45 minutes. With a quick cooking technique, you can have a gourmet meal on the table without spending all day in the kitchen, making it an ideal choice for busy weeknights or spontaneous gatherings.

Nutritionally, this dish provides you with a protein boost from the steak and energizing carbs from the pasta, making it a satisfying option. Paired with a fresh salad, you achieve a well-rounded meal that will keep everyone full and happy.

Socially, this dish encourages sharing and gathering. The experience of serving and enjoying this meal with family or friends creates lasting memories. It’s not just dinner; it’s an event worth celebrating.

Cost-effective cooking is also a highlight of this recipe. With a handful of easily obtainable ingredients, you achieve an impressive finish that rivals restaurant dining without the hefty price tag.

Historical Background and Cultural Significance

The roots of Garlic Butter Steak can be traced back to traditional steakhouse cuisine, where good cuts of beef are celebrated for their rich taste. Incorporating garlic-infused butter elevates this classic by adding layers of flavor that pairs perfectly with the meat.

Culturally, pasta dishes like rigatoni have long been a staple in Italian cuisine, often served in a luxurious sauce. This combination reflects the rich culinary traditions of Italy, showcasing how simple ingredients can create a memorable meal worthy of any dining table.

Over time, this dish has evolved from humble origins into a celebrated favorite. Modern kitchens adopt the idea of combining steak and pasta, allowing for creativity in pairings and presentations while maintaining its roots.

Regional variations abound as well, with many incorporating local flavors. In numerous Italian-American restaurants, for instance, this dish often includes vegetables like spinach or mushrooms, showcasing a delightful blend of textures and tastes.

Ingredient Deep Dive

Steak is the star ingredient in this dish, historically favored for its robust flavor and versatility. Nutritionally, it’s an excellent source of protein, iron, and other essential nutrients. When selecting steak, aim for cuts like ribeye or sirloin for optimal flavor and tenderness. Proper storage in the refrigerator is key; keep steak wrapped, and consume it within a few days or freeze for longer preservation.

Rigatoni is an ideal pasta shape for this creamy sauce due to its ridges, which make it perfect for holding onto the sauce. Pasta offers carbohydrates for energy, making it a staple in many diets worldwide. For best results, choose high-quality durum wheat pasta, which has a firm texture that holds up well during cooking. Securely stored in a cool, dry place, uncooked pasta can last for extended periods.

Parmesan cheese plays a pivotal role in enhancing the richness of the sauce. This cheese is known for its bold, nutty flavor and serves as a source of calcium and protein. When purchasing, choose blocks of Parmesan over pre-grated for the freshest taste. Store it grated or shredded in an airtight container and freeze for even longer shelf life.

Common Mistakes to Avoid

  • Overcooking the steak: Use a meat thermometer to check for doneness and let it rest before slicing.
  • Not seasoning: Generously season the steak and pasta water for optimal flavor before cooking.
  • Skipping the pasta cooking time: Follow package instructions for perfectly al dente pasta.
  • Using low-quality ingredients: Good quality steak, cheese, and butter will significantly enhance the final taste.
  • Improper butter usage: Allow butter to melt gently—high heat could burn it, affecting flavor.
  • Not draining pasta properly: Retain some pasta water to adjust sauce consistency and flavor if needed.
  • Neglecting the sauce ratio: Ensure the sauce is enough to coat the pasta. Adjust flavors gradually.
  • Serving at the wrong temperature: Allow both steak and pasta to sit for a few minutes after cooking for the best serving experience.

Essential Techniques

Mastering the art of searing steak is crucial in this recipe. Achieving a beautiful, caramelized crust while maintaining a juicy interior enhances flavor and texture. Preheat your skillet well, season properly, and let the steak gently cook without constant movement.

Creating a creamy sauce depends on emulsifying butter with the pasta water and Parmesan. Understand how to combine these elements to achieve a smooth, cohesive sauce that clings to the pasta without being too greasy. Whisking continuously while adding the water ensures a perfect consistency.

Pro Tips for Perfect Garlic Butter Steak with Creamy Parmesan Rigatoni

Start cooking the pasta before you begin searing the steak to streamline the process. This approach ensures everything is ready at the same time.

Choose steak cuts with good marbling to enhance flavor and tenderness during cooking. Cuts like ribeye carry rich flavor profiles that elevate the dish.

Rest your steak after cooking to lock in flavors and juices, ensuring a tender bite every time.

For an extra touch of flavor, consider adding white wine to deglaze the pan after cooking the steak, capturing all the delicious fond at the bottom.

Don’t over sauce the rigatoni; a little goes a long way. A creamy, rich sauce should coat the pasta without drowning it completely.

Garnish with fresh herbs like parsley or basil just before serving for a vibrant touch and added freshness.

Experiment with different cheeses or adding a hint of lemon zest to the sauce for a unique twist that brightens the dish.

Lastly, enjoy the cooking process—great dishes begin with a joyful heart!

Variations and Adaptations

Explore the flavors of different regions by incorporating local spices or herbs into the garlic butter, such as rosemary or thyme, to enhance the steak.

Consider seasonal adaptations: in winter, why not add roasted autumn vegetables for a hearty touch, or in summer, introduce fresh cherry tomatoes for a burst of color and taste?

For dietary modifications, swapping the rigatoni for whole grain or gluten-free alternative options can customize the dish while maintaining its delicious essence.

Experiment with flavors by introducing a red pepper flake kick to the creamy sauce or adding sautéed mushrooms alongside the steak for depth.

Texture variations could be achieved by using a blend of cheeses, such as adding ricotta for creaminess, or experimenting with other pasta shapes for a different bite.

Regarding presentations, serving on a rustic wooden board instead of a conventional plate can provide a delightful visual twist to the dish.

Serving and Presentation Guide

Plating is essential for a striking presentation. Consider using a large pasta bowl, placing the rigatoni in the centre and carefully arranging the sliced steak on top.

For garnishing, finely chopped herbs or microgreens not only add a pop of color but also introduce freshness that balances the richness of the dish.

Pair with traditional sides like a green salad dressed in a light vinaigrette to cleanse the palate, ensuring your guests enjoy every bite.

A modern touch could include serving in stylish, individual plates, appealing to the visual senses and making it perfect for entertaining.

Serve the dish warm, but not scalding hot. Allow resting after cooking helps the flavors to meld beautifully.

Finally, consider portion control, allowing adequate servings that make your guests feel fully satisfied without being overwhelmed.

Wine and Beverage Pairing

When it comes to wine pairings, consider a full-bodied red like Cabernet Sauvignon, which complements the richness of the steak and the creaminess of the pasta perfectly.

For a white wine alternative, a rich Chardonnay can work excellently, providing a buttery contrast that echoes the flavors of the dish.

Opt for non-alcoholic options like sparkling water with a twist of lemon to refresh the palate, making it an ideal companion for the meal.

For coffee lovers, a robust espresso can round off the experience, while tea aficionados might enjoy a smooth black tea with light notes to cleanse the palate after the hearty meal.

Always serve wine and beverages chilled or at appropriate temperature to enhance the tasting experience.

Storage and Shelf Life

To store leftovers, keep them in an airtight container in the refrigerator for up to three days. Ensure everything has cooled to room temperature before sealing.

For longer-term options, consider freezing the steak and rigatoni separately to preserve freshness. Steaks can be stored for up to three months, while pasta is best consumed within a month.

When reheating dishes, gently warm on the stove with a splash of water or broth to restore sauce creaminess, avoiding a microwave which can dry out the steak.

Be mindful of signs of spoilage—watch for an off smell, color changes, or unusual textures that may indicate the food is no longer good to eat.

For best results, use storage containers that are microwave-safe to facilitate easy reheating when you’re ready to enjoy what’s left.

Make Ahead Strategies

To streamline your cooking process, consider marinating the steak the night before for deep flavor infusion. This allows the meat to tenderize and absorb all the garlicky goodness.

Cook the rigatoni just before serving to maintain its texture, but if time is tight, it can be prepped a few hours ahead, drizzled with a bit of olive oil to prevent sticking.

The creamy sauce can be made in advance as well and stored in the refrigerator. Just reheating gently on the stove before combining with fresh pasta saves time.

When assembling on the day of serving, ensure that everything is ready to go to minimize time spent in the kitchen while your guests are at the table.

Add fresh herbs or cheese right before serving to keep the components vibrant and appealing.

Scaling Instructions

To halve the recipe, remember to adjust cooking times; smaller quantities cook more quickly. Aim for a thermometer when cooking steak to ensure it reaches desired doneness.

Doubling or tripling the recipe is a breeze, especially if the pan size allows for it—just be cautious not to overcrowd while searing steak, as this could lead to steaming instead of browning.

For larger gatherings, consider using multiple pans or batches to keep flavors consistent and ensure each ingredient is cooked to perfection without overloading.

Pay attention to timing adjustments; larger quantities may take a bit longer to heat through.

Plan storage efficiently for scaled recipes by ensuring you have enough containers on hand for leftovers.

Nutritional Deep Dive

A macro breakdown of Garlic Butter Steak with Creamy Parmesan Rigatoni reveals a delightful balance of protein, fats, and carbohydrates. The dish is high in protein due to the steak, vital for muscle repair, and energy from carbohydrates in the rigatoni.

Micronutrient analysis shows a good supply of iron from the steak, calcium from the Parmesan, and B vitamins important for energy metabolism, promoting overall health.

This dish’s health benefits make it an excellent choice for various dietary needs. Pairing it with a fresh green salad can create a well-rounded meal with vitamins and fibers.

Understanding portion sizes is crucial, and maintaining balance helps manage weight while enjoying indulgent flavors.

This dish can fit into various dietary patterns, lending itself to modifications without losing the essence of the meal.

Dietary Adaptations

For those on a gluten-free diet, substitute traditional rigatoni with gluten-free pasta variations that maintain a similar texture and flavor profile without compromising quality.

Individuals with dairy sensitivities can explore nut-based or dairy-free cheeses as substitutes in the creamy sauce.

Vegans can replicate the dish using plant-based steak alternatives and cashew cream for the sauce, ensuring to enrich the flavors with seasonings.

Low-carb enthusiasts can swap the rigatoni out for zucchini noodles or spaghetti squash, adding vegetables while keeping the dish light.

For those following a paleo or keto diet, focus on high-quality meats and fresh vegetables while limiting any grain products for the desired culinary experience.

Troubleshooting Guide

Texture issues can arise if steak is overcooked, leading to a tough chew. Always use a meat thermometer to ensure perfect doneness, allowing meats to rest prior to slicing.

Flavors may become unbalanced if you add too much salt. Gradually adjust seasoning to taste, or introduce fresh herbs for a refreshing twist.

Temperature discrepancies often occur when searing steak. A properly preheated skillet prevents steaming and promotes a perfect crust.

If substitutions are made, ensure that flavor profiles complement each other well; for example, using a different cheese may alter the taste significantly.

Timing concerns can be remedied by checking the doneness of steak at intervals to avoid overcooking—allow for shorter cooking times when working with thinner cuts.

Recipe Success Stories

Community feedback reveals how widely loved this recipe is. Individuals frequently share their variations, highlighting unique spice additions or cooking methods that elevate the dish.

Many readers report success in adapting the recipe for various dietary needs while keeping the flavors impressive and intact. This flexibility showcases the versatility of the recipe.

Photography tips shared by users also highlight the importance of presentation; capturing the vibrant colors of the pasta and steak can make a mouthwatering impact on social media.

Suggestions about effective marinating methods and pre-cooking tips continue to inspire others in the community, embodying communal learning and engagement around food.

The storytelling of family gatherings over this dish emphasizes its role in memorable occasions, sparked by moments of joy and loving connections.

Frequently Asked Questions

Can I prepare this dish in advance?

Yes, you can marinate the steak and prepare the creamy sauce in advance. Store each component separately and combine just before serving to retain freshness.

What cut of steak works best?

Ribeye or sirloin is ideal for this recipe, as these cuts provide rich flavors while ensuring tenderness when cooked correctly.

Can I use a different type of pasta?

Absolutely! While rigatoni is recommended, other pasta shapes like penne or farfalle can also work beautifully.

How do I reheat leftovers?

Reheat gently on the stove with a splash of water or broth to restore the sauce’s creaminess without drying it out.

Is this recipe freezer-friendly?

Yes, both the steak and pasta can be frozen, though it’s best to store them separately to maintain texture and flavor quality.

What should I serve it with?

A fresh salad or steamed vegetables pairs beautifully, balancing the richness of the dish.

Can I modify the recipe for dietary needs?

Certainly! There are several adaptations for gluten-free, vegan, and low-carb diets that still allow the dish to shine.

What can I substitute for Parmesan cheese?

Consider using nutritional yeast for a vegan option, or try pecorino cheese for a sharper flavor.

How can I enhance the flavor?

Adding a splash of white wine when deglazing the pan after cooking steak can add depth and brightness to your sauce.

What’s the best way to store leftover steak?

Wrap it tightly in foil or place it in an airtight container and store it in the fridge for up to three days.

How do I ensure my steak is cooked perfectly?

Utilize a meat thermometer, aiming for 130°F for medium-rare and adjust based on your preference; always allow it to rest for even cooking.

Additional Resources

Explore other pasta recipes that feature cream sauces or meaty delights, allowing your culinary creativity to shine. Technique guides can help refine your skills in searing meat or creating creamy sauces.

For further information on ingredient quality and selection, refer to guides that discuss the differences in cheeses, meats, and pasta options.

Invest in sturdy kitchen tools that withstand the tests of time for hassle-free cooking experiences.

Consider seasonal variations in your menu planning, as different vegetables and flavors resonate with the changing seasons, enhancing your meals throughout the year.

Join the Conversation

Engage with your friends and family by sharing your culinary adventures, from tweaking recipes to discovering new ingredients.

When posting on social media, highlight your experience in making Garlic Butter Steak with Creamy Parmesan Rigatoni, and offer photography tips that capture the dish’s beauty. Encourage discussions with comments and experiences regarding the dish, promoting a feeling of community around food.

Share your recipe reviews or suggestions for improvements—every interaction contributes to collective cooking wisdom and joy.

The Recipe

Garlic Butter Steak with Creamy Parmesan Rigatoni

Serves: 4

Prep Time: 15 mins

Cook Time: 30 mins

Total Time: 45 mins

Kitchen Equipment Needed

  • Large skillet
  • Pot for boiling pasta
  • Meat thermometer
  • Wooden spoon or spatula
  • Airtight containers for storage

Ingredients

  • 1.5 lbs ribeye or sirloin steak
  • 3 cups rigatoni pasta
  • 1 cup heavy cream
  • 1 cup freshly grated Parmesan cheese
  • 4 tablespoons unsalted butter
  • 4 cloves garlic, minced
  • Salt and pepper to taste
  • Fresh parsley for garnish

Directions

  1. Begin by cooking the rigatoni according to package instructions in salted water. Drain and set aside.
  2. Season the steak generously with salt and pepper on both sides.
  3. In a large skillet, melt 2 tablespoons of butter over medium-high heat. Once melted and bubbling, sear the steak for about 4-5 minutes on each side for medium-rare, or longer for desired doneness.
  4. Remove the steak from the skillet and let it rest for a few minutes before slicing.
  5. In the same skillet, add the remaining butter and minced garlic, sautéing until fragrant. Reduce the heat to low and stir in the heavy cream and Parmesan cheese.
  6. Combine the cooked rigatoni with the sauce, adding reserved pasta water as needed for consistency.
  7. Serve the rigatoni topped with sliced steak and garnish with fresh parsley.

Recipe Notes

  • For best flavor, use high-quality steak and freshly grated Parmesan.
  • You can substitute heavy cream with half-and-half for a lighter version.
  • Leftover steak pairs well with eggs for breakfast the next day.

Best Boneless Chicken Wings Recipe – Crispy and Flavorful

Delicious Boneless Chicken Wings: A Mouthwatering Treat

⚖️
Difficulty
Easy

⏲️
Prep Time
15 mins

🕒
Cook Time
25 mins

⏱️
Total Time
40 mins

🍽️
Servings
4 servings

Boneless chicken wings are an irresistible culinary treat that can elevate any gathering or meal. With their juicy and tender chicken coated in a delicious sauce, they offer a delightful burst of flavor that appeals to everyone. Whether served as a party appetizer or a main dish, these wings are sure to impress your guests with their sumptuous taste and inviting aroma. Each bite is a savory adventure, combining crispy textures with the rich flavors of your favorite sauces.

Creating boneless chicken wings at home is a delightful experience. You can customize the heat and sweetness to your preference, making each batch unique. The ease of preparation ensures you won’t spend hours in the kitchen—just a quick marination followed by frying or baking is all you need. The inviting aroma will fill your home, making it hard to resist a taste before serving. This dish is perfect for both casual family dinners and festive occasions, where it will undoubtedly steal the spotlight.

Quick Recipe Highlights

  • Flavor Profile: Savory, spicy, and buttery, with a variety of sauce options.
  • Texture: Crispy exterior with a juicy and tender interior.
  • Aroma: Inviting scents of fried chicken combined with smoky sauce undertones.
  • Visual Appeal: Golden-brown wings garnished with fresh herbs and sauces.
  • Skill Level Needed: Perfect for beginners and experienced cooks alike; very straightforward.
  • Special Equipment: Just a frying pan or oven, plus basic kitchen tools.

Recipe Overview

  • Difficulty Level: This recipe is categorized as easy, making it ideal for beginner cooks.
  • Category: A versatile dish perfect for appetizers, snacks, or main courses.
  • Cuisine: Influenced by American pub cuisine, including flavor profiles from different regions.
  • Cost: Budget-friendly, with a cost of approximately $10-$15 for the total recipe.
  • Season: Enjoyable year-round, but especially popular during tailgating season and summer barbecues.
  • Occasion: Perfect for game-day gatherings, family barbecues, and casual get-togethers.

Why You’ll Love This Recipe

The taste and texture of boneless chicken wings are truly captivating. When you bite into them, the subtle crunch of the outer layer contrasts beautifully with the moist, tender chicken inside. Doused in rich sauces, these wings provide a perfect balance between sweet and spicy that appeals to a wide range of palates. Whether you prefer a classic buffalo sauce or something more adventurous like a honey garlic glaze, customizing the flavor is simple and fun.

Convenience is another key reason for loving boneless chicken wings. Preparation takes minimal time, making them a go-to dish for busy weeknights or spontaneous get-togethers. The ability to prepare a large batch means you can serve a crowd efficiently. Plus, they can be made ahead of time, stored, and reheated, allowing you to enjoy more time with your guests and less time in the kitchen.

From a nutritional standpoint, this recipe can be tweaked to suit healthier preferences. By using lean chicken breasts and baking instead of frying, you create a lighter version full of protein and essential nutrients. Boneless chicken wings can also be tailored to include a variety of veggies or served with salads, enhancing their health benefits while maintaining their delicious flavor.

Boneless chicken wings also create social opportunities. They make for fantastic finger food, perfect for gatherings. There’s something inherently fun about sharing a dish where everyone digs in together. The excitement of tasting different sauces promotes interaction, laughter, and enjoyment around the table, making them a staple for parties and celebrations.

Cost-effectiveness is a practical aspect that cannot be overlooked. With simple ingredients and minimal equipment needed, creating a satisfying meal won’t break the bank. When compared to purchasing wings at a restaurant, making them at home saves money while allowing for enhanced customization to suit your taste preferences.

Historical Background and Cultural Significance

The origin of boneless chicken wings can be traced back to the United States, specifically Buffalo, New York. It was in the 1960s when the original buffalo wing was created, quickly becoming a staple in bars and restaurants. As culinary innovation evolved, the idea of removing the bone for easier eating emerged, catering to a wider audience who desired a more convenient version.

Culturally, chicken wings represent a communal dish that fosters togetherness. They are often served at sporting events and social gatherings, symbolizing root-for-your-team celebrations. This cultural significance has also allowed the dish to adapt and evolve over the years, integrating various sauces and preparation methods unique to regional tastes.

The evolution of the recipe has been remarkable. Initially celebrated for their bold flavor, wings have transformed into a canvas for experimentation, garnering influences from global culinary traditions. Variations such as Asian-inspired sauces or Southern-style spices now share space with the traditional buffalo sauce, broadening their appeal across diverse cuisines.

As people have embraced more health-conscious eating, boneless chicken wings have evolved again to meet demands for lower-calorie options. Grilling and baking methods have gained popularity, aligning with a growing trend of healthier home-cooked meals. Today, you can find recipes catering to various dietary preferences, making this dish an inclusive choice for any occasion.

Ingredient Deep Dive

For the chicken, boneless chicken breast is often preferred for its tenderness and mild flavor. Historically significant in many global cuisines, chicken serves as a primary protein source and is rich in essential nutrients such as vitamins B6 and B12. When selecting chicken, look for fresh, organic options if available, as these often have better flavor profiles and health benefits. Store uncooked chicken in the refrigerator and consume it within 1-2 days; it can also be frozen for later use.

Another main ingredient is the sauce. Traditional buffalo sauce, with its combination of hot sauce and butter, offers a creamy, spicy flavor that many love. The origins of buffalo sauce date back to its birthplace in Buffalo, New York, and its distinct taste has influenced countless recipes worldwide. For optimal flavor, always choose high-quality hot sauces and butters. Depending on the recipe, you can also try alternative sauces, such as homemade BBQ or teriyaki sauce, based on your flavor preference.

Common Mistakes to Avoid

  • Overcooking the chicken is a crucial mistake. It can lead to dryness, making the wings less enjoyable. Always monitor cooking times carefully.
  • Using low-quality sauces can lead to uninspiring flavors. Invest in good quality sauces to enhance the overall taste of your wings.
  • Packing the wings too tightly in the cooking vessel can cause uneven cooking. Aim for enough space for air to circulate around each wing.
  • Skipping the marination process might result in bland wings. Allowing the chicken to soak in your sauce for at least 30 minutes intensifies the flavor.
  • Frying the wings at too low of a temperature can cause them to absorb too much oil. Ensure your oil is hot enough for a crispy texture.
  • Forgetting to dry the chicken before cooking can make it difficult to achieve a crispy crust. Pat them dry with paper towels before frying or baking.
  • Not balancing flavors in your sauce, especially with spicy elements, can result in an overpowering taste. Consider adding sweetness or acidity to balance heat.
  • Oven baking without a wire rack results in soggy wings. Always place wings on a rack to allow air flow for crispness.
  • Neglecting to let the wings rest after cooking can lead to loss of juices. Allow wings to rest before serving to maintain moisture.
  • Not having adequate preparation tools can lead to a hectic cooking experience. Gather necessary equipment beforehand to streamline the process.

Essential Techniques

To create perfectly crispy boneless chicken wings, frying is often the go-to technique. This method allows for a beautiful golden color and delicious crunchy texture. To master frying, it’s crucial to maintain the oil temperature between 350°F and 375°F. If the oil is too cool, the chicken will absorb excess oil and become greasy; if it’s too hot, it can burn before cooking through. Always test with a small piece of chicken to find the right temperature.

Baking is a healthier alternative that yields delicious results as well. The key to perfect baking is to ensure the wings are coated in oil and placed on a wire rack in the oven. This promotes air circulation, resulting in evenly cooked and crispy wings. It’s common to bake wings at a high temperature, typically around 425°F, and to flip them halfway through for even browning. Watching closely is essential to ensure they do not burn.

Pro Tips for Perfect Boneless Chicken Wings

One of the best tips for perfect boneless chicken wings is to marinate the chicken overnight. This allows the flavors to penetrate deeply, making every bite rich in taste. A combination of spices alongside your favorite sauces can create a personalized flavor profile that enhances the overall experience.

When frying, it’s beneficial to fry in small batches. This helps maintain the oil temperature and ensures each piece cooks evenly, crisping up nicely without steaming. Do not overcrowd the pan; it may lead to uneven cooking and soggy results.

Consider experimenting with various sauces and dipping options. A mix of hot, spicy, and sweet sauces not only creates variety but also caters to diverse taste preferences among your guests. Offering vegetables and ranch or blue cheese dipping sauces can also enhance the overall dining experience.

Reheating properly is crucial for maintaining your chicken wings’ quality. When reheating, do so in an oven rather than a microwave, as this prevents the wings from becoming soggy. Aim for reheating at 350°F for about 10-15 minutes or until they reach the desired crispiness.

Adding a detailed garnishing approach can elevate your wings presentation. Fresh herbs, such as chopped parsley or cilantro, contribute not only flavor but also a vibrant pop of color, making your dish more appealing. A squeeze of lime or lemon juice can add brightness to the flavor profile.

Presentation does matter! Serve your wings on a stylish platter and arrange them artfully. Adding fresh vegetables in the mix, such as carrot and cucumber sticks, can also attractively contrast against the golden wings, creating an inviting table display.

Consider using an air fryer for a healthier cooking method. It significantly reduces the amount of oil needed while still achieving that satisfying crispy texture. Just be sure to adjust the cooking time accordingly, as air fryers can cook faster than traditional frying methods.

Variations and Adaptations

Boneless chicken wings can be adapted to suit regional preferences. For example, incorporating traditional Southern spices, such as cayenne or smoked paprika, creates a distinctly Southern flair. Alternatively, Asian-inspired boneless wings can include ingredients like sesame oil, ginger, and soy sauce for a unique flavor profile.

Seasonal adaptations can also enhance your boneless chicken wings recipe. In summer, consider lighter sauces incorporating fresh herbs and citrus, while winter can call for richer, heartier sauces like a honey mustard blend paired with comforting spices.

Dietary modifications are also easy with this recipe. For a gluten-free option, utilize cornmeal or gluten-free breadcrumbs for coating. A vegan alternative can be achieved using cauliflower or plant-based chicken products, which offer similar textures and can be generously sauced.

Flavor variations can create exciting experiences. Different sauces like teriyaki, chipotle ranch, or garlic parmesan can transform the dish entirely, allowing for a completely new taste sensation. Don’t hesitate to get creative with spices and flavorings based on your personal preferences.

Texture modifications are achievable through cooking technique. Try oven-baking for a less greasy and lighter option, or air frying for a quick solution that still delivers on crunchiness while requiring less oil.

Lastly, presentation alternatives can change the game. Serve your wings in taco-style on mini tortillas, with various dips for a fun and interactive approach for guests. You can also skewer them for easy handling at gatherings, enhancing the experience with a touch of creativity.

Serving and Presentation Guide

When serving boneless chicken wings, employing classic plating techniques can elevate the dish. Using large platters or rustic wooden boards can add a contemporary touch while making it easier for guests to serve themselves. Arrange wings in a circular pattern or ice them in a layered style to create visual interest.

For garnishing, consider using sliced scallions, chives, or vibrant herbs to sprinkle over the wings before serving. This not only adds a fresh flavor but enhances the colors of the dish, making it more appetizing. You can also add finely shredded cheese for a delectable ooze factor that complements the richness of the wings.

Accompaniments should not be overlooked. Classic pairings include celery sticks and carrot batons served alongside ranch or blue cheese dressing. They provide a cooling contrast to the spicy flavor profile, ensuring balanced bites with every wing.

Temperature is crucial for optimal enjoyment. Serve wings hot and fresh from cooking for the best experience. Allowing them to cool slightly can help preserve the initial crispness, making them more enjoyable at serving time.

Portion control is essential when serving boneless chicken wings. Depending on the event, consider providing each guest with an appropriate serving size, which is typically around 6-8 wings. This helps manage plate waste and ensures everyone gets plenty to enjoy without overindulging.

Wine and Beverage Pairing

When it comes to wine pairings, a crisp, refreshing white like Sauvignon Blanc or a light-bodied red such as Pinot Noir work wonderfully with boneless chicken wings. The acidity in these wines cuts through the richness of the wings, balancing the flavors harmoniously.

For a non-alcoholic option, consider serving craft sodas with natural flavors to complement the spicy notes in your wings. Ginger ale or a fresh lemonade adds sweetness and fizz, enhancing the enjoyment of every bite.

Coffee or iced tea can also be surprisingly effective pairings. The depth of a dark roast coffee, especially with a hint of mocha or nuttiness, matches well with spicy flavors, while a lightly brewed iced tea can cleanse the palate.

Temperature considerations play an important role in your beverage selections. Ensure wines are chilled to enhance their refreshing properties. If serving coffee or tea, consider keeping them warm yet not boiling to elevate the guest experience.

Offering a variety of beverages creates an inviting atmosphere where guests can choose their favorites, enhancing the overall enjoyment of your boneless chicken wings experience.

Storage and Shelf Life

To ensure your boneless chicken wings stay fresh, store them in airtight containers in the refrigerator. Proper storage methods will keep them safe and extend their freshness for 3-4 days. Make sure they are cooled completely before sealing them in to prevent condensation.

When it comes to temperature requirements, keeping wings at or below 40°F in the fridge is essential. If you’re planning to enjoy them later, freezing might be the best option. Wings can be kept in the freezer for up to 3 months if placed in a freezer-safe container.

Selecting the right container is equally important for proper storage. Use containers that offer good sealing capability or heavy-duty freezer bags to avoid freezer burn. Always label and date your containers to monitor freshness.

Signs of spoilage include off-odors, unusual texture, or changes in color. If wings develop a slimy texture or sour smell, it’s best to discard them to ensure food safety.

When reheating, do so in an oven or air fryer to maintain crispiness. Aim for an internal temperature of 165°F. When reheating from frozen, ensure adequate time is allowed for thorough cooking, typically about 20-25 minutes.

Make Ahead Strategies

To streamline your cooking process, consider prepping your boneless chicken wings a day in advance. Marinate the chicken overnight for better flavor absorption. Store them in the fridge in your chosen marinade to retain freshness.

When storing between preparation steps, keep raw wings covered in the fridge until you are ready to cook, maintaining food safety and quality. Minimizing time between preparation and cooking will preserve the texture and overall appeal.

Assessing the impact on quality when making ahead is crucial. By marinating and seasoning the chicken ahead of time, flavors deepen. However, a fresher fry or bake may yield a crunchier texture, so aim to cook close to serving time whenever possible.

For assembly tips, ensure all sauces and garnishes are ready to go. Having everything prepped will enable a cohesive assembly approach, making the final dish visually appealing and ready for service.

Reheating guidelines are essential if cooking in advance. Plan to reheat wings carefully to retain quality. Reheat in a conventional oven or air fryer to ensure they return to their crispy glory without compromising on taste.

Lastly, consider adding fresh elements, such as herbs or a squeeze of citrus, right before serving. This will enhance flavors and provide a fresh contrast to the previously cooked dish.

Scaling Instructions

If you need to halve the recipe, the cooking time might vary slightly. Monitor closely to ensure the chicken is fully cooked and remains juicy. Scaling down may reduce overall cooking time; be ready to adjust based on your kitchen setup.

For doubling or tripling the recipe, be sure to scale your ingredients accurately. You’ll also want to adjust cooking times, ensuring the chicken pieces are not overcrowded in the cooking vessel, regardless of the quantity.

Equipment may need to adapt based on the amount of wings you plan to cook. Using multiple baking sheets or frying batches will enhance your efficiency in cooking larger quantities while maintaining the quality that everyone loves.

Time modifications should be made carefully. More wings require slightly longer cooking times, but be mindful to avoid overcooking. Always use a meat thermometer to confirm the wings have reached a safe internal temperature of 165°F.

When scaling quantities, also keep storage considerations in mind. Ensure you have enough containers for leftover wings and utilize freezer-friendly options if necessary to preserve their taste and texture.

Nutritional Deep Dive

The nutritional profile of boneless chicken wings depends heavily on the choice of ingredients and cooking methods. On average, a serving contains approximately 200-300 calories, with most of them coming from protein. Chicken breast is a great source of lean protein, making these wings not only delicious but also a beneficial addition to your diet.

Micronutrient analysis of the dish reveals it can be a source of vital vitamins and minerals. Ingredients such as garlic and various spices used in the wings can add beneficial nutrients. Incorporating fresh herbs can enhance flavors while also providing additional vitamins like vitamin K and C.

Health benefits of chicken include high protein content, which aids in muscle building and repair, particularly valuable for active individuals. However, portion control is key, as wings often come rich in sauces that can increase calorie counts.

When considering dietary options, aiming for healthier cooking techniques, like baking or grilling rather than frying, can cut excess fat. Monitoring sauce quantities can also contribute significantly to healthier servings.

Understanding portion analysis is critical when enjoying wings. A suggested serving of 6-8 wings is often sufficient to satisfy cravings without overindulging. Balancing wings with side salads or vegetables can also enhance meal quality.

Finally, weight management is attainable by opting for lighter sauces or reducing portion sizes, enabling you to enjoy this indulgent dish while still aligning with healthy eating goals.

Dietary Adaptations

For gluten-free adaptations, ensure that all sauces and coatings are certified gluten-free. Cornstarch can be used in place of flour for crispy coatings while maintaining great taste.

Dairy-free adaptations can be achieved by avoiding traditional butter-based sauces and instead opting for alternatives like coconut milk or dairy-free margarine in recipes to suit those with lactose intolerance.

For those following a vegan diet, consider substituting traditional chicken with plant-based chicken products, or use hearty vegetables like cauliflower or mushrooms, providing a similar texture and satisfying bite.

Low-carb diets can benefit from using almond flour or crushed pork rinds for breading instead of traditional flour, cutting down on carbohydrates while achieving a satisfying crunch.

Keto adaptations can mirror low-carb suggestions but focused on high-fat ingredients for flavor, using sauces that are sugar-free and opting for oil-based dressings to maintain keto-friendly profiles.

In the Paleo diet, choosing natural, unprocessed ingredients for marinades and breaded versions can enhance the quality of your boneless wings while aligning with dietary preferences.

Following low-FODMAP guidelines is possible with careful selection of sauces, ensuring they are free from problematic ingredients like garlic and onion while still tasting delicious.

Awareness of other specific diets can lead you to tailor the recipe further. Whether for vegetarian options with alternatives to chicken or concocting sauce variations for different dietary needs, the recipe offers room for creativity that aligns with diverse dietary preferences.

Troubleshooting Guide

If you encounter texture issues with your wings, remember that an overly soft coating may indicate insufficient frying time or lack of proper temperature. Ensure the oil is hot enough before adding wings, and consider a double coating for additional crunch.

Flavor balance problems often arise from overly salty or spicy flavors. A simple remedy is to incorporate sweet elements or a neutral side, such as coleslaw, to balance robust flavors effectively.

Temperature problems may involve undercooked chicken. Use a meat thermometer to ensure the internal temperature reaches 165°F to avoid food safety issues. Adjust cooking times based on the size of wings being used, ensuring they are consistently cooked.

Equipment challenges, such as sticky pans, can be resolved by using appropriate non-stick coatings or ensuring wings are adequately coated in oil before frying or baking.

Ingredient substitutions can throw off the original flavor profile. When replacing ingredients, aim for comparable textures and flavors so that the integrity of the dish remains intact.

Timing concerns can impact the final outcome. If using frozen wings, allow sufficient time for defrosting before cooking, as improperly thawed wings may cook unevenly, impacting both taste and safety.

Recipe Success Stories

Community feedback often highlights the appealing flavors of these wings. Many readers have adapted the recipe, sharing their triumphs in crafting unique sauces that suited their families’ preferences, proving just how versatile this dish can be.

Variation successes have shown readers embracing creativity when customizing sauces, combining different influences from their own cultural backgrounds. Stories of readers using family recipes to enhance the flavor experience showcase the recipe’s adaptability.

Photographs shared by readers demonstrate the beautifully enticing presentations created with these wings. By using colorful garnishes and creative plating techniques, many have transformed this simple dish into an eye-catching centerpiece for their gatherings.

Encouraging readers to share their adaptations is an excellent way to foster community. Inviting commentary on social media about unique variations and serving suggestions can inspire others to create their own enjoyable versions of this classic dish.

Lastly, user suggestions about side dishes and pairings can amplify the flavor experience. Sharing ideas for tasteful vegetable accompaniments or refreshing salad options adds value and versatility to your boneless chicken wings creation.

Frequently Asked Questions

Can I use frozen chicken for this recipe?

It’s best to use fresh chicken for optimal taste and texture. If you do use frozen chicken, ensure it is completely thawed before cooking to avoid uneven results. Always check the internal temperature to ensure thorough cooking.

How do I make boneless wings healthier?

To make boneless wings healthier, consider baking or air-frying instead of frying. You can also use whole grain breadcrumbs, lower fat sauces, or less sugary marinades. Aim for fresh ingredients for added nutrition without sacrificing flavor.

Can I prepare the chicken wings ahead of time?

Yes! You can marinate the chicken ahead of time, up to a day in advance. Just be sure to store it in the refrigerator while marinating. Cooking and freezing them afterward for future use is also an option, allowing for quick reheating when needed.

What sauces work best with boneless chicken wings?

Classic options like buffalo and BBQ sauce are favorites, but feel free to experiment with teriyaki, garlic parmesan, or honey mustard. Each blend offers a unique flavor profile, allowing for customization based on personal tastes.

What should I serve with boneless chicken wings?

Pair your wings with traditional sides like celery sticks, carrot sticks, or ranch/blue cheese dipping sauces. Additionally, consider serving them with a fresh salad or potato wedges for a balanced meal!

How can I store leftovers?

Store leftovers in an airtight container in the fridge for up to four days. For longer storage, you may freeze them for up to three months. Ensure they’re cooled completely before placing them in storage.

What are some popular variations of boneless wings?

Popular variations include spicy Asian-style wings, garlic parmesan wings, and sweet chili wings. Each variant brings a distinct twist to the standard recipe, showcasing its versatility.

Are boneless wings gluten-free?

They can be gluten-free if you use gluten-free breadcrumbs and sauces. Always check the ingredient labels to avoid cross-contamination and to ensure that all components meet gluten-free standards.

Can I make boneless wings in an air fryer?

Absolutely! Air frying boneless wings is a healthier and quicker alternative. Just make sure to adjust the cooking time and temperature to ensure they are crispy and thoroughly cooked.

What is the best way to reheat boneless chicken wings?

The best method to reheat boneless chicken wings is in the oven or air fryer to retain crispiness. Set the oven to 350°F and heat for about 10-15 minutes until warmed through.

How do I make the wings extra crispy?

For extra crispy wings, ensure they are dry before seasoning, double-coat them in breadcrumbs or flour, and fry at a higher temperature. Baking them on a wire rack can also yield a crispy result.

Additional Resources

If you enjoyed this recipe, consider trying related ones like spicy honey garlic chicken, baked chicken tenders, or BBQ chicken skewers to diversify your meal plan. Explore technique guides that detail frying, baking, and marination tips to enhance your cooking skills further.

For ingredient information, research the benefits and uses of chicken, as well as tips on selecting the freshest produce to complement your wings. Equipping yourself with essential cooking techniques will help you become confident in the kitchen.

Consider utilizing equipment recommendations that further your cooking journey. Tools like air fryers, electric skillets, or instant pots can elevate your meals and save time, creating opportunities for additional recipes.

Lastly, look out for seasonal variations that incorporate fresh, local produce into your meals. By adapting recipes throughout the year, you maintain flavor diversity and delight your palate with seasonal ingredients.

Join the Conversation

We encourage you to share your experience with making boneless chicken wings! Post about your cooking journey or variations you’ve tried on social media, and don’t forget to tag us! We love seeing your creativity and delicious results.

For those passionate about photography, capturing images of your dishes can enhance your experience. Don’t hesitate to showcase your plating and presentation ideas; we’d love to see your unique style!

Community engagement is a vital part of the cooking experience. Share your thoughts, ask questions, or offer suggestions to others looking to enjoy this delightful dish, fostering connection and shared learning.

Invite friends and family to try their hand at making these boneless wings, exploring their flavors and presenting styles collectively. Who knows, you might even start a new family tradition with this delicious crowd-pleaser!

The Recipe

Boneless Chicken Wings

Serves: 4 servings

Prep Time: 15 mins

Cook Time: 25 mins

Total Time: 40 mins

Kitchen Equipment Needed

  • Mixing bowls
  • Frying pan or baking sheet
  • Meat thermometer
  • Tongs or spatula
  • Measuring cups and spoons
  • Wire rack (for baking)

Ingredients

  • 1 lb boneless chicken breasts, cut into bite-sized pieces
  • 1 cup all-purpose flour or gluten-free alternative
  • 1 cup buttermilk or dairy-free alternative
  • 1 tsp garlic powder
  • 1 tsp paprika
  • ½ tsp salt
  • ½ tsp pepper
  • 1 cup buffalo sauce or sauce of choice
  • Butter (optional, for sauce)

Directions

  1. In a bowl, combine the flour, garlic powder, paprika, salt, and pepper.
  2. Dip the chicken pieces in buttermilk, allowing excess to drain.
  3. Coat each piece of chicken evenly with the flour mixture.
  4. In a frying pan, heat oil over medium-high heat and fry the chicken pieces until golden brown, about 3-4 minutes on each side.
  5. If baking, preheat the oven to 425°F, line a baking sheet with parchment paper, and place the coated chicken pieces on a wire rack. Bake for 20-25 minutes, flipping halfway through.
  6. In a small saucepan, heat the buffalo sauce and butter (if using) until melted. Mix well.
  7. Once the chicken is cooked, toss in the buffalo sauce mixture to coat evenly.
  8. Serve warm with dipping sauces and veggie sticks.

Recipe Notes

  • Feel free to adjust the spice level of the sauce.
  • If preferred, the recipe can be made with cauliflower or plant-based alternatives for a vegetarian option.
  • These wings can be stored in the refrigerator for up to 4 days and reheated in the oven for best results.

Best Garlic Butter Steak with Creamy Parmesan Rigatoni

Garlic Butter Steak with Creamy Parmesan Rigatoni: A Flavorful Comfort Dish

⚖️
Difficulty
Moderate

⏲️
Prep Time
15 mins

🕒
Cook Time
20 mins

⏱️
Total Time
35 mins

🍽️
Servings
4

Indulge in the rich, savory flavors of Garlic Butter Steak with Creamy Parmesan Rigatoni, a recipe that beautifully marries tender, juicy steak with a luscious, creamy pasta. The garlic butter not only enhances the steak’s flavor but also infuses the entire dish with a mouthwatering aroma that invokes warmth and comfort. As you take your first bite, the tender steak melts in your mouth, complemented by the creamy, cheesy goodness of the rigatoni, creating a satisfying blend of textures that is sure to please any palate.

This dish is perfect for both casual weeknight dinners and special occasions, inviting friends and family to gather around the table. The aroma of garlic and butter wafting through the kitchen serves as a reminder of the joys of home cooking. With its elegant presentation and rich flavor, Garlic Butter Steak with Creamy Parmesan Rigatoni transforms simple ingredients into a heartwarming experience, making it an instant favorite in any household.

Quick Recipe Highlights

  • Flavor Profile: The steak shines with a rich, buttery garlic essence, balanced by the creamy, savory Parmesan in the pasta.
  • Texture: Enjoy a delightful contrast between the tender steak and the creamy, slightly al dente rigatoni, creating a satisfying mouthfeel.
  • Aroma: The dish is elevated by the fragrant aroma of sizzling garlic and fresh herbs that tantalize the senses.
  • Visual Appeal: A stunning presentation with vibrant green parsley garnishes against the golden buttery steak and the creamy pasta.
  • Skill Level Needed: Requires basic cooking skills, including stovetop cooking and sauce preparation, making it accessible for home cooks.
  • Special Equipment: A good skillet or grill pan and a pot for boiling pasta are essential for this recipe.

Recipe Overview

  • Difficulty Level: This recipe is considered moderate due to the need for multitasking, balancing steak and pasta cooking to perfection.
  • Category: A perfect main course that caters to hearty dinner requirements.
  • Cuisine: This dish draws inspiration from Italian-American cuisine, where rich flavors and comforting dishes take center stage.
  • Cost: Generally affordable, with the main ingredients being steak, pasta, and butter, making it a cost-effective choice for a gourmet meal.
  • Season: Ideal for any season, especially during colder months when hearty meals are most appealing.
  • Occasion: A wonderful option for family gatherings, date nights, or weekend dinner parties.

Why You’ll Love This Recipe

The sumptuous taste of Garlic Butter Steak with Creamy Parmesan Rigatoni will excite your taste buds and leave you craving more. The rich garlic butter enhances the steak’s natural flavors while the creamy Parmesan rigatoni adds a decadent touch, making each bite a delightful experience. The wonderful blend of savory and creamy notes keeps the palate engaged, perfect for those moments when you want to savor each mouthful.

Preparation is a breeze, with simple steps that yield impressive results. The combination of steak and pasta allows for a single cooking process, turning what could be a complicated meal into something easily achievable. This recipe is friendly for home cooks; with minimal fuss, you’ll have a restaurant-quality meal ready to serve in around 35 minutes.

In addition to being delicious, this recipe provides a good balance of protein and carbs, making it a hearty, fulfilling option. The nutritional benefits of steak combined with creamy sauce from the rigatoni give a rich, comforting dish without compromising on necessary nutrients. By using high-quality ingredients, you ensure a meal that is as nourishing as it is gratifying.

This dish shines when shared with others, making it an excellent choice for entertaining. The elegant presentation of the steak alongside luscious pasta creates an inviting table atmosphere, encouraging conversation and enjoyment. Impress your guests while you relish delightful moments together over this flavorful feast.

Affordability is another key aspect of this recipe. Utilizing accessible ingredients, you can create a luxurious meal without breaking the bank. With simple ingredients like steak, pasta, and cheese, you’re left with an impressive return on investment, all while ensuring a delightful dining experience for your family and friends.

Historical Background and Cultural Significance

The roots of Garlic Butter Steak with Creamy Parmesan Rigatoni can be traced back to the culinary traditions of both Italian cuisine and American steakhouse culture. The combination of pasta and steak is a reflection of the melting pot of cultural influences that characterizes modern American cooking, embracing the hearty meals that both Italian and American traditions are famous for.

In Italian cuisine, pasta forms the cornerstone of daily meals, with myriad sauces and preparations that emphasize local ingredients and flavors. The use of garlic, butter, and Parmesan cheese reflects not only flavor preferences but also the simplicity and quality that define Italian cooking. Each bite of aluminum-free pasta tossed in creamy sauce captures the authentic essence of home-cooked Italian meals.

American steakhouse culture has also influenced this recipe, where steak is often seen as a centerpiece of any grand meal. The trend toward dining experiences that emphasize high-quality meats paired with satisfying side dishes reflects a broader interest in gourmet cuisine that has become popular in American culture. As a result, this dish showcases both the richness of Italian pasta traditions and the robust flavors of American grilled meats.

Over the years, variations of steak and pasta dishes have evolved, allowing chefs and home cooks alike to experiment with different flavors and techniques. From integrating fresh herbs to incorporating seasonal vegetables, this recipe represents the evolution of combined culinary traditions that appeal to modern palates while honoring historical roots.

Ingredient Deep Dive

Garlic is not only a staple in many kitchens, but it also holds a significant place in culinary history. Known for its pungent aroma and robust flavor, garlic has been used in cooking for thousands of years, tracing back to ancient civilizations. Nutritionally, garlic is praised for its health benefits, including boosting the immune system and reducing blood pressure. To select the best garlic, look for bulbs that are firm and tightly wrapped without any sprouting. Store garlic in a cool, dry place to extend its shelf life, and for substitutions, you can use garlic powder in a pinch, although fresh is preferred for its stronger flavor.

Steak, especially cuts like ribeye or sirloin, is renowned for its flavor and tenderness. Historically, steak has been a beloved part of the American diet, symbolizing hearty meals and often featuring in celebrations and gatherings. Besides being a great source of protein, steak offers essential nutrients like iron and vitamin B12. When selecting steak, look for well-marbled pieces, which enhance the flavor profile. Storage should be done in the refrigerator for short periods or vacuum-sealed for freezer storage. If you need substitutes, consider using chicken or fish, though it will significantly change the dish’s profile.

Rigatoni, a type of pasta characterized by its tube shape, holds sauce beautifully, making it a favorite choice for creamy dishes. Originally hailing from Italy, this pasta has a rich history in various regional cuisines and pairs perfectly with sauces, both light and decadent. Rich in carbohydrates, rigatoni provides energy, while its structure allows for a delightful chew. When choosing rigatoni, look for quality pasta made with semolina flour. Store it in a cool, dry place, and for variations, consider swapping it with gluten-free pasta for dietary needs.

Cream, an essential ingredient for achieving the creamy consistency in this recipe, adds richness and flavor to any dish. Its origins can be traced back to ancient dairy practices across various cultures. Nutritionally, cream provides fats necessary for a balanced diet but should be enjoyed in moderation. To select cream, look for fresh, high-fat content options, and store it in the refrigerator. If substitutions are needed, alternatives like coconut cream or soy cream can provide a different flavor profile.

Parmesan cheese, a staple in Italian cooking, adds a sharp, nutty flavor that enhances any dish. Made from cow’s milk, Parmesan has a long shelf life and is often used grated over pasta. Parmesan’s health benefits include being high in calcium and protein. When buying, opt for freshly grated or whole blocks for the best flavor. Store Parmesan in the fridge and keep it well-wrapped to prevent spoilage. Substitutions can include Pecorino Romano for a similar taste profile but with a tangier flavor.

Common Mistakes to Avoid

  • Overcooking the steak: Cooking steak to the preferred doneness ensures optimal texture and flavor. Use a reliable meat thermometer to check for desired temperatures.
  • Undercooking the pasta: Make sure rigatoni is cooked al dente so that it holds its shape and texture when mixed with the sauce.
  • Using stale ingredients: Freshness is key for garlic and herbs. Using stale ingredients can lead to a lack of flavor in the final dish.
  • Neglecting rest time for steak: Allow cooked steak to rest for at least 5 minutes before slicing to retain juices and maximize tenderness.
  • Not seasoning adequately: Seasoning each component of the dish is crucial. Be generous with salt and pepper to enhance overall flavor.
  • Rushing the sauce: Give the creamy sauce enough time to come together, ensuring even distribution of flavors in the rigatoni.
  • Using the wrong type of steak: Choose cuts that are well-suited for pan-searing or grilling to ensure tenderness and flavor.
  • Skimping on garnishes: Fresh herbs like parsley brighten the dish and add a visual appeal that elevates the final presentation.
  • Not tasting as you cook: Regularly tasting your dish throughout the cooking process ensures balanced flavors and ingredient adjustments.
  • Forgetting to preheat the pan: Properly preheating the skillet or grill contributes to achieving that perfect sear on the steak.

Essential Techniques

Searing steak is a fundamental technique that creates a flavorful crust while locking in juices. To master this technique, ensure your pan is hot before placing the steak to achieve that beautiful golden brown finish. Common pitfalls include overcrowding the pan, which causes steam instead of searing, so always cook in batches if necessary. Look for that caramelized crust as an indicator of success.

Making a creamy sauce involves combining dairy with seasonings to reach a velvety texture. The key is to slowly add the cream to a base such as butter and garlic, stirring consistently to prevent burning. Ensure you use low to medium heat; high heat can cause the cream to separate. The ultimate goal is a thickened sauce that can coat the pasta nicely.

Pro Tips for Perfect Garlic Butter Steak with Creamy Parmesan Rigatoni

1. Choose a quality cut of steak, such as ribeye or sirloin, for better flavor and tenderness. Look for well-marbled meat for the best results.
2. Make sure to season the steak generously with salt and pepper before cooking to enhance its natural flavors and contribute to developing a crust.
3. Always let the steak rest after cooking to keep it juicy and flavorful. This allows the juices to redistribute within the meat.
4. Don’t skip on fresh herbs for garnish. They add a burst of color and a hint of freshness that ties all the flavors together.
5. Ensure that you cook the pasta al dente, as it will continue to cook slightly when mixed with the sauce, maintaining a perfect texture.
6. Incorporate a splash of pasta water into the sauce when mixing with the rigatoni to help it adhere and create a luscious consistency.
7. Experiment with different pasta shapes if desired, but choose ones that can hold the creamy sauce well.
8. For extra depth, consider adding a pinch of red pepper flakes to the creamy sauce for a bit of heat and complexity.

Variations and Adaptations

When it comes to regional variations, this dish can take on many forms. For instance, using different cuts of steak such as filet mignon for a more upscale version or flank steak for something more budget-friendly can alter the overall experience. You might also incorporate vegetables such as asparagus or spinach into the rigatoni for seasonal adaptations.

To tailor the recipe for dietary needs, consider using gluten-free pasta for a gluten-free version or dairy-free alternatives like cashew cream for the sauce. Flavor variations can be introduced by adding sun-dried tomatoes, mushrooms, or changing the cheese type to feta or goat cheese for a different taste.

For a twist on texture, try adding crispy breadcrumbs on top of the rigatoni before serving, providing a satisfying crunch alongside the creamy pasta. Presenting the dish in individual servings or in a family-style platter can cater to different dining experiences, ensuring every guest feels special.

Serving and Presentation Guide

Plating your Garlic Butter Steak with Creamy Parmesan Rigatoni is essential for presenting a memorable meal. Start by twirling the rigatoni onto a plate, creating a nest shape. Slice the rested steak against the grain and layer it attractively atop the pasta for visual appeal. Garnish with finely chopped fresh parsley and optional freshly grated Parmesan for an elegant touch.

Consider complementing the dish with traditional accompaniments like garlic bread or a fresh side salad drizzled with vinaigrette for contrast. Temperature is essential; serve the steak warm alongside the creamy pasta to ensure that every bite is delightful. For portion control, aim for balanced serving sizes, allowing your guests to experience the dish without overwhelming their plates.

Wine and Beverage Pairing

When pairing wine with Garlic Butter Steak with Creamy Parmesan Rigatoni, consider a full-bodied red like Cabernet Sauvignon or Merlot, which enhances the rich flavors of the steak beautifully. The tannins in these wines complement the meat’s texture while balancing the creaminess of the pasta.

For those who prefer non-alcoholic options, a sparkling water with a splash of lemon can cleanse the palate nicely. Consider serving this dish with a robust black coffee or a creamy espresso after dinner, offering a lovely contrast to the richness of the meal. Ensure that all beverages are served at their ideal temperatures to enhance the overall dining experience.

Storage and Shelf Life

Proper storage is crucial for maintaining the quality of leftovers from Garlic Butter Steak with Creamy Parmesan Rigatoni. Allow the dish to cool before transferring it to airtight containers to prevent moisture loss. Store in the refrigerator for up to 3 days; however, for long-term storage, you can freeze the components separately.

When freezing, slice the steak into pieces and store it in a vacuum-sealed bag to prevent freezer burn. The rigatoni can also be frozen but is best consumed within a month for optimal texture. When reheating, gently warm on the stovetop with a splash of water or cream to restore its creaminess without drying out.

Signs of spoilage include a sour smell, off-taste, or discoloration in your pasta or steak, indicating that it should not be consumed. Reheating leftovers should be done until they reach an internal temperature of 165°F to ensure safety.

Make Ahead Strategies

To streamline the cooking process, consider preparing components of Garlic Butter Steak with Creamy Parmesan Rigatoni ahead of time. You can marinate the steak in garlic, herbs, and butter and store it in the refrigerator for a few hours or overnight to enhance flavor. This preparation allows for a quicker cooking time when you are ready to serve.

Cook the rigatoni al dente earlier and toss it with a light drizzle of olive oil to prevent sticking, refrigerating it until you are ready to incorporate it into the creamy sauce. When it comes to assembling, simply reheat the pasta while cooking the steak for a seamless experience.

You can also prepare the creamy sauce in advance, storing it in an airtight container in the fridge where it can last up to 2 days. This method allows you to quickly combine and serve on demand while keeping the dish fresh and delicious. Just remember to bring the refrigerated ingredients to room temperature before reheating to ensure even heating.

Scaling Instructions

Adjusting the recipe for different serving sizes is straightforward. To halve the recipe, simply cut all ingredients and seasonings in half while retaining cooking times, as the same techniques apply.

For larger gatherings, doubling or tripling the ingredients will maintain the same flavor balance. Be mindful, however, as larger quantities may require longer cooking times and larger equipment. Utilize larger skillets or multiple pans to avoid overcrowding the steak, ensuring proper searing.

When scaling, it’s beneficial to keep an eye on texture and doneness, especially when cooking steak in larger batches, and incorporate more than one thermometer to check doneness. After cooking, store leftovers properly as mentioned to prevent waste.

Nutritional Deep Dive

Garlic Butter Steak with Creamy Parmesan Rigatoni offers a balanced macro breakdown, with a hearty contribution from both protein and carbohydrates. The steak provides a rich source of protein, essential for muscle growth and repair, while the rigatoni serves as an energy source.

Looking at micronutrients, steak is particularly high in iron and vitamin B12, both of which support overall health. Rigatoni contributes well to dietary fiber when made from whole wheat versions, enhancing digestive health. Portion control is crucial; being mindful of serving sizes can aid in maintaining a balanced diet and managing weight.

For those looking to enjoy this dish while monitoring caloric intake, consider using leaner cuts of steak or substituting rigatoni with whole grain pasta to enhance fiber content. The balance of flavors ensures satisfaction without the need for large portions.

Dietary Adaptations

For gluten-free adaptations, substitute traditional rigatoni with gluten-free pasta options that mirror the texture. Brands available in stores or homemade alternatives can accommodate this requirement without losing overall flavor or satisfaction.

To achieve a dairy-free version, use coconut milk or cashew cream instead of heavy cream for the sauce, enriching the dish with a unique flavor while also catering to lactose intolerant individuals. Nutritional yeast can be used as a cheese substitute, offering a similar umami flavor.

Vegan adaptations are easily made by replacing steak with marinated, grilled portobello mushrooms or tempeh, which provide great texture and protein. Utilize plant-based butter and dairy alternatives in the sauce, allowing anyone following a vegan diet to enjoy this comforting dish.

Keto enthusiasts may opt for low-carb pasta options available in stores, such as zucchini noodles or shirataki noodles, significantly reducing carb content while maintaining flavor.

Troubleshooting Guide

When faced with texture issues in your dish, ensure the steak is not overcooked, as this can lead to dry, tough meat. A meat thermometer can assist in achieving the desired doneness.

For problems with flavor balance, consider adjusting seasoning levels incrementally. Avoid adding too much salt at once; tasting regularly can help identify areas needing improvement before significant changes are made.

If ingredients are not cooking properly due to temperature problems, ensure your cooking surfaces are adequately preheated. Low heat will cause cooking times to extend unnecessarily, preventing perfect textures.

Should you encounter issues with ingredient substitutions, always use equivalent measurements or adjust based on knowledge of the substitute being used. For instance, buttermilk can substitute for heavy cream; however, it may require additional thickening agents to achieve a creamy texture.

When timing concerns arise, ensure you prep ingredients beforehand. Proper mise en place can drastically reduce stress while cooking and help keep timing under control.

Recipe Success Stories

Community feedback is often invaluable when it comes to recipe adaptations. Readers have shared their successful variations of Garlic Butter Steak with Creamy Parmesan Rigatoni, such as incorporating seasonal vegetables or choosing different pasta shapes to match available ingredients.

Adaptation stories often highlight the ease of customizing this dish based on personal preferences. One reader opted for a spicy version by adding jalapeños, showcasing the versatility and flair potential in traditional recipes.

Photography tips from the community emphasize lighting, angle, and garnishing as key elements for capturing the dish beautifully. Natural light often highlights the freshness of the ingredients and the inviting nature of creamy pasta dishes.

Encouragement from fellow cooks reinforces the idea that anyone can achieve similar delicious results by following the outlined steps, inspiring new chefs to take on the recipe and positing them for success.

Frequently Asked Questions

Can I use another type of pasta in this recipe?
Yes, feel free to substitute rigatoni with any pasta of your choice, but be sure to adjust cooking times according to the type of pasta you opt for.
What type of steak is best for this recipe?
Ribeye or sirloin are both great options as they are flavorful and tender. Choose cuts with good marbling for the best taste.
Can I make this dish vegetarian?
Absolutely! Consider using grilled portobello mushrooms or tempeh in place of steak, and stick to the creamy sauce recipe as is or with dairy-free alternatives.
How do I prevent the creamy sauce from separating?
Be sure to simmer your sauce over low heat and avoid boiling it. Gradually warming the cream and constantly stirring will help maintain a smooth texture.
Is it possible to make this dish ahead of time?
Yes, you can prepare individual components, such as marinating steak or cooking pasta, ahead of time and assemble the dish when ready.
What wine pairs well with this meal?
A full-bodied red wine like Cabernet Sauvignon or Merlot pairs well, complementing the rich flavors of the steak and creamy pasta.
Can I add vegetables to this dish?
Of course! Sautéed spinach, asparagus, or roasted cherry tomatoes make excellent additions, boosting the dish’s nutritional profile and flavor.
What should I do if my sauce is too thick?
If the sauce becomes too thick, add a splash of reserved pasta water or additional cream while stirring to achieve your desired consistency.
What fresh herbs work best as a garnish?
Fresh parsley is a classic choice, but basil or chives also work beautifully and can enhance the dish’s aromas and flavors.
What is the best way to reheat leftovers?
Gently reheat in a skillet over low heat, adding a splash of cream or broth to restore creaminess while preventing the dish from drying out.

Additional Resources

For those intrigued by this dish, you might enjoy exploring related recipes like Garlic Butter Shrimp Pasta or Creamy Aglio e Olio. Technique guides on sautéing basics or how to grill meat offer helpful insights for achieving perfect results every time.

Ingredient information on high-quality pasta and how to select premium cuts of steak will bolster your culinary skills, ensuring you always choose the best. Lastly, check out seasonal variations for this dish, using vegetables or proteins that align with what’s fresh and available.

Join the Conversation

Engage with us on social media to share your photography of Garlic Butter Steak with Creamy Parmesan Rigatoni. Your recipe variations and feedback enrich our community, leading us to new culinary creations.

Join in recipe reviews and discussions about making this dish, and don’t hesitate to reach out with your tips and favorite pairings. Your participation creates a vibrant cooking community that inspires everyone to try new flavors and ideas.

The Recipe

Garlic Butter Steak with Creamy Parmesan Rigatoni

Serves: 4

Prep Time: 15 mins

Cook Time: 20 mins

Total Time: 35 mins

Kitchen Equipment Needed

  • Skillet or grill pan
  • Large pot for boiling pasta
  • Meat thermometer
  • Cutting board
  • Knife

Ingredients

  • 1.5 lbs ribeye steak
  • 12 oz rigatoni pasta
  • 4 tbsp garlic butter
  • 1 cup heavy cream
  • 1 cup freshly grated Parmesan cheese
  • Salt and pepper to taste
  • Fresh parsley, chopped (for garnish)

Directions

  1. Season steak generously with salt and pepper. Heat a skillet over medium-high heat and add garlic butter.
  2. Once sizzling, add the steak and cook according to desired doneness, about 4-5 minutes per side for medium-rare.
  3. While the steak cooks, boil the rigatoni according to package instructions until al dente. Drain and set aside.
  4. In the same skillet, add the cream and cheese once the steak is done. Stir until combined and creamy.
  5. Toss the rigatoni in the creamy sauce, allowing it to coat evenly.
  6. Slice the steak against the grain and serve atop the rigatoni. Garnish with chopped parsley.

Recipe Notes

  • For the best flavor, use high-quality steak and freshly grated cheese.
  • Substitute rigatoni with any pasta type as desired.
  • Try adding sautéed vegetables for added nutrition.

Delicious Cracked Out Tater Tot Casserole Recipe Easy to Make

Cracked Out Tater Tot Casserole: A Comfort Food Classic

⚖️
Difficulty
Easy

⏲️
Prep Time
15 mins

🕒
Cook Time
30 mins

⏱️
Total Time
45 mins

🍽️
Servings
6

Cracked Out Tater Tot Casserole is a hearty and satisfying dish that blends the wonderful flavors of crispy tater tots with creamy cheese, savory bacon, and delicious ranch seasoning. As soon as this dish comes out from the oven, your kitchen will be filled with the delightful aroma of melt-in-your-mouth cheese and crispy tater tots, inviting everyone to gather around the table. This casserole not only makes for a fantastic weeknight dinner but also has the potential to impress guests at any gathering.

The beauty of this recipe lies both in its simplicity and its comforting flavor profile. Each bite offers a perfect combination of textures, where the crunchy tater tots contrast beautifully with the creamy filling. With such appealing flavors and textures, Cracked Out Tater Tot Casserole quickly becomes a family favorite, perfect for feeding a crowd or enjoying as leftovers during the week.

Quick Recipe Highlights

  • Flavor Profile: This casserole features a rich blend of savory flavors from the bacon and ranch seasoning, balanced with the creamy cheese.
  • Texture: Expect a delightful combination where the crispy tater tots provide contrast against the smooth, gooey filling.
  • Aroma: The dish emits deliciously inviting notes of bacon and melted cheese that will entice anyone within sniffing distance.
  • Visual Appeal: The golden brown tater tots topped with bubbly cheese create a stunning visual presentation.
  • Skill Level Needed: Easy enough for beginner cooks; anyone can master this simple assembly and baking technique.
  • Special Equipment: You’ll only need a baking dish, mixing bowl, and an oven to create this comforting casserole.

Recipe Overview

  • Difficulty Level: This recipe is considered easy because it requires minimal preparation, allowing you to assemble and bake it quickly.
  • Category: Cracked Out Tater Tot Casserole falls under the dinner category, perfect for weekday meals or casual gatherings.
  • Cuisine: Inspired by American comfort food, this dish combines familiar flavors and beloved ingredients for a nostalgic taste experience.
  • Cost: The total cost to prepare this casserole is budget-friendly, making it an ideal choice for family meals.
  • Season: Enjoy this dish year-round; however, it’s particularly comforting in the colder months when hearty meals are most appreciated.
  • Occasion: This casserole is great for family dinners, potlucks, or any occasion where comfort food is welcomed.

Why You’ll Love This Recipe

Cracked Out Tater Tot Casserole stands out for its incredible taste and texture. The crunchy tater tots provide a satisfying contrast to the creamy, cheesy filling while the smoky bacon and zesty ranch seasoning elevate every bite, creating a well-rounded flavor that appeals to both children and adults. The rich, indulgent nature of the dish makes it a hit on any dining table, leaving everyone wanting seconds.

Not only is this casserole delicious, but it is also incredibly convenient. With just a handful of ingredients and minimal prep time, this dish can come together in under an hour. It’s a fantastic solution for busy weeknights or when unexpected guests drop by. You can throw it together quickly, pop it in the oven, and enjoy the time saved with loved ones while it bakes.

In terms of nutritional benefits, this casserole provides a good mix of protein from the bacon and cheese, along with carbohydrates from the tater tots. While it’s comfort food, it can also serve as a complete meal when paired with a light salad or steamed vegetables. The recipe’s flexibility also allows you to sneak in additional veggies to boost the nutritional profile without sacrificing flavor.

Socially, Cracked Out Tater Tot Casserole is perfect for gatherings. Its casual vibe encourages sharing, and its rich flavors create a warm atmosphere among friends and family. Serving this dish can spark conversations about favorite childhood meals, creating a delightful shared experience that enhances any occasion.

Finally, this recipe is cost-effective and easily accessible. Most of the ingredients are staples that you likely already have on hand or can find at any grocery store. This makes it not only an economical choice for those on a budget but also one that doesn’t compromise on flavor or satisfaction.

Historical Background and Cultural Significance

The origin of Cracked Out Tater Tot Casserole is rooted in classic American cuisine, often celebrated for its emphasis on comfort and familiar flavors. Over the years, these ingredients have become staples in many households, particularly in Midwest cooking, where casseroles are a beloved tradition. The melding of hearty potatoes, savory meats, and rich cheeses speaks to the essence of comfort food that many American families cherish.

Culturally, this casserole has become synonymous with potluck dinners and holiday gatherings. The act of sharing a warm, homemade dish among friends and family is an important ritual in many cultures, fostering connections and offering a sense of belonging. The casserole also represents resourcefulness, allowing cooks to use up leftover ingredients creatively while still delivering a satisfying meal.

The evolution of this dish showcases the creative adaptations that have emerged in home kitchens across the country. While the core ingredients remain largely the same, variations abound, with many families adding their twists to the classic recipe—be it changing the protein or introducing new spices and herbs.

Regional variations have also contributed to the charm of this dish. In some areas, it might be common to see the addition of green beans or corn, while in others, chili or taco toppings are popular adaptations. This versatility celebrates local culinary traditions, making Cracked Out Tater Tot Casserole a uniquely American dish that brings people together.

Ingredient Deep Dive

Bacon is a key ingredient that adds both flavor and texture to Cracked Out Tater Tot Casserole. Its rich and savory taste enhances the overall appeal of the dish. Bacon also brings a satisfying crunch that complements the soft textures of the tater tots and cheese. When selecting bacon, opting for high-quality cuts can significantly improve the flavor profile, and storage in an airtight container can prolong freshness.

Tater tots, the star of this casserole, are celebrated for their fun shape and crunchy exterior. Made from grated potatoes, they provide comfort and nostalgia to many people. Nutritionally, tater tots are primarily a source of carbohydrates, making them a filling addition to the meal. When selecting tater tots, look for brands with fewer additives for a more authentic taste, and store them in the freezer for optimal longevity.

Cream cheese adds a luscious creaminess and depth to the casserole, creating a rich, comforting texture that binds the dish together. It is a versatile ingredient that can also be used in desserts and spreads. For nutrition, cream cheese offers fats and protein but should be consumed in moderation. When selecting cream cheese, organic or low-fat versions can provide lighter alternatives, while storing it in the refrigerator can maintain its freshness.

Ranch seasoning is a delightful punch of flavor that elevates every bite of the casserole. This seasoning blend typically combines herbs, garlic, and onion, bringing a zesty twist to the dish. Ranch seasoning is easy to find in stores, but making your own can be a fun way to customize the flavor. Store homemade seasoning in an airtight container to maximize shelf life.

Common Mistakes to Avoid

  • Overcooking the Bacon: Pre-cooking bacon to a crispiness level that leaves it tough can lead to a less enjoyable dish. Aim for slightly undercooked bacon, as it will become crispier while baking.
  • Using Fresh Tater Tots: While fresh potatoes are delicious, using frozen tater tots provides a texture that’s hard to replicate at home. The frying process beforehand gives them the right consistency and taste.
  • Neglecting Seasoning: Skipping the ranch seasoning can result in a bland casserole. This recipe relies significantly on this seasoning; don’t hesitate to use plenty!
  • Loading Too Many Ingredients: While it’s tempting to add extra ingredients, too many can muddy the flavors and throw off the casserole’s original intention. Stick to the recommended amounts for optimal balance.
  • Not Preheating the Oven: Baking the casserole in an unheated oven can lead to uneven cooking and undesired texture. Always preheat for the best results.
  • Overcrowding the Dish: If the baking dish is too small, the casserole may take longer to cook. Use a appropriately sized dish for even baking.
  • Skipping the Let-it-rest Phase: Allowing the casserole to sit for a few minutes post-baking helps the filling set. Skipping this step could make serving difficult.
  • Failing to Cover: Covering the dish with foil when first baking can help prevent over-browning, promoting an all-around soft and creamy texture.
  • Ignoring Leftovers: Don’t forget that this casserole stores well, so making extra for next-day enjoyment is always a good idea. Just be sure to store properly to maintain quality.
  • Not Garnishing: Presentation matters—adding fresh herbs or a sprinkle of cheese on top elevates both the look and flavor of your dish. Don’t skip this simple step!

Essential Techniques

One essential technique for crafting the perfect Cracked Out Tater Tot Casserole is mastering proper layering. It’s crucial to evenly distribute ingredients in the baking dish, allowing every bite to have the same flavor composition. When assembling, start with a layer of tater tots, followed by the cheese and other fillings. This method ensures that the top layer gets a satisfying crunch while the filling remains creamy.

Additionally, it’s important to bake the casserole at the correct temperature. Baking at too low of a temperature may leave the inside undercooked while not achieving that desired golden crisp on top. Use an oven thermometer to verify that the temperature is accurate to maintain baking consistency and achieve perfect results every time.

Pro Tips for Perfect Cracked Out Tater Tot Casserole

First, consider using an assortment of cheeses. Combining sharp cheddar, mozzarella, and cream cheese can enhance flavor complexity and provide a delightful creaminess. This balance not only adds richness but also creates varied textures throughout the dish.

Secondly, experiment with your preferred protein. While bacon is classic, you can switch things up by using cooked ground beef, turkey, or even sausage depending on your taste preferences. These options add different flavors, making the casserole a flexible dish.

Third, don’t hesitate to introduce vegetables. Mixing in cooked broccoli, spinach, or bell peppers can enhance the nutritional value while adding a pop of color. It can round out the dish and provide a welcome contrast to the creaminess.

Fourth, reserve some of the toppings until the casserole is nearly done baking. Adding additional cheese or crushed chips in the last 5-10 minutes promotes a crispy, cheesy crust while keeping the textures distinct.

Fifth, make it ahead. This casserole can be fully assembled, covered, and stored in the refrigerator a day in advance. This tip is perfect for gathering preparations, allowing you to pop it in the oven as guests arrive.

Sixth, allow the casserole to rest after baking. Waiting 5-10 minutes helps to set the filling, improving the overall presentation and ease of serving.

Seventh, save some bacon to sprinkle on top as a garnish before serving. This final touch adds that extra bit of flavor and a beautiful finishing touch.

Lastly, don’t forget to serve along with your favorite sides. A light garden salad or fresh fruit can balance the dish perfectly and make for a well-rounded meal.

Variations and Adaptations

When considering regional variations, you might find that southwestern flair can be introduced with the addition of black beans, corn, and spicy pepper jack cheese to elevate the flavor profile. This adaptation pays homage to the vibrant flavors common in southwest cuisine.

For seasonal adaptations, substituting sweet potatoes for traditional tater tots during fall can give a delightful twist to the dish, presenting a heartier flavor and additional nutrients that align well with autumnal tastes.

Dietary modifications are also easy with this casserole. If you’re looking for a vegetarian option, simply replace the bacon with sautéed mushrooms or a blend of diced bell peppers, maintaining the overall taste while catering to dietary restrictions.

Flavor variations could include adding different spice blends, such as taco seasoning or smoked paprika, to create a dish with a unique personality, perfect for the adventurous palate.

Texture modifications can be intriguing as well. Introducing a crumb topping made of crushed crackers or tortilla chips can provide an exciting crunch that contrasts beautifully with the creamy filling while also providing extra substance.

For presentation alternatives, consider individual servings by baking in ramekins. Not only does this allow for personalized portions, but it can also add a sophisticated touch to dinner parties or holiday meals.

Serving and Presentation Guide

When plating Cracked Out Tater Tot Casserole, consider using a shallow, wide dish to allow the golden-brown topping to shine. A sprinkle of fresh chopped parsley or green onions can add a vibrant color contrast and elevate the dish visually.

For garnishing, adding a dollop of sour cream on top can enhance the flavor profile and provide a cool, creamy counterpart to the warm casserole. This simple addition can greatly enhance the overall presentation.

Traditional accompaniments include light salads or steamed vegetables. These provide a fresh balance against the heavy, cheesy casserole and create a well-rounded meal.

For modern serving suggestions, consider serving it alongside artisan bread or rustic rolls to augment the indulgent experience. Pairing with colorful, seasonal vegetables can make for an inviting presentation that appeals to the eyes.

Temperature considerations should be taken into account; serving the casserole warm maintains the delightful textures of melted cheese and crispy tots. Make sure to allow it to cool slightly for easier serving.

Portion control can also help maintain balance in this rich dish. Using a measuring cup for servings can prevent overindulgence and can help keep the meal fulfilling without being overwhelming.

Wine and Beverage Pairing

A great wine pairing for Cracked Out Tater Tot Casserole is a light-bodied red, such as Pinot Noir. This wine offers enough acidity to balance the richness of the casserole without overpowering its flavors. Alternatively, a crisp white wine like Sauvignon Blanc can complement the creamy elements and refresh the palate.

For non-alcoholic alternatives, consider offering iced tea or sparkling water with a slice of lemon. The effervescence and acidity of these drinks can cleanse the palate and enhance the overall dining experience.

Coffee can also be an unexpected yet delightful pairing—opt for a smooth blend to accompany any post-dinner sweets. If you’re entertaining, consider serving a light dessert to conclude the meal, rounding out the experience with warmth and satisfaction.

Temperature considerations are essential; serve wines slightly chilled to accentuate their refreshing qualities against the rich casserole.

Storage and Shelf Life

For proper storage, keep any leftovers in an airtight container and refrigerate. This dish can last up to 3-4 days in the fridge while maintaining quality. Alternatively, to prolong the lifespan, freezing portions of the casserole is an excellent option; just ensure it is fully cooled before wrapping in plastic and aluminum foil.

Temperature requirements should be observed; when reheating, ensure the casserole reaches an internal temperature of 165°F to ensure safety and quality.

When it comes to container recommendations, glass or BPA-free plastic is preferred for reheating, as they retain heat well while preventing any unwanted flavors from previous meals.

Signs of spoilage include off-smells, discoloration, or separation of the layers. If any of these indicators are present, it’s best to discard the casserole for safety reasons.

Reheating instructions should involve either the microwave or the oven. For the oven, preheat to 350°F and bake for about 20-25 minutes. If using a microwave, heat in short increments while checking regularly to avoid overcooking.

For freezing, make sure to label your containers with the date. The casserole can last in the freezer for up to three months, ensuring a delightful meal is always ready at your fingertips.

Make Ahead Strategies

To maximize efficiency, prepare your Cracked Out Tater Tot Casserole a day ahead of time. Assemble the casserole—layering the ingredients as directed—then cover and refrigerate. This strategy allows the flavors to meld beautifully overnight, enhancing the overall taste.

Storage between steps is crucial; keep the ingredients properly sealed and cool to prevent spoilage. Components like uncooked bacon or pre-chopped vegetables should be stored in separate containers, ensuring optimal freshness until assembly.

Assessing quality impact reveals that while most ingredients hold up well refrigerated, cheese and creamy mixtures should be kept airtight to prevent drying out or developing off-flavors.

Assembly tips suggest that preparing individual components saves time. Cook bacon and chop vegetables ahead of time, storing them separately until you’re ready to assemble the casserole.

Reheating guidelines are simple—just follow the reheating instructions mentioned earlier. If the casserole has been stored properly, it lends itself well to quick reheating, allowing you to serve a delicious meal with minimal effort.

For fresh element additions, consider preparing a fresh salad or serving some seasonal fruits alongside the casserole. This combination can create a refreshing balance that enhances the meal.

Scaling Instructions

If you need to halve the recipe, adjust all ingredients proportionally. This adjustment is straightforward and allows flexibility based on the number of servings you need.

Doubling or tripling the recipe is just as simple, but you may want to use a larger baking dish to accommodate additional ingredients. Keep in mind that baking times may vary slightly; always check for doneness.

Equipment adjustments may be necessary; consider using multiple baking dishes to produce different sizes of portions or even using smaller ramekins for individual servings.

Timing modifications are critical when scaling up; larger batches may take longer to cook. Monitor the internal temperature to ensure even cooking, adjusting as needed.

Finally, remember that storage considerations change as well. Larger quantities may require different containers or methods to store leftovers safely. Vacuum-sealing can be a great option for maintaining quality if freezing in bulk.

Nutritional Deep Dive

Starting with a macro breakdown, each serving of Cracked Out Tater Tot Casserole typically provides a balance of carbohydrates, proteins, and fats. The dish is rich in energy, making it satisfying and fulfilling, ideal for family meals and gatherings.

During micronutrient analysis, you’ll find that this casserole contains essential vitamins and minerals, particularly from cheese and potatoes. However, keep an eye on sodium levels due to the inclusion of bacon and ranch seasoning.

The health benefits of this dish lie in its provision of comfort and familiarity, making it an excellent vehicle for social gatherings; food often serves as a medium for connection among family and friends.

Dietary considerations should be given to individual needs; while this dish is delicious, be conscious of portion sizes due to the richness. Balance indulgent meals with lighter options on other days to maintain overall health.

Portion analysis is key; it’s easy to overindulge with casseroles, so measuring servings can help prevent excessive intake. Enjoy this dish, but be mindful of your servings alongside other nutritious foods.

Weight management tips include pairing moderate portions of this casserole with fresh salads or steamed vegetables, enhancing the meal’s nutritional profile while providing satisfying portions without compromising on flavor.

Dietary Adaptations

For gluten-free options, ensure you select gluten-free tater tots and check the ranch seasoning brand for gluten-free labeling. This way, everyone can enjoy this tasty casserole without worry.

If you’re looking for a dairy-free version, replace cheese with vegan cheese alternatives, and use non-dairy milk in the cream mixture. These substitutions can maintain the casserole’s creamy texture and flavor while accommodating dietary restrictions.

Vegans can recreate the dish by substituting the bacon with marinated and seasoned mushrooms or tempeh, offering earthy flavors that supplement the other ingredients beautifully.

For those following low-carb diets, swap out the tater tots for cauliflower tots or shredded zucchini; these alternatives provide the same satisfying texture with fewer carbs.

Keto enthusiasts can also benefit by using keto-friendly ingredients; utilize cheese crisps in place of tater tots for a low-carb yet delicious distribution across the casserole.

Paleo dieters can substitute traditional dairy cheeses with cashew-based cheeses, while replacing crusty tater tots with sprouted grain foods or root vegetables to comply with paleo standards.

Lastly, exploring low-FODMAP variations can be done by eliminating garlic and using low-FODMAP vegetables, making this casserole accessible for those with dietary sensitivities.

Troubleshooting Guide

Texture issues can arise if the casserole is over or undercooked. If it’s too watery, ensure that the filling is fully set by increasing the baking time slightly. On the other hand, if it’s too dry, consider adding a splash of chicken or vegetable broth while reheating to achieve the right consistency.

Flavor balance can become skewed if using a different ranch seasoning or too little. To mitigate this, taste-test your filling before assembling the dish and adjust the seasoning to your liking. Remember, flavors can be enhanced with other condiments or spices if needed as well.

Temperature problems can occur if the oven temperature is incorrect. Invest in an oven thermometer to ensure the accuracy of baking temperatures as even slight discrepancies can affect the cooking outcome.

Equipment challenges include using the wrong baking dish size, leading to uneven cooking. Be sure to select an adequately sized dish for even results; when in doubt, use parchment paper to line the bottom for easier removal.

Ingredient substitutions can alter the expected outcome. If you swap ingredients, be aware that additional cooking time or adjustments to liquid measurements may be necessary to achieve the desired texture and flavor.

Timing concerns can leave you with undercooked or overcooked components. Always refer to recommended cooking times but remain flexible based on your specific oven’s performance, adjusting shorter increments if needed.

Recipe Success Stories

The community feedback surrounding Cracked Out Tater Tot Casserole resonates with positive experiences from families and individuals. Shared on social media, many have praised its satisfying flavors and delightful textures, reporting successful gatherings post-meal.

Variation successes have emerged with numerous adaptations, showcasing personal touches including the addition of favorite ingredients, proving that this dish is as versatile as it is beloved.

Readers have shared adaptation stories that highlight the adaptability of the recipe; whether it’s adjusting for dietary needs or creating unique flavors, the core recipe remains while still allowing room for individual creativity.

Photography tips often focus on capturing the casserole’s golden charm; strategic lighting and overhead shots showcase its crunchy top layer best, drawing more engagement and interest in the dish.

Offering readers a chance to contribute to the recipe’s legacy fosters community engagement, creating a sense of camaraderie and shared love for delicious comfort food. Those commenting on their experiences highlight the unifying power of food in everyday lives.

Frequently Asked Questions

Can I make this casserole in advance?
You can prepare Cracked Out Tater Tot Casserole the day before. Simply assemble the entire dish and store it covered in the refrigerator. Bake it when you’re ready to enjoy it, allowing for fantastic flavor development.
Can I freeze leftovers?
Yes, you can freeze leftovers! Make sure to use an airtight container and consume them within 3 months to ensure optimal taste and quality.
What can I substitute for bacon?
If you’re looking for a bacon substitute, try diced ham, turkey bacon, or sautéed mushrooms for a similar texture and flavor foundation in the casserole.
Is there a vegetarian version?
Absolutely! You can easily make it vegetarian by omitting the bacon and adding extra vegetables, such as bell peppers or zucchini, to create a fulfilling dish.
How do I reheat the casserole?
To reheat, place the casserole in a preheated oven at 350°F for about 20 minutes or until heated through. You can also microwave it in increments, checking frequently to avoid overcooking.
Can I use sweet potatoes instead of tater tots?
Yes, using sweet potato tots can be a delicious alternative, providing a slightly sweeter flavor and boosting the nutritional value of the dish.
Is this dish gluten-free?
To make this casserole gluten-free, ensure your tater tots and ranch seasoning are certified gluten-free. This modification allows everyone to savor the dish worry-free.
How long will leftovers last in the fridge?
Cooked Cracked Out Tater Tot Casserole typically lasts for 3-4 days when stored in an airtight container in the refrigerator.
Can I use different cheeses?
Certainly! Feel free to mix different cheeses based on your preferences. Popular combinations include sharp cheddar, pepper jack, or even mozzarella.
What should I serve with this casserole?
Pair it with a simple garden salad, steamed vegetables, or fresh fruits for a balanced meal that complements the richness of the casserole nicely.

Additional Resources

If you’re looking for related recipes, check out our other comforting casseroles like Beef and Cheese Lasagna or Creamy Chicken and Rice Casserole. These meals channel the same satisfying flavors perfect for family dinners or entertaining.

Explore technique guides that focus on mastering layered casseroles, or read expert articles on meal prepping for busy weeknights. These resources can provide additional insights and further encourage your culinary journey.

Ingredient information can educate you about selecting the best products for this dish. Learn what to look for when purchasing fresh vegetables or how to choose high-quality dairy for optimal flavor.

For equipment recommendations, consider investing in versatile baking dishes or kitchen gadgets that make preparing and serving casseroles easier, enhancing your cooking experience.

Lastly, get creative with exploring seasonal variations. As summer approaches, try incorporating seasonal veggies into the dish or tap into fall flavors with roasted squash for a memorable twist on this crowd-pleaser.

Join the Conversation

We’d love for you to share your experience with Cracked Out Tater Tot Casserole on social media! Tag us in your photos—don’t forget to use our designated hashtag for a chance to be featured on our page.

Photography tips can help you capture the delectable aspects of this casserole, ensuring you highlight the golden tater tots and bubbling cheese—a sure way to entice your followers.

Leave a review in the comments below! Your feedback not only supports our community but inspires others to try this delicious recipe. We appreciate your insights, ideas, and adaptations that make this dish even better.

Lastly, join us in engaging with other readers. Share your unique variations or twists on the recipe; your creativity can spark inspiration within the community, bridging culinary gaps and fostering connections through food.

The Recipe

Cracked Out Tater Tot Casserole

Serves: 6

Prep Time: 15 mins

Cook Time: 30 mins

Total Time: 45 mins

Kitchen Equipment Needed

  • 9×13 inch baking dish
  • Mixing bowl
  • Wooden spoon or spatula
  • Measuring cups and spoons

Ingredients

  • 1 (32 oz) bag frozen tater tots
  • 8 oz cream cheese, softened
  • 1 cup shredded cheddar cheese
  • 1 cup cooked bacon, crumbled
  • 1 packet ranch seasoning mix
  • 1/2 cup sour cream
  • 1/2 cup milk
  • Salt and pepper to taste

Directions

  1. Preheat your oven to 375°F (190°C).
  2. In a mixing bowl, combine the cream cheese, sour cream, milk, and ranch seasoning. Mix until smooth.
  3. In the prepared baking dish, spread half of the frozen tater tots in an even layer.
  4. Spread the cream cheese mixture evenly over the tater tots.
  5. Sprinkle with crumbled bacon and cheddar cheese.
  6. Top with the remaining tater tots and season with salt and pepper as desired.
  7. Bake for 30 minutes or until the top is golden and bubbly.

Recipe Notes

  • Feel free to adjust the cheese varieties to suit your tastes.
  • This casserole can be made ahead of time; just refrigerate before baking.
  • Consider adding vegetables for an extra nutritional boost!
  • Store leftovers in an airtight container for up to 4 days in the refrigerator.

Best Million Dollar Dip Recipe with Crispy Bacon

Million Dollar Dip: The Ultimate Party Appetizer

⚖️
Difficulty
Easy

⏲️
Prep Time
10 mins

🕒
Cook Time
0 mins

⏱️
Total Time
10 mins

🍽️
Servings
8-10 servings

Million Dollar Dip is the perfect blend of creamy, savory, and crunchy flavors that will elevate any gathering into a memorable event. This easy-to-make dip is ideal for parties, game days, or simply enjoying with friends and family during a cozy night in. With its rich ingredients like sour cream, cream cheese, and a medley of seasonings and toppings, it brings an explosion of flavor in every bite, leaving your guests eagerly reaching for more.

This dip is not just delicious; it’s a feast for the senses. The striking combination of textures—from the creamy base to the crunchy toppings—makes it visually appealing and exciting to eat. It pairs fabulously with a variety of dippers, from crispy crackers to vegetables, making it versatile enough to suit any palate. Each scoop is a new adventure, ensuring that it’s a hit at any social gathering.

Quick Recipe Highlights

  • Flavor Profile: A creamy, tangy base balanced with savory herbs and a hint of spice.
  • Texture: A delightful contrast between creamy and crunchy elements that keeps each bite interesting.
  • Aroma: Uplifting and inviting, with hints of onion, garlic, and smoky seasonings.
  • Visual Appeal: A beautiful array of colors from fresh green onions and spices against a creamy backdrop.
  • Skill Level Needed: Perfect for beginners; anyone can master this simple recipe.
  • Special Equipment: Requires only a mixing bowl and a spatula for easy preparation.

Recipe Overview

  • Difficulty Level: This Million Dollar Dip is incredibly easy to make, requiring no advanced cooking techniques, making it accessible for cooks of all skill levels.
  • Category: An ideal appetizer or snack for parties, potlucks, and casual gatherings.
  • Cuisine: This recipe draws from classic American flavors, perfect for various occasions across the country.
  • Cost: Affordable and budget-friendly; most ingredients are pantry staples or easily obtainable.
  • Season: Enjoyable year-round, but particularly popular during holidays and summer gatherings.
  • Occasion: Great for parties, movie nights, or as an engaging snack at family gatherings.

Why You’ll Love This Recipe

Million Dollar Dip is packed with delicious flavors that cater to everyone’s taste. Its creamy texture combined with the crunchiness of garnishes creates a mouthfeel that is both satisfying and enjoyable, making it perfect for parties. This dip is incredibly convenient to prepare, taking just ten minutes to whip up, allowing you to spend more time with your guests rather than in the kitchen.

In addition to its convenience, this dip also provides a good balance of nutrients thanks to the included ingredients like green onions and cream cheese. This makes it not just a treat but a somewhat indulgent snack that doesn’t stray too far from healthy eating when enjoyed in moderation.

When it comes to social occasions, Million Dollar Dip shines. It invites social interaction, as guests can gather around and enjoy dunking their favorite dippers. It acts as a conversation starter, often leading to compliments and requests for the recipe, solidifying its status as a crowd-pleaser.

Due to its simple and accessible ingredients, this dip is budget-friendly, ensuring that you don’t have to break the bank to impress your guests. Whether preparing for a large crowd or a small gathering, this recipe allows for scalability without sacrificing flavor.

Finally, the recipe’s versatility means you can adjust it to cater to dietary preferences, making it a go-to for anyone looking to host. Whether you’re entertaining omnivores or vegetarians, Million Dollar Dip can easily be adapted to suit various needs without losing its distinctiveness.

Historical Background and Cultural Significance

The origins of Million Dollar Dip are somewhat obscure, but it is often associated with upscale gatherings in American cuisine, likely stemming from the rich combination of cream cheese, sour cream, and flavorful seasonings. This dip gained popularity as a fixture at parties and gatherings, appealing to those looking for easy yet delicious recipes to serve guests.

Culturally, dip recipes have always played a significant role in American entertaining. From the road trips to picnics, dips have evolved into most gatherings’ staple due to their shareable nature. Million Dollar Dip stands out as it has a reputation for being a crowd favorite, often found at potlucks and cookouts, encapsulating the essence of comfort food and community sharing.

Over the years, variations of the recipe have emerged, with different regions adapting their local ingredients and preferences into the mix. The adaptability of Million Dollar Dip allows for a myriad of interpretations, each adding to its cultural fabric.

Regional variations see this recipe enhanced with local spices or ingredients, such as adding jalapeños for heat or bacon bits for a smoky touch. Such adaptations enrich its culinary significance, making it a cherished dish across diverse American households.

Ingredient Deep Dive

Sour Cream: Sour cream adds a creamy texture to the dip, enhancing its flavor profile with its tangy essence. This ingredient is a staple in many American recipes and is rich in probiotics, beneficial for gut health. When selecting sour cream, opt for a full-fat variety for the best taste and texture, and store it in the refrigerator, keeping an eye out for expiration dates.

Cream Cheese: This rich ingredient provides the foundational creaminess of Million Dollar Dip. Historically used in various American desserts and snacks, cream cheese is easy to spread and blend, making it ideal for dips. When choosing cream cheese, go for regular or low-fat options based on your dietary preferences. Store it tightly sealed in the fridge and be mindful of its shelf life, as it can spoil quickly.

Green Onions: Green onions bring a refreshing crunch and mild onion flavor to the dip. They are commonly found in various culinary traditions, known for boosting flavor without overwhelming other ingredients. Choose fresh green onions with vibrant green tops, and store them in the refrigerator, wrapped in a damp paper towel. They can easily be substituted with chives for a similar flavor.

Shredded Cheese: Adding shredded cheese not only enhances the dip’s richness but also contributes another layer of flavor. Cheese has been a versatile ingredient across many cuisines and adds a savory component to this dip. Opt for a blend of your favorite cheeses, and ensure they are fresh for the best melt. Store shredded cheese in the refrigerator, and be aware of its use-by dates for optimal quality.

Common Mistakes to Avoid

  • Overmixing the Ingredients: Mixing too vigorously can make the dip too runny; gently fold in the ingredients instead.
  • Using Low-Quality Ingredients: The flavor relies heavily on ingredient quality, so always opt for the best available.
  • Skipping Chilling Time: Allowing the dip to chill for at least an hour before serving enhances the flavors significantly.
  • Not Tasting Before Serving: Always sample the dip before serving to ensure it has the right balance of flavors.
  • Neglecting Dipper Options: Provide a variety of dippers for guests to enhance their experience.
  • Storing Improperly: Make sure to store leftovers in an airtight container to prevent spoilage.
  • Ignoring Dietary Preferences: Consider guests’ dietary needs by offering a few variations of the dip.
  • Using Outdated Spices: Fresh spices make a noticeable difference—always check dates for optimal flavor.

Essential Techniques

Mixing: Mixing is crucial to achieving the right consistency and flavor balance. Gently folding in the ingredients helps incorporate everything without overworking the dip. Common pitfalls include vigorous mixing, leading to a runny texture; avoid this by using a spatula for a gentle fold.

Chilling: Chilling allows the flavors to meld beautifully and enhances the overall taste. Aim for at least one hour in the refrigerator. A common mistake is serving immediately without chilling, which can result in a flat taste. Look for visual cues, such as the dip firming up slightly after chilling.

Pro Tips for Perfect Million Dollar Dip

1. For extra flavor, use room temperature cream cheese to create a smoother texture when mixing.
2. Add a splash of Worcestershire sauce for depth; it elevates the savory notes.
3. Incorporate fresh herbs like parsley or cilantro to enhance flavor and presentation.
4. Experiment with different cheeses for unique flavor variations, such as pepper jack for a kick.
5. For a lighter version, substitute Greek yogurt for half the sour cream without sacrificing taste.
6. Serve with a colorful assortment of vegetables and chips to entice guests visually and attractively.
7. Make a mini batch for a smaller gathering by halving the ingredients, ensuring you’re not left with leftovers.
8. Pair with homemade pita chips for a gourmet touch that complements the dip perfectly.

Variations and Adaptations

The regional variations of Million Dollar Dip can intensify its appeal. In some Southern states, adding jalapeños introduces a delightful heat, while in the Midwest, crumbled bacon enhances the savory aspect. Depending on the season, fresh herbs or spices can be introduced to provide a unique twist.

During winter holiday seasons, incorporating seasonal ingredients like cranberries or pecans can elevate the dip’s flavors, making it festive and colorful. For certain dietary modifications, consider creating a vegan version by substituting all dairy ingredients with plant-based alternatives such as cashew cream and dairy-free cheese.

Textures can also be modified by adding nuts or seeds, providing an interesting crunch that contrasts with the creamy base. Guests will appreciate finding an unexpected texture in each bite.

Serving and Presentation Guide

Plating Million Dollar Dip beautifully can enhance its appeal. Using a large, shallow dish allows the dip to spread out, making it easy for guests to serve themselves. Garnishing with additional green onions, herbs, or even edible flowers can add a refreshing visual pop.

Traditional accompaniments include crispy tortilla chips or crackers, but consider adding innovative options such as sliced vegetables or assorted breads for varied textures.

Keep the dip cool until served, and if it’s going to be out for a while, consider placing it over a bowl of ice to maintain the ideal temperature and freshness. Portion control is crucial, especially at larger gatherings; offer smaller amounts at a time to reduce waste and ensure freshness.

Wine and Beverage Pairing

When it comes to wine pairing, a light, crisp white such as Sauvignon Blanc complements the creamy and savory flavors of Million Dollar Dip. The refreshing acidity contrasts nicely with the richness of the dip.

For those looking for non-alcoholic alternatives, sparkling water or a citrus-infused lemonade makes a refreshing accompaniment, balancing the dip’s richness. If coffee or tea is preferred, a smooth iced tea can also be a lovely counterpoint.

Serve drinks chilled, particularly white wines and non-alcoholic options, to heighten the enjoyment of the creamy dip and ensure that flavors remain pleasant.

Storage and Shelf Life

Proper storage of Million Dollar Dip is essential to maintain freshness and prevent spoilage. Transfer any unused dip into an airtight container, ensuring it is sealed tightly to keep out contaminants. Store in the refrigerator where it can last up to three days.

Buying fresh ingredients, particularly dairy ones, is key to achieving optimal shelf life. Signs of spoilage include an off smell or changes in texture. For longer-term storage, consider freezing the dip but keep in mind that the texture may change upon thawing.

When reheating, avoid microwave heating as it may alter the dip’s consistency. Instead, opt to let it sit out for a bit until room temperature is reached before serving again.

Make Ahead Strategies

Planning ahead when making Million Dollar Dip can save time on busy days. Prepare the dip at least a few hours in advance, allowing the flavors to develop through chilling. It can be made a day before serving, giving you an advantage in flavor depth.

Consider storing all dry ingredients separately if you’re unsure about your guests’ preferences; mixing them in on the day of serving retains freshness. Keeping garnishes aside until serving time also aids in maintaining visual appeal without becoming soggy.

If reheating is necessary, ensure you do so cautiously to prevent overcooking. Fresh elements like herbs can be added right before serving to elevate brightness without compromising on taste.

Scaling Instructions

For smaller gatherings, halving the recipe is easy; simply divide each ingredient measurement by two to suit your needs without any compromise on flavor.

If you’re expecting a larger crowd, doubling or tripling the recipe can be done seamlessly—just ensure you have enough mixing space. However, note that the chill time may increase, requiring patients to let those flavors meld together.

Equipment adjustments may include using a larger mixing bowl or two. Keep timing modifications in mind, as larger batches require more space to cool in the refrigerator effectively.

Nutritional Deep Dive

A breakdown of the macros reveals that Million Dollar Dip can offer a balance of carbohydrates, protein, and fats. On average, per serving, it provides approximately 120 calories, with 8 grams of fats coming primarily from creams and cheeses.

Micro-nutrient-wise, green onions contribute vitamins A and K and some vitamin C, enhancing the dip’s health profile. Moderate indulgence allows enjoyment without straying too far from healthy living.

For portion analysis, serving about two tablespoons per person—as a part of a varied spread—ensures that the dip can fit seamlessly into a balanced diet while preventing overconsumption.

Weight management considerations highlight the importance of moderation. Despite its delicious components, a mindful approach to serving sizes is crucial for healthier lifestyle choices.

Dietary Adaptations

Creating a gluten-free version of Million Dollar Dip is simple; ensure all added ingredients, like sauces, are certified gluten-free. Using gluten-free crackers and chips for dipping always provides a great alternative for those with gluten sensitivities.

For a dairy-free rendition, vegan cream cheese and dairy-free sour cream work excellently as substitutes, resulting in a delicious mix while accommodating lactose intolerance.

Incorporating vegan shredded cheese can elevate the textures expected from the original dish while still adhering adaptively to dietary restrictions. Explore plant-based options to keep it inclusive, allowing guests to partake fully.

Other specific diets, including low-carb and keto versions, can adopt alternatives like cauliflower or celery sticks for dipping, steering clear of traditional carbohydrates without sacrificing flavor and fun.

Troubleshooting Guide

If the dip turns out too runny, an excellent fix is to incorporate additional cream cheese or even a bit of finely chopped vegetables for texture. Adjusting by allowing a short chill time may also aid in firming up.

Should you find the dip lacking in flavor, a touch of salt, pepper, or your favorite seasoning blend could enhance the taste without overwhelming the base ingredients.

When faced with temperature issues, consider allowing the dip to sit for a few minutes at room temperature before serving; this generally improves texture and flavor integration.

If using alternate ingredients leads to unexpected alterations, adjusting other flavors can restore balance. For instance, if using a substitute cheese reduces richness, consider a pinch of garlic powder for added depth.

Timing concerns often arise when unexpected guests arrive; preparing the dip as close to serving as possible helps maintain freshness and texture, alleviating any potential hiccups in your plans.

Recipe Success Stories

Community feedback on Million Dollar Dip has been overwhelmingly positive, with many sharing their delightful modifications over time. Adapting the recipe to include local ingredients has been a common success, showcasing how versatile this crowd pleaser can be.

Readers often share their experiences of hosting parties where this dip was the star of the snack table, leading to requests for the recipe from multiple guests. Sharing variations like spicy versions with jalapeños or sweet versions with pineapple have enriched the stories, fostering a sense of community.

Photography shares surrounding this dip often highlight its colorful presentation, drawing others into wanting to recreate the magic. Detailed captures of the dip surrounded by assorted dippers encourage creative experimentation amongst home chefs.

Frequently Asked Questions

Can I make Million Dollar Dip ahead of time?

Absolutely! You can prepare it a day prior and let it chill in the fridge to enhance the flavors. Just remember to keep it tightly sealed to maintain freshness.

How long does Million Dollar Dip last?

The dip can be stored in the refrigerator for up to three days. Ensure it is kept in an airtight container to maximize its shelf life and prevent spoilage.

Can I freeze Million Dollar Dip?

It is not recommended to freeze Million Dollar Dip as the texture will change once thawed. It’s best enjoyed fresh, ensuring optimal quality and taste.

What can I serve with Million Dollar Dip?

Fresh vegetables, tortilla chips, crackers, or pita chips pair beautifully with this dip. Consider offering a variety of dipping options to suit all preferences.

Can I modify the spice level?

Definitely! You can add jalapeños for heat or dive into spice blends to adjust the kick according to your taste. Experimenting with flavors is encouraged!

Is there a vegan option for this dip?

Yes! You can substitute dairy ingredients with plant-based alternatives such as vegan cream cheese and yogurt to create a delicious vegan version of this dip.

What makes this dip “Million Dollar”?

The combination of rich, creamy ingredients, paired with flavorful seasonings, creates a taste experience that feels indulgent—hence the name “Million Dollar Dip!”

What is the best way to store leftovers?

Store leftovers in an airtight container in the refrigerator. It will keep well for up to three days when properly sealed to maintain freshness.

Can I use lite cream cheese for a healthier option?

Yes, you can use lite cream cheese to reduce the overall calories and fat in the dip without significantly altering the taste. Just remember to adjust other ingredients if necessary!

What is a good substitute for sour cream?

Greek yogurt is a wonderful alternative to sour cream, providing a similar flavor and texture while offering added protein benefits!

Additional Resources

For those wanting to explore more, consider checking out related recipes that incorporate dips or creamy appetizers. Technique guides can provide insights into improving your dish-making skills further.

Ingredient information will help you become more familiar with the benefits and uses of staples, while equipment recommendations ensure you have the right tools for crafting delicious appetizers.

Explore seasonal variations as well; you might discover new favorites based on fresh, local ingredients available throughout the year.

Join the Conversation

We’d love to see your creations and variations of Million Dollar Dip! Share your photos and experiences on social media, and engage with others looking to try this crowd-pleasing appetizer.

Whether you’ve added your unique spin or kept it classic, community engagement through reviews and suggestions is instrumental in making this recipe even more adored.

Try out different dippers or serve it styled uniquely; your ideas may inspire others to elevate their next gathering.

The Recipe

Million Dollar Dip

Serves: 8-10

Prep Time: 10 mins

Cook Time: 0 mins

Total Time: 10 mins

Kitchen Equipment Needed

  • Mixing bowl
  • Spatula
  • Measuring cups and spoons

Ingredients

  • 1 cup sour cream
  • 1 cup cream cheese, softened
  • 1 cup shredded cheese (cheddar or a blend)
  • 1/2 cup green onions, chopped
  • 1 tsp garlic powder
  • 1 tsp onion powder
  • Salt and pepper to taste

Directions

  1. In a large mixing bowl, combine softened cream cheese and sour cream until smooth and creamy.
  2. Add shredded cheese, green onions, garlic powder, onion powder, salt, and pepper, and mix until well combined.
  3. Transfer the mixture to a serving dish and refrigerate for at least one hour to allow flavors to meld.
  4. When ready to serve, garnis with additional green onions or herbs if desired.
  5. Serve with your choice of crackers, chips, or vegetable dippers.

Recipe Notes

  • Feel free to customize the dip by adding ingredients like crumbled bacon or diced jalapeños for extra flavor.
  • For a lighter version, substitute some sour cream with Greek yogurt.
  • The dip can be prepared a day in advance; just store it in an airtight container.

Easy Cheesy Chicken Crescent Rolls for Delicious Weeknight Dinners

Cheesy Chicken Crescent Rolls: A Delicious Twist on a Classic Favorite

⚖️
Difficulty
Easy

⏲️
Prep Time
15 mins

🕒
Cook Time
20 mins

⏱️
Total Time
35 mins

🍽️
Servings
8 servings

Cheesy Chicken Crescent Rolls are a fantastic blend of savory flavors and gooey richness that promise to elevate any meal or snack time. This delightful recipe features tender chicken, melted cheese, and buttery crescent rolls, all wrapped up in a golden-brown package that beckons you to take a bite. Whether you’re looking for an easy dinner idea or a crowd-pleasing appetizer, these cheesy morsels pack a punch in both flavor and satisfaction.

As you bite into these crescent rolls, you’ll experience the burst of cheesy goodness combined with the succulent taste of chicken that dances on your palate. The crispy exterior provides a satisfying crunch, while the warm, cheesy filling keeps you coming back for more. Perfect for serving at parties or as a quick family dinner, these cheesy chicken crescent rolls are sure to become a staple in your recipe collection!

Quick Recipe Highlights

  • Flavor Profile: A perfect blend of creaminess from cheese and savory chicken with a hint of seasonings for a delicious taste sensation.
  • Texture: Crispy and flaky on the outside, with a warm and gooey interior that melts in your mouth.
  • Aroma: Inviting and comforting with the rich scent of melting cheese enhanced by seasonings that fill your kitchen.
  • Visual Appeal: Golden-brown rolls that look delectable, with visible cheese oozing from their edges, enticing everyone around.
  • Skill Level Needed: A simple dish ideal for novice cooks, requiring just a few steps and minimal kitchen experience.
  • Special Equipment: Just a baking sheet and parchment paper are needed to create this delicious dish.

Recipe Overview

  • Difficulty Level: This recipe is rated as easy, making it the perfect dish for beginner cooks or those short on time yet eager to enjoy a tasty meal.
  • Category: These cheesy chicken rolls fall into the savory snack/appetizer category, but they can also be served as a main course.
  • Cuisine: Drawing inspiration from American comfort food, this recipe combines classic chicken and cheese flavors with a fun twist.
  • Cost: Inexpensive to prepare, the main ingredients consist of chicken, cheese, and crescent roll dough, making it budget-friendly.
  • Season: Ideal for all seasons, these rolls are a comforting option in colder months and a fun finger food for summer gatherings.
  • Occasion: Perfect for family dinners, parties, game nights, or impromptu gatherings, these rolls are always a hit.

Why You’ll Love This Recipe

These Cheesy Chicken Crescent Rolls are not just tasty; they bring delightful flavors and textures that will impress anyone who tries them. Each bite delivers a perfect mix of savory chicken and melty cheese, all encased in a flaky and buttery crescent roll. The appeal of this dish lies in its comforting taste, making it suitable for both adults and children alike. Additionally, these rolls are great for satisfying cravings while providing a delightful culinary experience.

Moreover, the convenience of preparing this dish cannot be overlooked. With a quick prep time of just 15 minutes and a cook time of 20 minutes, you can have this delicious offering on your table in under 40 minutes. Perfect for busy weeknights or unexpected guests, this recipe allows you to whip up a mouthwatering meal without spending hours in the kitchen.

From a nutritional perspective, incorporating chicken provides a good source of protein that pairs beautifully with the creamy cheese, helping to keep you feeling full and satisfied. Moreover, this recipe is balanced enough to be enjoyed as a light meal or combined with salads and sides for a more filling option. It can easily be modified to include veggies or different seasonings to tailor it to your family’s preferences.

Socially, Cheesy Chicken Crescent Rolls are excellent for entertaining. They’re easy to serve and perfect for sharing during gatherings, making them an ultimate crowd-pleaser. Friends and family will love indulging in these warm, cheesy bites, creating a fun and relaxed dining atmosphere. Particularly for game nights or casual dinners, they’re guaranteed to be a hit!

Cost-effectiveness is another advantage of this recipe. The ingredients are widely available and reasonably priced, making it an accessible option for anyone looking to enjoy a meal without breaking the bank. Plus, with simple ingredients and minimal cooking methods, you can add this recipe to your weekly menu without worry, making life a little easier without sacrificing flavor.

Historical Background and Cultural Significance

The origin of the crescent roll can be traced back to Austria, where its creation began in the 13th century. However, in the United States, it gained immense popularity with the introduction of refrigerated dough, which allowed home cooks easier access to make this delightful pastry. Over the years, the crescent roll has transformed from an ethnic delicacy into an American staple, featured in countless recipes that showcase its versatility.

In American culture, crescent rolls have become synonymous with potlucks and family gatherings. Their adaptability allows for infinite variations, making them a favorite among both home cooks and professional chefs. Cheesy Chicken Crescent Rolls embrace this heritage while incorporating popular fillings to create a comforting dish that resonates with many.

The evolution of this recipe is quite compelling. Initially filled with sweet or basic savory options, the popularity of savory fillings like chicken and cheese has taken the spotlight. This transformation highlights the desire for convenient meals that do not compromise flavor or satisfaction, showcasing the contemporary palate’s preferences.

Across regions, variations abound, showcasing the adaptability of the crescent roll. Ingredients may vary based on local culture, preferences, and seasonal availability. Whether filled with vegetables, meats, or a combination of both, the crescent roll will remain a versatile option embraced by many.

Ingredient Deep Dive

Chicken: Chicken is known for its nutritional benefits, including high protein content and versatility in dishes. When selecting chicken for this recipe, opt for boneless, skinless options for convenience. Proper storage involves refrigeration for a few days or freezing for up to six months. If you’re looking to substitute, consider turkey or plant-based alternatives like chickpeas for a delicious modification.

Crescent Roll Dough: Crescent roll dough is conveniently packed in tubes, offering ease of use and quick preparation. A common pantry item, crescent rolls can also be found as gluten-free options now. Store in the fridge until ready to use, and you can even freeze for later. For substitutions, feel free to switch to puff pastry or biscuit dough to create diverse textures.

Cheese: Cheese adds a richness to dishes and varies widely in types and flavors. In this recipe, cheddar is favored for its sharp flavor, but others like mozzarella or pepper jack can be delicious alternatives. Always opt for quality cheese to enhance the taste, and consider fresh or block cheese over pre-shredded for flavor. Store cheese in an airtight container, and it can usually be kept for a few weeks in the fridge.

Common Mistakes to Avoid

  • Overfilling the dough: Placing too much filling can cause the crescent rolls to burst open during baking. Always stick to the recommended quantity.
  • Not sealing properly: Be sure to pinch the edges of the crescent roll tightly to prevent the filling from leaking out while baking.
  • Using cold dough: If your dough is too cold, it won’t roll out smoothly. Allow it to sit at room temperature for a few minutes to soften slightly.
  • Skipping egg wash: An egg wash enhances the color and shine of the rolls, giving them a beautiful golden appearance. Don’t skip this step for a professional look.
  • Underestimating bake time: Each oven is different; ensure to keep an eye on the rolls and adjust the baking time as necessary for golden perfection.
  • Neglecting seasoning: Flavor can drastically change with the addition of herbs and spices, so don’t overlook seasoning the filling for a delightful taste.
  • Ignoring resting time: Allow the rolls to cool slightly before serving to enhance flavors and prevent burns.
  • Improper storage: Storing leftover rolls improperly can lead to sogginess. Use airtight containers, and if you plan to freeze, use parchment for freezing between layers.

Essential Techniques

Rolling the dough: Properly rolling out the dough ensures even cooking and an attractive presentation. Use a clean, floured surface to minimize sticking and achieve a consistent thickness. A rolling pin can help, but make sure to maintain the dough’s shape—over-rolling can lead to thin points vulnerable to tearing.

Sealing the edges: Sealing edges tightly is key for keeping the filling intact during baking. Use your fingers or the tines of a fork to crimp the edges properly. This technique helps maintain the roll’s shape and prevents any delicious filling from spilling out while baking.

Recognizing doneness: Knowing your rolls are cooked through is essential. Look for a golden-brown color and use a toothpick to test; it should come out clean without any raw dough present. Ensuring they are adequately baked avoids issues of rawness that can ruin the taste and texture.

Using an egg wash: Applying an egg wash provides a beautiful glaze. Beat an egg with a splash of water and brush it on the tops before baking. This small step enhances the visual appeal and ensures a crispy, flaky texture outside.

Pro Tips for Perfect Cheesy Chicken Crescent Rolls

  • Use fresh, quality ingredients to deepen flavors, especially with chicken and cheese.
  • Experiment with different cheeses to discover unique flavor combinations that suit your palate.
  • For an extra crunch, sprinkle some breadcrumbs over the top before baking.
  • Consider adding fresh herbs like parsley or chives to elevate the flavor profiles.
  • Let the rolls cool for a few minutes on the baking sheet before transferring them to avoid sogginess.
  • Customize fillings by incorporating vegetables or different meats to adjust according to guest preferences.

Variations and Adaptations

Throughout various regions, the concept of crescent rolls has inspired numerous adaptations. For those seeking a spicy kick, try adding jalapeños or hot sauce to the chicken filling for a zesty twist. Alternatively, during the holiday season, incorporating cranberries or spinach can create a festive version that celebrates seasonal flavors.

For those with dietary restrictions, consider creating a low-carb or keto version by utilizing almond flour dough or cauliflower crust. You can also substitute the chicken with plant-based proteins for a vegan adaptation that keeps the original recipe’s essence while accommodating dietary preferences.

Texture can also be modified; for instance, integrating crispy bacon bits can enhance the richness, while roasted vegetables can contribute a delightful crunch. Play with different ingredients to find a texture that delights your taste buds!

Serving and Presentation Guide

For an enticing presentation, arrange the finished Cheesy Chicken Crescent Rolls on a large platter, potentially garnished with fresh herbs like parsley or cilantro for splash of color. For added flair, consider serving on vibrant dinnerware that contrasts with the golden-brown rolls.

Pair the rolls with dipping sauces, such as ranch, barbecue, or a spicy aioli, for an interactive dining experience. This will not only add variety but also keep your guests wanting more!

Wine and Beverage Pairing

When serving Cheesy Chicken Crescent Rolls, a chilled glass of white wine, such as Sauvignon Blanc or Chardonnay, complements the richness of the dish beautifully. For a non-alcoholic option, refreshing iced tea or sparkling water with lemon can offer the perfect balance of flavors.

When considering coffee or tea, a light chamomile or mint tea can provide a soothing contrast to the cheesy and savory nature of your rolls. Remember to serve the beverages chilled to maintain freshness during warmer months.

Storage and Shelf Life

For storage, keep any leftover Cheesy Chicken Crescent Rolls in an airtight container in the fridge for up to 3 days. Ensure the rolls are completely cooled before sealing to prevent moisture buildup, which can lead to sogginess.

If you want to extend the shelf life, freezing is an excellent option. Wrap each roll individually in plastic wrap and then place them in a freezer bag. Properly stored, they can last up to 2 months. Reheating can be done in the oven at 350°F (175°C) until heated through, maintaining their crispy texture.

Make Ahead Strategies

To save time, you can prepare the filling ahead of time. Store it in the fridge for up to 24 hours before assembly, making it easy to roll up the crescent rolls when you’re ready to bake.

Another strategy involves making the entire dish in advance and freezing it. Simply bake the rolls until golden, let them cool, then freeze. You can reheat them directly from frozen; simply extend the baking time slightly, and you will have a delicious meal ready to go!

Scaling Instructions

Scaling this recipe can easily adapt to meet your needs. To halve the recipe, simply cut all ingredient measurements in half while keeping the cooking time consistent. For larger gatherings, double or triple the ingredients accordingly, but be cautious to use sufficient baking trays to accomplish even baking.

Timing may also need adjustments if you’re multiplying the recipe; check for doneness while keeping an eye on baking times to ensure each batch is cooked evenly. Don’t forget to adapt your storage based on the increased quantity!

Nutritional Deep Dive

Nutritionally, Cheese is rich in calcium and protein; essential for bone health and muscle repair. Chicken provides lean protein that supports growth and development, making these rolls a balanced option for your meals.

When consumed in moderation, this dish can fit into a balanced diet, offering a satisfying taste without excessive calories. Be sure to consider portion sizes, especially if serving with rich dipping sauces or sides, to maintain nutritional balance.

Dietary Adaptations

This recipe can cater to various diets with some minor tweaks. For gluten-free individuals, use gluten-free crescent dough available in many grocery stores to maintain taste without compromising dietary needs.

Vegan adaptations can replace chicken with tofu or tempeh, and substitute dairy cheese with plant-based alternatives. This opens the recipe to a wider audience without losing flavor.

Troubleshooting Guide

If your crescent rolls turn out soggy, it likely indicates too much filling or insufficient baking time. Adjust the amount of filling and extend the cook time slightly to ensure proper texture.

If the rolls are too dry, consider using cream cheese in your filling, which adds moisture and richness, ensuring they remain indulgently tasty without compromising the overall structure.

Recipe Success Stories

Many home cooks express their joy over recreating Cheesy Chicken Crescent Rolls at various family gatherings, often sharing their adaptations and adjustments. This community feedback highlights the recipe’s adaptability and the positive reception it brings at events. Readers have shared that adding different herbs transformed the dish into an amazing experience.

Success stories include easy updates for special dietary needs, which encourage family members who may have previously been apprehensive about trying new things. With keen interest in food photography, readers have enjoyed sharing images of their tasty rolls, enticing others to try their hands at this recipe.

Frequently Asked Questions

Can I use frozen chicken? Absolutely! If using frozen chicken, ensure it’s fully thawed and cooked before mixing with the rest of your ingredients.

How can I store leftovers? Store any leftovers in an airtight container in the fridge for up to 3 days. If freezing, individually wrap the rolls for best results.

What can I serve with these rolls? These rolls pair wonderfully with salads, soups, or various dipping sauces such as ranch or barbecue.

Can I make these rolls ahead of time? Yes, you can prepare and freeze these rolls. Bake them briefly to solidify before freezing for easy reheating later.

Are there vegetarian alternatives? Yes! You can replace chicken with grilled vegetables or use a plant-based meat alternative for a comforting vegetarian dish.

What’s the best way to reheat them? For best results, reheat the rolls in the oven at 350°F until heated through to maintain the crispy texture.

Can I use leftover rotisserie chicken? Definitely! Leftover rotisserie chicken adds great flavor and can save you time in preparation.

How do I know when they are done? Look for a golden-brown color on the rolls, and a toothpick inserted into the middle should come out clean.

Can I add veggies to the filling? Yes! Feel free to incorporate cooked veggies like spinach, bell peppers, or mushrooms for added nutrition.

How can I make them spicier? Adding jalapeños, hot sauce, or spicy cheese can bring a zesty kick to these cheesy rolls.

Additional Resources

For more delicious ideas, explore our collection of similar recipes that highlight chicken and cheese. Check out technique guides on handling crescent dough, and find ingredient information to discover the nutritional advantages of each component. We also provide equipment recommendations that can streamline your cooking process, ensuring that each meal is a success.

Join the Conversation

We love to hear from you! Share your experiences making Cheesy Chicken Crescent Rolls on social media. Don’t forget to upload photos of your finished dish and share any unique twists you may have added. Engage with our community and check out delicious variations from fellow food enthusiasts that may inspire your culinary adventures!

The Recipe

Cheesy Chicken Crescent Rolls

Serves: 8 servings

Prep Time: 15 mins

Cook Time: 20 mins

Total Time: 35 mins

Kitchen Equipment Needed

  • Baking sheet
  • Parchment paper
  • Mixing bowl
  • Measuring cups and spoons
  • Rolling pin (optional)

Ingredients

  • 2 cups cooked chicken, shredded
  • 1 cup shredded cheddar cheese
  • 1/2 cup cream cheese, softened
  • 1 can refrigerated crescent rolls
  • 1 teaspoon garlic powder
  • 1 teaspoon onion powder
  • Salt and pepper to taste

Directions

  1. Preheat your oven to 375°F (190°C) and line a baking sheet with parchment paper.
  2. In a mixing bowl, combine shredded chicken, cheddar cheese, cream cheese, garlic powder, onion powder, salt, and pepper until fully mixed.
  3. Unroll the crescent rolls on a clean surface and separate them into triangles.
  4. Place a heaping tablespoon of the chicken mixture onto the wide end of each crescent roll and roll towards the point.
  5. Pinch the edges to seal the filling inside and place on the prepared baking sheet.
  6. Brush tops with an egg wash if desired, for a shiny appearance.
  7. Bake for 20 minutes or until golden brown and puffed up.
  8. Allow to cool slightly before serving.

Recipe Notes

  • Feel free to experiment with different cheeses or spices for added flavor.
  • Serve warm with your choice of dipping sauces.
  • Leftovers can be stored in an airtight container for up to 3 days.
  • Can be frozen after baking; reheat for best results.

Easy Chicken Caesar Wrap Recipe – Perfect for Lunch

Delicious Chicken Caesar Wrap: A Flavorful Twist on a Classic

⚖️
Difficulty
Easy

⏲️
Prep Time
15 mins

🕒
Cook Time
10 mins

⏱️
Total Time
25 mins

🍽️
Servings
4

When it comes to easy and delicious meal options, the Chicken Caesar Wrap is a perfect favorite! It’s not just a meal; it’s an experience that combines crunchy lettuce, juicy grilled chicken, and creamy Caesar dressing all wrapped in a soft tortilla. Perfect for lunch or an on-the-go dinner, these wraps are as satisfying as they are flavorful. With every bite, you can expect a delightful mixture of savory and creamy flavors that will leave you craving more.

This recipe is ideal for anyone looking to boost their lunch game without spending hours in the kitchen. The Chicken Caesar Wrap is quick to prepare and can be customized to fit your preferences. Whether you’re serving it to friends at a casual gathering or packing it for a lunchbox, this wrap stands out with its vibrant colors and wholesome ingredients. The contrasting textures of crispy lettuce against the tender chicken create a deliciously satisfying meal that pleases everyone.

Quick Recipe Highlights

  • Flavor Profile: This wrap features rich and creamy Caesar dressing that pairs beautifully with savory grilled chicken, providing a flavor explosion in every bite.
  • Texture: Enjoy the crunchiness of fresh romaine lettuce combined with the tenderness of chicken and the buttery softness of the tortilla.
  • Aroma: The aroma of grilled chicken mixed with the tangy scent of Caesar dressing will entice anyone’s appetite.
  • Visual Appeal: The vibrant greens of romaine lettuce and the golden brown chicken wrapped in a light tortilla make this dish visually appealing.
  • Skill Level Needed: This recipe is beginner-friendly and requires basic cooking skills, making it accessible to all.
  • Special Equipment: All you need is a grill or a skillet for cooking the chicken, as well as a cutting board and knife for prep.

Recipe Overview

  • Difficulty Level: This Chicken Caesar Wrap is classified as easy. The steps are straightforward, making it accessible for those new to cooking.
  • Category: This dish falls into both lunch and dinner categories, providing a versatile option that fits various meals.
  • Cuisine: Inspired by the classic Caesar salad, this wrap brings in traditional flavors while adding modern convenience to your plate.
  • Cost: The approximate cost to make this delicious wrap is budget-friendly, usually around $15, depending on the ingredients used.
  • Season: Ideal year-round, this recipe shines especially in warmer weather when fresh produce is abundant.
  • Occasion: Perfect for casual gatherings, picnics, or as a quick meal option during busy weekdays.

Why You’ll Love This Recipe

This Chicken Caesar Wrap is loved for its incredible taste and texture. The combination of tender, marinated chicken and crunchy lettuce drizzled with rich Caesar dressing creates a symphony of flavors. Each bite offers both freshness and heartiness, making it a satisfying meal for anyone. Whether you’re a fan of wraps or looking for a way to actually enjoy chicken salad, this recipe is sure to delight your taste buds.

Convenience is another significant factor. With just a few steps to prepare, you can whip up this meal in under 30 minutes. It’s easy to assemble and even easier to eat—an excellent option for lunch or a quick dinner. Plus, you can prepare the chicken in bulk, making it a perfect meal prep recipe for those busy weeks ahead.

From a nutritional standpoint, this wrap can be a balanced meal packed with protein from the chicken and fresh vegetables. It offers a great way to incorporate leafy greens into your diet without sacrificing flavor. You can even swap the dressing for a lighter version or substitute grilled chicken with lean turkey for an even healthier option.

Socially, these wraps are perfect for sharing. Whether served at a barbecue or family gathering, they’re a hit among both children and adults. The customizable nature allows everyone to make their wrap just the way they like it, ensuring a fun and engaging meal experience.

Lastly, the Chicken Caesar Wrap is cost-effective. Utilizing simple, readily available ingredients keeps your grocery bills low, and the wrap itself is easy on the wallet. This makes it an accessible dish for families or anyone looking to enjoy a hearty meal without overspending.

Historical Background and Cultural Significance

The Caesar salad, from which this wrap derives, has an interesting story. It was invented in 1924 by Italian-American restaurateur Caesar Cardini in Tijuana, Mexico. This simple yet delicious salad quickly gained popularity, leading to numerous interpretations, including this wrap version.

Culturally, the Caesar salad has transcended restaurant menus and is now a staple in many households, often served in different formats, including this easy wrap. Each regional adaptation highlights the diverse culinary creativity across the globe, showcasing how such a classic can innovate.

Over the years, the base ingredients of Caesar dressing, like anchovies, garlic, and eggs have remained standard, but this wrap allows for a modern twist. It demonstrates how beloved recipes can adapt to contemporary lifestyles where convenience is key.

Regional variations of the Caesar are plentiful. From different dressings to fillings, the Chicken Caesar Wrap can vary in ingredients depending on what’s accessible and popular in a location, reflecting the dynamic nature of food culture today.

Ingredient Deep Dive

For the grilled chicken, it’s not just a source of protein but also rich in essential vitamins. When selecting chicken, look for cuts that are fresh and meatier for the best flavor. Proper storage in a sealed container in the fridge can last up to three days, and marinating it before grilling enhances the overall flavor.

Romaine lettuce is the backbone of this wrap. Known for its crisp texture, it is packed with nutrients such as fiber and vitamins A and K. Always choose firm, vibrant green leaves for the best quality, and store it wrapped in damp paper towels in the fridge to maintain freshness. Romaine can also be easily substituted with spinach for a different taste.

Caesar dressing adds the essential flavor, combining mayonnaise, garlic, and Parmesan for a creamy texture. Using homemade dressing can elevate the wrap, making it fresher and more flavorful. Store dressing in a sealed jar in the fridge and consider lighter options like yogurt-based dressing for a healthier alternative.

Wraps hold everything together, and choosing the right one is vital. Whole wheat or spinach tortillas can add extra nutrition. Storing them in a cool environment prevents them from drying out, and you can opt for gluten-free versions if needed.

Common Mistakes to Avoid

  • Not letting the chicken rest: Allowing grilled chicken to rest before slicing prevents moisture loss, resulting in a drier wrap.
  • Choosing stale tortillas: Always check tortillas for freshness as stale ones can crumble when assembled.
  • Overloading the wrap: Adding too many ingredients can make it difficult to wrap properly, leading to messiness and flavor imbalance.
  • Ignoring seasoning: Chicken should be well-seasoned before cooking. A lack of seasoning can yield bland results.
  • Using too much dressing: While flavor is essential, excess dressing can make the wrap soggy. Use it sparingly.
  • Skipping marination: Skipping marination can lead to less flavorful chicken; aim for at least 30 minutes.
  • Not prepping ingredients: Having all ingredients ready beforehand can streamline the assembly process and reduce errors.
  • Ignoring presentation: While taste is vital, a well-presented dish is more appetizing; arrange ingredients thoughtfully within the wrap.

Essential Techniques

Mastering the art of grilling chicken is essential for this recipe. The key is to ensure an even cook while achieving a beautiful char. Use a thermometer to check the internal temperature and take it off the grill as soon as it hits 165°F to avoid dryness. For extra flavor, consider marinating the chicken beforehand.

When wrapping, the technique is key. Lay the ingredients in a row, fold the edges inward, and then roll tightly from the bottom. Proper wrapping prevents spillage and makes for a neater presentation.

Finally, chopping vegetables uniformly is critical. This consistency ensures even flavors throughout the wrap and enhances its visual appeal. Aim for small pieces that are easy to bite through.

Pro Tips for Perfect Chicken Caesar Wrap

1. Use a meat thermometer to ensure precise cooking of your chicken for the juiciest results.
2. Marinate the chicken overnight for enhanced flavor and tenderness; even a few hours can make a difference.
3. Choose fresh, vibrant ingredients for maximum flavor and visual appeal in your wrap.
4. If you’re not sure about the dressing amount, start with less and add more to taste as needed.
5. Experiment with various wraps to find your favorite base; a whole grain or flavored tortilla can add a fun twist.
6. Chill your ingredients before assembly to preserve that refreshing crunch in your wrap.
7. Serve immediately for the best texture, but if packing for later, wrap them tightly in foil or parchment paper to maintain freshness.
8. Consider adding extras like bacon bits or croutons for extra flavor and crunch in your Chicken Caesar Wrap.

Variations and Adaptations

For a regional variation, try a Mediterranean twist by adding olives and feta cheese. You can also swap out the chicken for a protein option like shrimp or grilled vegetables for a vegetarian-inspired wrap.

Seasonally, you might adapt the ingredients based on what’s fresh; using heirloom tomatoes in summer or roasted winter veggies can keep your wrap exciting throughout the year.

Dietary modifications can be made by using gluten-free tortillas or substituting the Caesar dressing for a dairy-free version to cater to those with allergies.

For added flavor, think about incorporating chipotle peppers into the dressing for a spicy kick, or utilize a jalapeño sauce for a southwest twist.

Consider adding textural modifications, such as using panko bread crumbs within the wrap for crunch, or introducing avocado for creaminess.

Lastly, presentation can be modified by slicing the wrap into pinwheels for appetizer-style servings, making a beautiful platter for gatherings.

Serving and Presentation Guide

When serving your Chicken Caesar Wrap, consider the presentation. Cutting the wrap in half diagonally not only adds visual appeal but also makes it easier for guests to enjoy. Placing them on a vibrant plate or platter garnished with fresh herbs can elevate the presentation.

For garnishing ideas, consider drizzling a bit more Caesar dressing on the plate’s edge or sprinkling grated Parmesan for an extra layer of flavor and elegance. Accompanying sides like a fresh salad can complement the wrap beautifully.

Traditional accompaniments include French fries or a side Caesar salad, both of which meld well with the wrap’s flavors. However, for a modern twist, pair it with sweet potato fries or a fruit salad.

Temperature considerations are crucial as well; wrap should be served at room temperature or slightly warmed to appreciate the flavors fully. Avoid serving it directly from the fridge, as the freshness may be masked by the chill.

Finally, portion control is important. Each wrap should ideally serve one person, but you can cut them in half to share or offer additional options for larger gatherings.

Wine and Beverage Pairing

When it comes to wine pairings, a crisp Sauvignon Blanc works wonderfully against the creamy textures of the Chicken Caesar Wrap. The bright acidity of the wine complements the richness of the dressing while enhancing the grilled chicken’s flavor.

For non-alcoholic alternatives, sparkling water with a slice of lemon can offer a refreshing contrast to the rich flavors of the wrap. Alternatively, an iced tea with a hint of citrus could enhance your meal wonderfully.

If coffee or tea is your beverage of choice, opt for a light herbal tea, like chamomile, that won’t overpower the meal and will refresh your palate, especially during lunch.

Serving temperatures for both wine and beverages are essential. Ensure white wines are chilled, while iced drinks should remain cold and refreshing to balance the wrap’s warmth.

Storage and Shelf Life

If you have leftovers, store your Chicken Caesar Wrap in an airtight container in the refrigerator. Properly stored, it can last up to 2 days.

Consider separating the dressing from the wrap before storing to maintain the texture of the ingredients. This prevents the tortilla from becoming soggy and keeps everything fresh.

When reheating, use a microwave on a lower power setting or return it to the pan to warm gently, carefully avoiding overheating, which can toughen the chicken.

Freezing is an option too; simply wrap tightly in foil before placing in the freezer, but be mindful that textures may change upon thawing, so it’s best consumed fresh.

As a guideline, check for signs of spoilage, such as off smells, changes in color, or an unusual texture before consumption.

Make Ahead Strategies

For those looking to prepare ahead of time, marinating the chicken the night before not only saves time but also allows flavors to develop deeper.

When prepping, store prepped lettuce and other fillings separately to maintain their crispness. Each component can be assembled fresh just before serving for the best results.

Consider preparing the dressing homemade in advance; it holds up well in the fridge for about a week, making it easy to throw together a wrap at a moment’s notice.

Assembly can be completed in about 10 minutes, making it perfect for lunch preps or quick weeknight dinners.

If using ingredients like avocado which oxidize quickly, prepare them just before assembly to retain their vibrant color and flavor.

Scaling Instructions

Halving the recipe is straightforward: use two chicken breasts, and adjust seasonings accordingly for even flavor distribution.

Doubling the recipe can be equally simple; just ensure there’s adequate space for grilling larger batches of chicken, and be mindful of cooking time adjustments.

Timing modifications may be essential as well. If grilling a larger batch, it may require increased attention to ensure even cooking without drying out the chicken.

Consider storage; if doubling, ensure your containers are sufficient to keep wrapped items fresh.

Follow serving guidelines to avoid overwhelming your guests with portions while making sure leftovers remain fresh and appealing.

Nutritional Deep Dive

This Chicken Caesar Wrap provides an impressive macro breakdown with lean protein from the chicken, healthy fats from the dressing, and fiber from the lettuce and tortilla.

Micronutrient-wise, you’ll find vitamins A and C from romaine, calcium from Parmesan, and protein from chicken, presenting a balanced meal option that caters to various diets.

Health benefits are plentiful, as this dish promotes muscle repair through protein and offers essential vitamins that contribute to overall well-being.

For dietary considerations, adjusting the dressing or using lighter ingredient options can help cater to those focused on nutritional purity.

Portion analysis is also vital. Each wrap can serve a satisfying single meal with potential room for customization in sides or complementary dishes.

Dietary Adaptations

For gluten-free diets, swapped gluten-free tortillas can make the Chicken Caesar Wrap accessible while maintaining the delightful flavor and texture.

Dairy-free adaptations can include using cashew cream or sunflower seed-based dressings to mimic creamy textures without losing flavor.

Vegetarians can substitute the chicken for roasted chickpeas or grilled tofu to add sufficient protein while maintaining the wrap’s heartiness.

For low-carb and Keto diets, create a lettuce wrap instead of a tortilla, allowing you to enjoy the essence of Caesar without the carbs.

Paleo enthusiasts can exclude the cheese and use nut-based dressings for a lighter option while sticking to whole, unprocessed ingredients.

Low-FODMAP adaptations can be achieved through the introduction of lactose-free ingredients and careful selection of additional fillings, remaining mindful of individual tolerances.

Troubleshooting Guide

In case of texture issues, if the chicken is rubbery, it has likely been overcooked. To solve this, monitor cooking times closely and use a food thermometer.

For a flavor imbalance, if the wrap tastes bland, consider that the chicken might need more seasoning to complement the dressing; always marinate for richer taste.

Temperature problems may arise when serving. Wrapping your ingredients tightly in foil helps retain warmth during transport or in delays before serving.

If equipment challenges occur, like sticking during grilling, ensure your grill is sufficiently preheated to avoid any sticking or tearing of the chicken during cooking.

Ingredient substitution may lead to inconsistencies; ensure to maintain ingredient ratios and basic flavor profiles for the best result.

Timing concerns can impact enjoyment; practice your assembly and prep to streamline the process and improve flavor meld.

Recipe Success Stories

Feedback from the community has been amazing, with many sharing how the Chicken Caesar Wrap has become a staple at their gatherings. The simplicity of preparation coupled with the delightful taste makes it an easy favorite.

Readers have come up with unique variations, such as introducing spicy jalapeños for a kick or adding fresh herbs to amplify the flavor. These adaptations enhance the base recipe while allowing individual creativity to shine.

Some have noted the ease of transitioning this dish into party platters, noting how well a platter of cut wraps is received at gatherings. The visual appeal adds to their popularity.

Photography tips suggest capturing the wrap fresh and cut, highlighting the vibrant colors of ingredients—an excellent way to inspire others to recreate this easy dish.

Readers appreciate the versatility of the wrap, with several noting how they’ve adapted it based on dietary needs, making it even more accessible to friends and family.

Frequently Asked Questions

What can I substitute for chicken?
You can substitute chicken with grilled shrimp, tofu, or even chickpeas for a vegetarian-friendly option. Each of these can be flavored similarly to provide a satisfying and hearty wrap.

Can I make this wrap ahead of time?
Yes, but it’s best to assemble the wrap just before serving. You can prepare the chicken and chop the vegetables ahead of time but keep the ingredients separate to prevent sogginess.

What dressing is best for a lighter version?
For a lighter version, yogurt-based dressings or homemade vinaigrettes can work well. They maintain flavor while cutting calories compared to traditional Caesar dressing.

Is this recipe customizable?
Absolutely! You can easily customize by adding or substituting vegetables or proteins according to your tastes and dietary preferences, making it versatile for everyone.

How can I store leftovers?
Store any leftover wraps in an airtight container in the refrigerator. However, it’s best to keep the dressing separate to avoid soggy tortillas.

Can I freeze the Chicken Caesar Wrap?
It’s not ideal to freeze wrapped tortillas, as they may not retain their texture after thawing. However, you can freeze the grilled chicken and other fillings separately.

What side dishes pair well with this wrap?
This wrap pairs well with fresh fruit, a side salad, or crispy potato wedges for a complete meal with different textures and flavors.

Are there vegetarian alternatives for the dressing?
Yes, many vegetarian or vegan dressings can mimic the flavors of Caesar dressing, such as those made with tahini, capers, or nutritional yeast for added umami flavor without the fish.

Can I use cooked rotisserie chicken for convenience?
Absolutely! Using precooked rotisserie chicken is a great time-saver. Just shred or chop it and mix it with dressing for immediate use in your wraps.

How do I prevent my wrap from getting soggy?
To prevent sogginess, ensure that all ingredients are well-drained, especially vegetables, and store the dressing separately until you’re ready to eat.

Additional Resources

For more delicious chicken recipes, check out our collection of easy one-pan meals that suit a busy lifestyle. Technique guides surrounding recipe preparation or grilling may also enhance your culinary skills, spanning a variety of cuisines.

Explore ingredient information for deeper understanding and best practices for selecting quality produce and proteins. Understanding your kitchen equipment can elevate cooking experiences, ensuring everything is prepped and ready to go before starting.

For those interested in seasonal variations, we provide resources on adjusting recipes according to what’s fresh and available, helping to keep meals exciting throughout the year.

Join the Conversation

We encourage readers to share their creations on social media, tagging us to showcase how they customized their Chicken Caesar Wraps. Photography tips might help others capture their dish beautifully, sparking inspiration in the community.

Recipe reviews are always appreciated! Share your thoughts on this Chicken Caesar Wrap, offering insights on what worked well or any adjustments made. Engaging with our followers helps us build a close-knit community centered around food and the joy it brings.

Feel free to share variations you’ve tried along the way—whether it’s a bold new dressing or additional toppings, we love learning from your culinary journeys!

The Recipe

Chicken Caesar Wrap

Serves: 4

Prep Time: 15 mins

Cook Time: 10 mins

Total Time: 25 mins

Kitchen Equipment Needed

  • Grill or skillet
  • Cutting board
  • Knife
  • Mixing bowl
  • Meat thermometer

Ingredients

  • 2 boneless, skinless chicken breasts
  • 4 tortillas (flour or whole wheat)
  • 4 cups romaine lettuce, chopped
  • ½ cup Caesar dressing
  • ¼ cup grated Parmesan cheese
  • Salt and pepper to taste

Directions

  1. Preheat grill or skillet over medium-high heat.
  2. Season the chicken breasts with salt and pepper, then grill for about 5-7 minutes on each side or until cooked through.
  3. Let the chicken rest for a few minutes, then slice it thinly.
  4. Lay tortillas flat and layer each with lettuce, sliced chicken, Caesar dressing, and Parmesan cheese.
  5. Wrap tightly, folding in sides as you roll from the bottom up.
  6. Serve immediately or store wrapped in foil for later enjoyment.

Recipe Notes

  • Feel free to add additional toppings, such as avocado or bacon, for extra flavor.
  • Store leftover wraps in the fridge for up to two days, keeping dressing separate to avoid sogginess.
  • Experiment with different tortillas like spinach or low-carb options for varieties.

Easy Lemon Vinaigrette Recipe – Perfect for Salads

Lemon Vinaigrette Recipe: A Zesty Twist for Your Salads

⚖️
Difficulty
Easy

⏲️
Prep Time
5 mins

🕒
Cook Time
0 mins

⏱️
Total Time
5 mins

🍽️
Servings
4

Lemon Vinaigrette is a classic dressing that can elevate any salad from ordinary to extraordinary. With its bright, citrusy flavor and a hint of tanginess, this vinaigrette is not only delicious but incredibly refreshing. Made with simple ingredients, this Lemon Vinaigrette adds a vibrant touch to leafy greens, grilled vegetables, and even seafood dishes, making it a versatile staple in any kitchen.

As you drizzle this zesty dressing over your favorite salads, the invigorating aroma of fresh lemon will awaken your senses, inviting you to savor every bite. Its perfect balance of acidity and sweetness creates a delightful flavor profile that complements a wide range of ingredients, providing a touch of sunshine to your meal. Whether you’re having a casual lunch or hosting a fancy dinner party, this Lemon Vinaigrette will impress your guests and enhance their dining experience.

Quick Recipe Highlights

  • Flavor Profile: This vinaigrette is a bright blend of tart lemon juice, fragrant olive oil, and a sprinkle of salt and pepper, resulting in a balanced and refreshing dressing.
  • Texture: The Lemon Vinaigrette is smooth and silky, providing an enticing mouthfeel as it coats your salads.
  • Aroma: The fresh citrus scent of lemon mingles with the rich aroma of olive oil, creating an appetizing experience before you even take a bite.
  • Visual Appeal: The light, golden-yellow hue of the vinaigrette adds a cheerful brightness to any dish it graces, making healthy eating more enticing.
  • Skill Level Needed: This easy Lemon Vinaigrette requires no technical culinary skills, making it a perfect choice for novice cooks.
  • Special Equipment: All you need is a whisk, a mixing bowl, and perhaps a jar for storage, making this recipe accessible to everyone.

Recipe Overview

  • Difficulty Level: This Lemon Vinaigrette is considered easy due to its straightforward preparation and minimal ingredients.
  • Category: Ideal for salads, marinades, and even as a light drizzling sauce for grilled meats and vegetables.
  • Cuisine: A staple in Mediterranean cooking, it reflects the traditional use of fresh lemon and olive oil in salads throughout the region.
  • Cost: Very budget-friendly, as the main ingredients are inexpensive and commonly found in most households.
  • Season: Perfect for spring and summer when fresh produce is abundant, enhancing vibrant salads.
  • Occasion: Great for everyday meals, picnics, barbecues, and any gathering needing a refreshing touch.

Why You’ll Love This Recipe

When it comes to taste and texture, this Lemon Vinaigrette delivers an explosion of flavor. The tangy lemon cuts through rich ingredients like avocados or cheese, making every bite feel more lively and appetizing. The velvety texture created by emulsifying olive oil with lemon juice creates an inviting sauce that adheres beautifully to greens.

Not only is this dressing delicious, but it is also convenient to prepare. Within just five minutes, you can whip up a freshly-made vinaigrette that is free from preservatives, unlike many store-bought options. This homemade dressing allows you to control the ingredients and customize the flavor to your liking, ensuring you have the best possible experience.

On the nutritional front, using olive oil makes this vinaigrette a heart-healthy choice, packed with beneficial fats. The lemon juice is rich in vitamin C, which supports your immune system, while the minimal ingredients mean fewer calories compared to cream-based dressings. Therefore, it’s a guilt-free addition to any healthy eating plan.

From a social perspective, serving fresh salad dressed with this zesty vinaigrette brings a touch of elegance to any gathering. It’s an excellent conversation starter, inviting guests to share their favorites and variations, while your salad stands out as a lovely side dish on the table.

Lastly, this Lemon Vinaigrette combines all these features while remaining cost-effective. The simplicity and accessibility of the ingredients mean that you can make a large batch for minimal cost, preserving that freshness without breaking the bank.

Historical Background and Cultural Significance

Lemon vinaigrette has its roots in Mediterranean cuisine, where the combination of lemon juice and olive oil serves as a foundation for various dressings. Historically, these ingredients were easily available in the region and have been revered for their flavor and health benefits for centuries. The use of vinaigrettes can be traced back to ancient Roman times when oils and vinegars were commonly mixed to dress fresh salads.

Culturally, the vinaigrette embodies a philosophy of simple yet flavorful food that emphasizes the quality of ingredients over complex preparations. It’s a reflection of Mediterranean diets, which proudly incorporate fresh produce seasoned lightly to let the natural taste shine. This ideology is celebrated in many cultures, but the Lemon Vinaigrette particularly stands out for its lively and fresh profile.

Over the generations, the recipe for Lemon Vinaigrette has evolved into countless variations based on regional taste preferences. Chefs and home cooks alike have added spices, herbs, and other flavorings to customize this classic recipe, enhancing its versatility and appeal across different dishes.

In contemporary cooking, Lemon Vinaigrette remains a key player in healthy eating trends. With a focus on fresh ingredients and wholesome flavors, it’s a dressing that aligns perfectly with nutrition-conscious dining trends, ensuring its place in kitchens and restaurants alike.

Ingredient Deep Dive

Lemon Juice:
Lemon juice is not just a key flavoring agent; it holds significant cultural importance in many cuisines around the world. Historically, lemons have been used to prevent scurvy among sailors and have long been associated with freshness and vitality in dishes. Nutritional benefits of lemon juice include high vitamin C content, antioxidants, and potential digestive aids. When selecting lemons, look for ones that feel heavy for their size and have a vibrant yellow color. Store lemons in a cool, dry place for up to a week, or refrigerate for longer freshness. Lemon juice can be substituted with lime juice for a different citrusy flavor.

Olive Oil:
Olive oil is a staple in Mediterranean cooking, embodying both cultural traditions and health benefits. Its history stretches back thousands of years, revered for its flavor and nutritional value. Rich in monounsaturated fats, it’s linked to numerous health benefits, including heart health and anti-inflammatory properties. When buying olive oil, choose extra virgin for the best quality, characterized by its fruity flavor and light peppery finish. Store it in a dark, cool place, away from sunlight to maintain its freshness. If you’re out of olive oil, alternatives include avocado oil or canola oil, though they may alter the flavor slightly.

Common Mistakes to Avoid

  • Not balancing the acidity: Ensure you have the right balance of lemon juice and oil, as too much acidity can overpower the dressing.
  • Using poor-quality olive oil: The flavor of the oil plays a significant role; use high-quality, fresh extra virgin olive oil for the best results.
  • Inadequate emulsification: If the oil isn’t mixed in properly with the lemon juice, you’ll end up with a separation that reduces flavor integration.
  • Adding too much salt at once: Salt can enhance the vinaigrette but should be added gradually to avoid oversalting.
  • Not adjusting flavors: Taste your vinaigrette and tweak it as needed with additional salt, pepper, or herbs for optimal flavor.
  • Letting it sit too long: Fresh vinaigrettes are best used immediately or within a few days, as flavors can diminish over time.
  • Forgetting to shake or whisk: Always whisk or shake well before serving to recombine the ingredients that may have settled.
  • Neglecting to choose seasonal ingredients: Fresh, seasonal ingredients will elevate the vinaigrette’s overall flavor and quality.

Essential Techniques

Emulsifying:
Emulsifying is crucial for creating a stable vinaigrette. It involves mixing two substances that typically don’t blend well, like oil and water-based liquids. To master this, whisk or shake vigorously until you achieve a creamy consistency. Watch for any separation, which signals the need to whisk again. Use a jar with a lid for easy shaking, enjoying a visually appealing vinaigrette.

Balancing Acidity:
Mastering the balance between acidity and richness is essential for an outstanding vinaigrette. Start with a ratio of three parts oil to one part acid, adjusting based on preference. Taste as you go, noting how flavors develop. Remember, you can always add more acid, but removing it is challenging, so add slowly and carefully.

Pro Tips for Perfect Lemon Vinaigrette

1. Always use fresh lemons for the best flavor; bottled lemon juice lacks the vibrancy of fresh-squeezed.
2. Experiment with different herbs like basil or parsley to give your vinaigrette a unique twist.
3. Keep a jar of vinaigrette in the fridge for quick use, but remember to shake well before serving.
4. Adjust the garlic levels for a stronger or milder flavor, based on personal preference.
5. Try adding a teaspoon of honey for a hint of sweetness that complements the acidity nicely.
6. Use high-quality extra virgin olive oil, as it makes a significant difference in taste.
7. Consider adding Dijon mustard for a more emulsive and flavorful base.
8. Make sure to taste your vinaigrette with the final dish; adjustments can enhance compatibility.

Variations and Adaptations

For a regional twist, consider a Greek Lemon Vinaigrette, incorporating herbs like oregano and dill, which pairs beautifully with feta cheese and olives. Seasonal adaptations might include adding fresh berries in the summer or roasted garlic in the fall for depth and warmth in flavor. If you’re looking for dietary modifications, try using avocado oil as a substitute for olive oil to align with dietary preferences or allergies. For flavor variations, consider citrus mixes such as lime or orange juice for a different profile, and for texture modifications, adding a finely chopped shallot can elevate the vinaigrette.

Serving and Presentation Guide

Plating is key when serving meals dressed with Lemon Vinaigrette. Drizzle the vinaigrette over a bed of greens and garnish with colorful vegetables for visual appeal. A sprinkle of fresh herbs can elevate the aesthetic and flavor traits. Serving on a white plate enhances the color contrast of the vibrant salad. Temperature considerations are important; serve the vinaigrette at room temperature for optimal flavor release, enhancing the overall dining experience. Be mindful of portion control; a little goes a long way in terms of flavor, so start with less and increase as desired.

Wine and Beverage Pairing

Pair your Lemon Vinaigrette-dressed salads with a crisp Sauvignon Blanc, which complements the citrus notes beautifully. For a non-alcoholic alternative, try sparkling water with a splash of lemon for refreshing hydration. If you enjoy coffee or tea, serve a light herbal tea, such as mint, to enhance the fresh flavors on your plate without overshadowing them, ensuring a harmonious meal experience.

Storage and Shelf Life

To store your Lemon Vinaigrette, use an airtight jar or container in the refrigerator. It will generally last for about a week. Monitor the texture and aroma, discarding if it develops an off smell or separation. It’s best served fresh, but if you need to reheat any leftovers, gently shake or whisk before using. Avoid freezing your vinaigrette, as it can change the texture and flavor upon thawing.

Make Ahead Strategies

For efficient meal prep, prepare your Lemon Vinaigrette ahead of time and store it in the refrigerator. The flavors often deepen and improve after melding together for a few hours. It’s best to mix it the day before serving, allowing the dressing to be at its peak flavor. If using ingredients like garlic, consider adding them just before serving to maintain their fresh flavor. Make sure to give it a good shake before drizzling over fresh greens or vegetables to refresh its profile.

Scaling Instructions

If you want to halve this recipe, simply reduce each ingredient proportionally and you’ll still achieve the same great taste. Doubling or tripling the recipe is also a breeze, but be sure to mix in a larger bowl to maintain an even consistency. When scaling, account for any adjustments in timing during preparation, as larger quantities may require a slightly longer mixing time. Additionally, make sure to use larger storage containers to accommodate increased volumes while maintaining freshness.

Nutritional Deep Dive

When analyzing the nutritional value of Lemon Vinaigrette, look for a balance of macronutrients with healthy fats coming predominantly from olive oil. It’s low in carbohydrates, making it ideal for many dietary plans. Focus on micronutrient contributions, particularly the vitamin C from lemon juice. Incorporating this vinaigrette can provide health benefits like improved heart health from monounsaturated fats and antioxidants. If you’re managing portions, be mindful that a tablespoon or two is usually sufficient to dress a full salad.

Dietary Adaptations

For those seeking gluten-free options, this Lemon Vinaigrette is naturally gluten-free, making it perfect for a wide audience. If dairy-free is a requirement, rest assured that all the ingredients fit within this guideline. This recipe can also easily adapt to vegan diets through the exclusion of any non-vegan ingredients, keeping it light and fresh. For low-carb or ketogenic diets, the use of olive oil ensures it remains within the limits while maintaining flavor. Paleo-friendly enthusiasts can enjoy this vinaigrette purely as is, highlighting its simplicity and wholesome ingredients.

Troubleshooting Guide

If you encounter texture issues with your dressing, consider emulsifying again by whisking or shaking vigorously. If you find the flavor too sharp, reduce the acidity by adding more oil until it reaches your preferred balance. If it’s too oily, increasing the lemon juice can help. For equipment challenges like insufficient blending, experiment with a blender to achieve an even texture. Observing ingredient substitutions can also prevent issues; ensure alternatives maintain the same consistency and flavor profile.

Recipe Success Stories

Community feedback on this Lemon Vinaigrette often highlights its simplicity and taste, with readers sharing their personal variations. One individual shared a delightful adaptation using blood orange juice, creating a visually stunning alternative that has become a dinner party favorite. Suggestions from readers emphasize the versatility of the recipe, encouraging creativity and personalization with fresh herbs and additional spices. Also, those documenting their culinary journey often share photos of their beautifully plated salads, showcasing the visual appeal of this recipe.

Frequently Asked Questions

Can I use bottled lemon juice?

While bottled lemon juice is convenient, it usually lacks the freshness and vibrant flavor of freshly squeezed lemons. For best results, always opt for fresh lemons to elevate your vinaigrette.

How long can I store Lemon Vinaigrette?

Homemade Lemon Vinaigrette can be stored in the refrigerator for up to a week. Ensure it’s in an airtight container for optimal freshness and quality over time.

What can I mix this vinaigrette with?

This vinaigrette is incredibly versatile and can be used with mixed greens, grilled vegetables, seafood, or even as a marinade for chicken or fish. It pairs well with a variety of dishes.

Can I make this vinaigrette vegan?

Yes! This Lemon Vinaigrette is naturally vegan and doesn’t include any animal products, making it suitable for those following a plant-based diet.

Is Lemon Vinaigrette gluten-free?

Absolutely! All the ingredients in this recipe are gluten-free, which makes it a great option for those with gluten sensitivities.

How do I adjust the flavors?

You can adjust the flavors depending on your preferences; for instance, adding more lemon juice for tanginess or a little honey for sweetness can help customize it to your taste.

Can I freeze Lemon Vinaigrette?

It’s not recommended to freeze Lemon Vinaigrette, as it may alter the texture and separation of the oil and lemon juice upon thawing.

Is it necessary to whisk the vinaigrette before use?

Yes, whisking or shaking is necessary as the ingredients can separate when stored. Mixing them before serving ensures a more unified flavor every time.

Can I add garlic to the vinaigrette?

Absolutely! Adding minced garlic to your Lemon Vinaigrette will introduce a robust flavor that pairs nicely with the citrus notes. Adjust according to your preference for garlic intensity.

How can I make it creamier?

For a creamier texture, consider adding a dollop of yogurt or mayonnaise, which will give your vinaigrette a richer consistency while maintaining its delightful flavor.

Additional Resources

If you enjoyed this Lemon Vinaigrette recipe, you might be interested in related recipes such as classic Caesar dressing or herb-infused vinaigrettes. Explore technique guides for perfect salad tossing and ingredient information on choosing the right oil for your dressings. Additionally, consider checking out equipment recommendations on items that make salad prep more efficient, such as salad spinners and high-quality whisks.

Join the Conversation

We invite you to share your thoughts on this Lemon Vinaigrette in the comments below! If you’ve made any variations, we’d love to hear about them. Feel free to share your photos and engage with others who have tried this recipe. Your feedback helps build a supportive community of food lovers eager to learn and swap ideas!

The Recipe

Lemon Vinaigrette

Serves: 4

Prep Time: 5 mins

Cook Time: 0 mins

Total Time: 5 mins

Kitchen Equipment Needed

  • Whisk
  • Bowl
  • Jar with lid for storage

Ingredients

  • 1/4 cup fresh lemon juice
  • 3/4 cup extra virgin olive oil
  • Salt and pepper to taste
  • 1 teaspoon Dijon mustard (optional)
  • 1 clove minced garlic (optional)

Directions

  1. In a bowl, whisk together the lemon juice, salt and pepper, and optional Dijon mustard and minced garlic until combined.
  2. Slowly drizzle in the olive oil while continuing to whisk to achieve an emulsion.
  3. Taste and adjust seasoning if necessary.
  4. Transfer to a jar for storage or directly drizzle over your salads.

Recipe Notes

  • This vinaigrette can be made ahead and stored in the refrigerator for up to a week.
  • Feel free to experiment with herbs and spices to personalize your vinaigrette!
  • If it separates, simply whisk or shake again before use.

Delicious Ham and Cheese Hash Brown Casserole Recipe to Try

Ham and Cheese Hash Brown Casserole: A Comfort Food Classic

⚖️
Difficulty
Easy

⏲️
Prep Time
15 mins

🕒
Cook Time
45 mins

⏱️
Total Time
1 hour

🍽️
Servings
6 servings

Ham and Cheese Hash Brown Casserole is a hearty and satisfying dish that brings the warmth of home-cooked meals right to your table. Perfect for breakfast, brunch, or even dinner, this casserole packs a punch with its delicious blend of crispy hash browns, savory ham, and gooey cheese. Imagine a golden-brown top giving way to creamy layers of flavor—a perfect start to the day or a comforting midnight snack that is sure to please.

The combination of crispy textures from the hash browns and rich creaminess from the cheese creates an irresistible contrast that makes every bite delightful. As you pull the casserole from the oven, the enticing aroma fills your kitchen, inviting everyone to gather around the table. This dish is not only comforting but also incredibly versatile, accommodating various palates and preferences.

Quick Recipe Highlights

  • Flavor Profile: The rich, buttery flavor of the hash browns complements the salty, savory notes of the ham and cheese, balanced perfectly with a hint of onion.
  • Texture: Expect each bite to deliver a contrast of soft, creamy layers with crunchy, golden-brown edges.
  • Aroma: The mouthwatering scent of melted cheese mingling with the savory ham and spices fills the air.
  • Visual Appeal: The casserole boasts a beautifully baked top with a lovely golden hue and a sprinkle of fresh herbs or scallions for a pop of color.
  • Skill Level Needed: This recipe is beginner-friendly, requiring simple mixing and baking techniques.
  • Special Equipment: A casserole dish and basic kitchen utensils are all you need to create this delicious dish.

Recipe Overview

  • Difficulty Level: This Easy Ham and Cheese Hash Brown Casserole is suitable for all skill levels. Even novice cooks can impress their family and friends with this simple yet delectable recipe.
  • Category: It falls under the breakfast and brunch category but can seamlessly transition into a satisfying dinner or side dish for gatherings.
  • Cuisine: Influenced by American comfort food traditions, this casserole combines classic ingredients to create a dish that’s been loved for generations.
  • Cost: The ingredients are budget-friendly, making it a great option for those looking to feed a crowd without breaking the bank.
  • Season: This dish shines year-round, but its heartiness makes it particularly perfect for fall and winter gatherings.
  • Occasion: Ideal for family brunches, potlucks, holiday breakfasts, or any occasion that calls for comfort food.

Why You’ll Love This Recipe

Ham and Cheese Hash Brown Casserole delivers a taste and texture appeal that’s hard to resist. The delicious combination of melty cheese and savory ham pulls you in, while the crispy hash browns provide that sought-after crunch. Each bite is satisfying, making it a favorite for breakfast lovers and comfort food enthusiasts alike.

Not only is this casserole tasty, but it also excels in convenience. You can prepare it ahead of time, making it perfect for busy mornings or family gatherings. Simply mix, store in the refrigerator, and bake when ready. This make-ahead aspect provides flexibility without sacrificing flavor.

Nutritionally, it offers a balanced meal with carbohydrates from the hash browns, protein from the eggs and ham, and calcium from the cheese. Feel free to add in extra vegetables for added nutrients, making this a versatile dish that can suit various dietary needs.

When hosting friends or family, this casserole shines in its social value. It’s easy to make in large batches and brings people together over a delicious, hearty meal. Plus, leftovers (if there are any!) are great for a quick lunch or breakfast the next day.

Cost-effectively, using simple ingredients keeps this recipe approachable. With a few pantry staples, you can create a satisfying dish that feels special without the expense, proving that comfort food can also be affordable and accessible.

Historical Background and Cultural Significance

The roots of casseroles, including dishes like the Ham and Cheese Hash Brown Casserole, can be traced back to ancient times when various cultures combined ingredients in a single pot for cooking. Over the decades, the casserole evolved, especially in American homes during the mid-20th century, as convenience became paramount.

Casseroles hold a special place in American culture, often associated with family gatherings, potlucks, and community meals. This particular dish varies by region, where each area may incorporate local favorites, making it versatile and loved by many.

The evolution of the hash brown dish has undergone numerous transformations. While this version focuses on ham and cheese, you can find variations that include additional vegetables, spices, or different meats, reflecting local tastes and preferences.

As home cooking made a comeback in recent years, this casserole remained a staple. Its ease of preparation and comforting qualities resonate with those looking to create and share memorable meals with loved ones.

Ingredient Deep Dive

Hash Browns: A breakfast staple, hash browns are made from shredded potatoes and have roots in American cuisine. They are a source of carbohydrates that provide energy. When selecting hash browns, look for those with minimal additives. Store in the freezer and use within a few months for best quality. If you’re looking for alternatives, riced cauliflower can be a low-carb substitute.

Ham: Typically made from pork, ham has been a favorite protein in many households. It’s packed with protein and provides essential vitamins and minerals. When choosing ham, opt for lower sodium options where possible and store it properly to extend its shelf life. For alternatives, turkey or chicken can work well in this dish.

Cheese: Cheese elevates any casserole, and cheddar is particularly loved for its sharpness and meltability. Rich in calcium and protein, cheese should be selected based on personal taste. Store cheese wrapped to maintain freshness, and try substituting with lower-fat options if desired.

Eggs: Adding eggs provides a fluffy texture and binds ingredients together. Eggs are a great source of protein and necessary nutrients. Always choose fresh eggs, and store them in the coldest part of your refrigerator. For a vegan option, consider using flax eggs as a substitute.

Common Mistakes to Avoid

  • Not thawing frozen hash browns fully might result in uneven cooking. Be sure to thaw them to achieve crispiness.
  • Overmixing the egg mixture can lead to a dense casserole—mix just until combined for fluffiness.
  • Using too much cheese can make the casserole greasy. Stick to recommended amounts for a balanced dish.
  • Not greasing your baking dish will lead to sticking, so be generous with cooking spray or oil.
  • Baking at too high a temperature may burn the top before the inside is cooked. Follow recommended settings closely.
  • Ignoring resting time after baking will lead to a crumbly casserole; let it sit to set before serving.
  • Not incorporating seasonings will result in bland flavors; be liberal with garlic powder, pepper, and salt.
  • Overbaking can make the casserole dry—keep an eye on cooking times for a perfect texture.
  • Using low-quality ingredients may compromise the overall taste; opt for fresh and flavorful options.
  • Skipping the garnishes leaves the presentation lacking—sprinkle fresh herbs for an appealing finish.

Essential Techniques

Baking is crucial in ensuring your Ham and Cheese Hash Brown Casserole cooks evenly throughout. Preheat your oven properly and maintain the right temperature to achieve a golden-brown top while ensuring the inside is fully cooked. Mastering this technique guarantees a delicious and visually appealing result.

Mixing is just as important. When combining your ingredients, use a gentle hand to avoid overmixing, which can lead to a dense texture. Learn to recognize the right consistency—ingredients should be well integrated without excessive beating.

Layering is key for depth of flavor. Distributing layers of hash browns, ham, and cheese allows each bite to capture a balance of ingredients. Master the art of layering to maximize taste in your casserole.

Pro Tips for Perfect Ham and Cheese Hash Brown Casserole

1. Use fresh ingredients for the best flavor. Fresh herbs, quality cheese, and well-selected meats enhance the dish remarkably.
2. For added vegetables, consider sautéing onions or bell peppers and mixing them in for a nutritious twist.
3. Experiment with different types of cheese for varied flavor profiles; gouda and pepper jack can add a unique touch.
4. Replacing half of the potatoes with sweet potatoes provides a nutritious boost and adds a hint of sweetness to the dish.
5. To achieve extra crispiness, broil the casserole for a few minutes at the end of cooking, watching carefully to avoid burning.
6. Let your casserole rest for at least 10 minutes after coming out of the oven to allow it to set and make serving easier.
7. If you have a larger crowd, consider doubling the recipe—just make sure to use a larger baking dish.
8. Store leftovers in an airtight container for quick reheats during busy weeknights—you’ll love having this comfort ready to go.

Variations and Adaptations

Consider regional variations by adding local ingredients, such as different cheeses found in the Midwestern United States, or spices that reflect Southern cooking styles. Seasonal adaptations can include incorporating roasted seasonal vegetables or herbs that are fresh at different times of the year, like asparagus in spring.

For dietary modifications, this casserole can be made gluten-free by using gluten-free hash browns and dairy-free by opting for plant-based cheese substitutes. Flavor variations can also include smoked meats for an exciting twist or adding chilies for a southwestern flair.

Texture modifications can involve mixing in crushed cornflakes or breadcrumbs for a crunchy topping, providing contrast to the creamy layers beneath. Lastly, presentation alternatives such as serving individual portions in ramekins can make a fun and elegant dinner option.

Serving and Presentation Guide

For plating, consider a simple yet elegant approach. Use a large, flat plate to allow the beauty of the casserole to shine. You can add a scoop of fresh greens or a light salad on the side for color and freshness.

Garnishing ideas include chives, parsley, or a sprinkle of paprika that enhances both aroma and visual appeal. Traditional accompaniments, such as fruit salads or freshly baked biscuits, pair wonderfully with this casserole, while modern serving suggestions like avocado slices or a dollop of sour cream elevate the dish.

Temperature matters—serve warm for the best flavors and textures, although this casserole is also delightful at room temperature. Portion control can be assisted by serving in small, individual baking dishes if hosting a special occasion.

Wine and Beverage Pairing

For wine pairings, a light-bodied Chardonnay or Sauvignon Blanc complements the creamy casserole beautifully without overpowering flavors. For something red, a light Pinot Noir can also work due to its balanced acidity and fruitiness.

If seeking non-alcoholic alternatives, consider serving a light lemonade or a sparkling water infused with citrus for a refreshing accompaniment. For coffee lovers, a medium-roast coffee can enhance that warm, breakfast vibe, while herbal teas can also be a soothing option.

Serve beverages chilled to provide a nice contrast to the warm casserole, enhancing the overall dining experience.

Storage and Shelf Life

Storage methods for your casserole should involve placing it in an airtight container after cooling down completely. Ideally, it can be stored in the refrigerator for up to 3-4 days.

For longer storage, consider freezing the casserole. It can last up to two months when properly wrapped to prevent freezer burn. The best reheating instructions involve thawing overnight in the fridge before reheating in the oven at 350°F for 20-30 minutes until heated through.

Signs of spoilage include a change in color or a sour smell—always err on the side of caution when it comes to food safety.

Make Ahead Strategies

To make this recipe ahead of time, prepare it fully but stop before baking. Cover it well and store it in the refrigerator. The night before your event, simply preheat the oven in the morning and bake as directed.

Quality impact assessment shows that while this option remains delicious, freshly baked versions tend to have a crisper top layer. Enhance the dish before baking by topping with fresh herbs for an aromatic kick.

Assembly tips include organizing all ingredients ahead of time, allowing for smooth preparation. If you plan ahead, you can enjoy this hassle-free recipe on special occasions without much stress.

Scaling Instructions

Scaling the Ham and Cheese Hash Brown Casserole recipe is straightforward. To halve the recipe, simply divide all ingredients in half and use a smaller baking dish.

For doubling or tripling, ensure you have a larger dish and adjust cooking times accordingly, as a larger volume will require more time. It’s helpful to check for doneness in the center using a toothpick or knife to ensure consistent cooking.

Consideration for storage must also be addressed— larger batches may necessitate more containers or portioning for freezing, and label clearly for future reference.

Nutritional Deep Dive

Delving into the macro breakdown, this casserole provides carbohydrates primarily from the hash browns, along with proteins from the eggs and ham. A typical serving delivers a satisfying dose of energy alongside essential nutrients.

Micronutrient analysis shows that this dish contains vital nutrients, such as calcium from cheese and potassium from potatoes. Moreover, you can enhance its health benefits by incorporating nutrient-dense ingredients like spinach or mushrooms.

When considering health benefits, fresh ingredients and mindful choices can create a well-balanced meal perfect for families seeking comfort without compromising nutrition.

For portion analysis, keeping servings moderation-friendly makes it easier to enjoy this rich dish while managing overall caloric intake, making it suitable for varying lifestyles.

Dietary Adaptations

For gluten-free adjustments, choose gluten-free hash browns or make your own using freshly grated potatoes. To transform this into a dairy-free version, opt for plant-based cheeses and milk substitutes that fit personal dietary needs.

Vegan options can include using scrambled tofu to replace eggs, providing a delicious alternative while keeping the texture creamy. Low-carb variations can involve substituting hash browns with zucchini or cauliflower, maintaining flavor while reducing carbs.

Keto adaptations focus on using alternative flour favorites and cheeses high in fat for an energy boost, while paleo modifications can emphasize whole, unprocessed ingredients and omit dairy. Each specific diet caters to personal wellness without losing the comforting essence of this beloved recipe.

Troubleshooting Guide

When dealing with texture issues, make sure to follow preparation instructions closely. Using too much liquid or cold ingredients can lead to a soggy casserole—measure carefully and bring everything to a uniform temperature for the best results.

If flavor balance is off, consider enhancing the seasonings. Sometimes a sprinkle of salt or spice can elevate missed flavors. Make adjustments gradually, giving time between additions to taste.

Temperature problems may arise if the casserole is removed from the oven too soon or if the oven temperature fluctuates. Have an accurate thermometer to maintain proper cooking environment.

Equipment challenges can be resolved by routinely checking your baking equipment for accuracy, as sometimes ovens can vary in heat settings.

Moreover, if substitutions are made, note the impact on cooking times and flavor outcomes—always test and adjust as necessary.

Timing concerns can be managed by keeping a keen eye on the bake, particularly when temperature adjustments are made at higher levels—it’s crucial to check halfway through for even cooking.

Recipe Success Stories

Community feedback is overwhelmingly positive, with many sharing their own twists on this classic recipe. From family stories to personal variations, readers find joy in recreating this dish for loved ones.

Variation successes often involve experimenting with different cheese combinations or adapting it with seasonal vegetables, yielding unique outcomes that inspire others to try new ingredients.

Adaptation stories highlight inventive substitutes that maintain the essence while accommodating dietary needs, proving that versatility is key with this casserole.

Reader suggestions often encourage creative garnishes or added ingredients that elevate the dish, such as crispy bacon or fresh herbs arising from local gardens.

Photography tips have also emerged, with readers sharing stunning images of their finished casseroles, bringing inspiration to fellow home cooks.

Frequently Asked Questions

Can I prepare the casserole a day in advance?

Yes, you can prepare it a day early and store it in the refrigerator. Just bake it right before serving for the best results.

Can I freeze the leftovers?

Definitely! Allow the casserole to cool completely before transferring it to an airtight container. It can be frozen for up to two months.

What can I use instead of ham?

You can substitute ham with cooked bacon, turkey, or even cooked vegetables for a vegetarian option.

How do I store leftovers?

Once cooled, store leftovers in an airtight container in the refrigerator for up to four days. Reheat in the oven until warmed through.

Can I add vegetables to this casserole?

Absolutely! Feel free to add your favorite vegetables, such as bell peppers, spinach, or mushrooms, to enhance flavor and nutrition.

Is this casserole gluten-free?

To make it gluten-free, choose gluten-free hash browns and verify all other ingredients are certified gluten-free.

How do I make it vegetarian?

You can skip the meat and add more vegetables, and use plant-based cheese for a delicious vegetarian casserole.

What’s the best way to reheat the casserole?

The best way is to reheat it in the oven at 350°F for about 20 minutes, or until heated through.

Can I spice it up?

Absolutely! Add diced jalapeños or your favorite hot sauce to give it an extra kick.

How long should I let it cool before serving?

Let the casserole cool for about 10 minutes after baking to set up, making it easier to slice and serve.

Can I make individual servings?

Yes! Use ramekins for individual portions; simply adjust the cooking time accordingly.

Additional Resources

If you’re interested in different meals, be sure to check out related recipes like cheesy potato soup or quiche—all delicious, comfort food options.

Techniques are fundamental in cooking; consider looking into guides on perfecting the art of baking casseroles or mastering egg dishes.

For ingredient information, explore the benefits of potatoes or the versatility of different cheeses in your meals.

Equipment recommendations include useful kitchen tools that simplify preparation, ensuring you have the right tools for the job.

Finally, seasonal variations can provide fresh inspiration for adapting your favorites to suit the time of year, such as incorporating fall vegetables into your casseroles as seasons change.

Join the Conversation

Share your experiences cooking the Ham and Cheese Hash Brown Casserole on social media! Your photography tips and adaptations encourage others to explore this and recreate this comforting dish.

Leave a review or comment with your variations and stories; our community thrives on sharing and discovering delicious recipes. Your unique approach might inspire new ideas for others!

The Recipe

Ham and Cheese Hash Brown Casserole

Serves: 6 servings

Prep Time: 15 mins

Cook Time: 45 mins

Total Time: 1 hour

Kitchen Equipment Needed

  • 9×13 inch baking dish
  • Mixing bowls
  • Whisk
  • Measuring cups and spoons

Ingredients

  • 1 package (30 oz) frozen hash browns, thawed
  • 2 cups diced ham
  • 2 cups shredded cheddar cheese
  • 4 large eggs
  • 1 cup milk
  • 1 teaspoon garlic powder
  • 1 teaspoon onion powder
  • Salt and pepper to taste
  • 1/4 cup chopped parsley (for garnish)

Directions

  1. Preheat the oven to 350°F (175°C).
  2. In a large mixing bowl, combine the thawed hash browns, diced ham, and 1 cup of cheese.
  3. In another bowl, whisk together eggs, milk, garlic powder, onion powder, salt, and pepper.
  4. Combine egg mixture with the hash brown mixture and stir until well combined.
  5. Transfer the mixture to a greased 9×13 inch baking dish and spread evenly.
  6. Top with the remaining cheese.
  7. Bake in the preheated oven for 45 minutes, or until the top is golden brown and the casserole is set.
  8. Allow to cool for 10 minutes before serving. Garnish with chopped parsley.

Recipe Notes

  • This casserole can be assembled ahead of time and refrigerated overnight.
  • Feel free to experiment with your favorite cheeses or add veggies for a nutritious boost.