Easy Buffalo Chicken Dip – Perfect for Parties and Game Day

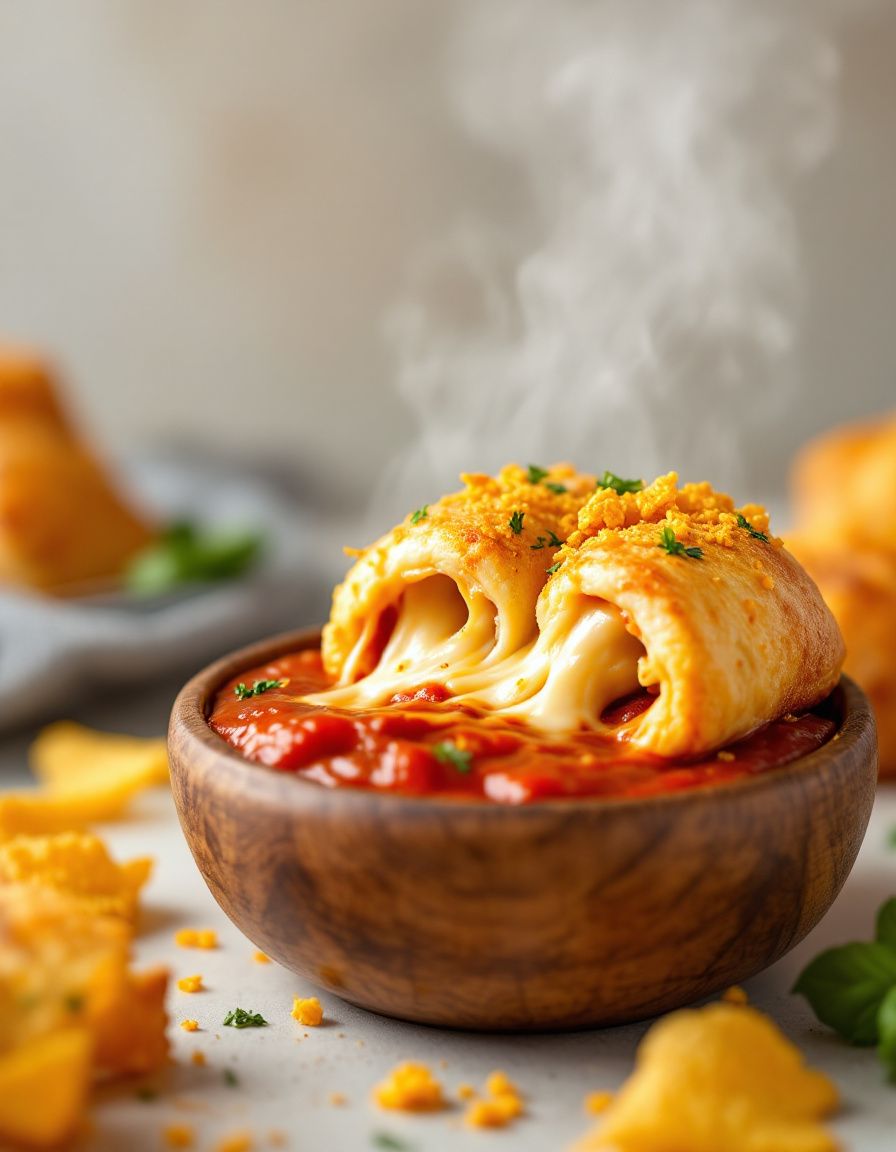
Easy Buffalo Chicken Dip: The Ultimate Game Day Snack

⚖️
Difficulty
Easy

⏲️
Prep Time
10 mins

🕒
Cook Time
20 mins

⏱️
Total Time
30 mins

🍽️
Servings
8 servings

Buffalo Chicken Dip is a beloved classic that never fails to impress at any gathering or game day event. This easy buffalo chicken dip recipe delivers the perfect combination of creamy, cheesy goodness and spicy, tangy buffalo flavor, making it an irresistible appetizer that your guests will constantly crave. Picture a bubbling, golden dip adorned with melted cheese and tender chunks of chicken, ready to be scooped up with crispy tortilla chips or fresh veggies.

The great thing about this buffalo chicken dip is its balance of flavors and textures. The cream cheese and shredded cheese meld into a smooth, gooey base, while the hot sauce adds a lively kick that will awaken your taste buds. Each bite delivers a comforting warmth, perfect for warming up those cold game nights or cozy gatherings. Serve it in a vibrant dish, and watch as the irresistible aroma draws everyone in, making it a definite star of the show.

Quick Recipe Highlights

  • Flavor Profile: Expect a combination of spicy buffalo sauce, creamy cheese, and tender chicken, delivering a satisfying punch of flavor that pairs perfectly with crunchy dippers.
  • Texture: The dip boasts a smooth and creamy base, complemented by chunks of juicy chicken, providing a delightful mouthfeel with every scoop.
  • Aroma: The enticing scent of spicy buffalo sauce mixed with melting cheese fills the room, creating an inviting atmosphere perfect for any gathering.
  • Visual Appeal: Serve this dip in a colorful dish, topped with fresh green onions or parsley, for an eye-catching presentation that will have everyone diving in.
  • Skill Level Needed: Ideal for novice cooks and beginner chefs; this recipe requires minimal technique, making it easy to whip up in no time.
  • Special Equipment: You will need a baking dish and mixing bowl, along with basic kitchen utensils like a spatula and measuring cups.

Recipe Overview

  • Difficulty Level: This easy buffalo chicken dip is perfect for those just starting out in the kitchen. It requires only basic cooking skills and can be prepared in under 30 minutes, making it a perfect choice for any host.
  • Category: This dish is an appetizer that’s excellent for parties, gatherings, or even casual family meals, fitting seamlessly into any meal plan.
  • Cuisine: Originating from American cuisine, buffalo chicken dip celebrates the bold flavors of Buffalo, New York, famously associated with Buffalo wings.
  • Cost: The ingredient list is budget-friendly, typically costing less than $15 for a full batch, depending on local prices and brand choices.
  • Season: This dish is perfect year-round but is particularly popular during colder months and during football season when warmth and comfort are beloved.
  • Occasion: Perfect for tailgating, game day parties, potlucks, and casual family get-togethers, this easy buffalo chicken dip is always a hit.

Why You’ll Love This Recipe

Buffalo chicken dip is an exquisite amalgamation of flavors and textures that tantalizes the palate. The potent blend of spicy buffalo sauce and creamy cheese creates a mouthwatering experience that lingers on the taste buds. The comforting warmth of the dip, coupled with tender chicken pieces, pushes it into the territory of comfort food at its finest.

One of the best things about this buffalo chicken dip recipe is its convenience. It comes together in just a few simple steps, meaning you can spend more time enjoying the festivities rather than worrying about meal prep. Its quick preparation time makes it suitable for last-minute gatherings, leaving you a hero amongst hosting seats.

On the nutritional front, while indulgently creamy and cheesy, you have the opportunity to fortify the dip with lean chicken and perhaps even sneak in some green veggies for added texture and nutrients. Paired with fresh veggie sticks or whole-grain chips, it’s not just a delicious choice but also a relatively wholesome snack.

Socially, this dip is a fantastic option for entertaining. It’s a dish that naturally invites sharing and creates vibrancy in any social setting, encouraging conversations and camaraderie. Whether spooned onto plates or piled onto chips, buffalo chicken dip gathers everyone together, sharing in the joy of good food and great company.

Finally, this easy buffalo chicken dip relies on inexpensive and accessible ingredients. Its cost-effectiveness ensures that you can whip up a larger batch without breaking the bank, ideal for feeding a hungry crowd during celebrations or gatherings where appetites are high, and expectations are greater.

Historical Background and Cultural Significance

The origin of buffalo chicken dip hails from Buffalo, New York, gaining fame through the legendary Buffalo wings that capture the hearts of food lovers across the United States. This flavorful introduction to cooking utilizes left-over chicken, responding to the need for a dish that is both economical and satisfying, making it an easy choice for home cooks to embrace.

Culturally, buffalo chicken dip symbolizes social gatherings, particularly sporting events, and parties. The dish has become synonymous with American cuisine, frequently appearing at tailgates and sports parties and evolving into a staple at gatherings celebrating sports buffs. Its versatility and iconic flavor have led to an enduring popularity that shows no sign of fading.

Over the years, buffalo chicken dip has evolved from its straightforward roots into a myriad of variations. From cream cheese bases to Greek yogurt alternatives for a healthier twist, this dish has been embraced and adapted by many to suit varying palates and dietary needs.

Regional varieties highlight unique spins on the classic recipe. From adding ranch seasoning to incorporating different cheeses, variations have emerged, reflecting diverse culinary influences while maintaining the classically loved buffalo chicken flavor. Such adaptations only serve to enrich the dish’s legacy within the broader tapestry of American appetizers.

Ingredient Deep Dive

– Chicken: Chicken has a long-standing cultural significance as a versatile protein source. In this recipe, shredded chicken provides a lean base that contributes to the dish’s hearty nature. It’s rich in protein, supporting muscle maintenance and overall health. When selecting chicken, always choose fresh thoughts without any discoloration. Store it properly in the refrigerator for up to 3 days after cooking, and consider substitutes like canned chicken or rotisserie chicken for convenience.

– Cream Cheese: Cream cheese lends its silky texture and consistency to buffalo chicken dip, making the dip creamy and rich. Its origin dates back to the 19th century, primarily used in American recipes. Nutritionally, it adds a bit of calcium while keeping the dip luscious. Store it in the refrigerator sealed tightly and consume before its expiration date. For a healthier alternative, opt for low-fat cream cheese or Greek yogurt.

– Hot Sauce: A key flavoring agent in this recipe, hot sauce is what brings that spicy kick to the dish. Originating from the Caribbean, hot sauce is now a staple across various cuisines. It can boost your metabolism due to its capsaicin content, providing a healthier way to enhance flavors. When selecting hot sauce, choose based on personal heat tolerance, and store it in a cool, dark place for longer shelf life.

Common Mistakes to Avoid

  • Using cold cream cheese, which can create lumps in your dip; always bring it to room temperature for a smooth mix.
  • Adding too much hot sauce can overpower the dip; start with a smaller amount and adjust to taste.
  • Not shredding the chicken finely, leading to larger chunks that may not blend well with the dip’s texture.
  • Skipping the baking step can result in a less flavorful dip; ensure to bake for that bubbly finish.
  • Using low-quality cheese can lead to poor melting; opt for a block cheese that you grate yourself instead.
  • Ignoring the importance of seasoning; a little salt and pepper can enhance the overall flavors of the dip.
  • Cooking the dip for too long will dry it out; monitor the time to achieve the perfect creamy consistency.
  • Not following the measurements; stick to the recipe for the best flavor balance.
  • Overcooking the chicken initially; use rotisserie chicken or precooked chicken to streamline the recipe.
  • Forgetting to garnish; a sprinkle of green onions or parsley can elevate your dip visually and flavor-wise.

Essential Techniques

Blending is critical for a smooth buffalo chicken dip. Ensuring the cream cheese is softened beforehand allows easy incorporation of ingredients. A hand mixer or spatula works well, but the goal is a homogeneous mixture without lumps.

Baking is essential for achieving the elevated flavor you desire. The dip should be placed in the oven until it bubbles and the top lightly browns, which not only enhances the taste but also gives the visual appeal of a baked dish. Monitor closely to avoid burning.

Pro Tips for Perfect Easy Buffalo Chicken Dip

1. Choose your hot sauce wisely! Different brands can vary in heat levels, so taste as you go until you find your perfect balance.
2. For an extra creamy texture, try adding a splash of sour cream or Greek yogurt along with the cream cheese for an added tang.
3. Customize the spices: Feel free to add garlic powder, onion powder, or even a dash of smoked paprika to elevate the flavor.
4. Consider using a slow cooker to keep your dip warm and ready to serve for longer periods, especially during parties or gatherings.
5. Experiment with different types of cheese such as Monterey Jack or Pepper Jack for extra flavor and texture variations in your dip.
6. For a fun twist, consider serving the dip in a hollowed-out bread bowl for a unique presentation that everyone will enjoy.
7. Serve with a diverse array of dippers such as celery sticks, carrot sticks, crackers, and tortilla chips to cater to all your guests’ preferences.
8. Prepare the dip ahead of time and simply bake it when your guests arrive to save you time.

Variations and Adaptations

There are countless ways to adapt buffalo chicken dip to your liking. For a Tex-Mex twist, consider adding black beans, corn, or diced jalapeños to create a zesty variation. Not only does it enhance the flavor profile, but it also adds a wonderful burst of color to the dish.

Seasonal adaptations may come into play as well. During fall, adding sweet potatoes or pumpkin puree can add a warm flavor that complements the traditional buffalo taste. Similarly, creamy spinach or artichokes can be mixed in for a seasonal touch during the spring.

Dietary modifications like utilizing rotisserie chicken or making the dip with Greek yogurt can cater to health-conscious guests while maintaining an indulgent flavor. For a vegan version, opt for plant-based cream cheese and shredded veggie chicken, ensuring you incorporate the flavors of the buffalo sauce seamlessly.

Experimenting with texture can make your dish stand out. Consider blending some of the dip with an immersion blender for added creaminess while leaving chunkier ingredients intact for a delightful contrast in each bite.

Finally, presentation alternatives can turn this dish into a showstopper. Serve in a warm cast-iron skillet with an array of colorful vegetables or crispy chips in a creatively decorated platter to invite guests into dippers.

Serving and Presentation Guide

Serving buffalo chicken dip can be as important as making it delicious. For a classic touch, use a cast-iron skillet to keep the dip warm and inviting while adding rustic charm. When plating, ensure your garnishing contains fresh herbs or finely chopped chives for a pop of color.

Garnishes such as crumbled blue cheese on top of the dip are not only traditional but offer an appealing visual contrast against the orange hue of the buffalo sauce. Pair it with a variety of dipping options—tortilla chips, veggie sticks, and pita chips—spread artfully across the plate.

Temperature is another crucial aspect; serving the dip warm promotes the sensory experience, and guests are more likely to indulge. During serving, encourage portion control with smaller bowls or ramekins, allowing guests to enjoy conveniently while mingling.

Finally, consider themed servingware for special occasions. Using plates or dishes that match the theme of your gathering can elevate the dining experience and create memorable presentations.

Wine and Beverage Pairing

To complement the zingy flavors of buffalo chicken dip, consider pairing it with a chilled Riesling or a Gewürztraminer; both wines offer sweetness that balances the heat from the dip. If you prefer red wine, a fruity Zinfandel can also harmonize well with the bold flavors.

For non-alcoholic options, offer sparkling waters infused with lemon or lime to cleanse the palate between tasty dips. Alternatively, craft a refreshing iced tea with hint of mango or peach to echo the flavor profile beautifully.

If you highly enjoy coffee, a darker brew or espresso can contrast pleasantly with the dish’s flavors while enhancing the experience. Just ensure beverages are served cold unless opting for hot coffee.

Always consider serving suggestions that align with your chosen pairings, ensuring that drinks are readily available and easy to access for your guests while enjoying the snack.

Storage and Shelf Life

When it comes to storage, buffalo chicken dip should be kept covered in an airtight container to maintain freshness. Stored in the refrigerator, this dip can last between 3 to 5 days after preparation, making it a great option for leftovers.

For longer storage options, you may freeze buffalo chicken dip before baking. Place it in a freezer-safe container, and it will last up to 3 months. Be sure to thaw it in the refrigerator overnight before baking.

Upon reheating, check for freshness and don’t consume if there are any signs of spoilage, such as an off smell or discoloration. When reheating, do so gently in the oven or microwave, stirring frequently until it is heated through and creamy once again.

Utilizing the proper container can also aid in maintaining the dip’s integrity; consider glass or heavy-duty plastic containers without BPA to ensure sustainability and safe re-heating.

Make Ahead Strategies

To ensure your buffalo chicken dip is ready when guests arrive, consider preparing the mixture a day in advance. Store the combined ingredients in the refrigerator, allowing their flavors to meld overnight. On the day of serving, incorporate any garnishes and bake the dip right before your guests arrive.

Create a timeline by prepping the dip a few hours before the event. Storing each component separately until assembly helps preserve texture — keep chips, vegetables, and the dip in separate containers.

If you opt for a slow cooker, prepare the dip ahead of time; once it’s assembled, keep it warm in the slow cooker if needed. This strategy allows you to mingle with guests without worrying about keeping an eye on the oven.

Finally, consider what fresh elements you might add right before serving—chopped herbs or the addition of more cheese—ensuring the dip tastes fresh and vibrant.

Scaling Instructions

Scaling up your buffalo chicken dip recipe is simple; for small gatherings, halving the recipe works while maintaining the same flavor profiles. Just remember to adjust your baking dish size appropriately based on your new quantities.

For larger gatherings, doubling or tripling the recipe is equally straightforward. Note the increased cooking time; a larger batch may require a bit more time in the oven to achieve that bubbly top.

If scaling significantly, perhaps consider using an extra-large baking dish. Bigger dishes distribute heat differently, so keep an eye on the dip while it bakes to avoid uneven cooking.

Always ensure storage considerations are proportional; when increasing your recipe size, use airtight containers that can accommodate the larger batch to preserve quality during storage.

Nutritional Deep Dive

When assessing the nutritional components of buffalo chicken dip, the macro breakdown reveals approximately 250 calories per serving, primarily from fats and proteins. It contains about 15 grams of protein and a substantial amount of saturated fat from the cream cheese and cheese used.

Micronutrient analysis shows essential vitamins and minerals, as cheese brings calcium while chicken serves as a strong protein source, offering benefits that support bone health and muscle recovery. Introducing veggies as dippers increases the micronutrient density of this dish, promoting healthier snacking.

Health benefits revolve around using lean chicken and cutting back on excess oils or fats where possible, allowing for a relatively healthier appetizer option. The key is moderation; enjoying buffalo chicken dip with vegetables ensures a balance.

Portion analysis is critical; serving smaller amounts can help prevent overindulgence while still allowing you to enjoy the savory flavors. Pair with veggie sides for a gratifying snack without the excess calories.

Dietary Adaptations

For gluten-free needs, buffalo chicken dip is naturally gluten-free, making it easy for those with dietary restrictions to enjoy. Just ensure any dipping options like chips are also gluten-free.

For a dairy-free version, swap cream cheese and regular cheese for plant-based alternatives, which can yield a deliciously creamy result while adhering to dietary needs.

Vegan adaptations require using shredded jackfruit or tofu in place of chicken and combining it with plant-based cheese or a nut-based dip to achieve the characteristic creaminess without animal products.

Low-carb health enthusiasts can replace tortilla chips with cucumber or celery sticks as dippers, maintaining the flavors without the carbs. You can also utilize cauliflower pieces for a vibrant twist.

For a keto-friendly approach, ensure to select low-carb varieties of all ingredients, balancing proteins and fats while cutting out carbohydrates wherever possible for optimal results.

Troubleshooting Guide

If your buffalo chicken dip is too thick, consider adding a dash of milk or broth while stirring to achieve a creamier consistency before serving. Always monitor the mixture to avoid gumminess.

In case of flavor balance issues, review the amounts of hot sauce—add a little sweetness, like honey or sugar, to balance overt spiciness instead of overwhelming flavors.

If the dip overheats and separates during baking, it may have been in the oven for too long; lower temperatures while ensuring to monitor closely. The right balance of heat and time ensures a smooth, bubbly dip.

Equipment challenges may arise if using inferior mixing tools; always opt for high-quality kitchen appliances to ensure even mixing and a professional-quality outcome.

Timing concerns during preparation can be mitigated by pre-chopping and organizing your ingredients to speed up the process, helping alleviate stress during cooking.

Recipe Success Stories

Community feedback around the easy buffalo chicken dip has been overwhelmingly positive. Readers praise its simplicity and delicious flavor, often mentioning how it has become a staple in their game day spread.

Countless variations have emerged from viewers as they adapt the recipe to fit their tastes, sharing their unique twists like corn additions or spice hints that create memorable experiences.

Adaptation stories from several families highlight how this dip has made its way into celebrations and family gatherings, embodying friendship and food just like the best recipes do.

Readers often share photography tips to showcase the dip in its best light, emphasizing garnishing and plating techniques that enhance the visual appeal immensely.

Each story, suggestion, and adaptation shared strengthens the community around buffalo chicken dip, bringing food lovers together to celebrate their own versions of this classic dish.

Frequently Asked Questions

Can I make buffalo chicken dip ahead of time?

Yes! You can prepare the mixture a day in advance and store it in the fridge until you’re ready to bake. This helps the flavors to meld nicely.

How do I reheat buffalo chicken dip?

Reheat in the oven at 350°F (175°C) for about 15-20 minutes or microwave in short bursts, stirring until it’s thoroughly heated and creamy.

Can I freeze buffalo chicken dip?

Absolutely! Freeze the unbaked dip in an airtight container for up to three months. Thaw it overnight in the fridge before baking.

What can I use as dippers?

Fresh vegetables like celery, carrots, and bell peppers work well. Tortilla chips, pita chips, and even garlic bread can accompany the dip beautifully.

How can I make this recipe healthier?

Swap regular cream cheese and cheese for lighter or dairy-free alternatives. You can also incorporate more veggies or serve it with healthier dippers.

What if the dip is too spicy for my taste?

To tone down the heat, mix in a bit more cream cheese or sour cream to balance the flavors, or consider adding some sugar to create contrast.

Is buffalo chicken dip gluten-free?

The dip itself is gluten-free, but ensure that any dippers you choose, like chips or bread, are also labeled gluten-free.

Can I make this dip in a slow cooker?

Yes! Combine all ingredients in a slow cooker on low for 2-3 hours or on high for 1-2 hours until everything is melted and bubbly.

What’s the best way to store leftovers?

Store leftovers in an airtight container in the refrigerator for 3-5 days. Make sure to let it cool before sealing.

How do I add more flavor to the dip?

Add in spices like garlic powder, onion powder, or herbs like dill into the mixture to enhance the flavor profile.

Can I substitute the chicken?

Yes, canned chicken, rotisserie chicken, or even shredded tofu for a vegetarian option works well in this recipe.

Additional Resources

Dive deeper into cooking with related recipes that celebrate bold flavors similarly, such as different wing recipes or classic dips. Explore technique guides for perfect blending issues, baking tips, and serving strategies that can elevate your hosting skills.

Ingredient guides can aid in understanding the health benefits of key ingredients used in buffalo chicken dip while promoting exploration into new flavors. Equipment recommendations ensure you have the best tools for success, making your cooking experiences enjoyable and simpler.

Lastly, check for seasonal variations to keep your recipe fresh and exciting while adapting it for different occasions and guests.

Join the Conversation

Engage with the community by sharing your buffalo chicken dip experiences on social media. Use hashtags related to recipes, and feel free to tag us with your own version. Invite your friends and family to join in and celebrate the fantastic world of cooking together.

Encourage photography standards that highlight the beauty of your dish; share your plating techniques, garnishes, and innovative adaptations in your presentations. Engaging through reviews enables everyone to discover new favorites and inspiring ideas.

Share your recipe variations or modifications, and encourage others to try out their culinary creativity. Join the growing network of food lovers; together, we can unlock countless exciting possibilities in the kitchen.

The Recipe

Easy Buffalo Chicken Dip

Serves: 8 servings

Prep Time: 10 mins

Cook Time: 20 mins

Total Time: 30 mins

Kitchen Equipment Needed

  • Baking dish
  • Mixing bowl
  • Measuring cups
  • Spatula

Ingredients

  • 2 cups shredded cooked chicken
  • 1 (8 oz) package cream cheese, softened
  • 1 cup shredded cheddar cheese
  • 1/2 cup buffalo sauce
  • 1/2 cup ranch dressing
  • 1/4 cup chopped green onions (for garnish)
  • Salt and pepper to taste

Directions

  1. In a mixing bowl, combine shredded chicken, softened cream cheese, buffalo sauce, ranch dressing, and 1/2 cup shredded cheddar cheese.
  2. Mix until well combined and creamy.
  3. Spread the mixture into a baking dish and sprinkle the remaining cheddar cheese on top.
  4. Bake in the preheated oven for 20 minutes or until bubbly and golden brown.
  5. Remove from the oven, garnish with chopped green onions, and serve with your choice of dippers.

Recipe Notes

  • For extra creaminess, mix in some sour cream or Greek yogurt.
  • Feel free to adjust the amount of buffalo sauce to suit your heat preference.
  • This dip can also be made in a slow cooker on low for 2-3 hours.
  • Great for meal prep; make it ahead and bake when ready to serve.
  • Leftovers can be stored in the refrigerator for 3-5 days.

Best Korean BBQ Meatballs with Spicy Mayo Dip

Korean BBQ Meatballs with Spicy Mayo Dip: A Flavorful Delight

⚖️
Difficulty
Easy

⏲️
Prep Time
15 mins

🕒
Cook Time
20 mins

⏱️
Total Time
35 mins

🍽️
Servings
4

If you’re looking for a delightful appetizer or a tantalizing main dish, Korean BBQ Meatballs with Spicy Mayo Dip is sure to impress your taste buds. These succulent meatballs are infused with the irresistible flavors of Korean BBQ, combining sweet, savory, and umami elements in each bite. The spicy mayo dip adds a perfect touch of creaminess and heat, elevating this dish to new heights. Whether you’re hosting a party or enjoying a cozy night in, these meatballs are a must-try!

The meatballs are not just delicious; they are also easy to prepare, making them an excellent choice for both experienced cooks and beginners alike. The vibrant flavors from the ginger, garlic, and green onions create a harmonious blend that will have everyone reaching for more. Plus, the quick cooking time means you can whip these up in no time, making them a fantastic weeknight meal or a quick snack during game day.

Quick Recipe Highlights

  • Flavor Profile: A delightful blend of sweet, spicy, and savory flavors derived from Korean seasonings such as gochujang and soy sauce.
  • Texture: Juicy, tender meatballs with a satisfying crispy exterior that contrasts perfectly with the creamy dip.
  • Aroma: Inviting notes of garlic and sesame fill your kitchen, creating an enticing atmosphere.
  • Visual Appeal: Vibrant, glazed meatballs garnished with green onions add a pop of color to your table.
  • Skill Level Needed: Perfect for home cooks of all skill levels, requiring basic cooking techniques.
  • Special Equipment: A baking sheet for roasting the meatballs and a mixing bowl for combining ingredients.

Recipe Overview

  • Difficulty Level: Easy, making it accessible for beginners and perfect for a quick yet impressive dish.
  • Category: This dish can serve as an appetizer, party snack, or a main course, fitting various dining occasions.
  • Cuisine: Rooted in Korean culinary traditions, this recipe incorporates essential flavors characteristic of Korea’s vibrant food scene.
  • Cost: Affordable ingredients mean this recipe is budget-friendly, making it great for regular meal rotation.
  • Season: Ideal year-round, but especially delightful during gatherings and celebrations.
  • Occasion: Perfect for parties, family dinners, or casual get-togethers, adding excitement to any meal.

Why You’ll Love This Recipe

These Korean BBQ meatballs offer a unique combination of taste and texture that is hard to resist. The mix of flavors derived from carefully selected ingredients creates a complex but harmonious taste sensation. The incorporation of ginger and garlic in the meatballs adds depth, while gochujang introduces a lovely kick. The creamy sweetness of the spicy mayo dip completes the experience, making each bite a culinary delight.

One of the main advantages of this recipe is its convenience. With a short prep and cook time, you can whip up a batch of these meatballs in under 40 minutes. This makes it an excellent weeknight meal option. Moreover, the simplicity of the recipe allows for customization based on your preferences—feel free to adjust the spiciness or add vegetables for a healthier twist.

Nutritionally, meatballs provide a good source of protein, making them great for those looking to maintain a balanced diet. In addition to protein, they can also be paired with a side of vegetables to enhance the nutrient profile, providing fiber and essential vitamins alongside your meal.

Socially, these meatballs are perfect for entertaining guests. The interactive nature of enjoying meatballs with a dip brings people together, making them an ideal choice for potlucks, game days, or holiday gatherings. Plus, their bite-sized nature makes them easy to enjoy while mingling.

In terms of cost-effectiveness, the ingredients are generally affordable, which makes these meatballs a budget-friendly option for feeding a crowd. A simple grocery list and minimal prep make them accessible for home cooks everywhere, ensuring everyone can enjoy this dish without breaking the bank.

Historical Background and Cultural Significance

Korean BBQ has its origins in traditional Korean cuisine, where grilling meats at the table is a popular social activity. The culinary practice has evolved over centuries, influenced by various regional ingredients and cooking styles. Korean BBQ meatballs, while a modern adaptation, reflect the deeper traditions of communal dining and shared meals within Korean culture.

Historically, barbecuing meat has been an integral part of Korean social customs, fostering camaraderie and connection among families and friends. The joy of preparing and sharing BBQ together underlines the importance of relationships, valuing both the meal and the time spent together.

As the recipe for Korean BBQ meatballs has emerged, it has taken on regional variations in ingredients and cooking styles, showcasing the diverse flavors found across Korea’s provinces. Many families have their own takes on this dish, reinforcing the idea that food is not just sustenance but also a way to connect with one’s heritage.

In recent years, global popularity has brought Korean BBQ to the forefront of international cuisine, with meatballs taking center stage. Their versatility allows for creativity, making them suitable for various palettes while still honoring traditional flavors, connecting people worldwide through food.

Ingredient Deep Dive

Ground Meat

Ground meat, typically beef or pork in this recipe, has a rich history as a staple in many cultures. Its texture allows it to absorb flavors well, making it a prime candidate for bold seasonings like garlic and soy sauce. Furthermore, it’s a great source of protein, essential for a balanced diet.

When selecting ground meat, look for fresh options with a good fat content to ensure juiciness. Store it in the refrigerator and use it within a day or two; alternatively, it can be frozen for longer storage. If needed, substitute with ground turkey or chicken for a lighter version of this dish.

Gochujang (Korean Red Chili Paste)

Gochujang is a fermented red chili paste that brings a unique umami flavor to dishes. With roots in Korean cuisine, it not only adds heat but also depth and sweetness. Nutritionally, gochujang contains beneficial probiotics and is lower in calories compared to traditional hot sauces.

Opt for high-quality gochujang for the best flavor. Store it in a cool, dry place, and it can last for months in your pantry. If you cannot find gochujang, consider using a mix of soybean paste and chili powder as a substitute.

Spring Onions

Spring onions are celebrated in many cuisines for their mild flavor and versatility. They add a freshness that brightens dishes, balancing the richness of meat. They are low in calories and high in vitamins A and C, contributing to a healthy diet.

Choose spring onions that are firm with bright green tops. Store them in the fridge in a plastic bag, and they can last up to a week. If unavailable, scallions or green onions can serve as great substitutes.

Common Mistakes to Avoid

  • Overmixing the meat mixture can lead to tough meatballs. Mix just until combined for a tender result.
  • Not allowing the meatballs to rest before cooking may lead to misshapen meatballs. Take a few minutes to form them properly.
  • Using low-quality meat can affect the flavor and texture. Always opt for fresh ingredients to enhance taste.
  • Failing to preheat the oven may result in uneven cooking. Ensure your oven is at the right temperature before baking.
  • Skipping the dip can leave your meatballs lacking in flavor balance. The spicy mayo dip is essential for a complete dish!
  • Not checking for doneness can lead to undercooked meatballs. Use a meat thermometer to ensure they reach a safe temperature.
  • Using the wrong type of pan can affect how the meatballs cook. Opt for a baking sheet or pan that promotes even cooking.
  • Forgetting to season the meat mixture appropriately can make the meatballs bland. Always taste a small bit of the mixture before forming.
  • Neglecting to garnish with additional green onion can make the dish lack visual appeal. A sprinkle of freshness enhances presentation.
  • Storage mishaps can lead to spoilage. Ensure meatballs are stored properly to maintain freshness after cooking.

Essential Techniques

Meatball Formation

Properly forming meatballs is essential for even cooking. Use a spring-loaded scoop for consistent sizing and roll gently in your hands to avoid compressing the meat too much. Watch for a slightly tacky texture; this indicates just the right amount of moisture.

Baking Method

Baking meatballs is an easy and efficient method. It allows for even cooking and reduces fat compared to frying. Line your baking sheet with parchment paper to prevent sticking and promote browning. Keep an eye on cooking time to avoid overcooking.

Creating the Dip

The Spicy Mayo Dip balances the meatballs’ richness. Mix mayonnaise with gochujang and some lime juice for brightness. Adjust the spice level to your preference. Taste test before serving and consider a dash of sesame oil for depth.

Pro Tips for Perfect Korean BBQ Meatballs

1. For added flavor, consider marinating the meat briefly before mixing the ingredients; it enhances the overall taste and aroma.

2. Use fresh herbs for garnishing; this not only adds color but also brightens up the dish.

3. Make a double batch—these meatballs freeze very well for later use, ensuring you have a quick meal available.

4. Experiment with different types of dipping sauces for a unique twist—try soy sauce with sesame oil alongside the mayo dip.

5. Include diced vegetables within the meat mixture for added nutrition and texture, such as finely grated carrots or bell peppers.

6. Ensure even cooking by spacing meatballs adequately on the baking sheet; overcrowding leads to steaming rather than browning.

7. Use a touch of brown sugar in the meat mixture for a hint of sweetness that balances the flavors beautifully.

Variations and Adaptations

Regional variations of Korean BBQ meatballs may include the addition of local spices or ingredients, enhancing their flavor profiles. Adapt this recipe seasonally by incorporating fresh herbs or vegetables available in farmers’ markets, such as zucchini in summer.

For dietary modifications, consider replacing ground meat with plant-based alternatives for a vegan option. This keeps the dish hearty while catering to different dietary needs. Flavor variations might include using different sauces or spices, such as hoisin or teriyaki sauces, for fusion-style meatballs.

Texture modifications can be made by introducing breadcrumbs or rolled oats into the mixture, adding a delightful crunch while also serving as a filler. Explore various presentation alternatives by serving meatballs on skewers for a fun twist during parties.

Serving and Presentation Guide

Plating techniques can dramatically enhance the appeal of your meatballs. For a rustic presentation, arrange the meatballs on a wooden board with a small bowl of spicy mayo in the center. Garnish with sesame seeds and thinly sliced green onions for a pop of color.

Consider traditional accompaniments like steamed rice or fluffy bao buns, both of which complement the meatballs beautifully. Additionally, modern serving suggestions include mini skewers for a fun finger food option, perfect for gatherings.

Temperature considerations are key; serve meatballs warm alongside the dip to keep the flavors vibrant. Portion control can be managed by offering small individual servings, encouraging guests to try multiple flavors or variations.

Wine and Beverage Pairing

For wine pairings, a light-bodied red like Pinot Noir complements the dish’s spiciness without overpowering it. If you prefer white, consider a Riesling; its sweetness balances the heat from the spicy mayo beautifully.

For non-alcoholic alternatives, try sparkling water infused with citrus for a refreshing contrast to the rich flavors. If you enjoy coffee or tea, a lightly brewed green tea can offer a subtle flavor harmony, cleansing the palate effectively.

Storage and Shelf Life

For proper storage methods, place cooked meatballs in an airtight container in the refrigerator. They can last for 3-4 days. It’s best to separate the meatballs from the dip, keeping both fresh and flavorful.

Check for signs of spoilage, such as off-smells or unusual textures, before consuming. When reheating, ensure meatballs reach an internal temperature of 165°F. Freezing guidelines suggest placing cooled meatballs in a freezer-safe container; they will last up to three months.

Make Ahead Strategies

For efficient meal prep, consider preparing the meatballs ahead of time. You can form them, then refrigerate or freeze them until you’re ready to bake. This cuts down your cooking time on busy days.

Store the spicy mayo in a separate container, and it can be prepared a couple of days ahead, maintaining its freshness. When you’re ready to serve, simply reheat the meatballs and enjoy!

Scaling Instructions

To halve the recipe, simply divide all ingredient quantities by two, adjusting cooking times as necessary. Conversely, when doubling or tripling, keep in mind the cooking time may increase slightly—use a meat thermometer for best results.

Be mindful of equipment adjustments; ensure your baking sheets are large enough to accommodate all meatballs at once for even cooking. Also, additional storage considerations should be made if preparing larger quantities, allowing for proper freezing methods.

Nutritional Deep Dive

The macro breakdown for Korean BBQ meatballs includes a solid protein source, aided by the ground meat. This helps in muscle repair and maintenance, ideal for active lifestyles. The fat content will vary based on meat selection, so choose wisely based on dietary preferences.

Micronutrient analysis reveals vitamins from added vegetables, providing traditional health benefits alongside your main protein. Maintaining healthy portions aids in weight management, allowing flexibility in fitting these meatballs into your meal planning without excessive calorie intake.

Dietary Adaptations

For gluten-free adaptations, use gluten-free breadcrumbs or oats in the meat mixture. Vegan versions can replace ground meats with chickpeas or lentils combined with spices to maintain flavor.

For those on a dairy-free diet, the spicy mayo can easily be made with dairy-free alternatives or omitted entirely in favor of Asian sauces that cater to your dietary needs. Similar considerations can be applied for low-carb and keto-friendly adaptations, focusing on adjusting fillers and dips according to preferences.

Troubleshooting Guide

If you find your meatballs are too dry, consider adding a little more fat, like oil, or mix slightly more fresh ingredients. For flavor balance, re-evaluate seasoning before cooking; an overly bland mixture can easily be adjusted.

For temperature issues, make sure your oven is accurately calibrated to avoid under or overcooking your meatballs. Experiment with smaller batches first; this allows for perfecting timing and seasoning before preparing larger portions.

Recipe Success Stories

Community feedback highlights the ease and accessibility of this recipe, particularly praising how quickly it can be made. Many have shared successful variations tailored to their personal tastes, enhancing the dish’s versatility.

Readers have reported success in adapting the recipe for large gatherings, with some local celebrities endorsing it at events. This success speaks to the adaptable nature of the recipe and its universal appeal.

Frequently Asked Questions

Q1: Can I freeze Korean BBQ meatballs? Yes, they freeze well. Allow them to cool completely, then place them in an airtight container in the freezer for up to three months.

Q2: How do I reheat the meatballs? Reheat them in the oven at 350°F for about 15 minutes or until heated through. Ensure they reach an internal temperature of 165°F.

Q3: Can I use a different type of meat? Absolutely! Ground turkey, chicken, or even plant-based options can work just as well.

Q4: How spicy is the dip? The spice level can be adjusted by adding more or less gochujang. Start with a smaller amount and adjust to taste.

Q5: Can I use fresh garlic instead of powdered? Yes, fresh garlic adds more flavor. Use about 1 clove for every teaspoon of garlic powder.

Q6: What can I serve with these meatballs? They pair beautifully with steamed rice, fresh vegetables, or even mini bao buns for a fun twist.

Q7: How long does it take to cook the meatballs? Cooking time is typically around 20 minutes at 400°F until golden brown.

Q8: Can this recipe be doubled? Yes, just double all ingredients and adjust cooking times if necessary.

Q9: How should I store leftovers? Store leftovers in an airtight container in the refrigerator for up to four days.

Q10: Is the spicy mayo suitable for dipping? Yes! It’s designed for dipping and can also be drizzled over the meatballs for extra flavor.

Additional Resources

For more delightful Korean recipes, explore our collection that features side dishes like kimchi and tangy pickled vegetables. Technique guides on grilling and marinating will enhance your culinary skills, while ingredient information helps you understand local produce and specialty items.

Consider investing in high-quality kitchen tools to simplify the cooking process. Understanding seasonal variations can also inspire you to adapt dishes based on what’s fresh and available, yielding maximum flavor.

Join the Conversation

We invite you to share your experiences with this recipe on social media. Tag us in your photos and reviews, telling us how your meatballs turned out! Join our community discussions to share variations and suggestions for enhancing the dish.

Your feedback is invaluable; let us know what adjustments you’ve made to cater to your taste. Sharing ideas can spark creativity and inspire others to try new takes on these Korean BBQ meatballs!

The Recipe

Korean BBQ Meatballs

Serves: 4

Prep Time: 15 mins

Cook Time: 20 mins

Total Time: 35 mins

Kitchen Equipment Needed

  • Baking sheet
  • Parchment paper
  • Mixing bowl
  • Measuring cups and spoons
  • Meat thermometer

Ingredients

  • 1 lb ground beef (or meat of choice)
  • 2 green onions, finely chopped
  • 2 cloves garlic, minced
  • 1 tablespoon ginger, grated
  • 2 tablespoons soy sauce
  • 2 tablespoons gochujang
  • 1/2 cup breadcrumbs
  • 1 egg
  • Salt and pepper to taste
  • 1/2 cup mayonnaise
  • 1 tablespoon gochujang (for the dip)
  • 1 teaspoon lime juice (for the dip)

Directions

  1. Preheat the oven to 400°F (200°C). Line a baking sheet with parchment paper.
  2. In a mixing bowl, combine ground beef, green onions, garlic, ginger, soy sauce, gochujang, breadcrumbs, egg, salt, and pepper.
  3. Mix gently until just combined. Avoid overmixing.
  4. Form the meat mixture into small balls (about 1 inch in diameter) and place them on the prepared baking sheet.
  5. Bake in the preheated oven for 20 minutes or until golden brown and cooked through.
  6. While the meatballs are baking, prepare the spicy mayo dip by mixing mayonnaise, gochujang, and lime juice in a bowl.
  7. Once the meatballs are done, remove them from the oven and let them cool slightly before serving.

Recipe Notes

  • For a milder sauce, reduce the amount of gochujang in the dip.
  • Add other ingredients like shredded carrots or zucchini for an extra nutritional boost.
  • This recipe is versatile; feel free to substitute proteins to suit dietary preferences.

Copycat Chicken Salad Chick’s Grape Salad Recipe Made Easy

Copycat Chicken Salad Chick’s Grape Salad: A Refreshing Sweet Treat

⚖️
Difficulty
Easy

⏲️
Prep Time
15 mins

🕒
Cook Time
0 mins

⏱️
Total Time
15 mins

🍽️
Servings
8

If you’re craving a delightfully refreshing dish, look no further than this Copycat Chicken Salad Chick’s Grape Salad. This creamy, sweet salad is a perfect way to bring a burst of flavor to your summer gatherings, potlucks, or even as a snack on a hot day. The combination of plump grapes, creamy dressing, and hints of sugar elevates a simple salad into a luxurious experience that delights the senses. It’s easy to prepare and will quickly become a favorite among friends and family.

Imagine the scene: you’re enjoying a sunny afternoon, a cool breeze blowing, and you have a bowl of this luscious grape salad in front of you. Each bite presents a perfect balance of sweet and creamy flavors, refreshing your palate and leaving you wanting more. It’s the ideal dish for any occasion and is sure to impress guests with its simplicity and amazing taste.

Quick Recipe Highlights

  • Flavor Profile: This grape salad balances sweetness with a creamy texture, making it a delicious dessert or side dish.
  • Texture: The burst of juicy grapes combined with a smooth creaminess delivers a satisfying mouthfeel that’s hard to resist.
  • Aroma: The fresh scent of grapes paired with a hint of vanilla creates an inviting aroma that draws you in.
  • Visual Appeal: The vibrant colors of green and red grapes mixed with creamy dressing make for an eye-catching presentation.
  • Skill Level Needed: This recipe is beginner-friendly, requiring no cooking skills, just some mixing and chilling.
  • Special Equipment: You only need basic kitchen items like bowls and utensils to prepare this delightful dish.

Recipe Overview

  • Difficulty Level: The ease of preparation makes this salad perfect for cooks of all skill levels. With minimal effort, you can whip up a delicious dish that feels indulgent.
  • Category: This recipe fits well in the dessert or side dish categories, serving wonderfully at events or as a sweet addition to your lunch.
  • Cuisine: This salad represents a modern American approach to combining sweet fruits with creamy elements, showcasing trends in contemporary cuisine.
  • Cost: Cost-wise, this dish is quite affordable, with common ingredients that you likely already have on hand or can find at your local grocery store.
  • Season: Best enjoyed in the warmer months when grapes are in season, this salad also makes a refreshing treat for holidays.
  • Occasion: Perfect for potlucks, picnics, and family gatherings, this grape salad will brighten any occasion with its vibrant flavors.

Why You’ll Love This Recipe

The appeal of this Copycat Chicken Salad Chick’s Grape Salad stems from its delightful taste and texture. The sweet grapes burst in your mouth, enhanced by the creamy dressing that leaves a subtle lingering sweetness. It’s a dish that both kids and adults adore, making it a family favorite during summer barbecues and get-togethers.

Convenience is another advantage of this recipe; with only a few ingredients and minimal prep time, you can have this salad ready in a flash. It requires no cooking, making it a hassle-free option for those evenings when you want something sweet but don’t have hours to spend in the kitchen.

Nutritionally, grapes are packed with antioxidants and vitamins, making this salad not only delicious but also a smart choice. They provide hydration and bring natural sweetness to the dish, allowing you to enjoy dessert without guilt.

This recipe shines in social and entertaining settings. It’s an excellent conversation starter at potlucks, as many will want to know your secret to that delightful flavor. Sharing this recipe is a great way to foster connection and create lasting memories over delicious food.

Cost-effectiveness is key for those on a budget. The ingredients can be easily sourced, and you can make a large batch without breaking the bank. This makes it an ideal option for large gatherings, ensuring that everyone can enjoy a taste of something sweet and satisfying.

Historical Background and Cultural Significance

The origins of grape salad are somewhat unclear, but it is believed to have emerged in the mid-20th century in American kitchens, particularly as a potluck favorite. Its simplicity and the innate appeal of fresh fruits made it popular, often featured alongside heavier dishes during gatherings.

In contemporary culinary culture, grape salad embodies the trend towards lighter, fresher desserts. It represents a shift from more traditional, heavier sweets to fruit-based options that are lighter yet satisfying. This represents a broader culinary movement towards health consciousness without sacrificing taste.

As grape salad has evolved, so too have the ingredients. While traditional recipes often include just grapes and a sweet cream dressing, modern variations embrace nuts, cheese, and alternative sweeteners, adapting to dietary preferences and enhancing flavors.

Regionally, grape salad has gained traction in several parts of the United States, particularly in the South, where fresh fruits are abundant. It often appears at summer gatherings, barbecues, and holiday feasts, highlighting its adaptability and timeless appeal in various culinary contexts.

Ingredient Deep Dive

Grapes: Grapes are not just delicious; they bring a burst of hydration and nutrients. Rich in antioxidants, they contribute to heart health and help maintain a balanced diet. When selecting grapes, look for firm, plump options without wrinkles, and store them in the refrigerator for freshness.

Cream Cheese: This ingredient adds a rich, creamy texture to the salad. Cream cheese provides protein and calcium, enhancing the nutritional profile. Be sure to let it soften before mixing for optimal blending. If you’re looking for an alternative, consider using yogurt for a lighter version.

Common Mistakes to Avoid

  • Not washing grapes thoroughly: Always rinse grapes under cold water to ensure they’re free from dirt and pesticides before serving.
  • Using unripe grapes: Choose fully ripe grapes for the sweetest flavor; unripe ones can be tart and unpleasant.
  • Overmixing the salad: Gently fold the ingredients to prevent the grapes from breaking, maintaining their lovely shape and freshness.
  • Skipping chilling time: Allowing the salad to chill enhances its flavors; don’t rush the process!
  • Using stale ingredients: Fresh ingredients are key—check expiration dates on cream cheese and other perishables.
  • Ignoring texture balance: Consider adding nuts or coconut for added crunch to contrast the creamy dressing and juicy grapes.
  • Not adjusting sweetness: Taste your dressing and adjust the sugar based on the tartness of the grapes; not all batches are equal.
  • Forgetting to serve cold: A chilled salad enhances refreshment; ensure it’s stored in the refrigerator until serving.

Essential Techniques

Mixing: The softening of cream cheese is crucial for thorough mixing. Use a whisk or an electric mixer at a low speed to avoid over-aeration, which can lead to runny dressing.

Chilling: Allowing the salad to chill for at least an hour helps the flavors meld beautifully. Use a covered bowl or plastic wrap to prevent absorption of other odors in the fridge.

Pro Tips for Perfect Copycat Chicken Salad Chick’s Grape Salad

1. Experiment with dressing variations: Try adding marshmallow cream for a sweeter twist or Greek yogurt for a protein boost.

2. Incorporate nuts for crunch: Walnuts or pecans can add a delightful texture contrast to the creaminess.

3. Use various grape colors: Mixing red and green grapes not only enhances flavor but also presentation.

4. Adjust sweetness: Depending on the grapes, you might want to add a touch more sugar or honey to the dressing.

5. Garnish creatively: Consider topping with shredded coconut or drizzling with honey for extra flair.

6. Serve in individual cups: Presenting the salad in small cups can make it the perfect portion for parties.

Variations and Adaptations

Regional interpretations may include local fruits, such as berries or tropical options. Seasonal adaptations such as adding grated apples or pears can enhance the freshness and crunch.

For dietary modifications, this grape salad can be made vegan using dairy-free cream cheese alternatives, while adjustments in sweetness can suit low-carb diets by replacing sugar with stevia.

Flavors can be enhanced with citrus zest or a splash of vanilla extract. These can transform the profile for those looking for a twist while still enjoying a classic dish.

Texture modifications can include adding crunchy cereals or using an alternative to traditional nuts for those with allergies. A sprinkle of chia seeds can also add interesting texture and nutritional benefits.

Serving and Presentation Guide

For plating, consider using clear bowls or individual cups to highlight the colorful grapes. A simple garnish of mint leaves can add a touch of elegance.

Garnishing ideas include sprinkling shredded coconut on top or adding a light drizzle of honey before serving. These not only enhance beauty but also taste.

Modern serving suggestions could involve pairing with a light dessert wine or refreshing sparkling water alongside this salad for a balanced meal.

Temperature considerations are key; ensure the salad is served cold for optimal refreshment, especially on warm days.

For portion control, consider prep servings in small cups, perfect for potlucks or parties, making it easy for guests to enjoy a manageable size.

Wine and Beverage Pairing

For wine pairings, consider a sweet Riesling or a light Moscato that complements the sweetness of the grapes without overpowering them. These wines enhance the fruitiness of the salad.

Non-alcoholic alternatives can include sparkling water with a splash of lemon, offering a refreshing pairing that matches the salad’s lightness.

If serving coffee or tea, consider a light herbal tea that won’t overpower the sweetness of the salad, perhaps a mint or chamomile variety that harmonizes nicely.

Storage and Shelf Life

To store grape salad, keep it in an airtight container in the refrigerator to maintain freshness. It’s best consumed within 3-5 days for optimal taste and texture.

Check for signs of spoilage such as an off smell or a slimy texture; freshness is key for the best experience.

For reheating, simply allow the salad to return to room temperature before serving if removed from the refrigerator, as it should be enjoyed chilled and not warmed.

Make Ahead Strategies

To prep ahead, you can wash and cut grapes a day before and store them in an airtight container in the refrigerator to save time.

Assembling the salad can be done a few hours prior to serving, allowing it to chill and flavors to meld beautifully.

For quality retention, adding nuts just before serving prevents them from becoming soggy, ensuring an enjoyable crunch.

Scaling Instructions

For halving the recipe, simply divide all the ingredient measurements by two. This is ideal for smaller gatherings or family-sized portions.

To double or triple the salad, use larger mixing bowls and ensure thorough mixing to maintain consistency in flavor and texture.

Pay attention to timing; while the mix itself doesn’t change significantly, ensuring proper chilling time remains crucial for all batch sizes.

Nutritional Deep Dive

This grape salad provides a refreshing take on desserts, offering a macro breakdown that is lower in calories compared to traditional sweets. The predominant macros include carbohydrates from grapes, providing natural sugars.

Micronutrient analysis shows grapes are a great source of Vitamin C and K, adding to their health benefits beyond just a sweet treat and aiding in overall health.

In analyzing health benefits, grapes can help improve heart health, thanks to their high antioxidant content, making this dessert not only tasty but beneficial.

For portion analysis, aim for a serving size of about half a cup, ensuring you maintain a balanced intake while enjoying this delightful dish.

Dietary Adaptations

This recipe can easily be made gluten-free by ensuring all ingredients are certified gluten-free, particularly when selecting cream cheese and additions.

For a dairy-free version, substitute cream cheese with cashew cream or vegan cream cheese options to achieve a similar consistency without dairy.

Vegans can enjoy this salad just as much, using plant-based cream alternatives and sweeteners that align with their lifestyle.

Low-carb and keto dieters can replace grapes with strawberries or blackberries, which are lower in carbohydrates, adjusting the recipe while still providing refreshment.

Troubleshooting Guide

If the salad has texture issues, ensure your ingredients were fresh. Overripe grapes can make the salad mushy, so it’s vital to select firm fruit.

For flavor balance, if it tastes too sweet, adding a squeeze of lemon juice can brighten flavors and improve overall harmony.

If temperatures are a concern, keep the bowl in a larger bowl of ice when serving to maintain its chill without losing the refreshing quality.

Common equipment challenges include ensuring the mixture blends well; use a mixer to achieve a uniform consistency without lumps.

If making substitutions, remember flavors may vary; always taste as you go to ensure you’re adjusting correctly.

Recipe Success Stories

Community feedback highlights how this copycat recipe has led many home cooks to discover a newfound love for grape salad, transforming it into a staple at gatherings.

Variations shared by readers include the introduction of different fruits, which have proven successful in adding exciting new flair to the traditional recipe.

Readers have suggested adding savory components for an unexpected twist, showing just how versatile and loved this recipe truly is.

Frequently Asked Questions

Can I use frozen grapes in this salad?
While fresh grapes are preferred for this recipe, frozen grapes can be used if you plan to serve the salad immediately. They will thaw slightly and create a refreshing texture.

Can I add other fruits to this grape salad?
Yes! Feel free to mix in diced apples, strawberries, or berries for added flavor and texture to enhance the overall experience.

How long can I store grape salad?
This salad can typically be stored in the refrigerator for up to 3-5 days, but for the best taste and texture, it is advised to consume it within the first couple of days.

Is this salad good for kids?
Absolutely! This grape salad is a perfect snack for children, combining sweetness and healthy fruit in a fun, appealing way.

What can I serve with grape salad?
This dish pairs wonderfully with grilled meats, sandwiches, or as a refreshing side at any gathering or picnic.

How do I make this salad lower in sugar?
You can reduce the sugar by substituting with a sweetener like stevia, or by using fewer grapes to lower the overall sweetness while maintaining flavor.

Can I prepare grape salad in advance?
You can! Prepare the salad a day ahead and store it in the fridge for the best flavor, but add any crunchy ingredients just before serving to keep them fresh.

What’s the best way to serve grape salad?
This salad is best served chilled, so store it in the fridge until ready to serve, allowing the flavors to meld beautifully.

Can I use Greek yogurt instead of cream cheese?
Yes, Greek yogurt can be used as a healthier substitute for cream cheese, resulting in a tangy and light version of this salad.

Is grape salad a suitable dessert option?
Absolutely! Its refreshing sweetness and creamy texture provide a wonderful alternative to heavier desserts.

Additional Resources

Explore related recipes like easy fruit salads, potluck favorites, and summer desserts that can complement your grape salad. Dive into technique guides whose focus on mixing and prepping will enhance your overall cooking skills.

Ingredient information is also vital; understanding the nutritional aspects of grapes and cream cheese can help you adjust the recipe to suit your dietary needs.

Recommendations for kitchen equipment, such as quality mixing bowls and utensils, will ensure you have the right tools on hand, while seasonal variations of fruits encourage creativity throughout the year.

Join the Conversation

We love hearing from our readers! Share your grape salad success stories, variations you’ve tried, and tips for perfecting your dish. Post your beautiful photos on social media and tag us to inspire others in our community!

Your feedback is invaluable; let us know what modifications you made and how they turned out. Engaging with fellow home cooks can lead to exciting new ideas and a vibrant cooking community.

The Recipe

Copycat Chicken Salad Chick’s Grape Salad

Serves: 8

Prep Time: 15 mins

Cook Time: 0 mins

Total Time: 15 mins

Kitchen Equipment Needed

  • Mixing bowl
  • Whisk or hand mixer
  • Spatula
  • Measuring cups and spoons

Ingredients

  • 4 cups of seedless grapes, halved
  • 1 (8 oz) package of cream cheese, softened
  • 1 cup of sour cream
  • 3/4 cup of granulated sugar
  • 1 teaspoon of vanilla extract
  • 1/2 cup of chopped pecans or walnuts

Ultimate Jalapeño Popper Football Cheese Ball for Game Day

Jalapeño Popper Football Cheese Ball: The Ultimate Game Day Snack

⚖️
Difficulty
Easy

⏲️
Prep Time
15 mins

🕒
Cook Time
0 mins

⏱️
Total Time
15 mins

🍽️
Servings
10

If you’re looking for a show-stopping appetizer to impress your guests at the next game day gathering, look no further than the Jalapeño Popper Football Cheese Ball. This delightful creation embodies all the classic flavors of a jalapeño popper, transforming them into a fun and festive shape that’s perfect for any occasion. Encased in a rich cheese mixture bursting with flavor and just the right amount of heat, this cheese ball is sure to be a hit! The best part? It requires minimal effort and prep time, making it an easy addition to your appetizer spread.

The Jalapeño Popper Football Cheese Ball not only tastes fantastic but also presents beautifully. Its football shape adds a playful touch to your table, making it an eye-catching centerpiece. Serve it with an array of crunchy crackers and fresh vegetables for a vibrant display that your guests will love. With a creamy texture and zesty kick from the jalapeños, each bite promises a delightful explosion of flavor!

Quick Recipe Highlights

  • Flavor Profile: A delightful mix of creamy cheese, smoky bacon, and spicy jalapeños.
  • Texture: Creamy and smooth on the inside, with a perfect crunch from the garnishes.
  • Aroma: The enticing scent of roasted jalapeños and crispy bacon fills the air.
  • Visual Appeal: Beautifully shaped like a football, garnished with fresh herbs for added color.
  • Skill Level Needed: Perfect for amateur cooks and seasoned chefs alike; anyone can master this recipe!
  • Special Equipment: Only basic kitchen tools are needed, making it accessible to everyone.

Recipe Overview

  • Difficulty Level: This recipe is classified as easy, requiring minimal cooking skills. The most challenging part is shaping the cheese ball, which is both fun and straightforward.
  • Category: Ideal for appetizers, snacks, and game day treats, this dish fits perfectly into any festive gathering.
  • Cuisine: Drawing inspiration from traditional American flavors, the jalapeño popper is a classic favorite in many households.
  • Cost: Incredibly budget-friendly, costing around $10 to prepare, ideal for parties.
  • Season: Perfect for football season, game day parties, and holiday gatherings.
  • Occasion: A must-have at tailgates, potlucks, and family gatherings where fun and food go hand in hand.

Why You’ll Love This Recipe

The taste and texture of the Jalapeño Popper Football Cheese Ball are simply irresistible. The creamy cheesy center harmonizes with the crunch of bacon bits and the spiciness of jalapeños, creating an explosion of flavor in every bite. It’s a comforting, nostalgic dish that transports you back to family gatherings and celebrations, making it a memorable treat that everyone will enjoy.

Convenience is another major benefit of this recipe. With just 15 minutes of prep time, you can whip up this impressive appetizer without feeling stressed. It’s a make-ahead dish that can easily be prepared the night before, allowing the flavors to meld beautifully in the fridge. Plus, it requires no baking, making it ideal for hot summer days when you want to keep your kitchen cool.

The nutritional advantages of the Jalapeño Popper Football Cheese Ball shouldn’t be overlooked either. It includes protein-rich cream cheese and the health benefits of jalapeños, such as boosting metabolism and providing essential vitamins. This irresistible dish can easily be enjoyed in a balanced way when served with fresh veggies.

Socially, this cheese ball is designed for sharing, making it perfect for groups. Its interactive nature allows guests to dive in and enjoy, creating a fun and relaxed atmosphere. It’s not just an appetizer; it’s a conversation starter that adds to the upbeat energy of any gathering.

Lastly, its cost-effectiveness makes it accessible for anyone looking to entertain. With affordable ingredients easily found at any grocery store, this cheese ball is a delicious way to impress guests without breaking the bank. It’s a crowd-pleaser every time you serve it!

Historical Background and Cultural Significance

The jalapeño popper originated in the United States, and its popularity exploded in the 1980s when it appeared on many bar and restaurant menus. This handheld snack combines the mild flavor of cream cheese with the heat of jalapeños, catering to a variety of palates. It quickly became a staple at gatherings and parties, transcending regional boundaries.

Culturally, jalapeño poppers highlight the American penchant for bold flavors and comfort food. They embody the spirit of celebration—whether at a sporting event, family reunion, or casual get-together. Their association with enjoyment and togetherness has made jalapeño poppers an enduring favorite in American cuisine.

Over the years, this recipe has evolved into many forms, from being deep-fried to baked, and now represented in the fun format of a cheese ball. The adaptability of the dish means cooks can get creative with fillings and toppings, making it a beloved choice among many home chefs.

Regional variations exist, with some families incorporating additional ingredients like shredded chicken or various types of cheeses. Each adaptation brings its own unique spin while honoring the original flavors that made this dish famous.

Ingredient Deep Dive

For the cream cheese, it is a foundational ingredient in countless recipes, celebrated for its creamy texture and versatility. Often used in both sweet and savory dishes, it is a staple in many households. Cream cheese is rich in calcium and protein but should be consumed in moderation due to its higher fat content. When selecting cream cheese, choose blocks over spreadable versions for better consistency when mixing. Store it in an airtight container in the fridge, and typically, it lasts about 1-2 weeks past the expiration date.

Jalapeños are not just spicy peppers; they are packed with vitamins A, C, and K, and have the added benefit of capsaicin, which is known to boost metabolism. When selecting jalapeños, look for firm peppers with shiny skin, and store them in the refrigerator for optimal shelf life. If they become too spicy for your palate, soaking them in milk can help mellow out the heat. They can also be substituted with milder peppers for a different flavor experience.

Bacon brings a savory, smoky element to the cheese ball, enhancing its richness. Historically, bacon has a long-standing presence in American cuisine, adding depth to various dishes. When buying bacon, opt for high-quality brands for the best flavor, and store it in the refrigerator or freezer to maintain freshness. If you don’t eat pork, turkey bacon or vegetarian bacon can serve as excellent substitutes without losing the umami taste.

Common Mistakes to Avoid

  • Overmixing the cheese mixture can result in a runny consistency, making it difficult to shape the ball. Mix just until combined.
  • Using pre-shredded cheese can contain anti-caking agents that prevent smooth blending. For the best texture, shred cheese from a block.
  • Not chilling the cheese ball before serving can affect its shape and make it messier to handle. Chill for at least an hour.
  • Under-seasoning can lead to a bland flavor profile. Taste the mixture before shaping, and adjust seasoning as needed.
  • Ignoring the freshness of the jalapeños can impact flavor and heat. Always use the freshest peppers for optimal taste.
  • Forgetting to remove seeds and membranes can lead to an overly spicy cheese ball. Remove them for a milder flavor.
  • Piling on toppings without a plan can make the presentation sloppy. Arrange garnishes thoughtfully for visual appeal.
  • Not providing enough serving options can limit enjoyment. Offer various crackers and vegetables to balance flavors.
  • Using cold ingredients directly from the fridge can affect mixing. Allow cream cheese to come to room temperature first.
  • Neglecting food safety practices can lead to spoilage. Always ensure proper storage and handling of ingredients.

Essential Techniques

One key technique is mixing the ingredients thoroughly without overmixing. It’s important to combine the cream cheese, jalapeños, and other elements until just smooth to avoid a runny cheese ball. Master this by folding the ingredients gently, and look for a cohesive mixture with even distribution of the flavors.

Shaping the cheese ball into a football requires a gentle hand. Mold the cheese mixture into an oval shape, ensuring even thickness. Visual cues include a smooth surface without cracks, and it’s okay if it’s not perfect—remember, it’s meant to be fun!

Pro Tips for Perfect Jalapeño Popper Football Cheese Ball

Use a combination of cheeses for added flavor complexity; mixing sharp cheddar with cream cheese gives a delightful depth. For extra heat, roast the jalapeños ahead of time to enhance their smokiness. When forming the cheese ball, wet your hands slightly to prevent mixture from sticking. Chill the assembled cheese ball overnight for maximum flavor. Use fresh herbs, such as chives, as a garnish for added color and freshness. Serve with a variety of dipping options, including tortilla chips or crunchy crostini. A light dusting of smoked paprika can elevate the flavor profile beautifully.

Variations and Adaptations

Regional variations can bring exciting twists to this recipe. In the southern United States, incorporating BBQ sauce into the mix adds a unique tangy sweetness. For a fresher take, consider using roasted red peppers instead of jalapeños, which creates a milder flavor profile.

Seasonal adaptations can also enhance your cheese ball. During the holidays, adding cranberries or walnuts can provide an interesting contrast to the spiciness of the jalapeños. For a healthier alternate version, consider using Greek yogurt in place of cream cheese, which retains creaminess with fewer calories.

Dietary modifications are easily achieved—making the cheese ball vegan by substituting dairy with cashew cream and nutritional yeast can be just as delicious. Adjust the spice level by opting for mini sweet peppers instead of jalapeños for a family-friendly version. Texture modifications can involve mixing in some crispy breadcrumbs for added crunch.

Presentation alternatives can elevate your cheese ball at any gathering. Shape it into a mini football with laces made from string cheese or thinly sliced chives for a fun and festive touch.

Serving and Presentation Guide

Plating techniques are crucial for maximizing the visual appeal of your Jalapeño Popper Football Cheese Ball. Use a rustic wooden board as a backdrop, with the cheese ball in the center surrounded by colorful ingredients. Garnishing with fresh herbs adds brightness and freshness to the overall presentation.

Traditional accompaniments include an array of simple crackers and tortilla chips. However, modern serving suggestions might include adding fresh veggie sticks like carrots and bell peppers for nice color contrasts. Temperature-wise, the cheese ball should be served cold and remain on ice if outdoors to avoid spoilage.

Portion control can be managed by providing small scoops or a cheese knife for easy serving. This helps guests take just the right amount without making a mess.

Wine and Beverage Pairing

Pairing wine with your Jalapeño Popper Football Cheese Ball can enhance the overall experience. A crisp, chilled Sauvignon Blanc complements the spiciness of the jalapeños beautifully, providing a refreshing contrast. If you prefer reds, try a medium-bodied Pinot Noir, which balances the richness of the cheese.

For non-alcoholic alternatives, consider homemade lemonade or sparkling water infused with fresh fruit, leading to a palate-cleansing effect. Coffee or tea pairings may not be traditional; however, a rich dark roast can surprisingly accentuate the flavors of the cheese ball.

Temperature is key with wine pairings; ensure whites are served chilled and reds at room temperature. Appropriate serving suggestions include chilling glasses in advance for an inviting presentation.

Storage and Shelf Life

Proper storage of your Jalapeño Popper Football Cheese Ball can prolong its life. Store in an airtight container in the refrigerator, where it can last for up to a week. If you want to make it ahead of time, wrapping it tightly in plastic wrap before placing it in a container will maintain its freshness.

Regarding signs of spoilage, if you notice an off smell or any discoloration, it’s best to discard it. To reheat, though not typical for this dish, a light warming can be done in the microwave at a low setting to soften it slightly before serving. Freezing is not recommended for this cheese ball due to potential texture changes upon thawing.

Make Ahead Strategies

To create the Jalapeño Popper Football Cheese Ball ahead of time, consider prepping the mixture the day before and chilling overnight to meld flavors. If your gathering is a few days away, you can form the ball and wrap it tightly for freshness.

While assembling, keep ingredients separated, storing jalapeños and bacon until ready to blend to maintain freshness. As for quality impact assessment, the flavors deepen the longer they meld in the fridge, but ensure it’s not left for more than two days before serving.

When reheating, simply remove from the fridge and let it rest at room temperature before presentation, allowing for easy spreading and serving without losing coolness.

Scaling Instructions

Scaling this recipe is remarkably simple. Halving the recipe will yield a cheese ball perfect for smaller gatherings, while doubling or tripling can accommodate larger groups brilliantly.

Equipment adjustments might include using a larger mixing bowl for increased quantities. Timing modifications are minimal, with chilling times remaining consistent, but keep a close eye on preparation times as larger batches can take longer to combine.

Storage considerations are essential, so make sure to use appropriately sized containers to maintain freshness regardless of the batch size.

Nutritional Deep Dive

When evaluating the nutritional profile of the Jalapeño Popper Football Cheese Ball, it’s rich in macro-nutrients, especially protein and fats from the cream cheese and bacon. The fiber content from the jalapeños and potential veggie accompaniments should not be overlooked, aiding in digestion.

Micronutrient analysis reveals that this dish is a good source of calcium, vitamin C, and various essential vitamins from the jalapeños. The health benefits tied to capsaicin, found in jalapeños, can add metabolism-boosting elements for those mindful of their health.

For dietary considerations, moderation is key; enjoy alongside lighter accompaniments to balance indulgence. When considering portion analysis, smaller servings can keep calorie counts in check without sacrificing flavor.

Dietary Adaptations

For a gluten-free version of the Jalapeño Popper Football Cheese Ball, ensure all added ingredients, including any crackers served, are certified gluten-free. Moreover, you can use rice crackers as a companion.

To create a dairy-free adaptation, substitute cream cheese with cashew or almond-based cheeses, capturing creaminess while avoiding dairy.

For vegan adaptations, replace bacon with smoked tempeh or coconut bacon to retain that smoky flavor and texture.

If keto or low-carb is the goal, you can keep the cheese ball as is, focusing on low-carb vegetable dips and avoiding traditional bread accompaniments.

Paleo dieters can omit the cheese entirely and substitute with nut-based cheese options while focusing on whole ingredients for their topping and presentations.

Troubleshooting Guide

If your cheese ball turns out too runny, this usually results from overmixing or using too much cream cheese. Adjust by incorporating additional shredded cheese to thicken the texture.

For flavor balance, a bland cheese ball can be enhanced by incorporating more spices and fresh herbs. Taste testing during preparation is essential for ensuring the right amount of creaminess and spice.

Temperature problems typically arise if the cheese ball isn’t chilled sufficiently. Ensure it spends enough time in the fridge to hold its shape when shaped.

Equipment challenges may include lacking a food processor; all mixing can be done by hand—use a sturdy bowl and a strong wooden spoon.

Ingredient substitutions require attention; avoid replacing ingredients with others that have significantly different moisture levels or cooking behaviors to ensure consistency.

Timing concerns can result from under-preparation; preparing the mixture the day before can ease stress and allow flavors to deepen before serving.

Recipe Success Stories

Community feedback often highlights how this recipe has become a staple at gatherings, with requests for sharing at potlucks and family events. Readers have reported back with variations, suggesting adding different spices for a flavor twist, while others have shared their tips for better presentations.

Adaptation stories often mention how readers have tailored the recipe based on allergies or taste preferences, demonstrating its versatility. Many successfully shared the cheese ball at game nights, often with rave reviews.

Photography tips from successful users recommend capturing the cheese ball’s texture by slicing into it, showcasing the creamy interior against the crispy exterior and garnishes.

Frequently Asked Questions

Can I make this cheese ball ahead of time?

Absolutely! It’s perfect for make-ahead preparation. Assemble and shape the cheese ball, then wrap it tightly in plastic wrap and refrigerate overnight. This allows the flavors to meld beautifully.

What can I serve with the Jalapeño Popper Football Cheese Ball?

Various options work well as accompaniments. Popular choices include tortilla chips, fresh vegetable sticks, or an array of crackers. Offering a variety allows guests to customize their experience.

How do I store leftovers?

Store any leftovers in an airtight container in the refrigerator. The cheese ball can last up to a week, although its freshness period is best within the first few days.

Is it possible to make this cheese ball dairy-free?

Yes! Substitute cream cheese with cashew or almond-based alternatives to maintain the creamy texture in a dairy-free format. Don’t forget some added lemon juice to accentuate flavors!

What kind of cheese can I use?

Feel free to use a mix of cheeses to enhance flavor. Cheddar and cream cheese are traditional choices, but you can experiment with pepper jack for an extra kick!

Can it be frozen?

Freezing is not recommended, as the texture of the cheese ball may change upon thawing. It’s best enjoyed fresh or within a week of preparation.

Is this recipe suitable for children?

This recipe can be child-friendly with some adjustments. You can reduce the jalapeño or experiment with mild peppers to appeal to younger taste buds.

Can I add additional ingredients?

Mixing in extras like corn, black beans, or a variety of spices can elevate the flavors. Just be mindful of the overall texture when adding.

How can I make the cheese ball spicier?

If you want an extra kick, add some crushed red pepper flakes or diced serrano peppers to the cheese mixture for enhanced heat.

How long should I chill the cheese ball?

Chill the cheese ball for at least one hour before serving. Longer chilling will help it hold shape and intensify flavors.

Additional Resources

Looking for recipes that pair well with the Jalapeño Popper Football Cheese Ball? Check out related recipes for guacamole, salsa, and various dip options—all of which can complement its flavor.

For technique guides, consider exploring how to properly shape and store cheese balls or managing spice levels. Detailed information about peppers, their history, and health benefits can deepen your culinary knowledge.

If you’re in need of kitchen tools, recommendations for high-quality food processors or mixing bowls can elevate your cooking experience. Don’t miss exploring seasonal variations of this cheese ball as it can adapt beautifully with ingredients from every season!

Join the Conversation

Engage with fellow food lovers on social media by trying out this recipe and sharing your results. Utilize hashtags to promote the recipe and share your success stories.

Photography tips are essential for capturing the beauty of your Jalapeño Popper Football Cheese Ball; simple yet aesthetic plating techniques can make your dish standout.

Encourage recipe reviews from family and friends to build a community around this crowd-pleaser. Your variations and suggestions could inspire others to try it in their kitchens, leading to creative adaptations and enthusiastic sharing!

The Recipe

Jalapeño Popper Football Cheese Ball

Serves: 10

Prep Time: 15 mins

Cook Time: 0 mins

Total Time: 15 mins

Kitchen Equipment Needed

  • Mixing bowl
  • Wooden spoon or spatula
  • Plastic wrap
  • Airtight storage container
  • Serving platter

Ingredients

  • 2 (8 oz) packages cream cheese, softened
  • 1 cup shredded sharp cheddar cheese
  • 1 cup cooked bacon, crumbled
  • 1/2 cup diced jalapeños (fresh or pickled)
  • 1/4 cup green onions, chopped
  • 1 tsp garlic powder
  • 1 tsp onion powder
  • 1/2 tsp smoked paprika
  • Fresh herbs for garnish (optional)

Directions

  1. In a mixing bowl, combine softened cream cheese with shredded cheddar cheese.
  2. Add crumbled bacon, diced jalapeños, green onions, and spices. Mix until well combined.
  3. Shape the mixture into a football shape and wrap it tightly in plastic wrap.
  4. Chill in the refrigerator for at least one hour to firm up.
  5. Unwrap the cheese ball and place it on a serving platter. Garnish with fresh herbs if desired.
  6. Serve with an assortment of crackers and vegetables for dipping.

Recipe Notes

  • Feel free to adjust the number of jalapeños based on your heat preference.
  • The cheese ball can be made up to 2 days in advance. Just store it in the fridge until ready to serve.
  • For a variation, consider adding other cheeses like pepper jack or blue cheese for different flavor profiles.

Easy Doritos Pizza Rolls – Perfect for Game Day Snacks

Doritos Pizza Rolls: The Ultimate Crunchy Snack Delight

⚖️
Difficulty
Easy

⏲️
Prep Time
15 mins

🕒
Cook Time
20 mins

⏱️
Total Time
35 mins

🍽️
Servings
4 servings

Doritos Pizza Rolls are an exciting twist on classic pizza snacks that will bring a burst of flavor to your next gathering. Imagine crispy, cheesy bites filled with zesty pizza toppings, all wrapped up in your favorite Doritos flavor. Perfect for game days, parties, or a cozy night in, these pizza rolls are not only easy to make but also incredibly satisfying. The combination of crunchy exterior and cheesy, savory filling hits all the right notes, leaving everyone asking for more.

The beauty of Doritos Pizza Rolls lies in their versatility. You can customize the fillings to match your favorite pizza toppings, from pepperoni to veggies, making them a hit for everyone, including picky eaters. The crunch from the Doritos adds a unique texture that’s both familiar and refreshing, while the melted cheese creates a delicious, gooey center. Once you pop one in your mouth, you’ll be enchanted by the burst of flavors and textures, making these pizza rolls a must-try recipe for any occasion.

Quick Recipe Highlights

  • Flavor Profile: These Doritos Pizza Rolls blend the flavors of classic pizza with the unmistakable crunch of Doritos, bringing a savory, cheesy, and tangy experience.
  • Texture: The crispy Doritos shell creates a delightful crunch, while the melted cheese and fillings provide a rich and satisfying mouthfeel.
  • Aroma: These rolls emit a mouthwatering aroma, with hints of melted cheese, spices, and that signature Doritos scent, making them hard to resist.
  • Visual Appeal: The vibrant colors of the Doritos combined with the cheesy filling create an enticing presentation that looks as good as it tastes.
  • Skill Level Needed: Perfect for beginners, making these pizza rolls requires just simple assembly and basic frying or baking techniques.
  • Special Equipment: You’ll need a frying pan or an oven for baking, along with a mixing bowl for combining the filling ingredients.

Recipe Overview

  • Difficulty Level: This easy recipe allows even novice cooks to create delicious snacks with minimal effort, making it a great choice for family activities.
  • Category: Doritos Pizza Rolls fit perfectly as a snack or appetizer, ideal for casual gatherings and celebrations.
  • Cuisine: Combining American snack culture with Italian pizza origins, this recipe offers a delightful fusion of flavors.
  • Cost: The recipe is budget-friendly, requiring only a few affordable ingredients that can typically be found in your pantry.
  • Season: Great year-round, Doritos Pizza Rolls shine particularly during sports seasons, parties, and family get-togethers.
  • Occasion: These delicious rolls are perfect for watch parties, birthdays, and casual gatherings with friends and family.

Why You’ll Love This Recipe

Doritos Pizza Rolls are a snack that captivates with their incredible taste and texture appeal. The playful crunch of the Doritos paired with a melty, savory filling creates an irresistible combination that delights the palate. The flavor possibilities are endless, allowing you to experiment with different pizza toppings and spices, so each batch can be unique. No matter your preference, there’s a pizza flavor waiting to be transformed into a pizza roll that everyone will enjoy.

Convenience is another significant advantage of this recipe. With minimal prep and cooking time, you can whip up a batch of Doritos Pizza Rolls in under an hour. They can be served hot and fresh, or prepared ahead and kept warm for a party. The ease of preparation means you can engage in conversations with guests rather than spending the entire time working in the kitchen.

Nutritionally, you can also make thoughtful choices about the ingredients. By incorporating healthier fillers and baked options, you can still enjoy the deliciousness of these rolls without the guilt. Adding fresh vegetables to the filling elevates their nutritional value while ensuring a satisfying snack.

These pizza rolls also shine in social situations. They are perfect finger foods, making them easy to share among a crowd. Whether at a party or during a movie night, Doritos Pizza Rolls promote a casual and fun atmosphere, encouraging social interaction and laughter.

The cost-effectiveness of this recipe makes it approachable for everyone. With simple ingredients that provide maximum taste, you can serve a crowd without breaking the bank. This accessible recipe is an exciting way to create delicious snacks that don’t require a lot of financial investment.

Historical Background and Cultural Significance

The concept of combining chips and savory fillings is an American innovation, merging popular food trends for a unique experience. Doritos, introduced in the 1970s, quickly became a staple snack, beloved for their bold flavors. The idea to wrap fillings in Doritos showcases the creative culinary spirit prevalent in American kitchens, where tradition meets innovation.

Culturally, the combination of products highlights the American trend of fusion cuisine. As food enthusiasts begin to look for new flavor experiences, recipes like Doritos Pizza Rolls manage to intertwine everyday snacks with classic comfort food. This blend is a reflection of changing dining habits where convenience meets culinary creativity.

The evolution of this recipe can be traced back to the popularity of both pizza and quick snacks. As lifestyles become busier, the desire for quick yet fulfilling meals has grown, and recipes that fulfill those needs have surged in popularity. By adapting traditional pizza into a simple, portable form, this recipe showcases how classic meals can also fit into modern life.

Finally, regional variations can be found in the way people customize their pizza rolls. Each household often has unique flavor profiles influenced by local cuisine, showcasing the adaptability and creativity of this recipe across different cultures and backgrounds.

Ingredient Deep Dive

One of the primary ingredients in Doritos Pizza Rolls is, of course, Doritos. This beloved snack has a rich history, having first hit shelves in 1964. Known for their bold flavors, Doritos can be a source of fun and creativity in the kitchen. Nutritionally, they offer a crunchy texture but should be consumed in moderation. When selecting Doritos, look for fresh bags without any visible damage or broken chips. Store them in an airtight container to keep them crispy.

The second critical ingredient is cheese, which brings richness and flavor to the pizza rolls. Cheese has been a staple in various cuisines for centuries, loved for its versatility. Rich in protein and calcium, cheese offers nutritional benefits but can be high in fat, so opting for reduced-fat versions may suit some diets better. When using cheese, freshness is key; check the expiration date, and choose cheeses that melt well for the best results.

Other fillings like pepperoni, bell peppers, and olives also play essential roles in enriching the flavors of the rolls. Bell peppers are a healthy addition, packed with vitamins and antioxidants, while pepperoni adds a classic pizza flavor. When using these ingredients, select quality meats and fresh vegetables. Proper storage involves keeping vegetables in a cool, dry place and meats well-refrigerated to maintain freshness.

Common Mistakes to Avoid

  • Overfilling the rolls can result in dough tearing and mess during cooking; only add the recommended amount of filling.
  • Not sealing the edges properly may lead to cheese leakage; use water or a fork to press and seal edges effectively.
  • Using cold ingredients can affect melting; ensure that cheeses and meats are at room temperature before use.
  • Failing to preheat the oven or oil can result in uneven cooking; make sure that equipment is at the right temperature before starting.
  • Not letting the rolls cool slightly before serving could lead to burning mouths; allow them to sit for a few minutes post-cooking.
  • Ignoring cooking times can leave the rolls undercooked; always set a timer to avoid over or undercooking.
  • Using the wrong type of Doritos can alter flavors significantly; choose flavors that complement your filling choices.
  • Not tasting the filling before assembly might result in bland rolls; always check for seasoning before stuffing.

Essential Techniques

Mastering the rolling technique when making Doritos Pizza Rolls is crucial for a successful end product. Properly rolling ensures an even cooking process and prevents any fillings from leaking out during baking or frying. To master this technique, start with a generous, but not excessive, amount of filling on one side of the chip, gently fold and roll it tightly, ensuring that each edge is securely sealed. The visual cue for success is a neatly closed roll, with no visible fillings peeking out.

Another important technique is controlling the frying or baking temperature. This is key to achieving a perfectly golden-brown crust without burning. Using a food thermometer can ensure the oil is at the right temperature for frying. In baking, keep an eye on the color; the rolls should become crisp and golden. Common pitfalls include cooking on too high heat, which can lead to burnt outsides and uncooked insides, or cooking at too low a temperature, causing soggy rolls.

Pro Tips for Perfect Doritos Pizza Rolls

1. Always use freshly opened Doritos for the best crunch; stale chips can ruin the texture of your pizza rolls.
2. Experiment with different types of cheese for a variety of melted flavors and textures, like mozzarella for stretch or cheddar for sharpness.
3. Try incorporating herbs and spices into your filling mixture to elevate the flavor profile; garlic powder or Italian seasoning works wonders.
4. For an added crunchy factor, consider mixing crushed Doritos into your filling for extra texture.
5. Use a combination of sauces—think marinara and ranch—for dipping to take your Doritos Pizza Rolls to the next level.
6. Consider using an air fryer for a healthier version; they provide the same crispiness with less oil.
7. Be mindful of oil temperature during frying to ensure even cooking and to avoid overly greasy rolls.
8. For variation, trade out traditional pizza ingredients for unexpected flavors, such as barbecue chicken or buffalo sauce.

Variations and Adaptations

Regional variations of the Doritos Pizza Rolls can highlight local flavors; for example, using spicy salsa or jalapenos can create a Tex-Mex twist. Seasonal adaptations are also fun—a fall-themed roll might incorporate pumpkin puree into the cheese filling, while spring could inspire the inclusion of fresh herbs like basil or chives. Dietary modifications can cater to specific preferences; gluten-free wraps can serve instead of Doritos for those avoiding gluten.

Flavor variations give you the freedom to experiment with different fillings, such as switching pepperoni for turkey sausage or adding spinach for a healthier option. For texture modifications, consider using different types of chips or crackers for wrapping. Presentation alternatives can include drizzling sauces on top or garnishing with fresh herbs, making each batch visually appealing.

Serving and Presentation Guide

Serving Doritos Pizza Rolls can be made special with some presentation ideas. Consider using a large platter and arranging the rolls in a beautiful circle or stack them for a fun display. Garnish your pizza rolls with fresh herbs like parsley or basil to add color and freshness. Serve alongside an array of dipping sauces in small bowls to encourage interaction among guests.

For temperature considerations, serve them warm right out of the oven or fryer, as they taste best when freshly cooked. Portion control can also be important—cutting rolls in half creates easier portions for sharing. Pair them with bite-sized vegetables or a refreshing salad to create a more rounded snack or meal setup.

Wine and Beverage Pairing

When it comes to pairing drinks with your Doritos Pizza Rolls, consider light-bodied wines such as Sauvignon Blanc or a fruity rosé. These wines complement the savory and cheesy flavors without overpowering them. For a richer experience, a light red like Pinot Noir can also work well, enhancing the overall taste.

If you prefer non-alcoholic options, sodas and sparkling waters with a hint of citrus can balance the richness of the rolls. For coffee lovers, a chilled iced coffee or latte can provide a contrasting flavor that works wonders with the cheesy bites. Always consider serving wines chilled for a refreshing pairing that enhances enjoyment.

Storage and Shelf Life

To ensure your Doritos Pizza Rolls stay fresh, proper storage is crucial. Store leftovers in an airtight container in the refrigerator, where they can last for about three days. If you have uncooked rolls, you can freeze them, wrapped tightly in aluminum foil or plastic wrap, for up to three months.

When reheating, consider using an oven or air fryer to regain their crispiness, rather than a microwave, which may lead to sogginess. Ideal reheating temperatures should be around 350°F, allowing them to warm through without losing their texture. Always check for visible signs of spoilage, such as off smells or discoloration, before consuming.

Make Ahead Strategies

Planning ahead with Doritos Pizza Rolls can save you time and effort. Prepping the filling a day before allows flavors to meld together nicely, enhancing the overall taste. Store the filling in the refrigerator in an airtight container to maintain freshness.

For assembly, you can prepare the rolls a few hours in advance and keep them in the refrigerator before cooking. However, it’s best not to freeze assembled rolls to ensure optimal texture post-cooking. If you freeze them before cooking, allow them to thaw in the refrigerator overnight before baking or frying.

If you want freshness during serving, consider adding components like fresh herbs or sauces right before meal time to retain their vibrant flavors and textures.

Scaling Instructions

Scaling your Doritos Pizza Rolls recipe can be easy as adjusting ingredient quantities based on your guests. To halve the recipe, simply reduce each ingredient by half, testing the filling for flavor balance as you go. Doubling or tripling the recipe can also be done by multiplying ingredients accordingly; however, be sure to adjust cooking times if using larger batches.

Equipment adjustments may also be necessary; if cooking for a crowd, using multiple baking sheets or frying batches can keep cooking consistent. Timing modifications are vital to maintaining quality—baking larger amounts may require more time in the oven. Make sure to keep an eye on the rolls to ensure they remain crispy and fully cooked for your guests.

Nutritional Deep Dive

Understanding the nutritional profile of Doritos Pizza Rolls can help you make informed choices. Each roll contains a balance of macronutrients, including carbohydrates from Doritos, protein from cheese and meats, and fats from both cheese and frying oil. A general serving may include 200-250 calories, making it a satisfying yet indulgent snack.

Micronutrient analysis often highlights calcium from cheese and vitamin C if vegetables are included in the filling. However, the rolls can be high in sodium and fats, which should be considered in moderation. For those conscious of their dietary intake, monitoring serving sizes can aid in maintaining a balanced diet while still enjoying these tasty rolls.

Additionally, these rolls can be made more health-conscious by opting for low-fat ingredients, incorporating vegetables, and adjusting portion sizes as necessary. This ensures you enjoy the delicious flavors of Doritos Pizza Rolls without compromising on nutritional health.

Dietary Adaptations

There are multiple adaptations you can make to turn this recipe into something for everyone. For a gluten-free option, consider using gluten-free Doritos or corn-based snack chips. This allows those with dietary restrictions to enjoy the same crunchy goodness without any concerns.

Dairy-free adaptations are also easy! Use vegan cheese to fill the rolls, ensuring melty alternatives are well-incorporated. You can even create a low-carb version using veggie-based wraps instead of Doritos, a perfect approach for those following keto diets.

Vegetarians and even vegans can rejoice; by skipping the meats and incorporating hearty vegetables, like mushrooms or beans, you can create a variety that’s still delicious. Keep in mind the flavor profiles when adjusting ingredients; always season appropriately for each dietary adaptation to maintain that all-important flavor punch.

Troubleshooting Guide

Texture issues can arise when making Doritos Pizza Rolls, perhaps due to thick filling or improper frying temperatures. Aim for a consistent filling that allows for easy rolling, and make sure to keep oil at a proper temperature for frying to achieve that perfect crunch.

Flavor balance can sometimes be off, usually due to over-seasoning or insufficient seasoning. Start with smaller amounts of spices and tasting as you go; it’s easier to add than to subtract once flavors are in.

If you’re having temperature problems, whether food is too hot or cold, aim for even heating. Ensuring the rolls cook evenly means fewer chances of undercooked centers.

Equipment challenges may arise depending on the frying method. If using a stovetop, ensure the heating is consistent and always watch for addictive splatter. Using multiple pots or pans can aid in managing larger batches efficiently.

Ingredient substitutions, like using different types or brands of chips and cheeses, can alter flavor; keep personal preferences in mind, and test a small batch as needed.

Timing concerns can also affect your results; cut times too short can lead to undercooked snacks. Always consider the recommended cooking times and check them periodically for doneness.

Recipe Success Stories

The Doritos Pizza Rolls have garnered much love and laughter in the community, with many sharing their variations online. Feedback generally highlights the fun involved in making them, with family and friends enjoying the process as much as the result. Experimenting with different fillings has led to unique and delicious outcomes, making the recipe adaptable for all occasions.

Readers have shared their success stories, noting how simple changes—like adding a specific spice blend or switching up cheeses—can lead to profound flavor differences. These personal touches not only make the recipe their own but also deepen the enjoyment of cooking and sharing meals with loved ones.

Photography tips suggest showcasing these rolls fresh out of the fryer or oven, as the vibrant colors of the Doritos alongside the gooey cheese provides a mouthwatering image. Encouraging others to share their photos has fostered a lively conversation around culinary creativity.

The easy assembly and engaging taste have led many to include these in game day menus, with rave reviews emphasizing their crowd-pleasing nature. Each success story adds to the joy of creating, sharing, and enjoying these unique snacks.

Frequently Asked Questions

Can I freeze Doritos Pizza Rolls?
Yes, unbaked Doritos Pizza Rolls can be frozen for up to three months. Just make sure they are tightly wrapped and then bake them straight from the freezer when you’re ready to enjoy them.

What are the best fillings for pizza rolls?
Popular fillings include cheese, pepperoni, mushrooms, and a mixture of vegetables. Feel free to experiment with your favorite pizza toppings!

How do I make them healthier?
Consider using reduced-fat cheese, baking instead of frying, or filling them with more vegetables to increase their nutritional value.

What sauces pair well with these rolls?
Marinara, ranch dressing, or spicy salsa complement the flavor of Doritos Pizza Rolls beautifully.

Can I make these rolls in an air fryer?
Absolutely! Air frying is a great alternative to achieve crispiness with less oil; adjust cooking time to about 10-12 minutes at 370°F.

How do I store leftovers?
Store leftovers in an airtight container in the refrigerator for up to three days.

Can I use Doritos with flavors other than cheese?
Yes! Different flavors can add unique twists to the rolls, so get creative with your choices.

How can I make them spicier?
Add spicy elements like jalapenos, pepper jack cheese, or hot sauce into your filling for an extra kick.

What temperature should they reach when cooked?
Ensure that the internal temperature reaches 165°F for safe consumption.

Can I cook these in the oven instead?
Yes! Baking them at 400°F for about 15-20 minutes will yield beautifully crisp rolls as well.

Additional Resources

If you loved this recipe, you may also enjoy exploring our collection of finger food recipes, perfect for gatherings. Additionally, check out our guides on frying techniques and the best dips to pair with your favorite snacks. Our ingredient information section can deepen your knowledge about the chip varieties that can elevate your recipes.

If you’re interested in seasonal variations, we have suggestions for making the perfect summer BBQ snacks or cozy winter comfort food. Don’t forget to explore equipment recommendations for air fryers and deep fryers that can help you achieve culinary perfection with your Doritos Pizza Rolls!

Join the Conversation

We love hearing from our readers! Share your Doritos Pizza Rolls creations on social media and tag us to join the conversation. If you have innovative adaptations or personal success stories, we encourage you to leave a review and inspire fellow culinary enthusiasts.

To enhance your cooking journey, share photography tips on how to make your rolls look as good as they taste. Let’s connect and celebrate the joy of cooking and sharing delicious foods that bring people together across tables and kitchens.

The Recipe

Doritos Pizza Rolls

Serves: 4 servings

Prep Time: 15 mins

Cook Time: 20 mins

Total Time: 35 mins

Kitchen Equipment Needed

  • Frying pan or baking dish
  • Mixing bowl
  • Measuring cups and spoons
  • Spatula or tongs
  • Airtight container for storage

Ingredients

  • 2 cups Doritos, crushed
  • 1 cup shredded mozzarella cheese
  • 1/2 cup pepperoni, chopped
  • 1/4 cup bell peppers, diced
  • 1 tablespoon Italian seasoning
  • 1/2 cup marinara sauce (for dipping)
  • Oil for frying or cooking spray (for baking)

Directions

  1. Prepare all ingredients on a clean work surface.
  2. In a mixing bowl, combine mozzarella, pepperoni, bell peppers, and Italian seasoning.
  3. Take a Dorito chip and place about a tablespoon of the filling on one end.
  4. Roll the chip tightly around the filling, sealing it with the edges facing down.
  5. Repeat the process until all filling is used.
  6. Heat oil in a frying pan over medium-high heat, or preheat the oven to 400°F.
  7. Fry rolls in batches until golden brown; approximately 2-3 minutes on each side.
  8. If baking, lightly spray the rolls with cooking spray and bake for 15-20 minutes until crispy.
  9. Remove from heat, let cool for a minute, and serve with marinara sauce on the side.

Recipe Notes

  • Feel free to customize the filling to your taste by adding other favorite ingredients.
  • Check the temperature of the oil to avoid overcooking; this can help achieve perfect rolls.
  • Store any leftovers in an airtight container in the refrigerator for up to three days.

Delicious Red Lobster Shrimp Scampi Recipe You Can Make at Home

Red Lobster Shrimp Scampi: A Delicious Home-Cooked Treat

⚖️
Difficulty
Intermediate

⏲️
Prep Time
15 mins

🕒
Cook Time
10 mins

⏱️
Total Time
25 mins

🍽️
Servings
4

If you’re craving a restaurant-worthy meal that you can whip up in no time, look no further than this delectable Red Lobster Shrimp Scampi recipe! Bursting with rich flavors and succulent shrimp, this dish combines the creamiest garlic butter sauce with perfectly tender shrimp. Whether you’re entertaining guests or enjoying a cozy dinner at home, the delightful aromas and exquisite taste of this dish will transport you straight to your favorite seafood restaurant.

This Red Lobster-inspired Shrimp Scampi is not only quick and easy to prepare, but it also offers a symphony of flavors with each bite. The freshness of garlic, the zest of lemon, and the warmth of herbs create an irresistible blend that pairs perfectly with pasta or crusty bread, inviting you to savor every mouthful. Let’s dive into this rich culinary experience together!

Quick Recipe Highlights

  • Flavor Profile: Succulent shrimp enveloped in a buttery garlic sauce with hints of lemon and herbs creates a dish that is bursting with flavor.
  • Texture: Each bite distinctly offers tender shrimp complemented by a smooth and creamy sauce, ensuring a delightful mouthfeel.
  • Aroma: The fragrant blend of garlic, butter, and a touch of citrus fills your kitchen with an inviting scent that promises a delicious meal.
  • Visual Appeal: This dish dazzles with its vibrant pink shrimp and golden sauce, making it an enticing centerpiece for any table setting.
  • Skill Level Needed: With relatively simple techniques, even novice cooks can master this dish with a little guidance.
  • Special Equipment: A large skillet is all you need to create this dish effortlessly.

Recipe Overview

  • Difficulty Level: The intermediate difficulty level of this recipe comes from the precise timing of cooking the shrimp and ensuring the sauce achieves a perfect balance.
  • Category: This shrimp scampi fits perfectly within the dinner category, making it an ideal choice for any evening meal.
  • Cuisine: Rooted in Italian culinary traditions, this dish showcases the region’s fondness for seafood and zestful flavors.
  • Cost: The overall cost to make this dish is reasonable, as shrimp is the primary ingredient, paired with pantry staples like garlic, butter, and pasta.
  • Season: Perfect for year-round enjoyment, this dish shines especially in the summer when shrimp is fresh and readily available.
  • Occasion: This shrimp scampi is equally suitable for date nights, family dinners, or festive gatherings, making it a versatile recipe to have on hand.

Why You’ll Love This Recipe

The Red Lobster Shrimp Scampi brings an explosion of flavor to your plate, balancing the savory essence of garlic and butter with the delicate taste of shrimp. Each bite melts in your mouth, creating a satisfying texture that promises to keep you coming back for more. The richness of the sauce elegantly coats the shrimp, enhancing every nuance of taste and ensuring a memorable dining experience.

One of the best aspects of this shrimp scampi recipe is its convenience. Requiring only a few ingredients and minimal prep time, you’ll have a delightful meal ready in under 30 minutes. This makes it perfect for busy weeknights or spontaneous dinner parties, allowing you to impress guests without extensive cooking.

Nutritionally, shrimp offer a wealth of benefits, including being a great source of protein and essential omega-3 fatty acids. This dish provides a delicious way to incorporate seafood into your diet, ensuring you enjoy those health benefits without sacrificing flavor.

The social aspect of enjoying this shrimp scampi can’t be overlooked. Whether shared over dinner with friends or served during a celebration, this dish fosters warmth and connection. The delicious aroma alone is sure to create an inviting atmosphere around your table.

Lastly, this recipe’s affordability makes it accessible to many home cooks. While it tastes gourmet, the ingredient list is simple and budget-friendly, allowing you to prepare a restaurant-quality meal right in your own kitchen without breaking the bank.

Historical Background and Cultural Significance

Shrimp scampi has roots deeply embedded in Italian-American cuisine, particularly associated with the coastal regions where seafood is abundant. Often enjoyed as a luxurious dinner option, the dish translates the essence of Italian cooking, characterized by simple yet vibrant flavors. Although traditionally prepared with larger shrimp varieties, variations have sprung up, making use of different sizes based on availability.

Culturally, shrimp scampi represents the celebration of fresh seafood and the skill of combining aromatic ingredients, a hallmark of Italian cuisine. Its evolution over time has led to the incorporation of various elements, such as the addition of pasta, which has become a staple serving suggestion in many households.

The versatility of shrimp scampi also reflects regional patterns within Italy. For instance, in some coastal cities, a white wine addition to the sauce is common, while others might favor the richness of cream. These differences highlight how the dish has adapted to local tastes and ingredient availability.

One of the most popular iterations of shrimp scampi emerged in the United States, especially in restaurants like Red Lobster, making it a beloved choice for seafood lovers. Its broad appeal continues to inspire home cooks, making it a staple in many households.

Ingredient Deep Dive

Shrimp: Shrimp are a popular seafood choice globally, prized for their delicate flavor and versatility. They are low in calories yet rich in protein, making them an excellent addition to a balanced diet. When selecting shrimp, look for firm, translucent bodies with a fresh seawater scent. Ensure they are stored on ice and cooked promptly for the best quality. Alternatives such as scallops or lobster can be used for a luxurious twist on this recipe.

Garlic: Known as a staple in many kitchens, garlic enhances the flavor profiles of various dishes. Its health benefits, including anti-inflammatory properties, add to its appeal. When choosing garlic, look for firm bulbs with tight skins. Chop or mince freshly for intense flavor, as pre-minced garlic often lacks the same potency. Storing garlic in a cool, dark place will prolong its freshness.

Common Mistakes to Avoid

  • Overcooking the shrimp: Shrimp cooks quickly, and overcooking leads to a rubbery texture. Cook until just opaque for the best results.
  • Neglecting flavor layering: Skipping aromatics like garlic or herbs will make the sauce bland. Always sauté these first to build depth in flavor.
  • Using frozen shrimp without defrosting: Cooking frozen shrimp will result in uneven cooking. Thaw shrimp in the refrigerator overnight or under cold water before cooking.
  • Not seasoning enough: Shrimp can be mild in taste; proper seasoning elevates the dish. Be generous with salt, pepper, and lemon juice to brighten flavors.
  • Rushing the sauce: A well-made sauce takes time to meld flavors. Allow the garlic to sauté until fragrant before adding other ingredients.
  • Using low-quality butter: The richness of the butter greatly impacts the sauce. Use high-quality unsalted butter for optimal flavor.
  • Forgetting to taste while cooking: Never skip this step! Regular tasting allows for adjustments, ensuring the final dish is balanced.
  • Ignoring pasta cooking techniques: Begin cooking the pasta separately and add it to the sauce only when both are ready. This one-pot approach works best!

Essential Techniques

Perfectly Cooking Shrimp: To achieve perfectly cooked shrimp, aim for a final internal temperature of 120°F. The key is to cook them just until they turn pink, which usually takes 2-3 minutes per side in a hot skillet. Look for a slight curl and brightness as visual cues for doneness.

Making a Flavorful Sauce: Creating the sauce involves sautéing garlic in butter until fragrant, followed by the addition of other flavor elements. Mastering the balance between high heat and timing is crucial; cook the sauce until it thickens slightly, ensuring the flavors meld beautifully.

Pro Tips for Perfect Red Lobster Shrimp Scampi

1. Use fresh shrimp whenever possible for the best flavor and texture.
2. For an extra kick, add crushed red pepper flakes to the garlic as it cooks.
3. Deglazing the pan with white wine adds depth to the sauce.
4. Pair the dish with a freshly baked baguette to soak up the delicious sauce.
5. Don’t skip the lemon juice! Its acidity brightens the dish and balances flavors.
6. Customize the recipe by adding seasonal vegetables like spinach or asparagus.
7. For a gourmet touch, consider garnishing with freshly chopped parsley or basil before serving.
8. Always serve the dish immediately for the best quality and texture.

Variations and Adaptations

Feel free to explore regional variations of this dish by incorporating ingredients commonly found in different locales. For example, adding a splash of white wine or arrabbiata sauce can provide a new flavor dimension. Seasonal adaptations might include substituting shrimp with scallops or adding seasonal vegetables like zucchini.

Dietary modifications are also possible, such as using gluten-free pasta or swapping butter with olive oil for a dairy-free option. If you’re looking to reduce carbs, serve the scampi over zucchini noodles instead of traditional pasta. Alternatively, consider modifying the presentation by serving on a bed of sautéed greens, bringing a fresh look to the dish.

Serving and Presentation Guide

When plating your Red Lobster Shrimp Scampi, consider using wide, shallow bowls to showcase the lovely shrimp and sauce visually. A sprinkle of freshly chopped parsley can add a touch of green, enhancing the dish’s visual appeal. Traditional accompaniments like crusty bread or a side salad complete the meal.

For modern serving suggestions, try serving the shrimp over a bed of arugula or alongside a light pasta salad. Remember to serve hot, as shrimp scampi is best enjoyed fresh out of the skillet. Portion control is also essential; consider 4-5 shrimp per serving alongside pasta or bread, providing ample sustenance without overwhelming.

Wine and Beverage Pairing

For those looking to elevate their dining experience, a crisp white wine pairs wonderfully with shrimp scampi. Chardonnays or Sauvignon Blancs offer acidity that complements the rich butter sauce beautifully. If you prefer non-alcoholic options, consider sparkling water with a citrus slice or herbal iced tea, both refreshing choices.

If you’d like, a coffee-based beverage can serve as an excellent ending to your meal. Ensure any hot drinks are served at the appropriate temperature to keep flavors intact and heighten the dining experience.

Storage and Shelf Life

To store any leftover shrimp scampi, transfer it to an airtight container and refrigerate. Properly stored, it should last 2-3 days. For longer storage, consider freezing; however, note that the texture of the shrimp might change. Always ensure the leftovers are reheated thoroughly, ideally on the stovetop with a splash of water or broth to maintain moisture.

Key signs of spoilage include off smells or discoloration of the shrimp. Always exercise caution when consuming leftovers.

Make Ahead Strategies

Making shrimp scampi ahead of time is straightforward. Consider prepping ingredients, such as chopping garlic or deveining shrimp, in advance for a seamless cooking experience. If desired, you can prepare the sauce and shrimp separately, combining them fresh upon serving to preserve quality.

Storing prepped components in the refrigerator or freezer until needed ensures maximum freshness. Just remember to add fresh herbs or a squeeze of lemon just before serving for that freshly cooked taste.

Scaling Instructions

Scaling the recipe is simple! Halving the recipe calls for reducing every ingredient by half, making meal prep for two a snap. Doubling or tripling involves adjusting quantities as necessary and ensuring you have a sufficiently large skillet or pot to accommodate larger portions.

Keep in mind that cooking times might vary slightly with larger quantities, so monitor them closely to achieve the perfect doneness. Also, consider how you will store leftovers; having enough containers on hand will make horizontal scaling more manageable.

Nutritional Deep Dive

The macro breakdown reveals that shrimp scampi is primarily a source of protein, offering a healthy portion of fuel for your body. With various vitamins and minerals present, such as vitamin B12 and selenium, shrimp contributes to a balanced diet. The inclusion of butter does add saturated fat, so portion control can help maintain dietary goals.

Micronutrient analysis highlights the importance of a variety of vitamins found in the garlic and herbs used. These elements contribute additional health benefits, like anti-inflammatory properties and improved immune support.

Understanding portion analysis is vital; this dish should be enjoyed in moderation, particularly due to the butter sauce’s richness. A careful approach to serving size will help you appreciate this meal without guilt.

Dietary Adaptations

For those following gluten-free diets, using gluten-free pasta or cauliflower rice as a base for the shrimp scampi offers delicious alternatives. Dairy-free individuals can substitute butter with olive oil or vegan margarine, achieving similar results while adhering to dietary restrictions.

Vegans can explore plant-based shrimp alternatives, offering an exciting twist on traditional ingredients. Low-carb and keto dieters might relish in zucchini noodles or riced vegetables as a substitute for pasta while maintaining a satisfying meal experience.

Low-FODMAP dieters can omit garlic in favor of garlic-infused oil, preserving flavors without triggering any digestive sensitivities. This adaptability makes the dish welcoming to diverse dietary needs.

Troubleshooting Guide

If you encounter texture issues with undercooked shrimp, return them to the hot pan and sauté for an additional minute or two. For overcooked shrimp, serve them on a bed of pasta with ample sauce to help mask the texture.

If the flavor seems unbalanced, incorporating additional seasoning or a splash of lemon juice can elevate the taste. Similarly, if the dish turns out too watery, continue cooking over medium heat until the sauce thickens up.

Facing equipment challenges such as hot spots on your stovetop? Use a thicker or heavier pan to distribute heat more evenly. If ingredient substitutions led to unexpected results, adjusting the cooking method accordingly can help you recover your dish successfully.

Recipe Success Stories

Many home cooks have praised this Red Lobster Shrimp Scampi recipe for its simplicity and depth of flavor. Community feedback highlights the success of adding personal touches, such as different herbs or even a touch of cream for a richer sauce.

Readers have shared their adaptations, introducing exciting flavors while maintaining the core essence of scampi. From sprinkling crushed red pepper for added heat to experimenting with various types of pasta, these variations successfully cater to taste preferences.

Photography tips abound among those who’ve shared their culinary creations on social media. Ensuring proper lighting and showcasing the vibrant colors of the dish makes for beautiful presentations that invite others to taste and experience.

Frequently Asked Questions

Can I use frozen shrimp for this recipe?

Yes, you can use frozen shrimp! However, it’s essential to properly thaw them before cooking to ensure even cooking and avoid rubbery texture. Thaw them in the refrigerator overnight or place them in a bowl of cold water for quicker defrosting.

What can I serve with shrimp scampi?

For an ideal accompaniment, serve shrimp scampi with cooked pasta, warm crusty bread, or a fresh green salad. These pairings enhance the meal and allow you to enjoy the rich sauce.

How should I store leftovers?

Leftovers should be stored in an airtight container in the refrigerator and can last 2-3 days. For optimal freshness, consume soon after cooking.

Can I make shrimp scampi vegan?

Absolutely! Use plant-based shrimp alternatives and substitute the butter with vegan margarine or olive oil. Adjust recipes to accommodate personal dietary needs while maintaining the delicious essence of the dish.

Is shrimp scampi gluten-free?

This dish can be made gluten-free by using gluten-free pasta. Alternatively, serving the shrimp over a bed of sautéed vegetables or cauliflower rice is another excellent option!

What type of wine pairs best with shrimp scampi?

A crisp white wine like Sauvignon Blanc or Chardonnay pairs well with shrimp scampi, as their acidity complements the richness of the sauce beautifully.

Can I use another type of seafood in this recipe?

Certainly! This recipe is versatile. You can replace shrimp with scallops, crab, or lobster, adjusting cooking times as necessary to prevent overcooking.

What’s the best way to reheat shrimp scampi?

The best method is to reheat the scampi gently on the stovetop. Add a splash of water or broth to maintain moisture and prevent the sauce from thickening too much.

Can I make shrimp scampi ahead of time?

While it’s best served fresh, you can prepare the sauce in advance. Reheat gently and add fresh-cooked shrimp just before serving to preserve quality and texture.

What herbs work well with shrimp scampi?

Classic herbs like parsley and basil enhance the flavor of shrimp scampi. Feel free to experiment with fresh oregano or thyme for a new twist!

Additional Resources

If you’re inspired to explore more seafood recipes, check out our collection of fish dishes or other pasta recipes featuring clean, vibrant flavors. Additionally, our guides on essential cooking techniques and top kitchen tools provide valuable insights that enhance your culinary adventures.

For ingredient-specific information, refer to our detailed articles on shrimp and other shellfish, ensuring you have all the necessary knowledge for your cooking successful. Seasonal variations can also add excitement to your meal planning, allowing you to utilize fresh produce alongside your favorite seafood.

Join the Conversation

We invite you to share your culinary experiences with Red Lobster Shrimp Scampi! Post photos of your creations on social media and engage with our community by sharing variations, tips, and tricks. Your feedback helps foster a supportive cooking environment and inspire others to try delicious recipes.

Feel free to leave comments, suggestions, or questions, as we love connecting with fellow food enthusiasts around the globe!

The Recipe

Red Lobster Shrimp Scampi

Serves: 4

Prep Time: 15 mins

Cook Time: 10 mins

Total Time: 25 mins

Kitchen Equipment Needed

  • Large skillet
  • Wooden spoon
  • Measuring cups and spoons

Ingredients

  • 1 pound large shrimp, peeled and deveined
  • 3 tablespoons unsalted butter
  • 1 tablespoon olive oil
  • 4 cloves garlic, minced
  • 1/4 cup chicken broth
  • 1/4 cup white wine
  • 2 tablespoons lemon juice
  • 1/4 teaspoon red pepper flakes
  • Salt and pepper to taste
  • Fresh parsley, chopped for garnish
  • Cooked pasta for serving

Directions

  1. In a large skillet, melt the butter with the olive oil over medium heat.
  2. Add minced garlic and red pepper flakes, cooking until fragrant, about 1 minute.
  3. Pour in the chicken broth and white wine, bringing to a simmer.
  4. Add shrimp to the skillet, cooking until they turn pink, approximately 3-4 minutes.
  5. Stir in lemon juice and season with salt and pepper to taste.
  6. Serve the shrimp over cooked pasta, garnishing with chopped parsley.

Recipe Notes

  • You can substitute shrimp with scallops or lobster for variation.
  • Feel free to add seasonal vegetables like spinach or asparagus for added nutrition.
  • For a creamier sauce, stir in a tablespoon of heavy cream just before serving.

Easy Taco Rice with Queso – Perfect for Weeknight Dinners

Taco Rice with Queso: A Flavorful Twist on Classic Tacos

⚖️
Difficulty
Easy

⏲️
Prep Time
15 mins

🕒
Cook Time
20 mins

⏱️
Total Time
35 mins

🍽️
Servings
4

Taco Rice with Queso is not just a meal; it’s a celebration of flavors that balances the zest of tacos with the comfort of rice and the creaminess of queso. Imagine a vibrant plate filled with seasoned rice, colorful veggies, and hearty proteins, all smothered in rich, gooey queso cheese. This dish brings together all the best elements of a classic taco while providing a unique and satisfying way to enjoy them. Perfect for a weeknight dinner or a casual gathering, this taco rice serves as a versatile and hearty option that everyone will love.

The aroma of spices wafts from the kitchen, filling the air with anticipation as you prepare to indulge in a comforting dish that has the essence of a taco bar. Every bite offers a blend of flavors—from savory beef or chicken to tangy salsa, all layered atop fluffy rice. Whether you’re craving something quick and easy or looking to impress guests, Taco Rice with Queso perfectly unites ease and flavor, making it a favored choice for busy weeknights or casual get-togethers.

Quick Recipe Highlights

  • Flavor Profile: This dish boasts a delightful mix of savory, cheesy, and slightly spicy flavors, bringing a delightful taco essence to your palate.
  • Texture: The fluffy rice contrasts beautifully with the creamy queso, while the protein adds a satisfying chew to each bite.
  • Aroma: A delightful blend of spices, herbs, and melting cheese ensnares your senses from the moment you start cooking.
  • Visual Appeal: The colorful ingredients create a festive dish that is as inviting to the eyes as it is to the taste buds.
  • Skill Level Needed: This dish is perfect for novices and seasoned cooks alike, making it an ideal choice for anyone in the kitchen.
  • Special Equipment: A skillet or large saucepan is necessary to sauté the ingredients effectively and create the creamy queso sauce.

Recipe Overview

  • Difficulty Level: Taco Rice with Queso is an easy recipe that requires minimal culinary skills. The straightforward ingredient list and the simple cooking process make it accessible for everyone, from beginners to seasoned chefs.
  • Category: This dish fits perfectly into a family dinner, potluck, or party meal, providing a hearty option that’s great for sharing.
  • Cuisine: Rooted in Mexican cuisine, Taco Rice incorporates traditional flavors while offering a fresh and creative take on beloved classic meals.
  • Cost: With affordable ingredients like rice, beans, and cheese, Taco Rice is a budget-friendly meal that doesn’t compromise on flavor.
  • Season: This dish is perfect year-round but especially shines during the summer months when fresh tomatoes and peppers are at their peak.
  • Occasion: Serve it at casual get-togethers, family dinners, or any event where a crowd-pleasing dish is required.

Why You’ll Love This Recipe

Taco Rice with Queso offers a taste sensation that blends the richness of melted cheese with the savory notes of seasoned meat and vibrant vegetables. Each mouthful is a delightful explosion of flavors that invoke the joy of enjoying tacos. The combination of textures—from the soft rice to the creamy queso and tender protein—creates an irresistible dish that everyone will crave.

Beyond just the taste, this recipe simplifies meal prep, allowing you to whip up a delicious dinner in under an hour. With minimal chopping and straightforward cooking steps, you can easily include this meal in your weekly rotation. It’s a perfect solution for those busy weeknights when you want something hearty yet easy to prepare.

Taco Rice is not only delicious but also packed with nutritious ingredients. With the inclusion of beans, you gain essential protein and fiber, while colorful vegetables provide vitamins and minerals essential for a well-balanced diet. The addition of queso contributes calcium, making this a nutrient-rich dish that satisfies both taste buds and health needs.

This recipe is ideal for social gatherings, providing a fun, interactive way to serve dinner. Set out the ingredients and let guests create their own bowl with their desired toppings, fostering a communal dining experience that encourages conversation and engagement.

Finally, Taco Rice with Queso is incredibly cost-effective. Using basic pantry staples, this dish can be made for only a few dollars per serving, making it an accessible meal for families and anyone on a budget.

Historical Background and Cultural Significance

Taco Rice has its roots in Mexican culinary traditions that have inspired countless variations across the globe. This dish presents a fusion of taco-inspired flavors and the comforting nature of rice, showcasing the adaptability of Mexican cuisine. Originating in the United States, Taco Rice is particularly popular in places like Texas and California, where Mexican and Tex-Mex influences are prominent.

Culturally, this dish reflects the evolution of taco servings. Traditionally centered around tortillas, the introduction of rice as a base signifies how meals can transform while retaining beloved flavors. Taco Rice is a testament to the versatility of Mexican cooking and its ability to adapt to various palates and dining preferences.

As this recipe has evolved, home cooks have embraced the convenience of one-pot meals. The blend of ingredients in Taco Rice highlights the importance of using what’s on hand, particularly in cultures where making food stretch is key. The dish encourages creativity in cooking, even as it pays homage to its taco origins.

Regional variations of Taco Rice incorporate local ingredients and preferences, showcasing how this dish can differ significantly based on location. For instance, some versions may include black beans, while others use pinto or kidney beans, illustrating the customize nature of this recipe across different communities.

Ingredient Deep Dive

  • Rice: Rice is a staple food across many cultures. It serves as an excellent base in this recipe, providing sustenance and texture. Whole grain options offer additional fiber, while white rice gives a fluffy finish. For best results, rinse rice before cooking to remove excess starch and prevent clumping. Store cooked rice in an airtight container in the refrigerator for up to a week.
  • Ground Meat (Beef or Chicken): Ground meat adds heartiness and protein to Taco Rice. When selecting, look for lean options to reduce fat content. The nutritional benefits of meat include essential amino acids and iron. For storage, keep it in the coldest part of the fridge, and cook it within a few days. Ground meat can be substituted with plant-based options for a vegetarian version.
  • Queso Cheese: Queso provides a creamy, indulgent layer to the dish. Made from cheeses like cheddar or Monterey Jack, it melts beautifully and enhances the taco flavor profile. Look for fresh or pre-packaged queso, ensuring it’s not packed with preservatives. Store queso in a cool, dry place until opened, then refrigerate.
  • Beans: Beans are a great source of protein and fiber, complementing the dish’s overall nutrition. Black beans or pinto beans work well in Taco Rice. When using canned beans, rinse them to reduce sodium content. Dried beans require more prep but offer a richer taste. Store opened cans in the fridge, while dried beans have a long shelf life.
  • Vegetables: Fresh vegetables like bell peppers, onions, and tomatoes add freshness and color to Taco Rice. Choose in-season produce for the best flavor and nutritional value. Store fresh vegetables in a cool, dark place or refrigerator, depending on the type. Creative substitutions, like avocado for creaminess or corn for sweetness, can enhance the dish.

Common Mistakes to Avoid

  • Overcooking the rice: Ensure you follow cooking times closely to prevent mushy rice. Use a timer and taste test the texture toward the end.
  • Skimping on seasoning: Don’t be shy with spices! Improper seasoning can lead to a bland dish. Taste throughout the cooking process and adjust accordingly.
  • Not browning the meat: Take time to brown the meat in the pan, as this creates depth of flavor through the Maillard reaction, enhancing your dish significantly.
  • Using cold queso: Make sure to heat your queso gently to achieve the best creamy texture before serving.
  • Skipping the beans: Beans not only add protein, but they also contribute to the overall heartiness of the dish. Don’t skip this important ingredient!
  • Neglecting the toppings: Fresh toppings like cilantro, sour cream, and jalapeños elevate the flavors and presentation. Use them generously!
  • Doing everything in one pot: While convenient, separating frying and simmering can improve flavors and prevent overcrowding. Use an extra skillet for cooking meat.
  • Using stale spices: Old spices can lack flavor potency. Always check your spices and replace them if they’ve been stored for over six months.

Essential Techniques

  • Cooking Rice: Cooking rice properly is crucial for achieving the right texture. Use the correct water-to-rice ratio and allow the rice to rest after cooking to absorb any remaining moisture.
  • Browning Meat: Browning your meat enhances flavor. Cook it in a hot pan without overcrowding, allowing it to develop a caramelized crust before stirring.
  • Making Queso: Create smooth queso sauce by gently heating cheese with a liquid. Stir continuously to avoid burning, and adjust thickness with cream or milk.
  • Layering Flavors: Introduce spices in stages during the cooking process for a more complex flavor profile, allowing ingredients to meld beautifully.
  • Chopping Vegetables: Consistency is key when chopping veggies for even cooking. Aim for uniform sizes and shapes to ensure everything cooks evenly.
  • Presentation: Master the art of plating by layering your ingredients thoughtfully in bowls, garnishing with fresh herbs or toppings for an inviting look.

Pro Tips for Perfect Taco Rice with Queso

  • Choose high-quality cheese—investing in good queso will make a noticeable difference in taste and texture.
  • Mix and match proteins to keep things interesting; ground turkey or shredded pork can offer delightful variations.
  • Make rice a day ahead and reheat before serving to maximize flavor and save time.
  • Experiment with homemade salsa to take the flavors over the top; it’s fresh and always better than store-bought.
  • Adjust spiciness by using mild spices or toppings for guests who prefer less heat.
  • For extra zest, squeeze fresh lime over the assembled taco rice just before serving.
  • Let your creation sit for a few minutes after assembling; this allows flavors to meld before digging in.
  • This dish is great for leftovers—consider repurposing them into burritos or nachos for next-day meals!

Variations and Adaptations

  • Regional Variations: In southern regions, taco rice might incorporate local peppers or spices, reflecting the local palate and culture.
  • Seasonal Adaptations: Use seasonal produce, such as zucchini in summer or squash in fall, to keep the dish fresh and exciting.
  • Dietary Modifications: For a vegan approach, swap out meat and cheese for plant-based alternatives, ensuring that flavor remains robust.
  • Flavor Variations: Experiment with different spice blends or salsas to customize flavor profiles according to your personal preferences.
  • Texture Modifications: Add nuts or seeds for an unexpected crunch that contrasts nicely with the creamy cheese and fluffy rice.
  • Presentation Alternatives: Serve in a lettuce wrap for a low-carb option, or use individual bowls for a fun, personalized touch.

Serving and Presentation Guide

  • Use deep bowls for serving, allowing an ample portion of rice and toppings while preventing spills.
  • Garnish with fresh herbs like cilantro or green onions for added color and flavor.
  • Serve alongside traditional accompaniments like tortilla chips or guacamole for a complete meal experience.
  • As a modern twist, present in a taco shell bowl for added crunch and an attractive display.
  • Maintain temperature, ensuring ingredients are served warm, especially the queso, for optimal taste and texture.
  • Practice portion control by measuring servings ahead of time, allowing guests to customize their bowls without excess waste.

Wine and Beverage Pairing

  • Light Whites: Choose crisp white wines like Sauvignon Blanc or Pinot Grigio, which cleanse the palate and complement the dish’s complexity.
  • Wine Coolers: For a refreshing option, consider wine spritzers with fresh fruit, perfect for summer gatherings.
  • Craft Beers: IPA or lager can pair beautifully with Taco Rice, highlighting the dish’s spiciness without overpowering it.
  • Non-Alcoholic Alternatives: Fresh fruit-flavored iced teas or sparkling water with lime offer refreshing options that resonate well with the meal.
  • Coffee Pairing: A light roast coffee can bring out the flavors in a savory dish, especially if served with a sweet dessert afterward.

Storage and Shelf Life

  • When storing leftovers, keep them in airtight containers in the fridge for up to three days, ensuring freshness and preventing spoilage.
  • For larger portions, consider freezing portions in freezer-safe bags or containers, which can last up to three months.
  • Signs of spoilage include an off smell or discoloration; when in doubt, discard the leftovers to ensure safety.
  • Reheat thoroughly in the microwave or on the stove to ensure even warming of rice and queso.
  • For reheating frozen portions, thaw overnight in the fridge before heating for best results.

Make Ahead Strategies

  • Prepare the rice a day ahead and refrigerate it to save time on busy evenings, allowing you to assemble quickly.
  • Cook ground meat and store pre-seasoned in the fridge for added convenience, ready to be mixed with the remaining ingredients.
  • Chop vegetables in advance and store them in an airtight container, anticipating the recipe for day-of cooking efficiency.
  • Assemble queso in advance; store it separately from other ingredients to maintain the optimal texture until serving.
  • Consider prepping all ingredients in advance and refrigerate until it’s time to cook, streamlining the cooking experience.

Scaling Instructions

  • To halve the recipe, simply reduce all ingredient quantities by 50%, making it ideal for smaller gatherings.
  • If doubling or tripling the recipe, use larger cookware and adjust cooking time, ensuring even heat distribution and flavor retention.
  • The time needed for browning meat may need extending when adjusting batch size; monitor closely for optimal results.
  • Consider storage space when scaling up; ensure you have enough containers for leftovers or grouping servings for large parties.
  • Always taste while adjusting seasoning to maintain consistency in flavor and texture across larger quantities.

Nutritional Deep Dive

  • The macro breakdown includes ample protein from meat and beans, carbohydrates from rice, and fats from cheese, offering a well-rounded meal.
  • This dish contains several micronutrients, including calcium, iron, and fiber, promoting overall health when consumed as part of a balanced diet.
  • Health benefits stem from the combination of beans and whole grains, aiding digestion and providing sustained energy levels throughout the day.
  • Consider your specific dietary needs when enjoying Taco Rice, adjusting portion size according to fitness or health goals.
  • Maintaining portion control can significantly contribute to weight management, allowing you to enjoy flavors without overindulgence.

Dietary Adaptations

  • For gluten-free adaptations, ensure all ingredients such as spices and sauces are certified gluten-free to avoid cross-contamination.
  • Dairy-free options can easily be achieved by substituting traditional queso with plant-based cheese or nutritional yeast for a cheesy flavor without dairy.
  • Vegan variations of Taco Rice can include using lentils or tofu as protein sources, maintaining the heartiness of the dish.
  • Low-carb diets can enjoy this dish by using cauliflower rice instead of traditional rice, significantly reducing carbohydrate content.
  • For keto advocacy, stay mindful of carbs in beans and consider using ground meats and high-fat cheeses to maintain ketosis.
  • Paleo enthusiasts might opt for sweet potatoes instead of rice, incorporating lean proteins and vegetables for a wholesome alternative.
  • Low-FODMAP options can tailor-down beans and onion usage while using suitable substitutes to ensure digestive comfort.
  • Adaptations for other specific diets can be made, remaining attentive to individual restrictions and preferences while maintaining the essence of the dish.

Troubleshooting Guide

  • If the rice turns out mushy, check the water ratio; too much water can cause a gummy texture. Next time, adjust accordingly.
  • For bland flavors, consider adding more seasoning or salt. Always season in layers to enhance the overall dish taste.
  • Overcooked meat can become tough; use a thermometer for accuracy, ensuring that ground meat reaches a safe temperature without losing moisture.
  • If your queso doesn’t melt well, ensure it’s being heated gently; adding a splash of cream can help achieve that smooth consistency.
  • Timing issues can arise; prepare meats and rice ahead, monitoring cooking times closely to ensure everything is ready simultaneously.

Recipe Success Stories

  • Readers report back with excitement over how quickly this recipe has become a family favorite, often making it weekly.
  • Several community members have shared their unique variations, using different proteins and serving styles, inspiring creativity.
  • Adaptation stories highlight how people made Taco Rice fit perfectly into their dietary preferences, using sweet potatoes or quinoa as substitutes.
  • Photography tips from readers suggest vibrant garnishes, such as herbs and cheese, to make the dish visually appealing when sharing online.

Frequently Asked Questions

Q: Can I make Taco Rice with Queso vegetarian?

A: Absolutely! Substitute ground meat with lentils, mushrooms, or a plant-based meat alternative while still maintaining a hearty flavor.

Q: How should I store leftovers?

A: Store leftovers in an airtight container in the fridge for up to three days. You can also freeze portions for up to three months.

Q: Can I use brown rice instead of white rice?

A: Yes, you can use brown rice. Keep in mind that cooking times will vary, so ensure you adjust accordingly to achieve desired texture.

Q: What toppings do you recommend?

A: Popular toppings include fresh cilantro, diced avocados, jalapeños, sour cream, and lime wedges for a refreshing touch.

Q: Is this dish kid-friendly?

A: Definitely! You can customize the spice level and toppings to make it more appealing to kids and even let them build their own bowls!

Q: How can I make this dish spicier?

A: To amp up the heat, consider adding diced fresh jalapeños, hot sauce, or spicy salsa when assembling your Taco Rice.

Q: Can I meal prep Taco Rice?

A: Yes! You can prepare the ingredients ahead of time. Just store them separately and assemble on the day you plan to serve.

Q: What can I substitute for queso?

A: For a lower-calorie option, use nutritional yeast combined with milk for a cheesy flavor without the richness of queso.

Q: Is Taco Rice kid-friendly?

A: Absolutely! You can tailor the spice levels to suit your children’s palates, and they can help assemble their own bowls!

Q: How do I make the dish more filling?

A: Consider adding quinoa or more beans to increase protein and fiber content, leaving everyone satisfied and full.

Additional Resources

  • Explore related recipes like Burrito Bowls and Quesadilla Casseroles for additional Tex-Mex inspiration.
  • Learn essential techniques for cooking rice and browning meat to elevate your cooking skills further.
  • Check out ingredient guides for understanding the benefits and preparation of various beans and grains.
  • For equipment recommendations, consider non-stick skillets and glass storage containers for efficient prep and cleanup.
  • Seasonal variations may include ingredients like pumpkin in fall or fresh herbs in spring for a delightful twist.

Join the Conversation

  • Share your creations on social media and tag us to join our lively cooking community.
  • Photography tips suggest using natural light and vibrant garnishes to make your dish shine online.
  • Add your own suggestions or modifications to the recipe, contributing to a growing collection of community favorites.
  • Engage with readers through comments, sharing your stories and experiences while cooking Taco Rice.

The Recipe

Taco Rice with Queso

Serves: 4

Prep Time: 15 mins

Cook Time: 20 mins

Total Time: 35 mins

Kitchen Equipment Needed

  • Large skillet
  • Measuring cups and spoons
  • Wooden spoon or spatula
  • Serving bowls

Ingredients

  • 1 cup white rice
  • 1 pound ground beef or chicken
  • 1 can black beans, rinsed and drained
  • 1 cup queso cheese, shredded
  • 1 cup diced tomatoes
  • 1 bell pepper, diced
  • 1 onion, diced
  • 2 tablespoons taco seasoning
  • Salt and pepper to taste
  • Fresh lime wedges for serving

Directions

  1. In a large skillet, cook the ground beef or chicken over medium heat until browned; drain excess fat.
  2. Add onions and bell peppers, cooking until softened, about 3-4 minutes.
  3. Stir in the taco seasoning, tomatoes, and black beans; simmer for 5 minutes.
  4. Meanwhile, cook the rice according to package instructions; fluff with a fork once ready.
  5. Combine the cooked rice into the skillet with the meat mixture; stir thoroughly.
  6. Remove from heat and mix in the queso cheese, allowing it to melt slightly before serving.
  7. Serve warm with lime wedges and desired toppings.

Recipe Notes

  • Feel free to customize toppings with fresh herbs, avocado, or jalapeños for added flavor.
  • This recipe can be doubled for larger gatherings or meal prep purposes.
  • Consider using brown rice for added nutritional value, adjusting cooking times accordingly.
  • Leftover Taco Rice can be stored for meal prep or repurposing into burritos or nachos.

Delicious Mushroom Chicken Alfredo Lasagna Recipe for Comfort Food Lovers

Mushroom Chicken Alfredo Lasagna: A Creamy and Savory Delight

⚖️
Difficulty
Moderate

⏲️
Prep Time
30 mins

🕒
Cook Time
45 mins

⏱️
Total Time
75 mins

🍽️
Servings
6

Delve into the comforting world of mushroom chicken Alfredo lasagna, where creamy goodness meets hearty layers, making this dish perfect for any family dinner. This recipe brings together tender chicken, savory mushrooms, and rich Alfredo sauce layered between sheets of lasagna, creating a delightful symphony of textures and flavors. Each forkful reveals a blend of melted cheese, meaty goodness, and aromatic spices that will undeniably captivate your taste buds and warm your heart.

Imagine the aroma wafting through your kitchen as this lasagna bakes to golden perfection. The melding of cheeses creates a top layer that is both gooey and enticing, while the underneath layers combine various textures that keep each bite interesting. This Mushroom Chicken Alfredo Lasagna will not only feed your family, but also become a cherished memory that will be brought up again and again during meals.

Quick Recipe Highlights

  • Flavor Profile: A rich, creamy combination of Alfredo sauce complemented by savory sautéed mushrooms and tender chicken creates a satisfying and indulgent flavor.
  • Texture: The creamy Alfredo melds beautifully with the soft noodles, while the mushrooms add a subtle chewiness that contrasts perfectly with the melted cheese.
  • Aroma: The dish exudes fragrant garlic and herbs, paired with the warmth of baked cheese, making it irresistible from the moment it hits the oven.
  • Visual Appeal: The golden top layer of melted cheese contrasts against the white Alfredo sauce and pale chicken pieces, making it as visually appealing as it is delicious.
  • Skill Level Needed: While the recipe requires chopping and assembling, it is perfect for cooks with an intermediate skill level who are ready to tackle layering techniques.
  • Special Equipment: You’ll need a large baking dish, a skillet for sautéing, and basic kitchen utensils to bring this lasagna to life.

Recipe Overview

  • Difficulty Level: This recipe is considered moderate due to the layering and sauce preparation. The steps require attention, but the rewards are well worth the effort.
  • Category: This Mushroom Chicken Alfredo Lasagna fits perfectly into the comfort food category, making it ideal for cozy family gatherings or gatherings with friends.
  • Cuisine: Influenced by Italian culinary traditions, this dish marries the classic lasagna concept with a delightful Alfredo twist, giving it a unique flair.
  • Cost: With a mix of pantry staples and fresh ingredients, the cost of this dish is manageable, making it an affordable option for family meals.
  • Season: This hearty lasagna is perfect for cooler months, bringing warmth and comfort during fall and winter gatherings.
  • Occasion: Whether it’s a holiday dinner, a birthday celebration, or a casual Friday night, this mushroom chicken lasagna is sure to impress.

Why You’ll Love This Recipe

The taste and texture appeal of mushroom chicken Alfredo lasagna is irresistible. Each layer presents a delightful contrast between creaminess and the umami flavor of mushrooms, complemented by the mild taste of chicken. The richness of the Alfredo sauce harmonizes perfectly with the tender pasta, creating a dish that offers both comfort and satisfaction.

Convenience is another significant benefit to this recipe. It can be made ahead of time and baked just before serving, making it perfect for busy weeknights or when entertaining guests. Preparing in advance allows flavors to meld beautifully, enhancing the overall taste.

This lasagna is not only satisfying but also packed with nutritional advantages. Mushrooms are rich in antioxidants, vitamins, and minerals, while chicken provides lean protein. When combined with nutrient-dense ingredients, this dish can form a balanced meal to fuel your day.

Socially, this Mushroom Chicken Alfredo Lasagna can serve as a centerpiece for gatherings, encouraging shared moments around the table. It promotes conversation and bonding, often being the highlight of any meal.

Cost-effectiveness is yet another reason to love this recipe. The use of simple ingredients ensures that you can feed a crowd without breaking the bank. It’s a straightforward way to provide comfort food that is both affordable and delectable.

Historical Background and Cultural Significance

The roots of lasagna can be traced back to ancient Greece, but the dish we know today has evolved through Italian culinary traditions. It was initially consumed as a simple dish, layering pasta with meat and sauce, but over time transformed into numerous variations that showcase regional ingredients.

Culturally, the importance of lasagna varies across Italy, with each region offering its twist. Whether made in the north with rich béchamel sauces or in the south with tomato-based sauces, lasagna is a dish that embodies the art of Italian cooking, rooted in family traditions and homemade meals.

The evolution of mushroom chicken Alfredo lasagna signals a broader trend where traditional recipes are merged with modern tastes. The addition of mushrooms and creamy Alfredo reflects the desire to innovate while honoring classic favorites.

Regionally, variations of recipes abound with different types of cheeses or meat in various cultures. Some families may add an additional layer of vegetables, while others prefer sticking closely to the main ingredients for their classic flavors.

Ingredient Deep Dive

Chicken is central to enhancing the lean protein content of this dish. It’s not only versatile but also loved globally. When selecting chicken, look for fresh, organic options for the best flavor. Store it properly in the refrigerator and consume it within a couple of days or freeze for longer durations. If chicken is not suitable, turkey can serve as an effective substitute.

Mushrooms, particularly varieties like cremini or shiitake, add flavor depth and richness to the lasagna. They are known for their health benefits, containing vitamins B and D, as well as important minerals. Choose firm, unblemished mushrooms and store them in a paper bag to maintain freshness. If you wish to lessen their presence in the recipe, consider finely chopping or even omitting them altogether.

Alfredo sauce typically consists of basic ingredients like butter, cream, and Parmesan cheese. Homemade versions can elevate the taste significantly by allowing for a customizable flavor. Remember, Parmesan should be freshly grated when possible, for the best flavor impact. Pre-made sauces can work in a pinch but ensure they are high quality.

Lasagna noodles can come as regular or no-boil options, which offer convenience. For the best results, opt for high-quality pasta that holds layering well. While traditional white noodles are standard, consider incorporating whole grain or gluten-free varieties as substitutes to cater to dietary preferences.

Common Mistakes to Avoid

  • Overcooking the noodles: Ensure they are al dente, as they’ll continue cooking in the oven. Undercook slightly for best results.
  • Too much sauce: Balance is key; too much sauce makes it sloppy. Aim for a moderate amount for optimal layering.
  • Not letting it rest: Allow the lasagna to sit for about 10-15 minutes post baking to help the layers set before cutting.
  • Using low-quality cheese: Always opt for fresh, high-quality cheese for the best flavor and texture.
  • Skipping the flavoring: Don’t forget to season each layer; a pinch of salt, pepper, or herbs can elevate the flavors immensely.
  • Not layering correctly: Ensure equal distribution of ingredients for a well-balanced lasagna in every bite.
  • Baking without foil: Cover with foil to prevent over-browning until the last few minutes of cooking.
  • Rushing preparations: Take your time to prep ingredients and build layers carefully; this enhances both flavor and presentation.

Essential Techniques

Mastering the art of layering is crucial for this Mushroom Chicken Alfredo Lasagna. Each layer should be even and cohesive to create a structure that holds well upon serving. Start with sauce at the base, followed by noodles and filling, repeating until all ingredients are used.

Sautéing mushrooms correctly is also essential. Cooking them over medium-high heat helps evaporate moisture, ensuring they develop a deeper flavor rather than becoming soggy in the lasagna.

The creation of a homemade Alfredo sauce, while not mandatory, significantly increases the depth of flavor in this dish. Melt butter, add garlic, then slowly whisk in cream and Parmesan until it thickens. This allows for a customized flavor profile, avoiding artificial additives often found in pre-made sauces.

Pro Tips for Perfect Mushroom Chicken Alfredo Lasagna

To achieve ultimate creaminess, consider mixing ricotta cheese with an egg, which helps bind ingredients while adding richness.

A sprinkle of fresh herbs, like parsley or basil, adds a vibrant touch that enhances taste and visual appeal.

Incorporating vegetables like spinach or zucchini can not only add nutrients but also create a textural contrast in the dish.

Experiment with cheese blends; adding a layer of mozzarella or fontina cheese can introduce additional flavors and stretchiness.

Ensure that all components (sauce, chicken, and mushrooms) are prepped and cooked before assembly to streamline the process.

For a crispy top, broil the lasagna for a few minutes after baking to create an appealing golden layer.

Finally, let your imagination run wild—adapt the ingredients based on what’s in season or available, creating your unique version of this classic dish.

Variations and Adaptations

Consider exploring regional variations by substituting traditional ingredients with local favorites. For example, if you’re in a seafood-rich area, try adding shrimp or crab instead of chicken for a coastal twist.

Seasonal adaptations can breathe new life into your lasagna. In Spring, consider adding asparagus or peas, while Fall can inspire the introduction of roasted squash for a cozy flavor.

Dietary modifications can cater to various eaters; for instance, to make a vegan version, substitute chicken with tofu and use plant-based cheeses and sauces.

Flavor variations, such as adding pesto to the Alfredo sauce, can elevate the dish and introduce unique herbs and spices to excite your palate.

Texture modifications can include switching to whole wheat or gluten-free lasagna noodles, providing a different bite while maintaining the integrity of the dish.

Presentation alternatives like serving in individual ramekins offer a modern twist, empowering each guest with their own personal lasagna.

Serving and Presentation Guide

Plating techniques for Mushroom Chicken Alfredo Lasagna can significantly affect its visual appeal. For a refined touch, consider using a sharp knife to cut perfectly proportioned squares, ensuring clean edges without disrupting the layers.

Garnishing with fresh herbs adds a burst of color while also enhancing flavor. A sprinkle of freshly grated cheese on top before serving can create an elegant finishing touch.

Traditional accompaniments include a simple side salad or garlic bread, balancing flavors and textures.

For modern serving suggestions, consider serving in individual portions, offering guests a personal touch to their meal, complete with a side of fresh greens.

Temperature is key; serve warm but avoid piping hot to ensure your guests can enjoy the full spectrum of flavors without risk of burns.

Portion control tips include cutting smaller squares for sharing, encouraging guests to indulge in seconds while still being mindful of their portions.

Wine and Beverage Pairing

When pairing wine, opt for a light white like Chardonnay or Pinot Grigio, which complements the creamy Alfredo sauce beautifully. The acidity balances the richness, enhancing the overall meal experience.

For non-alcoholic alternatives, sparkling water with a slice of lemon can refresh the palate between bites, providing a bright contrast.

If you prefer coffee or tea with your meal, consider a smooth herbal tea that won’t overpower the flavors in the lasagna.

Temperature considerations are crucial; serve red wines slightly chilled for an improved taste profile.

Don’t hesitate to offer a small tasting flight of wines, allowing guests to choose their favorite with each savory bite of lasagna.

Storage and Shelf Life

Proper storage is vital for maintaining the quality of your lasagna. Store leftovers in an airtight container in the refrigerator, where they can last 3 to 5 days.

Temperature requirements for storage are essential; ensure the lasagna cools to room temperature before sealing to prevent condensation and sogginess.

Container recommendations include glass or high-quality plastic containers, which can withstand changes in temperatures and help preserve freshness.

Signs of spoilage to look for include off smells, changes in texture, or discoloration of ingredients, which signifies it’s time to discard your leftovers.

Reheating instructions are straightforward; place the lasagna in the oven or microwave until heated, ensuring it reaches an internal temperature of 165°F for safety.

For long-term storage, consider freezing a portion; cover tightly with plastic wrap and foil, and it can last for up to three months.

Make Ahead Strategies

To make this lasagna ahead of time, prepare the components separately. Cook the noodles, sauté the chicken and mushrooms, and prepare the sauce, then assemble just before baking.

For optimal flavor, consider prepping the lasagna a day in advance. Assembly allows the flavors to meld beautifully, improving taste.

Quality impact can be reduced if stored correctly; ensure that the assembled lasagna is well-covered to prevent drying.

When it comes to assembly tips, layer using parchment paper between layers to facilitate lifting while cutting upon serving, keeping the layers intact.

For reheating guidelines, preheat your oven and consider using a cover to prevent the top layer from burning.

Adding fresh components, such as herbs or salads, just before serving can elevate an otherwise reheated dish for an appealing visual presentation.

Scaling Instructions

To halve the recipe, maintain proportions of all ingredients but adjust cooking times slightly to ensure even cooking.

For doubling or tripling the recipe, utilize two or more baking dishes to accommodate increased volume, ensuring even heat distribution for optimal cooking.

Equipment adjustments are essential; larger pots for sauce or additional skillets may be necessary for sautéing ingredients in bulk.

Timing modifications for cooking can involve extending times based on thickness; ensure to check internal temperatures to guarantee doneness.

Storage considerations include clearly labeling larger batches, informing eaters of best before dates and necessary reheating guidelines for leftovers.

Nutritional Deep Dive

The macro breakdown of this dish highlights a blend of carbohydrates, proteins, and fats from the noodles, chicken, and cheese, contributing to a balanced meal.

Micronutrient analysis suggests this dish contains vitamins B and D from chicken and mushrooms, along with calcium from cheese, supporting overall health.

Health benefits stem from the inclusion of lean proteins and nutrient-dense vegetables, providing energy and strength essential for daily activities.

Dietary considerations may need to be noted for individuals monitoring intake; adjusting portion sizes can help manage calories while maximizing enjoyment.

Portion analysis is essential when serving; each slice can be marked to ensure even distribution among diners, promoting conscious eating habits.

Weight management tips revolve around balancing this rich dish with lighter side salads or vegetable servings to create a more wholesome plate.

Dietary Adaptations

For gluten-free options, consider using gluten-free lasagna noodles, which can replicate the dish’s structure without compromising on taste.

Dairy-free adaptations can include nut-based cheeses or coconut cream in the Alfredo sauce for those avoiding animal products.

A vegan version of this dish can incorporate tofu or lentils for a protein source, along with cashew-based cheese for creaminess.

Low-carb offerings can utilize zucchini or eggplant slices instead of traditional noodles to create a hearty dish without the added carbohydrates.

For those following a keto diet, ensure substitutions continue to adhere to low-carb guidelines, focusing on high-quality fats and proteins.

Paleo adaptations can omit grains and dairy products, using nutrient-dense ingredients like sweet potatoes or almond flour as alternatives.

Low-FODMAP considerations may involve eliminating specific ingredients like garlic and using lactose-free cheese for those with sensitivities.

Troubleshooting Guide

For texture issues like a watery lasagna, consider reducing liquid content in the sauce or pre-cooking vegetables to evaporate excess moisture.

If you encounter flavor balance problems, adjust seasoning levels. A dash of salt or acidity can often enhance or balance the taste.

Temperature problems can stem from incorrect oven settings; an oven thermometer can help ensure accuracy for the best cooking results.

Equipment challenges, such as a cooking dish that burns, may be alleviated by using an oven-safe cover during the baking process to provide even heat.

Ingredient substitutions may affect the final taste; use as close to intended ingredients as possible for consistency, but feel free to experiment within reason.

Timing concerns may involve potential overcooking; use a thermometer to check the internal temperature of the lasagna, aiming for 165°F when ready to serve.

Recipe Success Stories

Community feedback often highlights how this dish creates lasting memories—it’s a favorite for gatherings, showing the power of good food in bringing people together.

Variation successes are evident in how readers share their interpretations, from adding seasonal veggies to trying different cheeses, all while retaining the soul of the original recipe.

Adaptation stories abound as users find creative ways to cater to dietary needs, sharing their personal twists on this classic comfort dish.

Reader suggestions enhance the recipe by introducing new combinations, helping fellow cooks expand their options while preparing the lasagna.

Photography tips are also commonly shared, with readers recommending bright lighting and close-up shots to showcase the dish’s appeal, enticing others to try the recipe.

Frequently Asked Questions

Q: Can I make this lasagna ahead of time?
A: Absolutely! You can prepare the layers ahead and assemble your lasagna a day before, then store it in the refrigerator until you’re ready to bake.

Q: What is the best way to reheat leftovers?
A: The best way to reheat your lasagna is in the oven, covered with foil, at 350°F until heated through. This prevents drying while ensuring that it warms evenly.

Q: Can I use store-bought Alfredo sauce?
A: Yes, using store-bought Alfredo sauce is convenient, but for a fresher and creamier taste, consider making your own with butter, cream, and Parmesan.

Q: What’s the optimal way to freeze this lasagna?
A: To freeze, ensure your lasagna is well-wrapped in plastic wrap and foil. It can be stored in the freezer for up to three months; just thaw and reheat when ready to serve.

Q: Are there vegetarian options for this recipe?
A: Definitely! You can substitute chicken with sautéed vegetables like zucchini, spinach, or roasted red peppers to create a delicious vegetarian lasagna.

Q: What can I pair with Mushroom Chicken Alfredo Lasagna?
A: A light salad, garlic bread, or even a side of steamed vegetables complement the lasagna beautifully, enhancing the meal experience.

Q: How do I know when the lasagna is done baking?
A: Your lasagna should be bubbly and golden on top. A thermometer inserted in the center should read 165°F when it is done.

Q: Can I use different types of cheese?
A: Absolutely! Feel free to experiment with cheese; mozzarella, ricotta, or even goat cheese can provide interesting flavors and textures.

Q: How do I make sure my lasagna doesn’t come out watery?
A: To avoid a watery lasagna, make sure to cook vegetables and meats beforehand to remove excess moisture, and do not overload the layers with sauce.

Q: What if I don’t have lasagna noodles?
A: You can substitute lasagna noodles with thinly sliced zucchini or eggplant for a low-carb version, or even roll up filling in crepes for a unique twist.

Additional Resources

For related recipes, explore *Chicken Lasagna Soup* or *Spinach and Ricotta Stuffed Shells*, which encapsulate similar flavors and textures.

Technique guides on making homemade sauces and perfecting pasta textures can enhance your cooking skills, ensuring that your lasagna is always a hit.

Ingredient information on various cheeses and their uses can help deepen your understanding of flavors, helping pair appropriately with your meal.

Consider investing in high-quality kitchen tools for better results, such as a versatile baking dish and reliable knife set for easy preparation.

Finally, check for seasonal variations, utilizing fresh vegetables during their peak to elevate flavors and create a dish that’s distinctive and delightful.

Join the Conversation

Engage with the community by sharing your experience through social media. Post photos of your finished Mushroom Chicken Alfredo Lasagna and tag your friends to join in the deliciousness.

Photography tips can help capture the dish’s beauty, focusing on natural light and vibrant colors, sharing recipes that look as good as they taste.

Dive into recipe reviews, sharing what you loved about the dish—if your family enjoys it or if you modified it uniquely.

Finally, encourage community engagement by asking others for their suggestions or variations on this classic meal. Your culinary journey is always enriched through shared experiences with others who share your love for cooking.

The Recipe

Mushroom Chicken Alfredo Lasagna

Serves: 6

Prep Time: 30 mins

Cook Time: 45 mins

Total Time: 75 mins

Kitchen Equipment Needed

  • Baking dish
  • Skillet
  • Mixing bowl
  • Wooden spoon
  • Knife
  • Oven mitts

Ingredients

  • 9 lasagna noodles
  • 2 cups cooked chicken, shredded
  • 1 cup mushrooms, sliced
  • 3 cups Alfredo sauce
  • 2 cups shredded mozzarella cheese
  • 1 cup ricotta cheese
  • 1 tablespoon olive oil
  • 2 cloves garlic, minced
  • Salt and pepper to taste
  • Fresh parsley for garnish

Directions

  1. Preheat the oven to 375°F (190°C).
  2. In a skillet, heat olive oil over medium heat. Add garlic and mushrooms, sauté until tender.
  3. In a bowl, mix cooked chicken, sautéed mushrooms, and Alfredo sauce.
  4. Spread a thin layer of the sauce mixture at the bottom of your baking dish.
  5. Layer 3 lasagna noodles on top of the sauce.
  6. Spread half of the remaining chicken and mushroom mixture over the noodles, followed by a layer of ricotta cheese. Add a layer of shredded mozzarella.
  7. Repeat layering: noodles, sauce, chicken mixture, ricotta, and mozzarella.
  8. Top with the final three noodles and the rest of the sauce mixture. Finish with a generous layer of mozzarella cheese.
  9. Cover with foil and bake for 30 minutes, then remove the foil and bake for another 15 minutes until golden and bubbly.
  10. Let it rest for about 10-15 minutes before slicing. Garnish with fresh parsley and serve hot.

Recipe Notes

  • Feel free to add vegetables like spinach or zucchini for extra nutrients.
  • For a richer flavor, use a blend of cheeses.
  • This lasagna is great for freezing; just cover and thaw before baking.

Best Taco Bell Chicken Quesadilla Copycat Recipe to Try

Taco Bell Chicken Quesadilla Copycat: A Flavorful At-Home Treat

⚖️
Difficulty
Easy

⏲️
Prep Time
15 mins

🕒
Cook Time
15 mins

⏱️
Total Time
30 mins

🍽️
Servings
4

If you’ve ever craved the deliciousness of Taco Bell’s chicken quesadilla, you’re in for a treat! This Taco Bell Chicken Quesadilla Copycat recipe captures the iconic taste of the fast-food favorite, bringing the zesty flavors and melty goodness right to your kitchen. With tender chicken, a perfect blend of spices, and gooey cheese all toasted together in a crisp tortilla, this recipe is guaranteed to satisfy your cravings.

Whether enjoyed as a quick lunch, a delightful dinner, or even a shareable snack during game night, this chicken quesadilla is wonderfully versatile. The combination of seasonings, creamy sauces, and grill marks create an alluring visual experience, making it a treat for both the eyes and the taste buds. Plus, making this popular dish at home means you can adjust the ingredients to match your preferences, ensuring it’s just how you like it!

Quick Recipe Highlights

  • Flavor Profile: Expect a savory blend of spices with a hint of creaminess from the melted cheese and a touch of richness from the chicken.
  • Texture: The quesadilla sports a crispy exterior, contrasting beautifully with the tender chicken and gooey cheese inside, providing a delightful mouthfeel.
  • Aroma: The warm, inviting aroma of toasting tortillas mingled with the scent of spices and grilled chicken fills the kitchen, making your stomach growl in anticipation.
  • Visual Appeal: With golden-brown tortillas and oozing cheese, the quesadilla not only tastes great but looks incredibly appetizing on a plate.
  • Skill Level Needed: As an easy recipe to follow, even beginner cooks will find success with this dish, making it ideal for cooking enthusiasts at any level.
  • Special Equipment: You’ll need a skillet or griddle for cooking the quesadillas, along with a spatula for flipping.

Recipe Overview

  • Difficulty Level: This chicken quesadilla is straightforward to prepare, making it a perfect dish for beginners and those short on time.
  • Category: Consider it a delicious snack or a wholesome main course, suitable for lunch or dinner.
  • Cuisine: Influenced by Mexican culinary traditions, this dish is a beloved American adaptation found at fast-food establishments nationwide.
  • Cost: Creating your own quesadilla is economical, with main ingredients costing around $10 for a filling meal that serves four.
  • Season: Perfect for any season, especially great for cozy indoor dining during cooler months or casual gatherings in the summer.
  • Occasion: Whether it’s a family dinner, movie night, or a picnic, these quesadillas fit any occasion seamlessly.

Why You’ll Love This Recipe

The blend of flavors and textures in the Taco Bell Chicken Quesadilla Copycat is simply irresistible. The seasoned chicken provides a savory richness, while the melted cheese brings a creamy smoothness to each bite. The toasty tortilla adds a satisfying crunch, making every mouthful a delightful adventure of taste and texture. It’s an explosion of flavors that keeps you coming back for more!

One of the best things about this quesadilla recipe is convenience. With just a few ingredients and minimal cooking time, you can whip up a tasty meal that appears as though it came from a restaurant. It’s a huge time-saver for busy weeknights or unexpected guests, allowing you to indulge without extensive preparation or cleanup.

This chicken quesadilla is not only delicious but also offers nutritional advantages. Packed with protein from the chicken and calcium from the cheese, it’s a satisfying option that can easily be made healthier by adding vegetables. You can sneak in some peppers or onions for added nutrition without sacrificing flavor!

As a fantastic dish for social gatherings, you can impress your friends and family with your cooking skills while serving a beloved favorite—everyone loves quesadillas! They can be customized with various dips, making them perfect for sharing or enjoyable solo.

Lastly, making your own quesadillas is cost-effective. For roughly the same price as one fast-food order, you can create multiple servings and enjoy the satisfaction of home-cooked food tailored just for you. This recipe not only respects your budget but also your taste preferences!

Historical Background and Cultural Significance

The quesadilla traces its origins to Mexico, where it traditionally consists of a tortilla filled with cheese and various other ingredients, then folded and grilled. Over the years, it has evolved into various forms reflecting regional tastes and available ingredients. As global cuisine continues to intermix, quesadillas with a multitude of fillings have gained popularity across North America.

The quesadilla is a staple comfort food for many, often made at home for family gatherings or fiestas. This dish embodies a piece of Mexican culture, making it a vibrant part of social and culinary communities that celebrate shared traditions through food.

As it made its way into American cuisine, the quesadilla has been modified to suit local palates, leading to creations like the Taco Bell Chicken Quesadilla. Fast-food adaptations have made this dish accessible to a wider audience, providing a taste of Mexican comfort food in a quick and convenient format.

Regional variations exist, such as variations in cheese types used, additional spices, or the inclusion of common ingredients like black beans and corn in some areas. This adaptability allows everyone to enjoy quesadillas in a way that resonates with their regional preferences and cultural backgrounds.

Ingredient Deep Dive

Cooked Chicken: Chicken plays a central role in this recipe, serving as the primary protein source. Grilled, roasted, or even shredded rotisserie chicken can be utilized for convenience. Packed with protein, chicken supports muscle health and provides essential nutrients. When selecting chicken, consider freshness and quality. Store leftovers in an airtight container, and they can be refrigerated for about 3-4 days.

Flour Tortillas: Tortillas function as the base that holds all ingredients together. While flour tortillas are the most popular choice, corn tortillas are a gluten-free alternative. When choosing tortillas, look for those with minimal ingredients for better quality. They can be stored in the refrigerator for several weeks, but make sure to seal them properly to prevent drying out. Feel free to substitute whole-wheat tortillas for a healthier option!

Common Mistakes to Avoid

  • Overstuffing the quesadilla: While it’s tempting to add extra fillings, overstuffing can lead to spills during cooking.
  • Using unheated pans: Cooking on a cold or uneven surface can yield a soggy quesadilla instead of a crispy one.
  • Skimping on the cheese: Cheese enhances flavor and texture, so don’t hesitate to use a generous amount.
  • Skipping the grilling step: Skipping the pre-cooking of tortillas will lead to a quesadilla that doesn’t meld together properly.
  • Under-seasoning: Failing to season your chicken before using it can miss out on the bold flavors you expect.
  • Not allowing it to rest: Cutting into the quesadilla right away can cause the cheesy filling to ooze out.
  • Neglecting to use a spatula: Trying to flip without a spatula may result in tearing the tortilla.
  • Choosing the wrong cheese: Using cheese that doesn’t melt well can lead to a dry quesadilla.
  • Forgetting garnishes: Leaving out toppings like salsa or guacamole can make your dish feel incomplete.
  • Not adjusting heat levels: Cooking on too high heat can burn the exterior before the inside is fully melted.

Essential Techniques

Grilling the Torres: It’s crucial for creating that perfect crisp texture. Ensure your skillet or griddle is preheated before adding the tortilla. To master the technique, cook on medium heat and monitor for a golden-brown color. Aiming for an even cooking surface prevents burning.

Evenly Distributing Ingredients: Spreading your chicken and cheese evenly ensures a consistent flavor in each bite. Remember to leave some space along the edges so they will seal better when folded. Checking for visual cues like cheese melting and bubbling indicates the quesadilla is ready to flip.

Pro Tips for Perfect Taco Bell Chicken Quesadilla

1. Choose a blend of cheeses for richer flavors. Combining Monterey Jack and cheddar creates depth.

2. Use a rotating spatula to flip your quesadilla without breaking it—it allows better control.

3. Add fresh ingredients like cilantro or diced tomatoes to enhance freshness and color.

4. Allow your quesadilla to rest for a minute before slicing to retain the filling.

5. Experiment with different sauces for dipping, like creamy ranch or spicy salsa.

6. Utilize leftover chicken from previous meals to save time and reduce waste.

7. Lightly oil the pan to improve browning without excessive grease.

8. Serve immediately for the best texture and taste experience!

Variations and Adaptations

Regional variations can result in unique flavor profiles. For instance, Tex-Mex versions incorporate ingredients like jalapeños for a spicy kick. Seasonal adaptations might include using fresh herbs in the spring or roasted vegetables in the fall. If you’re following dietary modifications, try substituting tofu for a vegetarian take or utilizing low-carb tortillas for a keto option. Flavor variations can include experimenting with different proteins, such as beef or shrimp. Lastly, you can present your quesadilla as a colorful platter with sides like guacamole and a fresh salad.

Serving and Presentation Guide

When plating your quesadillas, consider cutting them into wedges for an appealing presentation. Garnish with fresh herbs like cilantro or green onions for a pop of color. Traditional accompaniments such as sour cream and salsa enhance flavor, while modern serving suggestions may include creative dipping sauces. Pay attention to the temperature; serving quesadillas hot ensures a satisfying experience. Portion control is also essential, so consider serving with sides, like a simple salad, to balance portions and add freshness.

Wine and Beverage Pairing

For wine lovers, a light, crisp white wine like Sauvignon Blanc pairs wonderfully with chicken quesadillas. The acidity balances the richness of the cheese, making each bite delightful. If you prefer non-alcoholic alternatives, a refreshing iced tea or sparkling water with lime complements the meal well. For those who enjoy coffee or tea, consider brewing a lightly flavored tea such as chamomile to finish your meal on a soothing note. Always serve beverages chilled to enhance the overall dining experience.

Storage and Shelf Life

Store any leftovers in an airtight container in the refrigerator to maintain freshness. Proper storage extends the shelf life to about 3-4 days. For longer preservation, quesadillas can be frozen—just wrap them in plastic wrap and place in a freezer bag. Signs of spoilage include unusual smells or changes in texture; discard if in doubt. When reheating, opt for an oven or skillet to recapture the crispiness rather than using a microwave, which may lead to sogginess.

Make Ahead Strategies

For an efficient cooking session, prepare your chicken and slice your veggies a day ahead. Enjoy assembling your quesadillas right before cooking. Store each layer separately to maintain freshness in ingredients. When ready, assembly minimizes cooking time and allows for quick meals on busy nights. Be sure to leave out fresh elements like lettuce or sour cream until serving to keep them crisp. Reheating is easy; just use a skillet to restore flavors and textures effectively.

Scaling Instructions

If you need to adjust the serving size, doubling or halving the ingredients can easily be done without affecting taste. Modify cooking times slightly, but closely monitor to ensure everything cooks evenly. For those cooking for large gatherings, consider batch-cooking quesadillas, keeping them warm in a low oven until ready to serve. Always check that your cooking equipment is suitable for larger quantities to avoid overcrowding the cooking surface, which can cause uneven cooking.

Nutritional Deep Dive

This recipe’s nutritional profile includes a substantial amount of protein from chicken and calcium from cheese. Whole tortillas add fiber and essential B vitamins. Understanding macronutrient distribution helps balance meals. Each serving offers essential nutrients while allowing flexibility for modifications. Portion control plays a crucial role, especially for those monitoring dietary intake, facilitating weight management while enjoying delicious homemade meals.

Dietary Adaptations

For gluten-free options, substitute traditional flour tortillas with corn varieties, ensuring everyone can indulge. A dairy-free version can be achieved through plant-based cheese or simply by increasing the amount of your favorite vegetables. Vegans can easily replace chicken with marinated mushrooms or jackfruit for a hearty, satisfying filling. Other adaptations include low-carb substitutions for the tortillas or utilizing a cauliflower crust for keto-friendly options.

Troubleshooting Guide

If your quesadilla comes out with a soggy texture, it may have lacked sufficient heat during cooking. Consider increasing the heat or keeping the lid off your pan for a crispier result. If flavors aren’t balanced, revisit seasoning during preparation to ensure proper distribution. For melting issues, selecting higher-quality cheese can prevent dryness. Timing may pose challenges; cook just long enough to see golden edges without burning.

Recipe Success Stories

Many home cooks have found success recreating this Taco Bell classic, tailoring it to suit personal tastes. Readers frequently share their adaptations, such as introducing unique spices or flavors, which highlight the recipe’s versatility. Photography tips often arise during sharing, with users showcasing beautifully plated quesadillas. The joy elicited from creating a beloved fast-food dish at home leads to countless success stories that inspire further experimentation in the kitchen.

Frequently Asked Questions

Can I use a different protein in this recipe? Absolutely! Feel free to substitute with beef or vegetarian proteins like beans or tofu for added variety.

How do I make it spicier? To add heat, consider including diced jalapeños or using a spicy cheese blend within your quesadilla.

Can I freeze quesadillas after cooking? Yes! Cooked quesadillas can be frozen. Wrap them tightly and follow proper thawing and reheating methods for the best results.

What’s the best cheese for quesadillas? A blend of Monterey Jack and cheddar is ideal, but other melting cheeses will work as well. Avoid non-melting options.

How do I reheat leftover quesadillas? Reheat in a skillet over medium heat, or place in a toaster oven for about five minutes to retain crispiness.

Can I make a vegetarian version? Yes! Simply replace the chicken with an assortment of veggies, such as spinach, mushrooms, or zucchini.

Are there gluten-free tortilla options? Yes! Look for gluten-free tortillas when shopping, which are widely available at most grocery stores.

How do I know when the quesadilla is done? Look for golden brown edges and melted cheese; this indicates it’s cooked just perfectly.

Can I add additional toppings? Certainly! Toppings like salsa, sour cream, or even guacamole elevate the taste.

How long does it take to cook one quesadilla? Each quesadilla typically requires about 2-3 minutes per side, depending on your heat level.

Additional Resources

For those interested in similar recipes, check out guides for various quesadilla fillings, or dive into articles on cooking essentials like homemade sauces! Explore ingredient information for fresh produce selections, and consider equipment recommendations for cooking perfect quesadillas every time. Also, don’t miss out on seasonal variations, leaning into fresh herbs or vegetables that add a spark to your dish during different times of the year.

Join the Conversation

Engage with fellow food enthusiasts by sharing your own taco quesadilla stories on social media! Use photography tips for capturing the perfect shot of your meal, and encourage others to make creative recipe adjustments. Community feedback continues to inspire exciting variations. Share your success or any unique adaptations you’ve made, fostering a space for recipe discovery and camaraderie in the culinary world!

The Recipe

Taco Bell Chicken Quesadilla Copycat

Serves: 4

Prep Time: 15 mins

Cook Time: 15 mins

Total Time: 30 mins

Kitchen Equipment Needed

  • Skillet or griddle
  • Spatula
  • Measuring cups
  • Knife and cutting board

Ingredients

  • 2 cups cooked chicken, shredded
  • 1 cup shredded cheese (Monterey Jack or Cheddar)
  • 4 large flour tortillas
  • 1 packet taco seasoning
  • Sour cream and salsa for serving

Directions

  1. In a bowl, mix the shredded chicken with taco seasoning until well coated.
  2. Heat a skillet over medium heat and lightly grease it if desired.
  3. Place one tortilla on the skillet and sprinkle half of the cheese evenly across it.
  4. Add half of the seasoned chicken on top of the cheese, then sprinkle with more cheese.
  5. Cover with another tortilla and cook for 2-3 minutes, until golden brown.
  6. Carefully flip the quesadilla and cook for an additional 2-3 minutes.
  7. Remove from heat and let it rest for a minute before slicing into wedges.
  8. Serve warm with sour cream and salsa.

Recipe Notes

  • Feel free to add sauteed peppers or mushrooms for extra flavor.
  • Any leftover chicken works well, making this recipe customizable.
  • For a spicier option, include jalapeños or a dash of hot sauce.

Indulge in Baked Brie Bread Bowl with Prosciutto and Honey

Baked Brie Bread Bowl with Prosciutto and Honey: An Irresistible Crowd-Pleaser

⚖️
Difficulty
Medium

⏲️
Prep Time
15 mins

🕒
Cook Time
25 mins

⏱️
Total Time
40 mins

🍽️
Servings
8 servings

Indulge in the creamy richness of Baked Brie paired with the savory notes of prosciutto and the sweetness of honey, all nestled in a warm, crusty bread bowl. This recipe not only serves as a delightful appetizer but also as a show-stopping centerpiece for any gathering. Whether you’re entertaining friends for game night or celebrating a special occasion, this baked brie dish brings an elegant touch to your table that is bound to impress.

Each bite offers a luxurious blend of flavors, from the nutty and mild brie that melts beautifully as it bakes, to the salty, delicate slices of prosciutto that perfectly complement the honey’s floral sweetness. The warm bread bowl invites you to dig in, making it a fun interactive dish that encourages sharing and sociability. The blend of textures—creamy cheese, crispy prosciutto, and the warm, chewy bread—creates an unforgettable tasting experience that will leave your guests raving about your culinary skills.

Quick Recipe Highlights

  • Flavor Profile: A delightful balance of savory, sweet, and creamy that dances on your palate.
  • Texture: Creamy and gooey cheese enveloped by crispy prosciutto and a warm, hearty bread bowl.
  • Aroma: A tantalizing mix of baked bread, melting cheese, and honey that fills the kitchen.
  • Visual Appeal: Golden, bubbling cheese surrounded by vibrant slices of prosciutto and the rustic charm of a bread bowl.
  • Skill Level Needed: Suitable for beginners and seasoned cooks alike, requiring only basic baking skills.
  • Special Equipment: A Dutch oven or any oven-safe dish that can hold bread and cheese.

Recipe Overview

  • Difficulty Level: This Baked Brie Bread Bowl with Prosciutto and Honey is classified as medium in difficulty, making it perfect for both novice cooks and culinary enthusiasts. It involves simple steps such as hollowing out bread, assembling ingredients, and baking to perfection.
  • Category: This dish fits perfectly into the appetizer category, ideal for sharing at parties, gatherings, or cozy nights in.
  • Cuisine: Drawing on French-inspired flavors with the use of brie and prosciutto, this recipe reflects European traditions of rich, creamy cheeses paired with cured meats.
  • Cost: The ingredients are relatively affordable, with brie cheese and prosciutto being slightly more luxurious yet still accessible compared to gourmet offerings.
  • Season: This recipe shines in the fall and winter months when hearty and comforting flavors are most appreciated, but it also makes a refreshing note in springtime gatherings.
  • Occasion: Perfect for holidays, family gatherings, game days, or simply a cozy dinner at home.

Why You’ll Love This Recipe

Baked Brie Bread Bowl with Prosciutto and Honey is undoubtedly a treat for the senses. The harmonious combination of flavors will take your taste buds on a delightful journey. The creamy brie melts and mingles with savory prosciutto, while honey adds a hint of sweetness, making each bite a delicious revelation. You can serve it hot, fresh from the oven, creating a satisfying contrast between the crispy bread and the smooth, melted cheese.

In addition to the fantastic taste, this recipe is incredibly convenient to prepare. You can assemble it in under 15 minutes and let the oven do the work, allowing you to enjoy the company of your guests while it bakes. The interactive nature of the dish, where everyone tears off pieces of bread to scoop up the melty cheese, adds a layer of fun to any gathering. This type of communal eating fosters conversation and connection, making it ideal for social events.

Another great advantage is the versatility of this recipe. You can easily tailor it to your taste preferences or dietary needs by adding herbs, spices, or even adjusting the type of cheese used. The nutritional benefits of the ingredients, such as healthy fats and proteins in the cheese and legumes in the bread, contribute to a balanced snack.

Hosting a gathering? This bread bowl is not just a dish; it’s a conversation starter, turning any ordinary get-together into a memorable experience. Serve it alongside a selection of wines, and you have a true culinary masterpiece that brings people together.

Cost-wise, this recipe remains affordable, especially if ingredients are sourced in bulk. Producing a sophisticated dish at home helps save money while impressing your guests with gourmet flavors.

Historical Background and Cultural Significance

The origins of baked brie can be traced back to France, where it has been a cherished cheese for centuries. Brie cheese itself hails from the Île-de-France region, boasting a rich history associated with nobility and gourmet cuisine. The act of baking brie became popular as a method to enhance its creamy texture and rich flavor, making it a favorite choice during festive occasions across Europe.

Culturally, the tradition of sharing a baked cheese dish can be linked to various European customs, where cheese plays a central role in social gatherings. The combination of melted cheese and bread is reminiscent of many rustic European peasant dishes that utilized local ingredients while also symbolizing hospitality and warmth.

Over the years, variations of baked brie have emerged, reflecting regional ingredients and personal preferences. The addition of prosciutto and honey to the traditional cheese plate captures the essence of fusion cooking, blending sweet and savory notes that resonate with many palates.

In the modern cooking landscape, this recipe has adapted to include fresh herbs and even fruits, showcasing the recipe’s evolving nature while maintaining its comfort-food status. Whether enjoyed at a holiday gathering or a casual dinner, the appeal of melted cheese in a bread bowl continues to endure, solidifying its place in both tradition and contemporary cuisine.

Ingredient Deep Dive

Brie Cheese

Brie is a soft cheese characterized by its creamy interior and edible white rind. Originating from the Île-de-France region, brie has long been enjoyed for its rich and buttery flavor. This cheese is known for its high fat content, which provides a luxurious mouthfeel. Nutritionally, brie is a good source of protein and calcium, making it a beneficial addition to your diet. When selecting brie, look for samples with a freshly made appearance without cracks.

For storage, keeping brie in the refrigerator is crucial, wrapped in wax paper or stored in an airtight container. This prevents it from drying out while allowing it to breathe. You can substitute brie with camembert or another soft cheese if preferred.

Prosciutto

Prosciutto is a dry-cured ham that originates from Italy and is renowned for its delicate flavor and tender texture. Rich in protein, it adds a savory depth to various dishes, pairing well with cheeses like brie. When selecting prosciutto, look for slices that are thin and have a rosy hue with a good fat-to-meat ratio, as this indicates quality.

For storage, prosciutto should be kept wrapped tightly in the refrigerator to retain its freshness. To enhance the flavor, try pairing it with sweet items like fruits or honey, which contrast beautifully. If prosciutto is not available, you can substitute it with other cured meats, but the flavor may vary considerably.

Bread Bowl

The bread bowl used in this recipe typically comprises soft and chewy bread varieties such as sourdough or French bread. Considered a fun and interactive way to enjoy various fillings, bread bowls have become increasingly popular in culinary creations. Nutritionally, bread provides carbohydrates that contribute to energy, although portioning should be considered for those monitoring intake.

When selecting bread, opt for a loaf that is fresh and has a good crust to withstand baking. Store bread in a cool, dry place wrapped in a kitchen towel, but avoid storing in the fridge as it can lead to staleness. Variations could include using whole grain bread for added fiber.

Honey

Honey, a natural sweetener produced by bees, boasts a rich history that spans centuries. This golden syrup not only enhances flavors but also offers numerous health benefits, including antioxidants. When selecting honey, look for raw or locally sourced options to ensure the best quality and flavor.

Storage should be in a cool, dark place, and honey can last indefinitely if kept properly sealed. You can experiment with different types of honey to find those that pair best with your dish, such as clover or wildflower honey.

Common Mistakes to Avoid

  • Using cold brie: Always allow your brie to come to room temperature before baking. Cold cheese won’t melt properly, impacting texture and taste.
  • Overbaking: Keep an eye on the baking time; overbaked brie can become rubbery and lose its delightful creaminess.
  • Choosing the wrong bread: Avoid dense or sweet breads; opt for options that will balance the richness of the cheese, such as sourdough.
  • Not hollowing out the bread bowl enough: Leaving too much bread in the center can prevent you from fully enjoying the melty cheese.
  • Omitting seasonings: Enhance the flavor profile by adding herbs or spices to the prosciutto or honey drizzle.
  • Cutting the cheese incorrectly: Use a sharp knife to prevent the cheese from crumbling before being baked.
  • Using too much honey: A little goes a long way; drizzle lightly to maintain balance with the savory prosciutto.
  • Ignoring the flavor combination: Be conscious of your ingredient choices; flavors should complement each other, not overpower.
  • Missing the presentation: Take time to visually appeal by beautifully arranging the dish before serving.
  • Not considering leftovers: Plan for how you’ll store or repurpose any leftovers to reduce waste.

Essential Techniques

Hollowing the Bread Bowl

Hollowing the bread for your Baked Brie Bread Bowl is essential to create enough space for filling. Use a serrated knife to slice off the top and carefully remove the inside, leaving a sturdy crust. This is important because it prevents breakage and ensures you have enough room for the gooey cheese. Aim for an even wall thickness, around an inch, for optimal support.

Baking Cheese to Perfection

Baking the cheese allows the brie to transform from a solid to a luscious, gooey delight. To master this technique, preheat your oven properly and monitor the cheese closely as it bakes. The visual cue of a bubbly, golden surface signifies that your cheese is ready. Avoid the temptation to open the oven frequently, as this can disrupt the cooking process.

Arranging the Ingredients

Layering ingredients thoughtfully enhances both flavor and presentation. Begin with the cheese at the center, then gently layer in prosciutto and drizzle with honey for an aesthetic look. The key is ensuring that each element is easily accessible when served. Ensure beautiful harmony in colors and textures to entice your guests at first glance.

Drizzling Honey

Drizzling honey is a fine art that can elevate your dish’s flavor profile. To achieve this, use a small spoon or squeeze bottle for precision. The goal is to add sweetness without overwhelming the savory elements. A well-drizzled serving should incorporate a touch of honey in each bite, enhancing enjoyment.

Temperature Control

Proper temperature control is crucial for a successful bake. Ensure your oven reaches the desired temperature before placing your dish inside. The ideal baking temperature for this recipe is usually around 350°F. Using an oven thermometer can help you maintain accuracy, which in turn affects the overall outcome of your dish.

Garnishing Techniques

Garnishing your bread bowl before serving not only enhances visual appeal but can add another layer of flavor. Fresh herbs, like rosemary or thyme, can be sprinkled around the dish to be used as a dipping flavor alongside the bread. Experiment with colorful garnishes like edible flowers for an elegant presentation.

Pro Tips for Perfect Baked Brie Bread Bowl

1. For an extra layer of flavor, try adding a pinch of rosemary or thyme between the cheese and prosciutto layers before baking. These herbs will infuse the cheese with their aroma during the cooking process while adding depth to the dish.

2. To determine if your brie is warmed through, gently press down with a spoon. If it feels jiggly, it’s ready to be served. If it feels firm, it may require additional baking time.

3. Consider adding sliced fruits, like figs or apples, surrounding the bread bowl as a beautiful contrast to the rich cheese and savory prosciutto.

4. Before serving, allow the baked brie to rest for a couple of minutes. This cooling time lets it set slightly, making it easier to scoop while still remaining warm.

5. Ensure you have plenty of extra baguette slices or crackers on hand for scooping or dipping. A variety of options encourages guests to explore their preferences.

6. When making multiple bread bowls, stagger their baking times in case your oven space is limited, preventing them from cooling while waiting.

7. Always keep some extra honey on hand for drizzling at the table. This lets guests personalize each bite according to their sweetness preference.

8. Experiment with a mix of cheeses to create a unique flavor profile; brie pairs beautifully with goat cheese or even figs as additional filling options.

Variations and Adaptations

Explore the potential of this Baked Brie Bread Bowl by playing with its components. Regional variations can enhance the flavor; for instance, substituting prosciutto with Serrano ham for a Spanish twist provides a delightful depth.

Consider seasonal adaptations by introducing fresh fruits such as raspberries or cranberries during warmer months to add brightness to your dish. For a dietary modification, switch to a dairy-free cheese alternative which can still deliver a creamy texture with proper blending.

Flavor variations can also be achieved by introducing infused honey or incorporating nuts such as walnuts into the filling. Choose hearty nut options or candied pecans to add an additional crunch.

You may also explore texture modifications by using crispy fried onions or carmelized apples as toppings. The preparation of the bread can shift, allowing for a mini muffin version or making smaller bread bowls for individual servings.

Presentation alternatives can include using personal-sized baguettes or rolls, which cater to gatherings by providing individual servings without the pass-around bowl.

Serving and Presentation Guide

Serving and presenting your Baked Brie Bread Bowl creatively boosts its appeal. Use a rustic wooden cutting board or a decorative tray for an elevated feel. Plating techniques such as smearing honey around the dish and stalling bread slices around can create an enticing atmosphere. Garnishing with fresh herbs or a sprinkle of sea salt enhances its aesthetic appeal and culinary experience.

Consider traditional accompaniments; a small bowl of chutney or fig preserves can complement the flavors beautifully. On the modern side, serve with artisan crackers or crisp breadsticks for a contrasting texture to showcase the delicious soft brie.

Temperature considerations are crucial; serve your dish immediately after baking to maintain the brie’s luscious texture. For portion control, cut the bread into bite-sized pieces to encourage communal sharing while ensuring guests sample generously without overwhelming their plates.

Wine and Beverage Pairing

For wine pairings, opt for a crisp Chardonnay or a light Pinot Noir, both of which beautifully complement the creaminess of the brie. A sparkling wine can also provide a refreshing note against the savory prosciutto, enhancing the overall tasting experience.

For non-alcoholic alternatives, consider serving herbal teas or sparkling lemonades for a lively refreshment against the richness of the dish. Additionally, a light apple or ginger soda can offer a wonderful contrast while keeping the focus on the baked brie.

Support flavor harmony by ensuring that drinks are served chilled while leaving the bread bowl at room temperature. This balance invites guests to savor each flavor element without feeling overwhelmed by any particular taste.

Storage and Shelf Life

Proper storage of leftover Baked Brie Bread Bowl is essential to maintain quality. Store uneaten brie in an airtight container in the refrigerator to keep it fresh for up to three days. Any leftover bread bowl should be covered tightly to prevent it from drying out or becoming stale.

Reheating instructions should include placing the bread bowl and cheese in an oven set to 350°F, warming for about 10–15 minutes. This helps retain the creamy texture while refreshing the bread exterior.

For those interested in freezing, freeze any unbaked assembly to save time later. Wrap it tightly in plastic wrap and aluminum foil, ensuring no air can enter to prevent freezer burn. Properly stored, it can last up to three months.

Make Ahead Strategies

If you’re short on time, planning ahead will ease serving stress. Prepare the bread bowl and hollow it out a day before your event, keeping it covered to avoid drying out. Additionally, slice the prosciutto and have the brie ready to assemble when you need it.

Aim to freeze the entire assembly so you can pop it directly into the oven fresh out of the freezer. This will allow you to enjoy warm, gooey brie on demand without compromising on flavor or freshness.

The quality impact is significant; while preparing in advance, you can ensure all ingredients are at their peak freshness and are harmonious. Just remember to allow extra baking time for frozen dishes, as they may take longer to heat through completely.

When planning the make-ahead strategy, keep in mind to add fresh herbs like thyme or rosemary just before baking to preserve their aromatic qualities.

Scaling Instructions

Scaling your Baked Brie Bread Bowl is simple and effective. To halve the recipe, adjust the ingredient amounts while retaining the same technique and cooking time. If you double or triple the recipe for larger gatherings, consider using a larger bread loaf and spreading the ingredients out among a few differently sized loafs or dishes.

Equipment adjustments may be necessary; opt for larger baking sheets or Dutch ovens if cooking multiple bread bowls simultaneously. Timing modifications may vary slightly based on the size and number of dishes you bake at once, so monitor closely.

When scaling portions, ensure to keep their freshness by storing precut bread in a sealed container and preparing individual cheese servings that allow for easy reheating later on. This ensures optimal taste and presentation, regardless of batch size.

Nutritional Deep Dive

Delving deeper into the nutritional aspects of Baked Brie Bread Bowl reveals its macro breakdown: each serving is rich in fats from the cheese, proteins from the prosciutto, and essential carbohydrates from the bread. Moderation is essential, especially for those managing energy intake.

Micronutrient analysis indicates beneficial components like calcium and vitamin B12 present in brie, while prosciutto offers sodium and iron. Complementing this with whole-grain bread can enhance fiber intake, beneficial for digestion.

The health benefits of this recipe, when consumed mindfully, can include improved energy levels from complex carbohydrates and sustained fullness from protein-rich ingredients. However, mindful eating should also consider calorie density, especially with creamy cheeses and cured meats.

Dietary considerations should be noted; while this recipe is indulgent, sharing among friends makes it a lighter fit for social gatherings. Portion analysis can also help individuals determine appropriate amounts, ensuring enjoyment without excess.

Dietary Adaptations

For those seeking gluten-free options, consider serving without the bread bowl or using gluten-free bread alternatives that maintain a similar texture. This ensures that even those with dietary restrictions can enjoy the delightful flavors of baked brie.

A dairy-free lifestyle doesn’t have to miss out; using plant-based cheese substitutes can mimic the creaminess of brie while keeping flavors intact. Nutritional yeast could be sprinkled for a cheesy flavor enhancer without dairy.

For vegan adaptations, create a plant-based bread bowl filled with roasted vegetables and dairy-free cheese. Use a blend of nuts and seeds to create a rich, creamy alternative that fulfills cravings without animal products.

Low-carb enthusiasts can alter the recipe by opting for almond flour bread or cheese crisps, substituting traditional bread with carb-friendly options while maintaining delicious flavor and presentation.

Other specific diets, such as low-FODMAP, may exclude certain onions and garlic, so tailor the ingredients to focus on lactose-free cheese and low-FODMAP breads, ensuring the taste remains intact while being gut-friendly.

Troubleshooting Guide

If your brie isn’t properly melting, ensure that it was at room temperature before baking, as cold cheese will not yield the desired gooey texture. Also, monitor the baking time closely—overbaking can lead to firmness.

For texture issues like a dry bread bowl, check that you haven’t hollowed it out too much. Adequate bread walls will sustain the integrity of the bread bowl while absorbing flavors.

If flavors feel unbalanced—too sweet or too salty—taste each ingredient beforehand. Adjustments can be made by cutting back on honey or opting for a less salty prosciutto to bring harmony to the dish.

If your oven temperature is inconsistent, invest in an oven thermometer to ensure you are baking at the correct temperature, which directly impacts texture and flavor development.

In cases of ingredient substitutions gone wrong, be mindful of how varying flavors interact. Test adjustments in small portions before committing to the full recipe, allowing for balanced outcomes.

Timing concerns for baked goods can lead to uneven cooking; familiarize yourself with your oven’s quirks and adjust bake times, especially when working with variations in ingredients or sizes.

Recipe Success Stories

The allure of the Baked Brie Bread Bowl with Prosciutto and Honey has captivated home cooks and culinary enthusiasts alike, leading to various success stories. Many have shared how this recipe not only impressed family but also became a go-to option for hosting gatherings, sparking joy among friends.

Community feedback often highlights the ease of preparation while encouraging customization—readers have delighted in experimenting with seasonal fruits and nuts, sharing their unique takes on the original recipe.

Photographers have documented their creations, showcasing the ooey-gooey melted cheese and golden-baked crust, earning praise for presentation—encouraging others to elevate their plating styles while sharing tips for achieving the perfect Instagram-worthy shot.

Variation successes emerged as new flavors were introduced; some opted for artisan breads or herbed cheeses, transforming this classic dish into something uniquely their own, thereby branching the recipe’s reputation beyond its original roots.

Reader suggestions continuously inspire adaptations, including alternative cheeses and flavor profiles, creating a sense of community around this beloved appetizer and ensuring it resonates with diverse palettes and preferences.

Frequently Asked Questions

Can leftovers be reheated?

Yes, leftover Baked Brie Bread Bowl can be reheated. Place it in an oven set to 350°F for 10-15 minutes to restore its gooey texture. Always cover it with foil to prevent drying out.

What is the best bread to use?

The best bread for this recipe is a sturdy sourdough or crusty baguette that holds its shape well. These types provide a delightful contrast to the creamy brie while supporting the dish’s integrity.

Is this recipe suitable for vegetarians?

Yes, you can easily adapt this recipe for vegetarians by omitting the prosciutto or replacing it with vegetables like roasted red peppers or artichokes for added flavor without meat.

Can I make this recipe gluten-free?

Absolutely! You can make this recipe gluten-free by using gluten-free bread options. There are various delicious gluten-free bread brands available that work perfectly for this dish.

How long can I store the leftovers?

The leftovers can be stored in an airtight container in the refrigerator for up to three days. Reheat in the oven for best results to maintain the cheese’s creamy texture.

Can I prepare this dish in advance?

Yes, you can prepare the Baked Brie Bread Bowl in advance. Assemble the ingredients and keep them in the fridge until you are ready to bake, ensuring the bread remains fresh.

What variations can I try?

You can experiment with various flavor profiles by incorporating fruits like figs or apples, trying different cheeses, or choosing various sweeteners such as maple syrup or spicy honey.

What beverages pair well with this dish?

For beverages, a crisp white wine like Chardonnay pairs wonderfully, while non-alcoholic options such as herbal teas or sparkling lemonades enhance the experience without overwhelming the flavors.

What can I serve with this recipe?

This dish pairs beautifully with a selection of crackers, a fresh side salad, or some roasted vegetables to balance the meal and provide a wholesome experience.

Are there any dietary substitutions?

Yes, those following dairy-free or vegan diets can swap brie with plant-based cheese and prosciutto with roasted veggies or plant-based bacon for similar flavors without using animal products.

Can I freeze this dish?

If you want to freeze the dish, wrap it tightly in plastic wrap and aluminum foil before storing it in the freezer. It can last for up to three months before baking.

Additional Resources

If you’re interested in more delightful culinary adventures, check out related recipes like cheesy spinach dip, garlic herb goat cheese spread, and savory stuffed mushrooms. These get-togethers will complement your Baked Brie Bread Bowl perfectly while offering a variety of flavors.

Dive into technique guides to refine your cooking skills, focusing on cheese handling, bread baking techniques, and mastering flavor pairings. Knowledge of ingredient information will also enhance your culinary creativity as you explore seasonal variations of dishes.

As for equipment recommendations, consider investing in a high-quality baking sheet or cast-iron skillet that can easily transition from stovetop to oven, ensuring safe and versatile cooking. Keep your kitchen stocked with various ingredient options for spontaneous culinary experimentation.

Join the Conversation

Join the conversation around Baked Brie Bread Bowl by sharing your creations on social media using hashtags related to the dish. Photography enthusiasts are encouraged to showcase their plating and presentation tips while inspiring others to explore their versions of this gourmet delight.

Engaging with your audience allows for shared experiences and recipe reviews, creating a community vibe around this shared love for baked brie. Encourage readers to exchange ideas on preferred flavors and adaptations; who knows, you may just inspire the next great twist on this classic dish!

The Recipe

Baked Brie Bread Bowl with Prosciutto and Honey

Serves: 8 servings

Prep Time: 15 mins

Cook Time: 25 mins

Total Time: 40 mins

Kitchen Equipment Needed

  • Oven-safe Dutch oven or casserole dish
  • Serrated knife
  • Measuring cups
  • Spatula

Ingredients

  • 1 round of brie cheese (8 oz)
  • 4 ounces of prosciutto, sliced
  • 1 large round loaf of bread (sourdough or French)
  • 2 tablespoons of honey
  • Fresh herbs (optional for garnish)

Directions

  1. Preheat your oven to 350°F (175°C).
  2. Carefully hollow out the center of the bread loaf, leaving about an inch of bread on the sides.
  3. Place the brie cheese in the center of the hollowed bread loaf.
  4. Layer the sliced prosciutto around and on top of the brie.
  5. Drizzle honey over the prosciutto.
  6. Cover the bread bowl with foil and bake for 20 minutes.
  7. Remove the foil and bake for an additional 5-10 minutes until the cheese is bubbly and the bread is golden.
  8. Remove from the oven, garnish with fresh herbs if desired, and serve immediately with the hollowed-out bread pieces for dipping.

Recipe Notes

  • Feel free to add in herbs like thyme or rosemary for additional flavor.
  • Try substituting the brie with camembert for a slightly different taste characteristics.
  • This recipe can easily be doubled for larger gatherings, but adjust baking time as needed.