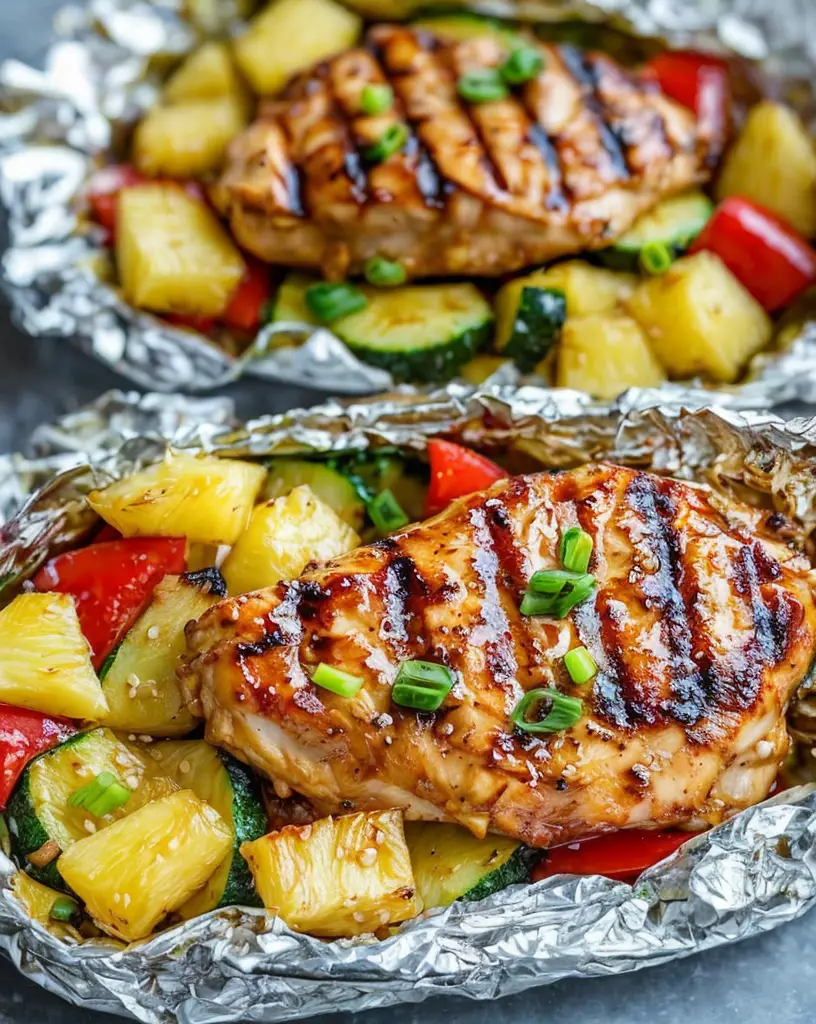
Irresistible Cheesy Garlic Bread Shrimp Grilled Cheese Recipe Delight

Cheesy Garlic Bread Shrimp Grilled Cheese: A Savory Delight for Gourmets Everywhere

⚖️
Difficulty
Intermediate

⏲️
Prep Time
15 mins

🕒
Cook Time
20 mins

⏱️
Total Time
35 mins

🍽️
Servings
4

Indulge in the irresistible fusion of flavors with our Cheesy Garlic Bread Shrimp Grilled Cheese. A sumptuous harmony of savory shrimp nestled within layers of melting cheese and crispy garlic-infused bread. This delightful creation isn’t just a sandwich; it’s an experience that brings the vibrant taste of the sea to a comforting classic. Imagine the oozy cheddar and mozzarella blanketing a succulent shrimp filling, all encased in golden, buttery bread. Whether you’re a seafood enthusiast or a grilled cheese aficionado, this recipe offers a delightful twist on traditional comfort food that satisfies every taste bud.

Quick Recipe Highlights

  • Flavor Profile: Enjoy an exquisite blend of cheesy richness and the savory depth of garlic-infused shrimp. A perfect balance of saltiness and umami with a hint of lemon zest for freshness.
  • Texture: Sink your teeth into a combination of crispy bread, gooey melted cheese, and tender shrimp that provide a delightful contrast in every bite.
  • Aroma: The aromatic garlic and melty cheese aromas bring back childhood comforts, infused with a modern twist from the fresh shrimp.
  • Visual Appeal: A beautiful golden crust complements the creamy, bubbling cheese for an appetizing presentation, sure to impress any gourmet.
  • Skill Level Needed: This recipe requires intermediate skills, such as mastering a perfectly golden grilled sandwich while balancing the cooking of shrimp.
  • Special Equipment: You’ll need a skillet, preferably cast iron, and a reliable spatula to handle the flipping with grace and precision.

Recipe Overview

  • Difficulty Level: While the preparation involves several steps, managing shrimp cooking and cheese melting requires attentive timing but nothing too complex for seasonal cooks.
  • Category: This dish is ideal for lunch or a savory snack, lying comfortably within the realm of comfort food with a gourmet twist.
  • Cuisine: The recipe draws from Italian-American influences, combining classic garlic bread with All-American grilled cheese and seafood bliss.
  • Cost: Relatively affordable, with shrimp being the most significant cost, yet the investment offers a great value for gourmet quality at home.
  • Season: Best enjoyed year-round, but shrimp quality can influence flavors, making spring and early fall optimal for fresh seafood.
  • Occasion: Perfect for casual gatherings, family dinners, or when you’re looking to impress guests with minimal fuss and maximum flavor.

Why You’ll Love This Recipe


Our Cheesy Garlic Bread Shrimp Grilled Cheese is a flavorful delight that’s sure to captivate your senses with its unique take on beloved classics. It brings the best of both worlds together, delivering the comforting satisfaction of a grilled cheese sandwich with the sophisticated twist of garlicky shrimp. The combination of flavors is further elevated by the texture contrast between crispy bread and tender, cheese-encompassed shrimp, making every bite a sensory delight. Not only is it a feast for the taste buds, but also a joy to prepare.

Convenience takes center stage with this easy-to-make dish. A straightforward recipe that requires basic ingredients commonly available in most kitchens simplifies the preparation process while offering flexibility in serving sizes. Ready in under 40 minutes, it’s an ideal choice for impromptu meals that don’t sacrifice on gourmet taste.

On the nutritional front, including shrimp adds a lean source of protein and essential nutrients to the mix, making this dish a more balanced option than many traditional hand-held snacks. The possibility to adjust cheese types and quantities allows for customization according to dietary preferences or requirements.

Social and entertaining values are inherent in the charm of this dish. Impress your guests with a new take on comfort food, turning simple lunches into memorable culinary experiences. Whether it’s a casual weekday or a special dinner party, the crowd-pleasing qualities of this dish cater to a wide range of taste preferences.

From a cost-effective perspective, the recipe makes gourmet accessible, especially when planned with sales or bulk purchase strategies. Making use of ingredients like cheese and bread that have easy availability and long shelf-life ensures this recipe fits within most household budgets without compromising taste or quality.

Historical Background and Cultural Significance


The origins of the grilled cheese sandwich can be traced back to the early 20th century when the invention of sliced bread revolutionized home cooking, bringing about a convenient and affordable way to create quick meals. Adding shrimp and garlic further establishes a connection between traditional comfort foods and America’s diverse culinary influences, highlighting regional seafood and Italian-American ingredients.

Culturally, grilled cheese is an iconic American sandwich that’s beloved across all age groups. Infusing it with garlic and shrimp incorporates flavors from other traditions while maintaining its cultural significance as a renowned crowd-pleaser. This particular recipe pays homage to Italian cuisine with its homage to garlic bread, showcasing the melding of cross-cultural tastes and the adaptability of American culinary preferences.

The evolution from simple sandwiches to gourmet creations reflects a broader trend in culinary arts, where blending cooking techniques and ingredients from various global cuisines illustrates progression in gastronomy. As American cuisine continuously evolves to incorporate international elements, dishes like this become more prevalent, representing contemporary fusion dining experiences.

Regionally, variations of this recipe might feature local seafood, distinctive cheeses, or unique breads. From Maine lobster rolls with cheese to California’s artisanal bread offerings, this dish can be effortlessly adapted to reflect local cultures and tastes, creating diverse iterations across different culinary landscapes.

Ingredient Deep Dive


Shrimp, the star protein of this dish, brings its own rich history and cultural significance. Highly regarded in Mediterranean and Asian cuisines, shrimp offers versatility and culinary flexibility. Known for their sweet, seafood flavor, shrimp pick up the garlic and butter beautifully in this recipe, elevating the cheese’s savory notes.

Nutritionally, shrimp are low in calories yet rich in protein, offering valuable omega-3 fatty acids and antioxidants that support heart and brain health. When sourcing shrimp, fresh or sustainably-farmed options are ideal for ethical and environmental reasons. Ensure they are firm to the touch with a briny smell to confirm freshness.

Storage of shrimp should be done in the refrigerator and consumed within two days of purchase for optimal taste. If needing to store longer, freezing is recommended. You can opt for cooked or uncooked shrimp based on preparation preference or time constraints, with uncooked shrimp offering the most authentic flavor.

In many cases, substitutions such as chicken or tofu can be made to cater to dietary restrictions or preferences without losing the overall dish’s flavor profile. Finding the right balance in substitutes allows for inclusivity while maintaining taste integrity.

Common Mistakes to Avoid

  • Overcooking Shrimp: Cook shrimp until pink and opaque; overcooking leads to rubbery textures.
  • Burning the Bread: Maintain a moderate heat and patience to achieve golden brown crust without burning.
  • Overstuffing: Avoid overloading the sandwich as it prevents even cooking and affects structural integrity.
  • Using Wet Ingredients: Pat shrimp dry to prevent additional moisture affecting bread crispness.
  • Uneven Cheese Melting: Distribute cheese evenly for consistent melting, enhancing sandwich texture.
  • Skipping Rest Time: Allow the sandwich to rest a few minutes before cutting to secure ingredients.
  • Inadequate Seasoning: Properly season shrimp and ingredients to enhance flavor depth.
  • Neglecting to Control Heat: Frequent adjustments to heat ensure even cooking, preventing burnt spots.
  • Forgoing Ingredient Quality: Use fresh, quality ingredients for optimal taste and texture.
  • Ignoring Cheese Variations: Don’t be afraid to explore different cheeses for custom flavor profiles.

Essential Techniques


Perfecting the art of a grilled cheese takes practice, particularly when incorporating additional ingredients like shrimp. Balancing the cook time for shrimp and achieving the desired bread crispness can be tricky. Preheating the pan is crucial to forming a perfect crust quickly. Recognizing the importance of butter temperature is also vital; clarified butter or a mixture can prevent scorching.

A useful technique is allowing the cheese to reach room temperature before cooking, helping it melt evenly and quickly. Cover the pan while cooking to use trapped steam for additional melting power without drying the sandwich. Additionally, using a spatula to gently press the bread ensures consistent contact with the pan surface for an even crust.

For shrimp, be attentive to color change as the reliable indicator of cooking progress. Leaving shrimp until just done before removing from heat prevents overcooking and retention of juices. Mastering shrimp cooking ensures tender, succulent pieces that complement the melted cheese.

Pro Tips for Perfect Cheesy Garlic Bread Shrimp Grilled Cheese


1. Prep Work: Prepare all ingredients before starting; busy assembly time leaves no room for multitasking.
2. Cheese Selection: Blend cheeses like cheddar and mozzarella for flavor and melting quality.
3. Pan Temperature: Preheat the pan gently; a hot pan delivers an instantaneous crust formation.
4. Seasoning: Don’t skimp on seasoning, incorporating garlic and herbs will awaken natural flavors.
5. Heat Distribution: Utilize medium-low heat to prevent outsides from burning while cheese melts.
6. Shrimp: Consider using pre-cooked shrimp for a quick and foolproof experience if pressed for time.
7. Resting Time: Allow resting post-cooking; heat stabilizes ingredients for cleaner slicing.
8. Experimentation: Customize with pesto, sun-dried tomatoes, or other ingredients for personal flair.

Variations and Adaptations


Cheesy Garlic Bread Shrimp Grilled Cheese has potential for several variations, adapting classic seafood gatherings to diverse culinary landscapes. Regional variations might include crab or lobster, seasoned locally with regional spices, enhancing this foundational recipe to suit coastal cuisines.

For a seasonal adaptation, consider adding fresh herbs or summer vegetables to the concoction. Zucchini, tomatoes, or grilled peppers introduce a garden-fresh character, perfect for warm months. Similarly, the richness of roasted squash or pumpkin can lend an autumnal depth to the dish.

Dietary modifications can readily convert this dish to suit various needs. For those avoiding dairy, a range of plant-based cheese offers similar textures with diverse flavor impacts. Gluten-free bread usage is a straightforward solution for those with gluten sensitivities.

For a flavor variation, incorporate additional spice layers like cayenne or chipotle powder for warmth. Alternatively, introducing different aromatics such as fresh basil or oregano results in distinct Mediterranean notes, providing a new dimension to the original profile.

Texture modifications can be achieved through bread choices, opting for thicker, rustic breads ensures hearty crunch, while sourdough contributes a tanginess that pairs well with seafood.

In terms of presentation, consider open-faced alternatives, showcasing melted cheese and shrimp toppings for visual appeal. Garnishing with fresh herbs and a sprinkling of paprika or grated Parmesan creates a dish worthy of its gourmet description.

Serving and Presentation Guide


When it comes to serving, focus on plating attention to detail. Create a contrast with a dark-colored plate to highlight the golden bread and oozing cheese. Slice diagonally for visual interest, revealing the flavorful filling, and serve with a side salad for balance.

Garnishing can enhance the appearance and flavor. Consider using chopped chives, dill, or parsley for a fresh, green touch, or sprinkle a little grated Parmesan for extra indulgence. A squeeze of lemon just before serving can add brightness.

Traditionally, these sandwiches could be accompanied by a classic tomato soup, providing a well-rounded meal with hot, savory notes complementing the buttery cheese bread. For modern serving suggestions, consider pairing them with roasted vegetables or crispy potato wedges.

Maintain the sandwiches at optimal temperature by serving them promptly. Ensure ingredients are evenly distributed to avoid cold spots. Portion control involves adjusting slices depending on whether these are appetizers or main courses, offering two to four portions each.

Wine and Beverage Pairing


Pairing beverages with our Cheesy Garlic Bread Shrimp Grilled Cheese requires considering its rich creamy nature. A crisp white wine, like Pinot Grigio or Sauvignon Blanc, complements the seafood and garlic without overpowering.

Non-alcoholic alternatives can include a rosemary-infused lemonade for freshness or a sparkling water with a slice of lemon to cleanse the palate between bites. Offer sparkling apple cider for those seeking a non-alcoholic bubbly treat.

In terms of coffee or tea, if preferring these, herbal teas, especially ones with citrus or mint, can provide the right contrast without overshadowing the main feature of the meal.

Temperature considerations revolve around keeping the beverages cool and refreshing to act as a perfect counterbalance to the warm, rich flavors of the sandwich. Serve wines and ciders slightly chilled, matching the cozy warmth of the cheese.

Presentation of beverages can reflect the casual yet chic style of the main dish. Use simple glassware for wines and large mugs for tea or coffee, creating an inviting homely ambiance.

Storage and Shelf Life


Once the Cheesy Garlic Bread Shrimp Grilled Cheese is prepared, it is best enjoyed fresh. However, considerations for storage can extend shelf life. Wrap sandwiches in aluminum foil and store in airtight containers in the refrigerator for up to 2 days.

Consider keeping individual components separate if making beyond immediate consumption, helping maintain ingredient integrity. For instance, cook shrimp and prepare bread separately, assembling right before consumption to preserve texture distinction.

Look for signs of spoilage such as a mushy texture or unpleasant odor, especially from the shrimp. Consume cooked sandwiches quickly to avoid deterioration in quality. When reheating, use an oven or toaster oven at a low temperature to rewarm without making the bread soggy.

If you wish to freeze, assemble sandwiches and cover them in plastic wrap before freezing for up to a month. Defrost in the refrigerator before reheating using the methods mentioned above, to maintain a crisp exterior and melty interior.

Make Ahead Strategies


Advance preparation is possible; start by gathering and chopping ingredients like garlic and cheese, which can be stored in sealed containers until needed. Pre-cooking the shrimp ahead of time can save significant minutes when you’re ready to assemble and cook your sandwich.

Consider marinating shrimp in garlic and seasoning for enhanced flavors, storing them in the refrigerator overnight. As far as bread, pre-butter slices and keep in protective wrapping to streamline the assembly process.

Quality might slightly vary if cooked ahead of time; aim to assemble just before cooking for optimal taste. Assembly tips include ensuring an even cheese distribution and tightly enclosing the shrimp to avoid mess during the grill phase.

Reheating can be done in a pan or oven; cover slightly if using an oven to prevent over-drying. Enhance freshness with additional cheese or a spritz of lemon post-reheating to reinvigorate flavors.

Maintain a fresh element by garnishing with freshly chopped herbs at the serving stage, allowing for a burst of flavor and color contrast.

Scaling Instructions


To scale this recipe, it’s essential to modify quantities proportionally. For halving, simply halve all ingredient measures but retain cooking times; this preparation adjustment will not require significant shifts in instructions or ingredient handling, allowing easier management for smaller portions.

Doubling requires strategic planning. Ensure you have ample cooking surface and preparation space to accommodate larger quantities simultaneously. Timing modifications are minimal; slightly increased cooking times may be needed due to pan or oven capacity adjustments.

Equipment adjustments can involve using larger skillets or pans; consider baking in the oven using a baking sheet if stove space becomes constrained. Distribute sandwiches evenly to ensure consistent cooking.

Storage considerations will involve planning with additional space for storing prepped ingredients and cooked batches. Proper containment and layering in storage containers keep ingredients crisp and fresh for subsequent use.

Nutritional Deep Dive


The Cheesy Garlic Bread Shrimp Grilled Cheese offers a thoughtful blend of macros, combining carbs from the bread, protein from shrimp, and fat from cheese, providing an efficient energy source. This balance helps sustain hunger from meal times.

Micronutrient analysis reveals shrimp as a rich source of Vitamin B12 and selenium, among other nutrients. Incorporating varied cheeses introduces calcium, Vitamin D, and essential fatty acids supporting bone health and brain function.

Health benefits can be derived from the inclusion of seafood; omega-3 fatty acids promote heart health. Garlic’s potential anti-inflammatory properties further add to the dish’s appeal as a nutritious comfort food choice.

Dietary considerations can be adjusted by opting for healthier bread variants, reduced-fat cheese, or plant-based cheese alternatives, customizing for specific dietary needs while maintaining the dish’s essence.

Portion analysis ensures logical consumption; consumed per sandwich with accompanying vegetables or a side provides a balanced meal. Weight management is aided by conscious choices or modifications favoring reduced cheese or light butter spreads.

Dietary Adaptations


For those requiring gluten-free adaptations, select a gluten-free bread option that holds up well against grilling. Options like rice flour-based or multi-grain gluten-free alternatives offer both texture and nutritional diversity.

Dairy-free variations achieve comparable results by substituting traditional cheese with dairy-free or vegan cheeses that melt well. These cheeses are often coconut oil or almond-based, allowing similar textures seen in traditional offerings.

Going vegan implies additional adaptations; replace dairy cheese with vegan cheese and shrimp with plant-based protein like tempeh or crispy tofu for a filling alternative, ensuring flavor is maintained through seasoning.

For low-carb or keto preferences, swap bread for low-carb alternatives or utilize portobello mushrooms as the “bread” providing a unique earthy taste. Adjust cheese accordingly to include higher-fat, lower-carb cheeses.

A paleo-friendly version excludes grains entirely, relying on almond flour-based bread to maintain compliant grains, with similar cheese adaptions bridging the gap needed for a thoroughly satisfying meal.

Low-FODMAP considerations mean swapping garlic for garlic-infused oil, allowing the aromatic benefit without gastrointestinal triggers, while customizing cheese selection to suit personal tolerance levels creates an equally delicious sandwich.

Troubleshooting Guide


When texture concerns arise, consider bread choice and cooking times. For overly soggy bread, moderate cheese quantities and maintain dry shrimp. Visually monitor bread during cooking to ensure crisp results without burning.

Flavor balance can shift with wrong cheese choices; experiment with different flavors until desired balance is met. Opt for cheeses that provide the desired level of creaminess and saltiness, adjusting other ingredients accordingly.

Temperature inconsistencies lead to sub-optimal cooking; preheat skillets before placing sandwiches, maintaining a medium, steady temperature to ensure even cooking throughout without burnt edges.

Equipment challenges may arise with inadequate pan size; for multiple portions, consider batch preparation or utilize oven grill settings to maintain quality across servings. Use appropriate spatulas without risk of sandwich dismantling.

Ingredient substitutions, like swapping prawns for shrimp or tofu for cheese, require adapting cooking times and methodology. Observe during transition to optimize outcome and taste retention.

Timing concerns should observe pre-prep strategies to streamline assembly, enhancing efficiency without compromising sandwich quality standards, especially important for larger gatherings or quick preparation needs.

Recipe Success Stories


In our community, this recipe has sparked creativity and rave reviews. From home chefs to culinary enthusiasts, feedback centers on the harmonious blend of flavors and the satisfying texture profile.

Notable successes include adaptations where readers utilized local seafood for additional flare, such as crab or lobster fillings, resulting in regionally inspired variations that maintain authenticity and innovation.

Adapting reader stories where additions like pesto or roasted peppers elevated taste encourage exploration, creating the opportunity for personal tailoring. Photography tips shared by users emphasize showcasing vibrant color contrasts of the finished dish.

A particularly popular photography tip involves capturing the moment of slicing, revealing melting cheese and shrimp, effectively highlighting the sensory appeal that defines this sandwich.

Readers enjoyed the option to present open-face or stacked sliders for entertaining, aligning portion sizes and creativity with occasion demands, showcasing the recipe’s versatility in style and delivery.

Frequently Asked Questions

Can I use frozen shrimp for this recipe?

Yes, frozen shrimp can be used; thaw completely and pat dry to remove excess moisture before cooking. This ensures the shrimp cooks evenly and retains a nice texture.

What cheese works best for melting?

Mozzarella and cheddar are wonderful melting cheeses that provide both flavor and texture. Feel free to mix these with a touch of parmesan for added richness.

How do I prevent the bread from becoming soggy?

Ensure shrimp is properly dried and avoid excess sauce; use fresh, slightly stale, or thicker cuts of bread for best results. Toasting bread lightly before assembly helps too.

Is there a way to reduce calories in this recipe?

You can minimize butter usage, opt for reduced-fat cheese, and select a lighter bread. Turkey or chicken can replace shrimp for a lower-calorie protein.

Can this recipe be made vegan?

Absolutely, replace cheese with vegan alternatives and use marinated tofu or seasoned jackfruit instead of shrimp. Taste and nutrient adjustments are easy to achieve.

What’s the best bread to use?

Rustic bread like sourdough or multigrain works well with its stronger structure, ensuring that it stays crisp and holds up to the filling’s weight.

What alternative cooking methods can I use?

An oven or toaster oven can effectively cook these sandwiches using a baking sheet. Lightly oil the sheet for optimal results at medium-high heat.

Is it possible to make it ahead for a party?

Prepare ingredients in advance but compile and grill prior to serving. Keep warm at low temperatures in the oven if necessary without diminishing texture.

Can gluten-free bread be used?

Yes, gluten-free bread is a good substitution. Opt for higher-quality brands to ensure it withstands grilling without becoming crumbly or too dense.

Is additional seasoning needed?

Consider taste preferences; basic salt, pepper, and nutritional yeast Seasoning enhance flavor depth without overpowering the shrimp’s natural taste.

Can you use other seafood?

Crab, lobster, or scallops can substitute shrimp. Adjust cooking times to accommodate these variations while maintaining the sandwich’s balance of flavors.

What’s the key to achieving crispy bread?

Employ medium heat with even pressure from a spatula, take care not to overload ingredients, and use butter or oil to enhance crust qualities.

Additional Resources


For those eager to explore beyond this recipe, consider diving into related cheese-focused recipes for inspiration or experimenting with garlic shrimp pasta for a complementary meal alternative.

Comprehensive technique guides provide assistance on perfecting cheese melting or achieving diverse bread crispness finishes, supported by ingredient information illustrating optimal shrimp selection virtues.

Look into equipment recommendations, ensuring all necessary kitchen tools are available to achieve satisfactory results consistently. Learn more about seasonal variations, focusing around seafood and grilled cheese trends.

Insightful blogs and community forums offer varied perspectives, allowing exploration and sharing within cooking networks, enhancing future endeavors through collaborative exchanges of ideas and experiences.

Join the Conversation


Share and connect with a vibrant culinary community eager to discuss adaptations and enhancements of the Cheesy Garlic Bread Shrimp Grilled Cheese. Engage through social media platforms by sharing photos, tips, and personal takes with hashtags capturing the creativity behind home culinary art.

Photography tips can elevate the visual storytelling of finished dishes, allowing the beauty and appeal to shine through in captured moments of enjoyment and sharing. Encourage recipe reviews, fostering an environment valuing feedback and suggestions for improvement.

Engage with community engagement opportunities by participating in discussions, offering support, and embracing amateur cooks striving for similar outcomes. Encourage creativity, as variations of this recipe open pathways for distinct culinary expressions, enriching both individual portfolios and collective knowledge bases.

Delicious Southwest Grilled Chicken Wraps for a Flavorful Meal

Southwest Grilled Chicken Wraps: Flavor-Packed Delight

⚖️
Difficulty
Easy

⏲️
Prep Time
15 mins

🕒
Cook Time
10 mins

⏱️
Total Time
25 mins

🍽️
Servings
4

Indulge in the zestful flavors of the Southwest with our irresistible Southwest Grilled Chicken Wraps. These wraps are a harmony of smoky, grilled chicken combined with vibrant veggies and a creamy, spiced sauce. The combination of textures and tastes in every bite makes this wrap a culinary delight that you will want to prepare over and over. Perfect for a quick lunch or a relaxed dinner, this recipe is both satisfying and nutritionally balanced.

Quick Recipe Highlights

  • Flavor Profile: A delightful blend of smoky grilled chicken with zesty lime and a hint of cilantro, these wraps burst with Southwest flavors.
  • Texture: The contrast of tender chicken, crisp veggies, and soft wrap creates a satisfying mouthfeel.
  • Aroma: Enjoy the enticing aroma of grilled chicken and spice-laden sauce that awakens your senses.
  • Visual Appeal: A vibrant palette of green, red, and golden-brown makes these wraps visually stunning.
  • Skill Level Needed: Perfect for beginners, requiring only grilling and assembly skills.
  • Special Equipment: A grill or grill pan is essential to infuse the chicken with smoky notes.

Recipe Overview

  • Difficulty Level: This recipe is straightforward, involving basic grilling and wrap assembly, making it ideal for cooks of all skill levels.
  • Category: Best enjoyed as a main course, but can easily be adapted to a starter with smaller servings.
  • Cuisine: Inspired by Southwestern cuisine, known for vibrant spices and fresh ingredients.
  • Cost: Economical, with ingredients like chicken breast, vegetables, and tortillas.
  • Season: Ideal for any season, particularly summer when grilling is at its peak.
  • Occasion: Suitable for casual meals, picnics, or as a party dish with friends.

Why You’ll Love This Recipe


The combination of flavors and textures in these Southwest Grilled Chicken Wraps is truly irresistible. The grilled chicken imparts a smoky and savory depth, perfectly balanced by the freshness of crisp lettuce and tomatoes. A zesty lime dressing adds an invigorating tang that complements the spicy kick from the Southwest sauce. These wraps are easy to prepare, requiring minimal kitchen finesse, yet delivering a taste that rivals any restaurant dish.

Convenience is another highlight of this recipe. With just 15 minutes of prep time, you can have a satisfying meal ready in no time. The ingredients are simple and easily found in most pantries, allowing for quick assembly on busy days. This speedy preparation truly makes these wraps a favorite for weeknight dinners and last-minute gatherings.

On the nutritional front, these wraps are a great source of lean protein, vitamins, and healthy fats. Chicken is known for its high-protein, low-fat profile, while the veggies provide an array of vitamins and fiber. Opting for whole-grain wraps can further boost the nutritional value, making this a wholesome meal option.

Socially, these wraps are a hit in any gathering. Their vibrant colors and enticing aromas pique curiosity and appetite alike, often becoming the center of conversation. Whether in a family setting or a backyard BBQ, these wraps appeal to both adults and children, ensuring everyone gets a taste of Southwest charm.

Finally, the cost-effectiveness of this recipe cannot be overstated. Common, affordable ingredients like chicken, vegetables, and tortillas make this a budget-friendly option without compromising on taste. You don’t need to break the bank to enjoy a delicious and fulfilling meal, defining these wraps as both accessible and satisfying.

Historical Background and Cultural Significance


Southwestern cuisine is a fusion of Mexican and Native American culinary traditions, evolving over centuries in regions like New Mexico, Texas, and Arizona. The use of spices, grilled meats, and fresh produce is a testament to both the environmental conditions and cultural influences of these areas. Southwest Grilled Chicken Wraps embody this progression, capturing the essence of the cuisine’s rich and diverse history.

The cultural importance of Southwestern dishes extends to community and familial gatherings, where food is a central element. Meals often reflect a mix of Mexican spices and Native ingredients, creating a unique culinary heritage. These wraps reflect this tradition, offering a modern twist on classic Southwestern flavors that are both accessible and deeply rooted in cultural practices.

Over time, recipes like these wraps have evolved, accommodating modern timelines and tastes while preserving their core flavors. The inclusion of varied spices and fresh ingredients remains steadfast, but the introduction of convenience through simplified methods caters to contemporary lifestyles, making these wraps both traditional and innovative.

Regionally, variations of Southwest Grilled Chicken Wraps can be found, each exhibiting unique traits influenced by local tastes and ingredients. Whether it’s the addition of specific spices or alternative dressings, these wraps adapt well to regional preferences, showcasing their versatility and cultural adaptability.

Ingredient Deep Dive


Chicken breast serves as the primary protein of these wraps, valued for its tenderness and ability to absorb flavors during grilling. Historically, chicken is a staple in many cuisines due to its availability and versatility, making it an essential component of Southwestern cooking. When selecting chicken breasts, look for fresh, firm meat with minimal fat content to ensure a juicy result after grilling.

Avocados provide a creamy texture and a boost of healthy monounsaturated fats. They are historically significant in Mexican cuisine and widely used throughout the Southwest for their richness and health benefits. Opt for ripe avocados that yield slightly to pressure for the best texture in your wraps.

Tortillas are fundamental, serving as the wrap base that encapsulates flavors. Originating from indigenous North American peoples, tortillas have been a dietary staple for centuries. Choose whole wheat or corn tortillas for a healthier alternative, and store them in a cool, dry place to maintain freshness.

Common Mistakes to Avoid

  • Overcooking the chicken can result in a dry texture; ensure it’s grilled to an internal temperature of 165°F.
  • Skipping marinade time affects flavor depth; allow the chicken to marinate for at least 30 minutes.
  • Using underripe avocados will lack the creamy texture; ensure avocados are ripe before use.
  • Overfilling the wraps can make them difficult to roll; be mindful of portioning the ingredients.
  • Not letting the grilled chicken rest before slicing can result in juice loss; let it rest for 5 minutes.
  • Using cold tortillas can cause cracking; warm them slightly to enhance pliability.
  • Skimping on the sauce reduces flavor impact; ensure there’s enough to coat all ingredients.
  • Ignoring balance in flavors might lead to overpowering tastes; adjust lime and spice levels to taste.

Essential Techniques


Proper grilling is the cornerstone of this wrap’s flavor profile. Starting with a well-preheated grill ensures those much-coveted char marks and imparts a smoky taste essential to this dish’s identity. Mastery of this technique involves recognizing visual cues like the development of grill marks and the firmness of the chicken, indicating doneness.

Rolling wraps correctly ensures easy handling and prevents ingredient loss. Lay the tortilla flat, place the filling slightly off-center, and fold one side over the filling, followed by the sides, and roll until closed. Secure with a toothpick if necessary. Knowing when enough is just enough with fillings is key to achieving a wrap that is neat and easy to handle.

Pro Tips for Perfect Southwest Grilled Chicken Wraps


1. Marinate chicken ahead of time: Letting the chicken marinate overnight enhances the depth of flavor significantly.
2. Mind your grill temperature: A medium-high heat helps achieve perfect grill marks without burning.
3. Use a meat thermometer: Ensure the chicken reaches 165°F for optimal results.
4. Experiment with cheese: Incorporating Monterey Jack or Pepper Jack adds a delightful creamy dimension.
5. Toast your tortillas slightly: This step can add an extra layer of flavor and texture.
6. Rest the chicken: Allow resting before slicing to keep juices intact, enhancing the wrap’s overall flavor.
7. Customize heat levels: Adjust the spice in the sauce to cater to your heat preference.
8. Add fresh herbs: Sprinkle chopped cilantro or parsley for a burst of freshness.

Variations and Adaptations


Explore regional variations by adding beans or corn to your wraps, typical in many Southwestern styles. Seasonal adaptations might include incorporating roasted squash or grilled summer zucchini, providing a touch of earthiness and added nutrition. For a twist, try a Mediterranean flair by subbing tzatziki sauce and adding feta cheese instead of the traditional Southwest seasoning.

Adapting these wraps to dietary needs is straightforward. For gluten-free options, use corn tortillas or lettuce wraps. The vegan route replaces chicken with grilled tofu or portobello mushrooms, ensuring flavor and texture are preserved. Lime zest and additional herbs can brighten the flavor without the use of added fats.

Vary the wrap texture by opting for crispy tortillas through baking or light frying, contrasting the typical soft wraps. Presentation alternatives could involve cutting them into pinwheel-style bites for appetizer-serving in gatherings.

Serving and Presentation Guide


For an evocative presentation, plate the wraps sliced diagonally, showcasing their colorful filling. Garnish with sprigs of fresh cilantro or a slice of lime to accentuate the dish’s vibrant theme. Traditional accompaniments include a side of pico de gallo or a light corn salad, enhancing the Southwest experience. Modern suggestions feature serving with sweet potato fries or a light, tangy slaw to balance the dish’s hearty aspects.

Temperature-wise, these wraps are best served warm to maintain the creamy consistency of avocado and the tenderness of grilled chicken. Keep portions in check by considering one wrap per person, pairing it with flavorful sides for a well-rounded meal experience.

Wine and Beverage Pairing


Pairing these wraps with a light white wine like Sauvignon Blanc or a refreshing Rosé can balance their vivid flavors with crisp notes. Non-alcoholic alternatives include a zesty lemonade or an infused water with cucumber and mint. For a sharper twist, consider a margarita with a hint of jalapeño.

If coffee or tea is preferred, a smooth black tea or lightly roasted coffee can complement the roasted elements of the dish without overpowering. Ensure beverages are served chilled, offering a refreshing contrast to the warm, smoky wraps.

Storage and Shelf Life


Proper storage involves refrigerating leftover components separately in airtight containers for up to three days. Keep tortillas in a sealed bag to prevent drying out. Observe for any signs of spoilage, such as discoloration or off-odors, especially in avocados and chicken.

When reheating, use a grill or oven to rediscover the wraps’ original texture, ensuring internal temperatures are consistent without drying out ingredients. Freezing the prepared wraps is viable; wrap individually and store in a freezer-safe bag, reheating directly from frozen for best results.

Make Ahead Strategies


Prepare all components, such as marinades and sauces, a day prior to save time. Store them separately and only assemble the wraps when ready to serve. This strategy ensures freshness and quality, maintaining optimal texture and flavor throughout the meal.

In expectancy of delays, keep cooked chicken and sauce refrigerated and build the wraps just before serving to preserve their appealing texture. Remember to add any fresh elements like avocado at the last minute for peak freshness.

Scaling Instructions


When halving or doubling the recipe, adjust ingredient proportions accordingly but maintain consistent marinating and cooking temperatures. Monitor timing adjustments based on equipment scaling; larger batches might require longer grill time to ensure even cooking.

Consider storage space when scaling up, ensuring adequate container sizes for prepared components. Likewise, when doubling, ensure grill space accommodates a larger volume, preventing crowding and resultant steaming rather than grilling.

Nutritional Deep Dive


A closer look at macro-nutrients reveals a balance of carbohydrates from tortillas, protein from chicken, and healthy fats from avocado, yielding a fulfilling meal. With each serving providing essential vitamins like C and K from fresh vegetables, these wraps support strong immune functions and overall health.

Micronutrient analysis also emphasizes the wrap’s contribution to daily fiber intake, aiding in digestion and promoting satiety. Swapping to whole-grain tortillas increases fiber content, enhancing the dish’s nutritional profile. Offering moderate calories, these wraps support weight management and offer lasting energy.

Dietary Adaptations


For a gluten-free adaptation, use corn tortillas or large lettuce leaves to encapsulate the fillings without losing the handheld charm. Dairy-free enthusiasts can omit cheese or replace it with vegan alternatives, preserving the wrap’s creamy component ingenuity.

A vegan version switches chicken for seasoned tofu or a mix of mushrooms, while savory nutritional yeast enhances the flavor profile. Incorporate more legumes like black beans for extra fiber and plant-based protein, maintaining taste while accommodating dietary constraints.

Troubleshooting Guide


If the chicken appears dry, ensure to marinate longer to enhance moisture retention. Flavor imbalance can often be adjusted by adding lime or salt post-assembly to suit individual taste preferences. Avoid cooking on high flames that cause uneven texture or burnt spots, opting for medium heat for a consistent result.

When facing equipment challenges like grill access, indoor grill pans work efficiently, maintaining authenticity in each wrap. Ingredient substitutions such as using lettuce for tortillas are effective, provided the leaves are large and firm. Timing concerns are minimized when batch-preparing stages, ensuring prompt assembly.

Recipe Success Stories


Our community revels in sharing creative takes on Southwest Grilled Chicken Wraps, often involving seasonal vegetables or homemade tortillas. Feedback consistently highlights the recipe’s adaptability and vibrant flavors as central to its success. Many readers have enjoyed experimenting with spice levels and garnishes, tailoring the wraps to family preferences.

Success is also found in variation stories, where readers adapt ingredients to fit vegetarian or low-carb lifestyles while retaining the signature Southwest appeal. Some enthusiasts have shared visually stunning photography, contributing to a growing gallery of wrap adaptations that inspire creativity and celebration.

Frequently Asked Questions

Q: Can I prepare these wraps in advance?
A: Yes, you can pre-cook the chicken and refrigerate it. Assemble the wraps just before serving to retain freshness.

Q: What can I use if I don’t have a grill?
A: A grill pan or even a regular frying pan can work in a pinch, though a grill provides the best smoky flavor.

Q: Are these wraps freezer-friendly?
A: Yes, you can freeze the prepared wraps. Wrap them individually for best results and reheat as needed.

Q: What if I don’t have all the spices listed?
A: Feel free to use a premade Southwest seasoning blend as a convenient alternative.

Q: How can I make these wraps spicier?
A: Add finely chopped jalapeños or a dash of hot sauce to increase the heat level.

Q: What type of chicken works best?
A: Boneless, skinless chicken breast is ideal for its ease of cooking and lean profile.

Q: Can I use other meats?
A: Certainly! Grilled turkey or steak are excellent alternatives to chicken.

Q: What if my wrap tears?
A: Prevent tearing by slightly warming wraps before filling and avoid overstuffing.

Q: How do I keep the wraps from becoming soggy?
A: Add liquid ingredients, such as sauces, sparingly and right before serving to maintain texture.

Q: Are there low-carb alternatives?
A: Try using lettuce leaves or low-carb tortillas instead of traditional flour wraps.

Q: Can I omit the lime for less tanginess?
A: Yes, adjust lime juice to your taste preference, though it adds a refreshing zest.

Q: Is there a substitute for cilantro?
A: Parsley or basil can serve as alternatives to cilantro if you prefer a different herb profile.

Additional Resources


Explore our collection of related recipes, including variations on grilled wraps and Southwest-inspired dishes. Delve into our technique guides for grilling tips and tortilla handling, offering insights for perfect wraps every time. Ingredients such as fresh herbs and spices have dedicated resource pages, providing detailed selection and usage tips.

Our equipment recommendations guide also assists in choosing the right tools for optimum grilling and preparation results. Discover seasonal adaptations in our guides, sharing ways to incorporate this recipe year-round with freshness and flair.

Join the Conversation


Engage with us on social media by sharing your Southwest Grilled Chicken Wrap creation! Use our hashtag to connect with a vibrant community swapping tips and tricks. Leave a review or tweak the recipe to your liking; reader feedback often inspires new kitchen endeavors.

We welcome photography tips and invite fellow culinarians to showcase their plating creativity. Share your recipe variations or family stories surrounding this dish, becoming part of a larger dialogue celebrating flavor and community resilience.

The Recipe

Southwest Grilled Chicken Wraps

Serves: 4

Prep Time: 15 mins

Cook Time: 10 mins

Total Time: 25 mins

Kitchen Equipment Needed

  • Grill or Grill Pan
  • Mixing Bowls
  • Cutting Board
  • Chef’s Knife
  • Tongs

Ingredients

  • 4 boneless, skinless chicken breasts
  • 2 tablespoons olive oil
  • 1 tablespoon lime juice
  • 1 teaspoon ground cumin
  • 1 teaspoon paprika
  • 1/2 teaspoon garlic powder
  • Salt and pepper to taste
  • 4 whole wheat tortillas
  • 1 avocado, sliced
  • 1 cup shredded lettuce
  • 1 cup cherry tomatoes, halved
  • 1/2 cup Southwest sauce (store-bought or homemade)

Directions

  1. Preheat the grill to medium-high heat.
  2. In a mixing bowl, combine olive oil, lime juice, cumin, paprika, garlic powder, salt, and pepper. Add chicken and marinate for at least 30 minutes.
  3. Grill chicken for 5-7 minutes per side until cooked through. Let rest before slicing.
  4. Warm tortillas on the grill for 30 seconds on each side.
  5. Assemble wraps by layering sliced chicken, avocado, lettuce, and tomatoes, then drizzle with Southwest sauce.
  6. Wrap tightly, slice diagonally, and serve immediately.

Recipe Notes

  • Substitute Greek yogurt for a lighter Southwest sauce.
  • Experiment with cheese varieties for added depth.
  • Add corn or black beans for a texture variation.

Irresistible Shrimp in Cream Sauce: Quick Weeknight Dinner Recipe

Shrimp in Cream Sauce: A Luxurious Seafood Delight

⚖️
Difficulty
Medium

⏲️
Prep Time
15 mins

🕒
Cook Time
20 mins

⏱️
Total Time
35 mins

🍽️
Servings
4

Embark on a culinary journey with our exquisite Shrimp in Cream Sauce recipe, a dish that embodies elegance and flavor harmony. The main keyword, Shrimp in Cream Sauce, highlights the luxurious combination of tender shrimp enveloped in rich, creamy sauce. As you prepare this dish, expect a delightful interplay of textures that create an unforgettable dining experience. Ideal for a romantic dinner or an impressive meal for guests, this recipe promises to satisfy your taste buds and elevate your home-cooked meals to gourmet status.

Quick Recipe Highlights

  • Flavor Profile: The Shrimp in Cream Sauce is a delight of savory goodness, combining the seafood’s briny sweetness with a rich, buttery base. The infusion of garlic and herbs completes the umami experience.
  • Texture: The dish offers a delightful contrast with plump, juicy shrimp accompanied by a smooth, velvety sauce that clings to each bite effortlessly.
  • Aroma: The enticing aroma of sautéed garlic and shrimp fills your kitchen, further enhanced by fragrant herbs and the creamy richness of the sauce.
  • Visual Appeal: Golden shrimp lie elegantly atop a pale cream sauce, garnished with vibrant green herbs, making the dish as appealing to the eyes as it is to the palate.
  • Skill Level Needed: While some culinary skills are needed to perfect the sauce’s texture, the recipe remains accessible, making it suitable for intermediate cooks.
  • Special Equipment: To achieve the ideal sauce consistency, a good-quality non-stick skillet and a whisk are recommended for even cooking and mixing.

Recipe Overview

  • Difficulty Level: This Shrimp in Cream Sauce recipe is classified as medium difficulty. Although the dish requires attention to sauce consistency and timing for perfectly cooked shrimp, following the instructions makes it achievable for most home cooks.
  • Category: This dish falls into the category of main courses, ideal for seafood lovers and those seeking an elegant entrée.
  • Cuisine: The recipe draws inspiration from French cuisine, known for its emphasis on high-quality ingredients and delicate flavors, yet it incorporates contemporary touches that appeal to modern palates.
  • Cost: Preparing this dish is relatively cost-effective, as shrimp are often affordable and other ingredients like cream and herbs are commonly used pantry items.
  • Season: Best enjoyed year-round, this dish shines in spring and summer when fresh seafood is abundant, yet remains a cozy winter indulgence.
  • Occasion: Perfect for formal gatherings, date nights, or a weekend family dinner, it brings sophistication to any occasion.

Why You’ll Love This Recipe


The Shrimp in Cream Sauce is a perfect blend of luxury and comfort. The delightful mix of flavors makes it a taste sensation, featuring the sweetness of shrimp balanced with a creamy, garlic-infused sauce. Despite being indulgent, the dish is also practical to prepare, making it a convenient option for both seasoned cooks and adventurous beginners. It provides a balanced nutritional profile, rich in protein and low-carb, making it favorable for various dietary preferences. Additionally, its elegance makes it a social centerpiece, impressing guests and family alike without excessive expenses. Its versatility allows for easy ingredient swaps to suit individual tastes and dietary needs.

Historical Background and Cultural Significance


Shrimp in Cream Sauce finds its roots in the culinary traditions of French cuisine, highlighting the nation’s love affair with both shrimp and cream-based sauces. This combination has evolved, blending classic French culinary techniques with modern influences that cater to a broader audience. Known for its cultural significance, this dish connects the exquisite seafood offerings of coastal regions with the sophisticated flair of French gastronomy. Over time, regional variations have emerged, where local ingredients and spices have infused their distinctive twist into the classic dish while preserving its fundamental appeal.

Ingredient Deep Dive


Shrimp, the star ingredient of this dish, has a rich cultural history as a seafood delicacy, cherished for its succulent texture and sweet flavor. Known for its low-fat content and high protein value, shrimp contribute to a health-conscious meal without sacrificing taste. To select the best shrimp, opt for firm, fresh-smelling ones, and store them in the coldest part of your refrigerator. In case of unavailability, prawns or scallops can serve as a delicious substitute.

The creamy sauce, a blend of cream and aromatic elements, is crucial for achieving the dish’s luxurious texture. Cream adds richness, while ingredients like garlic, herbs, and broth balance the flavors. For those with dietary restrictions, coconut milk or cashew cream can be used as alternatives. Proper storage of the cream requires refrigeration to maintain its freshness.

Common Mistakes to Avoid

  • Overcooking shrimp: Ensure you cook shrimp just until opaque to prevent rubbery texture.
  • Curdling the sauce: Gradually incorporate cream at a low temperature to avoid separation.
  • Over-salting: Balance the seasoning carefully, as some shrimp may already be salted.
  • Uneven cooking: Cook shrimp in a single layer for uniform heat distribution.
  • Neglecting the sauce: Stir continuously while making the sauce to prevent burning and clumping.
  • Improper shrimp cleaning: Devein shrimp thoroughly to remove any grit.
  • Skipping aromatics: Do not omit garlic or herbs, as they contribute essential flavors.
  • Inadequate preparation: Have all ingredients ready before cooking to ensure smoothly timed steps.

Essential Techniques


Mastering the art of Shrimp in Cream Sauce involves a handful of essential techniques. Achieving the perfect sauce consistency is crucial; thus, maintaining low heat and continuous stirring while incorporating cream prevents curdling. Understanding the indicators of well-cooked shrimp, such as color change to opaque and a slight curl, will help you avoid overcooking. Lastly, learning herb infusion techniques enhances aromatic depth without overpowering the dish. By focusing on these elements, you ensure a restaurant-quality outcome.

Pro Tips for Perfect Shrimp in Cream Sauce


Employ these expert tips for the best results: For added depth, briefly sauté shrimp in garlic before finishing in the sauce. Incorporate a splash of white wine for acidity and complexity. Introduce fresh herbs at the end of cooking to maintain their vibrancy. Opt for freshly peeled shrimp for superior texture. Consider using homemade broth for the sauce to maximize flavor. Finally, always let the sauce rest for a couple of minutes before serving, allowing the ingredients to meld harmoniously.

Variations and Adaptations


Shrimp in Cream Sauce offers numerous variations to suit diverse tastes. Explore regional twists by incorporating local spices, giving the dish unique flair. In colder seasons, enrich the sauce with a hint of nutmeg for warmth, or opt for zestier flavors like lemon in summer. Dietary modifications can include using almond milk for a dairy-free version or substituting zucchini noodles for a low-carb alternative. Customize the presentation with vibrant garnishes like edible flowers or microgreens for a contemporary spin.

Serving and Presentation Guide


Serve Shrimp in Cream Sauce with a side of fluffy rice or al dente pasta to soak up the creamy goodness. For upscale presentation, arrange shrimp neatly on individual plates, drizzling sauce artfully. Garnish with freshly chopped herbs and lemon wedges for a pop of color. Traditionally, the dish pairs well with a simple green salad on the side. Consider serving it piping hot to highlight its rich aroma and maximize the sauce’s luscious mouthfeel.

Wine and Beverage Pairing


An elegant dish like Shrimp in Cream Sauce deserves a thoughtful beverage pairing. Crisp white wines, such as Sauvignon Blanc or Pinot Grigio, provide an acidic counterpoint to the dish’s richness, while a buttery Chardonnay harmonizes seamlessly. For non-drinkers, a citrus-infused sparkling water offers refreshing contrast. Even a light oolong tea complements the cream and herbs without overpowering the flavors, making it a versatile choice for varied preferences.

Storage and Shelf Life


Ensure optimal storage by placing leftovers in an airtight container and refrigerating them within two hours of cooking. Consume within three days to maintain quality, checking for any off smells as a spoilage indicator. To reheat, gently warm on low heat, stirring occasionally to preserve sauce consistency. Although not ideal for freezing due to potential texture changes, if necessary, freeze in portioned containers and thaw slowly in the refrigerator before reheating.

Make Ahead Strategies


Streamline your preparation by making the sauce up to a day in advance, storing it separately from the shrimp. When ready to serve, gently reheat and complete the dish with freshly cooked shrimp. This allows the flavors to develop and meld further. Additionally, prep ingredients such as garlic and herbs ahead, ensuring quick assembly. Consider adding a fresh squeeze of lemon for vibrancy when serving.

Scaling Instructions


Adapt Shrimp in Cream Sauce to your needs by scaling up or down. For larger gatherings, easily double or triple the recipe, ensuring you use a larger skillet to maintain even cooking. If halving, adjust seasoning meticulously, as even slight variations can impact flavor balance. Remember to proportionally adjust cooking times when increasing quantities, ensuring ample heat distribution for larger batches.

Nutritional Deep Dive


This dish boasts a balanced nutritional profile, rich in lean protein from shrimp while moderate in calories due to creamy elements. Variants like low-fat milk offer reduced caloric options without sacrificing flavor. Shrimp contributes vital minerals such as selenium and vitamin B12. Emphasizing portion control helps manage weight goals, ensuring an indulgent yet health-conscious culinary experience.

Dietary Adaptations


Catering to specific dietary needs is simple with this adaptable dish. For gluten-free modifications, ensure all products, especially broth and cream, are certified gluten-free. Dairy-free substitutions like coconut cream or almond milk maintain creaminess. While a vegan version is challenging given the shrimp base, tofu or tempeh offer plant-based alternatives. Adjust seasoning and spices to match personal preference while respecting dietary guidelines.

Troubleshooting Guide


Perfect every aspect of your dish with these solutions. Counteract a broken sauce by gently whisking in a splash of cream until smooth. Should the shrimp appear rubbery, use lower heat and shorter cooking times to retain tenderness. For unbalanced flavors, adjust acidity with a dash of lemon or a pinch of sugar. If using frozen shrimp, ensure thorough thawing and pat dry to prevent excess moisture diluting the sauce.

Recipe Success Stories


Join countless others in our recipe community who have embraced the Shrimp in Cream Sauce. One reader added sun-dried tomatoes for a tangy twist, while another replaced cream with soy milk for a dairy-free variant. Numerous adaptations showcase the dish’s versatility, proving its ability to inspire creativity in everyday cooks. Such experiences emphasize the recipe’s potential to become a cherished staple.

Frequently Asked Questions

Can I use frozen shrimp?
Yes, ensure they are fully thawed and patted dry before cooking to maintain texture and avoid diluting the sauce.

Is this dish suitable for lactose-intolerant individuals?
Dairy-free adaptations using coconut or almond milk can accommodate lactose intolerance while preserving creaminess.

How can I prevent the sauce from breaking?
Incorporate cream slowly over low heat, whisking continuously to maintain emulsion and prevent separation.

Can I make the dish ahead of time?
The sauce can be made a day ahead and combined with freshly cooked shrimp when ready to serve, enhancing flavor development.

What side dishes complement this recipe?
Rice, pasta, and fresh salads make excellent accompaniments, balancing the dish’s richness with contrasting textures.

How do I adjust the recipe for more servings?
Simply scale up ingredients proportionally, keeping an eye on the cooking vessel size and time adjustments to maintain even cooking.

Does this dish freeze well?
While freezing is not recommended due to potential texture changes, careful reheating after refrigeration preserves quality.

What varieties of wine pair well?
Crisp white wines like Sauvignon Blanc or buttery Chardonnay complement the flavors well without overpowering them.

What can I use instead of shrimp?
Prawns or tender scallops prove suitable swaps, maintaining the essence of the dish while catering to availability or preference.

Can I substitute herbs?
Yes, tailor herb selection to your liking, considering options like basil or tarragon for alternative flavor profiles while respecting the dish’s delicacy.

Additional Resources


Explore related culinary creations that reinforce your love for seafood delicacies. Visit our seafood technique guides for tips on perfecting other seafood recipes, ensuring every dish emerges with professional finesse. Discover resources on ingredient sourcing, equipping yourself with the best quality choices from reputable producers. Embrace seasonal variations, guaranteeing your dishes remain fresh and vibrant throughout the year.

Join the Conversation


We invite you to share your Shrimp in Cream Sauce endeavors on social media, cultivating a vibrant community of food enthusiasts eager to exchange inspiration. Provide feedback, explore others’ adaptations, and delight in reader-submitted photographs, showcasing the endless versatility of this beloved dish. Celebrate culinary creativity and legacy by engaging with fellow enthusiasts, fostering collaborative enjoyment, and elevating home cooking.

The Recipe

Shrimp in Cream Sauce

Serves: 4

Prep Time: 15 mins

Cook Time: 20 mins

Total Time: 35 mins

Kitchen Equipment Needed

  • Non-stick skillet
  • Whisk
  • Garlic press
  • Sharp knife
  • Measuring spoons and cups

Ingredients

  • 1 lb shrimp, peeled and deveined
  • 2 tablespoons butter
  • 2 cloves garlic, minced
  • 1 cup heavy cream
  • 1/4 cup chicken broth
  • Salt and pepper to taste
  • 1 tablespoon lemon juice
  • 2 tablespoons chopped parsley

Directions

  1. Heat a non-stick skillet over medium heat and add butter.
  2. Sauté shrimp until pink on both sides, about 4 minutes total. Remove and set aside.
  3. In the same skillet, add garlic and sauté until fragrant.
  4. Pour in chicken broth, scraping up any browned bits from the bottom of the pan.
  5. Stir in cream, and bring to a gentle simmer.
  6. Season with salt, pepper, and lemon juice.
  7. Return shrimp to skillet and coat with sauce. Cook for an additional 2 minutes.
  8. Remove from heat and stir in parsley.
  9. Serve immediately with your choice of side.

Recipe Notes

  • Add sun-dried tomatoes for a tangy variation.
  • The sauce can be adjusted with a splash of white wine for more depth.
  • For a thicker sauce, allow it to reduce slightly longer before adding shrimp back in.

“Dijon Mushroom Cream Chicken: A Delicious and Easy Dinner Recipe”

Dijon Mushroom Cream Chicken: A Comforting Delight

⚖️
Difficulty
Medium

⏲️
Prep Time
15 mins

🕒
Cook Time
30 mins

⏱️
Total Time
45 mins

🍽️
Servings
4

The Dijon Mushroom Cream Chicken is an exquisite dish that combines the earthy flavors of mushrooms with the tangy warmth of Dijon mustard and the creamy richness that binds them together perfectly. This recipe brings comfort to your dining table while delivering a gourmet experience right at home. Imagine tender chicken breasts bathed in a luxurious mushroom cream sauce, seasoned with a hint of garlic and thyme, perfect for any dinner party or cozy night in.

This cream chicken recipe doesn’t just serve up deliciousness; it’s also a testament to the beauty of simple yet elegant ingredients coming together to create an unforgettable meal. Whether you’re an experienced cook or a home chef looking to impress, this dish is a wonderful way to indulge in the rich flavors of rustic cuisine while incorporating contemporary zest.

Quick Recipe Highlights

  • Flavor Profile: Tangy Dijon mustard lends a sharpness that melds beautifully with the earthy mushrooms and creamy sauce.
  • Texture: The chicken is tender and juicy, complemented by a velvety sauce that has a slight thickness without being too heavy.
  • Aroma: A delightful waft of garlic, thyme, and sautéed mushrooms fills the kitchen, creating an enticing and savory smell.
  • Visual Appeal: The dish boasts a creamy beige sauce dotted with mushrooms and flecks of fresh herbs, showcased against the golden-seared chicken.
  • Skill Level Needed: Moderate—requires some finesse in creating the sauce and cooking the chicken to perfect juiciness.
  • Special Equipment: A sauté pan, whisk, and a sharp knife for slicing mushrooms and chicken.

Recipe Overview

  • Difficulty Level: While it calls for a few precise steps, such as sauce thickening and maintaining the right temperature, it’s manageable with basic cooking skills.
  • Category: Perfect as a main course for a lunch or dinner setting, especially suited for occasions where you want something slightly upscale yet hearty.
  • Cuisine: While rooted in classic French techniques, the recipe has a universal appeal due to simple ingredients easily found in many regions.
  • Cost: Moderate, given the quality mushrooms and Dijon mustard; however, can be managed with everyday kitchen staples.
  • Season: Best enjoyed in autumn or winter due to its rich nature, but also a treat any time you crave comfort.
  • Occasion: Ideal for family dinners, date nights, or entertaining guests, offering elegance without the need for a professional kitchen.

Why You’ll Love This Recipe


The Dijon Mushroom Cream Chicken is a deliciously versatile dish that promises a delightful taste and texture profile. The chicken’s juiciness is enhanced by the creamy, rich sauce, which provides a perfect balance to the earthiness of mushrooms and the pungent kick of Dijon mustard. Each bite delivers a symphony of flavors that stay with you long after the meal is over.

Convenience is king with this recipe, allowing for a satisfying meal without demanding much pre-planning. With just under an hour to prepare and cook, it fits seamlessly into a busy lifestyle. An ideal option for those quick weeknight dinners or impromptu gatherings where you need a reliable crowd-pleaser.

Nutritional benefits are not compromised in this creamy indulgence. With chicken as a lean protein source, mushrooms supplying vital vitamins, and controlled use of cream, it’s a dish that aligns with balanced eating goals without sacrificing flavor.

The social and entertaining value of this dish is elevated by its elegant presentation and gourmet taste, making every serving feel special. This recipe often becomes a conversation starter due to its delightful aroma and comforting yet sophisticated flavors, drawing people around the table.

Cost-effectiveness and accessibility are keys to its allure. Ingredients are commonly available, and the dish requires no extravagant outlay, making it both restaurant-quality in taste and budget-friendly for routine cooking.

Historical Background and Cultural Significance


The story of this Dijon Mushroom Cream Chicken is steeped in French culinary heritage, a homage to the robust flavor pairings that France is renowned for. The use of mustard in cooking trials bears historical significance, originating from Dijon, a region globally celebrated for its mustard production.

Culturally, mustard has been prized for centuries not only as a condiment but also for its ability to enhance and marry complementary flavors, a testament to French cooking’s ability to transform simple ingredients into complex and tasteful dishes. This recipe serves as a contemporary nod to these age-old traditions.

Over time, the dish has evolved, allowing for regional variations and personal customization. While initially confined to French kitchens, it has been embraced widely, making its way into homes and restaurants worldwide, adapting to local tastes and dietary preferences.

Regional adaptations include the inclusion of diverse mushrooms or substitutions with plant-based creams, mirroring dietary trends and regional preferences. The evolving nature of this dish is a testament to its timelessness and universal appeal, bridging culinary traditions across continents.

Ingredient Deep Dive

Chicken Breast: In many cuisines, chicken is a staple protein due to its versatility and nutritional profile. Lean, high in protein, and low in fat, chicken breast serves as the foundational canvas for this recipe’s flavors.

Mushrooms: Esteemed for their umami richness, mushrooms have long been a culinary gem. They’re a low-calorie source of fiber, protein, and antioxidants, adding depth to the creamy sauce. Opt for cremini or shiitake mushrooms for more intense flavors.

Dijon Mustard: With roots tracing back to Roman times, Dijon mustard is lauded for its pungency and smoothness. Stored in a cool place, it maintains its robust flavor profile for months. If out of Dijon, horseradish mustard can serve as a suitable substitute.

Heavy Cream: While adding luxurious richness, heavy cream provides essential calcium and saturated fats crucial for heart health in moderation. Use fresh cream for the best consistency; alternate with coconut cream for a dairy-free option.

Thyme: A quintessential herb in European cooking, thyme imparts subtle, earthy undertones. It’s best stored dried, as fresh sprigs may wilt quickly. If short on thyme, rosemary offers a complementary flavor alternative.

Common Mistakes to Avoid

  • Overcooking the Chicken: Lead to dryness; cook just until internal temps reach 165°F.
  • Curdling the Sauce: Gradually stir in cream; avoid high heat for a smooth finish.
  • Neglecting Mushroom Prep: Slice uniformly for even cooking; excess moisture should be avoided for a better sear.
  • Skimping on Seasoning: Properly salt each layer for a balanced dish.
  • Sacrificing Freshness: Use fresh herbs and check cream’s date for optimal taste.
  • Inadequate Deglazing: Sufficient deglazing ensures depth from browned bits.
  • Incorrect Pan Size: Use the correct pan to avoid overcrowding and achieve a good sear on the chicken.
  • Ignoring Rest Time: Allow chicken to rest after cooking to retain juices.

Essential Techniques


Mastering the sear on your chicken is crucial—this develops flavor through the Maillard reaction, providing a lovely crust. Ensure your pan is hot before the chicken hits and avoid moving it too soon to prevent sticking.

Creating the sauce requires patience and a steady hand; whisk gently to incorporate cream without boiling, which can lead to separation. The goal is a silken sauce that cohesively envelopes the chicken.

The art of deglazing takes practice but adds remarkable flavor. As you introduce liquids to hot caramelized bits, stir to lift these delicious morsels, forming the flavor base of your sauce.

Balancing the dish is critical. Begin with measured additions of mustard and taste frequently. Too little and the dish lacks dimension; too much, and it can overpower.

Pro Tips for Perfect Dijon Mushroom Cream Chicken


Toast your spices briefly before adding liquids to release their full aromas, enhancing the depth of the dish.

Always clean mushrooms with a damp cloth instead of rinsing, preserving their ability to absorb the cream sauce more effectively.

Brining chicken for an hour before cooking ensures it’s juicier, improving the final mouthfeel and flavor retention.

Consider adding a touch of white wine to deglaze; it pairs excellently with the Dijon and elevates the sauce profile.

Including a dash of lemon zest at the end can cut through the cream, adding brightness and contrast.

Present your dish on a pre-warmed plate to maintain temperature, keeping the sauce fluid and visually appealing.

Variations and Adaptations


Embed regional flair by swapping mushrooms for local varieties. In Italy, porcini brings a pronounced earthiness, while Japanese enoki adds delicate texture.

Adapting the recipe for summer, sprinkle fresh chives over the top for lightness, or introduce a squeeze of chilled lemon juice for freshness during the meal.

Catering to dietary needs can see dairy swaps with coconut cream or soy-based alternatives without losing the dish’s creamy allure.

For a hearty winter dish, incorporate root vegetables like parsnips or finishing with a touch of nutmeg for warmth.

Present on individual plates with a side salad for a more modern interpretation, adding pops of color and contrast.

Use butter lettuce cups for serving a lighter version, with the sauce acting as a creamy dressing, blending with chicken.

Serving and Presentation Guide


Plating should be an art—arrange chicken on a lipped plate, dribbling sauce over the top with mushrooms ornately placed around.

Garnish with fresh thyme sprigs or finely chopped parsley for contrast against creamy colors. Their freshness invigorates the plating visually and aromatically.

Accompany with herb-infused rice or garlic mashed potatoes for side texture contrast, delighting in the merging of flavors with each bite.

Modernize serving techniques by using a ring mold; it helps with consistent plating, dotted with sauce around the edge for finesse.

Serve warm immediately for best cream stability and flavor impact, focusing on portioning each element proportionately.

Wine and Beverage Pairing


A good Chardonnay or a supple Pinot Noir complements the creamy, rich flavors while cutting through with sufficient acidity.

For a non-alcoholic choice, opt for an elderflower tonic or lemon rosemary spritzer; their brightness counterbalances the sauce without overpowering.

Completing breakfast or brunch with a robust black tea offers an earthy pairing, supporting the dish with a pleasant tannic complement.

Serve wine and non-alcoholic options slightly chilled, allowing flavors to open up while complementing the dish’s warmth.

Storage and Shelf Life


Store leftovers in airtight containers, refrigerating promptly after cooling to preserve flavors. Best used within 2-3 days.

Use oven-safe glass or BPA-free plastic containers, which retain moisture without damaging the sauce integrity.

Ignoring spoilage indicators, such as sour smell or curdled sauce, can compromise taste; always assess freshness before serving.

Gently reheat in a saucepan over low heat, stirring until warmed through without reaching boiling point.

Freezing affects the sauce’s texture, but while feasible for short-term solutions, it’s best enjoyed fresh within its recommended timeframe.

Make Ahead Strategies


Preparing parts of the dish in advance, like slicing mushrooms or prepping chicken, cuts down cooking time significantly on the day of service.

Storage at each step involves careful sealing to avoid drying or unintended flavor transfer in the fridge.

Assembly is best tackled in stages; cook chicken and make the sauce separately if pressed for time, combining just before serving.

Reheating the entire dish in a low oven prevents breaking down its components, gently coaxing it back to serving temps.

Final fresh touches, like herbs, should always be added last minute for vibrancy and aroma.

Scaling Instructions


For smaller servings, halve ingredients proportionally, ensuring balance is maintained, and adjust seasoning to taste.

Doubling the recipe requires careful attention to pan size and heat distribution; evenly cooked chicken and sauce are crucial to success.

Equipment adjustments might need larger sauté pans or additional mixing bowls to accommodate increased quantities effectively.

Timing should be extended for larger batches, allowing each part to cook evenly without rush and avoiding crowding issues.

Storing any excess requires strategic packing, focusing on preserving sauce quality and preventing potential separation in storage.

Nutritional Deep Dive


The dish offers an excellent protein supply from chicken, balanced by the creamy sauce’s caloric content.

It’s rich in vitamins and minerals from mushrooms, like selenium, essential for protecting cells from damage.

A moderate portion keeps the meal nutrient-dense, supporting muscle repair and daily bodily functions while indulging in a hearty meal.

Balancing portion sizes prevents overconsumption while still allowing for enjoyment and satiety.

Promoting a balanced use of cream supports weight management; paired with high-fiber sides, it creates a full, nutrient-angled meal.

Dietary Adaptations


For a gluten-free version, ensure thickening agents like cornflour or arrowroot are used in place of wheat-based ingredients.

Create a dairy-free alternative by selecting coconut milk or cashew cream, yielding a different but equally luscious sauce.

Vegan swaps include replacing chicken with tofu or tempeh, adapting mustard for plant-based emulsification as its binding agent.

Dial down carbohydrates by accompanying dishes like cauliflower rice or spiralized zucchini.

Keto considerations could replace heavy cream with full-fat versions, maintaining dish depth while focusing on macro ratios.

Troubleshooting Guide


If sauce appears too runny, incorporate more thickening agents gradually, whisking vigorously to achieve desired body.

Off-balance flavors necessitate seasoning adjustments; adding salt or acidity can modify taste drastically in the right direction.

Temperature problems may indicate overcooking or incorrect settings; equip with a digital thermometer to improve accuracy.

Equipment challenges like pan sticking demand proper cookware use recommendations; non-stick surfaces can help balance.

Ingredient substitutions, such as unavailability, should be explored—cilantro could substitute thyme or similar consistent flavors.

Over-cooked chicken? Allow resting or make thinner gravy to partially rehydrate without masking flavors.

Recipe Success Stories


Readers share rave reviews of its ease and consistent results, claiming it’s become a staple that emulates professional culinary results.

Adaptive versions inspire, with combinations of different mushroom types yielding deeper umami flavors, increasing its audience and seasonal adaptability.

Featuring updated photography tips aids in visually capturing this dish’s inherent beauty—utilizing natural lighting and positioning for the best effect.

Community engagement surrounds recipe modifications, inspiring creativity far beyond the initial scope, such as inclusion in gourmet weekly meal kits.

Photography captures weren’t merely for show; plating allure was beneficial for presentations across several dinner parties, driving conversation.

Frequently Asked Questions

Q: Can I prepare the sauce ahead of time?
A: Yes, the sauce can be made ahead and stored in an airtight container in the fridge for up to two days. Reheat gently before serving.

Q: Is there a way to make this recipe spicier?
A: Absolutely! You can add a pinch of red pepper flakes or a dash of cayenne pepper to the sauce for a subtle heat.

Q: Can this dish be made entirely dairy-free?
A: Yes, substitute the heavy cream with coconut cream and use a vegan butter alternative for a dairy-free version.

Q: How can I ensure my sauce doesn’t split?
A: Avoid boiling the sauce; gently heat and whisk until the components have fully combined for a smooth result.

Q: What’s the best wine for cooking this dish?
A: A dry white wine, such as Chardonnay or Sauvignon Blanc, is ideal, though completely optional.

Q: Can I make this recipe in a slow cooker?
A: It’s possible with modifications; sear chicken first and then combine with sauce ingredients to slow cook until tender.

Q: How can I thicken the sauce without flour?
A: Use cornstarch or arrowroot mixed with a little water to create a slurry, adding it gradually to the sauce.

Q: Is substituting chicken thighs an option?
A: Yes, chicken thighs offer more flavor and moisture, requiring adjustments in cook time to maintain tenderness.

Q: Are there any specific side dishes that pair well?
A: Sides like mashed potatoes, wild rice, or steamed asparagus complement the rich flavors beautifully.

Q: Can I freeze the leftovers?
A: While possible, note that sauces containing cream may change in texture when thawed and reheated.

Additional Resources


Explore our other chicken recipes, curated for flavor consistency and versatility, providing ample ideas for any dining occasion.

Engage with video-guided techniques to elevate basic cooking methods, simplifying steps within Dijon Mushroom Cream Chicken preparations.

Gain ingredient insights, from sourcing the finest mushrooms in farmers’ markets to choosing sustainably reared poultry for healthier meals.

Seasonal inspiration thrives; discover recipes aligned with the same eclectic spirit, turning each season into a new dining adventure on your table.

Invest in the right equipment, with recommendations tailored to recipes ensuring each tool is fit for purpose, ensuring cooking pleasure.

Join the Conversation


Showcase your rendition on social platforms with #DijonMushroomCreamChicken, allowing others to appreciate and interact with your unique twist.

Photography aficionados are encouraged to share snaps, together with lighting tips, to capture the essence of gourmet dining atmospheres.

Recipe reviews foster growth; leave feedback, highlighting any adaptations you loved or potential improvements.

Community engagement through comments motivates continual recipe sharing, ensuring suggestions enrich future culinary undertakings.

Experimentation isn’t just encouraged—it’s essential. Share your variants and engage globally in a growing foodie community.

The Recipe

Dijon Mushroom Cream Chicken

Serves: 4

Prep Time: 15 mins

Cook Time: 30 mins

Total Time: 45 mins

Kitchen Equipment Needed

  • Sauté pan
  • Whisk
  • Sharp knife
  • Cutting board

Ingredients

  • 4 chicken breasts
  • 2 tablespoons olive oil
  • 1 cup mushrooms, sliced
  • 2 garlic cloves, minced
  • 1 cup heavy cream
  • 2 tablespoons Dijon mustard
  • 1 teaspoon thyme, dried or fresh
  • Salt and pepper to taste

Directions

  1. Heat olive oil in a sauté pan over medium heat. Add chicken breasts, seasoning with salt and pepper, and cook until golden and cooked through. Remove and set aside.
  2. In the same pan, add mushrooms and garlic, cooking until mushrooms are tender and fragrant.
  3. Reduce heat to low, whisk in cream and mustard, cooking until the sauce thickens slightly.
  4. Sprinkle thyme into the sauce, adjusting seasoning to taste.
  5. Return chicken to the pan, spooning sauce over the top. Simmer briefly before serving.

Recipe Notes

  • Experiment with different mushroom types for varied flavors.
  • Add a splash of white wine during cooking for depth.
  • Garnish with fresh parsley or chives for extra freshness.

Irresistible Blue Cheese Walnut Thyme Pull Apart Puff Pastry Delight

Blue Cheese, Walnut, and Thyme Pull Apart Puff Pastry Twirl: A Flavorful Delight

⚖️
Difficulty
Easy

⏲️
Prep Time
15 mins

🕒
Cook Time
25 mins

⏱️
Total Time
40 mins

🍽️
Servings
8

Imagine the perfect afternoon filled with the savory aroma of freshly baked pastry wafting through your kitchen. The Blue Cheese, Walnut and Thyme Pull Apart Puff Pastry Twirl is an indulgent treat ideal for any gathering or a cozy evening at home. This delectable pastry brings together rich blue cheese, the crunch of walnuts, and earthy thyme, creating a symphony of flavors with every bite. Its simplicity yet elegant presentation makes it an irresistible addition to your recipe collection.

This recipe is a brilliant amalgamation of textures and tastes. The buttery layers of puff pastry envelop a filling that combines creamy blue cheese with crunchy walnuts, imparting an irresistible bite. The thyme adds an aromatic, herbal note that perfectly balances the robust cheese, making this pull apart pastry not only delicious but also intricately flavorful.

Quick Recipe Highlights

  • Flavor Profile: Celebrate a delightful savory experience with sharp blue cheese, earthy thyme, and nutty walnuts.
  • Texture: Enjoy a harmonious blend of creamy, crunchy, and flaky textures that melt in your mouth.
  • Aroma: Allow the herbaceous scent of thyme and toasted walnuts to enchant your senses.
  • Visual Appeal: Relish the golden-brown pastry spiraling around a rich cheese filling, making it a visual centerpiece.
  • Skill Level Needed: Basic pastry handling and spreading skills are all you need to impress your guests.
  • Special Equipment: A rolling pin and pastry brush will be your trusty tools for this easy-to-create masterpiece.

Recipe Overview

  • Difficulty Level: This recipe is straightforward, making it accessible even for beginners. The key is to manage the puff pastry gently and ensure it is packed with all the savory ingredients.
  • Category: Perfect as an appetizer or snack, it fits well into brunch settings or as a party appetizer.
  • Cuisine: This dish finds its roots in European cuisine, with a focus on combining premium cheese and rustic flavors.
  • Cost: Expect to spend a modest amount, as high-quality puff pastry and blue cheese can elevate this recipe substantially.
  • Season: Ideal for the holiday season, but its delightful flavors make it a year-round favorite.
  • Occasion: Perfect for gatherings, parties, or an exquisite addition to weekend brunch.

Why You’ll Love This Recipe


This Blue Cheese, Walnut, and Thyme Pull Apart Puff Pastry Twirl offers a taste and texture that is simply captivating. Each bite is a delightful contrast of creamy blue cheese, crunchy walnuts, and flaky puff pastry, harmoniously flavored with aromatic thyme. It’s a recipe that is as much a joy to eat as it is to prepare.

Convenience and ease of preparation make this recipe a favorite among both novice and seasoned cooks. The use of ready-made puff pastry streamlines the process, allowing you to focus on creating a luscious filling and assembling a stunning presentation in no time.

Indulging in this pastry twirl doesn’t only satisfy your taste buds but also provides some nutritional benefits. Rich in calcium from the cheese and healthy fats from the walnuts, this treat is a wholesome addition to your meal repertoire, perfect for occasional enjoyment.

Beyond its nutritional perks, this recipe excels as a social centerpiece. Whether at a cozy family breakfast or a lively evening party, its inviting aroma and gorgeous presentation invite guests to gather and share joyful moments over delicious food.

Finally, this recipe stands out for its cost-effectiveness and accessibility. With a few high-quality ingredients, you can create a gourmet experience that rivals restaurant-style dishes without breaking the bank. The intrinsic richness and multifaceted flavors ensure that every penny is well spent.

Historical Background and Cultural Significance


The origin of this recipe draws inspiration from the rich culinary traditions of Europe, where cheese and nuts have been integral components of festive and ceremonial dishes for centuries. Across various regions, combining creamy blue cheese with nuts is a testament to the enduring appeal of contrasting textures and savory profiles.

Blue cheese, with its storied past stretching back to the Roman era, has long been cherished for its robust flavor and complexity. Traditionally crafted in caves, it symbolizes artisanal expertise and a deep connection to heritage, elements which are celebrated through this pastry recipe.

Over time, the recipe has evolved, embracing modern culinary innovations like pre-made puff pastry while retaining its classic core ingredients. The fusion of old-world cheese-making with the versatility of contemporary baking creates an exciting and timeless culinary experience.

Regional variations are popular, with some swaps in ingredients reflecting local tastes and seasonal availability. Whether introducing fresh herbs or experimenting with different nut varieties, the adaptability of this recipe makes it a beloved staple in many households.

Ingredient Deep Dive


Blue cheese is the hero of this dish, offering a sharp, tangy flavor profile that sets the stage for a memorable culinary experience. Renowned for its origins in various European countries, blue cheese boasts a variety of styles, each with unique notes influenced by specific climates and production methods.

Beyond its storied cultural heritage, blue cheese is rich in calcium and protein. To select the best variety, look for a cheese that is slightly soft but firm to the touch, and store it wrapped in parchment paper in the fridge to maintain freshness.

Walnuts bring both nutritional benefits and texture dynamism to this recipe. Historically revered for their richness in omega-3 fatty acids and antioxidants, walnuts add a delightful crunch that complements the creaminess of blue cheese beautifully.

For best results, choose raw, unsalted walnuts and store them in an airtight container in a cool, dark place to prevent rancidity. If needed, other nuts like pecans or almonds may substitute walnuts, maintaining the recipe’s textural harmony.

Common Mistakes to Avoid

  • Overfilling the pastry can lead to it splitting during baking. Ensure an evenly distributed and moderate filling amount.
  • Failing to seal edges properly may allow filling to escape during baking, so press gently to secure seams.
  • Underbaking can result in a soggy pastry; ensure adequate cooking time to achieve a golden-brown finish.
  • Cooling the pastry too quickly might affect its texture, so allow it to cool on a wire rack.
  • Using puff pastry that isn’t fully thawed can lead to uneven rolling and baking.
  • Skipping the egg wash results in a dull appearance; a quick brush enhances color and shine.
  • Too much thyme can overpower the dish; balance is key to capturing its aromatic notes without overwhelming flavors.
  • Handling the pastry too much can cause it to lose its flakiness when baked.

Essential Techniques


Achieving the perfect puff pastry texture is crucial. When rolling out the dough, ensure its thickness is consistent to promote even cooking. Avoid stretching the pastry, as this can cause it to shrink during baking and affect texture.

Mastering the art of spreading is essential for an evenly distributed filling. Use a small offset spatula to achieve a smooth layer that covers the entire pastry surface without spilling over the edges.

Paying attention to baking visual cues is vital. A golden-brown hue with slight blistering indicates the perfect puff pastry doneness. Overbaking can result in a dry pastry, while underbaking leads to a soggy bottom.

Rolling the pastry into a tight spiral is an art. It’s key to maintaining shape and keeping the filling intact. Practice patience, and if needed, refrigerate for 10 minutes to make handling easier.

Pro Tips for Perfect Blue Cheese Twirl


Maintain cold ingredients when working with puff pastry to ensure it remains flaky. Warmth causes the butter layers within the pastry to melt, leading to a denser texture.

After assembling, chill the pastry for 20-30 minutes before baking. This helps maintain shape and enhances the flakiness when baked.

Experiment with different crumble sizes for the cheese. Larger pieces provide a more robust flavor bite, while finer pieces distribute flavor more evenly.

For added depth, try toasting the walnuts slightly before integrating them into the filling. This amplifies their flavor and adds a warm, nutty aroma to the dish.

Using fresh thyme sprigs instead of dried ones elevates the aromatic quality of this pastry, enhancing its genuine herbal notes without overpowering the cheese’s tang.

Serving the twirl slightly warm ensures the cheese maintains its creamy texture without becoming overly runny or firm, offering the best taste and texture experience.

Variations and Adaptations


Regional variations can include swapping blue cheese with other crumbly cheeses such as feta or goat cheese, allowing the recipe to cater to various palates while preserving its core essence.

Seasonal adaptations invite the inclusion of other herbs in place of thyme during different times of the year. Fresh basil or rosemary can bring a new dimension to the dish during summer and winter, respectively.

Dietary modifications are attainable with gluten-free puff pastry alternatives, offering the same texture and taste experience for those with gluten sensitivities.

For a flavor twist, consider adding dried cranberries to the filling during festive seasons, bringing a sweet contrast against the savory profile of the blue cheese and walnuts.

Texture modifications come through adjusting the nut varieties. Substituting with pecans or hazelnuts can provide a more buttery, sweet nuance to the pastry twirl.

Presentation alternatives may involve serving as smaller, individual pinwheels, each offering a bite-sized burst of flavor perfect for cocktail-style events.

Serving and Presentation Guide


When it comes to plating techniques, consider arranging the pastry in a spiral pattern on a rustic wooden board or on a sophisticated serving platter for a striking centerpiece.

Garnishing ideas could include a sprinkle of fresh thyme leaves or thin curls of cheese on top to accentuate the dish’s rustic charm and enhance visual appeal.

Traditional accompaniments such as a small bowl of honey or fig preserves complement the sharpness of the cheese with a sweet counterpoint, bringing balance to the tasting experience.

For modern serving suggestions, consider pairing with a delicate green salad, lightly dressed, to add a fresh, crisp contrast to the creamy, rich pastry.

Temperature considerations suggest serving the twirl slightly warmed, allowing the cheese to ooze slightly and maintain its melt-in-the-mouth quality.

Portion control tips involve slicing the pastry into six sections, making it easy to handle and ensuring each guest enjoys a satisfying but not overwhelming portion.

Wine and Beverage Pairing


A chilled glass of Pinot Grigio or Chardonnay offers an acidic complement to the creamy, tangy richness of the blue cheese. These whites balance the dish’s bold flavors without overpowering them.

For non-alcoholic alternatives, consider a refreshing iced tea or an apple cider. Their slight sweetness gently elevates the pastry’s savory notes, providing a refreshing cleanse to the palate.

If pairing with coffee or tea is preferred, opt for a rich, full-bodied coffee or a robust black tea that shares the pastry’s intrinsic complexity and can match its flavor intensity.

It’s essential to serve these beverages slightly chilled; the crispness cuts through the cheese’s richness while the carbonation can cleanse and refresh.

For serving suggestions, choose clear glasses to showcase the beverage’s hues and serve with a side of fresh fruits or nuts to mirror the pastry’s complementary tastes and textures.

Storage and Shelf Life


To maintain freshness, store the puff pastry twirl in an airtight container at room temperature for up to two days. For slightly longer storage, keep it in the fridge, ensuring it is well-sealed to prevent drying.

Temperature requirements for stored pastry should be consistent to maintain texture; too much heat can cause the pastry to become soggy, while too much cold can turn it brittle.

When considering container recommendations, opt for a shallow glass or metal storage container to prevent squishing and retain layer integrity in the pastry.

Signs of spoilage include mold growth visible on the cheese or a stale, off-putting smell. The pastry should also feel consistently firm, rather than excessively soft or hard.

Reheating instructions involve warming the pastry in the oven on low heat (300°F/150°C) until slightly warm to the touch. Avoid using the microwave to prevent the puff pastry from becoming soggy.

Freezing guidelines suggest that if you need to freeze, do so before baking. Assemble the pastry as instructed, then tightly wrap and freeze. Bake from frozen, adding a few extra minutes to the cook time.

Make Ahead Strategies


When planning to make this recipe ahead, consider constructing the pastry up to a day before and storing it chilled in the fridge until baking time. This allows flavors to infuse and makes for easy oven transfer.

Store components between steps in sealed containers. Pre-prepped ingredients won’t lose their freshness, even when assembled later.

Quality impact is minimal when making ahead, as the pastry aims to capture all flavors tightly without risking quality loss over time in refrigeration.

Assembly tips include using cold ingredients straight from storage to ensure the pastry remains firm and pliable for shaping and filling.

For best reheating, allow the pastry to return to room temperature before the second oven chill. This prevents uneven warming and restores the flaky texture.

Adding fresh elements like a dusting of cheese or herbs post-baking ensures vibrant flavor contrast and visual appeal, negating any muted potential from storage.

Scaling Instructions


Scaling this recipe to half is straightforward, reducing each ingredient proportionally and following the same assembly techniques but with a smaller pastry sheet.

Doubling or tripling the recipe demands increased ingredient availability, such as extra cheese or additional puff pastry sheets, but doesn’t complicate cooking techniques or methodologies.

Equipment adjustments such as larger baking trays or oven space consideration may arise when increasing batch size but require no specialized kitchen tools.

Timing modifications include extending the baking phase slightly if increasing batch size, as larger quantities necessitate thorough cooking to achieve optimal texture.

When increasing servings, consider ample storage space and airtight containers to retain quality.

Nutritional Deep Dive


This recipe offers a balanced macro breakdown with wholesome fats from cheese and nuts, moderate protein content, and low carbohydrates when conforming to specified ingredient quantities.

Micronutrient analysis showcases calcium and Vitamin K from the cheese and heart-healthy omega-3 fatty acids sourced from walnuts.

Health benefits are apparent, with healthy fats contributing to satiety and energy retention, while the controlled portion of complex carbohydrates offers sustained metabolic energy.

Dietary considerations involve awareness of sodium levels due to cheese content, emphasizing portions and balance concerning overall daily intake.

Portion analysis serves to bring richness and flavor concentration into one small serving, avoiding excessive caloric intake but still offering indulgent satisfaction.

Weight management tips involve limiting the pastry to smaller portions and pairing with water-rich, low-calorie foods such as leafy greens and vegetables for a well-rounded meal.

Dietary Adaptations


For a gluten-free version, utilize gluten-free puff pastry available in specialty stores or make your version from alternative flour blends.

A dairy-free modification involves substituting blue cheese with dairy-free cheese varieties like cashew blue cheese spread, maintaining texture and flavor while ensuring dietary considerations are met.

For vegan adaptation, combine gluten-free and dairy-free ingredients, relying on vegan cheese alternatives and coconut oil-based puff pastry.

A low-carb adaptation reduces any remaining puff pastry carbs, potentially substituting with keto-friendly pastry alternatives available in specialty stores.

Those following a keto lifestyle may enjoy the reduced carb version, focusing on cheese, nuts, and broader inclusion of low-carb ingredients in complementary dishes.

Paleo adaptation allows for potential nut cheese substitutions and a focus on almond flour-based pastry versions, reducing processed elements.

For a low-FODMAP approach, maintain low-FODMAP cheese choices and a reduced onion/garlic approach, facilitating easy digestion for sensitive stomachs.

Troubleshooting Guide


Encountering texture issues such as sogginess may indicate underbaking or excessive filling, necessitating refined proportions and thoroughly baking until golden brown.

If flavor balance doesn’t impress, adjust cheese types or increase herb quantities; yet adhere to a refined palette of complementary tastes without overwhelming the delicate pairing essence.

Temperature problems often relate to preheating accuracy or inadequate cooling times post-baking; monitoring both ensures texture and taste meet expectations.

Equipment challenges arise if using subpar pastry tools; committing to a sharp knife and appropriate rolling pins ensures precision and professional presentation.

Ingredient substitutions invite varied adaptations; consider flavor profiles and textural advancements, embracing experimentation while ensuring core recipe integrity.

Timing concerns primarily involve overextending pan heating or inadvertently adjusting cooking times beyond instructed; watch for visual cues to ensure baking remains on track.

Recipe Success Stories


Many community members have shared their success with this Blue Cheese, Walnut, and Thyme Pull Apart Puff Pastry Twirl. Numerous readers have embellished the flavors with additional locally sourced cheeses, enhancing regional pride and producing unique twists to common adaptations.

Variation successes often involve including figs or berries, introducing sweetness that balances the savory elements while offering additional vibrant color upon serving.

Adaptation stories invoke creative inspiration, demonstrating commitment to diverse dietary requirements without sacrificing the classic essence of the pull-apart pastry.

Reader suggestions embrace creative pairings, such as adding a spoon of honey or a sprinkle of chili flakes before baking, adding intriguing, personal touches to traditional methods.

Photography tips guide aspirant food bloggers, allowing them to spotlight the twirl’s stunning layers. Close-up shots emphasize its enticing complexity, while wider angles capture the twirl’s charming rustic texture.

Frequently Asked Questions

Can I use other types of cheese in this recipe?
Absolutely! While blue cheese is renowned for its tangy flavor, feel free to experiment with alternatives like feta or gouda to suit your preference.

What if I don’t have walnuts on hand?
You can substitute walnuts with other nuts such as pecans or almonds, maintaining the recipe’s crunch and nutty element.

How do I prevent the pastry from getting soggy?
Ensure you bake the pastry sufficiently to achieve a golden-brown crust, and avoid overfilling to reduce excess moisture.

Is it necessary to use fresh thyme?
While fresh thyme imparts a stronger aroma, dried thyme may be used sparingly if fresh is unavailable.

Can this recipe be frozen before baking?
Yes, it can be prepared and frozen, then baked from frozen, providing convenience for quick homemade delights.

What’s the best way to reheat leftovers?
Reheat in an oven at a moderate temperature to ensure the pastry remains flaky and warm within, avoiding microwave sogginess.

How do I present this recipe beautifully?
Arrange on a serving board, garnish with fresh herbs, and serve with accompaniments like fig jam to enhance its gourmet appearance.

Can I use pre-made puff pastry?
Certainly! Pre-made puff pastry simplifies preparation, offering consistent flakiness and saving significant time and effort.

Is it okay to prepare ahead of time?
Yes, assemble the pastry and chill until baking time for maximum flavor infusion and ease of serving.

Can I adjust for dietary needs?
Certainly! Opt for gluten-free or dairy-free alternatives as needed, ensuring compliance without compromising flavor.

How do I ensure even filling distribution?
Use a spatula to spread the filling evenly, preventing concentrated pockets that may disrupt texture upon baking.

Can I add fruit flavors to this recipe?
Incorporate fruits like figs or dried cranberries sparingly for a touch of sweetness complementing the tangy cheese and earthy nuts.

Additional Resources


Explore related recipes that incorporate similar ingredients, like blue cheese and walnut salad, which can complement the twirl and expand on flavor profiles distinct to these ingredients.

Technique guides are available for pastry handling, offering a keen insight on mastering dough management and achieving professional-level textures with each bake.

Ingredient information, spotlighting cheese varieties and walnut benefits, provides deeper understanding of attributes and culinary synergy present in this dish.

Equipment recommendations include owning a humble rolling pin and precise pastry brush, essentials that ensure perfect pastry execution without specialized gear.

Seasonal variations suggest adapting the recipe throughout the year, incorporating spring herbs and summer fruits to fit different occasions and taste journeys.

Join the Conversation


Join us on social media, where you can share your successes, adaptations, and photographs of this Blue Cheese, Walnut and Thyme Pull Apart Puff Pastry Twirl. Tag us to be featured and inspire others with your culinary creativity.

Photography tips for capturing your pastry include utilizing natural light and playing with perspective, focusing on its flaky layers and filling vibrance to entice your followers.

Recipe reviews help our community by offering valuable feedback, paving the way for upcoming variations and ensuring the recipe meets dietary and flavor satisfaction goals.

Engage in community discussion about creative ingredients, and showcase novel variations, like introducing spices or developing themed adaptations for unique culinary experiences.

Explore new recipe variations through collective insight, experimenting toward mutual culinary discovery and delight. Let’s create a universal tapestry of flavors, one pull apart pastry twirl at a time!

The Recipe

Blue Cheese, Walnut and Thyme Pull Apart Puff Pastry Twirl

Serves: 8

Prep Time: 15 mins

Cook Time: 25 mins

Total Time: 40 mins

Kitchen Equipment Needed

  • Rolling pin
  • Pastry brush
  • Baking tray
  • Paring knife
  • Offset spatula

Ingredients

  • 1 sheet puff pastry, thawed
  • 100g blue cheese, crumbled
  • 50g walnuts, coarsely chopped
  • Fresh thyme leaves
  • 1 egg, beaten
  • Salt and black pepper to taste

Directions

  1. Preheat your oven to 200°C (400°F) and line a baking tray with parchment paper.
  2. Roll out the thawed puff pastry sheet on a floured surface to ensure even thickness.
  3. Evenly spread the blue cheese over the pastry, leaving a small border on all sides.
  4. Sprinkle chopped walnuts and fresh thyme leaves over the cheese layer.
  5. Season the filling lightly with salt and fresh black pepper.
  6. Brush the border of the pastry with beaten egg and roll it into a log, sealing the edge tightly.
  7. With a sharp knife, cut the roll into 8 equal pieces and arrange them on the prepared baking tray.
  8. Brush the tops of each roll with remaining egg wash for a decorative gloss.
  9. Bake in the preheated oven for 25 minutes or until golden brown and crispy.
  10. Remove from the oven and allow the pastries to rest for a few minutes before serving.

Recipe Notes

  • For added sweetness, incorporate dried cranberries into the filling.
  • If blue cheese is unavailable, try goat cheese or feta for a different flavor profile.
  • Serve warm for the best texture and taste.

Savor Crispy Homemade Mozzarella Cheese Sticks with Easy Recipe

Irresistible Mozzarella Cheese Sticks: A Cheesy Delight for Every Occasion

⚖️
Difficulty
Easy

⏲️
Prep Time
15 mins

🕒
Cook Time
10 mins

⏱️
Total Time
25 mins

🍽️
Servings
4

Imagine biting into a warm, crunchy, and gooey Mozzarella Cheese Stick, with texture so tempting it makes you reach for another one almost instantly. These Irresistible Mozzarella Cheese Sticks are the epitome of cheesy comfort food, bringing a playful burst of flavor with every bite. With this recipe, you can transform ordinary mozzarella into a remarkable appetizer, snack, or party treat in just a few simple steps.

Whether you’re planning a family gathering, a game night, or simply indulging in some me-time, these Mozzarella Cheese Sticks offer a tantalizing combination of textures and aromas. The crispy exterior gives way to a soft, molten cheese center, making it a sensory delight. The aroma of fried mozzarella fills your kitchen, enticing everyone and elevating the anticipation of this mouth-watering dish.

Most importantly, this recipe for Mozzarella Cheese Sticks requires minimal ingredients and effort, making it perfect for both beginners and experienced home cooks looking for a quick, satisfying fix. Let this cheesy delight be your go-to snack for any occasion—simple, effortless, and unforgettable.

Quick Recipe Highlights

  • Flavor Profile: Mozzarella Cheese Sticks offer a mild, creamy flavor complemented by a subtle crunch from the breaded coating. The slight hint of seasoning enhances the cheese’s natural taste without overwhelming it.
  • Texture: Experience the perfect combination of crunchy, crispy coating and soft, melt-in-your-mouth mozzarella cheese, making each bite sensational.
  • Aroma: A captivating aroma of melted cheese and freshly fried breadcrumbs fills the air, tantalizing your senses and making your mouth water.
  • Visual Appeal: These golden brown cheese sticks, often accompanied by a vibrant marinara sauce, create an appetizing visual contrast that’s hard to resist.
  • Skill Level Needed: Easy—perfect for novice cooks looking to impress with minimal effort and maximum taste.
  • Special Equipment: Requires basic kitchen tools such as a pan for frying and a rack or tray for cooling the cooked cheese sticks.

Recipe Overview

  • Difficulty Level: This recipe is classified as easy because it involves straightforward steps such as breading and frying. The main challenge lies in maintaining the right oil temperature to achieve a perfect golden crust without overcooking the cheese.
  • Category: Mozzarella Cheese Sticks belong to the appetizer and snack category, ideal for parties, gatherings, or as a comforting treat.
  • Cuisine: These cheese sticks are a favorite in American cuisine, often found in diners, pubs, and eateries, showcasing a playful twist on traditional Italian mozzarella.
  • Cost: An affordable dish, the main expense comes from the cheese. Breadcrumbs, eggs, and flour are economical and often pantry staples.
  • Season: While these cheese sticks can be enjoyed year-round, they shine during sports seasons, holidays, and casual get-togethers when rich, comforting snacks are in demand.
  • Occasion: Perfect for casual snack sessions, game nights, and family gatherings. Their playful form and flavor make them a hit with both adults and children.

Why You’ll Love This Recipe

The taste and texture of these Mozzarella Cheese Sticks are truly unrivaled. Each stick boasts a perfectly crisp crust surrounding gooey, stretchy mozzarella cheese, making every bite an indulgent escape. The contrast between the crunchy coating and the smooth interior creates a delightful sensory experience.

These Cheese Sticks offer convenience and ease of preparation, making them an ideal choice for spontaneous snacking or when unexpected guests arrive. With just a handful of ingredients and straightforward steps, you can create a restaurant-quality appetizer in your kitchen in no time.

Mozzarella Cheese Sticks are not only delicious but also provide protein and calcium, making them a relatively nutritious snack option. When paired with a healthy dip or sauce, they can fit into a balanced diet without any guilt.

One of the greatest joys of this recipe is its ability to spark social interactions. Whether you’re hosting a party or simply enjoying them with your family, these cheese sticks bring people together, evoking shared smiles and memories.

Cost-effectiveness and accessibility are key reasons why this recipe is a winner. The ingredients are readily available at most grocery stores, and the affordability of mozzarella cheese makes it a budget-friendly choice without skimping on flavor.

Historical Background and Cultural Significance

Mozzarella Cheese Sticks have a fascinating origin story rooted in Italian cuisine, where mozzarella cheese has been a staple for centuries. The idea of breading and frying mozzarella transformed this cheese from a mere ingredient to the main attraction in a delightful appetizer.

Culturally, Mozzarella Cheese Sticks have grown beyond their Italian roots to become a beloved snack across the globe. They are often synonymous with comfort food in American eateries and associated with warmth, sharing, and indulgence.

Over the years, mozzarella sticks have evolved in their presentation and recipes, with variations that include different breading and seasoning techniques. This adaptability is a testament to their versatility and enduring popularity.

Regional variations of Mozzarella Cheese Sticks can be found worldwide. While the base concept remains the same, certain regions may incorporate local herbs, spices, or sauces to give their cheese sticks a unique flair, demonstrating culinary creativity and adaptability.

Ingredient Deep Dive

Mozzarella Cheese is the star of these delectable sticks. Originally hailing from Italy, mozzarella is a highly esteemed cheese renowned for its creamy texture and mild flavor. This cheese’s history dates back to ancient Roman times, where it was crafted from buffalo milk.

From a nutritional standpoint, mozzarella is an excellent source of protein and calcium, crucial for bone health. Its lower fat content compared to other cheeses makes it a relatively healthier option for indulgent recipes.

When selecting mozzarella cheese, opt for whole-milk varieties to ensure creaminess and meltability. Pre-shredded cheese should be avoided here, as it may not yield the desired gooey texture due to anti-caking agents.

For storage, mozzarella should be kept refrigerated in its original packaging until ready to use. Once opened, wrap it in cheese paper or parchment to maintain freshness and prevent drying.

Substitutions for mozzarella are numerous; however, low-moisture mozzarella is the best alternative to achieve the classic texture. For dietary restrictions, consider using dairy-free mozzarella varieties that melt well.

Breadcrumbs form the crunchy exterior of the cheese sticks. Originating from dried bread, they are a staple in breading recipes. This makes them a key player in achieving the crispy texture desired in cheese sticks.

Beyond texture, breadcrumbs offer a blank slate for additional herbs and spices, allowing customization of flavor. Nutritionally, they provide a carbohydrate-rich coating that balances the protein-heavy cheese.

Fresh breadcrumbs yield the best results, as they retain moisture better than pre-packaged options. Toast stale bread and pulse it in a food processor to create homemade breadcrumbs that elevate your dish.

Store homemade breadcrumbs in an airtight container at room temperature, ensuring they remain crispy and free from moisture. They can also be frozen for longer storage, ready for use at a moment’s notice.

Breadcrumbs can be substituted with panko for extra crunch, or gluten-free breadcrumbs for dietary needs. Adjust the seasoning to complement your desired flavor profile and enhance the dish.

Common Mistakes to Avoid

  • Skipping the Freezing Step: Failing to freeze the breaded mozzarella can lead to cheese leakage during frying. Ensure they’re frozen solid before cooking.
  • Overheating the Oil: Frying at too high a temperature can result in a burnt exterior and undercooked interior. Maintain a medium heat for even cooking.
  • Using Pre-shredded Mozzarella: Here, pre-shredded options don’t melt nicely. Whole-milk mozzarella sticks are a better choice for superior texture.
  • Neglecting Moisture Control: Pat dry your cheese sticks to remove excess moisture before breading; this helps the coating adhere better.
  • Inadequate Bread Crumb Coverage: Ensure each mozzarella stick is thoroughly coated in breadcrumbs to avoid cheese seepage during frying.
  • Using Stale Oil: Fresh oil is key for a clean-tasting and crispy result. Replace oil if it’s been previously used for other fried foods.
  • Rushing the Breading Process: Double coat the cheese efficiently, allowing time for the layers to adhere properly for extra crispiness.
  • Overcrowding the Pan: Fry a few sticks at a time to maintain oil temperature and ensure even cooking and crispness.

Essential Techniques

Mastering the breading technique is crucial for perfect Mozzarella Cheese Sticks. This involves a three-step process of flour, egg wash, and breadcrumbs to ensure a well-adhered and crispy coating.

Frying is another vital technique that greatly influences the outcome. Maintaining the oil at a consistent medium temperature prevents burning and ensures a golden brown exterior.

Monitoring oil temperature requires practice. Visual cues such as gentle bubbling around the cheese stick and an even browning indicate success.

Freezing the breaded mozzarella before frying helps maintain shape and prevents the cheese from oozing out, critical for achieving the iconic look and texture.

Pro Tips for Perfect Mozzarella Cheese Sticks

For ultimate crispness, consider using panko breadcrumbs in combination with regular breadcrumbs. This mixture yields an extra crunchy coating that elevates the cheese stick experience.

Season your breadcrumbs with garlic powder, Italian herbs, or paprika for an enhanced flavor that complements the mild cheese and pleases your palate.

Freeze your cheese sticks on a baking sheet before frying. This step is essential to maintaining their shape and ensures minimal cheese loss during cooking.

Serve your Mozzarella Cheese Sticks immediately after frying for the best taste and texture. Allowing them to cool can result in loss of crunch and molten interior.

Pair your cheese sticks with marinara or arrabbiata sauce for an authentic Italian touch that enhances the taste profile.

For a healthier twist, bake the cheese sticks in an oven preheated to 400°F (200°C), turning them halfway until golden brown, to reduce oil intake while maintaining a crispy exterior.

Experiment with fillings by wrapping a slice of pepperoni or sundried tomato around the mozzarella before breading for a unique twist on the classic recipe.

Variations and Adaptations

Regional variations offer diverse takes on Mozzarella Cheese Sticks. Explore adding spices like cayenne for a Southern-inspired kick or herbs like fresh basil and oregano for an Italian flair.

Incorporate seasonal adaptations to your Mozzarella Cheese Sticks by including seasonal herbs within the breading or serving alongside fresh garden salsa for a summer twist.

For those with dietary restrictions, consider gluten-free breading options or plant-based mozzarella alternatives to cater to a wider spectrum of dietary needs.

Experiment with flavor variations by integrating parmesan into the breadcrumb mix for added savory depth, or using smoked mozzarella for a unique, rich taste.

Change up the texture by creating stuffed mozzarella sticks with ingredients such as jalapeños or bell peppers, adding an extra layer of flavor and a delightful crunch.

For an elegant presentation, stack the Mozzarella Cheese Sticks high and garnish with finely chopped parsley or a sprinkle of parmesan cheese for a polished finish.

Serving and Presentation Guide

To enhance visual appeal, arrange Mozzarella Cheese Sticks on a serving board with decorative garnishes such as fresh basil leaves or lightly roasted tomato slices.

Consider garnishing ideas like a drizzle of balsamic reduction to add both elegance and a hint of sweetness that pairs well with the savory cheese.

Traditional accompaniments such as marinara sauce served in a bowl alongside the Mozzarella Cheese Sticks provides a classic Italian touch that complements the dish.

For a modern twist, serve with an avocado dip or spicy aioli to introduce exciting new flavors that inspire diners to explore different taste combinations.

Temperature plays a significant role; serve them hot for the best texture and taste, ensuring the cheese is gooey and the coating remains crisp.

Pay attention to portion control, offering 3-4 sticks per person alongside a balanced salad or other sides, creating a well-rounded meal experience.

Wine and Beverage Pairing

Pair Mozzarella Cheese Sticks with a crisp Sauvignon Blanc or Pinot Grigio wine that complements the mild cheese flavor while balancing the richness of the fried crust.

For those seeking non-alcoholic alternatives, consider offering a sparkling water with a hint of citrus or a chilled iced tea to cleanse the palate and refresh between bites.

If coffee or tea is preferred, a subtle green tea or lightly brewed black tea provides a nice contrast to the Mozzarella Cheese Sticks’ richness.

Maintain wine and beverage temperatures; serving wines slightly chilled and non-alcoholic drinks cool enhances the overall tasting experience.

Encourage creative serving suggestions, such as offering drinks in decorated glasses with garnishes like fresh citrus slices or mint sprigs for added appeal.

Storage and Shelf Life

Mozzarella Cheese Sticks should be stored in an airtight container in the refrigerator to maintain their quality and prevent moisture loss, ideally consumed within two days for best taste.

Temperature requirements are crucial; keep them refrigerated at around 40°F (4°C) to prevent spoilage and maintain their freshness.

Consider using glass or BPA-free plastic containers for storage, ensuring a tight seal to contain aromas and moisture effectively.

Watch out for signs of spoilage such as off smells, visible mold, or changes in texture, and discard immediately to ensure food safety.

Reheat leftover cheese sticks in an oven preheated to 350°F (175°C) for a few minutes to regain crispiness and heat them evenly while maintaining the cheese’s gooey texture.

Mozzarella Cheese Sticks are suitable for freezing. Arrange them on a baking sheet in a single layer, freeze until solid, then transfer to a sealable bag. Reheat from frozen as needed.

Make Ahead Strategies

Prepare cheese sticks ahead by breading and arranging them on a tray, freezing them, and storing them in freezer bags for easy access and cooking when needed.

Between steps, particularly after breading, refrigerate the cheese sticks to allow the coating to firm up and adhere, ensuring consistent quality.

Assess quality impact for make-ahead strategies; refrigeration and freezing maintain integrity, making minimal impact on texture and taste when cooked fresh.

Assembly tips include organizing an efficient station with ingredients and equipment within reach to streamline the preparation process for quicker results.

Reheating guidelines include using an oven for previously cooked sticks, maintaining crispness, and ensuring even heating without sogginess.

Add fresh elements like freshly chopped parsley or grated parmesan cheese to garnish and enhance flavor when serving reheated cheese sticks.

Scaling Instructions

To halve the recipe, reduce the number of mozzarella sticks and adjust the breading ingredients accordingly, keeping the technique and cooking time consistent.

For doubling or tripling, ensure you have enough oil and a large pan to fry in batches without crowding to maintain the oil temperature and consistency.

Equipment adjustments may include using larger bowls for breading ingredients and multiple baking sheets for freezing in advance, enabling efficient upscaled production.

Timing modifications involve allocating additional time for frying and preparation when handling a larger quantity, ensuring quality remains intact and process streamlined.

During scaling, consider storage implications, particularly for leftovers, and ensure proper refrigerated or frozen storage facilities are available based on quantity.

Nutritional Deep Dive

These Mozzarella Cheese Sticks offer a balance of macronutrients, with substantial protein content from the cheese and carbohydrates from the breading.

Micronutrient analysis indicates levels of calcium and vitamin B, which are beneficial for bone health and metabolism, respectively.

The recipe’s health benefits include protein-mediated satiety and fulfilling the body’s calcium needs, playing a role in a balanced diet when consumed in moderation.

Dietary considerations include monitoring portion sizes and pairing the cheese sticks with fresh vegetables or a salad to enhance nutritional diversity.

Portion analysis reveals that typical serving sizes provide ample protein and contribute to daily nutrient intake, encouraging mindful consumption.

For weight management, consume these cheese sticks in moderation, balancing with other nutrient-rich foods and maintaining an active lifestyle to optimize health.

Dietary Adaptations

For gluten-free options, use gluten-free breadcrumbs, ensuring the whole recipe is suitable for those with gluten intolerance or Celiac disease.

Substitute dairy-free mozzarella for a cheese-like texture and flavor in dairy-free adaptations, ideal for vegans or lactose-intolerant individuals.

A vegan modification utilizes dairy-free cheese alternatives and egg replacements such as flaxseeds or aquafaba for binding in the breading process.

A low-carb version might involve using almond flour or crushed pork rinds for breading, reducing carbohydrate content and offering a keto-friendly option.

For paleo adaptations, employ almond meal as a breading substitution and adhere to dairy-free cheese, maintaining flavor and texture while aligning with paleo guidelines.

A low-FODMAP diet can accommodate these cheese sticks through careful selection of lactose-free mozzarella and gluten-free breading to meet dietary restrictions.

Troubleshooting Guide

To resolve texture issues, ensure the cheese sticks are adequately frozen before frying, preventing leakage and maintaining structural crispness.

Flavor balance can be achieved by seasoning the breadcrumbs adequately and using complementary dipping sauces to enhance the natural cheese flavor.

Temperature problems are resolved by frying in small batches and maintaining consistent oil heat using a thermometer for accuracy.

Manage equipment challenges by organizing your kitchen space efficiently, using a spacious pan and necessary tools to ease the frying process.

Ingredient substitutions, such as swapping regular mozzarella for smoked or spicy versions, can enhance flavor and accommodate personal preferences.

Timing concerns are mitigated by planning prep and cooking times ahead, allocating sufficient pauses to allow proper breading adherence before proceeding.

Recipe Success Stories

Community feedback on Mozzarella Cheese Sticks has been overwhelmingly positive, with many praising the simple recipe steps and delightful outcome, sharing tips on social media.

Variation successes include the addition of ingredients like jalapeños or ham in the breading process, creating unique versions that pique interest.

Adaptation stories often emphasize dietary successes, with readers sharing their gluten-free or vegan journeys based on this versatile recipe, encouraging others to explore it.

Reader suggestions frequently highlight the use of alternative dipping sauces, inspired by international cuisines, broadening the taste experience.

Photography tips suggest capturing images of the cheese pull or crisp coating, showcasing the dish’s appeal and encouraging others to try the recipe.

Frequently Asked Questions

Can I use different types of cheese for the sticks? Yes, while mozzarella is traditional, other melting cheeses like provolone or cheddar can be used for variation.

How do I prevent the cheese from oozing? Freezing the breaded sticks ensures that cheese stays in place while frying and maintains crispness.

Is it possible to bake these cheese sticks? Absolutely! Bake them in a preheated 400°F oven, turning until golden brown, for a healthier alternative.

What is the best oil for frying? Neutral oils with high smoke points, such as canola or vegetable oil, are ideal for frying cheese sticks.

Can I prepare these in advance? Yes, bread and freeze beforehand. Simply fry or bake directly from the freezer when ready to serve.

Can gluten-free ingredients be used? Certainly, use gluten-free breadcrumbs and flour to adapt the recipe for those with gluten sensitivities.

What dips complement these cheese sticks? Classic marinara, pesto, or a spicy aioli are popular choices that enhance the dish’s flavor profile.

Do variations affect cooking times? Ingredient additions like fillings may slightly alter timing, requiring careful monitoring to avoid burning.

How long can leftovers be stored? Store in the refrigerator for up to two days, or freeze for longer-term storage and reheat as needed.

Any tips to avoid a soggy texture? Cool the fried cheese sticks on a rack, avoiding direct contact with surfaces that trap steam, to maintain crispness.

What’s the best way to serve them? Serve immediately after cooking for optimal texture, alongside a complementary sauce and garnish for visual appeal.

Can I make these vegan? Yes, use dairy-free mozzarella and egg replacer in the breading to create a delicious, cruelty-free version.

Additional Resources

Related recipes such as homemade marinara sauce or other fried appetizers can complement your cheese sticks, elevating your menu for guests.

Explore technique guides focusing on frying skills or how to achieve perfect breading coverage, which are crucial for these cheese sticks’ success.

Dive into ingredient information, including the history and uses of mozzarella cheese, offering insight into its culinary versatility and applications.

Equipment recommendations highlight essential kitchen tools and gadgets, ensuring you have the right tools to prepare these Mozzarella Cheese Sticks effortlessly.

Investigate seasonal variations to adapt this recipe according to seasonal produce availability, keeping it fresh and aligned with varying tastes and ingredients throughout the year.

Join the Conversation

Engage with fellow food lovers on social media, sharing your Mozzarella Cheese Sticks creations and discovering unique twists and additions shared by others.

Photography tips inspire you to capture stunning images of your cheese sticks, showcasing the alluring cheese pull or golden crispy exterior to perfection.

Encourage readers to leave recipe reviews and share their experiences with their variations, fostering a rich community of Mozzarella Cheese Stick enthusiasts.

Community engagement through cooking challenges or collaborations prompts collective creativity, inspiring new takes on a classic recipe worldwide.

Explore and exchange recipe variations and adaptations, showcasing the versatility and global appeal of Mozzarella Cheese Sticks in diverse culinary contexts.

The Recipe

Irresistible Mozzarella Cheese Sticks

Serves: 4

Prep Time: 15 mins

Cook Time: 10 mins

Total Time: 25 mins

Kitchen Equipment Needed

  • Frying pan or deep fryer
  • Mixing bowls
  • Whisk
  • Wire rack
  • Baking sheet

Ingredients

  • 8 mozzarella cheese sticks
  • 1 cup all-purpose flour
  • 2 large eggs, beaten
  • 1 cup breadcrumbs
  • 1 cup panko breadcrumbs
  • 1 tsp garlic powder
  • 1 tsp Italian seasoning
  • Salt and pepper, to taste
  • Oil for frying
  • Marinara sauce, for dipping

Directions

  1. Set up a breading station with three bowls: one with flour, one with beaten eggs, and one with breadcrumbs mixed with panko, garlic powder, and Italian seasoning.
  2. Coat each mozzarella stick with flour, then dip into the egg mixture, and finally roll in the breadcrumb mixture thoroughly. Repeat the egg and breadcrumb steps for a thicker coating.
  3. Place the breaded mozzarella sticks on a baking sheet and freeze for at least 1 hour.
  4. Heat oil in a pan to 375°F (190°C). Fry a few sticks at a time to avoid overcrowding. Cook for about 2-3 minutes per side until golden brown.
  5. Transfer the fried cheese sticks to a wire rack to drain excess oil and retain crispness.
  6. Serve immediately with marinara sauce for dipping.

Recipe Notes

  • Ensure mozzarella is fully submerged during frying for even cooking.
  • If doubling the recipe, fry in batches to maintain oil temperature.
  • Experiment with additional seasonings in the breadcrumb mix for personalized flavor.

Irresistible Cheeseburger Pretzel Balls: A Savory Snack Delight

Cheeseburger Pretzel Balls: Bite-Sized Comfort

⚖️
Difficulty
Medium

⏲️
Prep Time
30 mins

🕒
Cook Time
20 mins

⏱️
Total Time
50 mins

🍽️
Servings
12

Indulge your taste buds with mouthwatering Cheeseburger Pretzel Balls. These delightful bites are a perfect fusion of juicy cheeseburgers and the comforting warmth of homemade pretzels. With a soft pretzel exterior encasing flavorful beef and melted cheese, they offer a mini-package of comfort food bliss. Imagine the aroma of freshly baked dough mingling with savory beef and cheese—pure culinary magic!

Cheeseburger Pretzel Balls combine the nostalgic flavors of a classic cheeseburger with the fun, chewy texture of pretzel dough. They’re an ideal party snack, easy to grab, and guaranteed to please kids and adults alike. As you bite into the golden-brown exterior, the softness of the pretzel gives way to a rich, savory filling, delivering a delightful taste and texture experience in every mouthful.

Quick Recipe Highlights

  • Flavor Profile: These bites capture the essence of a classic cheeseburger with savory beef, melty cheese, and a hint of tangy pickle nestled in a soft, freshly-baked pretzel.
  • Texture: Experience the satisfying contrast between the soft, chewy pretzel dough and the juicy, savory filling inside.
  • Aroma: Expect a tantalizing blend of fresh-baked bread, melted cheese, and seasoned beef with every batch.
  • Visual Appeal: The golden-brown hue of perfectly baked pretzels presents an inviting and appetizing dish that’s sure to impress at any gathering.
  • Skill Level Needed: Moderate baking skills are required, particularly for handling yeast dough and shaping each ball evenly.
  • Special Equipment: A kitchen scale, rolling pin, and baking sheet are essential, along with parchment paper for easy cleanup.

Recipe Overview

  • Difficulty Level: This recipe requires some familiarity with dough-making, especially for shaping the balls and ensuring even distribution of the filling.
  • Category: Cheeseburger Pretzel Balls fall under the categories of appetizer, snack, and comfort food, perfect for casual gatherings.
  • Cuisine: Drawing influences from American cuisine, this recipe embodies a fusion of classic cheeseburgers and soft pretzels.
  • Cost: Reasonably priced, these treats rely on accessible ingredients like ground beef, cheese, and pantry staples for pretzel dough.
  • Season: While ideal year-round, their warm and hearty nature makes them especially enjoyable during fall and winter months.
  • Occasion: Perfectly suited for game days, family gatherings, and casual parties, with their bite-sized portability.

Why You’ll Love This Recipe

Cheeseburger Pretzel Balls captivate with their mouthwatering taste and irresistible texture, creating a delightful bite every time. The softness of the pretzel blends harmoniously with the delicious surprise of a cheeseburger-inspired filling, making them a joy to savor.

Convenience is key with this recipe—relatively easy to prepare, these tasty bites offer an impressive snack option for parties or family gatherings. With straightforward steps, they fit perfectly into busy schedules without sacrificing flavor or presentation.

These Pretzel Balls offer nutritional benefits, too. By using lean ground beef and fresh ingredients, you ensure a balanced snack. Customize fillings, such as adding grains or vegetables, for added nutrient profiles.

Perfect for social events, these bite-sized snacks encourage mingling and sharing. Their unique blend of flavors sparks conversation, allowing guests to enjoy classic tastes in a playful package.

One of the advantages of Cheeseburger Pretzel Balls is their cost-effectiveness. With simple ingredients, you create a dish that feels gourmet without overextending your budget, making entertaining more accessible for all.

Historical Background and Cultural Significance

Cheeseburgers have iconic American roots, evolving from simple ground beef patties to beloved staples nationwide. This innovation soon inspired creative reinterpretations, leading to delicious variations like Cheeseburger Pretzel Balls.

Culturally, cheeseburgers represent comfort food, embodying the fast-paced American lifestyle. Their adaptability made them popular, as nuanced recipes like this bring nostalgic familiarity with novel twists, increasing their appeal.

This recipe evolved as chefs sought to combine favorite foods, leading to unexpected pairings like pretzels with burgers. The outcome is delightful, wrapping classic flavors in a thought-provoking ensemble of textures.

Regional variations abound, with areas imparting unique flavors, like spicy sauces or gourmet cheeses, personalizing Pretzel Balls into distinctively local delicacies that pay homage to the cheeseburger’s enduring legacy.

Ingredient Deep Dive

Ground beef serves as the quintessential base for this recipe, symbolizing American culinary tradition. Its versatility ensures a hearty filling, and using lean options promotes healthier choices without compromising on taste.

Nutrition-wise, beef provides essential nutrients, including protein and iron. Choose fresh, high-quality cuts for optimal results, and properly store refrigerated leftovers to prevent spoilage, retaining flavor and safety.

Cheese, particularly cheddar, adds a creamy richness to these bites, enhancing flavor profiles. Opt for sharp varieties for extra tang or experiment with blends of Swiss or mozzarella for personalized cheesiness.

Cheese’s nutritional content includes calcium and vitamin D, contributing to bone health. Buy in blocks for freshness, shred as needed, and refrigerate in airtight conditions for prolonged quality. Considerify vegan cheese substitutes for dietary needs.

Common Mistakes to Avoid

  • Over-kneading the dough: Avoid tough pretzels by kneading until just combined.
  • Skipping dough rest: Allow adequate resting for a perfect rise and texture.
  • Underfilling: Ensure enough filling for a balanced bite, but not too much to avoid bursting.
  • Incorrect water temperature: Use tepid water for yeast activation, not too hot or cold.
  • Overbaking: Rely on appearance—golden brown is perfect. Avoid drying out the interior.
  • Ignoring seasonings: Add salt and pepper to enhance the ground beef’s natural flavors.
  • Inadequate sealing: Pinch dough edges thoroughly, ensuring no filling escapes.
  • Lack of oven preheating: Preheat oven fully, ensuring even cooking and puffing.
  • Skipping egg wash: Apply egg wash to develop the quintessential pretzel sheen.
  • Limited boiling time: Boil pretzels thoroughly for the right chewy texture.

Essential Techniques

Master the art of dough kneading to achieve the ideal pretzel texture, as it balances elasticity and resistance—key for the delicious chew of Cheeseburger Pretzel Balls. Adequate kneading primes dough for structure and support.

Knowing when and how to properly fill each ball prevents spills and ensures balanced bites. Gather the dough around the delicious core, pinching edges closed and guarding against ooze during baking.

Understanding yeast activation is pivotal—too hot or cold can impede rise. Optimal yeast activity occurs in tepid conditions, so exercise precision in preparation for airy, tender pretzels.

Applying a boiling step activates the dough’s skin, sealing surface starch and developing iconic chewy exteriors. Strict adherence ensures textural success, safeguarding against over expansion.

Pay attention to shaping, forming uniform balls for even baking. Practiced shaping ensures well-distributed filling and consistent presentation across batches.

Pro Tips for Perfect Cheeseburger Pretzel Balls

Enhance the beef mix with Worcestershire sauce for an umami boost. It enriches without overpowering, elevating depth while maintaining the cheeseburger’s essence.

Alternate toppings and integrate jalapeños or caramelized onions, personalizing taste profiles. This simple step enriches and diversifies the basic recipe seamlessly.

Ensure cheese is fully enclosed, preventing oozing during baking, which can impede presentation and increase kitchen cleanup.

Monitor baking closely, trusting appearance over time adherence. Adjust positioning on outliers to nourish imperfect browning into its golden promise.

Use a finely ground salt bath during pretzel boiling for enhanced flavors and texture.

Scale the recipe for larger gatherings, adjusting ingredients straightforwardly via direct multiplication of values while maintaining key conditions.

Variations and Adaptations

Regional variations, like Southwest twists with pepper jack cheese and jalapeños, introduce bold, spicy flavors, crafting an innovative twist on the well-loved classic.

Adapt for seasons by incorporating seasonal produce within fillings or toppings, tailoring comfort to the abundant flavors of fall with roasted vegetables or greens.

Catering to dietary needs, utilize gluten-free flour blends for celiac-safe alternatives, accommodating with replacement ingredients without sacrificing beloved characteristics.

Experiment with flavors, opting for tangy lemon zest or dashes of cayenne pepper in fillings. Balance the cheeseburger aesthetic with surprise notes underscoring each bite.

Adjust textures, designing crumblier interiors via minced mushrooms and breadcrumbs for variety, appealing to alternative palates seeking softer textures.

For presentation twists, bake balls within muffin cups for a novel serving aesthetic. Include a dipping sauce station with flavored aiolis or ketchups to enhance the sensory experience.

Serving and Presentation Guide

When plating, stack balls creatively in a pyramid or tower shape. Consider a sprinkle of chopped parsley or chives for color contrast, adding a beauty edge.

Garnishing with sesame seeds or poppy seeds atop yields visual intrigue, suggesting cheeseburger bun qualities enhanced further by the pretzel style.

Common accompaniments like ketchup, mustard, or pickles afford diner control, giving traditionally loved staples the modern rendition it deserves.

Contemporary presentation ideas focus on individual plating, allocating serving sizes with small bites arranged in meticulous fashion on trendy platters.

Adjust temperature during plating, ensuring melting cheese accommodates mouthfeel without losing pretzel form integrity.

Maintain portion control by assigning per-guest limits, reinforcing awareness through creative setups and labels, ensuring voracious yet modest consumption.

Wine and Beverage Pairing

Pair a robust, oaked Chardonnay with Pretzel Balls, complementing savory beef notes and accentuating rich, comforting flavors via crisp acidity.

Non-alcoholic options include ginger beer, with its sweet-spicy flavor offset mellow cheddar and robust pretzel, maintaining a refreshing balance.

Coffee pairings aren’t typical, yet a mild roast could underscore cheesy richness, merging savory experience with delightful aromatics.

Serving temperature considerations prioritize moderate cool to lukewarm, balancing cheesy fillings and warm pretzel exteriors, ensuring optimal texture.

Innovative serving suggestions might involve customizing drink stations, providing bases with mixable syrups and garnishments, encouraging guests to tailor experiences.

Storage and Shelf Life

Store leftover Pretzel Balls in an airtight container in the refrigerator. Prioritize separating them with wax paper layers to maintain freshness and prevent sticking.

Refrigeration retains flavor, requiring gentler reheating to protect texture from excessive heat via microwave or low oven settings.

Container selection favors glass or non-reactive shelves, preserving integrity across storage periods while avoiding material leaching.

Recognize spoilage as softness deteriorates and off-odors emerge, urging cautious consumption and removal.

For extended storage, freezing is an option. Pre-freeze flat before transferring to bags, extracting incrementally and reheating upon thawing for consistent quality.

Make Ahead Strategies

Prepare Pretzel Balls up till shaping a day ahead, refrigerating until ready. Enable filling adjustments and seasoning enhancements closer to baking.

Between steps, store filled balls appropriately, leveraging enclosures that minimize airflow, as uncovered dough risks drying out through exposure.

Consider a pre-boil freeze if a timed event looms, ensuring prepared balls undergo a swift defrost period before the finale bake.

Quality impacts include potential texture changes, necessitating careful reheating technique applications for resurgence of originally promised chewiness and mouthfeel.

Delay final assembly until service convenience is paramount, increasing timetable flexibility and presenting freshest possible offerings.

To finish, consider adding fresh garnishments at serving time for visual and textural enhancements, offering guests updated tastes.

Scaling Instructions

Halve the recipe for smaller gatherings, dividing each ingredient exactly, promoting proportional quality despite quantity variances.

Doubling the batch enhances output without doubling complexity, leveraging same-time preparations with confidence knowing core ratios maintain predictability.

Adjust equipment—consider larger bowls for dough, and multiply baking sheets to prevent overcrowded baking areas preserving energy during simultaneous rise and bake.

Timing shifts demand awareness of extended groupings, juggling necessary times via staggered setups for effective kitchen flow—multiple ovens assist when possible.

Storage accommodates excess, directing freeze opportunities or alternative processes catering to the variety in contexts while prioritizing culinary integrity post-scale.

Nutritional Deep Dive

Per serving, a serving of Cheeseburger Pretzel Balls delivers a balanced macronutrient profile, highlighting high protein contents as key contributions—crucial for satiety minus excessive fats typical of traditional burgers.

Micronutrient highlights encompass contributions from added vegetables without overshadowing the symbiotic relations built upon each core participant providing value alongside tactile enjoyment.

Embrace adjustments aligning with dietary considerations, encouraging substitutions like reduced-fat cheese when focused on broader outreach targeting diverse audiences.

Comprehend portions maintaining wellness targets seamlessly intertwining flavor and calories for satisfaction without extensive overconsumption.

Weight management assesses simple offering proportions via bite-size constraints, regulating indulgence, inviting return snacking.

Dietary Adaptations

For gluten-free adaptations, opt for flour replacements such as chickpea or rice alternatives, experimenting with consistent dough cushion to vitalize the textural signature.

Non-dairy cheese selections expand lactose-intolerant audiences, emphasizing fermented, meltable products aligning within constraints of the original concept.

Vegans embrace protein-pletful meat alternatives and innovative cheeses to reinterpret plant-based paradigms without breaking tradition’s promises—a draw for diverse palates while embodying preservation.

Situated low carb while nourishing keto targeting depends on innovative resourceful ingredient swaps—flour-based goods find mirrors in nut flours or increasing ground meat balance further adaptations.

Embroil fittingly through paleo filters, withdrawing starchy linchpins, increasing nutrient-dense permutations within structural limitations preserving playfulness.

Interact comfortably under low-FODMAP parameters, cushioning digestive friendly adjustments appeasing oft-frustrated digestive experiences—consider effective showcasing.

Troubleshooting Guide

Manage chewy textures by adjusting bake time and ingredient ratios, avoiding over-drying or lackluster formation.

Address flavor balance by seasoning attentively and encouraging exploration—taste as you go.

Solve temperature problems judging attempted solutions reproducibility— evaluate dough rest, address oven calibration needs.

Tackle equipment challenges by procuring required gadgets timely; acknowledge creative rethink around improvised efficiency means.

Exercise ingredient substitution vigilantly, safeguarding intentions while maintaining ingenuity— matching flavors competently within new frameworks promotes individualistic approaches.

Allocate timing concerns humbly, leveraging tested multipliers for baking efficiency poised skillfully for structured results duplicating expected feats.

Recipe Success Stories

Community feedback highlights versatility, emphasizing participant flavors personalization—members exchange alt-favorite filling stories exceptional in twists and creativity within core traditions.

Enthused adaptation testimonials shine light, showcasing organic results spanning varied attempts modifying frameworks for numerous diets.

Readers passionately engage, contributing to shared culinary evolution and showcasing photographic pursuits woven tightly over digital canvases—inspired words transmute enthusiasm into exposure, exploring humble pleasures together.

Photo enthusiasts leverage snap-shot moments, enriching recipes novelty depiction journey, emulating successful crossings between culinary and visual imaginary spaces.

Frequently Asked Questions

  • Can I make the dough ahead of time? Yes, you can prepare and refrigerate the dough a day ahead. Allow it to rest at room temperature before shaping.
  • What’s the best cheese choice? Cheddar offers a classic taste, but feel free to experiment with Swiss or pepper jack for alternative flavors.
  • Can I use turkey instead of beef? Absolutely, ground turkey or chicken make excellent substitutes, adding distinctiveness to the classic profile.
  • How do I avoid filling leaks? Ensure edges are tightly sealed by pinching the dough around the filling to prevent leaks during baking.
  • Can I freeze unbaked Pretzel Balls? Yes, you can freeze them. Just defrost before baking to allow even cooking.
  • Can I serve them with a dip? Certainly! Sauces like mustard, BBQ, or spicy mayo complement these pretzel bites well.
  • Can whole wheat flour be used? Using whole wheat alters flavor slightly but remains a healthy, viable option.
  • How long do leftovers last? Store in an airtight container in the fridge; consume within 3 days for best freshness.
  • Is an egg wash necessary? Egg wash enhances color and shine, adding traditional pretzel presentation and visual appeal.
  • Can I add other ingredients to the filling? Certainly, feel free to add ingredients like caramelized onions or diced peppers for elevated flavors.
  • Do they remain soft after baking? Store properly-sealed to maintain softness, reheating carefully via microwave or oven if needed.
  • What’s the perfect oven temperature? Preheat and maintain your oven at 400°F (200°C) for ideal baking conditions.

Additional Resources

Explore related recipes for additional inspiration, such as traditional pretzels or mini sliders, building versatility by expanding culinary adventures.

Dive deeply into technique guides online allowing structured learning approaches presented seamlessly as ongoing projects, enhancing aspirational skills.

Indulge in ingredient overviews, enhancing appreciation through background discovery and thoughtful selection, featuring impact-rich randomness enriching culinary voyages.

Browse desired gadgets enriching presentation, initiating converging discussions affirming accomplishments—balance portrayals oscillating between experimental focus and polished completion.

Seasonal variations thrive by elucidating organic relationships, gently navigating aromatic terrain—ethereal reflections act as launchpads toward awe-inspiring capturing moments.

Join the Conversation

Engage with fellow food lovers through social media platforms, share your variations using the hashtag #CheeseburgerPretzelBalls for a chance to be featured.

Offer photography tips and recipe reviews, enhancing community interaction and cultivating an online space dedicated to culinary exploration.

Embrace community engagement thoughtfully, reciprocating genuine connections, seeking feedback, and showcasing shared passion concurrently.

Explore inventive recipe variations, personalized artistry, and new horizons—cross-pollinating cultural genres yields predictable stylistic bouquets rewarding affectionate depth.

The Recipe

Cheeseburger Pretzel Balls

Serves: 12

Prep Time: 30 mins

Cook Time: 20 mins

Total Time: 50 mins

Kitchen Equipment Needed

  • Kitchen Scale
  • Rolling Pin
  • Baking Sheet
  • Parchment Paper
  • Mixing Bowls

Ingredients

  • 2 cups all-purpose flour
  • 1 packet active dry yeast
  • 1 tbsp sugar
  • 1 tsp salt
  • 3/4 cup warm water
  • 1 lb ground beef
  • 1 cup shredded cheddar cheese
  • 2 tbsp Worcestershire sauce
  • 1 egg beaten (for egg wash)
  • Coarse salt (for topping)

Directions

  1. In a large bowl, dissolve yeast and sugar in warm water. Let sit until frothy, about 5 minutes.
  2. Add flour and salt; mix until a dough forms. Knead until smooth.
  3. In a separate pan, brown ground beef. Stir in Worcestershire sauce and cheddar cheese.
  4. Divide dough into equal portions. Flatten each and add a spoonful of beef mixture.
  5. Pinch dough to seal and shape into balls.
  6. Preheat oven to 400°F (200°C). Line baking sheet with parchment paper.
  7. Brush balls with egg wash. Top with coarse salt.
  8. Bake for 20 minutes until golden brown. Let cool slightly, then serve.

Recipe Notes

  • For added flavor, toss ground beef with diced onions during browning.
  • Substitute cheddar with mozzarella for a milder taste.
  • For spice, add chopped jalapeño to the filling.

Irresistible Homemade Chicken Pot Pie Recipe for Ultimate Comfort

Delicious Chicken Pot Pie: Comfort Food at Its Finest

⚖️
Difficulty
Medium

⏲️
Prep Time
30 mins

🕒
Cook Time
45 mins

⏱️
Total Time
75 mins

🍽️
Servings
6

Craving a delicious meal that brings warmth to your soul? Look no further than this delightful chicken pot pie recipe. With its flaky golden crust and hearty filling, this dish offers not only taste but also a satisfying texture. Perfect for a cozy family dinner or a gathering with friends, this pot pie elevates the dining experience, making every bite feel like a warm hug on a chilly day. Get ready to indulge in a sensory journey with aromas that embrace your kitchen, flavors that dance on your palate, and textures that define comfort food.

Quick Recipe Highlights

  • Flavor Profile: A rich and savory medley of tender chicken, fresh vegetables, and creamy sauce, harmoniously balanced within a buttery crust.
  • Texture: The flaky pastry provides a crisp contrast to the creamy, slightly chunky filling, offering an engaging mouthfeel.
  • Aroma: The intoxicating scent of baked pastry and savory filling wafts through your home, beckoning everyone to the table.
  • Visual Appeal: An inviting golden-brown crust punctuated by peeking vegetables and tender chicken pieces adds rustic charm.
  • Skill Level Needed: Ideal for intermediate cooks familiar with pastry work and sauce preparation, requiring careful attention to detail.
  • Special Equipment: A pie dish and rolling pin are essential for achieving the perfect crust, while a sauté pan ensures evenly cooked filling.

Recipe Overview

  • Difficulty Level: This medium-difficulty recipe requires basic culinary skills, including dough handling and simmering techniques for sauce preparation.
  • Category: Main course, ideally suited for a hearty family meal or cozy gathering.
  • Cuisine: Rooted in classic American comfort food traditions, evoking nostalgic memories of homestyle cooking with a modern twist.
  • Cost: With accessible ingredients like chicken, carrots, and peas, the dish is budget-friendly and elevated by quality pastry.
  • Season: Best enjoyed in fall or winter when a warm, nourishing meal is most comforting.
  • Occasion: Perfect for Sunday dinners, family gatherings, or evenings when cozy dining is desired.

Why You’ll Love This Recipe


Chicken pot pie captures the heart with its delectable marriage of flavors and textures. The buttery, flaky crust encases a luscious filling that blends the tender juiciness of chicken with the crispness of fresh vegetables, simmered to perfection in a rich, creamy sauce. Each bite offers an explosion of taste and texture, appealing to both refined and simple palates. The recipe’s convenience is unmatched—using accessible ingredients and straightforward steps, it streamlines your kitchen efforts while showcasing culinary skill.

From a nutritional standpoint, this meal provides a well-rounded serving of proteins, vitamins, and minerals, ensuring your family enjoys both flavor and health. It’s also a social centerpiece, inviting everyone to gather around, share stories, and enjoy the warmth it brings to the table. Affordable and straightforward, chicken pot pie makes an excellent addition to your menu, satisfying cravings while respecting your grocery budget.

Historical Background and Cultural Significance


The beloved chicken pot pie traces its origins back to medieval times when savory pies were a staple in European cuisine. Initially reserved for royalty and the upper classes, these pies evolved over centuries, transforming into the comforting dish we know today. In America, chicken pot pie became popular for its versatility and ability to stretch ingredients further. Its cultural significance lies in its adaptability; variations are found across regions, each uniquely influenced by local ingredients and traditions.

Over time, the dish has evolved to reflect cultural shifts—incorporating diverse flavors and techniques. Regional takes on pot pie, from New England to the Southern states, showcase how this dish continues to evolve while holding steadfast to its roots. As we’ve embraced health-conscious eating, the recipe has further adapted, sometimes featuring whole-grain crusts and more vegetables, allowing modern cooks to tailor it to their needs.

Ingredient Deep Dive


The star of the pot pie is undoubtedly the chicken. With a timeline stretching back centuries, chicken holds a place in many cuisines worldwide. Packed with protein, it’s not only nutritious but also adaptable to various cooking methods, ensuring moistness when baked. Select fresh, free-range chicken for superior flavor, storing it in the refrigerator and using it within a few days.

In tandem with chicken, vibrant vegetables such as carrots, peas, and potatoes bring color, texture, and nutrients. Carrots, rich in beta-carotene, are a traditional choice that maintains its integrity within the pie. Fresh herbs like thyme and rosemary elevate the depth of flavor with their aromatic earthiness. These should be stored in cool, dry places, and choosing plump, vibrant herbs guarantees potency.

Common Mistakes to Avoid

  • Overcooking the chicken: This leads to dry, tough meat. Avoid this by poaching or steaming it gently.
  • Uneven crust thickness: Roll pastry evenly to ensure consistent baking, crucial for avoiding underdone or burnt edges.
  • Thick filling: Ensure your sauce consistency is pourable yet thickened enough to set as the pie bakes. A slurry of cornstarch can remedy a runny filling.
  • Rushing the baking process: Allow the pie to bake until the crust is golden and the filling bubbly to achieve the right texture.
  • Improperly chilling the dough: Cold dough is key to achieving a flaky crust. Rest it in the fridge before use.
  • Overloading the pie: Filling should be balanced to avoid spillage and ensure even cooking.
  • Ignoring seasoning: Season the filling thoroughly before baking to enhance flavors.
  • Serving immediately: Let the pie cool slightly after baking for easier slicing and to retain structure.

Essential Techniques


Creating the perfect chicken pot pie involves mastering a few key techniques. First, mastering the pastry dough ensures a flaky, buttery crust—a hallmark of good pie making. Avoid overworking the dough, using cold ingredients and light handling to preserve that sought-after crumb. Similarly, constructing a creamy sauce requires making a roux, blending equal parts flour and fat to form the base for a luscious, velvety sauce. Stir continuously as liquid is added to avoid lumps, and cook until the desired thickness is reached.

Pro Tips for Perfect Chicken Pot Pie

1. Use a combination of butter and shortening in your crust for an optimal blend of flavor and flakiness.
2. Allow your filling to cool before adding it to the raw crust to prevent sogginess.
3. Incorporate frozen veggies if fresh ones aren’t available—they save time and retain nutrients.
4. Pre-bake the bottom crust for few minutes to avoid a soggy base in your chicken pot pie.
5. If the edges of the pie crust begin to over-brown, tent them with foil for the remaining bake time.
6. To create an eye-catching presentation, cut decorative designs into the top crust before baking.
7. For extra flavor, brush the crust with an egg wash and sprinkle with a hint of sea salt or herbs.

Variations and Adaptations


Let your chicken pot pie stand out by incorporating regional spices, or try international twists with curry for a flavorful punch. For a lighter take, use a phyllo dough topping instead of traditional pie crust to reduce calories while maintaining crisp texture. Create a vegetarian version with robust mushrooms as the primary ingredient, or adapt a vegan version using coconut milk in the sauce and substituting plant-based protein for chicken. Texturally, you might add in roasted nuts for a contrasting crunch, while adding or altering herbs provides endless flavor potential.

Serving and Presentation Guide


When plating your chicken pot pie, consider a rustic presentation. Place a generous slice on a simple country-style plate, allowing the golden crust and hearty filling to take center stage. Garnish with fresh herbs such as parsley or thyme for a burst of color. Traditional accompaniments include a fresh green salad or roasted root vegetables to balance the richness of the pie. For modern flair, you might serve smaller individual pies, enhancing both portion control and aesthetic appeal.

Wine and Beverage Pairing


A dish as fall-friendly as chicken pot pie pairs wonderfully with a glass of Chardonnay or a crisp Sauvignon Blanc, emphasizing its creamy and savory elements. For red wine enthusiasts, a light Pinot Noir can complement the chicken’s mild flavor without overwhelming it. Non-alcoholic pairings might include a slightly tart apple cider or a herby iced tea. When considering temperature, serve whites chilled and reds slightly below room temperature to enhance the dish’s flavors.

Storage and Shelf Life


Proper storage ensures your chicken pot pie stays fresh. Store leftovers in an airtight container in the refrigerator, where it will keep for up to three days. To reheat, use an oven rather than a microwave, which helps maintain the crust’s texture. For longer storage, freezing is possible—wrap the pie tightly in plastic wrap and foil, where it will remain good for up to three months. Before serving, thaw in the refrigerator overnight and reheat thoroughly.

Make Ahead Strategies


Prepare elements of your chicken pot pie in advance for easy assembly. Make and refrigerate the dough up to two days ahead, or freeze it until needed. The filling can also be cooked and stored in the fridge for up to 24 hours before assembling and baking the pie. To retain freshness, add any fresh herbs or citrus zest just before baking. This not only saves time but also delivers the taste of a freshly-prepared meal.

Scaling Instructions


Scaling the chicken pot pie recipe to feed more or fewer people is simple. For a smaller household, halve the recipe, ensuring you adjust the pie dish size accordingly. Doubling the recipe to serve a crowd necessitates larger baking dishes or creating multiple pies. Always consider oven space and cooking time, which may need tweaking for larger quantities. Store additional portions using the storage methods mentioned above for convenience.

Nutritional Deep Dive


Chicken pot pie offers a harmonious balance of macronutrients, providing protein from the chicken and carbohydrates from the crust and vegetables. Micronutrients abound from the variety of vegetables included, contributing to a robust vitamin and mineral profile. When consumed mindfully, it serves as both a hearty family meal and a component of a balanced diet. Adjust serving sizes to manage calorie intake while enjoying the dish’s complexity and fulfilling nature.

Dietary Adaptations


For those needing gluten-free options, substitute the pie crust with a gluten-free flour blend, ensuring the same flaky texture. A dairy-free version can be achieved by using vegetable shortening and coconut milk in place of butter and cream. A low-carb adaptation leans towards almond flour crusts and relying more on low-carb vegetables like cauliflower. Personalized adjustments ensure everyone can delight in this classic dish while adhering to their dietary requirements.

Troubleshooting Guide


Common issues like soggy crusts often require pre-baking solutions, while overly runny filling suggests thickening with additional cornstarch. Balancing seasoning can be tricky; taste frequently during preparation and adjust as needed. Avoid crust shrinkage by ensuring dough rests before baking and use pie weights to prevent puffing. If timing issues arise, be mindful to start with a preheated oven and monitor closely to catch early signs of over or under-cooking.

Recipe Success Stories


Our recipe community continually shares success stories, with many readers customizing their chicken pot pies with delightful results. From adding fresh herbs to experimenting with various crust decorations, these adaptations inspire creativity. We invite you to share your versions through our social media channels. Capture stunning photos by focusing on natural light to highlight the pie’s golden crust and vibrant filling, making every creation picture-perfect.

Frequently Asked Questions

Q: Can I use pre-made crust for the chicken pot pie?
A: Yes, a store-bought crust offers convenience, though making your own allows for better flavor and ingredient control.

Q: How do I prevent the bottom crust from getting soggy?
A: Pre-baking the crust or brushing it with egg white helps create a barrier, retaining its texture.

Q: What should I serve alongside chicken pot pie?
A: A crisp green salad or tangy coleslaw complements the richness of the pie well.

Q: How can I make the pie dairy-free?
A: Swap butter for a plant-based alternative and use coconut milk for creaminess.

Q: Is it okay to substitute other meats?
A: Certainly! Turkey or ham work wonderfully as alternatives, especially with post-holiday leftovers.

Additional Resources


Explore our comprehensive guides for further recipe success, from mastering dough techniques to detailed ingredient profiles. Check out related recipes like beef stew or vegetable pot pie, offering additional insight into building flavors and techniques. For those interested in equipment advice, our reviews can help guide your choices, ensuring each kitchen task is executed with precision.

Join the Conversation


We encourage you to join our culinary community through social media. Share your recipe trials, triumphs, and adaptations, creating a dialogue that celebrates diverse tastes and creativity. Your feedback and suggestions continually improve our shared experiences, while photography tips and reviews help us evolve these beloved traditions into contemporary culinary arts.

The Recipe

Delicious Chicken Pot Pie

Serves: 6

Prep Time: 30 mins

Cook Time: 45 mins

Total Time: 75 mins

Kitchen Equipment Needed

  • Pie dish
  • Rolling pin
  • Sauté pan
  • Whisk
  • Baking sheet

Ingredients

  • 2 cups cooked chicken, diced
  • 1 cup carrots, diced
  • 1 cup peas
  • 1 small onion, chopped
  • 2 celery stalks, chopped
  • 1/3 cup butter
  • 1/3 cup all-purpose flour
  • 1/2 teaspoon salt
  • 1/4 teaspoon black pepper
  • 1/4 teaspoon celery seed
  • 1 3/4 cups chicken broth
  • 2/3 cup milk
  • 2 pie crusts

Directions

  1. Preheat oven to 425°F (220°C).
  2. In a saucepan, combine chicken, carrots, peas, and celery. Add water to cover and boil for 15 minutes. Remove from heat, drain, and set aside.
  3. In the saucepan, over medium heat, cook onions in butter until soft and translucent. Stir in flour, salt, pepper, and celery seed. Slowly stir in chicken broth and milk. Simmer over medium-low heat until thick. Remove from heat and set aside.
  4. Place the chicken mixture in the bottom pie crust. Pour hot liquid mixture over. Cover with top crust, seal edges, and cut away excess dough. Make several small slits in the top to allow steam to escape.
  5. Bake in the preheated oven for 30 to 35 minutes, or until pastry is golden brown and filling is bubbly. Cool for 10 minutes before serving.

Recipe Notes

  • Add herbs like thyme or parsley for additional flavor.
  • Substitute vegetables based on preference, such as sweet potatoes or corn.

Savory Curried Coconut Basil Chicken: A Flavorful Twist on Dinner

Curried Coconut Basil Chicken Recipe: A Flavorful Escape

⚖️
Difficulty
Easy

⏲️
Prep Time
15 mins

🕒
Cook Time
30 mins

⏱️
Total Time
45 mins

🍽️
Servings
4

Welcome to a delightful gustatory journey with this Curried Coconut Basil Chicken Recipe. Combining the exotic taste of coconut milk with the refreshing notes of basil and the robust aroma of curry, this dish transports you to the heart of tropical culinary bliss. Whether you’re seeking comfort or a vibrant new flavor profile, this chicken recipe is perfect for those who crave a blend of aromatic spices and creamy textures. Prepare to treat your senses to a home-cooked meal that is both nourishing and delightful, with just the right balance of flavors that satisfy the palate and soothe the soul.

Quick Recipe Highlights

  • Flavor Profile: The marriage of coconut and curry creates a symphony of spices with a hint of sweetness that envelops tender chicken pieces.
  • Texture: Creamy sauce coats the chicken, ensuring each bite is juicy, succulent, and rich.
  • Aroma: As it simmers, the dish releases a tantalizing aroma of fresh basil mingling with warm curry spices.
  • Visual Appeal: The vibrant golden sauce contrasts beautifully against the fresh green basil, promising an irresistibly appetizing appearance.
  • Skill Level Needed: With basic cooking techniques, this recipe is accessible to both novices and seasoned home chefs.
  • Special Equipment: A good quality skillet for sautéeing and simmering is essential to achieve the perfect consistency.

Recipe Overview

  • Difficulty Level: This recipe scores as easy due to straightforward steps that do not require advanced skills, just a keen eye on simmering the sauce carefully without burning.
  • Category: Ideal as a main course, this dish can complement a variety of sides for a balanced meal experience.
  • Cuisine: While rooted in Asian culinary traditions, it draws influence from Thai and Indian flavors, showcasing a unique fusion.
  • Cost: With budget-friendly ingredients like chicken, coconut milk, and spices, this dish is economically accessible.
  • Season: Best enjoyed in warmer months when fresh basil is abundant, yet equally comforting in cooler seasons as a warming meal.
  • Occasion: Suitable for casual dinners or a small gathering, offering an exotic touch that’ll impress guests.

Why You’ll Love This Recipe


Chicken lovers will revel in the impeccable taste and texture of this recipe. The harmony of coconut milk and curry provides an enticing creaminess, contrasted by the herbaceous freshness of basil. Each mouthful bursts with rich flavors, creating an irresistible experience for your taste buds.

What makes this Curried Coconut Basil Chicken even more enticing is its simplicity. Whether you’re short on time or desire a hassle-free cooking session, this recipe offers convenience without compromising on taste. The ingredients are common and the process straightforward, allowing for seamless preparation.

From a nutritional standpoint, this dish offers numerous benefits. Coconut milk is rich in healthy fats, and the spices carry antioxidant properties. Additionally, chicken is a great protein source, making this meal both satisfying and nourishing.

This recipe’s versatility makes it a fantastic option for social gatherings. It’s an excellent choice for entertaining, promising to leave a memorable impression on guests with its sophisticated flavors. Its adaptability to different dietary preferences also ensures it’s a crowd-pleaser.

Lastly, the affordability of the ingredients enhances this recipe’s appeal. It is an accessible choice for anyone who wishes to enjoy a gourmet meal without a hefty price tag. The ingredients can be found at most local groceries, making it both cost-effective and convenient.

Historical Background and Cultural Significance


Curried Coconut Basil Chicken bears the influence of its Asian culinary roots, particularly from Southeast Asia. Coconut, curry, and basil are staples in the regions’ kitchens, celebrated for their rich flavor profiles and adaptability in various dishes.

In many cultures, coconut and curry are fundamental to traditional cooking, often used in ceremonious feasts and family meals to showcase hospitality. The use of these ingredients echoes a history of trade and cultural exchange, exemplifying the blending of diverse culinary techniques and flavors.

Over the years, the recipe has evolved by incorporating local ingredients, adapting to Western palates while retaining its exotic essence. Modern variations often include diverse herbs or different proteins, reflecting the globalization of this beloved dish.

Different regions have put their own spin on this classic, depending on available ingredients and tastes. For instance, some variations may include lemongrass for an added citrus note, reflecting regional flavor preferences and creativity.

Ingredient Deep Dive


Basil is cherished for its fragrant aroma and distinct flavor, woven deeply into cultural cuisines worldwide. This herb not only enhances the taste but offers numerous health benefits. It’s rich in vitamins A and K and acts as a natural antiseptic.

To select the best basil, look for vibrant green leaves without brown spots. Fresh basil can be stored in a glass of water, much like flowers, or refrigerated wrapped in a damp cloth for longer shelf life. Should fresh basil be unavailable, dried basil can be a substitute, but with a milder flavor profile.

The choice of coconut milk in this dish is paramount, contributing to the luscious, creamy texture it’s known for. As a key ingredient in numerous tropical cultures, its usage has historical roots in providing richness to meals. Coconut milk is a good source of healthy fats and contains antioxidants.

When selecting coconut milk, opting for full-fat ensures a more decadent sauce. It can be stored unopened in a pantry or refrigerated once opened and used within a few days. If looking for a lighter dish, coconut cream can be substituted for a creamier consistency without diluting flavor.

Common Mistakes to Avoid

  • Overheating coconut milk can cause it to separate, resulting in a less creamy sauce. Cook it on low to medium heat.
  • Using under-flavored curry powder can diminish the dish’s robustness—select a high-quality blend for full flavor.
  • Neglecting to taste and adjust seasoning can lead to a bland dish. Always taste as you cook.
  • Adding basil too early can cause it to lose its vibrant flavor. Stir it in just before serving.
  • Cooking chicken on high heat initially can lead to uneven cooking. Sear on medium-high and then reduce heat.
  • Using light coconut milk may make the sauce too thin. Full-fat coconut milk helps achieve ideal consistency.
  • Neglecting to stir continuously while simmering can cause the sauce to stick or burn.
  • Overcrowding the pan with chicken pieces can prevent proper browning. Give each piece space to cook evenly.
  • Skipping the resting time for the chicken may affect tenderness. Allow it to rest to retain juices.
  • Using stale or old spices can dull the recipe’s fragrance. Fresh spices ensure a robust aromatic profile.

Essential Techniques


Mastering the technique of simmering is crucial for this recipe. Simmering involves cooking the ingredients gently and steadily, allowing flavors to meld and the sauce to thicken. It’s pivotal to avoid boiling, as it can alter the texture and separate the coconut milk.

Another vital technique is properly searing the chicken. This process helps lock in juices and adds a crisp texture to the dish. The key to successful searing is using a hot pan and not moving the chicken until it’s easy to flip.

Controlling temperature throughout cooking ensures the dish develops without scorching. Starting with medium-high heat to sear then reducing to maintain a gentle simmer optimizes the balance between cooking and preserving moisture.

Recognizing visual cues such as sauce thickening and chicken browning is essential. These indicators help achieve the perfect texture and flavor balance, ensuring a professional finish.

Pro Tips for Perfect Curried Coconut Basil Chicken


Marinate the chicken beforehand with a little salt, turmeric, and lemon juice to enhance the flavor depth before cooking. Allow it to rest for at least 20 minutes.

If you’re short on time, pre-cut essential ingredients like onion, garlic, and basil, and pre-measure spices, setting a streamlined cooking process.

Experiment with texture by adding a handful of toasted cashews or almonds on top—this adds a delightful crunch.

For a complex flavor, incorporate a splash of lime juice at the end to brighten the dish, enhancing both taste and aroma.

Use a non-stick or well-seasoned cast iron skillet to prevent sticking and ensure even heat distribution during cooking.

Swap in boneless, skinless chicken thighs for even juicier results, as they offer a richer taste and are less prone to drying out.

Variations and Adaptations


This dish welcomes regional variations beautifully. Experiment by adding lemongrass and kaffir lime leaves if a Southeast Asian twist is desired, both enhancing the citrus elements.

For a seasonal adaptation, consider add-ins like fresh, diced mango in the summer months for a sweet contrast, or roasted pumpkin during autumn festivities.

Dietary modifications can be easily integrated; for instance, use tofu or tempeh instead of chicken for a vegan version without sacrificing the rich, creamy texture.

To dial up the flavor, incorporate additional spices such as star anise or cinnamon for a warm, spicy complement to the existing curry profile.

For a heartier texture, toss in vegetables such as bell pepper or zucchini, adding vibrant color and nutritious content.

Presentation alternatives can elevate your dish; try serving in a hollowed-out coconut shell for a dramatic touch or on banana leaves for authenticity.

Serving and Presentation Guide


For a visually striking presentation, serve the dish on a platter with a garnishing of fresh basil leaves and a sprinkle of red chili slices. This accentuates the vibrant variety of colors.

Opt for high-contrast plates—preferably white or light-colored—to ensure the golden yellows and greens stand out dramatically on the dining table.

Traditional accompaniments include jasmine or basmati rice, providing a fragrant yet neutral palate cleanser for the rich curry sauce.

Modern serving suggestions include pairing with quinoa or cauliflower rice for a health-conscious twist without losing valuable nutrition and texture.

Serve hot to maximize the full aroma and taste, ensuring the sauce remains creamy and the chicken tender.

Consider portioning carefully, recommending about one cup of cooked chicken per serving to maintain balance in a shared family-style meal.

Wine and Beverage Pairing


Wine pairings can vary, but an off-dry Riesling or a Gewürztraminer complements the dish’s spicy backbone with their inherent sweetness and acidity.

For non-alcoholic alternatives, a refreshing Thai iced tea or a light coconut water enhances the meal’s tropical essence while not dulling the flavors.

Consider an herbal tea pairing if serving in the afternoon, with muted floral notes like chamomile or jasmine enhancing the dish’s delicate nuances.

Ensure wines are chilled appropriately, accentuating the meal’s spicy components while refreshing the palate.

Serving suggestions include pouring small amounts to encourage savoring both the dish and accompanying beverage.

Storage and Shelf Life


Store leftovers in an airtight container to maintain flavor and prevent cross-contamination in the refrigerator. The dish can be safely stored for up to three days.

For optimal taste retention, reheat thoroughly to original serving temperature over medium heat, adding a dash of water or coconut milk to loosen any thickened sauce.

Containers with tight-fitting lids are recommended to keep odors contained and prevent spoilage, ensuring enduring freshness.

Regularly inspect for signs of spoilage before reheating. Any change in smell or appearance indicates the dish should not be consumed.

For longer storage, the dish can be frozen; however, note slight changes in texture upon thawing. For best results, thaw overnight in the refrigerator before reheating.

Make Ahead Strategies


Prepare components such as diced chicken and chopped spices ahead of time, storing separately in sealed containers to combine fresh as needed.

Interim storage of uncooked, prepped ingredients can occur in the refrigerator for up to a day without impact on final quality.

When preparing to serve from storage, ensure the chicken has retained its moisture by mixing it well before and after reheating.

Adding fresh basil just before serving enhances the dish’s aroma and adds vibrant color, ensuring an appearance akin to freshly cooked.

For picnic-style presentation, consider assembling into a layered jar, shaking right before serving to combine ingredients effortlessly.

Scaling Instructions


To half the recipe, proportionally reduce ingredients maintaining relative ratios, being mindful of spice dilution due to smaller overall volume.

When doubling or tripling, increase cooking time by up to 15 minutes and use larger cooking vessels to ensure even heating.

Adjustments in equipment, such as utilizing a bigger skillet, can help manage volume increases while maintaining consistent cooking results.

Account for refrigeration or freezing space when storing large quantities, and utilize appropriate dishes for reheating evenly.

Consider adding a touch more salt when increasing volume, as flavors can mellow with larger batches and require enhancement.

Nutritional Deep Dive


This recipe offers substantial nutritional value, balanced in macronutrients, with lean protein from chicken and healthy fats from coconut milk.

Micronutrient-rich basil and antioxidant-loaded spices contribute to immune support and digestive health, enhancing overall wellness.

Health benefits include anti-inflammatory properties from ingredients like ginger or garlic, contributing positively to heart health.

For those considering dietary implications, note the moderate carb content from coconut milk, adaptable for low-carb diets when paired smartly.

Mindful portion analysis can aid in maintaining nutritional balance, serving as a complete meal when paired with fibrous sides like salad or vegetables.

Portions should consider caloric intake goals, with one serving offering a moderate 400-500 calorie count depending on specific ingredient adaptations.

Dietary Adaptations


For a gluten-free adaptation, ensure curry paste and all used ingredients are certified gluten-free, avoiding filler elements.

Opt for a dairy-free version intrinsically by relying purely on coconut milk, enhancing natural creaminess without additional creams.

To adapt for a vegan diet, replace chicken with tofu or chickpeas, maintaining protein balance without losing texture or taste.

Lower carb intake by subbing rice for cauliflower variants while considering basil inside the dish versus solely as garnish for flavor consistency.

For a keto-focused version, leverage butter or coconut oil, enriching fats without increasing carbohydrate content, optimizing texture.

Explore making the dish Paleo-friendly by substituting any artificial elements with natural forms, honoring the diet’s ancestral approach.

Low-FODMAP diets can be accommodated by using shallots in place of garlic and onion, reducing fermentable sugar content significantly.

Specialized diets may explore lowering sodium through reduced soy products or salt alternatives, considering natural flavors for enhancement.

Troubleshooting Guide


For texture issues, if chicken appears tough, ensure resting or correct simmering to avoid over-cooking. Letting it rest retains moisture levels.

Balance flavor by adjusting seasoning at the end—added salt, pepper, or citrus can enliven if taste lacks vibrancy.

Address temperature problems by consistent monitoring. Adjust heat as needed, especially during simmering phases to prevent burning.

Tackle equipment challenges effectively by choosing reliable, non-stick cookware, ensuring even heat distribution without ingredient sticking.

If substituting ingredients, like swapping tofu for chicken, consider marinating for taste absorption, tailoring cooking times slightly.

Timing concerns often arise when managing multiple tasks, so prioritize mise en place, beginning ingredients prepped and within reach.

Recipe Success Stories


Our community has embraced Curried Coconut Basil Chicken with enthusiasm, revolutionizing weeknight dinners with Asian-inspired flair.

Success in variations range from additional spice infusions with star anise to veggie additions, each creating unique spins on the classic.

Adapting for personal dietary needs, many find altering the traditional basil chicken spices results with flavorful, compliant meals.

Reader suggestions have inspired transformations, from revisiting childhood memories to romantic dinner escapades, showcasing the dish’s versatility.

Photography tips have included focusing on textural juxtaposition, highlighting the contrast between creamy sauce and crisp garnish, captivating viewer interest.

Frequently Asked Questions

How do I thicken the sauce if it’s too runny?
Allow the sauce to simmer uncovered or gently add a cornstarch slurry until desired consistency is reached, ensuring thorough mixing to avoid clumps.

Can I use light coconut milk?
While possible, light coconut milk results in a thinner sauce. Consider adding a small amount of cream or flour paste, balancing thickness and taste.

What are alternative proteins besides chicken?
Tofu, shrimp, or even firm fish fillets can work splendidly, offering diverse textures and intriguing flavor shifts while maintaining core dish elements.

How do I revive leftovers?
Slowly reheating on low while stirring periodically prevents sauce separation and dryness, adding a splash of coconut milk if needed for moisture.

Is fresh basil necessary?
While dried basil can suffice, the fresh variant imparts a crucial zest and aroma that elevate the dish’s overall character and visual appeal.

Can I prepare part of the dish in advance?
Absolutely, components like sauce or spice mix can be prepared ahead, streamlining the cooking process and preserving freshness when assembling.

What sides pair well?
Complement with fragrant rice or quinoa, and consider simple steamed vegetables or crisp salads to offset richer flavors pleasantly.

Can I use frozen chicken?
Yes, but ensure it’s thoroughly defrosted to avoid uneven cooking. Fresh chicken retains more flavor, a choice to consider for peak taste.

How spicy should the dish be?
Spice levels can be tailored. Adjustments through chili additions or reductions accommodate individual preferences without overwhelm.

Are there garnishing options?
Besides fresh basil, slivers of red chili or toasted nuts add contrast, offering both visual flair and an added textural dimension.

Additional Resources


Explore related recipes like Thai Green Curry or Coconut Lime Chicken for enriching your culinary repertoire with exciting international flavors.

Refer to our technique guides to master simmering efficiently and effectively, allowing for flawless execution across various dish types.

Learn more about ingredients such as basil and coconut milk through dedicated blogs detailing nutritional advantages and diverse culinary uses.

For those new to different culinary tools, our equipment recommendations can guide informed decisions, enhancing cooking quality and ease.

Discover seasonal variations in similar dishes through newsletters, sharing innovative applications and ingredient swaps to inspire creativity.

Join the Conversation


Engage with us through social media, sharing your Curried Coconut Basil Chicken experiences and adaptations with our vibrant community.

Discover photography tips for capturing the essence and beauty of your culinary creations, highlighting intricate details and compelling presentation.

Leave recipe reviews on our website, contributing to our dynamic platform where feedback and dialogue foster shared growth and learning.

Participate in crafting recipe variations, offering insights and suggestions for developing new takes on beloved classics for diverse tastes.

Connect with other home chefs by exchanging ideas, photos, and stories, enriching the shared culinary journey through interaction and collaboration.

The Recipe

Curried Coconut Basil Chicken

Serves: 4

Prep Time: 15 mins

Cook Time: 30 mins

Total Time: 45 mins

Kitchen Equipment Needed

  • Skillet
  • Knife
  • Cutting board
  • Measuring cups
  • Mixing spoon

Ingredients

  • 1 pound chicken breast, cut into cubes
  • 1 can coconut milk
  • 2 tablespoons curry powder
  • 1 onion, diced
  • 3 cloves garlic, minced
  • 1 tablespoon vegetable oil
  • Salt and pepper to taste
  • Fresh basil leaves, for garnish

Directions

  1. Heat oil in a skillet over medium heat. Add the onion and garlic, sautéing until fragrant.
  2. Stir in the curry powder, allowing it to release its oils and become aromatic.
  3. Add the chicken pieces, season with salt and pepper, and cook until they are evenly seared.
  4. Pour in the coconut milk, stirring well to combine the flavors. Reduce heat to simmer.
  5. Let the dish simmer for 25 minutes or until the chicken is cooked through and the sauce has thickened.
  6. Stir in fresh basil leaves just before serving, allowing their aroma to infuse the sauce.
  7. Serve hot, garnished with additional basil if desired.

Recipe Notes

  • For added spice, include a pinch of red pepper flakes or fresh chili.
  • Experiment with different vegetables such as bell peppers or peas for extra texture.
  • Leftovers can be stored in the refrigerator for 3 days or frozen for up to 1 month.

Discover the Secret to Perfect Utah Fry Sauce Recipe

Utah Fry Sauce: The Ultimate Dipping Companion

⚖️
Difficulty
Easy

⏲️
Prep Time
5 mins

🕒
Cook Time
0 mins

⏱️
Total Time
5 mins

🍽️
Servings
4

Utah Fry Sauce is a delightful and versatile condiment that elevates your snacking experience. Known for its creamy texture and tangy flavor, this sauce has become a staple in Utah cuisine. It pairs perfectly with fries, burgers, and even as a sandwich spread. The blend of mayonnaise and ketchup, with a hint of spice, creates a symphony of flavors that will leave your taste buds craving more. Quick to prepare and highly customizable, Utah Fry Sauce is perfect for casual meals or when entertaining guests.

Quick Recipe Highlights

  • Flavor Profile: The sauce balances the creaminess of mayonnaise with the tanginess of ketchup, resulting in a slightly sweet, slightly savory taste.
  • Texture: The sauce is smooth and creamy, providing a luscious mouthfeel that coats your fries or other dipping foods evenly.
  • Aroma: It boasts a mild, comforting aroma with hints of vinegar and a touch of spice, making it an inviting addition to meals.
  • Visual Appeal: The pale pink hue of the sauce adds an attractive pop of color to any dish, enhancing its visual presentation.
  • Skill Level Needed: Simple enough for beginners, this sauce requires basic measuring and mixing skills, suitable for cooks of all levels.
  • Special Equipment: No special tools are needed beyond a mixing bowl and spoon, making it accessible for any kitchen setup.

Recipe Overview

  • Difficulty Level: This easy-to-make sauce requires minimal ingredients and time, making it perfect for cooks seeking simplicity without sacrificing taste.
  • Category: Ideal for snacks and appetizers, it also shines as a condiment for main dishes like sandwiches and burgers.
  • Cuisine: Rooted in American regional cuisine, Utah Fry Sauce carries cultural significance and local pride, especially in its namesake state.
  • Cost: Budget-friendly, as it uses common pantry staples, making it a cost-effective option for flavor enhancement.
  • Season: Although suitable year-round, its refreshing taste is particularly delightful in summer months, accompanying barbecues and picnics.
  • Occasion: Versatile for everyday meals, the sauce also suits social gatherings, sports events, and casual get-togethers with friends and family.

Why You’ll Love This Recipe

The taste and texture of Utah Fry Sauce are unparalleled. The combination of tangy ketchup and creamy mayonnaise creates a perfect harmony that dances on the palate, elevating simple dishes to new heights. Its convenience cannot be overstated; within five minutes, you can whip up a batch of this beloved sauce, saving time for other culinary adventures.

Nutritionally, using low-fat or homemade mayonnaise can make this sauce a healthier option without compromising flavor. It’s a fantastic way to indulge without the guilt. Socially, this sauce acts as a conversation starter at gatherings. Its unique taste often intrigues guests, inviting customization discussions, and encouraging playful variations tailored to individual palates.

Utah Fry Sauce is incredibly cost-effective. Most of the ingredients are likely already in your kitchen, and a little goes a long way, making it an economical addition to your meal. Moreover, it’s a versatile condiment that accommodates different dietary needs, allowing swaps like vegan mayo for those preferring plant-based options.

Historical Background and Cultural Significance

Utah Fry Sauce has an intriguing origin story linked to Utah’s local diners, where inventive cooks sought to enhance their dishes. Its popularity grew, becoming a symbol of regional pride and culinary creativity. Over time, this sauce has gained fame beyond its birthplace, appealing to food enthusiasts nationwide.

Culturally, Utah Fry Sauce embodies the spirit of adaptation and simplicity celebrated in American cooking. Its evolution mirrors the dynamic nature of cuisine and the blend of flavors that define regions like Utah. This condiment exemplifies how regional recipes can gain national recognition through shared appreciation.

Its variations across regions highlight the adaptability of Utah Fry Sauce. While the basic recipe remains consistent, tweaks like adding hot sauce or using smoked paprika add a personalized touch, showcasing the versatile nature of this culinary gem.

Ingredient Deep Dive

Mayonnaise plays a starring role in Utah Fry Sauce, offering a rich, creamy base that combines seamlessly with other flavors. Originally hailing from France, mayonnaise found its place in American kitchens, celebrated for its smooth texture and ability to bind ingredients. In Utah Fry Sauce, it provides the necessary creaminess and balances out the tang from the ketchup.

Ketchup, another key ingredient, enhances the sauce with its sweet, tangy profile. Its origins trace back to Asia before evolving into the tomato-based condiment enjoyed today. In this sauce, ketchup adds acidity and color, harmonizing beautifully with the mayonnaise. Selecting high-quality ketchup ensures the best flavor outcome—opt for organic or homemade varieties if possible.

Common Mistakes to Avoid

  • Avoid using Miracle Whip instead of mayonnaise, as it alters the intended taste, adding unwanted sweetness and spices.
  • Over-mixing can lead to an overly thin sauce. Stir gently to preserve the desired creamy texture.
  • Using low-quality ketchup restricts the sauce’s potential. Invest in a good brand to enhance flavor.
  • Adding too much seasoning can overwhelm the palate, so start small and adjust to taste.
  • Leaving the sauce out for extended periods affects freshness; refrigerate promptly after making.
  • Inadequate ingredient ratios lead to imbalance; stick to the recommended measurements for optimal taste.
  • Storing in a non-airtight container can impact texture and freshness, so use sealed jars or containers.
  • Not allowing the sauce to sit for a few minutes after preparation may affect the melding of flavors; let it rest briefly before serving.

Essential Techniques

Ensuring the right mayonnaise-to-ketchup ratio is crucial for achieving the iconic taste of Utah Fry Sauce. Aim for a creamy consistency by whisking the ingredients together gently. This easy technique highlights the importance of blending without overdoing it—visual cues include a smooth mixture without lumps.

Adjusting flavor to personal preference is another vital technique. Don’t hesitate to tweak it with spices like pepper or a splash of vinegar. Allow your palate to guide adjustments, refining the balance of creamy, tangy, and spicy elements until satisfied.

Pro Tips for Perfect Utah Fry Sauce

Experiment with additional flavorings such as a dash of garlic powder, Worcestershire sauce, or chipotle for added depth. Using homemade mayonnaise further enriches the sauce, lending a personal touch that’s both fresh and flavorful. Allow the sauce to chill briefly in the fridge for flavors to meld, resulting in a more unified taste profile.

Serve Utah Fry Sauce alongside a variety of fried delights or use it to upgrade your sandwich game. Use fresh herbs like chopped chives or dill for a bright, aromatic twist. A pinch of smoked paprika can introduce a smoky note, enhancing the sauce’s complexity while maintaining its original appeal.

To prevent overconsumption, portion control may help when serving, providing individual dipping cups for guests. For a healthier twist, consider swapping traditional fries for veggie sticks or baked alternatives, which pair delightfully with this sauce.

Variations and Adaptations

Utah Fry Sauce offers ample room for regional adaptations, such as adding Mexican hot sauce for a Southwest kick. In season, incorporate fresh produce like minced shallots or roasted garlic, complementing the sauce’s creamy and tangy notes. Dietary modifications are straightforward—substitute vegan or low-fat mayonnaise without impacting flavor.

Seasonal variations might include using spicy chipotle ketchup in colder months for warmth or citrus zest in spring for refreshing brightness. Texture-wise, integrating coarse mustard provides a pleasant graininess, diversifying the mouthfeel while maintaining a cohesive flavor.

Presentation alternatives invite creativity, such as drizzling sauce over fries in a zigzag pattern or serving in elegant ramekins with garnish. These visual twists ensure a sophisticated touch that enhances the overall dining experience.

Serving and Presentation Guide

When serving Utah Fry Sauce, consider elegant plating techniques that highlight its creamy texture. Present the sauce in small bowls or ramekins, accentuated with a sprig of fresh herbs. For traditional accompaniments, fries are an obvious choice, but consider serving alongside crispy vegetables for a modern twist.

Explore temperature variations—chilled offers refreshing contrast to hot dishes, while room temperature enhances seamless integration in sandwiches. Adjust portion sizes based on the main dish, ensuring enough for hearty fries or delicate finger foods.

Wine and Beverage Pairing

Wine pairings for Utah Fry Sauce should complement its tangy and creamy qualities. Consider serving with a light, fruity Pinot Grigio or a crisp Sauvignon Blanc. Non-alcoholic alternatives like sparkling water with a lemon garnish refresh the palate, serving as delightful soda substitutes.

For added warmth, herbal teas such as mint or chamomile enhance the sauce’s mild flavors without overpowering them. When presenting beverages, cold glassware maintains refreshment, while warm cups enhance cozy tea experiences.

Storage and Shelf Life

Proper storage extends the sauce’s shelf life, allowing it to enrich future meals. Store Utah Fry Sauce in a tightly sealed container, keeping it refrigerated to preserve freshness. Designed to last up to a week, inspect for spoilage signs, like changes in color or off smells, before consuming.

To maximize longevity, avoid cross-contamination by using clean utensils for each interaction. For an extended schedule, freezing isn’t recommended due to altered texture upon thawing, maintaining its creamy delight within the recommended time frame instead.

Make Ahead Strategies

Craft Utah Fry Sauce ahead of time to simplify meal preparation on busy days. Prepare up to a week in advance, storing in the fridge to ensure flavors remain vibrant. Assembling the ingredients hours or days prior allows time for thorough melding, enhancing the overall taste profile.

Test quality prior to use by sampling flavors or adjusting spicing if desired. For busy hosts, pre-portion into serving bowls for quick assembly at gatherings, maintaining effortless kitchen flow while impressing guests.

Scaling Instructions

Scaling Utah Fry Sauce recipes up or down is a breeze, accommodating different serving needs with ease. To halve the recipe, simply adjust ingredient amounts proportionately, ensuring harmonious flavor balance remains intact. When doubling or tripling, maintain standard measuring tools for accuracy, considering larger mixing bowls if needed.

Adjust timing and overall yield accordingly, conserving storage space for any leftover sauce by using appropriately sized containers. As with the standard recipe, quick and easy adjustments make this sauce versatile for any occasion or guest list size.

Nutritional Deep Dive

Utah Fry Sauce presents a balanced macro breakdown primarily from fats, alongside modest carbohydrates and proteins. Micronutrient content includes trace vitamins and minerals, especially when using fortified mayonnaise or ketchup. Adding omega-rich ingredients, like avocado oil mayo, enhances health benefits while retaining flavor.

Mindful portioning supports dietary considerations, offering flavorful indulgence without overconsumption risks. Serving size awareness supports weight management efforts, sustaining enjoyment without sidetracking nutritional goals.

Dietary Adaptations

Adapting Utah Fry Sauce to suit gluten-free diets is straightforward—ensure condiments are gluten-free certified, and consult labels if unsure. For dairy-free options, alternative plant-based mayonnaise provides an excellent substitution. Vegan adaptations are similarly seamless, requiring only vegan mayo adjustments without flavor loss.

Exploring low-carb options? Opt for sugar-free ketchup to decrease carbohydrates, supporting low-carb or keto adherence effortlessly. Further customizations accommodate varied dietary preferences, maintaining the sauce’s originality while extending reach to diverse nutritional needs.

Troubleshooting Guide

Experiencing texture issues with Utah Fry Sauce? Ensure ingredient proportions are adhered to, adjusting if necessary for smoother consistency. If flavor balance feels off, incrementally tweak the condiment ratios, taking time to taste-test after small adjustments. Temperature complications arise when storing at improper levels—aim for consistent refrigeration to preserve quality.

Equipment challenges are rare, given minimal needs, though using proper measuring utensils ensures precision. Ingredient substitutions are frequent and offer needed flexibility—experiment with confidence while maintaining core elements like mayonnaise and ketchup. Timing concerns typically revolve around allowing flavors to meld; patience reaps flavorful rewards.

Recipe Success Stories

Our community has shown tremendous love for Utah Fry Sauce, sharing countless stories of success. Enthusiasts rave about the sauce’s ease of preparation and how quickly it becomes a household staple. Creative adaptations see ingredients like curry powder or lemon juice, diversifying its application and broadening horizons for culinary experimentation.

Reader suggestions have sparked new ideas, such as using it as a marinade base—a strategy enhancing grilled vegetables and meats alike. Our community’s creativity doesn’t stop with taste; photography tips illuminate vibrant presentations on social media, making Utah Fry Sauce as appealing to the eyes as it is to taste.

Frequently Asked Questions

What is Utah Fry Sauce?

Utah Fry Sauce is a creamy condiment made by blending mayonnaise and ketchup, popular in the state of Utah and often served with fries.

Can I make it spicier?

Yes, spice it up by adding hot sauce, cayenne pepper, or chili flakes to taste.

What should I serve it with?

It’s fantastic with fries, burgers, chicken tenders, and even as a sandwich spread or salad dressing.

How long does it last?

Stored properly in an airtight container in the refrigerator, it can last up to a week without losing quality.

Can I use Miracle Whip instead of mayonnaise?

While technically possible, Miracle Whip alters the flavor due to its unique taste; stick with mayonnaise for authenticity.

Is it gluten-free?

Yes, by using gluten-free certified mayonnaise and ketchup, the sauce retains its gluten-free profile.

Are there sugar-free versions?

Absolutely; consider using sugar-free ketchup to reduce sugar content while maintaining flavor.

What are some common mistakes?

Over-mixing, improper ingredient balance, and not allowing sufficient melding time are easily avoidable with careful preparation.

Are there vegan alternatives?

Vegan mayonnaise substitutions offer plant-based solutions without compromising flavor integrity.

Can I freeze the sauce?

Freezing is not recommended, as thawing alters texture—a better strategy involves making fresh batches as needed.

Additional Resources

Explore related recipes such as homemade ketchups or mayonnaise to accompany your Utah Fry Sauce journey, further enriching your condiment repertoire. Delve into technique guides, like emulsifying sauces, mastering simple skills yielding vast rewards in future culinary endeavors. Ingredient information ensures informed decisions, offering insights into the benefits of high-quality condiments.

For those seeking diverse equipment recommendations, browse our comprehensive articles for gadget advice elevating your kitchen experiences. Seasonal variations inspire ongoing innovation, expanding possibilities and introducing fresh elements to Utah Fry Sauce staples.

Join the Conversation

Engage with fellow enthusiasts by sharing your Utah Fry Sauce creations on social media, showcasing vibrant photography and innovative twists. Encourage recipe reviews to foster community dialogue, exchanging feedback and inspiring new applications for this beloved condiment.

The recipe variations crafted by readers ignite inspiration for endless possibilities, encouraging a dynamic, shared culinary journey. Participate in community engagement through interactive platforms, exchanging tips and adapting the recipe in ways that uniquely resonate with diverse tastes.

The Recipe

Utah Fry Sauce

Serves: 4

Prep Time: 5 mins

Cook Time: 0 mins

Total Time: 5 mins

Kitchen Equipment Needed

  • Mixing bowl
  • Spoon or whisk

Ingredients

  • 1 cup mayonnaise
  • 1/2 cup ketchup
  • Salt and pepper to taste

Directions

  1. Combine mayonnaise and ketchup in a mixing bowl.
  2. Stir gently until fully blended, achieving a smooth texture.
  3. Adjust seasoning with salt and pepper according to preference.
  4. Refrigerate for at least 30 minutes to allow flavors to meld.
  5. Serve chilled or at room temperature with your favorite sides.

Recipe Notes

  • For a smoky twist, add a pinch of smoked paprika.
  • Adjust ingredients proportionately for larger or smaller servings.
  • Store leftovers in an airtight container in the refrigerator.