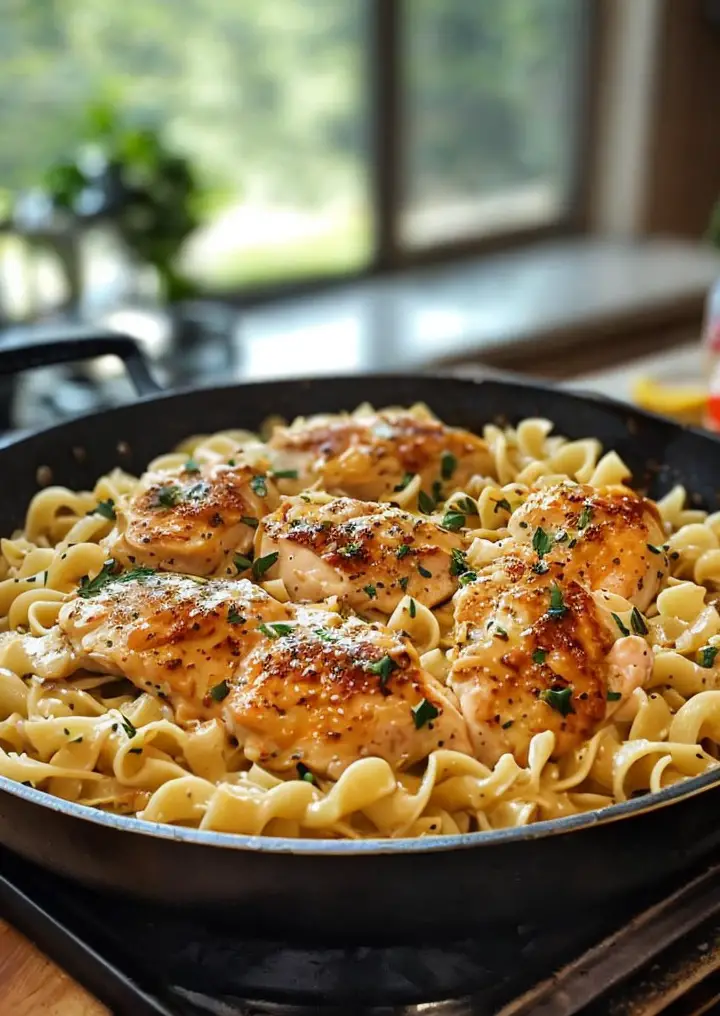
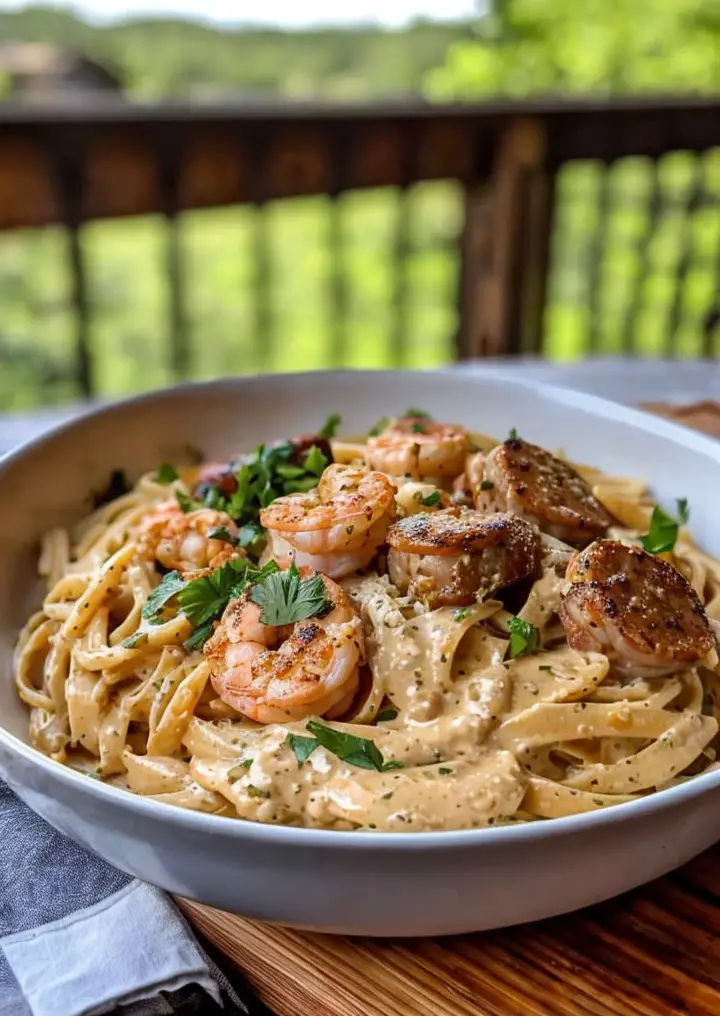
Irresistible Homemade Pimento Cheese: Elevate Your Snack Game

The Best Homemade Pimento Cheese: A Southern Delight for Every Occasion

⚖️
Difficulty
Easy

⏲️
Prep Time
10 mins

🕒
Cook Time
0 mins

⏱️
Total Time
10 mins

🍽️
Servings
4

Welcome to an irresistible journey into the world of Southern cuisine with the Best Homemade Pimento Cheese. This spread, with its creamy and tangy profile, captures the essence of traditional Southern flavors in just one bite. The smooth cheese becomes mesmerizingly richer with the addition of pimentos, while a hint of mayonnaise binds these flavors with unbeatable creaminess. It’s a simple yet exquisite recipe that serves as a perfect appetizer or a charming addition to your lunch sandwich.

Pimento cheese is more than just a recipe; it’s a skilled blend of modest ingredients creating something extraordinary. Whether it’s served with crackers, vegetables, or sandwiched between slices of freshly baked bread, the experience is nothing short of delightful. The vibrant colors of this spread invite you to indulge, while its heartwarming flavors keep you coming back for more. Perfect for picnics, parties, or even a regular day when you want to elevate your meals effortlessly.

Quick Recipe Highlights

  • Flavor Profile: A harmonious balance of creamy cheese and sweet-tangy pimentos, with a delicate peppery undertone.
  • Texture: Smooth and creamy with occasional chunks of pimento providing a pleasant contrast.
  • Aroma: Inviting aroma of sharp cheddar mingling with the subtle scent of mayonnaise and pimentos.
  • Visual Appeal: A visually striking spread with its vibrant orange hue accentuated by red pimento flecks.
  • Skill Level Needed: Ideal for beginners; requires basic mixing skills and no specialized techniques.
  • Special Equipment: A mixing bowl and spoon or a food processor for faster preparation.

Recipe Overview

  • Difficulty Level: This recipe is rated easy due to its simple ingredient list and straightforward preparation method.
  • Category: This delightful spread fits perfectly as an appetizer, snack, or a sandwich filling.
  • Cuisine: A Southern classic, pimento cheese is deeply rooted in American culinary tradition.
  • Cost: Generally inexpensive to prepare, making it an accessible treat for all budgets.
  • Season: Enjoyed year-round, though particularly popular in summer for outdoor picnics and gatherings.
  • Occasion: It suits any occasion, from casual get-togethers to festive gatherings like barbecues or potlucks.

Why You’ll Love This Recipe

The irresistible taste and creamy texture of homemade pimento cheese make it a favorite across households in the South and beyond. With a balance of sharp and tangy cheddar mixed with sweet pimentos, it creates a flavor sensation that’s hard to resist. The creamy base is perfectly crafted to complement the crunchiness of fresh veggies or the warmth of crispy toast, elevating the taste sensation with every bite.

Convenience is king when it comes to this pimento cheese recipe. With just a few minutes of preparation and no cooking required, it’s a must-have recipe for busy hosts or those craving a quick, tasty treat. Simply mix, spread, and serve—your guests will think you spent all day on this dish!

Not only is pimento cheese a culinary delight, but it’s also packed with nutritional benefits. Cheese provides a good source of calcium and protein, while pimentos add a splash of vitamins. When made at home, you can control the ingredients, ensuring a healthier version than many store-bought options.

Perfect for entertaining, this pimento cheese spread encourages socializing as guests gather around to enjoy it. It pairs beautifully with a cheese board, elevating any snack platter. Its versatility means it works on various occasions, from casual lunches to elegant dinners.

Budget-friendly and requiring minimal ingredients, this pimento cheese is a cost-effective choice for every meal. Whether you’re feeding a family or meal-prepping for the week, the recipe is easy to stretch or modify, ensuring everyone gets their fill of this southern classic.

Historical Background and Cultural Significance

The origin of pimento cheese is as rich and intriguing as its taste. Thought to have originated in the early 20th century, it quickly gained popularity as a quintessentially Southern dish. Initially, it served as an affordable staple during economic hard times due to its simple and accessible ingredients.

Culturally, pimento cheese holds a special place in Southern heritage. Often referred to as the ‘caviar of the South,’ it’s a symbol of hospitality and home-style comfort. It has graced countless gatherings, from holiday parties to church luncheons, deepening its appeal as a beloved communal dish.

Over the years, the recipe has evolved, seeing various adaptations that reflect evolving tastes and the availability of ingredients. While each family may have its cherished version, the fundamental elements of cheese and pimento remain constant, highlighting its enduring appeal.

Regional variations add layers to its story, showcasing subtle differences between state lines. Whether it’s extra spicy in one region or mayo-heavy in another, these changes reflect the personal and cultural nuances that keep pimento cheese a dynamic staple in American kitchens.

Ingredient Deep Dive

Cheddar Cheese: Cheddar cheese is the star of pimento cheese, renowned for its rich, sharp flavor that defines the spread. As a staple in many culinary traditions, its history dates back to England, with deep ties to American cuisine through Southern cooking. Nutritiously, cheddar provides calcium and protein, crucial for bone health and body functions. When selecting, opt for fresh, well-aged cheddar for depth in flavor. Store it wrapped in parchment or wax paper in the fridge to maintain freshness. If needed, substitute with Colby for a milder taste.

Pimentos: These sweet red peppers enhance the spread’s flavor profile by adding a subtle sweetness and vibrant color. Originally cultivated in Spain, pimentos bring an international twist to this classic Southern dish. They’re low in calories and contain significant vitamin content, contributing to the spread’s nutritional value. Choose jarred pimentos for convenience; store opened jars in the fridge. When not available, roasted red peppers make an acceptable substitute, offering a similar taste and texture.

Mayonnaise: Integral for its creamy consistency, mayonnaise binds the cheese and pimento into a silky spread. Originating from French cuisine, mayonnaise plays a versatile role in American dishes as a binding and flavor-enhancing agent. While high in calories, it provides healthy fats and aids in the absorption of vitamins. Opt for traditional or light varieties depending on dietary needs. Store in a cool place after opening; Greek yogurt can be a lighter alternative for health-conscious adaptations.

Common Mistakes to Avoid

  • Using pre-shredded cheese: Processed cheese often lacks the rich, creamy texture necessary for authentic pimento cheese.
  • Overmixing: This can lead to a paste-like consistency, losing the spread’s trademark texture.
  • Ignoring seasoning: A properly seasoned spread elevates the flavor; be mindful of salt and pepper additions.
  • Skipping pimento draining: Ensure pimentos are well-drained to prevent a watery spread.
  • Using flavorless mayonnaise: Always choose quality mayonnaise for a rich flavor binding.
  • Not allowing to sit: Letting the spread rest brings flavors together beautifully for a fuller taste.
  • Refrigerating improperly: Store in airtight containers to maintain optimum freshness and flavor.
  • Skipping taste testing: Always check the balance of flavors before serving to guests.
  • Using low-quality cheese: The recipe heavily depends on cheese’s flavor; invest in good quality cheddar.
  • Forgetting about texture: Aim for a balance between creamy and a slight chunky feel, especially with pimentos.

Essential Techniques

The magic of the best pimento cheese recipe lies in its utterly simple yet essential techniques. Using freshly grated cheddar enhances flavor and texture, crucial for achieving the perfect consistency that can’t be matched by pre-shredded varieties. Ensure the cheese is at room temperature before mixing, allowing smoother amalgamation and creamier results.

Balance is the next key technique; it’s about achieving the harmonious interplay between creamy mayonnaise and the hearty texture of cheddar. Mix gently to maintain this balance, while ensuring that pimentos remain intact to introduce bursts of sweet, tangy flavor. Remember—this spread isn’t about finesse; it’s about showcasing rich, hearty flavors in each mouthful.

Pro Tips for Perfect Pimento Cheese

  • Let it sit: Allow the pimento cheese to sit in the fridge for at least an hour to let the flavors meld beautifully.
  • Choose a robust cheddar: The sharper the cheese, the more complex the flavor profile.
  • Fresh is best: Use fresh peppers when possible, roasting them for an enhanced smoky note.
  • Add a twist: Incorporate a dash of hot sauce for an exciting spicy kick.
  • Texture balance: Don’t overblend; leave bits of cheese and pimento to preserve texture.
  • Experiment with spices: A hint of paprika or garlic powder can elevate the flavor complexity.
  • Pair wisely: Serve with textured, hearty breads or add crisp crackers for crunch contrast.
  • Pepper it: A sprinkle of freshly ground black pepper can accentuate the spread’s flavor.

Variations and Adaptations

The beauty of the best homemade pimento cheese lies in its versatility. Regional variations showcase how this spread morphs to match local tastes. Southern versions might opt for a creamier base through additional mayonnaise, while Texas-style infuses a hint of spice. Don’t hesitate to explore seasonal twists by adding finely chopped spring onions in spring or crispy bacon in winter for a smokier edge.

Dietary adaptations are a breeze with pimento cheese. For a vegan version, swap cheese for nutritionally rich cashew cheese and opt for vegan mayonnaise. Season with nutritional yeast to replicate the cheesy flavor, providing a spread that’s both plant-based and deliciously fulfilling.

Serving and Presentation Guide

An eye-catching display elevates the best pimento cheese from traditional to gourmet. Plate using small ramekins for individual servings lined with vibrant, fresh herb sprigs which enhance not just aesthetics but also aroma. Present alongside a palette of colorful veggie sticks, freshly baked bread, and a choice of savory biscuits or crackers for diverse textural experiences.

For a modern touch, try forming the spread into small bullet-shaped bites sprinkled with chives, turning a humble spread into delicate hors d’oeuvres. Pay attention to the temperature—it should be served chilled but not overly cold, ensuring the flavors remain bold and vivid.

Wine and Beverage Pairing

Pair the best homemade pimento cheese with wine choices that complement its bold flavors yet balance its creaminess. A crisp, chilled Sauvignon Blanc works beautifully to enhance its sharp cheddar notes, while a young Pinot Noir, served at the right temperature, provides an exceptional counterpoint to the sweet pimentos.

For non-alcoholic options, try fruity sparkling beverages like a berry soda or a homemade lemonade with mint. These choices add a refreshing contrast to the richness of the cheese, ensuring a palate-cleansing sip between bites.

Storage and Shelf Life

Proper storage can prolong the deliciousness of your pimento cheese. Keep it in an airtight glass container to prevent absorption of fridge odors. For optimal freshness and flavor, consume within a week. Monitor for spoilage signs like changes in color and scent, a key indication it’s past its prime.

To reintroduce, allow it to reach room temperature before spreading on warmed toast or using in recipes. While freezing isn’t recommended as texture alters, small portions freeze well in airtight freezer bags, making for convenient defrosting.

Make Ahead Strategies

Planning in advance maximizes preparation convenience for pimento cheese. Grate cheese and chop pimentos a day ahead, storing them separately. Combine all ingredients hours before serving, allowing flavors to meld without pressure.

A well-prepped spread enhances quality. Refrigerate in an airtight container for the best results and don’t skimp on fresh elements like herbs or seasoning right before serving, lifting the entire dish with just a sprinkle.

Scaling Instructions

Whether you’re hosting a large gathering or preparing a cozy meal for two, scaling this pimento cheese recipe is straightforward. Halve the recipe for smaller servings using a smaller bowl, or double the ingredients for larger batches requiring a food processor to evenly combine the mixture without sacrificing texture.

Timing remains the same since there’s no actual cooking involved. When scaling up, ensure your storage solutions are adjusted to keep the spread fresh and vibrant for your event. Accompany with ample pairing options to cater to a larger crowd.

Nutritional Deep Dive

The nutritional appeal of pimento cheese lies in its balanced combination of proteins and fats. The cheese itself provides ample protein and calcium, crucial for muscle and bone health, while pimentos contribute a vitamin A boost.

This spread offers a concentrated source of fats, beneficial in moderation. Tracking portion sizes ensures mindful consumption, aiding in weight maintenance and offering rich flavors without overindulgence. Adjust ingredients for specific dietary preferences, ensuring you’re aligning with personal health goals while maintaining taste integrity.

Dietary Adaptations

The best pimento cheese recipe can easily accommodate dietary needs without sacrificing its charming flavors. For a gluten-free option, ensure all ingredients and pairings meet the criteria, with gluten-free bread being an excellent serving choice.

Opt for dairy-free alternatives for lactose-intolerant individuals by utilizing lactose-free cheese options or plant-based cheeses, offering a seamless shift without loss of flavor. Keto-friendly adaptations are also effortless—use full-fat ingredients and replace conventional mayonnaise with avocado oil-based varieties.

Troubleshooting Guide

Addressing texture issues begins with cheese selection; avoid pre-shredded products that result in gritty spreads. Use vibrant, well-drained pimentos to prevent overly watery textures. If the flavor feels off-balance, a touch more seasoning, like salt or a sprinkle of cayenne, can offer depth.

Monitor room temperature to prevent ingredient separation or oiliness. Try different equipment if mixing proves difficult, ensuring a smooth blend in desirable proportions. Timing changes can relax prep pressures, with an extended period for chilling allowing flavors to meld effectively.

Recipe Success Stories

Across countless kitchens, success stories of homemade pimento cheese signal its universal charm. Many followers share images of customized versions; some added jalapeños for spice, while others layered extra cheese for depth. Variations bring creativity to the forefront, inspiring others.

Enthusiastic readers have commended its adaptability with other southern classics, such as deviled eggs or as a burger topping, pushing the boundaries of its traditional role. Community engagement breathes life into the recipe, inviting all to share experiences and capitalize on shared insights.

Frequently Asked Questions

Can pimento cheese be made ahead?
Pimento cheese improves when made ahead, allowing flavors to meld and mature. Store in an airtight container and chill for up to a week for optimal taste.

What’s the best cheese for this recipe?
A sharp cheddar is ideal due to its flavor and melting qualities, though Colby can be used for a milder profile.

Are there vegan alternatives?
Yes, use vegan cheese and mayonnaise. Nutritional yeast can mimic cheddar’s depth, providing a plant-based positive balance.

How can I add spice to the spread?
Add ingredients like minced jalapeños or a dash of cayenne pepper for a heat element. Hot sauce is another fine choice.

Can this be frozen?
While recommended for instant use, portions can freeze well. Defrosting alters texture slightly but retains flavor for future use.

What crackers pair well?
Choose sturdy crackers like wheat or water varieties, allowing the cheese’s spread and flavors to be fully appreciated.

Does it need to be served cold?
Pimento cheese is best served chilled, maintaining flavors and texture but should never be icy cold as it dampens taste profiles.

How do I prevent it from being watery?
Drain pimentos thoroughly and avoid excess mayonnaise. Proper mixing is key to achieving a consistent texture.

What’s the best way to store leftovers?
Use airtight containers in the refrigerator, preserving flavors for up to a week while monitoring signs of spoilage.

Is it suitable for children?
Most kids love pimento cheese for its smooth texture and mild flavors, offering a kid-friendly snack option that’s nutritious.

Additional Resources

Dive deeper into Southern cuisine with related dishes that hark to the hospitality and tradition the South is famous for. Explore cornbread variations, learn about distinct Southern barbecue styles, or craft homemade buiscuits to complement pimento cheese perfectly.

Technique guides focus on achieving ideal texture, perfecting cheese mixes, or even canning methods for those keen on preserving spreads. Delve into ingredient breakdowns, examining the role cheese plays in culinary desirability, or uncover seasonal gourmet adaptations to expand your repertoire with each new season.

Join the Conversation

Engage with our vibrant foodie community by sharing your pimento cheese experiences on social media platforms. Capture your spread creations, and tag us to connect with other culinary enthusiasts. We’re curious to see your presentation styles and any creative twists you’ve added.

Dive into discussions over reviews and adaptations, and sign up for our newsletter for ongoing recipe inspirations. Your stories inspire us to keep versatility and flavor at the forefront of our culinary adventures. Engage and explore the innovative world of food creation today!

The Recipe

The Best Homemade Pimento Cheese

Serves: 4

Prep Time: 10 mins

Cook Time: 0 mins

Total Time: 10 mins

Kitchen Equipment Needed

  • Mixing bowl
  • Grater
  • Spoon or spatula
  • Food processor (optional)

Ingredients

  • 2 cups sharp cheddar cheese, freshly grated
  • 1/2 cup mayonnaise
  • 1/4 cup pimentos, drained and chopped
  • 1/4 teaspoon garlic powder
  • 1/4 teaspoon onion powder
  • Salt and pepper to taste

Directions

  1. In a mixing bowl, combine the grated cheese and mayonnaise.
  2. Add the drained and chopped pimentos.
  3. Season with garlic powder, onion powder, salt, and pepper.
  4. Mix until thoroughly combined and smooth.
  5. Chill in the fridge for at least 30 minutes before serving to enhance flavors.
  6. Serve chilled with crackers, vegetables, or as a sandwich spread.

Recipe Notes

  • Adjust seasoning according to taste preferences.
  • Store in the refrigerator in an airtight container for up to one week.
  • For a spicy twist, add minced jalapeños or a dash of hot sauce.

Savor the Ultimate Louisiana Crawfish and Fried Chicken Sandwich Recipe

Louisiana Crawfish and Fried Chicken Sandwich: A Southern Delight

⚖️
Difficulty
Moderate

⏲️
Prep Time
30 mins

🕒
Cook Time
20 mins

⏱️
Total Time
50 mins

🍽️
Servings
4

Craving something hearty, flavorful, and slightly indulgent? Our Louisiana Crawfish and Fried Chicken Sandwich is the perfect choice. This sandwich combines the succulent and spicy flavors of traditional Louisiana crawfish with the crispy, juicy goodness of Southern fried chicken. Each bite offers a harmonious blend of textures and flavors that are bound to transport you straight to the heart of Cajun country.

The Louisiana Crawfish and Fried Chicken Sandwich is not only a feast for the palate but also a visual delight. Imagine the bright red hues of crawfish peeking out alongside golden-brown fried chicken, all held together by a plush bun. This sandwich promises not only a mouthwatering taste experience but also an aroma that will have your senses dancing. Whether you’re a seafood enthusiast or a fried chicken aficionado, this dish promises satisfaction.

Cooking this Louisiana Crawfish and Fried Chicken Sandwich might seem a tad intricate, yet with our guided instructions, it’s a fulfilling culinary endeavor. The sandwich’s preparation process is achievable with basic cooking techniques, making it accessible for home cooks eager to explore Southern flavors. Make this sandwich for lunch, dinner, or even a special occasion, and watch your loved ones revel in this Southern masterpiece.

Quick Recipe Highlights

  • Flavor Profile: This exquisite sandwich features the spicy, savory essence of crawfish combined with the rich, juicy flavor of fried chicken, complemented by subtle Cajun spices.
  • Texture: Experience the satisfying crunch of the fried chicken juxtaposed with the tender, flaky texture of crawfish.
  • Aroma: Indulge in an inviting blend of spices, with hints of pepper, garlic, and Cajun aromas wafting through the air.
  • Visual Appeal: Enjoy a beautifully presented sandwich showcasing vibrant red crawfish and golden-crusted fried chicken sandwiched in a soft, fresh bun.
  • Skill Level Needed: While some basic frying techniques are required, the recipe is manageable for intermediate home cooks.
  • Special Equipment: A deep fryer or a heavy-bottomed pot for frying, alongside a thermometer to ensure precise oil temperature.

Recipe Overview

  • Difficulty Level: This recipe is moderately challenging due to the frying process, which demands careful temperature control and timing to achieve perfectly cooked chicken and crawfish.
  • Category: Perfect for hearty lunch or dinner, this sandwich falls into the category of main meals, providing a fulfilling eating experience.
  • Cuisine: This sandwich highlights Southern culinary traditions, especially those stemming from Louisiana’s rich and diverse food culture.
  • Cost: Cost-effective yet premium, the sandwich balances affordable ingredients with a luxurious experience, thanks to the crawfish and quality chicken.
  • Season: Best enjoyed during spring and summer when crawfish are in season, providing the freshest and most flavorful ingredients.
  • Occasion: Ideal for gatherings, casual dinners, or even as a standout dish at a Southern-themed party.

Why You’ll Love This Recipe


The Louisiana Crawfish and Fried Chicken Sandwich is perfect for those seeking a blend of Southern charm and bold flavors. The savoriness of the crawfish, combined with the delightful crunch of fried chicken, results in an unforgettable taste sensation. The sandwich strikes a balance between spice and flavor, appealing both to those who appreciate nuanced seasoning and those seeking a kick.

The preparation process, while slightly detailed, is a labor of love that pays off with each delectable bite. The convenience of having a complete meal sandwiched between two halves of a bun cannot be overstated, offering a portable feast perfect for on-the-go gourmets. Each component can be prepared ahead, streamlining your cooking process for a seamless meal.

Despite its indulgent nature, this sandwich incorporates crawfish, a lean protein rich in essential vitamins and minerals. Coupled with the energy-packed ingredients of the sandwich, it makes for a remarkably balanced meal. Pair this sandwich with a fresh salad or a side of veggies for a nutritionally complete dining experience.

From casual gatherings to intimate dinners, this dish serves as an excellent culinary centerpiece, enchanting guests with its bold flavor and visual appeal. Its versatile nature means it can adapt to a variety of settings and moods, whether you’re entertaining company or enjoying a weekend cookout.

This sandwich is surprisingly accessible. The majority of the ingredients are household staples, easily adaptable to suit budgets and availability. While crawfish and chicken standout as the stars, pantry staples like spices and flour help bring the sandwich together economically.

Historical Background and Cultural Significance


The Louisiana Crawfish and Fried Chicken Sandwich is deeply rooted in the culinary traditions of the Southern United States. Louisiana, known for its vibrant Creole and Cajun cuisines, shines in this dish, bringing together fresh, local seafood and hearty fried elements, both hallmarks of Southern cooking. This sandwich captures the essence of a culture that marries land and sea-based ingredients harmoniously.

Crawfish, often referred to as the “seafood of the South,” is a cultural staple, celebrated in festivals such as the Crawfish Boil, and enjoyed in numerous dishes across Louisiana. Historically, crawfish has been vital to the state’s economy and food heritage, providing both sustenance and a sense of community bonding over crawfish-centered gatherings.

As Southern cuisine evolved, the marriage of fried chicken and seafood became more prominent in dishes like po’boys and this sandwich. Rooted in tradition, yet open to innovation, the sandwich captures the spirit of Louisiana’s food landscape—rich in flavor, culture, and history. The union of fried chicken and crawfish is more than culinary fusion; it’s a testament to Louisiana’s adaptable and diverse food traditions.

Regional variations are quite prevalent in Southern cuisine, with each area adding its unique twist. While the core of the sandwich remains constant—fried chicken and crawfish—variations might include different seasoning blends or accompaniments that reflect local preferences or seasonal influences.

Ingredient Deep Dive


Crawfish, a celebrated ingredient of Louisiana cuisine, finds its home in this sandwich, bringing an authentic oceanic touch. Historically, crawfish consumption began as a necessity among settlers, later transforming into a regional delicacy. Rich in protein and low in calories, this crustacean supports heart health and boosts energy. When selecting crawfish, fresh, lively specimens ensure taste integrity. Store in a cool, damp place, and cook within a day of purchase. Substituting shrimp maintains the flavor profile if crawfish is unavailable.

The sandwich’s soul lies in the fried chicken, a staple in Southern cooking with roots tracing back to African American culinary traditions. Chicken provides essential nutrients like lean protein and vitamins B6 and B12, promoting muscle health and energy. Opt for chicken thighs for juicier, more flavorful bites, or adjust to breasts for a leaner option. Store uncooked chicken in the coldest part of your refrigerator and use fresh within two days, or freeze for later use.

A softly toasted bun binds the components, serving as a canvas for the explosion of flavors within. Select buns with a slight sweetness for balance or go traditional with a French roll for a firmer bite. Keep buns fresh in a breadbox or freeze for prolonging freshness. For substitution, consider gluten-free options if dietary restrictions necessitate.

Common Mistakes to Avoid

  • Overcooking crawfish can result in a rubbery texture. Ensure a quick, precise cooking time for tender meat.
  • Underseasoning is common; crawfish and chicken need assertive Cajun spices to reach full flavor potential.
  • Frying chicken at the wrong temperature often leads to greasy results. Use a thermometer to maintain 350°F for optimal crunch.
  • Forgettting to pat dry the crawfish before cooking can lead to sogginess.
  • Skipping marinading reduces flavor depth in the chicken; allow at least 30 minutes for seasoning to penetrate.
  • Using too much oil can overwhelm the sandwich’s flavor balance.
  • Mismatched buns can overpower the delicate ingredients. Choose neutral-flavored, light-textured breads.
  • Improper storage after assembly can result in soggy bread. Keep the components separate until serving.
  • Forgetting to season the flour in the dredging process can result in bland chicken.
  • Inadequate oil resting causes greasy sandwiches. Let the fried ingredients rest on a rack.

Essential Techniques


Mastering the frying technique is crucial for this recipe. Proper oil temperature ensures crispy, golden-brown chicken. If the oil is too hot, the exterior cooks too fast, leaving the inside undercooked. Conversely, low temperatures lead to sogginess. Use a thermometer to maintain a consistent 350°F, and avoid overcrowding the frying vessel, as this can cause temperature fluctuations affecting texture.

Timing the crawfish cooking process ensures tender, succulent meat. Crawfish cook quickly—overcooking renders them tough and chewy. Boil in seasoned water briefly, just until the shells turn vibrant red. Immediately rinse with cold water to stop the cooking process, preserving flavor and texture.

Marinating is key for infusing flavor into the chicken. A rest of at least 30 minutes allows spices to penetrate, enhancing every bite. Longer marinades deepen the flavor but keep overnight marination to a minimum to prevent texture changes from acidic components.

Toasting buns might seem minor but adds a critical layer of texture. A slight toast provides a barrier against moist ingredients, ensuring the bun maintains its structure. For perfect toasting, a hot pan or grill with no oil will crisp the bread without adding greasiness.

Pro Tips for Perfect Louisiana Crawfish and Fried Chicken Sandwich

Leverage a double dredging method for extra crispy chicken. Dredge, allow to rest, and dredge again. This ensures a robust crust, ideal for complementing the tender crawfish.

Test the oil temperature with a drop of batter. If it sizzles immediately, the oil is ready. This ensures constant frying quality and predictability without relying solely on a thermometer.

Infuse the oil with spices before frying to subtly enhance flavors without over-seasoning the chicken itself, adding depth to every bite.

Enhance the sandwich by adding pickled jalapeños for an extra kick. Their acidity cuts through the sandwich’s richness, creating a balanced taste experience.

Let the cooked chicken rest on a wire rack instead of paper towels. This prevents steaming, ensuring the crust remains crispy till serving.

Butter the buns lightly before toasting for an extra layer of flavor. It also helps to crispen the surface of softer buns, adding textural contrast.

Variations and Adaptations

Adapt the sandwich for different regional tastes by altering the spice mix. A touch of smoked paprika or chipotle powder adds a Southwest flair. Alternatively, a dash of Old Bay seasoning gives a nod to the Eastern Seaboard.

For seasonal variations, include fresh summer tomatoes or switch to arugula for a peppery note in winter. Seasonal vegetables can provide fresh crispness, enhancing the sandwich’s appeal and nutritional value.

Modify the recipe for dietary preferences by substituting gluten-free buns and flour, or baking the chicken instead of frying for a healthier twist. Ensure alternative bread types withstand hearty fillings without falling apart.

Experiment with unique flavors by infusing the accompanying mayonnaise with sriracha or chipotle for an added flavor punch, appealing to those with a love for spicy sandwiches.

To transform the texture, opt for a softer brioche bun to highlight the contrast with the fried elements, or choose a ciabatta for a firmer bite more suited to robust sauces and fillings.

For creative presentation, serve the sandwich open-faced, layering ingredients visually appealingly on one half, allowing an intricate look into its delicious components.

Serving and Presentation Guide

Crafting an inviting visual presentation begins with structure. Stack the sandwich cleanly, with crawfish and chicken centered for an enticing cross-section when sliced. Consider slicing diagonally to reveal the gourmet layerings within the sandwich.

Garnish the plate with fresh herbs like parsley or scallion, bursting with color and inviting aroma. Alternatively, incorporate pickled vegetables like onions or cucumbers for a dash of color and tang.

Complement this Southern favorite with traditional sides like a creamy coleslaw or sweet potato fries, enhancing the comfort-food feel while adding balance and variety to the meal.

For a modern serving approach, present the sandwich deconstructed, allowing diners to appreciate each ingredient’s quality, assembled just before eating. This also enables individuals to tailor portions and flavor augmentation personally.

Serving temperatures significantly impact enjoyment. Ensure the sandwich is assembled just before serving, allowing for optimal hot-and-cold contrast between the ingredients. Warm elements should remain hot, while vegetables provide a cool, refreshing balance.

Portion control is crucial. Given the indulgence of ingredients, serving half portions alongside substantial side dishes can cater to various appetites and occasions without overwhelming.

Wine and Beverage Pairing


A chilled glass of crisp white wine, like Sauvignon Blanc, pairs perfectly with the sandwich, complementing the crawfish’s delicate flavors while cutting through the rich fried chicken. Its citrus notes balance the meal’s spice elements harmoniously.

Consider non-alcoholic alternatives like a sparkling lemonade or iced sweet tea—classics that elevate the Southern culinary experience with refreshing sweetness, countering spice with cool relief.

For beer enthusiasts, a light lager or ale enhances the sandwich without overpowering its intricate flavor profile. These provide a smooth, clean finish, reinforcing the dish’s bold and spicy characteristics.

If coffee or tea is your preference, select unsweetened green tea; its mild bitterness contrasts rich oily textures, but its temperature must remain cool to avoid exacerbating spice levels.

Serving a grapefruit or blood orange spritzer adds a vibrant, effervescent touch. These drink choices uplift the dining experience with a sense of flair, ensuring balance and excitement in every sip.

Storage and Shelf Life


Efficient storage extends the sandwich’s life without compromising quality. Store components separately to maintain individual texture and flavor integrity, especially vital for fried items to remain crispy.

Refrigerate the chicken and crawfish in airtight containers to prevent moisture loss and flavor absorption from other foods, keeping them fresh for up to two days.

Signs of spoilage include soggy, discolored components or an off scent. The fresh aroma should prevail, indicating no need for disposal.

Gently reheat chicken in a low oven to regain crispiness. Avoid microwaving, which softens the crust unavoidably, detracting from traditional enjoyment.

Freezing is viable for individual ingredients, but assembly just before serving lends itself best to a superior sandwich experience. Wrap each segment tightly before freezing to minimize freezer burn.

Safe defrosting practices insist on refrigerator time, allowing the chicken and crawfish to return to temperature steadily. Ensure complete reheating for safety and textural quality.

Make Ahead Strategies


Prepare ingredients in advance to streamline mealtime assembly, saving time while preserving flavor. Marinate chicken overnight to enhance its depth, allowing a melding of ingredients.

After cooking, while separated, components may be stored up to two days. Wait to toast buns and heat fillings just before serving for optimal freshness and vibrancy.

Should you opt to prepare far in advance, consider vacuum sealing where possible. It prolongs freshness, particularly beneficial for crawfish, retaining their distinctive aroma and taste effectively.

To reheat, focus on individual parts, minimizing texture loss by utilizing oven, stove-top, or air-fryer techniques—avoid microwave methods for maintaining peak sandwich excellence.

Introduce fresh elements, like lettuce or tomato, post-reheating, preserving their brightness and crunch. Adding them after reassembly ensures the sandwich feels made-to-order.

Assemble sandwiches just before serving, placing emphasis on retaining their homemade appeal. Even pre-prepared fillings showcase freshness when built carefully by hand.

Scaling Instructions


Adjusting the recipe to accommodate additional mouths involves slight change adaptations, ensuring scalability without excess complication. Halve ingredients by simple division, yet allocate proportionate attention to cooking time adjustments.

Double or triple the mix, considering fryer oil volume and capacity revisions to maintain consistent frying quality across increased servings.

Equipment may need resizing, such as larger mixing bowls or frying vessels, to hold the added volume effectively. Adequate preparation space is vital, ensuring comfortable workflow.

Note extended timing requirements; increased volume necessitates phased cooking, avoiding overcrowding in any singular process. Management of preparation pace is key.

Storage considerations are also essential. As the volume rises, so does storage need expansion. Have ample containers available to separate items or refrigerate accordingly.

Nutritional Deep Dive


This sandwich provides a rounded nutritional profile, blending crawfish and chicken proteins efficiently. Crawfish is a low-fat source of selenium and B vitamins, supporting metabolism and cellular functions.

Chicken completes this profile with a hearty boost of lean protein, alongside the provision of zinc and iron, essential for maintaining immune and blood health.

The sandwich houses a balanced distribution of macronutrients, with carbohydrates from the bun complementing the protein content, ensuring sustained energy release throughout digestion.

Within micronutrients are supportive effects, notably vitamins A, B, and C, vital for immune support, reducing inflammation, and maintaining skin health.

Portion analysis proves beneficial for balanced delivery—value lies in selection variety for sides and extended nutrition. Complementing with fiber-rich accompaniments uplifts meal wholesomeness.

Mindful consumption keeps dietary peace enjoyable; it’s treat-soaked comfort devoid of guilt when placed amid broader healthy diets.

Dietary Adaptations


Choose gluten-free flours and buns to accommodate sensitivities without sacrificing flavor. Many rice-based mixes retain crisp and tender qualities essential for the perfect sandwich.

For dairy-free needs, substitute milk in marinades for plant-based alternatives. Nut or soy milk remains a popular choice for mimicking traditional marinating liquids in a dairy-free manner.

Vegan adaptation introduces alternative proteins such as tofu or tempeh, treated with similar Cajun spices. Crispy coating methods can replicate the chicken’s texture, ensuring a delectable meal.

Aim for low-carb versions through careful bun selection or lettuce wraps, reducing bread reliance while maintaining richness with the protein focus.

This sandwich fits keto-friendly molds due to protein content; reduce carbohydrate load with consideration to seasoning sugars and bun swaps.

Transition to Paleo eats by eliminating processed bread, opting instead for creative alternatives like sweet potato slices or other grain-free options.

For low FODMAP guidance, monitor ingredient choices alertly, recognizing affects rendering potential intolerance despite protein focus adjusted.

Troubleshooting Guide


Managing texture issues stems from correct oil temperature during frying. Successful crispiness results from 350°F, verified with reliable thermometers to assure consistency.

Ensure flavor balance with all-seasoned components equally. Bland elements risk whole sandwich appeal; apply spices liberally while observing palate variations.

Navigate temperature problems with thermometer validation or preliminary oil testing. Ideal frying achieves golden crust while retaining internal juiciness.

Tackle equipment challenges by pre-sourcing suitable fryers or pots. Adequate sizing guarantees efficiency, allowing correct batch preparation without ingredient compromise.

Ingredient substitution requires understanding of comparable flavor and texture replacements. Swap shrimp for crawfish in equivalent diets or choose labeled GF flour for similar outcomes.

Timing concerns require clock awareness; phased cooking processes alleviate stress from narrow finishing windows, maintaining personal rhythm within recipe adaptation.

Recipe Success Stories


Community engagement has favored this recipe, reflecting Southern comfort merges spotlight vibrancy, raving about the dynamic combination of crawfish’s delicateness with traditionally robust fried chicken.

Experimenters shared variations successfully swapping standard to gluten-free setups, reaffirming adaptability without quality diminution—a testament to creative culinary exploration’s potential.

Reader suggestions mirrored presentation experiments, suggesting open-faced or deconstructed forms highlighted underlying beauty in often hidden elements.

Photographers chimed in with appreciative captures, recommending natural light angles illuminating texture hues, achieving menu-ready plates brimming with palatable enticement.

Adaptation stories continued, inviting kitchen adaptations incorporating personal regional influence. Users confidently created with Eastern or Southwestern twists, broadening recipe scope seamlessly.

Diverse range paints possibilities vibrant; fixed recipe norms melt under reimagining breadth, inventive interpretation blooming within shared culinary enjoyment.

Frequently Asked Questions

1. Can I use pre-cooked crawfish? Pre-cooked crawfish work if you can’t access fresh—reheat gently with seasoning to retain flavor and texture.

2. Is it possible to bake the chicken instead? Bake at 400°F until golden and cooked through. Opt for oil spritz to enhance crust without frying.

3. What’s the best bread substitute for gluten-free diets? Consider gluten-free buns with a firm texture to hold fillings. Reviews suggest Udi’s or Schär as reliable brands.

4. How do I prevent grease overload? Ensure ingredients are patted dry before cooking. Rest fried items on wire racks to maintain crispening during cooling.

5. Can I meal-prep this sandwich? While initial prep is suited earlier in the day, the final assembly should be close to serving time for optimal results.

6. How can I reduce overall spice for milder palates? Adjust Cajun seasoning levels, choosing less intense spices or reducing cayenne pepper content.

7. Is an air fryer a suitable alternative? Yes, air fryers are popular substitutes providing similar crisp textures without deep frying’s subtle flavor nuances.

8. How do you adapt this recipe for keto diets? Select low-carb bread substitutes or use lettuce wraps, retaining protein-centric ingredients at the core of the meal.

9. What’s a good vegetarian alternative? Marinated and fried tofu versions balance flavor while capturing outer crispy features of original concepts.

10. Can I freeze the assembled sandwich? It’s best to freeze components separately to maintain texture integrity, recombining post-thaw upon anticipated consumption.

11. How do I avoid sogginess in leftovers? Store fillings independently, keeping buns dry until reheating, preventing sogginess from condensing in moisture.

12. What’s the most common mistake to avoid? Ensure proper seasoning through every ingredient layer—flavorful balance throughout is key to successful recreation.

Additional Resources


Explore related recipes tapping into Southern culinary landscapes, such as Po’boys or jambalaya, inspiring iterations of traditional flavors into new and exciting forms.

Technique guides discuss the art of frying, seasoning mastery, and spice-blend knowledge, elevating all dishes touched by these critical cooking skills.

Ingredient exploration fathoms crawfish intricacies, deepening understanding in its nutritional profile and culinary versatility, drawing connections between history and modern use.

Equipment considerations highlight suitable kitchen tools for achieving perfect frying environments, including digital thermometers’ trustworthiness or fryer size dynamics.

Uncover seasonal recipe turns, using vegetables in peak availability’s fullness, underscoring potential adaptations reshaping year-long enjoyment of favored dishes.

Join the Conversation


Share your sandwich preparation on social media using #LouisianaCrawfishChickenSandwich to connect with fellow creators, fostering a dynamic community of culinary enthusiasts.

Capture captivating photos with natural light, accentuating vivid colors and textures, enhancing visual storytelling while contributing to collective inspiration.

Delight in recipe reviews—taste experiences and tweaking triumphs tell tales of shared success, energizing others with creative culinary pursuits online.

Engage with evolving ideas and recipe variations emerging spontaneously, inviting freshness to context and execution while catering to wider enjoyment dimensions;

Your involvement breathes life into templates; responses rekindle recipe narratives, harmonizing unity within a broader culinary landscape.

The Recipe

Louisiana Crawfish and Fried Chicken Sandwich

Serves: 4

Prep Time: 30 mins

Cook Time: 20 mins

Total Time: 50 mins

Kitchen Equipment Needed

  • Frying pan or deep fryer
  • Tongs
  • Wire rack
  • Mixing bowls
  • Kettle or pan for boiling crawfish

Ingredients

  • 4 boneless chicken thighs
  • 1 lb crawfish tails
  • 4 sandwich buns
  • Cajun seasoning
  • 2 cups all-purpose flour (or gluten-free substitute)
  • 1 cup buttermilk (or dairy-free alternate)
  • Vegetable oil (for frying)
  • Salt and black pepper to taste
  • Optional toppings: lettuce, tomato, pickles

Directions

  1. Season chicken thighs with salt, pepper, and Cajun seasoning. Marinate in buttermilk for at least 30 minutes.
  2. Boil crawfish in salted water with a dash of lemon juice; drain and cool.
  3. Heat oil in frying pan to 350°F. Coat chicken in seasoned flour, dredge again for extra crispness.
  4. Fry chicken until golden brown and cooked through, around 5-7 minutes per side. Rest on wire rack.
  5. Slice and lightly toast sandwich buns.
  6. Assemble sandwich: layer fried chicken, crawfish, and optional toppings on toasted buns. Serve hot.

Recipe Notes

  • Adapt side ingredients based on availability and preference, ensuring the main components’ freshness.
  • Use a sweet or spicy sauce for added flavor if desired.

Delicious Roasted Garlic Mushrooms: Easy Recipe for Perfect Flavor

Roasted Garlic Mushrooms: A Flavor-Packed Appetizer

⚖️
Difficulty
Easy

⏲️
Prep Time
10 mins

🕒
Cook Time
30 mins

⏱️
Total Time
40 mins

🍽️
Servings
4

Imagine a warm plate of roasted garlic mushrooms fresh out of the oven—golden-brown mushrooms accentuated by the savory aroma of garlic and herbs. This dish combines the umami of mushrooms with the rich notes of caramelized garlic, offering a captivating experience for both your palate and senses. The perfect choice for those evenings when you want to impress without laboring in the kitchen, these roasted garlic mushrooms are not only delicious but also incredibly easy to prepare.

Quick Recipe Highlights

  • Flavor Profile: The primary flavors include the deep umami of mushrooms complemented by the sweetness of roasted garlic, with subtle hints of thyme enhancing the overall taste.
  • Texture: Mushrooms offer a tender bite, while the slightly crispy edges add a delightful contrast to their juicy interior.
  • Aroma: Expect an enticing aroma of earthy mushrooms and nutty roasted garlic, with a dash of herbal fragrance from fresh thyme.
  • Visual Appeal: The mushrooms take on a lovely golden hue, adorned with green flecks of herbs, presenting an appetizing visual.
  • Skill Level Needed: Suitable for beginners, requiring only basic chopping and mixing skills.
  • Special Equipment: A baking tray and oven are essential to achieve the perfect roast on these mushrooms.

Recipe Overview

  • Difficulty Level: This recipe is classified as easy due to its simple ingredient list and straightforward cooking steps.
  • Category: Best classified as an appetizer, though it also makes a great side dish for main meals.
  • Cuisine: With influences of Mediterranean cooking, it embraces a rustic and earthy style synonymous with European culinary traditions.
  • Cost: Economical and cost-effective, this recipe relies on affordable ingredients like mushrooms and garlic, ensuring it won’t break the bank.
  • Season: While it can be enjoyed any time of the year, mushrooms tend to be at their peak in the fall, making it a seasonal favorite.
  • Occasion: Ideal for cozy family dinners and gatherings, especially as a warm appetizer during festive occasions.

Why You’ll Love This Recipe

The combination of roasted garlic and mushrooms serves up such a delightful flavor experience that your taste buds will undoubtedly celebrate. The softened texture of mushrooms paired with the crispness of their edges offers a pleasurable eating experience that both children and adults adore. Not only does this dish pack a flavorful punch, but it’s also remarkably convenient to prepare with minimal cleanup required—making weeknight cooking a breeze.

In terms of nutrition, mushrooms are a great source of vitamins and antioxidants, promoting overall health while providing a low-calorie option. Furthermore, the dish is perfect for entertaining guests, as it requires minimal effort and can be prepared ahead of time, allowing you more time to mingle.

Emphasizing cost-effectiveness, roasted garlic mushrooms capitalize on budget-friendly ingredients, making them accessible to households looking to save time and money without compromising on flavor. Their adaptability to various dietary preferences only enhances their appeal, making them a favorite in many kitchens.

Historical Background and Cultural Significance

Mushrooms have been a staple in culinary traditions worldwide for centuries, valued for their flavorsome properties and health benefits. Originating from ancient times, they have graced the tables of many cultures, from the ancient Romans, who revered them as a delicacy, to the expansive forests of China and Japan.

Throughout history, garlic and mushrooms have transcended cultural boundaries, integrating into numerous cuisines. Whether roasted, sautéed, or used as a pastry filling, these ingredients boast a rich cultural heritage that intertwines with the culinary practices and traditions of many nations.

The beloved combination of garlic and mushrooms is emblematic of rustic European cooking, capturing seasonal harvest flavors and promoting natural ingredients’ use. This recipe, with its roots in such traditions, showcases how food can bridge time, tradition, and taste.

Ingredient Deep Dive

Mushrooms are celebrated globally for their unique flavor profile and culinary versatility. They have long been associated with both earthly and ethereal qualities, often linked to mystical lore due to their growth habits. From a nutritional standpoint, they’re low in calories but high in vitamins and micronutrients, making them a great addition to any meal.

Garlic, known for its aromatic potency and delightful flavor, has been a valued ingredient over millennia across various culinary landscapes. In addition to its versatility and robust flavor, garlic is renowned for its health benefits, including anti-inflammatory and cardiovascular protection qualities.

Common Mistakes to Avoid

  • Overcrowding the baking tray can cause the mushrooms to steam rather than roast, resulting in a soggy texture.
  • Using too much oil may lead to greasy mushrooms rather than allowing them to achieve the desired crispness.
  • Skipping the step to pat dry the mushrooms can introduce excess moisture.
  • Neglecting seasoning adjustments based on mushroom variety can lead to an imbalanced taste.
  • Roasting at a lower temperature may require additional cooking time, potentially drying out the mushrooms.
  • Improper storage of herbs can lead to flavor loss or spoilage.
  • Overcooking minced garlic results in bitterness.
  • Ignoring mushroom size uniformity can cause uneven cooking.
  • Using dried herbs without accounting for potency can overpower the aroma.
  • Disregarding oven preheating might lead to inconsistent roast.

Essential Techniques

Achieving perfectly roasted mushrooms hinges on selecting techniques wisely. Roasting allows natural sugars to caramelize, delivering deep flavors. Mastery over these techniques ensures elevated culinary skills and success in the kitchen. Watch for visual cues like golden coloring and aromatic development to gauge doneness.

Pro Tips for Perfect Roasted Garlic Mushrooms

Ensure your mushrooms are cleaned and patted dry to avoid unwanted moisture during roasting. Proper marination with oil and seasoning aids the absorption process, which enhances flavor. For even cooking, trim and arrange mushrooms cap-side down on the baking tray, allowing each piece ample space to breathe and roast properly.

Variations and Adaptations

This versatile recipe can morph to fit various palettes and dietary needs. For a spicy kick, consider adding crushed chili flakes. If you’re craving a richer dish, a splash of balsamic vinegar or a sprinkle of parmesan cheese can further elevate the flavors. Seasonal adaptations with available produce can offer an exciting twist to this classic appetizer.

Serving and Presentation Guide

These roasted garlic mushrooms can be plated artfully by using minimalist porcelain plates that contrast their rich color. Garnishing with finely chopped parsley adds a touch of freshness and visual appeal. Serving warm enhances the aroma and ensures a delightful tasting experience for your guests.

Wine and Beverage Pairing

While these mushrooms stand well on their own, pairing them with an appropriately selected wine or beverage enhances the overall dining experience. Pinot Noir, with its earthy tone, complements roasted garlic beautifully. A non-alcoholic pairing like spiced herbal tea can also match savoury mushroom notes.

Storage and Shelf Life

For optimal shelf life, allow mushrooms to cool completely before storing them in an airtight container, preserving their flavor and texture in the refrigerator for 2-3 days. The secret to reheating lies in avoiding the microwave; instead, use the oven to retain crispiness and depth of flavor.

Make Ahead Strategies

Prepare the ingredients a day in advance, keeping them in optimal condition to streamline cooking. Marinate mushrooms, allowing flavors to deepen, without compromising quality. Assembling all elements before the meal significantly reduces stress and ensures a seamless and enjoyable dinner experience.

Scaling Instructions

This recipe can easily be halved or doubled. Adjust seasoning proportionally to maintain intended taste. Use larger or multiple baking trays when scaling up to ensure even roasting. Cooking time remains stable but consider supervised adjustments as quantity increases.

Nutritional Deep Dive

These mushrooms are packed with nutritional benefits, delivering a healthy dose of vitamins and antioxidants, notably B vitamins and selenium. They serve as low-calorie, nutrient-dense foods that suit various dietary regimes, enhancing well-being and dietary satisfaction.

Dietary Adaptations

This recipe offers flexibility to suit dietary preferences. Substituting margarine for butter achieves a vegan version. Nut butter can introduce a creamier texture for those following a keto diet. Minor adjustments in the oil choice broaden suitability without sacrificing flavor depth.

Troubleshooting Guide

If the mushrooms turn out soggy, ensure adequate spacing and an elevated cooking rack next time. Flat or muted flavors can benefit from a more generous sprinkle of salt post-roasting. For uneven roasting, prioritize an even mushroom size and alignment on the tray.

Recipe Success Stories

Feedback from readers consistently highlights the positive experiences with roasted garlic mushrooms, from adapting seasonings to presentation inspiration. Many have shared creative photography and plating, celebrating the dish’s versatility in varied cultural cuisines.

Frequently Asked Questions

How do I store leftover roasted garlic mushrooms? Allow cooling completely before storing in an airtight container in the refrigerator for up to 3 days. Can I freeze this dish? While not recommended as fresh is best, flash-freezing soon after cooling retains some quality. Are other mushroom varieties suitable? Yes, button and cremini mushrooms are excellent alternatives. How to avoid bitterness in my garlic? Ensure garlic roasts to golden, avoiding burnt edges adhering to recommended cooking time.

Additional Resources

Explore related recipes to expand your mushroom-focused culinary repertoire, consult guides for innovative cooking techniques, and discover in-depth ingredient knowledge. Tailor your preparation with equipment recommendations and seasonal twist suggestions.

Join the Conversation

Engage with fellow culinary enthusiasts by sharing your experience with roasted garlic mushrooms on social media. Gather feedback, share photos, explore community tips, and foster a sense of connection and creativity in the kitchen.

The Recipe

Roasted Garlic Mushrooms

Serves: 4

Prep Time: 10 mins

Cook Time: 30 mins

Total Time: 40 mins

Kitchen Equipment Needed

  • Baking tray
  • Mixing bowl
  • Oven
  • Knife and chopping board

Ingredients

  • 500g button mushrooms
  • 4 cloves garlic, minced
  • 3 tablespoons olive oil
  • 1 teaspoon thyme leaves
  • Salt and pepper to taste

Directions

  1. Preheat the oven to 400°F (200°C).
  2. In a large bowl, combine minced garlic, olive oil, thyme, salt, and pepper.
  3. Add mushrooms, toss well ensuring even coating.
  4. Arrange mushrooms on a baking tray spaced apart.
  5. Roast for 30 minutes, stirring halfway, until golden and aromatic.
  6. Serve immediately, garnished with parsley if desired.

Recipe Notes

  • Add a dash of balsamic vinegar before serving for extra taste.
  • Substitute thyme with rosemary for a different flavor profile.

Irresistible Crunchy Tangy Pickled Vegetable Medley for Flavorful Snacking

Crunchy Tangy Pickled Vegetable Medley: A Zesty Feast for Your Senses

⚖️
Difficulty
Easy

⏲️
Prep Time
20 mins

🕒
Cook Time
10 mins

⏱️
Total Time
30 mins

🍽️
Servings
8

Embark on a vibrant culinary journey with this Crunchy Tangy Pickled Vegetable Medley. Perfect as a side dish or a snack, this recipe combines an array of fresh vegetables with a punchy brine. The explosion of tangy flavors paired with the satisfying crunch makes this pickled medley an irresistible enhancement to any meal. Whether you’re entertaining guests or simply desire a healthy bite, these pickled vegetables promise to please a variety of palates.

This recipe is a compelling balance of taste, texture, and aroma. It collects a colorful array of carrots, cucumbers, and radishes, each bringing a unique attribute to the medley. The brine, with its mix of vinegar, sugar, and spices, infuses each vegetable slice with a tangy zip while maintaining their crisp freshness. Served in a sleek jar, this medley not only contributes a burst of color to your kitchen counter but also a touch of homemade elegance.

Quick Recipe Highlights

  • Flavor Profile: A tangy, sweet, and slightly spicy harmony that dances on your taste buds.
  • Texture: Relish the crispy, crunchy bite in every vegetable slice.
  • Aroma: A delightful pickling scent with notes of garlic and dill filling the air.
  • Visual Appeal: A vibrant, kaleidoscope of colors that adds charm to any dish it accompanies.
  • Skill Level Needed: Easy enough for beginners yet rewarding for seasoned cooks looking for quick sides or snacks.
  • Special Equipment: A sharp knife, cutting board, and airtight jars are essential tools.

Recipe Overview

  • Difficulty Level: This is an easy-level recipe, perfect for those new to pickling or looking for a quick kitchen project without the demands of stove-top canning.
  • Category: Ideal as a side dish, condiment, or appetizer, adding an intriguing twist to meats, cheeses, or sandwiches.
  • Cuisine: The crunchy tangy pickled vegetable medley takes inspiration from American and global pickling traditions, emphasizing fresh ingredients and simplicity.
  • Cost: This economical recipe takes advantage of fresh seasonal produce, making it a budget-friendly way to enhance meals.
  • Season: Best enjoyed in summer when vegetables are at their peak, or anytime you’re in need of brightness in your winter meals.
  • Occasion: Suitable for BBQs, picnics, or holiday gatherings, and makes an excellent gift for food enthusiasts.

Why You’ll Love This Recipe

The medley is a treat for the taste buds. It’s a delightful balance of sweet, sour, and subtle heat, achieved through the vinegar and spices in the brine. Imagine layering a crunchy slice over your favorite deli sandwich or serving it as a zesty side to grilled meats. No matter the pairing, this medley is sure to be a hit.

The preparation of this crunchy tangy pickled vegetable medley is delightfully simple and quick, requiring minimal effort and yielding a result that’s as versatile as it is delicious. In just 30 minutes, you’ll have a flavor-packed pickled vegetable assortment ready to refrigerate and enjoy.

Nutritionally, this recipe is mostly vegetables with a light pickling solution, making it a low-calorie accompaniment packed with the natural vitamins and minerals found in fresh produce. It’s a healthful way to explore pickling without the addition of heavy syrups or preservatives.

Sharing this medley at social gatherings brings a touch of homemade charm and differentiates your contributions with its unique presentation and fresh flavors. It’s an excellent conversation starter and complements a variety of dishes, from charcuterie boards to simple hors d’oeuvres.

Being accessible and affordable, the ingredients for this medley are commonly found in grocery stores year-round, ensuring that this tangy treat can brighten your table whatever the season.

Historical Background and Cultural Significance

The history of pickling traces back over 4,000 years to ancient Mesopotamia, where it began as a method to preserve surplus foods. Since then, it has crossed cultural barriers, adapting and evolving across continents. This medley draws from traditional pickling practices while allowing room for innovation in personal flavor preferences.

In many cultures, pickling is an art form and a necessity, passed down through generations as a means of conserving the harvest. From Korean kimchi to German sauerkraut, each tradition offers unique methods and flavors that inspire today’s gusto for pickled creations.

The Craft of Pickling became prominent in 18th and 19th-century America with the advent of homesteading, where preserving food was critical to surviving long winters. This legacy continues today as home cooks and chefs alike reinvent pickling techniques to introduce modern flavors and ingredients.

While regional variations are numerous, the heart of pickling remains the same—to transform vegetables into tangy, crisp delights that enhance meals—reflecting both our universal need for preservation and our creative culinary expressions.

Ingredient Deep Dive

Carrots are known for their sweet, earthy taste and are a pickling favorite. A good source of beta carotene, fiber, and several vitamins, carrots add both nutritional and aesthetic appeal to any dish. Choose firm, vibrant carrots for the best results, and store them in the refrigerator crisper drawer to keep them fresh longer.

Cucumbers, always a staple in pickling due to their fresh, juicy bite, offer nutritional benefits such as hydrating properties and high vitamin K content. For pickling, opt for firm cucumbers without soft spots. Store them in a cool, dry place to enhance their shelf life.

Radishes provide a peppery kick that awakens your senses and adds a touch of heat to the medley. They’re packed with vitamin C and antioxidants, making them a healthy, flavorful addition. Use fresh radishes and consume them within two weeks to ensure they retain their crisp texture.

Common Mistakes to Avoid

  • Not cutting vegetables evenly, which can result in inconsistent pickling.
  • Overcrowding jars, leading to incomplete pickling and loss of crunch.
  • Forgetting to sterilize jars, which could introduce harmful bacteria.
  • Using old spices, diminishing flavor strength and aroma.
  • Storing in direct sunlight, which may heat the brine and spoil the pickles.
  • Opening jars frequently, exposing the brine to air and affecting fermentation.
  • Ignoring vegetable freshness, which impacts overall quality and taste.
  • Ignoring salt and vinegar ratios, leading to over-salty or too mild pickles.

Essential Techniques

Uniform slicing of vegetables is crucial for even pickling. Achieve this by using a mandolin or sharp knife, ensuring each piece absorbs the brine uniformly and enhances the overall texture. Be careful with your fingers when working with sharp tools.

Creating a perfect brine requires balancing acidity, sweetness, and spice. Always taste your brine before adding it to your vegetables. Adjusting salt, sugar, and vinegar proportions is key to getting the flavor just right.

Maintaining a sterile environment is essential in pickling to prevent spoilage. Boil jars and lids for at least 10 minutes, then air dry completely. Clean work surfaces and hands ensure minimal risk of contamination.

Pro Tips for Perfect Crunchy Tangy Pickled Vegetable Medley

Use fresh dill rather than dried, as it imparts a brighter, fresher flavor to the brine. Snip stems directly into jars for maximum aroma.

For added kick, consider including a pepper or two, such as jalapeño or chili, sliced thinly alongside your vegetables.

Experiment with your spice selection—mustard seeds, coriander seeds, or bay leaves can all add unique elements to the brine, bringing your personalized touch to the recipe.

Ensure your jars are tightly sealed to maintain a vacuum effect, preserving your medley’s longevity and flavor integrity.

Consider pickling overnight for a more intense flavor, keeping the taste robust and vegetables crispy.

Always refrigerate your medley after opening to retain freshness and stave off spoilage.

Variations and Adaptations

Regional variations of this medley may see the inclusion of beets for a deeper flavor and color, or incorporating exotic spices like star anise and cardamom for a fragrant delight. Adjust your recipe to reflect these unique preferences while honoring traditional techniques.

In the cooler months, opt for root vegetables like turnips and sweet potatoes, which provide a heartier crunch and earthy sweetness. Summer calls for lighter veggies like zucchini and peppers to refresh the palate.

For dietary modifications, this pickle can easily go sugar-free by substituting with stevia or monk fruit, allowing low-sugar dieters to enjoy the medley without compromise.

Enhance the brine with citrus notes such as lemongrass or orange peel for an extra layer of complexity, offering a twist to the traditional tangy profile.

Alter the texture by including lightly steamed cauliflower for a softer bite, expanding the pickled vegetable’s role as both a snack and side dish.

Serving and Presentation Guide

Serve your pickled medley in crystal-clear jars with sprigs of dill or peppers as decorative garnishes, highlighting the vibrant colors and emphasizing their homemade charm.

Arrange on wooden boards alongside creamy cheeses, nuts, and charcuterie for a sophisticated, elevated presentation.

Balance heartier meals by serving cold from the jar, adding a refreshing note to the warmth of oven-baked dishes.

Consider individual tasting portions in small cups or ramekins for starter plates at gatherings, sparking curiosity in the colorful mix.

Plating should reflect the medley’s rustic origins yet contemporary versatility, aligning with the recipe’s charm.

Pair temperature wisely, ensuring vegetables are served chilled or at room temperature to enhance freshness.

Wine and Beverage Pairing

A good white wine with crisp acidity, such as Sauvignon Blanc or a dry Riesling, complements the pickle’s tang while helping counteract its vinegar sharpness.

For a non-alcoholic choice, selection should center around beverages with a slight acidity—like a brewed ginger soda or sparkling water with lime.

Consider pairing with cold brew teas or herbal infusions that carry floral or citrus notes, balancing the richness of the vegetables with their calm subtleties.

Serve wines chilled and ensure beverages are served at their optimal temperature to maintain essential characteristics which enhance the pickled components.

Storage and Shelf Life

Store jars in a cool, dark place such as a pantry or cupboard before opening, ensuring the most extended shelf life for your pickles.

Post-opening, secure lids tightly and refrigerate them immediately, maintaining temperature control to prevent spoilage.

Opt for glass containers with airtight lids which help preserve flavor integrity and avoid contaminants interacting with the brine.

Check pickles regularly for signs of spoilage such as cloudiness or off-odors, a sign the pickling process has been compromised.

Reheating is not necessary for this medley, as its nature is best enjoyed cold or at room temperature, preserving texture and crunch.

Freezing is inadvisable as it compromises the integrity of the vegetables, causing them to become mushy once thawed.

Make Ahead Strategies

Prepare the brine days in advance, allowing it to meld flavors and ensuring a potent infusion when combined with vegetables.

Store brine separately from vegetables until required, avoiding premature soaking and potential textural changes.

Consider slicing and preparing vegetables the night before, keeping them fresh in the refrigerator covered in cold water for peak crispness.

Assemble the pickles on the day they are to be gifted or served as maximal freshness ensures the best flavor profile.

If adding fresh herbs, do so at later stages to maintain vibrant color and aromatic appeal.

Reheating isn’t recommended—serve chilled for the best taste experience.

Scaling Instructions

Halve the recipe easily by maintaining the ratio of spices and brine ingredients, adjusting only the volume of vegetables accordingly.

For larger batches, simply double the amounts, considering bigger jars and more extensive equipment like larger pans to accommodate the extra liquid.

Keep in mind timing adjustments, especially when packing and sealing higher volumes, as overpacking can delay even pickling.

Storage becomes crucial with larger quantities; ensure ample cool storage is available for the additional jars.

Care must be taken that each scaled portion retains distinct flavor elements—test brine before finalizing with additives.

Nutritional Deep Dive

This vegetable medley is an excellent low-calorie, nutrient-dense addition to meals, supporting dietary needs with vitamins A, C, and K without compromising taste.

Each serving offers a macro-friendly profile ideal for sticking to nutritional goals, offering hydration benefits alongside a crisp crunch.

Pickling boosts potential probiotics—good for gut health—while still being mindful of sodium content dictated by personal dietary preferences.

For those monitoring portion sizes, aim for a moderate serving that accompanies a balanced diet, lending exciting taste to even the most straightforward dishes.

Maintaining a balanced diet while savoring the potent tangy element assures this medley remains a multipurpose, healthy selection.

Dietary Adaptations

For gluten-free diets, ensure vinegar choice is gluten-free certified.

Dairy-free diets remain unaffected, as this recipe excludes any dairy contamination.

To make it vegan-friendly, keep focus on fresh plant-based enhancements, with no animal derivatives or additives involved.

For a low-carb or keto adaptation, focus on vegetables with low glycemic indices, like bell pepper or cabbage, enhancing variety here without excess carbohydrates.

Paleo dieters will find the addition of sugar-free brine accommodates their nutritional needs excellently, preserving traditional values yet modern adaptability.

Potential for low-FODMAP versions is realizable by avoiding onions or garlic within brine selections or choosing appropriate alternatives.

Troubleshooting Guide

Troubleshoot texture issues by ensuring precise cut sizes—uneven thicknesses lead to variance in crunch.

Balance flavors if overly tangy by adding sugar or boiling longer to tame vinegar bite; alternatively, dilute with additional water.

Address temperature concerns by adjusting cooling time, especially if brine remains warm when pouring over vegetables.

Tackle equipment constraints by opting for reliable measuring tools and sharp knives, achieving consistency in process.

Contend with ingredient substitutions—personal taste is king; consider varied spices to replace hard-to-find items.

Address timing concerns by following recipe steps closely, allowing consistent flow and integrity throughout preparation.

Recipe Success Stories

Many readers share stories of experimenting with new spices, confirming the rewarding joy of culinary innovation surrounding this medley.

Success often follows those who make personalized adjustments to favorite spice profiles, adapting the medley while respecting its foundations.

Positive feedback continually underlines the blend’s flexible assignments—seen transformed into delightful snacks and thoughtful gifts.

Community insight frequently informs subtle adaptations, contributors generously divulging kitchen anecdotes enhancing collective knowledge.

Photography wisdom amassed through these sharings widens vistas—imageries depict lovingly-styled jars against natural backdrops, celebrating ingredient vibrance.

Frequently Asked Questions

Can I use any type of vinegar?
While apple cider or white vinegar is customary, experimentation with balsamics is feasible. Results may differ; choose assertive essences for full appreciation.

How long do the pickles last?
Unopened, these pickles maintain freshness for up to six months. Once opened, consume within four weeks under refrigeration to sustain quality.

What happens if the brine turns cloudy?
Cloudy brine may stem from impurities. Always sterilize jars, and select fresh, quality ingredients to minimize the risk.

How can I make the pickles spicier?
Incorporate sliced peppers like jalapeño into the brine or add red chili flakes for a more pronounced heat.

Is the sugar necessary?
Sugar balances acidity, although alternatives like stevia work if desired, keeping sweetness without refined sugars.

Why is sterilization important?
Sterilization protects against bacteria and ensures the pickles remain fresh, safe, and delicious.

Can I reuse the brine?
Reusing brine is possible, but flavor intensity may dip. Reheat and adjust seasonings if ventured.

Why are my pickles not crispy?
Overboiling or over-filling jars can soften pickles; ensure a balance between acid ratios and vegetable quality.

What’s the ideal temperature for storage?
Keep unopened jars in a cool, dark place, and refrigerate when opened to extend the medley’s lifespan.

Can I use different vegetables?
Absolutely—your choice could range from zucchinis to peppers. Aim for similarity in texture and acidity absorption.

How thick should the vegetable slices be?
Strive for uniform, quarter-inch thickness per slice—this heightens both absorption and texture retention.

Is it necessary to dry vegetables before pickling?
While not mandatory, it ensures better crispness and reduces residual water affecting brine potency.

Additional Resources

For linked resources, explore craft pantry basics highlighting fresh ingredients for ideal pickling outcomes or culinary origins informing global preferences, heightening enjoyment.

Technique guides on best cutting methods enhance proficiency, honing kitchen skills beneficial for wider recipe applications.

Ingredient insights are invaluable, offering deeper dives into nutritional profiles and shelf-life extensions aiding consistent quality.

Equipment recommendations persist as crucial considerations for preparation success—any enthusiastic cook benefits from erring toward reliability and precision.

Celebrate regional influences, embracing seasonal expansions during cultural festivals or innovative fusions contributing joy within dietary frameworks.

Join the Conversation

Engage in community-building through recipe sharing and storytelling on social media. Find others who have tried the medley and disseminate your creations through photos.

Explore various platform photography tips, capitalizing on natural light and seasonal backdrops online.

Delve into active recipe reviewing, expressing creations and adaptations with shared experiences for expanding collective knowledge.

Offer feedback and garner suggestions while weaving personal twists into robust dialogues, cultivating interchange and enriching recipe legacies.

The Recipe

Crunchy Tangy Pickled Vegetable Medley

Serves: 8

Prep Time: 20 mins

Cook Time: 10 mins

Total Time: 30 mins

Kitchen Equipment Needed

  • Cutting board
  • Sharp knife or mandolin
  • Peeler
  • Mixing bowl
  • Saucepan
  • Jars with airtight lids

Ingredients

  • 1 cup carrots, peeled and sliced thin
  • 1 cup cucumbers, thinly sliced
  • 1 cup radishes, thinly sliced
  • 1 cup white vinegar
  • 1 cup water
  • 1/4 cup sugar
  • 1 tbsp salt
  • 1 tsp mustard seeds
  • 2 cloves garlic, sliced
  • Fresh dill, to taste
  • Optional: Chili flakes for heat

Directions

  1. Prepare all vegetables by washing, cutting, and placing them into a mixing bowl.
  2. In a saucepan, combine vinegar, water, sugar, salt, mustard seeds, and garlic. Bring to a boil over medium heat, stirring until the sugar dissolves.
  3. Remove from heat; let cool slightly. Pour brine over vegetables, mixing to ensure even coating. Add dill and chili flakes if using.
  4. Transfer vegetables to jars, packing tightly but not so much to crush them.
  5. Tightly close jars and let them sit at room temperature for about an hour before refrigerating.
  6. Allow flavors to meld by refrigerating overnight before serving.

Recipe Notes

  • Experiment with additional vegetables like beets or cauliflower for variety.
  • Adjust spice amounts to personal preference for heat and aroma variations.

Irresistible Crock Pot Mississippi Beef Noodles for Cozy Comfort Food

Crock Pot Mississippi Beef Noodles: A Slow Cooker’s Delight

⚖️
Difficulty
Easy

⏲️
Prep Time
15 mins

🕒
Cook Time
480 mins

⏱️
Total Time
495 mins

🍽️
Servings
8

Welcoming the rich and hearty flavors of Crock Pot Mississippi Beef Noodles into your home is like embracing an old culinary friend. This dish, imbued with a perfect balance of tender beef, aromatic spices, and comforting noodles, epitomizes the soul-warming potential of savory home cooking. As the spices blend harmoniously with the beef in your slow cooker, the aromas fill the air, marking the countdown to a delicious, effortless meal that’s both satisfying and easy to create.

Mastering the art of slow cooking brings a myriad of joys, from the simplicity of preparation to the depth of flavor. By allowing the ingredients to meld over hours, the Crock Pot Mississippi Beef Noodles create a multi-layered taste explosion. The slight tanginess of pepperoncini adds a lively zing, while the beef releases its juices to create a succulent broth that the noodles eagerly soak up, resulting in a bowl of comfort food that is hard to resist.

Quick Recipe Highlights

  • Flavor Profile: The dish combines savory beef flavors with tangy pepperoncini, enhanced by a buttery-rich broth.
  • Texture: Enjoy the tender fall-apart beef paired with slightly chewy, fully absorbed noodles.
  • Aroma: Expect inviting scents of slow-cooked beef mingled with spices filling your kitchen.
  • Visual Appeal: A hearty and rustic presentation with specks of green pepperoncini across a rich broth.
  • Skill Level Needed: Perfect for beginners, with simple steps and minimal hands-on time.
  • Special Equipment: A crock pot and pot for boiling noodles simplify the cooking process.

Recipe Overview

  • Difficulty Level: This recipe is easy, relying on slow cooking to tenderize the beef without requiring complex techniques.
  • Category: Ideal as a main course for lunch or dinner.
  • Cuisine: While American in origin, it harbors southern flavors reminiscent of comfort food staples.
  • Cost: Economical, with ingredients that are accessible and budget-friendly.
  • Season: Best enjoyed in cooler months when hearty meals are most appreciated, though suitable year-round.
  • Occasion: Perfect for family dinners, casual gatherings, or comfort-focused meal prepping.

Why You’ll Love This Recipe


Crock Pot Mississippi Beef Noodles is a testament to the power of flavors brought together in a harmony only achievable through slow cooking. The lean, succulent beef becomes tender in its bath of savory spices, offering a melt-in-your-mouth texture balanced by the accompany of firm noodles. Whether you’re longing for a weeknight meal that minimizes stress or seeking to impress guests with an aromatic dish, this recipe is perfect. Its straightforward preparation is a major convenience, with most of the work done by your trusty crock pot.

Nutritionally, this dish provides a hearty meal rich in protein from the beef, supporting muscle health and energy levels. Its naturally low-carb profile can be adjusted to suit dietary preferences by simply choosing alternative pasta options like zucchini noodles or low-carb shirataki.

Not only is this recipe convenient, but it also offers significant social value by evoking warmth and comfort in every bite. This makes it a great choice for a shared meal that brings loved ones together. Its cost-effectiveness is undeniable, assembling simple ingredients into a gourmet-level feast, proving that a delicious meal doesn’t need to be expensive or overly complex.

Historical Background and Cultural Significance


Crock Pot Mississippi Beef Noodles draws influences from the beloved Mississippi Pot Roast. This dish emerged as a popular alternative to classic beef dishes, combining the simplicity of ranch seasoning with tart pepperoncini for a distinctive taste. Originating in American households looking to innovate simple beef meals, it represents culinary creativity born from commonplace ingredients.

Its cultural importance is tied to its rise in the late 20th century as a staple comfort food, loved for its gathering qualities and substantial heartwarming nature. With time, variations sprouted nationwide, with chefs adding their personal twists to adapt it for modern diets and preferences, like incorporating noodles for a more complete meal.

Regional variations add a layer of intrigue, with some households favoring spicy versions, while others prefer to enrich the dish with additional vegetables. Regardless of changes, its core essence remains, a testament to comforting, delicious simplicity via slow cooker magic.

Ingredient Deep Dive


For the star protein, beef chuck roast is unrivaled in this recipe due to its ideal composition for slow cooking. Its marbled fat breaks down over hours, delivering succulence and flavor unmatched by leaner cuts. Nutritionally, it’s a robust source of essential minerals and protein.

When sourcing, aim for a roast with a good balance of red and marbled white. This not only ensures flavor but also guarantees tenderness post-cooking. To store, wrap tightly and refrigerate or freeze, ensuring freshness until use. If unavailable, brisket or a good-quality stewing beef stand as solid substitutes.

Pepperoncini buck tradition with their use, providing a tangy punch. Tied to Mediterranean cuisine, they bring both zest and brightness, intriguing the palate. Opt for fresh links or marinated jars, stored sealed to retain flavor and crunch. Consider banana peppers for a milder take without losing character.

Common Mistakes to Avoid

  • Using the wrong cut: Avoid lean cuts which may dry out, like sirloin or flank steak.
  • Skimping on cooking time: Ensure the beef is adequately slow-cooked for tenderness.
  • Overcrowding with liquid: Maintain balance, as too much stock dilutes flavor intensity.
  • Undercooking noodles: Add them last to prevent sogginess.
  • Neglecting seasoning adjustments: Taste frequently to manage saltiness and spice.
  • Skipping browning: Searing the beef briefly enhances the dish’s depth of flavor.
  • Inadequate crock pot size: Choose a suitable size to allow for even cooking.
  • Overcooking: Like any slow-cooked dish, excessive time can lead to texture breakdown.

Essential Techniques


Mastering the sear on your beef provides an extra layer of flavor that’s essential to the dish’s fullness. Browning meat catalyzes the Maillard reaction, wondrously caramelizing natural sugars and amino acids, resulting in complex flavor without added effort. Achieving this involves a hot pan and patience, allowing the beef to develop a rich crust before slow cooking begins.

Managing slow-cook temperature is equally crucial; too high and tough fibers remain, but optimally low temperatures convert fibers into silky textures. Visual cues guide; bubbling indicates high heat, while gentle steaming implies even cooking.

Pro Tips for Perfect Crock Pot Mississippi Beef Noodles


Opting for homemade beef broth elevates, taking depth further than store-bought varieties. This addition enhances the savory undertones naturally present, unfolding complexity with every bite. Similarly, fresh garlic cloves provide more vibrant flavors in comparison to powders or pastes.

Adding butter towards the end, rather than the beginning, ensures a rich finish keeping all elements commanded under the sumptuousness unique to this dish. Exploring noodle varieties opens up exciting options; egg noodles introduce silkiness, while whole wheat pairs heartily.

While traditional recipes favor classic stews, experimenting with seasonal vegetables, such as autumn’s squash or spring’s asparagus, infuses both color and nutrition. Lastly, always taste before serving; seasoning balances can shift slightly during transit and adjust it as desired.

Variations and Adaptations


Regional takes offer something new every time. In hotter climates, the dish accepts chili flakes for a spirited kick, contrasting with added cream in cooler areas for a velvety texture. Celebrating seasonality, winter brings hearty roots interspersed throughout while summer invites fresh herbs and lighter noodles.

For dietary needs, gluten-free diners welcome rice noodles as an adaptable alternative, maintaining texture without gluten concerns. Low-carb analogs like zucchini noodles or shirataki replace traditional, accommodating ketogenic approaches and broadening recipe appeal.

Flavor tweaks abound; add balsamic glaze or dijon mustard for a nuanced twist without subtracting authenticity. A puree of peppers or a cilantro sprinkle introduces new personalities, while fried shallots atop ensure a touch of crunch contrasting the stew’s softness. Consider deviations part of the fun in making it your own.

Serving and Presentation Guide


Serving Crock Pot Mississippi Beef Noodles is just as much an art as it is enjoyment. Utilize deep bowls to contain the comforting broth alongside noodles, ensuring warmth throughout the serving. A pretty garnish makes all the difference; delicately place fresh parsley or thyme atop for an inviting pop of green, contrasting beautifully against the beef’s umber.

Traditional pairings like crusty bread soak up any remaining broth, integrating as part of the meal rather than mere sidekick. Intriguingly spice with sautéed greens or a light side salad for modernity. Temperature matters hugely, serving while warm retains flavors fully and offers the natural mouthfeel of the plump beef and noodles.

For larger gatherings, portion control is simple; pre-measured servings allow each guest to self-assemble, mingling conversation with culinary exploration. Encouraging diners to personalize garnishes not only enhances presentation but invigorates their dining experience swiftly turning your meal into memorable feasting.

Wine and Beverage Pairing


Wine pairing begins with choices complementing hearty undertones, red and full-bodied wines such as Cabernet Sauvignon or Merlot are perfect companions, intertwining with savory beef complexity. For a softer touch, Pinot Noir’s fruitiness cuts through richness without dominating.

Non-alcoholic wishers can savor iced tea, its subtlety refreshes palate depth, while beverage lovers indulge further using sparkling water infused with lemon or mint shards enhancing, instead of overshadowing, meal vibrations.

Coffee might satisfy post-dinner cravings; French roast offers elegance and ensures guests leave sated by the entire culinary narrative while proving a splendid afterthought in the meal’s prolonged enjoyment. Serving these at room temperature brings out notes naturally harmonious with the beefy dishes’s unbranched vitality.

Storage and Shelf Life


Longevity with Crock Pot Mississippi Beef Noodles reflects the benefits of slow-cooked meals, improving flavor over one or two resting nights in the fridge. Room-temperature cooling is paramount before sealing leftovers in airtight containers, designed to lock in freshness.

Storage remains optimal in the fridge for two to three days; longer alone compromises taste integrity, entailing deep preservation with reputable freezing methods. When thawing, gentle reheating over consistent medium warmth revives the dish’s former glory.

Signs of spoilage exist primarily in aroma shifts—musty scents indicate need for discard. Consider quick-freezing for prolonged enjoyment; efficiencies advocate meal preparedness without nutrient depletion.

Make Ahead Strategies


Crock Pot Mississippi Beef Noodles presents itself well as a make-ahead strategy, cooling and storing enriches flavor while reheating maintains freshness. Construct over two phases if time demands cap; premises include assembling stewed base premade, freezing and warming subsequently before serving.

Proactive planning facilitates untroubled mealtimes, even during fast-paced schedules. If reconciling as event serving, assemble fully save last-minute accompaniments stored spartially. With gentle warming methods, including slow cooker settings proffering noticeable advantages during service.

Fresh elements complement right before serving; even finished dishes attract added zest spoonfuls enhance well-honed culinary efforts. The care you take now provides dividends inspiring culinary satisfaction whenever desired.

Scaling Instructions


Scaling the recipe caters to varying needs; doubling suits larger gatherings yet demands larger crock pots, ensuring sufficient heat distribution for even cooking. Noodles adjust proportionally, monitored closely to forestall sogginess.

Halving relieves single or couple meals, modulating spices and tweaking seasoning concentrations appropriately, maintaining balance. Each step recognizes requirements of changed sizes without altering basic enjoyed integrity.

Time alterations reflect adjustments; smaller portions require shortened exposure to heat, potentially modifying tenderness. Store repetitive servings efficiently reaching maximum flavor utilization. Adept scaling involves awareness married with the courage to trust senses as guides.

Nutritional Deep Dive


Despite its hearty nature, Crock Pot Mississippi Beef Noodles achieves a balanced nutritional profile. Lean protein from beef supports muscle growth while B vitamins promote metabolism stability, vital for energy maintenance.

The marinade of ingredients introduces micronutrients while low-carb potential accommodates special dietary adherence, sported through nutritional sources sans undue carbohydrates. Serving size advocacy ensures healthfulness whenever absorbing culinary delight.

Weight management direly influences, directing focus towards consuming optimal ratios personally fulfilling yet aligning with nutritional aspirations and schemes for healthier living. Delve into proportions for gratifying yet responsible nourishment enjoyment.

Dietary Adaptations


For those adhering to a gluten-free regimen, replacing traditional noodles with rice or rice varieties ensures comfort without concern. Dairy-free options may exclude butter, using coconut oil or ghee for similar richness.

Vegan seekers find joy substituting beef with hearty mushrooms, tofu or a blend of plant-based meats appealing per need. Shrink carbohydrate intake using shirataki noodles or spiralized veggies, yielding keto adaptations without losing familiar warmth.

Addressing paleo preferences sees broth crafted first, eliminating artificial condiments. Various alterations prove an open canvas, modifying per taste or compliance, allowing universal embrace of beloved Beef Mississippi flavors in inclusive kitchen settings.

Troubleshooting Guide


For achieving consistent texture avoid excess liquid dilution, concentrate flavors. Inconsistencies arise when liquid overheats, requiring vigilance. Tackle flavor imbalances by reassessing component quantities; subtle tweaks rectify.

Equipment choice determines efficiency yet adaptors prevail using larger free configurations, distributing heat evenly and achieving desired tenderness. For substitutes uncaptured, experiment temperance and revise aromatic inclusions tactfully.

Timing guides remain essential, dictated by needs and demands; prioritize quality delivery and frequent reassessment between stages aids showcasing favorable outcomes. Unearth successes by attentiveness and earnest culinary exploration shared aspirationally here.

Recipe Success Stories


Crock Pot Mississippi Beef Noodles’ success has transcended from original homes, with audiences sharing satisfaction and creativity. Feedback enriches the recipe, sparking innovation with individual touches, bringing contrasting contexts woven into culinary artistry.

Reader adaptations spark room for camaraderie, suggesting assorted changes like swapping zucchini ribbon noodles at neighborhood potlucks, providing countless visually engaging and dynamic colors alongside refreshing textures with ease.

Boasting viewer photography opens glimpses into unique presentations accompany radiantly-styled assortments and exchanges. Seeking energy fulfilling culinary customs collectively, welcoming learning thrives with every delighted dish shared, celebrated with further prospective contributions influencing course of future tables.

Frequently Asked Questions

Can I make this dish without a slow cooker? Absolutely, the recipe can be adapted for oven or stovetop use, adjusting the cooking time accordingly for tenderness.

What if I prefer a different meat? Beef’s robustness fits well here, although pork shoulder or chicken thighs offer alternative flavors requiring different cooking times for best results.

Is it possible to freeze this dish? Yes, Crock Pot Mississippi Beef Noodles hold up well when frozen. Ensure complete cooling before sealing in portions to optimize storage longevity.

How do I achieve the right noodle texture? Introduce noodles near serving to avoid overcooking, allowing them to retain that perfect al dente quality while absorbing the delicious broth.

What’s an alternative to pepperoncini? Substitute with mildly spiced banana peppers or even capers for an alternative tangy zest without overpowering the established profile.

Can it be adapted for a vegetarian? Certainly, substitute beef with robust vegetables or use meat alternatives, adjusting spices slightly for desired flavor balance.

How should I season to avoid oversalting? Seasoning should occur incrementally, starting conservatively and adjusting per taste preference nearing serving, especially when using stock or consolidated broth variants.

What kind of noodles complement the beef best? Broad egg noodles marry exquisitely due to their ability to sop up the broth’s richness, but rice noodles deliver similarly delightful results.

Can I add other vegetables? Vegetables like carrots, onions, or celery integrate seamlessly, complementing without overshadowing the primary flavor players.

Is this dish suitable for reheating? Reheating is definitely possible, either gently over the stove or in a microwave to preserve the aromatic foundation laid meticulously during the cooking process.

What if my beef turns out dry? Avoid overcooking, keep slow-cooked temperatures consistent, and ensure liquids cover ingredients sufficiently to retain beef’s moisture.

How do I adjust the recipe for spice levels? Play with spice metrics through reductions or omissions, especially involving hot components like pepperoncini, customizing it comfortably to your palate.

Additional Resources


Explore further by delving into complementary recipes like Southern Buttermilk Biscuits or Mac and Cheese for delightful accompaniments that shine alongside Crock Pot Mississippi Beef Noodles. Unravel slow cooking guidelines optimizing crock pot capabilities and culinary outcomes.

Ingredient focus fosters deeper understanding; ranging from beef sourcing excellence to herbaceous pepper selection, enriching foundational knowledge enhances authenticity further. Alternatively, browse the best seasonal alterations aligning comforts of Mississippi Beef Noodles to match climates beautifully.

Technical aids advise equipment matching, ensuring high device performance, elevating consistent results. Embark with imaginative seasonal inspirations gravitating diverse methodologies for familiar yet fresh rediscoveries in kitchen experiments.

Join the Conversation


Community engagement provides dynamic inspiration. Share your take on Crock Pot Mississippi Beef Noodles via social media, invite collective exchanges reflecting variations as kitchen tours kindle fresh conversation, using hashtags with pride.

Spur photographic creativity; align meals instinctively capturing presentations fulfilling eyes and expectations. Partake in recipe review sections extending inspiration blending melding insights and aspirations, directly enriching mutual understanding.

Craft newer variations and envision collaborations channeling positivity; through engaging exchanges, our table together pulsates with vibrance rekindling adventures anew and spirited wide-reaching momentum.

The Recipe

Crock Pot Mississippi Beef Noodles

Serves: 8

Prep Time: 15 mins

Cook Time: 480 mins

Total Time: 495 mins

Kitchen Equipment Needed

  • Crock pot
  • Large pot for noodles
  • Sharp knife
  • Cutting board
  • Measuring cups/spoons

Ingredients

  • 3 lbs chuck roast
  • 16 oz egg noodles
  • 1 pack of ranch seasoning mix
  • 1 pack of au jus gravy mix
  • 1/2 cup unsalted butter
  • 6-10 pepperoncini peppers
  • 4 cups beef broth
  • Salt and pepper to taste

Directions

  1. Place the chuck roast in the crock pot. Sprinkle with ranch and au jus mixes.
  2. Top with butter and pepperoncini peppers. Add beef broth.
  3. Cover and cook on low for 8 hours or until beef is tender.
  4. Shred beef in the pot, using forks.
  5. Cook noodles separately as per package instructions; drain and add to crock pot.
  6. Stir ingredients to combine well and serve hot.

Recipe Notes

  • For a spicier version, add additional pepperoncini or crushed red pepper flakes.
  • Leftovers can be stored in an airtight container for up to 3 days.
  • Substitute beef broth with chicken broth for a different flavor profile.

Discover the Timeless Delight of Classic Beef Liver and Onions

Classic Beef Liver with Onions: A Hearty Delight

⚖️
Difficulty
Easy

⏲️
Prep Time
10 mins

🕒
Cook Time
20 mins

⏱️
Total Time
30 mins

🍽️
Servings
4

Delight in the rich and savory flavors of Classic Beef Liver with Onions, a recipe that’s as nutritious as it is delicious. This traditional dish combines tender beef liver with sweet, caramelized onions to create a perfect symphony of taste and texture. It’s a meal that brings comfort and warmth, perfect for any time you crave a hearty home-cooked dinner.

Beef liver is known for its distinct, deep flavor, enhanced by the sweet softness of sautéed onions. As you cook this dish, the aroma fills your kitchen, promising a deliciously satisfying meal. Enjoy each bite of this nutrient-dense food, packed with iron, vitamin A, and various essential nutrients, all while embracing a classic recipe passed down through generations.

Whether you’re a longtime fan of beef liver or trying it for the first time, this recipe for Classic Beef Liver with Onions is sure to impress. Easy to prepare, this dish allows you to enjoy a gourmet experience at home without spending hours in the kitchen. With just a few essential ingredients and simple steps, you can serve a meal that delights both the palate and the senses.

Quick Recipe Highlights

  • Flavor Profile: The dish offers a bold and rich flavor from the beef liver, perfectly complemented by the sweet and savory taste of the onions.
  • Texture: Experience a delightful combination of tender liver with the soft, caramelized texture of onions, making every bite pleasurable.
  • Aroma: Immerse yourself in the enticing scent of liver searing combined with onions slowly caramelizing in the pan.
  • Visual Appeal: Present a visually appealing plate with the deep brown of liver juxtaposed against golden onions.
  • Skill Level Needed: This recipe is easy, suitable for both beginner and seasoned cooks who appreciate traditional dishes.
  • Special Equipment: A good quality frying pan ensures even cooking and enhances caramelization.

Recipe Overview

  • Difficulty Level: Categorized as easy, this recipe requires minimal culinary skills and focuses on basic cooking techniques like sautéing.
  • Category: Fits well into both main course and quick weekday dinner categories, making it versatile for meal planning.
  • Cuisine: A staple in many cultures, this dish showcases a blend of traditional Western culinary practices.
  • Cost: Considered a budget-friendly option, using inexpensive ingredients without sacrificing quality or taste.
  • Season: Best enjoyed in cooler months, thanks to its hearty and warming characteristics, but enjoyable year-round.
  • Occasion: Suitable for casual family dinners, offering a comforting and familiar dining experience.

Why You’ll Love This Recipe

The Classic Beef Liver with Onions is a culinary gem featuring a robust medley of flavors, making it a must-try for liver lovers. Its rich taste comes from perfectly cooked beef liver, enhanced by sweet, sautéed onions that add a pleasant contrast. Together, they create a taste profile that is both nostalgic and satisfying.

Cooking this dish is convenient and straightforward, making it ideal for busy weeknights or when you want a quick but flavorful meal. With just a few steps and ingredients, it’s easy to bring the essence of home-cooked goodness to your table without any fuss.

Nutritionally, beef liver is a powerhouse. Packed with iron, vitamins A and B12, it’s an excellent source of essential nutrients. Adding liver to your regular meal rotation can contribute to a balanced diet, particularly if you are looking to boost your intake of key vitamins and minerals.

Beyond its taste and nutritional advantages, this dish holds social and entertaining value. It’s a dish that evokes fond memories of family dinners and time-honored recipes. Sharing it with family and friends can be a delightful way to revisit those cherished culinary traditions together.

Finally, the cost-effectiveness of this recipe is another reason to love it. Beef liver is affordable and widely available, making this dish accessible to everyone looking to enjoy a hearty and nutritious meal without stressing their budget.

Historical Background and Cultural Significance

Beef liver has long held a place in global culinary traditions, revered for its nutritional benefits and rich taste. Historically, it was consumed by ancient civilizations that recognized its health-boosting properties, and it has since evolved into a staple ingredient across cultures.

In many cultures, liver dishes carry significant cultural importance, symbolizing both simplicity and abundance. Families cherished recipes like Classic Beef Liver with Onions, passing them down through generations as part of their culinary heritage. It embodies a connection to the past and a preservation of cherished culinary traditions.

Over time, the ways to prepare and season beef liver have evolved, with each region putting its unique spin on the dish. From the simplicity of frying to adding aromatic spices and herbs, liver has morphed into a versatile ingredient used in various culinary creations worldwide.

Regional variations abound in the culinary world of liver dishes, influenced by local tastes and preferences. For example, in the Mediterranean, you’ll find liver dishes featuring olive oil and garlic, while in Northern Europe, creamy gravies and onions are popular. These nuances highlight the global appreciation and versatility of this humble ingredient.

Ingredient Deep Dive

Beef liver is the star of this dish, and it enjoys a storied place in culinary history. Known for its deeply nourishing qualities, beef liver has been part of diets since ancient times due to its high nutrient content. Today, it’s recognized for providing essential vitamins and minerals that support overall health.

Nutritionally, beef liver is a powerhouse. It’s an excellent source of iron, crucial for blood health, and vitamin A, beneficial for vision and immune function. Vitamin B12 is also prominent, supporting brain health and energy levels. Consuming liver can complement a balanced diet by delivering these crucial nutrients.

When selecting beef liver, look for firm, cohesive pieces with a deep red-brown color, indicating freshness. It should have a clean scent, reflecting its quality. Proper storage is vital; store liver in the coldest part of your refrigerator and use it within a day or two of purchasing for best results.

For those seeking substitutions, chicken liver offers a milder taste while providing similar nutritional benefits. Alternatively, consider plant-based options, such as lentils or mushrooms, when crafting vegetarian variations without compromising on flavor or texture.

Onions, the dish’s other main component, play a critical role. They’re valued for their natural sweetness, which is accentuated when cooked. Caramelizing onions enhances this sweetness, creating a delightful counterbalance to the liver’s robust flavor.

Nutritionally, onions are low in calories but rich in antioxidants and flavonoids, promoting overall health and reducing inflammation. When selecting onions, opt for those with firm skin and no soft spots. Store them in a cool, dry place to extend their shelf life and preserve freshness.

Common Mistakes to Avoid

  • Overcooking liver can result in a tough texture. Aim for medium doneness to retain moisture and tenderness.
  • Not soaking the liver in milk beforehand, which can help mellow its strong taste.
  • Using high heat can quickly brown the liver’s exterior without cooking it through. Moderate heat is best for even cooking.
  • Not allowing onions to caramelize fully. Slow cooking enhances their natural sweetness, improving the overall flavor.
  • Skipping the resting time after cooking can lead to a loss of juices. Allow a brief rest to lock in moisture.
  • Insufficient seasoning results in a bland dish. Ensure ample seasoning to enhance the liver’s flavor profile.
  • Choosing overripe onions can affect flavor and sweetness. Fresh onions deliver the best results.
  • Incorrect slicing thickness can affect cooking time and texture. Ensure uniform slices for consistent cooking.
  • Not deglazing the pan for added flavor. Utilize wine or stock to capture all the delectable brown bits from cooking.
  • Forgetting to taste and adjust seasonings after cooking, ensuring the dish is perfectly balanced for serving.

Essential Techniques

Mastering the art of cooking liver is key to perfecting this dish. Start by soaking liver slices in milk, which helps temper the strong taste and tenderize the meat, a crucial step for achieving a desirable flavor profile.

When it comes to cooking, ensure your pan is preheated and add the liver slices without overcrowding. This technique promotes even browning, necessary for developing those delicious crusty edges while locking in moisture.

Caramelizing onions is an essential technique requiring patience. Cook onions slowly over low to medium heat to draw out their natural sugars. This slow process offers a deep, sweet flavor, perfectly juxtaposed with the savory liver.

Deglaze the pan post-cooking with some broth or dry wine, helping to scrape up all the flavorful bits. This step forms a simple sauce that enhances the dish, integrating hidden flavors back into the meal.

Pro Tips for Perfect Classic Beef Liver with Onions

Pat liver slices dry before cooking to ensure they brown well without steaming. This step guarantees a flavorful crust.

Consider adding a splash of balsamic vinegar to onions towards the end of cooking, enhancing their sweetness and adding a subtle tangy note.

Season the liver generously with salt and pepper just before cooking to enhance its natural flavor without drawing out moisture beforehand.

For a richer taste, cook liver slices in a mix of butter and olive oil. The butter adds depth, while the olive oil prevents the butter from burning.

Serve immediately upon finishing, as liver can continue to cook from residual heat. This timing ensures optimal juiciness.

Use a thin bladed knife for slicing liver and onions, aiding in achieving uniform pieces that cook evenly.

Variations and Adaptations

Regional variations can be explored by adding spices native to certain cuisines, like cumin or coriander, enhancing the liver’s ethnic flair. Experiment with flavor variations such as adding a splash of wine to the pan, introducing complexity to the dish’s flavor profile. For texture modifications, try breadcrumb coating the liver slices, adding a satisfying crunch to each bite while maintaining the dish’s original essence.

Adaptation for different dietary needs is also possible. For a lactose-free option, use almond milk for soaking; adapt the recipe by employing gluten-free flours instead of wheat-based ones. Presentation alternatives involve serving liver atop a bed of creamy mashed potatoes or with vibrant, seasonal vegetables, turning it into an eye-catching plate.

Modernize this classic dish by integrating root vegetables or leafy greens, making it even more visually appealing and nutrient-rich. The dish’s inherent versatility allows seasonal adaptations, utilizing the freshest available produce to accompany the liver during various times of the year.

Serving and Presentation Guide

Plating the dish elegantly begins with selecting a warm plate, highlighting colors by placing liver slices atop a golden heap of onions. Based on tradition or creativity, serve alongside common accompaniments like mashed potatoes or steamed greens, adding both nutrition and visual contrast.

Garnishing presents another opportunity for presentation. Fresh herbs like parsley can be sprinkled over, adding a pop of color and a touch of vibrancy to the plate. Engage with modern serving suggestions by creating a liver “tower,” layering onions and liver for an impressive vertical presentation. Remember that portion control ensures the liver’s rich flavor doesn’t overwhelm the palate, allowing the complete meal composition to shine.

Temperature plays a key role; plate everything while it’s warm, preserving the flavors and mouthfeel, maintaining restaurant-like quality in a home-cooked dish.

Wine and Beverage Pairing

Pairing this Classic Beef Liver with Onions with a robust red wine, such as a Shiraz or Cabernet Sauvignon, beautifully complements the liver’s deep flavors and the onions’ sweet undertones.

For non-alcoholic options, a chilled iced tea with a hint of lemon provides a refreshing contrast, cleansing the palate between bites.

If you prefer coffee or tea alongside your meal, consider earthy dark roast coffee or a spiced black tea, each adding depth without overwhelming the dish’s natural complexities.

Temperature considerations matter; choose drinks that aren’t excessively hot or cold to maintain harmony on the palate. Providing glasses at the ideal serving temperature enhances the overall dining experience.

Storage and Shelf Life

Store any leftovers promptly in airtight containers, refrigerating them to maintain freshness. Proper sealing prevents contamination and maintains the integrity of flavors. Ensure storage at consistent refrigerator temperatures, ideally below 40°F (4°C), extending the shelf life to up to two days.

Monitor for signs of spoilage, such as off smells or changes in color, discarding any compromised portions to preserve food safety.

Reheating liver can be delicate; aim for lower temperatures to gently revive the dish without overcooking. Avoid microwave reheating as it can dry out the liver, instead opting for a pan over low heat for better moisture retention.

Freezing guidelines advise against freezing cooked liver due to texture changes, but freezing raw liver can be suitable if needed for future preparations, ensuring it’s well-wrapped and used within three months for optimal quality.

Make Ahead Strategies

Prepare portions of the meal ahead of time, like caramelizing onions, storing them in the fridge to simplify daily preparation. Assembled ingredients can streamline cooking, particularly appreciated for quick weekday meals.

Storage between each step must maintain quality, requiring appropriate sealing and refrigeration. Cold storage does not compromise flavors and ensures the dish remains appetizing upon final cooking.

When reheating, focus on gradually bringing the beef liver back to temperature, avoiding high heat to maintain its moisture. Consider adding fresh herbs or a squeeze of lemon juice before serving, injecting fresh elements into the dish for a vibrant finish.

Scaling Instructions

To half this recipe, adjust ingredient quantities proportionally, ensuring the thickness and size of liver slices remain manageable for your cooking utensils and space.

For doubling or tripling, additional batches might be necessary to maintain quality when cooking, preventing overcrowding that compromises browning and flavor.

Adjust heavyweight equipment accordingly; utilizing larger pans or multiple pans simultaneously maintains efficiency without sacrificing quality.

Recognize that larger volumes may extend cooking times slightly. Monitor closely to prevent overcooking and ensure flavors remain harmoniously balanced.

For storage, prioritize cooling dishes quickly to avoid bacteria incubation when scaling up, ensuring larger portions are promptly chilled for future use.

Nutritional Deep Dive

The macro breakdown of this Classic Beef Liver with Onions makes it a nutritious powerhouse, rich in protein and vital nutrients often lacking in standard diets. Beef liver offers remarkable micronutrient content, especially iron and vitamins B12 and A, integral for maintaining energy, vision, and overall health.

Health benefits include improved energy thanks to vitamin B12, enhanced immune defense from vitamin A, and improved blood health due to its rich iron content.

Each portion aids dietary considerations by delivering nutrient density without unnecessary calories. Balance comes from conscious pairing with fiber-rich sides or vegetables, ensuring overall meal composition supports health goals.

For weight management, moderate portion sizes offer the necessary nutrition without overabundance, focusing on pairing with greens or whole grains for a well-rounded plate.

Dietary Adaptations

For gluten-free options, use cornstarch instead of traditional flour in any optional coating to minimize meat sticking and to cater to specific dietary requirements.

Dairy-free adaptations can be considered by soaking the liver in a milk alternative such as almond milk, providing similar outcomes without lactose content.

While a vegan version of this particular dish may not be feasible, creative exploration of substituting mushrooms or lentils with caramelized onions can offer a taste-alike experience without animal products.

Low-carb diners can focus on serving the liver with leafy vegetables rather than starch-rich sides, preserving the dietary macro balance while adapting the dish to low-carb lifestyles.

Those following specific diets like keto or paleo might appreciate the liver’s nutrient density, serving it with compatible sides like roasted vegetables, contributing to their nutritional requirements and culinary diversity.

Troubleshooting Guide

When liver texture turns tough, focus on precise cooking times, removing the liver from heat once it reaches perfect doneness, keeping it tender and moist.

Balancing flavors may require adjusting seasoning levels, adding additional salt or a touch of acidity to enhance the dish’s overall palette profile.

Temperature challenges, such as uneven stove heat, can be addressed by maintaining medium-low heat, ensuring consistent cooking throughout the process.

Equipment limitations are overcome by using quality non-stick pans or cast iron skillets for even cooking and simple cleaning.

Ingredient substitutions occasionally fall flat, necessitating taste testing and potential seasoning adjustments, addressing the base recipe’s integrity.

Ensure proper timing of additions, like onions and garlic, to avoid bitterness and optimize flavor development throughout the recipe.

Recipe Success Stories

Community feedback consistently praises this recipe’s straightforward instructions and the delightful harmony of flavors it delivers without complexity. Readers often share successful adaptations, such as creating herb-infused variations that add different aromatic profiles to the classic base recipe.

Photographic exchanges showcase beautifully plated liver dishes and community creativity in garnishing and pairing. Reader suggestions highlight on-point improvements, like attempting to add a touch of vinegar or alternative spices for subtle changes, revealing engagement with this beloved traditional dish.

Engaging in shared success experiences drives connection, providing an enhanced appreciation for this classic beef liver recipe as it continues to be adapted and cherished worldwide.

Frequently Asked Questions

What is the best way to tenderize beef liver? Soak the liver in milk for at least an hour before cooking. This process helps to mellow its taste and ensure a tender texture when cooked.

Can I freeze beef liver? While freezing raw liver is possible, it is best used fresh for optimal texture. If freezing, ensure airtight wrapping to prevent freezer burn and use within three months.

How can I reduce the strong taste of liver? Allowing the liver to soak in milk or lemon juice can help reduce its strong taste, resulting in a more subtle flavor profile.

What sides pair well with liver and onions? Mashed potatoes, steamed vegetables, or a side salad with a zingy vinaigrette are excellent pairings providing balance and added nutrition.

Is beef liver healthy to eat regularly? Beef liver is a nutrient-dense food packed with essential vitamins and minerals. Incorporating it occasionally can complement a balanced diet. Moderation is key due to high vitamin A content.

Can I use chicken liver instead of beef liver? Yes, chicken liver offers a milder flavor and can be substituted if desired. It also cooks more quickly, so adjust cooking times accordingly.

Why should liver be soaked in milk? Milk soaking helps to temper the liver’s strong taste and improve its tenderness, enhancing the overall flavor and texture of the dish.

Why are my onions not caramelizing? Cook onions on medium-low heat, allowing time for natural sugars to release and caramelize, resulting in a sweet, golden outcome.

Can I make this dish ahead of time? Portions like caramelized onions can be made ahead and stored in the fridge, streamlining meal preparation when cooking the liver immediately before serving.

What can I use to deglaze the pan? Deglaze the pan using broth or white wine, capturing flavors left in the pan and creating a quick sauce to complement the main dish.

Additional Resources

  • Explore our seasoning guides for diversifying flavors in your liver recipes.
  • Visit our ingredient information section for detailed knowledge about incorporating beef liver into your meals.
  • Check out our technique guides for mastering caramelization and creating perfect sautéed onions.
  • Browse related liver recipes to inspire your culinary adventures with variety and new challenges.
  • Consider our recommended kitchen equipment for optimal results and enjoyable cooking experiences.
  • Seasonal variations section provides ideas for incorporating fresh produce into any liver-based dish you prepare throughout the year.

Join the Conversation

We invite you to share your thoughts and experiences with our Classic Beef Liver with Onions recipe on social media! Tag us in your photos, show off your plating, or inspire others with creative adaptations. Connect with fellow food enthusiasts through recipe reviews or community forums, where you can swap variations or discover new serving ideas.

Your feedback and interaction are what fuels this culinary journey. Whether you’re offering a suggestion or showing your personal twist on the recipe, be part of our food-loving community that appreciates and preserves timeless recipes in today’s kitchens. The conversation is ongoing—and your voice matters!

The Recipe

Classic Beef Liver with Onions

Serves: 4

Prep Time: 10 mins

Cook Time: 20 mins

Total Time: 30 mins

Kitchen Equipment Needed

  • Non-stick skillet or frying pan
  • Sharp knife
  • Cutting board
  • Tongs or spatula
  • Mixing bowl for soaking liver

Ingredients

  • 1 lb beef liver, sliced
  • 2 cups whole milk (or milk alternative)
  • 2 large onions, thinly sliced
  • 2 tablespoons olive oil
  • 2 tablespoons butter
  • Salt and pepper to taste
  • Fresh parsley for garnish

Directions

  1. Soak the beef liver slices in milk for 1 hour. This step helps tenderize the liver and mellow its flavor. Drain and pat dry.
  2. Heat olive oil and butter in a large skillet over medium heat. Add sliced onions and cook until caramelized, about 10 minutes. Remove and set aside.
  3. In the same skillet, increase heat to medium-high. Add liver slices in a single layer, cooking for 2-3 minutes per side until brown and cooked through.
  4. Return onions to the skillet and stir to combine, adding salt and pepper to taste.
  5. Let the liver rest for a few moments before serving, allowing juices to redistribute.
  6. Garnish with freshly chopped parsley and serve immediately.

Recipe Notes

  • For an added tangy twist, drizzle a tablespoon of balsamic vinegar over the onions during the final minutes of caramelizing.
  • Substitute white wine for a portion of the oil for richer flavor layers.
  • Consider pairing with mashed potatoes or steamed vegetables for a complete meal.

Deliciously Creamy Sweet Potato Casserole Recipe for Perfect Holidays

Sweet Potato Casserole: A Comforting Classic for Every Occasion

⚖️
Difficulty
Easy

⏲️
Prep Time
20 mins

🕒
Cook Time
45 mins

⏱️
Total Time
65 mins

🍽️
Servings
8

When it comes to comforting side dishes, nothing beats a well-made Sweet Potato Casserole. With its rich, creamy filling complemented by a perfectly crunchy topping, this dish is a favorite at holiday gatherings and family dinners. The delightful blend of sweet and savory flavors offers a taste of homely warmth and indulgence, making it an undeniable crowd-pleaser. By incorporating pecans into the mix, this casserole provides a textural balance that enhances each bite.

The versatility of sweet potatoes shines in this classic recipe, as it transforms simple ingredients into a decadent experience. Their natural sweetness pairs brilliantly with spices like cinnamon and nutmeg, evoking the aromas of a cozy, festive kitchen. A Sweet Potato Casserole is carefully layered to create a dish that’s not only delicious but visually appealing, with a contrasting color palette of vibrant orange and golden-brown topping.

Quick Recipe Highlights

  • Flavor Profile: This Sweet Potato Casserole combines the earthiness of sweet potatoes with a lovely blend of cinnamon and nutmeg, creating a sweet and warmly spiced dish accented with a hint of vanilla.
  • Texture: The smooth, velvety texture of the sweet potatoes is complemented by a crunchy pecan topping, offering a perfect contrast in each mouthful.
  • Aroma: Inviting scents of sweet spices and lightly toasted nuts fill the air, enhancing the anticipation of a comforting meal.
  • Visual Appeal: Beautiful, vibrant orange peaks underneath a golden, nut-studded crust make this casserole a stunning dish for any dining table.
  • Skill Level Needed: Basic cooking skills are sufficient for this recipe, making it accessible even for beginners.
  • Special Equipment: A hand mixer or masher is needed to achieve the desired potato consistency, along with a baking dish to complete the casserole.

Recipe Overview

  • Difficulty Level: This dish is an easy-level recipe that involves straightforward steps. Pre-cooking the sweet potatoes and combining them with other ingredients requires minimal effort, making it a hassle-free addition to any menu.
  • Category: Sweet Potato Casserole falls under the side dish category, ideally suited for dinners, festive occasions, and potlucks.
  • Cuisine: This recipe is deeply rooted in Southern American cuisine, celebrated for its rich flavors and warm spices, often featured in holiday feasts like Thanksgiving and Christmas.
  • Cost: Sweet Potato Casserole is an economically friendly dish, comprised of budget-friendly ingredients like sweet potatoes, butter, and sugar, with luxury being added if you choose high-quality pecans.
  • Season: While available all year, this casserole shines brightest during the fall and winter months when sweet potatoes are in season, perfectly aligning with festive and holiday gatherings.
  • Occasion: Whether for Thanksgiving, Christmas, or a family reunion, this casserole stands out as a delectable comfort food, offering warmth and heartiness to any meal.

Why You’ll Love This Recipe


The Sweet Potato Casserole is truly a delight for anyone seeking comforting, home-cooked meals. The rich, creamy texture of the sweet potato blend is perfectly balanced with the crunchiness of its topping. The delightful harmony of flavors offers a sweet touch with a hint of warmth and spiciness from the cinnamon and nutmeg, creating a dish worth savoring.

Convenient and easy to prepare, this casserole fits wonderfully into both leisurely weekends and festive times when you want to spend more time with loved ones than in the kitchen. All ingredients are accessible and simple to prepare, ensuring you can enjoy the process.

Moreover, the nutritional benefits of sweet potatoes, high in vitamins and minerals, add a healthy bonus to this tasty dish. Pecans add healthy fats and protein, making this casserole a nutritious choice amidst indulgent holiday foods.

Sweet Potato Casserole not only sustains its charm as a side dish for celebrations but also promotes social connections by sharing a timeless and cherished recipe. Its ability to accommodate numerous servings makes it ideal for gatherings, sharing warm memories and delicious experiences.

Finally, this recipe is cost-effective, offering maximum flavor and satisfaction without stress, thanks to its simple preparation with easily sourced ingredients. It is truly a gift to every home cook seeking to deliver both taste and pleasure within a manageable budget.

Historical Background and Cultural Significance


The origins of Sweet Potato Casserole lie deep within traditional Southern American cuisine, a staple closely tied to the Thanksgiving table. Believed to have made its debut in cookbooks in the early 20th century, the dish encapsulates the warmth and generosity of Southern hospitality.

Having its roots in Southern culture, Sweet Potato Casserole plays a significant role in preserving community bonds. This dish symbolizes abundance and celebration, designed to be shared and appreciated collectively amongst friends and family.

Throughout the years, Sweet Potato Casserole has evolved with variations that incorporate regional influences and personal family twists. Today, it stands as a versatile dish that can be adapted to suit a range of tastes and dietary needs, while its core comforting properties remain unchanged.

Regionally, the casserole varies with some families incorporating marshmallows, while others prefer a pecan streusel topping. Each adaptation speaks to the area’s unique culinary traditions while maintaining the universal appeal of the dish.

Ingredient Deep Dive


Sweet potatoes are the heart of this casserole, celebrated across many cultures for their rich history and versatility. Known for their nutritional value, sweet potatoes are high in beta-carotene, vitamin C, and fiber. When selecting sweet potatoes, look for ones that are firm, smooth, and free of blemishes. Store them in a cool, dry place to maintain their freshness.

In this recipe, pecans add a delightful crunch and complement the sweet potatoes’ softness. Pecans are native to North America, lending an authentic touch to this casserole. They are rich in healthy fats and offer a buttery, sweet flavor. Choose pecans that are fresh and store them in an airtight container to preserve their freshness.

Common Mistakes to Avoid

  • Overcooking Potatoes: Avoid mushy potatoes by boiling them until just tender. Overcooking can affect the casserole’s texture.
  • Inconsistent Mashing: Achieve a smooth consistency by thoroughly mashing or blending the sweet potatoes.
  • Skipping Topping: Do not skip the topping; it provides essential texture contrast.
  • Under-seasoning: Sweet potatoes require adequate seasoning to enhance flavors. Don’t be shy with spices like cinnamon and nutmeg.
  • Improper Storage: Store the prepared casserole in the refrigerator to maintain its freshness until baking.
  • Overcrowding the Pan: Use a baking dish that allows the casserole to layer sufficiently, ensuring even cooking.
  • Burning Topping: Keep an eye on the baking time and temperature to prevent burning the nut topping.
  • Inadequate Resting Time: Allow the casserole to rest post-baking, allowing flavors to meld and set.

Essential Techniques


Mastering the art of creating a creamy, lump-free mashed sweet potato base allows for a cohesive and luxurious casserole. Achieve this by thoroughly blending or mashing until smooth, ensuring even texture distribution. Careful prebaking and roasting can elevate the sweet potatoes’ natural flavors while maintaining their nutrient content.

The streusel technique for the topping requires mixing butter into dry ingredients until crumbly. This allows the toppings to adhere nicely, creating a crisp layer atop the casserole.

Pro Tips for Perfect Sweet Potato Casserole


For added flavor complexity, consider roasting sweet potatoes instead of boiling. This caramelizes their natural sugars, enriching the casserole.

Add a splash of fresh orange juice or zest to the sweet potato mix for a bright, refreshing note.

Experiment with different nuts or seeds for the topping if pecans aren’t available or desired, adjusting cooking times as needed.

Allow the casserole to sit for 10-15 minutes after baking. This resting time aids in setting the dish and amplifying flavors.

Enhance the depth of the spices by gently toasting them before adding to the sweet potato mixture.

Should you desire a lighter version, substitute half the sugar with natural sweeteners like maple syrup or honey for an equally delightful taste.

Variations and Adaptations


Regionally, Sweet Potato Casserole can differ, with variations like adding marshmallows for a gooey, sweet finish or opting for coconut flakes as a tropical twist. Enhance seasonal elements by incorporating cranberries or apples for a fall flair.

Dietary modifications such as substituting butter with coconut oil and opting for gluten-free flour can create a more inclusive dish for diverse diets. Additionally, explore the addition of alternative spices or herbs to add unique flavor undertones, catering to personal preferences.

Textural shifts can be made by introducing finely chopped nuts within the sweet potato layer, providing added interest with every bite. Presentation alternatives include serving the casserole individually in ramekins or offering it as part of an elegant layered parfait.

Serving and Presentation Guide


Achieving an impressive presentation involves garnishing with a sprinkle of powdered sugar or finely chopped herbs. Plate elegantly by slicing the casserole uniformly, offering clean, visually pleasing portions. Traditionally paired with roasted turkey or ham, this casserole also complements sautéed greens or a simple salad.

Modern serving suggestions include pairing with pulled pork sliders or a spicy lentil stew for a global culinary inspiration. Consider the optimal serving temperature; usually, warm but not hot, allowing the flavors to be at the forefront without overwhelming the palate.

Portion control is effortless with a pre-made standard baking dish, ensuring each serving contains a balanced layer of sweet potato and topping.

Wine and Beverage Pairing


The richness of Sweet Potato Casserole pairs beautifully with a semi-sweet Riesling or a lightly oaked Chardonnay, balancing sweetness with subtle acidity. For non-alcoholic alternatives, consider pairing with a refreshing apple cider or a spiced chai for added warmth.

If coffee or tea is preferable, a smooth, aromatic Kenyan coffee or a robust Assam tea complements the casserole’s flavors effectively. Be mindful of serving temperatures, offering warm beverage options that mirror the cozy, comforting nature of the dish.

Storage and Shelf Life


Store any leftover Sweet Potato Casserole covered in the refrigerator for up to 3-4 days. Ensure proper sealing or covering to prevent drying out. Utilize glass or ceramic baking dishes for ideal reheat results, allowing gentle heating in an oven set to 350°F.

Monitor storage conditions by avoiding exposure to moisture, which can lead to unwelcome texture changes. Signs of spoilage include strange odors or a souring appearance; discard if detected. For freezing, portion the casserole before placing in airtight containers. Ensure thawing in the fridge prior to reheating for consistent quality.

Make Ahead Strategies


Prepare the sweet potato mixture and topping separately, storing both in the refrigerator until assembly. Assemble and bake the casserole before serving to ensure freshness and optimal taste.

Quality assessment involves minimal loss of flavors during such preparation; reheating gently in the oven ensures maintained textures. Add fresh topping post-reheat for an appetizing, crunchy surface.

Assembly tips include layering carefully to prevent smushing, while reheating guidelines recommend covering loosely with foil to maintain moisture without compromising topping quality.

Scaling Instructions


To halve this recipe, divide all ingredients by two and select a smaller baking dish appropriate for even layering. Conversely, for doubling or tripling, use larger baking dishes and adjust baking times, maintaining close watch to avoid overbaking.

Ensuring even preparation requires equitable distribution of ingredients across extended surface areas within larger dishes. For storage, prepare in advance by organizing extra portions for freezer storage, allowing for future use without sacrificing flavor.

Nutritional Deep Dive


Sweet Potato Casserole provides a balanced blend of macros and micros, primarily driven by the naturally rich sweet potatoes. It’s a good source of dietary fiber, vitamins A and C, and potassium, which support overall well-being.

Health benefits extend to the pecans used, offering heart-healthy fats while providing sustaining energy, ideal for indulgent occasions. Analyzing portions involves tracking sugar and fat contents, encouraging moderation in large gatherings.

Dietary considerations cater to specific guidelines, with opportunities to substitute lower-calorie and lower-sugar alternatives to maintain nutritional goals while embracing sweet indulgence.

Dietary Adaptations


For gluten-free adaptations, utilize almond flour in place of traditional flour in the topping. Ensure all additional ingredients are certified gluten-free to provide a safe dish for those with sensitivities.

Dairy-free adjustments can be made by substituting coconut milk and dairy-free margarine. A vegan variation involves using flax egg in place of traditional eggs, offering a cohesive, binding element while respecting dietary boundaries.

Low-carb or keto options feature reduced sugar alternatives, such as monk fruit or stevia, while minimizing sweet potato quantity. Other specialized diets can incorporate additional plant-based or protein-rich elements for tailored nutritional needs.

Troubleshooting Guide


Texture issues, like overly liquid or dense casseroles, can be mitigated by precise ingredient measurements and allowing potatoes to fully cook before mashing. Ensure proper seasoning, balancing sweet and savory elements, to maintain flavor equilibrium.

Temperature problems, such as uneven baking, are rectified by rotating the dish mid-bake and ensuring preheated ovens. Adjust timing based on baking dish materials and sizes, adapting to altitudes or equipment variances.

Ingredient substitutions require mindful selection, accounting for flavor and binding characteristics, avoiding trial and error frustration. Maintain timing concerns by utilizing timers and alarms, ensuring prepped aversions yield successful results.

Recipe Success Stories


Community feedback indicates a high rate of enjoyment, with shared experiences of flavorful experiences and enjoyment in varied settings. Successful adaptations range from nut-free alternatives to enhanced spice blends, showcasing the recipe’s versatility.

Reader suggestions frequently incorporate toasted seeds for a nut-free topping option, while photography tips offer guidance in capturing the casserole’s vibrant colors and textures for memorable imagery presentations.

Recipe adaptation stories reveal enthusiastic exchanges, focusing on incorporating unique regional elements like adding cheese or spice, fostering creative engagement within kitchen communities.

Frequently Asked Questions

1. Can I prepare Sweet Potato Casserole ahead of time?
Yes, you can prepare the sweet potato mixture and topping separately a day in advance. Store them in the fridge, then assemble and bake when ready to serve.

2. Can I use canned sweet potatoes instead?
While fresh is best for flavor and texture, canned can be used in a pinch; ensure they are well-drained to avoid excess moisture.

3. How do I prevent the topping from burning?
Cover the casserole with foil during initial baking and uncover towards the end to lightly brown the topping.

4. Is there a substitute for pecans?
Walnuts or even almonds can be used, offering different but enjoyable flavor profiles and textures.

5. Can I make a lower-sugar version?
Sweeteners like monk fruit or stevia can be used to reduce sugar content without compromising sweetness.

6. How do I store leftover casserole?
Leftovers should be stored covered in the refrigerator and consumed within 3-4 days. Reheat in the oven or microwave before serving.

7. Does this dish freeze well?
Yes, freeze in individual portions, ensuring the container is airtight. Thaw overnight in the fridge before reheating.

8. What is the best way to mash sweet potatoes?
A hand mixer or potato masher is ideal. For extra smoothness, pass them through a ricer or food mill.

9. Can I make it vegan?
Substitute butter with coconut oil, milk with almond milk, and eggs with flax eggs to create a vegan-friendly version.

10. Are there any nut-free alternatives?
For a nut-free version, omit nuts and use shredded coconut or crushed pretzels for the topping texture.

Additional Resources


For variations and complimentary dishes, consider exploring recipes like Rustic Pumpkin Soup or Herb-Roasted Chicken pairing perfectly with Sweet Potato Casserole. Enhance your kitchen techniques with guides on perfect potato mashing strategies or selecting the best quality spices.

Dive deeper into ingredient information for detailed insights into the sweet potato’s impact and how pecan selection can elevate flavors. Equipment recommendations, like quality baking dishes or potato mashers, ensure success, with seasonal variations for creative culinary expressions.

Join the Conversation


Embrace the joy of sharing your Sweet Potato Casserole creations on social media platforms, inviting comments and connections. Participate in culinary challenges or share your perfected photography tips to help others shine.

Review this recipe on cooking forums or contribute to community blogs, fostering an exchange of unique twists and new serving concepts. Engage with fellow enthusiasts to develop or customize this classic dish, creating a dynamic culinary dialogue that continuously evolves and inspires.

The Recipe

Sweet Potato Casserole

Serves: 8

Prep Time: 20 mins

Cook Time: 45 mins

Total Time: 65 mins

Kitchen Equipment Needed

  • Large pot
  • Hand mixer or potato masher
  • 9×13 inch baking dish
  • Mixing bowls
  • Oven

Ingredients

  • 4 large sweet potatoes, peeled and cubed
  • 1/2 cup brown sugar
  • 1/4 cup melted butter
  • 1/2 cup milk
  • 2 large eggs
  • 1 teaspoon vanilla extract
  • 1/2 teaspoon ground cinnamon
  • 1/4 teaspoon nutmeg
  • 1/2 teaspoon salt
  • 1 cup chopped pecans
  • 1/2 cup brown sugar (for topping)
  • 1/4 cup flour
  • 1/4 cup melted butter (for topping)

Directions

  1. Preheat your oven to 350°F (175°C).
  2. Bring a large pot of salted water to boil. Add sweet potatoes and cook until tender; drain.
  3. Mash sweet potatoes in a large bowl until smooth.
  4. Mix in brown sugar, butter, milk, eggs, vanilla, cinnamon, nutmeg, and salt.
  5. Spread the sweet potato mixture into a 9×13 inch baking dish.
  6. In a separate bowl, mix pecans, brown sugar, flour, and melted butter. Sprinkle over the sweet potato mixture.
  7. Bake for 30 minutes, until topping is lightly browned.
  8. Allow to cool slightly before serving.

Recipe Notes

  • For a marshmallow topping variation, replace the pecan topping with mini marshmallows before the final bake.
  • Ensure the eggs are at room temperature to prevent curdling when mixed with melted butter.
  • This casserole can be prepared a day in advance and stored in the refrigerator overnight.

Delicious Sweet Potato Casserole Recipe for Your Holiday Table

Sweet Potato Casserole Recipe – Perfect Holiday Side Dish

⚖️
Difficulty
Easy

⏲️
Prep Time
20 mins

🕒
Cook Time
40 mins

⏱️
Total Time
60 mins

🍽️
Servings
8

Sweet Potato Casserole is the star side dish of any holiday feast, bringing together creamy layers of sweet potatoes with a delightful, crunchy topping that is simply irresistible. Whether you’re hosting a large family gathering or a cozy dinner with friends, this dish promises to be a crowd-pleaser. Its vibrant orange color sets a festive tone on your dining table, while the mix of textures and flavors provides a comforting experience with every bite.

Indulge in the perfectly balanced taste of sweet potatoes enhanced by the warmth of cinnamon and nutmeg, and topped with a buttery pecan crumble. The delightfully creamy interior contrasts beautifully with the crispy topping, creating a dynamic tasting experience. The aroma of this casserole, as it bakes, fills your home with a sweet, cozy fragrance that hints at the deliciousness to come.

Quick Recipe Highlights

  • Flavor Profile: The sweet potatoes are sweet and spiced, perfectly balanced with a buttery pecan topping.
  • Texture: Creamy and smooth with a contrasting crunch from the pecan topping.
  • Aroma: Sweet with hints of cinnamon and nutmeg, filling your home with a holiday scent.
  • Visual Appeal: Vibrant orange contrasted by the golden-brown topping.
  • Skill Level Needed: Easy, suitable for beginners and seasoned cooks alike.
  • Special Equipment: Requires a casserole dish and a hand mixer for best results.

Recipe Overview

  • Difficulty Level: Easy, thanks to straightforward steps and minimal equipment.
  • Category: Side dish, perfect for holiday meals and special occasions.
  • Cuisine: American, with Southern influences highlighted by sweet potatoes and pecans.
  • Cost: Affordable, with sweet potatoes and pecans being the main ingredients.
  • Season: Best in the fall and winter when sweet potatoes are in peak season.
  • Occasion: Ideal for Thanksgiving, Christmas, or any festive gathering.

Why You’ll Love This Recipe


This Sweet Potato Casserole recipe boasts an incredible taste that captivates the senses with its perfect balance of sweetness and spiced warmth. The creamy sweet potatoes are beautifully complemented by a crunchy topping, making every bite a delightful experience. Its convenience shines through in simplicity, requiring minimal preparation time and easy steps that guarantee perfect results every time.

Nutritionally, sweet potatoes are a powerhouse of vitamins and fiber, providing a healthful addition to your meal. This dish also offers social benefits as a beloved component of traditional holiday meals, enhancing your festive table with its vibrant colors and inviting aromas. Cost-effectiveness is another plus, with mostly affordable ingredients that make it accessible for any cook aiming to impress without breaking the bank.

Historical Background and Cultural Significance


Sweet Potato Casserole has its roots deeply embedded in American culinary traditions, particularly within Southern cuisine. Historically, sweet potatoes have been a staple food in the South due to their adaptability to the region’s agriculture and climate. This dish gained prominence as a holiday staple, evolving with various regional adaptations over time.

Culturally, the casserole signifies the warmth and unity of festive gatherings, marking a special place in Thanksgiving and Christmas menus across the country. Over generations, this recipe has adapted to include marshmallow toppings in some regions, while others prefer the classic pecans, demonstrating its versatility and the local flair added by different communities.

Ingredient Deep Dive


Sweet potatoes take center stage in this recipe, offering a rich history linked to Native American and African cultures. These vibrant tubers are celebrated for their nutritional benefits, being a rich source of vitamins A and C, fiber, and antioxidants. When selecting sweet potatoes, look for firm ones without blemishes or sprouting for the best quality.

The pecans contribute a delightful crunch and add a heart-healthy dose of omega-3 fats and fiber. Opt for fresh pecans for maximum flavor, and store them in a cool, dry place to ensure they remain crisp and flavorful. Butter and spices like cinnamon and nutmeg enhance both sweetness and warmth in this comforting dish while providing room for variations with other nuts or spices.

Common Mistakes to Avoid

  • Overcooking takes away the natural sweetness and texture of the potatoes. Aim for a fork-tender texture without becoming mushy.
  • Neglecting to season the sweet potatoes properly can result in a bland casserole. Be generous with spices and salt to bring out the flavors.
  • Skipping the topping can lead to a one-note dish. The pecan crumble is crucial for providing textural contrast.
  • Not mashing the sweet potatoes completely leaves lumps that affect the creamy texture.
  • Forgetting to grease the baking dish can result in sticky casserole sides, making serving messy.
  • Storing the casserole with the topping can make it soggy. Keep the topping separate if making ahead.
  • Using old pecans results in a rancid taste; ensure freshness for the best flavor.
  • Adding too much sugar can overshadow the natural sweetness of the potatoes; adjust to taste.

Essential Techniques


Achieving a perfectly creamy mash relies on properly cooked sweet potatoes. Steam or boil until just tender, and immediately mash them to maintain their natural juices and flavor. The pecan topping requires the right ratio of butter to nuts, ensuring it turns golden brown and crunchy without burning.

Master the art of seasoning by tasting as you go; this allows you to adjust spices and sweetness according to your preference. Visual cues like a bubbling casserole edge signal optimal baking time, while a golden topping indicates it’s ready to serve. Avoid overbaking, which can dry out the dish.

Pro Tips for Perfect Sweet Potato Casserole


Pre-cook sweet potatoes with the skin on to lock in moisture and nutrients. Cooling them slightly before peeling keeps the flesh intact.

Toast pecans lightly before adding for a deep, nutty flavor that’s unmatched. To prevent the topping from sinking, distribute it evenly just before baking.

Use fresh, high-quality spices for a more pronounced aroma and taste. For a twist, add orange zest to the sweet potatoes for a citrusy lift.

For optimum results, always mash sweet potatoes while warm. This ensures a smoother texture and better integration of butter and spices.

Variations and Adaptations


Regional variations welcome marshmallow toppings in some recipes, offering a sweeter ending contrast. In the South, it’s common to add bourbon for a sophisticated depth.

Seasonal adaptations can include cranberries for a tart twist during Thanksgiving. For dietary modifications, swap pecans with gluten-free oats for the topping or add maple syrup instead of sugar for a natural sweetener.

Flavor enhancements include incorporating ginger or cayenne for a spicy kick, or rosemary for an herby note. For texture modifications, add some chunky pineapples to create another layer of texture and sweetness.

Serving and Presentation Guide


Plating techniques such as using a crisp, white dish can enhance the vibrant color contrast of the casserole. Garnishing with fresh herbs like parsley adds a touch of greenery and freshness.

Traditional accompaniments might include roasted turkey or glazed ham, providing depth to the sweet-savory profile. Modern suggestions include pairing with kale salads or stuffed portobello mushrooms for a vegetarian touch.

Serve at room temperature to allow the flavors to harmonize seamlessly. Portion control can be managed by serving from the baking dish with a wide spatula for precision.

Wine and Beverage Pairing


For wine pairings, opt for a warm Riesling or a light Pinot Noir that complements the sweet and savory notes of the casserole. Non-alcoholic alternatives include sparkling apple cider or a cinnamon-infused iced tea.

For coffee or tea pairings, consider a spiced chai that mirrors the casserole’s warm spices. Ensure all beverages are slightly chilled to contrast the warm casserole, enhancing the entire dining experience.

Storage and Shelf Life


Store leftovers in an airtight container in the refrigerator for up to three days. If your casserole dish allows, covering and refrigerating in the same dish can save time and effort.

Before reheating, allow the casserole to come to room temperature for even warming. To prevent topping sogginess, consider reheating in the oven under a low broil. Freezing is an option, but for best quality, freeze components separately, avoiding added moisture to the topping.

Make Ahead Strategies


Prep elements like boiling and mashing sweet potatoes a day ahead for efficiency. Store the topping separately and combine just before baking.

Assess the impact of pre-baking, noting that texture and flavor remain intact up to two days after assembly. Following assembly, refrigerated storage ensures flavors meld beautifully.

Before serving, ensure fresh elements like herbs are added post-baking to elevate presentation and taste.

Scaling Instructions


Halve the recipe by reducing ingredient quantities proportionally, noticing that smaller baking dishes may require adjusted cooking times.

For larger gatherings, doubling is seamless; adjust seasoning levels accordingly to prevent overwhelming flavors. Ensure sturdy mixing equipment for larger portions to maintain creamy textures.

Extra portions warrant separate containers for balanced freezing and reheating. Timing modifications might involve increased baking time for deeper dishes to ensure the center is fully warmed.

Nutritional Deep Dive


This dish offers a macro breakdown of carbohydrates from sweet potatoes, healthy fats from pecans, and moderate protein content. Micronutrients include beta-carotene from sweet potatoes, beneficial for eye health, and vitamin E from pecans with antioxidant properties.

Dietary considerations include balancing the natural sugars present while still benefiting from the fiber content. It offers ease in managing portions as a side serving, providing satiety through its nutrient-dense nature.

Dietary Adaptations


For a gluten-free version, simply verify the source of your spices and optional toppings, like marshmallows. Dairy-free adaptations are easily made by using coconut oil instead of butter, complementing the casserole’s sweetness.

Vegan modifications involve skipping eggs, relying on a small amount of almond milk for creaminess. Low-carb enthusiasts can replace sweet potatoes with butternut squash, though texture and sweetness will vary slightly.

Troubleshooting Guide


If texture issues arise from overcooking, combine the potatoes with a little cream to restore smoothness. Balance overly sweet flavors with a dash of lemon juice or additional salt for complexity.

Don’t forget equipment challenges; if a hand mixer is unavailable, use a sturdy whisk and elbow grease for similar results. Ingredient substitutions like swapping nuts should maintain the essence without impacting taste.

Timing concerns from undercooking the topping can be corrected by broiling briefly to achieve the desired crispness.

Recipe Success Stories


Our readers have shared delightful variations, like incorporating chopped apples for a fall twist or a personal favorite – adding a chocolate-chip pecan topping for a sweet indulgence.

Community engagement proves inspiring with shared images of decorated casseroles enhancing festive tables, prompting collective creativity through user suggestions for diverse presentations.

Photography tips emphasize utilizing natural light to capture the casserole’s rich hues and textures, ensuring the visual delight translates through the screen and inspires kitchen creativity.

Frequently Asked Questions

What can be used instead of pecans for nut allergies?

Consider using oats or sunflower seeds as alternatives for the crunchy topping without compromising texture.

Can the casserole be frozen after baking?

While freezing post-baking is possible, expect some textural changes. It’s best to freeze components separately where possible.

How do I prevent the topping from becoming soggy?

Ensure the topping is added just before baking. If reheating, do so under a broil or add fresh topping to restore crispness.

Is there a way to make this recipe vegan?

Yes, replace butter with coconut oil, and utilize a dairy-free milk alternative to maintain moisture and flavor.

How can I make the dish less sweet?

Reduce added sugars and focus on spices to highlight the natural sweetness of the potatoes without overpowering them.

Which wine pairs best with sweet potato casserole?

A dry Riesling or a light Pinot Noir complements the sweet and savory elements without overshadowing flavors.

Are there suitable non-alcoholic beverage options?

Yes, a spiced cider or sparkling water with citrus works beautifully to enhance the dining experience without alcohol.

Can I prepare parts of the recipe in advance?

Absolutely, advance preparations include boiling and mashing potatoes and storing toppings separately until ready to bake.

What if I don’t have a hand mixer?

A whisk or potato masher works as a manual alternative for achieving a smooth consistency in the sweet potatoes.

How can I experiment with flavor variations?

Introduce spices like ginger or add fruits like cranberries for seasonal experiments that lend depth and complexity.

Why did my casserole not thicken?

Ensure sweet potatoes are fully drained before mashing to prevent excess liquid that could affect consistency.

What’s the best way to store this casserole?

Refrigerate in an airtight container for freshness, or freeze individual components to preserve quality effectively.

Additional Resources


Explore related recipes like our ‘Classic Mashed Potatoes’ or ‘Holiday Roasted Vegetables’ for more festive inspiration. Review technique guides on perfect potato preparation and pecan toasting in our culinary toolbox for honed skills.

For further ingredient insights, visit our comprehensive database on seasonal produce with storage recommendations ensuring quality and sustainability. Season-specific variations are detailed in our ‘Annual Flavor Calendar’ showcasing how to integrate seasonal produce into everyday cooking.

Join the Conversation


Share your Sweet Potato Casserole creations on our social platforms with #CasseroleCreations, and engage with our community to explore global variations and seasonal adaptations.

Review this recipe and share your tweaks to inspire others and expand communal knowledge. Discover photography tips to beautifully capture your culinary endeavors, enhancing both presentation and plating techniques through peer exchanges and expert advice.

The Recipe

Sweet Potato Casserole

Serves: 8

Prep Time: 20 mins

Cook Time: 40 mins

Total Time: 60 mins

Kitchen Equipment Needed

  • Casserole dish
  • Hand mixer or potato masher
  • Baking sheet

Ingredients

  • 4 cups sweet potatoes, mashed
  • 1 cup brown sugar
  • 1/2 cup melted butter
  • 1/2 cup milk
  • 2 teaspoons vanilla extract
  • 1/2 teaspoon cinnamon
  • 1/4 teaspoon nutmeg
  • 1/4 teaspoon salt
  • 2 cups chopped pecans
  • 1/2 cup flour
  • 1/2 cup brown sugar (for topping)
  • 1/4 cup melted butter (for topping)

Directions

  1. Preheat oven to 350°F (175°C).
  2. In a large bowl, combine mashed sweet potatoes, brown sugar, melted butter, milk, vanilla extract, cinnamon, nutmeg, and salt. Mix until smooth and creamy.
  3. Spread the sweet potato mixture evenly into a greased casserole dish.
  4. In a separate bowl, mix pecans, flour, brown sugar, and melted butter for the topping. Sprinkle evenly over the sweet potato mixture.
  5. Bake in the preheated oven for 30-40 minutes or until the topping is golden brown and crispy.

Recipe Notes

  • Ensure sweet potatoes are fully drained before mashing to avoid extra moisture.
  • Adjust sugar levels based on your preferred sweetness.
  • Try adding a sprinkle of bourbon or orange zest for flavor variations.
  • For nut-free alternatives, use crushed gluten-free cookies for topping.

Spicy Cajun Chicken and Shrimp Alfredo: A Quick Dinner Delight

Cajun Chicken and Shrimp Alfredo Recipe 🍝 – Easy Dinner Idea 🍴

⚖️
Difficulty
Medium

⏲️
Prep Time
15 mins

🕒
Cook Time
30 mins

⏱️
Total Time
45 mins

🍽️
Servings
4

Indulge in the ultimate comfort food experience with this Cajun Chicken and Shrimp Alfredo recipe. Combining succulent chunks of seasoned chicken and juicy shrimp with creamy, rich Alfredo sauce, this dish is perfect for a cozy dinner at home. The spice of Cajun seasoning beautifully complements the velvety Alfredo, creating a burst of flavor that’s both hearty and satisfying. Whether it’s a family meal or a special occasion, this easy dinner idea brings a taste of restaurant-quality pasta right to your table.

Experience the magic of flavors as bold Cajun spices meet smooth, creamy Alfredo sauce. Each bite is a delicious dance of textures—from the tender chicken and shrimp to the luxurious, silky pasta coating. The fusion of these distinct elements leads to a memorable culinary experience that will leave everyone craving for more. This Cajun Chicken and Shrimp Alfredo recipe is not just a meal; it’s an occasion in itself.

Quick Recipe Highlights

  • Flavor Profile: Expect a harmonious blend of spicy and creamy, with a hint of garlic and herbs.
  • Texture: Enjoy tender and juicy proteins with perfectly cooked pasta swimming in a luscious sauce.
  • Aroma: Smell the inviting mix of garlic, spices, and cheese as it fills your kitchen.
  • Visual Appeal: A vibrant mélange of golden-brown chicken, shrimp, and fresh parsley garnishes on a creamy pasta backdrop.
  • Skill Level Needed: Moderate skills required, mainly for timing and sequence management in cooking proteins and sauce simultaneously.
  • Special Equipment: Basic kitchenware like a pot, skillet, and strainer; optional use of a microplane for fresh parmesan.

Recipe Overview

  • Difficulty Level: Considered medium due to the need for multitasking between sauces and proteins but straightforward with prep done right.
  • Category: This recipe falls under main course and pasta categories, ideal for hearty dinners.
  • Cuisine: A satisfying fusion of Italian and Cajun cuisines, bringing creamy Alfredo together with spicy Southern flavors.
  • Cost: Relatively affordable, with chicken, shrimp, and cheese being the main cost factors balanced by pantry staples.
  • Season: Perfect year-round, although its warmth and spices suit colder months beautifully.
  • Occasion: Excellent choice for family dinners, date nights, and dinner parties where you aim to impress.

Why You’ll Love This Recipe


The Cajun Chicken and Shrimp Alfredo recipe stands out due to its unique taste and texture appeal. The spicy Cajun seasoning and creamy Alfredo sauce create a perfect contrast, resulting in a dish that’s both flavorful and comforting. The juicy shrimp and tender chicken add protein that complements the creamy pasta, making each bite a delightful experience.

Convenience is another big plus of this recipe. With a total cooking time of just 45 minutes, it’s an easy dinner idea perfect for busy weeknights. Preparation can be streamlined with simple ingredients and minimal cooking techniques, ensuring you can enjoy a delicious homemade meal without much hassle.

Nutritional advantages lie in its balance of protein from chicken and shrimp, along with carbs from pasta. While it’s rich, using fresh ingredients and controlled portions makes this recipe a relatively healthy indulgence. You can customize it further by adjusting the cream or opting for whole-grain pasta.

In terms of social and entertaining value, this dish garners compliments for its restaurant-style quality and impressive flavors. Whether it’s family night or Friday friends gathering, this recipe brings the wow factor to the dining table, encouraging interaction and enjoyment.

Cost-effectiveness and accessibility make it accessible for most shopping budgets, using a combination of pantry goods and fresh items like chicken and seafood. No need for exotic ingredients; its appeal lies in the quality and cooking techniques that enhance the flavors of everyday items.

Historical Background and Cultural Significance


Cajun cuisine has its roots in Southern Louisiana, influenced by French, African, and Spanish culinary traditions. This recipe takes inspiration from traditional Cajun cooking, which emphasizes bold spices and rich flavors, and combines it with Italian pasta culture, known for its creamy and cheesy bases.

The cultural importance of blending Cajun and Italian influences shines through in this recipe, illustrating the dynamic nature of American cuisine where diverse flavors come together. Such recipes showcase the adaptability of Cajun spices with globally loved dishes like Alfredo pasta.

Evolution of the recipe reflects modern palates that seek the thrill of fusion dishes. While traditional Cajun and Italian recipes stand robustly on their own, combining them creates a new culinary experience that satisfies multi-ethnic flavor cravings.

Regional variations might involve swapping shrimp for other seafood like crawfish or using different pasta types. Across regions, the basic principle remains: a spicy and creamy blend that unites contrasting textures and flavors into one harmonious dish.

Ingredient Deep Dive


Chicken is the star protein, offering culinary versatility and broad appeal. In southern cooking, chicken is often used as a base for flavor-rich meals. It absorbs Cajun spices well, enhancing both taste and aroma. Choose boneless, skinless chicken breast for the best texture in this recipe.

Nutritionally, chicken provides lean protein and essential minerals like selenium, known for supporting thyroid health and metabolism. It’s a staple protein choice due to its low-fat content and high vitamin B6 levels, crucial for heart health and energy metabolism.

Storage recommendations suggest raw chicken should be kept refrigerated or frozen, ideally consumed within two days of purchase when fresh. Opt for airtight containers or butcher paper for freezing to prevent freezer burn. For leftover cooked chicken, store it for up to four days in the refrigerator.

Substitution options can include boneless thighs for richer flavor or turkey breast for a leaner alternative. Ensure that any substitute follows appropriate cooking time adjustments for optimal tenderness.

Common Mistakes to Avoid

  • Overcooking the chicken can result in a dry texture. Ensure you sear the chicken until golden brown but not fully cooked, allowing it to finish in the sauce.
  • Using under-seasoned shrimp can dull the flavor profile. Marinate shrimp adequately with spices to match the dish’s bold taste.
  • Failing to properly time pasta cooking leads to soggy noodles; cook it al dente for the perfect bite.
  • Adding cream too quickly can cause it to break; instead, slowly incorporate it into your sauce for a smooth consistency.
  • Overuse of oil may result in a greasy dish, which can overshadow intended aromas and spices.
  • Not letting proteins rest before cutting leads to moisture loss; allow the chicken and shrimp to sit for a few minutes.
  • Ignoring garnish details limits visual appeal; fresh parsley or a sprinkle of parmesan can elevate presentation.
  • Using pre-made sauce negates custom flavor depth; making fresh Alfredo ensures tailored seasoning balance.

Essential Techniques


Mastering the searing technique is crucial here for that perfect crust on both chicken and shrimp. It creates complex flavors through the Maillard reaction, enhancing overall taste. Pat proteins dry to encourage browning, and avoid overcrowding the pan to prevent steaming.

Creating the creamy Alfredo sauce requires patience; continuous stirring and gradual heat prevent cream from curdling. Monitoring temperature helps maintain the sauce’s luxurious texture. Aim for silky smoothness as garlic and parmesan mingle with cream.

Cooking pasta properly means achieving an al dente texture, ensuring a perfect bite that stands firm against rich sauces. Stir pasta occasionally to prevent sticking, and avoid rinsing post-cooking to keep the surface starches, promoting sauce adhesion.

Visual cues include sauce thickening and pasta’s firm texture. The creamy sauce should cling to the spoon without being runny, indicating it’s ready. Practice makes perfect, so keep an eye on these subtle changes to gauge readiness.

Pro Tips for Perfect Cajun Chicken and Shrimp Alfredo


Use a combination of olive oil and butter to sauté, providing a rich, nutty background flavor while preventing burning due to butter’s lower smoke point. This combo sets the foundation for deep flavors in both chicken and shrimp.

Deglaze your pan with a splash of white wine before adding cream to incorporate fond, which consists of browned, flavorful bits left from searing. This step adds depth to your Alfredo sauce, heightening the dish’s overall taste.

Always reserve some pasta water when draining; this starchy water can adjust sauce consistency later if needed. It integrates seamlessly, providing perfect sauce coverage without adding extra cream.

Use high-quality parmesan for an authentic Alfredo touch. Freshly grated parmesan offers unmatched flavor and texture, avoiding the graininess of pre-grated varieties often treated with anti-caking agents.

Enhance Cajun seasoning with smoked paprika for an added layer of complexity and subtle smokiness, elevating the dish’s flavor profile beyond basics.

Balance out rich flavors with fresh herbs like parsley or basil. Use a sprinkle as garnish to cut through the creamy richness, adding color and freshness to the plating.

Variations and Adaptations


Regional variations could include incorporating Andouille sausage for an extra layer of Cajun flavor, offering a smokier and spicier kick. In coastal regions, opting for local fish can provide a fresh twist.

Seasonal adaptations involve using vegetables like asparagus or cherry tomatoes during spring for added brightness or substituting dairy-free cream alternatives during animal product scarcity.

For dietary modifications, gluten-free pasta varieties work efficiently without compromising texture, offering those sensitive to gluten a delicious alternative. Choose rice or chickpea-based pasta for best results.

Flavor adaptations are limitless; tweak spices to your preference by increasing cayenne for heat or incorporating lemon zest for a citrusy note that complements the seafood.

Texture modifications come through choosing different pasta shapes. Rigatoni or fusilli hold sauce well, while spaghettini offers a lighter texture contrast, allowing customization based on desired mouthfeel.

Presentation alternatives aim at layering pasta, sauce, and proteins almost lasagna-style for a dramatic reveal, or side-serving components for interactive meal assembly at the table.

Serving and Presentation Guide


Plating techniques often utilize wide bowls to emphasize pasta’s curvatures and sauce draping overtop, creating a natural focal point for other ingredients like chicken and shrimp.

Garnishing ideas include finely chopped parsley sprinkles or parmesan shavings, adding an elegant touch by providing vibrant color and contrasting textures on a creamy surface.

Traditional accompaniments recommended include garlic bread or a simple green salad, their crispiness and freshness balancing the richness and creaminess of the main dish.

Modern serving suggestions might explore nesting the pasta in individual bowls for controlled portions, designed to showcase carefully curated colors and textures with garnishes positioned strategically.

Temperature considerations highlight serving the pasta hot, ensuring the saucy coating remains luscious and enticing while avoiding dilution or separation, crucial for Alfredo.

Portion control tips focus on measuring pasta and proteins beforehand to maintain balance in servings, preventing any ingredient from overshadowing the others, thus preserving flavor harmony.

Wine and Beverage Pairing


Wine pairings suggest a crisp Chardonnay or Sauvignon Blanc for their acidity, which cuts through the sauce’s creaminess while enhancing the garlic and parmesan notes.

Non-alcoholic alternatives include sparkling water with a splash of lemon or lime, providing a refreshing cleanse between bites, highlighting the seasoning and texture interplay.

Coffee/tea pairing is unnecessary but could explore light green teas for their subtlety and palate-clearing properties, if served afterward.

Temperature considerations encourage chilled beverages to contrast the warm pasta, offering a refreshing balance especially during warmer weather.

Serving suggestions recommend ensuring wines or beverages are freshly chilled to maintain optimal flavor infusion, making them complement the rich notes of the Cajun Alfredo.

Storage and Shelf Life


Proper storage methods involve airtight containers for any leftovers, prolonging life by minimizing air exposure which can lead to spoilage or texture deterioration.

Temperature requirements guide keeping the dish refrigerated, as this helps maintain optimal freshness and safety, ideally consumed within 3-4 days post-cooking.

Container recommendations include using glass containers, which not only track freshness visually through transparency but guard against odor transfer, preserving dish purity.

Signs of spoilage often manifest in unpleasant odor changes or texture shifts, such as excessive separation in sauces or protein dryness, signaling the dish is no longer good for consumption.

Reheating instructions favor gentle warming in a skillet over low heat, adding a splash of milk if the sauce thickened due to chilling, ensuring even heat distribution without overcooking proteins.

Freezing guidelines should be conservative due to cream sauces which can undergo undesirable texture changes—if necessary, freeze separately from pasta to mitigate this.

Make Ahead Strategies


Make-ahead strategies involve prepping components like chopped vegetables, peeled shrimp, and spice mixtures up to two days earlier, reducing final day workload.

Storage between steps like sauce preparation ahead of time can streamline the cooking process on busy days, justifying its status as a quick easy dinner idea when planned correctly.

Quality impact assessment views advanced prepping for this dish as beneficial, maintaining flavor integrity while easing time-intensive tasks closer to serving.

Assembly tips encourage staging materials efficiently and considering individual servings for optimal presentation and speed during final assembly at mealtime.

Reheating guidelines favor low-heat methods to prevent chalky pasta or rubbery proteins. Keep backups such as cream on hand for texture refresh if needed.

Fresh element additions like herbs or grated cheese should be saved for just before serving, ensuring the freshest garnish touch and complementing reheated components.

Scaling Instructions


Scaling instructions are handy for adapting to different group sizes; doubling ingredients is straightforward but ensure sufficient pot size and staggered protein cooking for large batch results.

Halving recipes still hold proportional integrity; adjust pan sizes to maintain proper browning and simmering depth important for sauces and proteins.

Doubling or tripling requires careful attention to seasoning adjustments; taste tests are crucial for maintaining undercurrent notes like cayenne or garlic amidst increased volumes.

Equipment adjustments often involve more substantial skillets or extra pasta pots, allowing space for varied elements ensuring even and consistent cooking.

Timing modifications may mean staggered starts for proteins to avoid overcrowding or ingredient sequencing ensuring all elements are ready concurrently.

Storage considerations emphasize storing separate portions for large batches ensuring freshness and easy meal retrieval during post-production periods.

Nutritional Deep Dive


Nutritional deep dive highlights the recipe’s balance between protein, fat, and carbohydrates. chicken and shrimp provide lean protein, while cream and parmesan contribute to the flavorful fat content.

Micronutrient analysis offers insights into vitamins and minerals like B12 and selenium from shrimp, with calcium inputs provided by parmesan cheese, supporting bone health and energy metabolism.

Health benefits align with moderate fat intake, emphasizing portion sizes and ingredient choice like low-sodium broth or light cream to reduce sodium and saturated fats intake if desired.

Dietary considerations encourage awareness of Alfredo’s rich nature, aligning it with indulgent days or balanced with lighter meals in subsequent days.

Portion analysis demonstrates crucial balance, ensuring energy needs meet culinary satisfaction without excess, recognizing the importance of earning hearty dishes their rightful place within a holistic diet.

Weight management tips incorporate mindful pasta serving sizes while focusing on protein distribution within the dish, allowing flavorful enjoyment aligned with nutritional goals.

Dietary Adaptations


Gluten-free adaptations effortlessly utilize alternative pasta types like corn or quinoa-based options, avoiding gluten without sacrificing cooking quality or texture.

Dairy-free versions utilize plant cream substitutions and nutritional yeast for that umami cheesy essence, offering satisfying Alfredo flavors for those avoiding dairy.

Vegan approaches can transform proteins into tofu or plant-based alternatives, coupled with cashew cream sauces which replicate richness while remaining animal product-free.

Low-carb adaptations focus on vegetable noodles like zucchini zoodle options for a lighter yet equally delicious version of a traditionally carb-rich dish.

Keto-friendly variations prioritize high-fat components like cream and skip pasta, embracing veggie noodle alternatives maintaining this lifestyle’s fat-oriented approach.

Paleo diets find solace in chicken and shrimp while substituting traditional Alfredo components with nuts like macadamia for base textures aligning with Paleo ideals.

Low-FODMAP accommodations involve garlic-infused oils and gluten-free pasta adjustments, aligning with sensitive digestive needs still thrilled by Cajun Alfredo’s flavors.

Specific diets can always find refuge in simple component swaps or portions control, maintaining diet adherence without forfeiting flavor.

Troubleshooting Guide


Texture issues, such as grainy Alfredo sauce, often stem from overheating cream; ensure gradual temperature increases and constant stirring when whisking cheese.

Flavor balance discrepancies, like blandness, may result from inadequate seasoning amounts; consider increasing Cajun spices and salt levels as needed for desired depth.

Temperature problems, especially rubbery shrimp, may arise from overcooking; monitor cooking time carefully and remove proteins once just done.

Equipment challenges like small pans or crowded cooking spaces hinder proper searing; use adequate sizes ensuring proteins can brown effectively thus developing key flavors.

Ingredient substitutions demand testing given differences in moisture content or heat resistance, affecting overall cooking times necessary for consistency and desired outcomes.

Timing concerns seek resolution through detaching prep from production timing, verifying mise-en-place before cook commencement, guaranteeing seamless kitchen operations.

Recipe Success Stories


Community feedback highlights consistent success with recommended tweaks such as varied cheese applications or alternative spice experimentation for personalized preferences.

Variation successes feature intriguing results with novel protein combinations like smoked sausage or blackened fish – expanding typical expectations creatively.

Adaptation stories relate how diets like veganism embraced alterations maintaining Cajun Alfredo’s beloved flavor platform without compromise on lifestyle commitments.

Reader suggestions often lead to exploration like pasta shape shifts enhancing texture variety, producing remarkable impressions achieved through minor adjustments.

Photography tips emerge to catalyze culinary visual engagements – employ color contrasts and vibrant garnishes to elevate visually appealing captures for all to enjoy.

Frequently Asked Questions

Can I make this recipe ahead of time?

Yes, you can prep the sauce and proteins separately and combine them just before serving to ensure freshness and texture integrity.

What type of pasta is recommended?

Fettuccine is traditional for Alfredo, but penne or linguine can also work well, providing sturdy textures that hold the sauce effectively.

Is this recipe suitable for kids?

Yes, adjust the spiciness by reducing Cajun seasoning for milder tastes, making it a family-friendly choice adaptable to all ages.

How can I reduce the calorie content?

Replace heavy cream with a lighter version or use half-and-half, manage portion sizes and increase the vegetable content for added bulk.

Can I use frozen shrimp?

Yes, thaw them completely and pat dry before using to ensure a superb sear and prevent water release during cooking, which would affect texture.

What’s a good substitute for cream?

Coconut milk or cashew cream can act as substitutes for a dairy-free version, altering the base subtly but effectively retaining Alfredo creaminess.

What should I do if my sauce breaks?

Whisk vigorously off heat with a splash of warm water or cream, stabilizing the mixture to restore smoothness and maintain cohesiveness.

Are there vegan variations for this recipe?

Absolutely, substitute dairy and proteins with plant-friendly options like tofu and almond milk-based sauce, ensuring compatibility with dietary preferences.

How long can leftovers be stored?

Properly refrigerated in airtight containers, keep leftovers fresh for up to 3-4 days, ensuring they maintain flavor and quality upon reheating.

Can I add vegetables to this recipe?

Definitely, incorporating vegetables such as spinach, bell peppers, or zucchini aligns with taste and texture profiles while boosting nutritional intake.

What’s the best way to reheat this dish?

Reheat gradually on the stovetop over low heat, adding a touch of milk if needed to return the sauce’s creamy consistency while avoiding protein overcooking.

What goes well with Cajun Chicken and Shrimp Alfredo?

Pair with garlic bread, a light green salad, or even a refreshing fruit salad to complement the rich flavors presented by this dish.

Additional Resources


Explore related recipes like classic Alfredo variations or spicy Cajun jambalaya, uncovering new dimensions of flavor and culinary challenges.

Technique guides focusing on mastering roux preparation, whisking techniques, or protein searing offer valuable insights for elevating kitchen skills.

Ingredient information delves into detailed analyses and spotlight features on local or seasonal items surrounding the Cajun Chicken and Shrimp Alfredo ensemble, enriching culinary understanding.

Equipment recommendations include worthy investments for sustaining cooking enjoyment, from multifunctional cookware pieces to cutting-edge kitchen tools enhancing recipe executions.

Seasonal variations provide inspiration for ingredient rotations, ensuring adaptability in varying climates or harvest periods, celebrating sustainable and locally-sourced cooking.

Join the Conversation


Engage with us on social media platforms where community exchanges bring fresh insights, sharing proud culinary outcomes, swaps, or story-rich recipe journeys with fellow enthusiasts.

Offer photography tips that accentuate recipe appeal through favorable lighting, composition strategy, and creative angle selection, enticing wider audience reach with visual allure.

Share personal recipe reviews and highlight journeys, enabling learning opportunities from variations attempted and experiences shared, fostering dialogue and mutual growth.

Nurture community engagement via user-submitted ideas, expanding recipe explorations, and experimenting with proposed modifications that resonate positively within shared spaces.

Express love for flavors through hashtag participation, connecting global enthusiasts collaborating over shared Cajun Chicken and Shrimp Alfredo experiences.

The Recipe

Cajun Chicken and Shrimp Alfredo

Serves: 4

Prep Time: 15 mins

Cook Time: 30 mins

Total Time: 45 mins

Kitchen Equipment Needed

  • Large skillet
  • Pot for boiling pasta
  • Knife and cutting board
  • Grater for fresh parmesan

Ingredients

  • 2 boneless, skinless chicken breasts
  • 1 pound shrimp, peeled and deveined
  • 2 tablespoons Cajun seasoning
  • 3 tablespoons olive oil
  • 1 cup heavy cream
  • 1 cup grated parmesan cheese
  • 3 cloves garlic, minced
  • 12 ounces fettuccine pasta
  • Salt and pepper to taste
  • Fresh parsley, chopped for garnish

Directions

  1. Cook the fettuccine pasta according to package instructions until al dente. Drain and set aside.
  2. Season the chicken breasts with Cajun spice, salt, and pepper.
  3. Heat olive oil in a skillet over medium heat. Add the chicken and cook until golden brown and cooked through. Remove and set aside.
  4. In the same skillet, add shrimp and cook until pink and opaque. Remove and set aside.
  5. Add minced garlic to the skillet, sauté until fragrant. Pour in heavy cream, stirring constantly.
  6. Reduce the heat and stir in the parmesan cheese until the sauce is smooth and creamy.
  7. Return the chicken and shrimp to the skillet to reheat and coat with sauce.
  8. Toss pasta with the sauce until well-coated. Serve with chopped parsley sprinkled on top.

Recipe Notes

  • Marinate shrimp with lemon juice before seasoning for additional zing.
  • If the sauce thickens too much, thin it out with reserved pasta water.

Irresistible Mozzarella Cheesesteak Stromboli: A Delicious Twist on a Classic

Mozzarella Cheesesteak Stromboli: A Savory Delight

⚖️
Difficulty
Medium

⏲️
Prep Time
20 mins

🕒
Cook Time
25 mins

⏱️
Total Time
45 mins

🍽️
Servings
4

Dive into the rich, savory flavors of the Mozzarella Cheesesteak Stromboli. This delicious recipe combines the goodness of a classic cheesesteak and wraps it in a warm, flaky breading that is both satisfying and comforting. With its perfect blend of mozzarella cheese and tender beef, this stromboli embodies the essence of comfort food. The Mozzarella Cheesesteak Stromboli is perfect for family dinners and gatherings.

Quick Recipe Highlights

  • Flavor Profile: A delightful combination of cheesy goodness with the savory taste of beef, highlighted by spices and herbs.
  • Texture: A crispy exterior envelops a warm, gooey center that melts in your mouth.
  • Aroma: Tempting notes of melted cheese and spices fill the air, enticing your senses.
  • Visual Appeal: A golden brown, flaky crust with oozing cheese peeping through the scored edges.
  • Skill Level Needed: Medium; requires some experience in dough handling and rolling techniques.
  • Special Equipment: A baking sheet and sharp knife for scoring the dough.

Recipe Overview

  • Difficulty Level: The recipe is moderately difficult, primarily due to dough preparation and filling distribution. It requires an intermediate understanding of baking and rolling.
  • Category: Perfect as a main dish or appetizer for gatherings.
  • Cuisine: This fusion dish combines traditional Italian-style stromboli with the iconic American cheesesteak.
  • Cost: The recipe is budget-friendly, reliant on basic ingredients like mozzarella, beef, and dough.
  • Season: Ideal for all year round, especially comforting in colder months when warm, hearty meals are desired.
  • Occasion: Great for family dinners, game nights, or casual get-togethers with friends.

Why You’ll Love This Recipe


Mozzarella Cheesesteak Stromboli is a crowd-pleaser, marrying rich taste with a pleasing texture. The melted mozzarella and tender beef provide indulgent satisfaction in every bite. The crispy crust adds a delightful contrast, making each serving a complete sensory experience. Its convenience lies in its straightforward preparation; the stromboli is easy to assemble and bake, making it a perfect option for busy weeknights. Nutritionally, it offers a hearty source of protein and calcium, essential for growth and maintenance of bones and muscles.

Socially, this dish is fantastic for entertaining. It serves well as an appetizer that can be casually enjoyed at parties. Its budget-friendly ingredients make it accessible for all. Cost-effectiveness is furthered by the use of readily available supermarket items, making it a hassle-free culinary endeavor for any home cook.

Historical Background and Cultural Significance


The stromboli originates from Italian-American culinary traditions. Its name derives from the Italian word for an island, known for its volcanic features, which metaphorically relate to the molten cheese and rich fillings encased within the dough. Cultural importance lies in its representation of Italian immigration influences on American cuisine. Over time, it evolved from traditional recipes, adapting to local tastes and ingredient availability.

Regionally, variations of stromboli reflect diverse flavor profiles, such as incorporating local cheeses and meats. These adaptations showcase the versatility and enduring appeal of this beloved dish, which continues to delight generations of food enthusiasts.

Ingredient Deep Dive

**Mozzarella Cheese**: A staple in Italian cuisine, mozzarella is renowned for its melting qualities, traditional in pizzas and other baked dishes. Rich in calcium and protein, it supports bone health. Choose fresh, quality mozzarella for the best flavor. Store in a refrigerator and use within a week of purchase. Substitute with smoked mozzarella for a unique twist.

**Beef**: Central to the cheesesteak experience, beef adds depth and richness. Opt for cuts like sirloin for optimal tenderness and flavor. It provides essential nutrients like iron and zinc. Store raw meat in the coldest part of the fridge and consume it within a few days of purchase. Substitutions include chicken or plant-based alternatives for dietary preferences.

Common Mistakes to Avoid

  • Overfilling: Avoid stuffing the stromboli excessively to prevent bursting during baking.
  • Under-baking: Ensure a fully baked crust to achieve the desired crispy texture.
  • Improper sealing: Securely pinch dough edges to contain the fillings.
  • Skipping resting: Let dough rest before rolling for easier handling.
  • Uneven filling distribution: Spread evenly to ensure balanced bites.
  • Overcooking beef: Cook just until tender to avoid toughness.
  • Excessive seasoning: Balance flavors without overwhelming the dish.
  • Direct refrigeration: Let stromboli cool before refrigerating to prevent sogginess.

Essential Techniques

**Dough Rolling**: Mastering dough rolling is crucial for a uniform stromboli. Ensure to apply even pressure and avoid tearing. Roll to the recommended thickness for the perfect bake.

**Filling Preparation**: Precise cutting of beef and cheese ensures optimal filling distribution within the stromboli. It enhances flavor uniformity in every bite.

Pro Tips for Perfect Mozzarella Cheesesteak Stromboli

– Use a pastry brush to apply an egg wash over the dough for a superior golden finish.
– Allow cooked beef to cool slightly before adding it to the dough, preventing premature melting of cheese.
– Score the stromboli top carefully to allow steam to escape and prevent bursting.
– Experiment with herbs like oregano and basil in the cheese mix for additional depth.
– Avoid over-kneading the dough to maintain a light, airy texture.
– Let the stromboli cool for a few minutes post-baking, making slicing clean and easier.

Variations and Adaptations

**Regional Variations**: In the northeastern US, variations might incorporate local cheeses or spicy peppers for added heat.

**Seasonal Adaptations**: Incorporate seasonal vegetables like bell peppers or mushrooms to complement traditional fillings.

**Dietary Modifications**: Substitute with gluten-free dough for those with dietary sensitivities, ensuring cross-contamination prevention.

Serving and Presentation Guide

Serve the Mozzarella Cheesesteak Stromboli sliced, revealing its luscious layers. Pair with a fresh salad for contrast or classic marinara sauce on the side for dipping. Presentation on a wooden board adds a rustic touch, enhancing the dining experience. Consider room temperature or slightly warm servings for optimal flavor release.

Wine and Beverage Pairing

Pairing this stromboli with a robust red wine like Cabernet Sauvignon complements its rich flavors. For non-alcoholic options, a sparkling water with lemon provides a refreshing contrast. Consider serving beverages slightly chilled to balance the warmth of the dish.

Storage and Shelf Life

Store leftovers in an airtight container in the refrigerator for up to 3 days. Reheat in a preheated oven to maintain the crispy texture, avoiding microwaves to prevent sogginess. For longer storage, consider freezing portions and reheating directly from frozen.

Make Ahead Strategies

Prepare the dough and cook the fillings in advance, storing them separately. Assemble shortly before baking for an efficient meal prep solution without compromising quality. Reheat leftovers with a fresh herb garnish for a revitalized taste.

Scaling Instructions

For larger gatherings, double the recipe ingredients, ensuring to adjust bake time accordingly. Utilize multiple baking sheets to avoid overcrowding and allow even heat distribution. Consider preparation in batches, maintaining an optimal workflow.

Nutritional Deep Dive

The Mozzarella Cheesesteak Stromboli provides substantial protein, essential for muscle health. Its calcium-rich cheese supports bone strength. Pair with vegetables to offset caloric intake, promoting a balanced meal. Mindful portioning aids weight management.

Dietary Adaptations

Create a dairy-free version using vegan cheese alternatives. Gluten-free flour can accommodate those with intolerances. Adjust the filling with plant-based beef for a vegan adaptation, ensuring meticulous seasoning to replicate flavors.

Troubleshooting Guide

If the crust is too pale, increase bake time slightly for a crispier finish. Ensure fillings are pre-cooked to prevent release of excess moisture that can lead to a soggy bottom. In case of dryness, reduce oven temperature for a better bake.

Recipe Success Stories

Our readers rave about the Mozzarella Cheesesteak Stromboli’s crowd-pleasing comfort. Many return to the recipe with personal tweaks like adding spicy condiments. Submit your variations and photos for a chance to be featured.

Frequently Asked Questions

Can I use pre-made dough? Absolutely, store-bought dough can save time without compromising on taste.

How do I avoid the bottom becoming soggy? Ensure fillings are not overly juicy and pre-bake the stromboli on a wire rack for airflow.

What can I do if I don’t have mozzarella? Use provolone or cheddar as a substitution for a slightly different flavor.

Can this recipe be made vegetarian? Swap beef for sautéed vegetables like mushrooms or zucchini for a vegetarian twist.

How do I reheat leftovers? Reheat in the oven for optimal texture or use a toaster oven for smaller portions.

Additional Resources

Explore related recipes like Italian Calzones or Philly-style sandwiches for more culinary adventures. Our technique guides provide essential tips on dough handling for perfect results every time.

Join the Conversation

Share your ramen hacks and photos with us on social media. Engage with fellow readers to exchange ideas and feedback. Our community thrives on social interaction, enhancing everyone’s cooking experience.

The Recipe

Mozzarella Cheesesteak Stromboli

Serves: 4

Prep Time: 20 mins

Cook Time: 25 mins

Total Time: 45 mins

Kitchen Equipment Needed

  • Baking sheet
  • Sharp knife
  • Rolling pin
  • Pastry brush

Ingredients

  • 1 lb pizza dough
  • 1 cup shredded mozzarella cheese
  • 1/2 lb thinly sliced beef, cooked
  • 1 bell pepper, sliced
  • 1 onion, sliced
  • 1 tbsp olive oil
  • Salt and pepper to taste
  • 1 egg, beaten (for egg wash)

Directions

  1. Preheat your oven to 375°F (190°C).
  2. In a skillet, sauté onions and peppers in olive oil until soft. Season with salt and pepper.
  3. Roll out pizza dough into a rectangle on a floured surface.
  4. Layer cooked beef, sautéed vegetables, and mozzarella cheese evenly over the dough, leaving room at the edges.
  5. Carefully roll the dough over the filling into a log shape. Pinch the seams to seal.
  6. Transfer to a baking sheet, make slits on the top, and apply an egg wash.
  7. Bake for 25 minutes or until golden brown.
  8. Allow to cool for a few minutes before slicing and serving.

Recipe Notes

  • Substitute mozzarella with your cheese of choice for a different flavor profile.
  • Add a dash of hot sauce to the filling for an extra kick.