Savory Marinated Greek Lamb Chops with Mushrooms and Tomatoes

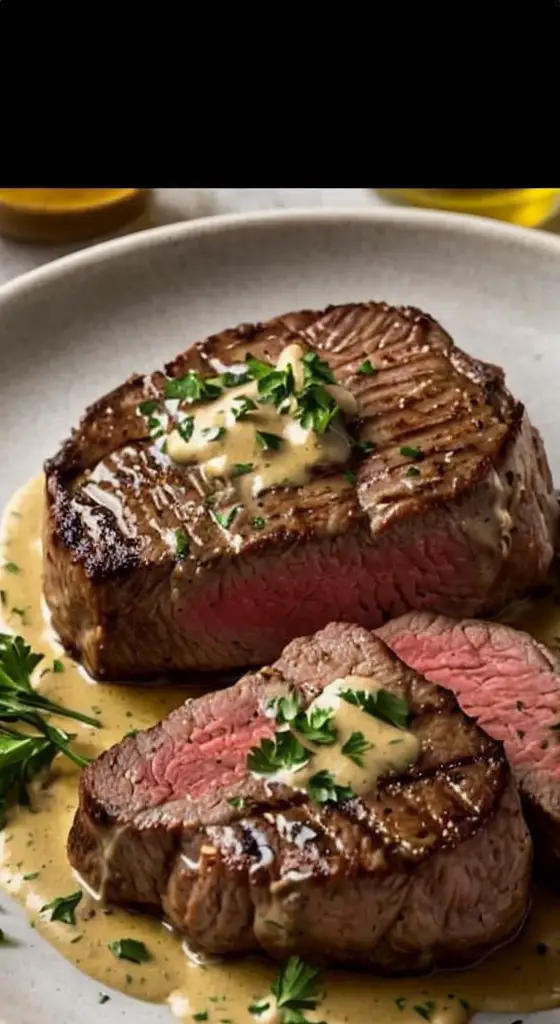
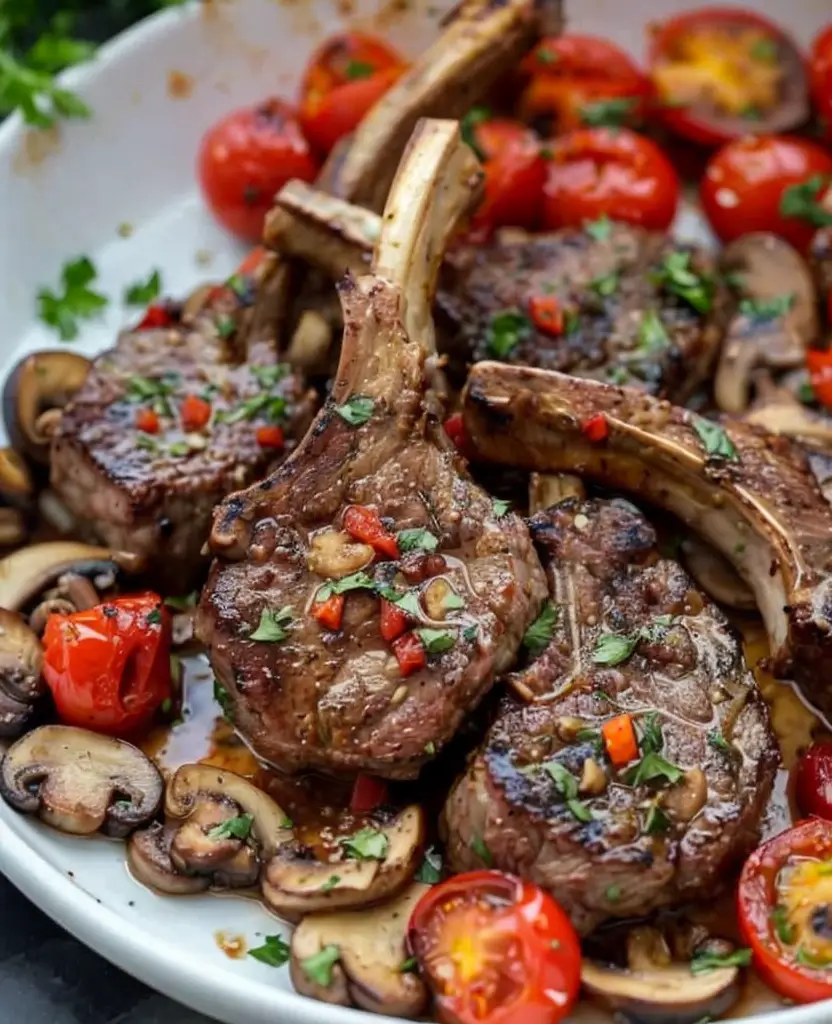
Marinated Greek Lamb Chops with Mushrooms and Tomatoes: A Flavorful Mediterranean Delight

⚖️
Difficulty
Intermediate

⏲️
Prep Time
20 mins

🕒
Cook Time
30 mins

⏱️
Total Time
50 mins

🍽️
Servings
4

Indulge in the rich and vibrant flavors of the Mediterranean with our Marinated Greek Lamb Chops with Mushrooms and Tomatoes. This dish blends juicy lamb chops marinated in a flavorful Greek-inspired concoction with tender mushrooms and ripe tomatoes, creating a symphony of tastes that transport you to sun-soaked shores. Perfectly grilled, these lamb chops are fragrant and infused with garlic, oregano, and lemon, delivering an authentic taste of Greece in every bite.

With a cooking method that highlights the natural flavors of each ingredient, this recipe not only tastes amazing but is also visually stunning. The bright colors of the tomatoes paired with the earthy mushrooms create an appealing plate that will impress your family or guests. Whether you’re hosting a dinner party or enjoying a cozy family meal, this dish is sure to impress and satisfy everyone at the table.

Quick Recipe Highlights

  • Flavor Profile: The marinated lamb chops deliver a savory and slightly tangy taste, complemented by the earthy mushrooms and sweet tomatoes, making it a well-rounded flavor experience.
  • Texture: The dish features a delightful contrast between the tenderness of the lamb and the slight crunch of the grilled vegetables, enhancing mouthfeel with each bite.
  • Aroma: A fragrant mix of garlic, oregano, and grill-smoked meat fills the air, creating an enticing aroma that makes this dish irresistible.
  • Visual Appeal: Vibrant colors from the red tomatoes and golden-brown lamb chops create a mouthwatering presentation that looks as good as it tastes.
  • Skill Level Needed: This recipe requires intermediate cooking skills, including marinating meat and grilling, making it perfect for home cooks looking to elevate their skills.
  • Special Equipment: A grill or grill pan is essential for achieving the perfect sear on the lamb chops, while a cutting board and sharp knife are necessary for prepping the vegetables.

Recipe Overview

  • Difficulty Level: The intermediate difficulty comes from the marinating process and the grill technique, which allows for hands-on practice in flavor development.
  • Category: This dish fits beautifully into the dinner category, making it an ideal option for an evening meal packed with flavor and nutrition.
  • Cuisine: Greek cuisine is known for its use of fresh herbs and bold flavors, making it a nourishing and satisfying choice that pays homage to its Mediterranean roots.
  • Cost: The approximate cost of this recipe is budget-friendly, relying on simple yet high-quality ingredients that provide delicious returns.
  • Season: Ideal for any season, the warmth from the grilled lamb makes it perfect for summer barbecues while the hearty vegetables suit fall and winter dining.
  • Occasion: Suitable for gatherings, family dinners, or even romantic evenings, this dish is versatile and festive enough for any occasion.

Why You’ll Love This Recipe

The taste and texture appeal of Marinated Greek Lamb Chops with Mushrooms and Tomatoes make it a standout dish that everyone will rave about. The lamb’s natural juiciness perfectly balances the slight acidity of the tomatoes, while the marination intensifies the overall flavor. Each bite offers a blend of tenderness and a slight chewiness from perfectly grilled layers, making it satisfying and wholesome.

In terms of convenience, this recipe shines through its straightforward preparation and cooking process. While the lamb chops marinate, you can prepare the vegetables and set the table, ensuring a stress-free cooking experience. Moreover, the dish comes together quickly once the marinating is complete, allowing you to serve up dinner in no time.

Nutritionally, lamb is rich in protein, and it delivers essential nutrients like B vitamins and zinc. The mushrooms add fiber and antioxidants, while tomatoes provide hydration and are rich in vitamins C and K, making this dish not only delicious but also nourishing for you and your loved ones.

Socially, serving this dish at gatherings is a surefire way to wow your guests. Its enticing aroma and stunning presentation allow you to create a memorable dining experience, encouraging conversation and delight. It’s an ideal centerpiece for any Mediterranean-themed night or food-loving get-together.

Lastly, the cost-effectiveness of this recipe stands out. With affordable ingredients and a simple preparation method, you can enjoy a gourmet meal at home without breaking the bank. It’s an opportunity to elevate your culinary skills while staying budget-conscious, making it a must-try for any home cook.

Historical Background and Cultural Significance

The origins of lamb as a prominent protein source in Greek cuisine trace back to ancient times when it was often associated with rituals and celebrations. Lamb reigned as a desirable meat, symbolizing abundance and hospitality in Greek culture, making it a staple in many traditional dishes.

Culturally, lamb chops have taken on a significant role in Greek culinary practices, often served during festivities and significant holidays like Easter. Preparing lamb is more than just a cooking task; it’s a ritual that embodies family unity and joy, where recipes are passed down from generation to generation.

The evolution of this recipe reflects modern culinary practices while staying true to its roots. Contemporary chefs have adapted traditional Greek flavors, such as olive oil, garlic, and herbs, to create accessible yet authentic dishes that cater to today’s tastes while honorably reflecting age-old customs.

Regional variations abound, with different areas in Greece offering unique takes on lamb dishes. Some may feature local herbs, spices, or cooking techniques, making each version a distinct representation of local flavors and cooking styles, allowing you to explore a range of tastes with this versatile dish.

Ingredient Deep Dive

Lamb is a significant part of Greek cuisine and has a rich history. It is often associated with ancient festivals and celebrations, showcasing its importance in cultural traditions. Nutritionally, lamb is an excellent source of protein, contributing to muscle growth and repair, while being rich in essential vitamins and minerals like vitamin B12, zinc, and iron. When selecting lamb, look for cuts that are bright red with firm, white fat for optimal flavor and quality. Proper storage is crucial; keep it refrigerated and use it within a few days or freeze it for longer preservation.

Mushrooms also play a key role in Mediterranean cooking, celebrated for their earthy flavor and versatility. They are low in calories but high in important nutrients like selenium and antioxidants. When selecting mushrooms, choose those that are firm and free from blemishes. They can be stored in a paper bag in the refrigerator to maintain freshness. If you find that certain varieties aren’t available, mushrooms can be substituted with a variety of other vegetables such as zucchini or eggplant.

Tomatoes are a quintessential part of any Mediterranean diet. Rich in flavors and nutrients, they offer significant health benefits, including improved heart health and skin wellness, thanks to their high vitamin C and lycopene content. When selecting tomatoes, opt for ones that are firm and vibrant in color. They can be stored at room temperature for optimum flavor and should be used promptly when ripe. Variations like canned or sundried tomatoes can work as delicious substitutions if fresh tomatoes are out of season.

Common Mistakes to Avoid

  • Not marinating long enough: To achieve flavorful lamb chops, allow them to marinate for at least 2 hours, preferably overnight. Skipping this step will lead to less depth in flavor.
  • Overcooking the lamb: Cooking lamb chops beyond medium-rare can result in tough and chewy meat. Invest in a meat thermometer and aim for an internal temperature of 145°F for perfect juiciness.
  • Skipping the resting step after cooking: Letting the lamb rest for 5-10 minutes post-cooking allows the juices to redistribute, resulting in a more tender and juicy final product.
  • Ignoring the quality of the ingredients: Low-quality ingredients can seriously affect the overall flavor. Select high-quality, fresh ingredients for the best results.
  • Under-seasoning the marinade: Ensure that you taste the marinade before adding the meat. If it’s bland, your final dish will be too.
  • Grilling at too high a temperature: While high heat is important for searing, too high can lead to uneven cooking. Aim for medium-high heat for better control.
  • Choosing the wrong cut of lamb: Different cuts have varying levels of tenderness. Opt for lamb chops, which are preferred for grilling; tougher cuts will not yield the same results.
  • Not using a non-stick spray or oil on the grill pan: This can lead to meat sticking, tearing when you flip, and ultimately an undesirable presentation.
  • Forgetting to prepare vegetables before cooking meat: Have your mushrooms and tomatoes ready to go to prevent overcooking the lamb while multitasking.
  • Neglecting to consider sides: Ensure you complement your lamb chops with suitable sides, like salad or grilled veggies, to round out the meal and enhance the eating experience.

Essential Techniques

Marinating the lamb is essential for flavor. You must effectively combine the marinade ingredients to ensure they coat the lamb evenly. Mastering the marination process means letting the lamb soak in the mixture for adequate time to absorb all the flavors. Always use a non-reactive bowl, like glass or ceramic, to avoid altering the flavor from metal containers.

Grilling the lamb chops gives them that coveted smoky flavor while keeping the meat tender. Always preheat the grill to the right temperature and use tongs to flip the meat instead of a fork to maintain its juices. Look for a nice char on the outside but remain cautious of overcooking; a medium-rare finish is ideal for lamb.

Pro Tips for Perfect Marinated Greek Lamb Chops

Marinate the lamb for a minimum of two hours for maximum flavor infusion, but overnight works best. To ensure even cooking, bring the meat to room temperature before grilling. Use a meat thermometer; lamb should reach 145°F for medium-rare. Sear the lamb on high heat for a couple of minutes on each side to develop a crust, then finish cooking with indirect heat if necessary. Don’t forget to let the lamb rest before slicing; this ensures juicy, flavorful meat. Drizzle with a little olive oil before serving to enhance moisture and flavor. Pair with a fresh salad or tzatziki for a traditional touch.

Variations and Adaptations

For a regional twist, consider incorporating local herbs. Rosemary and thyme are excellent substitutes for oregano if you want different flavor notes. Seasonal adaptations may include adding vegetables like zucchini or bell peppers during summer grilling days for a more colorful plate. For those with dietary modifications, consider using boneless chicken thighs in place of lamb for a lower-fat variation. If you want an even lighter dish, you can grill the tomatoes and mushrooms for a quick char and layering of flavors, amplifying the overall dish’s texture.

Flavor variations can include adding spices like cumin or coriander to the marinade for a different aromatic experience. Alternatively, a hint of sweetness, like honey or balsamic reduction, can create a contrasting flavor profile. For texture modifications, consider pan-searing the mushrooms for a crispy edge before adding them to the final plating.

Lastly, a modern presentation could involve skewering the lamb and vegetables for easy serving and a fun dining experience. Serve with a side of yogurt or hummus and sprinkle fresh herbs on top for an appealing finish.

Serving and Presentation Guide

Presentation is key; ensure to plate your Marinated Greek Lamb Chops neatly. Start by layering the grilled vegetables around the chops for a colorful arrangement. Garnish with fresh herbs like parsley or mint to add vibrancy and freshness. Present with a drizzle of olive oil and a sprinkle of sea salt to enhance taste and appeal visually.

Traditional accompaniments include pita bread and a side of tzatziki for a refreshing touch that complements the rich meat. If you’re aiming for a more contemporary feel, consider serving the dish on a wooden board with the vegetables neatly piled next to the chops. For optimal taste, serve at medium temperature rather than hot or cold, allowing the flavors to shine through.

Portion control is also essential; each serving should consist of 2-3 lamb chops per person, accompanied by a generous serving of grilled vegetables.

Wine and Beverage Pairing

When it comes to pairing wine with Marinated Greek Lamb Chops with Mushrooms and Tomatoes, a robust red like a Cabernet Sauvignon or a Syrah beautifully complements the deep flavors of the lamb. The wine’s tannins interact well with the richness of the meat, enhancing your dining experience.

For those preferring white wine, a full-bodied Chardonnay balances the dish’s savory aspects, creating an elegant pairing. For non-alcoholic options, consider pomegranate juice or a homemade lemonade; both provide a refreshing contrast to the meal.

When serving beverages, ensure they are chilled, particularly white wines, to enhance the refreshing quality. Serve in appropriate glassware to elevate your dining experience.

Storage and Shelf Life

Storing leftover Marinated Greek Lamb Chops is essential for maintaining freshness and quality. Refrigerate within two hours of cooking and consume within 3-4 days. For longer storage, consider freezing the meat after cooking, where it can last for up to 3 months. Use airtight containers or high-quality freezer bags to ensure the lam remains free from freezer burn.

When reheating, do so gently to maintain the meat’s moisture. The best method is to allow the lamb to thaw in the refrigerator overnight before reheating in a skillet or oven. Avoid using a microwave, as this can lead to tough meat and uneven heating.

Signs of spoilage include an off smell, discoloration, or a slimy texture; if any of these are present, discard the meat immediately.

Make Ahead Strategies

Preparing ahead of time is an excellent strategy when making Marinated Greek Lamb Chops. You can marinate the meat the night before, allowing the flavors to intensify. Store it in the refrigerator in a non-reactive container, ensuring it stays covered for maximum flavor absorption.

Vegetables can be prepped several hours in advance; simply chop and refrigerate in airtight containers until ready for grilling. This reduces stress during your cooking time and ensures everything is ready when you need it.

When it comes time to cook, take the lamb out of the fridge to allow it to come to room temperature for about 30 minutes before grilling. This helps in even cooking. If possible, grill the lamb and vegetables just before serving to ensure everything is hot and fresh.

Scaling Instructions

Halving the recipe involves using fewer ingredients, making it perfect for small gatherings or intimate dinners. Adjust cooking times slightly since smaller batches may cook more quickly.

For doubling or tripling the recipe, ensure you have sufficient grill space to accommodate larger quantities. You may need to cook in batches or utilize multiple grills or pans to ensure even cooking and avoid overcrowding, which can inhibit the proper sear and flavor.

Always consider equipment adjustments; for larger amounts, larger bowls for marinating and bigger trays for serving are helpful. As for timing, keep a close eye on the cooking times since they may alter with varying quantities.

Remember to properly store any leftovers by allowing the cooked lamb to cool before refrigerating and ensure all is sealed tightly to maintain freshness.

Nutritional Deep Dive

The macro breakdown of Marinated Greek Lamb Chops includes high protein, necessary for muscle recovery and growth, as well as healthy fats that contribute to overall satiation. Each serving provides adequate energy for your day while balancing flavor and nutrition.

Micronutrient analysis reveals that lamb is an excellent source of essential B vitamins, notably B12, which is crucial for energy production and neurological functions. Additionally, the vibrant vegetables used in this dish contribute a range of vitamins and antioxidants, further enhancing this food’s nutritional profile and health benefits.

Portion analysis shows that each serving offers a well-rounded meal option that satisfies hunger without compromising health goals. For those managing weight, the high protein content of the lamb can aid in keeping you fuller, potentially leading to decreased overall calorie intake throughout the day.

Dietary considerations should be noted; for low-carb adaptations, you can enjoy the dish without the typical sides, while also providing suitable options for those looking for nutrient-dense meals.

Dietary Adaptations

For gluten-free adaptations, simply ensure your marinade ingredients are gluten-free, avoiding any soy sauce or similar products that contain wheat.

For a dairy-free option, avoid using traditional side dressings that may contain dairy; instead, consider making a refreshing cucumber and yogurt dip from plant-based yogurt.

For vegan adaptations, substitute the lamb with sizable vegetable skewers featuring marinated portobello mushrooms, zucchini, and bell peppers for a hearty and satisfying alternative.

Keto enthusiasts will appreciate this recipe as it can be enjoyed with lower-carb vegetables, keeping the meal within allowable boundaries while still enjoying rich flavors.

Lastly, low-FODMAP options can easily be achieved by focusing on certain herbs and avoiding garlic in the marinade, maintaining the essence of the dish without compromising dietary needs.

Troubleshooting Guide

If you encounter texture issues, such as tough meat, it’s often a sign that the lamb was overcooked. To resolve this, always use a meat thermometer and rest the meat post-cooking for improved tenderness.

For flavor balance, if the dish tastes bland, it may require additional seasoning. Consider adding more salt, pepper, or herbs either during cooking or just before serving to enrich the overall flavor.

Temperature problems can often arise; for instance, lamb not cooking evenly may relate to temperature inconsistencies on the grill. Always preheat properly and make adjustments during grilling as necessary.

Handling equipment challenges, like the grill flames being too high, can result in charring while leaving the inside uncooked. Adjust heat as required until ideal cooking conditions are achieved.

Ingredient substitution may lead to unintended flavors; for instance, using low-quality oils can dull the dish. Always opt for fresh, high-quality ingredients to uphold flavors.

Timing concerns can affect the overall dish as well. Be sure to follow step-by-step instructions and not skip essential resting periods or cross-prep timings, to allow for optimal results.

Recipe Success Stories

Community feedback reveals a wide appreciation for the Marinated Greek Lamb Chops, with many users sharing their positive cooking experiences. Some have mentioned how the flavors evoked memories of family gatherings during holiday seasons, establishing a sense of nostalgia.

Variation successes include adaptations made during summer BBQs, where marinated vegetables were added alongside the lamb. Home cooks have noted how this not only enriched the overall flavor but also made their gatherings more colorful and appealing.

Readers have suggested interesting twists, like adding pomegranate molasses to the marinade for a juicy sweet-sour finish that elevated the dish’s profile and made it even more enjoyable.

Photography tips from our community highlight the importance of natural light and presentation, emphasizing the contrast between bright vegetables and the beautifully grilled lamb, ensuring that every snap reflects the dish’s tantalizing appeal.

Frequently Asked Questions

Can I marinate the lamb overnight?

Yes, marinating the lamb overnight enhances the flavor profile significantly, allowing the meats to absorb all the garlic, herbs, and acidity from the marinade, resulting in a delicious outcome.

What can I serve with this dish?

We recommend serving with a refreshing salad, tzatziki, or grilled flatbreads for a more complete Mediterranean experience. Roasted potatoes or rice are also fantastic sides.

How do I know when the lamb is properly cooked?

The best method is to use a meat thermometer, aiming for an internal temperature of 145°F for medium-rare. For more well-done meat, aim for a higher temperature, but be cautious of overcooking.

Can I use other meats instead of lamb?

Absolutely! This marinade also works well with chicken or beef. Adjust cooking times according to the meat you choose to ensure optimal cooking results.

How long can leftovers last in the fridge?

Leftovers can be safely stored in the refrigerator for 3 to 4 days if kept in an airtight container. Always ensure you cool them before refrigerating.

Can I freeze the cooked lamb chops?

Yes, cooked lamb typically freezes well for up to 3 months. Be sure to wrap it tightly to avoid freezer burn and label it with the date of freezing.

Is it necessary to let the meat rest after cooking?

Definitely! Allowing meat to rest for about 5-10 minutes ensures that the juices redistribute throughout the meat, resulting in a tender texture and enhanced flavors.

What’s the best way to reheat lamb chops?

The best method is to reheat them gently in a skillet over low heat or bake them at a low temperature to prevent them from becoming tough or dry.

What if I don’t have fresh herbs?

If fresh herbs aren’t available, dried herbs make an excellent substitute. Use about one-third of the amount of dried herbs compared to fresh herbs for proper flavor balance.

Can I grill this dish in the oven?

Yes, if you don’t have access to a grill, broiling in the oven works well. Just be sure to preheat the broiler and watch closely to avoid burning.

Additional Resources

For those interested in further culinary explorations, check out related recipes such as Greek-style chicken, stuffed grape leaves, or refreshing Mediterranean salads. These can provide wonderful accompaniment options.

Explore technique guides that give insights into marinating and grilling techniques, perfect for perfecting your skills. More ingredient information on selecting high-quality lamb or vegetables can also be beneficial for ensuring excellent results every time you cook.

Discussing equipment recommendations, a quality grill pan or outdoor grill, and high-quality knives and cutting boards can elevate your cooking experience for an exceptional meal.

Finally, keep an eye out for seasonal variations. Each season offers unique ingredients that can alter your recipes into delightful new versions, inviting creativity in the kitchen.

Join the Conversation

We’d love to have you share your photos and experiences with the recipe on social media! Join our community by tagging us, sharing your adaptations, and seeing what others have created. Recipe reviews and feedback help others learn and discover the joys of cooking.

If you’ve experimented with variations on this dish or discovered new sides that paired perfectly, let us know! Your insights not only help enrich our community but also inspire creativity in the kitchen for all.

Don’t forget to share your tips for photo captures and plating, as we love to see the beautiful meals our community creates. Together, we can create a culinary adventure that celebrates flavors, traditions, and love for cooking.

The Recipe

Marinated Greek Lamb Chops with Mushrooms and Tomatoes

Serves: 4

Prep Time: 20 mins

Cook Time: 30 mins

Total Time: 50 mins

Kitchen Equipment Needed

  • Grill or grill pan
  • Measuring spoons and cups
  • Mixing bowl
  • Sharp knife
  • Cutting board
  • Meat thermometer

Ingredients

  • 4 lamb chops
  • 2 cups mushrooms, sliced
  • 2 cups cherry tomatoes, halved
  • 1/4 cup olive oil
  • 2 garlic cloves, minced
  • 2 tablespoons fresh oregano, chopped
  • Juice of 1 lemon
  • Salt and pepper to taste

Directions

  1. In a mixing bowl, combine olive oil, garlic, oregano, lemon juice, salt, and pepper to create the marinade.
  2. Add lamb chops to the marinade, ensuring they are fully coated, and let sit for at least 2 hours or overnight for maximum flavor.
  3. Preheat the grill to medium-high heat.
  4. Remove lamb from the marinade, letting excess drip off, and place on the grill.
  5. Cook the lamb chops for 4-5 minutes per side for medium-rare, or to your desired doneness.
  6. Add mushrooms and tomatoes to the grill in the last few minutes, cooking until tender.
  7. Remove from the grill and let the lamb rest for 5-10 minutes before serving.
  8. Serve the lamb chops topped with grilled mushrooms and tomatoes.

Recipe Notes

  • For extra flavor, consider adding additional spices like cumin or paprika to the marinade.
  • Leftovers can be stored in the refrigerator for up to 3 days and reheated for a quick meal.
  • Feel free to substitute the lamb for chicken or beef for different variations.

Delicious Parmesan-Basil Chicken Cutlets for Savory Dinner Delight

Parmesan-Basil Chicken Cutlets: A Crispy Delight

⚖️
Difficulty
Easy

⏲️
Prep Time
15 mins

🕒
Cook Time
20 mins

⏱️
Total Time
35 mins

🍽️
Servings
4

Welcome to your new favorite dish: Parmesan-Basil Chicken Cutlets! This scrumptious recipe combines tender chicken breasts with a golden, crispy crust seasoned to perfection with aromatic basil and savory Parmesan cheese. The moment you take your first bite, your taste buds will dance with joy at the harmonious blend of flavors. Ideal for a weeknight dinner or a special occasion, these chicken cutlets promise to make mealtime memorable.

Imagine a plate of beautifully cooked chicken cutlets nestled beside a refreshing salad or pasta, glistening in the warm sunlight. The perfectly crispy exterior yields to a juicy center, and each bite bursts with flavor. Whether you’re cooking for family or friends, this dish brings a level of elegance and comfort, making it a true crowd-pleaser. Let’s dive into this delightful recipe that will leave you craving more!

Quick Recipe Highlights

  • Flavor Profile: This dish features a delightful balance of savory and slightly nutty flavors from the Parmesan cheese, complemented by the fresh, herby notes of basil.
  • Texture: Enjoy the combination of crispy, crunchy chicken on the outside and moist, succulent meat inside, creating a pleasing contrast.
  • Aroma: The enticing aroma of fresh basil mingling with the warm, cheesy scent wafts through the kitchen, inviting everyone to gather around the table.
  • Visual Appeal: The golden-brown cutlets offer a stunning contrast to any colorful side dish, making for an aesthetically pleasing plate.
  • Skill Level Needed: Ideal for beginner cooks, the simplicity of this recipe makes it accessible while still impressing even the most seasoned home chefs.
  • Special Equipment: You will need standard kitchen tools such as a frying pan, measuring cups, and a meat mallet, making this recipe easy to prepare.

Recipe Overview

  • Difficulty Level: Easy. This recipe requires minimal steps and is simple enough for beginners, making it perfect for a quick family dinner.
  • Category: Dinner. These chicken cutlets can serve as the main dish, perfectly accompanied by sides like roasted vegetables or pasta.
  • Cuisine: Italian-American. This classic dish draws inspiration from Italian flavors, with its use of Parmesan cheese and fresh herbs.
  • Cost: Approximately $15 to $20, making it a budget-friendly option for feeding a family.
  • Season: Great year-round, but particularly delightful in spring and summer when fresh basil is at its peak.
  • Occasion: Perfect for weeknight dinners, casual gatherings, or any occasion where you want to impress with minimal effort.

Why You’ll Love This Recipe

The taste of Parmesan-Basil Chicken Cutlets is simply irresistible. The savory Parmesan crust is not only flavorful but also creates a satisfying crunch that perfectly complements the juicy chicken inside. Each bite is an explosion of flavor, enhanced by fresh basil that offers a light, herbal note, making this dish a hit for all ages.

Preparation is quick and straightforward, making these chicken cutlets perfect for busy nights. Most of the ingredients are pantry staples, and you can have this dish on the table in under 40 minutes. This convenience allows you to look like a culinary pro without spending hours in the kitchen.

From a nutritional standpoint, chicken is a great source of lean protein, essential for muscle repair and overall health. By baking instead of frying, you can enjoy a lower fat version of this classic dish, ensuring it aligns with your health goals.

This recipe is excellent for social gatherings, as it can be easily doubled to serve larger groups. Pairing the cutlets with a salad or bread creates a meal that feels fancy yet is incredibly welcoming—a perfect combination for entertaining guests.

Furthermore, the cost-effectiveness of this recipe makes it accessible for anyone. With affordable ingredients and straightforward preparation, you can create a gourmet meal without breaking the bank, proving that fine dining truly can be achieved at home.

Historical Background and Cultural Significance

The origins of chicken cutlets can be traced back to Italian and French cuisines. These cultures have a rich history of breaded and fried meats. This particular dish merges the Italian love for cheese and herbs with American cooking styles, showcasing a blend of culinary history.

Culturally, food plays a significant role in family and social gatherings in Italian-American communities. Recipes like Parmesan-Basil Chicken Cutlets are often passed down through generations, holding sentimental value that ties families to their heritage.

Over time, this dish has evolved from a traditional preparation to modern interpretations that focus on lighter cooking methods, such as baking instead of frying, while maintaining the essence of flavor and comfort.

Regional variations can be found depending on personal or family recipes, with some opting for different seasonings or garnishes, showcasing the versatility and adaptability of this beloved dish.

Ingredient Deep Dive

**Chicken Breast:** This lean meat is a staple in many cuisines, prized for its versatility and health benefits. When selecting chicken breast, look for cuts that are plump and firm to ensure freshness. Store in the refrigerator for 1-2 days or freeze for later use.

**Parmesan Cheese:** This hard, aged cheese hails from Italy and adds a depth of flavor to dishes. When purchasing, opt for block cheese and grate it fresh for the best taste and aroma. Nutritionally, Parmesan is higher in protein and calcium, making it a fantastic addition to any meal.

**Fresh Basil:** A classic herb in Italian cooking, fresh basil contributes a vibrant flavor that elevates the dish. Select bright, fragrant leaves and wash them gently. Store in a glass of water in the refrigerator to keep fresh longer.

**Breadcrumbs:** This ingredient provides the crunchy coating that makes cutlets so enjoyable. Use store-bought for convenience or make your own by toasting and grinding bread. Ensure that breadcrumbs are kept dry and sealed to avoid moisture.

Common Mistakes to Avoid

  • Not pounding the chicken: Failing to flatten the chicken can result in uneven cooking. Always pound to an even thickness for consistent results.
  • Skipping the seasoning: Seasoning the breadcrumbs and chicken is vital. Don’t miss this step, as it elevates the overall flavor of the dish.
  • Crowding the pan: Overcrowding can lead to steaming rather than frying. Cook in batches if necessary to maintain crispiness.
  • Using low-quality cheese: Cheap cheese may not melt or flavor the dish well. Always opt for high-quality Parmesan.
  • Ignoring rest time: Letting the cooked cutlets rest allows the juices to redistribute. Cutting too soon can lead to dry chicken.
  • Overcooking the cutlets: Keep an eye on them during cooking. Aim for an internal temperature of 165°F to avoid dryness.
  • Not preparing a proper setup: Don’t forget to organize your breading station. A tidy workspace makes the process more manageable.
  • Neglecting to preheat the pan: Start with a hot pan to create a crispy crust. An unheated pan may result in soggy cutlets.
  • Using cold chicken: Let the chicken sit at room temperature before cooking. Cold chicken can disrupt cooking times and texture.
  • Failing to pair wisely: Choose sides that complement the richness of the cutlets without overpowering them. Think light salads or steamed vegetables.

Essential Techniques

**Pounding the Chicken:** This step ensures an even thickness for uniform cooking, crucial for achieving tender cutlets. Use a meat mallet and be gentle, as overdoing it can tear the meat. Visual cues like flattened, even pieces indicate readiness.

**Breading Process:** Mastering the art of breading is essential. Start with seasoned flour, then dip into egg, and finally coat with breadcrumbs. This three-step method prevents sogginess and results in a perfect crispy exterior.

Pro Tips for Perfect Parmesan-Basil Chicken Cutlets

1. Use freshly grated Parmesan for maximum flavor. This cheese adds richness that pre-grated options often lack.

2. Experiment with different herbs in the breadcrumb mixture for added depth. Oregano or thyme can be wonderful complements.

3. Consider adding a splash of lemon juice to the chicken before breading for a bright flavor balance.

4. Try baking instead of frying for a healthier option; just ensure the oven is properly preheated.

5. Allow cutlets to rest before serving to keep them juicy. This simple step can profoundly affect their texture.

6. Serve with a homemade dipping sauce, like marinara or a pesto aioli, for extra flavor options.

7. If preparing in advance, store breaded cutlets in the fridge for a few hours before frying for even more flavor absorption.

8. For crispy leftovers, reheat them in an air fryer or oven rather than the microwave to maintain crispiness.

Variations and Adaptations

**Regional Variations:** Different regions may incorporate unique spices or cheeses into the breading, such as integrating spices like paprika in the South or adding local cheeses that suit regional tastes.

**Seasonal Adaptations:** In fall, consider incorporating spices like sage or rosemary into your breadcrumb mix to complement the season’s flavors.

**Dietary Modifications:** Health-focused adaptions could include using whole-grain breadcrumbs or gluten-free alternatives to fit various dietary needs.

**Flavor Variations:** For a kick, add crushed red pepper flakes to the breadcrumbs, providing a spicy undertone that pairs well with the cheese.

**Texture Modifications:** For crunch, incorporate crushed nuts, such as almonds or walnuts, in the breadcrumb mixture for a fun twist.

**Presentation Alternatives:** Try serving with arugula or a fresh salad to brighten the plate visually, providing a great contrast to the cutlets.

Serving and Presentation Guide

**Plating Techniques:** Serve the chicken cutlets on a large platter for family-style dining or individually on elegant plates for a refined approach.

**Garnishing Ideas:** Fresh basil leaves or a sprinkle of grated Parmesan on top enhances visual appeal and flavor.

**Traditional Accompaniments:** Classic pairings include marinara sauce, pasta with olive oil, or roasted vegetables for a balanced meal.

**Modern Serving Suggestions:** Consider serving atop a bed of couscous or quinoa for a trendy twist that adds health benefits.

**Temperature Considerations:** Serve the cutlets warm, freshly cooked, to fully appreciate the flavors and textures.

**Portion Control Tips:** For adults, aim for one cutlet per person, while children can enjoy half, encouraging mindful eating.

Wine and Beverage Pairing

**Wine Pairings:** A crisp Pinot Grigio or a lightly oaked Chardonnay can enhance the flavors beautifully with their acidity complementing the richness of the cheese.

**Non-Alcoholic Alternatives:** Sparkling water with a wedge of lemon provides a refreshing contrast to the savory dish.

**Coffee/Tea Pairings:** A herbal tea, like chamomile or a lightly brewed green tea, can help cleanse the palate between bites.

**Temperature Considerations:** Serve white wines chilled for the best dining experience alongside this dish.

**Serving Suggestions:** Choose wine glasses that highlight the flavors of your selected pairing, enhancing the overall experience.

Storage and Shelf Life

**Storage Methods:** Leftover cutlets should be stored in an airtight container or wrapped tightly in foil to maintain freshness.

**Temperature Requirements:** Refrigerate leftovers within two hours of cooking to ensure safety and quality.

**Container Recommendations:** Use glass or BPA-free plastic containers for storage; avoid metal containers as they can react with the food.

**Signs of Spoilage:** If the chicken has an off smell, slimy texture, or discoloration, it’s best to discard it.

**Reheating Instructions:** To reheat, place the cutlets in an oven preheated to 375°F for 10-15 minutes or until heated through.

**Freezing Guidelines:** These cutlets can be frozen for up to three months if wrapped properly; reheat in the oven for best results.

Make Ahead Strategies

**Prep Timeline:** You can prepare the cutlets a day in advance, just hold off on the cooking part until the day of serving.

**Storage Between Steps:** Breadcrumbed cutlets can be stored in the fridge for a few hours before cooking, allowing flavors to meld.

**Quality Impact Assessment:** Preparing ahead of time can enhance flavor absorption, making the cutlets even more delicious.

**Assembly Tips:** Consider assembling all ingredients before starting to streamline the cooking process.

**Reheating Guidelines:** If cooked a day in advance, gently reheat in the oven to keep the crust crispy.

**Fresh Element Additions:** Add fresh herbs or a squeeze of lemon just before serving for an extra burst of flavor.

Scaling Instructions

**Halving the Recipe:** To serve a smaller group, simply cut the amounts in half, ensuring even cooking times.

**Doubling or Tripling:** Increase ingredient amounts proportionately, but remember to cook in batches to maintain crispness and avoid crowding the pan.

**Equipment Adjustments:** When making larger quantities, you may need multiple pans to ensure all the cutlets are cooked evenly.

**Timing Modifications:** Keep an eye on cooking times; larger cutlets may need an extra couple of minutes for perfect doneness.

**Storage Considerations:** Adjust storage containers size based on batch size to keep leftovers fresh without waste.

Nutritional Deep Dive

**Macro Breakdown:** Each serving of Parmesan-Basil Chicken Cutlets provides a great balance of protein, fats, and carbohydrates, thanks to the chicken and breadcrumbs.

**Micronutrient Analysis:** Key nutrients include high amounts of calcium from Parmesan and potassium from chicken, essential for muscle and heart health.

**Health Benefits:** The use of lean chicken promotes healthy weight management and muscle growth, while the incorporation of fresh herbs boosts vitamins and antioxidants.

**Dietary Considerations:** This recipe can easily be adapted for dietary preferences, making it versatile for a variety of eating plans.

**Portion Analysis:** Servings can be adjusted based on dietary needs; with 4 pieces, it’s manageable for a family.

**Weight Management Tips:** Pair the chicken cutlets with plenty of veggies to create a balanced, satisfying meal that supports weight loss goals.

Dietary Adaptations

**Gluten-Free:** Substitute regular breadcrumbs with gluten-free options or crushed gluten-free crackers for a delicious alternative.

**Dairy-Free:** Use dairy-free cheese alternatives and omit the Parmesan for a similar experience without the dairy.

**Vegan:** For a plant-based version, use sliced eggplant as a base or chickpea patties, ensuring to adjust the cooking time.

**Low-Carb/Keto:** Opt for almond flour instead of breadcrumbs to maintain a low-carb approach while enjoying the flavors.

**Paleo:** Skip the breadcrumbs and use crushed nuts for breading, staying within the Paleo guidelines while adding extra flavor.

**Low-FODMAP:** Ensure the chicken and breadcrumbs are sourced from low-FODMAP options for those sensitive to certain carbohydrates.

**Other Specific Diets:** Tailor the recipe according to personal dietary choices while maintaining its core flavor profile.

Troubleshooting Guide

**Texture Issues:** If the cutlets are too dry, ensure proper cooking times and allow resting before serving to keep moisture.

**Flavor Balance:** If the cutlets lack flavor, adjust seasoning levels in the breadcrumb mixture, and consider brining the chicken beforehand.

**Temperature Problems:** An imbalance in temperature can occur if the chicken is too thick; evenly pound for best results.

**Equipment Challenges:** If frying, ensure sufficient oil in the pan for proper frying; too little oil can lead to soggy results.

**Ingredient Substitutions:** Substituted ingredients can affect texture and flavor; test small batches when trying major ingredient changes.

**Timing Concerns:** Adjust timing if doubling recipes; take extra care to monitor doneness to prevent overcooking.

Recipe Success Stories

Many home cooks have raved about this recipe, praising how easy it is to prepare delicious chicken cutlets that please a crowd. Readers have shared their successful variations, incorporating different cheeses or herbs, leading to exciting adaptations that inspire creativity in the kitchen.

Adaptation stories tell of families gathering around the dinner table, where these cutlets have become a staple during holidays and special occasions. Photos of beautifully plated chicken cutlets have portrayed the dish’s appealing presentation and made it a favorite for social media sharing.

Photography enthusiasts recommend focusing on the golden crust and vibrant basil garnish to capture the essence of the dish. These success stories not only showcase the recipe’s joy but also highlight its ability to bring loved ones together through shared meals.

Frequently Asked Questions

Can I bake these chicken cutlets instead of frying them? Yes, you can bake them! Preheat your oven to 400°F and bake on a parchment-lined tray for about 15-20 minutes or until golden brown, flipping halfway through.

How do I store leftovers of Parmesan-Basil Chicken Cutlets? Place leftovers in an airtight container and refrigerate for up to 3 days. For longer storage, freeze them, and they will last for up to 3 months.

Can I use frozen chicken for this recipe? Yes, but it’s best to thaw it completely before breading or cooking to ensure even cooking and proper texture.

What sides pair well with these chicken cutlets? These cutlets go well with a fresh green salad, pasta, or roasted vegetables, providing a balanced meal.

Can I make the breadcrumb mixture in advance? Absolutely! You can prepare the breadcrumb mixture ahead of time and store it in an airtight jar in your pantry.

What if I don’t have fresh basil? You can substitute dried basil; just remember to use about one-third of the amount as dried herbs are more concentrated in flavor.

How can I make the cutlets spicier? Add red pepper flakes or a dash of hot sauce to the egg wash for a spicy kick.

Is there a vegetarian option for this dish? Yes, you can use eggplant or cauliflower as a substitute for chicken, following the same breading process.

What is the best way to reheat leftovers? The best way to reheat the cutlets while keeping them crispy is in an oven or air fryer.

Can I use other types of cheese? Yes, Parmesan can be substituted with Pecorino Romano or any cheese that melts well for a different flavor profile.

Additional Resources

If you loved this recipe, check out our other chicken recipes that feature vibrant flavors and easy-to-follow steps. Additionally, explore our technique guides to improve your cooking skills, including tutorials on breading and frying techniques. For those interested in ingredient information, we have an extensive library dedicated to chicken, cheese, and herbs, helping you make informed choices for your kitchen adventures.

Join the Conversation

Share your thoughts or ask questions about the Parmesan-Basil Chicken Cutlets in the comments below! Connect with us on social media, share your delicious photos, and discover the unique variations our community has created. Your feedback is invaluable, and we can’t wait to hear how this recipe has brought joy to your dining table.

The Recipe

Parmesan-Basil Chicken Cutlets

Serves: 4

Prep Time: 15 mins

Cook Time: 20 mins

Total Time: 35 mins

Kitchen Equipment Needed

  • Frying pan
  • Meat mallet
  • Measuring cups
  • Mixing bowls
  • Spatula

Ingredients

  • 4 boneless, skinless chicken breasts
  • 1 cup breadcrumbs
  • 1/2 cup grated Parmesan cheese
  • 1/4 cup fresh basil, chopped
  • 1 egg, beaten
  • 1/2 cup all-purpose flour
  • Salt and pepper, to taste
  • Olive oil, for frying

Directions

  1. Begin by pounding the chicken breasts to an even thickness to ensure even cooking.
  2. Season the chicken with salt and pepper.
  3. Set up a breading station with three bowls: one with flour, one with a beaten egg, and another with a mixture of breadcrumbs, Parmesan, and basil.
  4. Coat each chicken breast first in flour, then dip in the egg, and finally coat with the breadcrumb mixture.
  5. In a large frying pan, heat olive oil over medium heat. Fry the cutlets for 5-7 minutes on each side, or until golden and cooked through.
  6. Once cooked, transfer to a plate lined with paper towels to absorb excess oil.
  7. Serve immediately with your favorite sides and enjoy!

Recipe Notes

  • For an extra crunch, consider adding crushed nuts to the breadcrumb mixture.
  • These cutlets freeze well; ensure they’re wrapped tightly for up to 3 months.
  • Experiment with different cheeses to discover your favorite flavor combinations.

Indulge in Garlic Butter Surf and Turf: Steak and Shrimp Delight

Garlic Butter Surf and Turf: A Luxurious Steak and Shrimp Combo

⚖️
Difficulty
Medium

⏲️
Prep Time
15 mins

🕒
Cook Time
20 mins

⏱️
Total Time
35 mins

🍽️
Servings
4

Delight in the sumptuous flavors of Garlic Butter Surf and Turf, a dish that cements itself as a favorite for special occasions and everyday indulgence alike. This luxurious steak and shrimp combo is not just a meal, but an experience that invites your senses to dance. The juicy and perfectly seared steak, paired with succulent shrimp coated in a rich garlic butter sauce, creates a mouthwatering symphony of flavors. When served together, they offer an exquisite contrast that is sure to impress your family and friends.

From the very first bite, the rich umami of the steak melds with the delicate sweetness of the shrimp, artfully balanced by the aromatic garlic and herb-infused buttery finish. Each bite is further enhanced by a delightful crunch from the seared edges of the steak and the tender, juicy shrimp. This dish doesn’t just fill your stomach—it fills your heart and creates lasting memories around the dinner table.

Quick Recipe Highlights

  • Flavor Profile: The garlic butter enhances the natural sweetness of shrimp and the savory, robust flavors of the steak.
  • Texture: Experience the juicy tenderness of the steak complemented by the slight crispness of the sautéed shrimp.
  • Aroma: The heady aroma of sizzling garlic, combined with the rich scent of cooking meat, fills your kitchen with irresistible allure.
  • Visual Appeal: The golden shrimp contrast against the deep mahogany of the perfectly cooked steak, creating a stunning dinner presentation.
  • Skill Level Needed: This recipe is ideal for anyone from beginner cooks to seasoned chefs, requiring only basic cooking skills.
  • Special Equipment: A good quality cast-iron skillet or frying pan makes this dish shine. A meat thermometer is also recommended for perfectly cooked steak.

Recipe Overview

  • Difficulty Level: This Garlic Butter Surf and Turf recipe is labeled as medium due to the need for timing coordination between the steak and shrimp.
  • Category: It fits perfectly in the categories of dinner, special occasions, and seafood recipes.
  • Cuisine: Rooted in American cuisine, this recipe captures the essence of surf and turf loved by many for its luxurious feel.
  • Cost: With an approximate cost of $30-$40, this dish caters to those looking to create gourmet meals at home.
  • Season: Ideal for any season but particularly favored during summer barbecues or winter gatherings for a comforting meal.
  • Occasion: This recipe shines on special occasions like anniversaries, holidays, or casual get-togethers with friends.

Why You’ll Love This Recipe

The taste and texture appeal of Garlic Butter Surf and Turf is extraordinarily enticing. The way the juicy steak marries with the tenderness of succulent shrimp creates a culinary masterpiece on your palate. The rich garlic butter sauce ties all the flavors together while liberating their individual character, resulting in a dish that feels indulgent and rewarding.

Convenience and preparation benefits make this recipe enviable. It takes only about thirty-five minutes from prep to plating, meaning it can seamlessly fit into your weeknight dinner plans or serve as the star of a weekend feast. Minimal clean-up is necessary, especially if using a one-pan method, allowing you to enjoy the meal instead of being tethered to the kitchen.

Nutritionally, this dish combines a balanced protein source through steak and shrimp, providing essential amino acids, vitamins, and minerals. Incorporating fresh herbs into the garlic butter brings forth additional health benefits while enhancing the flavor profile, ensuring you don’t have to compromise nutrition for taste.

Social and entertaining value is immense with this recipe. Surf and turf exudes sophistication, making it perfect for impressing guests or family during gatherings. It sparks conversation and complements countless side dishes from simple salads to creamy mashed potatoes, allowing for versatile meal options to suit different tastes.

Cost-effectiveness comes into play particularly when planning for gatherings or special dates. Preparing a gourmet meal at home saves your pocket while leaving a lasting impression. The combination of readily available ingredients means you can both impress and indulge without breaking the bank.

Historical Background and Cultural Significance

Garlic Butter Surf and Turf has an origin deeply rooted in American cuisine. This dish reflects a post-war era shift in dining where previously exclusive elements, like steak and seafood, became accessible to all. The luxurious pairing of land and sea proteins echoed the elevated dining experiences established by fine-dining restaurants.

Culturally, surf and turf represents indulgence, a celebration of life’s special moments. In American households, it has evolved into a go-to meal for festivities and gatherings, embodying warmth and shared experiences among loved ones. The dish has not only remained relevant but has adapted to various culinary trends.

The evolution of the recipe has seen adaptations across regions. Chefs and home cooks alike have introduced personalized twists with different flavorings, cooking methods, and presentation styles, all while keeping the original theme of surf and turf intact.

Regional variations are numerous, with some areas opting for different seafood elements, like lobster or scallops, in lieu of shrimp. Regional cuisines often prompt the addition of spicy elements or unique seasonings, creating a distinct local interpretation of this classic dish.

Ingredient Deep Dive

Steak, a primary component of Garlic Butter Surf and Turf, holds significant cultural weight. It has long been a symbol of abundance and hospitality, easily elevating meals. It’s essential to choose high-quality cuts, such as ribeye or filet mignon, which offer rich marbling that results in remarkable taste and tenderness. When selecting steak, look for bright red coloration and firm texture to ensure freshness.

Nutritionally, steak is an excellent source of protein, iron, zinc, and B vitamins, making it an integral part of a balanced diet. Proper storage involves refrigerating raw steak and ensuring it is consumed within a few days for optimal safety. Alternatives for the steak include chicken or plant-based options for those seeking alternatives.

Shrimp, another star of the dish, has long been celebrated in coastal cuisines worldwide. Its sweetness and versatility make it a beloved seafood choice. When selecting shrimp, look for those that are firm, odorless, and of high quality—fresh or frozen varieties will work well.

In terms of nutrition, shrimp are low in calories, high in protein, and packed with omega-3 fatty acids, beneficial for heart health. For storing shrimp, keep them in the coldest part of the refrigerator or freeze for prolonged storage. Substitution options may include other seafood like scallops or even shellfish for a different taste.

Common Mistakes to Avoid

  • Overcooking the steak can lead to a dry texture; always use a meat thermometer to ensure it’s cooked to your desired doneness.
  • Cooking the shrimp too long can make them rubbery; they should only take a few minutes to cook until opaque.
  • Not letting the steak rest after cooking can cause it to lose juiciness; give it a rest of 5-10 minutes.
  • Skimping on the seasoning diminishes the overall flavor; liberally season both steak and shrimp before cooking.
  • Using low-temperature cooking methods for steak may lead to uneven doneness; a hot pan is critical for a good sear.
  • Nabbing shrimp that aren’t deveined can affect the dish’s presentation; always clean shrimp properly before cooking.
  • Failing to preheat the pan can lead to sticking; ensure you heat the skillet adequately before adding proteins.
  • Ignoring the flavor of butter; using high-quality butter will elevate the sauce’s richness significantly.
  • Not balancing flavors; consider adding a splash of lemon juice or zest to enhance freshness and brightness in the dish.
  • Neglecting to pair appropriate sides; thoughtful pairing of sides can elevate the meal even further, so plan ahead.

Essential Techniques

Achieving a perfect sear on the steak is crucial for enhancing flavor. Start by searing on high heat to develop a caramelized crust. Mastering this technique involves knowing when to flip the steak—wait until it releases naturally from the pan. Watch for the color to shift to a rich brown indicating a crust has developed.

The technique for cooking shrimp requires attentiveness. Sauté them in the garlic butter just until they turn opaque and curl. Handling them gently prevents overcooking while allowing you to gauge doneness by their color. Visual cues, like a pink color on one side, show they are ready to flip.

Pro Tips for Perfect Garlic Butter Surf and Turf

Selecting the best cut of steak will significantly impact your final dish; opt for ribeye or filet mignon for tenderness and flavor. Use fresh garlic and herbs for the butter sauce to maximize aroma and taste. Mind the resting time for steak, which helps retain moisture. Avoid overcrowding the pan; cook proteins in batches if necessary for better heat distribution. When preparing the garlic butter, let the butter clarify slightly before adding garlic—this prevents burning. Accompany the dish with a light salad or roasted vegetables, providing balance and vibrancy.

Variations and Adaptations

Regional variations of surf and turf can be delightful—consider lobster instead of shrimp for a luxurious alternative. Adjust seasonal adaptations by incorporating fresh summer vegetables or herbs into your garlic butter. Dietary modifications, such as using plant-based butters or alternatives to steak, offer inclusive dining options. Flavor variations could include a touch of chili flakes for a bit of heat or adding citrus zest for brightness. For texture, try roasting the shrimp for added crunch or grilling both proteins for a smoky flavor. Finally, presentation alternatives can include serving on wooden boards for rustic appeal or individual platings with sophisticated garnishes.

Serving and Presentation Guide

Crafting an eye-catching plate begins with careful plating techniques. Slice the steak against the grain for tenderness and arrange on a plate beside the shrimp. Garnish with freshly chopped parsley or chives to add color, and consider placing lemon wedges on the side for a pop of brightness. Traditional accompaniments like garlic mashed potatoes or a seasonal vegetable medley can elevate the dish further.

Serving temperatures matter; both shrimp and steak should be warm to emphasize flavors. Portion control tips advise serving a balanced amount of each protein along with sides to create a well-rounded meal. Consider offering ingredients family-style for a cozy, communal dining experience.

Wine and Beverage Pairing

When selecting wine pairings, opt for a robust red like Cabernet Sauvignon to complement the steak’s richness. Alternatively, a crisp white wine, such as Sauvignon Blanc, works wonderfully with shrimp. Non-alcoholic alternatives could include herbal teas or sparkling water infused with lemon for a refreshing balance. For coffee enthusiasts, consider offering a robust coffee blend post-dinner to cleanse the palate and enhance the meal’s richness.

Serving temperatures for the wine should be cool for whites and slightly below room temperature for reds to optimize the tasting experience.

Storage and Shelf Life

Proper storage methods for leftover Garlic Butter Surf and Turf involve placing the steak and shrimp in airtight containers. Store in the refrigerator for up to 3 days, ensuring that both proteins maintain their moisture. Checking for signs of spoilage, such as off-odors, is essential before consuming leftovers. When reheating, use a low heat to prevent overcooking—microwave in short intervals or warm in a pan.

Freezing is an option for longer storage; ensure both proteins are sealed separately, and they can be kept for up to three months. Thaw gradually in the refrigerator before reheating.

Make Ahead Strategies

To make ahead efficiently, prepare the garlic butter and season steak a day before your gathering. Store both in the refrigerator; this preserves freshness while enhancing flavors. Assemble shrimp only an hour before cooking to achieve peak flavor and texture. Quality assessment should always be performed before cooking to ensure nothing has gone off.

Assembly tips involve prepping ingredients like herbs or vegetables the night before, placing them in labeled containers in the fridge. Fresh elements such as salads or garnishes can be added right before serving, keeping them vibrant and crisp.

Scaling Instructions

To halve the Garlic Butter Surf and Turf recipe, simply adjust the ingredient quantities while maintaining the same cooking techniques. Doubling or tripling the recipe is manageable by selecting a larger pan and adjusting cooking time slightly to accommodate more food. In larger batches, monitor doneness closely.

Equipment adjustments may involve using multiple skillets to maintain even heat across all proteins. Storage considerations also come into play; ensure proper airtight containers if preparing in bulk to maintain freshness.

Nutritional Deep Dive

The macro breakdown of Garlic Butter Surf and Turf reveals a protein-rich meal featuring approximately 30 grams of protein per serving. It also contains a combination of healthy fats from the butter used in the recipe while remaining moderate in carbohydrates when served with suitable sides.

Assessing micronutrient analysis reveals essential vitamins and minerals, especially B vitamins from beef and selenium from shrimp. The health benefits are substantial, particularly with the addition of garlic, known for its anti-inflammatory properties.

Portion analysis suggests serving control is crucial for maintaining a balanced diet; be mindful of side portions when considering overall daily caloric intake. This dish can fit well into weight management plans when combined with appropriate exercise and nutrition.

Dietary Adaptations

Adapting this recipe for gluten-free diets is simple; ensure butter and seasonings are certified gluten-free. Dairy-free alternatives can utilize plant-based butters without sacrificing flavor and richness. For a vegan approach, swap steak and shrimp for marinated tofu and mushrooms, seasoned similarly for an enticing profile.

Low-carb and keto enthusiasts can indulge in this dish without traditional side items like bread or heavy carbs, using leafy greens instead. Paleo diets benefit from using grass-fed beef and homemade garlic herb butter to maintain simplicity and health standards.

Flexitarian diets can enjoy a mixed protein approach; consider a blend of plant-based and traditional proteins for flexibility without compromising on the dish’s core flavors.

Troubleshooting Guide

Addressing texture issues, such as tough steak, often stems from overcooking; consider using a meat thermometer for precision. In cases of flavor imbalance, a touch of sea salt or pepper can enhance the flavors, particularly in the butter sauce.

Temperature problems usually arise from uneven heating; always let the pan preheat sufficiently before adding proteins. Challenges with equipment can be mitigated by using heavy-bottomed, quality pans designed for even heat distribution.

If substituting ingredients, ensure that the flavors and textures align with your original intention; if you’re uncertain, a trial run may be necessary before serving guests. Timing concerns can often be resolved by meticulous planning; ensure all prep work is completed to maintain the flow in the kitchen.

Recipe Success Stories

Community feedback on Garlic Butter Surf and Turf often highlights the impressive presentation and rich flavors as standout aspects. Readers have shared variations, successfully substituting different proteins, and discovering unexpected combinations of spices that enhance the dish.

Photographic success tips suggest using natural lighting when capturing this dish; the vibrant colors pop beautifully in well-lit environments. Many suggest including a detailed list of ingredients in every photograph to guide others through the recipe.

Adaptation stories feature individuals customizing the butter to vegan-friendly options and creating delightful meals that fit their dietary requirements while sharing the joy of this classic dish.

Frequently Asked Questions

Q: Can I use frozen shrimp for this recipe?

A: Yes, just ensure to thaw them completely in the refrigerator before cooking. This leads to better texture during cooking.

Q: What type of steak is best for surf and turf?

A: Ribeye or filet mignon are excellent choices due to their tenderness and flavor.

Q: How can I tell if the shrimp are done cooking?

A: Shrimp will turn opaque and curl up when perfectly cooked. Overcooking creates a rubbery texture.

Q: Can I prepare garlic butter in advance?

A: Absolutely! Prepare and refrigerate the garlic butter in advance for richer flavors when you’re ready to use it.

Q: What sides pair well with this dish?

A: Consider classic sides like garlic mashed potatoes, a fresh green salad, or roasted seasonal vegetables.

Q: Is it possible to reheat leftovers?

A: Yes, reheat gently on low heat to avoid overcooking the proteins. Use a skillet or microwave in short intervals.

Q: How do I ensure my steak is perfectly cooked?

A: Utilize a meat thermometer for best results; aim for the internal temperatures of 130°F for medium-rare and 145°F for medium.

Q: Can I substitute the steak for another protein?

A: Certainly! Chicken or pork can be used, but cooking times will vary. Adjust accordingly.

Q: What’s the best way to store leftovers?

A: Store leftovers in airtight containers in the refrigerator for up to three days, or freeze for longer storage.

Q: Can I make this recipe ahead of time for a gathering?

A: You can prepare the garlic butter and season the steak ahead. Cook just prior to serving for optimal flavor.

Q: Is it necessary to let the steak rest after cooking?

A: Yes, resting the steak for 5-10 minutes allows the juices to redistribute for a tender bite.

Additional Resources

If you’re looking to expand your culinary repertoire, explore related recipes like Grilled Lobster Tails or Herb-Crusted Rack of Lamb to complement your new favorite. Technique guides on mastering the art of cooking seafood or perfecting steak grilling are valuable additions to your kitchen skillset.

For ingredient information, check local markets for fresh seafood options and seasonal vegetables, ensuring ultimate freshness and quality. Equipment recommendations include investing in a quality cast iron skillet and a reliable meat thermometer for consistent results in your cooking adventures.

Join the Conversation

We invite you to share your experiences with Garlic Butter Surf and Turf! Upload your photos to social media and tag us for a chance to be featured. Engage with our community of home cooks, exchanging ideas and adaptations of this delightful recipe. You can also leave reviews about your experience; your comments inspire others to try their hand at this luxurious dish.

The Recipe

Garlic Butter Surf and Turf

Serves: 4

Prep Time: 15 mins

Cook Time: 20 mins

Total Time: 35 mins

Kitchen Equipment Needed

  • Cast iron skillet or frying pan
  • Meat thermometer
  • Spatula
  • Knife and cutting board

Ingredients

  • 4 ribeye steaks (1 inch thick)
  • 1 pound large shrimp, peeled and deveined
  • 1/2 cup unsalted butter
  • 4 garlic cloves, minced
  • 2 tablespoons fresh parsley, chopped
  • Salt and pepper, to taste
  • 1 tablespoon olive oil
  • Lemon wedges, for serving

Directions

  1. Preheat your skillet over medium-high heat. Add olive oil and let it heat until shimmering.
  2. Season both sides of the steaks generously with salt and pepper.
  3. Add the steaks to the hot skillet, searing for about 4-5 minutes on each side for medium-rare.
  4. While the steaks are cooking, in a separate small pan, melt the butter over medium heat and add the minced garlic. Cook for 2 minutes, stirring frequently to prevent burning.
  5. Once the steaks reach your desired doneness, remove them from the skillet and let them rest for 5-10 minutes.
  6. In the same skillet, add the shrimp and cook for about 2-3 minutes on each side until they turn pink and opaque.
  7. Add the garlic butter to the shrimp, tossing to coat. Stir in the fresh parsley.
  8. Slice the steaks against the grain and serve with shrimp on top. Garnish with lemon wedges and extra parsley if desired.

Recipe Notes

  • For an extra kick, consider adding a pinch of red pepper flakes to the garlic butter sauce.
  • Experiment with different types of steak or seafood based on your preferences!
  • Ensure your butter does not burn by keeping the flame under control.
  • Leftovers can be stored in an airtight container and reheated gently.

Ribeye Steak with Caramelized Onions and Crispy Fries Recipe

Ribeye Steak with Caramelized Onions and Crispy Fries: A Perfect Meal!

⚖️
Difficulty
Medium

⏲️
Prep Time
15 mins

🕒
Cook Time
30 mins

⏱️
Total Time
45 mins

🍽️
Servings
4

Ribeye Steak with Caramelized Onions and Crispy Fries is not just a recipe; it’s a celebration of flavors and textures that promises to delight your taste buds and warm your heart. The rich marbling of the ribeye steak provides a succulent and juicy bite, while the sweet, slowly caramelized onions add depth and complexity to the overall dish. Accompanied by perfectly crispy fries, this meal creates an indulgent experience that is equal parts satisfying and comforting.

Imagine savoring a perfectly cooked ribeye steak, its savory juices bursting forth with each mouthful, complemented by the mellow sweetness of onions that have transformed through the caramelization process. As you take a bite of the crispy fries, their crunchy exterior gives way to a fluffy interior, enhancing the meal’s overall indulgence. This recipe invites gatherings and makes every dining moment an occasion to remember.

Quick Recipe Highlights

  • Flavor Profile: The contrast of savory, sweet, and umami flavors makes this dish memorable.
  • Texture: Juicy steak with tender onions and crispy fries create a delightful mouthfeel.
  • Aroma: The enticing aroma of seared steak and caramelized onions fills the kitchen, inviting everyone to join.
  • Visual Appeal: A beautifully plated steak topped with golden onions and golden fries is a feast for the eyes.
  • Skill Level Needed: Intermediate cooking skills are required to master the steak cooking technique and onion caramelization.
  • Special Equipment: A cast-iron skillet or grill, and a heavy pan for frying are recommended for optimal results.

Recipe Overview

  • Difficulty Level: Medium due to the need for timing and technique in cooking the steak and onions perfectly.
  • Category: This dish fits perfectly within the dinner or main meal category.
  • Cuisine: Inspired by American cuisine, it reflects hearty, comfort food traditions.
  • Cost: Expect the cost to be moderate, primarily due to the quality of steak and other fresh ingredients.
  • Season: Best enjoyed in cooler months, but can be made year-round as an indulgent treat.
  • Occasion: Perfect for family dinners, special occasions, or a cozy date night at home.

Why You’ll Love This Recipe

The taste and texture appeal of Ribeye Steak with Caramelized Onions and Crispy Fries is unmatched. The oily, rich ribeye melds beautifully with the sweet and tender onions, creating a dish that delights the palate. Each bite harmonizes flavors, making it feel both luxurious and satisfying. The contrast between the crispy fries and juicy steak brings an exciting element to every mouthful.

Convenience is key with this recipe; with just a few simple ingredients and minimal prep, you can create a restaurant-quality meal at home. In about 45 minutes, you can start from scratch and end up with a stunning plate of food that will impress even the most discerning guests. The straightforward cooking techniques allow for ease while still providing an elegant meal.

Nutritionally, beef is a great source of protein, essential for muscle repair and health, while the onions add fiber and antioxidants. This meal strikes a good balance, making it both indulgent and nourishing, suitable for those mindful of their health and dietary requirements.

On the social side, serving Ribeye Steak with Caramelized Onions and Crispy Fries at your next gathering is a sure way to create shared moments of joy. The aroma wafting through the air as you cook will have everyone gathering in the kitchen, eager to indulge in your delicious creation. It fosters connection and great conversations as you share a meal together.

Finally, this recipe offers cost-effectiveness because it uses quality ingredients that yield satisfying and filling portions. By preparing this dish at home instead of dining out, you save money while enjoying a sumptuous meal that rivals restaurant offerings. You can indulge without breaking the bank.

Historical Background and Cultural Significance

The ribeye steak derives its name from the rib section of the cow, which has been a prized cut for many generations. This cut’s popularity surged in the 20th century as more people discovered its flavor and tenderness, establishing it as a staple in American steak houses. Understanding its history brings appreciation for this beloved dish.

Culturally, beef has been central to many cuisines around the world, particularly in the United States. It symbolizes a hearty meal suitable for gatherings and celebrations. Dining on a great ribeye steak is often associated with significant social experiences, from family dinners to romantic celebrations, highlighting its importance.

Over the years, recipes for ribeye steak have evolved, with culinary techniques and flavors adapting to suit contemporary tastes. From simple salt and pepper preparations to gourmet versions with various sauces and sides, there is a ribeye steak recipe for everyone, catering to diverse palates while honoring its roots.

Regionally, variations exist in how the ribeye is prepared and served. In the American South, it’s common to pair it with barbecue flavors, while in other areas, it might be served with savory sauces or sides that highlight local ingredients. These regional adaptations reflect the versatility of the ribeye and the individual touch of various culinary traditions.

Ingredient Deep Dive

For the ribeye steak, its cultural significance is immense, often considered the crème de la crème of steak cuts. High marbling translates to a rich flavor, and as a source of protein, iron, and B vitamins, it supports a balanced diet. When selecting ribeye, look for bright red color and ample marbling for the best flavor. Store in the refrigerator and use it within a few days or freeze for longer preservation. If you’re in need of a substitute, sirloin or tenderloin can work, but adjust cooking times accordingly.

Caramelized onions are another star of this dish. Historically used to enhance many recipes, their sweetness is unlocked through low-and-slow cooking, making them a celebrated ingredient in various cuisines. Nutritionally, onions offer antioxidants and may help support heart health. Select fresh, firm onions with shiny skins, and for storage, keep them in a cool, dark place. If needed, shallots or leeks can offer similar flavor profiles as substitutions.

Crispy fries are the perfect companion to steak. Originating in Belgium or France, they have become a beloved side dish in various cultures. Rich in carbohydrates, they provide energy but should be enjoyed in moderation. When selecting potatoes for frying, opt for starchy varieties like Russets. To store, keep in a cool, dark place and avoid the fridge. Sweet potatoes can be used as a healthier alternative for a twist on traditional fries.

Common Mistakes to Avoid

  • Overcooking the steak: It’s essential to use a meat thermometer for perfect doneness.
  • Not resting the steak: Allow the steak to rest after cooking to retain juices.
  • Rush caramelizing onions: Patience is key; low and slow yields the best results.
  • Using cold ingredients: Start with steak at room temperature for even cooking.
  • Inadequate seasoning: Don’t shy away from salt; it enhances the flavors tremendously.
  • Frying at too low a temperature: This can lead to greasy fries instead of crispy ones.
  • Ignoring oil temperature: A cooking thermometer can help achieve that perfect fry.
  • Overcrowding the pan: Frying in batches can help maintain consistent heat.
  • Not using enough oil: Sufficient oil ensures fries are submerged and cook evenly.
  • Neglecting to pair flavors: Balance the richness of ribeye with lighter sides or sauces.

Essential Techniques

Searing the steak is essential for achieving that flavorful crust. This technique involves cooking the meat at high heat for a short duration and helps to lock in moisture. To master it, preheat your skillet adequately and use a bit of oil to prevent sticking. Look for visual cues of browning edges and reduce the heat after flipping for even cooking.

Caramelizing the onions requires patience and low heat. This method transforms their natural sugars into sweet, flavorful goodness. Start with a bit of oil and thinly sliced onions, stirring them occasionally as they soften and brown. Watch for a golden color, indicating readiness, and avoid rushing the process to develop flavor fully.

Frying the fries involves cutting potatoes evenly to ensure consistent cooking. Soaking them beforehand helps to remove excess starch, leading to crispiness. Fry in batches, keeping an eye on them as they turn golden and crispy. Drain on paper towels and season them immediately for the best results.

Pro Tips for Perfect Ribeye Steak with Caramelized Onions and Crispy Fries

1. Always let the ribeye come to room temperature before cooking to ensure even doneness.
2. Use a cast iron skillet or grill for optimal heat retention and distribution.
3. Season the steak generously with salt and pepper on both sides to enhance flavor.
4. Opt for a meat thermometer to achieve your desired level of doneness accurately.
5. Caramelize onions slowly, giving them the time they need to develop deep flavors.
6. Cut potatoes evenly for fries to ensure they all cook at the same rate.
7. Oil temperature is crucial; around 350°F is ideal for frying crispy fries.
8. Serve immediately for the best texture and warmth; fried foods taste best fresh!

Variations and Adaptations

Regional variations often showcase local flavors, such as adding spices from different cuisines or trying different cuts of beef. Seasonal adaptations can include using heavier root vegetables or different seasonal greens as sides.

For dietary modifications, consider a gluten-free approach by ensuring your fries are cooked in a gluten-free oil and avoid using flour coatings. Flavor variations can be made by marinating the steak in different herbs, spices, or sauces that reflect your culinary likes.

Texture modifications are also possible; for example, try baked fries instead of fried fries for a healthier alternative. Presentation alternatives might include platters with garnishes using fresh herbs or colorful vegetables to elevate the visual appeal of the dish.

Serving and Presentation Guide

Plating techniques can elevate the meal’s presentation; stack fries neatly alongside the steak for a dynamic display. Use garnishes like fresh parsley or thyme to add color and interest. Traditional accompaniments might include a simple salad or dipping sauces for the fries.

Modern serving suggestions could involve crafting a small plate of steak bites with a side of fries for entertaining or casual dining experiences. Focus on temperature considerations—serve steak slightly warm and ensure fries are served crispy and hot.

Portion control tips suggest cutting steaks into portions for sharing, allowing everyone to enjoy a taste while keeping the meal balanced. This also creates a communal experience.

Wine and Beverage Pairing

For wine pairings, consider a full-bodied red wine like Cabernet Sauvignon or Malbec, which complement the richness of the ribeye. These wines enhance the flavor profile and balance the dish’s savory elements profoundly.

If you prefer non-alcoholic alternatives, a sparkling water with lemon can refresh the palate beautifully without overpowering the meal. For coffee lovers, a robust cup of coffee can serve as a wonderful finale to the meal, especially when enjoyed after dessert.

Temperature considerations for serving beverages are vital; ensure red wines are slightly below room temperature for optimal flavor, while sparkling options should be chilled for refreshment.

Storage and Shelf Life

To store leftovers, keep the ribeye steak in an airtight container in the fridge for up to 3 days. For fries, it’s best to consume them fresh, but if needed, they can be stored in a sealed container for about 2 days.

Reheating should be done with caution; steak is best reheated slowly on a skillet over low heat to avoid drying out. Fries can be revived in the oven or air fryer for a crispy finish.

Freezing guidelines suggest that steak can be frozen for about 3 months. Wrap it tightly in foil or freezer-safe bags to prevent freezer burn. However, fries are best enjoyed fresh due to texture changes when thawed.

Make Ahead Strategies

Prep strategies include slicing onions ahead of time to save on cooking day. You can caramelize onions and store them in the fridge for up to a week, enhancing the dish’s depth anytime you want to prepare it.

For storage between steps, you can season ribeye a day beforehand, allowing flavors to mingle and deepen. Quality impact assessments reveal that while some steps can be prepped ahead, it’s best to cook the steak and fries fresh for the best texture and flavor.

Assembly tips suggest preparing all the elements before starting to cook; this technique streamlines cooking and helps in avoiding stressful timing conflicts. Always add fresh components, like herbs or greens, right before serving for the best flavor.

Scaling Instructions

To halve the recipe, simply reduce the quantities of each ingredient accordingly. This method works well for small gatherings without compromising flavor or cooking techniques.

Doubling or tripling the recipe involves ensuring you have enough skillet or grill space to cook everything efficiently. You may need to adjust cooking times depending on the equipment used.

Equipment adjustments might include cooking in batches if you lack space. Timing modifications ensure that thicker steaks require a bit more time to cook through.

Consider storage options if preparing in larger quantities; invest in suitable containers to accommodate increased amounts without compromising freshness.

Nutritional Deep Dive

This recipe offers a robust macro breakdown, with protein from ribeye steak being the star. Each serving provides a satisfying amount of protein, essential for muscle building and repair.

Micronutrient analysis shows ribeye steak is rich in iron, which supports energy production, alongside Vitamin B12 for red blood cell formation. These essential nutrients make the dish both indulgent and beneficial for health.

Health benefits highlight ribeye’s role in supporting overall vitality, while the fiber from onions aids in digestion. In moderation, this meal fits nicely into a balanced diet.

Dietary considerations suggest mindful portions, especially for those managing weight. A serving of steak alongside a hearty portion of fries allows satisfaction without excessive calories when done carefully.

Dietary Adaptations

For gluten-free adaptations, ensure no gluten-containing products are used in preparing the fries. They can be enjoyed without worry by focusing on fresh and natural ingredients.

Dairy-free options work well with this recipe; simply skip any buttery oils or cream sauces traditionally paired with steak.

Vegan adaptations can be achieved by substituting the steak for plant-based protein like portobello mushrooms or tofu, seasoned similarly for maximum flavor.

Low-carb and keto diets can benefit from the focus on ribeye; serve it with leafy greens instead of fries for a satisfying meal rich in healthy fats.

Finally, for those on paleo or low-FODMAP diets, consider using specific ingredients and spices that align with dietary restrictions, allowing everyone to enjoy a variant of this fantastic recipe.

Troubleshooting Guide

Texture issues often arise from overcooking the steak; if you find it tough, try cooking for shorter periods at high heat. Resting allows juices to redistribute, resulting in a tender bite.

Flavor balance can be fine-tuned by adjusting the seasoning. Use taste as your guide; a little more salt or acid might be needed to elevate the overall experience.

Temperature problems often lead to undercooked centers or burnt outsides; mastering heat levels and using a meat thermometer can help you avoid these pitfalls.

A cluttered kitchen can create equipment challenges. Organize ingredients beforehand, and ensure your frying oil is at the correct temperature to help fries cook smoothly.

Timing concerns can throw off your cooking rhythm. Create a timeline for each component, allowing for simultaneous cooking, so you can serve everything hot and fresh.

Recipe Success Stories

Reader feedback highlights the versatility of this ribeye steak recipe—many have experimented with different toppings or marinating techniques, sharing their delightful experiences.

Several adaptations from the community have included creative side dishes, with one reader particularly fond of pairing it with herb-infused mashed potatoes that complemented the steak beautifully.

Photography tips often suggest capturing the dish before slicing for the best presentation, showcasing the juicy steak artfully plated with its crispy fries.

Sharing cooking experiences has inspired others to try their hand at mastering the art of caramelization, leading to proud successes in home kitchens, reinforcing the powerful connection through shared cooking adventures.

Frequently Asked Questions

What is the best doneness for ribeye steak?
Ribeye steak is best enjoyed medium-rare to medium. This provides a juicy and tender bite while still showcasing the rich flavors of the marbled beef.

Can I use frozen ribeye for this recipe?
Yes, but make sure to fully thaw it before cooking for an even cook. Frozen meat can retain moisture, leading to a potential loss of flavor.

What types of potatoes are best for making fries?
Starchy potatoes like Russets are ideal for crispy fries due to their high starch content, yielding a fluffy interior and crispy exterior.

How do I know when the caramelized onions are ready?
They should be deep golden brown and have a sweet aroma. This process can take around 20-30 minutes on low heat when done correctly.

Is it necessary to use cast iron for cooking the steak?
While not mandatory, cast iron skillets retain heat beautifully, providing an excellent sear. A heavy-bottomed pan will also work but may require more attention.

Can I prepare the entire meal ahead of time?
You can caramelize onions and cut fries ahead of time, but it’s best to cook the steak fresh to lock in flavor and texture.

What sauces pair well with this dish?
A simple chimichurri or garlic butter sauce complements the steak wonderfully, enhancing its flavor without overpowering it.

Can I air fry the fries?
Yes! Air frying is a healthier alternative; cook at 400°F for about 15-20 minutes, shaking halfway through for even cooking.

What should I serve with ribeye steak if I’m on a diet?
Consider replacing fries with a fresh salad or steamed vegetables for a lighter meal while still enjoying the rich flavors of ribeye.

How do I store leftovers?
Store the steak in an airtight container in the fridge for up to 3 days, and try to consume the fries within 2 days for the best quality.

Additional Resources

For related recipes, check out hearty dishes like Beef Wellington, Stuffed Bell Peppers, or Chicken Marsala that will complement any celebratory meal.

Technique guides on mastering steak cooking, including information on sous-vide or reverse-searing methods, can expand your culinary skills.

Understanding ingredient information can enhance your cooking repertoire, especially tips on the best cuts of meat or quality products to use.

Equipment recommendations can help streamline your cooking process; consider investing in a good quality cast-iron skillet or a high-temperature cooking oil for frying.

Seasonal variations often lead to fresh ideas for sides; consider pairing seasonal vegetables with your ribeye for a lighter, refreshing balance to the meal.

Join the Conversation

Social media sharing encourages community engagement, inviting you to showcase your delicious creations and inspire others.

Photography tips can guide you in capturing the beauty of your cooked dishes, leading to wonderful engagement on platforms like Instagram or Pinterest.

Recipe reviews allow others to learn from your experiences, helping to refine the dish for future cooks aiming for perfection.

Community engagement fosters a sense of connection through shared cooking experiences and stories, uniting food lovers everywhere in their passion for great meals.

The Recipe

Ribeye Steak with Caramelized Onions and Crispy Fries

Serves: 4

Prep Time: 15 mins

Cook Time: 30 mins

Total Time: 45 mins

Kitchen Equipment Needed

  • Cast iron skillet or grill
  • Heavy frying pan
  • Meat thermometer
  • Cutting board and knife
  • Spatula
  • Serving plates

Ingredients

  • 2 Ribeye steaks (approx. 1 inch thick)
  • 2 large onions, sliced
  • 4 medium potatoes, cut into fries
  • 2 tablespoons olive oil
  • Salt and pepper to taste
  • Butter for frying (optional)

Directions

  1. Preheat your skillet or grill over high heat.
  2. Season the ribeye steaks generously with salt and pepper.
  3. Add olive oil to the pan and sear the steaks for 4-5 minutes on each side to achieve a perfect crust.
  4. Check doneness with a thermometer (135°F for medium-rare).
  5. Remove the steaks and let them rest while you caramelize the onions in the same skillet.
  6. Add sliced onions and a pinch of salt to the skillet, cooking on medium-low heat until golden brown, about 20 minutes.
  7. For the fries, cut potatoes, soak in water for 30 minutes, then dry, and deep-fry in hot oil until golden and crispy.
  8. Assemble the dish: place steak on the plate, top with caramelized onions, and serve with crispy fries.

Recipe Notes

  • For extra flavor, consider marinating the ribeye beforehand.
  • Feel free to experiment with seasonings for the steak, such as garlic or herbs.
  • For healthier fries, consider baking them instead of frying.

Ribeye Steak with Caramelized Onions and Crispy Fries Recipe

Ribeye Steak with Caramelized Onions and Crispy Fries: A Perfect Meal!

⚖️
Difficulty
Medium

⏲️
Prep Time
15 mins

🕒
Cook Time
30 mins

⏱️
Total Time
45 mins

🍽️
Servings
4

Ribeye steak with caramelized onions and crispy fries is not just a meal; it’s a culinary experience that combines robust flavors, satisfying textures, and a gorgeous presentation that is sure to impress any guest at your dinner table. The richness of the ribeye, renowned for its marbling and juiciness, pairs beautifully with sweet, golden-brown onions that have been slowly caramelized to perfection. Add on some homemade crispy fries, and you have the dinner of a lifetime that evokes the warmth of a cozy steakhouse right in your own kitchen.

Each bite of this ribeye steak bursts with flavor, elevating the dining experience to new heights. The combination of savory beef and sweet onions creates a symphony of tastes that dances across your palate, while the crispy fries offer a satisfying crunch that complements the tender meat. This is comfort food done right, perfect for a special occasion, or simply to treat yourself after a long day.

Quick Recipe Highlights

  • Flavor Profile: Rich and meaty with a hint of sweetness from the caramelized onions.
  • Texture: Juicy steak, soft, melting onions, and crunchy fries provide contrast.
  • Aroma: Inviting scents of seared beef and sweet onions fill the kitchen.
  • Visual Appeal: Beautifully browned steak with glistening onions and golden fries.
  • Skill Level Needed: Suitable for home cooks with some grilling experience.
  • Special Equipment: Grill or cast-iron skillet, and a sharp knife for slicing.

Recipe Overview

  • Difficulty Level: This recipe requires a balance of time management for caramelizing onions while ensuring the steak reaches the perfect doneness, making it a moderate challenge even for experienced cooks.
  • Category: This dish easily fits into the dinner category as a main course.
  • Cuisine: Inspired by American cuisine, it showcases classic steakhouse elements with a modern twist.
  • Cost: Ingredients are relatively affordable; ribeye is a premium cut, but with proper planning, it can be made cost-effective.
  • Season: Perfect year-round, especially during fall and winter for cozy evenings.
  • Occasion: Ideal for family dinners, gatherings, or romantic meals.

Why You’ll Love This Recipe

Indulging in the ribeye steak with caramelized onions and crispy fries is a guaranteed way to elevate your dining experience. The taste and texture appeal lies in the tender, juicy ribeye which, when cooked to medium-rare, is blissfully succulent. The sweetness from the caramelized onions adds depth, making each bite a delightful experience. Crispy fries not only serve as a delicious side but also contribute a satisfying crunch that perfectly balances the softness of the steak and onions.

Moreover, this recipe is incredibly convenient. With the right preparation, it can be whipped up in just 45 minutes, making it a great option for those busy weeknights when you want something delicious without spending hours in the kitchen. The culinary benefits are noteworthy as well; steak is packed with protein and essential nutrients, while the caramelized onions provide antioxidants.

The ribeye steak with caramelized onions also holds social and entertaining value. Serving this dish can impress your guests and create a more festive atmosphere. Whether it’s a milestone celebration or a casual get-together, this meal will surely spark conversation and compliments.

Cost-effectiveness is another reason why you will love this recipe. While ribeye steaks may seem expensive, the ingredient list remains simple, and with the right portioning, it can serve multiple people. This dish proves that you don’t need to shell out a fortune at a restaurant to enjoy a fine meal.

Lastly, the accessibility of this recipe means that anyone can enjoy a steakhouse-quality dinner at home. The ingredients are commonly found in grocery stores, and with the right techniques, even novice chefs can master this dish and create their own restaurant-worthy meal.

Historical Background and Cultural Significance

The ribeye steak has a rich origin story that traces back to its prominence in American beef culture. As cattle ranching and beef production burgeoned in the 19th century, the succulence and marbling of the ribeye cut became highly sought after. Its popularity has maintained robust growth into modern cuisine, where it has gained recognition as a staple in steakhouses across the country.

Culturally, steak in general is regarded as a symbol of culinary indulgence and celebration. It’s often served during significant occasions such as birthdays, anniversaries, and holidays. This association elevates the experience of consuming ribeye steak with caramelized onions and crispy fries, turning it into a dish that creates cherished memories and connects people.

The evolution of the recipe showcases the versatility of the ribeye steak itself. Initially featured as a standalone item, it has transformed into various interpretations, garnished with a multitude of sauces, including rich gravy, bold chimichurri, or tangy BBQ. Similarly, the addition of caramelized onions and fries adapts a traditional dish into something more complete and satisfying.

In terms of regional variations, the ribeye can be found across many cultural contexts, from American barbecues to French bistros, demonstrating its global appeal. Each locale brings its unique twist, but the heart of the ribeye experience remains the same: a robust and flavorful steak that delights diners.

Ingredient Deep Dive

Ribeye Steak: This cut of beef is celebrated for its marbling, which contributes to its rich flavor and tenderness. Ranging from USDA Choice to Prime, ribeye is best selected for its even distribution of fat. Look for a deep red color and a good amount of marbling for the most flavorful cut. When storing, keep in its original packaging and refrigerate for up to five days, or freeze for several months to retain freshness.

Caramelized Onions: Onions bring sweetness through the caramelization process, enhancing the dish’s overall flavor. Vidalia or yellow onions are ideal for this recipe due to their natural sweetness. Selecting onions with firm, unblemished skins is key. Store them in a cool, dark place for longevity. They can be substituted with shallots for a milder taste or red onions for a different flavor profile.

Crispy Fries: Potatoes, particularly Russets, are the best choice for frying due to their starchy content. Select potatoes that are firm and devoid of blemishes. Once cut into fries, soak them in cold water to remove excess starch for a crispier finish. Store leftover fries in an airtight container; however, they are best enjoyed fresh for optimal crunch. Sweet potatoes can be a nutritious alternative that adds sweetness.

Common Mistakes to Avoid

  • Overcooking the steak: Use a meat thermometer to ensure the ribeye is cooked to your desired doneness; medium-rare is ideal for preserving its juices.
  • Not resting the steak: Allow the cooked steak to rest for at least 5 minutes before cutting to retain its juices and enhance flavor.
  • Caramelizing onions too quickly: Patience is key; cooking onions slowly at a medium-low heat brings out their natural sweetness.
  • Cutting the steak against the grain: Always slice against the grain for a more tender bite.
  • Inadequate seasoning: Properly seasoning each component will elevate the dish; don’t skip this step.
  • Using cold oil for frying: Heated oil will prevent fries from becoming greasy; make sure your oil is hot enough before adding potatoes.
  • Overcrowding the pan: Cooking too many fries at once can lead to steaming rather than frying, resulting in soggy fries.
  • Ignoring visual cues: Keep an eye on the onions; they should turn a deep golden color and become tender, which indicates they are perfectly caramelized.

Essential Techniques

Caramelization is a critical technique that transforms onions into a deeply flavored component of the dish. This process requires patience as it involves cooking onions slowly at low heat until their natural sugars caramelize, creating sweetness and depth. To master this technique, stir constantly to prevent burning, and keep the heat moderate. Visual cues include a golden brown color and soft texture.

Cooking steak properly is vital for achieving the perfect doneness. Using a cast-iron skillet or grill will help retain heat and create a beautiful sear. Monitor cooking time and use a meat thermometer to check the internal temperature—135°F for medium-rare to achieve a juicy, flavorful steak. For visual success, look for a nicely browned exterior and juices running clear.

Frying potatoes requires skill to reach the desired crispness. Start by soaking cut potatoes in cold water, which helps remove excess starch and prevents them from sticking together. Heat oil sufficiently until it reaches 350°F for frying. To avoid sogginess, fry in smaller batches and allow enough space for steam to escape. A perfect fry is golden brown and crispy on the outside.

Pro Tips for Perfect Ribeye Steak with Caramelized Onions and Crispy Fries

1. Choose steaks that are at least 1-inch thick for the best texture and flavor.
2. Allow the steak to reach room temperature before cooking to ensure even cooking.
3. Season liberally with salt and pepper just before cooking to contrast beautifully with the sweet onions.
4. For added flavor, consider marinating the steak for a few hours before cooking.
5. Use a spatula to flip the steak only once during cooking to maintain juices.
6. For the crispiest fries, double fry them: fry once until soft, let sit, and fry again for that perfect crunch.
7. Experiment with seasonings in the fries like garlic powder or paprika for a flavor boost.
8. Pour a splash of wine into the pan after cooking the steak for a quick and delicious sauce.

Variations and Adaptations

Regional variations of ribeye steak can adapt to local tastes, such as using a spice rub with a hint of smokiness in Southern regions, or pairing with chimichurri in Latino cuisine. Seasonal adaptations can include swapping out crispy fries for sweet potato fries in the fall for added sweetness and nutrition.

For dietary modifications, consider using a leaner cut of beef such as sirloin for those watching their fat intake while still enjoying the flavors of steak. Vegetarians can adapt this dish using grilled portobello mushrooms or a hearty cauliflower steak as a substitute, providing a similar texture and experience.

Flavor variations could incorporate different marinades such as teriyaki, barbecue, or a spicy rub for a kick. Texture modifications could involve roasting vegetables instead of fries for a healthier crunch, while presentation alternatives can include serving on a bed of arugula or topped with crumbled blue cheese for an elegant touch.

Serving and Presentation Guide

Presenting the dish beautifully enhances the overall dining experience. For plating techniques, use a large white plate for a striking contrast with the rich colors of the steak and fries. Arrange the crispy fries alongside the steak, and place the caramelized onions on top or on the side to showcase their golden color.

Garnishing ideas can include fresh herbs like parsley or chives sprinkled atop the dish for a touch of freshness. Traditional accompaniments such as a side salad or grilled vegetables can elevate the meal further. For modern suggestions, consider serving with aioli or spicy ketchup for dipping crispy fries.

Temperature considerations are also key; ensure your steak is rested to maintain its warmth, while fries should be served hot and crispy for maximum enjoyment. Portion control tips suggest serving individual portions so guests can enjoy a hearty meal while allowing room for additional sides or dessert.

Wine and Beverage Pairing

For wine pairings, robust red wines like Cabernet Sauvignon or Malbec complement the richness of ribeye steak beautifully. The tannins in these wines help cut through the fat, creating a balanced flavor profile. If you prefer white wine, a full-bodied Chardonnay can also pair nicely.

For non-alcoholic alternatives, consider serving sparkling water with lemon or a mocktail with fresh herbs and citrus for a refreshing contrast. Coffee lovers may enjoy a cup of dark roast coffee served alongside to enhance the meal’s savory elements.

Temperature considerations for wine are significant; serve red wines at room temperature and white wines chilled to bring out their ideal flavors. Serving suggestions for the beverage should also align with the meal for cohesive enjoyment.

Storage and Shelf Life

Proper storage methods will maintain the integrity of your leftovers. Any remaining ribeye steak can be stored in an airtight container in the refrigerator for up to 3 days and can be reheated gently to avoid drying out. For longer storage, wrap it tightly in plastic wrap and place it in the freezer for up to 6 months.

Crispy fries, however, are best enjoyed fresh. That said, leftover fries can also be kept in the refrigerator for up to 2 days. When reheating, try utilizing an oven or an air fryer to bring back some of the original crispiness.

Signs of spoilage for beef include a sour smell or gray tint, while fries that smell off or have a slimy texture should be discarded. Reheating instructions suggest warming leftover steak at a low temperature with a splash of broth to retain moisture.

Make Ahead Strategies

To streamline the cooking process, consider prepping in advance. For example, caramelized onions can be made a day ahead and stored in the refrigerator for up to 3 days, making the final assembly faster.

Cutting the fries in advance is also an option; soak them in cold water and store them in an airtight container until you’re ready to fry. This removes excess starch, leading to the perfect crispy fries with less prep time.

Quality impact assessments should be made for any prepped items; ensure onions are reheated gently to preserve their flavor. When you assemble everything together, add fresh herbs or a squeezed lemon wedge right before serving for an added burst of freshness.

Scaling Instructions

If you need to adjust the recipe to serve a larger group, doubling or tripling the ribeye and fries is easily managed. Be sure to increase cooking times slightly; cook in batches to prevent overcrowding the pan.

Equipment adjustments may include larger skillets and pots to accommodate increased quantities. During timing modifications, keep an eye on the steak’s doneness with a meat thermometer to ensure perfect results.

When storing larger portions, utilize multiple containers for easy access. Divide the leftovers into single servings for guests to take home or to enjoy over the week.

Nutritional Deep Dive

The macro breakdown of this dish showcases a healthy balance of protein from the ribeye steak paired with carbohydrates from the crispy fries. Ribeye offers a rich source of essential amino acids necessary for muscle growth and overall health.

Micronutrient analysis reveals the ribeye as an excellent source of iron and B vitamins, which play critical roles in energy production and oxygen transport in the body. Although fries are higher in carbohydrates, using fresh potatoes provides dietary fiber too.

Health benefits extend beyond muscle repair; steak and onions also provide antioxidants, supporting immune health. Portion analysis is important to maintain balance; a serving of steak alongside a serving of fries aligns with standard dietary guidelines.

Portion control tips can help maintain a balanced meal; serve smaller quantities of fries and complement with a side of vegetables or salad to round out the dish nutritionally.

Dietary Adaptations

For gluten-free diners, this dish naturally fits the bill since all components are gluten-free as long as no sauces containing gluten are used. For those who are dairy-free, avoiding buttery additions in the fries provides a clean alternative.

Vegetarians can substitute the ribeye steak with hearty grilled vegetables or seasoned portobello mushrooms, while vegans can use plant-based meat substitutes that provide similar textures.

Low-carb enthusiasts may opt for cauliflower fries or zucchini fries for a similar crunch with fewer carbohydrates. Those following a keto diet can enjoy a ribeye steak without the fries, replacing them with a side salad instead.

Similar adaptations can also cater to paleo or low-FODMAP diets, allowing flexibility while enjoying the core flavors of this delicious meal.

Troubleshooting Guide

Texture issues can arise, such as overcooked steak becoming tough. Ensure the steak is removed from heat at the right temperature and rested before slicing. If fries turn out soggy, a double fry method is effective for achieving the desired crispness.

Flavor balance may be a concern; if the dish seems bland, consider adjusting salt levels and incorporating fresh herbs for an aromatic boost. For any temperature problems, using a meat thermometer will help achieve desired doneness reliably.

Facing equipment challenges, such as a frying pan that is too small, requires patience; prioritizing batches ensures better cooking. Ingredient substitutions may affect final taste; consider choosing wisely or tweaking seasonings as needed, and always adjust timing to maintain integrity throughout.

Recipe Success Stories

Community feedback highlights how home cooks have adapted this recipe with personal twists. Some have shared variations, such as adding jalapeños during the caramelization phase for a spicy kick, while others recommend serving with a tangy aioli for dipping fries.

Adaptation stories include families cooking it together on special occasions, transforming a simple meal into a bonding experience filled with laughter and joy. Readers have also shared tips on achieving that perfect sear, emphasizing patience and the right type of skillet.

Photography tips often include using natural light to capture the freshness of the dish, showcasing the golden onions and deep colors of the steak. Overall, this recipe has proven to bring families and friends together in genuine enjoyment and celebration of great food.

Frequently Asked Questions

How do I know when my ribeye steak is done cooking?

Using a meat thermometer is the most reliable method. Aim for an internal temperature of 135°F for medium-rare, and remember to rest your steak after cooking for at least 5 minutes to lock in flavors.

Can I use another cut of meat for this recipe?

Yes! While ribeye is recommended for its rich flavor, you can substitute with cuts like sirloin or strip steak. However, adjust cooking times accordingly depending on the thickness and cut.

What causes the fries to become soggy?

Soggy fries are often a result of overcrowding the frying pan, leading to steam instead of a crisp fry. Fry in smaller batches and ensure the oil is hot enough before adding the potatoes.

How can I make this dish less caloric?

Consider using lean cuts of beef or adding more vegetables to the plate. You could also try making baked fries instead of fried, significantly reducing overall caloric intake.

Can this dish be made ahead of time?

Yes! You can prepare the caramelized onions and fry the potatoes in advance. Just reheat gently before serving to maintain their flavor and texture.

What is the best way to reheat leftover steak?

Your best bet is to use a low-heat oven or a skillet, adding a little broth to help retain moisture. Avoid microwaving as this may lead to a rubbery texture.

What should I do if my onions caramelize too quickly?

If they darken too fast, reduce the heat and stir frequently. This will help develop their sweetness without burning them.

Could I use frozen fries for this recipe?

Yes, frozen fries are a convenient alternative. They can save time, though the texture may differ slightly from homemade fries.

What wines pair best with ribeye steak?

For ribeye steak, robust reds such as Cabernet Sauvignon and Malbec make excellent pairings, complementing the richness of the meat with their tannins.

Can this recipe be adapted for a grill?

Absolutely! Grilling the ribeye adds a delightful smoky flavor. Ensure to control the heat and monitor cooking temperatures closely for optimal results.

Additional Resources

For those intrigued by this recipe, consider exploring related recipes such as grilled vegetables, homemade steak sauces, or gourmet salads that can accompany your meal. Technique guides on perfecting the art of grilling steaks or mastering onion caramelization are also invaluable for any amateur chef.

Ingredient information is available on different beef cuts and their optimal cooking methods, which aids in making informed choices for future meals. Additionally, equipment recommendations highlight skillets, knives, and even thermometers needed to elevate your cooking effectiveness.

Don’t forget to explore seasonal variations that highlight local produce, as well as fresh ingredients, making this ribeye dish even more delightful.

Join the Conversation

We invite you to share your experiences with this ribeye steak recipe! Post your photos on social media using our hashtag and include your personal touches or variations. Community engagement can drive creativity; we encourage feedback on techniques, cooking successes, or hiccups you may have encountered.

Recipe reviews are essential for connecting with fellow food enthusiasts, allowing for shared tips and joy in crafting perfect meals. Join in and exchange personal experiences, ideas for similar recipes, and stories that showcase the role this dish has played in your dining adventures.

The Recipe

Ribeye Steak with Caramelized Onions and Crispy Fries

Serves: 4

Prep Time: 15 mins

Cook Time: 30 mins

Total Time: 45 mins

Kitchen Equipment Needed

  • Cast-iron skillet or grill
  • Sharp knife
  • Cutting board
  • Meat thermometer
  • Large bowl for soaking fries
  • Spatula for flipping steaks

Ingredients

  • 2 ribeye steaks (1-inch thick)
  • 2 large onions, sliced
  • 4 large Russet potatoes, cut into fries
  • 2 tablespoons olive oil
  • 2 tablespoons unsalted butter
  • Salt and pepper to taste
  • Optional: Fresh herbs for garnish

Directions

  1. Preheat your skillet or grill over medium-high heat.
  2. While the pan heats, slice the onions and soak the cut potatoes in cold water for 30 minutes.
  3. Add a tablespoon of olive oil and butter to the skillet, add onions, and reduce heat to low. Cook, stirring occasionally until caramelized (about 20 minutes).
  4. Season the ribeye steaks with salt and pepper on both sides.
  5. When onions are golden brown, remove them from the skillet and set aside. Increase heat back to medium-high.
  6. Add the ribeye steaks to the skillet and cook for about 4-5 minutes per side for medium-rare, checking with a thermometer for doneness.
  7. While the steaks are cooking, drain the potatoes and dry them thoroughly with a towel.
  8. In a separate pot, heat oil to 350°F and fry the potatoes in batches until golden and crispy, about 5 minutes. Remove and drain on paper towels; season with salt.
  9. Let the steaks rest for 5 minutes before slicing against the grain. Serve the ribeye topped with caramelized onions alongside crispy fries.

Recipe Notes

  • For added flavor, marinate the steak for a few hours before cooking.
  • Feel free to experiment with seasonings in the fries for additional flavor.
  • Store leftover caramelized onions in the refrigerator for up to 3 days.

Delicious Ricotta Meatballs Recipe for Ultimate Comfort Food Lovers

Ricotta Meatballs: Juicy and Flavorful Italian Delights

⚖️
Difficulty
Easy

⏲️
Prep Time
15 mins

🕒
Cook Time
25 mins

⏱️
Total Time
40 mins

🍽️
Servings
4 servings

Ricotta meatballs are a delightful and hearty dish that brings together the richness of ricotta cheese with the tender juiciness of ground meat. These meatballs are not only easy to prepare but also explode with flavor, making them a favorite for family dinners or meal prep. Each bite reveals a creamy texture mixed with herbs and spices, offering a perfect blend of Italian flavors that everyone will love. Whether paired with a vibrant marinara sauce or enjoyed on their own, ricotta meatballs are sure to become a go-to recipe in your kitchen.

The alluring aroma of garlic, basil, and freshly grated cheese fills the air as these meatballs cook, creating an inviting environment that warms the heart and stirs the appetite. Visually, they present beautifully – a golden brown crust cradling a soft and succulent interior. With minimal effort, you can create a dish that not only satisfies taste buds but also looks fantastic on the plate, making it ideal for casual gatherings and special occasions alike.

Quick Recipe Highlights

  • Flavor Profile: The ricotta meatballs burst with savory goodness, enhanced by garlic, parsley, and Italian herbs. Each meatball is rich and creamy, with a subtle tang from the cheese that perfectly complements the seasonings.
  • Texture: Expect a delightful contrast between a crispy outer layer and a soft, melt-in-your-mouth interior. The ricotta adds moisture, making these meatballs incredibly tender.
  • Aroma: Your kitchen will be filled with the mouthwatering scent of fresh herbs, garlic, and simmering tomato sauce, enticing everyone to gather around the table.
  • Visual Appeal: Garnished with fresh parsley and a sprinkle of cheese, the meatballs are inviting and colorful, making them an impressive dish for any dinner table.
  • Skill Level Needed: This recipe is suitable for all skill levels, including novice cooks eager to try their hands at homemade meatballs.
  • Special Equipment: A baking sheet and mixing bowls are all that’s required, making this a fuss-free recipe to execute.

Recipe Overview

  • Difficulty Level: This recipe is straightforward and beginner-friendly, aiming to guide you through each step to achieve perfectly cooked ricotta meatballs.
  • Category: Ricotta meatballs fall under main dishes and can be served as an appetizer or with pasta for a heartier meal.
  • Cuisine: Rooted in Italian cuisine, these meatballs reflect the use of fresh ingredients like ricotta, which adds to the authentic flavor profile.
  • Cost: Ingredients for this recipe are typically budget-friendly, making it a practical choice for family meals without sacrificing flavor.
  • Season: Ricotta meatballs can be enjoyed year-round, offering comfort during colder months and a delightful option for summer gatherings when served with fresh salads.
  • Occasion: Perfect for weeknight dinners, holiday gatherings, or potlucks, these meatballs fit a variety of occasions and will impress your guests.

Why You’ll Love This Recipe

Ricotta meatballs are not only a treat for the taste buds but also an enjoyable cooking experience. The combination of ground meat and ricotta creates a unique flavor profile that stands out. The subtle creaminess of ricotta balances the robust spices and herbs, making these meatballs a comforting and satisfying meal. The ease of preparation means you can whip up a batch quickly, perfect for busy weeknights or spontaneous gatherings.

Beyond their marvelous taste, these meatballs offer nutritional advantages. Ricotta cheese provides a source of protein and calcium, contributing to a balanced diet, especially for those seeking lighter yet fulfilling meals. Additionally, incorporating lean ground meat and fresh herbs enhances the nutritional value, making these meatballs a wholesome choice.

Another reason to love ricotta meatballs is their versatility. They can be enjoyed in various ways—served with marinara sauce over spaghetti, as a filling in subs, or even as bite-sized appetizers for parties. This adaptability allows for creativity in the kitchen, catering to different tastes and preferences, ensuring that everyone can enjoy this delightful dish.

Cost-effectiveness is a crucial element in any recipe, and ricotta meatballs fit the bill perfectly. The ingredients are easily accessible at most grocery stores and won’t break the bank. By making these meatballs at home, you save money without compromising on quality or taste, making it an excellent choice for families on a budget.

Finally, ricotta meatballs are an ideal dish for entertaining. Their shared nature fosters a communal dining experience and engages conversation. Preparing them with loved ones adds to the social aspect, turning cooking into a shared activity. With every satisfying bite, you’ll create lasting memories around the table.

Historical Background and Cultural Significance

The origin of meatballs dates back to ancient Rome, where dishes of ground meat formed the foundation of many traditional recipes. Over the centuries, variations emerged across different regions, each adding unique ingredients and techniques. The addition of ricotta to meatballs symbolizes the Italian tradition of incorporating local cheeses into everyday meals, showcasing the country’s rich culinary heritage.

Culturally, meatballs represent comfort and togetherness. In Italy, these dishes are often shared among family, emphasizing gathering and celebrating over good food. They are frequently served during special occasions and holidays, signifying warmth and hospitality unique to Italian culture. The communal aspect of sharing a hearty plate encourages connection and cherished moments among loved ones.

As the recipe evolved, ricotta meatballs became popular not just in Italy but also among Italian-American communities. This adaptation reflects the blending of culinary traditions, where classic recipes were adapted to local ingredients and tastes, further enriching the cultural narrative surrounding these delightful bites.

Regional variations of meatballs abound, reflecting the diverse ingredients and culinary influences found throughout Italy. Each region offers its twist, from the addition of different herbs and spices to varying sauces and cooking methods, highlighting the versatility and enduring popularity of meatballs in Italian cuisine.

Ingredient Deep Dive

Ricotta Cheese
Ricotta cheese holds a significant place in Italian cooking, with a history stretching back to ancient times. Traditionally made from the whey leftover from cheese production, it embodies the Italian philosophy of minimizing waste by utilizing all food resources. Nutritionally, ricotta is packed with protein, calcium, and vital vitamins, making it a fantastic addition to a balanced diet. When selecting ricotta, opt for fresh, high-quality cheese. Look for a smooth texture and avoid overly watery varieties. Store ricotta in the refrigerator and use it within a week for the best flavor and quality. If necessary, you can substitute ricotta with cottage cheese or make a dairy-free alternative using blended tofu for a similar texture.

Ground Meat
Ground meat, varying from beef, pork, turkey, or chicken, is the core ingredient of any meatball recipe. It provides the primary protein source and introduces contrasting flavors, depending on the meat type used. Nutritionally, lean ground meats offer high protein content while being lower in fat, making them a healthier choice for meat lovers. When buying ground meat, look for fresh, high-quality options from trustworthy sources. Store it in the refrigerator for 1-2 days or freeze it for long-term usage. If you wish to make a lighter version, use ground turkey or chicken, which will yield equally tender meatballs.

Common Mistakes to Avoid

  • Using dry ricotta: Ensure that your ricotta cheese is fresh and creamy; old or dry ricotta can lead to dry meatballs.
  • Overmixing the meat: Too much mixing can create dense meatballs; mix just until combined for a light texture.
  • Skipping the resting time: Letting the meatballs rest before cooking allows flavors to meld and enhances the overall taste.
  • Inadequate seasoning: Don’t be shy with the herbs, spices, and salt; these are critical to enhancing flavor.
  • Not sealing the meatballs: Properly shape and seal meatballs to prevent them from falling apart during cooking.
  • Cooking at too high heat: Cooking meatballs at high temperatures can scorch the outside while leaving them raw inside; moderate heat is key.
  • Overcrowding the pan: Give meatballs space when cooking to allow them to brown evenly; overcrowding can cause steaming instead of searing.
  • Underestimating cook time: Always ensure meatballs are cooked through; use a meat thermometer for accuracy (internal temperature should reach 165°F).
  • Not letting them cool before storage: Meatballs should cool before storing to prevent moisture buildup in the container.

Essential Techniques

Mixing: Properly mixing your meatball ingredients ensures an even distribution of flavors. Don’t overmix, as this will lead to a tough texture. Combine ingredients just until moist and cohesive, allowing for tender, airy meatballs.

Shaping: Shaping meatballs requires gentle pressure to create uniform size and consistency. Use your palms and lightly roll them into balls, ensuring they are packed enough to hold together without being overly dense. A consistent size ensures even cooking.

Cooking: Aim to sear meatballs in a hot skillet before simmering them in sauce. This locks in flavors and creates a desirable crust. Monitor the heat closely; too high can lead to burning, while too low can cause them to dry out.

Resting: Allow cooked meatballs to rest briefly after cooking. This time lets juices redistribute throughout the meat, ensuring a succulent bite when served.

Pro Tips for Perfect Ricotta Meatballs

1. For extra flavor, incorporate grated parmesan cheese into the meat mixture for a cheesy kick that complements the ricotta.
2. Consider using a mix of ground meats—beef and pork blend well together for a richer flavor and texture.
3. If you have fresh herbs on hand, use them instead of dried for an amplified flavor profile.
4. For an added moisture boost, a splash of milk mixed into the meat combination enhances tenderness.
5. Browning the meatballs in small batches ensures they retain heat and color uniformly, elevating their look and taste.
6. Experiment with spices such as red pepper flakes or smoked paprika for a personal twist that elevates the overall flavor.
7. Always use a meat thermometer! Cooking meatballs to the right internal temperature will ensure food safety and perfect doneness.
8. For meal prep, bake the meatballs instead of frying—this creates a less greasy option while keeping the flavor intact.

Variations and Adaptations

For a delicious twist, consider adding chopped spinach or kale to the meat mixture for a nutritious boost and a vibrant green color. On the other hand, a spicy kick can be introduced by incorporating diced jalapeños or crushed red pepper flakes into the mix. If you’re looking for a lighter seasonal option, swap half of the ground meat for grated zucchini or sautéed mushrooms, enhancing the veggie content without compromising taste.

For special dietary needs, you might adapt this recipe to fit a gluten-free diet by ensuring that breadcrumbs and sauces are gluten-free. If you’re interested in a vegan variation, try using plant-based ground meats or finely chopped vegetables mixed with chickpea flour and nutritional yeast for a satisfying meatball substitute.

You can also explore different regional variations. For example, making Sicilian-style meatballs by adding raisins and pine nuts delivers a unique flavor profile that reflects traditional Italian cuisine.

Serving and Presentation Guide

When plating ricotta meatballs, consider serving them atop a bed of spaghetti or fresh zoodles for a vibrant and colorful display. A drizzle of marinara or a sprinkle of freshly grated parmesan can enhance both appearance and flavor. Opt for garnishing with fresh basil leaves or parsley for a pop of color and freshness.

Create an appealing presentation by using rustic serving dishes that bring out the Italian heritage of the dish. Serve with crusty garlic bread on the side, which is perfect for scooping up the meatballs and sauce. Be mindful of portion control, serving a set number of meatballs per plate, such as three to four, to keep your dish well-balanced.

Wine and Beverage Pairing

For wine enthusiasts, a medium-bodied red wine like Chianti or Sangiovese pairs beautifully with the bold flavors of ricotta meatballs. The vibrant cherry notes and moderate tannins of these wines enhance the dish while providing a pleasant contrast. If you prefer white wine, try a crisp Pinot Grigio to bring a refreshing element to the meal.

If you’re looking for non-alcoholic options, sparkling water with a hint of lemon provides a wonderful cleansing effect that complements the richness of the meatballs. For a unique pairing, consider serving an Italian soda for a sweet and fizzy contrast.

Temperature is key—serve both the meatballs and the wine at optimal temperatures for the best experience. While the meatballs should be hot and fresh, wine is best served slightly chilled to balance the flavors.

Storage and Shelf Life

Ricotta meatballs can be stored effectively to maintain their flavor and integrity. Once cooled, transfer them to an airtight container and refrigerate for up to three days. Always label the storage container with the date to keep track of when they were made.

If you plan to keep them longer, consider freezing the meatballs. They can be frozen for up to three months. To do so, spread them in a single layer on a baking sheet to freeze individually before transferring them to a resealable freezer bag for easy portioning later.

To reheat frozen meatballs, allow them to thaw in the fridge overnight before reheating them in a skillet or directly in sauce on medium heat until heated through. If reheating from frozen, be sure to adjust the heating time and check for a minimum internal temperature of 165°F.

Make Ahead Strategies

To save time, consider preparing your ricotta meatballs in advance. You can mix the meatball ingredients a day before and refrigerate the mixture to allow the flavors to meld. Shape the meatballs as needed and store them in an airtight container until you’re ready to cook.

Alternatively, you can fully cook the meatballs in advance and store them in the refrigerator or freezer for later use. This allows for a quick meal option when you’re pressed for time.

If reheating baked meatballs, do so in the oven to retain their texture. Add a little sauce during reheating to keep them moist.

Scaling Instructions

Scaling your ricotta meatballs recipe can easily adapt to your needs. If halving the recipe, ensure that all ingredients, including spices and herbs, are proportioned accurately. Make sure to adjust your cooking time accordingly, as smaller batches may require less time to cook.

When doubling the recipe, consider your mixing and cooking equipment. Ensure you have a sizable bowl for mixing and enough baking sheets or baking dishes for cooking. There is often no need to adjust cooking temperatures, but keep an eye on the time as larger batches may take a bit longer.

For any significant scaling, be mindful of ingredient freshness; some herbs and spices might lose potency over time. Store excess meatballs in portioned freezer bags to make future meals effortless.

Nutritional Deep Dive

Nutritionally, ricotta meatballs offer a balance of macronutrients, providing a hearty protein source through the ground meat and ricotta cheese. On average, each serving contains a well-rounded ratio of protein, fat, and carbohydrates, depending on the specific ingredients used.

Micronutrient analysis reveals that ricotta is an excellent source of calcium and vitamin A, while herbs lend antioxidants and essential vitamins. Adding vegetables not only heightens the nutritional content but also brings in fiber, which aids digestion.

For those keeping an eye on their dietary needs, understanding portion sizes is crucial. Typically, two to three meatballs make a satisfying serving that aligns well with a balanced meal plan.

Weight management is also supported by incorporating these meatballs into a meal surrounded by vegetables or whole grains, achieving satisfaction and nutrition without excess calories.

Dietary Adaptations

For a gluten-free option, substitute traditional breadcrumbs with gluten-free alternatives such as almond flour or crushed gluten-free crackers. This will maintain the binding quality without compromising dietary needs.

Dairy-free adaptations can use almond or coconut milk-based ricotta. The rich texture of these alternatives still allows for delicious meatballs without the creaminess of traditional cheese.

For a vegan version, consider using lentils or crumbled tofu mixed with nutritional yeast for a cheesy flavor, along with vegetables for moisture and texture.

Low-carb diets can benefit from using ground turkey or chicken paired with vegetables instead of breadcrumbs, ensuring a fulfilling, low-carb meal without losing flavor.

Keto enthusiasts can also recreate the recipe using cheese-based binders and additional low-carb vegetables, tailoring it to fit dietary guidelines while still providing delicious results.

Troubleshooting Guide

If your ricotta meatballs turn out too dry, the primary reason could be under-seasoning or using lean meats that don’t have enough fat content. To rectify this in future batches, include richness through additional cheese or a little olive oil into the mixture.

If flavor balances seem off, consider reassessing your spice quantities. Sometimes, particularly fresh herbs, might lessen over time; fresh is always better when possible, and adjusting seasoning post-cooking can help reach desired tastes.

Temperature issues can arise if the meatballs are overcrowded in the pan while cooking; always leave enough space for even cooking and browning. Proper heat control is essential to avoid burning the outsides while ensuring the insides are cooked thoroughly.

Should you find your meatballs fall apart during cooking, the most likely culprits are excess moisture in the mixture or lack of adequate binding agents. If future issues arise, adding an egg as a binder can reinforce the structural integrity needed for the perfect meatball.

Recipe Success Stories

Many home cooks have shared their joyful experiences with ricotta meatballs, often highlighting their unique texture and flavor as standout elements. Some have creatively adapted the recipe, introducing local spices or whole grains tailored to their dietary restrictions, which has fostered excitement and community.

Readers have recommended using the meatball mix as a filling for stuffed peppers or baked in savory sauces for a personal twist, ensuring versatility in meal planning. Others enjoy photography tips shared within communities that encourage picturesque spreads of beautifully plated meatballs, emphasizing the importance of presentation.

Collectively, the feedback illustrates a sense of shared achievement and connection, showcasing how simple a recipe can bring people together while allowing culinary exploration and adaptation within homes and communal spaces.

Frequently Asked Questions

Can I make ricotta meatballs ahead of time? Yes, you can prepare and shape the meatballs ahead. They can be stored in the refrigerator for up to 24 hours before cooking. Alternatively, cook the meatballs and refrigerate or freeze them for later use.

What type of meat is best for meatballs? Commonly used ground meats include beef, pork, turkey, and chicken. A mix of ground beef and pork often yields moist and flavorful meatballs.

Can I bake the meatballs instead of frying? Absolutely! Baking is a healthier alternative that still produces delicious meatballs. Bake them until golden brown and cooked through, usually around 20-25 minutes at 400°F.

Why do my meatballs fall apart? Meatballs may fall apart if the mixture is too wet or there’s not enough binding agent like breadcrumbs or egg. Ensure the mixture is properly balanced and allow them to rest before cooking.

What can I serve with ricotta meatballs? Ricotta meatballs pair beautifully with pasta, on subs, or alongside fresh salads and roasted vegetables. They also work well as appetizers on party platters.

Can I freeze meatballs? Definitely! After cooking, allow them to cool completely, then freeze in an airtight container or freezer bag for up to three months. Reheat directly from frozen or thaw in the fridge.

How can I enhance the flavor of my meatballs? Enhance flavor by adding grated cheese, different herbs, or a splash of your favorite sauce. Feel free to experiment with spices to hit your personal taste preferences.

Can I substitute ricotta in the recipe? While ricotta is unique, alternatives like cottage cheese or dairy-free spreads can work in a pinch, although texture may slightly change.

What is the best way to reheat meatballs? Reheat in a skillet with a touch of sauce to maintain moisture, or microwave gently, ensuring they are heated through without drying out.

Are ricotta meatballs healthy? Ricotta meatballs can be part of a healthy diet, especially if balanced with vegetables and served in moderation. The nutritional benefits of ricotta and lean meat contribute to a wholesome meal.

Additional Resources

For those interested in exploring more flavors, check out related recipes such as classic spaghetti and meatballs or zucchini noodle bowls for a healthy twist. Enhancing your cooking techniques through guided cooking classes or tutorial videos can also elevate your culinary skills.

Supplementing your pantry with fresh herbs and spices can transform simple meatballs into flavorful masterpieces. Investing in quality kitchen tools like a good meat thermometer or high-quality cooking pans will ensure consistent results every time.

Stay inspired by seasonal variations of ingredients for your meatballs; local produce can greatly enhance the freshness and flavor throughout the changing seasons.

Join the Conversation

We love hearing from you! Share your experiences making ricotta meatballs and any variations you’ve tried or discovered. Posting photos on social media using our dedicated hashtag brings our community together and encourages creative exchanges.

Engage in the conversation by sharing your review and tips for perfecting the recipe. Everyone’s feedback contributes to an ever-growing dialogue about mastering this Italian classic, encouraging connections over delightful homemade meals.

The Recipe

Ricotta Meatballs

Serves: 4 servings

Prep Time: 15 mins

Cook Time: 25 mins

Total Time: 40 mins

Kitchen Equipment Needed

  • Mixing bowl
  • Baking sheet
  • Skillet
  • Meat thermometer

Ingredients

  • 1 cup ricotta cheese
  • 1 pound ground meat (beef, pork, or turkey)
  • 1/2 cup breadcrumbs
  • 1/4 cup grated parmesan cheese
  • 1 large egg
  • 2 cloves garlic, minced
  • 1 tablespoon chopped parsley
  • 1 teaspoon dried oregano
  • Salt and pepper to taste
  • Marinara sauce, for serving

Directions

  1. In a large mixing bowl, combine ricotta cheese, ground meat, breadcrumbs, parmesan, egg, garlic, parsley, oregano, salt, and pepper.
  2. Gently mix until all ingredients are well combined, being careful not to overmix.
  3. Shape mixture into meatballs, approximately 1-2 inches in diameter.
  4. Preheat a skillet over medium heat and add a bit of oil.
  5. Brown meatballs in the skillet until each side is golden, about 5 minutes.
  6. Add marinara sauce to the skillet and cover, letting meatballs simmer for an additional 15-20 minutes until cooked through.
  7. Serve hot with additional cheese and herbs if desired.

Recipe Notes

  • These meatballs can be made in advance and stored for up to three days in the fridge or frozen.
  • Feel free to experiment with different ground meats or add chopped vegetables to the mix for an extra twist.
  • Adjust the spice levels to your preference by adding chili flakes or using different herbs.

Irresistible Spanakopita Triangles: Easy Bite-Sized Appetizer Recipe

Spanakopita Triangles: A Delicious, Bite-Sized Appetizer

⚖️
Difficulty
Moderate

⏲️
Prep Time
30 mins

🕒
Cook Time
20 mins

⏱️
Total Time
50 mins

🍽️
Servings
24 triangles

Spanakopita triangles are a delightful, bite-sized appetizer that combine flaky phyllo pastry with a rich and savory spinach filling. Each triangle is packed with the flavors of fresh spinach, aromatic herbs, and creamy feta cheese, resulting in a perfect balance of taste and texture. These appetizers are often a staple at parties and gatherings, pleasing a crowd with their crunchy exterior and deliciously creamy interior.

Making spanakopita triangles can seem daunting, but this recipe breaks it down into manageable steps, ensuring that you can create restaurant-quality bites right in your kitchen. Whether you’re hosting a special event or simply looking for a delightful snack, these triangles will impress your family and friends.

Quick Recipe Highlights

  • Flavor Profile: The combination of earthy spinach, tart feta cheese, and aromatic herbs creates a delightful balance of flavors that is both satisfying and light.
  • Texture: The contrast between the crispy, golden phyllo pastry and creamy filling makes every bite a delightful experience.
  • Aroma: As they bake, the intoxicating aroma of buttered phyllo and sautéed garlic will fill your kitchen, inviting everyone to the table.
  • Visual Appeal: Golden brown triangles with visible green spinach peeking through create an enticing presentation that’s perfect for any occasion.
  • Skill Level Needed: This recipe is moderate in difficulty, requiring basic pastry skills but rewarding with delicious results.
  • Special Equipment: A baking sheet, parchment paper, and a sharp knife or pizza cutter make the process smooth and easy.

Recipe Overview

  • Difficulty Level: Moderate. While working with phyllo dough might seem challenging, it’s manageable, and with practice, you can perfect it.
  • Category: Appetizer. Spanakopita triangles are perfect as a starter or snack, ideal for parties or gatherings.
  • Cuisine: Greek. This dish reflects the rich culinary traditions of Greece, where spinach and cheese are common ingredients.
  • Cost: Approximate cost per serving is low since most ingredients, such as spinach and feta, are affordable, making this a budget-friendly recipe.
  • Season: Best enjoyed throughout the year, particularly in spring when fresh spinach is abundant.
  • Occasion: Ideal for entertaining, these triangles shine at potlucks, holiday gatherings, and casual dinner parties.

Why You’ll Love This Recipe

Spanakopita triangles offer a unique combination of taste and texture that delights the palate. The savory spinach, combined with the creaminess of feta, creates a filling that is both satisfying and light. This perfect blend, wrapped in crispy phyllo, makes each bite an irresistible experience.

Another reason to love this recipe is its convenience. These triangles can be prepped ahead of time and frozen before baking. When it’s time to enjoy them, simply bake straight from the freezer for a hot, fresh snack without the last-minute stress.

Nutritionally, spanakopita is a winner. Spinach is loaded with vitamins and minerals, providing a healthy boost. With feta cheese adding calcium and protein, this appetizer satisfies both cravings and nutrition.

Spanakopita triangles are also excellent for social settings. Picture a buffet table filled with these golden bites; they encourage sharing and conversation. Guests often enjoy trying out different dips, making the experience more engaging.

Finally, this dish is incredibly cost-effective. The ingredients are straightforward, and it yields a substantial amount for the effort required, making it a great option for feeding a crowd without breaking the bank.

Historical Background and Cultural Significance

Spanakopita has a rich history in Greek cuisine, believed to date back to ancient times. Its origins are tied to the Mediterranean tradition of using local, seasonal vegetables, making it a staple in Greek households.

Culturally, spanakopita symbolizes hospitality in Greece. It is often served at celebrations and gatherings, reflecting the family-oriented nature of Greek culture. Sharing food like spanakopita promotes togetherness and community.

The recipe has evolved over the years, with different regions of Greece adding their flair. Variations may include additional ingredients such as leeks or different types of cheese, showcasing local tastes and preferences.

Regional variations also exist outside Greece, particularly in Middle Eastern and Balkan cuisines, where similar pastries are made with diverse fillings and spices, further enriching the culinary landscape.

Ingredient Deep Dive

Spinach:
Spinach has been a dietary staple in many cultures for centuries, valued for its nutritional benefits. It is rich in iron, vitamins A and K, and antioxidants, making it a healthful addition to any diet. When selecting spinach, look for vibrant green leaves without wilting. Fresh spinach should be stored in the refrigerator and consumed within a few days to ensure quality.

Feta Cheese:
Feta cheese has historic roots in Greek cuisine, known for its tangy flavor and crumbly texture. Made from sheep’s or goat’s milk, feta is lower in calories compared to many other cheeses. To choose quality feta, select cheese that is firm rather than overly soft, avoiding those that are overly salty. Feta should be stored in its brine or wrapped in a damp paper towel to maintain moisture.

Common Mistakes to Avoid

  • Overhandling the phyllo: Working with phyllo dough can be delicate; overhandling can lead to tears. Handle gently to maintain layers.
  • Not using enough butter: Buttering each layer of phyllo ensures crispness. Skimping can result in soggy pastry.
  • Skipping the cooling step: Filling should cool before wrapping to prevent steam from making the pastry soggy.
  • Using too much filling: Overstuffing can lead to tearing; aim for a balanced filling within each triangle.
  • Not preheating the oven: Ensure your oven is preheated for an even, golden bake.
  • Using old phyllo dough: Check expiration dates; stale phyllo can be challenging to work with and won’t crisp properly.
  • Ignoring the broth: For added flavor, consider brushing a light broth over the triangles when they come out of the oven.
  • Not checking for doneness: Keep an eye on them towards the end of baking; they can brown quickly.

Essential Techniques

Mastering the art of handling phyllo dough is key; it requires taking your time. Keep unused sheets covered to prevent drying. Practice makes perfect, and you’ll soon get the hang of layering with butter.

Additionally, proper filling techniques enhance flavor. Make sure the filling is well-mixed and seasoned before placing it in the triangles. Tasting the filling ensures a balanced flavor profile that will shine through once baked.

Pro Tips for Perfect Spanakopita Triangles

Start by warming your butter; this makes it easier to spread across the phyllo layers. Use a pastry brush for even coverage.

Consider freezing unbaked triangles for quick appetizers. When unexpected guests arrive, bake straight from the freezer for a delightful surprise.

Experiment with flavor by adding herbs like dill or mint to the filling. They complement the spinach beautifully, offering additional depth.

Don’t forget to score the top of the triangles before baking. This helps steam escape and promotes even browning.

Check internal temperature; ideally, they should reach about 165°F to ensure the filling is heated through.

Plan your serving time wisely; they taste best straight out of the oven but can be reheated if needed.

Lastly, always have a dipping sauce nearby. Tzatziki or a yogurt-garlic blend pairs perfectly with every bite.

Variations and Adaptations

Regional variations of spanakopita abound; try adding different greens like kale or Swiss chard. Each green brings its unique flavor profile while maintaining the traditional essence.

Seasonal adaptations can also be fun. In the fall, consider incorporating roasted butternut squash and nutmeg for a seasonal twist. This variation can deliver a sweet and savory contrast.

For dietary modifications, use almond or soy-based cheese for a dairy-free option. This keeps the recipe inclusive without sacrificing taste.

Herbs also offer flavor variations; replace dill with basil or parsley for a fresh take. Each herb imparts its essence and can redefine your filling’s taste.

Presenting the triangles differently can create a new experience. Try plating them on skewers or in a stacked formation to elevate their appearance for special occasions.

Serving and Presentation Guide

To plate spanakopita triangles beautifully, arrange them in a circular pattern, highlighting their golden crunch. Garnish with a sprinkle of fresh herbs for a vibrant touch.

Serve alongside traditional accompaniments like tzatziki, which pairs well and enhances their flavors. Consider adding olives or a Greek salad for a complete spread.

When serving, keep in mind temperature preferences. These triangles are best served warm, offering that crispy bite that contrasts perfectly with the creamy filling.

For portion control, aim for two to three triangles per person, alongside other bites at your gathering, ensuring guests enjoy without overindulging.

Wine and Beverage Pairing

When pairing wine with spanakopita triangles, consider a crisp white wine like Sauvignon Blanc. Its acidity balances the richness of the filling beautifully.

If you prefer non-alcoholic options, consider serving sparkling water with a splash of lemon. This refreshing drink complements the flavors and enhances the overall experience.

For coffee or tea enthusiasts, a mild herbal tea can be a delightful companion, providing a warm finish that enhances the dish’s richness.

Ensure drinks are served chilled, particularly white wines. Having a well-corked bottle nearby can make for seamless refills throughout your gathering.

Storage and Shelf Life

For storage, keep any leftover spanakopita triangles in an airtight container in the refrigerator for up to three days. Reheat them in the oven for the best texture.

If you have unbaked triangles, they can be frozen. Wrap them individually and store in a freezer-safe container for up to two months, ready for popping into the oven.

Signs of spoilage include a strange odor or an excessive change in texture. If they become overly soggy, it’s best to discard them.

For reheating, an oven set to 350°F for about 10-15 minutes ensures they regain their crispness without drying out.

If you’re freezing, use wax paper between layers to avoid sticking, which preserves their quality until ready to bake.

Make Ahead Strategies

Prepping spanakopita triangles ahead of time is straightforward. Assemble them and freeze prior to baking for maximum freshness when guests arrive.

For storage between steps, keep fillings refrigerated until ready to use. Phyllo should remain covered with a damp towel to prevent drying out.

Quality may slightly impact if frozen for an extended period, so aim to consume the frozen triangles within two months for optimal flavor.

Before baking from frozen, there’s no need to thaw; simply increase cooking time by about 5-10 minutes, ensuring a hot, crispy result.

Add fresh elements, such as a drizzle of lemon juice or a sprinkle of herbs, just before serving to enhance flavors that may diminish during freezing.

Scaling Instructions

If halving the recipe, reduce phyllo and filling quantities accordingly. Be mindful to keep the butter layering consistent for the remaining sheets.

When doubling or tripling, focus on even cooking; you may need to bake in batches, and adjust the timing based on your oven’s specifications.

Consider using two baking sheets to ensure that your triangles don’t overcrowd each other for even cooking and browning.

Ensure larger pans or sheets are used if scaling significantly, as larger batches may affect overall baking time and texture.

Finally, adjust storage considerations; larger quantities may require larger containers, or consider freezing in smaller portions for easy access later.

Nutritional Deep Dive

Each spanakopita triangle contains a balance of macro and micronutrients that make them a satisfying choice for any gathering. They are primarily composed of carbohydrates from the phyllo pastry and healthy fats from the butter used.

Spinach contributes significant vitamins A and K, enhancing nutritional value while providing a delicious flavor. Feta cheese contributes calcium and protein, making them filling.

Portion control is essential; enjoy them as a small appetizer to avoid overindulging. Eating in moderation allows you to savor the flavors without compromising dietary goals.

Weight management becomes more manageable with such versatile options; the fillings can be adjusted to incorporate more vegetables while reducing calorie-dense ingredients, making them a healthy treat.

Lastly, consider dietary considerations for those with specific health goals; these treats can be adapted to fit various lifestyles with simple ingredient swaps.

Dietary Adaptations

For gluten-free needs, opt for gluten-free phyllo or a different pastry wrapper. This can reinvent the classic while maintaining the essence of spanakopita.

Dairy-free enthusiasts can choose nutritional yeast instead of feta or explore plant-based cheeses for a similar texture and taste without the dairy.

Vegan adaptations can incorporate chickpea or lentil-based fillings, providing protein and flavor while eliminating all animal products.

Low-carb versions can play with cauliflower rice as a base instead of traditional fillings, giving a lighter option while retaining that beloved crunch.

Keto dieters may also enjoy making phyllo alternatives from almond flour-based recipes, providing texture without compromised goals.

If you follow the Paleo diet, consider swapping in nut-based creams or cashew cheese as a filling, aligning with whole-food principles.

Finally, for Low-FODMAP followers, using lactose-free feta cheese and avoiding certain spices can keep the flavors intact while respecting digestion sensitivities.

Troubleshooting Guide

If you find your phyllo pastry is too dry, ensure it is covered properly during prep. Dry layers can lead to cracking and affect texture.

For flavor balance, taste the filling before assembly. If it’s bland, add spices or herbs to enhance the overall flavor profile.

Overcooked triangles can become too brown or burnt; check frequently during the final stages for optimal color without charring.

If your oven temperature seems off, use an oven thermometer for accuracy. This prevents undercooking or overcooking your delicious appetizers.

If the filling leaks during baking, it’s often due to overstuffing. Ensure a balanced amount for each triangle to avoid spillage.

When substituting ingredients, be mindful of moisture content; wet ingredients can throw off the balance, so adjust as necessary.

Finally, if assembling proves tricky, practice your folding technique ahead of time to streamline the assembly process.

Recipe Success Stories

Community feedback on spanakopita triangles has been overwhelmingly positive, with many sharing their variations and personal touches that elevate this classic recipe.

Readers have suggested using a blend of cheeses, including goat cheese, which adds tang and creativity to the traditional filling, making it a hit at gatherings.

Adaptation stories highlight how different herbs or vegetables can enhance flavors without straying too far from the essence of the dish.

Many have shared photography tips for capturing the golden crust in all its glory, emphasizing the importance of good lighting in food presentation.

Recipe reviews consistently praise the balance of flavors and ease of preparation, establishing spanakopita triangles as a go-to party appetizer in many homes.

Frequently Asked Questions

Can I freeze spanakopita triangles?
Yes, unbaked triangles can be frozen. Just wrap them individually and bake straight from the freezer when ready.

How do I prevent the phyllo dough from drying out?
Always keep unused phyllo covered with a damp towel while you work to retain moisture and prevent cracking.

Can I use other greens besides spinach?
Absolutely! Kale, Swiss chard, or mixed spring greens work beautifully as alternatives to spinach in the filling.

What’s the best way to serve spanakopita?
Serve them warm directly from the oven, garnished with fresh herbs and accompanied by a yogurt-based dip.

How long do spanakopita triangles last in the fridge?
They can be stored in an airtight container for up to three days. Reheat in the oven for best results.

Can I make them vegan?
Yes! Replace the feta with a plant-based cheese or a mixture of blended nuts for a delicious vegan filling.

What’s the ideal temperature for baking?
Preheat your oven to 375°F (190°C), which is perfect for ensuring a crispy, golden result without burning.

How do I know when they’re done?
They should be a crisp, golden brown on the outside and heated through. You can also check the internal temperature.

Are spanakopita triangles gluten-free?
Traditional phyllo is not gluten-free, but you can find gluten-free phyllo options in specialty stores or make alternatives.

Can I add other ingredients to the filling?
Yes! Ingredients such as artichokes, leeks, or even sun-dried tomatoes can be delicious additions to the filling.

Is there a healthier version of spanakopita?
To make it healthier, reduce the amount of butter used or try baking instead of frying to lower the calorie count.

How do I store leftover filling?
Store any leftover filling in the refrigerator for up to two days; you can use it for other dishes like omelets or salads.

Additional Resources

If you enjoyed this spanakopita triangle recipe, consider exploring related recipes like Greek salad for a refreshing side or tzatziki for dipping.

For technique guides, look into mastering phyllo pastry, as understanding its nuances can elevate many other recipes as well.

Further ingredient information about spinach and feta can also offer insights into their health benefits and culinary uses.

If you’re looking to invest in kitchen equipment, a good quality knife and pastry brush can ensure successful preparation of many dishes.

For seasonal variations, consider showcasing pies or pastries using in-season vegetables for efforts that celebrate the best produce throughout the year.

Join the Conversation

We’d love to connect with you! Share your spanakopita triangle experiences on social media, tagging us in your culinary creations. Your photography tips can inspire fellow food enthusiasts as they prepare this delicious appetizer.

If you’ve modified the recipe, share your variations in the comments. Engaging with our community enriches the whole experience and offers new perspectives on classic dishes.

We encourage recipe reviews and stories of personal successes that can help others master their own spanakopita triangles. Together, our culinary journey can flourish!

The Recipe

Spanakopita Triangles

Serves: 24 triangles

Prep Time: 30 mins

Cook Time: 20 mins

Total Time: 50 mins

Kitchen Equipment Needed

  • Baking sheet
  • Parchment paper
  • Sharp knife or pizza cutter
  • Pastry brush

Ingredients

  • 1 package of phyllo dough
  • 1 lb fresh spinach, chopped
  • 1 cup feta cheese, crumbled
  • 1/2 cup ricotta cheese
  • 1/4 cup fresh dill, chopped
  • 1/4 cup green onions, chopped
  • 1/2 cup melted butter
  • Salt and pepper to taste

Directions

  1. Preheat your oven to 375°F (190°C) and line a baking sheet with parchment paper.
  2. In a large bowl, combine spinach, feta cheese, ricotta, dill, green onions, salt, and pepper.
  3. Prepare the phyllo dough, keeping it covered with a damp towel to prevent drying.
  4. Layer sheet of phyllo, brushing with melted butter, and fold it in half lengthwise.
  5. Cut the phyllo into strips about 3 inches wide, then place a tablespoon of filling at the bottom of each strip.
  6. Fold the phyllo over the filling diagonally to form a triangle. Continue folding until you reach the end of the strip.
  7. Arrange the triangles on the baking sheet and brush the tops lightly with butter.
  8. Bake for 20 minutes or until golden brown and crispy.

Recipe Notes

  • Feel free to experiment with the filling ingredients for a custom taste.
  • For extra flavor, add crushed garlic or nutmeg to the filling mixture.
  • Leftover triangles can be stored in the fridge and reheated.

Indulge in Filet Mignon with Creamy Parmesan Mustard Sauce

Delicious Filet Mignon with Creamy Parmesan Mustard Sauce

⚖️
Difficulty
Intermediate

⏲️
Prep Time
15 mins

🕒
Cook Time
20 mins

⏱️
Total Time
35 mins

🍽️
Servings
2

Indulge in a luxurious culinary experience with our exquisite Filet Mignon with Creamy Parmesan Mustard Sauce. This tender cut of steak, known for its great flavor and buttery texture, is complemented beautifully by a rich sauce that combines the nutty taste of parmesan and the zesty bite of mustard. Perfect for impressing guests or enjoying a special evening at home, this dish delivers an unforgettable dining experience.

With just the right blend of spices and ingredients, this filet mignon is not only visually stunning but also enticing to the palate. Imagine slicing into the perfectly cooked meat, releasing its savory juices, and drenching it in a creamy sauce that enhances each bite.

Quick Recipe Highlights

  • Flavor Profile: The filet mignon is succulent and flavorful, enriched by the creamy mustard sauce’s tangy and nutty notes.
  • Texture: The steak’s melt-in-your-mouth tenderness pairs wonderfully with the smoothness of the sauce, creating a delightful contrast.
  • Aroma: The enticing aroma of searing steak combines with the rich scent of parmesan and herbs, making this dish irresistible.
  • Visual Appeal: The dish is beautifully presented with golden sauce drizzled over the juicy steak, garnished with fresh herbs for added color.
  • Skill Level Needed: This intermediate level recipe requires basic cooking techniques and a little finesse, making it achievable for home cooks looking to impress.
  • Special Equipment: A well-seasoned cast iron skillet or a heavy-bottomed pan is ideal for searing the steak to perfection.

Recipe Overview

  • Difficulty Level: This recipe is rated intermediate due to the precise cooking method needed for the filet mignon and the timing involved in preparing the sauce.
  • Category: This meal fits perfectly into the dinner category, ideal for a romantic night or special occasion.
  • Cuisine: Drawing from classic French techniques and ingredients, this dish showcases a culinary tradition that emphasizes refinement and rich flavors.
  • Cost: While filet mignon is one of the more expensive cuts of meat, the overall cost for the entire dish remains reasonable when considering its delicious outcome.
  • Season: This dish shines in cooler months, making it perfect for cozy dinners in the fall and winter seasons.
  • Occasion: Ideal for anniversaries, holiday dinners, or intimate gatherings, the presentation and flavors make it a gift to your guests.

Why You’ll Love This Recipe

The taste and texture of Filet Mignon with Creamy Parmesan Mustard Sauce make it a standout dish for any occasion. The filet mignon is known for its melt-in-your-mouth tenderness, which gets a delightful uplift from the creamy sauce, resulting in a symphony of flavors on your palate. The combination of parmesan and mustard brings together a spicy, tangy component that perfectly complements the rich and buttery nature of the steak.

Convenience is another reason to adore this recipe. With a prep time of just 15 minutes and a cook time of 20, this elegant dish can quickly be a part of your weekly meal rotation. The straightforward steps ensure that you spend more time enjoying your meal rather than being buried in the kitchen.

The nutritional advantages of filet mignon cannot be overlooked. High in protein and rich in iron, it makes for not only a delicious option but one that’s beneficial for energy and muscle health. Coupled with the vitamins in the sauce ingredients, this dish comes together to create a balanced meal.

Socially, it’s a talking point at the dinner table, bringing together family and friends over a shared love for gourmet food. The richness of the filet mignon stimulates conversation and creates a warm atmosphere, making it an ideal dish for gatherings.

Cost-effectiveness comes into play when you consider the ingredients used. While filet mignon may be thought of as a luxury item, the sauce elevates the meal without requiring a full range of costly sides or ingredients. This means you can impress your guests and family without breaking the bank.

Historical Background and Cultural Significance

The filet mignon has a storied history that traces back to the French culinary tradition. Highly prized and often associated with fine dining, this tender cut is derived from the smaller end of the tenderloin, making it one of the most sought-after steaks. Traditionally, it has been served at grand meals and special occasions throughout Europe, investing it with a sense of luxury and exclusivity.

Culturally, filet mignon is symbolic of gourmet cuisine, often representing a celebration of fine ingredients and skilled cooking techniques. The dish is typically enjoyed in upscale restaurants but has successfully made its way into home kitchens across the globe, democratizing this luxury meat.

As recipes evolve, so too does the preparation of filet mignon. The addition of sauces, such as the creamy parmesan mustard featured here, enhances its appeal and integrates other flavor profiles, ensuring the dish remains relevant to modern palates. Adaptations seen around the world reflect local tastes and traditions, making it a versatile centerpiece for many culinary explorations.

Regional variations also tell a compelling history of this dish. While France presents the classic take, variations can be found in higher-end American steakhouses, where the steak might be served with barbecue or house-made sauces. Such adaptations illustrate the global love for this particular cut, blending ingredients native to diverse cultures.

Ingredient Deep Dive

Filet mignon: This elegant cut of beef is beloved for its natural tenderness and buttery texture. Originating from the short loin, it is often regarded as a luxury ingredient. Nutritionally, filet mignon is rich in proteins and offers essential amino acids, making it vital for muscle building. When selecting, look for bright red color and good marbling. Store it refrigerated and consume within a few days of purchase or freeze for longer storage.

Cream: A staple in making the creamy sauce, cream adds a rich texture and mouthfeel. Dairy products are known to be a good source of calcium and vitamins. Look for fresh, high-fat cream for the best results, and ensure it’s stored in a cool, airtight container. As a substitute, non-dairy alternatives can be used, although they may alter the sauce’s richness.

Parmesan cheese: This Italian cheese is celebrated for its nutty flavor and granular texture, integral to giving depth to the sauce. Parmesan is also a good source of protein and calcium, contributing to a balanced diet. Always choose aged parmesan for the best flavor. It should be stored carefully to prevent spoilage and can often be substituted with pecorino cheese or nutritional yeast for a dairy-free version.

Mustard: Offering a zesty kick, mustard can heighten the flavor profile of the sauce. Its health benefits include being low in calories and high in antioxidants. When selecting mustard for the sauce, choose quality brands, and store them in a cool place. You can use any variety, from Dijon to whole grain, depending on your desired flavor nuances.

Garlic: This aromatic is crucial for elevating flavors in many recipes. Garlic is enriched with antioxidants and has numerous health benefits, including improving heart health. Fresh garlic cloves should be chosen as they provide the best flavor; store them in a cool, dark place. When substitutions are necessary, garlic powder can work, though fresh garlic is always preferred.

Common Mistakes to Avoid

  • Cooking at the wrong temperature: Ensure the skillet is properly heated to achieve a good sear on the filet, sealing in juices.
  • Overcooking the steak: Use a meat thermometer to check doneness and remove it slightly before it reaches your desired temperature, as it will continue to cook off the heat.
  • Skipping the resting period: Allow the filet to rest after cooking so the juices redistribute for a more tender bite.
  • Neglecting seasoning: Seasoning should not be an afterthought; a good amount of salt and pepper enhances the beef’s natural flavors.
  • Using low-quality ingredients: Premium cuts of meat and fresh, quality ingredients are essential for the best flavor and texture.
  • Forgetting about sauce reduction: Allowing the sauce to simmer properly helps to meld the flavors and thicken, resulting in a richer sauce.
  • Not preparing in advance: Gathering all ingredients and pre-measuring them can streamline the cooking process and ensure nothing is forgotten.
  • Ignoring aromatics: Using fresh herbs and spices can heighten flavor; don’t skip them, as they bring complexity to simple dishes.
  • Incorrectly combining ingredients: Be mindful when adding cream to avoid curdling; always temper it by adding it gradually and stirring.
  • Skipping garnish: A simple fresh herb garnish can elevate the presentation and flavor profile significantly; don’t skip this final touch.

Essential Techniques

Searing: This key technique is vital for developing a flavorful crust on the filet mignon. For best results, preheat your skillet until it’s smoking before adding the meat. Ensure the steak is at room temperature and dry; this will help it sear and not steam. Watch for a deep golden-brown color as your cue for flipping.

Sauce-making: Knowing how to create a creamy sauce is an essential culinary skill. Start with a roux or simply reduce the cream to thicken it. Use low heat to prevent burning, and constantly stir to avoid sticking to the bottom. Incorporating your flavors gradually ensures a harmonious balance that enhances the entire dish.

Resting: Resting meat is just as essential as cooking it. Once cooked, let your filet mignon rest for a minimum of five minutes to ensure juices are redistributed. This simple step will make your meat more succulent and enjoyable to eat.

Garnishing: Proper garnishing techniques can elevate a meal significantly. Use fresh herbs to highlight colors and flavors throughout the dish. Consider offsetting rich dishes with bright, fresh elements for balance—like a sprinkle of parsley or chives.

Pro Tips for Perfect Filet Mignon with Creamy Parmesan Mustard Sauce

Start with high-quality filet mignon for the best flavor and tenderness; look for well-marbled cuts when purchasing. Use a cast iron skillet for an even sear and better heat retention, which will help achieve that coveted crust. Allow your steak to come to room temperature before cooking for more even results and to reduce cooking time.

Use a meat thermometer to ensure the steak reaches your desired level of doneness—145°F for medium rare yields the best taste and texture. Always rest the steak post-cooking to maximize juiciness. Whisk the sauce gently while it’s heating but avoid boiling, as boiling will reduce the creaminess and alter the flavors.

Experiment with the mustard flavors; try Dijon or honey mustard to see which blends best with the parmesan for your personal taste preferences. Finally, surprise your guests with seasonal vegetables as a side, enhancing both the color on the plate and the meal’s freshness.

Variations and Adaptations

For regional variations, consider a chimichurri sauce made with herbs from Latin recipes, adding an aromatic twist to the filet. Seasonal adaptations can include adding roasted vegetables in the winter or a fresh salad in warmer months to complement the dish’s richness. If dietary modifications are necessary, swap out filet mignon for lean cuts like sirloin, though this will slightly change the texture.

For flavor variations, consider adding a splash of balsamic vinegar to the sauce for a sweet and tangy note. Texture modifications, such as incorporating toasted nuts into the sauce, can provide a delightful crunch. Presentation alternatives could involve serving the steak atop a bed of pureed cauliflower for a picturesque and lower-carb option that also adds depth to the dish.

Serving and Presentation Guide

To ensure your filet mignon with creamy parmesan mustard sauce is presented beautifully, consider employing simple plating techniques. Use a large, white plate, allowing the colors of the dish to pop. Slice the filet before serving to showcase its juicy interior, and pour the sauce over the top just before placing it on the table.

Garnish with fresh herbs, such as parsley or chives, for a touch of color and freshness. Traditional accompaniments include roasted vegetables or a simple side salad, which can provide a delightful contrast to the rich steak. For modern serving suggestions, consider placing the filet on a bed of sautéed spinach or served alongside a grain salad.

Temperature considerations are crucial; serve the filet mignon warm for maximum enjoyment. Portion control is important as well, particularly when serving guests, allowing each person to enjoy a substantial serving without overwhelming their plates.

Wine and Beverage Pairing

Pairing your filet mignon with the right wine elevates the culinary experience. A bold red wine, such as Cabernet Sauvignon or Merlot, complements the richness of the steak beautifully. Specifically, a Napa Valley Cabernet is often recommended due to its robust flavor profile.

For white wine lovers, a full-bodied Chardonnay can also work well, particularly when served alongside the creamy sauce. Consider non-alcoholic alternatives, such as sparkling grape juice, which can provide a celebratory touch without the alcohol.

If coffee or tea pairs are appropriate for your meal, a rich espresso can enhance the savory flavors, acting as a delightful closing note to the meal. Be sure to serve all beverages at their optimal temperatures to fully appreciate their profiles.

Storage and Shelf Life

Proper storage methods are essential for maximizing the freshness of leftover filet mignon. Store the cooked steak in an airtight container in the refrigerator, where it can last for around 3-4 days. If freezing leftovers, wrap the steak tightly in plastic wrap and foil, ensuring no air gets in, which will prevent freezer burn.

Temperature requirements for reheating should always be mindful of food safety; ensure that the internal temperature reaches at least 165°F. Signs of spoilage to watch for include an off smell or slimy texture. When reheating, consider using an oven or skillet rather than a microwave, which can dry out the steak.

For sauce storage, keep it separated from the steak until you’re ready to reheat, as the cream may separate when stored. Consider frozen sauce, as freezing can preserve flavors well, but be sure to label the container with the date it was made.

Make Ahead Strategies

Planning ahead is a great way to enhance the enjoyment of your filet mignon. Preparing the creamy parmesan mustard sauce a day in advance allows flavors to meld beautifully; simply reheat before serving. You can also season the filet mignon and allow it to marinate in the fridge for extra flavor, giving the spices time to soak in.

For a prep timeline, aim to gather all your ingredients and tools the day before to streamline your cooking process. Store ingredients like garlic and herbs separately to maintain their potency. Make sure to assess the quality of ingredients over time; fresh herbs should be used first to prevent spoilage.

For reheating, gently warm the filet in an oven at a low temperature, which will help keep the meat tender against quick, high-heat methods. Consider adding fresh elements like herbs or lemon zest just before serving to enliven the dish after storage.

Scaling Instructions

Scaling your filet mignon recipe can be easily achieved. To halve the recipe, simply divide all ingredient quantities by two while maintaining the same cooking times. Doubling or tripling the recipe requires more than just multiplying ingredients; ensure you have adequate pan space and avoid overcrowding the skillet to achieve that perfect sear.

Equipment adjustments should be made depending on the number of servings; consider using larger skillets or multiple pans to maintain even cooking. Timing modifications can include cooking batches separately to ensure each filet receives the attention it needs.

Lastly, consider storage considerations based on increased quantities; having additional containers ready will make storing leftovers much easier after serving guests.

Nutritional Deep Dive

In understanding nutrition, it is essential to note that filet mignon provides a high protein content, about 23 grams per serving, making it an excellent choice for muscle maintenance and repair. The steak is also rich in essential vitamins and minerals, such as B vitamins, iron, and zinc, contributing to energy production and overall body health.

Micronutrient analysis reveals the presence of selenium, which plays a crucial role in thyroid function and immune health. Balancing your portions can help in weight management—serving sizes should be monitored to prevent excessive caloric intake that could detract from a healthy diet.

Nutritional benefits are best maximized when paired with vegetables or other high-fiber sides, which can help create a well-rounded meal with a balance of macronutrients. For those tracking dietary considerations, it’s advisable to be mindful of sodium content from any added sauces or seasonings to develop a harmonious and health-conscious meal option.

Dietary Adaptations

Making this recipe accessible for various dietary needs is certainly achievable. For a gluten-free version, ensure any sauces or condiments used do not contain gluten-based ingredients, opting for certified gluten-free options instead. Dairy-free adaptations can be achieved by substituting creamy sauces with coconut cream, which offers a slightly different flavor yet remains delicious.

For vegan modifications, while replacing filet mignon directly may not be feasible, consider preparing portobello mushrooms, marinated and grilled, serving them with the creamy sauce for a hearty alternative. Low-carb options fit seamlessly with the base recipe; serve alongside non-starchy vegetables or salads for a perfect dish that keeps carbs at bay.

If following Keto or Paleo diets, simply ensure sauces are free from added sugars or excessive carbohydrates, focusing on high-quality fats for flavor. Lastly, Low-FODMAP adaptations could involve adjusting the garlic and onion elements—both of which can be plentiful in dressings—replacing them with suitable alternatives to maintain flavor integrity.

Troubleshooting Guide

In tackling texture issues, ensure your meat is well-rested post-cooking to keep it tender. If the sauce appears too thin, consider thickening it by simmering longer or adding a bit of cornstarch to your cream. For flavor balance, adding a pinch of salt or sugar can often help elevate underwhelming flavor profiles.

Temperature problems can be addressed by investing in a good meat thermometer to prevent undercooking or over-cooking. Equipment challenges may arise, particularly with pans; using a nonstick skillet is not recommended for searing, maintaining the right type of cookware is essential.

Ingredient substitutions should be made cautiously; while trying to replace mustard or cheese, ensure the flavors complement each other to prevent a jarring experience. Timing concerns can be addressed with stacking your prep work; adhere to the times needed for resting or cooling to fit everything smoothly into your cooking plan.

Recipe Success Stories

Community feedback highlighting the success of this recipe has brought many home cooks joy, with several noting its dramatic impact on dinner parties. Variations shared by readers, such as seasoning tweaks and sauce enhancements, have led to unique adaptations that have helped personalize the dish.

Adaptation stories showcasing the use of alternative cuts of meat while keeping the sauce intact also demonstrate creativity while retaining the essence of this wonderful dish. Photography tips shared by the community include taking care to plate the food neatly for Instagram-worthy results that invite appetites!

Reader suggestions continuously flow in about additional pairings and side dishes that compliment the filet mignon, further illustrating the dish’s versatility. Encouraging user-generated content fosters engagement and brings a richness to the recipe that showcases varied culinary experiences.

Frequently Asked Questions

What is the best way to cook filet mignon?

The best way to cook filet mignon involves searing it in a hot skillet to create a caramelized crust while achieving your preferred level of doneness with care. A meat thermometer will ensure accuracy, and resting the steak afterward is crucial for juiciness.

Can I substitute filet mignon with another cut of meat?

Yes, while filet mignon is ideal, you can substitute it with other tender cuts like ribeye or sirloin. Just adjust your cooking times slightly to accommodate different fat contents and tenderness levels.

How do I know when my filet mignon is done?

Using a meat thermometer is the most reliable method; for medium-rare, aim for an internal temperature of 130°F–135°F. Remember that the steak will continue cooking slightly after being removed from heat.

What if I don’t have fresh parmesan cheese?

If fresh parmesan isn’t available, shelf-stable grated parmesan can be used but may result in a slightly different flavor profile; ensure it’s kept in a cool, dry place to maintain freshness. Alternatively, use pecorino cheese for a flavorful swap.

Is this recipe suitable for special dietary needs?

This recipe can be adapted for various dietary needs, including gluten-free and dairy-free diets. Explore alternatives that do not compromise the dish’s integrity for those with specific health considerations.

How long can I store leftovers?

Leftovers will keep in the refrigerator for about 3-4 days if stored properly in an airtight container. You can freeze them for longer storage, up to around 3 months, but note that the texture may change slightly after reheating.

Can I make the sauce in advance?

Yes, the creamy parmesan mustard sauce can be made in advance and stored in the refrigerator. Just reheat it gently, adding a splash of cream if it gets too thick during storage.

What sides pair well with filet mignon?

Filet mignon pairs beautifully with side dishes such as roasted vegetables, garlic mashed potatoes, or a fresh garden salad. Each brings additional layers of flavor and texture to complement the richness of the steak.

Is there a vegetarian option for this dish?

While filet mignon is a meat dish, you can create a vegetarian experience by using portobello mushrooms marinated and grilled as the main protein, topped with the same creamy sauce for an earthy flavor.

How important are the resting times for the steak?

Resting times after cooking are crucial, allowing the juices within the steak to redistribute evenly, resulting in a tender and flavorful eating experience. A minimum of 5 minutes is recommended before slicing.

Additional Resources

If you’re looking to explore more recipes, consider checking out our collection of steak dishes that highlight various cooking techniques and flavors. For deep dives into culinary techniques, valuable guides on sauce-making and grilling can enhance your cooking skills immensely.

Ingredient information can provide insights into seasonal produce to pair with your meals and elevate flavors. Equipment recommendations are beneficial for finding the best kitchen tools to utilize for this and other gourmet recipes.

Lastly, engagement with seasonal variations will encourage you to make the most of fresh produce and flavors available throughout the year, providing an endless source of inspiration for your culinary endeavors.

Join the Conversation

Engagement through social media sharing allows you to connect with others who share your passion for cooking and flavorful recipes. Share elements of your cooking experience, including any photography tips that could help enhance the visual appeal of your finished dishes.

We encourage you to leave recipe reviews, sharing your experiences and any personal adaptations you might have made. Discussing variations with fellow home chefs enhances community engagement and fosters creativity in the kitchen.

The culinary journey can be further enriched by swapping ideas, exploring flavors you’ve discovered, and enjoying the camaraderie that comes from food shared with loved ones.

The Recipe

Filet Mignon with Creamy Parmesan Mustard Sauce

Serves: 2

Prep Time: 15 mins

Cook Time: 20 mins

Total Time: 35 mins

Kitchen Equipment Needed

  • Cast iron skillet or heavy-bottomed pan
  • Meat thermometer
  • Whisk
  • Cutting board
  • Chef’s knife
  • Airtight container for storage

Ingredients

  • 2 filet mignon steaks (about 6 oz each)
  • 1 tablespoon olive oil
  • Salt and pepper to taste
  • 1 cup heavy cream
  • 1/2 cup grated parmesan cheese
  • 2 tablespoons Dijon mustard
  • 2 cloves garlic, minced
  • Fresh herbs for garnish (optional)

Directions

  1. Remove filet mignon from the refrigerator, allowing them to come to room temperature for about 30 minutes.
  2. Season both sides with salt and pepper generously.
  3. In a cast iron skillet, heat olive oil over medium-high heat.
  4. Sear the filet mignon for about 4-5 minutes on each side for medium-rare, using a meat thermometer to reach 130°F-135°F.
  5. Once cooked, transfer the steaks to a plate and let them rest.
  6. In the same skillet, reduce the heat to medium and add minced garlic, cooking until fragrant.
  7. Add heavy cream, stirring well and letting it simmer gently, incorporating the mustard and parmesan cheese until the sauce thickens.
  8. Slice the steaks and serve them with the creamy sauce poured generously on top.
  9. Garnish with fresh herbs, if desired.

Recipe Notes

  • Feel free to adjust the amount of parmesan cheese based on your preference for richness.
  • The sauce can be made in advance and reheated gently before serving.
  • Experiment with different types of mustard for varied flavors.

Delicious Smothered Chicken with Creamed Spinach, Bacon, and Mushrooms

Smothered Chicken with Creamed Spinach: A Hearty Delight

⚖️
Difficulty
Medium

⏲️
Prep Time
15 mins

🕒
Cook Time
30 mins

⏱️
Total Time
45 mins

🍽️
Servings
4

Welcome to the delightful world of Smothered Chicken with Creamed Spinach, Bacon, and Mushrooms! This hearty dish combines tender chicken with a rich, creamy sauce that will tantalize your taste buds. The smokiness of the bacon complements the earthiness of mushrooms, while the vibrant creamed spinach adds a fresh note, making this recipe a perfect comfort food for any occasion.

Imagine a plate filled with juicy chicken thighs drenched in a luscious sauce, with every bite delivering a burst of flavor. The creamy spinach mixed with savory bacon and mushrooms creates an enticing contrast in texture and taste—making it not just a meal but a truly decadent experience. Whether you’re preparing a family dinner or entertaining guests, this smothered chicken dish is sure to impress!

Quick Recipe Highlights

  • Flavor Profile: Each bite offers a delightful blend of savory and creamy flavors, making it incredibly satisfying.
  • Texture: The tender chicken, creamy sauce, and crispy bacon create a variety of mouthfeel that is both comforting and indulgent.
  • Aroma: The aromatic notes of garlic, fresh spinach, and fried bacon fill your kitchen, creating an inviting atmosphere.
  • Visual Appeal: A beautifully plated dish with a vibrant green spinach base and golden-brown chicken will be the star of your table.
  • Skill Level Needed: Suitable for home cooks with some experience, requiring techniques like sautéing and simmering.
  • Special Equipment: A large skillet and a matching lid are essential for creating this delicious meal.

Recipe Overview

  • Difficulty Level: Moderate, as it requires several cooking techniques but can be mastered with practice.
  • Category: Main Course, perfect for dinner or special occasions.
  • Cuisine: This recipe is influenced by classic American cuisine, featuring comforting flavors.
  • Cost: Approximately $15-$20 for four servings, making it an affordable option for home-cooked meals.
  • Season: Ideal for any season, especially autumn and winter, when hearty meals are most appreciated.
  • Occasion: Perfect for family gatherings, dinner parties, or cozy nights in.

Why You’ll Love This Recipe

Taste and texture appeal: The combination of crispy bacon, tender chicken, and rich creamy sauce creates a flavor explosion in every bite. The earthiness of mushrooms paired with vibrant spinach elevates the overall experience, ensuring no one will want to leave the table.

Convenience and preparation benefits: With just 45 mins from start to finish and kitchen staples used throughout, this dish strikes an excellent balance between deliciousness and practicality. The recipe also allows for preparation ahead of time, which is a plus for busy weeknights.

Nutritional advantages: Packed with protein from chicken, nutrients from spinach, and the added flavor of mushrooms, this dish can have a well-rounded nutritional profile. It brings delicious flavor without compromising health.

Social and entertaining value: This dish makes an excellent centerpiece for gatherings, as its rich flavor profile and stunning presentation are sure to impress guests. Sharing this dish adds warmth to any occasion.

Cost-effectiveness and accessibility: Using relatively inexpensive ingredients, this recipe provides a lavish feel for an affordable price. The use of everyday items makes it easy for anyone to recreate at home, perfect for those on a budget.

Historical Background and Cultural Significance

The origins of smothered chicken can be traced back to Southern cooking, where the enriching practice of “smothering” meat in gravy or sauce gained popularity. The technique allowed for inexpensive cuts of meat to be transformed into a delectable meal through slow cooking, resulting in tender meat infused with flavor.

Culturally, smothered dishes hold a special place, representing comfort and home-cooked traditions. They often evoke memories of gatherings around the family table, celebrating both everyday meals and special occasions with loved ones, maintaining cultural heritage through food.

As the dish evolved, regional variations began to emerge, with each area adding its twist. In the Midwest, for example, creamy sauces laden with mushrooms became popular, leading to the inclusion of these ingredients in recipes, as seen in our Smothered Chicken dish.

Today, recipes like Smothered Chicken with Creamed Spinach continue to be a staple in many homes, reflective of the love and care that goes into preparing a meal meant to foster togetherness and community.

Ingredient Deep Dive

Chicken Thighs

Chicken thighs are often favored for their superior flavor and juiciness compared to chicken breasts. Culturally, they are a common choice in Southern cooking, symbolizing hearty meals. Nutritionally, they provide a good source of protein and essential B vitamins. When selecting thighs, look for ones with a slight pink hue and minimal fat; store them in the refrigerator for a few days or freeze for longer storage. For substitutions, boneless, skinless chicken breasts or even turkey thighs can be used without losing texture.

Spinach

This leafy green is known for its nutritional profile, being rich in vitamins A, C, and K, as well as iron. Its use in dishes can be traced back centuries, providing a source of nourishment across various cultures. When selecting spinach, look for fresh, vibrant green leaves without any signs of wilting or browning. Store it in the fridge wrapped in a damp paper towel, and for substitutions, kale or Swiss chard can work well in place of spinach.

Bacon

Bacon has a long-standing place in culinary traditions, contributing its distinctive flavor to numerous recipes. It’s a source of protein with a notable amount of fat, which enhances dishes such as our Smothered Chicken. When buying bacon, opt for thick-cut varieties for better texture while cooking. Store it in refrigeration; it can also be frozen for extended periods. Alternatives include turkey bacon or pancetta for a similar flavor profile but may differ in fat content.

Mushrooms

Mushrooms, particularly varieties like cremini or button, add earthiness to dishes while being low in calories. Culturally, they’re a versatile ingredient that has been used in many cuisines around the world for thousands of years. When selecting mushrooms, choose ones with firm caps and no damp spots. Store them in a paper bag in the fridge to allow them to breathe, and for substitutions, zucchini or eggplant can be used to achieve a similar texture.

Common Mistakes to Avoid

  • Not seasoning the chicken ahead of time, which can lead to bland flavor. Always season your chicken with salt and pepper before cooking.
  • Overcooking the bacon, making it too crispy and dry. Cook it until just crispy for the best flavor and texture.
  • Neglecting to sauté vegetables adequately before adding other ingredients can affect the final flavor. Properly sautéing helps release their natural sugars and enhances depth.
  • Skipping the resting time for chicken after cooking, leading to dryness. Let the chicken rest for a few minutes to keeper moisture locked in.
  • Using low-quality canned spinach can alter the taste significantly, so always opt for fresh or frozen spinach.
  • Failing to adjust liquid levels in the sauce based on thickness. If your sauce seems too thin, let it simmer longer to reduce.
  • Not tasting the sauce for seasoning before serving might yield a flat flavor. Always check for seasoning balance before plating.
  • Not using a lid when simmering can lead to inconsistencies in heat and texture. Always cover your pan to maintain even cooking.
  • Inadequate preparation of ingredients can lead to rushed cooking. Take the time to prep everything before starting to ensure a smoother cooking experience.
  • Using one type of oil instead of a blend can limit flavor—mixing oils enhances richness and taste.

Essential Techniques

Sautéing

Sautéing is crucial for releasing flavors in garlic, onions, and other vegetables. Master it by using medium-high heat and adding oil only when it is hot. Avoid overcrowding the pan, which can lead to steaming instead of browning. Look for a golden color and aromatic scents as cues for success.

Simmering

Simmering allows flavors to meld beautifully while preventing overcooking. To master this, maintain a low heat to keep bubbles gently rising. Avoid boiling vigorously, which can lead to undesirable texture changes. Look for a slight movement in the surface for perfect simmering.

Deglazing

Deglazing helps lift flavor-packed bits stuck to the pan, enhancing richer sauces. After sautéing ingredients, pour in liquids like broth or wine and scrape the bottom of the pan. The process is successful when you see the stir becomes smooth and flavorful.

Pro Tips for Perfect Smothered Chicken

1. Choose bone-in, skin-on chicken for enhanced flavor and moisture retention throughout cooking.

2. Cook bacon slowly over lower heat to ensure the best texture and flavor before adding it to the sauce.

3. Experiment with fresh herbs like thyme or parsley added at the end for an aromatic finish.

4. For a spicier version, incorporate red pepper flakes into your sauce for added warmth.

5. Let the sauce cool slightly before adding dairy elements to prevent curdling.

6. Serve with a side of buttery mashed potatoes or crusty bread to soak up that luscious sauce.

7. Prepare a larger batch—this dish freezes beautifully for quick weeknight dinners.

8. Garnish with freshly grated Parmesan or a sprinkle of chili powder for extra flair at serving.

Variations and Adaptations

Regional variations of this dish can include different protein choices like pork or turkey, maintaining the core flavors while giving a unique twist. Additionally, seasonal adaptations such as adding squash or pumpkin puree in fall can enhance the dish and introduce new flavors.

For dietary modifications, consider gluten-free flour for thickening the sauce or coconut cream for a dairy-free version. These substitutions ensure everyone can enjoy this savory dish without compromising taste.

Flavor variations could involve experimenting with different cheeses like fontina or gouda to create an even creamier texture. Meanwhile, for a crunchier texture, you might finish the dish with crispy fried onions on top.

Presentation alternatives can include serving in individual cast iron skillets for a rustic feel or over a bed of polenta for an added touch of comfort while maintaining the creamy essence of the main dish.

Serving and Presentation Guide

To create an appealing presentation, start by plating the chicken in the center with the creamed spinach forming a colorful border. Garnish with fresh herbs such as parsley to add vibrant color and freshness. Consider serving alongside roasted vegetables for added color and nutrition.

In addition to garnishing, using colorful dishes or bowls can make the meal visually appealing. Serving the dish in rustic cast iron pans adds a homey touch, creating an inviting atmosphere around the table.

Temperature is also essential—serve the dish warm to make the sauce inviting and rich, with a side of artisan bread or a grain-based salad to enhance the whole meal experience.

Finally, ensure portion control by serving balanced portions that round out the meal without overwhelming guests. This consideration contributes to the eatability and enjoyment of the dish.

Wine and Beverage Pairing

Pairs beautifully with a Chardonnay, with its buttery finish complementing the richness of the dish. A Pinot Noir can also enhance the mushroom and spinach flavors, providing a balanced palate interaction.

For non-alcoholic alternatives, consider pairing with a sparkling water infused with lemon or herbal tea for a refreshing counter to the creamy sauce. For a satisfying conclusion, a light dessert wine could also round off the meal nicely.

Storage and Shelf Life

Store any leftovers in an airtight container in the refrigerator, where they will last for up to three days. Ensure the dish has cooled before sealing to prevent condensation.

When reheating, use a medium heat, either on the stovetop or in the microwave, to avoid drying out the chicken. Keep the dish covered to retain moisture. For long-term storage, it can be frozen for up to two months—ensure it’s well-wrapped to prevent freezer burn.

Make Ahead Strategies

To save time, consider preparing the sauce and cooking the chicken the day before. Store separately in the fridge and combine before reheating for serving. This not only frees up your schedule but allows flavors to develop further overnight.

For assembly, keep the spinach and sauce in separate containers if you’re making the dish more than a day in advance, ensuring each component stays fresh. When ready to serve, simply reheat and bring the dish together before enjoying.

Scaling Instructions

For more significant gatherings, simply double or triple the ingredients while ensuring that cooking times may need slight adjustment based on the size of your cooking vessels. Prepare in batches if your equipment isn’t large enough to handle everything at once.

When halving the recipe, be sure to adjust your seasoning to taste as flavors may concentrate differently with smaller amounts. For the best outcome, keep an eye on cooking times for proteins to ensure they remain tender.

Nutritional Deep Dive

The macro breakdown of this meal boasts a strong protein source while being relatively moderate in fats, complemented by fiber from spinach. It serves as a hearty option for those out seeking a balanced meal without heavy carbs.

Micronutrient analysis shows an abundance of vitamins A, C, and K from spinach, alongside essential minerals and antioxidants from mushrooms and chicken. Paying attention to portion size can also assist individuals in managing their heart health with meals that are both satisfying and nutritious.

Focus on diet considerations such as low-carb or high-protein preferences when serving to guests, allowing for flexibility without compromising on taste. Weight management may incorporate this dish as part of balanced portions alongside fresh sides.

Dietary Adaptations

For gluten-free options, simply utilize cornstarch or another gluten-free thickener to achieve a similar creaminess in the sauce without compromising texture. Dairy-free versions can experiment with almond or coconut milk as substitutes for heavy cream while adding flavor through herbs.

Vegetarians can substitute chicken with a hearty plant-based protein like tempeh or portobello mushrooms, ensuring to maintain the savory tones with herbs and spices.

For low-carb diets like Keto, using cauliflower instead of the creamy sauce can lead to a satisfying end result while remaining within dietary preferences. Paleo diets can benefit from using grass-fed beef or bison as alternatives for an equally delectable experience.

Troubleshooting Guide

If you encounter texture issues such as a runny sauce, consider simmering longer to reduce excess liquid. Blend in a bit of cornstarch mixed with water to thicken if necessary.

Flavor balance failures can often be addressed through adding salt or acid, like a splash of lemon juice, to elevate the overall flavor profile.

Temperature problems while cooking can lead to uneven crispiness. Adjust your cooking heat to maintain a consistent simmer while ensuring the sauce is cooked thoroughly to avoid overly dense sauce texture.

For equipment challenges, like a pan that sticks, ensure to use enough oil or butter and preheat the surface adequately to prevent sticking during the cooking process.

Recipe Success Stories

Community feedback highlights how various twists on the original recipe have thrilled families—some adapting flavors based on what’s available in the pantry. Readers have found joy in sharing their adaptations, whether introducing new spices or making this dish vegetarian-friendly.

Adaptation stories showcase the creativity of home cooks who have successfully personalized this dish to their taste, experimenting with spice levels or adding seasonal vegetables to enhance the experience.

Photography tips share insight into capturing the vibrant essence of this dish, emphasizing the importance of natural lighting to showcase the creamy textures and colorful ingredients.

Frequently Asked Questions

Q1: Can I make this recipe ahead of time?
A1: Absolutely! The sauce can be made in advance and stored separately from the chicken. Reheat together before serving.

Q2: What can I serve with Smothered Chicken?
A2: This dish pairs well with rice, mashed potatoes, or a fresh salad to balance the richness of the sauce.

Q3: Can I freeze leftovers?
A3: Yes, you can freeze this dish for up to two months. Be sure to store it in an airtight container to prevent freezer burn.

Q4: Is there a vegetarian option for this recipe?
A4: You can substitute chicken with hearty vegetables like portobello mushrooms or tempeh for a vegetarian alternative.

Q5: How can I adjust the spice level?
A5: For more heat, add crushed red pepper flakes during cooking or serve with spicy sauce on the side.

Q6: Is it necessary to use cream?
A6: While cream adds richness, you can use chicken broth and a bit of flour or cornstarch for a lighter option.

Q7: Can I use other greens instead of spinach?
A7: Yes! Kale or Swiss chard can provide similar nutritional benefits with varying flavors.

Q8: What type of wine goes well with this dish?
A8: A Chardonnay or Pinot Noir complements the creamy sauce and rich flavors beautifully.

Q9: How long does this dish keep in the fridge?
A9: Smothered chicken can be stored in an airtight container for up to three days in the refrigerator.

Q10: What’s the best way to reheat leftovers?
A10: Reheat on the stovetop over low heat, covered, to retain moisture and prevent drying.

Additional Resources

For those looking to expand their culinary repertoire, check out related recipes such as Chicken Alfredo, Beef Stroganoff, or Classic Baked Ziti. Each of these dishes offers a comforting and satisfying meal similar to Smothered Chicken with Creamed Spinach.

Technique guides for sautéing, simmering, and ingredient selection can help refine your cooking skills, ensuring you achieve the best results. Additionally, as ingredients vary by season, explore resources focused on seasonal cooking for the freshest flavors.

Join the Conversation

We encourage you to share your experience trying Smothered Chicken with Creamed Spinach! Have tips or variations? Connect with us on social media and tag us in your cooking adventures—the culinary community thrives on shared knowledge and creativity!

The Recipe

Smothered Chicken with Creamed Spinach

Serves: 4

Prep Time: 15 mins

Cook Time: 30 mins

Total Time: 45 mins

Kitchen Equipment Needed

  • Large skillet
  • Wooden spoon
  • Meat thermometer
  • Serving platter

Ingredients

  • 4 chicken thighs
  • 4 slices of bacon, chopped
  • 2 cups fresh spinach, chopped
  • 1 cup button mushrooms, sliced
  • 1 cup heavy cream
  • 2 cloves garlic, minced
  • 1 tablespoon olive oil
  • Salt and pepper to taste
  • Optional: fresh herbs for garnish

Directions

  1. Heat olive oil in a large skillet over medium heat. Add chopped bacon and cook until crispy.
  2. Remove bacon and set aside, leaving grease in the pan. Add chicken thighs, seasoning with salt and pepper, and cook until golden brown on both sides.
  3. Remove chicken and set aside. In the same pan, add mushrooms and garlic, sautéing until softened.
  4. Stir in spinach and cook until wilted, then add heavy cream, mixing well.
  5. Return the chicken and bacon to the pan. Simmer on low heat for 10-15 minutes until chicken is cooked through.
  6. Serve warm, garnished with herbs if desired.

Recipe Notes

  • For a spicier dish, add red pepper flakes to the sauce.
  • You can use other leafy greens in place of spinach if desired.
  • Leftovers can be stored in an airtight container in the fridge for up to three days.

Delicious Jalapeño Popper Tomato Soup Recipe for Spicy Comfort

Jalapeño Popper Tomato Soup: A Spicy Twist on a Classic Comfort Food

⚖️
Difficulty
Easy

⏲️
Prep Time
10 mins

🕒
Cook Time
30 mins

⏱️
Total Time
40 mins

🍽️
Servings
4 servings

Indulge in the rich and creamy warmth of Jalapeño Popper Tomato Soup, a delightful twist on traditional tomato soup that promises to awaken your taste buds. Imagine dipping into a bowl filled with velvety tomato soup infused with the zesty heat of jalapeños, topped with a generous sprinkle of cheese and crunchy breadcrumbs. This inviting soup is perfect for chilly evenings, bringing comfort paired with a spicy kick that will leave you wanting more.

This recipe melds the classic flavors of jalapeño poppers with the comforting essence of tomato soup, creating a seamless blend of spiciness and creaminess. Each spoonful unfolds layers of flavor – from the tangy tomatoes to the aromatic spices, finishing with the crunch of bacon for an added textural surprise. Jalapeño Popper Tomato Soup is not just a meal; it’s an experience that tantalizes the palate and warms the heart.

Quick Recipe Highlights

  • Flavor Profile: A perfect balance of sweet tomatoes and spicy jalapeños with creamy cheese.
  • Texture: Silky soup balanced with crunchy toppings for a delightful mouthfeel.
  • Aroma: Inviting aromas of roasted peppers, fresh garlic, and warm spices.
  • Visual Appeal: A vibrant red-orange hue topped with golden cheese and crispy bits.
  • Skill Level Needed: Suitable for novice cooks and busy weeknight chefs alike.
  • Special Equipment: A blender for smooth soup consistency and a pot for cooking.

Recipe Overview

  • Difficulty Level: This recipe is categorized as easy, making it ideal for all skill levels.
  • Category: Perfect as a starter or light meal, great for lunches or cozy dinners.
  • Cuisine: Rooted in American comfort food with a hint of Mexican flavor influence.
  • Cost: Budget-friendly ingredients make this a cost-effective choice for any home cook.
  • Season: Enjoy this soup best in the cooler months, when spicy flavors are most comforting.
  • Occasion: Ideal for casual gatherings, family dinners, or as a warm meal on a cold day.

Why You’ll Love This Recipe

Taste and texture appeal: The Jalapeño Popper Tomato Soup offers a rich and tangy flavor profile, where the sweetness of ripe tomatoes meets the spicy bite of fresh jalapeños. Cream cheese or sour cream adds a delightful creaminess that enhances the overall mouthfeel, making it not just a soup but a flavorful experience. The combination of flavors dances on your palate, inviting you to take more sips with each comforting bowl.

Convenience and preparation benefits: With a quick prep time of just 10 minutes and a cook time of 30 minutes, this Jalapeño Popper Tomato Soup is the perfect solution for busy weeknights. The simplicity of the recipe means you can easily whip it up even after a long day. Plus, it’s made primarily with pantry staples and fresh vegetables, minimizing grocery trips and simplifying meal prep.

Nutritional advantages: Packed with vitamins from tomatoes and jalapeños, this soup doesn’t just satisfy your cravings; it also nourishes your body. Tomatoes are rich in antioxidants, while jalapeños have been shown to increase metabolism and provide a hefty dose of vitamin C. This flavorful bowl is not only delicious but also contributes to your overall well-being.

Social and entertaining value: Whether you’re hosting a dinner party or simply enjoying a cozy night in, serving Jalapeño Popper Tomato Soup is sure to impress your guests. Its unique twist on a classic dish opens up conversations and invites compliments, getting everyone to share in the experience and flavors. Consider serving it alongside crusty bread or crispy quesadillas for a full meal.

Cost-effectiveness and accessibility: This recipe helps you fall in love with cooking at home. With inexpensive and easily accessible ingredients, this Jalapeño Popper Tomato Soup stands out as a go-to meal for anyone looking to enjoy gourmet flavors without breaking the bank. Plus, leftovers reheat beautifully, making it a practical choice for meal prep for the week ahead.

Historical Background and Cultural Significance

Origin story: The concept of combining creamy tomato soup with spicy ingredients can be traced back to American comfort food traditions. Over the years, various adaptations have taken form, with many recipes taking cues from regional dishes across the country, notably in areas with strong Mexican influences.

Cultural importance: Tomato soup itself has remained a staple in American households as a comforting dish that evokes nostalgia and warmth. The addition of jalapeños introduces a modern twist that reflects a growing culinary trend of fusing traditional dishes with contemporary flavors. This fusion honors both American and Mexican culinary heritage, celebrating the union of diverse flavors.

Evolution of the recipe: As palates expand and cooking methods evolve, recipes like Jalapeño Popper Tomato Soup have surfaced. Chefs and home cooks alike have embraced the trend of “spicing up” comforting classics, showcasing the versatility of soup while retaining its essence.

Regional variations: Across different regions, you’ll find variations of tomato soup that experiment with spice levels and additional ingredients, such as chorizo or avocados. Each adaptation takes on a local flavor, allowing this recipe to resonate differently based on geography, making it a global favorite.

Ingredient Deep Dive

Tomatoes: Tomatoes serve as the foundation of this dish, providing a natural sweetness and acidity that balances the heat from jalapeños. Rich in vitamins C and K, they enhance the nutritional profile of the soup. When selecting tomatoes, choose ripe, firm specimens. Store them at room temperature and use within a few days for the best flavor.

Jalapeños: Jalapeños are known for their signature heat and vibrant flavor. They offer a unique kick that makes this soup stand out. Loaded with nutrients, they contain vitamins B6 and C, along with capsaicin, which may promote weight loss and reduce inflammation. For the best experience, select firm, shiny peppers. Store them in the refrigerator and try to use them within a week if not used fresh.

Cream Cheese: Cream cheese takes this recipe to the next level by adding creaminess and a rich texture. This versatile ingredient enhances the overall mouthfeel of the soup and provides a wonderful contrast to the heat of the jalapeños. When shopping, look for full-fat varieties for the best results. Store opened cream cheese in the refrigerator and utilize within a few weeks.

Bacon: Though optional, crispy bacon adds a delightful crunch that complements the smooth soup. Rich in flavor, it brings an umami depth that enhances the overall dish. When buying bacon, select high-quality options for a more robust flavor. Keep it refrigerated and account for the fat when cooking, ensuring a crispy finish.

Common Mistakes to Avoid

  • Overcooking jalapeños: Cooking jalapeños too long can result in a loss of their fresh flavor and make them overly soft. It’s best to add them towards the end of the cooking process to keep their integrity.
  • Ignoring seasoning: This soup relies heavily on seasoning, especially salt and pepper. Be sure to taste and adjust as necessary during cooking to enhance the flavors.
  • Using canned tomatoes without seasoning: Canned tomatoes often lack flavor. Kick things up a notch by adding herbs and spices to create a robust base.
  • Not blending long enough: For a smooth textural experience, ensure you blend the soup thoroughly. It should be completely uniform without chunks or lumps.
  • Leaving out the cream cheese: Skipping cream cheese may lead to a soup that lacks creaminess and depth. Ensure you incorporate it for a delightful mouthfeel.
  • Adding too much liquid: To achieve the right consistency, avoid over-adding broth or water. Start with less and adjust as needed to avoid a watery soup.
  • Skipping the garnish: Presentation is important. Adding bacon bits, cheese, and fresh herbs should not be overlooked as they bring added flavor and visual appeal.
  • Not letting it simmer: Allowing the soup to simmer lets all the flavors meld beautifully. Skimping on this step can result in a less flavorful outcome.
  • Chopping vegetables unevenly: For an even cook, ensure all vegetables are chopped to a consistent size, promoting even cooking and flavor distribution.
  • Using low-quality ingredients: Quality matters in achieving the best results. Opting for fresh, quality ingredients will significantly enhance the flavor of the soup.

Essential Techniques

Proper sautéing: Sautéing vegetables correctly is crucial for building flavor. Start with a hot pan, adding oil before introducing ingredients. Watch for softening while maintaining some crunch for added texture, signaling a successful sauté.

Blending for smoothness: When blending the soup, start on low speed to avoid splatters and gradually increase. This ensures a beautifully creamy texture without overworking the ingredients, which can lead to an undesirable consistency.

Managing spice levels: Control the heat in your Jalapeño Popper Tomato Soup by removing the seeds from jalapeños. Taste-testing along the way will help you adjust spice levels to your preference, creating a dish that suits your palate.

Perfectly timing the cook: Timing is critical in ensuring that both the tomatoes and jalapeños release their flavors without becoming mushy. Monitoring the cooking time can help you achieve the desired texture and taste suited for your perfect soup.

Pro Tips for Perfect Jalapeño Popper Tomato Soup

Choosing ripe tomatoes enhances flavor – look for those that are firm and fragrant.

For extra spice, add a pinch of cayenne or crushed red pepper for balance.

Blend half of the soup for creaminess while leaving the other half chunky for texture.

Finish with a squeeze of lime juice for brightness that cuts through the richness.

Consider garnishing with cilantro or green onions for freshness.

Use a quality stock for added depth; homemade if possible trumps store-bought.

Adjust cream cheese levels based on desired creaminess – more for a richer soup.

Serve with crusty bread or tortilla chips for an excellent contrast in texture.

Variations and Adaptations

Regional variations: Consider incorporating local ingredients that complement the soup. For example, add black beans for a Southwestern flair or avocado for a California twist.

Seasonal adaptations: Enjoy this soup year-round by substituting fresh tomatoes with canned varieties when they are out of season, ensuring good flavor any time of the year.

Dietary modifications: Make this soup vegan by using plant-based cream cheese alternatives and taco-seasoned vegetable broth, keeping the integrity of flavors intact.

Flavor variations: Experiment with different spices and herbs to personalize the taste. Basil, oregano, or even smoked paprika can redefine the profile of your soup.

Texture modifications: For a richer mouthfeel, explore adding a splash of cream or garnish with sour cream to elevate the soup’s taste and smoothness.

Presentation alternatives: Create a stunning presentation by serving in parmesan crisps or decorative bowls, adding visual excitement to your meal.

Serving and Presentation Guide

When plating your Jalapeño Popper Tomato Soup, consider using wide bowls to showcase the vibrant colors. For garnishing, sprinkle crispy bacon bits and shredded cheese atop for added visual appeal and texture contrast. Serve alongside a crispy baguette or grilled cheese sandwich for a nostalgic touch and a satisfying meal.

Temperature plays an important role; serve the soup hot to enjoy the rich flavors fully. Allow guests to add fresh herbs or a squeeze of lime at the table, personalizing each bowl to their taste. Portion control is also key—serve in smaller bowls to encourage seconds and foster a cozy dining atmosphere.

Wine and Beverage Pairing

For wine pairings, opt for a medium-bodied white wine like Sauvignon Blanc, which complements the soup’s spiciness and richness. If you’re a red wine lover, a light Pinot Noir can also harmonize with the flavors without overpowering them.

Cocktail enthusiasts might enjoy a margarita, especially one infused with jalapeño for a themed drink. For non-alcoholic options, consider serving the soup with sparkling water infused with lime or a refreshing herbal iced tea, making the meal feel festive and light.

Ensure chilled beverages are served temperature-appropriate, with wines at around 45-50°F and cocktails served over ice. This approach enhances the overall dining experience, providing balance against the warm soup.

Storage and Shelf Life

To store your Jalapeño Popper Tomato Soup, allow it to cool to room temperature before transferring it to an airtight container. It can last in the refrigerator for up to 4 days, making it a great option for meal prep.

For longer storage, consider freezing the soup in airtight containers or freezer bags, where it will stay good for up to 3 months. Thaw frozen soup in the refrigerator overnight before reheating, and ensure you stir well for even heating.

Check for signs of spoilage, such as an off smell or unusual texture, before consuming. Reheat gently over low to medium heat on the stovetop, avoiding boiling to preserve its flavor and creaminess. If the soup thickens after freezing, add a splash of broth during reheating for restoration.

Make Ahead Strategies

Prepping your Jalapeño Popper Tomato Soup ahead of time can save you valuable minutes during busy nights. Chop vegetables a day in advance and store them in the refrigerator in airtight bags to maintain freshness, streamlining the cooking process.

You can also prepare the soup base in advance, keeping it refrigerated for up to two days. When it’s time to serve, simply reheat and blend if desired.

For the best flavor impact, consider saving garnishes like bacon bits and cheese until just before serving. This ensures your additions remain crispy and visually appealing. If your recipe includes fresh herbs, add those last to maintain their vibrant color and flavor.

Scaling Instructions

Scaling your Jalapeño Popper Tomato Soup can accommodate larger gatherings or yield leftovers. Halving the recipe is as simple as dividing all ingredients and adjusting cooking times slightly as needed.

Doubling or tripling the recipe requires larger pots and careful consideration of heating times to ensure the soup cooks evenly without scorching. Watch for changes in texture and flavor, as larger batches may take longer to reach optimal seasoning balance.

Keep in mind that when doubling, it’s wise to assess how long your blending will take or if you will need to blend in batches. Additionally, when storing oversize portions, opt for larger containers to make reheating more convenient.

Nutritional Deep Dive

Each serving of Jalapeño Popper Tomato Soup is packed with macro and micronutrients essential for a balanced diet. Providing carbohydrates primarily from tomatoes, this recipe contributes to energy levels.

The soup offers dietary fiber, promoting digestive health, along with essential vitamins and minerals from various ingredients. Jalapeños deliver vitamin C and antioxidants, while cream cheese adds fats required for nutrient absorption.

This dish can fit well into weight management plans given its lower calorie count compared to traditional creamy soups. Always consider portion sizes to align with dietary goals and ensure that each bowl is enjoyed without guilt.

Dietary Adaptations

For those adhering to gluten-free diets, using gluten-free broth and ensuring all other ingredients are certified gluten-free is essential. Many stocks available commercially today are compliant, making this adaptation simple.

To cater to dairy-free preferences, plant-based cream alternatives can replace cream cheese in the recipe while ensuring that taste and texture remain appealing. Look for options like cashew or almond-based products for a creamy consistency.

For vegan diets, along with a plant-based cream substitution, consider using nutritional yeast for added cheesy flavor without dairy. This aligns nicely with the recipe, ensuring enjoyable compliance with dietary preferences.

Troubleshooting Guide

If your soup is too spicy: Understanding jalapeño heat levels can save a dish—don’t hesitate to dilute the soup with additional tomatoes and cream to tone down the spice.

If it’s too thick: This can easily be remedied by adding a splash of stock or water while stirring well to achieve the desired consistency.

If the flavors are bland: Always taste! Add more salt, pepper, or herbs as necessary to boost flavor profiles to your liking.

If it curdles: If cream cheese separates upon cooking, adjustments on low heat while stirring can help incorporate it back for a smooth finish.

If using canned tomatoes: Rinse canned tomatoes before adding to reduce excess sodium and improve flavor balance in the dish.

If blending yields chunks: Sometimes, chunky textures are a result of not blending long enough or at high enough speeds, so be generous in blending time for a smooth result.

Recipe Success Stories

Readers often rave about how their families love the Jalapeño Popper Tomato Soup, frequently complimenting the unique flavor combination that brings a new twist to traditional meals. Many have experimented with varying spice levels, resulting in different textures and flavors that succeed in unexpected ways.

Adaptation stories highlight successful ingredient substitutions, sharing how using a mix of peppers or adding corn contributed to an entirely different but enjoyable experience.

Photography tips from the community showcase how garnishing with brightly colored cilantro or fresh diced avocados enhances the soup’s visual appeal, making for Instagram-worthy presentation.

Positive community feedback emphasizes how creating this dish has sparked conversations around dinner tables, breathing life into traditional meals and igniting excitement for home-cooked food.

Frequently Asked Questions

Can I use frozen tomatoes for this recipe?

Yes, frozen tomatoes can be used effectively, especially if they are peeled and cored before freezing. They might result in a slightly different texture but will still impart great flavor.

Is this soup recipe spicy?

The soup has a kick from the jalapeños, but it’s adjustable! If you’re worried about the heat, remove the seeds and inner membranes or use milder peppers.

Can I make this soup ahead of time?

Absolutely! This soup can be prepared in advance and stored in the refrigerator for up to 4 days, or frozen for longer storage. Just reheat before serving.

How do I store leftovers?

Store leftovers in an airtight container in the refrigerator for up to 4 days. For longer storage, freeze in safe containers up to 3 months.

What can I serve with the soup?

This soup pairs wonderfully with crusty bread, grilled cheese sandwiches, or tortilla chips for a satisfying meal.

Can I make this soup vegan?

Yes! Use coconut cream or a dairy-free cream cheese alternative, avoiding any animal products in the recipe.

What if my soup is too thick?

If your soup turns out thicker than desired, simply add more broth or water until you reach the preferred consistency.

Can I use other types of peppers?

Absolutely! Feel free to experiment with different peppers like poblano for a milder taste, or bell peppers for sweetness.

Does this soup freeze well?

Yes! This soup freezes well. Be sure to cool it completely before transferring to a freezer-safe container.

How can I make this soup spicier?

For an extra kick, try adding crushed red pepper flakes or cayenne pepper, or consider using habanero peppers instead of jalapeños.

Is this soup gluten-free?

The soup can be gluten-free if you use gluten-free broth and check other ingredients for gluten content. It’s always best to verify labels.

Additional Resources

For more delightful recipes, explore our collection of comforting soups, including classic butternut squash soup and creamy potato leek soup. If you’re interested in improving your cooking techniques, check out our guides on sautéing and blending for smoother results.

Additionally, learn about the importance of fresh ingredients by visiting our ingredient round-up section, featuring seasonal produce and how to select the best varieties. Should you need equipment recommendations, we highlight the best kitchen tools for home cooks, including essential blenders and stovetop options for soups.

Join the Conversation

We invite readers to share their Jalapeño Popper Tomato Soup experiences on social media, showcasing your creations with friends and family. Don’t forget to tag us in your posts—we love to see how you’ve personalized the recipe!

Consider submitting your twists and variations in the comments below; your insights can help others find inspiration. Engage in our community discussions, and let us know your favorite additions and serving tips to enhance everyone’s experience.

The Recipe

Jalapeño Popper Tomato Soup

Serves: 4 servings

Prep Time: 10 mins

Cook Time: 30 mins

Total Time: 40 mins

Kitchen Equipment Needed

  • Blender or immersion blender
  • Large pot
  • Wooden spoon
  • Measuring cups and spoons

Ingredients

  • 2 tablespoons olive oil
  • 1 onion, chopped
  • 3 cloves garlic, minced
  • 2-3 jalapeños, chopped (seeds removed for less heat)
  • 1 can (28 ounces) crushed tomatoes
  • 2 cups vegetable or chicken broth
  • 8 ounces cream cheese, softened
  • Salt and pepper to taste
  • 1/4 cup cooked bacon, crumbled (optional)
  • 1 cup shredded cheese (cheddar or pepper jack)

Directions

  1. Heat olive oil in a large pot over medium heat. Add chopped onions and sauté until translucent, about 5 minutes.
  2. Add minced garlic and chopped jalapeños; sauté for an additional 3 minutes until fragrant.
  3. Stir in the crushed tomatoes and broth, bringing the mixture to a boil.
  4. Reduce the heat and let it simmer for about 20 minutes, allowing the flavors to develop.
  5. Add softened cream cheese to the soup and stir until fully melted and combined.
  6. Season with salt and pepper to taste. Blend the soup until smooth, either with an immersion blender or in batches using a countertop blender.
  7. Serve hot, garnished with crumbled bacon, shredded cheese, and additional jalapeños if desired.

Recipe Notes

  • For a creamy vegan version, substitute the cream cheese with a plant-based alternative and use vegetable broth.
  • Adjust spice levels by using fewer jalapeños or opting for milder peppers.
  • The soup can be garnished with fresh cilantro or green onions to complement the flavors.