Indulge in Steak with Creamy Peppercorn Sauce and Fries

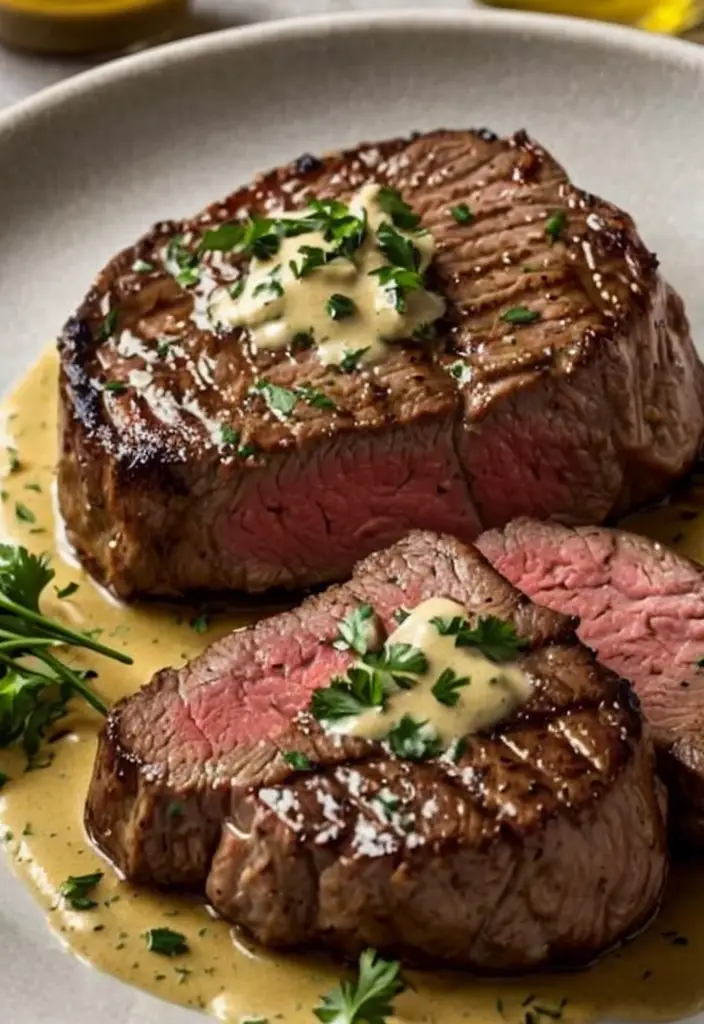
Steak with Creamy Peppercorn Sauce and Fries: A Luxurious Dinner Delight

⚖️
Difficulty
Medium

⏲️
Prep Time
15 mins

🕒
Cook Time
25 mins

⏱️
Total Time
40 mins

🍽️
Servings
4

Steak with Creamy Peppercorn Sauce is not just a meal; it’s an experience that tantalizes your palate. The rich, buttery sauce with its peppery nuances transforms a simply grilled steak into a gourmet dish. As you take your first bite, the savory warmth of the steak coupled with the creamy, aromatic sauce creates a luxurious symphony of flavors. Paired with perfectly cooked fries, this dish offers a delightful contrast between protein and carbs, ensuring every diner walks away satisfied.

Imagine the mouthwatering aroma wafting through your kitchen as the steak sizzles, coaxing your senses into anticipation. The visual allure of a well-seared steak drizzled with a velvety peppercorn sauce invites anyone to the table. Ultimately, this recipe is perfect for those special occasions or an indulgent weeknight treat, making it a timeless classic in any culinary repertoire.

Quick Recipe Highlights

  • Flavor Profile: A delightful blend of savory, creamy, and slightly spicy from the peppercorns.
  • Texture: The steak is juicy and tender, while the sauce is smooth and luscious, complemented by crispy fries.
  • Aroma: Inviting notes of garlic, butter, and fresh pepper excite the senses.
  • Visual Appeal: Beautifully seared steak topped with a rich sauce served alongside golden, crispy fries.
  • Skill Level Needed: A basic understanding of steak cooking techniques and sauce preparation is required.
  • Special Equipment: A heavy skillet or cast-iron pan for optimal searing.

Recipe Overview

  • Difficulty Level: This meal falls into the medium category due to the need for precise cooking times and sauce preparation skills.
  • Category: Perfect for dinner or special occasions, this dish embodies the essence of sumptuous home-cooked meals.
  • Cuisine: Drawing inspiration from classic French cuisine, this dish showcases a sophisticated approach to steak and sauces.
  • Cost: Expect a reasonable price point based on steak cuts and ingredients, making it accessible for a home-cooked gourmet dinner.
  • Season: Ideal for any season, this hearty dish warms up cool evenings, while it encourages social gatherings.
  • Occasion: Wonderful for date nights, holiday dinners, and celebratory occasions where impressive dishes are called for.

Why You’ll Love This Recipe

This Steak with Creamy Peppercorn Sauce recipe will captivate your taste buds with its harmonious blend of flavors and textures. The peppercorn sauce complements the rich taste of the steak, creating a bold yet balanced dish that feels indulgent and satisfying. With the added texture of the crispy fries, every bite is a delightful experience that keeps you coming back for more.

In terms of convenience, this recipe is straightforward and quicker than you might think. The steps are clearly laid out, making it accessible for both novice cooks and seasoned chefs alike. The beauty of this dish is its ability to elevate a simple dinner at home into a restaurant-quality experience, impressing your guests without overwhelming you in the kitchen.

Nutritionally, steak provides a robust source of protein, which is essential for muscle repair and overall health. When prepared with fresh ingredients and paired with wholesome sides, this dish can fit nicely into a balanced diet. The creamy peppercorn sauce, made with high-quality dairy, offers a delightful touch without straying too far from a nutritious profile.

Socially, sharing a beautifully plated steak with creamy peppercorn sauce and fries can enhance any dining experience. It fosters conversation and connection as everyone gathers around the table, enjoying good food and great company. This meal is perfect for celebrating milestones or simply enjoying a relaxing evening with family and friends.

Lastly, the cost-effectiveness of this recipe assures that indulging in a fabulous meal doesn’t have to break the bank. The ingredients are commonly found, and when selected carefully, can yield a great return on your investment in flavor and satisfaction, making it a go-to for home cooks seeking to impress.

Historical Background and Cultural Significance

The origins of steak with creamy peppercorn sauce can be traced back to classic French cooking, where sauces often elevate the main ingredient to new heights. Traditionally, steak dishes have been a staple in French cuisine, reflecting the country’s rich culinary traditions and techniques that emphasize the harmony between flavors and textures.

In many cultures, steak represents luxury and celebration. For numerous families, indulging in a well-cooked steak is a way to commemorate special occasions, reinforcing its cultural importance as a dish associated with gatherings and significant life events. The creaminess of the sauce adds an elegant touch, making it suitable for fine dining as well as cozy family dinners.

Over the years, this recipe has evolved, adapting to the preferences and ingredients available in various regions. Modern interpretations may include variations of the sauce or alternative cooking methods, which allow the classic dish to remain relevant while catering to contemporary tastes and dietary needs.

Regional variations also exist, with different countries adding their twist to the classic recipe. For instance, some may incorporate local herbs or spices, infusing the dish with unique flavors that represent their culinary heritage and make each version special in its own right.

Ingredient Deep Dive

Steak
Steak is a quintessential dish in many cultures and its history runs deep, often symbolizing celebration and abundance. Historically, high-quality cuts were reserved for special occasions, making them a mark of status. Nutritionally, steak is packed with protein, essential for muscle repair, and provides significant amounts of iron, which plays a crucial role in energy production.

When selecting steak, opt for cuts that exhibit marbling for enhanced flavor and tenderness. Aged steak can also offer a deeper, more complex taste profile. Store steak in the fridge for up to 3-5 days; it should remain vacuum-sealed or tightly wrapped in plastic. For substitutions, consider turkey or chicken for a lighter protein option, or try plant-based alternatives like tofu for a vegetarian meal.

Creamy Peppercorn Sauce
The tradition of utilizing peppercorns in sauces can be traced back to several European cuisines, enhancing various meats with its sharpness. This sauce is cherished for its ability to elevate dishes with depth and warmth. The base of the sauce, often made with heavy cream, brings richness and complements the spice of the peppercorns, contributing to a decadent flavor profile.

When preparing this sauce, fresh peppercorns are preferred for their robust flavor. Remember to store the sauce in an airtight container in the refrigerator, where it can last for about a week. If you need an alternative, consider using a white sauce or béchamel with added spices like mustard or smoked paprika for variation.

Common Mistakes to Avoid

  • Choosing the wrong cut of steak: Opt for a cut with enough marbling for tenderness; lean cuts can be tough when overcooked.
  • Overcooking the steak: Using a meat thermometer ensures perfect doneness and avoids turning meat into dry, chewy steak.
  • Rushing the sauce: Allow the sauce to thicken properly; this requires patience for the best flavor and consistency.
  • Not seasoning the steak in advance: A good marinade or seasoning mix enhances flavor; don’t skip this step!
  • Using too high heat initially: Start on high to sear and then lower the heat to finish cooking for a perfect crust and juicy interior.
  • Neglecting to rest the meat: Resting allows juices to redistribute, which leads to a juicier final product.
  • Not tasting as you go: Adjust the seasoning gradually; flavors evolve throughout cooking.
  • Forgetting about side dishes: Both steak and fries should be served hot—time your sides to finish simultaneously for optimal temperature.

Essential Techniques

For optimal results, mastering the technique of searing the steak is crucial. Searing enhances caramelization, providing a rich crust that enhances the overall flavor. Begin by heating a heavy skillet until hot, adding oil just before the steak to avoid burning. Look for deep browning and flip only once for best results.

Creating a creamy sauce requires an understanding of emulsification. By gradually whisking in heavy cream and ensuring the mixture simmers gently, you’ll achieve a rich, smooth texture without breaking the sauce. Avoid boiling it too vigorously as this can lead to separation or a curdled appearance.

Pro Tips for Perfect Steak with Creamy Peppercorn Sauce

Choosing the right cut of steak is essential; opt for ribeye or filet mignon for tenderness and flavor. Bring your steak to room temperature before cooking for more even cooking. Use a cast-iron skillet for improved heat retention and searing quality.

Don’t rush the resting phase after cooking; allow the steak to sit for at least 5-10 minutes to enhance juiciness. For the sauce, fresh peppercorns create a more vibrant flavor—don’t be afraid to adjust the quantity to match your spice preference.

Always taste and adjust the seasoning for your sauce before serving; a little extra salt or acidity can elevate the dish. Finally, ensure to serve the dish hot and freshly plated for an impressive presentation.

Variations and Adaptations

Regional variations of steak and peppercorn sauce can add unique twists to the classic recipe. For example, using local herbs like chimichurri can infuse the dish with fresh, vibrant flavors that suit various palates. Seasonal adaptations may include incorporating fresh vegetables as sides or seasonal sauces that complement the main ingredients well.

Dietary modifications can also be embraced, such as using an alternative cream base like cashew cream or coconut cream for a dairy-free option. For flavor variations, consider incorporating spices like smoked paprika or garlic powder for added depth. With texture modifications, try serving with sweet potato fries for a healthier twist or grilling the steak to impart a smoky flavor.

When it comes to presentation, garnishing with fresh herbs like parsley or thyme not only enhances the visual appeal but also adds an aromatic touch. You can also serve the dish on a wooden board for a rustic look or arrange the fries in a cone for a fun, appealing design.

Serving and Presentation Guide

Plating your Steak with Creamy Peppercorn Sauce beautifully enhances the dining experience. Start by placing the steak at the center of the plate, crowning it with a generous drizzle of creamy sauce. For garnishing, sprinkle chopped fresh herbs such as parsley or chives for a burst of color and flavor.

Consider using a large, shallow bowl to create depth; add the fries artfully on the side or beneath the steak to maintain the visual height. Traditional accompaniments like a light salad of arugula and cherry tomatoes can provide freshness, creating a balanced plate with a variety of colors.

Serve the dish at the right temperature—warm steak is key to retaining its juiciness. Portion control is important; aim to serve around a 6-8 ounce steak portion per person, with a similar serving of fries to maintain a well-rounded meal.

Wine and Beverage Pairing

When it comes to pairing wine with steak in a creamy peppercorn sauce, a bold red wine is the way to go. Consider a full-bodied Cabernet Sauvignon which complements the richness of the steak and sauce, enhancing its flavors.

If you’re looking for non-alcoholic alternatives, a sparkling grape juice or a well-crafted mocktail can serve as refreshing companions. For those interested in coffee pairings, a rich, dark roast brewed as an espresso can beautifully contrast the flavors of the dish without overpowering them.

Temperature is crucial for all beverages; serve red wine slightly cooler than room temperature, while sparkling drinks should be chilled for a refreshing taste. Consider offering water with lemon as an option to cleanse the palate if guests desire.

Storage and Shelf Life

Storing leftovers properly is key to maintaining the quality of your Steak with Creamy Peppercorn Sauce. Once cooled, place the steak and sauce in airtight containers, ensuring minimal air exposure to prolong freshness. Refrigerated, the dish should last about 3-4 days without significant loss of flavor.

Temperature requirements are essential; ensure your fridge is set below 40°F (4°C) to keep food safe. For container recommendations, opt for glass containers that seal well to avoid leaks and facilitate reheating. Before reheating, inspect the food for any unpleasant odors or changes in texture, as this can indicate spoilage.

Reheating should be done gently; consider using the oven or microwave on a low setting to prevent the steak from becoming tough. If you plan to freeze the dish, do so before adding the creamy sauce, as this may separate when thawed and reheated. Properly stored, the steak can last up to 3 months in the freezer, ensuring that delicious flavors remain intact.

Make Ahead Strategies

If you’re planning to serve Steak with Creamy Peppercorn Sauce for an upcoming event, consider prepping ahead to ease your cooking burden on the day. Marinating the steak a few hours prior or overnight enhances the flavor and tenderness of the meat.

You can also prepare the creamy peppercorn sauce in advance; simply warm it up before serving to maintain its consistency. Store the sauce in the fridge, where it can last up to a week. For garnishes such as chopped herbs or bacon bits, prepare them ahead of time to streamline the serving process.

Assess the quality impact of preparing the dish a day ahead—sometimes, flavors develop more fully when allowed to meld. However, be cautious; avoid cooking the steak too far in advance as it could compromise its texture.

Lastly, consider reheating guidelines: gently warm the steak to restore its temperature without overcooking, and add fresh elements, like a sprinkle of chopped herbs or freshly cracked pepper, just before serving for that fresh touch.

Scaling Instructions

When scaling the Steak with Creamy Peppercorn Sauce recipe for a larger gathering, be mindful of the ingredients’ proportions. Halving the recipe is straightforward; simply divide the quantity of each ingredient accordingly while keeping the cooking times similar since they remain the same for smaller portions.

Doubling or tripling requires attention to the size of your cooking equipment; ensure you have a large enough skillet to sear multiple steaks simultaneously without overcrowding, which can lead to uneven cooking. Adjust your timing slightly for larger batches; monitoring the internal temperature of the steaks remains critical.

Storing considerations should also be taken into account; you may need multiple containers if storing leftovers. Keeping flavor profiles in mind, the creamy sauce may need a little extra whisking after scaling to achieve consistent thickness and flavor.

Always taste as you go when scaling recipes; slight differences can arise based on ingredient variances or cooking techniques, and adjusting spices or flavors on the fly can help maintain flavor integrity.

Nutritional Deep Dive

Analyzing the nutrition in Steak with Creamy Peppercorn Sauce reveals essential components that contribute to a wholesome diet. The main ingredient, steak, is an excellent source of protein, containing essential amino acids that support muscle growth and restoration. A typical portion may contain around 25-30 grams of protein, catering to the dietary needs of active individuals.

Macro breakdown shows the presence of healthy fats, especially when using grass-fed beef, providing beneficial omega-3 fatty acids. The creamy peppercorn sauce, while rich, adds some carbohydrates through cream, offering a quick energy boost. However, mindful consumption is encouraged to balance out total calorie intake.

Micronutritional advantages shouldn’t be overlooked; steak and the accompanying sauce will typically offer notable amounts of vitamins and minerals, including iron, zinc, and B vitamins which play significant roles in oxygen transport and energy production. Be sure to account for overall dietary balances, mindful of portion sizes when enjoying this indulgent preparation.

Dietary Adaptations

Various dietary adaptations exist to ensure the Steak with Creamy Peppercorn Sauce recipe caters to everyone’s needs. For a gluten-free version, simply ensure all sauces and seasoning blends are free of gluten-laden ingredients. Most steaks naturally fit into this category without modification.

Dairy-free adaptations can be achieved by substituting heavy cream with coconut cream or a non-dairy heavy cream alternative. These options maintain the richness while ensuring a delicious, creamy texture without lactose. For vegan selections, consider using grilled portobello mushrooms as a substitute for steak, combined with a cashew-based peppercorn sauce.

Low-carb enthusiasts might swap fries for a cauliflower mash, providing a satisfying alternative without the extra carbs. Similarly, keto followers can enjoy this delightful meal without worrying about exceeding their carb limits.

When it comes to low-FODMAP diets, modifying the creamy sauce by omitting garlic or using garlic-infused oil provides flavor without disrupting gut health, ensuring all diners can relish this sumptuous dish.

Troubleshooting Guide

If you encounter texture issues with your steak, perhaps it turned out tough or chewy. Ensure the meat is cooked to the appropriate temperature, and always allow it to rest post-cooking. If overcooked, consider slicing it thinly against the grain to improve mouthfeel.

In cases of flavor balance problems, if the sauce is too salty or bland, gradually adjust it by adding more cream or a pinch of sugar to balance the flavors. If using fresh pepper, be cautious with quantity; it’s easier to add than to fix an overly peppery sauce.

Temperature problems often arise if the steak cools too fast; be sure to serve it immediately after cooking or use a warming tray. For equipment challenges, if a skillet isn’t available, a grill works well for perfecting the steak; just keep an eye on the cooking time.

Ingredient substitutions might not always yield the same results; if unable to use heavy cream, a thick coconut milk can surpass expectations while preserving a creamy texture.

Timing concerns arise often when preparing multiple dishes; ensure to stagger cooking times to allow everything to finish and be served hot. This probably requires planning or help in the kitchen to maintain organization.

Recipe Success Stories

Community feedback often highlights the ease and elegance associated with this Steak with Creamy Peppercorn Sauce recipe. Many readers have shared their adaptation experiences, praising the guidance and flavor balance, noting it was the star dish of their celebrations.

Variations, such as mushroom steak or using a different sauce base, have led to successful outcomes, encouraging others to experiment with their versions while enjoying the delicious core elements of this dish. Readers have found joy in utilizing fresh herbs and local ingredients to enhance their experience while following the recipe.

Photographic successes have flooded social media, showcasing beautifully plated dishes that encourage viewer interaction and engagement. The appeal of well-cooked steak with a velvety peppercorn sauce has inspired many to join the meal-prepping movement, with the recipe serving as a frequent go-to for gatherings.

Overall, the story of this recipe highlights how a simple approach to steak can lead to unforgettable experiences, bringing friends and family together to enjoy a rich, delightful meal that truly leaves a lasting impression.

Frequently Asked Questions

1. Can I use frozen steak for this recipe?
Yes, but for best results, thaw the steak in the refrigerator overnight before cooking. This helps maintain texture and flavor while ensuring even cooking.

2. What type of steak is best for creamy peppercorn sauce?
Ribeye or filet mignon are excellent choices due to their tenderness and flavor. Sirloin can also work well if you prefer a leaner cut.

3. Can I prepare the creamy sauce ahead of time?
Absolutely! You can prepare the sauce in advance and store it in the refrigerator, rewarming it when ready to serve. This makes meal prep easier.

4. What can I substitute for heavy cream?
For a dairy-free version, consider using coconut cream or cashew cream. In a pinch, evaporated milk may also provide a decent consistency.

5. How do I know when the steak is done?
Using a meat thermometer is the best way to ensure perfect doneness—145°F (63°C) for medium-rare, 160°F (71°C) for medium, and 170°F (77°C) for well done.

6. What sides pair well with this dish?
Classic fries, roasted vegetables, or a fresh salad are great companions. Additionally, garlic bread or a creamy mashed potato can enhance the dining experience.

7. Is this recipe suitable for meal prep?
Yes! You can prep all components in advance. Store them separately and assemble before serving to maintain texture and flavor.

8. Can I make this recipe gluten-free?
Yes, both the steak and the creamy sauce can be made gluten-free by ensuring all ingredients are certified gluten-free, particularly the broth or seasonings used.

9. How do I store leftovers?
Store leftovers in airtight containers in the fridge for up to 4 days. Make sure to reheat the steak gently to avoid toughness.

10. Can I scale this recipe for a larger group?
Yes, simply increase ingredient amounts according to the number of servings desired, and adjust cooking times and equipment as needed to accommodate larger portions.

Additional Resources

To further explore the culinary world of steak and sauces, check out related recipes that complement the richness of Steak with Creamy Peppercorn Sauce. Technique guides on proper cooking methods for various cuts of meat provide valuable insights for future cooking endeavors.

Digging deeper into ingredient information enhances your knowledge about quality selection for meats and dairy, ensuring you’ll select the best for your dishes. Equipment recommendations can aid in choosing the right tools to bring out the best flavors and textures in your meals.

Seasonal variations of steak recipes can inspire new ways to enjoy this classic dish all year round, utilizing fresh produce and local flavors that change with the seasons.

Join the Conversation

Engage with our culinary community by sharing your own experiences cooking this Steak with Creamy Peppercorn Sauce. We’d love to see your variations and adaptations, so don’t hesitate to post photos on social media.

Share your feedback and recipe reviews to help others discover the joy of this dish. Your insights could inspire innovative twists that further merge traditional and modern cooking styles.

If you have any additional tips or tricks from your own kitchen, join the conversation below! Your contribution can enhance our growing community, making this recipe a beloved staple for enthusiasts everywhere.

The Recipe

Steak with Creamy Peppercorn Sauce

Serves: 4

Prep Time: 15 mins

Cook Time: 25 mins

Total Time: 40 mins

Kitchen Equipment Needed

  • Heavy skillet or cast-iron pan
  • Meat thermometer
  • Whisk
  • Airtight containers for storage

Ingredients

  • 4 (6-8 oz) ribeye steaks
  • 2 tablespoons olive oil
  • 1 cup heavy cream
  • 2 tablespoons whole peppercorns
  • 2 cloves garlic, minced
  • Salt to taste
  • Fresh parsley for garnish
  • Fries, for serving

Directions

  1. Heat the olive oil in a heavy skillet over medium-high heat.
  2. Season the steaks with salt and prepare to add them to the hot skillet.
  3. Sear the steaks for 4-5 minutes on each side for medium-rare.
  4. Remove the steaks from skillet and let them rest on a plate.
  5. In the same skillet, add the garlic and cook until fragrant, about 30 seconds.
  6. Pour in the heavy cream and allow it to simmer gently.
  7. Crush the peppercorns and add them to the sauce; stir to combine.
  8. Simmer the sauce for about 5 minutes until thickened slightly.
  9. Serve the steaks topped with creamy peppercorn sauce and accompany with fries and garnished with parsley.

Recipe Notes

  • Feel free to experiment with different cuts of steak based on your preference.
  • For more depth, consider adding a splash of brandy to the sauce before the cream.
  • If you prefer a milder sauce, reduce the quantity of peppercorns used.

Savory Baked Barbecue Chicken Thighs with Sweet Caramelized Onions

Baked Barbecue Chicken Thighs with Caramelized Onions: The Ultimate Comfort Meal

⚖️
Difficulty
Easy

⏲️
Prep Time
15 mins

🕒
Cook Time
45 mins

⏱️
Total Time
60 mins

🍽️
Servings
4

Baked Barbecue Chicken Thighs with Caramelized Onions is more than just a meal; it’s a celebration of flavors and comfort food at its finest. The juicy, tender chicken thighs baked to perfection bathed in rich, smoky barbecue sauce complement the sweet, buttery caramelized onions beautifully. Imagine gathering around the dinner table with your loved ones, the aroma of this delicious dish wafting through the air, creating an inviting atmosphere that entices everyone to dig in. This recipe promises not only a feast for the palate but also an experience that warms the heart.

The combination of succulent chicken and sweet onions creates a symphony of tastes that dances on your tongue. With each bite, expect a burst of savory barbecue paired with the melt-in-your-mouth texture of caramelized onions. This dish is perfect for casual family dinners or when entertaining friends at a barbecue. Its eye-catching presentation makes it a showstopper, while the ease of preparation leaves you plenty of time to enjoy the company of your guests.

Quick Recipe Highlights

  • Flavor Profile: Smoky barbecue meets the sweetness of caramelized onions for a perfect harmony of flavors.
  • Texture: Juicy chicken with a crispy exterior, contrasted by the soft, caramelized onions.
  • Aroma: Enticing aromas of barbecue and sweet onions blend beautifully as they cook.
  • Visual Appeal: A plate brimming with vibrant chicken thighs and golden onions, creating an inviting centerpiece.
  • Skill Level Needed: Perfect for novice cooks but delicious enough for seasoned chefs.
  • Special Equipment: Just a baking dish and a good knife for slicing onions.

Recipe Overview

  • Difficulty Level: This recipe is easy to follow, even for beginners in the kitchen. It involves simple cooking techniques that yield delicious results.
  • Category: Ideal for dinner, this recipe fits beautifully into casual family meals or friend gatherings.
  • Cuisine: Inspired by classic Southern barbecue flavors, combining elements from American culinary traditions.
  • Cost: Budget-friendly, as chicken thighs and onions are both affordable, making this dish accessible for all.
  • Season: Perfect for year-round enjoyment, but particularly satisfying in the warmer months when barbecues are plentiful.
  • Occasion: Great for daily meals or special gatherings like potlucks, family reunions, or summer barbecues.

Why You’ll Love This Recipe

The rich taste and tender texture of Baked Barbecue Chicken Thighs with Caramelized Onions will make it a frequent request at your dinner table. The chicken thighs soak up the barbecue sauce, infusing each bite with a delightful tanginess that contrasts beautifully with the sweet onions. This balance of flavors creates an unforgettable taste that leaves you craving more.

Convenience is key in today’s fast-paced world, and this recipe shines when it comes to ease of preparation. With only a handful of ingredients, you can have a hearty meal ready without spending hours in the kitchen. After a brief prep, your chicken thighs do all the work in the oven, letting you relax or attend to other tasks.

Nutritionally, chicken thighs are a great source of protein and essential nutrients. Paired with onions, which provide antioxidants and fiber, this dish is not only filling but also nourishing. Serve this dish guilt-free, knowing you’re indulging in a wholesome meal that supports your health.

This recipe is also perfect for social gatherings. Its inviting aromas and stunning presentation will spark conversation and fill your home with warmth. Share a plate at dinner parties or around the grill during summer outings, creating memorable moments with friends and family alike.

With affordable ingredients and accessible flavors, this dish is perfect for anyone on a budget. Chicken thighs offer excellent value while delivering on taste. Your guests will be none the wiser as they savor the deliciousness of this dish.

Historical Background and Cultural Significance

The origins of barbecue can be traced back to indigenous cooking methods, where meats were slow-cooked over open flames. The practice evolved over centuries, integrating various influences from settlers and immigrants, ultimately shaping the rich barbecue traditions we celebrate today. This dish pays tribute to those foundational techniques, emphasizing the fusion of flavors.

Culturally, barbecue carries deep significance, often serving as a focal point during gatherings and celebrations. Its communal nature encourages togetherness, making it a beloved cooking style worldwide. The act of sharing food, filled with rich traditions, strengthens bonds among friends and family.

Over time, barbecue recipes have evolved across different regions, leading to unique adaptations. From tangy sauces in the Carolinas to the sweet styles of Kansas City, each variation reflects local palates and available ingredients. This dish melds sweet and smoky flavors, capturing a bit of that rich heritage.

Regional variations are plentiful, as each area adds its twist. From the simple barbecue sauce to innovative flavor infusions, there’s a barbecue style to suit every taste bud. Each recipe evolution demonstrates the adaptability of barbecue across different cultures and tastes.

Ingredient Deep Dive

Chicken Thighs: Chicken thighs are flavorful and juicy, being a staple in many cuisines around the world. They are higher in fat compared to chicken breasts, making them richer and more tender, perfect for roasting or baking. When selecting, look for thighs with uniform color and no bruising for the best quality. Store them in the refrigerator for 1-2 days, or freeze for up to six months.

Barbecue Sauce: Barbecue sauce can vary by region, typically featuring sweet and tangy elements. Its roots stretch back to the Caribbean and American South, where various cultures contributed to its diverse flavors. This sauce not only adds flavor but also moisture to the chicken. Opt for a sauce that aligns with your taste preferences, whether sweet or smoky. Homemade versions allow for customization, while store-bought options provide convenience.

Onions: Onions are a vital ingredient in kitchens worldwide, celebrated for their versatility and flavor-enhancing qualities. They are rich in vitamins and minerals, offering health benefits like improved heart health. When selecting, choose firm onions without soft spots. Store them in a cool, dark place for optimal freshness, and avoid refrigeration to prevent sprouting. You can substitute with shallots or leeks for a different flavor profile.

Common Mistakes to Avoid

  • Overcooking the Chicken: Monitor the internal temperature to avoid drying out the chicken; aim for 165°F for moist, juicy thighs.
  • Using Low-Quality Sauce: A cheap barbecue sauce can lead to bland flavor; opt for a high-quality sauce for the best taste.
  • Neglecting to Caramelize Onions Properly: Allow onions to cook slowly to develop their sweetness; rushing this step can result in unpleasant raw flavors.
  • Skipping Marination: Marinating the chicken enhances flavor; do not skip this step, even if it’s just for a short time.
  • Not Prepping Ingredients First: Preparing ingredients beforehand can smooth the cooking process; take time to chop and measure before cooking.
  • Ignoring Cooking Time: Ovens can vary significantly; keep an eye on the food to prevent overcooking or burning.
  • Missing Flavor Enhancers: Don’t forget to season well; a bit of salt and pepper can elevate the dish dramatically.
  • Skipping the Rest Time: Allow the chicken to rest after cooking; this step retains juices for a more flavorful bite.

Essential Techniques

Caramelizing Onions: Caramelizing onions is crucial for flavor development. Cooking them low and slow allows natural sugars to break down, resulting in sweetness. Avoid high heat to prevent burning, and use a wide pan for even cooking.

Roasting Chicken: Roasting allows for even cooking and flavor enhancement. Start at a high temperature to lock in juices and finish with a lower temperature to ensure thorough cooking. Basting the chicken periodically with sauce can also boost flavor.

Pro Tips for Perfect Baked Barbecue Chicken Thighs

Experiment with different barbecue sauce varieties to find your favorite flavor profile.

Try marinating the chicken overnight for even deeper flavor penetration.

For added crunch, broil the chicken for the last few minutes of cooking.

Consider adding smoked paprika to the barbecue sauce for a deeper, more robust flavor.

Serve with fresh herbs sprinkled on top for a burst of freshness and color.

Accompany this dish with classic sides like coleslaw or cornbread for a complete meal.

Variations and Adaptations

Switching out chicken thighs for drumsticks or breasts can alter the cooking time and flavor.

Seasonal adaptations can include adding fresh herbs or changing the barbecue sauce to complement seasonal flavors.

For dietary modifications, use gluten-free barbecue sauce to accommodate gluten intolerances.

Experiment with different types of onions, such as red or sweet onions, for unique taste variations.

Incorporating fruits like pineapples or peaches in the sauce can provide a delightful sweetness.

For presentation, serve on a bed of greens for an eye-catching effect.

Serving and Presentation Guide

To present your dish beautifully, plate the chicken thighs and spoon caramelized onions generously over the top.

Add a sprinkle of freshly chopped parsley or cilantro for color and aroma.

Serve in vibrant, contrasting dishes that also hold the barbecue sauce to entice presentation.

Temperature is key; serve hot for the best flavors and textures to shine.

Consider portion control by offering individual servings or a family-style platter.

Wine and Beverage Pairing

A fruity red wine, such as Zinfandel or Merlot, pairs beautifully with the smoky flavors of barbecue.

For beer lovers, an amber ale or lager complements the sweetness of the sauce.

If you’re looking for non-alcoholic options, consider iced tea or a sparkling lemonade for brisk refreshment.

Serving at the correct temperature enhances the pairing experience, offering a delightful balance.

Storage and Shelf Life

To store, let the chicken cool before transferring it to airtight containers, where it can last up to three days in the refrigerator.

For extended freshness, freeze portions in vacuum-sealed bags, where they can remain tasty for up to three months.

Always check for signs of spoilage before consuming leftovers, such as an off smell or color variations.

When reheating, aim to bring the chicken back to a minimum internal temperature of 165°F.

Make Ahead Strategies

Prep ingredients the night before, chopping onions and measuring out spices for quicker cooking.

Assemble the dish fully except for cooking, then refrigerate it; this works well for busy evenings.

Ensure to assess quality after thawing if previously frozen, as some textures may change slightly.

Reheat in the oven for the best flavor retention; avoid the microwave when possible.

Scaling Instructions

To halve the recipe, adjust ingredient amounts precisely; timing may decrease slightly but check for doneness.

For larger gatherings, doubling or tripling the recipe works well; use extra large baking sheets or multiple pans.

Adjust cooking times based on the total volume, ensuring even cooking throughout the dish.

When scaling recipes, consider the storage needs for leftovers or any unconsumed amounts.

Nutritional Deep Dive

With a balanced macro breakdown, this dish provides healthy protein from chicken, essential fats, and carbohydrates from the sauce.

Micronutrient analysis shows benefits such as B vitamins and minerals important for health.

Nutritionally, this recipe supports overall wellness, especially as part of a balanced diet.

When portioning, be mindful of serving sizes for better weight management and mindful eating.

Dietary Adaptations

For gluten-free options, select a suitable sauce without cross-contamination risks.

Dairy-free adaptations are straightforward, as this recipe contains no dairy ingredients.

To align with keto and low-carb diets, opt for a lower-carb barbecue sauce version.

Paleo adaptations can focus on organic sauces and whole ingredients without preservatives.

Troubleshooting Guide

For texture issues, avoid high heat during caramelization, as this can lead to undesirable results.

If flavor seems off, revisit seasoning; a pinch of salt or additional herbs can elevate your dish.

For equipment challenges, potholes in oven temperatures can lead to uneven cooking; invest in a reliable thermometer.

Address timing concerns by prepping ingredients beforehand to streamline the cooking process.

Recipe Success Stories

Community feedback often highlights the explosive flavors of this dish, particularly among novice cooks.

Readers have shared their variations, showing endless possibilities for personalization with this recipe.

Many have praised how easy it is to adapt, whether swapping out proteins or spices.

Storytelling through photography tips helps others visualize their success in the kitchen with this dish.

Frequently Asked Questions

Can I use boneless chicken thighs? Yes, boneless chicken thighs can be used, but adjust cooking times since they may cook faster than bone-in thighs.

What type of barbecue sauce is best? Choose a barbecue sauce that suits your taste preferences—sweet, tangy, or spicy—to customize the dish.

Can I bake this dish in advance? Absolutely! You can prepare and assemble the dish a day ahead, then bake when ready to serve.

How do I prevent the chicken from drying out? Keep an eye on the cooking time, and use a meat thermometer to check for doneness at 165°F.

Is this recipe suitable for meal prep? Yes, it’s great for meal prep! Portion out leftovers into containers for easy reheating.

Can I substitute other proteins? Definitely! This recipe works well with pork, beef, or even grilled tofu for a vegetarian option.

How should leftovers be stored? Store in airtight containers in the refrigerator for up to three days, or freeze for longer storage.

What’s a good side dish? Classic sides like cornbread, coleslaw, or grilled vegetables pair beautifully with this dish.

Can I adjust the sweetness of the sauce? Yes, you can add honey or brown sugar for more sweetness, or vinegar for tanginess.

Will the recipe still work without caramelizing the onions? While you can skip caramelizing, it enhances flavor, so we recommend including that step for best results.

Additional Resources

Check out other barbecue recipes, including smoked ribs or grilled vegetables, for more ideas to complement your barbecue experience.

Technique guides for mastering baking and marinating will elevate your cooking skills.

Ingredient information can help you select the freshest products available at your local market.

Equip your kitchen with recommended tools that will make preparation easier and more enjoyable.

Join the Conversation

Share your own photos of this recipe on social media to inspire others in the cooking community.

Engage with fellow cooking enthusiasts by leaving reviews and suggestions in the comments section.

Explore creative adaptations of this dish and see how others enhance their recipes.

The Recipe

Baked Barbecue Chicken Thighs with Caramelized Onions

Serves: 4

Prep Time: 15 mins

Cook Time: 45 mins

Total Time: 60 mins

Kitchen Equipment Needed

  • Baking dish
  • Knife
  • Cutting board
  • Skillet
  • Meat thermometer

Ingredients

  • 4 bone-in chicken thighs
  • 1 cup barbecue sauce
  • 2 large onions, sliced
  • 2 tablespoons olive oil
  • Salt and pepper, to taste

Directions

  1. Preheat your oven to 375°F (190°C).
  2. In a skillet, heat olive oil over medium heat. Add sliced onions, seasoning with salt. Cook slowly, stirring occasionally until caramelized.
  3. Season chicken thighs with salt and pepper, then place them in the baking dish. Cover generously with barbecue sauce.
  4. Add the caramelized onions over the chicken before placing the dish in the oven.
  5. Bake for 45 minutes, ensuring internal temperature reaches 165°F (75°C).
  6. Let rest for a few minutes before serving to enhance flavor.

Recipe Notes

  • For an extra kick, add hot sauce to the barbecue sauce before coating the chicken.
  • You can substitute chicken thighs for drumsticks or breasts if preferred.
  • Leftovers can be stored in the refrigerator for up to 3 days and reheated thoroughly.

Indulge in Garlic Butter Lobster & Scallops for Dinner

Garlic Butter Lobster & Scallops: A Decadent Seafood Delight

⚖️
Difficulty
Moderate

⏲️
Prep Time
15 mins

🕒
Cook Time
20 mins

⏱️
Total Time
35 mins

🍽️
Servings
4

Indulge in a culinary experience that combines the luxurious flavors of garlic butter, succulent lobster, and tender scallops. This Garlic Butter Lobster & Scallops recipe is perfect for a romantic dinner or a special occasion. The rich, buttery sauce perfectly complements the sweetness of the seafood, creating a dish that is truly unforgettable. With every bite, you’ll savor the freshness and quality of these magnificent ingredients, taking your taste buds on a delightful journey.

This recipe not only brings the taste of the ocean to your kitchen but also provides a sense of extravagance that few dishes can match. The velvety garlic butter sauce envelops the tender scallops and lobster, enhancing their natural flavor while creating a beautiful glow that is visually appealing. Impress your guests with this elegant dish, and watch as they marvel at your culinary prowess.

Quick Recipe Highlights

  • Flavor Profile: The essence of rich garlic melds seamlessly with the sweetness of lobster and scallops, balanced by a hint of acidity from lemon juice.
  • Texture: Enjoy a delightful mix of textures: the tender snap of scallops contrasted with the succulent lobster meat creates a satisfying mouthfeel.
  • Aroma: The fragrant aroma of garlic and butter wafts through the air, inviting everyone to the table.
  • Visual Appeal: The dish showcases a stunning contrast of colors—golden butter against the deep red of lobster and the pearly sheen of scallops.
  • Skill Level Needed: This recipe is moderately difficult, requiring careful timing and technique, especially in handling seafood.
  • Special Equipment: Prepare this dish using a large skillet or sauté pan to properly cook the seafood and sauce.

Recipe Overview

  • Difficulty Level: With a moderate level of complexity, this recipe requires attention to detail and timing to ensure both the lobster and scallops are perfectly cooked.
  • Category: This dish falls under seafood entrees, making it an ideal choice for fancy dinners or celebrations.
  • Cuisine: Influenced by coastal culinary traditions, this recipe combines classic techniques with fresh, locally-sourced seafood.
  • Cost: The approximate cost of preparing this dish ranges from $40-$60 depending on the quality of seafood and where you purchase it.
  • Season: Best enjoyed year-round, but fresh seafood can often be more accessible during the summer and fall months.
  • Occasion: Perfect for special occasions such as anniversaries, birthdays, or any celebratory meal.

Why You’ll Love This Recipe

Indulging in Garlic Butter Lobster & Scallops allows you to experience a perfect harmony of flavors. The buttery richness, combined with a touch of garlic and a burst of lemon, creates a tasting experience that elevates the seafood to new heights. The texture of the lobster and scallops is tender yet firm, offering a delightful bite with every mouthful. The comforting aroma of garlic melted in butter adds an irresistible appeal that makes this dish unforgettable.

Convenience plays a crucial role in why you’ll love this recipe. With a quick preparation time and straightforward cooking instructions, you can create a gourmet experience in less than an hour. Ideal for home cooks looking to impress, this dish allows you to spend more time with your guests and less time in the kitchen. The ingredients are easy to find at your local market, making it accessible for many.

In addition to its delightful flavors, Garlic Butter Lobster & Scallops offers nutritional advantages, including high protein content and valuable omega-3 fatty acids. Seafood is known for its health benefits, contributing to heart health, brain function, and overall well-being. Enjoy this dish with the knowledge that you are nourishing your body while indulging your senses.

Hosting guests? This dish is sure to be a crowd-pleaser. The luxurious presentation of lobster and scallops bathed in garlic butter will leave a lasting impression. Be prepared for compliments on your culinary skills as guests savor each bite. This dish is perfect for entertaining and makes any gathering feel extra special.

Finally, consider the cost-effectiveness of this recipe. While seafood can sometimes seem expensive, by preparing it at home, you are saving on dining out while enjoying a similarly high-quality meal in the comfort of your own home. Plus, creating this decadent dish provides an opportunity to showcase your cooking abilities and encourages experimentation with flavors.

Historical Background and Cultural Significance

The origin of the Garlic Butter Lobster & Scallops dish can be traced back to coastal regions where seafood has always been a staple. Lobster has been a culinary delicacy for centuries, enjoyed by the elite and served in fine dining establishments. When combined with scallops, another prized seafood, this dish represents a celebration of the ocean’s bounty and reflects the cultural significance of seafood in coastal cuisine.

The cultural importance of seafood dishes like this one cannot be overstated. They symbolize not only the wealth of marine resources available but also a lifestyle tied to the sea. Communities along the coast have thrived on fishing and seafood cuisine, sharing traditional recipes passed down through generations. Special occasions often call for lavish seafood dishes, highlighting their significance in celebrations and gatherings.

Over time, the evolution of this recipe has seen various adaptations as chefs and home cooks experiment with flavors and ingredients. Modern variations incorporate elements from different cuisines, showcasing the versatility of garlic butter and seafood. With creativity at the forefront, the dish has adapted to meet contemporary tastes while preserving its classic roots.

Regional variations abound, particularly along the North American East Coast, where lobster is abundant. Each locale boasts unique takes, such as adding regional spices or infusing local flavors, enhancing the overall dish while paying homage to its heritage. From New England’s creamy versions to Cajun-inspired twists, the possibilities are endless.

Ingredient Deep Dive

Lobster: Lobster is not just a delicacy; it holds significant historical value as a food resource in coastal communities. Rich in protein and low in fat, lobster is packed with essential nutrients such as zinc and omega-3 fatty acids. When selecting lobster, opt for fresh, live specimens whenever possible; they should feel heavy for their size and have a clean, salty smell. Store lobster in a cool place but avoid keeping them in fresh water as it can kill them. If necessary, you can substitute lobster with shrimp or crab, albeit with a different flavor profile.

Scallops: These sweet, tender mollusks carry cultural importance, particularly in maritime regions where they are harvested. Scallops are known for being rich in protein and low in calories, making them ideal for healthy cooking. When purchasing, look for dry-packed scallops for superior quality, avoiding those that are “wet” as they often contain added preservatives that alter taste. Scallops can be stored in the fridge for a quick meal, while frozen options should be used within three months for best flavor. As a substitution, you could use sliced chicken breast for a different take—although the texture will vary significantly.

Common Mistakes to Avoid

  • Overcooking seafood: This leads to rubbery textures. Always monitor cooking time closely and remove from heat as soon as they turn opaque.
  • Using prepackaged seafood: Fresh is best. Prepackaged seafood often loses flavor and texture, diminishing the dish’s quality.
  • Not seasoning adequately: Salt and pepper enhance seafood flavors. Underseasoning leads to a bland dish.
  • Skimping on the garlic: Garlic is the star of the dish; don’t be afraid to use a generous amount for flavor and aroma.
  • Improperly handling seafood: Always keep seafood refrigerated before use and avoid cross-contamination with raw ingredients.
  • Neglecting the sauce: The garlic butter sauce is essential; make sure it’s well mixed and hot before adding the seafood.
  • Using the wrong kind of pan: A non-stick skillet is crucial for preventing seafood from sticking and maintaining proper cooking temperatures.
  • Failing to drain seafood properly: Any liquid left on the seafood can dilute the flavor of the dish; ensure they are patted dry before cooking.
  • Serving at the wrong temperature: Seafood dishes are best served warm, so ensure they are plated immediately after cooking.
  • Not allowing the flavors to meld: Let the finished dish sit for a few minutes off the heat to enhance the flavors before serving.

Essential Techniques

Proper Cooking of Seafood: Mastering the cooking process for lobster and scallops involves carefully timing each component for perfect doneness. When cooking, aim for a firm texture without being tough—this is achieved by observing visual and tactile cues. Seafood should be cooked until it is just opaque, typically around 3-5 minutes on each side. A seafood thermometer can help, as an internal temperature of 140°F is ideal.

Making the Garlic Butter Sauce: This technique is crucial for creating a flavorful base. Sauté minced garlic in butter over low heat until fragrant but not browned, which can introduce bitterness. Stir frequently to prevent burning. Experimenting with added herbs, like parsley or thyme, can enhance the sauce and contribute extra freshness. Lastly, incorporating lemon juice just before serving brightens flavors and balances richness.

Pro Tips for Perfect Garlic Butter Lobster & Scallops

Use fresh seafood wherever possible. Fresh ingredients will yield the best flavors and textures, ensuring that your dish stands out. Consider utilizing a seafood market or local fishmonger for premium selections.

Invest in high-quality butter. The richness of the dish relies on the flavor of the butter, so opt for a grass-fed option when available; it can significantly amplify the dish’s overall taste.

Don’t overcrowd the pan. Cooking in batches if necessary will ensure that each piece of seafood is perfectly cooked without steaming. Overcrowding can lead to uneven cooking and a watery dish.

Adjust seasoning throughout. Taste as you cook and adjust seasoning—this ensures that the final dish balances correctly. Flavor profiles change as they cook, so don’t skip this step.

Consider adding a splash of white wine. Deglazing the pan after cooking seafood can add depth while enhancing the overall flavor of the dish. The alcohol cooks off, leaving a lovely acidity.

Let it rest. After cooking, allow the seafood to rest for a few minutes. This helps retain moisture and allows the flavors to meld beautifully before serving.

Garnish smartly. Fresh herbs like parsley or chives can brighten the dish. Add these right before serving for a pop of color and additional flavor.

Pair with complementary sides. Serve with a fresh salad or garlic bread to soak up any leftover sauce, enhancing the overall dining experience.

Variations and Adaptations

Regional variations include incorporating local spices, such as Old Bay seasoning or Cajun blends, to add character to the dish. These spices elevate the flavor profile and celebrate regional culinary traditions.

Seasonal adaptations can also be made by swapping in vegetables that are fresher or more available, such as asparagus or zucchini, which add unique flavors and textures. Utilizing seasonal ingredients contributes freshness and sustainability.

For dietary modifications, consider using plant-based seafood alternatives for a vegan version. These substitutes can mimic the textures and flavors of lobster and scallops, allowing you to enjoy similar dishes without animal products.

Flavor variations can involve experimenting with different cheeses, such as adding Parmesan or a sprinkle of goat cheese, providing a unique twist and extra creaminess to the sauce.

Texture modifications can include adding a crispy topping, such as panko breadcrumbs mixed with herbs, providing a satisfying crunch alongside the tender seafood.

Presentation alternatives could involve serving in a clam shell for a unique touch that adds visual interest and intrigue to your seafood dish.

Serving and Presentation Guide

Plating techniques play a significant role in the overall enjoyment of the dish. Consider using a wide, shallow bowl to showcase the seafood beautifully, allowing the rich sauce to pool around the elements and deliver a visually stunning presentation.

Garnishing ideas might include a drizzle of extra garlic butter on top and a sprinkle of fresh chopped parsley for color. Bright slices of lemon can also serve as a decorative and functional touch.

Traditional accompaniments, such as crusty bread, are perfect for dipping into the luxurious garlic butter sauce. This not only complements the dish but also enhances the overall experience.

Modern serving suggestions may include pairing with an elegant side salad dressed lightly with vinaigrette, bringing a refreshing contrast to the richness of the seafood.

Temperature considerations are vital; serve the dish immediately after cooking while it’s still hot, ensuring optimal flavor and texture for your guests.

For portion control, aim for about one lobster tail and three scallops per serving. Adjust based on the size of the seafood, ensuring everyone gets a fair share of this delicacy.

Wine and Beverage Pairing

Pairing this Garlic Butter Lobster & Scallops dish with a crisp white wine, such as Chardonnay or Sauvignon Blanc, enhances its flavor profile. The acidity in the wine complements the richness of the butter and seafood beautifully.

For non-alcoholic alternatives, consider sparkling water with a twist of lemon or a refreshing iced tea that will cleanse the palate between bites without overpowering the dish.

If coffee or tea pairing applies, consider a light herbal tea, which can deliver a calming finish after the richness of the meal. The aromatic qualities will also enhance the dining experience.

Temperature considerations for serving wine are crucial; a slight chill on white wines elevates their refreshing qualities, ensuring perfect harmony with the seafood dish.

Serving suggestions include decanting the wine beforehand to allow it to breathe, heightening its flavor before pairing it with your exquisite meal.

Storage and Shelf Life

Storage methods for leftovers include placing them in an airtight container and refrigerating promptly. Properly stored, the dish will last for 1-2 days. Avoid freezing if possible, as seafood doesn’t reheat well without losing texture and flavor.

Temperature requirements suggest keeping the dish at or below 40°F if stored. If reheating is necessary, aim for gentle methods like a low oven heat or a skillet to avoid overcooking.

Container recommendations include glass containers with tight seals to prevent odor absorption from other foods in the refrigerator, ensuring your seafood retains its fresh taste.

Signs of spoilage might include off-putting smells, slimy texture, or discolorations. If any of these are detected, it’s best to discard the dish.

Reheating instructions involve taking care to heat gradually, ensuring even warmth throughout without cooking the seafood further. A few tablespoons of fresh butter can reinvigorate the flavors upon reheating.

For freezing guidelines, while not ideal, if you must freeze, do so immediately after cooking, using freezer-safe containers and consuming within a month for best quality.

Make Ahead Strategies

Prep timeline advice suggests chopping garlic and preparing the butter sauce a day ahead, storing it in the refrigerator. This shortens cooking time when you’re ready to serve the dish.

Storage between steps is vital; while the seafood should be cooked fresh, any sauces or sides can be prepped beforehand and refrigerated to maintain quality.

The quality impact assessment is crucial; precooked ingredients can lose texture and flavor if they remain too long in storage, so only prepare what’s necessary.

Assembly tips suggest assembling the dish just before serving to ensure the seafood is hot and the sauce is velvety, preventing any elements from becoming soggy.

Reheating guidelines indicate that any previously cooked seafood should only be warmed gently to prevent toughness, often best achieved in a sauté pan.

Fresh element additions can include tucking fresh herbs into the dish after cooking, adding layers of brightness and enhancing the flavors right before serving.

Scaling Instructions

Halving the recipe is simple; just divide each ingredient measurement by two while maintaining the cooking times as needed for the size reduction.

Doubling or tripling requires a larger skillet or multiple cooking batches to ensure the seafood cooks evenly without overcrowding—adjust cook times slightly.

Equipment adjustments mean ensuring you have sufficient space and tools (like extra pans) for larger batches, especially when scaling for a crowd.

Timing modifications are important; always check seafood doneness, particularly when scaling, as increased quantities can require slight adjustments in cook time.

Storage considerations should account for larger batches; the leftovers should be promptly stored in airtight containers to ensure freshness when scaling recipes.

Nutritional Deep Dive

The macro breakdown of this dish shows it to be high in protein and healthy fats, making it satisfying while also being nutrient-dense, ideal for health-conscious eaters.

Micronutrient analysis reveals that seafood is rich in essential nutrients such as vitamin B12, selenium, and zinc, vital for overall health and well-being.

Health benefits of enjoying seafood regularly include supporting cardiovascular health, reducing inflammation, and improving brain function due to omega-3 fatty acid content.

Dietary considerations indicate the dish is gluten-free and can be adapted for low-carb diets, while portions should be mindful, especially as seafood can contribute to higher cholesterol levels.

Portion analysis reveals that a reasonable serving size of this dish provides a balance of indulgence and nutrition, offering a satisfying meal without excessive calorie intake.

Weight management tips include enjoying this meal with plenty of fresh vegetables and smart portion control for a balanced approach to indulgence.

Dietary Adaptations

This recipe can be made gluten-free by ensuring any added sauces or seasonings are certified gluten-free, allowing those with dietary restrictions to enjoy without concern.

To create a dairy-free version, substitute butter with a plant-based alternative; almond or coconut oil works marvelously while providing a unique flavor twist.

A vegan adaptation could involve using plant-based lobster and scallop substitutes, allowing those with dairy and meat-free preferences to partake in the enjoyment.

For a low-carb version, serve alongside keto-friendly vegetables like zucchini noodles or roasted cauliflower to keep carbs in check while enjoying the luxurious flavors of the seafood.

The keto diet enthusiast can enjoy this dish as is, as it naturally fits within the principles of low-carb eating due to its base of rich proteins and healthy fats.

Moreover, Paleo followers can relish this dish without modifications since the main ingredients comply with the Paleo guidelines for whole foods.

Low-FODMAP adjustments may be necessary for sensitive individuals by substituting garlic with garlic-infused oil, maintaining flavor without triggering digestive issues.

Other specific diets can also be accommodated with tailored ingredient swaps and careful consideration of seasoning options for flavor without compromise.

Troubleshooting Guide

For texture issues, like rubbery seafood, ensure proper cooking time—if seafood is overcooked, it becomes tough; remove from heat at just the right moment to ensure tenderness.

If flavor balance is off, consider adjusting with fresh herbs or acid, such as a squeeze of lemon, which can elevate the flavors and restore harmony in the dish.

Temperature problems can occur when seafood sits too long after cooking. To avoid this, plate promptly and serve as soon as possible after preparation.

Equipment challenges, such as non-stick problems, can be avoided by preheating your skillet carefully before adding butter and seafood; this ensures even cooking and prevents sticking.

Ingredient substitutions should be approached cautiously; using inferior-quality seafood will result in a lackluster dish, so always strive for the freshest options possible.

Timing concerns can cause stress: if you’re cooking for others, coordinate nicely with side dishes to ensure everything comes together smoothly at once.

Recipe Success Stories

Community feedback on Garlic Butter Lobster & Scallops often praises its rich flavors and impressive presentation, making it a favorite among home cooks looking for a show-stopping entrée.

Variation successes, like incorporating different herbs or spices, have led to exciting adaptations, showcasing the versatility of this dish while maintaining its classic charm.

Adaptation stories from readers frequently highlight how they’ve tailored the recipe for special dietary needs without sacrificing flavor or enjoyment, further proving the dish’s flexibility.

Photography tips often emphasize the importance of lighting and garnishing to showcase the vibrant colors and textures beautifully, ensuring that each plate looks as good as it tastes.

Frequently Asked Questions

Can I use frozen seafood? It’s best to use fresh seafood when possible, but if frozen is what you have, ensure it is thawed completely before cooking. This will prevent uneven cooking and maintain quality.

How can I tell if lobster is cooked? Perfectly cooked lobster will turn bright red and opaque. Timing is essential, and it’s recommended to cook for about 8-12 minutes per pound depending on the cooking method used.

What’s the best way to reheat this dish? Reheat gently in a skillet on low heat. Adding a bit of butter will help maintain moisture and prevent rubbery textures.

Can I make this in advance? While seafood is best cooked fresh, you can prepare the sauce ahead of time. Cook the seafood just before serving for optimal texture and flavor.

Is this dish suitable for kids? Yes, this dish can be adapted to suit kids by reducing the garlic and spice levels. Additionally, serve it with kid-friendly sides to balance the meal.

What can I serve with Garlic Butter Lobster & Scallops? Consider pairing with a green salad, crusty bread, or a light vegetable side to keep the meal fresh and balanced.

Can I switch out the seafood? Yes! Feel free to swap lobster and scallops with other seafood like shrimp or crab based on preferences or availability.

What kind of pasta can I pair it with? If you’re looking to add pasta, a simple linguine tossed with olive oil can complement the flavors beautifully without overwhelming the dish.

Are there any vegetarian options for this recipe? For a vegetarian experience, consider using grilled vegetables or stuffed mushrooms in the garlic butter sauce as a delicious alternative.

How do I know if my scallops are fresh? Fresh scallops should be moist and translucent, with a sweet ocean smell. If they have a strong fishy odor or are dry, it’s best to discard them.

Additional Resources

For those looking for related recipes, consider checking out other seafood dishes, such as Sautéed Shrimp with Garlic and Lemon or Baked Salmon with Herb Butter. These provide a great array of flavors while highlighting the beauty of seafood.

Technique guides covering sautéing and searing seafood can enhance skills, ensuring proper cooking methods are utilized to achieve restaurant-quality results at home.

Ingredient information about how to select and store seafood can provide useful tips for maintaining quality, ensuring fresher meals each time you cook.

Equipment recommendations, including the right pans for seafood cooking, can help streamline your culinary experience, making it easier and more enjoyable.

Finally, exploring seasonal variations allows home chefs to cater their dishes to fresh, in-season ingredients, enhancing flavor and quality while enjoying culinary creativity.

Join the Conversation

Engage with the community by sharing your own experiences with Garlic Butter Lobster & Scallops on social media! Post your photos and inspire others with how you personalized this recipe.

Photography tips on capturing beautiful dishes can spark creativity among fellow cooks, encouraging them to showcase their culinary creations.

Recipe reviews and feedback encourage sharing what worked well and what can be improved, creating a space for growth and collaboration within the cooking community.

Community engagement motivates adaptation sharing, collecting diverse feedback that can inspire new ideas or variations worth exploring in the kitchen.

The Recipe

Garlic Butter Lobster & Scallops

Serves: 4

Prep Time: 15 mins

Cook Time: 20 mins

Total Time: 35 mins

Kitchen Equipment Needed

  • Large skillet or sauté pan
  • Spatula
  • Measuring cups and spoons
  • Sharp knife
  • Cutting board

Ingredients

  • 2 lobster tails
  • 12 scallops
  • ½ cup unsalted butter
  • 4 cloves garlic, minced
  • Juice of 1 lemon
  • Salt and pepper to taste
  • Fresh parsley for garnish

Directions

  1. In a large skillet, melt butter over medium heat. Add minced garlic and sauté until fragrant but not browned, about 1-2 minutes.
  2. Season lobster tails with salt and pepper. Add them to the skillet, cooking for about 5-6 minutes until they turn opaque.
  3. Remove lobster and set aside. In the same skillet, add scallops and cook for 2-3 minutes on each side until golden brown and opaque.
  4. Add lobster tails back to the skillet, pour in lemon juice, and gently mix to combine. Allow to heat for an additional minute.
  5. Plate the garlic butter lobster and scallops, garnishing with fresh parsley before serving.

Recipe Notes

  • For added flavor, consider adding a splash of white wine while cooking the seafood.
  • Leftovers can be stored in the refrigerator for up to two days; consume quickly to maintain freshness.

Delicious Filet Mignon with Creamy Parmesan Mustard Sauce Recipe

Filet Mignon with Parmesan Mustard Sauce: An Elegant Culinary Delight

⚖️
Difficulty
Moderate

⏲️
Prep Time
15 mins

🕒
Cook Time
20 mins

⏱️
Total Time
35 mins

🍽️
Servings
4

Indulging in a perfectly cooked Filet Mignon with Parmesan Mustard Sauce is akin to experiencing a symphony of flavors that dance on your palate. This succulent cut of beef, renowned for its tenderness and rich flavor, takes center stage, enhanced by a creamy Parmesan mustard sauce that adds a savory depth. Each bite delivers a melt-in-your-mouth experience, creating a memorable dining occasion whether it’s a regular weeknight meal or a special celebration.

The allure of this dish begins with its aroma, where the inviting scent of sizzling filet mingles with the sharp, tangy essence of mustard and the nutty notes of Parmesan. This aromatic combination creates an unforgettable dining atmosphere, making it a standout choice for dinner parties or romantic evenings. Moreover, the dish presents beautifully, with the golden sauce draped over the perfectly seared steak, offering a feast for the eyes as well as the taste buds.

Quick Recipe Highlights

  • Flavor Profile: This dish balances the rich, savory notes of filet mignon with the tanginess of mustard and the creaminess of Parmesan, creating a harmonious flavor experience.
  • Texture: The filet is tender and juicy while the sauce has a smooth, creamy consistency that envelops each bite.
  • Aroma: The dish boasts aromatic notes of grilled beef, sharp mustard, and nutty Parmesan, creating an inviting scent profile.
  • Visual Appeal: The vibrant sauce adds a striking contrast to the deep brown of the seared filet, garnishing with fresh herbs enhances its presentation.
  • Skill Level Needed: This recipe requires moderate cooking skills, particularly proficiency in preparing meat to the perfect doneness.
  • Special Equipment: A heavy skillet or grill pan, along with a meat thermometer for optimal results, is essential for this recipe.

Recipe Overview

  • Difficulty Level: This Filet Mignon with Parmesan Mustard Sauce is categorized as moderate due to the techniques involved in searing the meat and preparing the sauce perfectly.
  • Category: This dish falls under the category of main course, fitting perfectly as a centerpiece for a gourmet meal.
  • Cuisine: Drawing influences from classic French cuisine, this recipe showcases the sophistication of fine dining in a home-cooked meal.
  • Cost: While filet mignon can be costly, overall ingredient costs are reasonable considering the culinary experience this dish provides.
  • Season: Best enjoyed during colder months when diners crave rich, hearty meals, this dish shines in autumn and winter seasons.
  • Occasion: Perfect for special occasions, such as anniversaries or elegant dinner parties, this dish impresses guests with its refined flavor profile.

Why You’ll Love This Recipe

The taste and texture of this Filet Mignon with Parmesan Mustard Sauce are remarkable, making it a true feature in your culinary repertoire. The filet mignon is known for its buttery tenderness, which is accentuated by the tangy, creamy sauce that elevates the beef to new heights of flavor. Each bite offers a delicious combination of savory, rich notes that will keep you coming back for more, making it an instant favorite.

Convenience plays a crucial role in meal preparation, and this recipe fits the bill. With a total time of just 35 minutes, it’s quick enough for a weeknight affair yet elegant enough for entertaining guests. The sauce can be prepared while the filet cooks, making the process smooth and manageable. It’s perfect for those who want to impress without spending a whole day in the kitchen.

Additionally, this filet mignon recipe is packed with nutritional advantages. Filet mignon is a lean cut of beef rich in protein, contributing to muscle building and repair. Pairing it with the nutritious ingredients in the Parmesan mustard sauce, including mustard seeds and cheese, offers a well-rounded meal that provides essential nutrients in a clutch of flavor.

On social occasions, this dish shines. Imagine hosting friends for dinner and revealing a perfectly seared filet mignon adorned with a divine sauce as the grand finale to the meal. The presentation alone is enough to stir conversation and admiration, giving you the host’s satisfaction of providing a top-notch dining experience.

Lastly, the cost-effectiveness of preparing your filet mignon at home is immeasurable. While dining out often comes at a premium, creating this exquisite meal in your own kitchen not only saves money but also allows you to control ingredient quality. A homemade gourmet meal can rival any restaurant offering, making it accessible for the passionate cook to recreate fine dining at home.

Historical Background and Cultural Significance

The origins of filet mignon can be traced back to the culinary traditions of France, where it has been celebrated for centuries as a prime cut of beef. The name “filet mignon” translates to “dainty filet,” and it is often regarded as the most tender and flavorful cut of beef, making it a popular choice for discerning diners. With its rich history, this dish has become synonymous with gourmet dining and special occasions.

Culturally, filet mignon holds a significant place in French cuisine, embodying the artistry of cooking that emphasizes technique and presentation. Its presence on the menu of upscale restaurants across the world highlights its prestige as a culinary delight. Filet mignon serves as a celebration of not only the ingredients used but also the craft of the chef, who prepares it to perfection.

Over time, the evolution of filet mignon has seen variations in preparation and serving styles. While traditionally served with rich sauces, modern interpretations have led to unique pairings that include lighter sauces or bold accompaniments. As a dynamic piece of culinary history, filet mignon continues to inspire creativity in kitchens around the globe.

Regionally, variations of filet mignon can be found in various cultures, each adding its own unique twist. For instance, in some regions of the United States, filet mignon is often paired with robust barbecue sauces, while others may opt for refined herb-infused butters. The adaptability of this cut of meat demonstrates its universal appeal across culinary landscapes.

Ingredient Deep Dive

Filet Mignon: Known for its exceptional tenderness, filet mignon is cut from the tenderloin of the beef, a muscle that does little work, making it inherently soft. This cut is highly regarded in culinary circles, often served in high-end steak restaurants and featured in special occasions. Nutritionally, filet mignon is rich in protein and contains important vitamins and minerals such as iron and zinc. When selecting filet mignon, look for cuts that are bright red with even marbling for optimal flavor and juiciness. For storage, keep it in the refrigerator and use it within a few days or freeze for longer shelf life. As a substitution, consider other tender cuts like tenderloin steak if necessary.

Parmesan Cheese: This aged cheese is admired for its hard texture and strong, nutty flavor. Originating from Italy, Parmesan cheese has cultural significance as a cornerstone in Italian cooking, often grated over pasta dishes and used in sauces. From a nutritional aspect, Parmesan is protein-rich and provides calcium, making it a healthy addition to your meals in moderation. When choosing Parmesan, opt for block cheese to grate fresh, ensuring better flavor compared to pre-grated alternatives. Store in the refrigerator wrapped tightly in a cheese bag or wax paper. If you need a substitute, Pecorino Romano or Grana Padano can work well due to their similar texture and flavor profiles.

Mustard: This versatile condiment comes in numerous varieties, with Dijon mustard being a favored choice for this recipe due to its smooth texture and sharp flavor. Mustard has been a staple in culinary traditions for centuries, used to add acidity and depth to many dishes. Loaded with health benefits, mustard is low in calories and contains antioxidants that promote good health. For selection, opt for high-quality mustard free from preservatives for the best taste. Mustard can be stored in the refrigerator for an extended period, but always check for freshness. Alternatives like honey mustard or spicy brown mustard can bring unique flavors if needed.

Common Mistakes to Avoid

  • Overcooking the filet: Filet mignon should be cooked to medium-rare (130-135°F); using a meat thermometer is crucial. Overcooking can lead to a dry, less flavorful steak.
  • Skipping the resting period: Allowing the steak to rest after cooking is essential. This helps the juices redistribute, ensuring a moist filet when cut.
  • Not seasoning properly: Seasoning the filet generously with salt and pepper enhances the meat’s natural flavors. Failing to do so may result in a bland dish.
  • Using cold meat: Ensure the filet is at room temperature before cooking. This leads to more even cooking.
  • Ignoring pan temperature: A hot skillet is key for a good sear. Don’t place the steak in a cold pan or it will steam rather than brown.
  • Not letting the sauce thicken: Allow the Parmesan mustard sauce to simmer enough to thicken properly for maximum flavor and creaminess.
  • Skipping high-quality ingredients: Using lower-quality beef or cheese can compromise the flavor and texture of the dish. Always opt for the best cuts and artisanal cheeses.
  • Overcrowding the pan: Cooking too many filets at once can lower the pan temperature, preventing a good sear. Cook in smaller batches if necessary.
  • Neglecting to taste along the way: Always taste your sauce and adjust seasoning as necessary for a balanced flavor before serving.
  • Cutting the steak too early: Let the steak rest for at least five minutes before slicing to maintain its juices.

Essential Techniques

Searing: Searing the filet is crucial for developing a rich, caramelized flavor. The high heat creates a Maillard reaction, giving a wonderful crust. To master this technique, ensure your skillet is preheated, and use oil with a high smoke point. A common pitfall is overcrowding the pan, which lowers the temperature and prevents browning. Visual cues for success include a deep brown color on the meat’s surface and a fragrant aroma.

Making the Sauce: The sauce is a blend of flavors that brings the dish together. Start by deglazing the pan after cooking the filet to incorporate all the flavorful bits left behind. Simmer the sauce until slightly thickened for the right consistency. A common mistake is rushing this step or neglecting to taste for seasoning adjustments. When done right, the sauce should coat the back of a spoon without being too thick.

Pro Tips for Perfect Filet Mignon with Parmesan Mustard Sauce

1. Always use a meat thermometer to ensure the perfect level of doneness. Aim for 130°F for medium-rare, removing the steak a few degrees before to allow for carryover cooking.
2. Season your filet generously with salt at least 30 minutes before cooking to enhance its flavor.
3. For added depth, consider using a splash of white wine in your sauce for an elevated flavor profile.
4. If you’re preparing multiple filets, sear them in batches to maintain the temperature of the pan and achieve the best sear.
5. When making the sauce, whisk in a little of the steak drippings to enhance the flavor and richness.
6. Serve the filet mignon on warm plates to help maintain its temperature longer when served.
7. Garnish your dish with fresh herbs like parsley or chives for a pop of color and freshness.
8. Pair leftovers with a light salad the next day for a delightful and fulfilling lunch.

Variations and Adaptations

Regional variations of this dish can include using different sauces, such as a red wine reduction or a blue cheese topping. These alternatives can enhance or shift the flavor profile significantly, catering to varying tastes. Seasonal adaptations may involve incorporating seasonal vegetables on the side, such as asparagus in spring or root vegetables in winter, adding vibrant colors and nutrients.

For dietary modifications, consider using alternative meats like a high-quality turkey cut for those avoiding beef. For different flavor variations, you might explore using flavored mustards, such as honey mustard or spicy Dijon, which can alter the sauce’s sweetness or spice level. Texturally, you can add crushed nuts atop the filet for a crunchy contrast or opt for a smooth sauce blended with cream for a richer mouthfeel.

For presentation, consider serving the filet on a bed of creamy mashed potatoes or a fresh salad, providing visual contrast and a balanced meal that looks as good as it tastes.

Serving and Presentation Guide

Plating techniques for filet mignon should emphasize the steak as the star ingredient. Start with a generous drizzle of the Parmesan mustard sauce on the plate, then carefully place the filet atop it to create height on the plate. Garnishing with a sprig of fresh herbs adds a touch of color and freshness to the dish.

To elevate your presentation, consider traditional accompaniments like sautéed mushrooms or seasonal vegetables placed artfully around the plate. Modern serving suggestions include adding a small side of roasted garlic mashed potatoes or a colorful salad to add complexity to the dish.

Temperature considerations are vital; serve the filet mignon hot to enhance its flavors and juiciness. Finally, practice portion control by cutting the filet into smaller pieces for sharing, allowing guests to enjoy a small taste of its rich flavors.

Wine and Beverage Pairing

When it comes to wine pairings, a robust red such as Cabernet Sauvignon or Malbec perfectly complements the rich flavors of filet mignon. These full-bodied wines match the steak’s intensity while their tannins help balance the meal’s richness. For those preferring white, a Chardonnay with oak aging can offer a lovely contrast with its buttery notes.

For non-alcoholic alternatives, consider a rich, berry-flavored sparkling water that refreshes the palate between bites. If you’re serving this dish during a brunch, consider offering a rich coffee or espresso to complement the meal’s depth.

Temperature considerations are paramount; ensure your wine is served at the appropriate temperature—red wines should be slightly below room temperature while whites are best served chilled. Presentation suggestions include serving in elegant glassware that highlights the sensory experience of your meal.

Storage and Shelf Life

Proper storage methods for leftover filet mignon include placing it in an airtight container and refrigerating it immediately after cooling. This helps maintain its flavor and texture for up to three days. When reheating, gently warm the filet in the oven at low heat to avoid drying it out.

Temperature requirements are crucial; always store cooked filet mignon below 40°F in the refrigerator or below 0°F for freezing. Container recommendations include using glass containers for effective temperature control. Signs of spoilage in leftover filet mignon include off-odors, discoloration, or a slimy texture, indicating that it should not be consumed.

For freezing guidelines, wrap the steak tightly in plastic wrap and then in aluminum foil to prevent freezer burn. When ready to eat, thaw it in the refrigerator overnight before reheating gently to maintain its juiciness.

Make Ahead Strategies

Preparing filet mignon with Parmesan mustard sauce can be made easier with some make-ahead strategies. Consider seasoning your steak a day prior, allowing the flavors to penetrate. Sauce components can also be prepped in advance, such as grating the Parmesan and measuring out the mustard.

During assembly, rest the steak after cooking, allowing you to prepare the sauce simultaneously for efficiency. Quality impact assessment is crucial; ensure proteins are stored correctly before cooking.

Fresh element additions, such as herbs or garnishes, should be held until just before serving for maximum flavor. This keeps your dish vibrant and exciting while allowing you more time to enjoy with your guests.

Scaling Instructions

Scaling the filet mignon recipe can be easily accomplished by halving or doubling the ingredient amounts. When halving, you may not need a full serving of sauce; adjust based on taste preference. For doubling or tripling, ensure you have enough space on your cooking surface to sear multiple filets without crowding them.

Equipment adjustments should consider larger pans or multiple cooking vessels to ensure even cooking temperatures. Timing modifications may also be necessary; larger batches might take slightly longer to reach the desired doneness, so using a meat thermometer is essential.

Storage considerations become relevant when scaling; ensure that leftovers are properly divided into manageable portions for easy reheating later.

Nutritional Deep Dive

When examining the nutritional profile of filet mignon with Parmesan mustard sauce, its macro breakdown leans heavily on protein due to the lean beef, providing about 24 grams of protein per 3-ounce serving. Additionally, the dish brings in healthy fats from the Parmesan cheese and adds dynamism with its sauce components, balancing the overall meal.

Micronutrient analysis reveals that filet mignon is a staple source of iron, zinc, and B vitamins, essential for energy and overall health. The mustard sauce contributes antioxidants that enhance the meal’s nutritional benefits. For those watching dietary considerations, keeping portion sizes in mind can help manage caloric intake while still enjoying this delicious dish.

Weight management tips include pairing the steak with high-fiber sides like vegetables to create a nutrient-rich meal that satisfies hunger without excess calories.

Dietary Adaptations

For those following a gluten-free diet, this recipe fits seamlessly as it contains no gluten ingredients. However, double-check the label on mustard and Parmesan for hidden sources of gluten.

If you’re seeking a dairy-free adaptation, consider using nutritional yeast for a cheesy flavor while omitting the Parmesan cheese entirely. For vegan modifications, use tofu or a hearty plant-based protein that mimics the meat’s texture, served with a creamy cashew-based sauce instead.

For low-carb diets, serving the filet mignon with zucchini noodles or a fresh salad can keep your carbs in check while providing balance. Keto and Paleo enthusiasts may also enjoy the rich flavors without needing major adjustments to the dish.

Other specific diets, such as low-FODMAP, can adopt this recipe easily by ensuring that all ingredient selections adhere to FODMAP guidelines, providing yet another version of this delightful meal.

Troubleshooting Guide

Texture issues can arise if overcooked; adjusting cooking time and monitoring with a thermometer ensures that your filet mignon maintains a tender bite. Flavor balance may occur with too much salt; taste the sauce early to prevent such issues, adding water or cream as necessary.

Temperature problems often stem from inadequate pre-heating or undercooked meat. Always ensure your pan is hot enough before adding the filet to perfect the sear. Equipment challenges may happen with an unfamiliar stove or skillet; familiarizing yourself with your equipment will mitigate these problems over time.

Ingredient substitutions, such as different mustards or cheeses, should be tested to align with flavor profiles while maintaining the integrity of your dish. Finally, timing concerns may arise when preparing multiple dishes; strategizing a prep timeline will keep your meal on schedule.

Recipe Success Stories

Our community has enjoyed numerous feedback success stories about the Filet Mignon with Parmesan Mustard Sauce. Many readers have tried personal adaptations, sharing tips and tricks for excellence. Reader suggestions often include pairing the dish with creative sides or experimental ingredients to elevate the flavors—like adding a hint of horseradish for an extra kick.

Photography tips are also shared by our readers who love showcasing their finished dishes on social media, helping visualize the colorful garnishes or a perfectly seared filet ready for a feast. Join the conversation and share your unique experiences with this delectable recipe!

Frequently Asked Questions

1. Can I make the Parmesan mustard sauce in advance?
Yes, you can prepare the sauce a day in advance. Store it in the refrigerator and reheat gently on the stovetop before serving.

2. What should I serve with filet mignon?
Side dishes like creamy mashed potatoes, sautéed asparagus, or a fresh garden salad beautifully complement filet mignon.

3. How do I know when my filet mignon is done?
The best way is to use a meat thermometer; medium-rare is around 130°F. Make sure to check the temperature in the thickest part of the steak.

4. Can I freeze cooked filet mignon?
Yes, cooked filet mignon can be frozen for up to three months. Be sure to wrap it tightly to prevent freezer burn.

5. What is the best way to reheat leftover filet mignon?
The best method is to reheat in a low oven (about 250°F) until warmed through to retain moisture.

6. How do I achieve a perfect sear on my filet?
To achieve a perfect sear, ensure your skillet is hot before adding the filet. Use a high-smoke point oil to prevent burning, and avoid overcrowding the pan.

7. Is it necessary to let the steak rest?
Yes, allowing the filet to rest for 5-10 minutes after cooking helps the juices redistribute, resulting in a more tender steak.

8. How do I make the sauce less tangy?
If you find the sauce too tangy, you can add a touch of cream or sugar to balance the flavors.

9. Can I use a different cheese in the sauce?
Yes, other cheeses like Grana Padano or Pecorino Romano can be used as substitutes to provide a different flavor profile.

10. What are common dry rubs for filet mignon?
Common dry rubs include a mixture of salt, black pepper, garlic powder, and smoked paprika for added flavor depth.

Additional Resources

Explore related recipes, including our flavorful herb-crusted rack of lamb or luscious chicken marsala, to expand your gourmet repertoire. Engaging in technique guides will enhance your skills, with tips for perfecting searing, sauce making, and side dish pairing.

For ingredient information, practical blogs on meat cuts and how to choose quality cheese can be immensely helpful in crafting perfect dishes. Equipment recommendations give insights into must-have kitchen tools that help streamline your cooking process and build your culinary mastery.

Seasonal variations with produce and other meats are also perfect for tailoring your cooking to what’s fresh and delightful any time of year.

Join the Conversation

We invite you to join our culinary community by sharing your creations on social media platforms. Utilize hashtags to reach fellow cooking enthusiasts, and don’t hesitate to share your own photography tips for capturing your masterpiece.

Your recipe reviews and experiences not only motivate others but also enrich our community. Engage with other members and share your variations or adaptations of this filet mignon dish, creating new dialogues and exchanging flavor secrets.

The Recipe

Filet Mignon with Parmesan Mustard Sauce

Serves: 4

Prep Time: 15 mins

Cook Time: 20 mins

Total Time: 35 mins

Kitchen Equipment Needed

  • Heavy skillet or grill pan
  • Meat thermometer
  • Whisk
  • Knife
  • Cutting board

Ingredients

  • 4 filet mignon steaks, about 6 ounces each
  • Salt and freshly ground pepper to taste
  • 2 tablespoons olive oil
  • 1 cup heavy cream
  • 1/4 cup freshly grated Parmesan cheese
  • 3 tablespoons Dijon mustard
  • 2 cloves garlic, minced
  • 1 tablespoon fresh parsley, chopped (for garnish)

Directions

  1. Season both sides of the filet mignon steaks with salt and pepper.
  2. Heat olive oil in a heavy skillet over medium-high heat. Once hot, add the filet mignon and sear for 4-5 minutes per side for medium-rare.
  3. Remove steaks from the skillet and let them rest covered with foil for about 5 minutes.
  4. In the same skillet, lower the heat and add minced garlic, cooking for 1 minute until fragrant.
  5. Whisk in the heavy cream, Dijon mustard, and Parmesan cheese. Let the sauce simmer and thicken for about 5 minutes.
  6. Slice the filet and plate it, drizzling the Parmesan mustard sauce over the top.
  7. Garnish with freshly chopped parsley and serve immediately.

Recipe Notes

  • The meat should ideally be brought to room temperature before cooking for even cooking.
  • For meal prep, season the steaks a day ahead and store them covered in the refrigerator.
  • Feel free to adjust the amount of mustard based on your taste preference.

Delicious Potsticker Soup with Mushrooms and Bok Choy Recipe

Delicious Potsticker Soup with Mushrooms & Bok Choy

⚖️
Difficulty
Medium

⏲️
Prep Time
20 mins

🕒
Cook Time
30 mins

⏱️
Total Time
50 mins

🍽️
Servings
4 servings

Potsticker Soup with Mushrooms & Bok Choy is the ultimate comfort dish that beautifully combines savory flavors and delightful textures. The aroma wafts through the kitchen as the broth simmers, infusing the air with hints of garlic, ginger, and soy sauce. There’s something inherently soothing about a warm, hearty soup, and this one checks all the boxes. Imagine the tender potstickers gently floating in a savory broth, enriched by the earthiness of mushrooms and the crisp freshness of bok choy, creating a bowl that is as nourishing as it is delicious.

In this soup, every ingredient plays a key role. The potstickers, whether homemade or store-bought, provide a satisfying chew that contrasts wonderfully with the soft mushrooms and crunchy bok choy. The broth is a delicate balance of savory and umami notes, finished with a sprinkle of scallions for brightness. This recipe not only warms the soul but also nourishes the body, making it perfect for cozy dinners or as a comforting meal on chilly days.

Quick Recipe Highlights

  • Flavor Profile: A delightful blend of savory, umami notes from the broth paired with the tender potstickers.
  • Texture: A comforting mix of chewy potstickers, soft mushrooms, and crisp bok choy creates various satisfying mouthfeel.
  • Aroma: The intoxicating scent of garlic and ginger warms the kitchen, promising a delicious meal ahead.
  • Visual Appeal: The bright green bok choy and golden-brown potstickers make for an inviting and colorful presentation.
  • Skill Level Needed: This recipe is quite approachable, requiring basic cooking skills and patience.
  • Special Equipment: A large pot, knife, and cutting board are essential for preparing this soup effortlessly.

Recipe Overview

  • Difficulty Level: This Potsticker Soup is classified as medium difficulty but is quite manageable for those with basic cooking skills.
  • Category: This dish is perfect for a main course and works well as a family meal or for hosting guests.
  • Cuisine: Rooted in Asian culinary traditions, this recipe draws from Chinese potstickers and showcases flavors typically found in beloved Asian soups.
  • Cost: The ingredients are generally affordable, making this dish perfect for budget-conscious meal planning.
  • Season: Potsticker Soup is ideal for fall and winter months when hearty, warming meals are most appreciated.
  • Occasion: This soup is excellent for casual dinners, special occasions, or when hosting friends and family.

Why You’ll Love This Recipe

The blend of flavors in this Potsticker Soup is a standout feature that will keep you coming back for more. Each slurp delivers not just the warmth of the broth but also the satisfying chewiness of the potstickers, making every bite a pleasure. The earthy notes from the mushrooms complement the spontaneous bursts of flavor from the bok choy, creating a dish that feels both heartwarming and gourmet.

Convenience is another reason to love this recipe. With a relatively short prep time, you can have a delicious potsticker soup on the table in under an hour. The recipe allows for both using homemade potstickers for an extra touch or reaching for store-bought options for an even quicker meal. This flexibility makes it suitable for various occasions, whether you’re cooking for a family or whipping up a quick weeknight meal.

Nutritionally, this soup packs a punch. With protein from the potstickers and essential vitamins from the bok choy and mushrooms, it provides a well-rounded meal without excessive calories. The use of low-sodium broth also allows you to control flavors and healthiness, supporting a balanced diet while still satisfying cravings.

This dish is perfect for any gathering, making it a great centerpiece for social events. Whether served as an appetizer or main course, the communal nature of soup encourages sharing and conversation. Its allow-and-feature nature lets your guests personalize their bowls with additional toppings like fresh herbs or chili flakes.

Finally, it stands out for its cost-effectiveness. With affordable ingredients and the ability to make large batches, it’s perfect for meal prep or family dinners. You can easily make it ahead of time and enjoy leftovers, making this soup a great option in your weekly menu repertoire.

Historical Background and Cultural Significance

Potstickers, also known as “jiaozi,” have a rich history in Chinese cuisine, dating back thousands of years. Originating from Northern China, these dumplings are traditionally filled with a variety of meats and vegetables, showcasing the agricultural bounty of the region. Their preparation often involved a steaming method that ensures the filling is tender and juicy, with a crispy bottom when pan-fried. This method has beautifully transitioned into modern recipes, where potstickers are embraced globally in various forms.

The popularity of potstickers has only grown over the years, becoming a favorite in many cultures extending beyond their Chinese roots. In Western cuisine, potstickers have led to numerous adaptations and variations, making them a staple in both casual dining and gourmet restaurants. The combination of dumplings and broth to create potsticker soup reflects the innovative methods through which traditional recipes evolve while still honoring their original heritage.

Evolution is at the heart of this dish. As global culinary influences intertwine, variations of potsticker soup have made their mark, making use of local ingredients and adapting to modern dietary preferences. This adaptability highlights the versatility of traditional cuisines and how they can be reshaped to suit contemporary tastes.

Regionally, variations of potsticker soup can be seen in many Asian countries, with each culture adding its twist to this comforting dish. From the use of different types of dumpling wrappers to the addition of specific local ingredients, every region offers a unique flavor profile. This highlights not just the soup’s international appeal, but also the unifying pleasure found in sharing a meal.

Ingredient Deep Dive

Mushrooms
Mushrooms have long been celebrated in various cultures for their culinary and medicinal properties. In Asian cuisine, shiitake mushrooms are particularly valued for their rich umami flavor, making them an excellent addition to any dish, especially soup. Nutritionally, they are low in calories but packed with vitamins, minerals, and antioxidants. When selecting mushrooms, look for firm, unblemished caps, and store them in a paper bag in the refrigerator to maintain freshness. For alternative options, you can substitute with button or portobello mushrooms.

Bok Choy
Bok choy, also known as Chinese cabbage, has significant cultural importance in Asian cuisine. It’s celebrated not only for its delicate flavor but also for its nutritional benefits, being a great source of vitamins A, C, and K. When choosing bok choy, opt for heads with crisp, vibrant green leaves and firm white stems. Store it in the refrigerator crisper drawer and consume it within a week for optimal freshness. If bok choy isn’t available, other leafy greens like napa cabbage or spinach can serve as suitable substitutes.

Common Mistakes to Avoid

  • Overcrowding the pot: When cooking the potstickers, give them enough space in the pot to cook evenly. Overcrowding can lead to steaming instead of browning.
  • Under-seasoning the broth: Make sure to taste the broth and adjust soy sauce or seasoning as needed; otherwise, it may lack depth.
  • Not properly sealing dumplings: Ensure that the potstickers are well-sealed to prevent them from bursting during cooking, which can release filling into the broth.
  • Using the wrong type of mushrooms: Opt for stronger-flavor mushrooms like shiitake instead of mild types that may dilute the soup’s taste.
  • Cooking on high heat: Maintaining a medium heat allows for gentle simmering and prevents the broth from boiling over, preserving flavors.
  • Using stale ingredients: Always check the freshness of ingredients, especially vegetables, to ensure the best flavor and texture in your soup.
  • Not preheating the pot: Preheating your pot can help achieve better searing for potstickers when pan-frying.
  • Ignoring cooking times: Overcooking bok choy will lead to a mushy texture; add it only near the end of cooking to maintain its crunch.

Essential Techniques

Boiling and Pan-frying Dumplings:
This cooking method is essential for achieving a crispy bottom and tender filling. Start by lightly oiling the pan to prevent sticking, and place the potstickers flat side down. Allow them to sear before adding a small amount of water and covering them to steam. Visual cues for success include golden-brown bottoms and a slight bubbling of the water, indicating they’re cooking properly.

Making Homemade Broth:
Homemade broth is what elevates this soup. It’s vital to simmer ingredients like ginger, garlic, and scallions to maximize flavor. Master this technique by ensuring you’ve roasted the aromatics and then simmered them low and slow for the best results. Avoid boiling too rapidly, which could lead to cloudiness and an imbalance in flavor.

Pro Tips for Perfect Potsticker Soup

1. Make your own potstickers for a truly authentic touch, allowing you to customize fillings to your liking.
2. Use homemade broth if possible; it adds depth of flavor that canned versions often lack.
3. Chill the potstickers before frying – they hold together better when cold.
4. Add a splash of rice vinegar to the broth just before serving for a pleasant tang.
5. Incorporate different mushrooms for varied flavors and textures.
6. Adjust the soup’s thickness by adding more or less broth to suit your preferences.
7. To save time, prepare and freeze potstickers for quick meals later.
8. Use fresh herbs as garnish to enhance the soup’s presentation and flavor.

Variations and Adaptations

Explore various regional adaptations by experimenting with different seasonal vegetables like spinach, kale, or carrots for added nutrition. You can also alter the flavors by using different broth bases, such as chicken or vegetable stock. For dietary modifications, try a vegetarian version by substituting meat-filled dumplings with tofu or mushrooms.

For a twist, consider adding a touch of chili oil or Sriracha to introduce heat. If you prefer a richer soup, add coconut milk for a creamy texture; this can change the taste profile entirely while keeping the essence of the soup. You can also customize texture via the dumplings’ crunchiness, by either frying them longer or baking them before adding to the soup.

Serving and Presentation Guide

Present your Potsticker Soup in large, deep bowls to showcase its vibrant colors. Garnish with sliced scallions or fresh cilantro for a pop of color. Consider serving it with a side of soy sauce or chili oil for dipping your potstickers. When plating, use a ladle to ensure even distribution of broth and ingredients for each serving. Mind the temperature; serve the soup hot to fully enjoy the flavors.

Portion control is important—about 1-2 potstickers per serving allows room for broth and vegetables, making it a balanced meal. Consider serving warm crusty bread on the side to soak up the savory soup.

Wine and Beverage Pairing

Pair this warming Potsticker Soup with a light, refreshing white wine such as Sauvignon Blanc or Pinot Grigio, which complements the delicate flavors without overshadowing them. If you prefer something non-alcoholic, try a sparkling water infused with lemon or ginger for a refreshing contrast. Additionally, a hibiscus tea can provide floral notes that enhance the aromatic profile of the dish.

Temperature is key; ensure that white wine is served chilled to balance the heat of the soup. For a unique pairing, consider serving the dish with a light beer, such as a lager, which offers a crisp and clean finish that can play well with the rich flavors of the soup.

Storage and Shelf Life

To store leftover Potsticker Soup, allow it to cool completely before transferring it to an airtight container. Store in the refrigerator for up to three days. If you wish to freeze it, separate the potstickers and broth into individual portions to prevent sogginess, and use within three months.

Signs of spoilage include an off smell or discoloration. When reheating, use gentle heat either on the stovetop or in the microwave, making sure that it is heated through. Avoid rapid boiling to maintain the potstickers’ texture. If freezing, you can reheat the components separately to preserve the quality.

Make Ahead Strategies

Preparing this Potsticker Soup ahead of time can be a game-changer for busy weeknights. You can make the broth a day in advance, allowing the flavors to develop fully. Store it in the fridge until ready to use. You can also prepare potstickers ahead and freeze them before cooking; this will save time and allow you to cook them fresh only when needed.

When you’re ready to serve, simply bring the broth to a simmer, add the frozen potstickers directly, and let them cook together. Always store the broth and ingredients separately until the day of serving to keep the texture of the potstickers intact. Ensure that any fresh additions, like bok choy, are added toward the end for optimal crunch.

Scaling Instructions

Scaling this Potsticker Soup recipe is straightforward. To halve the recipe, simply divide all ingredients by two, paying attention to cooking times, which may need slight adjustments. For doubling, keep mindful of pot sizes; you may need to split the cooking into batches if your pot isn’t large enough for a crowd.

Be prepared to modify cooking times slightly when scaling due to varying heat distributions in larger batches. Maintain flavor integrity by not skimping on seasonings, and always taste as you adjust ingredient quantities. Store any leftovers correctly, and enjoy them within a few days.

Nutritional Deep Dive

This Potsticker Soup presents a nourishing blend of macronutrients, combining carbohydrates from the potstickers with protein from the filling, and an abundance of vitamins from the vegetables. This balance supports energy needs while delivering the essential nutrients your body craves.

Micronutrient analysis reveals that this dish is particularly rich in vitamins A, C, and K, thanks largely to the bok choy and mushrooms, which are essential for maintaining healthy skin, immune function, and bone health. With careful ingredient choices, this soup provides robust nutritional benefits without overwhelming calories, fitting into various dietary lifestyles.

For those mindful of weight management, serving sizes can be easily adjusted, allowing for filling meals without excess. The soup’s ingredients promote a sense of fullness while providing substantial flavor and feature low-calorie options, perfect for those aiming to maintain their weight or shed a few pounds.

Dietary Adaptations

If you’re looking to make this Potsticker Soup gluten-free, simply ensure that the potstickers are made with gluten-free wrappers and use tamari instead of soy sauce. For vegan versions, replace the meat filling in the potstickers with a mixture of tofu and vegetables, enhancing satisfaction and nutrition.

For those requiring low-carb options, consider skipping the potstickers altogether and load the soup with vegetables such as zucchini or mushrooms instead. A keto adaptation could include using cauliflower rice as a thickener or alternative base while keeping the essence of the soup.

If you’re following a paleo diet, focus on using clean, natural ingredients without processed elements while maintaining the heartiness of the dish. These adaptations provide ways to enjoy a classic recipe while catering to specific dietary needs.

Troubleshooting Guide

If you encounter texture issues with your potstickers, it’s often a sign they weren’t sealed properly or cooked at the right temperature. Ensure you press the edges tightly when filling them and heat your pan adequately before adding them for frying.

Flavor balance can sometimes seem off; adjust by adding more seasoning or acid—like a splash of vinegar or citrus juice can amplify the taste. If the broth becomes too salty during cooking, add water or more vegetables to dilute it, restoring a balanced flavor.

If equipment challenges arise, ensure your pot is large enough to accommodate the ingredients without overcrowding, which could impact overall cooking. Promptly address timing concerns by observing the potstickers and adjusting as necessary to ensure they are cooked through while maintaining their structural integrity.

Recipe Success Stories

Community feedback often highlights how approachable and satisfying this Potsticker Soup is. Home cooks share their experiences of experimenting with various fillings for the potstickers, showcasing the versatility and personal adaptation of the recipe.

Many readers have shared success stories through social media, posting their beautifully plated versions and often tagging friends to share the joy of cooking together. This interaction fuels community engagement and displays various iterations that inspire others to try new takes on the dish.

Photographic tips from audiences reveal how the dish benefits from natural lighting and close-up shots, enticing others to embrace the recipe and share among their circle. As requests for adaptations grow, it showcases the evolving nature of cooking, where the essence remains while accommodating diverse palates.

Frequently Asked Questions

Can I make this soup ahead of time?

Yes, you can prepare the broth ahead of time and store it in the refrigerator. However, it’s best to add the potstickers and bok choy just before serving for optimal freshness.

What type of mushrooms should I use?

Shiitake mushrooms are recommended for their robust flavor, but you can also utilize button mushrooms or portobello, depending on your taste preference.

Can I use store-bought potstickers?

Absolutely! Store-bought potstickers save time and are a convenient option, providing a fast way to enjoy this delicious soup.

How spicy is this soup?

The base recipe is not spicy, but you can adjust the heat by adding chili oil or Sriracha to suit your taste.

How long can I store leftovers?

Leftover soup can be stored in an airtight container in the fridge for up to three days. For longer storage, freeze portions separately.

What should I serve with this soup?

This soup can be served as a main dish, but pairing it with crusty bread or a simple salad could make it a more fulfilling meal.

Is this soup gluten-free?

To make it gluten-free, use gluten-free potsticker wrappers and tamari instead of soy sauce. Always check ingredient labels for hidden gluten.

Can I make this soup vegetarian?

Yes! Simply replace the meat fillings with tofu or vegetables, and use vegetable broth to maintain a vegetarian profile.

How do I adjust the recipe size?

You can easily scale this recipe by halving or doubling the ingredients, adjusting the cooking times slightly based on batch size.

What if my potstickers stick to the pot?

To prevent sticking, ensure the pan is adequately heated and lightly oiled before placing the potstickers inside.

Can I use different types of greens?

Absolutely. If bok choy is not available, you can substitute it with spinach, kale, or napa cabbage for similar textures and flavors.

Additional Resources

For those looking to expand their culinary skills, check out related recipes that incorporate dumplings, soups, and a variety of Asian cuisines. Consider exploring technique guides that delve deeper into making homemade dumplings or crafting rich broth from scratch.

Ingredient information on choosing the best produce, including mushrooms and leafy greens, can enrich your cooking experience. Additionally, consider equipment recommendations when investing in useful kitchen tools, making your cooking process more efficient and enjoyable.

Seasonal variations can inspire creative takes on this soup, allowing you to adapt based on your food preferences and availability of ingredients. Dive into seasonal produce guides for ideas on complementing ingredients that elevate the classic Potsticker Soup.

Join the Conversation

We invite you to share your experiences with this Potsticker Soup on social media! Snap a photo of your dish and tag us for a chance to be featured. Engage with other culinary enthusiasts as you swap tips, insights, and variations.

Photography tips can help you capture the essence of your meal beautifully, enhancing its appeal. We love hearing your recipe reviews, sharing successes, and even the flops that lead to learning opportunities.

Feel free to suggest your own twists on the recipe, whether it’s a unique filling for the potstickers or an innovative broth recipe. Community engagement fuels creativity in the kitchen, shaping future recipes and stories.

The Recipe

Potsticker Soup with Mushrooms & Bok Choy

Serves: 4 servings

Prep Time: 20 mins

Cook Time: 30 mins

Total Time: 50 mins

Kitchen Equipment Needed

  • Large pot
  • Knife and cutting board
  • Wooden spoon
  • Measuring cups and spoons

Ingredients

  • 1 pack (about 1 lb) of potstickers
  • 4 cups low-sodium chicken or vegetable broth
  • 1 cup shiitake mushrooms, sliced
  • 2 cups bok choy, chopped
  • 2 cloves garlic, minced
  • 1 tbsp fresh ginger, grated
  • 2 tbsp soy sauce or tamari
  • 2 green onions, sliced (for garnish)
  • 2 tbsp sesame oil
  • Salt and pepper to taste

Directions

  1. In a large pot, heat sesame oil over medium heat. Add garlic and ginger; sauté until fragrant.
  2. Pour in the broth and bring it to a simmer.
  3. Add the sliced mushrooms and soy sauce, allowing them to cook for about 5-7 minutes.
  4. Introduce the potstickers to the pot and cook according to package instructions, typically 8-10 minutes.
  5. Add the bok choy during the last 2-3 minutes of cooking.
  6. Season with salt and pepper to taste, and garnish with sliced green onions before serving.

Recipe Notes

  • For homemade potstickers, feel free to experiment with different fillings!
  • Leftovers can be stored for 3 days in the fridge or frozen in portions.
  • Adjust the spice level by adding sriracha or chili oil when serving.

Delicious Anti-Inflammatory Creamy Chicken Soup for Better Health

Anti-Inflammatory Creamy Chicken Soup: A Soothing Delight for Your Soul

⚖️
Difficulty
Easy

⏲️
Prep Time
15 mins

🕒
Cook Time
30 mins

⏱️
Total Time
45 mins

🍽️
Servings
4 servings

Indulge in a warm bowl of Anti-Inflammatory Creamy Chicken Soup, crafted specifically to soothe not just the taste buds but also your body. This velvety soup is packed with nutritious ingredients that support an anti-inflammatory diet, making it an ideal choice for anyone looking to alleviate inflammation naturally. The richness of creamy coconut milk combined with tender chicken and a medley of healthy vegetables creates a comforting hug in a bowl, perfect for the chilly evenings or anytime you need a little self-care.

The flavors of this delightful soup are meant to dance on your palate. Picture the savory notes of chicken mingling with the earthiness of thyme and rosemary, complementing the sweetness of carrots and the mild pungency of garlic. The creamy texture, brought to life by the coconut milk, makes every spoonful luxurious while being inherently healthy. This dish doesn’t just nourish your body; it also tantalizes your senses, making you feel like you’re enjoying a gourmet meal without the fuss.

Quick Recipe Highlights

  • Flavor Profile: The blend of coconut milk, tender chicken, and aromatic herbs creates a rich and satisfying soup that’s perfectly balanced.
  • Texture: Creamy and smooth, this soup offers comforting thickness complemented by chunks of soft chicken and vegetables.
  • Aroma: The inviting aroma of garlic and fresh herbs fills your kitchen, making it impossible to resist a taste.
  • Visual Appeal: A beautiful bowl of creamy yellow soup speckled with vibrant vegetables makes for an enticing presentation.
  • Skill Level Needed: This recipe is easy to prepare, making it accessible for novice cooks, yet satisfying for experienced chefs.
  • Special Equipment: A sharp knife, a large pot, and a whisk are all you need for this quick and easy recipe.

Recipe Overview

  • Difficulty Level: This recipe is easy to follow, requiring minimal cooking techniques. The straightforward instructions are perfect for those who are new to cooking.
  • Category: This creamy chicken soup falls under the categories of comforting main dishes and healthy meals, making it versatile for lunch or dinner.
  • Cuisine: With its use of classic herbs and spices, this soup embodies a fusion of traditional chicken soup with a modern, health-oriented twist.
  • Cost: The ingredients for this recipe are budget-friendly, with costs averaging around $15 for a family-sized batch.
  • Season: This soup is perfect for the winter months, providing warmth and nourishment during chilly weather.
  • Occasion: Whether you’re hosting a family dinner or needing a cozy meal for one, this soup fits the bill for all occasions.

Why You’ll Love This Recipe

This Anti-Inflammatory Creamy Chicken Soup brings together a harmonious blend of flavors and textures that is incredibly satisfying. The rich, creamy base paired with wholesome ingredients provides not only comfort but also nourishment for your body. Each bowl encapsulates the warmth of home cooking, inviting you to take a moment to unwind and enjoy a nutritious meal.

Convenience is another reason to love this soup. It comes together quickly, making it an excellent choice for busy weeknights or when unexpected guests arrive. You can easily prep the ingredients ahead of time and have a delicious and healthy meal ready in about 45 minutes, without sacrificing flavor or quality.

Nutritionally, this soup packs a powerful punch. Due to its anti-inflammatory ingredients such as ginger and turmeric, it supports your immune system and can help alleviate symptoms of inflammation. This makes it ideal for those looking to maintain a healthy lifestyle without compromising on taste.

Socially, this recipe serves as a great centerpiece for gatherings or family dinners. Sharing a hearty soup shows love and care, warming hearts and bellies alike. The delightful aroma wafting through your home will have everyone eagerly anticipating a bowl, encouraging shared moments together.

Cost-effectiveness is yet another bonus. With affordable ingredients, this dish allows you to create a wholesome meal without breaking the bank, making it not only a healthy option but also a wallet-friendly one that you can enjoy again and again.

Historical Background and Cultural Significance

Chicken soup has long been a staple in many cultures, often viewed as a healing dish. Its origins can be traced back to ancient civilizations, where it was commonly used to nourish and restore health. The belief that chicken soup can soothe the sick and bring comfort has transcended cultural boundaries, making it a universal remedy for ailments ranging from colds to emotional distress.

As this soup evolved, many variations appeared globally, from the herbed chicken soups of France to the spicy chicken dishes of Southeast Asia. Each region sprinkles its unique spices, herbs, and cooking techniques, enhancing both flavor and cultural significance. The version we present today combines the best of traditional comfort and modern health-consciousness, embracing the benefits of anti-inflammatory ingredients.

Today, we cherish creamy chicken soup as a go-to meal for both families and individuals. It evokes nostalgia and warmth, likely reminding many of their own childhood experiences of being cared for by a loved one during times of illness or post-adventure tiredness. This emotional connection helps to solidify the soup’s place in our culinary hearts.

Regional variations also reflect the diversity of ingredients available across the globe, with creative adaptations often becoming local favorites. Whether it’s a spicy twist from the Caribbean or a creamy version found in northern Europe, chicken soup continues to thrive in various cultures, uniting people through shared experiences of comfort and nourishment.

Ingredient Deep Dive

Chicken: Chicken is the heart of our soup, providing both protein and flavor. Historically, it has been a staple in many diets worldwide due to its versatility and availability. Nutritionally, chicken is rich in B vitamins and essential amino acids, promoting muscle growth and immune support. When selecting chicken, opt for free-range or organic varieties when possible to enhance flavor and texture. Proper storage involves refrigerating raw chicken and cooking it promptly to avoid spoilage.

Coconut Milk: This rich ingredient adds creaminess and a hint of sweetness to the soup while keeping it dairy-free. Cultures in tropical regions have enjoyed coconut milk in their diets for centuries, celebrated for its creamy texture and health benefits. It contains healthy fats, particularly medium-chain triglycerides, which are excellent for energy and metabolism. When selecting coconut milk, choose canned versions that are full-fat for optimal flavor. Store opened cans in the fridge, using them within a few days.

Common Mistakes to Avoid

  • Using low-quality chicken: Using inferior quality chicken can lead to tough meat and an unappetizing broth. Always opt for fresh or organic chicken for the best results.
  • Overcooking the chicken: Cooking the chicken for too long may make it dry and unpalatable. Aim for just tender, then remove it to prevent further cooking.
  • Neglecting aromatics: Skipping onions, garlic, or herbs can lead to a bland soup. Aromatics enhance the depth of flavor and should not be overlooked.
  • Ignoring simmer time: Failing to let the soup simmer can prevent flavors from fully developing. Allow it to simmer gently for optimal consistency and taste.
  • Using cold liquids: Adding cold broth or water can halt the cooking process.To maintain a steady temperature, add warm liquid to the pot.
  • Not seasoning adequately: Under-seasoning can result in a bland soup. Always taste and adjust the seasoning throughout the cooking process.
  • Skipping the whisk: Not whisking the coconut milk before adding it can lead to lumps in your soup. Always give it a good stir for a smooth texture.
  • Not adjusting for thickness: If your soup is too thick, you can add additional broth or water. Be sure to monitor consistency for a pleasant mouthfeel.
  • Disregarding the finish: Adding additional fresh herbs or a squeeze of citrus at the end elevates the flavor. Don’t forget these final touches!

Essential Techniques

Simmering: Simmering is essential in developing deep flavors in your soup. It allows the ingredients to release their natural essences without boiling away too quickly. Master this by keeping your pot at a gentle bubbling point and monitoring the heat closely. Look for small bubbles forming without a vigorous boil, which indicates your soup is simmering perfectly.

Whisking: Whisking is crucial when incorporating coconut milk into your soup to avoid lumps. Start by using a small bowl to mix a bit of warmed broth with the coconut milk. Gradually add it back into the pot while whisking consistently for a smooth consistency. When done correctly, your soup will be beautifully creamy and luxuriously thick.

Pro Tips for Perfect Anti-Inflammatory Creamy Chicken Soup

1. For extra flavor, sear the chicken in the pot before adding other ingredients. This creates a rich fond for the soup.
2. Add vegetables that complement the soup, like spinach or kale, towards the last few minutes for added nutrition and color.
3. Feel free to substitute chicken with turkey or a plant-based protein for a different flavor profile.
4. Use homemade broth if possible for the utmost in flavor and health benefits.
5. Enhance depth by adding a splash of lemon juice or apple cider vinegar right before serving.
6. Include a variety of spices like turmeric or black pepper to heighten the soup’s anti-inflammatory properties.
7. For a spicy kick, consider adding red pepper flakes or a dash of your favorite hot sauce.
8. Always let the soup cool completely before storing, ensuring freshness when reheating later.

Variations and Adaptations

For a regional twist, consider adding spices specific to a culture of your choice, such as cumin and coriander for an Indian flair, or use smoked paprika for a Spanish influence. Seasonal adaptations might include using butternut squash in the fall or fresh herbs like cilantro during summer. Dietary modifications are easily achieved by swapping chicken with chickpeas or tofu for a vegetarian option. Flavor variations can come from different bases—like vegetable broth instead of chicken—or incorporating citrus zest for a refreshing touch. You can also adapt the texture by blending part of the soup for a creamier consistency or adding cooked grains for heartiness. Presentation alternatives like serving in hollowed-out bread bowls or garnishing with roasted seeds will impress your guests.

Serving and Presentation Guide

Plating techniques play an essential role in presenting your soup. Use a shallow bowl to showcase the creamy texture, and garnish with fresh herbs or a swirl of coconut cream for contrast. Garnishing ideas such as crispy croutons or a sprinkle of nutritional yeast can enhance both visual appeal and flavor. Traditional accompaniments include crusty bread or a fresh green salad, while modern serving suggestions could involve pairing with a tangy dipping sauce or savory pastries. Ensure the soup is served warm, maintaining quality and flavor. For portion control, scoop even amounts into bowls to create uniform servings.

Wine and Beverage Pairing

Chardonnay pairs beautifully with creamy chicken soup thanks to its rich and buttery profile that complements the soup’s flavors. For a red option, consider a light Pinot Noir, offering a delicate balance without overpowering the dish. Non-alcoholic alternatives like sparkling water with a slice of lemon can refresh the palate and enhance the meal. If you enjoy coffee, a smooth, medium-roast coffee can evoke warmth, accentuating the comforting nature of the soup. Remember to serve beverages at appropriate temperatures; chilled for wines and room temperature for coffee.

Storage and Shelf Life

For storage methods, always cool your soup to room temperature before transferring it to airtight containers. Refrigerate and consume within 3 to 4 days for freshness, or freeze it for extended shelf life—up to 3 months. When reheating, ensure you do so gently on the stove to maintain flavor and texture. Avoid microwaving, as it may result in a rubbery consistency. Signs of spoilage include off-smells or strange colors. If you see any changes, it’s best to discard the soup.

Make Ahead Strategies

To prepare ahead, chop vegetables and season the chicken the day before, storing them in airtight containers in the fridge. You can also cook the soup completely and freeze portions, ensuring you leave space in containers to avoid explosions from expansion. Assessing quality impacts means knowing that freezing may slightly alter texture, but flavors will remain intact. When ready to serve, thaw in the fridge overnight and reheat gently. Consider adding fresh herbs or a squeeze of lemon just before serving to uplift the dish.

Scaling Instructions

When halving the recipe, remember that cooking times won’t change significantly, but ensure you use a smaller pot to maintain consistent heat. Doubling or tripling the recipe requires larger pots or stockpots; adjust the heat accordingly to cook evenly. Timing modifications may include longer simmering if making a larger batch. Ensure storage considerations allow for adequate cooling space before freezing or refrigerating larger amounts.

Nutritional Deep Dive

Analyzing macronutrients shows that each serving of the soup provides a balanced amount of protein, healthy fats from coconut milk, and fiber from vegetables. Micronutrient analysis highlights essential vitamins and minerals, including B-vitamins, potassium, and magnesium, all contributing to overall health. The health benefits are compounded with the soup’s anti-inflammatory properties, making it a great choice for anyone interested in boosting immunity. Portion analysis reveals it’s easy to control serving sizes, supporting weight management efforts.

Dietary Adaptations

For gluten-free diets, ensure all broths and seasonings used are certified gluten-free. Dairy-free options are covered with the use of coconut milk instead of dairy cream. For vegans, replace chicken with chickpeas or lentils to maintain protein content. Low-carb enthusiasts can skip the more starchy vegetables or use cauliflower in place of potatoes. Keto-friendly adaptations can also be achieved by integrating more fibrous vegetables, while maintaining a low carbohydrate count. Paleo diets are accommodated through the absence of grains or processed ingredients.

Troubleshooting Guide

If your soup turns out too thin, add a cornstarch slurry to thicken it up. If it’s too thick, just a little more broth or water can help adjust the consistency. For flavor balance issues, consider adding more herbs and spices progressively. If the soup is too hot, allow it to cool before serving. Equipment challenges can arise from using the wrong pots—stick with heavy-bottomed to avoid scorching. Ingredient substitutions can alter outcomes; always account for moisture and seasoning differences in replacements.

Recipe Success Stories

Community feedback on this Anti-Inflammatory Creamy Chicken Soup suggests that it has become a household favorite for many. Readers have shared how they adapted the recipe to accommodate dietary needs while retaining the comforting essence. Moreover, recipe variations shared by readers have opened up new flavor experiences, showing the versatility of this dish. Ample photography tips have also been shared, inspiring others to document their cooking adventures.

Frequently Asked Questions

Q1: Can I use leftover chicken for this soup?

Absolutely! Leftover roasted chicken or rotisserie chicken works perfectly and can save prep time. Just add it towards the end of the cooking process to warm it through.

Q2: Is there a way to make this soup spicier?

Yes! You can add crushed red pepper flakes or diced jalapeños during the cooking process to boost the heat level. Adjust according to your spice tolerance.

Q3: Can I freeze this soup?

Yes! This creamy chicken soup freezes well. Just ensure to store it in an airtight container, and it should hold up for about three months. Thaw in the fridge overnight before reheating.

Q4: Can I substitute coconut milk for regular cream?

Definitely! While coconut milk provides a unique flavor and health benefits, you can use regular cream if you prefer. Ensure to adjust other liquids as needed to maintain consistency.

Q5: How long does the leftovers last in the fridge?

Leftover soup can last in the fridge for up to four days. Be sure to store it in an airtight container for freshness.

Q6: What can I serve with the soup?

This soup pairs wonderfully with crusty bread, a fresh salad, or even crackers for dipping. You can also serve it alone for a light lunch or dinner.

Q7: Are there any vegetarian options for this recipe?

Yes! You can replace the chicken with chickpeas, lentils, or any hearty vegetables to maintain the texture and protein content in a vegetarian version of this soup.

Q8: What herbs work best in this soup?

Fresh herbs like thyme, rosemary, and parsley are excellent choices. You can add them towards the end for a burst of fresh flavor.

Q9: Can I make this recipe in a slow cooker?

Yes, you can! Cook on low for 4-6 hours or high for 2-3 hours. Add coconut milk towards the end to maintain its creaminess.

Q10: How can I add more vegetables to this soup?

You can incorporate multiple vegetables such as spinach, peas, or bell peppers. Add them according to their cook times to ensure they remain vibrant and tender.

Additional Resources

For more delicious ideas, check out my other comforting soup recipes such as Butternut Squash Soup or Tomato Basil Soup, both packed with flavors that warm the soul. Dive deep into technique guides that cover simmering, sautéing, and seasoning. Ingredient information is readily available for a range of healthy vegetables and grains that can elevate your meals. Additionally, explore equipment recommendations to enhance your cooking experience, focusing on tools that save time and improve efficiency.

Join the Conversation

I invite you to join our vibrant community on social media by sharing your own creations inspired by this Anti-Inflammatory Creamy Chicken Soup. Post your photos, share your variations, and leave reviews—we love to hear from you! Engage with other readers, swap tips, and participate in discussions around healthy cooking. Together, let’s celebrate delicious and nutritious recipes that bring joy and comfort to our kitchens!

The Recipe

Anti-Inflammatory Creamy Chicken Soup

Serves: 4 servings

Prep Time: 15 mins

Cook Time: 30 mins

Total Time: 45 mins

Kitchen Equipment Needed

  • Large pot
  • Sharp knife
  • Wooden spoon
  • Whisk
  • Airtight containers for storage

Ingredients

  • 1 lb boneless, skinless chicken breast, diced
  • 1 can (13.5 oz) coconut milk
  • 3 cups chicken or vegetable broth
  • 1 cup carrots, diced
  • 1 cup celery, diced
  • 1 medium onion, diced
  • 3 cloves garlic, minced
  • 1 tablespoon fresh ginger, grated
  • 1 teaspoon turmeric
  • 1 teaspoon thyme
  • Salt and pepper to taste
  • Fresh parsley for garnish

Directions

  1. In a large pot, heat olive oil over medium heat. Add diced onion, garlic, and ginger. Sauté until fragrant and onions are translucent.
  2. Add diced chicken and cook until browned, stirring occasionally—about 5-7 minutes.
  3. Stir in carrots, celery, turmeric, thyme, salt, and pepper. Cook for an additional 2 minutes.
  4. Pour in chicken broth and bring the mixture to a boil. Reduce heat and let simmer for 15-20 minutes until vegetables are tender.
  5. Stir in coconut milk and heat through. Adjust seasoning as needed before removing from heat.
  6. Serve hot, garnished with fresh parsley.

Recipe Notes

  • Feel free to add other vegetables like spinach or peas for additional flavor and nutrients.
  • You can substitute chicken with turkey or a plant-based protein for a different flavor experience.

Delicious Rotel Cream Cheese Sausage Balls Recipe for Parties

Delicious Rotel Cream Cheese Sausage Balls: An Irresistible Snack

⚖️
Difficulty
Easy

⏲️
Prep Time
10 mins

🕒
Cook Time
20 mins

⏱️
Total Time
30 mins

🍽️
Servings
24 balls

These Rotel Cream Cheese Sausage Balls are the perfect treat for any gathering, adding a burst of flavor and fun to your snack table. Imagine biting into a warm, cheesy ball that’s packed with the savory goodness of sausage and a hint of spicy Rotel. The blend of cream cheese and sausage creates a rich, indulgent experience that will keep your guests coming back for more. These delicious bites are easy to prepare and cook quickly, making them an ideal choice for both casual get-togethers and festive occasions.

What makes these sausage balls irresistible is not just their incredible taste, but also their versatile nature. Whether served at a game day party, holiday gathering, or just as an after-school snack, they cater to various tastes. With their golden-brown exterior and gooey center, Rotel Cream Cheese Sausage Balls are not only a feast for the palate but also a treat for the eyes.

Quick Recipe Highlights

  • Flavor Profile: The combination of spicy Rotel, creamy cheese, and savory sausage creates a delightful balance of rich and zesty flavors.
  • Texture: Each bite offers a wonderful contrast between the crispy outer layer and the tender, cheesy interior.
  • Aroma: The tantalizing smell of cooked sausage combined with the distinctive scent of cheese and spices makes these balls stand out.
  • Visual Appeal: Their inviting golden color and round shape make them enticing for guests of all ages.
  • Skill Level Needed: This recipe is straightforward and perfect for beginner cooks, requiring minimal culinary skills.
  • Special Equipment: All you need is a mixing bowl and a baking sheet, making it hassle-free to whip these up.

Recipe Overview

  • Difficulty Level: These sausage balls are incredibly easy to make, with only a few steps from start to finish, making them perfect even for those new to cooking.
  • Category: Appetizer or snack, ideal for a variety of occasions, from casual gatherings to formal events.
  • Cuisine: Rooted in Southern cuisine, these sausage balls reflect the region’s love for hearty, flavorful dishes.
  • Cost: Ingredients are affordable and commonly found, allowing for a substantial quantity without breaking the bank.
  • Season: While great year-round, they shine particularly during cooler months and holidays.
  • Occasion: Perfect for parties, holiday celebrations, or even as a game day snack, appealing to both adults and children alike.

Why You’ll Love This Recipe

Savoring these Rotel Cream Cheese Sausage Balls is an experience unlike any other. The rich flavors harmonize perfectly, delivering a taste that is both comforting and exciting. The creamy cheese balances the spice of Rotel, creating a unique and delectable flavor profile that keeps you reaching for more. Their satisfying texture enhances the eating experience, providing a delightful mix of crunch and softness that is truly irresistible.

Ease of preparation is another reason to adore this recipe. With just a handful of ingredients, you can create something spectacular and delicious in under 30 minutes. This convenience means you can focus on enjoying your guests’ company rather than being stuck in the kitchen. Plus, the cleanup is a breeze, making it an even more appealing option for busy times.

Nutritionally, these sausage balls offer protein and flavor, giving you energy and satisfaction. They can serve as a hearty appetizer without overwhelming your meal plans, great for those who are conscious of their dietary choices but don’t want to compromise on taste.

Gathering around with friends and family to enjoy food is what makes these sausage balls significant. They can spark conversation and joy at any event, festive or casual, acting as the centerpiece of your appetizers. Share these delicious bites, and you’ll likely hear rave reviews that encourage a vibrant, interactive atmosphere.

Lastly, the cost-effectiveness of this recipe allows you to serve many guests without overspending. With simple ingredients and minimal preparation time, you’ll find that Rotel Cream Cheese Sausage Balls not only please the palate but also your wallet.

Historical Background and Cultural Significance

The origin of sausage balls can be traced back to Southern kitchens, where the combination of sausage and cheese became an instant classic. Often seen at family gatherings and festive occasions, these snacks reflect the area’s love for hearty food that brings people together. In Southern culture, food often plays a vital role in celebrating community and camaraderie, making these balls a popular choice at potlucks and parties.

Culturally, sausage balls have grown beyond their Southern roots, gaining popularity in various settings across the United States. They’re frequently featured at gatherings, sports events, and holiday parties due to their portability and crowd-pleasing flavor. Their ability to cater to diverse taste preferences contributes to their ambiance-enhancing qualities, making them a staple in many homes.

Over the years, the basic recipe has evolved, leading to creative adaptations that incorporate different meats, spices, and cheeses. While the classic Rotel Cream Cheese Sausage Balls remain beloved, variations abound, allowing home cooks to express individuality through culinary artistry while maintaining the dish’s traditional essence.

Regional variations have also emerged, showcasing unique culinary elements. In some areas, users might substitute the sausage for turkey or chicken, while others might add vegetables to create a healthier twist. Despite these adaptations, the core appeal remains, rooted in the ease of preparation and the comforting flavors that unite everyone around the table.

Ingredient Deep Dive

Rotel tomatoes are a key ingredient in this recipe, known for their vibrant red color and zesty flavor profile. They bring a kick that elevates the overall taste of the sausage balls. This popular brand has become synonymous with Tex-Mex dishes, showcasing its integral role in various Southern and Southwestern cuisines. Rich in vitamins A and C, Rotel not only enhances flavor but also contributes nutritional benefits, such as antioxidants.

When selecting Rotel, consider varieties that suit your spice tolerance, as they come in mild, original, and spicy options. Store any leftover can in the fridge, ensuring sealed tightly to preserve freshness. If fresh tomatoes are available, you could opt for dicing them and adding spices for a homemade substitute.

Cream cheese is another star ingredient that brings richness and smoothness to these sausage balls. Known for its creamy texture, it’s a versatile cheese celebrated in various dishes, from cheesecakes to dips. The high fat content ensures moisture, contributing to the appealing mouthfeel of the finished product. Nutritionally, cream cheese offers protein, calcium, and certain vitamins, though it’s important to consume it in moderation due to its calorie count.

When purchasing cream cheese, look for blocks rather than spreadable varieties, as they tend to melt better in cooking. Store it in the refrigerator, and be mindful of its expiration date; it typically lasts about two weeks after opening. For healthier alternatives, consider using Greek yogurt, though it may alter texture slightly.

Sausage, the third main ingredient, is rich in flavor and protein, lending its hearty essence to the dish. Available in various types, including pork, turkey, and chicken, it serves as the primary source of protein in these sausage balls. Each type offers a different taste experience, allowing for personal preference and dietary considerations.

When selecting sausage, choose high-quality products from reputable brands to ensure freshness and flavor. Store it in the fridge, and if you plan to freeze, wrap it tightly to avoid freezer burn. Additionally, experimenting with flavored sausages or leaner varieties can create new dimensions of taste in your sausage balls.

Common Mistakes to Avoid

  • Overmixing the dough: Mixing too rigorously can lead to tough sausage balls. Combine just until the ingredients are evenly distributed for a tender texture.
  • Not using enough cream cheese: Insufficient cream cheese will impact the moisture and creaminess of the balls. Always follow the suggested measurements for the best results.
  • Skipping the chilling step: Not refrigerating the mixture before baking can lead to flattening during cooking. Allowing the mixture to chill helps maintain shape.
  • Baking at incorrect temperature: Make sure to preheat your oven to the proper temperature; an incorrect setting can lead to uneven cooking.
  • Insufficient seasoning: Under-seasoning can make these flavorful bites bland. Adjust spices according to your taste preferences for maximum flavor.
  • Not checking for doneness: Always use a kitchen thermometer to ensure the sausage reaches a safe internal temperature of 160°F (70°C).
  • Overcooking: Leaving them in the oven too long can dry them out. Keep a close eye on the baking time for peak flavor.
  • Forgetting to grease the baking sheet: A non-greased baking sheet can result in sticking. Ensure you lightly grease or use parchment paper for easy cleanup.
  • Using low-quality ingredients: Investing in quality sausage, cheese, and Rotel significantly enhances flavor and texture, leading to a more satisfying outcome.
  • Ignoring leftover storage: Failing to store leftovers properly can lead to spoilage. Always cool and refrigerate them in an airtight container.

Essential Techniques

One essential technique for making sausage balls is proper mixing. This is crucial because it blends flavors without overworking the ingredients, which can change the texture of the final product. To master mixing, combine the ingredients until just incorporated to yield tender results. Watch for dough that is too sticky or too dry; aim for a consistent, moldable mixture.

Another vital skill involves monitoring the baking time and temperature. The right temperature ensures even cooking without burning or drying out the balls. Always adjust the oven according to your recipe, and keep a close watch as they approach the finish time. Look for a golden-brown exterior and use a kitchen thermometer to check for doneness.

Pro Tips for Perfect Rotel Cream Cheese Sausage Balls

Start with room temperature ingredients to allow for easier mixing and a smoother consistency in your dough. This helps achieve a uniform texture and prevents lumps from forming.

Experiment with different types of sausage, such as spicy sausage or turkey sausage, to alter the flavor profile. Each type can bring a unique taste and texture to your sausage balls.

Adding finely chopped vegetables like green onions or bell peppers can enhance flavor and add nutritional value. Be sure to adjust your baking time accordingly based on any additional ingredients.

For a cheesy twist, incorporate shredded cheese into the mixture before baking. This extra cheese can melt beautifully inside the sausage balls, providing an even creamier texture.

Using parchment paper on your baking sheet can help reduce cleanup time and prevent sticking, ensuring that your sausage balls maintain their shape as they bake.

If you prefer mini sausage balls, simply adjust the cooking time, as smaller ones will cook through quicker, giving you more bite-sized treats.

Lastly, let the baked sausage balls cool slightly before serving. This allows the flavors to set and makes them easier to handle for serving.

Variations and Adaptations

For regional variations, consider incorporating local spices or flavors from a specific cuisine, such as using chorizo or incorporating cumin for a Southwest twist. This experimentation can elevate the traditional recipe, bringing exciting new tastes to the table.

Seasonal adaptations can also make the dish more relevant. For instance, during the holidays, consider offering a mix of herbs like sage or rosemary to enhance the savory flavors, creating a festive touch.

Dietary modifications are readily achievable with this recipe. Opt for gluten-free bread crumbs to cater to gluten-sensitive guests, or experiment with vegetarian sausage alternatives for a satisfying meatless option.

For a different flavor profile, introduce additional spices such as smoked paprika or garlic powder. These can transform the dish, offering a unique taste experience that garners rave reviews.

Texture modifications might include adding crushed crackers or breadcrumbs to incorporate a crunchier exterior while maintaining the soft center, enhancing the overall eating experience.

Considering presentation alternatives, arrange the sausage balls on a beautiful platter and add a colorful dip, such as a spicy ranch dressing. This not only elevates visual appeal but provides a flavorful complement to your dish.

Serving and Presentation Guide

Plating techniques for serving Rotel Cream Cheese Sausage Balls can include arranging them in a circular formation on a large, vibrant platter. Use a contrasting color plate to make the golden-brown balls stand out visually, creating an inviting presentation.

For garnishing ideas, you can sprinkle fresh herbs like parsley or chives on top to add pops of color and freshness. Offering a small bowl of spicy dipping sauce on the side also enhances the visual layout while providing guests with additional flavor options.

Traditional accompaniments could include toothpicks for easy serving or even small, festive paper cups. These provide convenience for guests and help keep your serving area tidy during gatherings.

Modern serving suggestions might incorporate individual serving bowls, allowing for personal portions as part of a buffet setup. Allowing guests to choose their servings can also create a more relaxed dining experience.

Temperature considerations are critical; ensure that the sausage balls are served warm. You can keep them in a low oven (around 200°F) if needed while guests arrive, ensuring they remain warm and inviting.

Portion control tips can help in keeping guests satisfied without overindulging. A good rule of thumb is to offer two to three sausage balls per person as an appetizer, ensuring everyone can enjoy the treat without waste.

Wine and Beverage Pairing

When it comes to wine pairings, an off-dry Riesling complements the spice of Rotel nicely, balancing the heat with sweetness. For red wine lovers, a light-bodied Pinot Noir can be an excellent choice, enhancing the richness of the cheesy sausage balls without overpowering the flavors.

For non-alcoholic alternatives, consider serving a refreshing iced tea or lemonade with mint, as the herbal notes will add a unique twist alongside the savory flavors of the sausage balls. This creates a wonderful balance between refreshing and hearty.

If coffee or tea is on the menu, serve a light roasted coffee that won’t interfere with the dish’s flavors; a nutty, lightly sweet tea can also provide a pleasant contrast.

Temperature considerations are essential; serving your wines chilled will offer a refreshing experience, especially if enjoying these tasty bites during a warm gathering or outdoor event.

Offering drinks that are versatile and can adapt to the occasion will help ensure that your guests enjoy the experience completely.

Storage and Shelf Life

For storing leftover Rotel Cream Cheese Sausage Balls, place them in an airtight container and refrigerate immediately after they cool. This will preserve their freshness for up to 3 days, maintaining taste and texture.

Ensure that the container is well-sealed to prevent the balls from absorbing any other odors in the refrigerator. If there’s a risk of longer storage, consider freezing them for extended shelf life.

When it comes to reheating, use an oven set to 350°F for about 10-15 minutes to regain the crisp exterior without drying them out. Avoid microwaving, as this can make them rubbery and affect their taste and texture.

Signs of spoilage include unusual smells, significant changes in texture, or visible mold. If any of these signs are present, it’s best to discard the remaining sausage balls.

For freezing, arrange the balls in a single layer on a baking sheet before transferring them to your freezer. Once frozen, you can place them in a freezer bag for up to three months. This method helps keep their shape during storage.

Make Ahead Strategies

For those looking to prep in advance, you can mix the sausage ball ingredients the night before. Simply cover your bowl with plastic wrap and keep it refrigerated to enhance the flavor marriage before cooking.

You can also roll the mixture into balls and store them in the fridge or freezer. Just bake them when your event approaches, making serving easy and allowing for freshly baked bites.

When assembling, consider preparing sauce or dips ahead of time, allowing flavors to meld together. This adds convenience during your serving time and also enhances taste quality.

Before baking, allow the sausage balls to sit at room temperature for about 20 minutes for even cooking. This is especially crucial when pulling them straight from the refrigerator.

If you’re including fresh elements (like cilantro or herbs), add these right before serving to ensure they remain vibrant and fresh, improving presentation and taste.

Scaling Instructions

If you want to halve the recipe, ensure you adjust the cooking time slightly, as smaller batch sizes can cook faster. Always check for doneness a few minutes earlier than the original time.

For doubling or tripling the recipe, feel free to mix larger quantities in a big bowl but be mindful of your oven space. You might need to bake in separate batches to ensure even cooking.

Equipment adjustments may be necessary for larger quantities. For example, using larger baking sheets or even multiple sheets can speed the cooking process.

Be conscious of timing modifications when scaling. Larger batches may require extra cooking time, while smaller ones may need less. Use a thermometer to check the internal temperature consistently.

Storage considerations are also important when scaling. Leftover portions should be stored separately from those meant for immediate serving, allowing you to enjoy them later without compromising their quality.

Nutritional Deep Dive

Examining the macro breakdown, each sausage ball is rich in protein due to the sausage and cream cheese, making them a filling appetizer. They do carry a higher fat content, primarily from the cream cheese and sausage, so moderation is key.

In terms of micronutrient analysis, the ingredients contribute vitamins A, C, and essential minerals such as calcium and iron. The Rotel adds additional vitamin C, while sausage can be a good source of B vitamins, vital for energy.

When considering health benefits, the protein-rich nature aids in muscle maintenance and feeling satiated longer. The blend of flavors also makes these balls satisfying, which can prevent overeating other less nutritious snacks.

It’s important to analyze portions, especially during gatherings where these may be consumed in larger quantities. Adhering to the recommended two to three sausage balls ensures enjoyment without excess calories.

For those being mindful of weight management, consider pairing the balls with lighter options, such as a fresh salad, to create a balanced plate that satisfies cravings for flavor while being mindful of caloric intake.

Dietary Adaptations

For gluten-free adaptations, substitute breadcrumbs with crushed gluten-free crackers or almond flour. This will keep the sausage balls together without altering the pleasing taste.

If looking for a dairy-free option, replace cream cheese with a plant-based alternative or avocado, which can still provide creaminess while catering to dietary restrictions.

For vegan adaptations, consider using plant-based sausage and combining it with a dairy-free cream cheese alternative. This modification allows for a similar flavor experience without animal products.

On the low-carb front, skipping breadcrumbs altogether or substituting them with grated cauliflower can significantly cut carbohydrates without sacrificing texture.

For keto diets, ensure to select high-fat, low-carb sausage and replace any high-carb ingredients accordingly. This can align the dish with keto principles while delivering satisfaction.

Lastly, paleo modifications might include using clean, minimally processed sausage and dropping any cheese from the recipe, emphasizing whole-food-based ingredients.

Troubleshooting Guide

For texture issues, if your sausage balls come out dry, it often indicates overbaking. Monitor closely, and remove them once golden brown to maintain moisture.

Flavor balance can be affected by ingredient variations. If the sausage balls are too salty or bland, adjust the spices in your mixture; add fresh herbs or a splash of hot sauce to enhance the flavors.

Temperature problems arise when the oven is not preheated, resulting in uneven cooking. Always ensure that your oven reaches the desired temperature before placing the sausage balls inside.

If facing equipment challenges, like a baking sheet not fitting in your oven, consider rotating the trays if baking in batches. This helps maintain consistent size and ensures adequate cooking time.

Ingredient substitutions may lead to unexpected results; if using turkey sausage, for instance, it can result in a drier texture. Try mixing in some more cream cheese or a splash of broth to retain moisture.

Timing concerns can be managed by checking the cooking process regularly. Ovens can vary in accuracy, so always use a kitchen thermometer to gauge the doneness of your sausage balls early.

Recipe Success Stories

Feedback from the community consistently highlights the ease of preparation as a great advantage in this recipe. Many readers have reported making these sausage balls for special gatherings, finding them to be instant crowd-pleasers.

Variation successes abound as creative cooks share how they’ve adapted the recipe, from adding unique seasonings to experimenting with different types of sausage. This encourages creativity in the kitchen while maintaining a popular classic.

Readers’ suggestions on photography tips emphasize the importance of natural light; capturing your sausage balls in that bright, inviting glow adds sociability to online recipe sharing.

Tips received emphasize the importance of keeping flavors balanced, with users sharing their experiences on how to mindfully integrate seasoning for the best-tasting results.

Statistics show high engagement on social media when sharing this recipe, praising not only flavor but also versatility, leading to ongoing community connections around a classic dish.

Frequently Asked Questions

Can I freeze Rotel Cream Cheese Sausage Balls?
Yes, you can freeze them. It’s recommended to freeze them uncooked on a baking sheet and then transfer them to a freezer-safe bag. When ready to enjoy, bake them directly from frozen, adding a few extra minutes to the cooking time.

What is the best way to reheat leftover sausage balls?
The best way to reheat sausage balls is to bake them in a preheated oven at 350°F for about 10-15 minutes until heated through. This will help keep them from getting soggy as in the microwave.

Can I substitute different cheeses?
Absolutely! Feel free to experiment with different cheese varieties like sharp cheddar or pepper jack to customize the flavor of your sausage balls. Just ensure that the cheese you choose melts well.

How do I store leftover Rotel Cream Cheese Sausage Balls?
Store baked sausage balls in an airtight container in the refrigerator for up to 3 days. Make sure they cool completely before sealing in a container to maintain their texture.

Are there any vegetarian substitutes for sausage?
Yes, look for plant-based sausage alternatives available at many grocery stores. These usually work well in this recipe while providing the same satisfying texture and shape.

What are some good dipping sauces to serve with sausage balls?
Popular dipping sauces include ranch dressing, BBQ sauce, or a spicy ketchup. You can also create a yogurt-based dip for a cooling effect alongside the spiciness.

Can I make these sausage balls ahead of time?
Definitely! You can prepare the mixture and even form the balls a day in advance. Store them in the refrigerator and then bake when you’re ready to serve.

What type of sausage is best for this recipe?
You can use any type of sausage—pork, turkey, or even chicken. Just choose one with good flavor and fat content to ensure the finished balls are moist and tasty.

Is it necessary to chill the mixture before baking?
Chilling the mixture can help the balls hold their shape better during baking, although it’s not mandatory. It can improve the overall texture and prevent them from flattening.

Can I use fresh tomatoes instead of Rotel?
Fresh tomatoes can be used if you prefer, but you may want to add some spices for heat and flavor. Rotel adds a distinctive zest that can be hard to replicate, so consider using diced tomatoes with green chilies as a substitute.

Additional Resources

For those looking to expand their culinary repertoire, consider exploring related recipes that feature sausage or cheese, such as stuffed peppers or cheese dips. These can create a delightful appetizer spread that complements your sausage balls.

Technique guides on mixing, baking pointers, and knife skills can enhance your cooking experience when preparing dishes that require finesse and precision.

Ingredient information about various types of sausage can provide clarity on which products best suit your nutrition and flavor preferences, making your shopping experience easier.

Equipment recommendations for necessary kitchen tools can help set you up for success. Having the right baking sheets and mixing bowls can streamline the cooking process significantly.

Be sure to explore seasonal variations which can inspire new interpretations of the sausage ball recipe, introducing unexpected flavors and ingredients based on what’s currently fresh and available.

Join the Conversation

We invite you to share your thoughts and experiences with this delicious recipe on social media. Join the community of fellow food enthusiasts and exchange tips or variations you’ve tried.

Don’t forget to post your photography of the finished product, as showcasing your creations often inspires others and highlights the vibrant appeal of these sausage balls.

Recipe reviews can also foster engagement and improvement; let us know any personal modifications or experiences you’ve had with this beloved dish.

Community engagement is fundamental for food lovers, allowing individuals to interact and share passion through food. We encourage conversations about how you might adapt the recipe for future gatherings or celebrations.

Suggesting your unique variations can inspire others to experiment, creating a network of culinary creativity that transforms basic recipes into extraordinary feasts.

The Recipe

Rotel Cream Cheese Sausage Balls

Serves: 24 balls

Prep Time: 10 mins

Cook Time: 20 mins

Total Time: 30 mins

Kitchen Equipment Needed

  • Mixing bowl
  • Baking sheet
  • Measuring cups and spoons
  • Oven
  • Optional: Parchment paper

Ingredients

  • 1 lb ground sausage (any variety)
  • 8 oz cream cheese, softened
  • 1 can Rotel diced tomatoes with green chilies (10 oz)
  • 1 cup shredded cheese (cheddar works great)
  • 2 cups biscuit mix

Directions

  1. Preheat the oven to 350°F (175°C).
  2. In a large mixing bowl, combine the ground sausage, softened cream cheese, and drained Rotel. Mix well until combined.
  3. Add in the shredded cheese and biscuit mix, mixing until everything is well incorporated.
  4. Form the mixture into 1-inch balls and place them onto a greased baking sheet.
  5. Bake for 20-25 minutes or until golden brown and cooked through.
  6. Remove from oven and let them cool slightly before serving.
  7. Enjoy your delicious Rotel Cream Cheese Sausage Balls warm with your choice of dipping sauces!

Recipe Notes

  • For a spicier kick, use hot sausage or add additional spices like cayenne or crushed red pepper flakes.
  • These sausage balls freeze well. Just bake from frozen; add a few extra minutes to the cooking time.
  • Feel free to substitute different types of cheese to suit your taste preferences.

Wholesome Hearty Chicken and Vegetable Stew Recipe for Comfort

Hearty Chicken and Vegetable Stew: Comfort in a Bowl

⚖️
Difficulty
Easy

⏲️
Prep Time
15 mins

🕒
Cook Time
45 mins

⏱️
Total Time
60 mins

🍽️
Servings
4 servings

Warm up your dinner table with this Hearty Chicken and Vegetable Stew, an easy recipe that brings comfort and flavor to any chilly night. Imagine succulent pieces of chicken simmered to perfection with a medley of colorful vegetables, filling your kitchen with delightful aromas. This stew is not just a meal; it’s an experience that wraps you in warmth with every spoonful.

The combination of tender chicken, nutrient-rich vegetables, and a fragrant broth creates a fulfilling dish that appeals to the senses. Each bite offers a balance of savory flavors and soft, comforting textures. As the stew simmers, the vegetables soften, while herbs and spices infuse their magic, making this hearty chicken stew a dish you’ll want to return to time and time again.

Quick Recipe Highlights

  • Flavor Profile: Savory with hints of thyme, garlic, and a touch of lemon zest that brighten up the rich flavors.
  • Texture: A wonderful blend of tender chicken, soft carrots, and slight crunch from green beans creating delightful contrasts.
  • Aroma: Inviting notes of garlic and herbs blend seamlessly with the hearty essence of chicken and fresh vegetables.
  • Visual Appeal: Vibrant colors of carrots, peas, and herbs against the golden broth draw the eye and whet the appetite.
  • Skill Level Needed: This easy recipe is perfect for beginners and experienced cooks alike, requiring basic cooking skills.
  • Special Equipment: A large pot or Dutch oven is essential for even cooking and maximizing flavor.

Recipe Overview

  • Difficulty Level: This Hearty Chicken and Vegetable Stew is rated as easy, making it accessible for all home cooks. The steps are straightforward, emphasizing flavor rather than technique.
  • Category: Ideal for dinner and family meals, this stew serves as a perfect main course for any day of the week.
  • Cuisine: Rooted in traditional comfort food, this stew reflects Western culinary influences with a focus on wholesome ingredients.
  • Cost: Budget-friendly, this recipe uses common ingredients, making it an economical choice for family meals.
  • Season: Best during fall and winter months, it serves as a warming dish for cold nights while using seasonal vegetables.
  • Occasion: Perfect for cozy family dinners, potlucks, or even a comforting meal after a long day.

Why You’ll Love This Recipe

The first aspect of this Hearty Chicken and Vegetable Stew that will win you over is its incredible taste profile. The chicken is tender and juicy, enhanced by the fragrant herbs and seasonings. As you dig in, the contrast of the delicate vegetables with the rich chicken broth creates a satisfying mouthfeel that comforts the soul. This is truly a stew that nourishes both body and spirit.

Convenience is another remarkable feature of this stew. With a prep time of just 15 minutes, you can get dinner on the table quickly without compromising on flavor or nutrition. The hands-off cooking process means you can engage in other activities while your meal simmers to perfection. This stew allows for flexibility—simply throw in whatever vegetables you have on hand or adjust flavors according to your palate.

From a nutritional standpoint, Chicken and Vegetable Stew is packed with proteins from the chicken and an array of vitamins from the assorted vegetables. Ingredients like carrots and peas not only make this dish visually appealing, but they also contribute essential nutrients that support overall health. It’s a wholesome meal that the entire family can enjoy, guilt-free.

When it comes to entertaining, this stew shines brightly as a communal dish perfect for sharing. Its rich flavors spark conversation around the table, creating a dynamic and engaging atmosphere for family gatherings or dinner parties. Everyone can savor the warm, comforting goodness together—a great way to create lasting memories.

Lastly, this Hearty Chicken and Vegetable Stew is cost-effective, allowing you to create a hearty meal without straining your budget. Utilizing affordable ingredients means you can make substantial portions, ensuring plenty of leftovers for lunches or quick dinners throughout the week. This recipe highlights the beauty of cooking at home, where delicious and satisfying meals can be made without breaking the bank.

Historical Background and Cultural Significance

The origin of chicken stew dates back centuries when rustic cooking involved slow-cooking meats and vegetables to enhance flavors and tenderize tougher cuts. Originally a peasant dish, it utilized available resources, making it a staple in various cultures around the world. Each culture adapts chicken stew according to local ingredients and seasonings, creating a global tapestry of flavors.

In the Western culinary tradition, chicken stew symbolizes comfort and home-cooked meals. Families have relied on this hearty dish for generations, often gathering around the table to enjoy it. As part of comfort food, it speaks to the warmth of hearth and home, inviting friends and family to share in the nourishment of both body and spirit.

Over time, chicken stew has evolved, with modern adaptations introducing new flavors and ingredients. While some recipes honor the rustic roots with simple seasonings, others experiment with global spices or cooking techniques, such as pressure cooking for faster results. The fundamental joy remains unchanged—a deliciously hearty pot ready to warm chilly evenings.

Regional variations often highlight local produce, enhancing the stew’s cultural significance. From Caribbean spices to Asian influences, chicken stew adapts beautifully, showcasing the unique culinary landscape of each region. This versatility ensures that chicken stew will continue to thrive, celebrated in homes around the world.

Ingredient Deep Dive

Chicken serves as the star of this stew, delivering protein and a rich flavor base. Choosing bone-in pieces, such as thighs or drumsticks, can enhance the broth’s depth. Nutritionally, chicken is packed with protein, essential for muscle health and recovery. When selecting your chicken, look for fresh, organic options, if possible. Store it in the refrigerator and use it within a couple of days or freeze it for prolonged shelf life.

Carrots add a natural sweetness, balancing the savory elements of the stew. Rich in beta-carotene, carrots support eye health and immune function. When picking carrots, opt for firm ones with bright color and minimal blemishes. They should be refrigerated in a produce drawer and used within a week for the best texture and flavor.

Common Mistakes to Avoid

  • Overcooking the chicken can lead to a dry texture; ensure chicken is cooked just until tender to preserve juiciness.
  • Not browning the chicken initially can result in a lack of depth in flavor; always sear for enhanced taste.
  • Skipping the resting phase after cooking can lead to uneven flavors; let the stew sit to let flavors meld before serving.
  • Using old vegetables will compromise taste; always choose the freshest produce available.
  • Not seasoning adequately can make the stew bland; season throughout the cooking process for best results.
  • Adding thickening agents too early may cause clumping; let the stew simmer first to develop a base before thickening.
  • Using a small pot can result in overcrowding, leading to uneven cooking; use a large pot for best results.
  • Ignoring the importance of simmering can undercook ingredients; maintain a gentle simmer for proper cooking.
  • Overly high heat can lead to burnt ingredients; keep the heat moderate throughout the cooking phase.
  • Not tasting as you go may result in a dish that fails to meet your preference; adjust flavors as needed.

Essential Techniques

Searing chicken is crucial for developing flavor in this Hearty Chicken and Vegetable Stew. By browning the chicken pieces in a hot pot, you create a caramelized crust that locks in juices. To master this technique, ensure the pot is well-heated before adding oil, and avoid overcrowding. The visual cue for success is a golden-brown appearance on the chicken surface, signaling rich flavor development.

Simmering is a key technique that allows the ingredients to meld harmoniously. The low-and-slow method ensures even cooking and optimal flavor extraction. To achieve the perfect simmer, keep an eye on the temperature; bubbles should gently break the surface. Watch for a noticeably aromatic scent that fills your kitchen, indicating that the stew is performing beautifully.

Pro Tips for Perfect Hearty Chicken and Vegetable Stew

1. Start with high-quality chicken for the best flavor; organic or free-range options can elevate your dish.

2. Customize your vegetables according to seasonality; using fresh, seasonal produce enhances both taste and nutrition.

3. If you’re short on time, consider utilizing a pressure cooker to speed up the process but still achieve tender results.

4. Fresh herbs, like parsley or thyme, added at the end of cooking will brighten flavors and provide fresh notes.

5. Leftovers taste even better the next day; allowing flavors to meld overnight is a bonus for your palate.

6. Serve with crusty bread; a hearty side will soak up the rich broth and make the meal even more fulfilling.

7. For added richness, consider finishing the stew with a splash of cream before serving.

8. You can freeze individual portions for quick meals on busy days—just ensure to store them in airtight containers.

Variations and Adaptations

Regional variations of chicken stew can introduce exciting new flavors. For instance, adding curry spices for a Caribbean twist or using Italian herbs can transport your dish to another culinary tradition. Seasonal adaptations can include root vegetables in winter or fresh summer vegetables like zucchini and squash.

Dietary modifications allow for this recipe to fit everyone’s needs—substituting chicken for tofu or chickpeas creates a fantastic vegan version. Likewise, using gluten-free grains instead of traditional thickeners can cater to gluten sensitivities while maintaining flavor and consistency.

Serving and Presentation Guide

Plating techniques for Hearty Chicken and Vegetable Stew can elevate your dining experience. Use a wide, shallow bowl to showcase the colorful ingredients, and allow the broth to pool in the center. Garnishing with a sprinkle of fresh herbs or a dollop of sour cream can add brightness to the visual appeal.

Served alongside crusty bread or buttery rolls, this stew becomes a delightful meal. Ensure your servings match the size of the bowls, and keep portion control in mind, especially if serving at gatherings. Warm the bowls prior to plating to enhance the comforting vibe as they arrive on the table, ensuring they maintain temperature longer.

Wine and Beverage Pairing

When considering wine pairings, a light-bodied white wine like Sauvignon Blanc complements the savory elements of the stew wonderfully. For those who prefer red, a Grenache offers a fruity balance without overpowering the dish. Non-alcoholic alternatives like sparkling water with a twist of lemon can refresh the palate, while unsweetened iced tea provides a subtle and satisfying complement.

Consider temperature too; whites should be chilled, while reds are best served at a slightly cooler than room temperature. Decanting reds for 30 minutes before serving can enhance their flavors, making for a delightful accompaniment to your meal.

Storage and Shelf Life

To maximize the lifespan of your Hearty Chicken and Vegetable Stew, store it in airtight containers in the refrigerator, where it will remain fresh for up to 3 days. For longer-term storage, consider freezing portions; ensure they are fully cooled before sealing them in freezer-safe bags. Signs of spoilage include an off smell, discoloration, or separation of ingredients.

Reheating can be done in a microwave or on the stove over low heat. If the stew appears thick upon reheating, add a splash of broth or water to restore the desired consistency. When freezing, be wary of overfilling containers to allow for expansion, which ensures a perfect texture upon thawing.

Make Ahead Strategies

Preparing your Hearty Chicken and Vegetable Stew in advance can save precious time on busy nights. Chop vegetables and measure out spices in advance, storing them in the refrigerator for up to 24 hours. Marinating chicken overnight can also enhance its flavor.

Assembling the stew the day before allows the flavors to deepen overnight. Just be sure to store it in an airtight container in the fridge. For best quality during reheating, maintain a gentle simmer while stirring frequently to ensure even heating without overcooking the chicken.

Scaling Instructions

If you want to halve the recipe, simply divide all ingredients by two, ensuring flavor ratios remain consistent. For a gathering, doubling the recipe is straightforward; just ensure your pot is large enough to accommodate increased volume without overcrowding.

Timing may need slight adjustments when scaling up—allow for an additional 5-10 minutes for boiling and simmering to ensure thorough cooking. Consider utilizing larger cooking tools if you’ve doubled or tripled the recipe, like an extra-large stockpot.

Nutritional Deep Dive

This Hearty Chicken and Vegetable Stew provides a rich source of macronutrients, balancing proteins from chicken, carbohydrates from vegetables, and healthy fats if you opt to add oil during cooking. Each serving is low in calories while high in dietary fiber, supporting digestion and fullness.

Micronutrient analysis reveals beneficial vitamins and minerals from vegetables, such as Vitamin A from carrots and Vitamin C from peas. These nutrients support immune function and skin health. Pay attention to portion sizes to manage your overall caloric intake while enjoying the stew’s comforting warmth.

Dietary Adaptations

For those with gluten sensitivities, swapping traditional thickeners with cornstarch or using gluten-free grains ensures you can enjoy this flavorful dish. Likewise, for a dairy-free option, simply eliminate any creamy finishes and stick to the original comforting broth.

Troubleshooting Guide

If you encounter texture issues, consider slow-cooking your stew longer; the additional time allows flavors to blend while also tenderizing chicken and vegetables. For flavor balance problems, try adding a touch of acidity—like lemon juice or vinegar—to brighten the overall taste.

Recipe Success Stories

Community feedback consistently praises this Hearty Chicken and Vegetable Stew for its heartwarming qualities. Readers enjoy sharing their personal variations, showcasing unique ingredients that still meet the comforting essence of the dish. Such reader adaptations highlight the recipe’s flexibility while retaining its core, making it beloved among diverse palettes.

Frequently Asked Questions

Can I use frozen chicken for this recipe? Yes, frozen chicken can be used, but it’s best to thaw it first for even cooking. Using fresh chicken will yield the best flavor and texture.

How do I store leftover stew? Allow the stew to cool before transferring it to airtight containers. It can be refrigerated for up to 3 days or frozen for longer storage.

Can I add different vegetables? Absolutely! Feel free to add whatever vegetables you enjoy or have on hand, just remember that cooking times may vary based on the type of vegetables used.

Is this recipe suitable for meal prep? Yes, this stew is perfect for meal prep. You can batch cook and portion it out for quick lunches or dinners throughout the week.

How do I reheat the stew? Reheat the stew on the stovetop over low heat or in the microwave, adding a bit of broth or water if it thickens too much.

What can I use as a substitute for chicken? For a vegetarian version, replace the chicken with tofu, chickpeas, or even hearty beans that will provide protein.

How spicy is this stew? This stew is typically not spicy, but you can adjust the heat by adding chili flakes or fresh peppers based on your preference.

Can I use a slow cooker for this recipe? Yes. Sear the chicken before adding everything to the slow cooker. Cook on low for 6-8 hours for wonderfully tender results.

What herbs work best in chicken stew? Thyme and rosemary are traditional choices that pair beautifully with chicken. Feel free to experiment with your favorite herbs for a personal touch.

How can I thicken the stew? For added thickness, you can mash some of the vegetables or blend a portion into a purée before returning it to the pot.

Additional Resources

Explore more related recipes for hearty meals, such as beef stew or vegetable lentil stew, to find the perfect dish for every occasion. Consider technique guides for soup making or slow cooking that can enhance your kitchen skills further. Ingredient information can give insight into selecting the freshest produce available.

Join the Conversation

Engage with us on social media by sharing your photos of the Hearty Chicken and Vegetable Stew. We love seeing your variations and hearing your stories! Don’t forget to leave your reviews and feedback, as it guides us in creating more recipes that you’ll enjoy. Join our community, where we celebrate home cooking and the joy it brings to our tables.

The Recipe

Hearty Chicken and Vegetable Stew

Serves: 4 servings

Prep Time: 15 mins

Cook Time: 45 mins

Total Time: 60 mins

Kitchen Equipment Needed

  • Large pot or Dutch oven
  • Cutting board
  • Sharp knife

Ingredients

  • 1.5 lbs bone-in, skinless chicken thighs
  • 3 large carrots, sliced
  • 2 cups chopped potatoes
  • 1 cup green beans, trimmed
  • 1 onion, diced
  • 3 cloves garlic, minced
  • 4 cups chicken broth
  • 2 tablespoons olive oil
  • 1 teaspoon dried thyme
  • Salt and pepper to taste

Directions

  1. In a large pot, heat the olive oil over medium-high heat. Add chicken and sear on all sides until browned. Remove and set aside.
  2. In the same pot, add onions and garlic, cooking until softened. Then add carrots, potatoes, and green beans, stirring well to combine.
  3. Return the chicken to the pot and pour in chicken broth. Season with thyme, salt, and pepper. Bring to a boil.
  4. Lower the heat, cover, and let it simmer for about 45 minutes, or until the chicken is cooked and the vegetables are tender.
  5. Once the chicken is tender, remove it from the pot, shred, and return it to the stew. Stir well before serving.

Recipe Notes

  • Customize vegetables based on seasonal availability.
  • Leftovers can be frozen for up to 3 months.
  • Feel free to add spices according to your taste preferences.

Delicious Chicken and Broccoli Pasta Recipe for Easy Weeknight Dinners

Delicious Chicken and Broccoli Pasta: A Comforting Weeknight Meal

⚖️
Difficulty
Easy

⏲️
Prep Time
10 mins

🕒
Cook Time
20 mins

⏱️
Total Time
30 mins

🍽️
Servings
4 servings

Chicken and Broccoli Pasta is a perfect recipe that encapsulates comfort food at its finest, combining tender chicken and tender-crisp broccoli with al dente pasta. This dish is not only quick and easy but also bursts with flavors that will make you and your family crave it time and again. The creamy sauce adds a rich texture, coating every bite and enhancing the delectable taste of fresh ingredients, making every forkful a delightful experience.

Not only is Chicken and Broccoli Pasta easy to prepare, but it also offers a colorful presentation that’s sure to impress guests. The vibrant green of the broccoli contrasts beautifully with the golden brown chicken and the creamy sauce, resulting in a visually appealing dish. Plus, it’s a great way to sneak in those veggies without any complaints—everyone loves pasta, after all!

Quick Recipe Highlights

  • Flavor Profile: The combination of garlic, chicken, and creamy sauce creates a comforting meal with a touch of savory goodness.
  • Texture: You’ll experience a delightful mix of tenderness from the chicken, crunch from the broccoli, and the smoothness of the sauce wrapping around the pasta.
  • Aroma: A tantalizing blend of garlic sautéed in olive oil fills the air, inviting you to indulge in this delightful dish.
  • Visual Appeal: The vibrant colors from the broccoli, chicken, and creamy sauce make this dish as pleasing to the eye as it is to the palate.
  • Skill Level Needed: Perfect for beginners, this recipe requires minimal cooking skills while still allowing for delightful results.
  • Special Equipment: All you need is a pot for boiling pasta and a skillet for sautéing the chicken and veggies.

Recipe Overview

  • Difficulty Level: This Chicken and Broccoli Pasta is ideal for novice cooks, with simple, straightforward steps that yield delicious results.
  • Category: A versatile meal that can serve as either a weeknight dinner or a gathering dish for friends and family.
  • Cuisine: This recipe boasts Italian influences, where pasta is celebrated as a beloved staple worldwide.
  • Cost: The ingredients, primarily chicken and broccoli, are budget-friendly, making this dish accessible without compromising on flavor.
  • Season: Enjoy this meal year-round, as broccoli is available at all times and chicken is a staple in many households.
  • Occasion: Perfect for busy weeknights, family gatherings, or even a casual dinner party, it fits any scenario.

Why You’ll Love This Recipe

The taste and texture of Chicken and Broccoli Pasta truly appeal to everyone. The creamy sauce enhances the flavors of both the chicken and broccoli, while the pasta adds a hearty component that makes the dish satisfying. Any leftovers can be transformed into a delightful lunch the next day, ensuring you really optimize the recipe.

The convenience of preparation cannot be overstated. With a total cook time of only 30 minutes, this recipe fits seamlessly into the busiest of weeknights. The ingredients come together effortlessly, making it possible to whip up a beautiful meal without spending hours in the kitchen. It’s a lifesaver for those who wish to eat well without losing time.

Nutritionally, this recipe is a powerhouse. Broccoli is packed with vitamins K and C, while the chicken provides lean protein. When combined with whole grain pasta, you’ll get a well-rounded meal that nourishes your body and keeps energy levels high throughout the day.

Enjoying a meal like Chicken and Broccoli Pasta is also a fantastic social experience. It fosters connections at the dining table, as family members share this delicious dish together. Its appeal to both children and adults creates an opportunity for relaxed family time, which is priceless amidst today’s busy schedules.

Lastly, this dish is cost-effective, allowing for plenty of servings at an affordable price. You can purchase ingredients in bulk, and this pasta meal stretches to feed a family without breaking the bank. Perfect for anyone on a budget!

Historical Background and Cultural Significance

The origins of Chicken and Broccoli Pasta can be traced back to traditional Italian cuisine, where pasta served as a staple. With globalization, many western variations began to incorporate local ingredients, such as chicken and broccoli, making it a unique fusion meal. This blend showcases the versatility of pasta in adapting to various culinary traditions.

Culturally, pasta has symbolized comfort and family unity in Italian households for centuries. It is often a gathering dish, reminiscent of warmth and shared stories around the dinner table. The addition of chicken and broccoli highlights the importance of incorporating nutritious elements into everyday meals, aligning with current health trends that prioritize vegetable-rich diets.

The evolution of this recipe has led to many iterations. Some people may choose to add different vegetables or sauces to suit their taste preferences. This adaptability keeps the dish fresh and encourages home cooks to experiment and find their unique versions.

In certain regions, variations of Chicken and Broccoli Pasta are famous for bringing communities together during local festivals, showcasing the importance of sharing food as an integral part of culture. As such, it has ingrained itself into many households as a beloved tradition.

Ingredient Deep Dive

– Chicken: Poultry has a long-standing history as a staple protein across cultures. It’s known for being lean and easy to cook. Chicken is rich in B vitamins, especially niacin, which is great for energy production. When selecting chicken, look for fresh cuts with no discoloration. Store it in the coldest part of your fridge and use it within a few days. If you’re in a pinch, substitute chicken with turkey or tofu for a vegetarian option.

– Broccoli: This nutritional powerhouse is loaded with vitamins C and K, and it also offers dietary fiber. A popular vegetable in numerous cuisines, broccoli’s bright green color signifies its nutrient density. Choose broccoli that’s firm and vibrant in color. It can be stored in the fridge in perforated bags for about 3-5 days. For substitutions, consider cauliflower or green beans for a different texture.

– Pasta: Originating from Italy, pasta is a staple food made from durum wheat. It is versatile and can be used in countless recipes worldwide. Whole wheat and gluten-free options provide additional fiber and nutrition. When storing, keep pasta in a cool, dry place. If you run out, just use any other type of pasta you have on hand!

Common Mistakes to Avoid

  • Overcooking the pasta can ruin its texture; always aim for al dente when boiling.
  • Using old or wilted broccoli can impact the flavor and nutrients; choose fresh, vibrant vegetables.
  • Failing to season your chicken adequately can lead to blandness; do not skip the salt and pepper.
  • Not letting chicken rest after cooking can result in dry meat; always allow it to sit for a few minutes.
  • Rushing through the sautéing process can prevent flavors from developing; take your time to allow ingredients to caramelize.
  • Skipping the garlic can minimize the depth of flavor; don’t overlook this key aromatizer.
  • Using cold ingredients can affect cooking times; ensure everything is at room temperature for best results.
  • Not properly coating the pasta in sauce can lead to uneven flavors; always mix well before serving.
  • Overcrowding the pan can restrict cooking efficiency; ensure ample space when sautéing chicken.
  • Failing to reserve pasta water can limit the sauce’s creaminess; make sure to set some aside before draining.

Essential Techniques

To achieve ideal pasta texture, start by bringing a large pot of salted water to a rolling boil before adding the pasta. The water must be properly salted to ensure the pasta is flavorful. Stir occasionally to prevent sticking and cook until al dente. Taste frequently as cook times may vary based on the pasta type. Using visual cues, look for a slightly firm center upon tasting to achieve the desired doneness.

Sautéing chicken correctly is crucial for juicy, flavorful results. Start over medium-high heat and ensure the skillet is hot before adding chicken pieces. This helps sear the meat and lock in moisture. Avoid flipping the chicken too frequently to allow it to brown evenly. Look for a golden crust before turning or removing from the pan for a beautifully cooked dish.

Pro Tips for Perfect Chicken and Broccoli Pasta

1. Use freshly grated Parmesan cheese for a killer flavor boost in the sauce—you’ll taste the difference right away!
2. Add a splash of lemon juice before serving to brighten the dish and elevate the flavors.
3. Incorporate crushed red pepper flakes for a hint of heat, balancing the creaminess beautifully.
4. Consider using whole grain or chickpea pasta for an added nutritional punch and a unique flavor.
5. End the cooking process by allowing the mixture to rest for a few minutes; it allows flavors to meld.
6. For a richer sauce, consider adding cream or unsweetened coconut milk for a twist.
7. Always taste and adjust the seasoning at the end of cooking; a few extra pinches of salt can make all the difference!
8. Serve with a fresh garden salad to enhance the meal and add nutritional value.

Variations and Adaptations

Exploring regional variations of Chicken and Broccoli Pasta can lead to numerous delicious discoveries. For instance, try adding sun-dried tomatoes to infuse a Mediterranean flair or incorporate some fresh basil for a summer touch. Seasonally, you can switch out broccoli for asparagus in the spring months, or use squash in the fall for a warm, heartier recipe.

Dietary modifications can also make this meal accessible to a broader audience. For those on a gluten-free diet, use gluten-free pasta made from rice or corn. Additionally, vegan adaptations are possible by substituting chicken with plant-based proteins, like chickpeas or tofu, and opting for a creamy almond milk sauce instead of dairy.

For a spin on flavors, consider adding a dollop of pesto sauce for an herby nuance or grated lemon zest for zest that enhances the dish’s freshness. Changing up the type of cheese used for garnish can also introduce new layers of flavor.

In terms of presentation, try plating on large rustic plates to highlight the colorful ingredients, or use individual bowls for a cozy dinner vibe. Adding toasted pine nuts or sesame seeds can elevate the dish visually and add a delightful crunch.

Serving and Presentation Guide

Plating Chicken and Broccoli Pasta can be both an art and a science. Start by twirling pasta into nests on a large plate and adding pieces of chicken and broccoli strategically atop the pasta. This not only looks appealing but also ensures every bite has a mix of ingredients.

Garnishing your dish with freshly chopped parsley or basil adds a touch of color and enhances aroma. A light sprinkle of toasted sesame seeds will provide a nice crunch and flavor boost.

Traditional accompaniments like garlic bread or fresh salads can round out the meal beautifully and create a satisfying dining experience. For modern presentation, consider serving the dish family-style in a large bowl at the table, encouraging sharing and connection.

Temperature considerations are also vital; always serve pasta dishes hot to enjoy them fully. If the pasta cools too quickly, consider keeping it warm in a low oven (around 200°F) while preparing the rest of the meal. For portion control, aim for serving sizes of about 1 to 1.5 cups per person, allowing room for second helpings.

Wine and Beverage Pairing

Pairing wine with Chicken and Broccoli Pasta can elevate your dining experience significantly. A light white wine, such as Pinot Grigio, complements this dish beautifully, balancing its creamy sauce and savory elements. Alternatively, you might enjoy a Chardonnay, particularly if you prefer a more oaky flavor that melds well with the richness of the dish.

For non-alcoholic alternatives, a refreshing iced tea with a hint of lemon can provide a crisp contrast. If looking for something warm, consider herbal teas like chamomile or peppermint for an inviting experience.

Temperature considerations are essential, especially for wine—serve it chilled to enhance its crispness against the creamy flavors of the pasta. A sparkling water with a twist of lime can also be the perfect palate cleanser.

Storage and Shelf Life

Proper storage of Chicken and Broccoli Pasta can retain its flavors and textures for days. To store, allow the dish to cool completely before transferring it to an airtight container. This method prevents moisture buildup, which can lead to spoilage. Refrigerate it for up to 3-4 days.

For longer storage, consider freezing the pasta. It’s best to do so before adding any creamy sauce, as dairy can change texture when thawed. Use freezer-safe containers, and label them with the date for easy reference. Frozen pasta can last for 2-3 months.

Signs of spoilage include an off smell or change in color, particularly with the broccoli. After reheating, ensure the dish reaches a safe internal temperature of 165°F before consumption. If reheating directly from the freezer, use gentle heat in the oven or stovetop for best results.

Make Ahead Strategies

To simplify meal prep, consider preparing certain components of Chicken and Broccoli Pasta ahead of time. You can marinate chicken in spices a day in advance for enhanced flavor. Additionally, pre-chop broccoli and even cook the pasta slightly al dente, draining and storing it in the fridge.

Storage between steps is crucial. Layer ingredients appropriately, keeping wet and dry components separate until you are ready to cook. This not only preserves flavors but also maintains texture.

Quality impact assessments are vital; while the chicken can marinate overnight, broccoli is best prepared fresh to retain its crunch. When assembling, simply warm the pre-cooked ingredients, combining them with sauce in a skillet.

Fresh additions, like parsley, should be added just before serving to maintain freshness. With advance preparation, you can have a delicious homemade dinner ready in minutes!

Scaling Instructions

When adjusting the Chicken and Broccoli Pasta recipe, scaling can be done easily—halving or doubling works well. For larger batches, utilizing a larger pot and skillet will ensure everything cooks evenly. Just remember to keep the cook times similar, adjusting as necessary based on the volume.

For timing modifications, larger amounts of ingredients may require a few extra minutes, but monitor closely to avoid overcooking. When halving, ingredients scale directly, while considering adjustments in your pan size, which may require a smaller heat setting.

Finally, when it comes to storage considerations for scaling up, make sure to portion out the pasta into smaller servings to avoid excessive leftovers. This allows for manageable reheating and sharing.

Nutritional Deep Dive

A macro breakdown of Chicken and Broccoli Pasta reveals that it’s rich in protein from chicken, complex carbohydrates from pasta, and fiber from broccoli. This combination provides lasting energy, making it an ideal meal for active individuals.

Micronutrients are plentiful as well—vitamin C from broccoli supports immune health, while B vitamins relate closely to energy metabolism, assisting in overall well-being. These nutrients work together favorably, promoting a balanced diet.

Health benefits extend further, as this dish can help maintain a healthy weight due to its nutrient density and high satiety factor—combining protein with vegetables helps you feel satisfied without excessive calories.

Dietary considerations are key, especially for those managing their macronutrients. Opting for whole grain or legume-based pasta can increase fiber intake, beneficial for digestive health. This dish easily fits into a weight management plan when portioned appropriately.

Lastly, portion analysis highlights that enjoying a well-rounded plate involves balancing protein, carbs, and vegetables, each supporting overall nutrition while keeping meals delightful.

Dietary Adaptations

For a gluten-free version of Chicken and Broccoli Pasta, substitute conventional pasta with gluten-free alternatives made from quinoa or brown rice. Ensure all seasonings and sauce components are gluten-free to maintain integrity.

Dairy-free adaptations are simple with the use of plant-based creams or milk for the sauce, delivering creamy texture without lactose. Nutritional yeast can also provide a cheesy flavor without dairy.

If following a vegan diet, exchange chicken for legume-based proteins or tofu, marinating them to enhance their natural flavors. Using vegetables like peppers or zucchini can enhance color and taste appeal.

For those on low-carb or keto diets, opt for zucchini noodles or spaghetti squash as a noodle substitute, pairing it with a lighter protein source. This variation allows the classic flavors to remain while adhering to dietary restrictions.

Lastly, the paleo approach dismisses grains, which means using alternatives like spiralized vegetables for a lightened, nutrient-rich meal, making it suitable for various dietary needs.

Troubleshooting Guide

For texture issues, overcooked pasta can become mushy; ensure you’re timing it closely and testing for doneness. If the chicken is dry, consider using a meat thermometer to track internal temperatures, ensuring it’s cooked perfectly.

Flavor balance is vital; if the dish tastes bland, add acidity with a touch of lemon juice or acidity to heighten flavors. If the sauce is too thick, use reserved pasta water to loosen it and achieve creaminess without losing richness.

Temperature problems can lead to uneven cooking; use evenly-sized pieces of chicken for uniform cooking times. For patchy cooking, ensure there’s enough space in the pan, allowing meat to brown rather than steam.

Equipment challenges may arise when scaling up; ensure you have suitable cookware to handle larger quantities effectively. If using a single pan for too many ingredients, batch cooking may provide better results.

Ingredient substitutions can impact flavor; for instance, if fresh herbs are unavailable, dried herbs can work, but adjust the quantity for potency. When faced with timing concerns, adjust meal assembly optimizing overlapping tasks.

Recipe Success Stories

Community feedback surrounding Chicken and Broccoli Pasta is overwhelmingly positive, with many home cooks praising its simplicity. Reader suggestions often highlight unique twists they’ve tried, like adding shrimp or using a mix of different vegetables for personalization.

One reader noted that this dish became a family favorite within a week of introducing it, sparking conversations about meal planning and cooking together. Success stories around adaptation showcase how well this dish lends itself to improvisation—a timeless quality in a beloved recipe.

Photography tips have also emerged, emphasizing the natural colors of the dish. Plating in natural light and garnishing with fresh herbs brings vibrancy and can turn a simple dish into a feast for the eyes, urging others to try their own variations.

Ultimately, the success stories underscore the heart of home cooking—the desire for connection through food. Chicken and Broccoli Pasta serves as a vehicle for sharing memories, making it a staple in many households.

Frequently Asked Questions

Can I use frozen broccoli for this recipe?
Yes, frozen broccoli works well. Just add it towards the end of the cooking process to ensure it doesn’t become mushy.

How do I make the sauce thicker?
To thicken the sauce, mix a small cornstarch slurry with water, then stir it into the sauce while cooking until desired consistency is achieved.

What other vegetables can I add?
Feel free to add bell peppers, peas, or spinach to enhance flavors and add more nutrients to the dish.

Can I prepare this ahead of time?
Yes! You can prep the chicken and vegetables in advance. Store separately until ready to cook.

Is this recipe suitable for meal prep?
Absolutely! It holds up well in the fridge. Just store servings in airtight containers for quick reheats during the week.

How can I make it spicier?
Add crushed red pepper flakes or a splash of hot sauce to the sauce for a kick.

What if I don’t have chicken stock?
You can substitute with vegetable stock or water. The flavors will be slightly different but still delicious.

Is this meal kid-friendly?
Yes, most kids love pasta and the sneaky addition of broccoli adds goodness without complaints!

Can I freeze the leftovers?
Yes, you can freeze the dish for up to three months. Just make sure to store it in an airtight container.

What type of cheese works best?
Parmesan is a classic choice; fresh mozzarella also works beautifully for a creamy texture.

Additional Resources

For those looking to dive deeper into cooking, explore related recipes that emphasize healthy ingredients, or check out technique guides focusing on pasta-making. Ingredient information provides insights into seasonal veggies, while equipment recommendations ensure you’re well-equipped.

Seasonal variations of this recipe can highlight various fresh produce, reflecting changes throughout the year and allowing for creativity. Websites and blogs dedicated to cooking often house community-driven recipes that add personal touches for collaboration and sharing.

Join the Conversation

Engage with us on social media to share your experiences with Chicken and Broccoli Pasta! Your photography can inspire others, and we love hearing your variations of this beloved recipe. Leave a review or comment about how you’ve made it your own, and don’t hesitate to exchange ideas as a community.

Encouraging conversation around recipe reviews and cooking techniques fosters engagement, bringing home cooks together to celebrate their culinary adventures. Sharing highs and lows keeps the spirit of community cooking alive, reminding us that each dish we create contains a story.

The Recipe

Chicken and Broccoli Pasta

Serves: 4 servings

Prep Time: 10 mins

Cook Time: 20 mins

Total Time: 30 mins

Kitchen Equipment Needed

  • Large pot for boiling pasta
  • Skillet for cooking chicken and vegetables
  • Colander for draining pasta
  • Wooden spoon for stirring
  • Measuring cups and spoons

Ingredients

  • 8 oz pasta of choice
  • 1 lb chicken breast, diced
  • 2 cups broccoli florets
  • 2 tbsp olive oil
  • 3 cloves garlic, minced
  • 1 cup heavy cream
  • 1/2 cup grated Parmesan cheese
  • Salt and pepper to taste
  • Crushed red pepper flakes (optional)

Directions

  1. In a large pot, bring salted water to a boil and cook the pasta according to package instructions. Drain and set aside.
  2. In a skillet, heat olive oil over medium heat and cook the diced chicken until golden brown and cooked through, around 6-7 minutes. Season with salt and pepper.
  3. Add minced garlic and cook for an additional minute, until fragrant.
  4. Add the broccoli to the skillet and cook until tender, about 3-4 minutes.
  5. Pour in heavy cream and bring to a simmer. Stir in grated Parmesan cheese until melted and incorporated.
  6. Combine cooked pasta with the chicken and broccoli mixture, tossing well to coat. Adjust seasoning as necessary.
  7. Serve immediately, garnishing with additional cheese if desired.

Recipe Notes

  • Feel free to substitute chicken with shrimp or tofu for a different protein option.
  • Add seasonal vegetables like asparagus or bell peppers for added color and nutrition.
  • For a lighter sauce, use half and half instead of heavy cream.
  • Leftovers can be stored in an airtight container in the fridge for up to 3 days.

Delicious Crock Pot Chicken and Dumplings Recipe for Comfort Food

Crock Pot Chicken and Dumplings: A Comforting Classic

⚖️
Difficulty
Easy

⏲️
Prep Time
15 mins

🕒
Cook Time
6 hours

⏱️
Total Time
6 hours 15 mins

🍽️
Servings
6

Crock Pot Chicken and Dumplings is a cherished recipe that fills your home with an irresistible aroma, evoking the warmth of a home-cooked meal. The tender chicken simmers in a rich and savory broth while fluffy dumplings steam atop, soaking up all that delightful flavor. Imagine digging into a bowl filled with hearty dumplings and well-seasoned chicken—you’ll find not just a meal, but a hug in a bowl. This recipe is perfect for busy weekdays or cozy weekends, offering both comfort and satisfaction with minimal effort.

This dish is not only simple but brings a depth of flavor that your family will love. The combination of chicken, vegetables, and herbs melds beautifully in the slow cooker, transforming into a weekday gem that makes dinner a breeze. Whether enjoyed on its own or paired with a side salad, crock pot chicken and dumplings delivers a nostalgic taste that delights both young and old alike. Make it your go-to recipe for family gatherings or as a comforting dish to brighten up a dreary day.

Quick Recipe Highlights

  • Flavor Profile: A classic blend of creamy broth, tender chicken, and fresh vegetables with herby undertones that envelops your senses.
  • Texture: Soft dumplings combined with juicy pieces of chicken create a delightful contrast, making every bite enjoyable.
  • Aroma: The sweet scent of thyme, pepper, and warm chicken broth creates a homey ambiance that invites everyone to the table.
  • Visual Appeal: The golden dumplings resting on a bed of hearty chicken and vibrant vegetables present a dish as visually pleasing as it is delicious.
  • Skill Level Needed: This recipe requires minimal culinary skill, ideal for those new to cooking or busy individuals who appreciate easy meals.
  • Special Equipment: A slow cooker is essential for this recipe, allowing for effortless cooking that enhances the deep flavors.

Recipe Overview

  • Difficulty Level: Preparing crock pot chicken and dumplings is easy. The steps are straightforward, involving just a bit of chopping and mixing before letting the slow cooker handle the rest.
  • Category: This recipe fits perfectly in the comfort food category, perfect for family dinners or gatherings. It’s a cozy meal that resonates with a sense of home.
  • Cuisine: Heavily influenced by traditional American cooking, this dish embodies the spirit of wholesome home-cooked meals, using simple ingredient profiles to create heartwarming flavors.
  • Cost: The ingredients are relatively affordable, with costs mainly attributed to chicken and seasonal vegetables, making it economical for meal prep.
  • Season: Best enjoyed in colder months, the warm, hearty nature of this dish is perfect for fall and winter dining, bringing comfort when it’s needed most.
  • Occasion: Perfect for casual family dinners, potlucks, or as a comforting dish during the holidays, this recipe is sure to be a hit at any gathering.

Why You’ll Love This Recipe

The taste and texture appeal of crock pot chicken and dumplings is unmatched. The combination of tender chicken, flavorful vegetables, and fluffy dumplings results in a dish that feels both homey and luxurious. Each bite is bursting with deliciousness, providing comfort on a rainy day or at dinner gatherings. The blend of textures—creamy broth and soft dumplings—creates a symphony of flavors that keeps you coming back for more.

Convenience is another significant advantage of this recipe. With only a little prep time required, you can set it and forget it, making it ideal for busy weeknights or lazy Sundays. The slow cooker works its magic while you carry on with your day, resulting in a beautifully cooked meal without the constant monitoring.

Nutritional benefits also play a role in making this dish a family favorite. Packed with lean protein from the chicken and an assortment of vegetables, it provides a balanced meal option that still delivers on taste. The combination contributes to your daily vegetable intake and provides essential vitamins and minerals.

Socially and entertainingly, crock pot chicken and dumplings is a standout. The communal aspect of sharing a big pot of comfort food strengthens connections with family and friends. It’s the kind of meal that invites conversations, laughter, and stories, making it perfect for cozy gatherings.

Finally, the cost-effectiveness of this dish is a winning point. With budget-friendly ingredients and bulk prepping capabilities, you can serve a crowd without breaking the bank. It’s easy to double the recipe for larger gatherings or meal prep for the week ahead.

Historical Background and Cultural Significance

Crock pot chicken and dumplings has deep-rooted origins in American culinary traditions. This dish dates back to the 19th century when hearty meals featuring meats and vegetables became staples in family kitchens. The slow-cooking method allowed for tougher cuts of meat to become tender and flavorful, making it a practical choice for families.

Culturally, the dish symbolizes comfort and connection. Throughout American history, such hearty meals have been served during gatherings and celebrations, bringing families together around the dinner table. The shared experience of enjoying a delicious and filling meal transforms it into something more profound than just sustenance.

As the recipe evolved over the years, variations sprouted within different regions. Each region added its unique spin, influenced by local ingredients and traditions. Northern states often incorporated more creamy flavors, while southern variations included added spices and seasonings, enriching the dish’s history.

Today, crock pot chicken and dumplings remains a beloved classic, demonstrating how a simple dish can transcend generations while adapting to modern palates. Its enduring popularity is a testament to the comfort it provides, making it a dinner-time favorite for millions.

Ingredient Deep Dive

Chicken plays a crucial role in this dish, providing lean protein and flavor. When selecting chicken, it’s essential to look for fresh, high-quality cuts. Skinless chicken breasts or thighs work best for this recipe, ensuring tender meat that absorbs the broth’s flavors. For optimal storage, keep raw chicken in the refrigerator and use it within a couple of days or freeze for long-term preservation. If you’re short on time, pre-cooked rotisserie chicken can be a great substitute.

Dumplings are the heart of this recipe, contributing texture and fullness. Traditional recipes often call for a combination of flour, baking powder, milk, and butter to create soft, fluffy dumplings. When choosing flour, consider using all-purpose flour for a light and airy texture. Store flour in a cool, dry place to prolong freshness, and look out for the date printed on the packaging. Gluten-free options are also available, with various flour blends that perform similarly in recipes.

Vegetables, such as carrots and celery, add layers of flavor and nutrition. These vegetables are not just fillers; they provide essential vitamins and minerals while enhancing the dish’s overall taste. When selecting vegetables, opt for fresh, bright-colored produce. Store them in the refrigerator to maintain crispness and avoid spoilage. You can also experiment with other vegetables based on personal preference or seasonal availability.

Common Mistakes to Avoid

  • Not browning the chicken: Skipping this step can lead to less flavor. Browning adds depth and richness to the dish.
  • Overloading the slow cooker: Filling the cooker too much can prevent even cooking. Stick to the recommended capacity for best results.
  • Using frozen vegetables: Fresh vegetables enhance flavor. Frozen ones may release excess moisture during cooking, affecting consistency.
  • Not measuring ingredients: Accuracy matters in cooking. Use measuring cups for consistent results, especially with dumpling ingredients.
  • Leaving out seasonings: Don’t forget herbs and spices. They elevate the dish and boost overall flavor.
  • Stirring too often: Frequent stirring can cause dumplings to break apart. Let them steam undisturbed for the best texture.
  • Neglecting to check doneness: Chicken should be cooked to 165°F. Always use a meat thermometer for food safety.
  • Skipping the liquid: Ensure enough broth for the dumplings to cook correctly. Without adequate liquid, they may turn out dry.
  • Not adjusting cooking time: If using frozen chicken, increase the cooking time for proper doneness.
  • Ignoring ingredient substitutions: Certain ingredients can impact the dish’s final outcome. Stick to the recommended substitutions for best results.

Essential Techniques

Browning chicken is a crucial first step that enhances flavor through caramelization. To master it, preheat your skillet and allow the chicken to develop a golden crust before adding it to the slow cooker. Pay attention to the color and adjust the temperature as needed to prevent burning. If you skip this step, you might miss out on the depth of flavor this technique brings.

Measuring ingredients accurately is crucial in ensuring consistency. Invest in a good set of measuring cups and spoons, and don’t neglect a kitchen scale if you’re working with larger quantities. This precision is especially important in baking, where the balance of ingredients impacts texture and taste.

Layering flavors is all about building a rich taste profile. Start with aromatics like onions, garlic, or herbs, and allow them to cook before adding proteins or vegetables. This step is important and can significantly enhance the overall flavor of your dish.

Pro Tips for Perfect Crock Pot Chicken and Dumplings

Use quality chicken for best results: Choose organic or locally sourced chicken for superior flavor and texture.

Add vegetables at different stages: To maintain their texture, add sturdier vegetables like carrots early and more delicate ones like peas towards the end of cooking.

Don’t rush the dumplings: Allow them to steam undisturbed for the recommended time for the fluffiest texture.

Experiment with spices: Add dried herbs like thyme, rosemary, or parsley to elevate the flavor and make the dish your own.

Incorporate a splash of cream: For extra richness, stir in a splash of heavy cream just before serving.

Save leftover broth: The liquid can be used in future soups or sauces to enhance flavor.

Adjust for altitude: If you’re cooking at high elevation, adjustments to cooking times may be necessary for optimal results.

Variations and Adaptations

Experiment with regional variations by incorporating local herbs or spices unique to your area. For example, adding a touch of Cajun seasoning can give your dish a southern twist that’s bursting with flavor.

Seasonal adaptations also let the recipe shine. Swap out summer vegetables like zucchini and bell peppers for heartier options in winter, such as root vegetables like parsnips and turnips.

Dietary modifications can make this dish more inclusive. For a vegetarian version, replace chicken with chickpeas and use vegetable broth. You can also modify the recipe to be gluten-free by using gluten-free flour for the dumplings.

Flavor variations are easy to achieve by adding different spices. A pinch of cayenne or smoked paprika can add a delightful kick or smokiness to your dish.

Texture modifications can be made by using an alternative for dumplings, such as biscuits or cornbread topping, providing a different, yet fun twist that still embodies comfort.

For presentation, consider serving in individual bowls topped with fresh herbs or a drizzle of olive oil. This adds a fresh touch that enhances both appearance and flavor.

Serving and Presentation Guide

When plating crock pot chicken and dumplings, consider using a shallow bowl. This allows the dumplings to be displayed beautifully atop the rich broth. For garnish, sprinkle fresh herbs like parsley or thyme over the top to add a burst of color and freshness.

Garnishing doesn’t need to be complex—adding a few sprigs of fresh herbs or even a dash of freshly cracked pepper can elevate the look of your dish.

Pair the recipe with traditional accompaniments like crusty bread or a simple green salad to balance the meal. Presenting with a light vinaigrette can cleanse the palate nicely.

For modern serving suggestions, consider using mason jars for individual servings at casual gatherings. This provides a charming, rustic feel that’s both practical and visually appealing.

Temperature is key: Serve the dish hot to ensure flavors are fully expressed. You can keep it warm until serving time by using a slow cooker set to warm.

Regarding portion control, consider serving in smaller bowls, especially if accompanying with other dishes. This not only makes the meal feel more manageable but also visually appealing on the table.

Wine and Beverage Pairing

For wine pairings, consider a medium-bodied white wine, like Chardonnay or Sauvignon Blanc, which complements the richness of the chicken and dumplings without overpowering it.

If you prefer a non-alcoholic alternative, sparkling water with a hint of lime or a light herbal tea can provide a refreshing balance to the dish.

Coffee or tea can also be lovely options to accompany a hearty meal—opt for a light roast coffee or chamomile tea for a calming finish.

Temperature considerations matter: Serve white wines chilled to enhance their refreshing qualities, while warming up the broth and accompanying dishes to maintain the overall experience.

When serving, consider adding a twist of citrus to your beverage, creating an elevated tasting experience alongside your meal.

Storage and Shelf Life

To store leftover crock pot chicken and dumplings, transfer them into an airtight container and refrigerate. It will typically last for about 3-4 days in the refrigerator without significant loss of quality. For extended storage, consider freezing portions for future meals.

The ideal temperature for storing your leftovers is below 40°F to prevent bacterial growth. If the dish has been left out at room temperature for more than two hours, it’s safer to discard it.

When it comes to reheating, ensure that all components reach an internal temperature of 165°F. Microwaving is convenient for quick meals, but reheating slowly on the stovetop ensures even warmth.

For freezing, consider using freezer-safe containers or bags, allowing for 2-3 months of quality storage. Be sure to label containers with dates to track freshness.

Signs of spoilage include off odors, discoloration, or any signs of frostbite in frozen meals, indicating that it may be time to toss it.

Make Ahead Strategies

When planning to make crock pot chicken and dumplings ahead of time, start by prepping ingredients. Chop vegetables and measure spices, storing them together in the refrigerator to streamline cooking day.

It’s vital to cook the chicken and broth base on the day before to deepen flavors. Just heat it slightly before adding to the slow cooker with fresh dumpling dough.

Quality is crucial; avoid making dumplings too far in advance, as they can lose their texture. Prepare the dumpling mix the same day of cooking for the fluffiest results.

During assembly, ensure each component is fresh, especially when mixing in herbs or greens. This helps maintain a bright flavor and prevents browning.

After cooking, leftovers can be stored efficiently, as indicated earlier, but consider separating components if possible. This maintains the texture of the dumplings when reheated.

If adding fresh elements, such as herbs or a squeeze of lemon, do so just before serving. These additions enhance freshness while balancing flavors beautifully.

Scaling Instructions

If scaling down, for a smaller batch, halving ingredients works well. This ensures that flavors remain balanced and no ingredient is lost in the process.

Doubling or tripling the recipe is straightforward, but consider the size of your slow cooker. Ensure it can accommodate the increased volume to maintain even cooking.

Equipment adjustments might be needed when scaling. Larger portions require a bigger slow cooker or more cooking vessels, so have these handy.

Timing modifications are essential—larger quantities may require additional cooking time to ensure everything is cooked properly, so monitor doneness closely.

For storage considerations, larger batches may benefit from portioning out into smaller containers. This makes for easier reheating and minimizes waste.

Experimenting with ratios while scaling can help refine the recipe to match your desired taste, so take notes for future reference.

Nutritional Deep Dive

To understand the macro breakdown of crock pot chicken and dumplings, consider the protein-rich chicken, carbohydrates from the dumplings, and fiber from the vegetables. Each serving provides a balanced nutritional profile.

Micronutrient analysis reveals that this dish offers essential vitamins, particularly from the vegetables—carrots provide Vitamin A, while spinach lends iron and calcium benefits.

Health benefits are plentiful; the combination of lean meat and vegetables supports muscle growth and overall health. The dish can also be tailored based on dietary needs by adjusting the ingredients used.

Dietary considerations are important; for those watching their carbs, modifications like lowering dumpling quantity or using low-carb vegetables can be beneficial.

Portion analysis can guide healthier eating; servings should be moderated depending on lifestyle and dietary goals, promoting mindful eating without feeling deprived.

Weight management tips include high protein intake and fiber content, which helps in satiety, aiding in weight control while enjoying a fulfilling meal.

Dietary Adaptations

For gluten-free adaptations, use gluten-free flour for the dumplings or alternative grains like almond flour. This ensures those with gluten sensitivity can still enjoy this comforting dish.

Dairy-free followers can swap butter for coconut oil and use almond milk in dumplings to create a creamy texture without dairy.

Vegan options can be achieved by replacing the chicken with plant-based proteins like chickpeas, using vegetable broth, and employing a flaxseed egg for the dumpling mix.

Low-carb diets can benefit from cauliflower rice instead of dumplings, delivering flavor and comfort while adhering to dietary goals.

Keto modifications emphasize high-fat ingredients; consider adding cream cheese in small portions to enrich the broth while reducing carbohydrates.

For those on the paleo diet, focus on whole-food ingredients, avoiding processed flours and sugars, ensuring a healthy and nutritious meal.

Low-FODMAP adjustments involve careful choices for vegetables, opting for ones lower in fermentable carbohydrates to accommodate sensitive digestive systems.

Troubleshooting Guide

If the dish appears overly watery, it may be due to excessive vegetable moisture or not enough thickeners. Add a cornstarch slurry to the broth towards the end of cooking to rectify this.

Texture issues with dumplings can arise if they’re too dense. Ensure adequate leavening agents and avoid overmixing the dough, as this can lead to overly tough dumplings.

Flavor balance may suffer if it turns out too salty; counter with acidity, such as a splash of lemon juice, to brighten the overall profile.

Temperature problems can occur if the slow cooker runs hot. Keep an eye on cooking times, as hot slow cookers may require adjustments for optimal results.

Equipment challenges, particularly with crock pots, often arise with older models. Ensure proper maintenance, like checking seals and heating elements, to avoid discrepancies in cooking.

Ingredient substitutions can lead to surprising outcomes. Be mindful of ingredient ratios when swapping to ensure the final dish maintains harmony.

Timing concerns may arise during busy evenings; establish a routine for prep and cooking times to streamline the process.

Recipe Success Stories

Community feedback highlights the joy of making this dish for family gatherings, often prompting joyful reminiscences of childhood dinners. Many readers have noted how this recipe has become a cherished part of their holiday traditions, bringing families together to share warmth and love.

Variation successes have emerged, with individuals experimenting with different spices and herbs, showcasing the versatility of the base recipe while catering to personal taste. Shared stories of adding new ingredients illustrate how this dish evolves within families.

Adaptation stories often include swapped ingredients for dietary needs, showcasing how this comfort food can be inclusive. Readers have transformed their favorites into gluten-free or vegan options, proving the recipe’s adaptability.

Suggestions from seasoned cooks emphasize the importance of presentation, with many sharing tips on garnishing and serving techniques that combine both visual appeal and taste.

Photography tips abound, with bakers sharing stunning images of their creations on social media, inspiring others to dive into the world of slow-cooked comfort food, capturing the homely essence beautifully.

Frequently Asked Questions

Can I use frozen chicken for this recipe?

Yes! You can use frozen chicken; however, it may increase the cooking time. Ensure it reaches 165°F internally for safety.

What can I substitute for dumplings?

If you’re looking for an alternative, biscuit dough or cornbread topping works beautifully, providing a different flavor and texture.

How do I reheat leftovers?

Reheating leftovers is simple; just ensure they reach 165°F. You can use the microwave, but reheating on the stovetop can help maintain texture.

Can I prepare this dish ahead of time?

Absolutely! You can prepare the ingredients a day in advance and cook them on the day of serving for optimal freshness.

How long will this dish last in the fridge?

This dish can last in the fridge for 3-4 days when stored properly in an airtight container. Be sure to check for spoilage.

Is it possible to freeze this recipe?

Yes, this recipe freezes well! Just portion it into freezer-safe containers, and it will maintain quality for about 2-3 months.

What spices can I add for more flavor?

Consider adding thyme, rosemary, or even a pinch of cayenne for an extra kick. Exploring new spices can alter the dish’s flavor profile beautifully.

Can I omit vegetables from the recipe?

While you can, vegetables add flavor and nutrition. If you prefer, consider replacing them with your favorites or a different selection.

How do I know when the chicken is done?

Always check the internal temperature; chicken should reach 165°F for safe consumption. A meat thermometer is your best tool for accuracy.

Can I make this recipe in a regular pot instead?

Yes, you can! Just reduce the cooking time and monitor the heat closely. Regular pots require more attention than a slow cooker for even cooking.

Additional Resources

For more delicious comfort food, check out these related recipes on the blog: creamy tomato soup, hearty beef stew, and vegetable pot pie. Each brings a rich variety of flavors designed to warm your heart.

Consider exploring technique guides, focusing on mastering slow cooking and meal prep to enhance your cooking skills. Learning about ingredient information can help you select the freshest options available at your local market.

Looking into equipment recommendations is essential for achieving the best results. Quality cookware, like cast iron skillets and durable slow cookers, can greatly enhance your culinary adventures.

Lastly, don’t forget seasonal variations. Incorporating in-season veggies not only boosts flavor but supports sustainable eating habits while reflecting on your dish’s freshness and quality.

Join the Conversation

Share your experience making crock pot chicken and dumplings with us on social media! Tag us in your photos or leave a comment below with your tips and insights.

We love to see how our community adapts and enjoys this beloved recipe. Engaging with fellow cooking enthusiasts can spark inspiration and share helpful advice.

Don’t hesitate to leave reviews or rate the recipe once you try it. We appreciate your feedback and aim to continue improving our content based on your experiences.

Consider sharing your variations or adaptations, as this community thrives on creativity. Your unique spin on this classic dish could inspire another cook to try something new!

Let’s create a conversation around delicious food! Engage with us by sharing your thoughts, stories, or even your cooking mishaps. We believe in learning and growing together in the kitchen.

The Recipe

Crock Pot Chicken and Dumplings

Serves: 6

Prep Time: 15 mins

Cook Time: 6 hours

Total Time: 6 hours 15 mins

Kitchen Equipment Needed

  • Slow Cooker
  • Skillet (for browning)
  • Measuring Cups and Spoons
  • Cutting Board
  • Knife

Ingredients

  • 4 boneless, skinless chicken breasts
  • 2 cups of chicken broth
  • 1 cup of carrots, diced
  • 1 cup of celery, diced
  • 1 small onion, diced
  • 1 teaspoon of thyme
  • 1 teaspoon of garlic powder
  • 2 cups of all-purpose flour
  • 2 tablespoons of baking powder
  • 1 cup of milk
  • 1/4 cup of butter, melted
  • Salt and pepper, to taste

Directions

  1. In a skillet, brown chicken breasts on both sides for about 5 minutes each. Transfer to slow cooker.
  2. Add chicken broth, diced carrots, celery, onion, thyme, garlic powder, salt, and pepper to the slow cooker.
  3. Cover and cook on low for 6 hours.
  4. In a bowl, mix flour, baking powder, milk, and melted butter to form a dough.
  5. After 6 hours, spoon dumpling batter over the chicken and broth mixture.
  6. Cover and cook on high for an additional 30 minutes until dumplings are set and cooked through.

Recipe Notes

  • You can substitute chicken thighs or rotisserie chicken for different flavors.
  • For a creamier texture, add a splash of heavy cream before serving.
  • Feel free to adjust the vegetables according to your preference.