Easy Chicken Pot Pie Pasta Skillet for Busy Weeknights

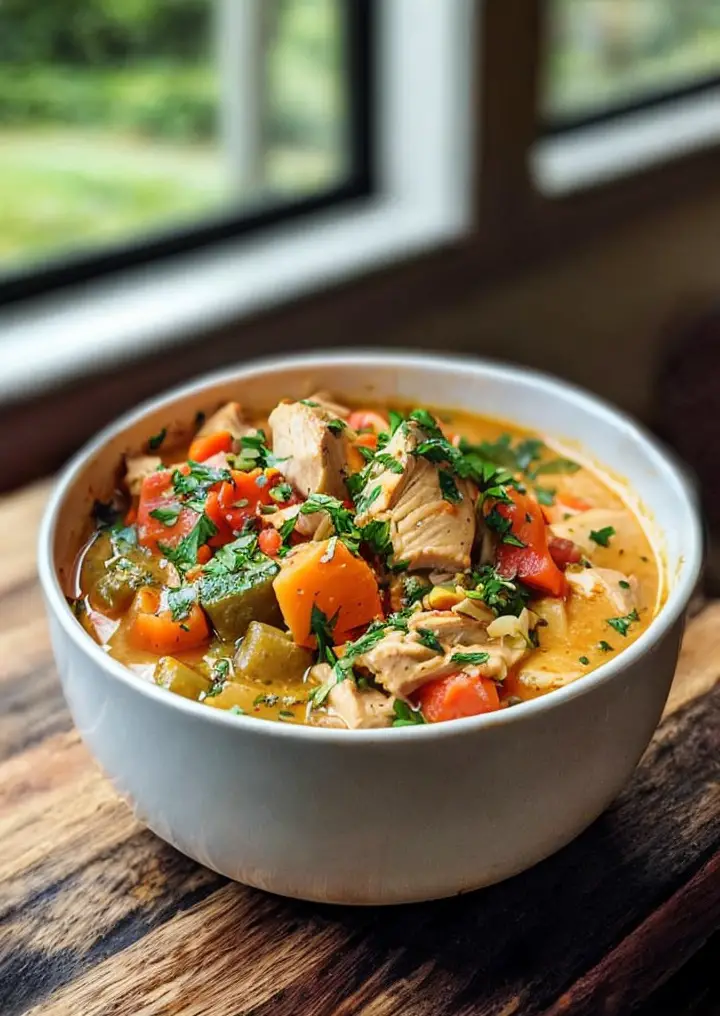
Chicken Pot Pie Pasta Skillet: A Comforting One-Pan Delight

⚖️
Difficulty
Easy

⏲️
Prep Time
10 mins

🕒
Cook Time
20 mins

⏱️
Total Time
30 mins

🍽️
Servings
4 servings

Pasta lovers and comfort food enthusiasts alike will rejoice in the flavors of this Chicken Pot Pie Pasta Skillet. Picture creamy pasta enveloped in rich broth, tender chicken, and a medley of colorful vegetables— all brought together in one harmonious dish. This recipe takes the classic chicken pot pie and transforms it into a quick and easy skillet meal that can be whipped up in less than 30 minutes. Every bite offers a delightful experience that will warm your heart and satisfy your cravings.

This Chicken Pot Pie Pasta Skillet is not just a meal; it’s an experience that evokes cozy family dinners and cherished gatherings. The creamy sauce and tender pasta perfectly mimic the comforting qualities of traditional pot pie, while the vegetables add a splash of color and a boost of nutrients. Whether you’re cooking for a busy weeknight or a special occasion, this one-pan dish makes dinner a breeze!

Quick Recipe Highlights

  • Flavor Profile: The combination of savory chicken and aromatic herbs, melded with creamy sauce, delivers a delightful balance of comfort and flavor that warms the soul.
  • Texture: The creaminess of the sauce with the al dente pasta and tender vegetables creates a satisfying mouthfeel that’s both rich and refreshing.
  • Aroma: As it cooks, the fragrant notes of thyme, onion, and garlic fill your kitchen, inviting everyone to the table with promises of deliciousness.
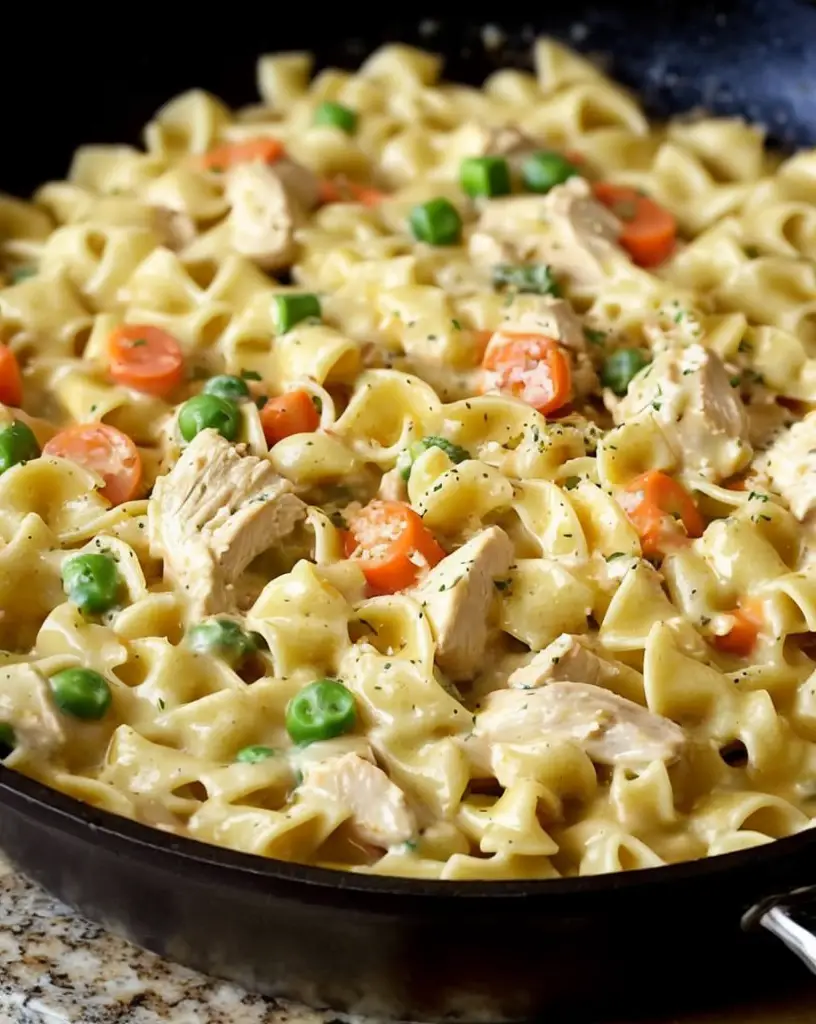
  • Visual Appeal: Creamy white sauce combined with colorful veggies and golden-brown chicken makes this dish not only tasty but visually enticing.
  • Skill Level Needed: This recipe is perfect for novices and experts alike, as it requires minimal techniques while still delivering a masterpiece on the plate.
  • Special Equipment: All you need is a large skillet or a Dutch oven to bring this delightful dish together, making cleanup even easier.

Recipe Overview

  • Difficulty Level: With simple steps and easily attainable ingredients, this Chicken Pot Pie Pasta Skillet falls under the easy category, making it great for beginners.
  • Category: This recipe fits perfectly into categories like one-pot meals, comfort food, and family-friendly recipes, ideal for any occasion.
  • Cuisine: Drawing inspiration from classic American comfort food, this dish takes familiar elements of chicken pot pie and translates them into a pasta favorite.
  • Cost: The ingredients are affordable, generally falling under $20 for four servings, making it an economical choice for families and gatherings.
  • Season: While perfect for any time of the year, it’s especially comforting during the chilly months, when hearty meals shine brightest.
  • Occasion: It’s suitable for weeknight dinners, casual gatherings, or even as a comforting meal during movie nights at home.

Why You’ll Love This Recipe

One of the primary reasons you’ll adore this Chicken Pot Pie Pasta Skillet is the incredible taste and texture it brings to the table. The creamy sauce envelops the pasta beautifully, and the tender chicken combined with the crisp vegetables crafts a symphony of flavors that’s hard to resist. Each bite is a celebration of classic pot pie comfort, all while being presented in a pasta form that elevates the dining experience.

Convenience is king in today’s fast-paced world, and this recipe delivers just that. With both preparation and cooking time totaling just 30 minutes, it’s designed to fit into your busy schedule while still allowing you to indulge in a homemade meal. Utilizing a single skillet for the entire preparation reduces cleanup time significantly, making it easier to enjoy your meal and the time spent with loved ones.

Moreover, this dish is packed with nutritional advantages. By using lean chicken breast and a variety of vegetables, you’re getting essential proteins, fiber, and vitamins in a single serving. The creamy base made from a blend of chicken stock and milk provides indulgence without sacrificing health, making it a balanced option for family dinners.

Socializing with friends and family is enhanced by this recipe as well; it encourages sharing and enjoying a hearty meal together. Nothing brings people to the table quite like a warm, comforting dish that invites second helpings and shared stories. You can sense the satisfaction and delight as everyone digs in and savors the flavors.

Finally, considering the cost-effectiveness of this dish, it stands out as a fantastic choice for families. You can whip up a delicious meal without breaking the bank, creating lasting memories over every plate without overspending on takeout options. It’s an accessible recipe that anyone can appreciate, both in flavor and value.

Historical Background and Cultural Significance

The origins of chicken pot pie date back to ancient times, with evidence of meat encased in pastry found in Roman recipe books. However, it was the introduction of poultry to European cuisine that truly established the dish we know today. In America, chicken pot pie became a staple comfort food, often embodying the soul of home-cooked meals and family gatherings, particularly during the colder seasons.

Culturally, chicken pot pie holds significant value in American households. It represents warmth, love, and nourishment, often prepared for beloved family members during chilly nights or holidays. The symbolism of this dish extends beyond mere ingredients; it embodies the care and creativity that goes into creating memorable meals that bring people together.

Over the years, the recipe for chicken pot pie has evolved, adapting to various regional preferences and available ingredients. From using different types of protein to adding diverse spices, families have made this cozy dish their own. Some variations include using turkey instead of chicken, while others embrace crust-less versions for a healthier twist.

Regional variations of chicken pot pie are abundant, showcasing the diversity of ingredients found across the United States. For example, in the South, you may find a biscuit-style topping instead of a pastry crust, while in New England, creamy seafood versions often entice palates. Each rendition reflects local tastes, enriching the cultural tapestry of this comforting meal.

Ingredient Deep Dive

Chicken

Chicken, often dubbed as a staple protein, has a long and storied history in many cultures. Traditionally integral to numerous cuisines, it offers versatility and nourishment. Nutritionally, chicken is a rich source of lean protein while providing essential vitamins and minerals. When selecting chicken, look for plump, evenly colored pieces without bruises, and ensure to store it at appropriate temperatures to maintain freshness. In recipes, you can substitute chicken with turkey or even plant-based proteins for a different protein profile.

Pasta

Pasta is a beloved dish worldwide, originating from ancient China and evolving through Italian culture into various shapes and styles. Its significance is paramount, often synonymous with traditional family meals. Pasta is a good source of carbohydrates, providing energy for the day, plus it’s laden with fiber, particularly whole grain varieties. When selecting pasta, opt for those made from durum wheat for quality texture. In terms of storage, keep pasta in a cool, dry place; for substitutions, consider gluten-free options like quinoa or chickpea pasta.

Vegetables

Vegetables not only elevate plate aesthetics but are also essential for balanced nutrition. Historically, they’ve been utilized in cooking for centuries, acting as flavor enhancers and nutritional powerhouses. For this recipe, common vegetables include carrots, peas, and onions, which offer vitamins A and C and add color. When chosen, opt for fresh, vibrant veggies; store them in the fridge to prolong freshness. Frozen vegetables are great substitutes when fresh produce isn’t available, making it easy to use up on-hand ingredients.

Cream

Cream has a rich culinary heritage across various cultures, enhancing flavors and textures in countless dishes. It’s prized for its richness and ability to elevate meals, particularly in comfort food. High-fat content offers satiety alongside essential fats. When shopping for cream, look for heavy cream for the desired consistency; store it in the fridge and adhere to expiration dates. Alternatives like half-and-half or coconut cream can serve well for a lighter or dairy-free option, respectively.

Common Mistakes to Avoid

  • Overcooking the pasta: When making Chicken Pot Pie Pasta Skillet, be mindful not to overcook the pasta. Aim for al dente, as it will continue to cook slightly in the sauce.
  • Using low-quality chicken stock: The stock serves as the foundation of flavor in this recipe. Opt for a good quality stock to enhance the overall taste.
  • Skipping the sautéing step: Sautéing the onions and garlic before adding other ingredients builds flavor. Skipping this step can lead to a flat taste.
  • Not seasoning adequately: Seasoning at every stage is crucial—don’t wait until the end! Taste along the way to enhance the flavors properly.
  • Rushing the cooking time: Allow enough time for the ingredients to meld and flavors to develop; cooking it too fast can diminish the dish’s depth.
  • Using frozen vegetables directly: If you’re including fresh vegetables, sauté them first to bring out their natural flavors before adding to the mix.
  • Neglecting to stir occasionally: Stirring occasionally prevents sticking and helps uniformly blend the flavors throughout the dish.
  • Using too much cream: While a creamy sauce is desirable, overdoing it can lead to an overly rich and unbalanced dish. Stick to suggested measurements.

Essential Techniques

Sautéing is a critical technique in this Chicken Pot Pie Pasta Skillet. Proper sautéing enhances flavor, creating a fragrant base that elevates the dish. To master sautéing, preheat your skillet adequately to prevent sticking, and don’t overcrowd the pan. A common pitfall is adding too much at once, which can lead to steaming instead of browning—ensure there’s space for the ingredients to caramelize.

Coating pasta in sauce is another essential technique to ensure every bite bursts with flavor. This involves adding a little pasta cooking water to the sauce before mixing, which helps the sauce adhere better. Look for the sauce to cling to the pasta without being overly soupy. The visual cue is a light sheen without excess liquid pooling at the bottom of your pan.

Pro Tips for Perfect Chicken Pot Pie Pasta Skillet

1. Use leftover chicken for an even quicker prepping time; it integrates seamlessly into the sauce for a more profound flavor.
2. Consider fresh herbs like thyme or parsley sprinkled at the end for a burst of freshness to contrast the rich flavors.
3. For an extra kick, add a splash of hot sauce or crushed red pepper flakes to the sauce for heat.
4. Make it a complete meal by serving with a side salad drizzled with light vinaigrette to balance the creaminess.
5. Allow the skillet to rest for a few minutes after cooking; it helps the sauce thicken and settle, improving mouthfeel.
6. For variations, try adding cooked bacon or mushrooms; these ingredients can add depth and create a more complex flavor profile.
7. If you like a golden crust, consider broiling the dish for the last few minutes, creating a delightful crispy top.
8. Ocassionally check and adjust for seasoning throughout the cooking process to ensure flavor intensity is to your preference.

Variations and Adaptations

Regional variations of Chicken Pot Pie Pasta Skillet allow for exciting culinary adaptations. In the Midwest, you’ll find the addition of sweet corn and a cream-based sauce, giving it a sweet undertone. For seasonal adaptations, consider including butternut squash or spinach when they’re at their peak, adding festive flair and nutritional benefits to the dish.

Health-conscious eaters might prefer dietary modifications like using whole grain pasta or reducing cream in favor of Greek yogurt, offering more protein and fewer calories. For flavor variations, incorporating different spices such as paprika or Cajun seasoning can introduce an entirely new dimension to this comforting dish.

Changing the textural experience is another excellent way to keep the dish interesting. You might swap out traditional pasta for sautéed zucchini or carrot noodles for a lighter option. Presentation alternatives can also enhance your dish; try serving it in individual ramekins topped with flaky phyllo pastry for a rustic touch that makes each serving feel special.

Serving and Presentation Guide

Achieving an appealing plating of Chicken Pot Pie Pasta Skillet can elevate everyone’s dining experience. Start by using large, shallow bowls to showcase the vibrant colors of the sauce and vegetables. A sprinkle of freshly chopped parsley or a drizzle of olive oil can add a touch of visual interest.

For garnishing ideas, consider topping each serving with freshly grated Parmesan cheese or crushed crackers to mimic the traditional pot pie crust. This not only adds flavor but also creates textures that contrast with the creamy skillet.

Traditional accompaniments such as a crisp side salad or crusty bread offer delightful pairing options. Modern serving suggestions could include portioning individual servings in elegant bowls, making it perfect for entertaining guests while keeping the ease of serving with just one pan.

Temperature is vital; serve hot from the skillet for the best flavor and texture. Portion control tips suggest ladling out smaller servings at first, allowing guests to come back for more if desired— a great way to encourage communal dining.

Wine and Beverage Pairing

When pairing a drink with Chicken Pot Pie Pasta Skillet, consider a medium-bodied Chardonnay. Its buttery notes complement the creamy sauce well, enhancing the overall dining experience. For those seeking a red option, a light Pinot Noir can provide a delightful contrast to the richness of the dish.

Non-alcoholic alternatives include a sparkling lemon-lime soda, which can cleanse the palate and offer a refreshing contrast. If coffee or tea are preferred, a light herbal tea such as chamomile can provide a calming post-dinner touch.

Temperature considerations are essential; enjoy white wine chilled to maintain its crispness while serving red at a cool room temperature to avoid overwhelming flavors. The right pairing heightens enjoyment, creating a complete meal experience.

Storage and Shelf Life

Storing Chicken Pot Pie Pasta Skillet properly ensures you enjoy the leftovers without sacrificing freshness. Refrigerate it in an airtight container for up to three days following preparation. When reheating, gently warm it in a skillet over low heat, adding a splash of chicken stock or water to maintain creaminess.

For freezing, ensure it has fully cooled before transferring to freezer-safe containers, where it can last for up to three months. Signs of spoilage include off odors, discoloration, or separation of the sauce—if any arise, it’s best to discard the dish.

When reheating from frozen, allow it to thaw overnight in the fridge and then warm on the stove while stirring to retain texture. Alternatively, gentle microwave reheating can work if done in short intervals to avoid overheating.

Make Ahead Strategies

If planning ahead, consider prepping the Chicken Pot Pie Pasta Skillet in stages. You can chop vegetables and even cook the chicken a day in advance, storing them separately in the fridge. On cooking day, simply combine and finish off the dish in under 30 minutes.

For storage between steps, ensure all ingredients are prepped in airtight containers, keeping flavors fresh. Note that certain components, like pasta, should be cooked last to avoid mushiness in storage.

Quality impacts arise when meals sit too long; for the best flavor, aim to finish cooking within two days of prep. Assembling tips include setting out all ingredients first, allowing for a smooth cooking flow with minimal downtime.

When reheating, consider adding in fresh herbs or a squeeze of lemon juice right before serving to refresh flavors, ensuring the dish tastes just as delicious as when it was first made.

Scaling Instructions

Scaling the Chicken Pot Pie Pasta Skillet recipe can accommodate various serving sizes with ease. To halve the recipe, simply cut all ingredient measurements in half; reduce the cooking time slightly as necessary to suit the smaller portion.

For doubling or tripling, ensure that your skillet is large enough to accommodate the extra ingredients. You may need to adjust cooking times, as larger volumes can require a bit more time to evenly cook through.

Timing modifications are crucial; monitor doneness closely as larger batches may cook more slowly. Storage considerations are the same— excess portions can be stored in individual containers for quick reheating throughout the week.

A helpful tip is to have all ingredients prepped beforehand; this enhances efficiency and can assist with calculated scaling without confusion.

Nutritional Deep Dive

The macro breakdown of a serving of Chicken Pot Pie Pasta Skillet typically includes approximately 30 grams of protein, which provides the necessary building blocks for muscle repair and growth. Carbohydrates contribute to around 50 grams, aiding in energy supply, while the fat content, primarily from cream and chicken, sits near 15 grams for a well-rounded intake.

Micronutrient analysis reveals the presence of vital vitamins such as Vitamin A from the carrots and Vitamin C from various vegetables, which assist in immune health and skin integrity. Iron and calcium offered by the chicken and cream add to the nutritional benefits, promoting bone health and energy levels.

In terms of health benefits, this dish serves as a balanced meal option, combining protein, fiber, and healthy fats. Dietary considerations are important; it can easily be modified to fit into various diet plans while maintaining its comforting appeal.

Portion analysis reveals that one serving is satisfying yet balanced, making it easier to enjoy without overindulgence. For weight management tips, consider pairing the dish with a side of vegetables to create a more complete meal that promotes satiety.

Dietary Adaptations

For those adhering to gluten-free diets, substituting traditional pasta with gluten-free alternatives such as rice noodles or chickpea pasta ensures that everyone can enjoy this dish without issues. Additionally, employing a gluten-free flour thickener for the sauce can maintain the desired creamy texture without compromise.

Dairy-free options can be achieved by using coconut milk in place of cream and nutritional yeast to replicate cheesy flavors. This maintains richness while catering to lactose intolerance or vegan preferences.

For low-carb or ketogenic diets, consider spiralizing vegetables like zucchini or squash to replace pasta. This adaptation provides a lower carbohydrate count while still delivering on deliciousness.

For paleo followers, replace cream with homemade cashew cream for a nut-based dairy alternative, making sure to pay attention to flavor within this substitute. Ensuring the dish aligns with dietary restrictions retains its comforting essence regardless of adaptations.

Troubleshooting Guide

Texture issues can arise if the sauce becomes too thick; add a splash of chicken stock or milk to achieve desired consistency. In cases of overly runny sauce, a quick solution is simmering it longer to thicken while stirring consistently.

Flavor balance can also be challenging; if too bland, consider adding more herbs or seasoning along the way to elevate the taste. For overly salty dishes, balance can be restored through the addition of additional vegetables or a squeeze of lemon juice.

Temperature problems often occur if ingredients aren’t prepped in succession; aim for everything to be ready to ensure a consistent cooking temperature throughout. If your skillet isn’t retaining heat well, reduce the heat slightly and cover to trap warmth.

Equipment challenges may arise with over-full skillets or improper stacking; ensure proper sizing and spacing during cooking to avoid overwhelming the skillet. For ingredient substitutions, make adjustments based on flavor profiles, ensuring compatibility while maintaining overall integrity.

Timing concerns are common if other cooking days collide; prepare vegetables in advance and store them, making the cooking portion fast and efficient when time-constrained.

Recipe Success Stories

Our community feedback has been overwhelmingly positive regarding the Chicken Pot Pie Pasta Skillet. Many home cooks have shared their modification successes, like incorporating diverse vegetables or enhancing the sauce with unique spices, which create an enjoyable twist on this classic recipe.

Adaptation stories often highlight those who’ve cleverly transformed this dish into creative leftovers, evolving it into new meals by mixing in different proteins or carrying over flavors into other pasta dishes. It showcases the versatility of the recipe and how one can continuously enjoy it without monotony.

Readers also suggest photography tips, emphasizing natural lighting to capture the dish’s vibrant colors and inviting essence. Ensuring presentation is appealing makes for more enticing recipes to share on social media platforms.

Before the dish is even served, the tantalizing aroma and appealing texture encourage friends and family to rave about their experience, leading to recurring dinner requests filled with laughter and joy around the table.

Frequently Asked Questions

1. Can I use rotisserie chicken in this recipe?
Yes, rotisserie chicken is a fantastic time-saving alternative! Simply shred it and add it to the skillet toward the end of cooking to warm it through without overcooking.

2. What kind of pasta works best for this dish?
Any pasta shape will do, but short varieties like penne, fusilli, or shells work best as they hold onto sauce well and meld with other ingredients seamlessly.

3. Can I freeze leftovers?
Absolutely! Store in an airtight container, and it can last up to three months in the freezer. Just remember to thaw overnight before reheating for the best results.

4. Is it possible to make this dish vegetarian?
Yes! Simply replace the chicken with a mix of mushrooms, tofu, or chickpeas, and use vegetable stock in place of chicken stock to preserve flavor.

5. How can I adjust the spice level in this recipe?
You can control the spice level by adjusting the quantity of black pepper, garlic, or even adding a dash of hot sauce or red pepper flakes to boost heat according to your preference.

6. What type of cream is best used?
Heavy cream creates the richest sauce; however, half-and-half or even a non-dairy cream alternative will work in varying degrees of creaminess, according to your dietary needs.

7. How do I avoid the pasta getting mushy?
To prevent mushiness, ensure you cook the pasta al dente. Pull it off slightly early when incorporating it into the skillet, as it will continue to cook in the sauce.

8. What if I don’t have fresh vegetables?
Frozen vegetables are a great substitute and can provide excellent flavor; simply toss them in with other ingredients according to their cooking times.

9. What kind of stock should I use?
Homemade chicken stock delivers the best flavor; however, store-bought low-sodium options are perfect if you’re short on time for a quick meal.

10. Can this recipe be prepared in advance?
Yes! You can prep ingredients ahead and store them in the refrigerator to pull together the dish in under 30 minutes on cooking day, making it easy for busy schedules.

Additional Resources

To further enhance your culinary skills, we provide related recipes like creamy pastas and hearty stews that can pair well with Chicken Pot Pie Pasta Skillet. Explore various technique guides on how to sauté effectively, ensuring that flavors develop throughout your meals.

For ingredient information, browse our comprehensive guides on the best chicken cuts and seasonal vegetables that align perfectly with this recipe. Consider investing in quality kitchen equipment like non-stick skillets or chef’s knives that can make preparation easier and more enjoyable.

Lastly, be sure to explore seasonal variations using fresh produce; trying out new ingredients each season keeps meals exciting while allowing you to maintain a healthy, balanced diet throughout the year.

Join the Conversation

We love hearing your thoughts and experiences with this Chicken Pot Pie Pasta Skillet recipe! Share your creations on social media and invite friends and family to join in on the fun of cooking together. Share pictures and ideas for variations and adapt it based on your preferences—let’s create a vibrant community full of culinary inspiration!

Leave reviews, suggest improvements, and connect with other avid cooks. Your feedback can inspire others to share their version of this warm dish! Create a network of recipe sharing to keep the conversation alive and bursting with creativity every time you gather around the table.

The Recipe

Chicken Pot Pie Pasta Skillet

Serves: 4 servings

Prep Time: 10 mins

Cook Time: 20 mins

Total Time: 30 mins

Kitchen Equipment Needed

  • Large Skillet or Dutch Oven
  • Cutting Board
  • Chef’s Knife
  • Measuring Cups and Spoons

Ingredients

  • 1 lb shredded chicken
  • 8 oz pasta of your choice
  • 1 cup frozen peas
  • 1 cup diced carrots
  • 1/2 cup diced onion
  • 3 cups chicken stock
  • 1/2 cup heavy cream
  • 2 tsp thyme
  • Salt and pepper to taste

Directions

  1. In a large skillet, heat a little olive oil over medium heat. Add diced onion and sauté until translucent.
  2. Stir in the carrots and frozen peas, cooking for another 5 minutes until softened.
  3. Pour in chicken stock and bring to a simmer. Add the shredded chicken and thyme, and let cook for 5 minutes.
  4. Add pasta and cook according to package instructions, stirring occasionally.
  5. Once the pasta is cooked, stir in heavy cream and season with salt and pepper to taste. Allow to thicken and serve warm.

Recipe Notes

  • For a lighter version, substitute half and half for heavy cream.
  • You can customize with any vegetables you have on hand.
  • Leftovers can be stored in the fridge for up to 3 days.

Delicious Creamy Spinach and Mushroom Lasagna Recipe You’ll Love

Creamy Spinach & Mushroom Lasagna: A Comforting Culinary Delight

⚖️
Difficulty
Medium

⏲️
Prep Time
30 mins

🕒
Cook Time
45 mins

⏱️
Total Time
75 mins

🍽️
Servings
6

Indulge in the rich, creamy layers of our Creamy Spinach & Mushroom Lasagna that not only looks stunning but also bursts with flavor in every bite. This hearty vegetarian dish combines velvety cheese, sautéed spinach, and earthy mushrooms, creating an unforgettable meal perfect for any occasion. Whether you’re preparing a cozy family dinner or hosting friends for a weekend feast, this lasagna offers a delicious balance of flavor, texture, and satisfaction.

The humble origins of lasagna, enriched with fresh ingredients and a bit of love, promise a comforting experience. Encased between layers of tender pasta are the vibrant greens of spinach, coupled with the umami notes of mushrooms and a luscious ricotta filling. As it bakes, the aroma fills your kitchen, creating an inviting atmosphere that will have everyone gathering around the table, eager to enjoy this culinary delight.

Quick Recipe Highlights

  • Flavor Profile: The combination of creamy ricotta, savory mushrooms, and fresh spinach delivers a decadent yet healthy taste that is irresistible.
  • Texture: Each bite offers a delightful contrast of soft pasta, creamy cheese, and slightly chewy mushrooms, creating a mouthwatering experience.
  • Aroma: The fragrant blend of garlic, sautéed mushrooms, and fresh herbs wafting through your kitchen enhances the anticipation of this comforting dish.
  • Visual Appeal: Layers of vibrant green spinach, rich white cheese, and golden-brown edges make for an impressive and appetizing presentation.
  • Skill Level Needed: While the recipe involves several steps, it is approachable for home cooks, making it perfect for a weekend project.
  • Special Equipment: A 9×13 inch baking dish and a large skillet are essential for assembling and baking the lasagna, ensuring even cooking.

Recipe Overview

  • Difficulty Level: This recipe falls under a medium difficulty level due to its layered assembly and the need to sauté vegetables first, which may require basic kitchen skills.
  • Category: Creamy Spinach & Mushroom Lasagna fits perfectly in the categories of main course and comfort food, ideal for family meals or gatherings.
  • Cuisine: This dish draws inspiration from classic Italian culinary traditions, showcasing the use of pasta, cheese, and seasonal vegetables.
  • Cost: The ingredients are approachable and cost-effective, making this dish budget-friendly for larger families or meal-prepping scenarios.
  • Season: While this lasagna is enjoyable year-round, its vegetable components make it especially delightful during spring and fall.
  • Occasion: Ideal for holiday gatherings, potlucks, and cozy family dinners, this lasagna is sure to be a hit at any gathering.

Why You’ll Love This Recipe

The creamy filling of spinach and mushroom lasagna creates a flavor explosion that leaves a lasting impression. The harmonious balance of rich cheese and earthy mushrooms paired with nutritious spinach offers a health-conscious indulgence that tastes decadent.

Preparation is user-friendly, making it a great choice for cooks of any skill level. With its detailed step-by-step direction, you can effortlessly create this comforting meal without feeling overwhelmed. The assembly of layers not only allows for creativity but also makes it suitable for meal prep.

Nutritionally, this lasagna stands out due to its key ingredients. Spinach is packed with vitamins and iron, while mushrooms contribute beneficial antioxidants, making this a meal that pleases both the palate and the body.

Consider this dish a social powerhouse; sharing a homemade meal with family or friends creates a unique bonding experience. The aroma and appearance of baked lasagna spark conversations and smiles around the table.

Lastly, the cost-effectiveness of this recipe allows you to serve a satisfying meal without breaking the bank. With quality ingredients, you can feed a family or prepare leftovers for the week ahead, always bringing comfort to your kitchen.

Historical Background and Cultural Significance

Lasagna’s history dates back to ancient times, with mentions of a layered pasta dish in Greek and Roman texts. This tradition has evolved, with different cultures putting their spin on the classic recipe, leading to the vibrant variations we see today.

In Italy, lasagna is often associated with family gatherings and holiday celebrations. It acts as a symbol of comfort food, representing warmth and togetherness, cherished across generations.

Over the years, the recipe has evolved from simple layers of pasta and cheese to complex combinations of flavors and ingredients, reflecting regional culinary influences using available local produce and cheeses.

Today, vegetarian adaptations of lasagna, such as our creamy spinach and mushroom version, have gained popularity, enabling more people to enjoy this beloved classic while prioritizing health and dietary preferences.

Ingredient Deep Dive

Spinach: Known for its nutritional density, spinach is rich in vitamins A, C, K, and iron. Selecting fresh spinach that is vibrant green ensures optimal flavor and nutrients. Store it in a perforated bag in the refrigerator to maintain freshness, and consider blanching for smoother incorporation into dishes.

Mushrooms: Packed with umami flavor and antioxidants, mushrooms can elevate the taste of any dish. Choose firm, unblemished mushrooms, and store them paper bag in the fridge to avoid moisture. Alternatives like cremini or portobello can provide a stronger flavor if desired.

Common Mistakes to Avoid

  • Skipping the sautéing step for mushrooms can result in excess moisture in the lasagna, leading to a soggy texture.
  • Not allowing the lasagna to rest after baking can cause it to fall apart when slicing.
  • Using too much sauce can overwhelm the flavors; balance is key for a well-rounded dish.
  • Overcooking or undercooking the lasagna noodles will affect the overall texture and integrity of the layers.
  • Forgetting to season your cheese mixture can make the filling bland; seasoning is important to enhance flavors.
  • Using pre-grated cheese may lead to a less creamy texture; consider grating fresh cheese for the best results.
  • Not sufficiently greasing the baking dish can result in sticking, which compromises presentation.
  • Rushing the assembly process can lead to uneven layers and inconsistent cooking.

Essential Techniques

Sautéing Vegetables: This technique is crucial for developing flavors in your dish. To master it, cook your vegetables in a hot pan with a bit of oil, stirring occasionally until they are golden and softened. Watch for a fragrant aroma and golden color as cues for success.

Layering: Properly layering ensures even cooking and presentation. To master this, alternate between noodles, filling, and sauce. Maintain consistency with the amounts of each layer to prevent any one component from overwhelming the dish. Look for evenly distributed layers as a sign of success.

Pro Tips for Perfect Creamy Spinach & Mushroom Lasagna

1. Consider mixing different types of cheese such as mozzarella and provolone for added flavor complexity.

2. Use fresh herbs like basil or thyme to elevate the taste; sprinkle them between layers.

3. Let your lasagna cool for at least 15 minutes before slicing; this will help retain the layers more firmly.

4. For a gluten-free version, use gluten-free pasta; check for cooking times as they can vary.

5. Experiment with additional vegetables like zucchini or eggplant for a colorful, nutritious twist.

6. Consider making a double-batch and freezing one for a quick meal option later on; lasagna freezes beautifully.

7. Adjust the spice level with red pepper flakes for a subtle kick.

8. For an extra creamy texture, add a dollop of cream cheese to your ricotta mixture.

Variations and Adaptations

For regional variations, consider integrating local cheeses or seasonal vegetables into the filling. For example, using ricotta and spinach is traditional, while adding pumpkin during the fall can create a delightful autumnal flavor.

In terms of dietary adaptations, try replacing traditional noodles with zucchini slices for a low-carb version. You could also substitute cashew cheese for a vegan-friendly option, ensuring all guests are satisfied.

Flavor enhancements can also be implemented by adding a layer of pesto between the cheese and spinach for an additional herbal kick.

Texture modifications can include mixing in cooked lentils or chickpeas into the spinach, which provides a hearty bite while increasing the protein content.

For presentation, try baking in individual ramekins, which create stunning individual servings and are perfect for entertaining.

Serving and Presentation Guide

When serving lasagna, consider utilizing a large spatula to cut neat squares, ensuring every slice contains equal layers of creamy goodness. Garnishing with fresh parsley or basil can add a vibrant pop of color and freshness.

Traditional accompaniments include garlic bread or a fresh salad; both complement the richness of the lasagna perfectly. Modern serving suggestions may involve plating individual portions for ease during a gathering.

Temperature matters; lasagna is best served warm, allowing the flavors to meld together while ensuring the cheese remains deliciously melted.

For portion control, consider serving with smaller slices due to the richness, encouraging guests to help themselves for seconds!

Wine and Beverage Pairing

When considering wine pairings, opt for a light white like Pinot Grigio which will balance the richness of the lasagna without overpowering it. Alternatively, a light-bodied red like Chianti is also a great match, enhancing the earthy tones of the mushrooms.

For non-alcoholic options, sparkling water with a splash of lemon or a refreshing iced tea can cleanse the palate beautifully.

If you appreciate coffee, a mild cappuccino can enhance the meal while creating a cozy, comforting atmosphere.

Storage and Shelf Life

Store any leftover Creamy Spinach & Mushroom Lasagna in an airtight container in the refrigerator for up to 3-4 days. Ensure it has cooled completely to prevent condensation and sogginess.

For longer storage, you can freeze lasagna for up to 3 months. Wrap it tightly in plastic wrap and then foil to prevent freezer burn.

When reheating, ensure the lasagna is heated through to the center, ideally in a preheated oven at 350°F for about 30-40 minutes, or until bubbling and hot.

Make Ahead Strategies

To effortlessly prepare this lasagna ahead of time, you can assemble it a day in advance and store it covered in the refrigerator until ready to bake. This allows the flavors to meld beautifully.

If you’re looking to freeze, consider preparing the lasagna and assembling it in a freezer-safe dish. Label with the date and baking instructions for easy reference.

For a quicker dinner, have all your ingredients prepped and measured the day before, streamlining the cooking process.

When reheating, a pop of freshness can be added by garnishing with fresh herbs or a drizzle of olive oil just before serving.

Scaling Instructions

Should you need a smaller dish, halving the recipe is straightforward: simply adjust cooking times to ensure even baking. Look for visual cues of doneness rather than strictly following time.

If doubling or tripling, ensure your baking dish is large enough; you may need additional time to ensure it heats evenly. Consider using multiple smaller dishes to ease serving later on.

Timing modifications may become necessary with larger portions, so keep an eye on cheese browning and bubbling to gauge readiness.

When storing larger quantities, clearly label containers to know when to enjoy them best!

Nutritional Deep Dive

This dish is rich in essential nutrients, primarily thanks to the spinach, which boasts high levels of vitamins A, C, and K, and iron. Mushrooms add additional vitamins and antioxidants, contributing to a balanced profile.

The macro breakdown shows a good ratio of carbohydrates from the pasta, protein from the cheese and added veggies, and healthy fats based on the cheese selection. Enjoying in moderation ensures that it fits beautifully into a balanced diet.

Micronutrient analysis reveals potassium levels from the greens, aiding in muscle function and overall wellness. Dietary fiber from the mushrooms and spinach helps promote good digestion.

When considering portion sizes, keep in mind that adding a side salad or vegetable pairing enhances not only nutrition but overall meal satisfaction.

Dietary Adaptations

To make this recipe gluten-free, use gluten-free lasagna noodles, ensuring the same delicious layers without the gluten content.

Dairy-free adaptations can be achieved by substituting traditional cheese with vegan cheese or cashew-based alternatives, making sure to maintain flavor.

For a vegan version, follow suit with the cheese substitutions and incorporate an egg substitute in the ricotta mix for texture.

For low-carb diets, consider using thinly sliced zucchini or eggplant in place of lasagna noodles, reducing carbohydrates while providing a nutritious base.

Paleo enthusiasts can enjoy by omitting the pasta entirely and using a mix of cooked vegetables layered in a baking dish.

Troubleshooting Guide

If you encounter texture issues, like mushiness, ensure that your vegetables are well-drained and sautéed before adding them to the dish.

Balancing flavors can sometimes be tricky; if the dish is bland, ensure seasoning layers are applied. Taste the cheese mixture before assembly to adjust accordingly.

For overheating problems, consider checking your oven’s temperature with an oven thermometer; overheating can lead to uneven cooking.

If your lasagna sticks to the baking dish, ensure that the dish is properly greased or that a parchment layer is included to assist with easy removal.

Adjusting cooking time for thicker layers will help avoid undercooking; a toothpick inserted should come out clean for assurance of a properly baked dish.

Recipe Success Stories

Our community has shared glowing feedback, celebrating this dish as a weeknight go-to. Adjustments from readers have influenced the ingredient list, experimenting with lentils and various cheeses yielding fantastic outcomes.

Readers have shared heartwarming stories of making this lasagna for family celebrations, and its comforting presence stir nostalgia of their home-cooked meals.

Variations using local or seasonal produce have resulted in unique flavors, showcasing how versatile this recipe truly is.

Photography tips from fellow cooks demonstrate beautifully layered portions, encouraging others to share their culinary triumphs with the world.

Frequently Asked Questions

Can I prepare this lasagna ahead of time? Yes, you can assemble the lasagna and store it in the refrigerator ready to bake later, or freeze it before baking for a future meal.

Is it possible to make this lasagna vegan? Absolutely! Replace the cheese with plant-based options and omit any eggs, using flaxseed meal as an alternative if needed.

What can I serve with this lasagna? It pairs beautifully with a side salad, garlic bread, or roasted vegetables to complement the rich flavors.

How do I reheat leftovers? For best results, reheat in the oven at 350°F for about 30 minutes, or until heated through.

Can I freeze leftovers? Yes, lasagna freezes well when wrapped properly, with a shelf life of 3 months if stored correctly.

What if I don’t have ricotta? You can blend cottage cheese with a bit of cream or use a homemade tofu ricotta as an alternative.

How long does this lasagna last in the refrigerator? It can be stored in the refrigerator for up to 3-4 days while being kept in an airtight container.

Can I use other vegetables in the recipe? Certainly! Feel free to incorporate vegetables like zucchini, bell peppers or even artichokes to personalize your lasagna.

What is a good way to serve leftovers? Reheat individual servings in the microwave, and consider topping with fresh herbs or a drizzle of olive oil to enhance the experience.

Can I use store-bought sauce instead of making my own? Yes, using a jarred sauce is a convenient option if you’re short on time but try selecting a quality brand to maintain flavor.

Additional Resources

Discover related recipes that explore versatile pasta dishes, such as baked ziti or stuffed shells, offering similar flavors with unique twists.

Explore our technique guides on making homemade pasta or perfecting your sauce-making skills for an even more authentic experience.

Learn more about the nutritional benefits of different leafy greens or mushrooms for a deeper understanding of your dish’s health impact.

For equipment recommendations, check out our must-have kitchen tools for preparing pasta dishes, ensuring you have everything required to create your masterpiece.

Consider seasonal variations in your ingredient choices, adapting to what’s fresh and available in your area.

Join the Conversation

We invite you to share your own culinary adventures on social media, using the hashtag for this recipe to connect with fellow cooking enthusiasts.

Photography tips are always welcomed as well; capturing the beauty of your dishes can inspire others to recreate them in their own kitchens.

Leave a review or comment with your thoughts, adaptations, and successful stories to grow our community and encourage others exploring this recipe.

Engage with readers by sharing your experience, challenges, and tips for making this creamy spinach and mushroom lasagna a family favorite!

The Recipe

Creamy Spinach & Mushroom Lasagna

Serves: 6

Prep Time: 30 mins

Cook Time: 45 mins

Total Time: 75 mins

Kitchen Equipment Needed

  • 9×13 inch baking dish
  • Large skillet
  • Mixing bowls
  • Cooking spoon
  • Measuring cups and spoons

Ingredients

  • 9 lasagna noodles
  • 15 oz ricotta cheese
  • 2 cups shredded mozzarella cheese
  • ¾ cup grated Parmesan cheese
  • 2 cups fresh spinach, chopped
  • 8 oz mushrooms, sliced
  • 2 cloves garlic, minced
  • 1 jar marinara sauce (about 24 oz)
  • Salt and pepper to taste
  • Olive oil for sautéing

Directions

  1. Preheat the oven to 375°F (190°C).
  2. Cook the lasagna noodles according to package instructions. Drain and set aside.
  3. In a large skillet, heat olive oil over medium heat. Add garlic and sliced mushrooms, sautéing until mushrooms are tender and browned.
  4. Add chopped spinach to the skillet, cooking just until wilted. Season with salt and pepper.
  5. In a mixing bowl, combine ricotta cheese, half of the mozzarella, and half of the Parmesan. Mix well to combine.
  6. Spread a thin layer of marinara sauce on the bottom of the baking dish. Layer 3 noodles on top.
  7. Add half the ricotta cheese mixture, half the sautéed spinach and mushroom mixture, and a layer of marinara sauce. Repeat layers, finishing with noodles.
  8. Top with remaining marinara sauce, then sprinkle with the rest of the mozzarella and Parmesan cheese.
  9. Cover with foil and bake for 30 minutes, then remove the foil and bake for an additional 15 minutes until cheese is bubbly and golden.
  10. Allow to cool for 15 minutes before slicing and serving.

Recipe Notes

  • You can substitute dried herbs such as oregano or basil for fresh herbs if necessary.
  • This lasagna can be frozen before baking, but make sure to adjust cooking times when baking from frozen.
  • Feel free to add more vegetables such as zucchini or bell peppers for added nutrition.

Delicious Spaghetti & Spinach in Sun-Dried Tomato Cream Sauce

Spaghetti & Spinach with Sun-Dried Tomato Cream Sauce: A Deliciously Creamy Delight

⚖️
Difficulty
Easy

⏲️
Prep Time
10 mins

🕒
Cook Time
15 mins

⏱️
Total Time
25 mins

🍽️
Servings
4

Indulge in the delightful flavors of Spaghetti & Spinach with Sun-Dried Tomato Cream Sauce, a dish that beautifully marries the richness of a creamy sauce with the freshness of spinach and the tanginess of sun-dried tomatoes. This easy-to-make recipe is perfect for busy weeknights or when you want to impress guests without spending hours in the kitchen. The creamy texture coats the spaghetti perfectly, enhancing every bite with its savory goodness.

This comforting pasta dish combines tender spaghetti with vibrant green spinach and flavorful sun-dried tomatoes, giving it a unique twist. The sun-dried tomatoes add depth with their robust flavor, while the cream sauce provides a luxurious finish, making it a total crowd-pleaser. Whether you’re making this dish for yourself or a group, you’ll enjoy its simple preparation that yields an impressive and satisfying meal.

Quick Recipe Highlights

  • Flavor Profile: This dish offers a harmonious blend of creamy, savory, and slightly tangy flavors, making each bite a delightful experience.
  • Texture: The creaminess of the sauce against the al dente spaghetti and fresh spinach creates a wonderful contrast that pleases the palate.
  • Aroma: The inviting aroma of garlic and sun-dried tomatoes wafts through your kitchen as you prepare this delectable meal.
  • Visual Appeal: The vibrant colors of the green spinach, bright sun-dried tomatoes, and rich cream sauce make for a beautifully plated dish.
  • Skill Level Needed: This recipe requires minimal cooking skills, making it a perfect choice for both beginners and seasoned cooks.
  • Special Equipment: A large pot for boiling pasta and a skillet for the sauce are all you need to create this delightful dish.

Recipe Overview

  • Difficulty Level: This dish is rated as easy, making it accessible for cooks of all skill levels. With straightforward steps and readily available ingredients, you’ll want to make it regularly.
  • Category: Ideal for a main course, this recipe can also serve as a delightful side dish for gatherings or family meals.
  • Cuisine: This recipe draws inspiration from Italian cuisine, which is known for its emphasis on fresh ingredients and simple preparations that let flavors shine.
  • Cost: The ingredients in this recipe are budget-friendly, with an approximate cost of $10-15 for a family of four, making it economical.
  • Season: Spaghetti & Spinach with Sun-Dried Tomato Cream Sauce is ideal for any season, but it’s especially comforting during colder months.
  • Occasion: Perfect for a cozy family dinner, a potluck, or a casual gathering with friends, this dish brings comfort and joy to any occasion.

Why You’ll Love This Recipe

The exquisite taste and texture of Spaghetti & Spinach with Sun-Dried Tomato Cream Sauce will make it a frequent favorite in your household. The combination of the creamy sauce and the subtle crunch of the spinach ensures a satisfyingly hearty meal that feels both indulgent and nutritious. Each forkful transports you to an Italian trattoria, just by the harmony of flavors.

Convenience is another reason to love this dish. With a quick prep time of just 10 minutes and a cook time of 15, you can have a delicious meal on the table in less than half an hour. It’s perfect for those bustling weeknights when time is at a premium yet you still crave something wholesome and satisfying.

This recipe also offers numerous nutritional advantages, thanks to the fresh spinach packed with Vitamins A and C, iron, and folate. The sun-dried tomatoes not only enhance flavor but also bring additional nutrients, making this dish not only delicious but also a healthy choice.

Whether hosting a dinner party or enjoying a quiet meal at home, this spaghetti dish invites social engagement. Guests will appreciate the effort you’ve put into preparing a delightful meal that is both comforting and elegant. Pair it with a simple side salad or a glass of wine for an elevated dining experience.

Lastly, the cost-effectiveness of this recipe is undeniable. With easily accessible ingredients that won’t break the bank, it proves that a gourmet meal can be made at home on a budget. You’ll find that this dish doesn’t demand an extravagant grocery list, yet it delivers on flavor and satisfaction.

Historical Background and Cultural Significance

The origins of spaghetti can be traced back to Italy, with roots that date back to the 12th century. This simple pasta has since evolved into a staple food enjoyed globally in various forms. The incorporation of spinach and sun-dried tomatoes into pasta dishes further exemplifies the Italian culinary tradition of utilizing fresh, local produce.

In Italian culture, a shared meal signifies familial bonds and community gatherings. Pasta has an integral role in celebrating special occasions and is often the centerpiece of family dinners. Spaghetti dishes, like this one, foster a sense of togetherness, inviting conversation and connection.

The evolution of this dish showcases the flexibility that pasta offers. Different regions in Italy often put their twist on traditional recipes, using whatever ingredients are locally available. This adaptability has led to countless variations of pasta dishes, emphasizing seasonal and regional ingredients.

Modern adaptations of traditional spaghetti recipes have gained popularity in international cuisine. With the integration of global flavors, restaurants worldwide have crafted their versions while staying true to the classic Italian base of pasta and sauce.

Ingredient Deep Dive

Spaghetti

As a quintessential Italian staple, spaghetti carries a rich history that connects it to Southern Italy. Various types of wheat are used to make this pasta, giving it a versatile quality to pair with different sauces. Nutritionally, it provides carbohydrates and fiber, essential for energy and digestive health. When selecting spaghetti, look for brands made with 100% durum wheat for the best texture.

Spinach

Spinach, with its ancient roots tracing back to ancient Persia, is celebrated for its nutritional value and versatility in dishes. Packed with vitamins A and K, as well as iron and antioxidants, spinach boasts health benefits that contribute to overall well-being. To select fresh spinach, choose vibrant green leaves that are free of wilting or browning, and store it in a cool, dry place to maintain freshness.

Sun-Dried Tomatoes

Sun-dried tomatoes are a revered ingredient in Mediterranean cooking, traditionally produced by drying ripe tomatoes under the sun. They offer a concentrated flavor that enhances various dishes. Nutritionally, they are high in vitamins and fiber while low in calories. When selecting sun-dried tomatoes, opt for those packed in oil to maintain moisture, and store them in the refrigerator for maximum freshness.

Common Mistakes to Avoid

  • Using overcooked pasta can result in a mushy texture. Ensure you cook spaghetti to al dente for the best mouthfeel.
  • Adding too much cream can overwhelm the dish’s flavor. Aim for balance by introducing cream gradually and tasting as you go.
  • Skipping the garlic might result in a less flavorful sauce. Garlic adds essential aroma and taste, so be sure to include it.
  • Not seasoning the sauce adequately can lead to bland results. Seasoning with salt and pepper enhances the overall flavor profile.
  • Using stale sun-dried tomatoes can diminish flavor. Always check their quality before use, ensuring they are not overly dry or expired.
  • Not incorporating the spinach early enough may leave it undercooked. Cook spinach until just wilted to ensure proper integration into the dish.
  • Failing to reserve pasta water can prevent achieving the desired sauce consistency. Use this starchy water to loosen your sauce as needed.
  • Skipping the final taste test can lead to unforeseen flavor imbalances. Always taste before serving to adjust seasoning or richness.

Essential Techniques

Cooking Pasta

Start with a large pot of salted water for boiling pasta—it’s crucial for flavoring the noodles. Always bring the water to a rolling boil before adding the spaghetti and stir immediately to prevent sticking. Mastering this technique ensures perfectly cooked pasta. Cooks should look for a firm texture and a slight bite, known as ‘al dente,’ to achieve ideal results.

Making the Sauce

The ability to create a creamy sauce is vital for this recipe. Begin by sautéing garlic and sun-dried tomatoes, followed by slowly adding cream. This technique allows the flavors to meld together harmoniously. Visual cues should indicate that the sauce has thickened slightly and coats the back of a spoon adequately, showcasing its readiness.

Pro Tips for Perfect Spaghetti & Spinach with Sun-Dried Tomato Cream Sauce

1. For extra depth, consider adding a pinch of red pepper flakes to the sauce for a gentle kick.

2. Enhance flavor by using homemade or quality store-bought chicken or vegetable stock in place of water when cooking pasta.

3. For added nutrition, incorporate other vegetables like mushrooms or bell peppers along with the spinach.

4. Try adding freshly grated Parmesan cheese to the sauce for an extra layer of creaminess and flavor.

5. If the sauce feels too thick, a splash of pasta water can help achieve the desired consistency without losing flavor.

6. For a touch of freshness, finish the dish with a squeeze of lemon juice before serving.

7. Serve immediately for the best texture, as the pasta absorbs the sauce over time.

8. Pair with a light white wine or sparkling water for a refreshing dining experience.

Variations and Adaptations

Regional variations can be seen in traditional Italian cooking, where different locally available ingredients are incorporated. For example, swapping in different greens such as arugula or kale provides flavor variations while retaining the essence of the original dish. Seasonal adaptations could include adding seasonal vegetables corresponding to the time of year, such as asparagus in spring.

Dietary modifications can easily be made by substituting gluten-free pasta for those with gluten sensitivities. Flavor variations can also be achieved by experimenting with cheeses, such as feta or goat cheese, for a tangy twist. For those seeking a heartier dish, consider adding grilled chicken or shrimp.

Texture modifications can be created by either blending the sauce for a smoother consistency or leaving it chunky for added texture. Additionally, play with presentation alternatives by serving the pasta in a large bowl family-style or plating individual servings with a sprinkle of fresh herbs.

Serving and Presentation Guide

Plating spaghetti dishes beautifully enhances the dining experience. Twirl the noodles using a fork and tongs, creating a nest in the center of the plate for a refined look. Garnish with finely chopped parsley or basil for freshness and a pop of color. Serve with a sprinkle of grated Parmesan cheese on top for added flavor and an elegant finish.

Consider traditional accompaniments, such as a fresh green salad dressed simply with olive oil and vinegar, which complements the richness of the creamy pasta. Modern serving suggestions include offering freshly baked garlic bread on the side, perfect for soaking up any leftover sauce. Remember to serve the dish hot for the most enjoyable dining experience.

Wine and Beverage Pairing

Ideal wine pairings for this dish include a crisp Sauvignon Blanc or a light Pinot Grigio, both of which will complement the creamy sauce and refreshing spinach without overwhelming the flavors. For a non-alcoholic alternative, consider serving an herbal iced tea or sparkling water with a slice of lemon, which can cleanse the palate beautifully.

Temperature considerations are important when it comes to serving wine; white wines should be chilled to enhance their crisp profile, while serving temperature for non-alcoholic beverages should be equally refreshing to contrast with the warmth of the dish.

Storage and Shelf Life

To properly store leftovers, transfer the spaghetti to an airtight container and refrigerate. It is best consumed within 3-5 days to ensure flavors remain fresh and textures do not deteriorate. If you need to freeze it for longer storage, place it in a freezer-safe container, ensuring all air is removed to prevent freezer burn.

Signs of spoilage include any off odors, a change in color, or separation of the ingredients. For reheating, use the microwave or stovetop, adding a splash of cream or pasta water to restore the sauce’s consistency before serving again.

Make Ahead Strategies

If you’re planning ahead, you can cook the spaghetti and let it cool before storing it in the fridge for quick meal assembly later. Prepare the cream sauce and sun-dried tomatoes in advance as well, storing them separately to maintain freshness. When you’re ready to serve, reheat the sauce and toss it with the freshly cooked pasta and spinach for best results.

Assessing quality impact is crucial; sauces can separate upon cooling, so ensure you stir well while reheating to keep the ingredients combined. Fresh elements like herbs or a squeeze of lemon juice can be added just before serving to revive flavors and freshness.

Scaling Instructions

Halving the recipe can easily create a meal for two, while doubling or tripling allows for larger family gatherings or meal prepping. When modifying quantities, ensure you have a pot large enough to accommodate the increased volume of spaghetti, and keep an eye on cooking times, as larger quantities may require slight adjustments.

Increased servings may necessitate additional sauce preparation, which can be made ahead and stored for convenience. Storage considerations should be kept in mind, as larger portions may take longer to cool and need adequate sealing to preserve flavor and freshness.

Nutritional Deep Dive

This dish is rich in macros, with carbohydrates from the spaghetti, healthy fats from the cream, and an array of nutrients from the vegetables. It’s a balanced meal if consumed in moderation as part of an overall healthy diet. With the inclusion of spinach, you also benefit from fiber content that supports digestive health.

Micronutrient analysis reveals that ingredients in this recipe contribute vitamins A, C, K, and essential minerals like iron and calcium. Health benefits are evident, including improved immunity, bone health, and overall nutrient density, making your meal nourishing.

Dietary Adaptations

This spaghetti dish can be made gluten-free by substituting standard pasta with gluten-free varieties available in most grocery stores. Dairy-free adaptations can be achieved by using coconut cream or almond milk, and nutritional yeast can replace cheese for a savory flavor in vegan variations.

For lower carbohydrate options, spiralized vegetables like zucchini can replace spaghetti, creating a light alternative. Keto dieters can enjoy this dish by limiting the portion size of pasta and increasing protein-rich additions, like chicken or sausage, to maintain their nutritional guidelines.

Troubleshooting Guide

If your pasta seems mushy, it may have been overcooked or left to sit in the sauce too long. For future attempts, check cooking times and enjoy pasta immediately after combining it with sauce. Should the sauce appear too thick, remember that a splash of pasta water can help achieve the desired consistency without sacrificing flavor.

Flavor balance may challenge some cooks—if your sauce is too rich, a dash of lemon juice or vinegar can brighten it up. If you experience ingredient substitution issues, common issues can often be solved with simple replacements, such as using fresh herbs instead of dried ones.

Recipe Success Stories

Community feedback on this dish has been overwhelmingly positive, with many praising both its flavor and ease of preparation. Home cooks have shared variations, such as incorporating fresh herbs like basil or oregano, which elevated the dish even further without adding complexity.

Adaptation stories highlight successful substitutions like using dairy-free cream for lactose sensitivities, allowing everyone to enjoy the meal together. Shared photography tips indicate that garnishing with fresh spinach and a sprinkle of cheese enhances visual appeal for social media sharing.

Frequently Asked Questions

Can I use fresh spinach instead of frozen? Absolutely! Fresh spinach is preferred for its texture and taste—just add it to the sauce until it wilts for the best results.

How do I store leftover pasta? Place it in an airtight container in the refrigerator, where it will stay fresh for 3-5 days.

Can I make this recipe in advance? Yes! You can prepare the sauce ahead of time and combine it with freshly cooked pasta when you’re ready to serve for best quality.

Is this recipe suitable for freezing? Yes, the pasta and sauce can be frozen. Just ensure that you store them in separate containers to maintain texture.

What can I use instead of sun-dried tomatoes? Roasted red peppers can often substitute for a similar flavor and additional sweetness if sun-dried tomatoes are unavailable.

Can I add meat to this dish? Definitely! Sautéed chicken or shrimp can enhance the dish further, providing extra protein and flavor.

How do I know when the spaghetti is al dente? The spaghetti should be firm to the bite but cooked enough that it’s not hard. Taste a strand a minute or two before the package time is completed for a perfect texture.

Is this gluten-free? This recipe isn’t gluten-free as is, but you can easily make it gluten-free by substituting with gluten-free pasta.

How long does it take to cook the entire dish? The dish takes about 25 minutes in total—10 minutes for prep and 15 minutes for cooking, making it a quick meal option.

Can I use cream alternatives? Absolutely! You can use cashew cream or coconut milk to achieve a creamy consistency without dairy.

Additional Resources

For more inspiration, check out related recipes like Creamy Mushroom Pasta or Garlic Butter Shrimp Pasta, each with their unique spin on flavors. Explore technique guides to master pasta cooking or learn more about ingredient substitutions to tailor recipes to your dietary needs.

Equipment recommendations include high-quality pots and pans that heat evenly and utensils like tongs for easy pasta tossing. Seasonal variations might inspire you to create a summer version of this dish by incorporating fresh tomatoes or herbs from your garden.

Join the Conversation

We love hearing your feedback and adaptations—share your experiences making Spaghetti & Spinach with Sun-Dried Tomato Cream Sauce! Our community thrives on social media, and we encourage you to share photos of your creations and unique twists.

Consider posting reviews detailing your cooking journey, and don’t hesitate to ask fellow home cooks for tips on enhancing the flavor or presentation of this delightful dish.

The Recipe

Spaghetti & Spinach with Sun-Dried Tomato Cream Sauce

Serves: 4

Prep Time: 10 mins

Cook Time: 15 mins

Total Time: 25 mins

Kitchen Equipment Needed

  • Large pot for boiling spaghetti
  • Skillet for sauce preparation
  • Collander for draining pasta
  • Wooden spoon or silicone spatula
  • Measuring cups and spoons

Ingredients

  • 400g spaghetti
  • 2 cups fresh spinach, washed and chopped
  • 1 cup sun-dried tomatoes, drained and chopped
  • 1 cup heavy cream
  • 2 tablespoons olive oil
  • 2 cloves garlic, minced
  • Salt and pepper to taste
  • Fresh basil or parsley for garnish

Directions

  1. Cook spaghetti according to package instructions until al dente. Drain and set aside.
  2. In a skillet, heat olive oil over medium heat; add minced garlic and sauté until fragrant (1-2 minutes).
  3. Add chopped sun-dried tomatoes and continue cooking for another 2 minutes.
  4. Pour in the heavy cream and stir to combine; allow the mixture to simmer for 3-4 minutes.
  5. Add the chopped spinach, cooking until just wilted, about 2-3 minutes.
  6. Season the sauce with salt and pepper to taste.
  7. Toss the drained spaghetti into the sauce, ensuring even coating.
  8. Serve hot, garnished with fresh basil or parsley if desired.

Recipe Notes

  • For a richer flavor, add freshly grated Parmesan cheese to the sauce prior to serving.
  • Feel free to add protein, such as chicken or shrimp, during the cooking process for added nutrition.
  • Leftovers can be stored in the refrigerator for up to 5 days.

Delicious No-Peek Chicken Casserole for Effortless Family Dinners

No-Peek Chicken Casserole: A Simple and Delicious Comfort Food

⚖️
Difficulty
Easy

⏲️
Prep Time
15 mins

🕒
Cook Time
60 mins

⏱️
Total Time
75 mins

🍽️
Servings
4-6

The No-Peek Chicken Casserole is a delightful dish that brings comfort and warmth to the dinner table, perfect for busy weeknights or family gatherings. Imagine tender chicken simmered with flavorful rice and a creamy sauce, all baked to perfection. The beauty of this recipe lies in its simplicity; just layer the ingredients, pop it in the oven, and let the magic happen without any peeking required! This casserole not only makes for a hearty meal but also offers a great way to bond with family over a delicious homemade feast.

The flavors meld beautifully during cooking, creating a rich and creamy texture that coats each bite. Each scoop reveals succulent pieces of chicken enveloped in perfectly cooked rice, making it a fulfilling dish that satisfies both the palate and the soul. Whether served alongside a fresh salad or on its own, this casserole is sure to become a family favorite, bringing smiles and warmth to every meal.

Quick Recipe Highlights

  • Flavor Profile: A savory blend of chicken, creamy soup, and fragrant rice creates a balanced taste that’s comforting and satisfying.
  • Texture: The casserole features a creamy exterior with tender chicken and fluffy rice, providing a delightful mouthfeel.
  • Aroma: As it bakes, expect an enticing aroma of garlic and herbs, filling your kitchen with warmth and comfort.
  • Visual Appeal: Golden tops and rich colors make this dish visually appealing, inviting everyone to dig in.
  • Skill Level Needed: This recipe is easy to prepare, requiring no prior cooking expertise—just a willingness to layer ingredients.
  • Special Equipment: A large baking dish or casserole dish is all you need for this straightforward recipe.

Recipe Overview

  • Difficulty Level: Easy. This casserole is perfect for beginner cooks and allows for flexibility during preparation.
  • Category: Main Dish. Ideal for family meals or potlucks, it serves as a complete dinner in one dish.
  • Cuisine: Comfort Food. This dish reflects classic American home-style cooking, with roots in hearty meals that warm the heart.
  • Cost: Budget-friendly. The ingredients used are affordable, making this casserole an economical choice for family dinners.
  • Season: Suitable for all year round. It’s always a hit regardless of the season, but particularly cozy in cooler months.
  • Occasion: Family gatherings, weeknight dinners, and potlucks. This versatile dish is perfect for any occasion that calls for comforting food.

Why You’ll Love This Recipe

This No-Peek Chicken Casserole is the epitome of comfort food, offering a perfect combination of taste and texture that will satisfy even the heartiest of appetites. The creamy sauce, combined with succulent chicken and fluffy rice, creates a mouthwatering experience that is both filling and delightful. Unlike other complicated recipes, this casserole simplifies meal prep without sacrificing flavor, allowing you to serve a wholesome dish without spending hours in the kitchen.

Moreover, it’s a dish that’s not only delicious but also packed with nutritional advantages; chicken is a great source of protein, while rice adds carbohydrates for energy. By incorporating a few vegetables, you can enhance the nutritional profile even further, making it a well-rounded meal option.

This casserole also shines when it comes to social settings, such as family gatherings or potlucks. It often becomes the centerpiece of conversations, where everyone shares their love for the dish and perhaps even their variations on the recipe. Cost-effectiveness is another incredible plus; with minimal ingredients required, feeding a family or group whilst keeping the budget low is easily achievable.

Ultimately, the No-Peek Chicken Casserole is a meal that not only satisfies hunger but also warms hearts, making it a go-to recipe for many home cooks.

Historical Background and Cultural Significance

The origins of casseroles can be traced back to times when food preservation was the primary challenge in the kitchen. The No-Peek Chicken Casserole is no exception, as it represents a culinary trend where utilizing leftovers and simple pantry staples became essential for efficient meal preparation. These one-dish meals quickly became popular in American households as they offered a convenient solution for busy families.

Over the decades, the casserole evolved from classic French recipes to an American staple, embodying an essence of home cooking that evokes nostalgia for many. Its adaptability allowed it to incorporate various regional flavors, making it a dish that every family could personalize.

As the years progressed, the casserole became a social dish, often featured at potlucks and gatherings. Its communal nature encourages sharing, and with each family adding a unique twist, the No-Peek Chicken Casserole became a beloved dish across different cultures.

Regional variations often include the addition of local spices or traditional ingredients, making it a versatile canvas for creativity. The dish’s simplicity and heartiness have cemented it as a timeless favorite that continues to gather families and friends around the dinner table.

Ingredient Deep Dive

Chicken: The main component of this casserole, chicken is not only a favorite protein source in various cuisines, but it is also a versatile ingredient that adapts well to different flavors. Opt for fresh or frozen chicken breast for the best taste. Nutritionally, chicken is high in protein and low in fat, making it a great option for muscle building and weight management. Additionally, ensure to store chicken in the refrigerator for a maximum of 2 days if fresh, or up to 6 months if frozen. For substitutions, consider turkey or plant-based proteins for a different twist.

Rice: As the backbone of the casserole, rice provides substance and aids in meal fulfillment. Brown rice offers a nutrient-dense alternative and adds a nuttier flavor, while white rice cooks up soft and fluffy. When selecting rice, go for whole grains whenever possible. For storage, keep rice in an airtight container to prolong its shelf life. If you want to switch things up, quinoa or couscous can serve as excellent alternatives.

Cream of Chicken Soup: This ingredient adds creaminess to the casserole while infusing it with rich flavor. While you can use store-bought soup, a homemade version can offer fresher taste and fewer preservatives. Look for low-sodium options for a healthier alternative. When storing, keep it sealed in the fridge, and use within a few days. If dairy is an issue, cream of mushroom or vegetable soup can also work beautifully here.

Common Mistakes to Avoid

  • Not Prepping Ingredients: Skipping the preparation process can lead to uneven cooking. Always prepare your vegetables and proteins beforehand.
  • Overcrowding the Casserole Dish: Too much food can lead to uneven cooking and longer bake times. Ensure your ingredients fit comfortably in your dish.
  • Peeking During Baking: Resist the urge to open the oven door. It releases heat and can disrupt cooking times.
  • Not Using Enough Liquid: Dry casserole can form if you don’t add sufficient moisture. Customize the soup or add extra broth as necessary.
  • Using Old Ingredients: Fresh ingredients yield the best flavor. Check expiration dates before preparing your dish.
  • Overcooking the Chicken: Chicken should be cooked through but still tender. Use a meat thermometer to ensure it doesn’t dry out.
  • Skipping Spices: Don’t forget to season generously! Herbs and spices elevate the dish’s flavor profile significantly.
  • Serving Without Letting It Rest: Giving the casserole a few minutes to settle helps with serving and enhances flavors.

Essential Techniques

– Layering: Layering ingredients helps create a balanced flavor profile. Start with the rice, then add the chicken and finally the soup to seal in moisture.
– Baking: Proper baking technique ensures even cooking, preventing burning at the top. Use a moderate oven temperature and cover with foil if browning too quickly.
– Tempering: If using frozen chicken, ensure to thaw it fully to prevent uneven cooking during the bake.

Pro Tips for Perfect No-Peek Chicken Casserole

1. Use broth instead of water for cooking the rice to enhance the flavor immensely.
2. Add a layer of your favorite vegetables, such as broccoli or bell peppers, to boost nutrition.
3. Consider garnishing with fresh herbs before serving for a pop of color and taste.
4. If you prefer crunch, sprinkle breadcrumbs or crushed crackers on top before baking.
5. For an added depth of flavor, include garlic or onion powder in your seasonings.
6. To reduce cooking time, pre-cook the rice slightly before adding it to the casserole.
7. Experiment with different creamy soups for unique flavor profiles.
8. Always allow the dish to rest for a few minutes once removed from the oven for easier serving.

Variations and Adaptations

The No-Peek Chicken Casserole can easily be adapted to suit personal tastes and seasonal preferences. For example, in the summer, you could incorporate seasonal vegetables like zucchini or corn. In colder months, adding root vegetables can provide an earthy flavor.

For those looking to make it a lighter option, consider using brown rice and lean chicken cuts. You can also create a gluten-free version by using gluten-free cream of chicken soup and ensuring all other ingredients are certified gluten-free.

Flavor variations are limitless; try adding different cheese types to the mix for a richer texture. To keep the dish fresh, serve it with a side of tangy salad for a balancing contrast.

Serving and Presentation Guide

Plating your No-Peek Chicken Casserole beautifully elevates the dining experience. Use a large spoon to serve and ensure an even distribution of chicken, rice, and sauce. Place it on a colorful dish for contrast, and consider garnishing with freshly chopped parsley or slices of lemon for brightness.

Traditional accompaniments enhance the meal; serve it alongside fresh bread or a simple green salad. Modern serving suggestions include personal portions in small baking dishes, which add flair and make for easier portion control.

Always keep in mind the serving temperature; the casserole tastes best when served warm, but ensure it has cooled slightly for safety.

Wine and Beverage Pairing

When selecting a beverage to pair with the No-Peek Chicken Casserole, consider a light white wine, such as Chardonnay or Sauvignon Blanc, which complements the savory flavors without overwhelming them. For a non-alcoholic alternative, a sparkling apple cider adds a refreshing touch that balances the dish’s creaminess.

For a more comforting beverage, a warm cup of herbal tea, like chamomile or mint, can round off the meal beautifully. Always serve drinks chilled to enhance the overall dining experience.

Storage and Shelf Life

To store leftover No-Peek Chicken Casserole, transfer it to an airtight container. It can be kept in the refrigerator for up to three days or frozen for up to three months. When reheating, ensure it warms through to a safe temperature.

Warning signs of spoilage include strange smells or changes in texture; never eat leftovers if any doubts arise about their freshness. When reheating, add a splash of broth or water to restore moisture and avoid drying.

Make Ahead Strategies

To streamline your cooking process, the No-Peek Chicken Casserole can be prepared ahead of time. Pre-cook the rice in advance and store it in the fridge until you’re ready to assemble.

Additionally, you can chop vegetables and season your chicken to save time. When filling your casserole dish, simply layer the ingredients as described and refrigerate it until you’re ready to bake.

For the best flavor and texture, aim to bake it within 1-2 days, but it can hold for longer in the fridge.

Scaling Instructions

Scaling up the No-Peek Chicken Casserole recipe for larger gatherings is straightforward. For doubling the recipe, ensure your baking dish is large enough to accommodate the extra volume.

Timing may vary slightly, so keep an eye on the dish, as it can take longer to cook through. When halving the recipe, consider using individual baking dishes for creative serving solutions that also reduce cooking time.

Remember to adjust cooking times accordingly and check for doneness with a meat thermometer to ensure safety.

Nutritional Deep Dive

A typical serving of No-Peek Chicken Casserole can provide a balanced macro breakdown of protein from the chicken, carbs from the rice, and fats from the creamy soup ingredients. Chicken offers essential nutrients including B vitamins and minerals, while rice serves as a great energy source.

The dish is customizable; by adding vegetables, you can increase fiber and vitamins significantly. If you want to modify for weight control, consider portion sizes and using leaner cuts of chicken to reduce overall calories.

For health-conscious individuals, substitutions such as brown rice will provide additional fiber and nutrients.

Dietary Adaptations

1. Gluten-free: Use gluten-free cream of chicken soup and ensure all ingredients are devoid of gluten.
2. Dairy-free: Substitute with plant-based creamy soups or make a thick sauce using nut milk and flour alternatives.
3. Vegan: Replace chicken with tofu or chickpeas and use vegetable broth with a non-dairy cream substitute.
4. Low-carb: Use cauliflower rice in place of regular rice to lower carbs significantly while maintaining volume.
5. Keto: Combine keto-friendly cream soups with cheese and chicken for a satisfying low-carb dish.
6. Paleo: Opt for non-processed ingredients, focusing on fresh vegetables and meats, avoiding traditional canned soups.
7. Low-FODMAP: Ensure ingredients are low in fermentable sugars and use broth for moisture.
8. Other specific diets: Tailor the recipe based on dietary needs by swapping ingredients accordingly.

Troubleshooting Guide

– Texture issues: If your casserole is too dry, consider adding more liquid in your next preparation. A splash of broth can enhance moisture.
– Flavor balance: If lacking flavor, add additional seasonings or salt gradually until satisfied with the taste.
– Temperature problems: If food isn’t cooking evenly, ensure your oven is calibrated correctly and rotate the dish midway.
– Equipment challenges: In case of a missing baking dish, any oven-safe dish can serve as a makeshift alternative, though its shape might alter cooking time.
– Ingredient substitutions: If you have to swap out an ingredient, seek similar textures and flavors to ensure the dish remains cohesive.
– Timing concerns: If short on time, consider pre-cooking components or using cook times to your advantage by preparing ahead.

Recipe Success Stories

Reader feedback on the No-Peek Chicken Casserole has been overwhelmingly positive, often sharing unique variations that personalize the dish. Many highlight how their family requests this comforting dish regularly, each time incorporating different vegetables and spices. Photography tips are popular amongst readers keen on showcasing their versions on social media, with many choosing to use vibrant garnishes.

Adaptation stories reveal how diverse the dish can be, from a spicy twist with jalapeños to a cheesy version with extra cheese on top, every family adds their flavor to make it unique. As community members share their successes, it forms a stronger bond over a shared love for this versatile casserole.

Frequently Asked Questions

Can I make the No-Peek Chicken Casserole ahead of time?

Absolutely! You can prepare it a day in advance, cover it tightly with plastic wrap, and store it in the refrigerator. When ready to cook, simply bake it without the need to thaw.

Is it possible to substitute rice in this casserole?

Yes, you can use quinoa, cauliflower rice, or any other grain of your choice. Just adjust cooking times as needed, as different grains have varying baking requirements.

What can I do if the casserole is too dry?

If your casserole comes out dry, try adding more liquid next time—such as broth or water—or cover with foil for part of the baking time to trap moisture.

Can I freeze the No-Peek Chicken Casserole?

This casserole freezes well, allowing you to enjoy it later. Just ensure it’s stored in an airtight container, and it can last in the freezer for up to three months.

Can I use leftover chicken for this recipe?

Absolutely! Using leftover chicken is a great way to repurpose it and save time. Just make sure to shred or dice it into small pieces before adding it to the casserole.

What types of vegetables can I add?

You can include any vegetables you like! Popular additions are peas, carrots, bell peppers, or green beans. Just ensure they’re chopped into small pieces for even cooking.

How can I make this dish healthier?

To create a healthier No-Peek Chicken Casserole, consider using brown rice instead of white, low-sodium soups, and loading it with plenty of fresh vegetables.

Can I make a dairy-free version of this casserole?

Yes! Substitute the cream of chicken soup with a dairy-free alternative or make your creamy sauce using coconut milk or dairy-free cream.

How do I reheat leftovers?

To reheat, simply place the casserole in the oven at 350°F (175°C) until warmed through, adding a splash of broth to prevent dryness. Alternatively, microwave individual portions for convenience.

What’s the best way to store leftovers?

Leftovers can be stored in an airtight container in the refrigerator for up to three days. Ensure to cool completely before sealing to maintain freshness.

Is there a vegetarian version of this casserole?

Yes! You can create a delicious vegetarian version by using vegetable broth, plant-based proteins like tofu or chickpeas, and vegetable-based cream soups instead of chicken.

Additional Resources

For more great recipes like No-Peek Chicken Casserole, check out our collection of comforting casseroles, and learn about techniques to master your cooking skills effectively. Explore ingredient profiles to get the most out of your cooking, and consider investing in quality kitchen equipment that can enhance your culinary creations. Discover seasonal variations that can help inspire your weekly meals, keeping your family excited about dinner.

Join the Conversation

We love hearing from our community! Share your No-Peek Chicken Casserole stories with us on social media, including tips for variations or unique ingredients you’ve tried. Your feedback enhances our recipe sharing and inspires other home cooks looking for that perfect comforting dish. Don’t hesitate to share your photography tips to help this recipe look as good as it tastes, and join our growing community of passionate home cooks exploring the joy of sharing meals together.

The Recipe

No-Peek Chicken Casserole

Serves: 4-6

Prep Time: 15 mins

Cook Time: 60 mins

Total Time: 75 mins

Kitchen Equipment Needed

  • Large casserole dish
  • Measuring cups and spoons
  • Mixing spoons
  • Cutting board
  • Knife

Ingredients

  • 1.5 lbs chicken breast, cubed
  • 1 cup uncooked long-grain white rice
  • 1 can cream of chicken soup
  • 1.5 cups chicken broth
  • 1 cup frozen mixed vegetables
  • 1 teaspoon garlic powder
  • Salt and pepper to taste

Directions

  1. Preheat your oven to 350°F (175°C).
  2. In a large casserole dish, layer the uncooked rice evenly at the bottom.
  3. Place the cubed chicken pieces on top of the rice.
  4. In a separate bowl, combine the cream of chicken soup and chicken broth. Mix well and pour it over the chicken and rice.
  5. Add the frozen vegetables and season with garlic powder, salt, and pepper.
  6. Cover the casserole dish with aluminum foil and bake in the preheated oven for 60 minutes.
  7. Remove foil and bake for an additional 10 minutes to allow it to brown slightly.
  8. Let it rest for a few minutes before serving.

Recipe Notes

  • Experiment with different vegetables for added nutrition or flavor.
  • Leftovers can be stored in an airtight container in the refrigerator for 3 days.
  • This recipe can be easily doubled for larger gatherings.

Delicious Baked Barbecue Chicken Thighs with Caramelized Onions Recipe

Baked Barbecue Chicken Thighs with Onions: A Flavorful Delight for Any Occasion

⚖️
Difficulty
Easy

⏲️
Prep Time
15 mins

🕒
Cook Time
45 mins

⏱️
Total Time
60 mins

🍽️
Servings
4

If you’re looking for a simple yet delicious dish that packs a punch of flavor, these Baked Barbecue Chicken Thighs with Onions are just what you need. The crispy skin contrasts beautifully with the tender, juicy meat, all combined with a homemade barbecue sauce that’s deeply satisfying. As the chicken bakes, the sweet and savory aroma fills your kitchen, tantalizing everyone in your home and making their mouths water in anticipation.

Perfect for weeknight dinners, family gatherings, or weekend cookouts, this dish combines a few basic ingredients to create something extraordinary. The caramelized onions serve not only as a bed for the chicken but also infuse their flavor throughout the dish, creating a harmonious blend. Serve these succulent thighs with a side of vegetable slaw or cornbread for a complete meal that is sure to impress.

Quick Recipe Highlights

  • Flavor Profile: Bold and tangy barbecue sauce meets savory chicken and sweet caramelized onions.
  • Texture: Enjoy a crispy skin with moist, tender meat and a slight crunch from the onions.
  • Aroma: A delightful combination of caramelized sugar and smoky barbecue fills the air.
  • Visual Appeal: The golden-brown chicken glistens with sauce, complemented by the vibrant color of the onions.
  • Skill Level Needed: Ideal for beginners but sure to impress experienced cooks.
  • Special Equipment: A baking dish and oven are all you need for this easy recipe.

Recipe Overview

  • Difficulty Level: This recipe is categorized as easy, making it perfect for novice cooks and a great way to build confidence in the kitchen.
  • Category: Main dish — great for family dinners or potlucks.
  • Cuisine: A classic American barbecue style, this dish is rooted in tradition, showcasing bold flavors.
  • Cost: An affordable dish that provides great value; chicken thighs and onions are budget-friendly ingredients.
  • Season: Enjoy year-round, but particularly during grilling season for those outdoor cookouts.
  • Occasion: Ideal for family dinners, game-day gatherings, and casual weeknight meals.

Why You’ll Love This Recipe

This Baked Barbecue Chicken Thighs with Onions is a dish you’ll fall in love with, thanks to its mouthwatering taste and inviting aroma. The perfectly balanced barbecue sauce enhances the natural flavors of the chicken, while the caramelized onions add depth, making each bite unforgettable. The ability to prepare this recipe quickly means you can spend more time savoring the meal and less time in the kitchen.

The convenience of this recipe is unmatched. With just a handful of ingredients that are easily available, you can whip up a delicious meal without complications. Additionally, the prep time is minimal, allowing you to focus on more important aspects, like enjoying time with family or friends while dinner is in the oven.

Nutritionally, chicken thighs offer a great source of protein, making this dish perfect for those looking to maintain a balanced diet. The addition of onions not only boosts the flavor but also provides vitamins and antioxidants. This dish can easily fit into a healthy eating plan when paired with fresh sides, ensuring you nourish your body without sacrificing flavor.

Socially, this dish is a crowd-pleaser, making it an excellent choice to share at gatherings. Its familiar flavors attract guests of all ages, and its ease of preparation ensures you spend less time cooking and more time enjoying the company of those you love.

Lastly, this recipe is cost-effective. Chicken thighs are often less expensive than other cuts of chicken, and their rich flavor combined with the onion’s natural sweetness provides a satisfying meal that doesn’t break the bank. You’ll be able to feed the family without stressing about the grocery bill.

Historical Background and Cultural Significance

Barbecue has deep roots in American cuisine, originating from various traditional cooking methods brought by Native Americans and later influenced by African and European cultures. The method of slow-cooking meat over an open flame has been a staple in American gatherings for centuries, celebrating the unification of flavors and families.

Regional variations of barbecue are abundant, with each area adopting its unique style and sauce. From tangy vinegar-based sauces in the Carolinas to the rich, sweet styles of Kansas City, barbecue chicken has evolved, showcasing the diverse palette of American flavors. The dish of Baked Barbecue Chicken Thighs with Onions honors this tradition while offering a comforting home-cooked twist that’s accessible for any home cook.

As barbecue culture continues to grow, its significance remains rooted in community and connection, often associated with social events, celebrations, and comfort food. Whether it’s a backyard cookout or a family dinner, the act of sharing a meal brings people together, enriching the culinary experience.

This dish mirrors the evolution of barbecue as it becomes more integrated into everyday meals, transforming once-complex recipes into simple yet flavorful options for busy lifestyles. Baked Barbecue Chicken Thighs with Onions embodies the essence of barbecue cooking: bringing joy and satisfaction to the table with minimal fuss.

Ingredient Deep Dive

  • Chicken Thighs: Considered a more flavorful cut compared to chicken breasts, thighs retain moisture well during cooking. Nutritionally, they provide healthy protein and iron. When selecting, look for organic options for better quality, and store in the refrigerator for up to two days or freeze for longer preservation. Substitutions can include chicken legs or breasts, although cooking times may vary.
  • Onions: Caramelized onions add sweetness and depth to the dish, essential for flavor development. Rich in vitamins, fiber, and antioxidants, onions also contribute to heart health. Choose firm, smooth-skinned onions, and store in a cool, dark place. If you need to substitute, shallots or leeks can provide a similar flavor, but with a milder profile.
  • Barbecue Sauce: A key ingredient that ties the dish together with flavor. Store-bought sauces can be convenient, but it’s easy to make your own with ketchup, vinegar, and spices. Nutritionally, watch for sugar content in commercial brands. Homemade options not only taste fresher but can be adjusted for sweetness and heat to your liking.

Common Mistakes to Avoid

  • Not marinating the chicken: Allowing the chicken to marinate will significantly enhance the flavors, so don’t skip this crucial step.
  • Using the wrong cooking temperature: Cooking at too high a temperature can burn the barbecue sauce, while too low might leave the chicken undercooked. Stick to a reliable temperature.
  • Overcooking the chicken: Check the internal temperature to avoid dry chicken. Aim for 165°F (74°C) for perfectly juicy thighs.
  • Neglecting the onion prep: Properly slicing the onions ensures even cooking and allows them to caramelize beautifully.
  • Not allowing the dish to rest: Letting the chicken rest a few minutes before serving retains juices and improves texture.
  • Skipping the baking dish: Using a proper baking dish helps trap juices and flavors, making the final dish more enjoyable.
  • Ignoring side dishes: Pairing your chicken with complementary sides enhances the overall meal experience.
  • Rushing the baking time: Patience is key; let the chicken cook through slowly to fully develop its flavors.

Essential Techniques

Marinating: Marinating the chicken thighs allows the flavors to penetrate deeper into the meat. Mix either store-bought or homemade barbecue sauce with seasoning, and allow the chicken to soak up these flavors for at least 30 minutes to a few hours. Avoid skipping this step for maximum flavor.

Caramelizing Onions: Slice onions thinly and cook them slowly over medium heat in a bit of oil. Patience is key here—allow the natural sugars to develop until they become soft and golden brown. This technique adds immense flavor depth to the dish.

Baking: Baking at a consistent temperature allows the chicken to cook evenly. Keep an eye on the internal temperature using a meat thermometer, which provides a visual cue when the meal is done.

Pro Tips for Perfect Baked Barbecue Chicken Thighs

  • For extra flavor, add a touch of smoked paprika to your marinade for a smoky depth.
  • Consider finishing the dish under the broiler for the last few minutes to achieve crispy skin.
  • Experiment with other flavor-enhancing ingredients like garlic or cayenne pepper in your barbecue sauce for a unique twist.
  • Let the chicken rest after baking to keep it juicy and flavorful.
  • When storing leftovers, separate the chicken from sauce to maintain quality.
  • Use high-quality barbecue sauce and experiment with regional varieties for different flavor profiles.
  • For a healthier option, skin the chicken before marinating—this will cut down on fat and calories.

Variations and Adaptations

  • Regional Variations: Try using Memphis-style barbecue sauce, or experiment with a peppery Texas sauce to switch things up.
  • Seasonal Adaptations: In the fall, incorporate roasted pumpkin or sweet potatoes for a heartier side.
  • Dietary Modifications: Opt for skinless chicken thighs or substitute turkey thighs for a leaner protein option.
  • Flavor Variations: Integrate flavors by adding chipotle peppers for a smoky, spicy kick.
  • Texture Modifications: Add vegetables like bell peppers or zucchini to the baking dish for added texture and nutrition.
  • Presentation Alternatives: Serve the chicken on a bed of herbs or with a sprinkle of fresh green onions for added color and flavor contrast.

Serving and Presentation Guide

  • Plating Techniques: Serve on a rustic wooden platter to enhance the barbecue experience.
  • Garnishing Ideas: Fresh parsley or cilantro can add a brilliant green contrast and freshness.
  • Traditional Accompaniments: Coleslaw and cornbread pair perfectly for a Southern-inspired meal.
  • Modern Serving Suggestions: For a contemporary twist, serve in bowls with a side of quinoa or brown rice.
  • Temperature Considerations: Serve the chicken warm to enjoy the full flavor experience; letting it cool can dull the taste.
  • Portion Control Tips: Offer sides to compliment a single serving of chicken, balancing the plate.

Wine and Beverage Pairing

  • Wine Pairings: Opt for a fruity Zinfandel or a light Pinot Noir that complements the barbecue without overwhelming it.
  • Non-alcoholic Alternatives: Sparkling water with a splash of lemon enhances the freshness of the meal.
  • Coffee/Tea Pairings: A lightly brewed iced tea with citrus notes can cleanse the palate between bites.
  • Temperature Considerations: Serve wine chilled and beverages at a refreshing temperature for the best enjoyment.
  • Serving Suggestions: Provide a mix of beverages to cater to guests’ preferences, balancing between alcoholic and non-alcoholic options.

Storage and Shelf Life

  • Storage Methods: Store leftovers in airtight containers in the refrigerator for up to 3 days.
  • Temperature Requirements: Always ensure food is cooled before sealing to avoid condensation.
  • Container Recommendations: Use glass containers for easy reheating and to maintain flavor integrity.
  • Signs of Spoilage: Always check for off smells or discoloration, as these indicate spoilage.
  • Reheating Instructions: Reheat in the oven for best results, ensuring the chicken reaches an internal temperature of 165°F (74°C).
  • Freezing Guidelines: You can freeze portions of the dish for up to 2 months. Thaw overnight in the refrigerator before reheating.

Make Ahead Strategies

  • Prep Timeline: Marinate the chicken the night before to allow the flavors to develop fully.
  • Storage Between Steps: Store sliced onions in the fridge covered in a bit of oil until you’re ready to cook.
  • Quality Impact Assessment: As flavors meld, allowing for marination overnight improves taste significantly.
  • Assembly Tips: Once marinated, you can assemble the dish quickly before baking, saving time on busy days.
  • Reheating Guidelines: To avoid nutrient loss, reheat only what’s needed efficiently.
  • Fresh Element Additions: Add fresh herbs or zesty lime before serving to brighten the dish.

Scaling Instructions

  • Halving the Recipe: For smaller gatherings, halve the ingredients, adjusting marinading times accordingly.
  • Doubling or Tripling: For larger crowds, ensure you have a baking dish large enough and consider cooking in batches.
  • Equipment Adjustments: Make sure your oven can accommodate the larger dish or use multiple sheet pans.
  • Timing Modifications: Expect slight changes in cooking time; use a thermometer to determine doneness.
  • Storage Considerations: When scaling, remember that leftovers can also be frozen efficiently.

Nutritional Deep Dive

  • Macro Breakdown: Each serving is high in protein, providing approximately 30 grams per portion, essential for muscle recovery.
  • Micronutrient Analysis: Chicken thighs are rich in iron and B vitamins, supporting energy production and metabolism.
  • Health Benefits: Onions add antioxidants and fiber, promoting heart health and digestion.
  • Dietary Considerations: This dish fits into a balanced diet when served with veggies; however, consider portion size for caloric intake.
  • Portion Analysis: Monitor serving sizes to keep meal prep within dietary goals while enjoying flavorful food.
  • Weight Management Tips: Balance richer meals with lighter sides to maintain overall dietary goals and wellness.

Dietary Adaptations

  • Gluten-free: Ensure your barbecue sauce is gluten-free; many brands offer options.
  • Dairy-free: This recipe is naturally dairy-free, so there are no concerns in that area.
  • Vegan: Substitute chicken with hearty vegetable options like eggplant or portobello mushrooms with a vegan barbecue sauce.
  • Low-carb: Serve with low-carb vegetables or salads to keep your meal light yet satisfying.
  • Keto: Keep the chicken as is but watch for high-carb sides; opt for non-starchy vegetables instead.
  • Paleo: This recipe fits nicely into a paleo diet; just ensure your barbecue sauce adheres to paleo principles.
  • Low-FODMAP: Reduce onion quantity as much as possible if you are following a low-FODMAP diet.
  • Other specific diets: Customize the ingredients to fit various dietary requirements by offering flexible alternatives to the sauce.

Troubleshooting Guide

  • Texture Issues: If the chicken is dry, consider cooking time and ensure it is not overcooked. Use a meat thermometer for accuracy.
  • Flavor Balance: If too tangy, add a pinch of sugar to your sauce blend for a more balanced taste.
  • Temperature Problems: Make sure you are preheating your oven completely before placing the dish inside.
  • Equipment Challenges: If you are having trouble with your oven temperature, consider using an oven thermometer to verify accuracy.
  • Ingredient Substitutions: If ingredients aren’t available, seek similar alternatives that can mimic the flavors needed.
  • Timing Concerns: If pressed for time, consider adjusting the cooking method to quicker alternatives like grilling.

Recipe Success Stories

  • Community feedback has been overwhelmingly positive, with many readers praising the ease of preparation and rich flavors.
  • Numerous variations have come from the community, where people shared their takes with different sauces and sides!
  • Adaptation stories highlight how readers have tweaked the recipe based on family preferences, making it a crowd-pleaser.
  • Suggestions on pairing it with various sides led to lively discussions and excitement for cooking together.
  • Photography tips have inspired others to capture their creations beautifully, facilitating sharing on social media.

Frequently Asked Questions

Can I use skinless chicken thighs?

Yes, you can use skinless chicken thighs if you prefer, but the skin adds flavor and moisture during cooking.

How long should I marinate the chicken?

Marinate for at least 30 minutes, but for best results, aim for 4 hours or overnight in the refrigerator.

What barbecue sauce do you recommend?

Feel free to use your favorite store-bought barbecue sauce or make your own to customize the flavors to your liking.

Can I cook this recipe on the grill?

Absolutely! This recipe can easily be adapted for the grill; just follow the same marinating and cooking directions.

What sides pair well with this dish?

Popular sides include coleslaw, corn on the cob, or roasted vegetables for a delightful balance to the meal.

How do I reheat leftovers?

Reheat the chicken in the oven at 350°F (175°C) until warmed through, about 15-20 minutes, to keep it juicy.

Can I use chicken breasts instead?

Yes, chicken breasts can be used, but adjust the cooking time since they may cook faster than thighs.

Is this recipe suitable for meal prep?

Yes, these baked barbecue chicken thighs store well and can be prepared in advance for multiple meals.

How spicy is the barbecue sauce?

The spiciness depends on the barbecue sauce you choose; you can adjust the heat by adding cayenne or chili powder.

What can I do if my chicken turns out dry?

If your chicken is dry, ensure you’re not overcooking it next time, and consider basting it with barbecue sauce during cooking.

Additional Resources

  • For more barbecue inspiration, check out our other chicken recipes and see how they compare!
  • Technique guides and videos are available for mastering marinating and baking techniques.
  • Ingredient information on choosing the best chicken cuts can elevate your cooking skills.
  • Equipment recommendations for baking help you get the best results from your kitchen.
  • Explore seasonal variations that can inspire unique flavor twists depending on the time of year.

Join the Conversation

We’d love to hear your thoughts on this recipe and your personal experiences! Share your photos on social media using the hashtag #BarbecueChickenThighs. Be sure to comment with feedback or any unique variations you’ve tried so we can all learn from each other. Community engagement is key to expanding our culinary horizons and ensuring each meal is a celebration of flavors!

The Recipe

Baked Barbecue Chicken Thighs with Onions

Serves: 4

Prep Time: 15 mins

Cook Time: 45 mins

Total Time: 60 mins

Kitchen Equipment Needed

  • Baking dish
  • Measuring cups and spoons
  • Mixing bowl
  • Meat thermometer

Ingredients

  • 4 chicken thighs, skin-on
  • 1 large onion, sliced
  • 1 cup barbecue sauce
  • 2 tablespoons olive oil
  • 1 teaspoon garlic powder
  • Salt and pepper to taste

Directions

  1. Preheat the oven to 375°F (190°C).
  2. In a mixing bowl, combine the barbecue sauce, olive oil, garlic powder, salt, and pepper.
  3. Marinate the chicken thighs in the sauce mixture for at least 30 minutes.
  4. Arrange the sliced onions in a baking dish and place the marinated chicken on top.
  5. Drizzle any remaining sauce over the chicken and onions.
  6. Bake in the preheated oven for 45 minutes or until the internal temperature reaches 165°F (74°C).
  7. Let rest for 5 minutes before serving.

Recipe Notes

  • You can use non-stick spray in the baking dish for easier cleanup.
  • Feel free to adjust the level of barbecue sauce based on your taste preferences.
  • For extra flavor, add in spices like paprika or cayenne pepper to your marinade.

Delicious Hearty Chicken and Vegetable Stew for Comforting Meals

Hearty Chicken and Vegetable Stew: Comfort in Every Bite

⚖️
Difficulty
Easy

⏲️
Prep Time
15 mins

🕒
Cook Time
45 mins

⏱️
Total Time
60 mins

🍽️
Servings
4 servings

Hearty Chicken and Vegetable Stew is a classic southern dish that warms the soul with every spoonful. Packed with tender chicken and a rainbow of fresh vegetables, this wholesome stew is perfect for family dinners or a cozy night in. The rich, savory broth enriches the flavors, bringing out the best in each ingredient. Imagine the comforting aroma wafting through your home as this stew simmers on the stove, inviting loved ones to gather around the table and enjoy a meal made with love.

This recipe not only promises a delicious meal but redefines home-cooked comfort food. Each bite is filled with succulent chicken, fresh carrots, potatoes, and peas, creating a delightful tapestry of flavors and textures. It is truly a recipe to bring everyone together, making memories as you enjoy this nourishing dish on cold evenings. Whether you’re serving it up for a special occasion or simply on a busy weekday, this hearty chicken stew is sure to impress.

Quick Recipe Highlights

  • Flavor Profile: Rich, savory, and aromatic, featuring tender chicken and a blend of fresh, seasonal vegetables.
  • Texture: A delightful contrast between the tender chicken, hearty vegetables, and thick, stew-like broth.
  • Aroma: A fragrant mix of herbs and spices that fills your kitchen and beckons tastiness with every stir.
  • Visual Appeal: Vibrant colors of carrots, peas, and bell peppers make this stew as pleasing to the eyes as it is to the palate.
  • Skill Level Needed: Perfect for novice cooks, this recipe is straightforward but offers delicious results.
  • Special Equipment: A large pot or Dutch oven is best for preparing this nourishing chicken stew.

Recipe Overview

  • Difficulty Level: This recipe is suitable for beginners, featuring simple steps and easily accessible ingredients. Perfect for anyone looking to build confidence in the kitchen.
  • Category: This chicken stew falls under comfort food and is ideal for hearty dinners, perfect for family gatherings.
  • Cuisine: The dish is inspired by rustic Southern cooking traditions, where hearty stews are a popular staple for family meals.
  • Cost: The ingredients are budget-friendly, making it an economical choice for feeding a group without breaking the bank.
  • Season: Best enjoyed in the cooler months, this stew provides warmth and nourishment, ideal for fall and winter dinners.
  • Occasion: Perfect for gatherings, game nights, or potlucks, this stew is bound to please a hungry crowd.

Why You’ll Love This Recipe

This Hearty Chicken and Vegetable Stew is a dish that satisfies your taste buds with its rich flavor while providing a delightful texture. The combination of juicy chicken, tender vegetables, and savory broth creates a symphony of flavors that is both comforting and energizing. Each spoonful is packed with nutrients, making it ideal for anyone looking to enjoy a healthy meal without sacrificing taste.

It’s also incredibly convenient! With minimal prep and cooking time, you can whip up this delicious stew on a busy weeknight. The process is simplified with straightforward steps that yield a satisfying result. Plus, the ingredients can be prepared ahead of time, allowing for efficient cooking once you’re ready to eat.

Speaking of nutrition, this stew is a powerhouse of vitamins and minerals. Chicken is a great source of lean protein, while a variety of colorful vegetables supply essential nutrients like fiber, vitamins A and C, and antioxidants. This dish supports your health while also filling you up, making it a win-win for mealtime.

Socially, this recipe brings people together. It’s perfect for sharing and encourages conversation around the dinner table. Whether you serve it family-style or in individual bowls, the warmth and comfort of this stew foster a cozy atmosphere, ideal for connecting with family and friends.

Lastly, the affordability of this recipe allows you to prepare a hearty meal without spending a fortune. Most ingredients can be found in your pantry or local grocery store, making it accessible for everyone. It’s a meal that suits both the casual cook and the experienced chef, providing value and satisfaction for all.

Historical Background and Cultural Significance

The history of chicken stew can be traced back to various culinary traditions, with roots in both European and Southern American cultures. Originally designed to make use of leftover meats and vegetables, stews were a practical solution that transformed simple ingredients into nourishing meals. The method of slow cooking allowed flavors to meld beautifully, resulting in the comforting stews we know today.

Culturally, chicken stew has served as a bonding dish for families and communities. Whether shared at home during casual dinners or at communal gatherings, stews symbolize nourishment and sharing. They have been a staple in numerous households, passed down through generations as family recipes, each with its own special twist.

Over the years, the chicken stew evolved to incorporate local vegetables, herbs, and spices, reflecting the tastes of the region. In Southern cooking, the use of varieties of vegetables and spices has become a hallmark, giving each stew a unique flair depending on the cook’s preferences and available ingredients.

Today, the recipe for chicken and vegetable stew still varies widely but continues to hold a special place in people’s hearts, symbolizing comfort and warmth in every bowl. From family dinners to potlucks, this dish remains a beloved comfort food for many.

Ingredient Deep Dive

Chicken: Chicken is the star ingredient in this hearty stew. It provides rich, lean protein that is low in fat, making it a staple in various cuisines. When selecting chicken, look for fresh, free-range options for the best flavor and quality. Store it in the refrigerator for up to two days or freeze for longer preservation. If you’re looking for alternatives, turkey or lean cuts of beef can be great substitutes.

Vegetables: The assorted vegetables in the stew add not only flavor but also a spectrum of nutrients. Carrots, potatoes, and peas are common choices due to their sweetness and texture. When buying vegetables, opt for vibrant, firm produce, and use fresh ones for the best taste. For storage, keep in cool, dry places and avoid washing until ready to use. You can swap in seasonal vegetables like squash in the fall or fresh herbs for extra flavor.

Common Mistakes to Avoid

  • Not searing the chicken: A quick sear before simmering enhances the flavor of the stew.
  • Overcrowding the pot: If too many ingredients are added at once, they may not cook evenly, resulting in a less flavorful dish.
  • Skipping the simmering step: A proper simmer allows the flavors to meld together effectively; rushing this process can compromise taste.
  • Using stale spices: Fresh herbs and spices are crucial for a rich flavor; ensure your pantry is stocked with fresh ones.
  • Neglecting to taste: Regularly tasting the stew while cooking allows you to adjust seasoning and ensure balanced flavors.
  • Not preparing vegetables uniformly: Cutting them into different sizes can lead to uneven cooking; keep them consistent.
  • Using cold broth: Use room temperature or warm broth to ensure a consistent cooking temperature.
  • Serving immediately: Allowing the stew to rest enhances the flavors as they continue to develop even after cooking.

Essential Techniques

Sauteing: This technique is essential for developing a rich base for your stew. Start by heating oil, then add your aromatics like onions and garlic until they are fragrant. Mastering this will ensure a flavorful foundation for your dish. Look for visual cues; once aromatic and golden, proceed to the next step of your recipe.

Simmering: Simmering is critical to allow ingredients to cook slowly, melding their flavors together. After bringing your stew to a boil, reduce to a gentle simmer; this low and slow approach brings out the best in all ingredients. Avoid boiling vigorously, which can overcook the proteins and vegetables.

Pro Tips for Perfect Hearty Chicken and Vegetable Stew

1. Prioritize fresh ingredients. Fresh vegetables will enhance both the flavor and nutritional value of your dish.

2. Don’t forget to adjust seasonings as you go. Every ingredient can change the flavor dynamics; be sure to taste frequently.

3. Consider cooking in batches. Stews often taste better the next day as the flavors develop further.

4. Experiment with herbs. Adding a fresh sprig of rosemary or thyme right before serving can elevate the flavors significantly.

5. Don’t rush the process. Letting your stew simmer longer really helps the ingredients break down and absorb flavors.

6. Thicken your stew with cornstarch or a roux if desired. This creates a richer texture that many find satisfying.

Variations and Adaptations

You can switch up the vegetables depending on what’s in season. For example, using butternut squash or sweet potatoes in place of regular potatoes can add a new dimension to the dish. Additionally, feel free to swap in different beans or lentils as a base for a heartier stew.

For those on a low-carb diet, consider using cauliflower instead of potatoes or adding more greens such as kale or spinach for added nutrition without the carbs.

Seasonal adaptations can also significantly alter this stew. In winter, incorporating root vegetables like parsnips or turnips can bring warming flavors, whereas in spring, lighter vegetables like asparagus and peas can offer freshness.

If you prefer a spicier version, adding jalapeños or a splash of hot sauce can elevate the heat. Conversely, to make it creamier, a splash of cream or coconut milk can turn this stew into a comforting chowder-like dish.

Serving and Presentation Guide

When serving your hearty chicken stew, consider garnishing it with fresh parsley or a drizzle of olive oil for an appealing presentation. Additionally, this stew can be served hot, accompanied by a side of warm crusty bread, which is perfect for dipping into the rich broth.

Plating techniques can also play a role; serve in deep bowls with ample broth and a few pieces of grilled chicken visible on top for aesthetic appeal. Modern touches can include serving in mason jars or rustic bowls that enhance the homey feel of this dish.

Temperature matters when it comes to serving; always ensure the stew is piping hot before serving. If preparing ahead, store in a slow cooker on low heat so it stays warm and ready for guests.

Wine and Beverage Pairing

For wine lovers, a full-bodied white wine such as Chardonnay or a light red like Pinot Noir pairs beautifully with the richness of chicken stew. These wines complement the savory notes without overpowering the dish.

If you’re looking for non-alcoholic alternatives, a crisp apple cider or sparkling water garnished with citrus can refresh your palate while enjoying this hearty meal. For those who prefer tea, a herbal blend with chamomile or lemon can provide a soothing complement to the flavors of the stew.

Storage and Shelf Life

For storage, allow the stew to cool completely before transferring it to an airtight container. It can be stored in the refrigerator for about 3-4 days or can be frozen for up to 3 months. Make sure to label the container with the date for longevity tracking.

When reheating, do so gently on the stove over medium-low heat, adding a splash of broth or water if necessary to loosen it up. Signs of spoilage include off odors or unusual texture; never consume if in doubt.

Make Ahead Strategies

To make your cooking process seamless, prep your vegetables a day in advance to save time on cooking day. Chop and store them in the refrigerator, and prepare your chicken by marinating it overnight for enhanced flavor.

Assemble the ingredients and seasonings so they’re ready to go when you’re prepared to cook. This way, you can quickly throw everything together and let it simmer without delay.

Scaling Instructions

To halve this recipe, simply cut all ingredients in half, and it should yield about two servings. If doubling or tripling the recipe, calculate ingredients carefully. Ensure you have a large enough pot to accommodate the increased volume while allowing for bubbling space.

If you adjust the quantities, you may need to increase the cooking time slightly to ensure all ingredients are cooked evenly, especially when dealing with larger pieces of chicken or root vegetables.

Nutritional Deep Dive

This Hearty Chicken and Vegetable Stew is not only delicious but also nutritious. Each serving is packed with lean protein from the chicken, which supports muscle growth and maintenance. The variety of vegetables, including carrots and peas, provide essential vitamins and fiber, aiding digestion and overall health.

For those conscious of their diet, the stew can be tailored to support weight management. It is low in calories while being high in satiety, making it an ideal meal for those trying to eat healthily without feeling deprived.

Dietary Adaptations

For a gluten-free version of this stew, simply ensure that all store-bought items are certified gluten-free, and opt for gluten-free broth. This dietary option is crucial for those with sensitivities while still enjoying this comforting dish.

Dairy-free adaptations can be achieved by using coconut milk instead of cream if you prefer a creaminess without dairy. Additionally, shift to plant-based broth, allowing this recipe to cater to vegan diets by substituting chicken for chickpeas or tofu.

Troubleshooting Guide

If your stew is too watery, you might consider simmering it for longer to allow some liquid to evaporate or adding a cornstarch slurry to thicken the broth. Beware; this should be done gradually to achieve the desired consistency without overpowering the original flavors.

If you find the flavor lacking, adjust the seasoning by incorporating a pinch more salt or acid like lemon juice for brightness. Taste regularly while doing this to ensure balance in flavors.

Recipe Success Stories

Feedback indicates that it’s a go-to recipe for family gatherings as it accommodates various palates and dietary preferences with simple modifications, making it a trusted favorite among friends and families.

Frequently Asked Questions

Can I freeze this stew?
Yes, this stew freezes very well. Ensure it’s in an airtight container and consume within three months for best quality.

What sides do you recommend with this stew?
This stew pairs wonderfully with crusty bread, rice, or a fresh salad. These sides complement the hearty flavor of the stew beautifully.

Is it possible to make this stew in a slow cooker?
Absolutely! Simply place all the ingredients in the slow cooker and let it cook on low for 6-8 hours for a convenient meal.

Can I add pasta to this stew?
You can! Add cooked pasta toward the end of the cooking time to avoid overcooking and ensure the pasta maintains its texture.

How do I store leftovers?
Once cooled, store leftovers in an airtight container in the fridge for up to four days or freeze for longer preservation.

Can I substitute chicken thighs for breasts?
Yes! Chicken thighs provide a richer flavor and remain tender during the cooking process, making them an excellent choice for this stew.

Can I make this dish vegetarian?
For a vegetarian version, replace chicken with hearty vegetables and proteins like lentils or chickpeas and use veggie broth.

How can I make this stew spicier?
To add spice, consider incorporating crushed red pepper flakes or diced jalapeños at the beginning of the cooking process.

What’s the best way to reheat this stew?
Reheat gently in a saucepan over medium heat, adding a splash of broth if it has thickened too much during storage.

Can I use canned vegetables?
While fresh is preferred for flavor, you can use canned vegetables, but please note they may change the texture of the stew.

Additional Resources

For those looking to expand their savory repertoire, you might also enjoy our other comforting recipes such as Beef Stroganoff or a classic Vegetable Soup. Additionally, our technique guides on mastering the perfect sauté or simmer can elevate your cooking skills further, making you a more confident home chef.

Explore ingredient resources that provide insight on selecting the freshest produce, and check out our equipment recommendations for the best pots and pans to use for stewing, ensuring optimal cooking results in all your dishes.

Join the Conversation

We’d love to hear about your experience with this Hearty Chicken and Vegetable Stew! Share your photos and tweak the recipes on social media, and tag us to become part of our community. Your feedback not only helps us grow but also inspires others to try new variations and techniques. Share your thoughts and let us know how you made this recipe your own!

The Recipe

Hearty Chicken and Vegetable Stew

Serves: 4 servings

Prep Time: 15 mins

Cook Time: 45 mins

Total Time: 60 mins

Kitchen Equipment Needed

  • Large pot or Dutch oven
  • Cutting board
  • Sharp knife
  • Ladle for serving

Ingredients

  • 2 tablespoons olive oil
  • 1 pound chicken breast, cubed
  • 2 cups carrots, sliced
  • 2 cups potatoes, diced
  • 1 cup frozen peas
  • 1 medium onion, chopped
  • 2 cloves garlic, minced
  • 4 cups chicken broth
  • 1 teaspoon dried thyme
  • Salt and pepper to taste

Directions

  1. In a large pot, heat olive oil over medium heat. Add chopped onion and cook until translucent.
  2. Add garlic and cook until fragrant, about one minute.
  3. Introduce the cubed chicken and cook until browned on all sides.
  4. Stir in the sliced carrots and diced potatoes, cooking for about five minutes.
  5. Pour in the chicken broth, add thyme, and season with salt and pepper.
  6. Bring to a boil, then reduce heat and let it simmer covered for about 30 minutes.
  7. Finish by adding frozen peas and cook for an additional 5 minutes.
  8. Adjust seasoning if necessary and serve hot.

Recipe Notes

  • Feel free to substitute chicken breasts with thighs for added flavor.
  • Any seasonal vegetables can be added based on your preference.
  • This stew can be made ahead of time and stored in the fridge for three days.

Delicious Garlic Parmesan Chicken Meatloaf Recipe You Must Try

Garlic Parmesan Chicken Meatloaf: A Flavorful Twist on a Classic Dish

⚖️
Difficulty
Easy

⏲️
Prep Time
15 mins

🕒
Cook Time
1 hour

⏱️
Total Time
1 hour 15 mins

🍽️
Servings
6 servings

Embrace the rich, savory flavors of Garlic Parmesan Chicken Meatloaf, a delightful twist on a traditional comfort food favorite. This recipe brings together the hearty essence of classic meatloaf with the aromatic allure of garlic and the nutty goodness of Parmesan cheese, making it a meal that’s not just filling but also packed with flavor. Perfect for family dinners or meal prepping for the week, this meatloaf will quickly become a staple in your kitchen.

As you slice into the meatloaf, the scent of roasted garlic will greet you, enticing everyone to the table. Each bite offers a tender texture complemented by the crispy, cheesy topping, creating a satisfying contrast that elevates the simple meatloaf into something extraordinary. Enjoy it with a side of seasonal vegetables or creamy mashed potatoes for the ultimate dining experience.

Quick Recipe Highlights

  • Flavor Profile: The Garlic Parmesan Chicken Meatloaf boasts a robust flavor from freshly minced garlic enhanced by the richness of Parmesan cheese.
  • Texture: Tender and juicy on the inside, with a crispy, cheesy crust that offers delightful texture in every bite.
  • Aroma: A delightful garlic aroma fills your kitchen, inviting everyone to enjoy this savory dish.
  • Visual Appeal: Golden brown on the outside with a mouthwatering cheesy topping, it looks as delicious as it tastes.
  • Skill Level Needed: This easy recipe suits cooks of all skill levels, making it perfect for both beginners and seasoned home chefs.
  • Special Equipment: Just a mixing bowl, meatloaf pan, and an oven – simple tools for a divine dish!

Recipe Overview

  • Difficulty Level: Easy to moderate, this recipe doesn’t require advanced cooking techniques and can be made with basic kitchen skills.
  • Category: Ideal for dinner entrées, this meatloaf fits well into family meals and gatherings.
  • Cuisine: This recipe blends American comfort food traditions with Italian influences, showcasing garlic and Parmesan as central flavors.
  • Cost: Economical, this dish makes use of affordable ground chicken and simple pantry staples, providing great value.
  • Season: Enjoy this hearty meal throughout the year, but it’s especially comforting in fall and winter when warm, nourishing foods are in high demand.
  • Occasion: Perfect for family dinners, potlucks, or as a comforting meal during a busy week.

Why You’ll Love This Recipe

Every bite of Garlic Parmesan Chicken Meatloaf bursts with flavor, combining savory garlic, zesty parsley, and rich Parmesan cheese for a delightful taste experience. The tender meat, seasoned to perfection, provides an unforgettable flavor; it’s a dish that will leave you craving more and enhance any meal plan.

This recipe is incredibly convenient and quick to prepare, making it ideal for busy weeknights. You can mix the ingredients in just 15 minutes, pop it into the oven, and have a delicious meal ready in no time. The leftovers also taste even better the next day, saving you effort on lunch preparation!

Nutritionally, chicken is a lean meat choice packed with protein, and combined with the garlic’s health benefits, this recipe offers a wholesome meal that won’t weigh you down. Enjoy a satisfying dish that supports your health goals.

Entertaining guests becomes effortless with this meatloaf—the aromas filling your home will create a welcoming atmosphere. Cook it in advance, slice, and serve; it’s a perfect centerpiece for gatherings and casual dinners alike.

Lastly, the cost-effectiveness of this dish is unbeatable. Using ground chicken instead of pricier meats, along with staple ingredients, means you can feed the whole family without breaking the bank.

Historical Background and Cultural Significance

The meatloaf has a storied history, emerging as a popular dish during economic hardships in the early 20th century when resourceful cooks sought to stretch their food budgets. This dish has evolved over time but remains a comforting family favorite.

While meatloaf is often seen as an American classic, many cultures have their variations of meatloaf, each adapting local flavors. The addition of garlic and Parmesan in this recipe introduces an Italian twist, enhancing its flavor and contributing to a broader culinary conversation.

The evolution of the recipe reflects cooking trends that embrace flavor and nutrition, adapting to modern palates while retaining the heartiness associated with meatloafs of the past. This Garlic Parmesan version celebrates that history while inviting a contemporary twist.

Regional variations of meatloaf abound, showing how different areas of the world incorporate their local ingredients. This Garlic Parmesan Chicken Meatloaf can be adapted to include various cheeses or spices, making it a versatile dish that can fit any cuisine.

Ingredient Deep Dive

Ground Chicken: A lean source of protein, ground chicken has gained popularity due to its versatile flavor and lower fat content compared to other meats. Select high-quality, fresh chicken for the best taste, and store it in the refrigerator for up to two days after purchase. Freeze any unused portion immediately to preserve flavor.

Parmesan Cheese: This hard Italian cheese is valued for its salty, nutty flavor and is a great source of calcium and protein. When buying, look for freshly grated cheese or a block to grate on your own for maximum freshness. Store in an airtight container in the refrigerator and consume within a week for optimal flavor.

Common Mistakes to Avoid

  • Using old or expired ingredients: Always check the freshness of your ground chicken and Parmesan to avoid off flavors.
  • Overmixing the meatloaf mixture: Mixing too much can result in a dense texture; mix just until combined.
  • Not preheating the oven: Ensure your oven is properly preheated for even cooking.
  • Skipping the meat thermometer: Using a meat thermometer ensures that your meatloaf is fully cooked without being dry.
  • Not letting it rest: Allow the meatloaf to rest after baking for better slicing and flavor retention.
  • Choosing the wrong baking dish: A loaf pan helps shape the meatloaf properly; other pans may not work as well.
  • Neglecting to season: Don’t forget to salt your mixture well; it’s key for flavor.
  • Adding too many fillers: Stick to the suggested ingredients; too many fillers can dilute the taste.
  • Ignoring structural integrity: If you want your meatloaf to hold its shape, use proper binding agents.
  • Overcooking: Monitor cooking time closely to avoid dry meatloaf.

Essential Techniques

Mixing: The way you mix your ingredients is crucial. Take care not to overmix, as this results in a tough meatloaf. The goal is to combine ingredients just enough so everything is incorporated.

Forming the Loaf: Properly shaping your meatloaf is important to ensure even cooking. Use your hands to form a loaf that is slightly wider at the base than at the top, which helps it cook evenly.

Pro Tips for Perfect Garlic Parmesan Chicken Meatloaf

1. Use freshly minced garlic for maximum flavor instead of pre-minced versions, which can lose their potency over time.

2. Experiment with different cheeses; mixtures of mozzarella and Parmesan can add a delightful stretchiness to your meatloaf.

3. For added moisture, consider adding a splash of milk or cream to the mixture.

4. Let the meatloaf cool for a few minutes before slicing, allowing the juices to redistribute.

5. Consider adding finely chopped vegetables like carrots or onions for added nutrition.

6. Always taste your mixture before cooking; adjust seasoning as needed to ensure full flavor.

7. For extra depth of flavor, add some Worcestershire sauce or hot sauce to the mix.

8. Use parchment paper in your loaf pan for easier cleanup.

Variations and Adaptations

Regional variations can introduce unique spices or ingredients to the mix. Consider adding green chiles for a Southwestern flair or Italian seasoning for an enhanced herb profile.

Incorporating seasonal ingredients, like roasted squash or zucchini, can provide a fresh twist suitable for various occasions throughout the year.

For dietary modifications, ground turkey can be swapped for chicken to lower fat content while maintaining great flavor.

If desired, experiment with bolder flavors such as barbecue sauce or mustard, providing a unique kick while staying within the realm of meatloaf.

To adjust for texture, mixing in some bread crumbs can yield a more traditional meatloaf structure, while oatmeal can add fiber without compromising flavor.

Creative presentation can also make a difference; try garnishing with fresh herbs or serving in individual portions for a modern look.

Serving and Presentation Guide

For an elegant presentation, slice your meatloaf and arrange on a large platter; drizzle with a sauce or glaze for a pop of color and added flavor.

Garnish with freshly chopped parsley or basil for a vibrant touch that catches the eye. Serve alongside creamy mashed potatoes and steamed vegetables for a vibrant plate.

Consider temperature while serving; this dish is best enjoyed warm but can also be served cold for those who appreciate meatloaf sandwiches!

For portion control, serve with individual side dishes, allowing guests to customize their servings according to their preferences.

Wine and Beverage Pairing

For wine pairings, a robust red like Cabernet Sauvignon complements the rich flavors of meatloaf beautifully. Alternatively, for those preferring white, a Chardonnay works well with garlic and chicken.

If you’re looking for non-alcoholic options, consider pairing with iced tea or a sparkling water with citrus for a refreshing contrast.

Coffee or a rich, dark tea can be served for those who enjoy a warm beverage at mealtime, especially during cooler seasons.

Storage and Shelf Life

Store any leftovers in an airtight container in the refrigerator for up to 4 days. Reheat gently in the oven to retain moisture.

If you wish to freeze, wrap the meatloaf tightly in plastic wrap followed by aluminum foil to prevent freezer burn, allowing for up to 3 months of storage. Thaw in the refrigerator before reheating.

Signs of spoilage include off-odors and changes in texture; always err on the side of caution when it comes to food safety.

Make Ahead Strategies

To save time, prepare the meatloaf mixture the night before, cover tightly, and refrigerate. This allows flavors to meld and can enhance the final taste.

Split the preparation over two days; cook your meatloaf one day and reheat the next for a quick weeknight dinner.

When reheating, consider adding fresh herbs or a bit of cheese on top to refresh the dish and add appeal.

For gatherings, you can prepare individual portions ahead of time; they will cook faster and be easier to serve.

Scaling Instructions

To halve the recipe, use a smaller loaf pan and adjust cooking time accordingly; the meatloaf may cook slightly quicker.

For large gatherings, doubling or even tripling the ingredients works beautifully; simply adjust your baking time depending on the size of the loaf pan.

Be mindful of equipment; larger quantities may require multiple pans or larger-sized equipment to manage baking effectively.

Nutritional Deep Dive

This Garlic Parmesan Chicken Meatloaf is high in protein due to the ground chicken and cheese, essential for muscle repair and growth.

A single serving can provide significant amounts of several vitamins and minerals, including B vitamins, calcium, and phosphorus, supporting overall health.

With careful portioning, this dish fits well into tranquil weight management plans, providing satisfaction without excessive calories.

Dietary Adaptations

For a gluten-free version, substitute breadcrumbs with gluten-free alternatives like almond meal or ground oats.

Dairy-free adaptations can include using non-dairy cheese substitutes, ensuring the dish remains creamy and flavorful.

To make it vegan, try using lentils or black beans as the base, adjusting flavors accordingly with herbs and spices.

For keto diets, consider reducing breadcrumbs substantially and increasing egg content for binding.

Paleo adaptations might include adding crushed nuts instead of traditional breadcrumb fillers, enhancing the texture while keeping it natural.

Troubleshooting Guide

If your meatloaf turns out dry, ensure you’re not overcooking it—using a thermometer can help gauge doneness accurately. Adding moisture in the mixture can also help.

Flavor balance issues can usually be rectified with added seasoning; tasting your mixture pre-cooking is critical for a perfectly seasoned meatloaf.

Temperature problems may arise from oven calibration; using an oven thermometer can ensure accurate cooking temperatures.

Ingredient substitutions can sometimes lead to unexpected results—maintaining ratios of binders and proteins is essential for achieving the desired texture.

If timing is a concern, consider pre-cooking some components; you can mix and match ingredients according to preparation schedules.

Recipe Success Stories

Readers have consistently praised this recipe for its straightforward execution and satisfying flavors. Many have shared their own variations, such as adding different cheeses or using a mix of ground meats.

Adaptation successes include using local herbs and spices, showcasing the versatility of this dish and its appeal to wider culinary palettes.

The photography aspect has also received positive comments, with many users enjoying capturing their creations before serving.

Frequently Asked Questions

Can I freeze the meatloaf? Yes, you can freeze leftovers. Wrap tightly and consume within three months for best results.

How do I know when it’s done? Use a meat thermometer; chicken should reach an internal temperature of 165°F.

Can I substitute ground turkey? Absolutely! Ground turkey is a great alternative for a leaner option.

How long can I store leftovers? Store in an airtight container for up to 4 days in the refrigerator.

What sides go well with this dish? Serve with mashed potatoes, green beans, or a fresh salad for a complete meal.

Can I make it gluten-free? Yes, swap out breadcrumbs for gluten-free alternatives.

Is this recipe suitable for kids? Definitely! Kids often enjoy the flavors of garlic and cheese.

How can I spice things up? Add red pepper flakes or spices to the meatloaf mixture for heat and flavor.

Can I use other meats? Yes, beef, pork, or mixtures can also be used for meatloaf.

How can I improve the flavor? Taste the mixture before cooking and adjust seasonings as needed.

Additional Resources

For similar recipes, explore our selection of comforting casseroles, savory bakes, and hearty pasta dishes. Enhance your cooking skills with our technique guides focused on meat handling and flavor building.

Ingredient information can help you understand the health benefits of each component in your meals, leading to healthier choices in your cooking.

Equipment recommendations for meatloaf making, like quality loaf pans or meat thermometers, can further enhance your kitchen experience.

Join the Conversation

We encourage our readers to share their takes on this recipe! Post your variations on social media or comment below with any adjustments you’ve made.

Photography enthusiasts – we invite you to showcase your best shots of the Garlic Parmesan Chicken Meatloaf. Engage with our community to swap tips and ideas!

Reader reviews and suggestions continue to inspire our community; feel free to leave feedback or share your success stories as you bring this dish to your family table.

The Recipe

Garlic Parmesan Chicken Meatloaf

Serves: 6 servings

Prep Time: 15 mins

Cook Time: 1 hour

Total Time: 1 hour 15 mins

Kitchen Equipment Needed

  • Mixing bowl
  • Loaf pan
  • Measuring cups and spoons
  • Meat thermometer
  • Oven

Ingredients

  • 1 lb ground chicken
  • 1 cup breadcrumbs
  • 2 cloves garlic, minced
  • 1/2 cup grated Parmesan cheese
  • 1 egg
  • 1/4 cup fresh parsley, chopped
  • Salt and pepper to taste
  • 1 tsp Italian seasoning

Directions

  1. Preheat your oven to 350°F (175°C).
  2. In a large mixing bowl, combine the ground chicken, breadcrumbs, minced garlic, Parmesan cheese, egg, and parsley. Season with salt, pepper, and Italian seasoning.
  3. Mix gently until all ingredients are well incorporated but do not overmix.
  4. Transfer the mixture to a loaf pan and shape into a loaf.
  5. Bake in the preheated oven for approximately 1 hour, or until a meat thermometer reads 165°F (75°C).
  6. Remove from the oven and let it rest for 10 minutes before slicing.

Recipe Notes

  • For extra flavor, consider adding finely shredded carrots or chopped bell peppers into the mix.
  • Leftovers can be stored in the fridge for up to 4 days.
  • Meatloaf can be frozen for up to 3 months; wrap tightly and thaw before reheating.

Delicious Garlic Herb Grilled Lobster Tails Recipe to Impress

Garlic Herb Grilled Lobster Tails: A Irresistible Seafood Delight

⚖️
Difficulty
Moderate

⏲️
Prep Time
15 mins

🕒
Cook Time
10 mins

⏱️
Total Time
25 mins

🍽️
Servings
2

Indulging in Garlic Herb Grilled Lobster Tails is an experience that captivates the senses, elevating any meal into a luxurious affair. The succulent lobster meat, tender and juicy, pairs effortlessly with a rich blend of garlic and fresh herbs that infuse each bite with an irresistible flavor. Whether you’re celebrating a special occasion or simply treating yourself after a long week, this dish promises to impress with its gourmet appeal and simplicity.

As the lobsters sizzle on the grill, their delightful aroma wafts through the air, heralding a culinary masterpiece. The preparation involves minimal effort, making it perfect for home cooks looking to achieve restaurant-quality seafood without the fuss. The vibrant colors of the lobster tails against the backdrop of the grill create an inviting visual that is guaranteed to make mouths water before the first bite is taken.

Quick Recipe Highlights

  • Flavor Profile: A harmonious blend of garlic, herbaceous goodness, and the sweet natural flavor of fresh lobster.
  • Texture: Firm yet tender lobster meat that is perfectly cooked, delivering a satisfying bite.
  • Aroma: Rich garlic notes intermingled with the fresh scent of parsley and lemon zest fill the air.
  • Visual Appeal: Golden-brown grilled lobster tails glistening with a drizzle of garlic herb butter.
  • Skill Level Needed: Requires basic grilling skills, great for both novice and experienced cooks.
  • Special Equipment: A grill or grill pan, tongs for handling hot seafood, and a basting brush for butter application.

Recipe Overview

  • Difficulty Level: This recipe falls under a moderate difficulty level, primarily because it requires careful timing to avoid overcooking the lobster.
  • Category: Ideal as a main dish for seafood lovers, perfect for summer barbecues or cozy dinners.
  • Cuisine: Influenced by coastal seafood traditions, particularly from regions where lobster is a prized delicacy.
  • Cost: While lobster can be a bit on the expensive side, the recipe calls for just a few ingredients, making it a worthwhile investment for a special meal.
  • Season: Best enjoyed during warmer months when grilling outdoors becomes a joyous activity.
  • Occasion: Perfect for celebrations, date nights, or impressing guests at a dinner party.

Why You’ll Love This Recipe

The taste and texture of Garlic Herb Grilled Lobster Tails are a marriage of elegance and indulgence. The sweetness of the lobster meat contrasts beautifully with the added richness of garlic and herbs, creating a mouthwatering experience that defines seafood dining. Each bite reveals tender meat that literally melts in your mouth, showcasing the quality of fresh ingredients.

In addition to its incredible taste, this recipe is remarkably convenient. With just 15 minutes of preparation and another 10 minutes on the grill, you can create a gourmet dish that requires minimal fuss. This makes it a great option for weekday dinners or impromptu gatherings with friends, allowing you to cook something memorable without the need for extensive preparation.

Nutritionally speaking, lobster is a lean protein, providing essential vitamins and minerals while being low in calories. This makes Garlic Herb Grilled Lobster Tails not only a delicious choice but also a healthy one, fitting perfectly into various dietary lifestyles. It offers a plethora of nutrients like omega-3 fatty acids, boosting both heart health and brain function.

Moreover, this recipe shines in social settings. Its visually stunning presentation in vibrant colors adds charm to any table setting, inviting conversation and shared enjoyment among guests. The experience of grilling together can also foster a sense of community, making it a favorite for gatherings.

Cost-effectively, while lobster may seem like a luxury, this recipe makes two generous servings. When you consider the quality of the meal, the price per serving becomes quite reasonable, especially for an upscale experience you can recreate at home without breaking the bank.

Historical Background and Cultural Significance

The origin of lobster as a culinary delicacy dates back centuries. Once considered food for the poor, it has transformed into a gourmet treasure that graces fine dining establishments and festive celebrations alike. This evolution represents not just changes in taste preferences but an interesting interplay between culture and economics in the culinary world.

Culturally, lobster holds a significant place, particularly in coastal communities where fishing is a way of life. Traditions around catching and preparing lobster have been passed down through generations, often accompanied by family gatherings and community events, resulting in resilient local ties and shared memories centered around food.

As recipes for preparing lobster have evolved, so too have techniques for cooking it. From boiling to grilling, the rise of grilling lobster tails has led to a more casual and enjoyable way of cooking this otherwise luxury ingredient. The popularity of grilling lobster tails further reflects the broader acceptance of relaxed, outdoor dining experiences.

Regional variations abound in the ways lobster is prepared and served. For instance, the Garlic Herb Grilled Lobster Tails recipe encapsulates influences from both New England and Mediterranean cuisines, showcasing garlic and herbs that elevate the natural flavors of the shellfish while honoring regional culinary practices.

Ingredient Deep Dive

  • Lobster Tails: Lobster is steeped in history as a delicacy, with roots tracing back to coastal North America. It is rich in protein and low in fat, making it a healthy option for seafood lovers. When selecting lobster tails, look for those that are firm and have a fresh ocean scent. Store them in the coldest part of the fridge or freeze them for longer preservation. If fresh lobster is unavailable, frozen tails are a viable alternative that can offer similar taste with proper preparation.
  • Garlic: Garlic is a culinary staple across many cultures, laden with a history of medicinal benefits. It contains essential vitamins and minerals, contributing to overall health. When using fresh garlic, select firm bulbs, and store them in a cool, dry place away from sunlight. For substitutions, garlic powder or granulated garlic can be employed, though fresh garlic is recommended for its bold flavor.
  • Fresh Herbs (e.g., parsley): Herbs have been used for their flavor and health benefits since ancient times. Parsley, in particular, is rich in antioxidants and can enhance digestion. Choose vibrant, fresh parsley with no signs of wilting. For storage, keep herbs in water like a bouquet or wrapped in a damp paper towel to maintain freshness. Alternatives like coriander or basil can add unique flavors but may alter the recipe’s spirit.

Common Mistakes to Avoid

  • Overcooking the lobster tails – This can lead to tough, rubbery meat. Always keep an eye on the cooking time.
  • Not using enough seasoning – Lobster has a mild flavor that benefits from robust seasonings. Consider liberal use of salt and garlic.
  • Using frozen lobster without thawing – Always fully thaw frozen lobster tails before grilling to ensure even cooking.
  • Neglecting to baste – Skipping the butter basting step can lead to dry lobster. Basting keeps the meat moist and flavorful.
  • Grilling at too high a temperature – Too much heat can cause the outside to burn while the inside remains undercooked. Moderate heat is key.
  • Not checking for doneness – Use an instant-read thermometer to check that the internal temperature reaches 140°F.
  • Using dull knives for prep – A sharp knife will make cutting lobster tails easier and safer. Ensure your tools are in good condition.
  • Skipping the marinade – Marinating the lobster enriches flavor. Don’t rush this step for better results.

Essential Techniques

Mastering the art of grilling lobster tails begins with understanding how to properly split the tail. Using sharp kitchen shears, cut through the top shell from end to end, but avoid cutting all the way through. This allows the meat to be gently pulled out while maintaining its shape during cooking.

Basting is another crucial technique to perfect for enhancing flavor. Mix melted butter with minced garlic and herbs, and use a brush to generously apply this mixture during grilling. Look for visual cues like a golden-brown color on the shell and a slight opacity in the meat for perfect doneness.

Pro Tips for Perfect Garlic Herb Grilled Lobster Tails

1. Always ensure your grill grates are clean and well-oiled before placing the lobster tails, to prevent sticking and ensure even cooking.
2. Experiment with different herb combinations such as thyme or dill to customize the flavor profile according to preference.
3. Consider adding a splash of lemon juice in the garlic butter for a zesty twist that complements the sweet flavor of lobster.
4. For extra presentation, grill lemon halves alongside the lobster tails and serve them together, allowing guests to squeeze fresh juice over the dish.
5. Always let the lobster rest for a few minutes after grilling, allowing juices to redistribute before serving.
6. If your grill has hot spots, rotating the lobster tails during cooking will ensure even exposure to the heat.
7. Pair lobster tails with a simple side salad to keep the meal light and refreshing.
8. Reach for a high-quality seafood or grill thermometer to guarantee perfectly cooked lobster every time.

Variations and Adaptations

One popular variation of grilled lobster tails incorporates a spicy twist, utilizing chili flakes or a drizzle of sriracha in the garlic butter. This adds a kick that can elevate the dish for those who enjoy heat.

Seasonal adaptations can include the use of fresh summer herbs like basil or mint when they are at their peak, offering a refreshing herbal contrast. Alternatively, winter adaptations might involve rich spices such as paprika and cumin for a warming flavor profile.

For those with dietary restrictions, consider swapping out garlic and butter for a vegan substitute. The use of nutritional yeast can add a cheesy, umami flavor without using animal products.

Texture modifications can also be achieved by opting for poached lobster tails before grilling. This method keeps the lobster moist and tender while allowing it to absorb other flavors before finishing on the grill.

Lastly, for presentations, consider stacking the lobster tails with grilled vegetables or serving them on a bed of aromatic rice to enhance both aesthetics and flavor.

Serving and Presentation Guide

When plating Garlic Herb Grilled Lobster Tails, draw inspiration from restaurant style. Arrange the tails cut-side up for visual impact, and drizzle the remaining garlic herb butter over and around the tails.

You can enhance the dish’s allure by adding garnishes such as freshly chopped herbs or edible flowers. For a pop of color, serve with bright lemon wedges that also allow guests to customize their flavor with fresh citrus.

Traditionally, grilled corn or a light salad pairs beautifully with lobster, providing crisp contrast to the tender seafood. When serving, be mindful of temperature, ensuring the dish remains warm for enjoyment without compromising the flavor.

Portion control becomes essential with rich dishes like these, so consider serving one lobster tail per person alongside small portions of sides, allowing room for a varied meal experience.

Wine and Beverage Pairing

Grilled lobster pairs exquisitely with white wines such as Chardonnay or Sauvignon Blanc. Their crisp acidity complements the richness of the butter and lobster, creating a harmonious balance in flavor.

For non-alcoholic options, consider sparkling water infused with citrus. This can refresh the palate without overpowering the seafood. Similarly, a light iced tea with lemon serves as an excellent counterpart to this dish.

If you wish to elevate the pairing experience, consider serving a light, herbal tea after the meal, assisting digestion while providing a soothing end to a delicious dining experience.

Storage and Shelf Life

Proper storage is critical for maintaining the quality of leftover Garlic Herb Grilled Lobster Tails. Store cooked lobster tails in an airtight container in the refrigerator, where they should remain safe for up to three days.

When it comes to freezing, raw lobster tails can last up to six months when properly sealed. Cooked lobster is best consumed fresh but can be frozen for up to three months. To avoid freezer burn, wrap each tail tightly in plastic wrap before placing them in a freezer-safe bag.

Reheating is best done gently, avoiding high temperatures that can lead to dryness. Consider lightly warming them in a skillet over low heat or in a microwave for short bursts of time.

Make Ahead Strategies

For those wanting to prepare ahead of time, consider marinating the lobster tails in the garlic herb butter a few hours beforehand. This allows the flavors to meld beautifully, enhancing taste when cooked.

If you prefer to minimize prep time on the day of the event, clean and split the lobster tails in advance, storing them in the refrigerator until you are ready to grill.

The emphasis should be on maintaining quality, so avoid assembling the dish completely until closer to serving time. This helps to preserve the freshness of the ingredients and ensures a stunning final presentation.

Concluding cooking just before serving is ideal, allowing the lobster tails to be served fresh off the grill, maximizing both flavor and texture for your guests.

Scaling Instructions

Scaling this recipe up or down can be done easily by adjusting the number of lobster tails. For example, if doubling, follow the same measurements for garlic butter and herbs to maintain flavor balance.

Equipment adjustments might be necessary for larger quantities. Consider using a larger grill or cooking in batches if your grill space is limited to ensure even cooking.

For timing modifications, keep an eye on cooking times as multiple tails can impact heat distribution. Using a thermometer for doneness is especially helpful when scaling recipes.

When scaling down, leftover lobster can be repurposed into other dishes, such as pasta or salads, ensuring nothing goes to waste.

Nutritional Deep Dive

From a nutritional perspective, lobster is a powerhouse of essential nutrients. Each serving of lobster tail offers a healthy dose of protein, enabling muscle repair and maintenance, while remaining low in saturated fat compared to other meats.

Additionally, lobster is rich in vital minerals like selenium and zinc, both of which play crucial roles in immune function and supporting cell metabolism. The dish also delivers ample B vitamins, which are important for energy production.

Monitoring portion sizes allows for an indulgent experience while still keeping calorie counts reasonable, making lobster an excellent centerpiece for any meal. When balanced with fresh side dishes, this recipe fits seamlessly into a healthy lifestyle.

For those mindful of dietary tracking, opting for reduced butter or incorporating more herbs can enhance flavor without significantly increasing calories, making this dish both satisfying and nurturing.

Dietary Adaptations

For those following a gluten-free lifestyle, this recipe is inherently suitable as it contains no gluten-based ingredients; however, always check any additional sauces or garnishes used.

For a dairy-free version, substitute traditional butter with a vegan alternative such as olive oil or coconut oil. This maintains the sumptuous flavor of the dish while catering to lactose-free diets.

Keto enthusiasts will appreciate the low carbohydrate count in lobster and can freely enjoy this dish while complementing it with low-carb vegetables for a filling meal.

If adapting for a low-FODMAP diet, limit garlic or substitute it with garlic-infused olive oil, providing a similar flavor profile without the digestive impact.

Lastly, those pursuing paleo diets will find this recipe fitting, as it emphasizes whole ingredients and excludes processed components, allowing for hearty nourishment in every bite.

Troubleshooting Guide

If your lobster tails produce an unappealing texture, it might indicate overcooking. Always refer to cooking times and use a thermometer for accuracy; lobster should be opaque and firm but not rubbery.

If the flavors seem unbalanced, consider seasoning adjustments after tasting. A sprinkle of salt or a dash of lemon juice can brighten the dish significantly, elevating overall flavors.

Temperature problems can result with uneven cooking; ensure your grill is preheated, and remember to rotate the tails if cooking multiple at once to avoid hot spots.

In cases where grilling equipment struggles, consider transferring to a broiler, allowing for a direct heat source that can yield quick results similar to grilling.

If you’re facing ingredient shortcomings, substitutions can often be seamlessly integrated; for example, fresh herbs can be replaced with dried options, recognizing that flavor intensity differs and adjusting quantities accordingly.

Recipe Success Stories

Community feedback often highlights moments of success when attempting Garlic Herb Grilled Lobster Tails. Many home cooks have expressed joy at utilizing this recipe for memorable occasions like anniversaries or birthdays, where the dish became the highlight.

Adaptation stories speak volumes about the versatility of the recipe. Several readers shared experiences of modifying the seasoning to adapt to personal preferences or exploring unique sauce pairings that bring out different flavor notes.

Suggestions from readers have included adding their favorite spice blends or herbs into the marinade, showcasing how flexible this recipe can be while still delivering exceptional taste.

Photography tips from the community emphasize the appeal of vibrant garnishes; utilizing colorful herbs or lemon can create stunning presentation, drawing attention to your culinary creation that could rival restaurant dishes.

Frequently Asked Questions

1. Can I use frozen lobster tails for this recipe?

Yes, frozen lobster tails can be used. Just make sure to fully thaw them before cooking to ensure even grilling and maintain the desired texture.

2. How do I know when lobster tails are done cooking?

The best way to determine if lobster is done is by checking the internal temperature, which should reach 140°F. Additionally, the meat should be opaque and firm.

3. Is it possible to make Garlic Herb Grilled Lobster Tails in the oven?

Absolutely! If grilling isn’t an option, you can broil the lobster tails in the oven. Just ensure you keep a close eye on them to prevent overcooking.

4. What sides pair well with lobster tails?

Light salads, grilled vegetables, or buttery corn on the cob are perfect sides that complement the richness of lobster tails beautifully.

5. Can I prepare the marinade ahead of time?

Yes! The garlic herb butter can be prepared in advance. Store it in the refrigerator for up to a week or freeze it for longer-term use.

6. How should I store leftover grilled lobster?

Store leftover lobster in an airtight container in the fridge for up to three days. For longer storage, you can freeze it for up to three months.

7. Can I grill lobster tails without splitting them?

While it’s more challenging to grill them whole, you can. However, splitting them allows the flavors to penetrate and results in a more enjoyable dining experience.

8. How can I enhance the flavor of grilled lobster tails?

You can enhance the flavor by experimenting with additional spices, herbs, or even citrus peels in your marinade for a vibrant twist.

9. What should I look for when buying fresh lobster tails?

Opt for lobster tails that are firm to the touch, with a clean ocean scent. Avoid any that are soft or have a strong, foul smell.

10. Can I make this dish in advance?

While it’s best enjoyed fresh, you can prep the lobster tails and refrigerate them with the marinade, cooking them just before serving to preserve optimal flavor and texture.

Additional Resources

If you are intrigued by Garlic Herb Grilled Lobster Tails, you might also enjoy related recipes such as classic shrimp scampi or a zesty seafood paella. For technique guides, consider resources on perfecting grilling methods or mastering marinades, as both can significantly elevate your culinary skills. Duration and consistency in preparation are key themes, reminding you to invest in quality equipment that enhances your cooking experience, particularly for high-quality seafood. Don’t forget to explore seasonal variations, taking advantage of seasonal produce to complement the richness of your seafood dishes.

Join the Conversation

We want to hear from you! Share your experiences, variations, and photography tips after trying out the Garlic Herb Grilled Lobster Tails. Engage with fellow food lovers in the comments section below and help inspire others through your story. Your reviews and suggestions play a vital role in creating a community passionate about great food. Let’s continue to explore the delightful world of gourmet recipes together!

The Recipe

Garlic Herb Grilled Lobster Tails

Serves: 2

Prep Time: 15 mins

Cook Time: 10 mins

Total Time: 25 mins

Kitchen Equipment Needed

  • Grill or grill pan
  • Sharp kitchen shears
  • Basting brush
  • Instant-read thermometer
  • Airtight storage containers

Ingredients

  • 2 lobster tails
  • 4 tablespoons unsalted butter
  • 4 cloves garlic, minced
  • 2 tablespoons fresh parsley, chopped
  • 1 tablespoon lemon juice
  • Salt and pepper to taste

Directions

  1. Preheat the grill to medium heat.
  2. Using sharp kitchen shears, carefully split the top of the lobster tails to expose the meat.
  3. In a small saucepan, melt the butter and mix in minced garlic, fresh parsley, lemon juice, salt, and pepper.
  4. Brush the garlic herb butter generously over the lobster meat.
  5. Place the lobster tails shell-side down on the grill, cooking for about 10 minutes while occasionally basting with the garlic herb butter.
  6. Once the lobster meat is opaque and the internal temperature reaches 140°F, remove from the grill.
  7. Let rest for a few minutes before serving with additional lemon wedges.

Recipe Notes

  • Experiment with different herbs to customize the flavor profile.
  • For a spicier dish, add red pepper flakes to the butter mixture.
  • Squeeze fresh lemon juice over the lobster just before serving for an extra zing.

Delicious Braised Oxtails with Garlic Mashed Potatoes and More

Braised Oxtails with Garlic Mashed Potatoes and Roasted Asparagus: A Soulful Culinary Journey

⚖️
Difficulty
Intermediate

⏲️
Prep Time
20 mins

🕒
Cook Time
3 hrs 30 mins

⏱️
Total Time
3 hrs 50 mins

🍽️
Servings
4

Indulge in the rich flavors of Braised Oxtails with Garlic Mashed Potatoes, Roasted Asparagus, and a delightful twist of Shrimp & Grits. This dish promises a heartwarming tapestry of textures and tastes that evoke feelings of comfort and satisfaction. Braised oxtails, slow-cooked to tender perfection, are elevated by their savory braising liquid infused with aromatic spices. Paired with creamy garlic mashed potatoes, it creates a balance of indulgence and comfort that’s perfect for family gatherings or cozy dinners.

The vibrant crunch of roasted asparagus adds a fresh contrast, while the creamy consistency of shrimp and grits introduces a Southern twist to your culinary experience. The amalgamation of flavors from these dishes has a way of bringing people together around the table, where every bite tells a story of tradition and warmth. From sourcing the freshest ingredients to the patient cooking process, every step of creating this meal is a passion project that culminates in a truly memorable dining experience.

Quick Recipe Highlights

  • Flavor Profile: Earthy tones from oxtails combined with a creamy garlic flavor in the mashed potatoes.
  • Texture: The oxtails melt in your mouth, while the mashed potatoes offer a velvety smoothness, contrasted by crisp asparagus.
  • Aroma: Inviting scents of garlic and herbs waft as the oxtails braise, creating a beautifully layered aroma.
  • Visual Appeal: The dish is a colorful palette – deep brown oxtails against the creamy white potatoes and bright green asparagus.
  • Skill Level Needed: Requires some culinary skill to ensure perfect braising and mastering the creaminess of the potatoes.
  • Special Equipment: Braising pot or Dutch oven, high-quality pots for boiling, and a mixer for the potatoes.

Recipe Overview

  • Difficulty Level: This recipe is classified as intermediate, as it requires attention to detail during the braising process and timing of dish components.
  • Category: This dish falls under main courses, perfect for family dinners or special occasions when you want to impress.
  • Cuisine: Drawing inspiration from Southern comfort food, this recipe reflects a rich culinary heritage focused on hearty flavors.
  • Cost: While the oxtails may be a bit more expensive, the overall dish remains cost-effective with simple, accessible ingredients.
  • Season: Best enjoyed during fall and winter months, when hearty meals are most comforting.
  • Occasion: Ideal for gatherings, holiday feasts, or special celebrations, this dish helps create lasting memories with loved ones.

Why You’ll Love This Recipe

The satisfying taste and texture of braised oxtails lend themselves to a truly enjoyable dining experience. This dish showcases the rich umami flavor that makes oxtails a beloved choice for many culinary enthusiasts. As they braise, the connective tissues break down, creating a dish that is not only flavorful but also tender and juicy – a must-try for meat lovers.

Beyond its taste, the convenience of preparing garlic mashed potatoes alongside the oxtails is a time-saver. There’s no need to manage multiple dishes! The creamy potatoes absorb the flavorful braising liquid, enhancing their taste. Furthermore, the quick preparation of roasted asparagus ensures the meal comes together with ease.

In terms of nutrition, braised oxtails are rich in collagen and gelatin, providing health benefits for joints. Meanwhile, the garlic mashed potatoes offer a good source of carbohydrates, essential for energy. Roasted asparagus contributes vitamins and minerals, making this dish not only hearty but also nourishing.

When entertaining, this recipe shines as it presents beautifully on the table. Guests will appreciate the variety and the flavors available, promoting conversation and shared enjoyment. More than just a meal, it fosters a warm, inviting atmosphere ideal for gatherings.

Lastly, considering cost-effectiveness, this dish uses budget-friendly ingredients while treating your palate to a gourmet experience. The oxtails, widely available, offer immense flavor for a reasonable price, making it accessible for various home cooks eager to delve into gourmet cooking without breaking the bank.

Historical Background and Cultural Significance

This dish’s origins trace back to the culinary traditions of various cultures, where oxtails were regarded as a flavorful cut, often slow-cooked to maximize tenderness. In many households, braising became a beloved method to create deep flavors with minimal effort, reflecting a philosophy that good food results from patience.

The cultural significance of oxtails can be traced through various cuisines, particularly in African, Caribbean, and Southern American cooking. Each culture embraces the ingredient in unique ways, showcasing its adaptability while maintaining its heritage and importance in celebratory meals.

Over time, the preparation of oxtails evolved as chefs found novel ways to serve and showcase them, leading to dishes like oxtail stew or braised variants that highlight their rich flavor. These adaptations reflect shifting tastes while preserving the essence of traditional cooking methods.

Today, regional variations exist, each with its signature touches, including spices and accompaniments. The classic combination of oxtails with hearty sides like mashed potatoes remains universally loved, maintaining its place in family meals across generations.

Ingredient Deep Dive

Oxtails: Historically, oxtails were considered a cut for the frugal. Now, they’re celebrated for their unique flavor and texture, rich in collagen, making them a choice cut for slow cooking. When selecting oxtails, look for well-marbled pieces that will tenderize beautifully. Store them in the coldest part of your fridge, ideally used within two days of purchase, or freeze for longer storage. If unavailable, beef shanks can serve as a substitution, providing a similar rich flavor.

Garlic: This aromatic has been revered not just for flavor but for its medicinal properties. Rich in antioxidants and vitamins, garlic has a profound impact on health. Look for firm, unbruised bulbs when shopping and store them in a cool, dry place. For recipes, consider fresh garlic whenever possible; however, garlic powder can substitute in a pinch.

Potatoes: A staple in many cuisines, potatoes offer versatility and comfort. Opt for starchy varieties like Russets or Yukon Golds for creamy mashed potatoes, while ensuring they are firm and blemish-free during selection. Store them in a dark, cool place for longevity. If necessary, sweet potatoes can be an interesting twist on the classic preparation.

Asparagus: Known for its seasonal availability, asparagus is lauded for its bright-green hue and crisp texture. This vegetable is rich in vitamins A, C, E, and K. Look for straight, firm stalks that are vibrant in color. Store them upright in water in the refrigerator. Substitutions for asparagus include green beans or broccoli, which can offer different textures while complementing the dish.

Common Mistakes to Avoid

  • Not braising long enough: Ensure oxtails are tender by allowing for extended cooking times.
  • Overcooking garlic: Adding garlic too early can result in a bitter flavor; consider adding it at the right moment.
  • Rushing the potato prep: Properly drying your boiled potatoes before mashing will enhance creaminess.
  • Skipping seasoning layers: Building flavor takes time; season throughout the cooking process for depth.
  • Ignoring the importance of fat: Including enough fat while cooking will add richness to your dish.
  • Undercooking asparagus: To achieve perfect crispness, avoid under-roasting; it should have a tender-crisp texture.
  • Using cold ingredients: For creamy mashed potatoes, ensure butter and cream are at room temperature before mixing.
  • Not tasting as you cook: Regular tasting allows you to adjust flavors to your liking.
  • Choosing the wrong cooking vessel: An appropriate pot or pan facilitates even cooking; avoid overcrowding.
  • Neglecting rests: Allowing meat to rest post-cooking enhances the distribution of juices.

Essential Techniques

Braising: Braising is critical for developing the deep, rich flavor of oxtails. It combines wet and dry cooking methods, using low heat over several hours. Mastering the timing and liquid ratio ensures the best results, avoiding dryness or undercooked meat. Look for that visual cue of tenderness, with the meat falling off the bone.

Mashing Potatoes: The technique of mashing potatoes is straightforward yet vital for achieving a creaminess that complements the dish. Using a potato ricer or a masher yields the best texture, while slow incorporation of warm butter and cream ensures a smooth finish. Avoid over-mixing to prevent gummy potatoes.

Pro Tips for Perfect Braised Oxtails

1. For enhanced flavor, brown the oxtails in batches to prevent overcrowding, ensuring they caramelize evenly.

2. Use a mix of stock and wine for your braising liquid to deepen the bouquet of flavors.

3. A bouquet garni can add herbaceous notes; tie together thyme, bay leaves, and parsley for easy removal.

4. Regularly skim off fat from the braising liquid to maintain a cleaner flavor profile.

5. Plan ahead; braised dishes often taste better the next day as flavors meld and develop further.

6. Balance out the salt seasoning throughout the cooking stages for optimum flavor without overwhelming the dish.

7. Pair your oxtails with complementary sides like garlic bread to soak up the flavorful juices.

8. For a final touch, finish with a squeeze of fresh lemon juice right before serving for brightness.

Variations and Adaptations

For regional variations, consider using spices characteristic of different cultures, such as adding red pepper flakes for a spicy kick or using Asian-inspired soy sauce and sesame oil to enhance the oxtails. Seasonal adaptations could involve featuring root vegetables in the mashed potatoes, offering an autumnal touch. In terms of dietary modifications, the recipe can easily be adapted by using low-fat cream for a lightened version. Alternatively, flavor variations can include different herbs and spices, creating diverse culinary experiences. Presentation alternatives such as using a rustic wooden board can elevate serving styles, inviting a homely yet sophisticated feel.

Serving and Presentation Guide

When plating, create height with the oxtails, arranging them artfully beside a generous scoop of mashed potatoes. Garnish roasted asparagus with a sprinkle of sea salt and cracked pepper for added flavor. Consider drizzling a rich, glossy sauce over the oxtails for an appealing finish. Presentation can be enhanced with colorful garnishes such as fresh herbs or microgreens, adding a modern touch. Ensure all components are served warm for optimal enjoyment. For portion control, consider serving alongside a fresh salad to balance the meal while keeping serving sizes in check.

Wine and Beverage Pairing

When it comes to wine pairings, a full-bodied red like a Cabernet Sauvignon or Malbec complements the rich flavors of oxtails beautifully. For a lighter option, consider a robust white wine like Chardonnay to balance the dish’s richness. Non-alcoholic alternatives could include sparkling water infused with citrus for a refreshing contrast. If you enjoy caffeinated beverages, a strong coffee pairs surprisingly well with the earthiness of the oxtails, making for an interesting dining experience.

Storage and Shelf Life

For optimal storage, cool the braised oxtails to room temperature before transferring them to airtight containers to prevent spoilage. Refrigerate for up to 3 days, or freeze for up to 3 months if making in advance. When reheating, slowly heat on the stove with a splash of broth to retain moisture. Signs of spoilage to watch for include off smells and texture changes. Always take caution and ensure food safety standards are met when handling leftovers.

Make Ahead Strategies

To maximize convenience, braise the oxtails a day in advance. This not only saves time but allows the flavors to develop extensively. Store the cooked oxtails in their braising liquid to keep them moist. When preparing garlic mashed potatoes, you can boil and mash them ahead of time, then warm with a touch of cream and butter before serving. For the asparagus, slice and prepare your garnishing elements a few hours prior for minimal day-of hassle. Ensure you reheat everything gently to maintain quality.

Scaling Instructions

Halving the recipe is simple; adjust ingredients accordingly while ensuring the same cooking times. To double or triple the recipe, consider using larger pots or multiple cookers to accommodate everything without compromising the cooking process. For doubling, keep an eye on seasoning levels as this may need adjusting. Adjust cooking times slightly as larger quantities require longer or more attention to avoid uneven cooking. Be mindful of storage, as larger portions may lead to less air exposure.

Nutritional Deep Dive

Braising oxtails offers a unique nutritional profile rich in collagen and protein, supporting both muscle recovery and joint health. The macro breakdown reveals a strong protein component from the meat, complemented by carbohydrates from the mashed potatoes. Micronutrient analysis shows ample potassium and vitamin C contributed by the asparagus. This dish can be a great addition to balanced diets, but moderation is key due to higher fat content. Managing portion sizes can assist in maintaining a healthy meal routine.

Dietary Adaptations

This recipe can be easily adjusted to fit various dietary needs. A vegan adaptation could substitute oxtails with a hearty portobello mushroom stew, adapting the braising method. For gluten-free diets, traditional ingredients work perfectly as they contain no gluten. Dairy-free individuals can swap regular cream with nut milk or coconut cream for the mashed potatoes. Low-carb adaptations could feature mashed cauliflower instead of potatoes, while ensuring the dishes remain rich and flavorful. These considerations ensure anyone can enjoy a version of this comforting meal.

Troubleshooting Guide

For texture issues, like tough oxtails, ensure they are braised sufficiently—cooking longer at low temperatures is key. If flavors feel off, balancing with additional salt or acidity may be beneficial. For inconsistent cooking temperatures, use a quality pot to maintain even heat distribution, avoiding hotspots. Should ingredient substitutions lead to flavor imbalances, consider enhancing the spices or aromatics to compensate. Lastly, if timing is a concern, preparing fewer elements or pre-preparing can alleviate rush while enriching the experience.

Recipe Success Stories

Community feedback often highlights the great adaptability of this recipe. Readers have successfully incorporated variations, such as Asian-inspired flavors, garnering excitement from family members. Adaptation stories showcase how families use local ingredients to create unique twists, making the dish their own. Suggestions from readers often include specific pairings or accompanying sides that elevate the meal even further. For photography enthusiasts, showcasing this dish in colorful plates has become a popular trend that channels its gourmet appeal.

Frequently Asked Questions

Can I use other cuts of beef for this recipe? Yes, you can substitute oxtails with cuts like brisket or beef shanks, which will still yield robust flavors but may have slight textural differences.

How do I store leftovers? Allow your leftovers to cool to room temperature, then transfer them to airtight containers. They can be stored in the fridge for about 3 days or frozen for up to 3 months.

Can I substitute garlic with other flavors? Absolutely! While garlic adds a unique flavor, other aromatics like shallots or leeks can be great alternatives.

How can I thicken the braising liquid? For a thicker sauce, you can add a cornstarch slurry towards the end of cooking or reduce the braising liquid over medium heat to concentrate flavors.

Can this recipe be prepared in advance? Yes! Preparing oxtails a day ahead allows flavors to deepen as they sit, enhancing the overall taste.

What sides pair best with braised oxtails? Common pairings include creamy mashed potatoes, polenta, or even roasted vegetables that balance the rich flavors of the dish.

How can I enhance the flavor of the mashed potatoes? Infusing your potatoes with herbs or utilizing roasted garlic instead of raw can provide an elevated taste.

Is this dish family-friendly? Yes, it’s an ideal family dish as it’s comforting and flavorful, appealing to a wide range of palates.

What’s the best way to check the doneness of oxtails? Oxtails are done when they are fork-tender, meaning the meat should easily pull away from the bone.

Can I use a slow cooker for this recipe? Definitely! Braising in a slow cooker will help tenderize the meat beautifully – just make sure to sear the oxtails first for maximum flavor.

Additional Resources

For those interested in furthering their cooking skills, consider exploring related recipes such as Beef Bourguignon or Short Ribs, which emphasize similar cooking techniques. Additionally, our technique guides on braising and mashing can bolster your confidence in the kitchen. For ingredient insights, check out our resource on selecting quality meats and produce that’s readily available. Lastly, seasonal variations offer ideas for adapting the dish according to what’s fresh.

Join the Conversation

We encourage you to share your kitchen experiences and variations of this recipe on social media! Your photographs and reviews not only inspire others but also create a community around shared culinary adventures. Feel free to reach out with suggestions, as we love seeing how everyone puts their spin on these beloved dishes, engaging and learning together throughout our cooking journeys.

The Recipe

Braised Oxtails

Serves: 4

Prep Time: 20 mins

Cook Time: 3 hrs 30 mins

Total Time: 3 hrs 50 mins

Kitchen Equipment Needed

  • Braising pot or Dutch oven
  • Pot for boiling potatoes
  • Hand mixer or potato ricer
  • Heat-resistant spatula

Ingredients

  • 2 lbs oxtails
  • 1 onion, chopped
  • 4 cloves garlic, minced
  • 2 cups beef stock
  • 1 cup dry red wine
  • 1 tbsp tomato paste
  • 2 bay leaves
  • 1 tsp thyme
  • Salt and pepper to taste
  • 2 lbs potatoes, peeled and chopped
  • ½ cup cream
  • ½ cup butter
  • 1 lb asparagus, trimmed
  • Olive oil, for drizzling
  • Optional: shrimp for serving with grits

Directions

  1. Preheat your oven to 350°F (175°C).
  2. In a braising pot, heat oil over medium-high heat. Brown the oxtails on all sides and set aside.
  3. Add the chopped onion and garlic to the pot and sauté until translucent.
  4. Stir in the tomato paste and cook for an additional minute before adding wine to deglaze the pot.
  5. Return the oxtails to the pot, add stock, bay leaves, thyme, salt, and pepper.
  6. Cover and transfer to the oven. Braise for 3 hours or until tender.
  7. Meanwhile, boil the potatoes until fork-tender, drain them, and mash with butter, cream, salt, and pepper.
  8. To roast asparagus, drizzle with olive oil, season with salt, and bake in the oven for the last 15 minutes of braising.
  9. To serve, plate the oxtails on a mound of mashed potatoes, with roasted asparagus on the side. Enjoy!

Recipe Notes

  • For added flavor, marinate the oxtails overnight with herbs and spices of your choice.
  • Feel free to add root vegetables to the braising liquid for extra substance and flavor.
  • Garnish with fresh parsley for an appealing presentation.
  • Experiment with different wines for varied flavor profiles.

Delicious Herb-Crusted Roast Lamb with Lemon and Potatoes Recipe

Herb-Crusted Roast Lamb with Lemon and Potatoes: A Flavorful Feast

⚖️
Difficulty
Medium

⏲️
Prep Time
15 mins

🕒
Cook Time
1 hour 30 mins

⏱️
Total Time
1 hour 45 mins

🍽️
Servings
4-6

Discover the tantalizing flavors of our Herb-Crusted Roast Lamb with Lemon and Potatoes recipe. This dish marries tender lamb with a zesty herb crust, offering an aromatic experience that excites the palate. The juicy meat, perfectly seasoned with fresh herbs and zesty lemon, complements the golden, crisp potatoes, creating a harmonious balance of taste and texture. Perfect for a family gathering or a festive occasion, this recipe will leave your guests impressed and craving more.

With every bite, you’ll experience the depth of flavors achieved through the careful selection of herbs—like rosemary and thyme—that are sprinkled generously over the lamb. Roast lamb has long been a celebrated dish around the world, representing comfort and tradition. Pairing it with roasted potatoes brings the meal together, ensuring it is as satisfying to the eyes as it is to the palate. Let’s delve into the details of preparing this exquisite dish.

Quick Recipe Highlights

  • Flavor Profile: The herb-crusted lamb offers a savory and aromatic experience, enhanced by the citrus brightness of lemon.
  • Texture: Indulge in the tender, juicy lamb juxtaposed with the crispy, buttery potatoes for a delightful mouthfeel.
  • Aroma: The fragrant combination of fresh herbs and roasting lamb fills your kitchen with an irresistible scent.
  • Visual Appeal: A golden-brown crust on the lamb adds a beautiful contrast to the vibrant green herbs and the fluffy potatoes.
  • Skill Level Needed: While the recipe has a few steps, the cooking techniques are manageable for home cooks.
  • Special Equipment: A roasting pan and meat thermometer ensure perfect cooking results.

Recipe Overview

  • Difficulty Level: This roast lamb recipe sits at a medium difficulty, perfect for cooks who are a bit adventurous or looking to refine their skills.
  • Category: Suitable for dinner parties or holiday gatherings, this dish stands out as a centerpiece, delivering joy and satisfaction.
  • Cuisine: The origins of this recipe lie in Mediterranean cuisine, where lamb is a star ingredient, often paired with fresh herbs and citrus.
  • Cost: With manageable cost, the primary ingredients are accessible, making it a smart choice for special occasions.
  • Season: Roasted lamb is especially beloved during spring and Easter celebrations, symbolizing renewal and feast.
  • Occasion: Ideal for Sunday dinners or festive celebrations, impress your guests with this elegant dish.

Why You’ll Love This Recipe

This herb-crusted roast lamb delivers a mouthwatering taste and luxurious texture that you and your guests will cherish. The marination process allows flavors to penetrate deeply into the meat, elevating every bite. The lamb’s tenderness, complemented by the crispy potatoes, creates a dining experience that tantalizes the senses.

Another reason to love this recipe is its convenience. The prep time is minimal, allowing for a stress-free cooking experience. While the lamb roasts, you can easily prepare side dishes or set the table, making it a well-rounded option for home chefs.

Nutritionally, lamb is a fantastic source of protein and essential vitamins and minerals, such as B12, zinc, and iron. Pairing with hearty potatoes ensures you have a filling and satisfying meal without sacrificing nutrition.

This dish shines in social settings, perfect for bringing people together. Sharing a roast lamb meal fosters warmth and connection, often accompanied by delightful discussions and laughter around the table.

Cost-effectiveness is also key. Utilizing a single protein source and straightforward ingredients makes this recipe budget-friendly, despite its gourmet flair. Impress family and friends without breaking the bank!

Historical Background and Cultural Significance

The history of roasting lamb dates back centuries, with roots in Ancient civilizations where lamb was considered a delicacy. Many cultures recognize the lamb as a symbol of prosperity and abundance, often served during significant celebrations.

Culturally, lamb holds a revered spot in Mediterranean cuisine, reflecting rich traditions of pastoral life where sheep farming flourished. In many countries, including Greece and Italy, lamb plays a prominent role in holiday feasts and family gatherings.

This recipe’s evolution showcases how culinary traditions adapt over time. Initially simple, roasting techniques have evolved to incorporate various herbs and flavors, enhancing the taste and presentation of the dish.

Regional variations abound, with countries putting their unique spins on roast lamb. From fragrant Moroccan spices to herbaceous Italian styles, each culture brings something special, celebrating the versatility of this beloved meat.

Ingredient Deep Dive

Lamb: A foundational ingredient, lamb is rich in flavor and provides numerous health benefits including high protein content and vital nutrients like iron and zinc. When selecting lamb, look for cuts that are firm with a deep red color, and store it properly in the refrigerator or freezer to maintain freshness. Substitutions for lamb could include beef or chicken, but these will yield different flavor profiles.

Herbs: Fresh herbs like rosemary and thyme complement the lamb beautifully, providing aromatic qualities. These herbs have long been celebrated for their medicinal benefits, offering anti-inflammatory properties. When choosing herbs, opt for vibrant, fresh leaves and store them in the refrigerator. For substitutions, dried herbs can be used, but reduce the quantity as they are more concentrated in flavor.

Potatoes: Potatoes serve as a classic side to absorb the flavors of the lamb. They are rich in potassium and carbohydrates, making them satisfying. For the best results, select firm potatoes and store them in a cool, dark place. Sweet potatoes can be a great alternative, adding a health twist and natural sweetness to the meal.

Lemon: The addition of lemon elevates the dish with its zesty brightness, enhancing flavor. Lemons are packed with vitamin C and antioxidants, promoting overall health. Choose bright yellow lemons with firm skin for optimal freshness. Such citrus can be effectively replaced with other tart fruits like limes or oranges for a different flavor profile.

Common Mistakes to Avoid

  • Not seasoning the lamb adequately can lead to a bland dish. Always season well ahead of cooking to ensure flavor permeates the meat.
  • Overcooking the lamb results in a tough texture. Use a meat thermometer to check for doneness, aiming for an internal temperature of 145°F for medium-rare.
  • Using dried herbs instead of fresh can dull the flavor. Fresh herbs bring a vibrant quality to the dish; if using dried, adjust the quantities.
  • Failing to rest the lamb after cooking leads to juices running out. Resting allows the juices to redistribute within the meat.
  • Not preheating the oven adequately can affect the cooking time and final result. Always ensure your oven is properly preheated to the desired temperature.
  • Piling potatoes on top of the lamb prevents even cooking. Arrange them around the meat for even roasting.
  • Skipping the marinating step can lead to a less flavorful experience. Marinating brings depth and richness to the dish.
  • Using the wrong cut of lamb can result in a less desirable texture. Opt for cuts suitable for roasting, like leg or rack of lamb.
  • Cooking potatoes without proper oil can lead to sticking. A light coating of oil ensures a crispy exterior.
  • Not cleaning your herbs properly can lead to unwanted grit. Always rinse and dry fresh herbs before using them.

Essential Techniques

Marinating: This technique is crucial as it allows the meat to absorb flavors, enhancing the taste. Aim to marinate the lamb for at least an hour, or ideally overnight. Avoid overly acidic marinades, as they can break down the meat’s fibers too much.

Roasting: Proper roasting brings out the lamb’s natural flavors. To master this, establish the right oven temperature and ensure even cooking by rotating the pan as needed. Keep an eye on the visual cues; the crust should be golden brown.

Seasoning: Effective seasoning is key to maximizing flavor. A mix of kosher salt and fresh herbs creates a delicious crust. Be generous, as this not only flavors the meat but enhances overall dish presentation.

Resting: Post-cooking, resting the lamb before carving allows juices to redistribute, ensuring a moist final product. Aim for a rest period of 10-15 minutes. Cover loosely with foil to keep it warm without steaming.

Pro Tips for Perfect Herb-Crusted Roast Lamb with Lemon and Potatoes

1. Use a high-quality cut of lamb for the best flavor and texture; choose fresh cuts from a reliable butcher.

2. Adjust the herb mixture based on personal preferences; try adding mint for a fresh pop.

3. Pre-squeeze the lemons before cooking to enhance the amount of juice released when baking.

4. For an extra crispy potato texture, parboil them before roasting; this helps to create edges that brown beautifully.

5. Consider using a dry rub of spices if you prefer a different flavor profile—smoked paprika or cumin can add depth.

6. Keep the skin on your potatoes for added nutrients and texture; they’ll become crispier in the oven.

7. Serve with a homemade gravy or jus to elevate the dining experience further.

8. Pair the meal with seasonal vegetables for a complete, well-rounded plate.

Variations and Adaptations

Consider regional variations such as Greek-style lamb, seasoned with oregano and served with tzatziki. For seasonal adaptations, incorporate root vegetables in fall or spring vegetables like asparagus for freshness. Dietary modifications can include using a herb crust that is gluten-free, or employing substitutions for those who lean vegetarian.

Flavor variations can also be achieved by experimenting with different herbs or adding a spicy element, like chili flakes, to the crust. For those who prefer a softer texture, consider wrapping the roast in parchment paper during cooking, allowing for more moisture retention. Presentation alternatives, such as serving on a bed of sautéed greens, can elevate the dish visually.

Serving and Presentation Guide

Plating can be executed elegantly by slicing the lamb into thick, juicy pieces and artfully arranging them on a serving dish, surrounded by the roasted potatoes. Garnishing with fresh herbs or lemon wedges can enhance the visual appeal significantly. Traditional accompaniments like mint sauce or gravy add layers of flavor, while modern serving suggestions may include a light salad on the side.

Consider temperature when serving; ensure the lamb remains warm without overcooking. Portion control is essential, so use a sharp knife for clean cuts and even portions, ensuring all guests receive a share of both lamb and potatoes.

Wine and Beverage Pairing

When it comes to wine pairings, a robust red wine, such as a Cabernet Sauvignon or a Syrah, complements the rich flavors of the herb-crusted roast lamb superbly. For white wine enthusiasts, a Chardonnay with oak undertones can provide a delightful contrast. Offering non-alcoholic alternatives like sparkling water with lemon creates a refreshing palate cleanser.

For a lovely end to the meal, consider pairing with a strong coffee or a light herbal tea, subtly hinting at the flavors present in the dish while keeping the experience cohesive.

Storage and Shelf Life

To ensure longevity, store leftover lamb in an airtight container in the refrigerator. It can typically last for 3-4 days before showing signs of spoilage, such as off-smells or discolorations. For longer storage, consider freezing the lamb for up to 3 months. When reheating, use a low temperature to prevent drying out, and be sure to add a splash of broth to retain moisture.

Make Ahead Strategies

You can marinate the lamb up to 24 hours in advance, allowing the flavors to deeply infuse the meat. The potatoes can be prepped by washing and chopping them the day before, keeping them submerged in water to avoid browning. Assemble all other ingredients in advance, so everything is ready to go when you’re prepared to cook.

Scaling Instructions

Halving the recipe is simple; simply reduce each ingredient’s quantity accordingly. For those looking to serve a larger group, doubling or even tripling the recipe requires careful monitoring of both cooking times and oven space. Ensure equipment like roasting pans are appropriately sized, and make adjustments to cooking times while keeping an eye on doneness.

Nutritional Deep Dive

This dish offers a balanced macro breakdown, providing a healthy source of protein from the lamb, complemented by the carbohydrates from the potatoes. The vitamin and mineral content, particularly from the lemon and herbs, enhances the dish’s overall health benefits, including digestive support from dietary fiber.

Dietary Adaptations

For gluten-free enthusiasts, this recipe naturally fits into the diet as no grains are utilized. Dairy-free options can be maintained by avoiding creamy sauces or sides. For those seeking a low-carb twist, consider substituting potatoes with cauliflower alternatives while keeping the lamb as the star of the plate. Each specific diet can enjoy a delightful, satisfying meal without compromising on flavor.

Troubleshooting Guide

If texture issues arise, such as a tough lamb, ensure that the cut is appropriate for roasting, and that resting time is applied post-cooking. If flavor becomes imbalanced, consider adding finishing salt or a squeeze of lemon juice to brighten the dish. For temperature challenges, consistent use of a thermometer will help in achieving the desired doneness without overcooking.

Recipe Success Stories

Community feedback has shown how well this dish resonates during gatherings, with several sharing encouragement from loved ones after preparing it. Adapting the recipe to fit personal taste preferences often leads to delightful variations, with readers noting how their unique twists brought new life to this classic dish.

Frequently Asked Questions

How do I know when the lamb is done? The best way to determine doneness is through a meat thermometer. Aim for an internal temperature of 145°F for medium-rare. Allow the meat to rest for about 10 minutes before cutting to retain juices.

Can I prepare this dish in advance? Yes! You can marinate the lamb a day ahead. However, it’s recommended to roast it fresh on the day of serving for the best texture and flavor.

What if I can’t find fresh herbs? Dried herbs can be used as a substitute; however, reduce the amount by approximately one-third, as they are more concentrated.

What sides pair well with this dish? Besides roasted potatoes, vegetables like green beans, asparagus, or a fresh salad can create a well-rounded meal.

Can I substitute another meat? Yes, you can substitute lamb with chicken or beef, but do adjust the cooking time according to the cut used.

How do I store leftovers? Place leftover lamb in an airtight container and refrigerate for 3-4 days. For longer storage, you may freeze it for up to 3 months.

Is there a vegetarian version of this dish? A vegetarian version can be created by using roasted vegetables like eggplant or a plant-based meat alternative, seasoned similarly with herbs.

How can I make the potatoes extra crispy? Pre-boiling the potatoes before roasting can create a crispy exterior. Ensure they’re well-oiled and spaced out on the baking tray for optimal roasting.

What wine pairs best with this meal? A robust red wine, such as Cabernet Sauvignon, complements the rich flavors of lamb beautifully. Meanwhile, a crisp white wine can provide a refreshing contrast.

Can I use a slow cooker for this recipe? While traditional methods yield excellent results, adapting this meal for a slow cooker is feasible. Cook on low for 6-8 hours for melt-in-your-mouth lamb.

Additional Resources

For those inspired by this dish, consider exploring related recipes that highlight seasonal ingredients or focus on roasting techniques. Technique guides on marinating or herb selection can enhance your skills further, while equipment recommendations can make your cooking adventures even smoother.

Join the Conversation

Share your culinary creations online! Tag us on social media with your photography tips, variations you’ve tried, and your personal take on the recipe. Engaging with our community brings added joy as we all discover new flavors together. Your feedback and recipe reviews inspire us to create more delicious dishes for you to enjoy.

The Recipe

Herb-Crusted Roast Lamb with Lemon and Potatoes

Serves: 4-6

Prep Time: 15 mins

Cook Time: 1 hour 30 mins

Total Time: 1 hour 45 mins

Kitchen Equipment Needed

  • Roasting pan
  • Meat thermometer
  • Sharp knife
  • Mixing bowl
  • Citrus juicer (optional)

Ingredients

  • 1 boneless leg of lamb (3-4 pounds)
  • 1/4 cup olive oil
  • 2 tablespoons fresh rosemary, chopped
  • 2 tablespoons fresh thyme, chopped
  • 3 cloves garlic, minced
  • Juice and zest of 1 lemon
  • Salt and pepper, to taste
  • 2 pounds potatoes, cut into wedges
  • 1 teaspoon paprika (optional)

Directions

  1. Preheat your oven to 375°F (190°C).
  2. In a mixing bowl, combine olive oil, chopped herbs, minced garlic, lemon juice, lemon zest, salt, and pepper to create the marinade.
  3. Rub the marinade all over the lamb, ensuring it coats evenly. Let the lamb sit at room temperature for 30 minutes.
  4. While the lamb is marinating, prepare the potatoes by tossing them with olive oil, salt, pepper, and paprika if using.
  5. Place the lamb in a roasting pan and arrange the potatoes around it.
  6. Roast for approximately 1 hour and 30 minutes, or until it reaches your desired doneness.
  7. Remove the lamb from the oven, cover it with foil, and let it rest for 10-15 minutes before slicing.
  8. Serve the lamb with the roasted potatoes and enjoy!

Recipe Notes

  • For extra flavor, consider adding a splash of white wine to the roasting pan.
  • The recipe can be adjusted to include seasonal vegetables; feel free to add carrots or onions alongside the potatoes.
  • This dish pairs well with a side of minted yogurt or a robust gravy for added richness.