Irresistibly Cheesy Chicken Parmesan Calzone: A Flavorful Twist on Tradition

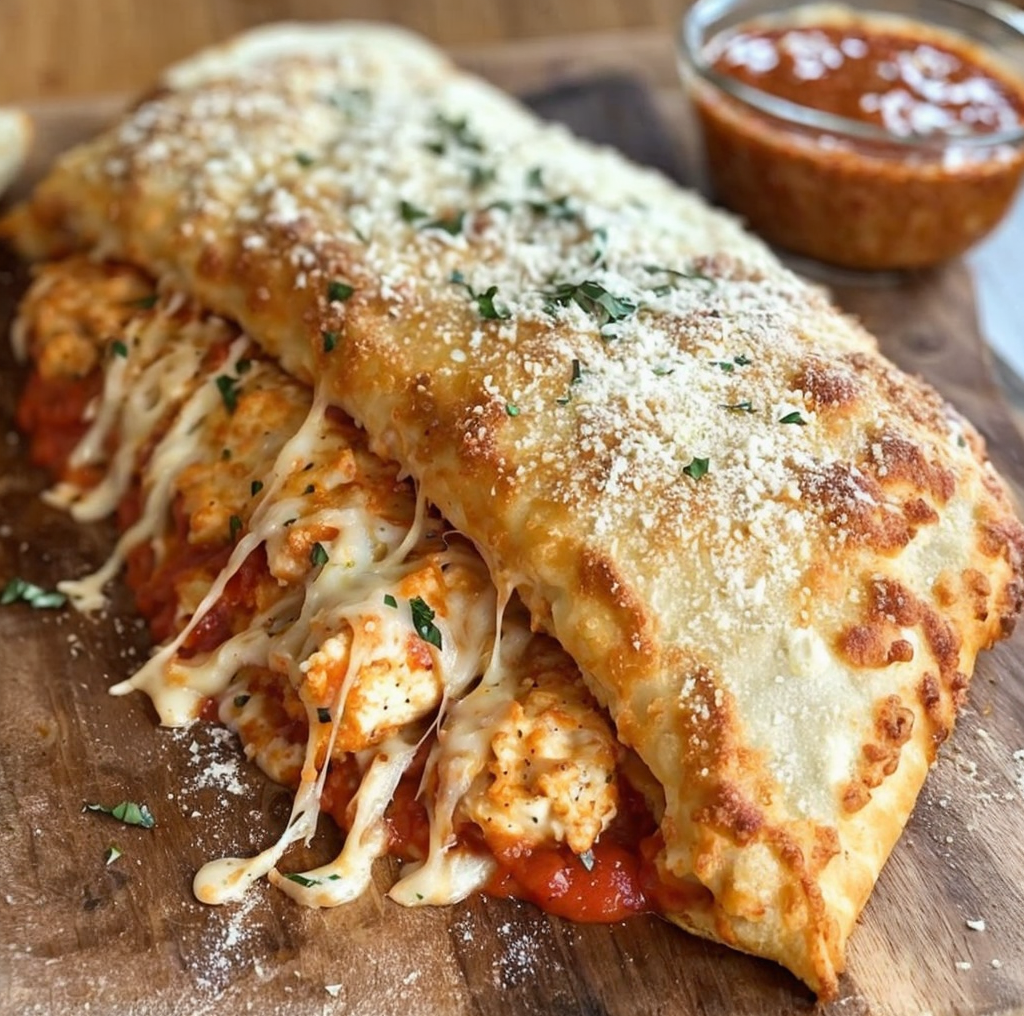
Cheesy Chicken Parmesan Calzone: A Comforting Delight

⚖️
Difficulty
Medium

⏲️
Prep Time
30 mins

🕒
Cook Time
25 mins

⏱️
Total Time
55 mins

🍽️
Servings
4

The Cheesy Chicken Parmesan Calzone is a delicious twist on the classic Italian-American dish that combines the comforting flavors of chicken parmesan wrapped in golden, flaky pizza dough. This calzone is filled with tender chicken, rich tomato sauce, and a gooey mozzarella cheese that melts in every bite. Perfect for family dinners or a hearty snack, this dish brings a cozy, homemade feel straight to your kitchen.

Imagine biting into a warm pocket of crispy dough, only to discover a cheesy burst of Italian flavor inside. The perfect harmony of spices in the chicken and the tangy marinara sauce make each mouthful a memorable experience. The Cheesy Chicken Parmesan Calzone is not just a meal; it’s a flavorful journey that transports you to a comforting place, reminding you of your favorite Italian diner visits.

Whether you’re cooking for friends or enjoying a quiet evening at home, this calzone will provide a comforting and fulfilling culinary experience. Let’s dive into the details of what makes this recipe unforgettable and how you can effortlessly bring it to life in your kitchen.

Quick Recipe Highlights

  • Flavor Profile: The Cheesy Chicken Parmesan Calzone offers a delightful mix of savory and cheesy flavors combined with the slight acidity of tomato sauce.
  • Texture: Enjoy a wonderful contrast between the crispy, flaky exterior and the creamy, cheesy interior packed with tender chicken chunks.
  • Aroma: As it bakes, this calzone fills your kitchen with the enticing aromas of melted cheese and herbs.
  • Visual Appeal: Its golden-brown crust envelops a bubbling, cheesy filling, creating a visually appetizing effect.
  • Skill Level Needed: A moderate level of baking experience is useful to ensure the dough is perfectly sealed and cooked evenly.
  • Special Equipment: A pizza stone or baking sheet is needed to bake this calzone to perfection.

Recipe Overview

  • Difficulty Level: Moderate, as it requires bread dough preparation and handling, which might need some practice for beginners.
  • Category: This recipe falls under the category of comfort foods and Italian-American cuisine, perfect for lunch or dinner.
  • Cuisine: Rooted in Italian-American culinary traditions, this dish combines a staple Italian recipe with a convenient calzone format.
  • Cost: Affordable, with basic ingredients that are budget-friendly and widely available.
  • Season: Best enjoyed throughout the year since its hearty and comforting flavors suit any weather.
  • Occasion: Ideal for family meals, casual gatherings, or as a tasteful addition to a potluck.

Why You’ll Love This Recipe


The Cheesy Chicken Parmesan Calzone is a perfect blend of rich, savory, and tangy flavors that make it a crowd-pleaser. The crispy, golden dough wrapped around a deliciously gooey interior promises a delightful culinary experience with every bite. Its convenience as a hand-held meal makes it a versatile option for any dining scenario, whether it’s a casual dinner or a grab-and-go lunch.

Beyond its incredible taste, this calzone is easy to prepare with simple steps that achieve a restaurant-quality dish at home. From seasoned home cooks to curious beginners, anyone can master this recipe with ease. The nutritional benefits of chicken and the opportunity to sneak in some veggies make it an all-rounded meal that caters to various dietary preferences.

Socially, hosting gatherings with Cheesy Chicken Parmesan Calzones as the centerpiece allows for interactive and engaging dining, with everyone enjoying the flavors together. Its adaptability to scaling up for large groups without extraordinary effort makes it a great choice for entertaining on a budget.

Historical Background and Cultural Significance


Calzones originated in Naples, Italy, in the 18th century as a portable version of pizza. Designed as an easy-to-eat street food, calzones became popular for their convenience and tasty fillings. In Italian culture, the calzone stands as a testament to culinary innovation, adapting traditional pizza recipes into an easily transportable meal.

Over time, the dish migrated to the United States, where Italian immigrants introduced calzones to the American palate. The Cheesy Chicken Parmesan Calzone is a perfect illustration of how American ingenuity has married Italian traditions with local food culture. Regional variations have flourished, each featuring local meats, cheeses, and vegetables, providing a taste of both heritage and innovation.

Ingredient Deep Dive


### Chicken
Chicken serves as the nutritious centerpiece of this calzone, providing high-quality protein and a myriad of vitamins and minerals essential for everyday health. To get the best flavor, opt for fresh, free-range chicken breasts. Store them in the coldest part of your refrigerator to maintain freshness and prevent spoilage.

### Mozzarella Cheese
Mozzarella cheese brings the iconic stretch and creaminess to this calzone. Known for its subtle milky flavor, mozzarella is an Italian cheese staple. Select mozzarella balls or pre-shredded versions available at most supermarkets for convenience. Keep your mozzarella refrigerated in an airtight container for maximum freshness.

### Pizza Dough
The dough acts as both a container and a canvas for the calzone flavors. Homemade or store-bought options work well, depending on your time and expertise level. For optimal results, choose a dough made with high-protein flour to achieve the right elasticity. Store unused dough in the fridge or freeze for later use.

Common Mistakes to Avoid

  • Overloading the calzone can cause it to burst during baking. Keep an eye on portioning the filling.
  • Undercooking the filling may leave the chicken raw. Ensure the chicken is cooked through before adding it to the calzone.
  • Sealing the edges improperly can lead to leaks. Press securely and crimp the edges well.
  • Ignoring dough temperature adjustments can result in a tough texture. Bring the dough to room temperature before use.
  • Skipping parchment paper or a baking stone can prevent even cooking. Use these tools for better results.
  • Opening the oven door too often may cause uneven cooking temperatures.
  • Using too much flour can make the dough dry. Dust sparingly when rolling out the dough.
  • Neglecting to preheat the oven can lead to inconsistent baking and uneven crust color.
  • Baking until crust darkens excessively will give a bitter taste. Aim for a golden-brown finish.
  • Mismanaging yeast quantity or quality can cause dough to rise incorrectly. Follow yeast package instructions carefully.

Essential Techniques


Rolling out the dough to an even thickness ensures the calzone bakes uniformly without any burnt or undercooked spots. Using a rolling pin, gently spread the dough from the center outward while checking thickness consistency.

Sealing the calzone is vital to avoid leaks during baking. After folding the dough, press the edges together firmly and twist or crimp using your fingers or a fork for added security. This keeps the luscious fillings inside and prevents a mess in your oven.

Pro Tips for Perfect Cheesy Chicken Parmesan Calzone


Ensure the chicken is well-seasoned before assembling your calzone to enhance the overall flavor profile. Including herbs like oregano or basil provides an aromatic boost that complements the cheese perfectly.

Allow your dough to rest for at least 20 minutes after rolling for additional rise and improved texture. This extra time helps the gluten relax, making the dough easier to shape and less prone to breaking.

Resist the urge to over-stuff your calzone. Remember that less is more to prevent a messy, poorly contained filling during the bake.

Add a layer of egg wash over the crust before baking for that desirable golden sheen and an additional crunch factor.

Consider preparing your tomato sauce ahead of time by simmering canned tomatoes with garlic, olive oil, and herbs to intensify the flavors.

Ensure the mozzarella cheese is freshly grated to maximize meltability and avoid store-bought fillers that hinder a smooth cheese stretch.

Freeze any leftovers, wrapped individually, to maintain freshness and ease of reheating later. Simply bake from frozen at a slightly reduced temperature.

Variations and Adaptations


Experiment with regionally inspired versions by incorporating ingredients like prosciutto, roasted red peppers, or sun-dried tomatoes for Italian authenticity. To adapt to seasonal changes, consider adding spinach or kale in the cooler months, switching to zucchini or fresh basil as temperatures rise.

For those with dietary restrictions, turn this calzone into a gluten-free delight by using gluten-free dough. For a vegan alternative, replace chicken with tofu and use vegan cheese options. Adjust the fillings accordingly for a seamless transition without compromising flavor.

Spice up your calzone with a touch of chili flakes or jalapenos for a fiery kick. Alternatively, replace traditional mozzarella with blue cheese for a more robust, tangy flavor contrast.

Serving and Presentation Guide


For an attractive presentation, slice the calzones diagonally with a sharp knife before serving, showcasing the rich, cheesy interior. Accompany plates with colorful salads, dressings, and aromatic herbs like parsley or basil for additional color and freshness.

While classic Italian antipasti such as olives or marinated artichokes make excellent accompaniments, consider serving the calzone with a simple side of marinara sauce for dipping. This not only keeps your meal cohesive but also enhances the existing flavors in the calzone.

Wine and Beverage Pairing


Pair this Cheesy Chicken Parmesan Calzone with a glass of Chianti, a medium-bodied red with hints of cherry and spice that complement the savory calzone. If you prefer white wine, opt for a Pinot Grigio, offering bright acidity to cut through the rich cheese.

Non-alcoholic options include Italian soda with lemon or lime as a refreshing balance to temper the calzone’s savory notes. For a coffee pairing, consider a smooth espresso post-meal for a classic Italian finish.

Storage and Shelf Life


Store any leftover calzones in an airtight container in the refrigerator for up to three days. Reheat by placing on a baking sheet in a preheated oven at 350°F for 10-15 minutes to regain crispness without drying it out.

Freeze unbaked or fully cooked calzones individually wrapped for up to three months. Thaw overnight in the refrigerator or bake from frozen at a slightly lower temperature to ensure even baking.

Make Ahead Strategies


This Cheesy Chicken Parmesan Calzone can be made ahead by preparing the dough and filling separately, storing them until needed. Roll out and assemble the calzone just before baking to retain freshness and texture.

If prepping ahead, seal the calzones and store on a baking sheet in the fridge for up to a day before cooking. Ensure the temperature is right before baking to prevent any undue loss of quality.

Scaling Instructions


When halving this recipe, use the same baking times for a single calzone. Scaling up involves adjusting ingredient quantities proportionally while maintaining the dough’s thickness and division.

Larger quantities may require additional baking sheets or oven space to prevent overcrowding and ensure even cooking. Adapt preparation times for larger-scale batches, especially in the dough proofing stages.

Nutritional Deep Dive


This recipe balances essential macronutrients with its chicken, a lean protein source, complemented by cheese providing ample calcium. Keep portion sizes mindful as part of a balanced diet to enjoy its benefits without excess.

For those monitoring dietary intake, substituting some ingredients with low-fat or reduced-sodium variations can maintain the flavor profile while adapting to health needs.

Dietary Adaptations


Adapt this calzone effortlessly for gluten-free diets by sourcing gluten-free pizza dough. Replace cheese with lactose-free options for those avoiding dairy without sacrificing cheesy goodness.

Vegan adaptations include plant-based proteins like tempeh or jackfruit paired with vegan cheeses, adjusting spices to maintain a flavorful profile altogether free from animal products.

Troubleshooting Guide


For issues with dough texture, ensure it is well-kneaded and allowed to proof sufficiently. Too tough or chewy dough often stems from inadequate resting times or overly hard kneading.

Flavors unbalanced? Adjust seasoning with herbs or salt as needed before assembly. Utilization of great quality tomato sauce significantly impacts the overall taste, enhancing or compensating for other flavor elements.

Dry or undercooked chicken concerns can be addressed by pre-cooking chicken pieces ahead and tasting before integrating. Ensuring a minimal but equal dough spread across all portions aids in cooking consistency.

Recipe Success Stories


Our readers love experimenting with variations such as adding caramelized onions or roasted peppers for a sweeter note! Many have successfully tailored this recipe using sourdough drizzled with garlic butter at the finish line for enhanced indulgence.

Consider crafting your unique spin on this versatile recipe and sharing your success with our community. Your feedback not only inspires others but also highlights the power of creativity in cooking.

Frequently Asked Questions

Q: Can I use pre-cooked chicken for this recipe?

A: Absolutely! Pre-cooked chicken cuts down on prep time and ensures your chicken is fully done before stuffing the calzone. Just ensure it’s well-seasoned.

Q: What kind of cheeses work best?

A: Mozzarella is classic, but feel free to blend with other melty varieties like provolone or Monterey Jack for varied flavor experiences.

Q: Can the calzone be made with a gluten-free crust?

A: Yes, simply use a gluten-free pizza dough alternative and follow the recipe as usual for delicious results.

Q: How should leftovers be stored?

A: Allow calzones to cool completely before wrapping tightly and refrigerating. They can also be frozen with minimal quality loss.

Q: Can I use pre-made dough?

A: Sure! Pre-made dough is perfect for saving time, just ensure it’s thawed if frozen and brought to room temperature for easy handling.

Q: What’s the best vegetarian version of this calzone?

A: Substitute chicken with thinly sliced mushrooms or eggplant for a hearty vegetable calzone. Add more cheese or nuts for added texture.

Q: How should I serve the calzone?

A: Serve with a side salad and marinara sauce for dipping, or pair with a simple garlic bread for a complementary meal.

Q: Does the calzone need to be egg-washed?

A: An egg wash provides a glossy, golden finish but isn’t necessary if you’re avoiding eggs. It purely affects aesthetics.

Q: Are there any recommended wine pairings?

A: A full-bodied red, such as a Chianti, works well to balance the savory richness of the calzone.

Q: Are there make-ahead tips?

A: Pre-assemble calzones and refrigerate overnight, baking fresh the day of serving for a convenient, stress-free meal.

Additional Resources


Explore similar recipes on our blog such as Mouthwatering Italiano Mozzarella Stuffed Breadsticks, and discover specific tips from our dough-rolling guide for perfectly round calzone bases. Dive into our ingredient insight articles designed to empower your culinary journey with knowledge about fresh produce selection and preservation.

Join the Conversation


Experience the joy of cooking by actively engaging with our community. Follow us on social media to share your adaptation of the Cheesy Chicken Parmesan Calzone. Submit reviews, post your pictures, and discuss successful variations with us—transforming this platform into your go-to culinary discussion space. Explore feedback and gain insights while creating delectable memories one recipe at a time.

The Recipe

Cheesy Chicken Parmesan Calzone

Serves: 4

Prep Time: 30 mins

Cook Time: 25 mins

Total Time: 55 mins

Kitchen Equipment Needed

  • Rolling pin
  • Baking sheet or pizza stone
  • Mixing bowls
  • Cheese grater

Ingredients

  • 2 chicken breasts, cooked and cubed
  • 1 cup marinara sauce
  • 2 cups mozzarella cheese, shredded
  • 1 pizza dough, homemade or store-bought
  • 1 tablespoon olive oil
  • 1 teaspoon Italian seasoning
  • 1 egg, beaten (optional for egg wash)

Directions

  1. Preheat the oven to 375°F (190°C). If using, heat your pizza stone simultaneously.
  2. Roll out the pizza dough on a floured surface into a large circle or oval, about 1/4 inch thick.
  3. On one half of the dough, layer the cooked chicken, marinara sauce, mozzarella cheese, and sprinkle with Italian seasoning.
  4. Fold the dough over the filling and press the edges firmly to seal, using a fork or twisting method.
  5. Place calzone on a baking sheet or preheated pizza stone. Brush with olive oil or egg wash for a golden crust.
  6. Bake for 25-30 minutes until the crust is golden brown and crispy.
  7. Allow to cool slightly before slicing and serving with additional marinara sauce or as desired.

Recipe Notes

  • Use leftover rotisserie chicken to save time.
  • Experiment with different fillings, such as spinach or mushrooms, for added variety.
  • Calzones can be made in smaller individual sizes for personalized servings.

Irresistibly Delicious Chinese Pepper Steak with Onions Recipe

Sizzling Chinese Pepper Steak with Onions: A Flavorful Delight

⚖️
Difficulty
Easy

⏲️
Prep Time
15 mins

🕒
Cook Time
20 mins

⏱️
Total Time
35 mins

🍽️
Servings
4

Savory, spicy, and absolutely mouthwatering, this Sizzling Chinese Pepper Steak with Onions is a dish that captures the essence of authentic Chinese cuisine. The bold flavors of soy sauce, garlic, and ginger come alive as they meld with the tender strips of beef and the crisp, sweet onions. Each bite delivers a satisfying medley of salty, sweet, and umami flavors that promise to delight your taste buds.

The magic of Sizzling Chinese Pepper Steak with Onions lies in its simplicity. This culinary masterpiece is perfect for both novice and experienced cooks looking to bring the taste of a Chinese restaurant into their home kitchen. With just a handful of ingredients, this recipe creates an impressive dish that’s sure to become a family favorite. The hearty combination of steak and vegetables makes it perfect for any occasion, whether it’s a quick weeknight meal or an impressive offering for guests.

Quick Recipe Highlights

  • Flavor Profile: The dish offers a harmonious blend of savory soy sauce, pungent garlic, and aromatic ginger, all balanced with a mild heat from the peppers.
  • Texture: Expect a delightful crunchy contrast from the caramelized onions and peppers against the tender, juicy steak slices.
  • Aroma: As it sizzles, your kitchen will be filled with the enticing aroma of soy-garlic glaze mingling with the sweet scent of peppers and onions.
  • Visual Appeal: The vibrant colors of the red and green peppers offer a stunning contrast to the rich, brown hues of the steak.
  • Skill Level Needed: Suitable for cooks of all levels, using straightforward techniques to bring the dish to life with impressive results.
  • Special Equipment: A wok or a large skillet is ideal for achieving the perfect sear without overcooking the ingredients.

Recipe Overview

  • Difficulty Level: This recipe is classified as easy, requiring minimal cooking techniques while providing forgiving steps perfect for beginners.
  • Category: It falls under the category of quick-and-easy weeknight dinners, ideal for anyone short on time but not willing to compromise on taste.
  • Cuisine: Rooted in Chinese culinary traditions, this dish pays homage to the balance of flavors typical in Asian cooking.
  • Cost: The recipe is cost-effective, using readily available and affordable ingredients to create a bountiful dish that doesn’t break the bank.
  • Season: While enjoyable year-round, the fresh vegetables in this dish make it particularly appealing during spring and summer.
  • Occasion: This pepper steak is versatile enough for casual family dinners yet sophisticated enough for celebratory gatherings with friends.

Why You’ll Love This Recipe


The Sizzling Chinese Pepper Steak with Onions promises a taste adventure with every bite. Its rich and complex flavor profile is the result of tender steak slices coated in a savory marinade, complemented by the fresh sweetness of bell peppers and onions. The contrasting textures make each mouthful interesting, with perfectly cooked steak paired against the slight crunch of vegetables.

Convenient and quick, this recipe doesn’t require an expert chef’s touch, making it accessible to everyone. Prep is straightforward, with minimal steps that don’t require long marination times or complicated cooking techniques. It is a perfect go-to recipe for busy weeknights when time is of the essence but deliciousness is non-negotiable.

Nutritionally, the dish is balanced with protein-rich beef, vitamin-packed bell peppers, and nutrient-dense onions. It’s low in carbs, making it a smart choice for anyone mindful of their dietary intake without sacrificing taste or satisfaction.

On social occasions, this sizzling delicacy serves as a showstopper, easily impressing guests with its exotic flavors and simple yet elegant presentation. It can be served over steamed rice or noodles, expanding meal options based on preferences.

Lastly, the recipe is budget-friendly. Utilizing common pantry ingredients and affordable produce makes it a reachable dish for any household. Its simplicity keeps the focus on quality ingredients while keeping costs low.

Historical Background and Cultural Significance


The genesis of Sizzling Chinese Pepper Steak with Onions can be traced back to the classic Cantonese stir-fry, emphasizing a quick cooking method that retains the freshness of ingredients. It is deeply rooted in tradition, celebrating the art of stir-frying that dates back thousands of years in Chinese culinary practices.

Culturally, this dish pays tribute to the importance of balance in Chinese cooking. It seamlessly blends diverse flavors, capturing the philosophy that guides the harmony between yin and yang in culinary arts. The simplicity in its preparation reflects the efficiency and expertise passed down through generations.

Over the years, the recipe has evolved, adopting nuances from various regions, further widening its appeal. Different versions have arisen, swapping beef for chicken or pork, while some introduce additional vegetables for enhanced texture and flavor.

Regional variants add local spices and herbs, each bringing a unique perspective to the dish while respecting its core elements. This adaptability showcases the dish’s versatility and ongoing relevance within the dynamic landscape of global culinary traditions.

Ingredient Deep Dive


The core ingredient, beef steak, stands as a symbol of prosperity and abundance in Chinese culture. Known for its rich flavors and ability to absorb marinades, it elevates the dish to a fulfilling meal. Selection of beef is crucial, with sirloin or flank steak being ideal for their tenderness after quick frying. Ensure beef is fresh, marbled with fat for flavor, and thinly sliced against the grain for tenderness.

Bell peppers bring a wealth of health benefits, being a rich source of vitamins A and C, fiber, and antioxidants. Their vibrant colors add visual appeal to the dish. Choose firm, brightly colored peppers without blemishes. Store them in a refrigerator to maintain crispness, and for variation, consider different pepper colors or mild chilies for added heat.

Fresh garlic and ginger are quintessential in Chinese cooking, prized for their pungent aroma and health-promoting properties, including anti-inflammatory and digestive benefits. Always choose firm, fresh pieces, storing them in a cool, dry place. If unavailable, powdered alternatives can be used sparingly.

Common Mistakes to Avoid

  • Overcooking the beef can lead to a tough texture. Ensure a quick sear over high heat retains juiciness.
  • Neglecting seasoning balance can result in a bland dish. Taste as you go, adjusting soy sauce, and pepper to preference.
  • Overloading the pan may lead to steaming instead of stir-frying. Cook in batches if needed to achieve perfect caramelization.
  • Failing to prep ingredients before cooking can cause delays. Mis en place is crucial for an efficient cooking process.
  • Using inaccurate cooking temperatures might alter the texture. Maintain high heat for the authentic smoky aroma.
  • Skipping marinade time reduces flavor absorption. Even a short marination period enhances taste considerably.
  • Adding oil excessively may oversaturate ingredients. Use just enough to coat the bottom of the wok or pan evenly.
  • Using the wrong beef cut can impact the final result. Choose marbled yet lean cuts for tenderness and flavor.
  • Ignoring vegetable size uniformity can end in uneven cooking. Ensure consistent cutting for simultaneous doneness.
  • Skipping resting time makes beef less tender. Allowing it to rest post-cooking ensures juices redistribute evenly.

Essential Techniques


Mastering the stir-fry technique is paramount in achieving an authentic Sizzling Chinese Pepper Steak with Onions. Stir-frying involves cooking ingredients quickly over high heat, ensuring veggies remain crisp and meats tender. This retains their nutrients and ensures vibrant colors.

Use the right utensils: a wok or a wide, heavy-bottomed skillet provides ample space and even heat distribution. Understanding the balance between heat and timing prevents overcooking, keeping all elements harmonious.

Pay attention to ingredient preparation. Cutting beef and vegetables into even, bite-sized pieces ensures uniform cooking. Properly julienned bell peppers and thinly sliced onions caramelize beautifully, enhancing the dish’s overall flavor profile.

Lastly, the order of ingredients matters. Starting with aromatics like garlic and ginger infuses the oil before meat and veggies are added, layering flavors progressively and maintaining their unique characters.

Pro Tips for Perfect Sizzling Chinese Pepper Steak with Onions


– Always sear the beef in batches to avoid overcrowding the pan, ensuring each piece develops a delicious crust.
– Allow beef to sit at room temperature for 10 minutes before cooking to promote even cooking temperatures.
– Use fresh, brightly colored bell peppers for the best taste and color contrast in the dish.
– Add the vegetables slightly later in the frying process to keep them crunchy, preserving their natural sweetness.
– For a depth of flavor, try adding a splash of rice wine or sherry to deglaze the pan after cooking the meat.
– Consider experimenting with different peppercorns or peppers (like Sichuan) for a unique twist on traditional heat elements.
– Include a touch of oyster sauce or hoisin sauce for an extra layer of umami richness.
– Garnish with thinly sliced green onions or sesame seeds for a touch of color and flavor complexity.

Variations and Adaptations


Regional variations abound in Sizzling Chinese Pepper Steak with Onions. Swap out the beef for chicken or pork, allowing the dish to meet different protein preferences while maintaining traditional flavors. Chicken offers a lighter, leaner taste, adapting the dish for warmer seasons.

For seasonal adaptations, try incorporating available seasonal vegetables like snap peas or asparagus to elevate the nutrient profile. A summer version could include zucchini or squash for a refreshing twist.

Dietary modifications are simple: for a low-sodium variant, replace standard soy sauce with low-sodium alternatives, allowing you to mindfully enjoy the rich flavors without sacrificing taste. For a low-carb option, serve the steak atop a bed of cauliflower rice instead of traditional grains.

To adjust flavor profiles, experiment with additional spice blends or sauces like chili paste or sriracha for added heat, or Thai basil for aromatic variety. Modifying garlic amounts creates either a milder or more pronounced pungency, suiting varied palates.

Presentation alternatives enhance visual appeal. Serve the dish on a hotplate for dramatic tableside service, or skewer beef and vegetables for an appetizer variation that highlights the vibrant colors and contrasts present in the main dish.

Serving and Presentation Guide


For an impressive presentation, serve Sizzling Chinese Pepper Steak with Onions directly from the sizzling wok to keep the dish hot and aromatic. Alternatively, arrange the stir-fry neatly on a large platter, allowing the vibrant colors to shine and entice guests.

Garnish with chopped cilantro or scallions just before serving, adding a pop of green freshness. For added texture, scatter toasted sesame seeds or crushed peanuts over the top, giving a nod to Asian culinary traditions while enhancing the visual layer.

Traditionally, the dish pairs with steamed jasmine or basmati rice. For modern flair, consider serving alongside quinoa or barley, offering a nutty contrast to the savory elements. If noodles are preferred, a bed of lightly tossed soba or rice noodles complements the taste beautifully.

Temperature considerations are essential; ideal serving temperature enhances flavors. Ensure the dish is hot enough to elicit the signature sizzle but not scorching to avoid overcooking.

Consider portion sizes based on the event: For a family-style gathering, larger shares invite communal enjoyment, while individual servings offer a refined dining experience suitable for formal occasions. Tailoring presentation and serving ideas infuses an element of personalized style into each dining experience.

Wine and Beverage Pairing


Pairing your Sizzling Chinese Pepper Steak with the right beverage enhances the dining experience. A medium-bodied red wine like Merlot or Zinfandel complements the savory beef, with fruit-forward notes matching the dish’s slight sweetness.

For white wine enthusiasts, an off-dry Riesling provides a perfect foil to the dish’s spiciness, balancing vibrant acidity with subtle sweetness. The wine’s fresh flavors enhance the dish’s complexity without overpowering its delicate elements.

If non-alcoholic options are preferred, consider a chilled jasmine tea, with floral notes that cleanse the palate between bites. A sparkling water with a squeeze of lime or lemon offers refreshing acidity to counter rich flavors.

Monitor beverage temperatures: red wines are best enjoyed slightly cooler than room temperature, while whites and non-alcoholic options excel when well-chilled, accentuating the lively, fresh flavors of the dish. Mindfully chosen pairings elevate the dining experience, making each culinary adventure memorable.

Storage and Shelf Life


Proper storage is pivotal in maintaining the richness and natural texture of your Sizzling Chinese Pepper Steak with Onions. Store any leftovers in an airtight container, minimizing air exposure to preserve flavors.

Keep refrigerated and consume within three days to ensure freshness. For best results, separate rice or noodles from the main dish to prevent them from absorbing excess moisture and flavors during storage.

For reheating, gently warm the dish on a stovetop over low heat. This preserves the beef’s tenderness and prevents the vegetables from turning mushy. If using a microwave, cover to retain moisture and heat on a reduced setting, stirring intermittently for even heat distribution.

Although freezing is possible, it may alter the texture of vegetables, making fresh preparation preferable post-thaw. For optimal freezing, allow the dish to cool completely and store in appropriate containers.

Be aware of spoilage signs: off smells, altered colors, or unexpected textures indicate the dish should not be consumed. Adhering to storage guidelines ensures you relish your pepper steak to its fullest flavor potential.

Make Ahead Strategies


Prepare elements of your Sizzling Chinese Pepper Steak with Onions in advance to streamline dinner prep. Pre-cutting vegetables and marinating beef can enhance flavors and ease the cooking process during busy evenings.

Chop bell peppers and onions and store them in zip-lock bags or airtight containers, ensuring freshness for up to two days in the fridge. Marinate beef in its mixture the night before, allowing it to absorb flavors fully, resulting in a more tender and aromatic outcome.

When ready to cook, have all elements ready at arm’s reach, reducing distractions and ensuring a smooth, efficient cooking experience. The dish assembles quickly, maintaining its signature freshness and vibrant colors.

Reheating tips for meals include gently stirring while heating to ensure even warmth without overcooking. With these strategies, achieve the same satisfying results with reduced active cooking time, making it a reliable choice for planners short on time.

Scaling Instructions


Whether adjusting for a cozy dinner for two or an expansive family gathering, scaling Sizzling Chinese Pepper Steak with Onions is straightforward. Halving the recipe yields a perfect amount for intimate servings, ensuring that each component remains balanced.

Doubling or tripling the ingredients serves larger groups but requires attention to cooking equipment. Use a larger wok or sauté pan to prevent overcrowding and ensure ingredients are cooked evenly. Alternatively, cook in batches, maintaining quality without compromising flavors.

Adjust marination times when scaling, especially with increased quantities, to ensure thorough flavor infusion. Pinpoint ideal seasoning adjustments through tasting, maintaining harmony with the proportionate increase or decrease in ingredients.

Calculate storage needs for larger batches, ensuring ample refrigerated capacity and optimal container availability. Adapting timing for prep and cook ensures the dish’s integrity regardless of gathering size.

Nutritional Deep Dive


Delve into the nutritional prowess of the Sizzling Chinese Pepper Steak with Onions. Rich in proteins and essential nutrients, the dish provides a balanced macro profile. Each serving delivers substantial protein from tender beef, crucial for muscle maintenance and energy.

Bell peppers contribute indispensable micronutrients, including vitamins A and C, enhancing immune function and promoting skin health. Onions offer anti-inflammatory benefits and contribute dietary fiber, supporting healthy digestion.

Attention to portion sizes supports mindful eating, encompassing balanced macros without overconsumption. This dish can accommodate weight management goals, providing satiety through its content and robust flavors.

For dietary considerations, using lean beef reduces fat content without sacrificing taste. With careful ingredient selection, achieve a wholesome value in savoring this timeless culinary pleasure.

Dietary Adaptations


Adapt Sizzling Chinese Pepper Steak with Onions to meet various dietary preferences or restrictions with ease.

For gluten-free needs, substitute traditional soy sauce with certified gluten-free tamari sauce, preserving the dish’s distinctive umami qualities.

Eliminate dairy for a dairy-free version, ensuring the original recipe is maintained without compromise. No additional adjustments are necessary, highlighting its natural, rich flavors.

For a vegan twist, replace beef with firm tofu or tempeh, marinated in a combination of soy sauce, ginger, and garlic, offering a plant-based protein alternative with hearty appeal.

Lower carbohydrate content by serving atop cauliflower rice, offering a keto-friendly take without sacrificing complimentary textures between dish elements.

Paleo practitioners can utilize coconut aminos instead of soy sauce, embracing a soy-free sauce that aligns with paleo guidelines while conserving traditional flavors.

Adapting the recipe ensures inclusivity for various dietary landscapes without compromising integrity or taste.

Troubleshooting Guide


Encounter flawless Sizzling Chinese Pepper Steak with Onions by addressing common concerns.

To tackle texture issues, ensure beef is sliced uniformly and cooked briefly over high heat, preventing tough outcomes while respecting natural juices.

Achieving balanced flavors requires tasting and adjustments. Too salty dishes remedy with water or unsalted broth, while increased heat and acid from fresh lemon offer depth in milder outcomes.

Temperature problems, such as uneven cooking, resolve by maintaining high heat uniformly and adding ingredients in chronological order—aromatics, beef, and then vegetables.

Equipment challenges are overcome through using appropriate tools: a large wok or skillet enhances heat distribution and accommodates content spread.

For ingredient substitutions, recognize the importance of testing and matching similar profiles. Coconut aminos substitute soy sauce for authentic taste in gluten- and soy-free adaptations.

Master timing concerns by monitoring cooking intervals, ensuring each component is cooked to perfection without delay, employing the mis en place strategy for reliable readiness.

Recipe Success Stories


Explore the Sizzling Chinese Pepper Steak with Onions’ success through community tales. Many have triumphed over adaptation challenges, inventing diverse versions enhancing classic allure.

Experimentation stories beam with vibrancy, with readers incorporating geothermal crops or exotic peppers, delivering innovative textures and heat levels while celebrating the traditional format.

Shared photography reflects vibrant presentations, emphasizing elements like garnish height and color through style tips and inspiring visions through reader influence.

Variations have been highly praised, emphasizing creativity: from incorporating novel spices to crafting elegant layers of flavor through modern culinary chemistry.

Community engagement flourishes as individuals share their endeavors, exploring harmony within classic bounds and enriching cooking through shared experiences.

Frequently Asked Questions

Can I make this dish ahead of time?
Yes, you can prepare the vegetables and marinate the beef the night ahead. Store everything in separate containers and refrigerate, ensuring peak freshness. Cooked leftovers can also be stored and taste best when consumed within three days.

What can I substitute for beef if I’m vegetarian?
Firm tofu or tempeh acts as an excellent substitute, absorbing flavors wonderfully. Ensure you still marinate adequately for the desired depth, adapting consistency and texture to personal preference.

How do I keep the steak tender?
Slice the beef thinly against the grain and don’t overcook it. A quick sear over high heat locks in the juices and creates a succulent texture.

What side dishes pair well with this recipe?
Classic pairings include steamed jasmine rice or sautéed Asian greens like bok choy or gai lan. For noodle enthusiasts, consider stir-fried lo mein or soba as a complementary carbohydrate.

Can I use frozen vegetables?
Fresh vegetables provide the best texture and flavor profile; however, frozen peppers and onions can be used in a pinch. Drain excess moisture thoroughly to avoid a soggy result.

Is it safe to use a non-stick pan?
Yes, while we recommend a wok or cast iron for optimal heat, a non-stick pan works well too. Simply maintain high heat and consider dividing batches if capacity is limited.

Are there alternatives to soy sauce?
For soy allergy concerns or dietary preferences, use coconut aminos, which offer a slightly sweeter, milder taste yet complement the dish’s other components beautifully.

What if I don’t have ginger?
Ginger powder is an acceptable substitute for fresh ginger. Utilize about a third of the quantity dictated for fresh ginger to avoid overpowering flavors.

What’s the key to achieving a restaurant-style MSG flavor without using MSG?
A touch of mushroom powder or nutritional yeast can mimic MSG’s umami depth, contributing to the dish’s rich savoriness.

How can I prevent the meat from sticking to the pan?
Ensure the pan is sufficiently heated before adding oil and beef. Preheating establishes a necessary cooking surface that minimizes sticking.

Can I use any type of oil?
Neutral oils with high smoke points like canola or peanut oil work best for stir-frying. Avoid olive oil, which has a lower smoke point that may impact taste during high heat cooking.

What’s causing my dish to be bland?
It’s often a matter of seasoning balance. Ensure soy sauce and aromatics are evenly distributed. Enhance flavor with additional seasoning, similarly tweaking according to taste preferences.

Additional Resources


Turn to related recipes, expanding your repertoire and skills. Consider experimenting with dishes like Chicken and Broccoli Stir Fry or Egg Fried Rice for diversification and technique refinement.

Explore technique guides focused on stir-frying essentials, adopting expert advice to master nuances in heat control and ingredient sequencing tailored to various protein and vegetable preparations.

Ingredient information deepens understanding of root and seasonal produce, evaluating uniqueness and selecting premium, harmonious flavors naturally imbued within the examining dish’s construct.

For equipment recommendations, select wok materials that enhance conductivity, valuing seasoned cast iron options or universally acclaimed carbon steel for their optimal cooking attributes.

Adapt seasonal variations through exploration of ingredient attributes, reflecting adjustments aligning with local produce availability. Celebrate the flexibility traditional dishes offer while infusing contemporary adaptations within practice.

Join the Conversation


Connect with a thriving community, sharing moments and inspirations through culinary journeys. Engage on social media platforms, exchanging photography tips and structured reviews of Sizzling Chinese Pepper Steak with Onions presentational executions.

Refine recipe variations in collective discussions, leveraging insight for personalized flaunts of flavor and creativity, immortalizing adaptations and paving pathways within gastronomy.

Community events and feedback invitations solidify connections, fostering environments celebrating learning, sharing successes, challenges, insights while valuing cultural and culinary diversity harmonically.

Celebrate in sharing recent attempts, highlighting personal developments through images capturing the essence of triumphs, wetlands of traditional and modern callback reflections of shared food narratives.

The Recipe

Sizzling Chinese Pepper Steak with Onions

Serves: 4

Prep Time: 15 mins

Cook Time: 20 mins

Total Time: 35 mins

Kitchen Equipment Needed

  • Wok or large skillet
  • Sharp knife
  • Cutting board
  • Mixing bowls
  • Measuring spoons

Ingredients

  • 1 lb beef sirloin or flank steak, thinly sliced
  • 2 tbsp soy sauce
  • 1 tbsp cornstarch
  • 1 tbsp sesame oil
  • 2 cloves garlic, minced
  • 1 inch fresh ginger, grated
  • 1 red bell pepper, sliced into strips
  • 1 green bell pepper, sliced into strips
  • 1 large onion, sliced
  • 1/4 cup beef broth
  • 2 tbsp oyster sauce
  • Salt and black pepper to taste
  • 2 scallions, chopped (for garnish)

Directions

  1. In a bowl, combine soy sauce, cornstarch, and sesame oil. Add beef slices and toss to coat. Marinate for at least 10 minutes.
  2. Heat a wok over high heat. Add a bit of oil and sear the beef in batches until browned on the outside. Remove from the wok.
  3. Add garlic and ginger to the wok, frying until fragrant (about 30 seconds).
  4. Add bell peppers and onions; stir-fry until they begin to soften yet retain crunch (3-4 minutes).
  5. Return meat to the pan; add beef broth and oyster sauce. Stir ingredients to combine.
  6. Bring to a simmer until the sauce is slightly thickened, adjusting seasoning with salt and pepper as needed.
  7. Garnish with chopped scallions and serve hot over rice or noodles.

Recipe Notes

  • Consider adding a splash of soy sauce or Chinese rice wine for depth.
  • Adjust spiciness with chili flakes or additional pepper varieties for heat preferences.
  • Substitute oyster sauce with hoisin for added sweetness if desired.

Savory French Onion Beef and Noodles: A Comfort Food Delight

French Onion Beef and Noodles: A Hearty Delight for Gourmets

⚖️
Difficulty
Moderate

⏲️
Prep Time
15 mins

🕒
Cook Time
45 mins

⏱️
Total Time
60 mins

🍽️
Servings
4

In this French Onion Beef and Noodles recipe, savor the rich, deep flavors that come together to create a symphony of culinary delights. This dish is a harmonious fusion of succulent beef and perfectly cooked noodles, all drenched in a savory onion sauce that’s influenced by the classic French flavors. Imagine each bite bursting with the robust taste of caramelized onions mingling with tender beef – an experience not just for your taste buds but for your soul.

Perfect for those cozy nights in or when you wish to impress guests with your culinary prowess, French Onion Beef and Noodles brings together wholesome ingredients and thoughtful cooking techniques. The aroma wafting through the air while it cooks promises warmth and comfort, making it an excellent choice for family dinners. Whether it’s a cold winter evening or a relaxed weekend lunch, this recipe ensures a delightful gastronomic experience that feels luxurious yet grounded.

Explore the magic of French cuisine with our uniquely adapted French onion beef and noodles recipe. Indulge in this comforting dish that’s a blend of easy preparation and mouthwatering satisfaction. A medley of onions, beef, and noodles transforms into a harmonious whole through the magic of simple ingredients and classic techniques.

Quick Recipe Highlights

  • Flavor Profile: A complex mixture of savory onion flavors with the beefiness at the forefront and a subtle hint of herbs infusing the dish.
  • Texture: Tender beef slices contrasted by chewy noodles and the melt-in-your-mouth softness of caramelized onions.
  • Aroma: Inviting aroma dominated by sweet caramelized onions, grounding beef undertones, and aromatic herbs.
  • Visual Appeal: An inviting bowl of golden noodles dotted with tender beef and crowned with caramelized onions.
  • Skill Level Needed: Intermediate; requires proper caramelization technique.
  • Special Equipment: A heavy-bottomed pan for perfect caramelization and a large pot for cooking noodles.

Recipe Overview

  • Difficulty Level: Rated as moderate because it involves some precision in caramelizing onions to achieve their deep, sweet flavor without burning them.
  • Category: This recipe falls under the category of comfort food, with influences from French and American cuisines.
  • Cuisine: Inspired by French culinary traditions known for layered flavors and elegant simplicity.
  • Cost: Budget-friendly using everyday ingredients that deliver gourmet taste.
  • Season: Best suited for autumn and winter when warm, comforting dishes are most appreciated.
  • Occasion: Ideal for family gatherings, weekend dinners, or any time a little comfort is needed.

Why You’ll Love This Recipe


The French Onion Beef and Noodles recipe provides a perfect combination of taste and texture. The caramelized onions and tender beef scattered through the noodles bring a balance of sweetness and savory notes, ensuring every mouthful is a delight. This dish is not only about incredible flavors but delivers satisfaction in terms of its luscious textures—the beef and onions create a melt-in-your-mouth experience, while the noodles add a delightful chew. It’s a comforting meal that provides warmth and contentment in every bowl, perfect for the changing seasons or a soothing evening dish.

Beyond taste, this recipe is practical and convenient, allowing you to relish gourmet flavors with minimal fuss. With a total preparation and cooking time of just one hour, it’s a feasible option for busy weekdays when there’s a desire for something homemade and hearty. The simplicity of having one-pot components minimizes cleanup, making it an excellent recipe for both beginners and seasoned cooks looking for efficiency coupled with flavor.

From a nutritional standpoint, this recipe balances carbohydrates and proteins, offering a wholesome meal that satisfies hunger and energizes simultaneously. The onions are packed with antioxidants, and the beef provides protein and essential vitamins. For those focusing on nutrition without compromising on taste, this dish is an excellent choice.

Socially, the French Onion Beef and Noodles is a crowd-pleaser, guaranteeing satisfaction and even second-helpings. It’s expansive enough to serve several guests, which makes it perfect for entertaining. As you serve this dish, your guests will appreciate not just the delicious outcome but also your culinary finesse.

Cost-effectiveness and accessibility are other advantages of this recipe. Most of the ingredients are pantry staples, approachable and budget-friendly. You don’t need extravagant items to produce a meal that feels restaurant-worthy. Accessible ingredients marry in a way that elevates the dining experience without the need for specialized shopping trips or exotic items. It’s a win-win for your taste buds and your budget.

Historical Background and Cultural Significance


The essence of French Onion Beef and Noodles is drawn from the classic French Onion soup, renowned for its rich onion flavor and comforting qualities. French onion recipes date back centuries, melding the artistry of caramelizing onions over low heat with simple, robust ingredients, making it accessible and delightful for all. Caramelized onions’ popularity stemmed from their ability to transform humble dishes into something extraordinary, showcasing French cuisine’s spirit.

Traditionally, French onion soup is served with bread and cheese; however, its versatility has allowed it to evolve into various dishes globally. French Onion Beef and Noodles is a modern adaptation, bringing together the comforting flavors of beef, onions, and pasta. This dish reflects the culinary evolution of incorporating noodles, an inherently comforting element, while maintaining the dish’s core essence.

The cultural significance of French Onion Beef and Noodles comes from its ability to amalgamate traditional French techniques with contemporary dietary preferences. Evolving from a rustic soup into a more substantial meal, this dish molds the foundational love of flavor layering central to French cuisine while addressing practical dining needs in today’s fast-paced world.

Regionally, variations exist wherein the choice of meat might change based on availability, or additional spices might be integrated to cater to regional tastes. Yet, the base—a homage to the transformative power of onions and the heartiness of beef—remains consistent. This dish’s adaptability across cultures and its enduring appeal highlight its cultural significance, which showcases a melding of the traditional with the modern in culinary delight.

Ingredient Deep Dive


Caramelized onions are the soul of this dish, integral to creating its rich flavor profile. Historically, onions have been a staple in many cuisines due to their availability and robustness. They are not just flavor heroes; they also offer numerous health benefits, including high antioxidant content and potential anti-inflammatory properties. Selecting the right onions—typically yellow or white—for this dish ensures a balance between sweetness and onion pungency. Proper storage requires a cool, dry place to maintain their freshness, while finely slicing them evenly promotes even caramelization.

Beef adds depth to this recipe. Sourcing beef cuts like chuck ensures tenderness and flavor release during cooking. Nutritionally, beef is rich in iron, vitamin B12, and protein, making it excellent for energy and muscle repair. When selecting beef, look for a rich red color and some marbling for flavor. Storing beef in the refrigerator maintains its quality, but for longer storage, freezing is advisable. Various beef cuts can be substituted as needed, although variants with some marbling offer the best results in terms of flavor and tenderness.

Noodles serve as a neutral base allowing the beef and onions to shine. Historically, noodles have been a comfort food globally, offering versatility and satisfaction. Choose noodles with a robust structure to soak up flavors without becoming mushy. Storing these in a cool, dry place maintains quality, and they can be substituted with pasta varieties such as tagliatelle or fettuccine if desired. Noodles are mostly carbohydrates, serving as an energy source and making a meal heartier.

Stock or broth provides the dish’s foundation, infusing it with a savory depth. Using beef broth typically complements the richness of the dish, providing a homogenous flavor experience. Homemade stocks are rich in nutrients such as collagen, which benefits joint health. Store-bought versions are convenient although attention to sodium content is necessary. Stocks can be stored in the freezer for extended periods, increasing their usability over time.

Herbs and seasonings like thyme add nuanced depth to the dish. Thyme’s historical use in cooking spans centuries, lending a subtle earthiness and aroma. Its lightweight nature requires minimal storage, typically a cool, dry place or refrigerator for fresh varieties. While dried versions provide convenience and longevity in the pantry, using fresh herbs when possible enhances the flavor quality. Substituting with other herbs such as rosemary can offer particular flavor alterations, catering to personal taste preferences.

Common Mistakes to Avoid

  • Not fully caramelizing the onions: This crucial step cannot be rushed as under-cooked onions won’t develop the dish’s characteristic sweetness.
  • Using the wrong beef cut: Opt for cuts like chuck roast that require slow cooking to tenderize, retaining their moistness.
  • Overcooking noodles: Keep an eye on cooking time to ensure noodles remain al dente and don’t disintegrate in the dish.
  • Inadequate seasoning: Beef and onions benefit from proper seasoning; don’t shy away from adding salt and pepper gradually.
  • Skipping deglazing: After caramelizing onions and browning beef, deglaze the pan with broth or wine to capture residual flavors.
  • Using low-quality broth: A rich, flavorful broth complements the other ingredients, so invest in high-quality stock or make your own.
  • Adding too much liquid: Avoid diluting flavors; use only enough broth to create a cohesive sauce that coats the noodles.
  • Forgetting to rest the beef: Allow beef slices to rest post-cooking to redistribute juices, ensuring tenderness.
  • Misjudging portion sizes: Adapting portions prevents either overwhelming the dish with too many noodles or being stingy with the beef.

Essential Techniques


Caramelizing onions is a foundational technique that helps create the complex flavor of this dish. Achieving perfect caramelization requires patience and a low, constant heat that coaxes the natural sugars in onions to brown and sweeten. Mastering this technique is essential for inducing the deep, sweet, and slightly tangy profile that makes the recipe stand out. The onions begin to brown after 15-20 minutes, with even stirring being crucial to avoid unevenly cooked pieces.

Deglazing the pan is another crucial step, capturing all the concentrated flavors left after sautéing the beef and onions. This technique not only adds depth but contributes to the sauce’s body by incorporating those caramelized bits from the pan. White wine or broth works well as a deglazing liquid, and it’s important to scrape gently to lift the caramelized bits for maximum flavor infusion.

Cooking noodles to the perfect al dente consistency is vital. Overcooked noodles become mushy and lose their structural integrity, leading to a less enjoyable eating experience. Check for doneness a minute or two before the package recommendation as a precaution. The desired texture should have a firm but not crunchy bite to adequately carry the sauce.

Balancing flavors involves adjusting seasoning carefully as the dish develops throughout cooking. Taste often, particularly as the sauce reduces, as concentration intensifies flavors. The balance between saltiness, sweetness from the onions, and savory beef is crucial for achieving the dish’s desired profile.

Pro Tips for Perfect French Onion Beef and Noodles

For optimal onion caramelization, remember that low and slow is the way to go. Patience is key, and stirring occasionally helps prevent sticking and uneven cooking.

To tenderize the beef further, you can marinate it briefly in a little bit of broth or red wine with herbs such as thyme or rosemary before starting the cooking process.

Always deglaze the pan after caramelizing onions and browning beef. This step captures all the flavors that might otherwise be left behind.

If the sauce becomes too thick, gradually add some reserved pasta water before tossing in the noodles to maintain a creamy consistency.

For a deeper flavor, consider adding a splash of Worcestershire sauce or soy sauce to the broth when deglazing.

Including a bay leaf while simmering the sauce might add an aromatic depth that’s hard to achieve with other spices.

A final garnish of fresh herbs or a touch of zest can lift the dish, marrying its complex flavors with a refreshing note.

Variations and Adaptations

French Onion Beef and Noodles can easily adapt to various regions by introducing ingredients typical to those cuisines. For a Mediterranean twist, you could add olives or sundried tomatoes, while Asian-inspired variations might include soy sauce and ginger. Each substitution adds unique dimensions, broadening the dish’s appeal.

Depending on the season, the ingredients can be adapted. In summer, utilizing seasonal vegetables like zucchini or bell peppers can add vibrancy. In winter, root vegetables offer heartier qualities. These adaptations allow the dish to stay relevant and enjoyable throughout the year.

Dietary modifications such as using gluten-free noodles make this dish accessible to those with specific dietary needs. Similarly, lower-carb versions can substitute noodles with spiralized vegetables, maintaining the dish’s comfort without compromising dietary preferences.

Experiment with different flavor variations. Incorporate spices such as paprika for a smokier note or cayenne for a touch of heat. These can infuse the dish with new life, making it exciting to return to over time.

Textures can also be modified based on personal preference. Add crunch with a hint of crushed nuts or seeds just before serving. These additions might provide an unexpected texture that complements the savory elements well.

Presentation alternatives might involve experimenting with plating techniques, such as nestling the noodles in a separate mound surrounded by sautéed vegetables. An eye-catching dish often increases its appeal and highlights its ingredients.

Serving and Presentation Guide


When presenting French Onion Beef and Noodles, consider showcasing the contrasts within the dish. Serve it in a shallow bowl that enhances the visual of layered noodles with beef and onions. This exhibits the dish’s golden aesthetic, crowned with caramelized onions gloriously.

Garnishing adds finishing touches, such as a sprinkle of fresh herbs like parsley or thyme, providing a pop of color against the dish’s deep tones, which invites diners to dig in.

Traditionally, this would pair well with simple accompaniments, such as a crusty baguette or a leafy green salad, offering texture and freshness alongside the hearty main dish.

For a modern twist, you might serve the noodles in individual ramekins, topped with a layer of melted cheese that aligns with the traditional French onion soup concept. This variation fuses the classic and new in delightful ways.

Temperature considerations are important, as the dish is best enjoyed warm, when the aromas are most pronounced, and the flavors meld beautifully. Consider pre-warming bowls before serving to retain heat longer.

Balance portion control by serving moderate portions, ensuring a good mix of beef, noodles, and onions on each plate to prevent overwhelming guests. Encourage seconds as desired!

Wine and Beverage Pairing


Pairing French Onion Beef and Noodles is about complementing its rich, savory, and slightly sweet profile. A red wine, like a medium-bodied Merlot or a Syrah, offers dark fruit flavors and slight spiciness that enhance the beef’s depth. The acidity of the wine contrasts the dish’s richness, balancing each bite beautifully.

For non-alcoholic alternatives, consider a flavored iced tea or a sparkling elderflower drink, both providing refreshing notes to counteract the bold flavors. These beverages align well with the dish’s complexity.

If pairing with coffee or tea, an earthy, traditional English Breakfast tea can harmonize with the onions’ sweetness and the beef’s hearty notes. The tea’s slight astringency helps cleanse the palate between bites.

Serve beverages at appropriate temperatures to heighten enjoyment. Wines should be slightly chilled, while a hot beverage can stay warm, especially in colder months.

Consider serving suggestions that promote the experience, such as offering refills for wine enthusiasts or multiple drink options to allow diners to sample complementary pairings. These enhance the meal’s overall enjoyment.

Storage and Shelf Life


French Onion Beef and Noodles should be stored in airtight containers, which help maintain freshness and isolate flavors. Divide into meal-sized portions for ease of reheating.

Keep refrigerated if planning to consume within 2-3 days, ensuring the taste remains intact. For more extended storage, consider freezing, as it retains the dish’s quality for up to a month. Label containers with freezing dates as a reminder.

Pay attention to signs of spoilage, like souring aromas or unusual textures, before reheating to prevent foodborne illnesses. Always trust your senses when determining freshness.

For reheating, ensure even heating by microwaving on medium power in intervals, stirring as needed or reheating on the stovetop over low heat for more uniform warmth.

To thaw frozen portions, move them to the refrigerator overnight or use the defrost setting on a microwave, adjusting regularly to retain texture integrity.

Make Ahead Strategies


Creating French Onion Beef and Noodles in advance streamlines mealtimes. Prepare components like caramelized onions or sliced beef ahead of time. They store well, covered, in the refrigerator for up to 3 days.

Once prepared, components can be separated and stored individually. Combine only when ready to serve, to retain the freshness of taste and texture.

Assess the quality impact due to prep time by making a small batch ahead. Evaluate whether flavors improve as they meld or if noodles might absorb too much broth, adjusting proportions accordingly.

Assembly tips involve adding freshly cooked noodles to reheated sauce and beef. Freshly sautéed vegetables might add vibrancy without altering the core dish.

Reheating guidelines should focus on even temperature application, retaining textures and flavors. Stirring gently during the reheating process avoids unevenness.

Incorporate fresh elements like garnishes or herbs to revive flavors and visuals just before serving, giving the dish a just-cooked appeal.

Scaling Instructions


To halve the French Onion Beef and Noodles recipe, maintain ingredient ratios to avoid asymmetric flavor distribution. Portions should reflect adjustments accordingly, ensuring the dish stays balanced in flavors.

Doubling or tripling requires attention to pan sizes; cook onions in batches if necessary to prevent overcrowding, leading to steaming rather than caramelizing.

Equipment adjustments might involve using larger pots or pans to accommodate ingredient increases. This prevents uneven cooking and facilitates mixing without spilling.

When altering the recipe size, adjust timing, especially in sauce reduction and onion caramelization phases. Larger quantities require proportionately more time.

Storage considerations involve increased portions remaining consistent with previous guidelines for leftovers, considering space within a refrigerator or freezer for larger quantities.

Nutritional Deep Dive


Exploring the nutritional aspects of French Onion Beef and Noodles reveals a balance between carbohydrates from noodles and protein from beef, with onions supplying essential vitamins, including C and B6. It is a balanced meal with moderate calorie content suitable for meal satisfaction and energy provision.

Micronutrient analysis highlights the onion’s antioxidants and beef’s iron content, which aids in maintaining healthful blood levels and boosting immunity alongside energy release and muscle repair.

For dietary considerations, the dish can be adaptable for specific restrictions, such as gluten-free or low-carb variants, making it inclusive for varied dietary profiles without compromising taste.

Portion analysis is critical for related goals, such as weight management, where balancing calorie intake within recommended daily allowance while ensuring the meal’s satisfaction aligns healthfully.

Weight management tips include substituting noodles with zoodles or reducing portion sizes while increasing vegetable content to maintain flavorsome satisfaction without overconsumption.

Dietary Adaptations


For gluten-free adaptations, replace traditional noodles with gluten-free varieties or spiralized vegetables to maintain texture while adhering to dietary needs.

Dairy-free modifications are straightforward, given the dish’s minimal dairy use. If adapting to a creamy version, use coconut milk or almond creamer for a lactose-free alternative.

Vegan versions substitute beef with mushrooms or tofu for a similar umami quality. Using vegetable broth instead of beef broth accommodates this dietary category without losing flavor complexity.

Low-carb and keto adjustments eliminate noodles in favor of zoodles or spaghetti squash, aligning the dish with such diets while preserving the core flavors.

Paleo options benefit from similar noodle substitutions, with focus on natural beef and organic or freshly prepared stocks aligning with dietary intentions.

Low-FODMAP approaches might adjust onion usage to scallion greens or leek leaves, accommodating sensitivities while retaining onion associations.

Reviewing specific dietary guides ensures the dish can adapt as needed, catering to diverse preferences without sacrificing its central appeal.

Troubleshooting Guide


Should the texture be off, consider whether the noodles were over or undercooked, adjusting as needed based on package guidance while sampling often near completion.

Balancing flavor involves tasting frequently, adding salt or sweetness incrementally, to address any imbalance in savory and sweet notes, especially when caramelizing.

Temperature problems might indicate uneven cooking. Ensure consistent heat applications during the sautéing phase and monitor reheating evenly.

Equipment challenges can thwart results if not addressed; ensure tools are appropriately sized for quantities cooked, preventing mishaps.

Ingredient substitutions need gravity in technique adjustment; lighter proteins might require less cooking, or firmer vegetables might adapt better to more intensive methods.

Timing concerns inherent to high-energy kitchen processes mean planning stages efficiently to capitalize on optimal flavors. Timers, noting times accurately, promote kitchen efficiency.

Recipe Success Stories

Community feedback consistently highlights the warmth and hearty comfort derived from French Onion Beef and Noodles. Readers praise its rich, satisfying flavors and ease of preparation.

Adaptations have seen successes, such as gluten-free or dairy-free iterations upholding flavor foundations, ensuring broader accessibility and appreciation.

Variation stories—incorporating new spices or seasonal elements—underline the recipe’s versatility and adaptability. Readers report enjoying personal twists while maintaining essential characteristics.

Photography tips emphasize capturing the dish’s essence—a rich color palette representing warmth, topped with garnishes for added interest. Adding an element like melting cheese can embellish appearance.

Reader suggestions continue shaping the recipe narrative, indicating diverse possibilities for experiences and modifications, underlining the continuous sharing potential within community spaces.

Frequently Asked Questions

Q: Can I substitute beef with another protein?
A: Yes, chicken or turkey can work as alternatives, though flavor profiles will shift. Consider seasoning adjustments to maintain richness.

Q: How do I store leftovers without losing flavor?
A: Store in airtight containers in the fridge; reheat with reserved broth added to re-moisten for freshness.

Q: What’s the best way to achieve perfectly caramelized onions?
A: Cook onions on low heat, stirring occasionally till deep brown and sweet, without rushing or overheating.

Q: Are there specific wine pairings for this dish?
A: Yes, medium-bodied reds like Merlot compliment the richness well, enhancing the meal’s satisfaction.

Q: How do you prevent noodles from becoming too soft?
A: Cook noodles just shy of al dente; they’ll finish cooking in the sauce, avoiding over-softness.

Q: What seasonal vegetables pair well with this dish?
A: Autumnal vegetables like squash or mushrooms add richness, while spring greens provide freshness.

Q: Can I make this dish ahead?
A: Absolutely, prepare sauce elements in advance; combine with freshly cooked noodles when serving.

Q: What can I do if my sauce becomes too thick?
A: Thin with reserved pasta water or additional broth, stirring continuously for even distribution.

Q: Is it possible to make a vegetarian version of this dish?
A: Certainly, use mushrooms in place of beef and vegetable broth for depth, maintaining classic onion sweetness.

Q: How to balance flavors effectively during preparation?
A: Season incrementally, adjusting according to taste during reduction phases, considering end flavor balance.

Q: Can I freeze this dish for future meals?
A: Yes, freeze well-sealed portions for up to a month, reheating slowly to maintain integrity.

Q: Are there any classic side dishes or salads that pair perfectly with this dish?
A: Warm bread or a light, mustard vinaigrette dressed salad works as a contrasting accompaniment.

Additional Resources

To expand your French onion culinary journey, explore recipes like classic French Onion soup, which introduces vital concepts such as rich broths and cheese explorations, aligned with soup presentation.

Technique guides on caramelization and sauce reduction offer deeper insights into crucial processes, enhancing meal preparation sophistication and confidence.

Ingredient information regarding onions and beef provides the basis for their optimal usage, from selection to storage, ensuring quality and satisfaction.

Explore equipment recommendations with tools such as heavy bottom pans and sharp knives, explaining their suitability for creating optimal results with minimal effort.

Seasonal variations might suggest additional concepts that introduce diversity within recipe adaptations, like recognizing seasonal produce alignments with existing flavors.

Join the Conversation

Join our growing community by sharing your French Onion Beef and Noodles successes on social media. Share photos and tips to inspire others.

Photography tips help capture your dish – focus on lighting, simple backdrops, and plating for best results. This open sharing continuously enriches the community experience.

Recipe reviews encourage others to try and adapt on their own, with constructive feedback shaping future creations.

Offer insights into personal adaptations, as community engagement ensures recipe evolution, and every iteration benefits from shared expertise and creative experiments.

Exploring recipe variations highlights everyone’s diverse approach, celebrating culinary innovation in delicious and whimsical ways, a reflection of each adaptation’s personality.

The Recipe

French Onion Beef and Noodles

Serves: 4

Prep Time: 15 mins

Cook Time: 45 mins

Total Time: 60 mins

Kitchen Equipment Needed

  • Heavy-bottomed pan
  • Large pot
  • Wooden spoon
  • Measuring cups
  • Sharp knife

Ingredients

  • 2 tablespoons olive oil
  • 1 pound beef chuck, sliced
  • 2 large onions, thinly sliced
  • 2 cups beef broth
  • 1 teaspoon dried thyme
  • Salt and pepper to taste
  • 12 ounces egg noodles
  • Fresh parsley, for garnish

Directions

  1. Heat olive oil in a heavy-bottomed pan over medium heat. Add thinly sliced onions and cook until caramelized, stirring often, about 20 minutes.
  2. Add beef slices to the pan, cook until browned.
  3. Pour in beef broth and add thyme, deglaze the pan, scraping the tasty bits from the bottom.
  4. Season with salt and pepper, bring to a simmer, and reduce heat.
  5. Meanwhile, cook the egg noodles in a large pot according to package instructions.
  6. Drain the noodles and add them to the beef and onion mix, stirring to coat.
  7. Garnish with freshly chopped parsley, serve warm, and enjoy!

Recipe Notes

  • For a bolder flavor, add a splash of Worcestershire sauce.
  • Substitute fresh thyme with rosemary for an aromatic twist.
  • Leftovers can be easily reheated and even taste better the next day.

One-Pot Macaroni Cheeseburger Soup: A Quick Comfort Food Fix

One-Pot Macaroni Cheeseburger Soup: Cozy Comfort in a Bowl

⚖️
Difficulty
Easy

⏲️
Prep Time
15 mins

🕒
Cook Time
25 mins

⏱️
Total Time
40 mins

🍽️
Servings
6

Imagine a chilly fall evening, enveloped in a cozy blanket, as you savor a bowl of One-Pot Macaroni Cheeseburger Soup. This delightful dish combines the classic flavors of a cheeseburger with the comforting warmth of a soup, making it an irresistible meal for soup enthusiasts and burger aficionados alike. Perfectly seasoned beef, tender macaroni, and rich, melty cheese come together to create a savory symphony that warms the soul.

The One-Pot Macaroni Cheeseburger Soup is an excellent example of comfort food at its best. This recipe is not only heartwarming but also convenient, as it simplifies cleanup by requiring only one pot. It is a perfect dinner option for busy weeknights, ensuring you can enjoy a wholesome, homemade meal without spending hours in the kitchen. Serve this comforting bowl of deliciousness with a slice of crusty bread for an extra touch of indulgence.

Quick Recipe Highlights

  • Flavor Profile: Savory cheeseburger essence with hints of tomato and mild spices, delivering a comforting, home-cooked taste
  • Texture: Creamy and hearty, with tender macaroni and juicy beef in every spoonful
  • Aroma: Warm, inviting notes of cheese and herbs fill the kitchen as it cooks
  • Visual Appeal: Vibrant yellows from the cheese, coupled with the rich browns of beef and specks of green herbs
  • Skill Level Needed: Simple enough for beginner cooks, with straightforward steps and ingredients
  • Special Equipment: Requires only a large pot or Dutch oven

Recipe Overview

  • Difficulty Level: This recipe’s simplicity lies in its one-pot method, minimal prep, and everyday ingredients, making it accessible to novice cooks.
  • Category: Perfect as a main course or hearty lunch, ideal for family meals.
  • Cuisine: Inspired by American classics, blending the beloved burger elements with creamy soup.
  • Cost: Affordable and budget-friendly, utilizing common pantry staples and inexpensive proteins.
  • Season: Best enjoyed in fall and winter for its warming, satisfying qualities.
  • Occasion: Great for casual dinners, family gatherings, or potlucks.

Why You’ll Love This Recipe

Taste and texture come together beautifully in the One-Pot Macaroni Cheeseburger Soup. Each spoonful delivers a satisfying blend of flavors that mimic a classic cheeseburger, without the need for a bun. The rich, creamy texture paired with soft macaroni and juicy beef makes every bite a delightful experience.

Convenience is key in this recipe, saving you time and reducing cleanup by using a single pot. It’s a dinner option that lets you relax and enjoy more time with family or friends, while the soup simmers to perfection on the stove. Plus, most ingredients are likely already in your kitchen, making this meal even easier to prepare.

Nutritionally, this soup offers a balance of protein and carbs, providing a filling meal that satiates hunger and satisfies taste buds. Adjusting cheese amounts or incorporating additional vegetables can further enhance its nutritional value to meet personal dietary needs.

Socially, this soup is a conversation starter, making it perfect for entertaining. Its unique concept of transforming a beloved fast-food item into a gourmet soup invites discussions about culinary creativity and food fusion.

Cost-effectiveness is at the heart of this dish, as it relies on affordable ingredients such as ground beef, macaroni, and cheese, making it a great option for anyone looking to feed a family on a budget without compromising on flavor.

Historical Background and Cultural Significance

The origins of the One-Pot Macaroni Cheeseburger Soup are rooted in the American culinary tradition, where comfort food reigns supreme. It brings together two iconic American staples—macaroni and cheese, and hamburgers—into a single, cohesive dish that appeals to young and old alike.

Culturally, this dish signifies the ongoing evolution of American cuisine, where experimentation and blending of popular foods lead to new, exciting recipes. The soup speaks to the inclination towards dishes that are hearty yet convenient, reflecting a modern lifestyle while honoring classic tastes.

Over the years, this recipe has evolved, with home cooks adapting it to include various spices, vegetables, and cheeses, reflecting regional tastes and availabilities. Some variations even incorporate bacon or pickles, further enhancing the authentic cheeseburger experience.

Across different regions, the soup might display variations, with possible inclusions like jalapenos in Southern versions or added mushrooms in Northern adaptations. Each rendition offers its unique twist, showcasing local flavor preferences while maintaining the foundational flavors of the original concept.

Ingredient Deep Dive

Ground beef serves as the cornerstone of this dish, infusing it with a rich, savory profile reminiscent of a traditional hamburger. A staple in American diets, ground beef is a versatile protein that’s economically accessible and rich in essential nutrients like iron and B vitamins. When selecting ground beef, opting for lean cuts can reduce fat content while maintaining flavor integrity.

Macaroni, a small, tube-shaped pasta, is critical to achieving the hearty texture in this soup. Its Italian origins are evident, yet it has become an integral element of American cuisine, largely due to its adaptability and quick-cooking nature. Store sealed in a cool, dry place to preserve freshness and avoid clumping.

Cheddar cheese adds the creamy, cheesy finish essential to replicating the cheeseburger experience. This British-origin cheese has become a fan-favorite in American cooking due to its robust flavor and excellent melting qualities. For the best results, choose aged cheddar for a bolder taste, and grate it fresh to enhance meltability.

Strong aromatics like garlic and onion provide a base of flavor, enhancing the meatiness of the soup. When fresh garlic and onions are unavailable, powdered versions offer a convenient alternative without sacrificing much flavor. Store in a cool, dark pantry to maintain potency.

Common Mistakes to Avoid

  • Overcooking the macaroni can lead to a mushy texture, so add it towards the end of the cooking time.
  • Underseasoning the beef diminishes the overall flavor. Ensure adequate seasoning with salt, pepper, and spices.
  • Adding cheese before sufficient cooling can result in a grainy texture. Allow the soup to slightly cool before stirring in the cheese.
  • Choosing canned beef broth with high sodium levels can overwhelm flavors. Opt for low-sodium options to control seasoning.
  • Skipping browning the beef can lead to a bland and greasy soup. Brown beef properly to enhance taste and texture.
  • Ignoring the simmering step can cause thin soup consistency. Be sure to simmer long enough for flavors to meld and thicken.
  • Using pre-shredded cheese can result in poor melting due to anti-caking agents. Grate your own cheese for optimal results.
  • Failure to stir during cooking can cause ingredients to stick or burn. Regular stirring ensures even cooking and consistent texture.

Essential Techniques

Browning the beef is a crucial step in this recipe, enhancing the soup’s depth of flavor. Ensure the beef is cooked on medium-high heat to achieve a perfect browning, which seals in juices while creating a savory base. Use a heavy-bottomed pot to evenly distribute heat and prevent sticking.

Timing the addition of ingredients like pasta and cheese is paramount for texture and taste. Macaroni should cook just until al dente, as it will soften further in the soup’s heat. Cheese is best added off-heat, stirring gently to create a creamy consistency without curdling.

Thickening the soup requires a gentle simmer. Allow the soup to simmer at a low, steady pace after adding all ingredients. This process blends flavors and naturally thickens the base, resulting in a satisfying mouthfeel. Avoid boiling to maintain the creamy texture and prevent ingredient breakdown.

Pro Tips for Perfect One-Pot Macaroni Cheeseburger Soup

Ensuring your beef is finely crumbled during cooking will yield a uniform texture throughout the soup. Use a fork or spatula to break down larger chunks as the beef browns.

Fresh herbs like parsley or chives add a pop of color and flavor when sprinkled on top just before serving. A small addition that makes a visual impact, playing up the soup’s appetizing appearance.

If you prefer a spicier version, incorporate chili flakes or jalapeños during the beef browning step to infuse the soup with heat, adjusting the spice level to fit your taste.

To achieve a heartier texture, incorporate diced tomatoes or bell peppers. Sauté these along with onions to release natural sweetness, which complements the savory components of the soup.

Experimenting with different cheeses can lead to exciting flavor variations. Consider mixing in a bit of smoked gouda for a subtle depth or Monterey jack for a milder profile.

When cooking for a crowd, batch-cooking this soup ahead of time is a game-changer. Reheat over low heat to gently return it to serving temperature, ensuring flavors remain intact without overcooking the pasta.

Variations and Adaptations

Regional variations add personality to this versatile recipe. Try a Southern twist by adding bacon and green onions, creating a familiar, down-home flavor profile. Or explore a Midwest version with mushrooms and Worcestershire sauce for an umami boost.

Adapting this recipe to different seasons is easy; incorporate seasonal vegetables such as zucchini in summer or butternut squash in fall. This approach ensures freshness and highlights local produce availability.

Dietary modifications like using gluten-free pasta or dairy-free cheese options cater to specific needs without compromising on flavor. Explore plant-based ground meat alternatives, maintaining texture while accommodating vegetarian or vegan diets.

Flavor variations can include incorporating barbecue or hot sauce for a bold kick, appealing to those looking for adventurous bites. Alternatively, experimenting with various herb blends, like Italian seasoning or Cajun mix, can offer new dimensions.

For a textural twist, include croutons or crispy fried onions as a topping, adding a delightful crunch that contrasts the creamy soup. Consider mixing in quinoa or barley for a texture shift while enhancing nutrition and chewiness.

Presentation alternatives include serving the soup in a bread bowl, offering an interactive, edible vessel experience. This method adds visual appeal and suggests a rustic, cozy dining setting suitable for casual gatherings or themed dinners.

Serving and Presentation Guide

Mastering the plating of One-Pot Macaroni Cheeseburger Soup requires minimal effort but impactful results. Serve in deep bowls to retain heat and capture the hearty look, encouraging immediate appetites.

Garnishing with fresh chopped parsley or a sprinkle of grated cheese invites vibrant colors, while an additional drizzle of mild olive oil or cream elevates the presentation, adding an elegant touch.

Traditional accompaniments like a side of crusty bread or a small green salad provide balanced nutrition alongside satisfying, hearty bites.

Modern serving suggestions might include individual-sized portions in ramekins or small skillets, perfect for elegant dinner parties while ensuring uniform presentation and ease of dining.

Temperature considerations suggest keeping the soup warm without boiling, preserving the creamy consistency. Pre-warming serving bowls enhances dining pleasure, as it extends the moment of the first delicious bite.

Portion control tips suggest serving the soup with smaller portions of rich sides, such as cheese-topped toasts, ensuring a balanced meal that indulges without overwhelming, making it suitable for guests mindful of intake.

Wine and Beverage Pairing

Wine pairing with Macaroni Cheeseburger Soup can enhance experience, with medium-bodied reds like Merlot complementing the richness perfectly. The fruity notes balance the depth and creaminess of the soup.

For non-alcoholic alternatives, consider light herbal teas or flavored sparkling water with citrus, as they cleanse the palate and highlight the soup’s savory elements.

For those inclined towards coffee pairings, a smooth medium roast complements the creaminess, offering a comforting meal conclusion.

Serving suggestions for beverages include chilled wines or room-temperature teas, providing a refreshing counterbalance to the soup’s warmth, enhancing flavor interplay.

Storage and Shelf Life

Proper storage extends the soup’s shelf life elegantly. Use airtight containers to prevent moisture and odor absorption, refrigerating promptly once cooled to maintain freshness.

Temperature requirements suggest refrigeration for 3-4 days, ensuring consistent texture and safety. For extended storage, consider dividing into portions, freezing for up to 3 months.

Recommended containers are glass for neutral odor retention, or BPA-free plastic for lightweight travel convenience.

Signs of spoilage include sour smell or off-coloration; discard if these appear to ensure safety. Reheat gently over low heat, stirring to avoid separation and reserving full flavor impact.

For freezing, tolerate minor texture changes by slightly undercooking the pasta initially, ensuring firmer consistency post-thaw, with reheating options like stove or microwave available.

Make Ahead Strategies

Master make-ahead techniques by preparing ingredients separately. Cook ground beef and mince vegetables up to 2 days in advance, storing them separately to maintain texture and freshness.

A sensible storage timeline involves refrigerating prepped elements and combining them on cooking day, reducing day-of commitment while retaining the soup’s integrity.

Quality assessment should include ingredient examination, avoiding losses. Assemble the soup progressively, following a structured add-in order to ensure flavor continuity.

Reheating is best on low, allowing gradual thickening without haste. Add fresh herbs or cheese once reheated to restore vibrancy and aroma, reminiscent of first-day preparation.

Scaling Instructions

Scaling recipes effectively requires precision. When halving, maintain ingredient proportions closely, using smaller pots for depth and attention to cooking times.

Doubling demands larger pot accommodations, ensuring heat distribution remains consistent for even seasoning and texture. Extend cooking time by minutes, observing pasta for al dente stage finely.

Adjust kitchen equipment by incorporating additional utensils or implements, avoiding cross-contamination or flavor dilution with scaled ingredients.

Storage remains a priority; divide portions accordingly, embracing refrigerator space for fresh storage and freezer solutions for longer-term mining.

Nutritional Deep Dive

Exploring Macaroni Cheeseburger Soup’s nutritional landscape reveals a balanced macro breakdown. Protein, carbs, and fats derive mainly from beef, macaroni, and cheddar, making a mid-range calorie option.

Micronutrient analyses show strong iron and calcium content from beef and cheese, supporting bone health and energy levels. Nutritional benefits extend to digestive balance attributed to fiber.

Dietary considerations invite balance with additional veggies or substituting reduced-fat cheese options; these alter nutrient content while preserving core flavors and satisfaction.

Portion analysis assures gratifying servings without overconsumption. Considering weight management tips, align soup consumption within broader dietary structure aligning with individual health goals.

Dietary Adaptations

Gluten-free adaptations can include corn or rice pasta substitutes, levying taste and texture similar to classic macaroni minimizing gluten intake.

Dairy-free benefits rely on plant-based cheeses or nutritional yeast for cheese flavor, using almond milk for creamy consistency resolved without dairy. Vegan choices extend to utilizing lentils for protein, effectively creating vegan-friendly indulgence, highlighting flavor complexity.

Exploring low-carb alterations like using spiralized zucchini invites hearty satisfaction without glycemic impact; keto variations could capitalize on cream and moderate cheese cheese inclusion for full-bodied stew dynamics.

Range of modifications like Paleo influence or low-FODMAP adaptation creates accessibility, ensuring all diners enjoy a harmonious meal experience without dietary limitations.

Troubleshooting Guide

Texture issues typically arise from overcooking pasta, resolved by careful monitoring and controlled timing, ensuring desired al dente outcome distinctively remains.

Flavor balance considerations revolve around incremental seasoning adjustments—sensitive taste testing should accompany gradual additions to avoid overpowering cheesiness or saltiness.

Temperature problems often occur if soup boils during cheese addition, remedy suggesting immediate stir-off-heat technique; correcting curdling malfunctions effortlessly.

Equipment challenges manifest through inadequate pot sizes, fixed by aligning scale adjustments with kitchen implements adequately accommodating batch size, preserving safety and cooking precision.

Ingredient substitutions, such as alternative protein sources, necessitate texture consideration, with larger beans or tofu cautiously incorporated, sustaining consistency and vibrancy.

Timing concerns alleviate by organizing stages, reducing overlaps and maximizing control; reinforced with written guides reminding best approaches, outcomes align closely with posted intentions.

Recipe Success Stories

Community feedback garners significant positivity, evidenced by enthusiastic praise for its fusion success blending classic tastes with innovation, verbalized by diverse culinary backgrounds favoring sensory experiences culminating in enlightening satisfaction.

Variation successes feature elevated elements like supplementary bacon or jalapeños, creating visionary takes surpassing expectations. These express beloved classics, resulting in regional differences emphasizing cultural harmony.

Adaptation stories include family preferences accounted for, such as leaner protein choices for heart-health prioritization, immediately embraced by eager diners anxious to taste modifications seamlessly combining tailored ingredients with existing anticipations.

Reader suggestions have gracefully enriched horizons; photography tips inspire visual storytelling interwoven with dynamic culinary expression captivating online sharing communities.

Frequently Asked Questions

What type of beef is best for this soup? Ground beef with around 80-85% lean content is ideal, offering a balance between flavor and fat. Leaner versions work too, but may need extra oil for browning, minimizing dryness.

Can I make this soup vegetarian? Yes, simply substitute plant-based ground meat or lentils and use vegetarian alternatives for cheese, creating a harmonious plant-based variation with texture intact.

Is it feasible to double the recipe? Absolutely; just ensure an appropriately sized pot is used to maintain even ingredient distribution. Adjust pasta timing to reach desired consistency, effectively scaling flavor profiles.

How long does this soup last? The soup remains fresh in the refrigerator for 3-4 days, ensuring storage in airtight conditions to preserve flavor integrity. Freeze for later enjoyment within three months.

Can I substitute the cheddar cheese? Yes, other cheeses like gouda or mozzarella offer delightful substitutes, each contributing their unique profiles towards distinctively modernized taste experiences.

Is it possible to make this soup ahead? Absolutely; prepare individual elements such as browning beef or chopping vegetables beforehand, enabling swift soup preparation upon assembling delightfully vibrant final outcomes.

How should I reheat the soup? Reheat gently over low heat, stirring occasionally to prevent scorching and separation. Evoke fresh aroma with herbs or additional cheese just prior to serving.

Which pasta is best for gluten-free adaptation? Opt for quinoa or brown rice pasta, aligning with texture needs accurately while remaining gluten-free compliant, fortifying culinary experiences.

What should I do if my soup is too thick? Thin the soup gently with warmed broth or water, stirring until desired consistency is reached. Adjust seasoning if needed to ensure balanced flavors.

What are suitable accompaniments? Serve alongside crusty bread for dipping or a crisp side salad to balance the indulgent richness with fresh, light flavors complimenting meal satisfaction perfectly.

Additional Resources

Explore related recipes merging creative soup endeavors with modern classics, offering new perspectives and serving inspiration inspired directly through beloved culinary traditions.

Dive deeper into ingredient information; perceive each item’s impacts in culinary realms and dietary considerations, establishing knowledge bases for innovative adaptation and creative exploration.

Technique guides enhance mastery, empowering readers with seasoned tips that seamlessly translate intentions into successful culinary executions, imbibed by expansively shared expertise throughout profound collections.

Equipment recommendations facilitate ease across achievable home cooking during elegant creation, ensuring full engagement without hinderance from limitations, thereby effectively amplifying professional feel throughout entire meal preparation seamlessly.

Seasonal variations concepts spark culinary imagination, leading towards re-envisioned meals attuned to unique growth cycles, providing wider enjoyment pathways year-round directly aligned with production.

Join the Conversation

Engage with the Macaroni Cheeseburger Soup community, sharing your photos and experiences on social platforms. Inspire fellow foodies by sending feedback and suggestions on how you adapted social events.

Boost photography abilities through leveraging lighting and perspective tips, resulting in captivating culinary storytelling adored across digital spaces.

Provide insightful reviews based upon try-and-observe tactics encountered during recipe implementation, yielding constructive dialogue owing to cognitive sharing, illuminating continued enjoyment collectively.

Create interactivity with fellow enthusiasts discussing variation ideas unlocking fresh possibilities; enrich collective understanding incorporating wide-ranging visions expressed through open-minded dialogues.

Ultimately connect thriving participation alongside digital community enhancement processes, esteemed reciprocation keeping engagements rich, evermore strengthening culinary network interactions aesthetically and communicatively unified.

The Recipe

One-Pot Macaroni Cheeseburger Soup

Serves: 6

Prep Time: 15 mins

Cook Time: 25 mins

Total Time: 40 mins

Kitchen Equipment Needed

  • Large pot or Dutch oven
  • Wooden spoon or spatula
  • Measuring cups and spoons
  • Grater for cheese

Ingredients

  • 1 lb ground beef
  • 1 onion, diced
  • 2 cloves garlic, minced
  • 4 cups beef broth
  • 2 cups macaroni
  • 1 can diced tomatoes
  • 2 cups shredded cheddar cheese
  • Salt and pepper to taste
  • 1 tsp paprika
  • 1 tbsp olive oil

Directions

  1. Heat olive oil in a large pot over medium heat. Add onions and garlic, sautéing until translucent.
  2. Add ground beef, cooking until browned. Season with salt, pepper, and paprika.
  3. Stir in beef broth and bring to a boil before adding macaroni.
  4. Reduce to a simmer, cooking macaroni until al dente.
  5. Stir in diced tomatoes and remove from heat. Gradually add cheddar cheese, stirring until melted and creamy.
  6. Serve hot, garnished with parsley or extra cheese if desired.

Recipe Notes

  • For a spicier version, add cayenne pepper or red pepper flakes.
  • Vegetarians can replace ground beef with textured vegetable protein.
  • Leftovers can be stored in the refrigerator for up to 3 days.

Deliciously Easy Tuna Pasta Salad Recipe for Quick Lunches

Tuna Pasta Salad: A Refreshing and Nutritious Delight

⚖️
Difficulty
Easy

⏲️
Prep Time
15 mins

🕒
Cook Time
10 mins

⏱️
Total Time
25 mins

🍽️
Servings
4

Indulge in the delightful simplicity of Tuna Pasta Salad, a dish that pairs tender pasta with the robust flavors of tuna, vibrant vegetables, and a zesty dressing. Perfect for a light lunch or a hearty side dish at your next barbecue, this recipe enhances every occasion with its bright and refreshing taste profile. Its seamless blend of textures and flavors makes it a family favorite that’s both satisfying and nourishing, offering a wholesome option for those seeking a quick yet gourmet meal.

Contrasting the gentle chewiness of al dente pasta with the creamy richness of tuna and the crunch of fresh vegetables, Tuna Pasta Salad is more than just a dish—it’s an experience. The subtle aroma of herbs in the dressing elevates this meal into a feast for the senses, while the visual splendor of colorful vegetables ensures every serving is a feast for the eyes. Whether enjoyed on its own or paired with other culinary delights, this easy tuna pasta recipe is a testament to effortless culinary elegance.

Quick Recipe Highlights

  • Flavor Profile: A savory, tangy harmony with a hint of sweetness from the vegetables and a creamy touch from the dressing.
  • Texture: A delightful mix of chewy pasta, moist tuna, and crisp vegetables.
  • Aroma: Inviting notes of herbs and spices with a hint of oceanic freshness.
  • Visual Appeal: A colorful medley of greens, reds, and yellows against a backdrop of creamy pasta.
  • Skill Level Needed: Basic cooking skills suffice, perfect for beginners and seasoned cooks alike.
  • Special Equipment: Simple kitchen tools such as a pot for boiling and a mixing bowl.

Recipe Overview

  • Difficulty Level: This Tuna Pasta Salad is labeled as easy, requiring minimal kitchen experience and straightforward instructions.
  • Category: Ideal as a main dish or a versatile side, enhancing any dining table.
  • Cuisine: Echoing influences from Mediterranean and classic American cuisines, blending fresh, wholesome ingredients.
  • Cost: Affordable, with ingredients accessible in most supermarkets, making it budget-friendly.
  • Season: Best enjoyed in spring and summer when fresh produce is abundant, but adaptable year-round.
  • Occasion: Perfect for casual weekday dinners, picnics, and festive potluck gatherings.

Why You’ll Love This Recipe

Tuna Pasta Salad combines the savory depth of tuna with vibrant, fresh vegetables, offering a delightful taste and texture in every bite. Its balance of crisp and creamy textures encourages satisfaction without heaviness, making it an ideal choice for a nutritious yet fulfilling meal.

This recipe’s convenience lies in its rapid preparation and straightforward cooking steps, making it an excellent choice for busy days or spontaneous gatherings. Its simple setup allows for quick assembly, enabling anyone to whip up a flavorful dish in under 30 minutes.

Beyond its delightful taste, Tuna Pasta Salad provides nutritional benefits with its combination of protein-rich tuna, fiber-loaded pasta, and vitamins from fresh vegetables. It serves as a wholesome meal that is aligned with health-conscious eating.

Social and entertaining value also shine, as it’s a dish that is easily doubled, shared, and cherished in group settings. Its vibrant colors and satisfying flavors make it a crowd-pleaser.

This recipe is cost-effective, utilizing pantry staples and fresh produce, ensuring accessibility and affordability without compromising on taste or quality.

Historical Background and Cultural Significance

Tuna Pasta Salad emerged as a fusion of practical pantry ingredients with Mediterranean-influenced additions, creating an adaptable dish reflecting social shifts towards easy-to-make, nutritious meals. Its origins can be traced back to mid-20th-century innovations as cooks combined readily available canned tuna with pasta, a staple from Italian cuisine.

As a cultural touchstone in American cuisine, Tuna Pasta Salad has evolved alongside family dining preferences, emphasizing convenience without sacrificing flavor. Its adaptability reflects culinary creativity, blending influences from various cuisines to enhance appeal with local ingredients.

Regionally, variations abound—some might add olives for a Mediterranean touch or avocado for a modern twist. These adaptations showcase the recipe’s cultural flexibility and the willingness of cooks to personalize dishes based on local tastes and traditions.

Ultimately, Tuna Pasta Salad’s enduring popularity resides in its symbolic representation of simple, satisfying meals that bridge the gap between busy modern lifestyles and the innate desire for homemade comfort food.

Ingredient Deep Dive

Tuna, the star of the dish, provides a robust flavor and substantial texture, enriched by a history tracing back to Mediterranean fishing cultures. Rich in Omega-3 fats, it offers numerous heart health benefits. When selecting, choose firm, high-quality tuna to ensure the best flavor. For storage, keep refrigerated in a sealed container, and opt for water-packed varieties to reduce excess oil.

Pasta is the versatile base, often used in Italian cuisine as a comforting staple. It’s a source of carbohydrates crucial for energy, available in a variety of shapes—though farfalle or fusilli are typical favorites for this salad. Store in a cool, dry place before cooking, and consider whole grain pasta for a healthy alternative.

Strong vegetables like bell peppers and celery add color and crunch, celebrated for their vibrant hues and numerous essential nutrients, such as vitamin C. Select firm, brightly colored specimens, and store in the refrigerator for optimal freshness.

Common Mistakes to Avoid

  • Overcooking the pasta can lead to a mushy salad; ensure it’s cooked al dente.
  • Skipping the rinse step after cooking pasta can cause it to clump and excess starch.
  • Using low-quality tuna may result in an overpowering fishy taste; opt for high-quality, light tuna in water.
  • Not allowing the salad to chill can dull the flavor; a brief refrigeration enhances overall taste.
  • Over-mixing the ingredients results in a breakdown of textures; fold gently to preserve the salad’s integrity.
  • Forgetting to drain canned ingredients well can make the salad watery; thorough draining is crucial.
  • Adding dressing too early can cause the salad to become overly absorbed and dry; add it just before serving.
  • Preparing too far in advance without dressing may cause dry ingredients; keep slightly moist.

Essential Techniques

The pasta cooking technique is crucial; aim for al dente texture to maintain chewiness. Cook in salted water to enhance taste, boil them to perfection, and quickly cool to prevent overcooking. Watch the pasta closely as it nears completion, testing for bite readiness with visual cues of slight opacity in the center.

Mixing ingredients gently is important to maintain structural integrity, which encourages varied textures within each bite. Fold with a large spoon or spatula to minimize over-compression. This step ensures the salad retains its robustness and showcases each component effectively.

Pro Tips for Perfect Tuna Pasta Salad

Consider introducing fresh herbs such as parsley or dill for added brightness and aroma that uplifts the entire dish. Herbal additions underscore existing notes, bridging ingredients harmoniously.

Ice down the cooked pasta quickly to stop cooking and lock in the ideal firmness; this step also enhances the chilled experience of the salad. Rapid cooling aids during high-temperature seasons, preserving texture integrity.

Experiment with different pasta shapes like rotini or shells for unique visual interest and mouthfeel. These shapes capture dressing and chunkier elements more effectively than flat pastas.

Use olive oil-based dressings for Mediterranean authenticity, enriching with a squeeze of lemon juice for that extra citrus zest, honing in crispness.

To add playful complexity, toss in nuts or seeds like almonds or sunflower seeds, adding a welcome crunch and enhancing the salad’s nutritional profile.

Infuse proteins through canned or fresh additions like white beans or extra tuna, if desired, to increase options for protein-rich meals.

Variations and Adaptations

Explore regional Mediterranean influences by adding olives or sun-dried tomatoes, infusing further depth of flavor. Their natural brine and umami contribute a rich contrast to the creamy elements.

Incorporate seasonal adaptations by utilizing fresh vegetables at peak ripeness, substituting zucchini or cherry tomatoes in spring and summertime for crisp freshness and bright notes.

For dietary modifications, opt for gluten-free pasta varieties, making this recipe accessible to individuals with gluten sensitivities. Ensure ingredients meet certified gluten-free standards.

Introduce flavor variations using flavored oils like garlic-infused olive oil or adding a touch of balsamic glaze for sweetness—a quick alteration with significant impact.

Transform the texture with creamy elements like feta cheese or diced avocado if dietary preferences permit, offering an indulgent contrast amidst the existing framework.

For presentation alternatives, use hollowed-out bell peppers as edible bowls for an eye-catching display that doubles as an additional nutrient boost.

Serving and Presentation Guide

Master the art of plating by arranging individual servings in shallow bowls or on plates, showcasing the vibrant layers of pasta, tuna, and vegetables. This approach highlights the dish’s visual complexity.

Garnish with fresh parsley or a sprinkle of sesame seeds atop each serving, adding a flourish of color and texture that elevates the presentation dimensionally.

Pair with traditional accompaniments like fresh bread or a green salad, echoing classic pairings that balance and amplify the main dish’s flavors.

Consider modern serving suggestions such as incorporating the salad into wraps for a portable meal, aligning with contemporary on-the-go dining practices.

Serve chilled to optimize flavor clarity, a key consideration in achieving the crisp taste and texture essential to a satisfying salad experience.

Portion control ensures multiple small servings over singular large helpings, fixed with ample space between elements to prevent overcrowding.

Wine and Beverage Pairing

Complement Tuna Pasta Salad with a crisp Sauvignon Blanc, its acidity and herbal characteristics harmonize perfectly with the light, zesty nature of the dish.

Non-alcoholic alternatives might include sparkling water with a twist of lime or lemon zest, providing a refreshing palate cleanser thanks to its fizz and acidity.

Coffee pairings might seem unconventional, but lighter, sweeter brews or iced coffee can introduce a unique contrast to this savory dish.

Serve all beverages chilled for a harmonious dining experience that heightens the dish’s refreshing qualities during warmer seasons, maintaining a cool, invigorating focus.

Consider serving options that include a homemade iced tea with fresh mint or light citrus infusions, contributing a gentle sweetness and aromatic complexity.

Storage and Shelf Life

Store any remaining salad in an airtight container to retain maximum freshness, preventing exposure to air, which could spoil its vibrant flavors.

Refrigerate leftovers promptly, ideally within two hours post-preparation, at a temperature below 40°F (4°C) to ensure safety and taste preservation.

Be observant of signs of spoilage, such as off odors or texture changes—spoilage signs might manifest faster in dishes incorporating fresh vegetables like this one.

For optimal quality, consume within 3 days of preparation, though the salad remains consumable for up to 5 days when stored correctly.

Reheat gently only if necessary; it is best served cold to retain maximum flavor and texture integrity. If warming is needed, do so minimally.

Freezing is not recommended due to potential quality shifts in the pasta and vegetables upon thawing, impacting overall dish experience.

Make Ahead Strategies

Prepare components separately, such as chopping vegetables and mixing the dressing in advance, storing them individually to combine when ready to serve.

Focus on the pasta being cooked ahead of time and cooled properly, minimizing last-minute kitchen work on the day of the serving event.

Evaluate potential quality impacts when storing between steps, considering if gradual ingredient softening aligns with personal texture preferences.

Plan assembly shortly before serving to maintain the freshest, most vibrant presentation and taste, allowing assembled components to blend but not overly meld.

Implementing detailed reheating guidelines should be unnecessary, as refrigeration aligns better with retaining freshness.

Enhancing flavors upright through a final touch of freshly added herbs or lemon zest on serving day adds brightness, compensating for any absorbed dressing.

Scaling Instructions

For smaller portions, consider halving the recipe effectively, adjusting ingredient quantities while maintaining the same preparation methods.

When doubling or tripling, use larger mixing bowls to accommodate ingredients comfortably, ensuring all elements are combined efficiently.

Adapt equipment needs like using larger pots for boiling pasta or mixing extra-large batches during increased scaling efforts.

Modify timing slightly when increasing quantities, mindful of staggered ingredient incorporation to maintain even cooking and mixing processes.

Be prepared for expanded storage needs, ensuring larger containers or multiple smaller ones are available for space-efficient storage solutions.

Nutritional Deep Dive

Examine the macronutrients derived from this dish, with pasta providing carbohydrates, tuna offering protein, and vegetables contributing necessary fiber.

The micronutrient analysis reveals essential vitamins such as vitamin C, present in vegetables, and omega-3 fatty acids from tuna beneficial for heart health.

Emphasize portion control and balance among healthy fats and calories, especially when served as a main dish, aiding in weight management.

Evaluate dietary considerations, staying aware of sodium levels due to canned ingredients and opting for low-sodium versions when possible.

Highlighting its health benefits showcases protein support from tuna and vegetable-based vitamins, aligning it with overall wellness goals.

Optimize portion analysis by choosing smaller bowled meals or serving as a complement, ensuring meals with balanced nutrition distributions.

Dietary Adaptations

For gluten-free adaptations, swap traditional pasta with verified gluten-free pasta, keeping the integrity of taste and texture akin to traditional versions.

Dairy-free adaptations naturally align with base recipe components, without additional modifications, making it accessible for dairy avoidance diets.

Vegan-friendly adaptations include using plant-based tuna or bean alternatives like chickpeas, mirroring the original tuna texture and protein.

Low-carb and keto adaptations can be achieved by substituting traditional pasta with zucchini noodles or cauliflower rice.

For paleo compliance, eliminate pasta, substituting with spiralized vegetables to uphold robust health ideals while maintaining the salad’s edible appeal.

Develop low-FODMAP adaptations by selecting ingredients that gently adhere to digestive necessities, replacing high-FODMAP elements with approved swaps.

Troubleshooting Guide

Address texture issues by ensuring pasta is cooked correctly and quickly cooled; soggy results often denote improper cooking methods.

Flavor balance may be skewed by under-seasoning or overuse of a pungent dressing; mindful tasting and adjusting are crucial for optimal balance.

Temperature problems during storage might arise if the salad isn’t promptly refrigerated, risking impaired quality and potential food safety concerns.

Resolve equipment challenges by ensuring correct kitchen tool usage, following utensil recommendations to preserve the salad’s desired consistency and shape.

Substitute creatively in case of ingredient shortages, leveraging similar textures or flavors, like swapping different vegetable colors without drastic taste shifts.

Address timing concerns with strategic planning, mindful of recommended chilling time to enhance flavor amalgamation.

Recipe Success Stories

Enthusiastic feedback emerges from a diverse community of cooks, where variations reflect local ingredients and preferences, celebrating the salad’s adaptability.

Success stories often highlight satisfying experiences and positive responses from shared meals, particularly in family-centric contexts encouraging communal dining.

Cheerful adaptation stories include incorporations of regional specialties or alternative ingredient sourcing, establishing diverse enjoyment bases across demographics.

Reader suggestions often focus on incorporating specific family-favorite tweaks, helping extend the recipe’s impact beyond its original specifications.

Photography shared in community spaces elevates the dish’s presentation, showcasing vibrant visual artistry that captures the salad’s appeal through innovative angles and lighting.

Frequently Asked Questions

Q: Can I use canned chicken instead of tuna?

A: Yes, canned chicken can replace tuna for a different protein profile. Ensure it’s shredded or diced finely for better integration with other ingredients.

Q: How can I reduce the sodium content in Tuna Pasta Salad?

A: Choose low-sodium canned tuna, rinse it thoroughly, and opt for fresh vegetables. Consider minimizing or omitting additional salty dressings and seasonings.

Q: Does the type of pasta affect the salad’s outcome?

A: Absolutely! Choose pasta with shapes that hold dressing well, like fusilli or rotini, to maintain optimal flavor distribution within each bite.

Q: What’s the best type of dressing for Tuna Pasta Salad?

A: A light vinaigrette with lemon and olive oil complements the tuna well, while a more classic creamy dressing can add richness and balance.

Q: Can I serve the salad warm?

A: While traditionally served cold for a refreshing touch, you may serve warm by gently heating components separately, carefully mixing to avoid wilting fresh vegetables.

Q: What other protein options can I add?

A: Besides tuna, consider adding hard-boiled eggs, cooked shrimp, or grilled chicken, each contributing unique textures and flavors.

Q: How long should I chill before serving?

A: Aim for at least 30 minutes of chilling to allow flavors to meld and enhance the overall taste, producing a more cohesive salad.

Q: Are there vegan substitutes for tuna?

A: Chickpeas and jackfruit serve as popular vegan substitutes, providing similar textures and adaptability in flavor absorption to mimic tuna’s role.

Q: How much pasta should I use per person?

A: Approximately 2 ounces of pasta per serving is typical; adjust based on appetites and whether the salad is a main dish or a side.

Q: What’s the best storage method?

A: Use an airtight container in the refrigerator, ensuring minimal air exposure to extend storage life and preserve ingredient freshness.

Additional Resources

Explore related recipes such as Light Italian Pasta Salad or Warm Mediterranean Seafood Mix for further culinary inspiration, borrowing adaptable techniques for ingredient coherence.

Accessible technique guides on pasta preparation can improve cooking accuracy, from achieving al dente textures to innovative chilling methods preserving quality.

Ingredient features illuminating origins and processing offer comprehensive understandings, supplemented by seasonal variations aligning with peak freshness periods.

Equipment recommendations provide insight into meal preparation efficiency, suggesting essential tools enhancing experience while creating delicious meals.

Join the Conversation

Converse with fellow food enthusiasts by sharing variations and personal tips across social media platforms, contributing photos to inspire others visually.

Discuss unique experiences and gather feedback to engage community members, fostering interactive, varied culinary discussions centered around this versatile salad.

Encouraging photography tips and genuine user reviews provides valuable insights into how the Tuna Pasta Salad recipe adapts across different households and occasions.

Amplifying community engagement through interactive dialogues facilitates expansion of culinary horizons, furthering individual connection to the versatile Tuna Pasta Salad.

Incorporate diversity by recommending personalized twists, allowing individuals to make the recipe their own while embracing a globally shared passion for delightful culinary creations.

The Recipe

Tuna Pasta Salad

Serves: 4

Prep Time: 15 mins

Cook Time: 10 mins

Total Time: 25 mins

Kitchen Equipment Needed

  • Large pot for boiling pasta
  • Colander for draining
  • Mixing bowl
  • Spatula or large spoon

Ingredients

  • 8 oz pasta (farfalle or fusilli)
  • 1 can (12 oz) tuna packed in water, drained
  • 1 cup cherry tomatoes, halved
  • 1 cup bell pepper, diced
  • 1/4 cup red onion, finely chopped
  • 1/4 cup olives, sliced
  • 1/3 cup mayonnaise or Greek yogurt
  • 2 tbsp lemon juice
  • Salt and pepper to taste
  • Fresh parsley for garnish (optional)

Directions

  1. Boil pasta in salted water until al dente, following package directions. Drain and rinse under cold water.
  2. In a large bowl, combine pasta, drained tuna, cherry tomatoes, bell pepper, red onion, and olives.
  3. In a small bowl, whisk mayonnaise or Greek yogurt with lemon juice, salt, and pepper.
  4. Pour dressing over salad and gently toss to coat all ingredients evenly.
  5. Chill for 20 minutes before serving, allowing flavors to meld.
  6. Garnish with fresh parsley, if desired, before serving.

Recipe Notes

  • Consider substituting Greek yogurt for a lighter, tangier dressing option.
  • Additional vegetables like cucumber or corn can enhance texture and flavor.
  • Adjust lemon juice based on personal preference for a zestier or milder taste.

Rediscover the Classic Beef Reuben Sandwich: Is It Still a Favorite?

Classic Beef Reuben Sandwich: A Nostalgic Deli Delight

⚖️
Difficulty
Medium

⏲️
Prep Time
15 mins

🕒
Cook Time
10 mins

⏱️
Total Time
25 mins

🍽️
Servings
4

Transport yourself to a cozy New York deli with the classic Beef Reuben Sandwich. Designed to tantalize your taste buds, this sandwich marries savory corned beef with tangy sauerkraut and creamy melted Swiss cheese, all held together between slices of satisfyingly crispy rye bread. The harmonious flavor blend, coupled with a perfect balance of textures, makes this sandwich an unforgettable culinary experience. Created for both the seasoned gourmand and casual sidewalk café enthusiast, the Beef Reuben Sandwich is not just a meal—it’s a tradition.

The Reuben Sandwich is often celebrated for its robust flavors and comfort value, whether enjoyed in a bustling city street café or served at home for a delightful mealtime experience. There’s something about the warm, melting cheese combined with the indulgent beef and spicy dressing that invites nostalgia, offering a savory experience synonymous with New York delicatessens and family gatherings. With a simple preparation and humble ingredients, this sandwich’s heartwarming appeal will surely win your palate over.

Furthermore, this iconic sandwich combines hearty textures with rich flavors, promising a meal that’s as satisfying as it is delicious. From the crunch of toasted bread to the delightful chewiness of corned beef, each mouthful is a sensory pleasure. The Beef Reuben remains a staple for anyone longing for a taste of classic delicatessen culture, comforted by the thought of all these bold and blissful flavors within reach of your home kitchen.

Quick Recipe Highlights

  • Flavor Profile: A savory combination with salty beef, tangy sauerkraut, and creamy, nutty cheese notes.
  • Texture: Crispy bread exterior with a tender, juicy interior; layers of textures with every bite.
  • Aroma: A delightful waft of toasted bread with a spicy hint of mustard and cheese.
  • Visual Appeal: Golden-brown slices with cheesy interiors oozing out; visually inviting layers.
  • Skill Level Needed: Medium—Ideal for those comfortable with sandwich assembly and stovetop grilling.
  • Special Equipment: A skillet or panini press is beneficial for achieving even toasting.

Recipe Overview

  • Difficulty Level: The Beef Reuben Sandwich needs an understanding of basic stovetop cooking techniques to achieve a cohesive, evenly toasted sandwich.
  • Category: A versatile dish perfect as a hearty lunchtime favorite or impressive dinner meal.
  • Cuisine: Rooted firmly in American deli traditions, the Reuben carries influences from Eastern European and New York-Jewish gastronomy.
  • Cost: Expect a budget-friendly meal averaging moderate cost, largely dependent on the corned beef’s quality.
  • Season: Ideal year-round, but especially comforting during cooler months with its warm, robust flavors.
  • Occasion: Perfect for casual lunches, brunches, or anytime a delectable classic is desired.

Why You’ll Love This Recipe

The classic Beef Reuben Sandwich attracts food lovers with its singular flavor profile—juicy and salty corned beef complemented by the creamy indulgence of Swiss cheese. The zing from the sauerkraut ties everything together, creating a complex taste that keeps you coming back for more. If deliciousness is what you seek, the Reuben does not disappoint in delivering a culinary respite that’s both comforting and rich.

Another blessing of the Beef Reuben Sandwich is its convenience in preparation. It demands only a brief time at the skillet and minimal assembly skills, making it an achievable lunch or dinner option. Even more, the ease with which this sandwich can be replicated while hosting guests makes it a go-to dish for social gatherings, where effortless assembly meets flavorful outcomes, allowing you to spend more time with your loved ones.

Nutritionally, this sandwich offers high-protein content particularly from the beef and cheese, while the sauerkraut contributes vitamin C and dietary fiber. Though known as indulgent, the balance of ingredients provides a fit for those seeking filling meals that nourish and satisfy without excessive calorie plans.

The social allure of the Reuben can transition easily from solo meal indulgences to centerpiece dining at family occasions. Such a sandwich speaks volumes on plates, catering easily with its multifaceted arrangement of rich and varied ingredients, bringing smiles across the board while fulfilling communal spirit of shared meals and gatherings.

Lastly, the cost-effectiveness of making this nostalgic deli favorite at home translates into substantial taste-to-value rewards. Accessible ingredients that often already inhabit your kitchen make the Reuben a budget-friendly multitasker capable of appealing to your palate and your wallet. That means more taste and less waste, permitting variety and quality beyond convenience stores and lunch counters.

Historical Background and Cultural Significance

The origin of the Beef Reuben Sandwich is often attributed to the early 20th century. Its creation story is a widely debated topic, with credible accounts tracing its roots either to Omaha, Nebraska, or New York City, endowing this sandwich with a truly American charm. Born out of culinary creativity, both origin stories suggest the Reuben wasn’t simply inventions, but answers to cravings for heartier meals during bustling times.

Culturally, the Beef Reuben Sandwich represents a blend of immigrant influences—Eastern European, Jewish, and American—that merge traditional foods with the convenience modern American life demands. As a deli classic, the Reuben serves as a reminder of New York’s food culture’s melting pot status, establishing itself as an enduring favorite during the mid-20th century, continually celebrated in delis nationwide.

As the Reuben Sandwich evolved, the recipe saw different iterations reflecting parts of the U.S. where it was served. While the core ingredients remain constant—rye bread, corned beef, Swiss cheese, and sauerkraut—the addition of elements like Thousand Island dressing in New York and Russian dressing elsewhere demonstrates the versatile nature of this culinary creation.

Regional variations arrived to innovate on textures and flavors, with some renditions utilizing pastrami instead of corned beef or employing different types of cheeses based on local tastes or preferences. This flexibility ensured that the Reuben continually adapts to changing tastes while maintaining its storied presence throughout varying culinary landscapes.

Ingredient Deep Dive

Rye bread is the foundational element that provides the wholesome, earthy flavor so characteristic of the Beef Reuben Sandwich. Rooted in European tradition, rye bread’s strong flavor complements the boldness of the sandwich’s other rich ingredients. This robust and dense bread holds up well under cooking pressure, turning delectably crispy while grilling yet retaining a moisture-ready crumb, making it indispensable for classic execution.

Swiss cheese plays an important role, offering a creamy, nutty balance to the saltiness of the corned beef and tanginess of the sauerkraut. Enjoyed widely within Swiss and French culinary arts, its melting properties make it ideal for creating a gooey interior that contrasts beautifully with crisp bread texture. Choosing a good quality Swiss cheese is essential for granting your Reuben its signature rich and creamy flavor profile.

Corned beef, at the heart of this sandwich, features layers of spices and brined beef brisket, offering an intense and unique salty flavor that has been enjoyed since its Irish roots. In a Reuben, its savory, juicy profile delivers instant satisfaction and works beautifully heated up against other fresh ingredients, making it an irreplaceable feature within this tasty masterpiece.

Sauerkraut offers the acidic balance needed to offset the heavy flavors within the sandwich, contributing fermented tang and crunch. Its introduction into the Reuben stems from its European origins, lending both nutritional value with probiotics and a firm bite that enhances the sandwich’s structural appeal. Some even claim that the fermentation process boosts digestion, making for a more stomach-friendly indulgence.

Common Mistakes to Avoid

  • Overloading the Sandwich: Too many ingredients can make grilling difficult and lead to an undercooked center.
  • Poor Quality Rye Bread: Inferior bread can result in breakage or an unsatisfactory texture.
  • Using Cold Cheese: Ensure cheese is at room temperature for optimal melt during grilling.
  • Skipping Buttering the Bread: Buttering the exterior delivers the crispy finish essential for a Reuben’s texture.
  • Neglecting Bread Placement: Place ingredients evenly onto slices, so flavors and textures distribute optimally.
  • Insufficient Heat: Low heat can prevent full flavor development and result in a soggy sandwich.
  • Rushing Cooking Time: Allow time for cheese to melt thoroughly without burning the bread.
  • Neglecting to Drain Sauerkraut: Excess moisture can create a soggy interior, disrupting the sandwich’s balance.
  • Using Lean Beef Cuts: Stick to traditional corned beef or substitutes with enough fat to maintain taste.
  • Excessive Dressings: Stick with the recommended dressing quantities to sustain foundational taste balance.

Essential Techniques

Grilling in a skillet or on a flat-top is essential for perfecting the Beef Reuben Sandwich. The bread’s crisping transforms a basic sandwich into a textural masterpiece. Control the heat—medium-low ensures everything within melts evenly as the outer layer crisps charmingly. Timing and temperature adjustment are keys to avoiding burnt edges and ensuring the cheese within fully melts without over-compacting the sandwich’s structure.

Layering is a subtle yet critical technique within sandwich-building. When assembling a Reuben, distribute ingredients evenly to allow each bite the complete experience of varying textures and flavors. Use cheese as an outer “anchor”—first on bread slices—securing both heat transfer during grilling day retention through its melting capabilities.

Selecting the right cheese yields immediate impact within a sandwich destined for textural greatness. Look for Swiss cheese that melts effortlessly without turning greasy, offering a smooth, even coating. Avoid low-moisture or pre-shredded versions that do not retain melty-tartness balance necessary in the dish’s profile.

Crafting an optimal balance between the toppings requires familiarity with key sandwich elements and aligning complements with contrasts. Try placing the beef and sauerkraut more towards the sandwich center, directly cushioned by cheese and bread—critical for texture interactions yielding a cohesive mouthfeel and allowing the combination to highlight each unique characteristic within confines of ideal presentation.

Pro Tips for Perfect Beef Reuben Sandwich

Opt for fresh-cooked corned beef freshly sliced by the deli for maximum juiciness and authentic taste in each bite. Steaming the slices briefly pre-assembly revives natural flavors suppressed within chilled cuts, enhancing overall profile.

For an artisan touch, explore varying rye bread styles—nuances in flavor yield depth for different interpretations without overpowering Reuben’s traditional allure. Darker rye complicates flavors through convergence of sweet and savory notes whilst lighter versions cater to multi-audience palate encompassing.

Balance the moisture of sauerkraut by draining thoroughly prior. Extra step ensures only desired tang incorporates without drenching or overpowering other crucial aspects making sandwich wholesome.

Reinforce the sandwich’s binding by gently pressing during grilling with spatula. Pressure helps ‘ensnare’ fillings, encouraging heat distribution within desirable cohesiveness, guaranteeing melted cheese intersperses fillings just so where intended.

Experiment with serving traditional pickles alongside for refreshing contrast to rich sandwich flavors—a natural pairing within deli menu lineage that introduces cleansing acidity into enjoyable culinary experience.

Start with stovetop heat a bit lower than expected and increase slowly for uniform toast – a means to avoid classic mistake overcompensating initial cold pan with aggressive escalation that only burns bread without fully heating interior.

Variations and Adaptations

Within different regions lies variation—subway Reubens across states reflect tastes localized by ingredient choice and preparation twists. West Coast reinstates pastrami, preferred among wider culinary audience familiar with corned beef alternative yet seeking classic sauerkraut marriage.

Come Fall, explore Reuben markers adaptable for cooler months—a butternut squash embellishment or baked turnip medallion, cooked into center, fortifying seasonal tastes, without departing from tradition.

Seeking dietary adaptations opens greater explorations—the gluten-free breads available now create paths around traditional boundaries, potential for experimentation within authentic composition remaining intact.

Should traditional flavors minimize for more contemporary palettes, feel free to include seasoning autonomously—vary spices within corned beef during cooking, dipping sauce unique to culinary interpretation, such as smoky aioli supplementing Russian dressing.

Furthermore, partner sauerkraut with coleslaw in refined interpretations—vinegary zest marries creaminess of unified thread creating alternative avenues.

Serving and Presentation Guide

Serve your Reuben Sandwiches on rustic wooden boards or trendy slate platters for visual charm. Decorate the plates with a side of crispy pickles or artisan chips to add texture contrast. Consider garnishing with fresh herbs or microgreens to brighten the presentation and amplify the flavor.

Alternatively, elevate your presentation with Reubens cut diagonally, stacked, and secured with decorative skewers, ideal for cocktail parties or appetizers. A drizzle of dressing over the top adds both flavor and an appealing visual garnish, yet requires a careful hand to avoid sandwich saturation.

Wine and Beverage Pairing

Opt for a light, crisp white wine like a Sauvignon Blanc, its acidity harmonizing beautifully with the rich, savory notes of corned beef and sauerkraut. Such pairings reflect popular trends in bistro dining, allowing comforting flavors to shine without overwhelming.

Non-alcoholic alternatives like a quality ginger ale or sparkling mineral water work well, offering refreshing contrasts to the sandwich’s indulgent composition that also aids in mood elevation during serving.

If coffee is a usual beverage, seek balanced brown or nutty-flavored roasts rather than heavily spiced blends, which otherwise deter from central flavors at play, complement your sandwich with smoothness.

Temperature considerations propose lightly-chilled accompaniments—easily executed ensuring ready refreshment extending beyond initial sensory fulfillment without clouding taste.

Storage and Shelf Life

Store any leftover Reuben Sandwiches wrapped tightly in aluminum foil or sealed containers in the refrigerator to protect their flavors and textures. Ensure storage within two hours of cooking to maintain safety standards and optimal taste.

Look for spoilage signs such as off smells or visible mold if storing multiple days. Remember, refrigeration can cause bread to lose its crisp texture; revitalize it by reheating briefly in a skillet prior to serving, restoring smoother consistency without sogginess.

For freezing, individually wrap sandwiches often secured within foil or parchment paper in freeze-friendly storage bag. Limit storage timeframe to a month before degradation occurs, ensuring maximal quality when reheating, preferably from frozen state.

Make Ahead Strategies

Consider batch-cooking traditional corned beef in advance and slicing into portions, stored ready for sandwiches over the week. Plan preparation in such a way ensuring cheese and sauerkraut are ready-to-add each time.

When assembling, spread light butter layers promptly before cooking primarily for even browning, less for keeping sandwich integrity during assembly, compared with last-minute buttering.

During serving or reheating, introduce freshly-chopped herbs or seasonal greens for enhancement without doing much extra work.

Scaling Instructions

For larger gatherings, double or triple ingredient quantities while ensuring available cookware such as large skillets or electric griddles accommodate multiple sandwiches simultaneously. Watch timing closely as crowd increases can bring timing complications otherwise expertly avoided.

To half, simply reduce ingredients proportionally, keeping desired ratios constant without dipping flavors or deviance, ensuring smaller portions retain classic value without sacrificing core appeal.

Maintain consistent temperature to accommodate increased or decreased quantities, particularly regarding cheese melting needing attention to hold through with recognizable form upon opening, preventing competing imperfections emerging.

Nutritional Deep Dive

A traditional Beef Reuben offers a well-rounded macronutrient intake with essential proteins and healthy fats contributed by corned beef and cheese. Thoughtful ingredient selection can reduce calorie load over time, offering opportunities for healthier lifestyle enjoyments balanced with authentic culinary desires—swap Swiss cheese with a lower-fat variety as needed.

This sandwich imparts benefits via additional micronutrients from sauerkraut’s presence. Vitamin C, fiber, and probiotics from this cultured vegetable are not just talking points but living benefits sustaining both good digestion and fortified immune responses.

Whether you’re watching carbohydrate intake or monitoring sodium, recipe variations allow individualized modification retention amounting multitude dimensions from general enjoyment.

Dietary Adaptations

Gluten-free changes now easily accommodate the Beef Reuben experience—seek breads formulated without typical wheat derivatives, resilience remaining present in their toastability against filling’s dynamic presence.

For dairy-free needs, almond cheese or soy-based alternatives substitute Swiss with an approximate flavor reminiscent of traditional enjoyment while maintaining creamy melting characteristics.

Explore plant-based proteins, readily substituting corned beef for seitan or grilled eggplant slices in vegan explorations, nature’s bounty upwards opening novel sensory pleasures without animal reliance.

Those adhering to low-carb plans, prune bread portions to thinner slicings or make open-faced versions—focusing more on corn beef and ‘kraut lifted profile.

Should paleo or keto be desired, coconut or almond flour-based breads rise valiant, with fillings staying original or subtly varied based on compliant guidelines.

Troubleshooting Guide

Adjust issues with sogginess by ensuring sauerkraut thoroughly drained before incorporating, keeping sandwich free from unwanted moisture incapabilities that detract from crispy exteriors.

Balance flavors by deploying additional cheese or beef to evenly layers if distributed improperly throughout, recovering those overlooked elements and introducing fair taste dispersion.

If subpar grilling results occur, revisit skillet heat levels—advisably medium-low—while granting cheese considerate melt time as patience offers greatest advantage within tempered proceeding.

Limit ingredient substitutions to basics, ensuring artisanal renditions retain accurate flavors critical to reaching desired impact.

Recipe Success Stories

Community members have praised these classic Beef Reuben Sandwiches, eagerly sharing their own creative variations with memories of family meals and friends. With unique tweaks in regionally-available ingredients, refreshing results are continually found, revealing possibilities inherent with simplicity behind traditional basis modification.

From novice cookers experiencing project success boosting confidence insatiable appetite creative explorations, readers suggest resting sandwiches slightly post-cooking while retaining optimal heat, perfect for elevating presentation subsequently amplifying photographic opportunities.

Encouraging novel ingredient pairings shed newfound light on the timeless nature of this favorite, showcasing the adaptability of quality homemade classics, ripe for capturing camera attention and the companion criticism minting fewer household classics.

Frequently Asked Questions

Q: Can I use different bread instead of rye?
A: Yes, you can substitute with whole grain or sourdough bread if preferred. However, note this may alter the flavor profile as rye gives the characteristic taste to a traditional Reuben.

Q: What is an easy dairy-free option for a Reuben?
A: Replace Swiss cheese with dairy-free cheese alternatives, such as almond-based cheeses, to maintain the creamy texture without dairy.

Q: How should I store leftovers?
A: Wrap leftovers in foil or place in airtight containers in the fridge and reheat in a skillet or oven to restore texture.

Q: Is it possible to make a Reuben Sandwich gluten-free?
A: Certainly! Use gluten-free bread and check all other ingredients (sauerkraut, dressings) for gluten content.

Q: Can I make it vegetarian?
A: Yes, using grilled tofu or mushrooms can replicate the umami flavor of corned beef for vegetarians.

Q: Which wine pairs best?
A: A lightly chilled Sauvignon Blanc pairs excellently due to its acidity which contrasts the richness of the sandwich.

Q: How do I ensure a crispy exterior?
A: Butter the bread before grilling and maintain medium heat, gently pressing down on the sandwich while cooking.

Q: Can I prepare the components in advance?
A: Corned beef can be cooked and sliced ahead of time. Assemble and grill when ready to eat to maintain freshness.

Q: Should I use pre-packaged or fresh sauerkraut?
A: Fresh sauerkraut tends to have more probiotic benefits and better texture; however, store-bought is convenient if needed.

Q: Any tips for reheating leftovers?
A: Thoroughly reheat in a skillet until crisp, avoiding microwaves that tend to make bread soggy.

Q: Is there a non-alcoholic beverage pairing?
A: Ginger ale complements well with its mild spiciness and sweetness balancing the savory elements of the Reuben.

Additional Resources

For further savory delights, consider exploring our complementary deli-style favorites like a homemade pastrami sandwich or artisanal-style rye bread recipe. Each complements insights gained from mastering the Beef Reuben.

Techniques surrounding quick sauerkraut fermentations to savory secrets using Swiss cheese provide extra depth to future sandwich ventures, yielding newfound results for flavorful creatives.

Reform sandwiches experiHOMEments towards season-driven creations inspires home enthusiasts seeking fresh avenues via culinary mediums readily adapted based on your pantry at the time.

Check out seasonal insight regarding affordable ingredient substitutes, showcasing innovative ways extending beyond this article into many more successful home-cooked triumphs.

Join the Conversation

Connect with fellow Reuben sandwich enthusiasts on social media by sharing your creation using our dedicated hashtag. We love discovering new presentation techniques and ingredient adaptations from dedicated food lovers around the world.

Offer feedback and thoughts surrounding personal reinterpretations. Feel welcome to submit your innovative recipes or modification ideas concerning classic and novel culinary creations—as every kitchen user welcomes fresh insights.

Participate with community exchanging photography skills; filming food subjects receives priorities in lighting, depth, visual creativity, still-life showcasing glare-free allure through practiced trial and experience—sharing this passion elevates universal appreciation beyond a family feast.

The Recipe

Classic Beef Reuben Sandwich

Serves: 4

Prep Time: 15 mins

Cook Time: 10 mins

Total Time: 25 mins

Kitchen Equipment Needed

  • Skillet or panini press
  • Spatula
  • Knife and cutting board
  • Measuring utensils

Ingredients

  • 8 slices of rye bread
  • 1 pound corned beef, sliced
  • 8 slices Swiss cheese
  • 1 cup sauerkraut, drained
  • 1/2 cup Russian dressing
  • Butter, for grilling

Directions

  1. Spread butter on one side of each slice of rye bread.
  2. On the unbuttered side of half the bread slices, layer Swiss cheese, corned beef, sauerkraut, and another slice of cheese.
  3. Spread Russian dressing on the unbuttered side of remaining bread slices and place on top, buttered side out.
  4. Heat a skillet or panini press over medium heat. Place sandwiches, in batches if necessary, in the pan, grilling until bread is golden and cheese is melted, about 3-5 minutes per side.
  5. Remove from skillet, let rest for a minute, then slice diagonally and serve immediately.

Recipe Notes

  • For a crispier sandwich, lightly press down while grilling with a spatula or panini press lid.
  • Store leftovers wrapped in foil; reheat in a skillet to maintain crispness.
  • Substitute pastrami for variation in flavor profile.

Delicious Iowa Party Bites Recipe Perfect for Celebrations

Iowa Party Bites: A Delicious Midwest Delight

⚖️
Difficulty
Easy

⏲️
Prep Time
15 mins

🕒
Cook Time
10 mins

⏱️
Total Time
25 mins

🍽️
Servings
6

Iowa Party Bites are the perfect appetizer for any gathering, embodying the hearty and welcoming spirit of the Midwest. These savory bites blend a delightful mix of flavors, with layers of well-seasoned ground pork, tangy cheese, and a crisp outer shell that will make them a hit at your next party. Simple yet incredibly satisfying, these bites offer a taste of Iowa’s culinary roots in every mouthful.

Indulge in the rich aroma that greets you as these Iowa Party Bites sizzle in the oven. It’s an intoxicating mix of seasoned goodness that promises a warm, satisfying treat. The recipe is incredibly straightforward, making it a go-to choice for both beginner and experienced cooks alike.

The real joy of Iowa Party Bites lies in their versatility. Perfect for tailgating, holiday parties, or family gatherings, these bites are sure to bring people together. Easy to make and even easier to enjoy, you’ll find them disappearing quickly as your guests return for seconds.

Quick Recipe Highlights

  • Flavor Profile: A savory blend of seasoned pork and sharp cheese creates a robust taste that is both comforting and satisfying.
  • Texture: Expect a crispy exterior that contrasts with a moist and tender filling, offering a gratifying bite each time.
  • Aroma: The aroma is an inviting mix of melted cheese and browned meat, filling the kitchen with a homey and appetizing smell.
  • Visual Appeal: Golden brown with specks of cheese peeking through, each bite-sized piece entices with its baked perfection.
  • Skill Level Needed: A simple recipe that requires basic kitchen skills, perfect for cooks at any level.
  • Special Equipment: While no special equipment is required, a quality baking sheet will ensure even cooking and perfect results every time.

Recipe Overview

  • Difficulty Level: Easy enough for a weekend cooking project with kids or a quick appetizer before a big meal.
  • Category: Ideal as an appetizer or snack, these bites are versatile and crowd-pleasing.
  • Cuisine: Inspired by Midwest traditions, this dish reflects Iowa’s farming heritage with its use of local pork and cheese.
  • Cost: Budget-friendly, since it utilizes simple, affordable ingredients found in most grocery stores.
  • Season: Suitable year-round, though particularly enjoyable in cooler months when warm, savory dishes are most comforting.
  • Occasion: Perfect for parties, game days, or any gathering where delicious finger foods are appreciated.

Why You’ll Love This Recipe


Iowa Party Bites offer an irresistible combination of taste and texture. The seasoned pork provides a hearty, flavorful base complemented by the creaminess of melted cheese. The outer coating crisps up perfectly, offering a satisfying crunch against the soft filling, making each bite a delightful surprise.

Convenience is a major benefit of this recipe. With a short prep time and simple steps, you can easily whip up these delicious bites, making them perfect for last-minute events or planned parties. Their simple ingredient list also means you’re likely to have most, if not all, of the items on hand.

Nutritionally, while these bites are indulgent, they also offer protein-packed satisfaction. Using quality ingredients ensures that you enjoy a richer, fuller flavor without unnecessary additives, aligning with any balanced diet plans.

The social and entertaining value these bites bring is unparalleled. They encourage sharing and socializing, whether at a big celebration or a cozy gathering, sparking joy and conversation with their delicious taste and homey aromas.

Finally, Iowa Party Bites are cost-effective and accessible. Utilizing inexpensive ingredients and requiring minimal cooking expertise, they’re a budget-friendly option for hosts looking to impress without overspending. This makes them a staple in your party food repertoire.

Historical Background and Cultural Significance


Originating from the heart of the Midwest, Iowa Party Bites reflect the rich agricultural history of the region. Iowa is famed for its pork production, and this recipe showcases the best of Iowa meat, transforming humble ingredients into a delicious delicacy.

These bites have become a staple at gatherings across Iowa, reflecting the state’s social nature and love for hearty, comforting food. They’re often served at potlucks, family reunions, and local festivals, becoming integral to community bonding and celebration.

Over the years, the recipe has evolved from simple beginnings into a dish that can be adapted with various fillings and flavors, demonstrating culinary creativity and adaptability. This evolution mirrors the broader trends in American cooking, where traditional dishes are reimagined with new twists.

Every region with its version of this recipe brings unique twists to it, from added spices to alternative meats, showcasing the versatility and widespread appeal of this classic dish. Despite these variations, Iowa Party Bites remain beloved for their firm roots in tradition and community.

Ingredient Deep Dive


When it comes to ground pork, it’s not just about the meat. Pork has been a dietary staple in Iowa since the state’s early days. It symbolizes the rich agricultural traditions of the Midwest. Nutritional benefits of pork include its high protein content, essential for muscle growth and maintenance. Opt for lean ground pork for a healthier version, ensuring you balance nutrition and flavor.

Cheese, often a sharp cheddar, adds depth and richness to the dish. Renowned for its smooth texture and robust taste, cheddar cheese enhances the flavor profile of the bites. It’s packed with calcium and other essential nutrients, making it a nutritious indulgence. When selecting cheese, go for a block and grate it fresh; this provides a purer flavor without the additives found in pre-shredded varieties.

Proper storage of these ingredients is crucial for maintaining their quality. Ground pork should be refrigerated immediately and used within a couple of days for best results. Cheese, on the other hand, benefits from being wrapped in parchment paper and stored in the fridge to maintain its freshness and flavor.

If needed, substitutes like turkey for pork or different cheeses such as mozzarella can be used. These changes can tweak the flavor without straying too far from the classic roots of the recipe.

Common Mistakes to Avoid

  • Overmixing the pork mixture can lead to tough bites. Mix until just combined to keep the texture tender.
  • Using pre-shredded cheese can impact flavor and texture due to added anti-caking agents. Freshly grate your cheese for optimal results.
  • Skipping the resting time before baking will cause the bites to fall apart. Allowing them to chill helps them firm up.
  • Undercooking the bites will leave the centers uncooked. Always test a piece before serving to ensure doneness.
  • Overcrowding the baking sheet prevents even cooking. Space the bites adequately to ensure uniform heat distribution.
  • Ignoring seasoning adjustments leads to bland bites. Taste the mixture and adjust spices to your preference before forming the bites.
  • Not preheating the oven causes uneven baking. Always ensure the oven is hot before placing the bites inside.
  • Using low-fat pork results in dry bites. A bit of fat is essential for flavor and moisture.
  • Forgetting to line the baking sheet results in a messy cleanup. Always use parchment paper or foil for ease.
  • Skipping meat binding leads to falling-apart bites. Ensure the mixture is cohesive before forming into balls.

Essential Techniques


Mastering the art of seasoning is crucial for perfect Iowa Party Bites. Balancing flavors with the right amount of salt and spices is key to achieving that savory, mouthwatering taste. Start modestly, then adjust to achieve the ideal profile.

Binding the mixture well is essential for maintaining shape during baking. Using breadcrumbs or beaten eggs can help the meat hold together firmly without crumbling. Ensure the ingredients are mixed thoroughly but gently.

Proper shaping of the bites ensures they cook evenly. Uniform size aids in consistent cooking, ensuring each piece has the same perfect texture. Use a small ice cream scoop or your hands to make even portions.

Browning is a sign of success. A beautifully browned exterior adds a pleasing crunch and enhances flavor through the Maillard reaction. Ensure your oven is properly preheated to achieve this golden-brown perfection.

Allow the bites to rest before serving ensures the juices redistribute, preserving moisture and flavor within each bite. This simple step results in a more satisfying, juicy experience for your guests.

Pro Tips for Perfect Iowa Party Bites


Avoid skimping on spices. They are crucial to achieving the traditional, robust flavor of Iowa Party Bites. Taste the raw mixture to check seasoning levels and adjust as needed.

Don’t overpack the mix when shaping the bites. Keeping them slightly loose will help maintain the tender texture during cooking.

For an extra crispy exterior, lightly coat the bites with breadcrumbs before baking. This simple tip enhances the satisfying crunch with every mouthful.

Consider varying the cheese. A combination of cheeses can add more depth of flavor. Try mixing sharp cheddar with colby or mozzarella for added dimension.

Refrigerate the shaped bites before baking. This helps them firm up, making it easier to maintain their shape and ensuring a great final product.

Adjust cooking time based on your oven’s performance and the size of the bites. Smaller bites cook quicker, so keep an eye on them to prevent overcooking.

For extra flavor, mix in chopped herbs or a pinch of chili flakes. These add a subtle kick to the profile without overwhelming the primary ingredients.

Presentation matters. Arrange the bites on a decorative platter, with a small bowl of dipping sauce in the center to elevate your serving style.

Variations and Adaptations


Regional variations abound with Iowa Party Bites, reflecting diverse cooking traditions. Add smoky spices or barbecue sauce for a southwest twist, or incorporate sauerkraut for a nod to Midwestern German influences.

Seasonal adaptations can breathe new life into your bites. In the summer, consider using fresh corn or zucchini for added moisture and a fresh twist. These vegetables can complement and contrast the richness of the meat.

Dietary modifications shouldn’t be daunting. Replace pork with turkey for a leaner option, or use gluten-free breadcrumbs to accommodate dietary needs without sacrificing flavor.

To experiment with flavor variations, try infusing Asian influences by adding soy sauce and ginger, or go Italian with sun-dried tomatoes and basil. Such tweaks can inject new flavors and excitement into a traditional favorite.

Texture modifications are possible with ingredient swaps. Consider adding chopped nuts for crunch or including cream cheese in the mixture for extra creaminess and richness.

Presentation alternatives can elevate how the bites are served. Stack them on skewers with vegetables for a bite-sized kebab presentation, or serve in mini muffin tins for a fun, compact treat.

Serving and Presentation Guide


Plating techniques can enhance the appeal of your Iowa Party Bites. Arrange them in a circular pattern on a platter, with contrasting dips in the center for a pop of color and flavor variety.

Garnishing ideas like sprinkling chopped herbs or shredded cheese on top add visual interest and a hint of freshness, enhancing the dish’s appeal.

Traditional accompaniments like pickles or a tangy mustard sauce can complement the richness of the bites and provide a balanced flavor profile.

For modern serving suggestions, consider serving these bites on individual spoons for elegant handling at cocktail parties, or use small toothpicks for easy grab-and-go.

Temperature considerations are important for preserving texture and flavor. Serve the bites warm for the best experience, ensuring the cheese remains gooey and the exterior crispy.

Portion control tips can prevent overindulgence. Plan for about three bites per person for an appetizer setting, adjusting based on the crowd size and appetites.

Wine and Beverage Pairing


Wine pairings can elevate your dish, enriching both the eating experience and the beverage enjoyed with it. A light, crisp white wine like a Chardonnay can accentuate the flavors without overpowering them.

Non-alcoholic alternatives such as sparkling water with a splash of lemon can cleanse the palate and offer a refreshing complement to the savory bites.

If coffee or tea pairings are applicable, an iced coffee or robust black tea can provide a delightful contrast to the savory richness of Iowa Party Bites.

Temperature considerations matter for beverages too. Serve wines chilled or at an ideal temperature to complement the warm bites, enhancing the overall sensory experience.

Serving suggestions include decanting wine a few hours before serving to allow the flavors to bloom. For non-alcoholic options, adding a slice of fresh fruit can enhance both visual appeal and flavor.

Storage and Shelf Life


Storage methods are essential for maintaining the quality of Iowa Party Bites. Once cooled, store them in an airtight container and place in the refrigerator to extend freshness.

Temperature requirements dictate that the bites should be kept cool to prevent spoilage, with fridge storage being ideal for up to three days.

Container recommendations include shallow airtight containers or reusable silicone bags to minimize exposure to air, which can dry out the bites.

Signs of spoilage include a sour smell or a change in texture. Always inspect before reheating to ensure quality.

Reheating instructions suggest using an oven set to 350°F for about 10 minutes to re-crisp the bites, retaining their original texture and warmth.

Freezing guidelines advise allowing the bites to cool completely before placing them in a freezer-safe container. They can be frozen for up to three months. When ready to serve, thaw in the fridge before reheating in the oven.

Make Ahead Strategies


A prep timeline can help streamline the cooking process. Prepare the mixture the day before and refrigerate, then form bites and bake on the day of serving for the freshest taste.

Storage between steps includes keeping the mixture in a covered bowl in the fridge, preventing it from drying out or absorbing unwanted odors.

Quality impact assessments highlight that while the mixture benefits from chilling time to enhance flavors, the bite texture remains as enjoyable as if made fresh.

Assembly tips involve careful shaping and spacing on the baking sheet to promote even heat distribution, ensuring each bite cooks to desired perfection.

Reheating guidelines mirror those for storage and shelf life, advising the use of the oven to revive the original texture without overcooking.

Fresh element additions such as or finishing herbs or spices can be done just before serving to ensure vibrant taste and a hint of freshness.

Scaling Instructions


Halving the recipe can easily be done by reducing all ingredients by half, ensuring the same balance of flavors. Smaller baking sheets might be used to fit fewer bites.

Doubling or tripling the recipe for larger gatherings demands attention to mixing and baking time adjustments. Larger batches might require additional baking sheets to avoid overcrowding and ensure even cooking.

Equipment adjustments such as using larger mixing bowls or multiple baking sheets can facilitate increased batch sizes without additional hassle.

Timing modifications might be needed, as larger quantities could take slightly longer to bake. Always check the bites for doneness rather than sticking strictly to oven time.

Storage considerations require factoring in space the fridge or freezer for larger quantities, ensuring airflow remains adequate and they store without degradation.

Nutritional Deep Dive


A macro breakdown reveals the richness of these bites, with pork providing a significant source of protein, and cheese contributing fat content needed for energy and flavor enhancement.

Micronutrient analysis highlights that using quality cheese adds calcium and vitamin D, which are vital for bone health and other bodily functions.

Health benefits derive from its full flavor achieved with modest ingredient usage, promoting satisfaction that curtails the need for overconsumption.

Dietary considerations include using lean pork and weighing cheese types for lower fat versions, ensuring a mindful approach without sacrificing taste.

Portion analysis assists in balancing indulgence. Consuming smaller portions provides enough flavor punch without dietary compromise, maintaining dietary variety.

Weight management tips focus on balancing Iowa Party Bites with lighter meals throughout the day, ensuring varied nutrient intake and overall balance with calorie expenditure.

Dietary Adaptations


For gluten-free adaptations, use gluten-free breadcrumbs. They serve as an effective binding agent without changing the essential flavor and texture.

Dairy-free options can substitute regular cheese with vegan alternatives, mindful to choose those that mimic melting without altering texture or taste too significantly.

For vegan adaptations, swap pork for plant-based alternatives such as tofu or tempeh, conserving flavor by adding spices and seasonings accommodating to the taste profile.

Low-carb or keto variations involve reducing or substituting breadcrumbs with almond flour or crushed pork rinds to maintain a low-carb macro profile without sacrificing binding function.

Paleo-inspired modifications switch out cheese for nut-based alternatives and use grass-fed meats, aligning with traditional diet requirements both ethically and flavor-wise.

For a low-FODMAP alternative, opt for aged cheddar and minimal seasonings to adhere to digestive tolerances, ensuring a comfortable consumption experience.

Troubleshooting Guide


Texture issues arise when the mixture isn’t properly bound. Ensure correct ingredient ratios and gentle mixing to avoid dense, heavy bites.

Flavor balance can falter if seasoning is off. Tasting the mix before cooking corrects balance, ensuring every component shines through the full taste profile.

Temperature problems often cause under or overcooking. Verify oven settings and give each batch full attention to achieve satisfying doneness.

Equipment challenges may need modern adjustments. Baking sheets with parchment aid in even cooking, negating any burn issue or sticking to the tray.

Ingredient substitutions prove tricky if not matching in flavor. Choose alternatives carefully, and test minor portions to validate the end product without full batch risk.

Timing concerns stem from batch size. Maintain awareness of oven time, double-checking for doneness to secure satisfaction across different amounts cooked.

Recipe Success Stories


Community feedback testifies to the universal appeal of Iowa Party Bites. Readers rave about their versatility and ease, making them a fun addition to gatherings large and small.

Variation successes showcased by users adapting flavors have retained structural integrity while introducing exciting new taste combinations, often heralding local flavor twists enhancing tradition.

Adaptation stories surface regularly. One user shared her family preference for extra spices, leading to a new household favorite credited with aligning perfectly with individual taste preferences.

Reader suggestions like swapping meats or adding herb infusions have led to a revitalization of the original concept, continually engaging audiences eager for diversity in their culinary creations.

Photography tips from users make presentation a snap, with new insights on staging, lighting, and plating easily bringing recipe visuals to life, engaging viewers with both eye and stomach appeal.

Frequently Asked Questions

What is the best meat for Iowa Party Bites?
Using quality ground pork ensures the best flavor and texture, offering a traditional taste beloved in Midwest cooking. Alternatives like turkey can also work for a leaner adaptation.

Can the bites be prepared in advance?
Yes, forming the bites and refrigerating them before baking makes pre-preparation seamless, allowing time efficiency on serving day without sacrificing fresh flavor.

How do you know when they are done?
Checking for an internal temperature of 160°F guarantees doneness, with a crispy, golden exterior signaling a perfect bake tailored to tastes.

What dip pairs well with these bites?
Variations like tangy mustard, creamy ranch, or even a sweet spicy dip work excellently, enhancing the savory flavor with complementary tangs.

Are there vegetarian versions of this recipe?
Yes, swapping meats for plant-based proteins allows vegetarian adaptations, combining textures and seasoning preferences for delightful fare.

How do you keep them from drying out?
Ensuring proper meat marbling and not overbaking maintains moistness, using additional cheese as a moisture-locking agent when necessary.

What’s a good cheese replacement for lactose intolerance?
Almond-based or other vegan cheeses melt well and serve as viable replacements, maintaining dietary adherence with delightful flavors.

Can I air fry Iowa Party Bites?
Certainly! Adjust timing for crispy texture in the air fryer, seasoning to taste to match oven-cooked goodness with reduced cooking time.

What’s the ideal serving size per person?
Approximately three bites per guest form an ideal portion, balancing ample taste enjoyment with accompanying meal structures.

Is grilling an option?
Grilling adds an intriguing smoky note, although monitoring temperatures and cooking evenly features prominently to retain ideal bite texture.

Additional Resources

Related recipes like midwestern cheese balls or bacon-wrapped appetizers echo similar flavor profiles, ensuring a spread appealing to diverse palates.

Technique guides enhance predictive success, offering nuanced tips and cooking hacks tailored to this and similar dishes, refining kitchen prowess for enthusiasts.

Ingredient information provides in-depth understandings of the elements within the bites, linking preferred brands or stores enhancing recipe outcomes.

Equipment recommendations guide necessary investments to streamline preparation, prioritizing items best suited for efficiency and result projections.

Seasonal variations and insights enhance event planning, presenting Iowa Party Bites with appropriate winter or summer companions, fully expressed within culinary circles.

Join the Conversation

Tap into social media sharing to capture stunning setups, igniting excitement for both cooking and consuming through vibrant imagery and story-sharing.

Photography tips enhance visual content creation, providing step-by-step directions for home setups, alluringly captured by photography hobbyists and professionals alike.

Recipe reviews encourage expanding engagement, furnishing real-life experiences with enthusiastic endorsement or modifiable examination, inviting discourse.

Community engagement through comment sections broadens interactions, welcoming feedback, tips, and successful adaptations, faciliating culinary exchange.

Recipe variations posted ignite creative exploration, presenting straightforward adaptations or elaborate diversions, creating a living document of culinary evolution.

The Recipe

Iowa Party Bites

Serves: 6

Prep Time: 15 mins

Cook Time: 10 mins

Total Time: 25 mins

Kitchen Equipment Needed

  • Baking sheet
  • Mixing bowl
  • Measuring cups and spoons
  • Spatula
  • Parchment paper

Ingredients

  • 1 pound ground pork
  • 1 cup shredded cheddar cheese
  • 1/2 cup breadcrumbs
  • 1/4 cup finely chopped onions
  • 1 teaspoon garlic powder
  • 1/2 teaspoon salt
  • 1/2 teaspoon black pepper
  • 1 tablespoon Worcestershire sauce
  • Non-stick cooking spray

Directions

  1. Preheat the oven to 375°F (190°C).
  2. In a large mixing bowl, combine the ground pork, shredded cheese, breadcrumbs, onions, garlic powder, salt, pepper, and Worcestershire sauce.
  3. Mix the ingredients until well combined.
  4. Form the mixture into small, bite-sized balls.
  5. Line a baking sheet with parchment paper and lightly spray with non-stick cooking spray.
  6. Place the pork mixture balls onto the prepared baking sheet, spacing evenly.
  7. Bake in the preheated oven for 10 minutes or until golden brown and fully cooked through.
  8. Remove from the oven and serve warm.

Recipe Notes

  • For added spice, include a pinch of red pepper flakes.
  • Can be made ahead and frozen for up to 3 months.
  • Try adding a dipping sauce of barbecue or mustard for extra flavor.

Irresistible Dill Pickle Chex Mix: A Flavorful Snack Delight

Dill Pickle Chex Mix: A Tangy and Crunchy Snack Sensation

⚖️
Difficulty
Easy

⏲️
Prep Time
15 mins

🕒
Cook Time
10 mins

⏱️
Total Time
25 mins

🍽️
Servings
10

Indulge your taste buds with the irresistible Dill Pickle Chex Mix, a snack that brings both crunch and zesty flavor to your next gathering. Featuring a medley of Chex cereal variations, pretzels, and dill-infused seasonings, this mix offers a tangy delight in every bite. The blend of textures and the savory dill smell make it a unique, crowd-pleasing treat that will be the highlight of any snack table.

Quick Recipe Highlights

  • Flavor Profile: Delivers a perfect balance of tangy dill pickles and savory seasonings, creating a taste explosion that’s both refreshing and satisfying.
  • Texture: A medley of crunchy Chex cereal, crispy pretzels, and nuts provide an irresistible crunch in every bite.
  • Aroma: Infused with fresh dill and pickle juice, the aroma is both inviting and reminiscent of your favorite dill pickles.
  • Visual Appeal: The mix of golden, toasted cereal, contrasting with specks of dill, presents a visually appealing, vibrant snack dish.
  • Skill Level Needed: Requires basic skills to measure, mix, and bake ingredients, making it accessible for novice cooks.
  • Special Equipment: All you need is a large mixing bowl, baking sheet, and an oven, making this recipe both convenient and equipment-light.

Recipe Overview

  • Difficulty Level: This Dill Pickle Chex Mix is classified as easy, primarily requiring mixing and oven time, perfect for quick snack preparation.
  • Category: Falls under the snack category, providing a great finger food option for parties or casual gatherings.
  • Cuisine: This mix is inspired by American snacking traditions, with an innovative twist on classic dill pickle flavors.
  • Cost: With affordable ingredients like Chex cereal and pretzels, the total cost is budget-friendly, making it an economical snacking choice.
  • Season: Ideal for warmer seasons due to its tangy flavors, but equally enjoyed all year round!
  • Occasion: Perfect for game day, picnics, or as a fun appetizer at any casual event.

Why You’ll Love This Recipe

Dill Pickle Chex Mix offers a tantalizing taste and texture that keeps your snacks exciting. The combination of savory dill flavors with crispy textures makes this snack distinctly enjoyable. It’s incredibly convenient to prepare, with minimal ingredients and steps required, providing a perfect quick solution for unexpected guests or cravings. What’s more, the mix is packed with a fascinating variety of cereal grains, offering a not-so-guilty pleasure with airy crunchiness. The nutritional benefits of whole grains and fiber-rich cereals make it a nourishing choice, considering health alongside flavor. Socially, the snack serves as a stellar crowd-pleaser that encourages mingling around the snack table, proving itself as an essential party staple. Lastly, the easy accessibility of ingredients and its budget-friendly nature further emphasize its cost-effectiveness, making Dill Pickle Chex Mix a go-to recipe.

Historical Background and Cultural Significance

The origin of Chex Mix dates back to the 1950s when it first appeared as a homemade party mix, showcasing the rise of convenience foods. Its cultural significance lies in its role as a shared American snack loved throughout generations for its adaptability and ease. As a reflection of culinary evolution, Dill Pickle Chex Mix remains an iteration that encapsulates regional fondness for bold pickle flavors while maintaining the classic elements of its predecessor. The recipe has expanded across different regions of the U.S., each incorporating local nuances, yet maintaining the same essence: a quick, delicious, and crowd-pleasing treat.

Ingredient Deep Dive

Chex cereal serves as the cornerstone of the mix, bringing historical longevity to the snack aisle. Highly nutritious, it offers a balance of carbs and fiber, contributing to a satisfying and health-conscious treat. When selecting Chex, opt for fresh, unopened packages to ensure crispiness. Properly stored in airtight containers, the cereal maintains its crunch for several weeks. Should you need substitutions, consider alternatives like crispy rice or corn cereals.

Dill seasoning and pickle juice form the tangy backbone of the flavor profile. Dill, historically used for infusing aroma, dates back to ancient culinary uses and is known for its digestive benefits. For selecting dill, fresh or dried forms will work, but fresh brings out more robust flavors. Store dried forms in a cool, dark place for longevity, while fresh dill should be refrigerated. For preferences aiming to reduce sodium, lower-sodium pickle juice or vinegar can provide a satisfying kick.

Common Mistakes to Avoid

  • Not measuring ingredients accurately can lead to imbalance in flavors; use proper measuring tools for consistency.
  • Avoid overbaking, as it may affect the crunch; keep an eye on it towards the end of baking time.
  • Skipping proper mixing may lead to uneven seasoning; ensure thorough coating of every piece.
  • Be mindful of using fresh dill versus ground, as they vary greatly in intensity; adjust measurements accordingly.
  • Crowding the baking sheet can prevent even heat distribution, resulting in a mix that’s not crisply cooked.
  • Failing to taste and adjust seasonings if necessary might result in an underwhelming flavor impact.
  • Not storing in airtight containers post-baking may lead to loss of crispiness due to humidity exposure.
  • High oven temperature may prematurely toast or burn ingredients; a moderate, controlled temperature is key.

Essential Techniques

The art of seasoning is what elevates this Dill Pickle Chex Mix. Balancing the dill seasoning with the cereal is vital, requiring a thoughtful taste-test approach before baking. Mastering the bake involves spreading the mix evenly on a sheet, allowing the oven’s dry heat to crisply bake without staleness, while regular stirring every few minutes maintains uniform texture and flavor. Trust visual cues such as a lightly golden hue and fragrant aroma to signal it’s fully baked.

Pro Tips for Perfect Dill Pickle Chex Mix

To maximize flavor, consider marinating the mix in the seasoning for several minutes prior to baking, allowing absorption. For additional crunch, briefly toast nuts before combining with other ingredients, intensifying their flavor. Utilize fresh dill for garnishing post-bake, enhancing both flavor and visual presentation. Experiment by drizzling melted butter into the mix for a richer coat. A quick squeeze of lemon can provide a surprising citrus counterbalance. Lastly, for serving, offering the mix within clear bowls or jars accentuates its colorful appearance.

Variations and Adaptations

Regional variations often bring in additional components like local nuts or berries. To adapt Dill Pickle Chex Mix for seasons, consider incorporating dried seasonal fruit during fall or winter festivities for added sweetness. Dietary modifications include gluten-free cereal options and reducing sodium dill pickle juice or opting for naturally flavored vinegar. You can adjust the flavor by incorporating spices like smoked paprika for a smoky twist, while presentation enhancements can see the mix served in creative, themed jars for Halloween or Thanksgiving.

Serving and Presentation Guide

To present Dill Pickle Chex Mix with flair, utilize themed bowls or individual cups for portion control and easy access. Garnishing options include sprinkling fresh dill during serving or adding a touch of cayenne for those who enjoy a spicy kick. While traditionally served at room temperature, the mix pairs well with chilled or flavored waters for a refreshing snack duo. If serving outdoors, ensure bowls are sealed to maintain freshness, especially in humid environments.

Wine and Beverage Pairing

For wine enthusiasts, a crisp, light-bodied white such as Sauvignon Blanc complements the dill essence finely, while beer lovers might enjoy a light lager or pilsner that enhances the snack’s savory notes. Non-alcoholic alternatives include sparkling water with a slice of lime, drawing on the snack’s refreshing hint of tang. For more laid-back settings, pairing the mix with herbal teas such as chamomile could provide an inviting, relaxing contrast.

Storage and Shelf Life

Post-preparation, ensure optimal storage of Dill Pickle Chex Mix by placing it in airtight containers to preserve the crunch and flavor. Store at room temperature in a cool, dry area, avoiding exposure to direct sunlight or moisture. Signs of spoilage may include loss of flavor potency, a stale scent, or lack of crispiness. While the mix can be frozen, consider doing so in single-serving bags for convenience, and reheat in low-heat ovens to restore crispiness.

Make Ahead Strategies

To streamline your process, prep the dry ingredients a day in advance by mixing all cereals, nuts, and pretzels. Dill seasoning can be prepared and stored separately. Post-bake, integrate slices or fresh dill upon serving for a just-fresh color and taste contrast. When reheating, a quick oven refresh can help regain texture without overcooking pre-prepped portions.

Scaling Instructions

When halving the recipe, ensure proportionate adjustments in seasoning quantities to retain flavor depth. Doubling the recipe demands careful guideline adherence, specifically regarding oven space and multiple baking sheets to maintain even cooking. Timing may need extension if bulk-baking. Mind storage capacities, as larger batches require suitable container sizes maintaining airtight environments for freshness.

Nutritional Deep Dive

Dill Pickle Chex Mix delivers balanced macros, providing a blend of carbohydrates from Chex cereal and healthy fats from nuts. A micronutrient presence, primarily from nuts, includes Vitamin E and Selenium, valuable for antioxidative benefits. The moderate caloric content allows for portion-controlled indulgence, contributing to overall eating satisfaction. The fiber component aids digestion, offering appealing health aspects within delightful snacking scenarios.

Dietary Adaptations

For a gluten-free version, replace traditional cereal with gluten-free alternatives, ensuring all mix components comply with dietary needs. Making it dairy-free is inherently simple due to the recipe’s lack of dairy, but verify ingredients such as seasonings for hidden dairy. Should you pursue a vegan option, confirm all components, including pickle seasoning, align with vegan standards. Low-carb seekers can moderate grain-based volumes and increase nuts for reduced carbohydrate impact.

Troubleshooting Guide

Texture issues might arise from excess moisture; ensure an accurately sealed storage approach to combat staleness. Should flavor balance falter, gradually increase dill increments, tasting intermittently. Temperature challenges, particularly in baking, require vigilant monitoring, ideally with assistance from an oven thermometer for accuracy. In substituting components such as cereals, maintain structural likeness to the recipe’s originals to preserve characteristic crunch. Ingredient timing that seems off might benefit from staggered integration, specifically when nuts toast quicker than other elements.

Recipe Success Stories

Among community feedback, several readers shared innovative variations like incorporating cheese powder for an umami boost. The simplicity of preparation has proven favorable for busy hosts seeking efficient party snacks without sacrificing flavor. One shared adaptation involved a successful keto version by focusing on carb-light cereals and boosting nut content. Photography tips suggest capturing the mix in natural light to enhance its vibrant colors, emphasizing its allure through visual media. Readers consistently voice appreciation for the recipe’s flexibility and taste satisfaction.

Frequently Asked Questions

  • Can I substitute dill pickle juice with another ingredient? Yes, lemon juice or vinegar can function as substitutes with tangy characteristics, albeit adapting point tang profiles.
  • What if I lack Chex cereal? Utilize similar-textured cereals such as rice or corn flakes to mimic Chex’s structural properties.
  • How can I make the mix spicier? Incorporating hot sauce or additional cayenne pepper during the seasoning process provides desirable heat.
  • Is it possible to prepare this snack ahead? Absolutely! Assemble the ingredients, store them correctly, and refresh with simple oven warming for serving.
  • How can I store leftover Dill Pickle Chex Mix? In airtight containers sheltered from humidity, ensuring a lasting crunch and flavor cohesion.
  • What type of nuts can I use? Pecans, almonds, or cashews are fantastic choices, adding richness while complementing seasoning.
  • Is there a vegan-friendly version? Yes, the majority of the recipe is plant-based, but check spice origins for compliance. Opt for vegan-identified products.
  • How long does the mix remain fresh?.Storage in optimal conditions ensures freshness lasting weeks with proper care, extending potential shelf life.
  • Can I freeze Chex Mix? Yes, freezing is an option with prior portion distribution in airtight freezer bags, enabling convenient snacking as needed.
  • Can I make a low-sodium version? By utilizing low-sodium pickles and seasoning, it’s simple to lower salt impacts while retaining essential flavor identity.

Additional Resources

For those interested in further exploring savory snack options, you can delve into other recipes combining Chex cereals with flavorful innovations. Numerous technique guides are available highlighting the art of seasoning balance and perfect roasting methods for nuts. Ingredient details explain the health benefits associated with whole grains and various nuts, aiding informed choices on dietary paths. Investing in reliable airtight containers promises longevity with storage and enhances the finished product’s textural pleasure.

Join the Conversation

Engage with fellow cooking enthusiasts by sharing your version of Dill Pickle Chex Mix on social platforms, tagging with dedicated recipe hashtags. Whether presenting them in beautiful photos or writing reviews, your contribution to the community encourages collaboration and idea exchanges. Explore reader suggestions which highlight creative seasoning alternatives and join discussions on flavor variations inspired by globally diverse culinary preferences.

Irresistible Baked Cranberry Cream Cheese Dip Recipe for Holiday Entertaining

Baked Cranberry Cream Cheese Dip: A Festive Delight

⚖️
Difficulty
Easy

⏲️
Prep Time
10 mins

🕒
Cook Time
25 mins

⏱️
Total Time
35 mins

🍽️
Servings
8

There’s nothing quite like the festive flavor of cranberry to elevate your holiday gatherings, and this Baked Cranberry Cream Cheese Dip is the perfect dish to do just that. With its rich cream cheese base complemented by a sweet and tart cranberry topping, it’s an appetizer that will have your guests raving. The combination of creamy and tangy flavors makes each bite an indulgent experience.

Cranberries not only bring a burst of color but also an irresistible aroma to your kitchen as you bake this delightful dip. These little red jewels are loaded with antioxidants and pair beautifully with the smooth cream cheese. Not only is this recipe easy to prepare, but it also offers a visually stunning presentation with its contrast of deep red and creamy white layers. Truly, Baked Cranberry Cream Cheese Dip is a feast for the senses.

Whether you’re hosting a casual gathering or a formal holiday dinner, this dip fits right in, bringing warmth to any occasion. With just a few simple ingredients and straightforward steps, you’ll have a show-stopping appetizer that tastes as incredible as it looks. Let’s dive into what makes this recipe a must-have for your festive menu.

Quick Recipe Highlights

  • Flavor Profile: The dip blends the creamy richness of cheese with the tart sweetness of cranberries, creating a balanced and savory start to any meal.
  • Texture: Enjoy the smooth creaminess of whipped cheese topped with a slightly chewy, tangy cranberry layer.
  • Aroma: Emitting fragrant notes of sweet cranberries and warm baked cheese, this dip is an olfactory treat.
  • Visual Appeal: Its vibrant red cranberries atop a pale, creamy layer create a striking contrast that enhances any table setting.
  • Skill Level Needed: Simple techniques make it suitable for even the most novice cooks, requiring no complex processes.
  • Special Equipment: A baking dish and a mixer are all you need to bring this delightful dish to life.

Recipe Overview

  • Difficulty Level: Designed for ease, this recipe can be prepared quickly, perfect for when you’re in a crunch for homemade appetizers without stress.
  • Category: This dish falls into the appetizer category, providing a perfect starter for parties and social gatherings.
  • Cuisine: Rooted in American culinary tradition, this recipe showcases the classic pairing of cranberries and cream cheese.
  • Cost: Relatively inexpensive, requiring just a handful of ingredients, making it an ideal choice for budget-friendly entertaining.
  • Season: Best enjoyed in the cooler months, particularly during festive occasions when cranberries are at peak freshness.
  • Occasion: Perfect for holiday dinners, potlucks, and casual get-togethers, bringing cheer with each flavorful bite.

Why You’ll Love This Recipe

The taste and texture of this Baked Cranberry Cream Cheese Dip are truly unparalleled. The smoothness of the cream cheese combined with the sweet, slightly tart cranberries creates a harmony of flavors that dance on your palate. Each bite is a delightful blend of savory and sweet, with a luscious creamy texture that pairs wonderfully with crispy crackers or warm bread.

Preparing this dip is remarkably convenient, requiring only a short amount of active cooking time. The simple steps make it accessible for cooks of all skill levels, allowing you to focus on entertaining guests. You can even prepare parts of the recipe ahead of time, minimizing kitchen work at the event.

Nutritionally, this dip offers more than just indulgence. Cream cheese provides essential vitamins such as B12, while cranberries are rich in antioxidants, contributing to a healthy immune system. This makes it an appetizer you can enjoy without excessive guilt.

With its vibrant colors and rich flavor, this dip adds an element of sophistication to any social gathering. It encourages conversation and sharing, making it a social staple. Pair it with a glass of bubbly or a refreshing non-alcoholic beverage, and you’re set for a memorable occasion.

Economically, Baked Cranberry Cream Cheese Dip is gentle on the wallet while offering a gourmet taste. Most ingredients are pantry-friendly, meaning you spend less time shopping and more time enjoying the company of friends and family. The simplicity and elegance of this appetizer make it an accessible treat for everyone.

Historical Background and Cultural Significance

The origin of the Baked Cranberry Cream Cheese Dip can be traced back to the marriage of two beloved ingredients: cranberries, a staple in North American cuisine, and cream cheese, an ingredient popularized in the 19th century. This combination celebrates the bounty of American flavors and the transition to festive culinary innovations.

Cranberries have been a significant part of North American culture and diet for centuries, often associated with Thanksgiving and holiday feasts. Their tartness and bright color have made them a versatile fruit used in various culinary applications, especially during festive seasons.

As culinary trends evolved, so did the use of cranberries. The sweet, rich cream cheese blends seamlessly with cranberries, providing a balance that has become a hallmark of comfort foods enjoyed in gatherings. This dip showcases the evolution from traditional uses to more creative, modern adaptations.

Regional variations have seen this dip transformed with added nuts, spices, or even a bit of citrus zest to enhance its profile. Each version retains the essence of cranberries, reflecting regional tastes and preferences. This adaptability is a testament to the dip’s enduring appeal.

Ingredient Deep Dive

Cream cheese, with its origins in the United States, is a versatile ingredient used globally, known for its smooth texture and mild flavor. Often associated with comfort food, cream cheese forms the creamy base of this dip. It is rich in fats and proteins, making it satisfyingly indulgent and perfect for the social tablescape.

To ensure the freshest product, select cream cheese from a reputable brand and check the expiration date. Store it in the refrigerator, tightly wrapped, to maintain its creamy texture and prevent contamination. If necessary, you can substitute with low-fat options to suit dietary needs without sacrificing too much creaminess.

Cranberries, native to North America, have historical significance as both a food and a trade item, known for their vibrant color and health benefits. Rich in antioxidants, cranberries contribute to wellness, particularly in supporting urinary tract health. For the dip, a sweetened or homemade cranberry sauce works best to balance the creaminess.

Choosing fresh cranberries or pre-made sauce depends on availability and convenience. Fresh cranberries should be firm and bright, stored in the refrigerator for maximum freshness. Leftover cranberries can be frozen for extended storage or used for garnish and added tartness.

Common Mistakes to Avoid

  • Overheating the cheese: Excessive baking can cause cream cheese to curdle or separate, affecting the texture.
  • Using unsweetened cranberries: Without added sweetness, cranberries can be too tart, overpowering the dip’s flavor balance.
  • Skipping the pre-softening of cream cheese: Softening ensures smoother blending and even texture in the dip.
  • Neglecting to check cook time: Over-baking can lead to a dry or rubbery dip rather than a creamy delight.
  • Inadequate seasoning: The dip needs a touch of salt to enhance cream cheese flavors and contrast the cranberries.
  • Ignoring the topping distribution: Uneven cranberry layers can affect the overall taste consistency in each serving.
  • Serving without adequate cooling time: A brief cooling period helps the dip set, enhancing flavor and serving ease.
  • Not adjusting for dietary needs: Failing to consider guests’ dietary restrictions limits enjoyment and accessibility.

Essential Techniques

Successfully softening cream cheese is crucial for an evenly integrated dip. Allow the cream cheese to sit at room temperature for at least 30 minutes before use, ensuring easy mixing and a smooth consistency. Proper softening prevents clumping, which can lead to lumps in the final product.

Achieving the right balance of cranberry to cream cheese ratio is essential for a well-rounded dip. Aim for a thick layer of cranberry sauce sufficient to impart flavor without overwhelming the base. Visual cues include a uniform spread and a clear division of layers, signaling balanced proportions.

When baking, pay attention to oven accuracy and tray placement. Baking on a middle rack fosters even heat distribution, avoiding hot spots that lead to inconsistent cooking. Achieving a gently browned top signals the perfect baking point where creaminess and warmth intersect.

For further instruction on achieving success with this recipe, try our comprehensive guide to mastering baked appetizers.

Pro Tips for Perfect Baked Cranberry Cream Cheese Dip

Prioritize using full-fat cream cheese for a richer flavor profile unless dietary modifications are necessary. This provides the creamiest texture and enhances the indulgence factor in the dip.

Incorporate a bit of fresh orange zest into the cranberry topping for added depth and contrast. The citrus notes elevate and brighten the cranberry flavor, creating a more dynamic experience.

Experiment with different types of sweeteners in the cranberry sauce, such as honey or maple syrup, to introduce nuanced sweetness and cater to personal taste preferences.

Consider crunch-factor additions such as chopped nuts to the cream cheese layer, bringing a pleasurable textural contrast with each bite.

Serve the dip warm for the best flavor and texture harmony. Warmer temperatures make for a smoother dip and more pronounced cranberry aroma, inviting guests to dig in.

Create variations by adding spices like cinnamon or nutmeg to the cranberry layer for a holiday-inspired version that’s aromatic and distinctive.

Garnish with fresh herbs like thyme or rosemary to add an earthy note that complements the dip’s richness and enhances its presentation.

Variations and Adaptations

Regional variations can be crafted by substituting traditional cranberries with local fruits, such as lingonberries in Scandinavian-inspired versions. These substitutions reflect local palates while preserving the essence of the dish.

Adapt to a summer theme by replacing cranberries with seasonal berries like strawberries or blueberries. This seasonal adaptation allows you to enjoy the flavors of the dip year-round with a fruity twist that suits warmer months.

For dietary modifications, opt for vegan cream cheese alternatives to accommodate plant-based diets. Ensure the cranberry topping is free from animal-based gelatin if using commercial products.

Experiment with incorporating spicy elements such as jalapenos or chili flakes for a sweet-heat fusion that takes the dip to new heights. This adds a daring twist that can cater to adventurous taste preferences.

Adjust the texture by adding chopped nuts or seeds to the cream cheese layer. This introduces an extra layer of textures, offering a comprehensive sensory experience beyond smooth and creamy.

Presentation alternatives include serving individual ramekins for personalized dining experiences, which ensures each guest receives the optimal cranberry-to-cream cheese ratio, adeptly controlled by portion sizing.

Serving and Presentation Guide

Master plating with an eye toward color dynamics and contrast. Serve the dip in a white or neutral-hued dish to highlight the rich cranberry topping, enhancing visual appeal.

Garnish with fresh rosemary or thyme sprigs, not only as a thematic touch but to draw upon their fragrance, enhancing the sensory experience of the dish.

Pair the dip with traditional accompaniments like buttered crostini or multi-seed crackers, emphasizing crispness that complements the soft, creamy texture of the dip.

Modern serving suggestions might include using vegetable crudités for a healthier, colorful platter. Cucumbers, bell pepper strips, and sliced carrots introduce a refreshing crunch that cuts through the creaminess.

Consider temperature management by serving the dip slightly cooled but not chilled, ensuring the best texture while maintaining flavor integrity.

Portion control is key to ensuring ample servings without overwhelming the palate, particularly in a larger party setting. Utilize small serving spoons or ladles to guide controlled servings, enhancing guest experience.

Wine and Beverage Pairing

For wine lovers, a crisp Sauvignon Blanc offers acidity that excellently counterbalances the dip’s richness, while a lightly oaked Chardonnay can complement its creaminess. Fruit-forward rosés also work beautifully with the cranberry notes.

Non-alcoholic alternatives such as sparkling water with a twist of lime or a mild, fruity punch add refreshment without overpowering the dip’s flavors, enabling a full appreciation of its layers.

For a cozy touch during cooler months, pair with herbal teas like chamomile blended with mint, allowing subtle herbal undertones to amplify the cranberry top notes.

When serving beverages, ensure they are served chilled, contrasting pleasantly with the warm dip and offering a refreshing palate cleanser between bites.

Consider presenting wine in large-bowled glasses to capture and enhance its aroma, ensuring guests savor every note as they enjoy the dip’s flavors.

Storage and Shelf Life

Store any leftover dip in an airtight container in the refrigerator, maintaining its freshness for up to three days. Ensure the container is tightly sealed to prevent flavor transference with other fridge contents.

Keep the dip at consistent cool temperatures to prevent cream cheese degradation. A clear plastic wrap directly on the surface helps minimize exposure to air and maximizes shelf life.

Signs of spoilage include visible mold, off odors, or an unusually watery consistency, indicating the dip has passed peak freshness and should be discarded.

To reheat, transfer to an oven-safe dish and warm in an oven preheated to 350°F (175°C) until heated through, approximately 10-15 minutes, preserving quality and texture.

Avoid freezing the dip as cream cheese may separate upon thawing, altering texture and flavor beyond desirable parameters.

Make Ahead Strategies

Prepare the cranberry topping up to a week in advance and store it in an airtight container in the fridge. This stratified prep timeline allows for effortless assembly on the day of serving.

Keep prepared parts unassembled to maintain peak freshness. Combine and bake the layers only when ready to serve, ensuring the dip remains vibrant and full-flavored.

Evaluate the quality impact if making ahead, as freshly assembled and baked provides the best taste; however, making components ahead effectively reduces day-of prep.

Consider executing preliminary baking, and then finish warming in the oven shortly before serving. This approach guarantees optimal aroma and warmth.

Prior to serving, add any fresh elements such as herbs to the baked dish to brighten and elevate its final presentation.

Scaling Instructions

Need to halve the recipe? Simply reduce all ingredient amounts by half while maintaining ratios for consistent taste. A smaller baking dish may be required to preserve thickness and cooking time.

For double or triple batches, ensure equipment adjustments by preparing additional baking dishes to avoid overcooking or extended baking due to thicker layers that trap heat.

Time adjustments may be necessary, particularly if modifying batch size significantly. A larger surface area in baking dishes can facilitate even heating despite increased volume.

Store extra batches with care following refrigeration guidelines, ensuring repeated freshness for any leftovers or future servings.

Consider additional garnishes or platter expansions when scaling up to accommodate varying guest preferences, ensuring everyone leaves satisfied.

Nutritional Deep Dive

The macro breakdown for this delightful dip reveals moderate caloric content with a balance of fats (from cream cheese) complemented by carbs, including sugars from cranberries. Aimed at indulgence, enjoying in moderation is key.

Micronutrient analysis highlights vitamin B12 from cream cheese, contributing to metabolism and red blood cell production, alongside cranberry’s vitamin C for immune support.

Health benefits include antioxidants from cranberries supporting overall wellness while offering tangy fruity flavors that balance creamy indulgence.

Dietary considerations focus on limiting saturated fat intake by portioning wisely, ensuring indulgence aligns with personal dietary goals.

Portioning the dip effectively allows for savoring its luxurious flavors without compromising wellness targets, providing satisfaction in moderation.

Dietary Adaptations

For gluten-free adaptations, select gluten-free crackers or bread for serving, ensuring the entire dish is accessible to gluten-sensitive guests without altering the dip itself.

Adapt to a dairy-free diet by utilizing vegan cream cheese, maintaining creamy consistency while aligning with plant-based dietary principles.

Creating a vegan version involves substituting both cream cheese and cranberry topping components to avoid animal-derived ingredients, preserving the delightful pairing.

Low-carb alternatives could emphasize vegetable sides over traditional bread accompaniments, enhancing healthful benefits without sacrificing enjoyment.

Paleo enthusiasts can revel in a version mindful of unprocessed ingredients, emphasizing natural cranberry sauces free from refined sugars.

Low-FODMAP dieters can indulge by focusing on cream cheese alternatives suitable within the diet’s parameters, ensuring comfort and enjoyment for those with digestive sensitivities.

Troubleshooting Guide

For texture issues like graininess, ensure cream cheese is softened adequately before blending and baking, preventing lumps and ensuring a smooth finish.

Flavor balance troubleshooting suggests adjusting sweetener levels in cranberry sauce if tartness overpowers. Incremental additions prevent overly sweet profiles from emerging.

Temperature challenges can be tackled by verifying oven accuracy with a thermometer, ensuring correct baking temperatures prevent cream cheese from separating or curdling.

If equipment poses an issue, such as incorrect accessibility to baking tools, substitutes like glass or ceramic dishes ensure successful transitions without affecting dish quality.

Ingredient substitutions should be approached with care, focusing on maintaining textural and flavor similarities to preserve dish integrity.

To manage timing concerns, utilize efficient kitchen practices such as pre-measured ingredient preparations to streamline processes and meet serving schedules.

Recipe Success Stories

Community feedback has been overwhelmingly positive, with many readers praising the dip’s blend of sweet and savory notes. Photos shared online showcase the stunning visual appeal that enhances home gatherings.

Variation successes include spiced cranberry toppings that add warmth, reflecting personal flavors while maintaining the recipe’s core principles of balance and creaminess.

Adaptations have seen the recipe enjoyed internationally, illustrating flexibility with local ingredients while preserving the heart of the dish, inviting diverse interpretations.

Reader suggestions have notably included adding nut toppings for texture diversity, contributing to a successful adaptation that others have eagerly adopted.

Photography tips feature capturing the vibrant contrast of cranberries against the creamy background, encouraging creative plating to attractively showcase the dish online.

Frequently Asked Questions

Can I make this ahead of time?
Yes, you can prepare the cranberry topping in advance and store it in the fridge. Assemble and bake the dip just before serving for best results.
What can I serve with the dip?
This dip pairs well with crostini, pita chips, or vegetable crudités, providing a variety of textures to accompany its creamy and tart flavors.
How can I store leftovers?
Store leftover dip in an airtight container in the refrigerator for up to three days. Reheat in the oven to restore warmth and texture.
Can I use fresh cranberries?
Absolutely. Fresh cranberries can be cooked into a sauce with sugar, offering a fresher, customizable topping for the dip.
Is it possible to freeze the dip?
While freezing isn’t recommended due to potential texture changes in cream cheese, preparing components separately for later assembly is possible.
What variations can I try?
Consider incorporating spices such as cinnamon or seasonal fruits like blueberries for unique takes on the traditional recipe.
Can the recipe be adjusted for dietary needs?
Yes, using vegan cream cheese can accommodate dairy-free and plant-based diets while maintaining a similar creamy texture.
Does the dip need to be served hot?
The dip is best served warm for optimal creaminess but can be enjoyed at room temperature if preferred or logistically needed.
How do I achieve a perfectly smooth texture?
Ensure cream cheese is fully softened before blending, and use an electric mixer for uniform consistency without lumps.
What if I don’t have a baking dish?
Substitute with any oven-safe dish, adjusting bake time slightly for depth variations, ensuring even cooking throughout.

Additional Resources

For those looking to explore further culinary adventures, consider related recipes like baked brie with cranberry topping or cream cheese and herb stuffed mushrooms, enhancing appetizer spreads with complementary options.

Explore our technique guides for mastering cream-based dips, offering insight into achieving perfect textures and flavor balances every time.

Dive into ingredient information resources to discover the full potential of cranberries as a versatile ingredient, with tips on selection and usage across various dishes.

Our equipment recommendations can guide your choice in kitchen tools that ensure efficient and successful recipe execution, enhancing your cooking experience.

Seasonal variations in this recipe allow for dynamic entertaining options. Check out our seasonal guide for tracking peak ingredient availability, ensuring optimal freshness and flavor.

Join the Conversation

Share your Baked Cranberry Cream Cheese Dip creations on social media, using our designated hashtag and tag us to feature your culinary masterpieces on our community boards.

Gain insights with photography tips focusing on natural lighting and plating angles that best capture the vibrant colors and textures of this enchanting appetizer.

Contribute to recipe reviews, sharing personal tips or adaptations that have worked for you, aiding others in their culinary explorations and fostering a shared love for food.

Engage with our community by exchanging ideas on innovative ingredient pairings or unique presentation styles that set your dish apart, celebrating creativity within the kitchen.

Explore variations through our discussion forums where fellow food enthusiasts share their takes on classic recipes, inspiring fresh adaptations and cultural exchanges.

The Recipe

Baked Cranberry Cream Cheese Dip

Serves: 8

Prep Time: 10 mins

Cook Time: 25 mins

Total Time: 35 mins

Kitchen Equipment Needed

  • Baking dish
  • Mixing bowl
  • Electric mixer
  • Spatula

Ingredients

  • 1 package (8 oz) cream cheese, softened
  • 1/2 cup sugar
  • 2 cups cranberry sauce
  • 1 teaspoon vanilla extract
  • 1 tablespoon orange zest (optional)
  • Crostini or crackers for serving

Directions

  1. Preheat oven to 350°F (175°C).
  2. In a mixing bowl, beat cream cheese, sugar, and vanilla extract until smooth.
  3. Spread the cream cheese mixture evenly in a baking dish.
  4. Top with cranberry sauce and smooth with a spatula.
  5. Optional: Sprinkle orange zest over the cranberry layer for extra flavor.
  6. Bake in the preheated oven for 25 minutes or until warm and bubbling.
  7. Let cool slightly before serving with crostini or crackers.

Recipe Notes

  • Ensure the cream cheese is well softened for easy mixing.
  • Adjust sweetness of cranberry sauce based on personal preference.
  • Best served warm for creamy consistency and enhanced flavors.

Deliciously Easy Green Olive and Feta Cheese Dip Recipe

Green Olive and Feta Cheese Dip: A Delightful Mediterranean Experience

⚖️
Difficulty
Easy

⏲️
Prep Time
10 mins

🕒
Cook Time
5 mins

⏱️
Total Time
15 mins

🍽️
Servings
4

This Green Olive and Feta Cheese Dip is a must-try for anyone who appreciates the rich, distinct flavors of the Mediterranean. The combination of tangy feta cheese with the briny goodness of green olives creates a dip that is not only perfect for parties but also makes for an extraordinary snack on a slow afternoon. With fresh herbs and a hint of lemon zest, this dip promises an exciting burst of flavors that will transport you to the sun-soaked shores of Greece.

Whether you are new to making dips or a seasoned culinary enthusiast, this recipe is designed to be accessible and enjoyable. The key is in the balance of flavors—the saltiness of feta, the tang of the olives, and the aromatic hit of fresh herbs. Not only does this dip serve as a chic appetizer when entertaining guests, but its simplicity ensures that you can whip it up without breaking a sweat.

Quick Recipe Highlights

  • Flavor Profile: This dip is a bold blend of salty, tangy, and savory notes, with olives adding a briny zest and feta providing a creamy undertone.
  • Texture: Smooth and creamy with small chunks of olive that add an interesting texture contrast, making every bite delightful.
  • Aroma: A blend of aromatic herbs combined with the rich smell of feta, finished with the fruity fragrance of olive oil.
  • Visual Appeal: A creamy base dotted with vibrant green olives and herbs, offering a picturesque addition to any platter.
  • Skill Level Needed: Beginner-friendly; just a simple blend of ingredients that doesn’t require advanced techniques.
  • Special Equipment: A food processor or a blender is all you need to achieve the perfect consistency.

Recipe Overview

  • Difficulty Level: This recipe is rated ‘easy’ due to its minimal preparation and cooking steps, making it perfect for novice cooks.
  • Category: Ideal as a snack or appetizer, it also serves well as a party dip or a picnic favorite.
  • Cuisine: Rooted in Mediterranean traditions, it showcases the fresh, vibrant ingredients typical of this region.
  • Cost: Budget-friendly, primarily using pantry staples, olives, and feta—all accessible and affordable ingredients.
  • Season: Suitable for year-round enjoyment but particularly refreshing in spring and summer with fresh herbs.
  • Occasion: Perfect for social gatherings, outdoor picnics, or even as a light appetizer before a meal.

Why You’ll Love This Recipe

The taste and texture of the Green Olive and Feta Cheese Dip are sure to win over even the toughest critics. The smooth creaminess from the feta pairs beautifully with the chunky, briny olives, creating a dynamic and decadent mouthfeel. The herbal and zesty aromas elevate the dip, leaving a fresh aftertaste that lingers pleasantly.

Preparing this dip is incredibly convenient. With only a few simple steps and basic kitchen tools, you can create an impressive appetizer or snack that doesn’t eat up your time. Whether you’re planning a quick hangout or a last-minute gathering, this recipe is a reliable go-to option.

Nutritionally, this dip is a blessing. Feta cheese and olives both provide beneficial fats, while the herbs offer a plethora of antioxidants. It’s a savory option that’s both nourishing and satisfying, allowing you to indulge without the guilt.

In a social setting, this dip is a versatile hero. It pairs well with various dippers like pita, crisp veggies, or crackers, making it a hit at parties. The dip’s vibrant flavors and pleasing aroma naturally invite conversation and camaraderie among guests.

Lastly, the cost-effectiveness of the Green Olive and Feta Cheese Dip cannot be overlooked. It’s a luxurious-tasting dip that’s affordable to make. Even if you’re hosting a large party, these ingredients won’t break the bank. With its accessibility and ease, this dip is a hidden gem waiting to impress.

Historical Background and Cultural Significance

The origins of this Green Olive and Feta Cheese Dip are firmly planted in the heart of the Mediterranean region. Known for their rich cultural heritage revolving around communal dining and fresh, local ingredients, Greek culinary practices have always embraced simple yet flavorful combinations such as this.

Cultural significance is intertwined with olives and cheese—traditional Greek symbols of fertility and prosperity. The olive tree, in particular, has strong mythological connections, regarded as a gift from the gods to humans, symbolizing peace and wealth.

Over the years, this recipe has evolved, with iterations found in many Mediterranean countries adapting local flavors and techniques. Ingredients like herbs and lemon have been added not just for flavor, but also for their preservative qualities in ancient times.

Regionally, the dip showcases the unique ingredients of each area. In Greece, olives are often locally harvested, with distinct regional flavors that add depth and character to the dish. Similarly, feta’s creamy texture provides a universal appeal and adaptability that transcends cultures.

Ingredient Deep Dive

Olives, particularly the green variety in this dip, hold a venerable place in Mediterranean cuisine. Celebrated for their robust, earthy flavor, they’re a staple in various dishes. Nutritionally, olives contribute healthy fats and antioxidants, making them an excellent choice for heart health. When selecting olives, opt for those that are firm and vibrant green. Store them in their brine for long-lasting freshness.

Feta cheese is another star ingredient, rich in history and tradition. Originating from Greece, feta offers a tangy, salty flavor profile that enhances any dish. It’s exceptionally nutritious, offering protein, calcium, and beneficial probiotics. When choosing feta, look for creamy white blocks that crumble easily, ensuring quality and freshness. For storage, keep it immersed in its brine or olive oil to maintain moisture.

Common Mistakes to Avoid

  • Avoid using pre-grated or flavored feta; it disrupts the authentic flavor balance.
  • Don’t over-process the dip; aim for a chunky texture with visible olive bits.
  • Steer clear of adding too much lemon juice as it can overpower the delicate flavors.
  • Avoid using dried herbs over fresh ones; fresh herbs offer much brighter fragrances.
  • Ensure that olives are pitted before processing to avoid bitter taste and equipment damage.
  • Do not skip the resting time; letting the dip sit enhances flavor melding.
  • Avoid using low-quality olive oil as it impacts overall taste and aroma.
  • Balance salt levels cautiously, considering the natural brininess of olives and feta.

Essential Techniques

To achieve the dip’s perfect consistency, pulsing is key. Pulsing allows for controlled processing, ensuring olives are adequately chopped without turning into a puree. Watch for the visual cue of small chunky bits rather than a smooth paste, ensuring a delightful texture with each bite.

Folding in herbs instead of blending them is crucial to retain their fresh aroma and natural color in the dip. This ensures each spoonful contains bursts of herbaceous flavor without overwhelming the palate. Mastering these techniques will elevate your dip and enhance its enjoyment.

Pro Tips for Perfect Green Olive and Feta Cheese Dip

1. Use Kalamata olives for an added depth of flavor, providing a slightly different yet intriguing taste profile.
2. Don’t shy away from experimenting with herb blends like dill and mint for an exciting twist.
3. For richer creaminess, incorporate a tablespoon of Greek yogurt into the blend.
4. If the dip is too thick, adjust with a splash of reserved olive brine for extra authenticity.
5. Garnish with a drizzle of high-quality olive oil and a sprinkle of paprika for a visually appealing finish.
6. Allow the finished dip to rest for at least 30 minutes before serving to enhance flavor melding naturally.

Variations and Adaptations

Regional variations of this dip include using different olive types which can transform the flavor profile substantially. Exploring Spanish or Italian olives adds unique flavor characteristics reflective of their terroir.

In seasonal adaptations, consider using sun-dried tomatoes or roasted red peppers during summer to add sweet and tangy notes. Dietary modifications are simple; for a vegan version, use blended tofu or almond cheese in place of feta, providing a similar creamy texture.

For added flavors, spices such as cayenne or smoked paprika offer heat, while texture modifications with chopped nuts like almonds provide an added crunch. Presentation alternatives include serving in phyllo cups or as a layered dip with hummus for a visually striking platter.

Serving and Presentation Guide

For plating, use shallow bowls that allow for swirls of olive oil and scattered herbs. Elevate the dish with garnishes like crushed red pepper flakes or lemon zest to add color and an aromatic punch.

Serve this dip with traditional accompaniments like pita bread triangles or modern additions such as gluten-free crackers. When serving, ensure the dip is at room temperature; it enhances the flavors, making it more appealing.

Consider portion control tips for gatherings to avoid overwhelm; pre-scooping individual portions can aid in maintaining a clean serving environment.

Wine and Beverage Pairing

Pair this dip with a crisp, dry white wine like Sauvignon Blanc or a chilled rosé, both complementing the tangy, salty flavors perfectly. For a non-alcoholic option, a chilled cucumber-infused water adds a refreshing balance.

If serving as part of a brunch, a light herbal tea such as mint or chamomile pairs well, enhancing the dip’s fresh herbaceous notes. Keep temperatures well-adjusted; wines should be lightly chilled for optimal enjoyment.

Storage and Shelf Life

Store the dip in an airtight container in the refrigerator, maintaining freshness for up to three days. Ensure the container is glass or non-reactive metal to prevent flavor absorption.

Signs of spoilage include an off-smell or flavor, or discolored patches, indicating it’s time to discard. For reheating, allow it to reach room temperature naturally; microwaving can alter the texture adversely.

Freezing is possible, though not recommended, as it can compromise feta’s creaminess. If frozen, thaw in the fridge overnight before serving.

Make Ahead Strategies

This dip is perfect for making ahead of time. Prepare a day in advance and store it in the fridge, allowing flavors to meld beautifully. Ensure to cover tightly with plastic wrap to prevent air exposure.

If preparing in stages, chopping ingredients the night before can save time. Assembling is quick and straightforward thereafter. When ready to serve, freshen up the dip with some freshly chopped herbs.

Reheating isn’t usually needed, but if so, stir the dip gently to prevent separation and ensure even flavor distribution before serving.

Scaling Instructions

To halve the recipe, consider ingredient ratios carefully to maintain flavor balance; use a smaller food processor to ensure even mixing. Doubling or tripling requires slightly longer pulsing times and possibly larger equipment like a full-sized food processor to accommodate increased volume.

Timing adjustments are minor in larger batches, with slightly longer blending times to achieve the same consistency. Consider storage options ahead of parties; prepare and store in several containers to be easily ready-to-serve.

Nutritional Deep Dive

The Green Olive and Feta Cheese Dip is low in carbohydrates, making it friendly for low-carb diets. Its protein content from feta is commendable, while olives supply heart-healthy monounsaturated fats and vitamin E, beneficial for skin health.

Ensure portion control by serving with vegetable sticks for a balanced meal inclusion. Paying attention to overall sodium levels is wise, balancing with lower-salt foods elsewhere in meals.

Dietary Adaptations

For a gluten-free adaptation, simply ensure any accompanying dippers are certified gluten-free options like rice crackers. To create a dairy-free version, substitute feta with a creamy vegan cheese for similar results.

Adapting for a low-carb lifestyle involves pairing with low-carb vegetables, such as cucumber or celery, enhancing the nutritional profile in a keto-friendly manner. By making small adjustments, this dish can easily fit diverse dietary needs.

Troubleshooting Guide

For texture issues, if the dip is too runny, incorporate extra feta to thicken naturally. Conversely, if too thick, a splash of olive brine will adjust the consistency appropriately.

Balancing flavors is key; if too salty, adding a dab of yogurt or cream cheese softens the impact. Temperature problems often resolve by serving at room temperature; cold dips can taste less flavorful.

If equipment challenges arise, using a hand blender can achieve desired results, ensuring ingredients are evenly spread. Substitutions for unavailable ingredients also play a role, ensuring taste adapts without compromise.

Timing concerns include resting the dip post-preparation, allowing flavors to meld before serving for optimal taste.

Recipe Success Stories

Feedback from our community highlights the dip’s versatility in various settings. Users have successfully customized the flavor profile with personal spice blends without affecting its traditional Mediterranean essence.

Adaptation stories reflect dietary needs and preferences, such as creating vegan-friendly versions that maintain the beloved taste and consistency. Readers suggest pairing with freshly baked baguettes or crostinis, amplifying its elegant presentation.

Photography tips from our community emphasize natural lighting and bright-colored dishes to showcase the vibrant appeal of this culinary favorite.

Frequently Asked Questions

Can I use black olives instead of green?

Absolutely! Black olives offer a milder flavor, which might alter the overall taste, but they pair well with feta, providing a subtle sweetness that some may find delightful.

How should I store leftover dip?

Store leftovers in an airtight container in the fridge. It keeps well for up to three days. Ensure it’s covered properly to prevent the dip from absorbing other fridge odors.

What can I pair with this dip?

This dip pairs wonderfully with pita chips, vegetable sticks, or as a spread on sandwiches and wraps. It also complements grilled meats as a flavorful condiment.

Can I make this dip in advance?

Yes, making this dip a day ahead is perfect. It allows flavors to meld beautifully. Just ensure it’s stored properly and given a good stir before serving.

Is this dip freezer-friendly?

While possible, freezing can alter feta’s texture. If necessary, freeze in airtight containers, and thaw in the fridge for the best consistency. Re-stir before serving.

Can I adjust the flavor to be less salty?

Indeed! Adjusting the quantity of feta, or balancing with a little cream cheese, can mellow out the saltiness without sacrificing flavor.

How do I handle leftovers safely?

For safe handling, store leftovers in the fridge promptly after serving. Avoid leaving at room temperature for extended periods to prevent spoilage.

What’s a good non-alcoholic pairing?

Iced teas, especially those flavored with citrus or herbs, complement the dip well. A cucumber-infused soda water adds a refreshing balance too.

Which herbs work best in this recipe?

Fresh dill or parsley enhances the dip’s flavor, but feel free to experiment with cilantro or mint based on personal preference and availability.

Do I need to use a specific type of feta?

No specific type is necessary, but opting for Greek feta ensures authentic taste. Sheep’s milk feta can offer a richer flavor than cow’s milk options.

Additional Resources

Explore related recipes that complement this dip, like classic hummus or roasted red pepper spreads, enhancing your Mediterranean platter.

Technique guides on blending and chopping provide useful tips for consistent results every time, elevating your culinary skills. You’ll also find ingredient insights, like the nutritional benefits of olives and cheese, highlighting their value in a balanced diet.

Join the Conversation

We invite you to share your experience making this Green Olive and Feta Cheese Dip on social media or in the comments below! Share your unique twists on this recipe and how it’s become a staple at your gatherings.

Photography enthusiasts, showcase your platter ideas and presentation skills. Join our community in sharing tips and engaging discussions around everyone’s favorite Mediterranean-inspired recipe creations.

The Recipe

Green Olive and Feta Cheese Dip

Serves: 4

Prep Time: 10 mins

Cook Time: 5 mins

Total Time: 15 mins

Kitchen Equipment Needed

  • Food processor or blender
  • Spoon or spatula for mixing

Ingredients

  • 1 cup green olives, pitted
  • 1 cup feta cheese, crumbled
  • 2 tablespoons olive oil
  • 1 tablespoon fresh lemon juice
  • 1 clove garlic, minced
  • 1 tablespoon fresh parsley, chopped
  • 1 teaspoon lemon zest
  • Salt and pepper to taste

Directions

  1. In a food processor, combine olives, feta, olive oil, lemon juice, and garlic.
  2. Pulse until the mixture is well combined but still chunky.
  3. Transfer to a serving bowl and fold in parsley and lemon zest.
  4. Season with salt and pepper to taste.
  5. Allow to rest for 15-30 minutes for flavors to meld.
  6. Serve with pita bread or vegetable sticks.

Recipe Notes

  • Opt for Greek feta for a more authentic flavor.
  • Can substitute fresh parsley with fresh dill for a different aromatic profile.
  • Adjust texture by adding more olive oil as desired.