“`html
Table of Contents
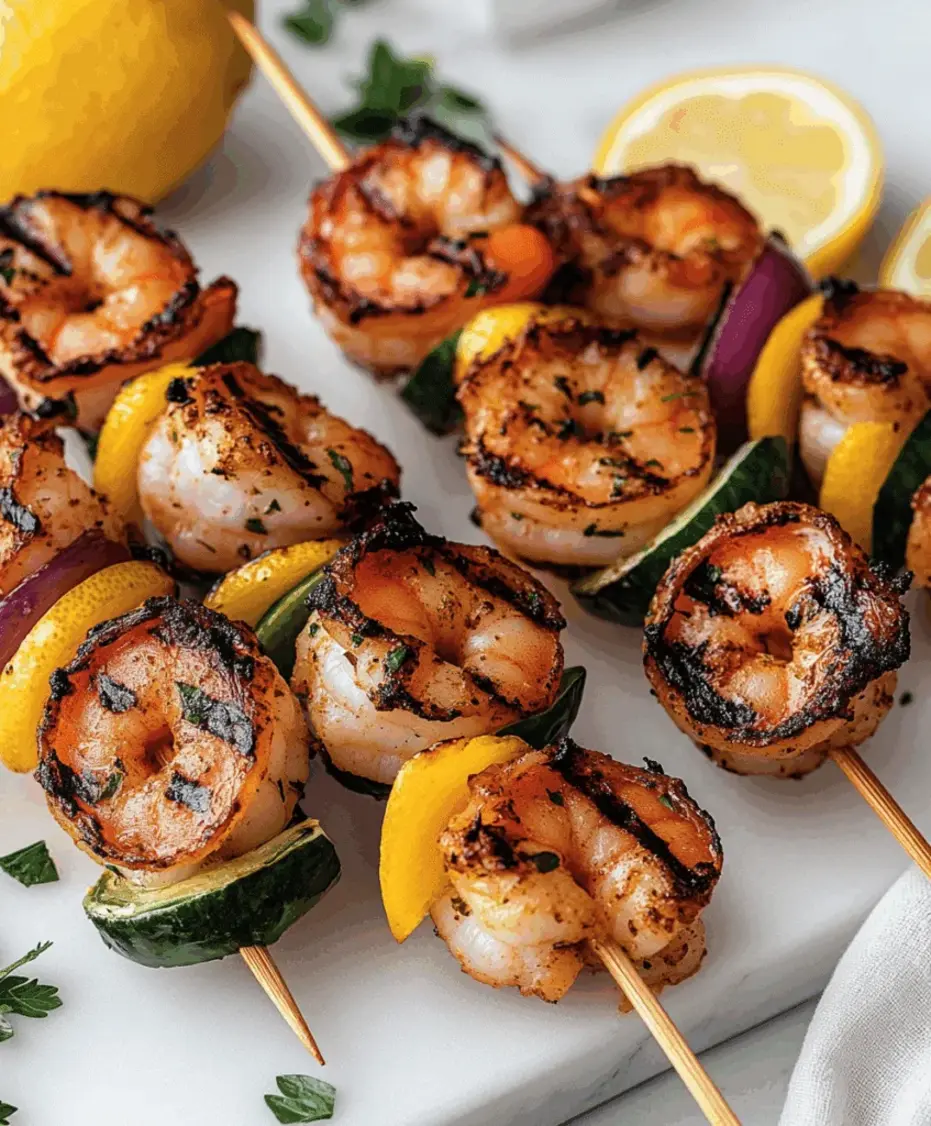
Grilled Lemon Herb Shrimp Skewers Recipe
Introduction
Did you know that grilled shrimp consumption has surged by over 40% in the last five years, making it one of America’s favorite fast-cooking proteins? This isn’t surprising when you consider its perfect blend of speed, health, and flavor. Our Grilled Lemon Herb Shrimp Skewers recipe embodies this trend, offering a light, flavorful seafood dish that’s perfect for summer grilling and beyond. Marinated in a vibrant bath of fresh lemon juice, aromatic garlic, and a bouquet of herbs, these shrimp are transformed into juicy, succulent bites of perfection. They’re not just food; they’re a solution for busy weeknights, a star for your weekend BBQ, or a healthy, protein-packed option for a picnic. This recipe proves that eating well doesn’t require hours in the kitchen—just fresh ingredients and a hot grill.
Ingredients List
Gather these simple, fresh ingredients to create a marinade that will make your shrimp sing with flavor. The key is quality and freshness.
- For the Shrimp & Skewers:
- 1.5 lbs (680g) large shrimp, peeled and deveined (tails on or off based on preference). Look for firm, translucent flesh with a mild sea scent. Substitution: Use jumbo prawns for a more substantial bite, or frozen shrimp (thawed completely) for convenience.
- Wooden or metal skewers. If using wooden, soak in water for at least 30 minutes to prevent burning.
- For the Lemon Herb Marinade:
- 1/3 cup extra virgin olive oil – the fruity, peppery base that carries the flavors. Substitution: Avocado oil for a higher smoke point.
- Zest and juice of 2 large lemons (about 1/4 cup juice) – provides the bright, tangy backbone. You should smell that sharp, clean citrus aroma.
- 4 cloves garlic, minced – for that essential pungent, savory depth.
- 2 tablespoons fresh parsley, finely chopped – adds a clean, slightly peppery green note. Substitution: 2 teaspoons dried parsley.
- 1 tablespoon fresh dill, chopped – introduces a delicate, anise-like fragrance. Substitution: 1 teaspoon dried dill.
- 1 teaspoon fresh oregano, chopped (or 1/2 teaspoon dried) – offers a warm, earthy hint.
- 1 teaspoon kosher salt – enhances all the natural flavors.
- 1/2 teaspoon freshly cracked black pepper – for a gentle, aromatic heat.
- 1/4 teaspoon red pepper flakes (optional) – for those who enjoy a subtle kick.
Timing
Compared to the average grilled protein recipe, which can take over an hour of active prep and cooking, this recipe is remarkably efficient. The majority of the “work” is passive marinating time, allowing the flavors to develop while you prepare sides or relax. From fridge to plate in about an hour, with only 10 minutes of active cooking, makes this a true fast and healthy meal champion.
Step-by-Step Instructions
Step 1: Prepare the Marinade
In a medium bowl large enough to eventually hold the shrimp, whisk together the olive oil, fresh lemon juice, and lemon zest. The zest is crucial—it contains potent citrus oils that pack a flavor punch. Add the minced garlic, chopped parsley, dill, oregano, salt, black pepper, and red pepper flakes (if using). Whisk vigorously until the mixture is fully emulsified and you see a beautifully speckled, aromatic liquid. Give it a quick taste—it should be brightly acidic, herby, and well-seasoned.
Step 2: Marinate the Shrimp
Pat your peeled and deveined shrimp completely dry with paper towels. This step is non-negotiable; wet shrimp will steam instead of sear on the grill. Add the dry shrimp to the marinade and toss gently with your hands or a spoon, ensuring each piece is lovingly coated. Cover the bowl with plastic wrap and refrigerate for 20 to 30 minutes, but no longer than 1 hour. Shrimp are delicate, and the acid in the lemon juice will start to “cook” them (ceviche-style) if left too long, resulting in a mushy texture.
Step 3: Thread the Skewers
While the shrimp marinates, if using wooden skewers, soak them in water. Preheat your grill to medium-high heat (about 400-450°F / 200-230°C). Remove the shrimp from the marinade, letting excess drip back into the bowl. Reserve the used marinade. Thread the shrimp onto the skewers, piercing through both the head and tail end to create a stable “C” shape. Aim for 4-5 shrimp per skewer, leaving a small space between each to ensure even cooking. This method prevents spinning and promotes beautiful grill marks.
Step 4: Grill to Perfection
Lightly oil the grill grates. Place the skewers on the hot grill. Cook for 2 to 3 minutes per side, brushing once with the reserved marinade during the first minute of cooking. Important: Discard any remaining marinade after this brush—it has touched raw seafood. The shrimp are done when they turn opaque and pink with slight charring, and they curl into a tight “C” shape. Do not overcook! The moment they become firm and opaque, they’re ready. Total cook time is typically 4-6 minutes. Remove immediately to a clean platter.
Nutritional Information
(Per serving, based on 4 servings)
- Calories: ~220 kcal
- Protein: 24g (Excellent source, supporting muscle health)
- Total Fat: 12g (Primarily healthy monounsaturated fats from olive oil)
- Saturated Fat: 2g
- Carbohydrates: 3g (Very low, making it ideal for low-carb diets)
- Fiber: 0.5g
- Sugar: 0.5g (Naturally occurring)
- Sodium: ~450mg (Can be adjusted by reducing added salt)
Healthier Alternatives
You can easily tweak this recipe for specific dietary needs without sacrificing the bursting with fresh flavor.
- Lower Fat/Oil-Free: Replace half the olive oil with low-sodium vegetable broth. The remaining oil is essential for flavor and preventing sticking, but this swap cuts fat significantly.
- Lower Sodium: Omit the added salt and use a salt-free herb blend. The lemon and herbs provide so much flavor, you may not miss it.
- Added Veggies: Thread cherry tomatoes, bell pepper chunks, zucchini slices, or red onion wedges between the shrimp. This adds fiber, vitamins, and makes the skewers a more complete meal.
- Different Protein: The marinade works wonderfully with scallops, cubed chicken breast, or firm tofu (pressed). Adjust cooking times accordingly.
Serving Suggestions
- Classic Summer BBQ: Serve alongside a crisp garden salad, grilled corn on the cob, and garlic bread.
- Light & Low-Carb Bowl: Place skewers over a bed of cauliflower rice or zucchini noodles with a side of tzatziki or a simple avocado salsa.
- Mediterranean Feast: Pair with a Greek orzo salad, grilled halloumi, and warm pita bread for dipping.
- Quick Dinner: Serve with a pre-made quinoa blend and steamed asparagus for a balanced, 15-minute plate.
- Appetizer Style: Slide the shrimp off the skewers and serve in a bowl with toothpicks for a crowd-pleasing party snack.
Common Mistakes
- Over-marinating: As mentioned, the lemon juice’s acid will break down the shrimp proteins, leading to a mealy, rubbery texture. Stick to 30 minutes max.
- Not Drying the Shrimp: Skipping the pat-dry step guarantees steaming, not searing. You’ll miss those beautiful caramelized grill marks and intense flavor.
- Overcrowding the Skewers: Packing shrimp too tightly causes them to steam each other. Give them breathing room for even heat circulation.
- Overcooking: Shrimp cook in a flash. The moment they turn pink and opaque, they’re done. Continuing to cook makes them tough and chewy.
- Using Dried Herbs Interchangeably: If substituting dried for fresh, use 1/3 the amount, as dried herbs are more concentrated. Crush them in your palm first to release their oils.
Storing Tips
- Refrigeration: Store cooked, cooled shrimp skewers in an airtight container in the fridge for up to 2 days. The texture is best when eaten fresh.
- Reheating: Gently reheat in a 300°F (150°C) oven for 5-10 minutes or in a skillet over low heat. Avoid the microwave, as it will make them rubbery.
- Freezing: It’s not recommended to freeze cooked shrimp skewers, as the texture deteriorates significantly. For meal prep, freeze the raw, marinated shrimp in the marinade in a freezer bag for up to 1 month. Thaw in the fridge overnight before threading and grilling.

Conclusion
These Grilled Lemon Herb Shrimp Skewers are more than just a recipe; they’re your ticket to a delicious, healthy, and impressively easy meal any day of the week. With their perfect balance of zesty lemon, fragrant herbs, and juicy, protein-packed shrimp, they deliver restaurant-quality flavor with